- 投稿日:2019-03-05T22:33:59+09:00
ESP32で極限までサンプルコードを変えずに、電子ペーパーに任意の画像を表示する方法 - SHIWORI
どうも、ゆるゆるです。この記事は組み込みマイスター2018-2019で作成した SHIWORI で使ったコードの紹介です。
SHIWORIは「より細かな読書記録を、馴染み深い本で」をテーマに作成しているデバイス・アプリの総称です。
説明が面倒くさい成果発表の動画があるのでそれで勘弁してください...
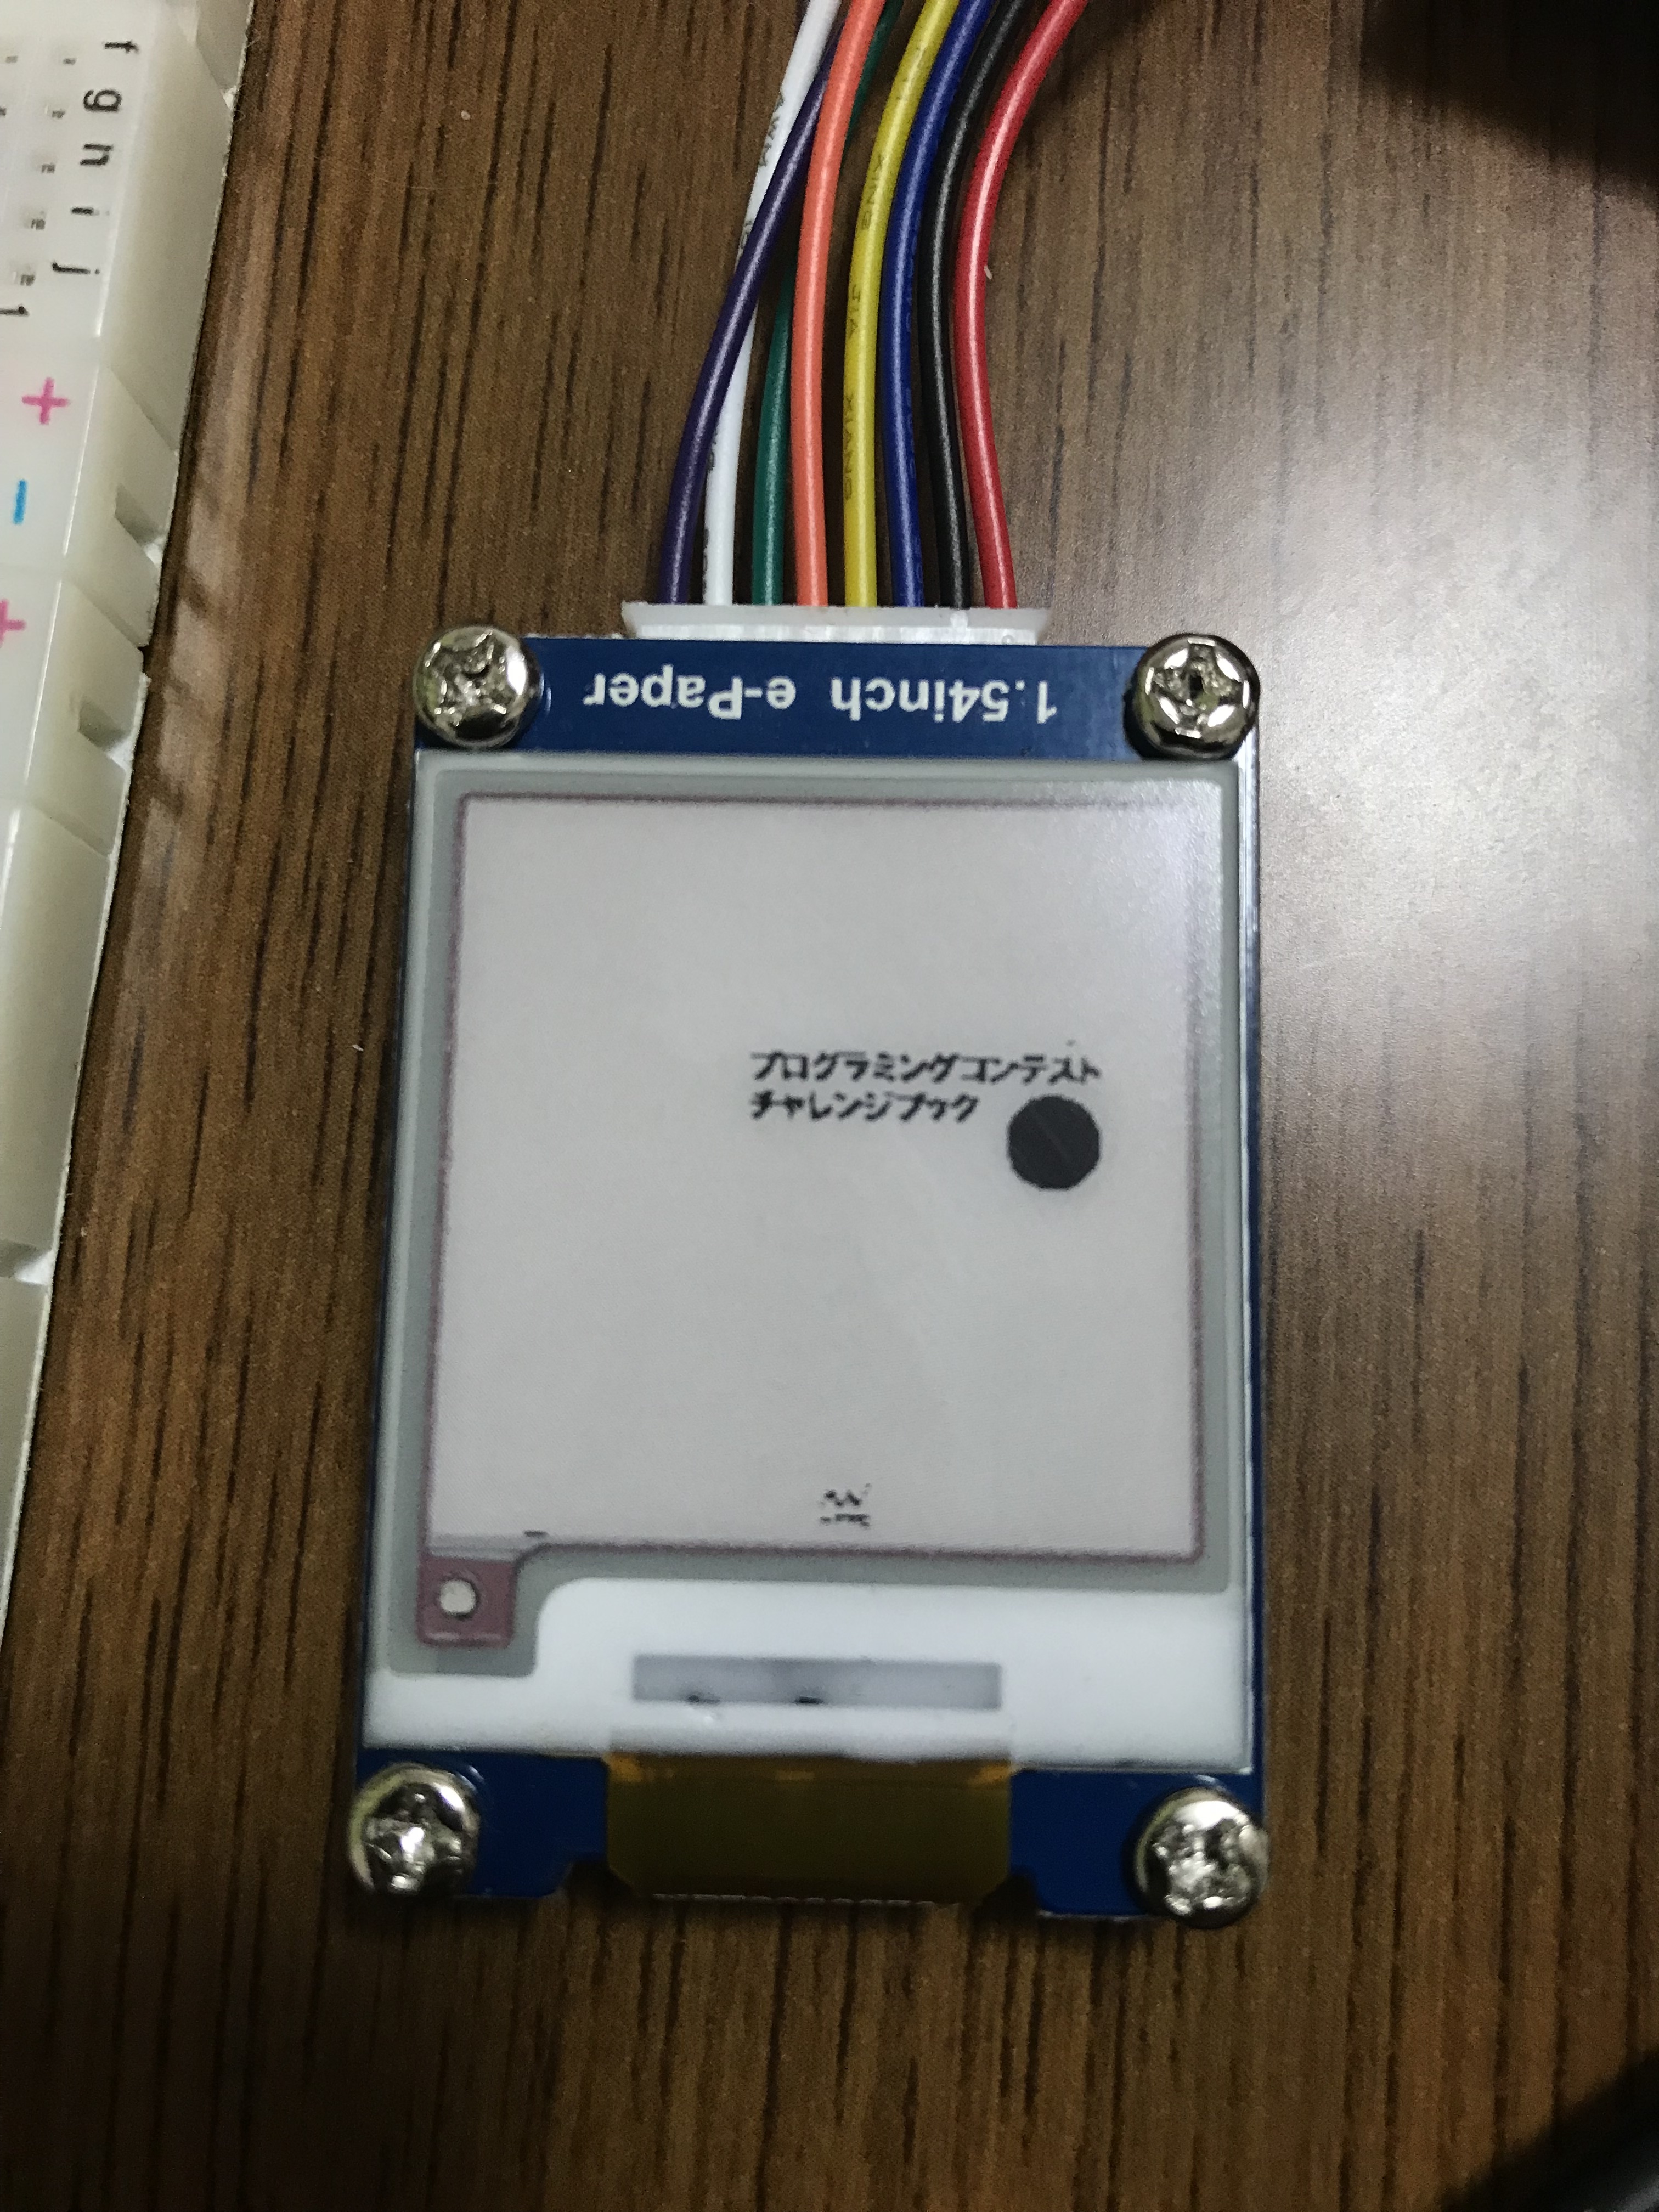
https://youtu.be/OaXHa2w4-VU?t=6646カメラが動かなくてヤバヤバのヤバだったので、何かしようと思って(ここで発表前日)電子ペーパーを使って現在読んでいる本の表紙を表示することにしました。
そこで使ったコードの保存です。
当然のことながら限界開発してたので超絶簡単に思いついたままの実装をしました。許してください。
概要・構成
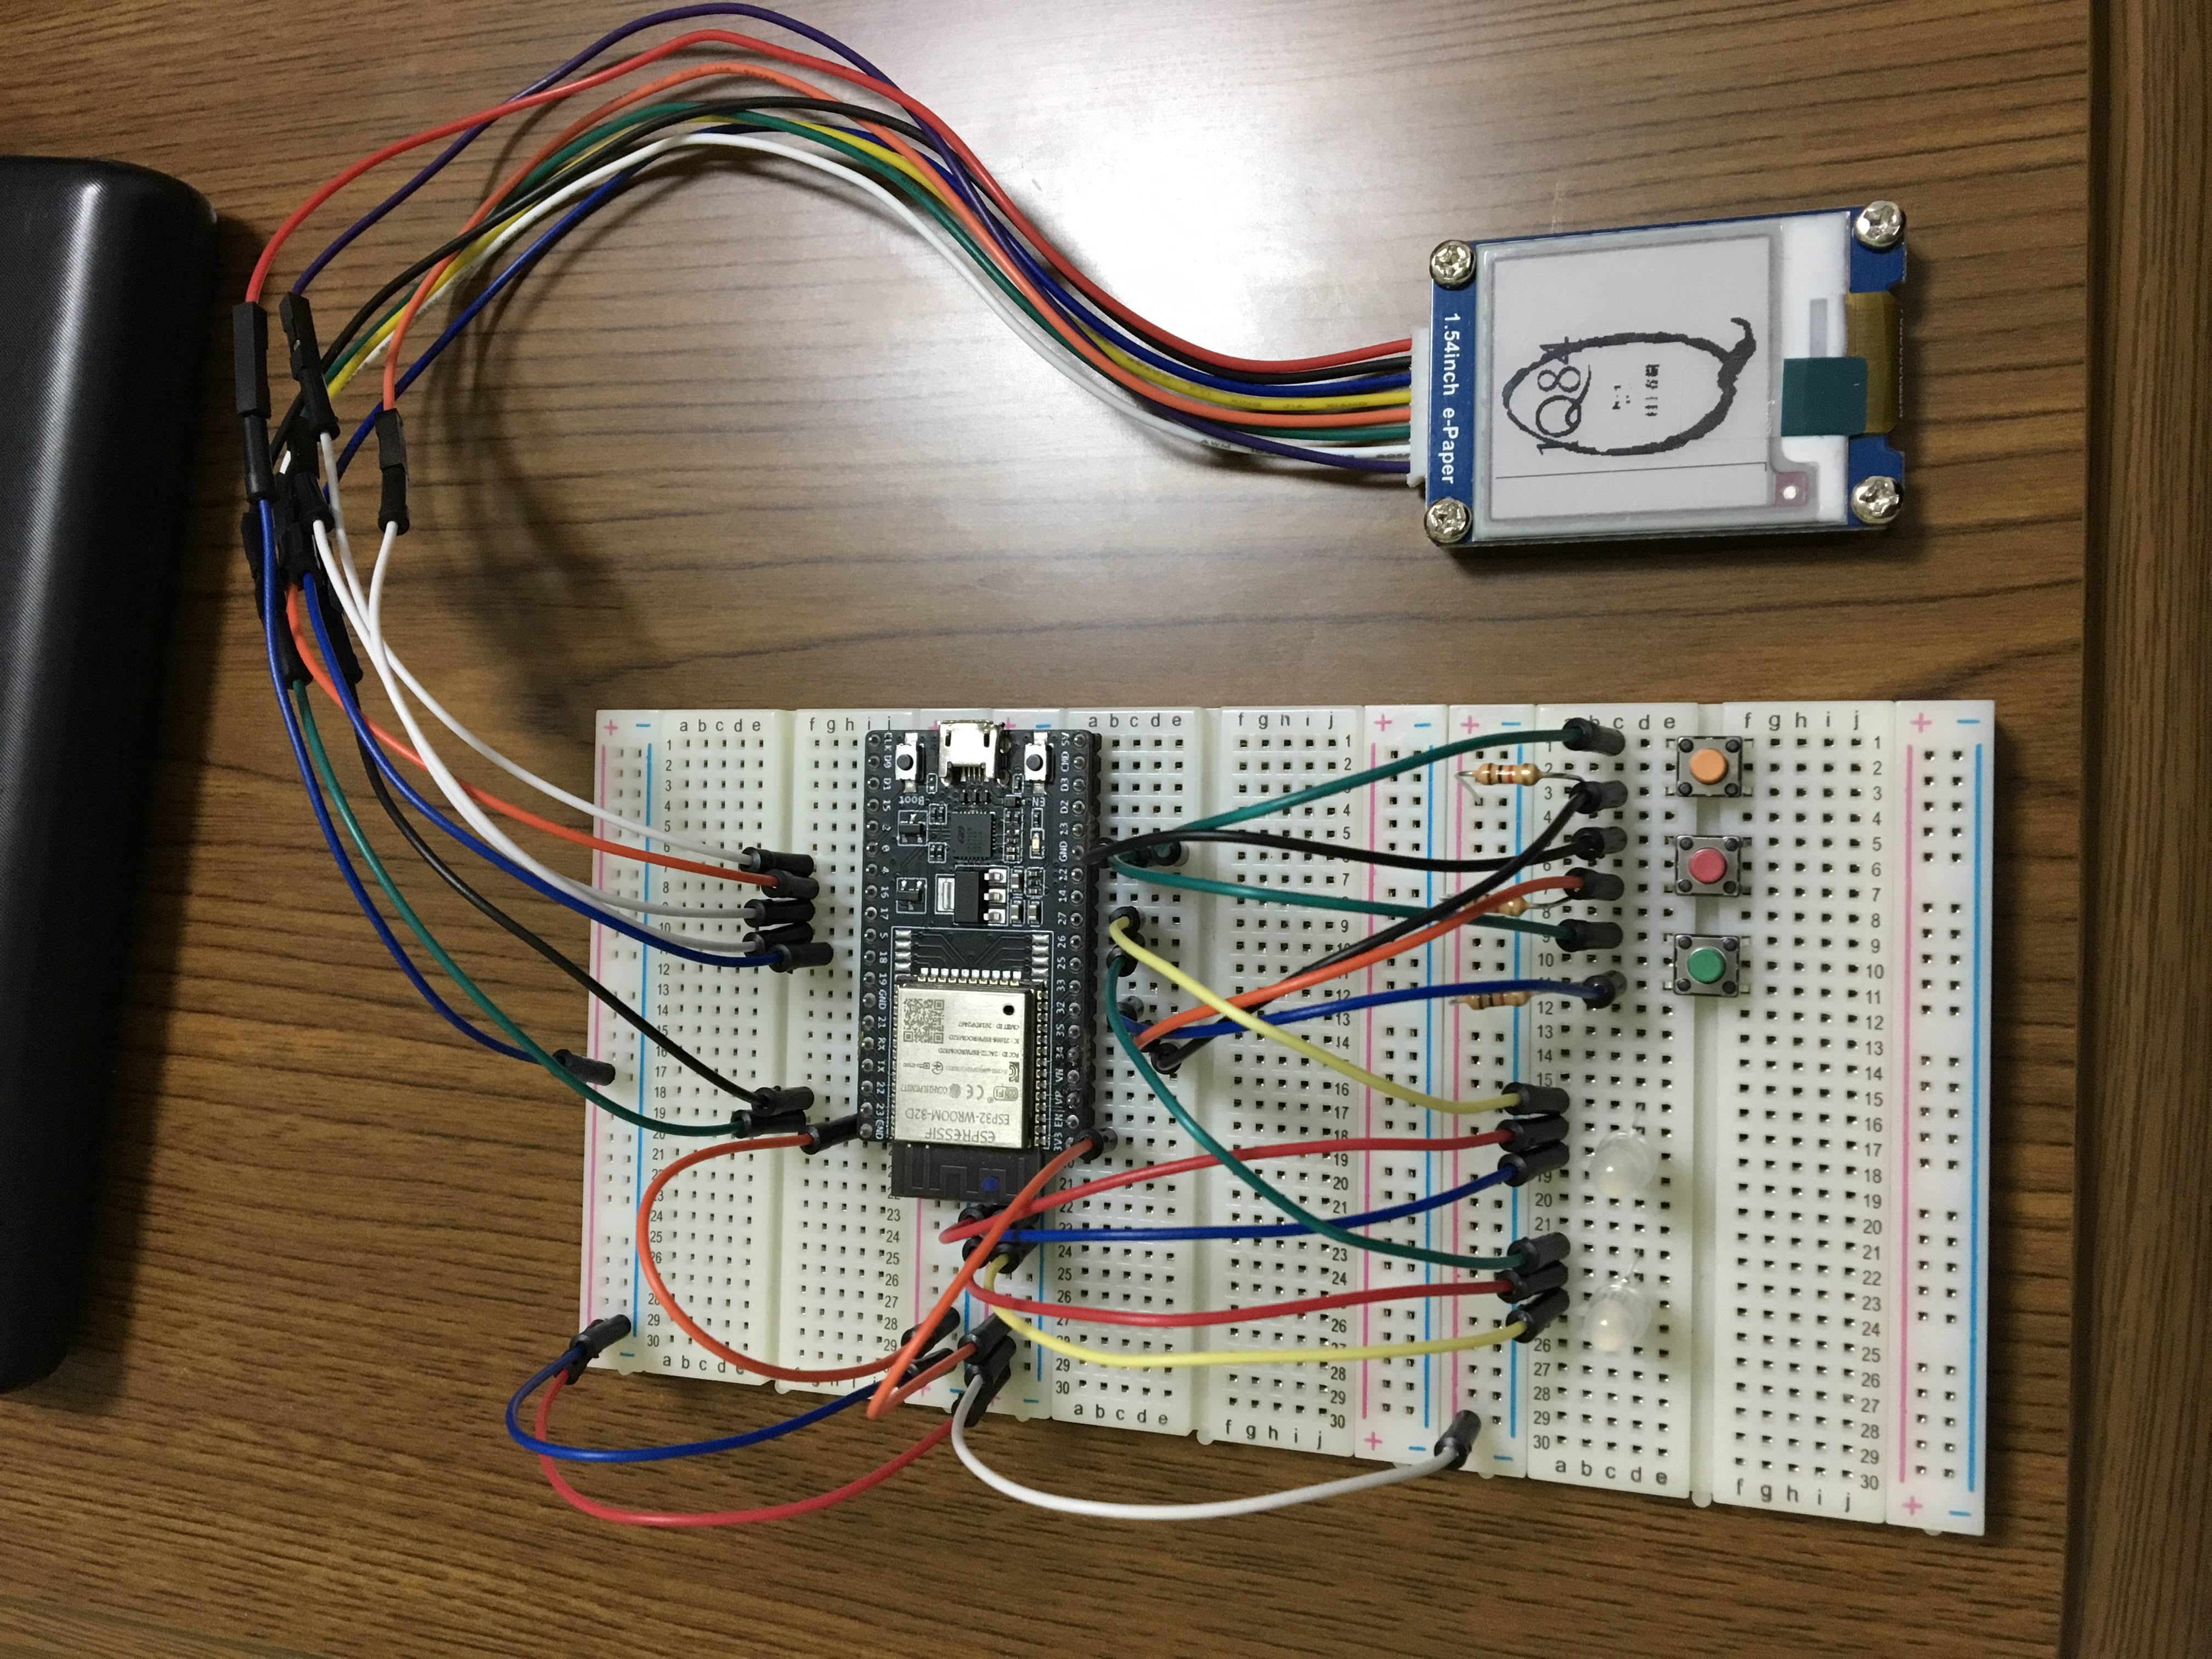
もの
- esp32
- 電子ペーパー(waveshare 13338)
- 2.4GHzのwifi環境
- 適当なサーバーで動いてるexpress
動作
- アプリから読書中の本の選択プロセスがあるので、そのタイミングで表紙画像をサーバーにダウンロード
- esp32のsetupでexpressから表示画像のダウンロード・表示
サーバー側
expressはpublic以下のファイルを自動的に配信してくれるので、
/public/images/UserID.bmpに保存することでなんとかします。セキュリティ???????????????
ちなみに表紙はGoogleBooksから持ってきています。ありがとうございます。※抜粋します
router.jsrouter.get('/current', async function(req, res, next) { const user_id = req.query.user_id; const c_book_id = req.query.book_id; //shiwori.getBookData(id)はgooglebooksapiから情報を取ってくる関数 var book = await shiwori.getBookData(c_book_id); let url = ""; //大きいサイズからダウンロード試行 if(book.imgUrl.large != null) url = book.imgUrl.large; else if(book.imgUrl.medium != null) url = book.imgUrl.medium; else if(book.imgUrl.small != null) url = book.imgUrl.small; else if(book.imgUrl.thumbnail != null) url = book.imgUrl.thumbnail; else if(book.imgUrl.smallThumbnail != null) url = book.imgUrl.smallThumbnail; else { res.status(300).end(); return; } Jimp.read(url, function(err, image) { if(err) { res.status(400).json(err); return; } image.scaleToFit(200, 200); //よくわからないけど鏡文字になったから回せ image.flip(false, true); const path = "public/images/"+user_id+".bmp"; image.write(path); res.sendStatus(200); }); })Jimp神、天才。これのおかげ。
ハード(ESP32)側
あ、arduinoです。
極限までサンプルを変更しないで使います。参考 https://qiita.com/nanbuwks/items/14257cf5f9edd192b8ec
まず、必要なライブラリをインストールします
https://github.com/ZinggJM/GxEPD
ファイル > スケッチ例 > GxEPD > GxEPD_WiFi_Exampleを開きます。コードを参考にピンをぶっ刺します。
// mapping suggestion for ESP32, e.g. LOLIN32, see .../variants/.../pins_arduino.h for your board
// NOTE: there are variants with different pins for SPI ! CHECK SPI PINS OF YOUR BOARD
// BUSY -> 4, RST -> 16, DC -> 17, CS -> SS(5), CLK -> SCK(18), DIN -> MOSI(23), GND -> GND, 3.3V -> 3.3V
邪魔な配線が多いですねw
そして、ここを
#include <GxEPD.h>こう変えます
#include <SPI.h>
#include <Adafruit_GFX.h>
#include <GxEPD.h>
使う電子ペーパーモジュールに従ってコメントを外します
//以下を解除
#include <GxGDEW0154Z04/GxGDEW0154Z04.h>  // 1.54" b/w/r 200x200
最後にwifiのssidとパスを直打ちします。
これでコンパイル通ってサンプルの描画が始まりますね。
移植します
#include <WiFi.h>
#include <WiFiClient.h>
#include <WiFiClientSecure.h>
#include <HTTPClient.h>
#include <Adafruit_NeoPixel.h>
#include <GxEPD.h>
// select the display class to use, only one
#include <GxGDEW0154Z04/GxGDEW0154Z04.h>  // 1.54" b/w/r 200x200
//#include <GxGDEW029Z10/GxGDEW029Z10.h>    // 2.9" b/w/r
#include <GxIO/GxIO_SPI/GxIO_SPI.h>
#include <GxIO/GxIO.h>

const char* ssid     = "自分のsaid";
const char* password = "パス";
const int httpPort  = 80; //httpsはゴメン

String user_id = "UserID"; //直打ち

const char* shiwori_book = "http://expressのアドレス/current";
void showBitmapFrom_HTTP(const char* host, const char* path, const char* filename, int16_t x, int16_t y, bool with_color = true);
//esp32用
GxIO_Class io(SPI, /*CS=5*/ SS, /*DC=*/ 17, /*RST=*/ 16);
GxEPD_Class display(io, /*RST=*/ 16, /*BUSY=*/ 4);

void setup()
{
  Serial.begin(115200);
  display.init(115200);
  delay(10);
  // We start by connecting to a WiFi network
  Serial.print("Connecting to ");
  Serial.println(ssid);
  WiFi.begin(ssid, password);
  while (WiFi.status() != WL_CONNECTED) {
    delay(500);
    Serial.print(".");
  }
  Serial.println("");
  Serial.println("WiFi connected");
  Serial.println("IP address: ");
  Serial.println(WiFi.localIP());
  int16_t x = (display.width() - 200) / 2;
  int16_t y = (display.height() - 200) / 2;
  showBitmapFrom_HTTP("expressのアドレス", "/images/", "UserID.bmp", x+25, y);
}

void loop(){}

//以下サンプルのコピペ
static const uint16_t input_buffer_pixels = 640; // may affect performance

static const uint16_t max_palette_pixels = 256; // for depth <= 8

uint8_t input_buffer[3 * input_buffer_pixels]; // up to depth 24
uint8_t mono_palette_buffer[max_palette_pixels / 8]; // palette buffer for depth <= 8 b/w
uint8_t color_palette_buffer[max_palette_pixels / 8]; // palette buffer for depth <= 8 c/w

void drawBitmapFrom_HTTP_ToBuffer(const char* host, const char* path, const char* filename, int16_t x, int16_t y, bool with_color)
{
  WiFiClient client;
  bool connection_ok = false;
  bool valid = false; // valid format to be handled
  bool flip = true; // bitmap is stored bottom-to-top
  uint32_t startTime = millis();
  if ((x >= display.width()) || (y >= display.height())) return;
  display.fillScreen(GxEPD_WHITE);
  Serial.print("connecting to "); Serial.println(host);
  if (!client.connect(host, httpPort))
  {
    Serial.println("connection failed");
    return;
  }
  Serial.print("requesting URL: ");
  Serial.println(String("http://") + host + path + filename);
  client.print(String("GET ") + path + filename + " HTTP/1.1\r\n" +
               "Host: " + host + "\r\n" +
               "User-Agent: GxEPD2_Spiffs_Loader\r\n" +
               "Connection: close\r\n\r\n");
  Serial.println("request sent");
  while (client.connected())
  {
    String line = client.readStringUntil('\n');
    if (!connection_ok)
    {
      connection_ok = line.startsWith("HTTP/1.1 200 OK");
      if (connection_ok) Serial.println(line);
      //if (!connection_ok) Serial.println(line);
    }
    if (!connection_ok) Serial.println(line);
    //Serial.println(line);
    if (line == "\r")
    {
      Serial.println("headers received");
      break;
    }
  }
  if (!connection_ok) return;
  // Parse BMP header
  if (read16(client) == 0x4D42) // BMP signature
  {
    uint32_t fileSize = read32(client);
    uint32_t creatorBytes = read32(client);
    uint32_t imageOffset = read32(client); // Start of image data
    uint32_t headerSize = read32(client);
    uint32_t width  = read32(client);
    uint32_t height = read32(client);
    uint16_t planes = read16(client);
    uint16_t depth = read16(client); // bits per pixel
    uint32_t format = read32(client);
    uint32_t bytes_read = 7 * 4 + 3 * 2; // read so far
    if ((planes == 1) && ((format == 0) || (format == 3))) // uncompressed is handled, 565 also
    {
      Serial.print("File size: "); Serial.println(fileSize);
      Serial.print("Image Offset: "); Serial.println(imageOffset);
      Serial.print("Header size: "); Serial.println(headerSize);
      Serial.print("Bit Depth: "); Serial.println(depth);
      Serial.print("Image size: ");
      Serial.print(width);
      Serial.print('x');
      Serial.println(height);
      // BMP rows are padded (if needed) to 4-byte boundary
      uint32_t rowSize = (width * depth / 8 + 3) & ~3;
      if (depth < 8) rowSize = ((width * depth + 8 - depth) / 8 + 3) & ~3;
      if (height < 0)
      {
        height = -height;
        flip = false;
      }
      uint16_t w = width;
      uint16_t h = height;
      if ((x + w - 1) >= display.width())  w = display.width()  - x;
      if ((y + h - 1) >= display.height()) h = display.height() - y;
      valid = true;
      uint8_t bitmask = 0xFF;
      uint8_t bitshift = 8 - depth;
      uint16_t red, green, blue;
      bool whitish=false, colored=false;
      if (depth == 1) with_color = false;
      if (depth <= 8)
      {
        if (depth < 8) bitmask >>= depth;
        bytes_read += skip(client, 54 - bytes_read); //palette is always @ 54
        for (uint16_t pn = 0; pn < (1 << depth); pn++)
        {
          blue  = client.read();
          green = client.read();
          red   = client.read();
          client.read();
          bytes_read += 4;
          whitish = with_color ? ((red > 0x80) && (green > 0x80) && (blue > 0x80)) : ((red + green + blue) > 3 * 0x80); // whitish
          colored = (red > 0xF0) || ((green > 0xF0) && (blue > 0xF0)); // reddish or yellowish?
          if (0 == pn % 8) mono_palette_buffer[pn / 8] = 0;
          mono_palette_buffer[pn / 8] |= whitish << pn % 8;
          if (0 == pn % 8) color_palette_buffer[pn / 8] = 0;
          color_palette_buffer[pn / 8] |= colored << pn % 8;
          //Serial.print("0x00"); Serial.print(red, HEX); Serial.print(green, HEX); Serial.print(blue, HEX);
          //Serial.print(" : "); Serial.print(whitish); Serial.print(", "); Serial.println(colored);
        }
      }
      display.fillScreen(GxEPD_WHITE);
      uint32_t rowPosition = flip ? imageOffset + (height - h) * rowSize : imageOffset;
      //Serial.print("skip "); Serial.println(rowPosition - bytes_read);
      bytes_read += skip(client, rowPosition - bytes_read);
      for (uint16_t row = 0; row < h; row++, rowPosition += rowSize) // for each line
      {
        if (!connection_ok || !client.connected()) break;
        delay(1); // yield() to avoid WDT
        uint32_t in_remain = rowSize;
        uint32_t in_idx = 0;
        uint32_t in_bytes = 0;
        uint8_t in_byte = 0; // for depth <= 8
        uint8_t in_bits = 0; // for depth <= 8
        uint16_t color = GxEPD_WHITE;
        for (uint16_t col = 0; col < w; col++) // for each pixel
        {
          yield();
          if (!connection_ok || !client.connected()) break;
          // Time to read more pixel data?
          if (in_idx >= in_bytes) // ok, exact match for 24bit also (size IS multiple of 3)
          {
            uint32_t get = in_remain > sizeof(input_buffer) ? sizeof(input_buffer) : in_remain;
            uint32_t got = read(client, input_buffer, get);
            while ((got < get) && connection_ok)
            {
              //Serial.print("got "); Serial.print(got); Serial.print(" < "); Serial.print(get); Serial.print(" @ "); Serial.println(bytes_read);
              uint32_t gotmore = read(client, input_buffer + got, get - got);
              got += gotmore;
              connection_ok = gotmore > 0;
            }
            in_bytes = got;
            in_remain -= got;
            bytes_read += got;
          }
          if (!connection_ok)
          {
            Serial.print("Error: got no more after "); Serial.print(bytes_read); Serial.println(" bytes read!");
            break;
          }
          switch (depth)
          {
            case 24:
              blue = input_buffer[in_idx++];
              green = input_buffer[in_idx++];
              red = input_buffer[in_idx++];
              whitish = with_color ? ((red > 0x80) && (green > 0x80) && (blue > 0x80)) : ((red + green + blue) > 3 * 0x80); // whitish
              colored = (red > 0xF0) || ((green > 0xF0) && (blue > 0xF0)); // reddish or yellowish?
              break;
            case 16:
              {
                uint8_t lsb = input_buffer[in_idx++];
                uint8_t msb = input_buffer[in_idx++];
                if (format == 0) // 555
                {
                  blue  = (lsb & 0x1F) << 3;
                  green = ((msb & 0x03) << 6) | ((lsb & 0xE0) >> 2);
                  red   = (msb & 0x7C) << 1;
                }
                else // 565
                {
                  blue  = (lsb & 0x1F) << 3;
                  green = ((msb & 0x07) << 5) | ((lsb & 0xE0) >> 3);
                  red   = (msb & 0xF8);
                }
                whitish = with_color ? ((red > 0x80) && (green > 0x80) && (blue > 0x80)) : ((red + green + blue) > 3 * 0x80); // whitish
                colored = (red > 0xF0) || ((green > 0xF0) && (blue > 0xF0)); // reddish or yellowish?
              }
              break;
            case 1:
            case 4:
            case 8:
              {
                if (0 == in_bits)
                {
                  in_byte = input_buffer[in_idx++];
                  in_bits = 8;
                }
                uint16_t pn = (in_byte >> bitshift) & bitmask;
                whitish = mono_palette_buffer[pn / 8] & (0x1 << pn % 8);
                colored = color_palette_buffer[pn / 8] & (0x1 << pn % 8);
                in_byte <<= depth;
                in_bits -= depth;
              }
              break;
          }
          if (whitish)
          {
            color = GxEPD_WHITE;
          }
          else if (colored && with_color)
          {
            color = GxEPD_RED;
          }
          else
          {
            color = GxEPD_BLACK;
          }
          uint16_t yrow = y + (flip ? h - row - 1 : row);
          display.drawPixel(x + col, yrow, color);
        } // end pixel
      } // end line
    }
    Serial.print("bytes read "); Serial.println(bytes_read);
  }
  Serial.print("loaded in "); Serial.print(millis() - startTime); Serial.println(" ms");
  if (!valid)
  {
    Serial.println("bitmap format not handled.");
  }
}

void showBitmapFrom_HTTP(const char* host, const char* path, const char* filename, int16_t x, int16_t y, bool with_color)
{
  Serial.println(); Serial.print("downloading file \""); Serial.print(filename);  Serial.println("\"");
  drawBitmapFrom_HTTP_ToBuffer(host, path, filename, x, y, with_color);
  display.update();
}

uint16_t read16(WiFiClient& client)
{
  // BMP data is stored little-endian, same as Arduino.
  uint16_t result;
  ((uint8_t *)&result)[0] = client.read(); // LSB
  ((uint8_t *)&result)[1] = client.read(); // MSB
  return result;
}

uint32_t read32(WiFiClient& client)
{
  // BMP data is stored little-endian, same as Arduino.
  uint32_t result;
  ((uint8_t *)&result)[0] = client.read(); // LSB
  ((uint8_t *)&result)[1] = client.read();
  ((uint8_t *)&result)[2] = client.read();
  ((uint8_t *)&result)[3] = client.read(); // MSB
  return result;
}

#if USE_BearSSL

uint32_t skip(BearSSL::WiFiClientSecure& client, int32_t bytes)
{
  int32_t remain = bytes;
  uint32_t start = millis();
  while (client.connected() && (remain > 0))
  {
    if (client.available())
    {
      int16_t v = client.read();
      remain--;
    }
    else delay(1);
    if (millis() - start > 2000) break; // don't hang forever
  }
  return bytes - remain;
}

uint32_t read(BearSSL::WiFiClientSecure& client, uint8_t* buffer, int32_t bytes)
{
  int32_t remain = bytes;
  uint32_t start = millis();
  while (client.connected() && (remain > 0))
  {
    if (client.available())
    {
      int16_t v = client.read();
      *buffer++ = uint8_t(v);
      remain--;
    }
    else delay(1);
    if (millis() - start > 2000) break; // don't hang forever
  }
  return bytes - remain;
}

#endif

uint32_t skip(WiFiClient& client, int32_t bytes)
{
  int32_t remain = bytes;
  uint32_t start = millis();
  while (client.connected() && (remain > 0))
  {
    if (client.available())
    {
      int16_t v = client.read();
      remain--;
    }
    else delay(1);
    if (millis() - start > 2000) break; // don't hang forever
  }
  return bytes - remain;
}

uint32_t read(WiFiClient& client, uint8_t* buffer, int32_t bytes)
{
  int32_t remain = bytes;
  uint32_t start = millis();
  while (client.connected() && (remain > 0))
  {
    if (client.available())
    {
      int16_t v = client.read();
      *buffer++ = uint8_t(v);
      remain--;
    }
    else delay(1);
    if (millis() - start > 2000) break; // don't hang forever
  }
  return bytes - remain;
}
loop以下を理解していないのでそのうち理解して実装したい。
動作動画
動作動画ってシャレっぽいw
まーたyoutubeで申し訳ないです参考url
とても助かりました。ありがとうございました。
・esp32のhttp系について https://qiita.com/tkt0821/items/5d730845f534c614f174
・jimpの使い方 https://s8a.jp/javascript-image-processing-library-jimp
・2回目の登場 https://qiita.com/nanbuwks/items/14257cf5f9edd192b8ec今後とか感想とか
SHIWORIに関してですが、テンションが上がっていればカメラとかbluetoothとか構想通りのものになるように制作していきたいと思っています。
サーバーの負荷やばいって???
知らないよねこれも課題。カメラが動かなかったのなんで? ライブラリにらめっこに負けました。よいこのみんなは古いのを使わないようにしようね。
コードはgithubにあります。
電子ペーパーは神!みんな使え!!!
おわり
- 投稿日:2019-03-05T22:09:16+09:00
python, ruby, php, node のループの速さ
今日も楽しいマイクロベンチマーク。
某所で python の for ループが遅いという話を聞いたので、そうなの? と思って他の言語と比べてみた。
ソース
python3
python3import sys r=0 for i in range(int(sys.argv[1])): r+=1 print(r)PHP
<?php
$len = (int)$argv[1];
$r=0;
for( $i=0 ; $i<$len ; ++$i ){
  ++$r;
}
echo($r);
node.js
node.jsconst len = process.argv[2]|0; let r=0; for( let i=0 ; i<len ; ++i ){ ++r; } console.log(r);ruby
ruby2.6n=ARGV[0].to_i r=0 n.times do r+=1 end p r測る人
測る人はわりとやる気ない感じで、
Benchmark.realtimeを使っている。bench.rbrequire "benchmark" require "pp" COMMANDS = [ [ "php for.php", "php" ], [ "node for_pp.js", "node" ], [ "python3 for_range.py", "python3" ], [ "ruby times.rb", "ruby" ], ] COUNTS = (10..27).map{ |e| 2**e } File.open( "result.csv", "w" ) do |f| f.puts( (["tick"]+COMMANDS.map{ |cmd| cmd[1] }).join(",") ) COUNTS.each do |count| s=([count]+COMMANDS.map{ |cmd| Benchmark.realtime{ %x(#{cmd[0]} #{count}) } }).join(",") f.puts(s) puts(s) end end各言語のファイル名がいい加減なのがバレるね。
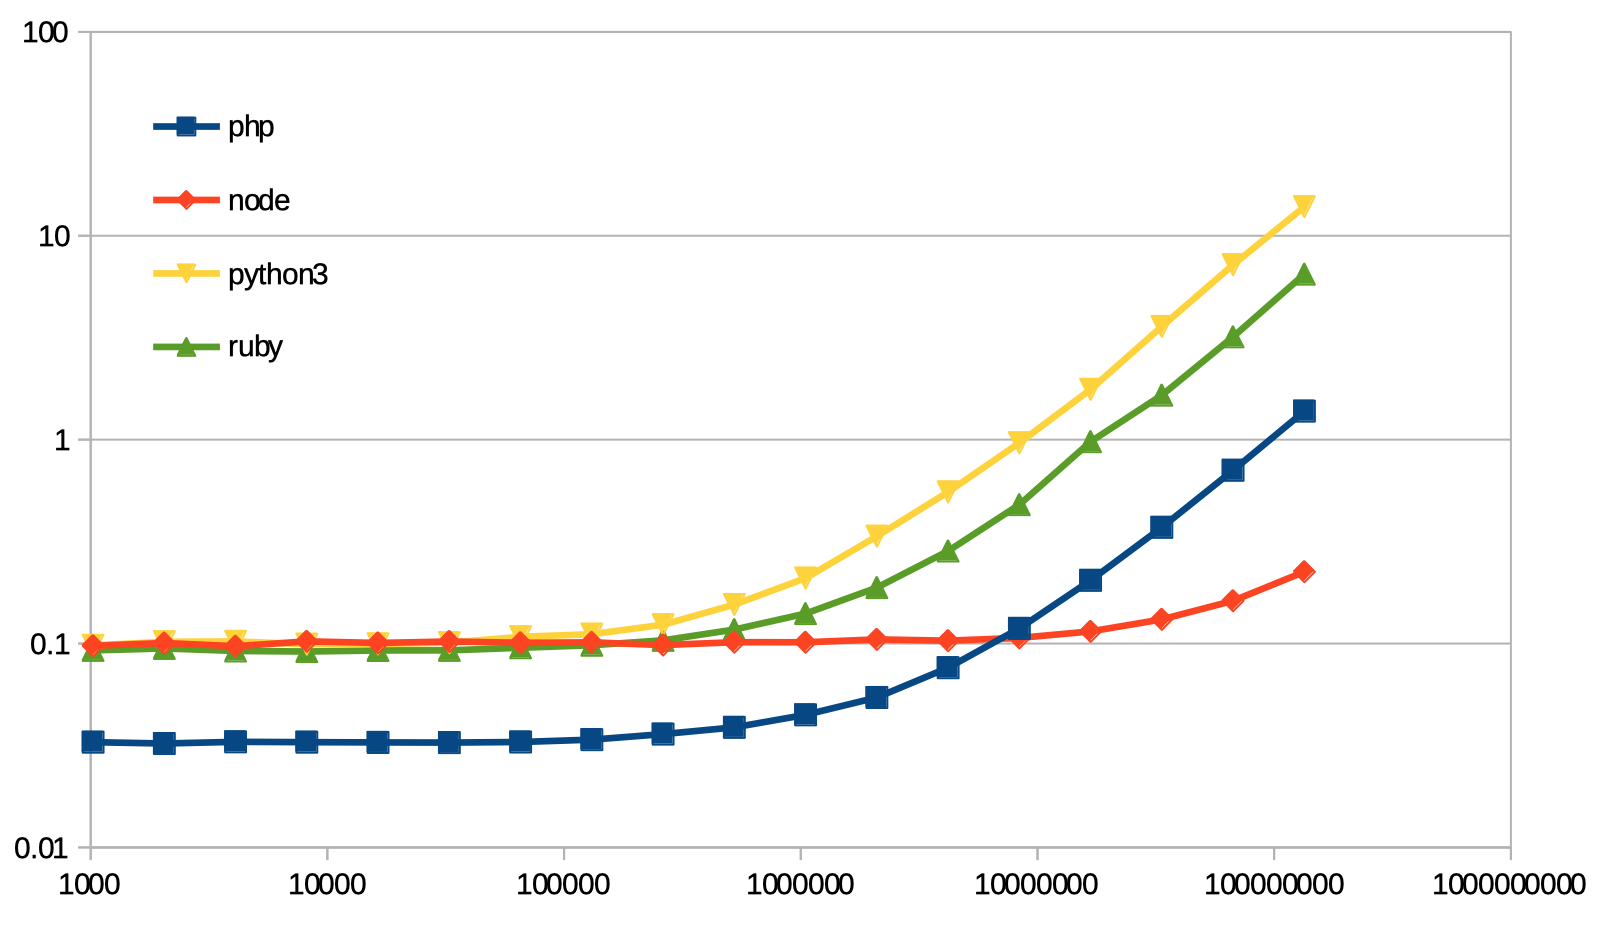
結果
結果は下記グラフの通り。
両対数グラフ注意。
測る人のソースコードを見ると分かる通り、プログラムの起動時間を含んでいる。
10万回ぐらい回しても、起動時間の影に隠れて殆ど見えないということがわかる。1.34億回回すのに要する時間を、node.js を 1.00 として表にすると:
php node python3 ruby Benchmark.realtime そのまま 6.13 1.00 61.72 28.83 起動時間らしきものを減算 10.56 1.00 108.11 50.13 「起動時間らしきものを減算」は、1.34億回の結果から 1024回の結果を減じたもの。
こんな感じ。node 速いね。
そして噂のとおり、python3 は遅いのであった。あと。PHP だけ起動が速いらしい。そういうものか。
- 投稿日:2019-03-05T17:47:14+09:00
オリジナルKdB(科目検索)を作ってみよう -番外3- GCP Cloud Functions編
これまでの記事
- オリジナルKdB(科目検索)を作ってみよう -1- Node.jsセットアップ編
- オリジナルKdB(科目検索)を作ってみよう -2- パース編
- オリジナルKdB(科目検索)を作ってみよう -3- データで遊ぶ編
- オリジナルKdB(科目検索)を作ってみよう -4- Express.jsでWEBアプリことはじめ編
- オリジナルKdB(科目検索)を作ってみよう -5- Express.jsでWEBアプリ整形編
- オリジナルKdB(科目検索)を作ってみよう -6- 本番環境Herokuにデプロイ編
- オリジナルKdB(科目検索)を作ってみよう -番外1- FaaS下準備編
- オリジナルKdB(科目検索)を作ってみよう -番外2- AWS Lambda編
この記事を読む前に
ある特定の人にしかわからない単語が出現する可能性が高いです。あらかじめご了承ください。
この記事での開発環境
- MacOS 10.14.3
- Visual Studio Code 1.31.1
- Node.js LTS 10.15.1 (GCP Cloud Functionsでは6.x)
はじめに
「オリジナルKdB(科目検索)を作ってみよう」の番外編です。これまではExpress.jsは使わず、サーバレスなシステムを作っていきましょう。シリーズでやっていたようにExpress.jsでエンヤコラはやらずに、関数を作るだけで簡単にサービスを作ることができます。
前提条件
- GCP(Google)のアカウントを持っていること
- node.jsの開発環境があること
AWS Lambda用の関数を作成
まずはじめにGCP Cloud FunctionsではNode.js(ver 6.x)のみがサポートされています。他の言語で描きたい場合はAWS LambdaやIBMCloud, Azure等の利用をオススメします。(なお、GCP Cloud FunctionsではPython3.7やGo1.11がベータ版として提供されています。)
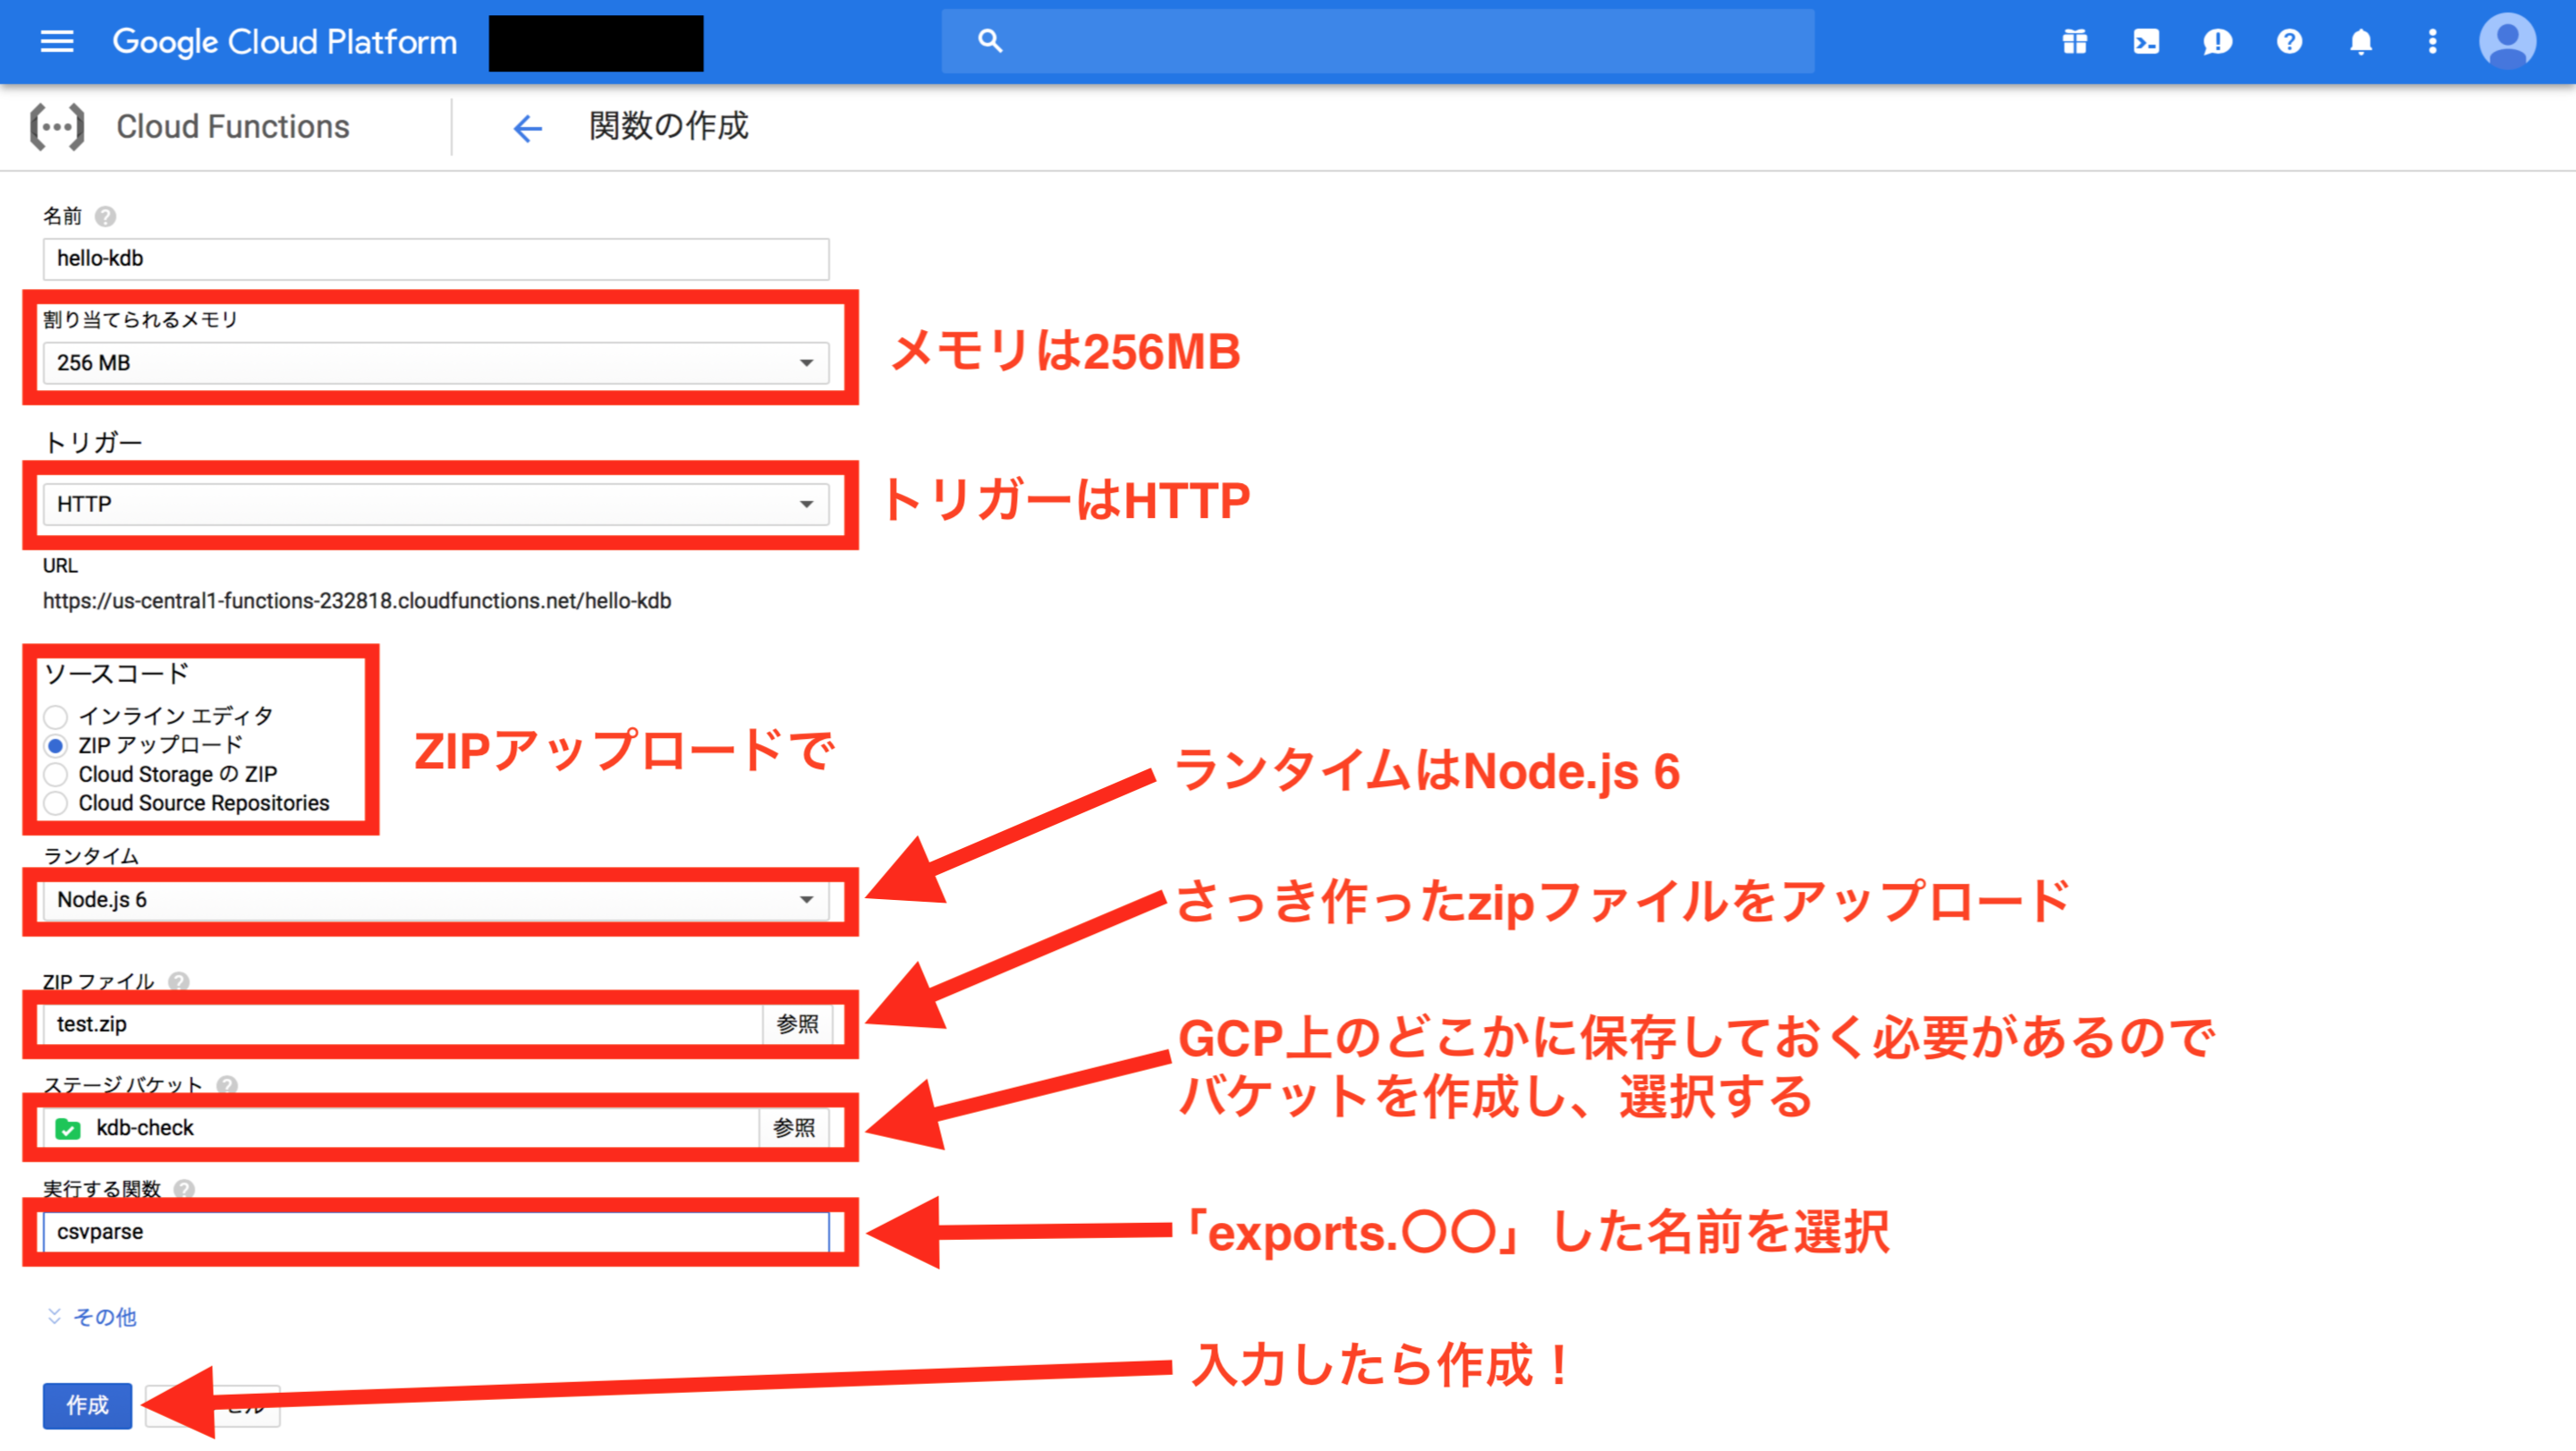
特に複雑な処理は行わないのでGoogleCloud-SDKを使わずに作れます。
それではindex.jsを作りましょう。index.js// GCPでは「exports.〇〇」とすることで好きな命名ができる。 // AWS Lambdaの時みたいに (event,callback) => ... もできるが // 簡単な関数では (req, res) => ... の方が簡潔で早い exports.csvparse = (req, res) => { // リクエストのクエリ文字列から「?search=〇〇」の値を変数に格納 const str = req.query.search // -番外1- で作ったJSONデータの読み込み const json = require("./data") // 正規表現オブジェクトを作成、filterで検索 const reg = new RegExp( str ) const filterCourse = json.subjects.filter( (value) => { return value.name.match(reg) }) // データ転送量削減のために最初の5件のみにする const resJson = { subjects: filterCourse.splice(0, 5) } // HTTPステータス200(success) でレスポンスを返す res.status(200).send( JSON.stringify(resJson) ) };※GCP Cloud Functionsではデータ転送量が多くなるほど、実行時間が長くなるほどお金がかかります。そのためresponseを5件に絞り、JSON.stringfy()のコストとデータ転送量を削減しています。
補足
ぱっと見でわかると思いますが、Express.jsの時に書いたコードと大きく変わることなく記述できていることがわかると思います。これはシンプルなHTTPレスポンス処理を採用しているからです。細かい部分ではExpress.jsと記述方法が異なりますので注意してください(req.queryの部分とか)
lambda関数のローカル実行テスト
Googleの方で提供されているエミュレータを使います。
こちらを参考にしました → https://cloud.google.com/functions/docs/emulator※エミュレートできる環境はNode.js 6.xのみ。PythonやGo, Node.js 8.xはエミュレートできません。
まずはエミュレータをダウンロードします。
$ npm install -g @google-cloud/functions-emulator
$ functions --version   # 入っていることを確認
1.0.0-beta.5
そしたらエミュレータを起動します
$ functions startこれで起動しました。
ちなみにエミュレータを終了するときはfunctions stopと入力すればOKです次はエミュレータ環境にデプロイします。
$ functions deploy csvparse --trigger-http

# 何かしら表示される。
# 「Function csvparse deployed.」と表示されていればOK
それではテストしてちゃんとレスポンスが返ってくるか確認します。
今回はクエリ文字列を直接入力できないので、以下のようにペイロードとして渡します。$ functions call csvparse --data='{"query":{"search":"生物"}}'ちゃんと検索結果が表示されたらOKです。
Zipファイルに圧縮してアップロードの準備をしましょう。$ zip -r test.zip index.js data.js node_modulesGCP Cloud Functions の準備
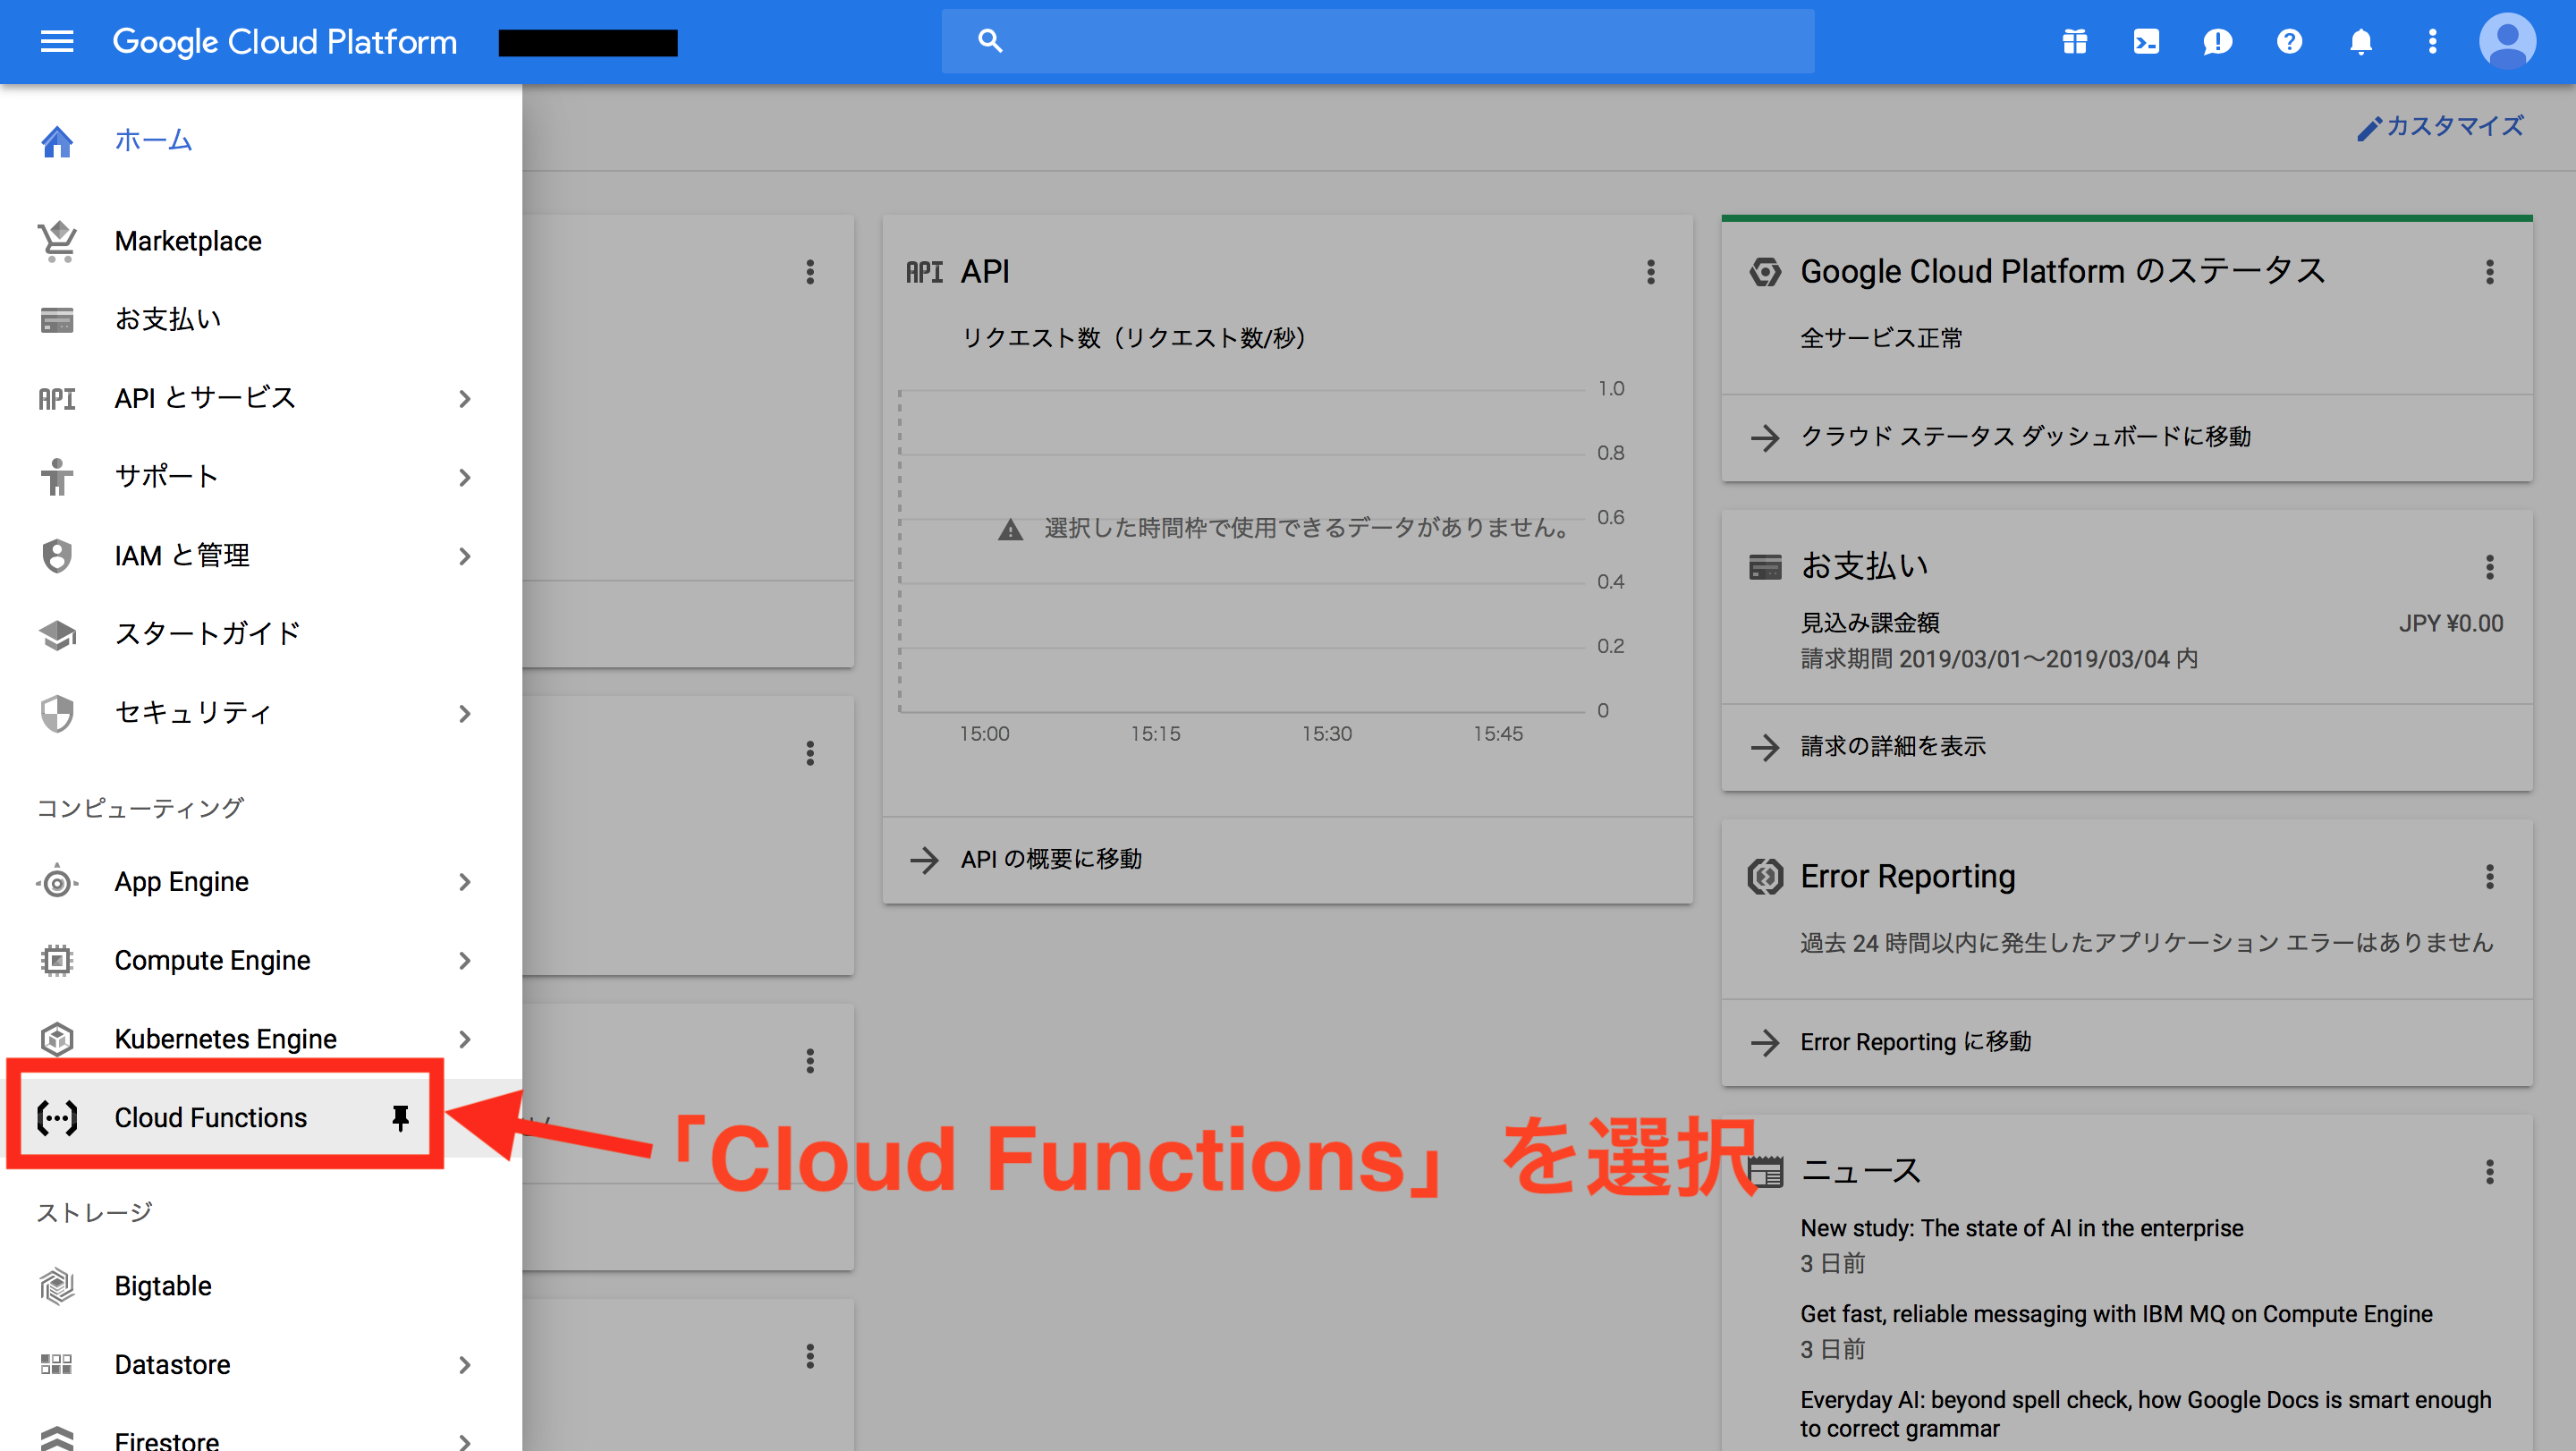
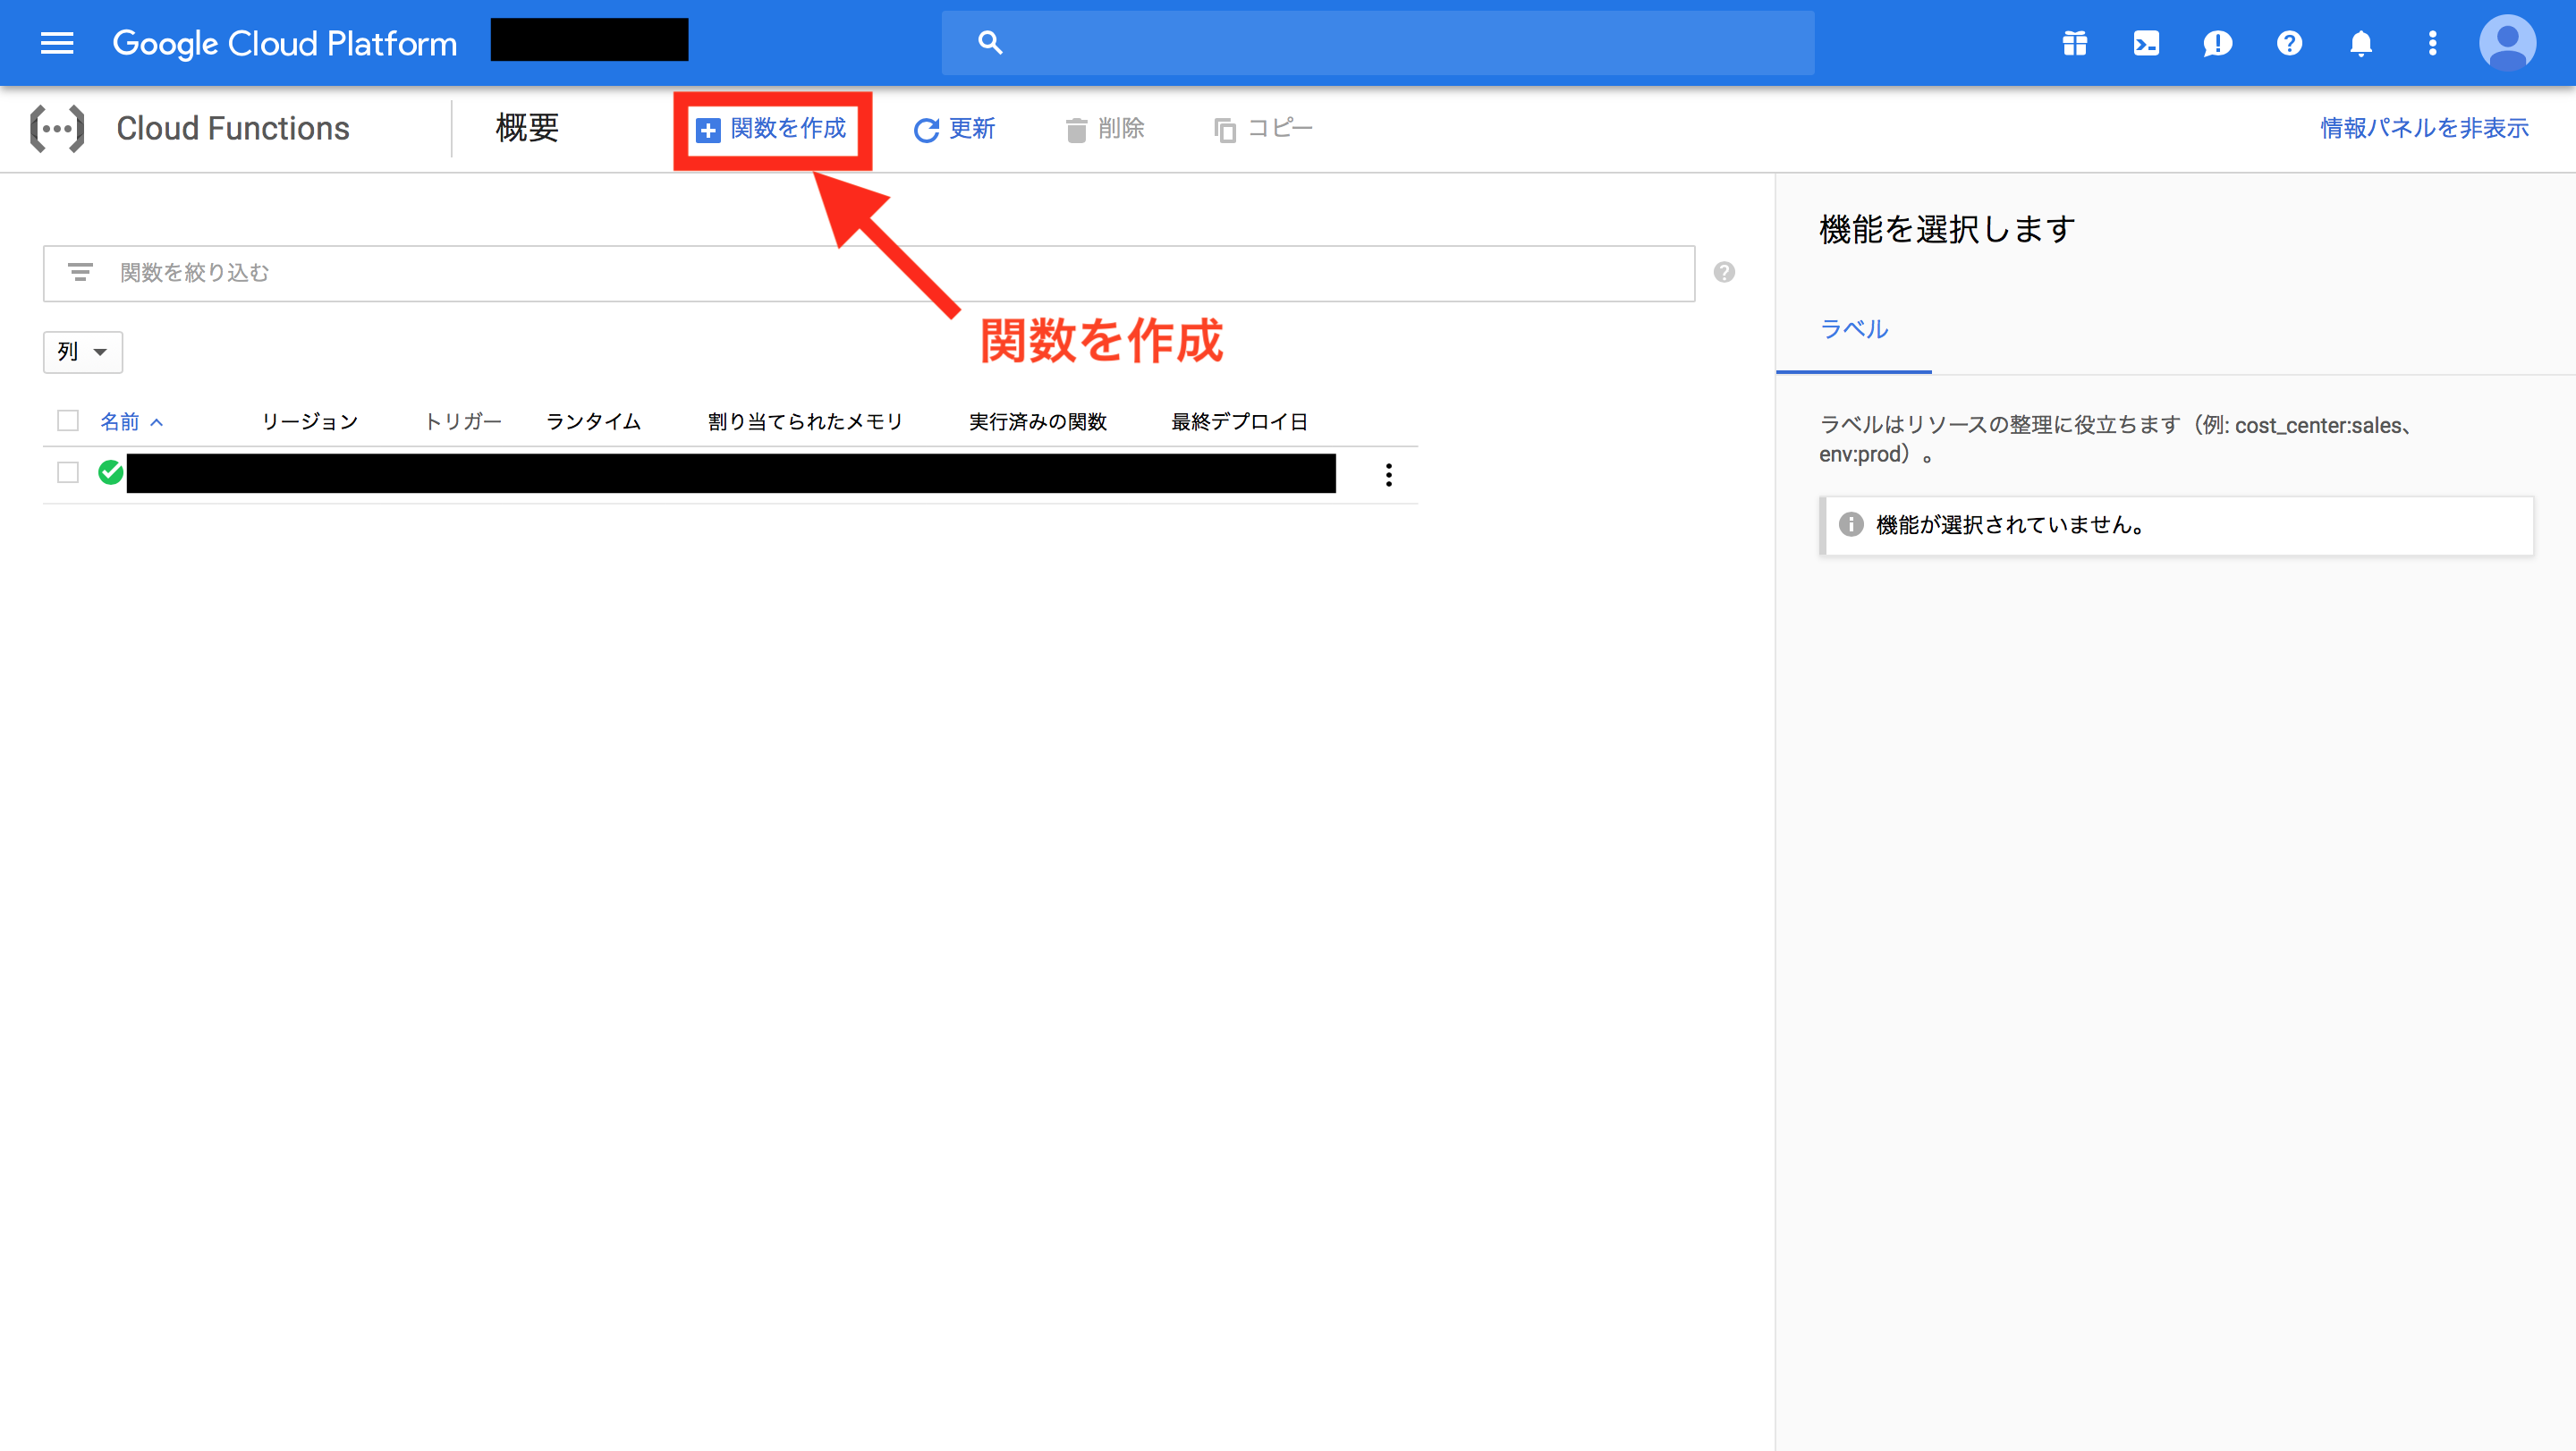
GCPのアカウントを作ったら、GCPのコンソールページにいきます。
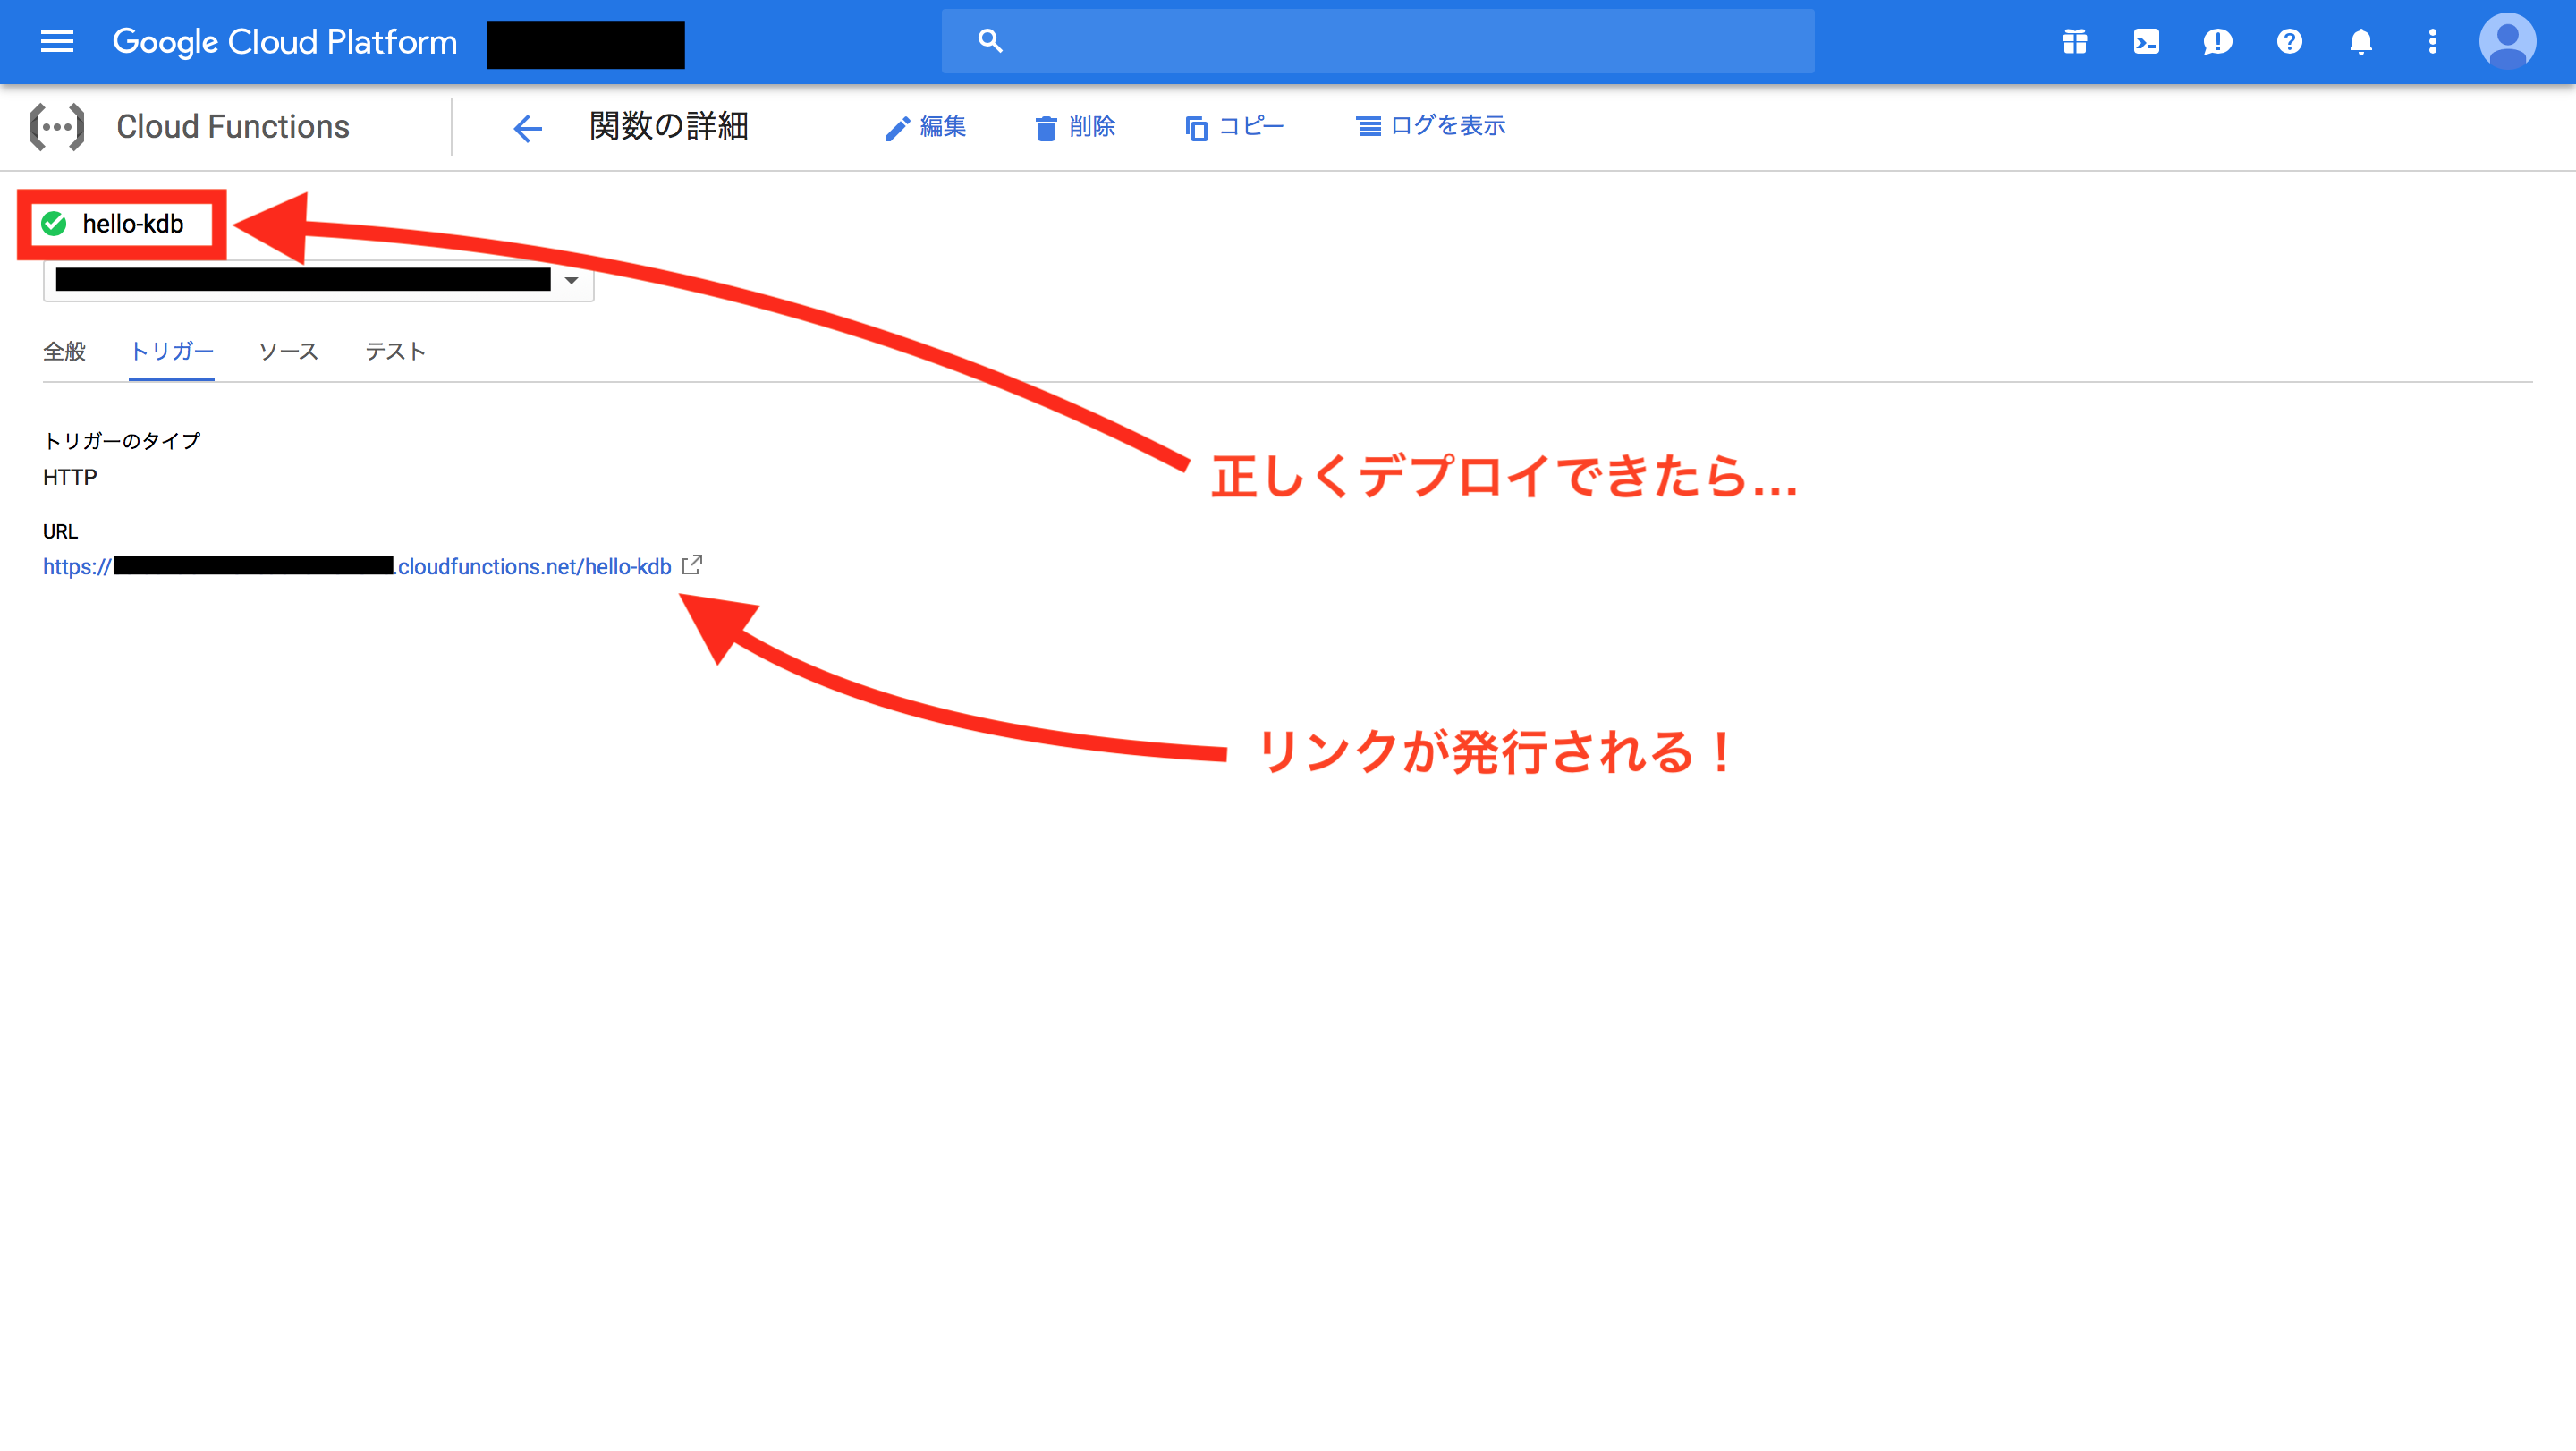
無事にリンクが発行できたのでリンクの最後に「?search=〇〇」を追加してアクセスしてみましょう!
APIが完成した!
APIのURLにクエリ文字列を指定して実行すると実際にレスポンスが返ることがわかります。
AWS Lambdaよりも少し簡単に実装できましたね!GCPも
gcloudというCLIがあり、そちらを使えばコマンドライン上で全ての処理が可能です。興味のある方はぜひ使ってみてください!なお、今回もAPIをオープンアクセス可能な状態で作成しましたが、API-Keyを発行するなり、ユーザ認証をするなど、何かしらのセキュリティを設けたほうが確実で安全です。ここでの説明は割愛させていただきますが最低限のマナーなので気をつけたほうがいいです。
参考記事↓
質問等はコメントでお願いします!
ありがとうございました!今回のあとがき
こんなに簡単ならAWS Lambdaを使わなくていいのでは...?
いえいえ、そんな簡単な話じゃないんです。確かにGCPの操作は簡単で便利ですが、設定の細かさで言ったらAWSに軍配があがるケースが多いです。細かい設定をすることで本当の意味での最適化を行うことができるのでコストカットには最適でしょう。でもやっぱFirebaseとかSearchAPIとかGoogleMapsAPIとかとか。Googleにしかない強みがこれでもかというくらいあるんですよね。やっっぱGoogleはつよい。
それでもクラウドも適材適所ってことです。いろんなサービスを使って仲良くしていきましょう。


- 投稿日:2019-03-05T13:40:28+09:00
Lambda×puppeteerでクロールしようとしたらゾンビプロセスの沼に浸かった記録(解決済)
headless chromeを使ってサーバーレスでいい感じにクローリングするプログラムを作ろうとしたら沼に浸かりました。
うまいこと動くテンプレートをgithubで公開しています。
https://github.com/inatomitk/lambda-puppeteer-template環境
- puppeteer ※headless chromeのNode.jsのAPI
- AWS Lambda
- Node.js
沼りポイント
headless chromeのバイナリがLambdaにアップロードできない
Lambdaには一つのfunctionあたり50MBまでのファイルしかアップロードできないという制限があります。
普通の処理ならその制限を気にする必要もない(まず、そんな大きいファイルにならない)です。が、headless chromeはサイズが大きい(50MB弱くらい)なので、その他諸々のパッケージを含めるとアップロードできない可能性が高いです。なので、Lambdaのlayerを使用しました。layerを使用することで関連するパッケージを関数とは別でアップロード・使用することが可能です。
serverlessというLambdaにアップロードするための便利なツールがlayerにも対応しています。ちなみに、serverlessでアップロードする際に、素直に
serverless deployをすると毎回layerもアップロードされるのであまりよろしくないです。$ serverless deploy function -f [関数名]と実行すると、該当の関数だけアップロードされます。
puppeteerが動かない
様々な記事を参考にさせていただいたのですが、バージョンの相性のせいなのか、うまくheadless chromeが起動せずうまく動きませんでした。
https://github.com/RafalWilinski/serverless-puppeteer-layers
試行錯誤を重ね、遂に、↑を参考に構築したところ、無事クローラーが動きました。だが、しかし、、、
ゾンビプロセスが溜まりクラッシュする
数回の実行ではまったく問題なかったのですが、短い時間に連続で何度も実行するとクラッシュしてしまう。。
メモリを観察すると、実行毎にメモリが圧迫されていたことがわかりました。そして限度を超えるとクラッシュする。そこでプロセスを出力してみると、ゾンビプロセス(メモリ0のプロセス)が実行の度に溜まっていることがわかりました。
USER PID %CPU %MEM VSZ RSS TTY STAT START TIME COMMAND
486 989 0.0 0.0 0 0 ? Z 07:56 0:00 [headless_shell] <defunct>
486 937 0.0 0.0 0 0 ? Z 07:50 0:00 [headless_shell] <defunct>
486 888 0.0 0.0 0 0 ? Z 07:50 0:00 [headless_shell] <defunct>
486 840 0.0 0.0 0 0 ? Z 07:50 0:00 [headless_shell] <defunct>
486 793 0.0 0.0 0 0 ? Z 07:50 0:00 [headless_shell] <defunct>
486 748 0.0 0.0 0 0 ? Z 07:49 0:00 [headless_shell] <defunct>
486 694 0.0 0.0 0 0 ? Z 07:49 0:00 [headless_shell] <defunct>
486 645 0.0 0.0 0 0 ? Z 07:49 0:00 [headless_shell] <defunct>
486 62 0.0 0.0 0 0 ? Z 07:45 0:00 [headless_shell] <defunct>
486 596 0.0 0.0 0 0 ? Z 07:49 0:00 [headless_shell] <defunct>
486 548 0.0 0.0 0 0 ? Z 07:49 0:00 [headless_shell] <defunct>
486 500 0.0 0.0 0 0 ? Z 07:48 0:00 [headless_shell] <defunct>
486 451 0.0 0.0 0 0 ? Z 07:48 0:00 [headless_shell] <defunct>
※「あれ?Lambdaってサーバレスだから毎回プロセスを破棄するんじゃないの?」と思ってましたが、そんなことはないようです。
https://qiita.com/koshigoe/items/afa3368352020660a220ここからスーパー試行錯誤しました。
一定時間待ったり、クローラ実行用のchild processを作ってchild process毎killしたり、あらゆる手でプロセスの終了を試みました。が、解決しなかった。
※該当のissueも存在します。執筆時点でまだopenになっている。
https://github.com/GoogleChrome/puppeteer/issues/1825バージョンのせいなのか、人によってkillするだけで上手くいったと報告してる人もいるのが難しいところでした。
私の場合は、puppeteer.launch時点で孤立したゾンビプロセスが生成され、消せなかった。。
ライブラリ依存の問題であろうことはわかってたので、Lambdaを辞めるという選択肢も含めて諦めかけていました。
もういっそこの際レポジトリにコントリビュートしてやろうかなと思っていたところ、意外な形で解決しました。headless chromeの新バージョンが出た
https://github.com/alixaxel/chrome-aws-lambda
最新のheadless chromeに追従してくれるこのライブラリをベースにlaunch部分を書き直したら動きました。今回のトラブルを活かして↑のレポジトリをlayerにしてserverlessで使えるようにテンプレート化したレポジトリを公開しています。
https://github.com/inatomitk/lambda-puppeteer-template結論
バージョンアップは偉大
- 投稿日:2019-03-05T10:37:45+09:00
【Alexaスキル】ダイアログモデルのスロットの検証をLambdaでやる
はじめに
アレクサスキル開発中に受け取ったスロットの検証をしたい場面があり調べました。
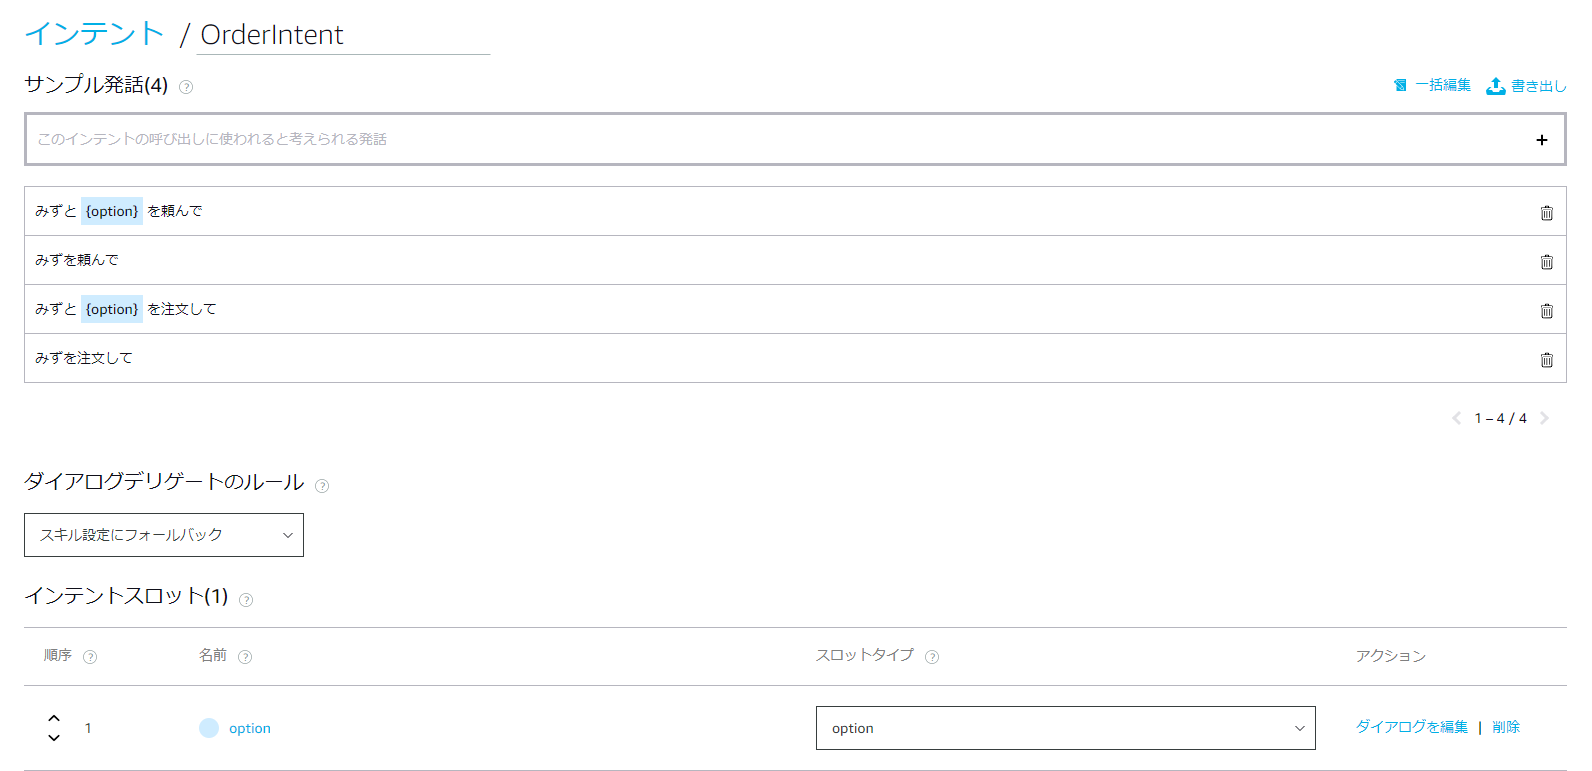
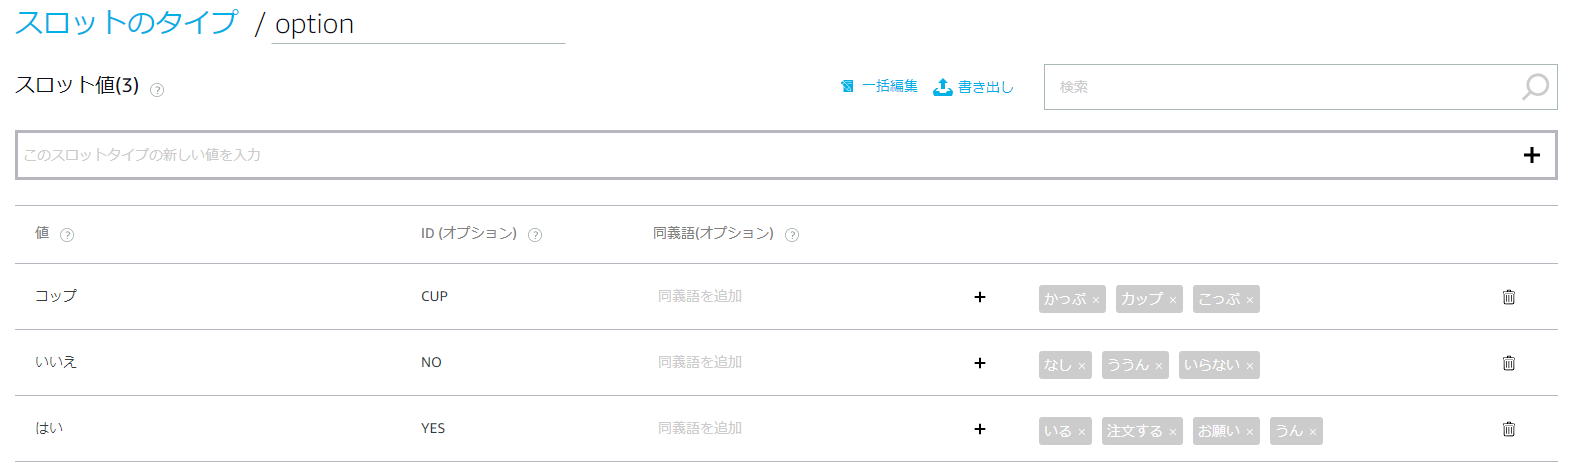
このインテントでは{option}スロットが必須の項目となっています。
ユーザーは【水】と【コップ】を頼むか、【水】だけ頼むかの選択肢があります。
{option}なしでインテントが呼び出された場合、アレクサは【コップ】も注文するか聞き返します。スロットのバリエーションは以下です。
※ここに【コップ】も入っちゃてるのがイケてません。いい方法があればコメントください。。。
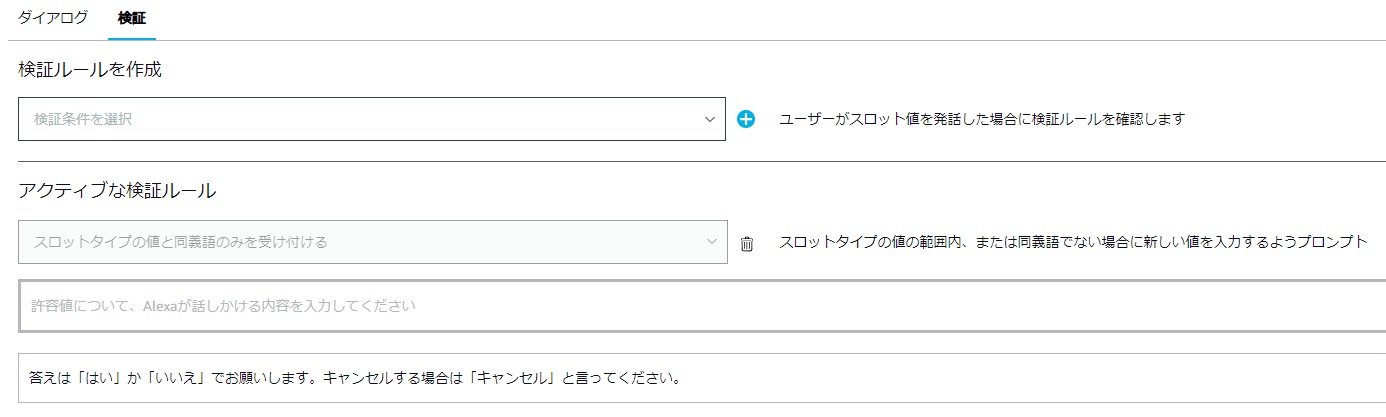
alexa developer consoleで検証ルールを設定したが。。。
テストしてみると、、、
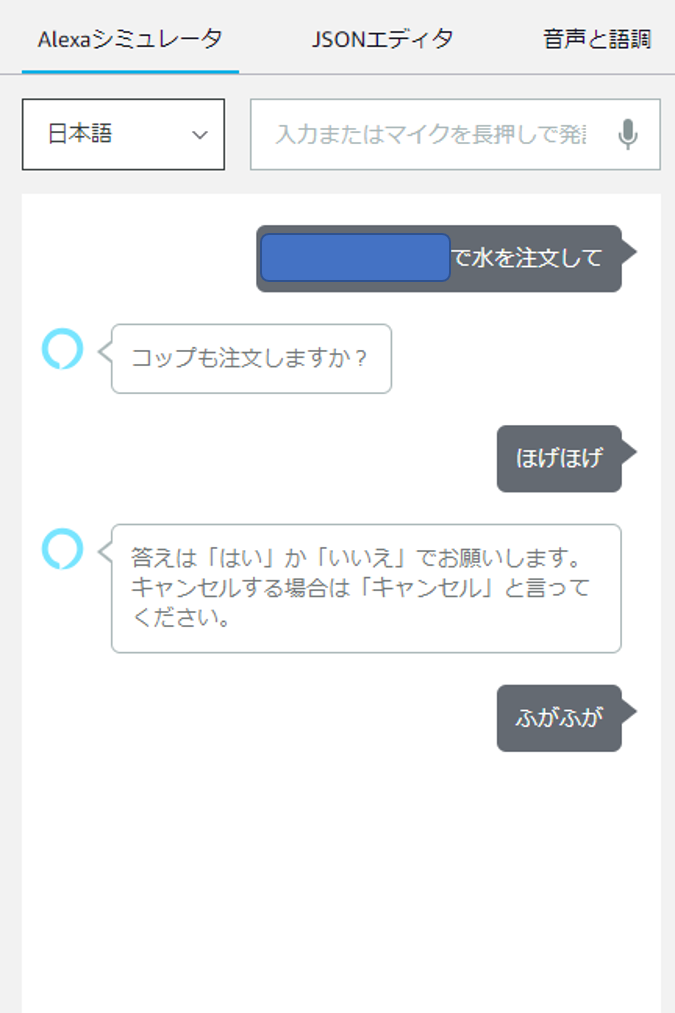
2回想定外の回答をするとスキルが強制終了してしまいました。
今回のスキルではユーザーの正しい回答があるまで何度も聞き返してほしかったので困ります。Lambdaで検証してユーザーに応答を促す
やっと本題です。
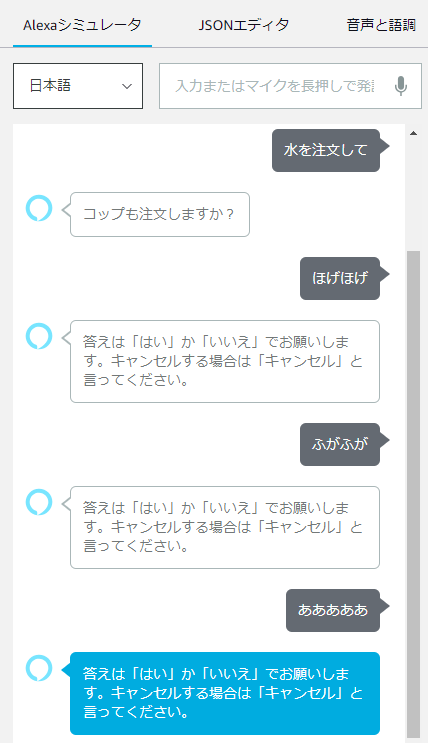
Alexa側の検証を外してしまい、Lambda側で検証を行います。const OrderIntentHandler = { canHandle(handlerInput) { return handlerInput.requestEnvelope.request.type === 'IntentRequest' && handlerInput.requestEnvelope.request.intent.name === 'OrderIntent'; }, handle(handlerInput) { const { slots } = handlerInput.requestEnvelope.request.intent; if (slots.option.resolutions["resolutionsPerAuthority"][0]["status"]["code"] != 'ER_SUCCESS_MATCH') { return handlerInput.responseBuilder .speak('答えは「はい」か「いいえ」でお願いします。キャンセルする場合は「キャンセル」と言ってください。') .addElicitSlotDirective('option') .getResponse(); } const option = slots.option.resolutions["resolutionsPerAuthority"][0]["values"][0]["value"]["id"]; // 本来の処理は省略 return handlerInput.responseBuilder .speak('ご注文を承りました。') .withShouldEndSession(true) .getResponse(); } };まず
slots.option.resolutions["resolutionsPerAuthority"][0]["status"]["code"] != 'ER_SUCCESS_MATCH'でスロットに入った単語が想定しているバリエーションの同義語かどうか判定します。
ユーザーに再度発話を促すには.addElicitSlotDirective('option')を呼び出します。
optionはスロット名です。また、同義語でIDを設定している場合は
slots.option.resolutions["resolutionsPerAuthority"][0]["values"][0]["value"]["id"]で一意のIDを取得できるのでいろいろな言い回しが想定される場合は便利です。これで何度でもユーザーに発話を促すことができました!
おわりに
もっときれいな形がありそうですがとりあえずは実現したいことができました。
これからもっとガンガン触っていこうと思います。

- 投稿日:2019-03-05T01:59:01+09:00
Vagrant + Selenium + node.js(CodeceptJS)でIE, Chrome, FirefoxのマルチブラウザE2Eテスト
なぜこの文章を書いたか?
普段PHPで色々なプログラムを書いていて、puppeteerを使った事はあるものの、そういえばSeleniumって避けて通っていたなと今更ながら環境構築をしてみようと思い立ったのでした。
でもいざ環境構築をしようとすると情報が分散されていてまとまっているところが少なかったので。環境
OS : macOS Mojave (10.14.3)
VirtualBox : 6.0.4
Vagrant : v2.2.3
node.js : 10.15.1インストール
IE11 on Win81
boxファイルのダウンロード
以下のURLから
IE11 on Win81 (x86) > VagrantのZIPをダウンロード
https://developer.microsoft.com/en-us/microsoft-edge/tools/vms/boxファイルの展開
ダウンロードしたらZIPを展開し、box追加を実行。
$ vagrant box add IE11-Win81 ./IE11\ -\ Win81.boxVagrantfileの作成
以下のVagrantfileを作成
# -*- mode: ruby -*-
# vi: set ft=ruby :
Vagrant.configure("2") do |config|
  config.vm.box = "IE11-Win81"
  config.vm.guest = :windows
  config.vm.communicator = "winrm"
  config.vm.network "private_network", ip: "192.168.33.200"
  config.vm.network "forwarded_port", guest: 4444, host: 4444
  config.vm.provider "virtualbox" do |vb|
    vb.memory = 4096
    vb.cpus = 2
    vb.gui = true
    vb.customize [
      "modifyvm", :id,
      "--vram", "256",
      "--clipboard", "bidirectional",
    ]
  end
end
Windows8.1の起動
$ vagrant upGuest Additionsのインストール
メニュー > Devices > Insert Guest Additions CD Image...を選択
マウントされたらエクスプローラからCDをダブルクリックしてGuest AdditionsのインストールJREのインストール
以下のURLからJREをダウンロードしてインストール
https://www.java.com/ja/download/manual.jspSelenium Server Standalone, IEDriverServer_Win64のダウンロード
以下のURLからSelenium Server StandalneとIEDriverServer_Win64をダウンロード
https://www.seleniumhq.org/download/
IEDriverServer.exeは展開し、C:\Windows\直下(もしくはPATHの通っている場所)に移動ChromeとFirefoxをインストール
(省略)
ChromeDriverのインストール
以下のURLからChromeDriverをダウンロード
http://chromedriver.chromium.org/downloads
chromedriver.exeは展開し、C:\Windows\直下(もしくはPATHの通っている場所)に移動geckodriverのインストール
以下のURLからgeckodriverをダウンロード
geckodriver.exeは展開し、C:\Windows\直下(もしくはPATHの通っている場所)に移動IEのセキュリティ設定
IE > Internet Options > Security > (各ゾーン) > Enable Protected Modeのチェックを入れるレジストリの修正
regedit.exeを起動し、以下にiexplore.exeをREG_DWORDで0として追加。\HKEY_LOCAL_MACHINE\SOFTWARE\Wow6432Node\Microsoft\Internet Explorer\MAIN\FeatureControl\FEATURE_BFCACHEnode.jsの設定(ローカルマシン上)
npm init
適当なフォルダを準備して、そこで
npm initを実行。(Vagrantfileのあるフォルダ直下で実行しても良い)$ npm init -yCodecept.jsのインストール
$ npm install codeceptjs --save-devCodecept.jsの初期化
$ npx codeceptjs init


  Welcome to CodeceptJS initialization tool
  It will prepare and configure a test environment for you

Installing to /Users/xxxx/IE11.Win81.Vagrant/test
? Where are your tests located? ./*_test.js
? What helpers do you want to use? WebDriver
? Where should logs, screenshots, and reports to be stored? ./output
? Would you like to extend I object with custom steps? Yes
? Do you want to choose localization for tests? ja-JP
? Where would you like to place custom steps? ./steps_file.js
2019-03-04T16:40:22.830Z DEBUG @wdio/config: @wdio/sync not found, running tests asynchronous
Configure helpers...
? [WebDriver] Base url of site to be tested http://localhost
? [WebDriver] Browser in which testing will be performed chrome
Steps file created at /Users/xxxx/IE11.Win81.Vagrant/test/steps_file.js
Config created at /Users/xxxx/IE11.Win81.Vagrant/test/codecept.conf.js
Directory for temporary output files created at `_output`
Almost done! Create your first test by executing `codeceptjs gt` (generate test) command
Selenium Serverの起動
jarフィルをダウンロードしたディレクトリで2つのコマンドプロンプトを起動し、以下のコマンドを実行(jarのバージョンが3.141.59とした場合)
java -jar selenium-server-standalone-3.141.59.jar -role hubjava -jar selenium-server-standalone-3.141.59.jar -role node -hub http://localhost:4444/grid/registerテストの作成
$ npx codeceptjs gt
Creating a new test...
----------------------
? Filename of a test github
? Feature which is being tested Github
Test for github was created in /Users/xxxx/IE11.Win81.Vagrant/test/github_test.js
github_test.js を以下のように書き換え
Feature('Github');

Scenario('test something', (I) => {
  I.amOnPage('https://github.com');
  I.see('GitHub');
});
テストの起動
$ npx codeceptjs run --steps
2019-03-04T16:47:59.215Z DEBUG @wdio/config: @wdio/sync not found, running tests asynchronous
CodeceptJS v2.0.6
Using test root "/Users/xxxx/IE11.Win81.Vagrant/test"

Github --
  test something
    私は ページを移動する "https://github.com"
    私は テキストがあるか確認する "GitHub"
  ✔ OK in 4103ms


  OK  | 1 passed   // 7s
IE, Chrome, Firefoxを使い分ける
codecept.config.jsを修正するexports.config = { tests: './*_test.js', output: './output', helpers: { WebDriver: { url: 'http://localhost', browser: process.profile || 'internet explorer', } }, include: { I: './steps_file.js' }, bootstrap: null, mocha: {}, name: 'test', translation: 'ja-JP' }テスト起動
デフォルト(IEが起動)
$ npx codeceptjs run --stepsIEを明示的に指定
$ npx codeceptjs run --steps --profile 'internet explorer'Chromeを指定
$ npx codeceptjs run --steps --profile chromeFirefoxを指定
$ npx codeceptjs run --steps --profile firefoxnpm run testで起動できるように設定
packege.jsonを以下のように修正{ "name": "test", "version": "1.0.0", "description": "", "main": "index.js", "scripts": { "test": "npm run test:ie; npm run test:chrome; npm run test:firefox;", "test:ie": "codeceptjs run --steps --profile 'internet explorer'", "test:chrome": "codeceptjs run --steps --profile chrome", "test:firefox": "codeceptjs run --steps --profile firefox" }, "keywords": [], "author": "", "license": "ISC", "devDependencies": { "codeceptjs": "^2.0.6" } }npm run testから起動
IEを指定
$ npm run test:ieChromeを指定
$ npm run test:chromeFirefoxを指定
$ npm run test:firefox全部のせ
$ npm run test終わりに
vagrant upがタイムアップしてしまう、vagrant haltが効かない、Windowsの設定を自動化していない、Selenium Serverの起動を自動化していない、などの問題が残っているので、どかで修正したいところ。