- 投稿日:2019-03-05T16:12:23+09:00
Vue.js とCloud Functions for Firebase をFirebase Hostingへデプロイするための環境構築手順
前置き
Qiitaに Vue.js や Firebase や Cloud Functions for Firebase などの記事を書いてて、ツールのセットアップや環境構築を都度継ぎ足してきたのですが、一度に構築する方法が整理できてなかったので、メモっておきます。
本記事で説明が足りないところは、適宜下記の記事を見ていただくとよいかもしれません。
- FirebaseとGoogle Cloud Platform をさわれる環境を構築する おもに firebase-tools まわり
- Vue.js の主要な機能をざっくりとつかってみたときのメモ Vue.jsのとっかかりはこちら
- Cloud Functions for Firebase をつかってみる。 Functionsまわり
コレをやったらできること
- Vue.jsのコマンドラインツールとFirebaseのコマンドラインツールがインストールできます
- Vue.jsのプロジェクトをローカルのWEBサーバで動かせます(npm run dev 上で)
- Vue.jsのプロジェクトをFirebaseのローカルWEBサーバで動かせます
- Cloud FunctionsをFirebaseのローカルWEBサーバで動かせます
- Vue.jsのプロジェクトをFirebase Hostingにデプロイできます
- Cloud FunctionsをFirebaseへデプロイできます
- Cloud FunctionsをHostingのドメインで呼び出す事ができます
前提環境
$ sw_vers
ProductName:    Mac OS X
ProductVersion: 10.14.3
BuildVersion:   18D42

$ node --version
v10.14.2    <-ホントはFunctionsとかのバージョンに合わせるべきなんだけどいったん気にしない :-)
準備
コマンドラインツール達のインストールと、Firebaseへのログインなど。あ、Firebaseはサインアップ済みってことで、、、。
vue コマンドラインツールのインストール
vue-cli というVue.jsのテンプレを生成してくれるコマンドラインツールをインストールします。
$ npm install -g vue-cli
$ source ~/.bash_profile
$ vue --version
2.9.6
よさそうですね。
firebase-toolsのインストール
firebaseのコマンドラインツール。
$ npm install -g firebase-tools
$ source ~/.bash_profile
$ firebase --version
6.3.0
Firebaseにログイン
$ firebase login
? Allow Firebase to collect anonymous CLI usage and error reporting information?
 No

Visit this URL on any device to log in:
https://accounts.google.com/o/oauth2/auth?client_id=...   // OAuthでアクセスの認可まち

Waiting for authentication...

✔  Success! Logged in as masatomix@example.com
やってみる
まずは プロジェクト全体の作成
メインとなるプロジェクトは Vue.jsのコマンドラインツールで作成します。
$ vue init webpack fb_vue_template

↓とりあえずすべて Yes

? Project name fb_vue_template
? Project description A Vue.js project
? Author Masatomi KINO <kino@example.com>
? Vue build standalone
? Install vue-router? Yes
? Use ESLint to lint your code? Yes
? Pick an ESLint preset Standard
? Set up unit tests Yes
? Pick a test runner jest
? Setup e2e tests with Nightwatch? Yes
? Should we run `npm install` for you after the project has been created? (recom
mended) npm

   vue-cli · Generated "fb_vue_template".

# Installing project dependencies ...
# ========================
...

# Project initialization finished!
# ========================

To get started:

  cd fb_vue_template
  npm run dev

Documentation can be found at https://vuejs-templates.github.io/webpack
完了しました。
Vue.jsの Hello World を表示
最後に
cd fb_vue_template,npm run devとでてましたので、その通りに。。$ cd fb_vue_template $ npm run dev ... DONE Compiled successfully in 7650ms 15:42:24 I Your application is running here: http://localhost:8080さて、メッセージ通りにブラウザで http://localhost:8080 をひらいてみます。
よさそうですね。。問題なければ、プロンプトは Ctrl-c で終了ておきましょう。
Firebase関連情報を設定
さて Firebase関連です。
Firebase Hosting設定
まずはこの Vue.js プロジェクトをサーバへデプロイするためのHosting設定を行います。
$ pwd
/xxx/xxxx/fb_vue_template
$ firebase init hosting

     ######## #### ########  ######## ########     ###     ######  ########
     ##        ##  ##     ## ##       ##     ##  ##   ##  ##       ##
     ######    ##  ########  ######   ########  #########  ######  ######
     ##        ##  ##    ##  ##       ##     ## ##     ##       ## ##
     ##       #### ##     ## ######## ########  ##     ##  ######  ########

You're about to initialize a Firebase project in this directory:

  /xxx/xxxx/fb_vue_template


=== Project Setup

First, let's associate this project directory with a Firebase project.
You can create multiple project aliases by running firebase use --add,
but for now we'll just set up a default project.

? Select a default Firebase project for this directory: hoge-xxxx (hoge)
i  Using project hoge-xxxx (hoge)

↑ デプロイしたい先のプロジェクトを選びます


=== Hosting Setup

Your public directory is the folder (relative to your project directory) that
will contain Hosting assets to be uploaded with firebase deploy. If you
have a build process for your assets, use your build's output directory.

? What do you want to use as your public directory? dist

↑ public?って聞いてきますが、vue.jsのプロジェクトが出力する先「dist」を選択します。


? Configure as a single-page app (rewrite all urls to /index.html)? Yes
✔  Wrote dist/index.html

SPAで作成するので、Yesを選択します。
サーバにデプロイした際、どのURLを叩いてもindex.html を表示するよっていう設定になります。

i  Writing configuration info to firebase.json...
i  Writing project information to .firebaserc...

✔  Firebase initialization complete!
$

$ cat firebase.json
{
  "hosting": {
    "public": "dist",
    "ignore": [
      "firebase.json",
      "**/.*",
      "**/node_modules/**"
    ],
    "rewrites": [
      {
        "source": "**",
        "destination": "/index.html"
        # サーバにデプロイした際、どのURLを叩いてもindex.html を
        # 表示するよっていう設定。
      }
    ]
  }
}
$
サーバにデプロイするための設定が追加されました。
Cloud Functions 設定
つづいてバックエンド機能となる、Cloud Functions の設定を行います。
$ pwd
/xxx/xxxx/fb_vue_template
$ firebase init functions

     ######## #### ########  ######## ########     ###     ######  ########
     ##        ##  ##     ## ##       ##     ##  ##   ##  ##       ##
     ######    ##  ########  ######   ########  #########  ######  ######
     ##        ##  ##    ##  ##       ##     ## ##     ##       ## ##
     ##       #### ##     ## ######## ########  ##     ##  ######  ########

You're about to initialize a Firebase project in this directory:
  /xxx/xxxx/fb_vue_template
=== Project Setup

First, let's associate this project directory with a Firebase project.
You can create multiple project aliases by running firebase use --add,
but for now we'll just set up a default project.


? Select a default Firebase project for this directory: hoge-xxxx (hoge) ← 使用するプロジェクト選択
? What language would you like to use to write Cloud Functions? TypeScript   ← TypeScriptをえらんでみた
? Do you want to use TSLint to catch probable bugs and enforce style? Yes    ← Yesをえらぶ
? Do you want to install dependencies with npm now? Yes

✔  Firebase initialization complete!
$
$ cat firebase.json { "hosting": { "public": "dist", "ignore": [ "firebase.json", "**/.*", "**/node_modules/**" ], "rewrites": [ { "source": "**", "destination": "/index.html" } ] }, "functions": { "predeploy": [ "npm --prefix \"$RESOURCE_DIR\" run lint", "npm --prefix \"$RESOURCE_DIR\" run build" ] } }Functionsの設定が追加されましたね。よさそうです。
最終的に、ディレクトリ構成は以下のようになりました。
$ tree -a
.
├── README.md
├── firebase.json
├── index.html
├── package-lock.json
├── package.json
├── src
│   ├── App.vue
│   ├── components
│   │   └── HelloWorld.vue
│   ├── main.js
│   └── router
│       └── index.js
├── .babelrc
├── .editorconfig
├── .eslintignore
├── .eslintrc.js
├── .firebaserc
├── .gitignore
├── .postcssrc.js
│
├── functions
│   ├── .gitignore
│   ├── package-lock.json
│   ├── package.json
│   ├── src
│   │   └── index.ts
│   ├── tsconfig.json
│   └── tslint.json
├── build
│   └── 割愛
├── config
│   ├── dev.env.js
│   ├── index.js
│   ├── prod.env.js
│   └── test.env.js
├── static
│   └── .gitkeep
└── test
    ├── e2e
    │   └── 割愛
    └── unit
        └── 割愛
(適度に整形)
ビルド
初回のセットアップである程度ビルドや 外部ライブラリのインストールなどは済んでるんですが、一応 ライブラリのインストールとビルドまでの手順を書きます。
Firebase Hosting 側
$ pwd
/xxx/xxxx/fb_vue_template
$ npm install    ← こちらは外部ライブラリを再度入れるときだけ実施
$ npm run build  ← こちらはVue.js側のコードをいじったら毎回実施
$ ls -lrt dist
total 8
-rw-r--r--  1 xx  staff  517  3  5 13:34 index.html
drwxr-xr-x  4 xx  staff  128  3  5 13:34 static
distディレクトリに ビルドされたファイル群ができました。
Cloud Functions 側
$ pwd
/xxx/xxxx/fb_vue_template
$ cd functions
ビルドするとき、プロジェクト初期状態の index.ts だと、関数がないためにエラーとなってしまうので、下記の通りコメントを外しておきます。
$ cat src/index.ts
import * as functions from 'firebase-functions';

// // Start writing Firebase Functions
// // https://firebase.google.com/docs/functions/typescript
//
export const helloWorld = functions.https.onRequest((request, response) => {
 response.send("Hello from Firebase!");
});

$ npm install    ← こちらは外部ライブラリを再度入れるときだけ実施
$ npm run build  ← こちらはfunctionsのtsコードをいじったら毎回実施
$ ls -lrt lib/
total 16
-rw-r--r--  1 xxx  staff  296  3  5 13:39 index.js.map
-rw-r--r--  1 xxx  staff  380  3  5 13:39 index.js
$
$ cd ../
こちらは「lib」のディレクトリに ビルドされたファイル群ができました。
ローカルのWEBサーバ起動
以下のコマンドで、ローカルのWEBサーバ上で起動します。
$ pwd /xxx/xxxx/fb_vue_template $ firebase serve --only hosting,functions === Serving from '/xxx/xxxx/fb_vue_template'... i functions: Preparing to emulate functions. i hosting: Serving hosting files from: dist ✔ hosting: Local server: http://localhost:5000 Warning: You're using Node.js v10.14.2 but Google Cloud Functions only supports v6.11.5. ✔ functions: helloWorld: http://localhost:5001/hoge-xxxx/us-central1/helloWorldブラウザで、http://localhost:5000 へアクセスすると、先ほどのVue.jsの画面が表示されると思います。またcurlで
curl http://localhost:5001/hoge-xxxx/us-central1/helloWorldとアクセスしてfunctionsを呼び出してみましょう。$ curl http://localhost:5001/hoge-xxxx/us-central1/helloWorld Hello from Firebase! $OKそうですね。。Ctrl-c で終了しておきましょう
Functionsの関数達を Hosting のドメイン経由で処理できるようにする
サーバにデプロイしたときのFirebase Hostingのドメイン(URL)と、Cloud Functions が使用するドメインは異なっています。具体的には、
Firebase Hosting: https://hoge-xxxx.firebaseapp.com/
Cloud Functions: https://us-central1-hoge-xxxx.cloudfunctions.net/とかになったりします。HostingしたWEBアプリからCloud Functions の関数を呼び出すときにドメインが異なっていると、CORSの考慮やURLをフルパス指定しないといけないなど何かとメンドウなので、HostingのURLでアクセス出来るようHostingのリバースプロキシを有効にします。
具体的には以下の通り firebase.json に設定を追加します。
firebase.json{ "hosting": { "public": "dist", "ignore": [ "firebase.json", "**/.*", "**/node_modules/**" ], "rewrites": [ { "source": "/hello", # /hello にきたら、 "function": "helloWorld" #functionsの helloWorld 関数へ転送 }, { "source": "**", "destination": "/index.html" } ] }, "functions": { "predeploy": [ "npm --prefix \"$RESOURCE_DIR\" run lint", "npm --prefix \"$RESOURCE_DIR\" run build" ] } }rewrites にリバースプロキシの設定を追加しました。
"source":"**"の設定よりも先に書いてるのがポイントです(後に書くと、**が優先されちゃう)。さて、ローカルのWEBサーバをもいちど起動します。
$ firebase serve --only hosting,functions疎通します。
$ curl  http://localhost:5000/hello
Hello from Firebase
$
これでHostingとCloud Functionsがおなじドメインとなりました。
"source": "/hello"の箇所は"source": "/hello/**"などとかけるので、必要なパラメタに応じて適宜工夫するのがよさそうです。サーバにデプロイする
ココまでできていれば、サーバへのデプロイも簡単です
$ pwd
/xxx/xxxx/fb_vue_template
$ firebase deploy --only hosting,functions

... 割愛

✔  functions[helloWorld(us-central1)]: Successful create operation.
Function URL (helloWorld): https://us-central1-hoge-xxxx.cloudfunctions.net/helloWorld
i  hosting[hoge-xxxx]: finalizing version...
✔  hosting[hoge-xxxx]: version finalized
i  hosting[hoge-xxxx]: releasing new version...
✔  hosting[hoge-xxxx]: release complete

✔  Deploy complete!

Please note that it can take up to 30 seconds for your updated functions to propagate.
Project Console: https://console.firebase.google.com/project/hoge-xxxx/overview
Hosting URL: https://hoge-xxxx.firebaseapp.com
$
表示されたサーバに アクセスしてみましょう。
ブラウザで: https://hoge-xxxx.firebaseapp.com
curlで: https://us-central1-hoge-xxxx.cloudfunctions.net/helloWorld
curlで: https://hoge-xxxx.firebaseapp.com/helloいままでおなじ結果が得られればOKです。
ビルド手順まとめ
$ pwd
/xxx/xxxx/fb_vue_template
プロジェクトがココに展開されている想定で、コマンドを整理しておきます。
Hosting側(Vue.jsのWEBアプリ)
ビルド
$ cd /xxx/xxxx/fb_vue_template
$ npm run build
ローカルWEBサーバ起動(事前にビルド要)
$ cd /xxx/xxxx/fb_vue_template
$ firebase serve --only hosting
カンマ区切りで、functionsもならべられる
デプロイ(事前にビルド要)
$ cd /xxx/xxxx/fb_vue_template
$ firebase deploy --only hosting
カンマ区切りで、functionsもならべられる
Cloud Functions
ビルド
$ cd /xxx/xxxx/fb_vue_template
$ cd functions && npm run build && cd ../
ローカルWEBサーバ起動(事前にビルド要)
$ cd /xxx/xxxx/fb_vue_template
$ firebase serve --only functions
デプロイ
$ cd /xxx/xxxx/fb_vue_template
$ firebase deploy --only functions
ちなみにfunctionsは、再ビルドが走るので、事前にビルドは不要
おつかれさまでした。
関連リンク
公式
いままで書いたVue.js/Firebase関連記事
- FirebaseとGoogle Cloud Platform をさわれる環境を構築する おもに firebase-tools まわり
- Vue.js の主要な機能をざっくりとつかってみたときのメモ Vue.jsのとっかかりはこちら
Cloud Functions for Firebase をつかってみる。 Functionsまわり
Cloud Functions で構築したREST APIをFirebase認証で保護する。そして自前RESTサーバのAPIにもFirebase認証を適用する。
- 投稿日:2019-03-05T15:42:30+09:00
How to 速度改善 ー原因調査編ー
前提
速度改善にこれから取り組もうと思っている方向けに書きました。
すでに速度改善に取り組んでいる方からするとちょっと基礎すぎるかもしれませんが、自分の勉強メモとしてアウトプットして残そうと思った次第です。前回の記事はこちらになります。
ご興味ある方はどうぞ。
原因の調査
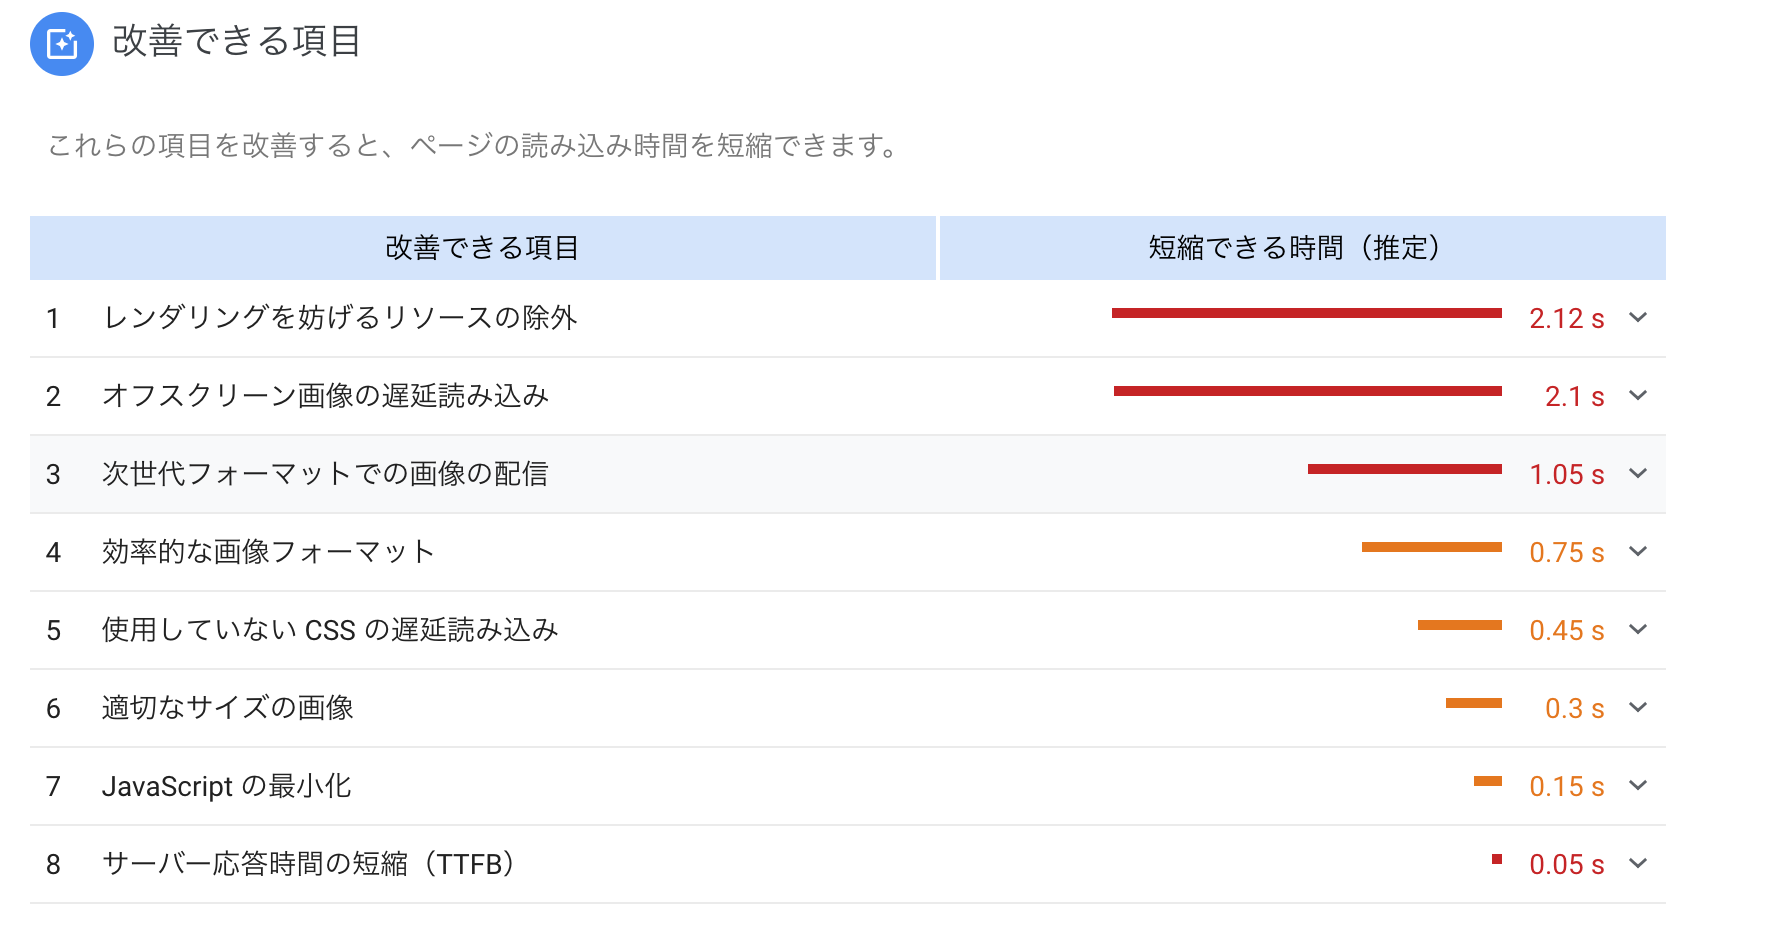
前回の記事でスコアのキャプチャを載せましたが、Page Speed Insightsの低スコアの原因については添付の画像の中に色々と書かれています。
8個の指摘がありますので順番に見ていきましょう。
1. レンダリングを妨げるリソースの除外
これはレンダリングを阻害しているファイルたちがいるよ、ということですね。
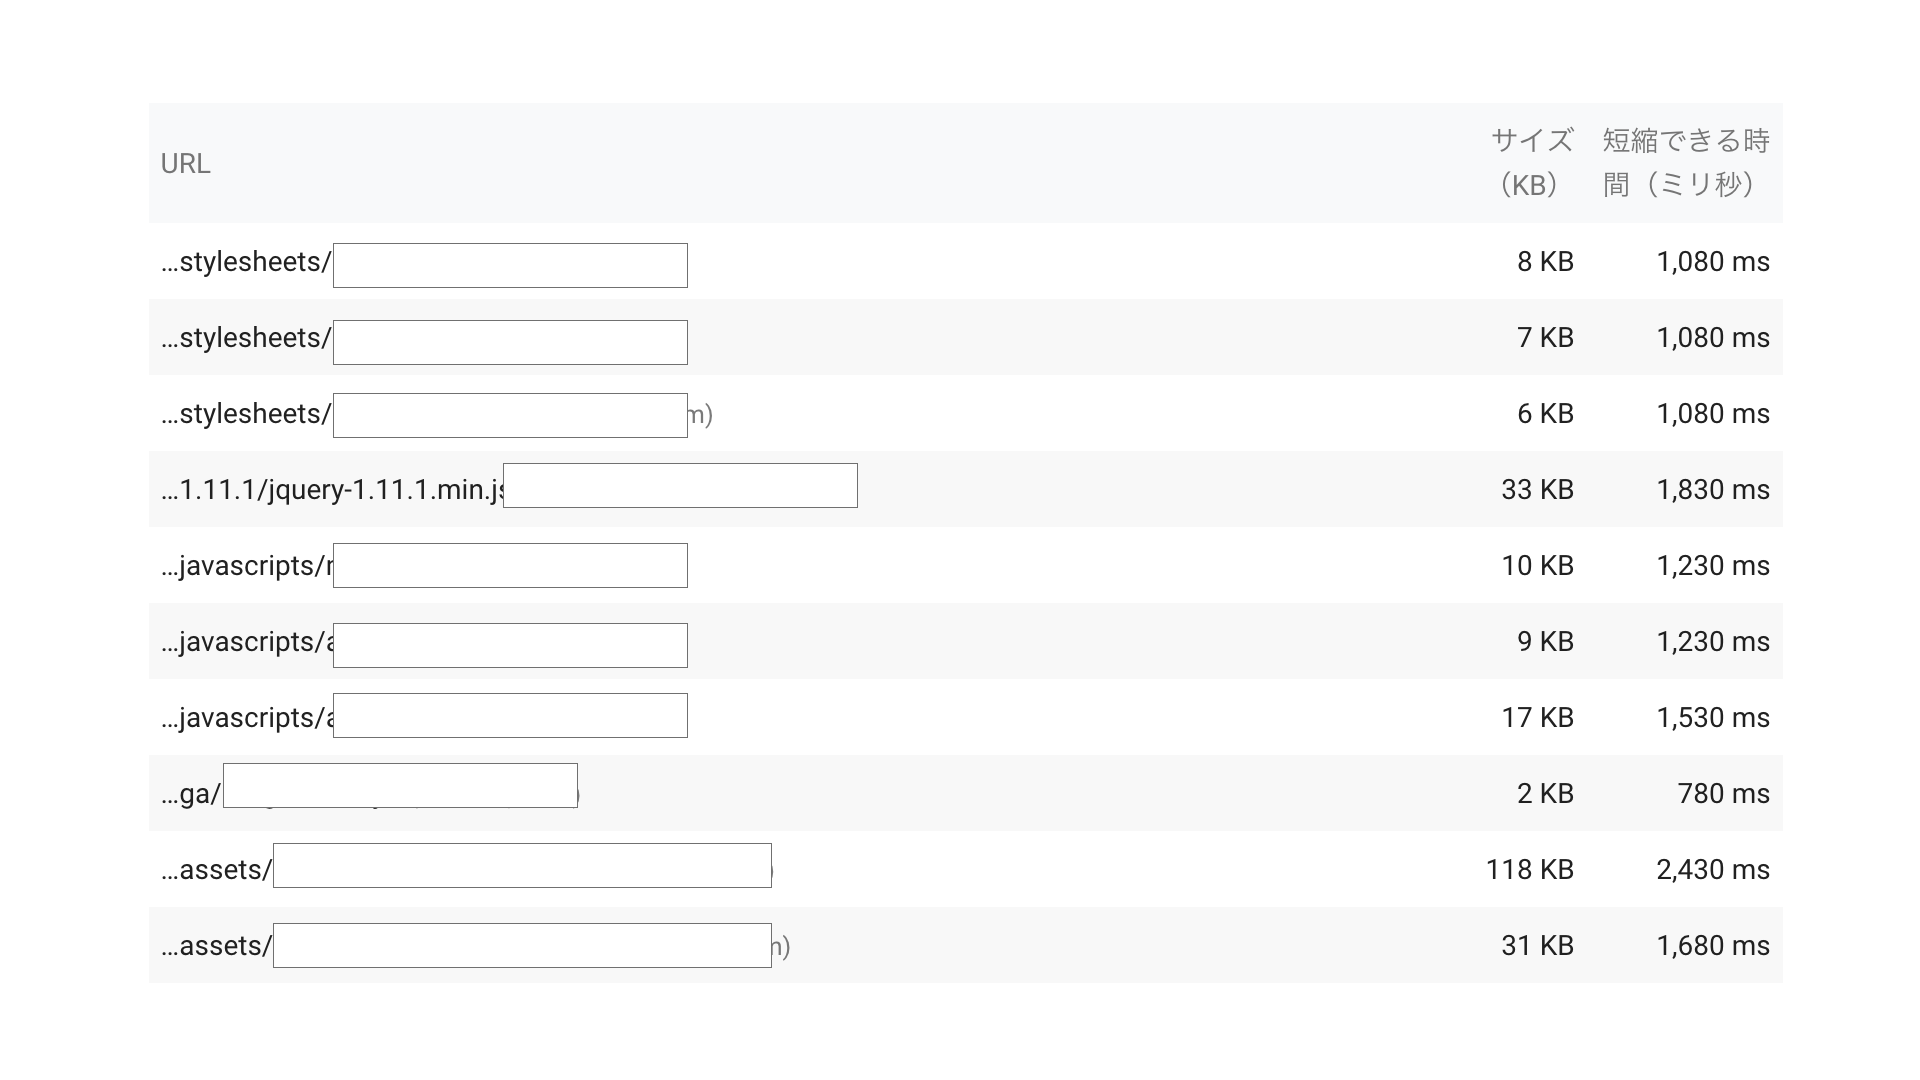
今回でいうとこんな感じで沢山のファイルがその対象となっていました。
ここの部分の解決策としては後ほど詳しく示しますが、指摘しているファイルたちを遅延読み込みする、必要なリソースはインラインでHTMLに書く必要がありそうです。
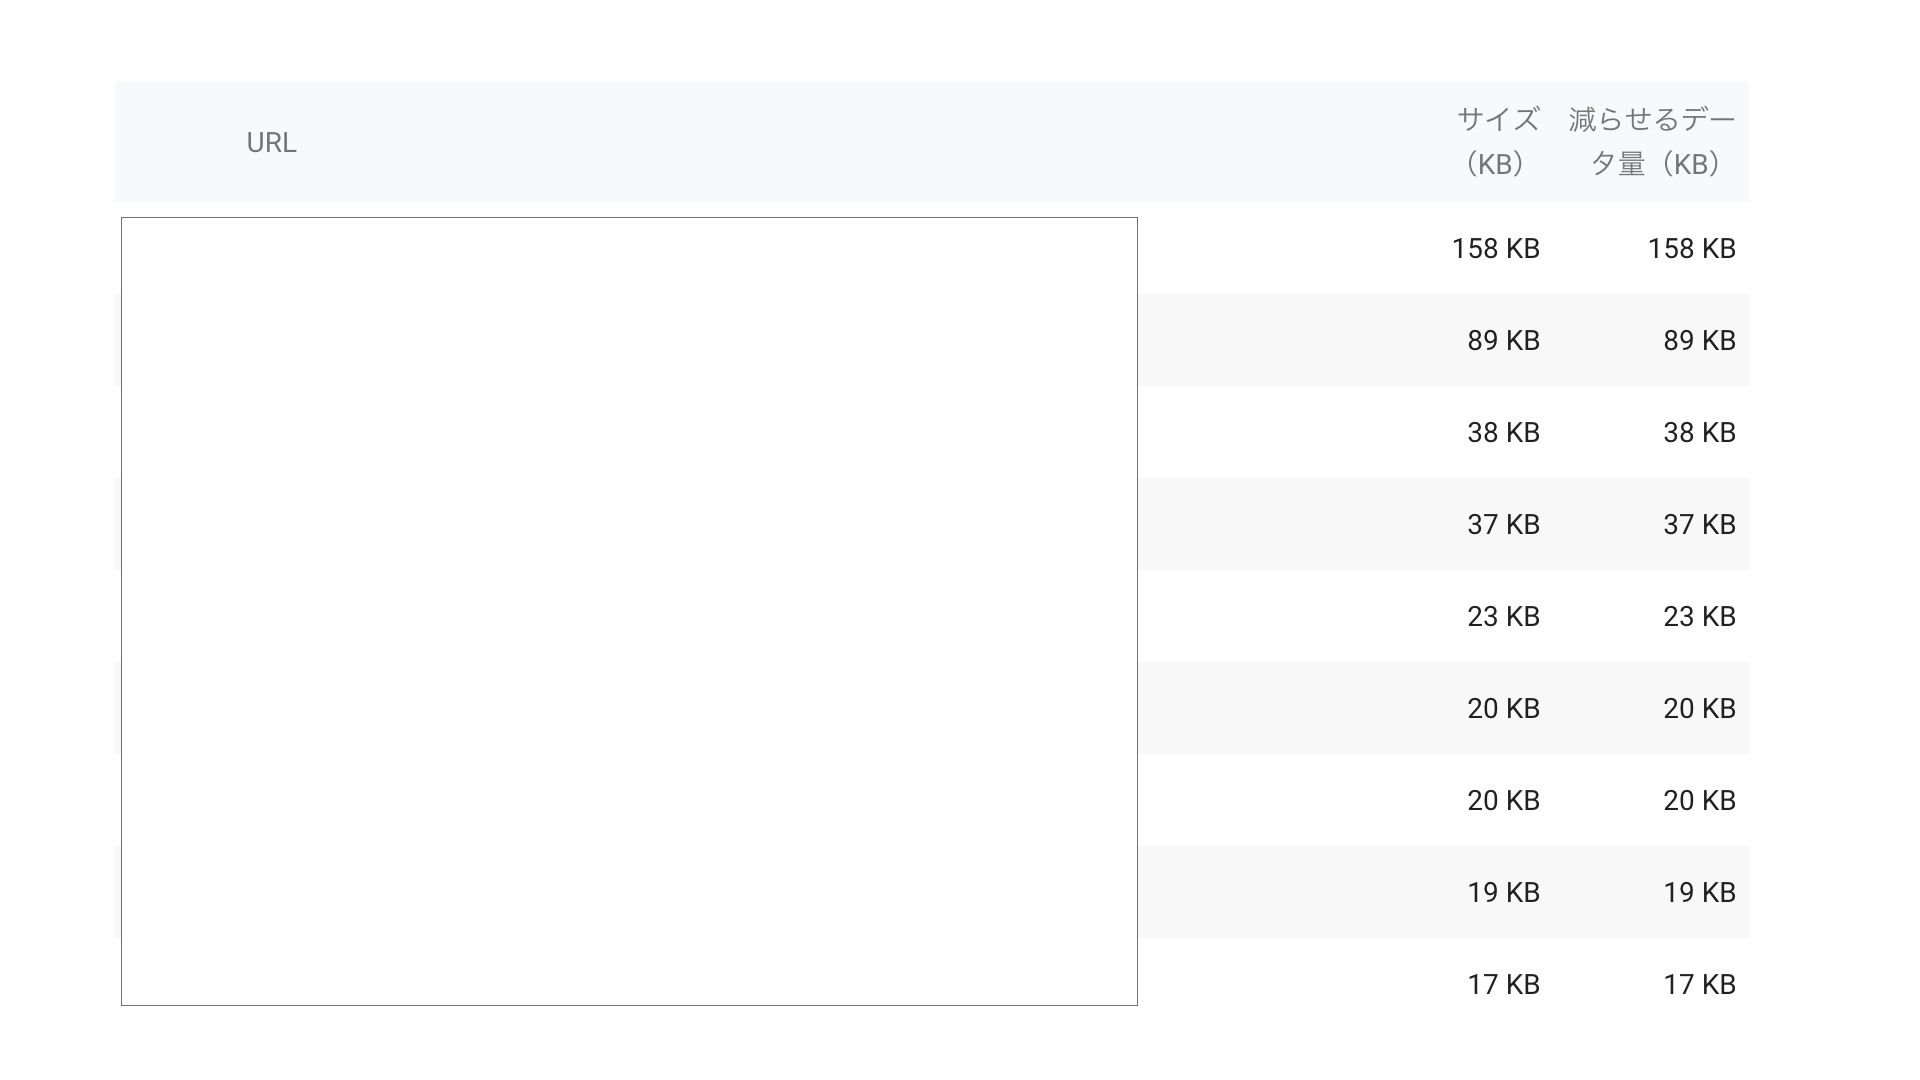
2. オフスクリーン画像の遅延読み込み
これは、そのページのファーストビューで読み込みする必要がない画像は遅延読み込みしましょう、という指摘ですね。
見えていない所の画像については、いちいち読みこむ必要ないので、それでページの読み込み速度をあげようということです。こんな感じで沢山指摘されていました。
これについても後ほど一つの解決策を共有します。
3. 次世代フォーマットでの画像の配信
画像といえばjpeg,pngあたりがすぐに思い浮かぶと思いますが
googleさんによるとJPEG 2000、JPEG XR、およびWebPは、以前のJPEGおよびPNGに比べて優れた圧縮および品質特性を持つ画像フォーマットです
とのことです。
要するにその形式のものを使ってみてはどうですか?ということですね。それぞれの画像形式についてCan I useで調べてみました。
JPEG 2000
JPEG XR
Web Pそれぞれ対応しているブラウザが違いますね。
上記の形式でほぼ全てのブラウザに対して対応できそうですが、ユーザーエージェントを判断して出し分けたりしないといけないんでしょうか・・・。大変だ。。4. 効率的な画像フォーマット
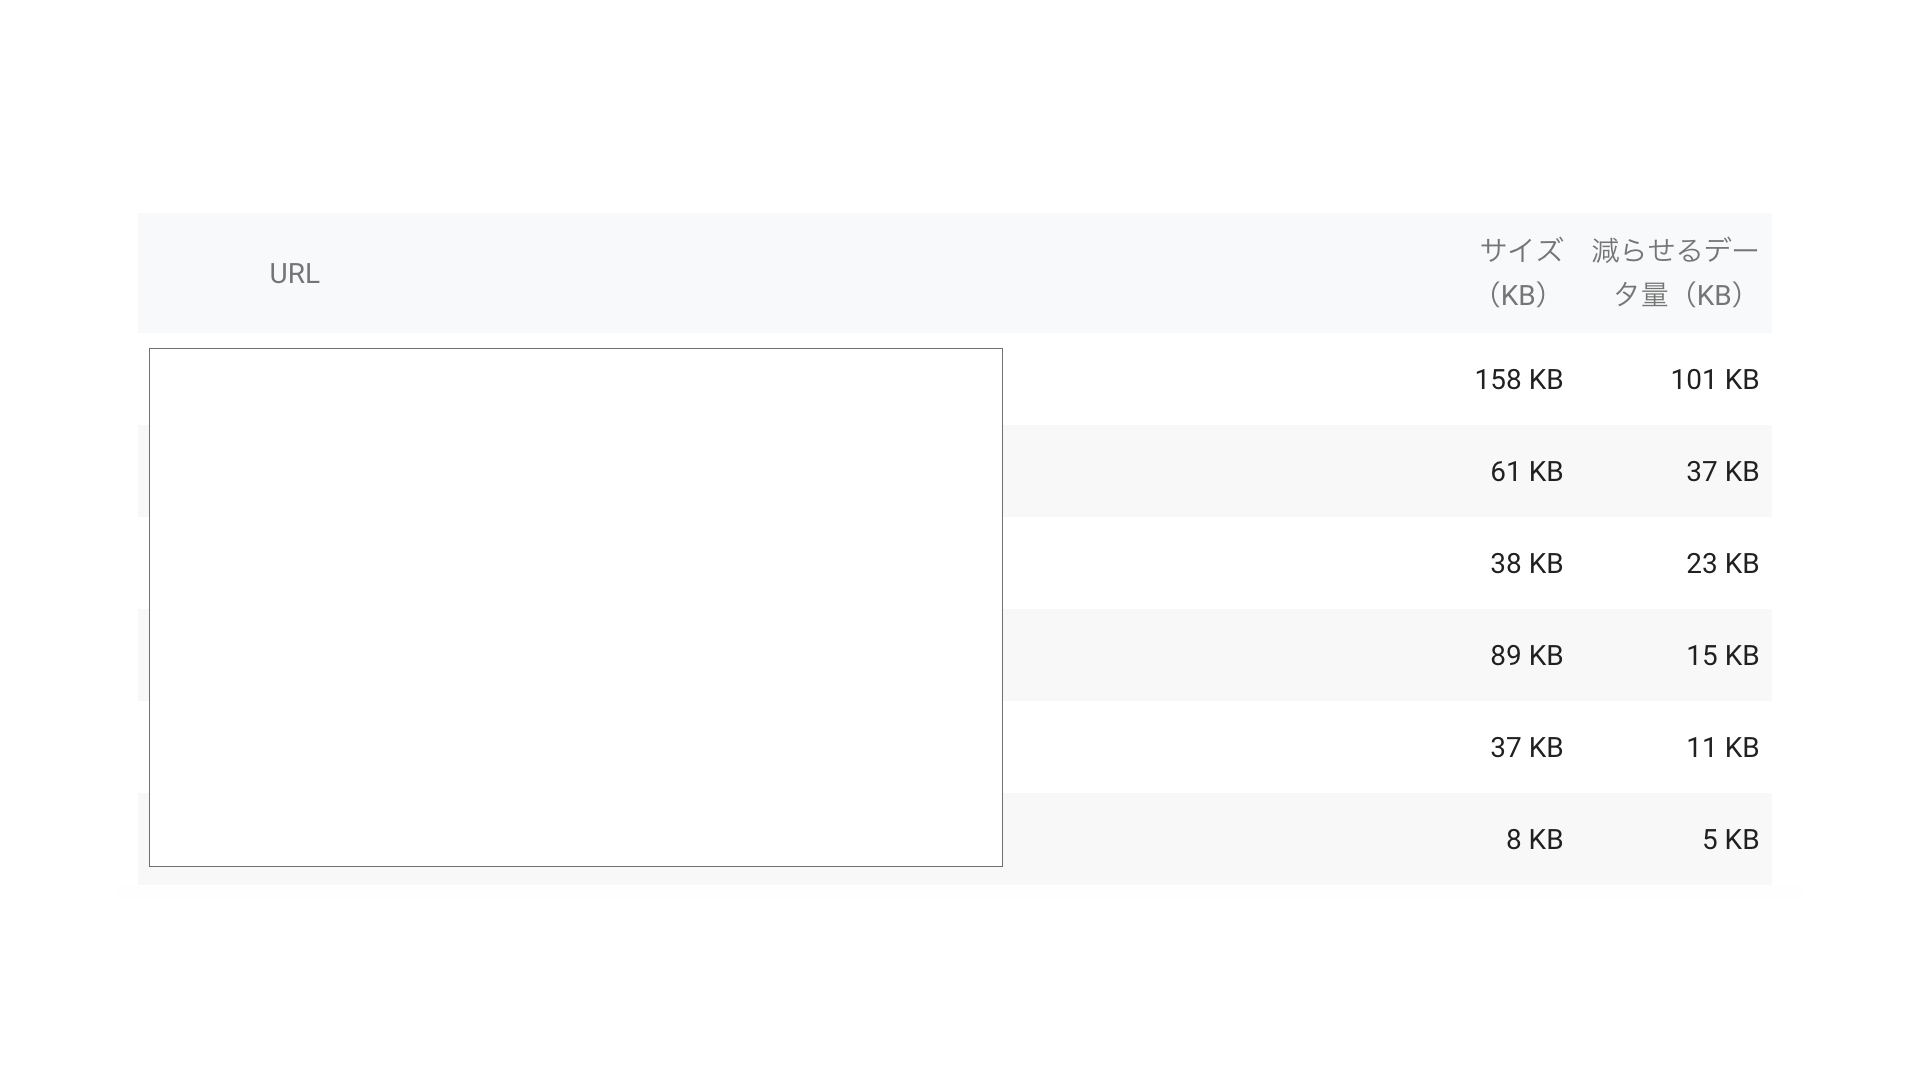
これについては、適切な画像のファイルサイズでサーバーに格納しましょう、という感じの指摘です。
サイズが大きすぎる画像があると指摘されます。
8KBの画像でも、減らせるデータ量がまだあると指摘されています。笑
5. 使用していないCSSの遅延読み込み
対象のページで使われていないCSSについてはあとで読み込むような仕組みにしましょう。ということですね。
critical css
critical cssとは、ページをロードするために必要とされるcssのことをさします。
一般に、ページロードは重要なCSSでのみブロックされるべき、という考えがあるので、それをまずはロードして、それ以外は遅延評価をして、あとで読み込みましょう、ということです。6. 適切なサイズの画像
これについては言わずもがな、画像のサイズを圧縮しましょうという話ですね。
7. Javascriptの最適化
これも言わずもがなですが、javascriptの空白とか諸々削除して最小化してね、ということですね。
それができていないファイルがいくつかあるのか・・・。8. サーバー応答時間の短縮
これはサーバーの応答時間を改善してくださいね、という指示になります。
TTFB(Time To First Byte)はブラウザがWebサーバーにリクエストを送信してから、Webサーバーが最初の1バイトの応答をブラウザに返すまでの時間です。
無駄なクエリが走っていたり、何かのファイルの読み込みに時間がかかっていたりすると応答時間の遅延が起こる模様です。原因の調査その2
page speed insightsの中身をもう少し詳しく見ていきましょう。
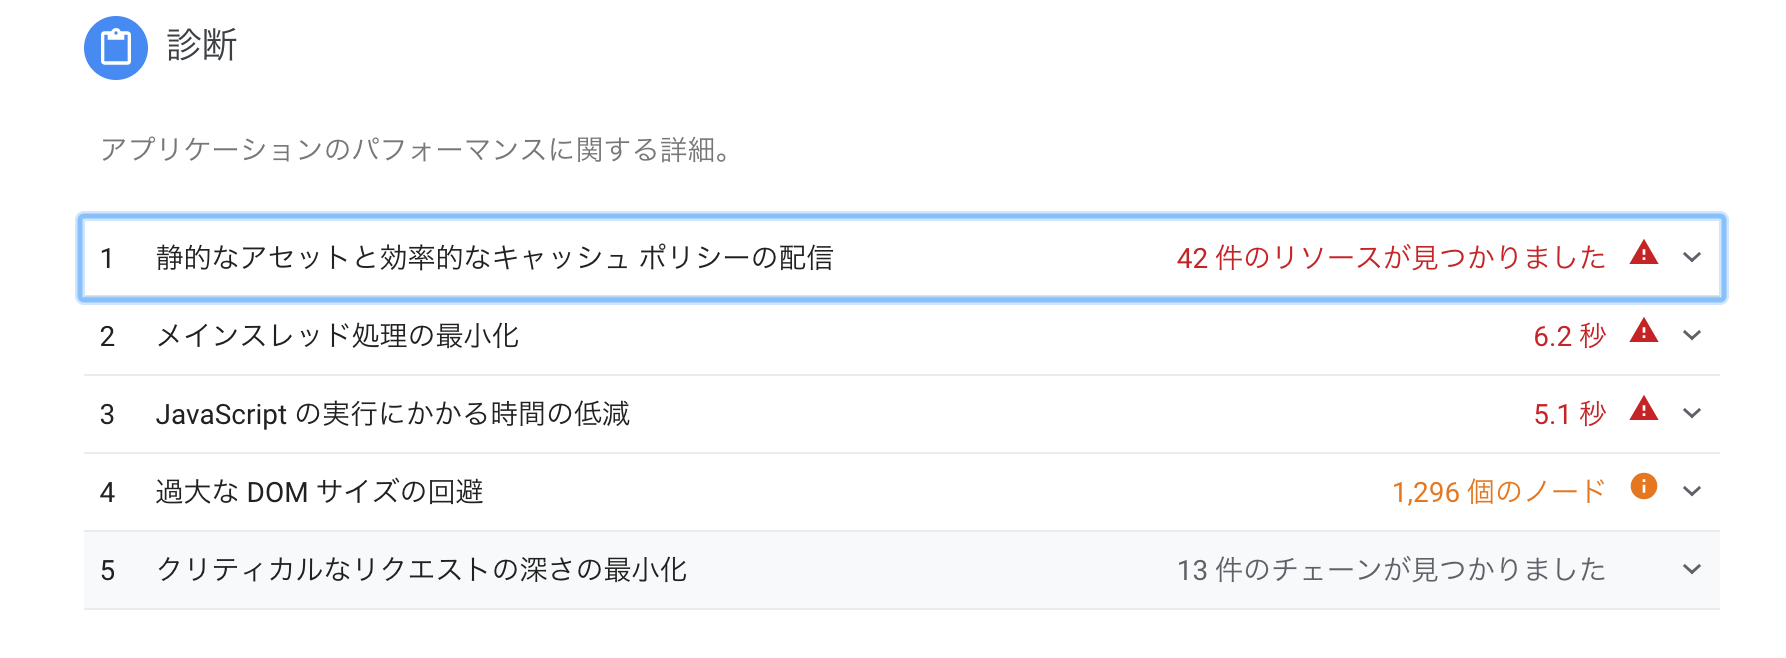
1. 静的なアセットと効率的なキャッシュポリシーの配信
キャッシュの有効期間を設定して、静的なアセットをキャッシュヒットさせるようにしましょう、ということですね。毎回HTTPリクエストを投げて画像を待つというのは無駄ですし。
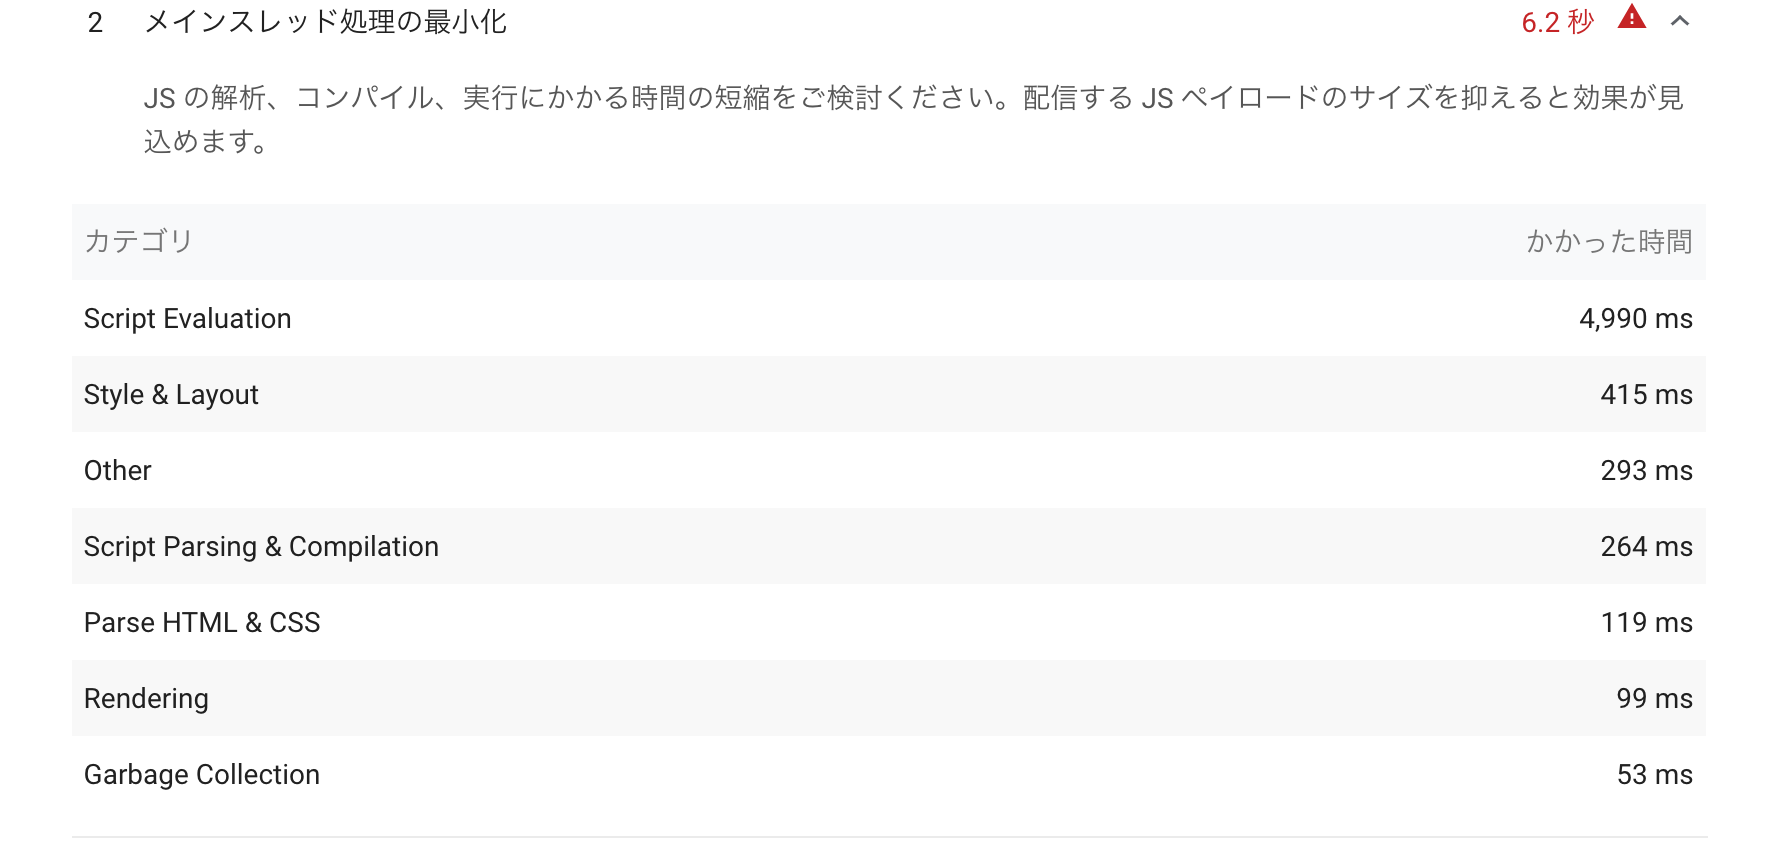
それにしても40個以上のファイルが対象になっているようで、修正のしがいがありますねぇ・・・。2. メインスレッド処理の最小化
メインスレッド処理については下の画像にあるように、かなりJavascriptが邪魔をしているようですね。
3. Javascriptの実行にかかる時間の低減
Javascriptの解析、コンパイル、実行にかかる時間の短縮をしてください、という内容ですね。
こちらについては上記の「メインスレッド処理の最小化」とも密接に関係していそうです。4. 過大なDOMサイズの回避
ページに含まれるDOMノード数が1500を超えない、というのが推奨されている値のようです。
DOMノードとは、DOMツリーの中にある要素のことをさします。例えばpタグ、aタグ、imgタグなどがそれに該当します。これの個数を押さえましょうということですね。5. クリティカルなリクエストの深さの最小化
こちらのGoogleのページによると
クリティカル リクエスト チェーンは、クリティカル レンダリング パス(CRP)の最適化技術のコンセプトの 1 つです。 CRP を考慮してリソースに優先度を設定し、読み込む順序を指定すると、ブラウザでより早くページが読み込まれるようになります。
とのことです。まあ、要は必要なリソースだけを読み込みましょう。ということですね。これらの問題を解決していくための案
さて、これである程度スコアが低い理由を把握することができました。色々と指摘されていますが
大まかに
①画像のサイズが適切でない
②レンダリングをブロックしている要素が多数ある
③キャッシュなどを設定していないのでHTTPリクエストの数が多い
④ファーストビューに必要な情報以外の情報も多数読み込んでしまっている
といった問題があり、それらが原因でPage Speed Insightsのスコアが落ちてしまっていることがわかりました。
それぞれの解決策として
① ImageOptimやImage Compressorなどで画像のサイズを適切なものにする。できればその作業を何度も行わなくても良いように、画像をアップロードしたら自動的に画像サイズを圧縮してくれるような仕組みを作る。
② Javascript、CSSについては遅延読み込みをする。
③ ブラウザキャッシュの設定をちゃんとやる。←
④ ファーストビューに対して必要な要素を割り出し、必要なものを読み込む。といったことがあげられます。
具体的には
①
- 先ほどのImageOptimやImage Compressorの利用
- Gruntなどを使い画像圧縮を自動化
- imgixのようなCDNサービスを使って画像を配信する
②
- Javascriptについてはasync defer属性を使い非同期で読み込む
- CSSについてはpreloadを利用する
③
- 社内のプロダクトなので公開はできないのですが、どうやら対象の画像ファイルたちがキャッシュの対象になっていない模様。。対象に入るように設定する
④
- ファーストビューのに必要なCSSのインライン化、読み込む必要のないjsファイルは読み込まないようにする
といった対策をとることを検討することにしました!
次回は
How to 速度改善 ー実装編①ー を書きたいと思います。ようやく実装。。
- 投稿日:2019-03-05T14:31:39+09:00
デザインパターン ~Strategy~
1. はじめに
GoFのデザインパターンにおける、Strategyパターンについてまとめます。
2. Strategyパターンとは
- Strategyという英単語は、戦略という意味になります。プログラミングの場合はアルゴリズムと考えていいみたいです。
- どんなプログラムも問題を解くために書かれています。問題を解くために特定のアルゴリズムが実装されています。Strategyパターンは、アルゴリズムを実装した部分をごっそりと交換できる方式です。
- GoFのデザインパターンでは、振る舞いに関するデザインパターンに分類されます。
3. サンプルクラス図
4. サンプルコード
4-1. Handクラス
じゃんけんの手を表すクラスです。
Hand.javapublic class Hand { public static final int HANDVALUE_GUU = 0; public static final int HANDVALUE_CHO = 1; public static final int HANDVALUE_PAA = 2; public static final Hand[] hand = { new Hand(HANDVALUE_GUU), new Hand(HANDVALUE_CHO), new Hand(HANDVALUE_PAA), }; private int handvalue; private Hand(int handvalue) { this.handvalue = handvalue; } public static Hand getHand(int handvalue) { return hand[handvalue]; } public boolean isStrongerThan(Hand h) { // thisがhより強いときtrue return fight(h) == 1; } private int fight(Hand h) { if (this == h) { // 引き分け return 0; } else if ((this.handvalue + 1) % 3 == h.handvalue) { // thisの勝ち return 1; } else { // hの勝ち return -1; } } }4-2. Playerクラス
じゃんけんを行うプレイヤーを表すクラスです。
Player.javapublic class Player { private String name; private Strategy strategy; private int wincount; private int losecount; private int gamecount; public Player(String name, Strategy strategy) { this.name = name; this.strategy = strategy; } public String getName() { return name; } public Hand nextHand() { return strategy.nextHand(); } public void win() { wincount++; gamecount++; } public void lose() { losecount++; gamecount++; } public void even() { gamecount++; } public String toString() { return "[" + name + "] " + gamecount + " gemes, " + wincount + " win, " + losecount + " lose"; } }4-3. Strategyインターフェース
じゃんけんの「戦略」を表すインターフェースです。
Strategy.javapublic interface Strategy { public abstract Hand nextHand(); }4-4. RandomStrategyクラス
ランダムに手を出す戦略を表すクラスです。
RandomStrategy.javaimport java.util.Random; public class RandomStrategy implements Strategy { public Hand nextHand() { Random random = new Random(); return Hand.getHand(random.nextInt(3)); } }4-5. GuuStrategyクラス
グーのみの手を出す戦略を表すクラスです。
GuuStrategy.javapublic class GuuStrategy implements Strategy { public Hand nextHand() { return Hand.getHand(Hand.HANDVALUE_GUU); } }4-6. Mainクラス
メイン処理を行うクラスです。
Main.javapublic class Main { public static void main(String[] args) { Player player1 = new Player("Taro", new RandomStrategy()); Player player2 = new Player("Hana", new GuuStrategy()); for (int i = 0; i < 5; i++) { Hand nextHand1 = player1.nextHand(); Hand nextHand2 = player2.nextHand(); if (nextHand1.isStrongerThan(nextHand2)) { System.out.println("Winner:" + player1.getName()); player1.win(); player2.lose(); } else if (nextHand2.isStrongerThan(nextHand1)) { System.out.println("Winner:" + player2.getName()); player1.lose(); player2.win(); } else { System.out.println("Even..."); player1.even(); player2.even(); } } System.out.println("----- Total result -----"); System.out.println(player1.toString()); System.out.println(player2.toString()); } }4-7. 実行結果
Winner:Taro
Winner:Hana
Even...
Winner:Hana
Even...
----- Total result -----
[Taro] 5 gemes, 1 win, 2 lose
[Hana] 5 gemes, 2 win, 1 lose
5. メリット
Strategyパターンでは、アルゴリズムの部分をほかの部分と意識的に分離します。そしてアルゴリズムとのインターフェースの部分だけを規定し、委譲によってアルゴリズムを利用します。
これは、プログラムを複雑にしているように見えますが、そうではありません。例えば、アルゴリズムを改良してもっと高速にしたい場合、Strategyパターンを使っていれば、Strategy役のインターフェースを変更しないようにして、アルゴリズムをだけを追加、修正すればいいのです。委譲というゆるやかな結びつきを使っているのため、アルゴリズムを用意に切り替えることができます。
また、ゲームプログラム等では、ユーザーの選択に合わせて難易度を切り替えたりすることにも使えます。6. 参考

- 投稿日:2019-03-05T01:09:08+09:00
ブラックジャック(一行でA処理版)
プログラミング入門者からの卒業試験は『ブラックジャック』を開発すべし
のルールでチャレンジしてみたブラックジャック。
スコアの計算、Aの処理の部分は少し考えてみるとシンプルに。スコアの計算
元ルールの処理:
JとQとKは10として扱う
Aはとりあえず「1」としてだけ扱うsc = sum(min(10, c.rank) for c in self)拡張版:Aを1か11、有利な方でカウント
if (sc <= 11 and 1 in [c.rank for c in self]): sc += 10こちらの機能拡張も一行追加するのみ。
「Aは2枚以上11とカウントされない(22をオーバーしてしまう)」
⇒ 「全体スコアが11以下の時のみ、Aが11とカウントされる場合がある」
と考えるとシンプルに。
改行入れてもソース全体で60行程度、Pythonは手軽に書きやすいなぁと思いました。
ブラウザで動かす版はこちら(colab)BlackJack:ソース全体(改行込みで60行)
class Card: #カード:ユニコードでSuit表示
    SUITS = '♤♡♢♧'
    RANKS = '0 A 2 3 4 5 6 7 8 9 10 J Q K'.split()
    def __init__(self, suit, rank): self.suit, self.rank = suit, rank
    def __repr__(self): return f'{Card.SUITS[self.suit]}{Card.RANKS[self.rank]}'

import random
class Deck(list): #トランプの山
    def __init__(self):
        super().__init__([Card(suit, rank) for suit in range(4) for rank in range(1, 14)])
        random.shuffle(self)

class Hand(list):  # 手札
    @property
    def score(self):  # ブラックジャックのスコア(Bustした場合は負の数を返す)
        sc = sum(min(10, c.rank) for c in self)
        if (sc <= 11 and 1 in [c.rank for c in self]): sc += 10
        return sc if sc <= 21 else -sc

class Player:
    def __init__(self, deck):
        self.deck = deck
        self.hand = Hand()
        self.draw()

    def __repr__(self): return (f"{self.__class__.__name__} {self.hand} :Score={self.hand.score}")

    def draw(self):
        self.hand.append(self.deck.pop())
        return self.hand.score

    def confirm_hit(self):
        view(self)
        return confirm('もう一枚引きますか?')

    def deal(self):
        while (self.draw() > 0):
            if (not self.confirm_hit()): return self.hand.score
        view(f"{self.__class__.__name__} の負け!バーストしました。 {self.hand} ")

class Dealer(Player):
    def confirm_hit(self): return self.hand.score < 17

def game():
    deck = Deck()
    dealer, player = Dealer(deck), Player(deck)
    view(dealer)
    if (player.deal() and dealer.deal()):
        view(dealer)
        if (player.hand.score >= dealer.hand.score):
            view('Playerの勝ちです。おめでとうございます!')
        else:
            view('Dealerの勝ちです。残念!')

def view(msg): print(msg)
def confirm(msg): return input(f'{msg} [y/n]').lower() == 'y'

if __name__ == '__main__':
    game()
    while confirm('もう一度ゲームしますか?'): game()
実行結果例Dealer [♧4] :Score=4 Player [♧A, ♡K] :Score=21 もう一枚引きますか? [y/n]n Dealer [♧4, ♧8, ♡4, ♢2] :Score=18 Playerの勝ちです。おめでとうございます! もう一度ゲームしますか? [y/n]y Dealer [♧7] :Score=7 Player [♧Q, ♤7] :Score=17 もう一枚引きますか? [y/n]n Dealer [♧7, ♤4, ♢10] :Score=21 Dealerの勝ちです。残念! もう一度ゲームしますか? [y/n]y Dealer [♢A] :Score=11 Player [♢9, ♢J] :Score=19 もう一枚引きますか? [y/n]n Dealer [♢A, ♤3, ♤K, ♢6] :Score=20 Dealerの勝ちです。残念! もう一度ゲームしますか? [y/n]n検討課題:
クラスや関数の名前、継承関係。GUI
参考