- 投稿日:2020-11-29T17:47:28+09:00
WebSocketとgorilla / websocketをみてみる
「Develop fun!」を体現する Works Human Intelligence Advent Calendar 2020の6日目の記事になります。
2枚目の「Develop fun!」を体現する Works Human Intelligence #2 Advent Calendar 2020もあるので、そちらもお楽しみください!はじめに
内容
この記事では
- WebSocketとは
- WebSocket通信の確立
- gorilla/websocketでどのようにWebSocketを確立しているか
について書いています。
コードはGoですが、
WebSocketとはを中心に書いています。きっかけ
Goのweb toolkitでgorilla/websocketというものがあります。?
gorilla/websocketの中にあるUpgrader.UpgradeメソッドがHTTP通信からWebSocket通信に更新してくれる便利なものでした。実装例としてはこのような形(Go言語によるWebアプリケーション開発より)
import "github.com/gorilla/websocket"

const (
    socketBufferSize  = 1024
    messageBufferSize = 256
)

var upgrader = &websocket.Upgrader{ReadBufferSize: socketBufferSize, WriteBufferSize: socketBufferSize}

func (r *room) ServeHTTP(w http.ResponseWriter, req *http.Request) {
    socket, err := upgrader.Upgrade(w, req, nil)
}
「とても便利!」と思い、
Upgradeメソッドの中を見てみると(server.go > Upgrade( ))func (u *Upgrader) Upgrade(w http.ResponseWriter, r *http.Request, responseHeader http.Header) (*Conn, error) { const badHandshake = "websocket: the client is not using the websocket protocol: " if !tokenListContainsValue(r.Header, "Connection", "upgrade") { return u.returnError(w, r, http.StatusBadRequest, badHandshake+"'upgrade' token not found in 'Connection' header") } . . . p = append(p, "HTTP/1.1 101 Switching Protocols\r\nUpgrade: websocket\r\nConnection: Upgrade\r\nSec-WebSocket-Accept: "...) p = append(p, computeAcceptKey(challengeKey)...) . . .と何かヘッダーをif文でチェックしていて、レスポンスらしきものを書き込んでいる。。。
が、WebSocketの仕組みをわからず、メソッド内部で何をしているかわからなかったので調べました。WebSocket
WebSocketとは
webアプリケーションにおいて、
サーバーとクライアントの双方向通信を可能とするアプリケーション層のプロトコル(通信規格)。ネットワーク上でTCP接続がHTTPを利用しているように見えるように、HTTPのリクエストの形式をとります。
RFC6455で定義されています。
WebSocketを使うと、
誰かがメッセージを送るとみんなのチャット画面に即座に表示されるみたいなことを実現できます。WebSocketのメリット
以下の特徴が挙げられます。
- コネクションを確立した後は、サーバーとクライアントどちらからでも通信が可能
- コネクションの確立が一度でいいので、通信のコストが低い
URLスキーム
URIスキームとしては
- ws://~~
- wss://~~
の2種類があります。
なぜWebSocketが必要??
WebSocket以前ではHTTPでクライアントからサーバーへの一方向でよかったのですが、
リアルタイムで多くのクライアントが最新の情報を取得したくなってきました。(SNSのチャットなど)HTTPで打開策を探した
以下のような手法で打開策を探していたが限界がありました。
- 一定時間ごとにクライアントからサーバーへ新着がないかリクエストをする
- Comet(※)という手法の活用
※サーバーからクライアントに送信はできるが、
- 双方間通信ごとにTCPのハンドシェイク手続きを行う必要がある
- 長時間のコネクションの占有
などが問題としてありました。
WebSocket通信の仕組み
WebSocketはハンドシェイクで通信を確立し、双方向通信を行います。
1.ハンドシェイク
ハンドシェイクとは、目的の情報のやり取り(通信)を行う前に、通信に必要なパラメータ等を決めるものです。
クライアントとサーバーからそれぞれハンドシェイクを送ります。ハンドシェイクが成立したら見事WebSocket通信の確立です?
クライアントからのハンドシェイク
クライアントから以下のようなハンドシェイクを送ります。
GET /chat HTTP/1.1 Host: server.example.com Upgrade: websocket Connection: Upgrade Sec-WebSocket-Key: dGhlIHNhbXBsZSBub25jZQ== Origin: http://example.com Sec-WebSocket-Protocol: chat, superchat Sec-WebSocket-Version: 13(RFC6455 > 1.2. Protocol Overviewより)
以下のヘッダーが必須で必要です。
- Host
- Upgrade
- Connection
- Sec-WebSocket-Key
- Origin
- Sec-WebSocket-Version
特徴的なパラメータは以下の通りです。
- Upgrade:HTTPの接続からwebsocketプロトコルにアップグレードする。
- Connection:この
upgradeヘッダーがその接続に限定的なもので、他の接続経由でプロキシが通信してはいけない。- Sec-WebSocket-Version:サーバーに対してWebSocketのバージョンに対応できているか確認する。最新の13を指定。対応できない場合、WebSocket通信を中断する。
- Sec-Websocket-Key:WebSocketを行なっているクライアントと通信していることを証明するキー。
サーバーからのハンドシェイク
サーバーからはクライアントからのメッセージを受けて以下のようなハンドシェイクを送ります。
HTTP/1.1 101 Switching Protocols Upgrade: websocket Connection: Upgrade Sec-WebSocket-Accept: s3pPLMBiTxaQ9kYGzzhZRbK+xOo= Sec-WebSocket-Protocol: chat(RFC6455 > 1.2. Protocol Overviewより)
HTTPのレスポンスと同じ形を取り、ステータスとしては
101が返ってきます。
UpgradeとConnectionはクライアントからのリクエストと同様のパラメータであるため説明は省略します。
Sec-WebSocket-Acceptヘッダーはサーバーでコネクションを承諾したかを示し、
リクエストヘッダーのSec-WebSocket-Keyを元に作成されます。2.双方向通信
TCP上で
フレームという単位でデータを転送します。
Payload Dataにデータを格納します。
なお、Payload Dataに加えて2byte~14byteの情報が追加されるだけであるため、低コストな通信が可能です。gorilla/websocket
改めてgorilla/websocketとは
Go言語でWebSocketプロトコルを利用する際に使われるweb toolkitです。
https://github.com/gorilla/websocketwebsocket.Upgrader.upgraderについて
webSocket通信を行うためにハンドシェイクををこなっているのが、冒頭であった
Upgrader.upgraderです。使い方としては以下のような形。(再掲)
import "github.com/gorilla/websocket"

const (
    socketBufferSize  = 1024
    messageBufferSize = 256
)

var upgrader = &websocket.Upgrader{ReadBufferSize: socketBufferSize, WriteBufferSize: socketBufferSize}

func (r *room) ServeHTTP(w http.ResponseWriter, req *http.Request) {
    socket, err := upgrader.Upgrade(w, req, nil)
}
このコードを基に今度こそ
Upgrader.upgraderを見ていきます。&websocket.Upgrader{...}について
まず
*websocket.Upgraderの型を返しているこのコードでは、以下の2つを指定することができます。
- ReadBufferSize
- WriteBufferSize
それぞれ読み込みと書き込みのbyteのバッファーサイズを決めることができ、
0と指定した場合は HTTPサーバーのよって作成されたバッファーサイズの4096がデフォルトで設定されます。Package websocketの buffers にある通り、
Applications should tune the buffer sizes to balance memory use and performance. Increasing the buffer size uses more memory, but can reduce the number of system calls to read or write the network. In the case of writing, increasing the buffer size can reduce the number of frame headers written to the network.
バッファーサイズを大きくすれば、メモリはより多く使用されますが、
ネットワークでのシステムコール数を下げることができ、データ転送のフレームヘッダー数を減らすことができます。upgrader.Upgrade(w, req, nil)について
そして、このコードでHTTP通信をWebSocket通信にupgradeしています。
▼ソース箇所
websocketパッケージ > server.go > Upgrade()func (u *Upgrader) Upgrade(w http.ResponseWriter, r *http.Request, responseHeader http.Header) (*Conn, error) { const badHandshake = "websocket: the client is not using the websocket protocol: " .....ソースの流れ
WebSocket通信の仕組みで記載したクライアントからのヘッダーをチェックし、ハンドシェイクを返します。
大きく分けて以下の2つをしています。
- リクエストヘッダーの値を確認
- レスポンスを返す
リクエストヘッダーの値を確認
以下のリクエストヘッダーの値を確認しています。
- Connection:upgrade
- Upgrade:websocket
- Method:GET
- Sec-Websocket-Version:13
- Sec-Websocket-Extensions:含まれていないか(サポートしていないようです)
- Origin リクエストヘッダー:許可されているか
- Sec-Websocket-Key:含まれているか
コードを見てみると
    .
    .
    .
    if !tokenListContainsValue(r.Header, "Connection", "upgrade") {
        return u.returnError(w, r, http.StatusBadRequest, badHandshake+"'upgrade' token not found in 'Connection' header")
    }

    if !tokenListContainsValue(r.Header, "Upgrade", "websocket") {
        return u.returnError(w, r, http.StatusBadRequest, badHandshake+"'websocket' token not found in 'Upgrade' header")
    }

    if r.Method != "GET" {
        return u.returnError(w, r, http.StatusMethodNotAllowed, badHandshake+"request method is not GET")
    }

    if !tokenListContainsValue(r.Header, "Sec-Websocket-Version", "13") {
        return u.returnError(w, r, http.StatusBadRequest, "websocket: unsupported version: 13 not found in 'Sec-Websocket-Version' header")
    }

    if _, ok := responseHeader["Sec-Websocket-Extensions"]; ok {
        return u.returnError(w, r, http.StatusInternalServerError, "websocket: application specific 'Sec-WebSocket-Extensions' headers are unsupported")
    }

    checkOrigin := u.CheckOrigin
    if checkOrigin == nil {
        checkOrigin = checkSameOrigin
    }
    if !checkOrigin(r) {
        return u.returnError(w, r, http.StatusForbidden, "websocket: request origin not allowed by Upgrader.CheckOrigin")
    }

    challengeKey := r.Header.Get("Sec-Websocket-Key")
    if challengeKey == "" {
        return u.returnError(w, r, http.StatusBadRequest, "websocket: not a websocket handshake: 'Sec-WebSocket-Key' header is missing or blank")
    }
    .
    .
    .
と、上記で提示したそれぞれのリクエストヘッダーをチェックしエラーハンドリングをしています。
サーバーからのハンドシェイク
以下の内容を返します。
- HTTP Status 101
- Upgrade: websocket
- Connection: Upgrade
- Sec-WebSocket-Accept: リクエストヘッダーの
Sec-WebSocket-Keyを元に作成された値。コードを見てみると
    .
    .
    .
    p = append(p, "HTTP/1.1 101 Switching Protocols\r\nUpgrade: websocket\r\nConnection: Upgrade\r\nSec-WebSocket-Accept: "...)
    p = append(p, computeAcceptKey(challengeKey)...)
    p = append(p, "\r\n"...)
    if c.subprotocol != "" {
        p = append(p, "Sec-WebSocket-Protocol: "...)
        p = append(p, c.subprotocol...)
        p = append(p, "\r\n"...)
    }
    if compress {
        p = append(p, "Sec-WebSocket-Extensions: permessage-deflate; server_no_context_takeover; client_no_context_takeover\r\n"...)
    }
    .
    .
    .
とハンドシェイクのレスポンスを作成しています。
見事これが返れば、ハンドシェイクの成立です。?
終わりに
たった1行のコードでwebSocketのハンドシェイクを実装できるのはありがたいですね。
参考
参考にさせて頂きありがとうございました。
- 投稿日:2020-11-29T17:47:28+09:00
WebSocketとは ~gorilla / websocketでみてみる~
「Develop fun!」を体現する Works Human Intelligence Advent Calendar 2020の6日目の記事になります。
2枚目の「Develop fun!」を体現する Works Human Intelligence #2 Advent Calendar 2020もあるので、そちらもお楽しみください!はじめに
内容
この記事では
- WebSocketとは
- WebSocket通信の確立
- gorilla/websocketでどのようにWebSocketを確立しているか
について書いています。
コードはGoですが、
WebSocketとはを中心に書いています。きっかけ
Goのweb toolkitでgorilla/websocketというものがあります。?
gorilla/websocketの中にあるUpgrader.UpgradeメソッドがHTTP通信からWebSocket通信に更新してくれる便利なものでした。実装例としてはこのような形(Go言語によるWebアプリケーション開発より)
import "github.com/gorilla/websocket"

const (
    socketBufferSize  = 1024
    messageBufferSize = 256
)

var upgrader = &websocket.Upgrader{ReadBufferSize: socketBufferSize, WriteBufferSize: socketBufferSize}

func (r *room) ServeHTTP(w http.ResponseWriter, req *http.Request) {
    socket, err := upgrader.Upgrade(w, req, nil)
}
「とても便利!」と思い、
Upgradeメソッドの中を見てみると(server.go > Upgrade( ))func (u *Upgrader) Upgrade(w http.ResponseWriter, r *http.Request, responseHeader http.Header) (*Conn, error) { const badHandshake = "websocket: the client is not using the websocket protocol: " if !tokenListContainsValue(r.Header, "Connection", "upgrade") { return u.returnError(w, r, http.StatusBadRequest, badHandshake+"'upgrade' token not found in 'Connection' header") } . . . p = append(p, "HTTP/1.1 101 Switching Protocols\r\nUpgrade: websocket\r\nConnection: Upgrade\r\nSec-WebSocket-Accept: "...) p = append(p, computeAcceptKey(challengeKey)...) . . .と何かヘッダーをif文でチェックしていて、レスポンスらしきものを書き込んでいる。。。
が、WebSocketの仕組みをわからず、メソッド内部で何をしているかわからなかったので調べました。WebSocket
WebSocketとは
webアプリケーションにおいて、
サーバーとクライアントの双方向通信を可能とするアプリケーション層のプロトコル(通信規格)。ネットワーク上でTCP接続がHTTPを利用しているように見えるように、HTTPのリクエストの形式をとります。
RFC6455で定義されています。
WebSocketを使うと、
誰かがメッセージを送るとみんなのチャット画面に即座に表示されるみたいなことを実現できます。WebSocketのメリット
以下の特徴が挙げられます。
- コネクションを確立した後は、サーバーとクライアントどちらからでも通信が可能
- コネクションの確立が一度でいいので、通信のコストが低い
URLスキーム
URIスキームとしては
- ws://~~
- wss://~~
の2種類があります。
なぜWebSocketが必要??
WebSocket以前ではHTTPでクライアントからサーバーへの一方向でよかったのですが、
リアルタイムで多くのクライアントが最新の情報を取得したくなってきました。(SNSのチャットなど)HTTPで打開策を探した
以下のような手法で打開策を探していたが限界がありました。
- 一定時間ごとにクライアントからサーバーへ新着がないかリクエストをする
- Comet(※)という手法の活用
※サーバーからクライアントに送信はできるが、
- 双方間通信ごとにTCPのハンドシェイク手続きを行う必要がある
- 長時間のコネクションの占有
などが問題としてありました。
WebSocket通信の仕組み
WebSocketはハンドシェイクで通信を確立し、双方向通信を行います。
1.ハンドシェイク
ハンドシェイクとは、目的の情報のやり取り(通信)を行う前に、通信に必要なパラメータ等を決めるものです。
クライアントとサーバーからそれぞれハンドシェイクを送ります。ハンドシェイクが成立したら見事WebSocket通信の確立です?
クライアントからのハンドシェイク
クライアントから以下のようなハンドシェイクを送ります。
GET /chat HTTP/1.1 Host: server.example.com Upgrade: websocket Connection: Upgrade Sec-WebSocket-Key: dGhlIHNhbXBsZSBub25jZQ== Origin: http://example.com Sec-WebSocket-Protocol: chat, superchat Sec-WebSocket-Version: 13(RFC6455 > 1.2. Protocol Overviewより)
以下のヘッダーが必須で必要です。
- Host
- Upgrade
- Connection
- Sec-WebSocket-Key
- Origin
- Sec-WebSocket-Version
特徴的なパラメータは以下の通りです。
- Upgrade:HTTPの接続からwebsocketプロトコルにアップグレードする。
- Connection:この
upgradeヘッダーがその接続に限定的なもので、他の接続経由でプロキシが通信してはいけない。- Sec-WebSocket-Version:サーバーに対してWebSocketのバージョンに対応できているか確認する。最新の13を指定。対応できない場合、WebSocket通信を中断する。
- Sec-Websocket-Key:WebSocketを行なっているクライアントと通信していることを証明するキー。
サーバーからのハンドシェイク
サーバーからはクライアントからのメッセージを受けて以下のようなハンドシェイクを送ります。
HTTP/1.1 101 Switching Protocols Upgrade: websocket Connection: Upgrade Sec-WebSocket-Accept: s3pPLMBiTxaQ9kYGzzhZRbK+xOo= Sec-WebSocket-Protocol: chat(RFC6455 > 1.2. Protocol Overviewより)
HTTPのレスポンスと同じ形を取り、ステータスとしては
101が返ってきます。
UpgradeとConnectionはクライアントからのリクエストと同様のパラメータであるため説明は省略します。
Sec-WebSocket-Acceptヘッダーはサーバーでコネクションを承諾したかを示し、
リクエストヘッダーのSec-WebSocket-Keyを元に作成されます。2.双方向通信
TCP上で
フレームという単位でデータを転送します。
Payload Dataにデータを格納します。
なお、Payload Dataに加えて2byte~14byteの情報が追加されるだけであるため、低コストな通信が可能です。gorilla/websocket
改めてgorilla/websocketとは
Go言語でWebSocketプロトコルを利用する際に使われるweb toolkitです。
https://github.com/gorilla/websocketwebsocket.Upgrader.upgraderについて
webSocket通信を行うためにハンドシェイクををこなっているのが、冒頭であった
Upgrader.upgraderです。使い方としては以下のような形。(再掲)
import "github.com/gorilla/websocket"

const (
    socketBufferSize  = 1024
    messageBufferSize = 256
)

var upgrader = &websocket.Upgrader{ReadBufferSize: socketBufferSize, WriteBufferSize: socketBufferSize}

func (r *room) ServeHTTP(w http.ResponseWriter, req *http.Request) {
    socket, err := upgrader.Upgrade(w, req, nil)
}
このコードを基に今度こそ
Upgrader.upgraderを見ていきます。&websocket.Upgrader{...}について
まず
*websocket.Upgraderの型を返しているこのコードでは、以下の2つを指定することができます。
- ReadBufferSize
- WriteBufferSize
それぞれ読み込みと書き込みのbyteのバッファーサイズを決めることができ、
0と指定した場合は HTTPサーバーのよって作成されたバッファーサイズの4096がデフォルトで設定されます。Package websocketの buffers にある通り、
Applications should tune the buffer sizes to balance memory use and performance. Increasing the buffer size uses more memory, but can reduce the number of system calls to read or write the network. In the case of writing, increasing the buffer size can reduce the number of frame headers written to the network.
バッファーサイズを大きくすれば、メモリはより多く使用されますが、
ネットワークでのシステムコール数を下げることができ、データ転送のフレームヘッダー数を減らすことができます。upgrader.Upgrade(w, req, nil)について
そして、このコードでHTTP通信をWebSocket通信にupgradeしています。
▼ソース箇所
websocketパッケージ > server.go > Upgrade()func (u *Upgrader) Upgrade(w http.ResponseWriter, r *http.Request, responseHeader http.Header) (*Conn, error) { const badHandshake = "websocket: the client is not using the websocket protocol: " .....ソースの流れ
WebSocket通信の仕組みで記載したクライアントからのヘッダーをチェックし、ハンドシェイクを返します。
大きく分けて以下の2つをしています。
- リクエストヘッダーの値を確認
- レスポンスを返す
リクエストヘッダーの値を確認
以下のリクエストヘッダーの値を確認しています。
- Connection:upgrade
- Upgrade:websocket
- Method:GET
- Sec-Websocket-Version:13
- Sec-Websocket-Extensions:含まれていないか(サポートしていないようです)
- Origin リクエストヘッダー:許可されているか
- Sec-Websocket-Key:含まれているか
コードを見てみると
    .
    .
    .
    if !tokenListContainsValue(r.Header, "Connection", "upgrade") {
        return u.returnError(w, r, http.StatusBadRequest, badHandshake+"'upgrade' token not found in 'Connection' header")
    }

    if !tokenListContainsValue(r.Header, "Upgrade", "websocket") {
        return u.returnError(w, r, http.StatusBadRequest, badHandshake+"'websocket' token not found in 'Upgrade' header")
    }

    if r.Method != "GET" {
        return u.returnError(w, r, http.StatusMethodNotAllowed, badHandshake+"request method is not GET")
    }

    if !tokenListContainsValue(r.Header, "Sec-Websocket-Version", "13") {
        return u.returnError(w, r, http.StatusBadRequest, "websocket: unsupported version: 13 not found in 'Sec-Websocket-Version' header")
    }

    if _, ok := responseHeader["Sec-Websocket-Extensions"]; ok {
        return u.returnError(w, r, http.StatusInternalServerError, "websocket: application specific 'Sec-WebSocket-Extensions' headers are unsupported")
    }

    checkOrigin := u.CheckOrigin
    if checkOrigin == nil {
        checkOrigin = checkSameOrigin
    }
    if !checkOrigin(r) {
        return u.returnError(w, r, http.StatusForbidden, "websocket: request origin not allowed by Upgrader.CheckOrigin")
    }

    challengeKey := r.Header.Get("Sec-Websocket-Key")
    if challengeKey == "" {
        return u.returnError(w, r, http.StatusBadRequest, "websocket: not a websocket handshake: 'Sec-WebSocket-Key' header is missing or blank")
    }
    .
    .
    .
と、上記で提示したそれぞれのリクエストヘッダーをチェックしエラーハンドリングをしています。
サーバーからのハンドシェイク
以下の内容を返します。
- HTTP Status 101
- Upgrade: websocket
- Connection: Upgrade
- Sec-WebSocket-Accept: リクエストヘッダーの
Sec-WebSocket-Keyを元に作成された値。コードを見てみると
    .
    .
    .
    p = append(p, "HTTP/1.1 101 Switching Protocols\r\nUpgrade: websocket\r\nConnection: Upgrade\r\nSec-WebSocket-Accept: "...)
    p = append(p, computeAcceptKey(challengeKey)...)
    p = append(p, "\r\n"...)
    if c.subprotocol != "" {
        p = append(p, "Sec-WebSocket-Protocol: "...)
        p = append(p, c.subprotocol...)
        p = append(p, "\r\n"...)
    }
    if compress {
        p = append(p, "Sec-WebSocket-Extensions: permessage-deflate; server_no_context_takeover; client_no_context_takeover\r\n"...)
    }
    .
    .
    .
とハンドシェイクのレスポンスを作成しています。
見事これが返れば、ハンドシェイクの成立です。?
終わりに
たった1行のコードでwebSocketのハンドシェイクを実装できるのはありがたいですね。
参考
参考にさせて頂きありがとうございました。
- 投稿日:2020-11-29T15:02:22+09:00
LeetCodeに毎日挑戦してみた 38. Count and Say(Python、Go)
はじめに
無料英単語サイトE-tanを運営中の@ishishowです。
プログラマとしての能力を上げるために毎日leetcodeに取り組み、自分なりの解き方を挙げていきたいと思います。
Leetcodeとは
leetcode.com
ソフトウェア開発職のコーディング面接の練習といえばこれらしいです。
合計1500問以上のコーデイング問題が投稿されていて、実際の面接でも同じ問題が出されることは多いらしいとのことです。golang入門+アルゴリズム脳の強化のためにgoとPythonで解いていこうと思います。(Pythonは弱弱だが経験あり)
11問目(問題38)
38. Count and Say問題内容
The count-and-say sequence is a sequence of digit strings defined by the recursive formula:
countAndSay(1) = "1"countAndSay(n)is the way you would "say" the digit string fromcountAndSay(n-1), which is then converted into a different digit string.To determine how you "say" a digit string, split it into the minimal number of groups so that each group is a contiguous section all of the same character. Then for each group, say the number of characters, then say the character. To convert the saying into a digit string, replace the counts with a number and concatenate every saying.
For example, the saying and conversion for digit string
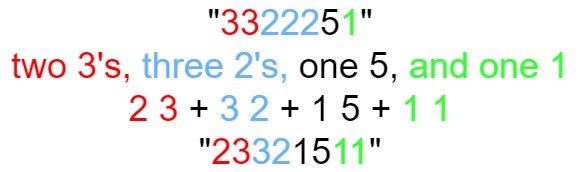
"3322251":
Given a positive integer
n, return thenthterm of the **count-and-say* sequence*.(日本語訳)
カウントと、言うのシーケンスは、再帰式によって定義された数字列の配列です。
countAndSay(1) = "1"countAndSay(n)これは、からの数字列を「言う」方法countAndSay(n-1)であり、その後、別の数字列に変換されます。数字列をどのように「言う」かを決定するには、各グループがすべて同じ文字の連続したセクションになるように、最小数のグループに分割します。次に、グループごとに、文字数を言い、次に文字を言います。発言を数字列に変換するには、カウントを数字に置き換え、すべての発言を連結します。
たとえば、数字列の言い回しと変換
"3322251":正の整数が与えられた場合
n、カウントアンドセイシーケンスの項を返します。nthExample 1:
  Input: n = 1
  Output: "1"
  Explanation: This is the base case.
Example 2:
  Input: n = 4
  Output: "1211"
  Explanation:
  countAndSay(1) = "1"
  countAndSay(2) = say "1" = one 1 = "11"
  countAndSay(3) = say "11" = two 1's = "21"
  countAndSay(4) = say "21" = one 2 + one 1 = "12" + "11" = "1211"
考え方
recurive(再帰)を使って1から順番に文字列を作成していく
その数字がいくつあるのかは次の数字と比較しながら決める
数字の個数はcountという名前の変数を使って数えていき戻り値は文字列型なのでstr()でそろえる
- 解答コード
class Solution(object):
    def countAndSay(self, n):

        if n == 1:
            return "1"
        res_str = self.countAndSay(n-1)
        return_str = ""
        count=0
        stack=res_str[0]
        for i in range(len(res_str)):
            if res_str[i] != stack:
                return_str += str(count) + str(stack)
                count = 0
            stack = res_str[i]
            count += 1
        return_str += str(count) + str(res_str[len(res_str)-1])
        return return_str
- Goでも書いてみます!
func countAndSay(n int) string {
    seq := "1"
    for i := 1; i < n; i++ {
        seq = next(seq)
    }
    return seq
}

func next(seq string) string {
    i := 0
    nextSeq := ""
    for i < len(seq) {
        count := 1
        for i < len(seq)-1 && seq[i] == seq[i+1] {
            count++
            i++
        }
        nextSeq += strconv.Itoa(count) + string(seq[i])
        i++
    }
    return nextSeq
}
- 投稿日:2020-11-29T15:02:22+09:00
LeetCodeに毎日挑戦してみた 35. Search Insert Position(Python、Go)
はじめに
無料英単語サイトE-tanを運営中の@ishishowです。
プログラマとしての能力を上げるために毎日leetcodeに取り組み、自分なりの解き方を挙げていきたいと思います。
Leetcodeとは
leetcode.com
ソフトウェア開発職のコーディング面接の練習といえばこれらしいです。
合計1500問以上のコーデイング問題が投稿されていて、実際の面接でも同じ問題が出されることは多いらしいとのことです。golang入門+アルゴリズム脳の強化のためにgoとPythonで解いていこうと思います。(Pythonは弱弱だが経験あり)
11問目(問題38)
38. Count and Say問題内容
The count-and-say sequence is a sequence of digit strings defined by the recursive formula:
countAndSay(1) = "1"countAndSay(n)is the way you would "say" the digit string fromcountAndSay(n-1), which is then converted into a different digit string.To determine how you "say" a digit string, split it into the minimal number of groups so that each group is a contiguous section all of the same character. Then for each group, say the number of characters, then say the character. To convert the saying into a digit string, replace the counts with a number and concatenate every saying.
For example, the saying and conversion for digit string
"3322251":
Given a positive integer
n, return thenthterm of the **count-and-say* sequence*.(日本語訳)
カウントと、言うのシーケンスは、再帰式によって定義された数字列の配列です。
countAndSay(1) = "1"countAndSay(n)これは、からの数字列を「言う」方法countAndSay(n-1)であり、その後、別の数字列に変換されます。数字列をどのように「言う」かを決定するには、各グループがすべて同じ文字の連続したセクションになるように、最小数のグループに分割します。次に、グループごとに、文字数を言い、次に文字を言います。発言を数字列に変換するには、カウントを数字に置き換え、すべての発言を連結します。
たとえば、数字列の言い回しと変換
"3322251":正の整数が与えられた場合
n、カウントアンドセイシーケンスの項を返します。nthExample 1:
  Input: n = 1
  Output: "1"
  Explanation: This is the base case.
Example 2:
  Input: n = 4
  Output: "1211"
  Explanation:
  countAndSay(1) = "1"
  countAndSay(2) = say "1" = one 1 = "11"
  countAndSay(3) = say "11" = two 1's = "21"
  countAndSay(4) = say "21" = one 2 + one 1 = "12" + "11" = "1211"
考え方
recurive(再帰)を使って1から順番に文字列を作成していく
その数字がいくつあるのかは次の数字と比較しながら決める
数字の個数はcountという名前の変数を使って数えていき戻り値は文字列型なのでstr()でそろえる
- 解答コード
class Solution(object):
    def countAndSay(self, n):

        if n == 1:
            return "1"
        res_str = self.countAndSay(n-1)
        return_str = ""
        count=0
        stack=res_str[0]
        for i in range(len(res_str)):
            if res_str[i] != stack:
                return_str += str(count) + str(stack)
                count = 0
            stack = res_str[i]
            count += 1
        return_str += str(count) + str(res_str[len(res_str)-1])
        return return_str
- Goでも書いてみます!
func countAndSay(n int) string {
    seq := "1"
    for i := 1; i < n; i++ {
        seq = next(seq)
    }
    return seq
}

func next(seq string) string {
    i := 0
    nextSeq := ""
    for i < len(seq) {
        count := 1
        for i < len(seq)-1 && seq[i] == seq[i+1] {
            count++
            i++
        }
        nextSeq += strconv.Itoa(count) + string(seq[i])
        i++
    }
    return nextSeq
}
- 投稿日:2020-11-29T01:44:37+09:00
golangのコンストラクタでinterface型を返すようにする理由
調べたらいろいろ出てきたが、以下が一番しっくりきた
https://selfnote.work/20201123/programming/how-to-use-interface-in-golang/
もし他の理由もあるよという方がいらしてれば、教えていただけると幸いです。
- 投稿日:2020-11-29T00:34:11+09:00
初学者向け Visual Studio Code でGo言語の超初期設定をした話(プラグインのインストール自動フォーマット)
はじめに
Goを始めるということでVSCodeの設定をしたのでメモ書きとして置いときます。
どなたかの参考になれば幸いです。お品書き
・Go言語を使えるようにする
・フォーマットの設定前提
OS:Windows10
Goのインストールは完了していること
VSCodeのインストール、基本的な設定が完了していることプラグインのインストール
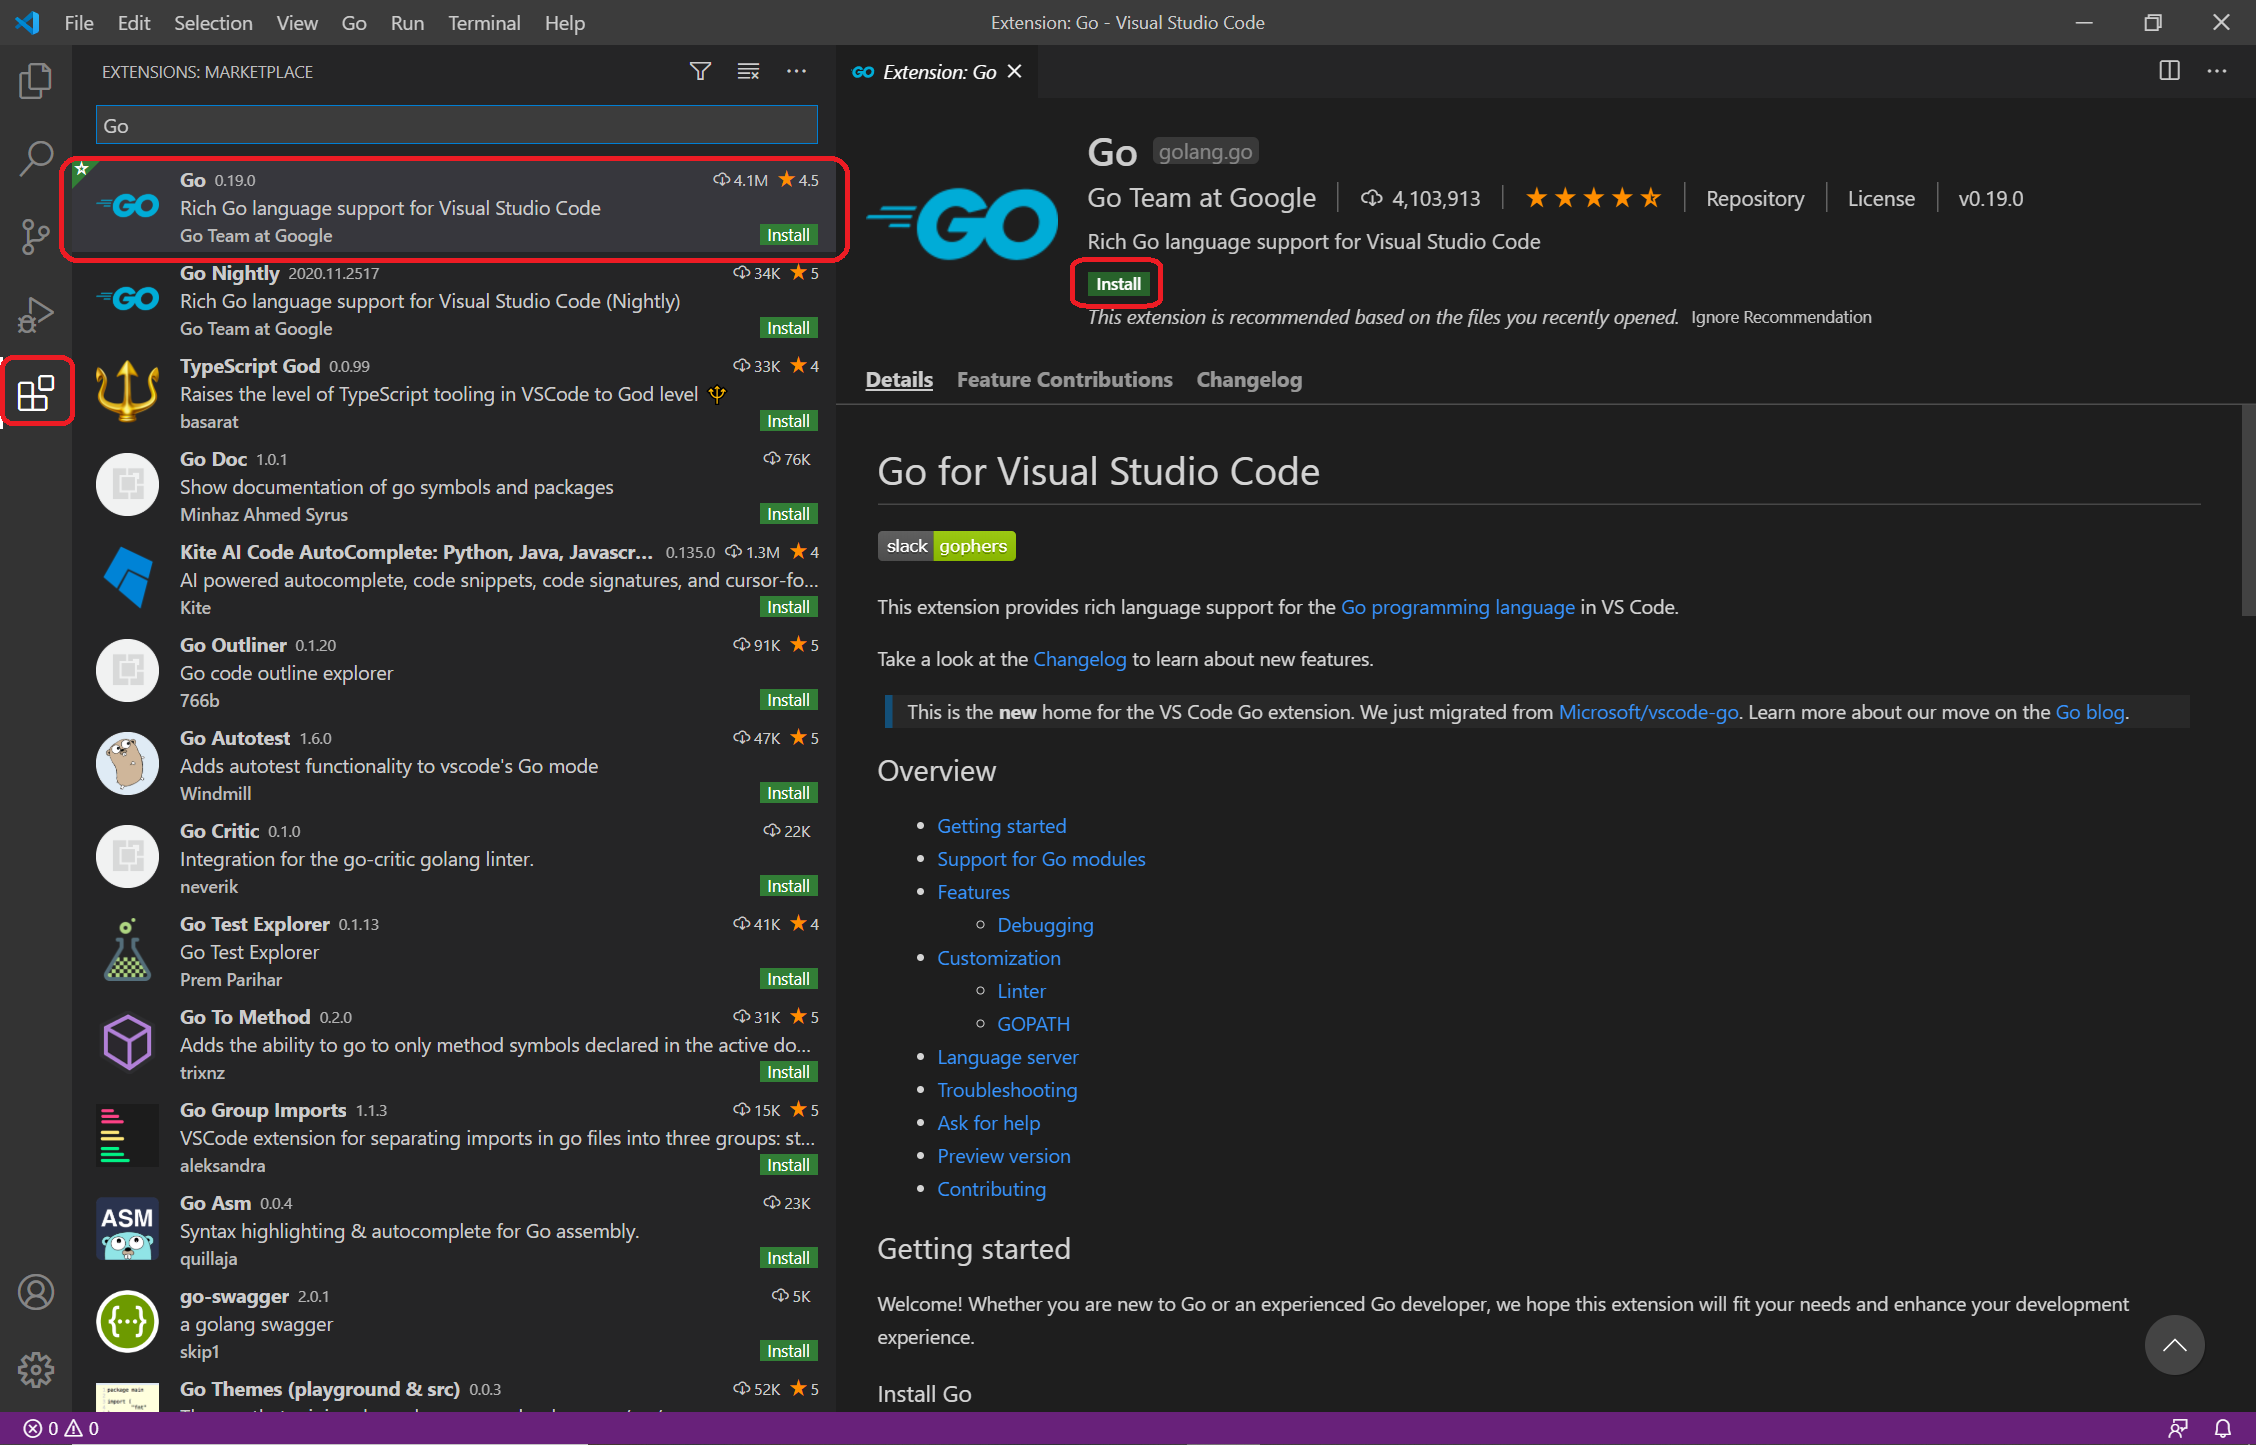
VSCodeにGoのプラグインを入れます。
Extensions(Ctrl + Shift + X) を開いて、"Go" と検索する。
"Go"というプラグインをインストールする。
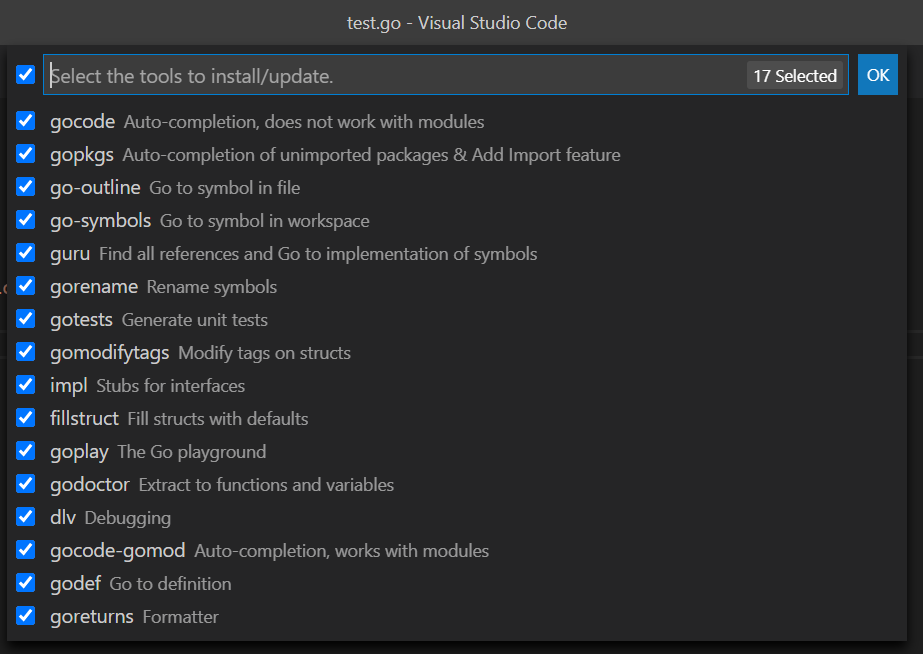
拡張機能依存パッケージのインストール
VSCodeでコマンドパレット(Ctrl + Shift + P)を開いてGO:Install/Update Toolsで検索する。
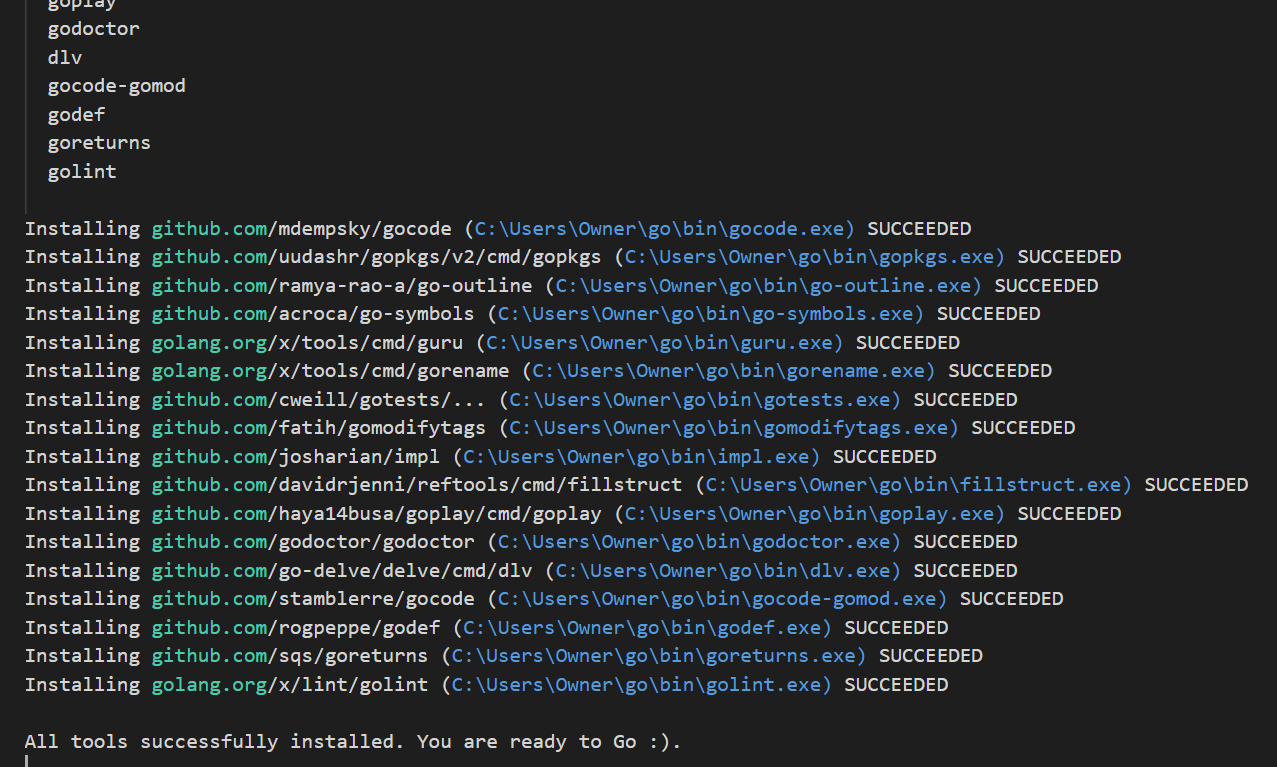
すべてにチェックを入れてインストールする。
All tools successfully installed. You are ready to Go :).
が出力されればOK!
以下、自動フォーマットの設定
自動フォーマットの設定
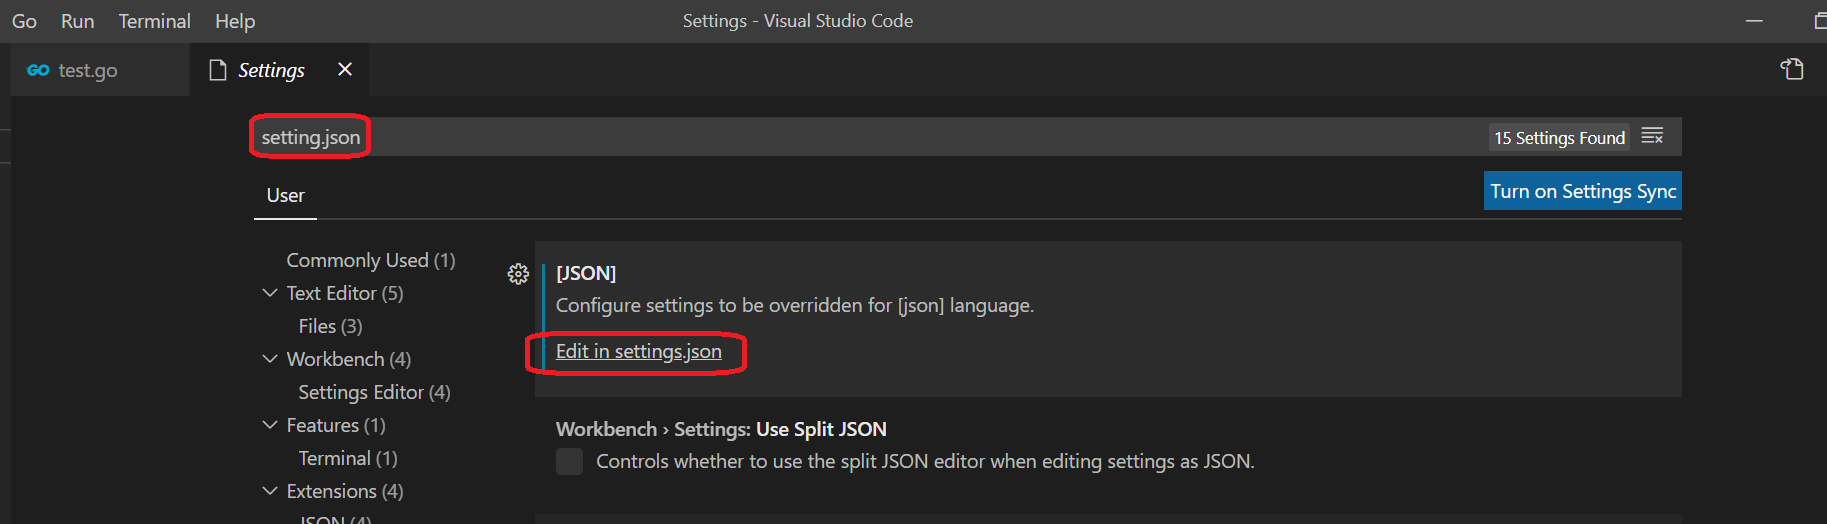
setting.json を開く。
*setting.jsonは(Ctrl + ,)で開ける。
検索タブに"setting.json"と入れ、[JSON]の"Edit in setting.json"を押下する。
setting.jsonに下記を追加する。
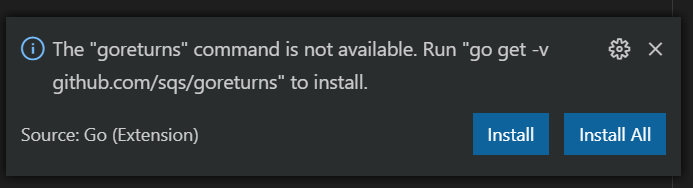
{
"[go]": {
        "editor.tabSize": 4,
        "editor.insertSpaces": false,
        "editor.formatOnSave": true,
        "editor.formatOnPaste": false,
        "editor.formatOnType": false
    },
    "go.formatTool": "goreturns",
    "go.formatFlags": [
        "-w"
    ],
    "go.lintTool": "golint",
    "go.lintOnSave": "package",
    "go.vetOnSave": "package",
    "go.buildOnSave": "package",
    "go.testOnSave": false,
    "go.gocodeAutoBuild": true,
    "go.installDependenciesWhenBuilding": true,
}
もしこんなポップアップが出てきたらインストールしてもらって大丈夫です。
コマンドが利用できんのでインストールしてね 的な意味
これで自動フォーマットの設定ができた。
最後に
今回、VSCodeでGoの設定をしてみたが、会社で使っているNetBeans以外使わない私にとっていい勉強になった。
ここらへんもスラスラ触れるようになりたいものだ。参考文献
Go言語のためのVisual Studio Codeの設定方法
https://casualdevelopers.com/tech-tips/how-to-setup-vscode-with-golang/