- 投稿日:2020-11-23T23:03:51+09:00
Flutterチュートリアルを咀嚼する part2 -routeとnavigator-
part1ではFlutterの概要を掴んだ
part2ではpart1で作ったstartup_namerアプリにスマホアプリによくある機能を搭載する
・アイコンの利用
・いいね機能
・別ページへの遷移対象のチュートリアル
https://codelabs.developers.google.com/codelabs/first-flutter-app-pt2/#0
コピペしてできあがったもの
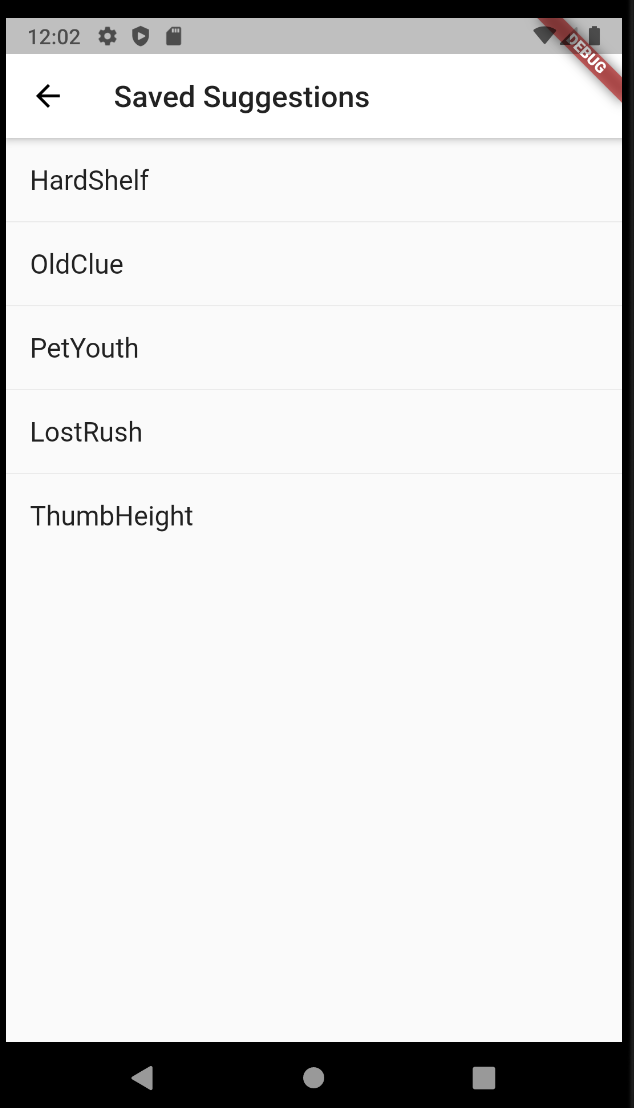
気に入った名前にいいねができるようになった
右上の(名前なんて言うのこれ)を押すと右にスライドしてもう一つのページが表示されるようになった
(いいねしたものだけが表示される)
ソースコード
main.dartimport 'package:flutter/material.dart'; import 'package:english_words/english_words.dart'; void main() => runApp(MyApp()); class MyApp extends StatelessWidget { @override Widget build(BuildContext context) { return MaterialApp( title: 'Startup Name Generator', theme: ThemeData( primaryColor: Colors.white, ), home: RandomWords(), ); } } class RandomWords extends StatefulWidget { @override _RandomWordsState createState() => _RandomWordsState(); } class _RandomWordsState extends State<RandomWords> { final _suggestions = <WordPair>[]; final _saved = Set<WordPair>(); final _biggerFont = TextStyle(fontSize: 18.0); @override Widget build(BuildContext context) { return Scaffold( appBar: AppBar( title: Text('Startup Name Generator'), actions: [ IconButton(icon: Icon(Icons.list), onPressed: _pushSaved), ], ), body: _buildSuggestions(), ); } Widget _buildSuggestions() { return ListView.builder( padding: EdgeInsets.all(16.0), itemBuilder: /*1*/ (context, i) { if (i.isOdd) return Divider(); /*2*/ final index = i ~/ 2; /*3*/ if (index >= _suggestions.length) { _suggestions.addAll(generateWordPairs().take(10)); /*4*/ } return _buildRow(_suggestions[index]); }); } Widget _buildRow(WordPair pair) { final alreadySaved = _saved.contains(pair); return ListTile( title: Text( pair.asPascalCase, style: _biggerFont, ), trailing: Icon( alreadySaved ? Icons.favorite : Icons.favorite_border, color: alreadySaved ? Colors.red : null, ), onTap: () { setState(() { if (alreadySaved) { _saved.remove(pair); } else { _saved.add(pair); } }); }, ); } void _pushSaved() { Navigator.of(context).push( MaterialPageRoute<void>( builder: (BuildContext context) { final tiles = _saved.map( (WordPair pair) { return ListTile( title: Text( pair.asPascalCase, style: _biggerFont, ), ); }, ); final divided = ListTile.divideTiles( context: context, tiles: tiles, ).toList(); return Scaffold( appBar: AppBar( title: Text('Saved Suggestions'), ), body: ListView(children: divided), ); }, ), ); } }順々にみていく
ハート形アイコンの追加
ハートアイコンと必要な変数の設定
class _RandomWordsState extends State<RandomWords> {
  final _suggestions = <WordPair>[];
  final _saved = Set<WordPair>();     // NEW
  final _biggerFont = TextStyle(fontSize: 18.0);
  ...
}
Widget _buildRow(WordPair pair) { final alreadySaved = _saved.contains(pair); //NEW return ListTile( title: Text( pair.asPascalCase, style: _biggerFont, ), trailing: Icon( // NEW from here... alreadySaved ? Icons.favorite : Icons.favorite_border, color: alreadySaved ? Colors.red : null, ), // ... to here. ); }Set
https://api.flutter.dev/flutter/dart-core/Set-class.html
_savedはいいねをした文字をメモリ上に保管するための変数contains()
https://api.flutter.dev/flutter/package-collection_collection/PriorityQueue/contains.html
対象が_savedに格納されていたらtrue、そうでない場合はfalseを返す
true/falseはalreadySavedに格納されるListTile.trailing
https://api.flutter.dev/flutter/material/ListTile/trailing.html
ListTile(リストの1行分のデータ)のタイトルの後に設定するIcon用のプロパティIcon
https://api.flutter.dev/flutter/widgets/Icon-class.html
Icons.favorite
https://api.flutter.dev/flutter/material/Icons/favorite-constant.html
色付きのハートアイコン
色はcolor:~のところで赤色としている
alreadySavedがtrueならこのアイコンを赤色に設定しているIcons.favorite_border
https://api.flutter.dev/flutter/material/Icons/favorite_border-constant.html
色なし枠だけのハートアイコン
alreadySavedがfalseならこちらを設定しているColors
https://api.flutter.dev/flutter/material/Colors-class.html
色を司るクラスColors.red
https://api.flutter.dev/flutter/material/Colors/red-constant.html
赤色を引き出せるいいね
タップしたらその単語が(メモリ上に)保存され、ハートアイコンが赤色になる
Widget _buildRow(WordPair pair) {
  final alreadySaved = _saved.contains(pair);
  return ListTile(
    title: Text(
      pair.asPascalCase,
      style: _biggerFont,
    ),
    trailing: Icon(
      alreadySaved ? Icons.favorite : Icons.favorite_border,
      color: alreadySaved ? Colors.red : null,
    ),
    onTap: () {      // NEW lines from here...
      setState(() {
        if (alreadySaved) {
          _saved.remove(pair);
        } else {
          _saved.add(pair);
        }
      });
    },               // ... to here.
  );
}
onTap
https://api.flutter.dev/flutter/cupertino/CupertinoTabBar/onTap.html
アイテムがタップされたときに呼び出されるコールバック。setState()
https://api.flutter.dev/flutter/material/ScaffoldFeatureController/setState.html
Flutterにstate(状態)が変わったことを知らせる
これによりStatefulWidgetの状態が変化する
今回はalreadySavedがtrueなら、_savedから対象を取り除き(いいねをやめる)、falseなら追加する右ページへの移動
class _RandomWordsState extends State<RandomWords> {
  ...
  @override
  Widget build(BuildContext context) {
    return Scaffold(
      appBar: AppBar(
        title: Text('Startup Name Generator'),
        actions: [
          IconButton(icon: Icon(Icons.list), onPressed: _pushSaved),
        ],
      ),
      body: _buildSuggestions(),
    );
  }
  ...
}
IconButton
https://api.flutter.dev/flutter/material/IconButton-class.html
押したら(onPressed)反応するアイコンボタン
今回は_pushSavedを呼び出しているIcons.list
https://api.flutter.dev/flutter/material/Icons/list-constant.html
リスト形のアイコン(画面右上にでているの)void _pushSaved() { Navigator.of(context).push( MaterialPageRoute<void>( builder: (BuildContext context) { final tiles = _saved.map( (WordPair pair) { return ListTile( title: Text( pair.asPascalCase, style: _biggerFont, ), ); }, ); final divided = ListTile.divideTiles( context: context, tiles: tiles, ).toList(); return Scaffold( appBar: AppBar( title: Text('Saved Suggestions'), ), body: ListView(children: divided), ); }, ), ); } }Navigator
https://api.flutter.dev/flutter/dart-html/Navigator-class.html
Flutterでは新しいページのことをrouteと呼ぶ。
根っこ(root)ではなく経路とかの意味のルートである。
Navigatorは別のrouteへユーザを導く。
※使い方Navigator.of(context).push( );MaterialPageRoute
https://api.flutter.dev/flutter/material/MaterialPageRoute-class.html
これが右に移動したら現れる新しいページの本体
中身はいいねした単語がリスト表示されている全体のテーマを変える
class MyApp extends StatelessWidget {
  @override
  Widget build(BuildContext context) {
    return MaterialApp(
      title: 'Startup Name Generator',
      theme: ThemeData(          // Add the 3 lines from here...
        primaryColor: Colors.white,
      ),                         // ... to here.
      home: RandomWords(),
    );
  }
}
ThemeData
https://api.flutter.dev/flutter/material/ThemeData-class.html
MaterialAppのthemeを変更することでアプリ全体のテーマを変更できる
今回は白くしたこれでWidgetの使い方
アイコン、新しいページの生成方法が学べた
基礎を理解できる良いチュートリアルだと思う
- 投稿日:2020-11-23T19:23:17+09:00
#40 Kotlin Koans Builders/The function apply 解説
1 はじめに
Kotlin公式リファレンスのKotlin Koans Generics/Generic functionsの解説記事です。
Kotlin Koansを通してKotlinを学習される人の参考になれば幸いです。
ただし、リファレンスを自力で読む力を養いたい方は、
すぐにこの記事に目を通さないで下さい!一度各自で挑戦してから、お目通し頂ければと思います
2 Generics
Generic型引数(Generic type parameter)は、呼び出し側が引数を渡すように自由に型を指定することができます。
example_Generic1class TreeNode<T>(val value: T?, val next: TreeNode<T>? = null)
TがGeneric型引数に相当し、任意の型を指定します。クラス名の横に
< T >のように指定することで、任意の型を
TというGeneric型引数に指定することができることを示します。example_Generic2fun <T> makeLinkedList(vararg elements: T): TreeNode<T>? { var node: TreeNode<T>? = null for (element in elements.reversed()) { node = TreeNode(element, node) } return node }こちらの例では、
makeLinkedList()をString型のインスタンスが呼び出すと、全ての
TがStringに相当するようになります。Generic型引数を用いることで、様々な型が共通の関数やプロパティ、クラスを利用することができるようになります。
3 Generics/Generic functions の解説
Kotlin Koans Generics/Generic functionsの解説です。
随時本サイトの内容を引用させていただきます。本文とコードを見てみましょう。
Make the following code compile by implementing a partitionTo function that splits a collection into two collections according to the predicate.
There is a partition() function in the standard library that always returns two newly created lists. You should write a function that splits the collection into two collections given as arguments. The signature of the toCollection() function from the standard library may help you.
import java.util.*

fun partitionTo() = TODO()

fun partitionWordsAndLines() {
    val (words, lines) = listOf("a", "a b", "c", "d e").
            partitionTo(ArrayList<String>(), ArrayList()) { s -> !s.contains(" ") }
    words == listOf("a", "c")
    lines == listOf("a b", "d e")
}

fun partitionLettersAndOtherSymbols() {
    val (letters, other) = setOf('a', '%', 'r', '}').
            partitionTo(HashSet<Char>(), HashSet()) { c -> c in 'a'..'z' || c in 'A'..'Z'}
    letters == setOf('a', 'r')
    other == setOf('%', '}')
}
partitionWordsAndLines()を呼び出すと、Listのうちの" "を含む要素と含まない要素のListを生成します。
partitionLettersAndOtherSymbols()を呼び出すと、Setのうちの記号と文字のそれぞれのSetを生成します。上記2点を満たすために、
partitionTo()を実装します。
partitionTo()はpartitionWordsAndLines()内ではListがpartitionLettersAndOtherSymbols()内ではSetが呼び出しています。したがって、
partitonTo()はCollectionで呼び出します。また、
partitonWordsAndLines()内では第1、第2引数としてArrayListとラムダ式を渡し、
wordsとlinesにListが返ります。
partitonLettersAndOtherSymols()内では第1、第2引数としてHashSetとラムダ式を渡し、
lettersとotherにSetが返ります。なので、以下のような実装になります。
fun <T,C:MutableCollection<T>> Collection<T>.partitionTo(first:C,second:C,predicate:(T) -> Boolean):Pair<C,C>{
}
呼び出しもとのCollectionの要素が、引数として渡したラムダ式の条件を満たす(trueを返す)とき、
firstに要素を渡し、条件を満たさない(falseを返す)とき、
secondに要素を渡すように実装します。したがって、最終的な実装は以下のようになります。
import java.util.*

fun <T,C:MutableCollection<T>> Collection<T>.partitionTo(first:C,second:C,predicate:(T) -> Boolean):Pair<C,C>{
    for(element in this){
        if(predicate(element)){
            first.add(element)
        }else{
            second.add(element)
        }
    }
    return Pair(first,second)
}

fun partitionWordsAndLines() {
    val (words, lines) = listOf("a", "a b", "c", "d e").
            partitionTo(ArrayList<String>(), ArrayList()) { s -> !s.contains(" ") }
    words == listOf("a", "c")
    lines == listOf("a b", "d e")
}

fun partitionLettersAndOtherSymbols() {
    val (letters, other) = setOf('a', '%', 'r', '}').
            partitionTo(HashSet<Char>(), HashSet()) { c -> c in 'a'..'z' || c in 'A'..'Z'}
    letters == setOf('a', 'r')
    other == setOf('%', '}')
}
4 最後に
これでKotlin koasnに関する解説記事は最終です。
- 投稿日:2020-11-23T19:23:17+09:00
#40 Kotlin Koans Generics/Generic functions 解説
1 はじめに
Kotlin公式リファレンスのKotlin Koans Generics/Generic functionsの解説記事です。
Kotlin Koansを通してKotlinを学習される人の参考になれば幸いです。
ただし、リファレンスを自力で読む力を養いたい方は、
すぐにこの記事に目を通さないで下さい!一度各自で挑戦してから、お目通し頂ければと思います
2 Generics
Generic型引数(Generic type parameter)は、呼び出し側が引数を渡すように自由に型を指定することができます。
example_Generic1class TreeNode<T>(val value: T?, val next: TreeNode<T>? = null)
TがGeneric型引数に相当し、任意の型を指定します。クラス名の横に
< T >のように指定することで、任意の型を
TというGeneric型引数に指定することができることを示します。example_Generic2fun <T> makeLinkedList(vararg elements: T): TreeNode<T>? { var node: TreeNode<T>? = null for (element in elements.reversed()) { node = TreeNode(element, node) } return node }こちらの例では、
makeLinkedList()をString型のインスタンスが呼び出すと、全ての
TがStringに相当するようになります。Generic型引数を用いることで、様々な型が共通の関数やプロパティ、クラスを利用することができるようになります。
3 Generics/Generic functions の解説
Kotlin Koans Generics/Generic functionsの解説です。
随時本サイトの内容を引用させていただきます。本文とコードを見てみましょう。
Make the following code compile by implementing a partitionTo function that splits a collection into two collections according to the predicate.
There is a partition() function in the standard library that always returns two newly created lists. You should write a function that splits the collection into two collections given as arguments. The signature of the toCollection() function from the standard library may help you.
import java.util.*

fun partitionTo() = TODO()

fun partitionWordsAndLines() {
    val (words, lines) = listOf("a", "a b", "c", "d e").
            partitionTo(ArrayList<String>(), ArrayList()) { s -> !s.contains(" ") }
    words == listOf("a", "c")
    lines == listOf("a b", "d e")
}

fun partitionLettersAndOtherSymbols() {
    val (letters, other) = setOf('a', '%', 'r', '}').
            partitionTo(HashSet<Char>(), HashSet()) { c -> c in 'a'..'z' || c in 'A'..'Z'}
    letters == setOf('a', 'r')
    other == setOf('%', '}')
}
partitionWordsAndLines()を呼び出すと、Listのうちの" "を含む要素と含まない要素のListを生成します。
partitionLettersAndOtherSymbols()を呼び出すと、Setのうちの記号と文字のそれぞれのSetを生成します。上記2点を満たすために、
partitionTo()を実装します。
partitionTo()はpartitionWordsAndLines()内ではListがpartitionLettersAndOtherSymbols()内ではSetが呼び出しています。したがって、
partitonTo()はCollectionで呼び出します。また、
partitonWordsAndLines()内では第1、第2引数としてArrayListとラムダ式を渡し、
wordsとlinesにListが返ります。
partitonLettersAndOtherSymols()内では第1、第2引数としてHashSetとラムダ式を渡し、
lettersとotherにSetが返ります。なので、以下のような実装になります。
fun <T,C:MutableCollection<T>> Collection<T>.partitionTo(first:C,second:C,predicate:(T) -> Boolean):Pair<C,C>{
}
呼び出しもとのCollectionの要素が、引数として渡したラムダ式の条件を満たす(trueを返す)とき、
firstに要素を渡し、条件を満たさない(falseを返す)とき、
secondに要素を渡すように実装します。したがって、最終的な実装は以下のようになります。
import java.util.*

fun <T,C:MutableCollection<T>> Collection<T>.partitionTo(first:C,second:C,predicate:(T) -> Boolean):Pair<C,C>{
    for(element in this){
        if(predicate(element)){
            first.add(element)
        }else{
            second.add(element)
        }
    }
    return Pair(first,second)
}

fun partitionWordsAndLines() {
    val (words, lines) = listOf("a", "a b", "c", "d e").
            partitionTo(ArrayList<String>(), ArrayList()) { s -> !s.contains(" ") }
    words == listOf("a", "c")
    lines == listOf("a b", "d e")
}

fun partitionLettersAndOtherSymbols() {
    val (letters, other) = setOf('a', '%', 'r', '}').
            partitionTo(HashSet<Char>(), HashSet()) { c -> c in 'a'..'z' || c in 'A'..'Z'}
    letters == setOf('a', 'r')
    other == setOf('%', '}')
}
4 最後に
これでKotlin koasnに関する解説記事は最終です。
- 投稿日:2020-11-23T19:12:36+09:00
【ReactNative】ExpoでAndroidのPermissonを設定する
はじめに
Expoのアプリを利用して開発をしていると権限回りはすべて許可された状態になりがちです。
開発中はいいのですが、いざリリースをしようとするとアップロード時に何故バックグラウンドで位置情報を使うのか申請が必要だったり、GooglePlay上でユーザー不用意に情報を取得しているアプリとみなされてしまうなどの問題が発生します基本的には公式のドキュメント通りではあるのですが、日本語訳されていないのと各パーミッションについての説明がされていないためわかりにくいです
Androidのパーミッションはあまり詳しくないため、基本的に1つずつ調べて概要をまとめますが、説明が正確じゃないなどあれば編集リクエストいただけると助かりますこちらは2020/11/23現在のドキュメントを基準にしています
設定方法
Expoの設定を記載する
app.jsonに下記の設定を追記します(permissions以外の項目は省略しています){ "expo": { "android": { "permissions": [ "CAMERA", "READ_EXTERNAL_STORAGE", "WRITE_EXTERNAL_STORAGE" ] } } }今回はカメラへのアクセスと外部ストレージの読み込み、書き込みの権限を要求しています
permissionsは空配列にすることも可能で、その場合はプライバシーポリシーが不要になります
ただし、下記の機能はPermissionsの設定にかかわらず、Expoでビルドする限り常時利用可能です
- インターネットからのデータの受信
- ネットワーク接続の表示
- 完全なネットワークアクセス
- オーディオ設定の変更
- デバイスがスリープしないようにする
permissionsを設定しなければ、設定可能なすべての権限を要求します各権限項目の詳細
Androidの共通の権限
- ACCESS_COARSE_LOCATION
- 街・区レベルの位置情報を取得したい時に必要
- ACCESS_FINE_LOCATION
- ACCESS_COARSE_LOCATIONよりも精度の高い正確な位置を取得したい時に必要
- AndroidのドキュメントによるとBLE(Bluetooth Low Energy)を使う際にも必要みたいです
- ACCESS_BACKGROUND_LOCATION
- バックグラウンドでの位置情報を取得する場合に必要
- バックグラウンド位置情報アクセスを利用する場合はGooglePlayでリリースする前に承認が必要になります
- CAMERA
- アプリ内でカメラを利用する場合に必要
- RECORD_AUDIO
- アプリケーションで録音機能を利用する場合に必要
- READ_CONTACTS
- 電話帳の読み取りに必要
- 下記のWRITE_CONTACTSと合わせて、機能上不要なのに許可しているとマルウェアかと疑われやすいです
- WRITE_CONTACTS
- 電話帳の書き込みに必要
- READ_CALENDAR
- カレンダーの読み取りに必要
- WRITE_CALENDAR
- カレンダーの書き込みに必要
- READ_EXTERNAL_STORAGE
- 外部ストレージの読み込みに必要
- WRITE_EXTERNAL_STORAGE
- 外部ストレージの書き込みに必要
- USE_FINGERPRINT
- 指紋データを取得する場合に必要
- ただし、APIレベル28では非推奨になっているらしく、より汎用的なUSE_BIOMETRICを推奨されているようです
- USE_BIOMETRIC
- デバイスでサポートされている生体認証モダリティを取得する場合に必要
- 指紋データもこちらに含まれるようです
- WRITE_SETTINGS
- Androidのシステム設定を読み書きできるようにする場合に必要
- VIBRATE
- バイブレーション機能を使用する場合に必要
- READ_PHONE_STATE
- 現在のセルラーネットワーク情報や通話ステータスなどを含む電話の状態への読み取りに必要
- com.android.launcher.permission.INSTALL_SHORTCUT
- Android 7.1以前でホーム画面にショートカットを追加する場合に必要
- Anrdoid 8以降は変更されており、新しい方法では権限追加なしでショートカットの追加が可能なようです
Google提供のライブラリ向け(すべて非推奨)
- com.google.android.c2dm.permission.RECEIVE
- プッシュ通知をGoogleCloudMessageing(CGM)をつかって実装する場合に必要
- 現在はGCMではなくFGM(Firebase Cloud Messaging)の利用が推奨されているため、新規でプッシュ通知を利用する場合は不要です
- com.google.android.gms.permission.ACTIVITY_RECOGNITION
- Activity Recognition APIを利用する場合に必要
- com.google.android.providers.gsf.permission.READ_GSERVICES
- 古いGoogleMapのAPIを組み込む場合に必要だったようです
- Google Maps Android API v2以降は不要になりました
特定のデバイス・アプリケーション向け
情報が少なく公式の情報ソースがないものも多いため、参考までに
iOSで存在するバッジ機能に類似した機能が、独自ランチャーに組み込まれている場合に要求される場合が多いみたいです
許可内容については設定名からの推測になるため、対象となるアプリケーション or メーカーをまとめておきます
- Apex Launcher
- com.anddoes.launcher.permission.UPDATE_COUNT
- com.android.launcher.permission.INSTALL_SHORTCUT
- HTC
- com.htc.launcher.permission.READ_SETTINGS
- com.htc.launcher.permission.UPDATE_SHORTCUT
- Solid Launcher
- com.majeur.launcher.permission.UPDATE_BADGE
- Samsung
- com.sec.android.provider.badge.permission.READ
- com.sec.android.provider.badge.permission.WRITE
- Sony
- com.sonyericsson.home.permission.BROADCAST_BADGE
- 投稿日:2020-11-23T18:55:52+09:00
#39 Kotlin Koans Builders/Builders how it works 解説
1 はじめに
Kotlin公式リファレンスのKotlin Koans Builders/Builders how it worksの解説記事です。
Kotlin Koansを通してKotlinを学習される人の参考になれば幸いです。
ただし、リファレンスを自力で読む力を養いたい方は、
すぐにこの記事に目を通さないで下さい!一度各自で挑戦してから、お目通し頂ければと思います
2 Builders/Builders how it works の解説
Kotlin Koans Builders/Builders how it worksの解説です。
随時本サイトの内容を引用させていただきます。これまでのKoansと異なり、1~4の質問にKotlinのコードを用いて答えるという形式になっています。
2-1 問題1について
1.In the Kotlin code
Q1tr { td { text("Product") } td { text("Popularity") } }'td' is:
a. special built-in syntactic construct
b. function declaration
c. function invocation
td()という関数にラムダ式text("Product")を渡して、関数を呼び出しているので、答えは、
c. function invocationとなります。2-2 問題2について
2.In the Kotlin code
Q2tr (color = "yellow") { td { text("Product") } td { text("Popularity") } }'color' is:
a. new variable declaration
b. argument name
c. argument value
tr (color = "yellow")は関数tr()を呼び出し、デフォルト引数としてyellowが格納されているので、答えは、
b. argument nameとなります。2-3 問題3について
3.The block
Q3{ text("Product") }from the previous question is:
a. block inside built-in syntax construction td
b. function literal (or "lambda")
c. something mysterious
問題1の解説で説明した通り
ラムダ式なので、答えは、
b. function literal (or "lambda")となります。2-4 問題4について
4.For the code
Q4tr (color = "yellow") { this.td { text("Product") } td { text("Popularity") } }which of the following is true:
a. this code doesn't compile
b. this refers to an instance of an outer class
c. this refers to a receiver parameter TR of the function literal
Q4tr (color = "yellow") { this@tr.td { text("Product") } }
thisは関数の呼び出し元自体を指しているので、答えは、
c. this refers to a receiver parameter TR of the function literal3 最後に
次回はKotlin Koans Generics/Generics functionsの解説をします
- 投稿日:2020-11-23T15:36:01+09:00
build.gradle : IDE から Gradle が読み込まれていることを判定する (Android Studio, IntelliJ IDEA)
build.gradle が IDE から読み込まれていることは
idea.activeプロパティで判定できます。IDE がプロジェクトを読み込んだり Gradle Tasks リストを読み出すときには
idea.active= "true" がセットされています。build.gradle.ktsval ideaActive = (System.getProperty("idea.active") == "true") if (ideaActive) { // IDE から読み込まれているときだけ実行したい処理 }公式のドキュメントは見当たりませんでしたが、Gradle Plugin 作成時のテクニックなどで使われているようです。
- 投稿日:2020-11-23T13:13:38+09:00
【Android / Kotlin】RecyclerView で一覧画面を実装
はじめに
Kotlin案件でリサイクラービューを使った際に学んだことを記事に残す。
作成したサンプルアプリの概要
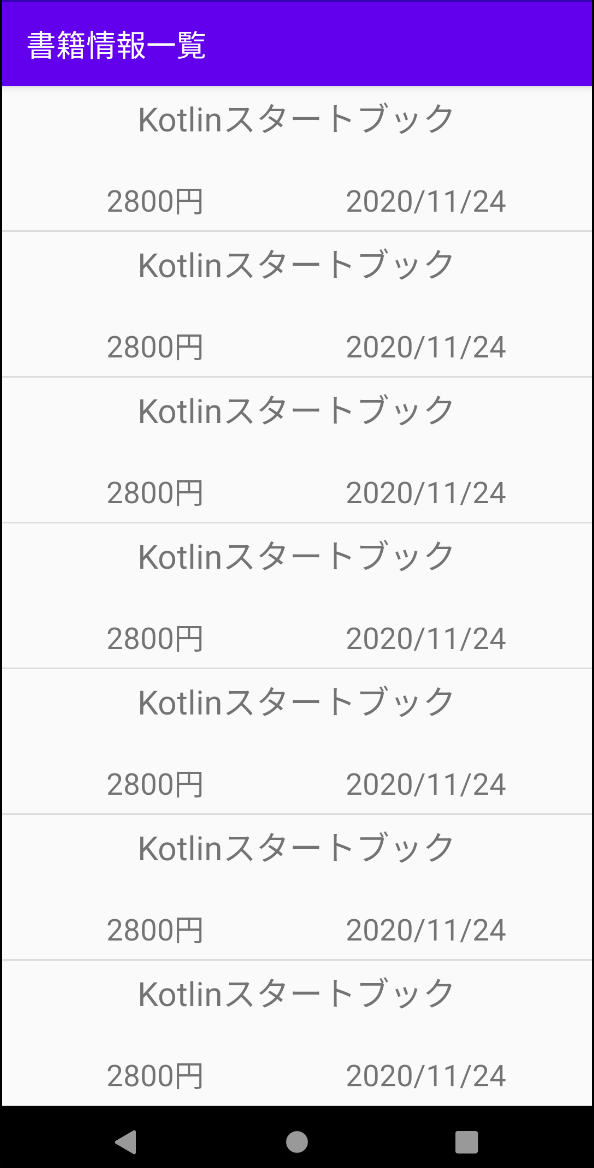
書籍情報(dataクラスBookを作成)をリサイクラービューを利用して要素3つ(名前、値段、購入日付)を一覧表示しただけのシンプルなもの。
今回はActivityの上に一覧表示のFragmentを実装しています。※ レイアウトはテキトーです。
- Support Libraryには AndroidX を採用
- minSdkVersion 24
実装
ライブラリの導入
build.gradle// ・・・省略 dependencies { implementation fileTree(dir: "libs", include: ["*.jar"]) implementation "org.jetbrains.kotlin:kotlin-stdlib:$kotlin_version" implementation 'androidx.core:core-ktx:1.3.2' implementation 'androidx.appcompat:appcompat:1.2.0' implementation 'androidx.constraintlayout:constraintlayout:2.0.4' testImplementation 'junit:junit:4.12' androidTestImplementation 'androidx.test.ext:junit:1.1.2' androidTestImplementation 'androidx.test.espresso:espresso-core:3.3.0' // この2行を追加 implementation 'androidx.recyclerview:recyclerview:1.1.0' implementation 'androidx.fragment:fragment-ktx:1.3.0-alpha04' }Activityの上にFragmentを表示させる
ActivityではFragmentを表示させる処理だけを記述
MainActivity.ktclass MainActivity : AppCompatActivity() { override fun onCreate(savedInstanceState: Bundle?) { super.onCreate(savedInstanceState) setContentView(R.layout.activity_main) // BookListFragment表示処理 supportFragmentManager .beginTransaction() .replace(R.id.fl_activity_main, BookListFragment()) .commit() } }MainActivityのレイアウトファイルはこのような形で記述
activity_main.xml<?xml version="1.0" encoding="utf-8"?> <androidx.constraintlayout.widget.ConstraintLayout xmlns:android="http://schemas.android.com/apk/res/android" xmlns:app="http://schemas.android.com/apk/res-auto" xmlns:tools="http://schemas.android.com/tools" android:id="@+id/activity_main" android:layout_width="match_parent" android:layout_height="match_parent" tools:context=".MainActivity"> <!-- このFrameLayoutにFragmentを表示する --> <FrameLayout android:id="@+id/fl_activity_main" android:layout_width="0dp" android:layout_height="0dp" app:layout_constraintStart_toStartOf="parent" app:layout_constraintEnd_toEndOf="parent" app:layout_constraintTop_toTopOf="parent" app:layout_constraintBottom_toBottomOf="parent"/> </androidx.constraintlayout.widget.ConstraintLayout>dataクラス Bookを作成
書籍一覧の各セルに表示するモデルとなるdataクラスを定義する
Book.ktdata class Book( var name: String, var price: Int, var date: String )リサイクラービューアダプターと各行セルのレイアウトファイルを作成
BookListRecyclerViewAdapter.kt// コンストラクタにBookクラスを持つMutableListをセット class BookListRecyclerViewAdapter ( private val bookListData: MutableList<Book>) : RecyclerView.Adapter<BookListRecyclerViewAdapter.BookListRecyclerViewHolder>() { // 画面部品要素を構成するクラスを定義 class BookListRecyclerViewHolder(itemView: View) : RecyclerView.ViewHolder(itemView) { // ここではcell_book_list.xmlより各レイアウト要素を取得して変数に格納している var bookName: TextView = itemView.findViewById(R.id.tv_book_name) var bookPrice: TextView = itemView.findViewById(R.id.tv_book_price) var bookPurchaseDate: TextView = itemView.findViewById(R.id.tv_book_purchase_date) } // 画面部品を保持する自作クラスであるBookListRecyclerViewHolderのオブジェクトを生成するメソッド override fun onCreateViewHolder(parent: ViewGroup, viewType: Int) : BookListRecyclerViewHolder { val inflater = LayoutInflater.from(parent.context) val view = inflater.inflate(R.layout.cell_book_list, parent, false) return BookListRecyclerViewHolder(view) } // BookListRecyclerViewHolder内の各画面部品に表示したいデータを割り当てるメソッド override fun onBindViewHolder(holder: BookListRecyclerViewHolder, position: Int) { // positionは表示するリストbookListDataのインデックス番号のようなもの val book = bookListData[position] // BookListRecyclerViewHolderより取得したレイアウト要素に書籍情報を格納 holder.bookName.text = book.name holder.bookPrice.text = book.price.toString() holder.bookPurchaseDate.text = book.date } // データ件数を返すメソッド override fun getItemCount() : Int = bookListData.size }各メソッド、クラスの役割
BookListRecyclerViewHolderクラス
各行に表示するための画面部品要素をレイアウトファイルcell_book_list.xmlより取得して保持するクラス
Kotlin ではJavaのようなstatic修飾詞は存在しないが、innerを付けないclassを定義することでstaticなclassとして定義できる(非staticな内部クラスが非推奨であることはKotlinでも同じ)
onCreateViewHolder()
定義したBookListRecyclerViewHolderクラスのインスタンスを生成するメソッド
onBindViewHolder()
まずコンストラクタで受け取ったbookListDataからインデックス番号(position)で一つの書籍データを取り出す(book)。
そして、onCreateViewHolder()で生成したBookListRecyclerViewHolderクラスのインスタンスの持つ画面部品に、書籍データ(name, price, date)をセットしている。
getItemCount()
コンストラクタのbookListDataの件数を返すメソッド各行の要素を表示するレイアウトファイルを作成
cell_book_list.xml<?xml version="1.0" encoding="utf-8"?> <androidx.constraintlayout.widget.ConstraintLayout xmlns:android="http://schemas.android.com/apk/res/android" xmlns:app="http://schemas.android.com/apk/res-auto" android:layout_width="match_parent" android:layout_height="96dp"> <TextView android:id="@+id/tv_book_name" android:textSize="22dp" android:layout_width="wrap_content" android:layout_height="wrap_content" app:layout_constraintEnd_toEndOf="parent" app:layout_constraintStart_toStartOf="parent" app:layout_constraintTop_toTopOf="parent" app:layout_constraintBottom_toBottomOf="parent" app:layout_constraintVertical_bias="0.1"/> <TextView android:id="@+id/tv_book_price" android:textSize="20dp" android:layout_width="wrap_content" android:layout_height="wrap_content" app:layout_constraintEnd_toEndOf="parent" app:layout_constraintStart_toStartOf="parent" app:layout_constraintTop_toTopOf="parent" app:layout_constraintBottom_toBottomOf="parent" app:layout_constraintHorizontal_bias="0.2" app:layout_constraintVertical_bias="0.9"/> <TextView android:textSize="20dp" android:layout_width="wrap_content" android:layout_height="wrap_content" app:layout_constraintTop_toTopOf="@id/tv_book_price" app:layout_constraintStart_toEndOf="@id/tv_book_price" android:text="円"/> <TextView android:id="@+id/tv_book_purchase_date" android:textSize="20dp" android:layout_width="wrap_content" android:layout_height="wrap_content" app:layout_constraintStart_toStartOf="parent" app:layout_constraintEnd_toEndOf="parent" app:layout_constraintTop_toTopOf="parent" app:layout_constraintBottom_toBottomOf="parent" app:layout_constraintHorizontal_bias="0.8" app:layout_constraintVertical_bias="0.9"/> </androidx.constraintlayout.widget.ConstraintLayout>一覧表示するフラグメントを作成
BookListFragment.ktclass BookListFragment : Fragment() { override fun onCreateView( inflater: LayoutInflater, container: ViewGroup?, savedInstanceState: Bundle?): View? { val view = inflater.inflate(R.layout.fragment_book_list, container, false) // タイトルをセット activity?.title = "書籍情報一覧" // レイアウト要素RecyclerViewを取得 val bookListRecyclerView = view.findViewById<RecyclerView>(R.id.recycler_view) // LayoutManagerを取得 val linearLayoutManager = LinearLayoutManager(view.context) // ダミーデータをセットしたアダプターを作成 val adapter = BookListRecyclerViewAdapter(createDummyBookList()) // linearLayoutManager と adapter をRecyclerViewにセット bookListRecyclerView.layoutManager = linearLayoutManager bookListRecyclerView.adapter = adapter // 一覧画面の各セルの区切り線を作成 bookListRecyclerView.addItemDecoration(DividerItemDecoration(view.context, linearLayoutManager.orientation)) return view } // アダプターにセットするためのサンプルデータを作成するメソッド private fun createDummyBookList(): MutableList<Book> { var bookList: MutableList<Book> = ArrayList() var book = Book("Kotlinスタートブック", 2800, "2020/11/24") // 20件のサンプルーデータを登録 var i = 0 while (i < 20) { i++ bookList.add(book) } return bookList } }書籍一覧を表示したいFragmentでは、レイアウトファイルより取得したRecyclerViewに、
- LinearLayoutManager
- RecyclerViewAdapter
をセットしている
今回は適当にサンプルデータをセットしている
fragment_book_list.xml<?xml version="1.0" encoding="utf-8"?> <androidx.constraintlayout.widget.ConstraintLayout xmlns:android="http://schemas.android.com/apk/res/android" xmlns:app="http://schemas.android.com/apk/res-auto" android:layout_width="match_parent" android:layout_height="96dp"> <TextView android:id="@+id/tv_book_name" android:textSize="22dp" android:layout_width="wrap_content" android:layout_height="wrap_content" app:layout_constraintEnd_toEndOf="parent" app:layout_constraintStart_toStartOf="parent" app:layout_constraintTop_toTopOf="parent" app:layout_constraintBottom_toBottomOf="parent" app:layout_constraintVertical_bias="0.1"/> <TextView android:id="@+id/tv_book_price" android:textSize="20dp" android:layout_width="wrap_content" android:layout_height="wrap_content" app:layout_constraintEnd_toEndOf="parent" app:layout_constraintStart_toStartOf="parent" app:layout_constraintTop_toTopOf="parent" app:layout_constraintBottom_toBottomOf="parent" app:layout_constraintHorizontal_bias="0.2" app:layout_constraintVertical_bias="0.9"/> <TextView android:textSize="20dp" android:layout_width="wrap_content" android:layout_height="wrap_content" app:layout_constraintTop_toTopOf="@id/tv_book_price" app:layout_constraintStart_toEndOf="@id/tv_book_price" android:text="円"/> <TextView android:id="@+id/tv_book_purchase_date" android:textSize="20dp" android:layout_width="wrap_content" android:layout_height="wrap_content" app:layout_constraintStart_toStartOf="parent" app:layout_constraintEnd_toEndOf="parent" app:layout_constraintTop_toTopOf="parent" app:layout_constraintBottom_toBottomOf="parent" app:layout_constraintHorizontal_bias="0.8" app:layout_constraintVertical_bias="0.9"/> </androidx.constraintlayout.widget.ConstraintLayout>参考サイト
Kotlin文法 - 分解宣言、範囲、型チェックとキャスト
KotlinでRecyclerViewを使ったリスト表示を行う
[kotlin] RecyclerViewの実装、クリックイベント付き非常にわかりやすく参考にさせていただきました!!
ありがとうございました!最後に
Kotlin を学び始めてまだ日が浅いですが、KotlinでのAndroid開発のコードを書くことに楽しさを感じています。
次回は表示したリサイクラービューの各行(セル)をクリックした際に画面遷移をさせて、クリックした要素のデータの受け渡しまで実装する記事を書きたいと思います。
- 投稿日:2020-11-23T13:13:38+09:00
【Android / Kotlin】RecyclerView で書籍一覧画面を実装
はじめに
Kotlin案件でリサイクラービューを使った際に学んだことを記事に残す。
作成したサンプルアプリの概要
書籍情報(dataクラスBookを作成)をリサイクラービューを利用して要素3つ(名前、値段、購入日付)を一覧表示しただけのシンプルなもの。
今回はActivityの上に一覧表示のFragmentを実装しています。※ レイアウトはテキトーです。
- Support Libraryには AndroidX を採用
- minSdkVersion 24
実装
ライブラリの導入
build.gradle// ・・・省略 dependencies { implementation fileTree(dir: "libs", include: ["*.jar"]) implementation "org.jetbrains.kotlin:kotlin-stdlib:$kotlin_version" implementation 'androidx.core:core-ktx:1.3.2' implementation 'androidx.appcompat:appcompat:1.2.0' implementation 'androidx.constraintlayout:constraintlayout:2.0.4' testImplementation 'junit:junit:4.12' androidTestImplementation 'androidx.test.ext:junit:1.1.2' androidTestImplementation 'androidx.test.espresso:espresso-core:3.3.0' // この2行を追加 implementation 'androidx.recyclerview:recyclerview:1.1.0' implementation 'androidx.fragment:fragment-ktx:1.3.0-alpha04' }Activityの上にFragmentを表示させる
ActivityではFragmentを表示させる処理だけを記述
MainActivity.ktclass MainActivity : AppCompatActivity() { override fun onCreate(savedInstanceState: Bundle?) { super.onCreate(savedInstanceState) setContentView(R.layout.activity_main) // BookListFragment表示処理 supportFragmentManager .beginTransaction() .replace(R.id.fl_activity_main, BookListFragment()) .commit() } }MainActivityのレイアウトファイルはこのような形で記述
activity_main.xml<?xml version="1.0" encoding="utf-8"?> <androidx.constraintlayout.widget.ConstraintLayout xmlns:android="http://schemas.android.com/apk/res/android" xmlns:app="http://schemas.android.com/apk/res-auto" xmlns:tools="http://schemas.android.com/tools" android:id="@+id/activity_main" android:layout_width="match_parent" android:layout_height="match_parent" tools:context=".MainActivity"> <!-- このFrameLayoutにFragmentを表示する --> <FrameLayout android:id="@+id/fl_activity_main" android:layout_width="0dp" android:layout_height="0dp" app:layout_constraintStart_toStartOf="parent" app:layout_constraintEnd_toEndOf="parent" app:layout_constraintTop_toTopOf="parent" app:layout_constraintBottom_toBottomOf="parent"/> </androidx.constraintlayout.widget.ConstraintLayout>dataクラス Bookを作成
書籍一覧の各セルに表示するモデルとなるdataクラスを定義する
Book.ktdata class Book( var name: String, var price: Int, var date: String )リサイクラービューアダプターと各行セルのレイアウトファイルを作成
BookListRecyclerViewAdapter.kt// コンストラクタにBookクラスを持つMutableListをセット class BookListRecyclerViewAdapter ( private val bookListData: MutableList<Book>) : RecyclerView.Adapter<BookListRecyclerViewAdapter.BookListRecyclerViewHolder>() { // 画面部品要素を構成するクラスを定義 class BookListRecyclerViewHolder(itemView: View) : RecyclerView.ViewHolder(itemView) { // ここではcell_book_list.xmlより各レイアウト要素を取得して変数に格納している var bookName: TextView = itemView.findViewById(R.id.tv_book_name) var bookPrice: TextView = itemView.findViewById(R.id.tv_book_price) var bookPurchaseDate: TextView = itemView.findViewById(R.id.tv_book_purchase_date) } // 画面部品を保持する自作クラスであるBookListRecyclerViewHolderのオブジェクトを生成するメソッド override fun onCreateViewHolder(parent: ViewGroup, viewType: Int) : BookListRecyclerViewHolder { val inflater = LayoutInflater.from(parent.context) val view = inflater.inflate(R.layout.cell_book_list, parent, false) return BookListRecyclerViewHolder(view) } // BookListRecyclerViewHolder内の各画面部品に表示したいデータを割り当てるメソッド override fun onBindViewHolder(holder: BookListRecyclerViewHolder, position: Int) { // positionは表示するリストbookListDataのインデックス番号のようなもの val book = bookListData[position] // BookListRecyclerViewHolderより取得したレイアウト要素に書籍情報を格納 holder.bookName.text = book.name holder.bookPrice.text = book.price.toString() holder.bookPurchaseDate.text = book.date } // データ件数を返すメソッド override fun getItemCount() : Int = bookListData.size }各メソッド、クラスの役割
BookListRecyclerViewHolderクラス
各行に表示するための画面部品要素をレイアウトファイルcell_book_list.xmlより取得して保持するクラス
Kotlin ではJavaのようなstatic修飾詞は存在しないが、innerを付けないclassを定義することでstaticなclassとして定義できる(非staticな内部クラスが非推奨であることはKotlinでも同じ)
onCreateViewHolder()
定義したBookListRecyclerViewHolderクラスのインスタンスを生成するメソッド
onBindViewHolder()
まずコンストラクタで受け取ったbookListDataからインデックス番号(position)で一つの書籍データを取り出す(book)。
そして、onCreateViewHolder()で生成したBookListRecyclerViewHolderクラスのインスタンスの持つ画面部品に、書籍データ(name, price, date)をセットしている。
getItemCount()
コンストラクタのbookListDataの件数を返すメソッド各行の要素を表示するレイアウトファイルを作成
cell_book_list.xml<?xml version="1.0" encoding="utf-8"?> <androidx.constraintlayout.widget.ConstraintLayout xmlns:android="http://schemas.android.com/apk/res/android" xmlns:app="http://schemas.android.com/apk/res-auto" android:layout_width="match_parent" android:layout_height="96dp"> <TextView android:id="@+id/tv_book_name" android:textSize="22dp" android:layout_width="wrap_content" android:layout_height="wrap_content" app:layout_constraintEnd_toEndOf="parent" app:layout_constraintStart_toStartOf="parent" app:layout_constraintTop_toTopOf="parent" app:layout_constraintBottom_toBottomOf="parent" app:layout_constraintVertical_bias="0.1"/> <TextView android:id="@+id/tv_book_price" android:textSize="20dp" android:layout_width="wrap_content" android:layout_height="wrap_content" app:layout_constraintEnd_toEndOf="parent" app:layout_constraintStart_toStartOf="parent" app:layout_constraintTop_toTopOf="parent" app:layout_constraintBottom_toBottomOf="parent" app:layout_constraintHorizontal_bias="0.2" app:layout_constraintVertical_bias="0.9"/> <TextView android:textSize="20dp" android:layout_width="wrap_content" android:layout_height="wrap_content" app:layout_constraintTop_toTopOf="@id/tv_book_price" app:layout_constraintStart_toEndOf="@id/tv_book_price" android:text="円"/> <TextView android:id="@+id/tv_book_purchase_date" android:textSize="20dp" android:layout_width="wrap_content" android:layout_height="wrap_content" app:layout_constraintStart_toStartOf="parent" app:layout_constraintEnd_toEndOf="parent" app:layout_constraintTop_toTopOf="parent" app:layout_constraintBottom_toBottomOf="parent" app:layout_constraintHorizontal_bias="0.8" app:layout_constraintVertical_bias="0.9"/> </androidx.constraintlayout.widget.ConstraintLayout>一覧表示するフラグメントを作成
BookListFragment.ktclass BookListFragment : Fragment() { override fun onCreateView( inflater: LayoutInflater, container: ViewGroup?, savedInstanceState: Bundle?): View? { val view = inflater.inflate(R.layout.fragment_book_list, container, false) // タイトルをセット activity?.title = "書籍情報一覧" // レイアウト要素RecyclerViewを取得 val bookListRecyclerView = view.findViewById<RecyclerView>(R.id.recycler_view) // LayoutManagerを取得 val linearLayoutManager = LinearLayoutManager(view.context) // ダミーデータをセットしたアダプターを作成 val adapter = BookListRecyclerViewAdapter(createDummyBookList()) // linearLayoutManager と adapter をRecyclerViewにセット bookListRecyclerView.layoutManager = linearLayoutManager bookListRecyclerView.adapter = adapter // 一覧画面の各セルの区切り線を作成 bookListRecyclerView.addItemDecoration(DividerItemDecoration(view.context, linearLayoutManager.orientation)) return view } // アダプターにセットするためのサンプルデータを作成するメソッド private fun createDummyBookList(): MutableList<Book> { var bookList: MutableList<Book> = ArrayList() var book = Book("Kotlinスタートブック", 2800, "2020/11/24") // 20件のサンプルーデータを登録 var i = 0 while (i < 20) { i++ bookList.add(book) } return bookList } }書籍一覧を表示したいFragmentでは、レイアウトファイルより取得したRecyclerViewに、
- LinearLayoutManager
- RecyclerViewAdapter
をセットしている
今回は適当にサンプルデータをセットしている
fragment_book_list.xml<?xml version="1.0" encoding="utf-8"?> <androidx.constraintlayout.widget.ConstraintLayout xmlns:android="http://schemas.android.com/apk/res/android" xmlns:app="http://schemas.android.com/apk/res-auto" android:layout_width="match_parent" android:layout_height="96dp"> <TextView android:id="@+id/tv_book_name" android:textSize="22dp" android:layout_width="wrap_content" android:layout_height="wrap_content" app:layout_constraintEnd_toEndOf="parent" app:layout_constraintStart_toStartOf="parent" app:layout_constraintTop_toTopOf="parent" app:layout_constraintBottom_toBottomOf="parent" app:layout_constraintVertical_bias="0.1"/> <TextView android:id="@+id/tv_book_price" android:textSize="20dp" android:layout_width="wrap_content" android:layout_height="wrap_content" app:layout_constraintEnd_toEndOf="parent" app:layout_constraintStart_toStartOf="parent" app:layout_constraintTop_toTopOf="parent" app:layout_constraintBottom_toBottomOf="parent" app:layout_constraintHorizontal_bias="0.2" app:layout_constraintVertical_bias="0.9"/> <TextView android:textSize="20dp" android:layout_width="wrap_content" android:layout_height="wrap_content" app:layout_constraintTop_toTopOf="@id/tv_book_price" app:layout_constraintStart_toEndOf="@id/tv_book_price" android:text="円"/> <TextView android:id="@+id/tv_book_purchase_date" android:textSize="20dp" android:layout_width="wrap_content" android:layout_height="wrap_content" app:layout_constraintStart_toStartOf="parent" app:layout_constraintEnd_toEndOf="parent" app:layout_constraintTop_toTopOf="parent" app:layout_constraintBottom_toBottomOf="parent" app:layout_constraintHorizontal_bias="0.8" app:layout_constraintVertical_bias="0.9"/> </androidx.constraintlayout.widget.ConstraintLayout>参考サイト
Kotlin文法 - 分解宣言、範囲、型チェックとキャスト
KotlinでRecyclerViewを使ったリスト表示を行う
[kotlin] RecyclerViewの実装、クリックイベント付き非常にわかりやすく参考にさせていただきました!!
ありがとうございました!最後に
Kotlin を学び始めてまだ日が浅いですが、KotlinでのAndroid開発のコードを書くことに楽しさを感じています。
次回は表示したリサイクラービューの各行(セル)をクリックした際に画面遷移をさせて、クリックした要素のデータの受け渡しまで実装する記事を書きたいと思います。
- 投稿日:2020-11-23T12:21:41+09:00
Jetpack ComposeのコードをGoogle Chromeブラウザから検索できるようにする
You can setup a chrome search engine to quickly browse compose source code.
— Alex Lockwood (@alexjlockwood) November 22, 2020
3rd link is: https://t.co/PPwFuZmre7
Then type "c" + space in chrome to search everything in the androidx compose project.
Thanks to @crafty for the idea. pic.twitter.com/4aUd9WW483Twitterで上記のような発言が流れてきたので、自分もやってみようとおもいました。ちょっと最初戸惑ったのでメモがてら共有させていただきます。
手順
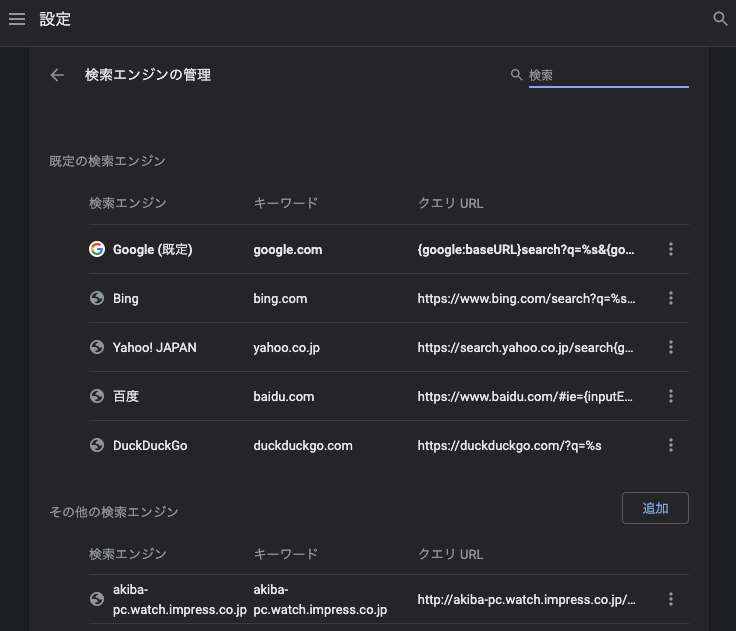
手順1. Google Chromeを立ち上げてURL/検索ワード入力エリア部分に
chrome://settings/searchEnginesと打ち込む。
手順2.
検索エンジンの管理という画面が出てくるので、そこにある"追加"ボタンを押す。
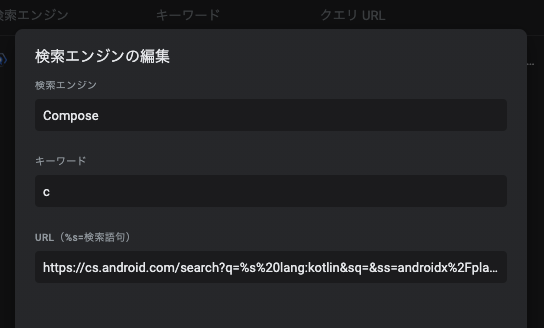
手順3. 以下のような画面が出てくるので、それぞれ埋めていく。
-検索エンジンは表示される名前。(今回はComposeに)
-キーワードはChromeのてURL/検索ワード入力エリア部分に先頭に入力する検索エンジン指定用のキーワド。(今回はcに)
-URLの部分に以下のURLを打ち込む。https://cs.android.com/search?q=%s%20lang:kotlin&sq=&ss=androidx%2Fplatform%2Fframeworks%2Fsupport:compose%2F(※パッケージの配置が変わる可能性があるので、検索できなくなった場合は都度確認して、
https://cs.android.com/search?q=%s%20の後に入れる語句を適宜変更が必要)打ち込んだらこんな感じ(下の画像)
手順4.
追加ボタンを押下して検索エンジンの追加をしたら設定は終わり。(ねんのため、検索エンジンの管理の画面でComposeと打ち込んで出てくるか確認)
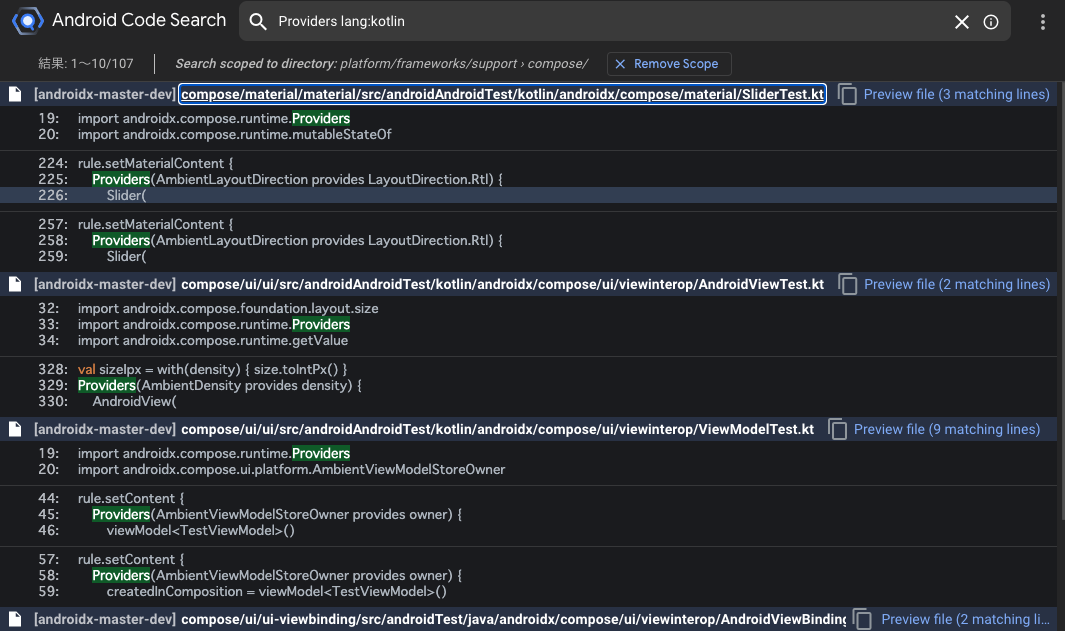
手順5. ChromeのてURL/検索ワード入力エリア部分にて先ほど手順3で指定した
キーワードであるcを入力してスペースを打ち込む。すると以下のようCompose を検索と表示される。
手順6. 試しにProvidersを検索してみると以下のような検索結果が表示されたら成功
以上です。
エンジョイしていきましょう!