- 投稿日:2020-10-22T22:58:50+09:00
React×Stripe×FirebaseでAmazonクローンを作った
はじめに
Reactのバックエンド処理と、決済処理機能を爆速で実装できると話題のStripeを習得するために実装しました。
Reactの最新の書き方に則ったコードを心掛けているので、Reactを勉強中の方にはGithubレポジトリが参考になると思います。
使用技術
- React
- JavaScript(ES6)
- Hooks
- Functional Component
- Context API
- Redux
- firebase(Hosting, Function)
- Stripe
- Express
- Material UI
- BEM
フロントはReact,バックエンドはExpressとFirebase Function、決済処理はStripeを使用しています。
状態管理はRedux、ContextAPI、HOOKsをフル活用しています。
スタイリングはMaterial UI、及びBEMに基づくCSSで行っています。参考
The Complete React Developer Course (w/ Hooks and Redux)


- 投稿日:2020-10-22T22:46:38+09:00
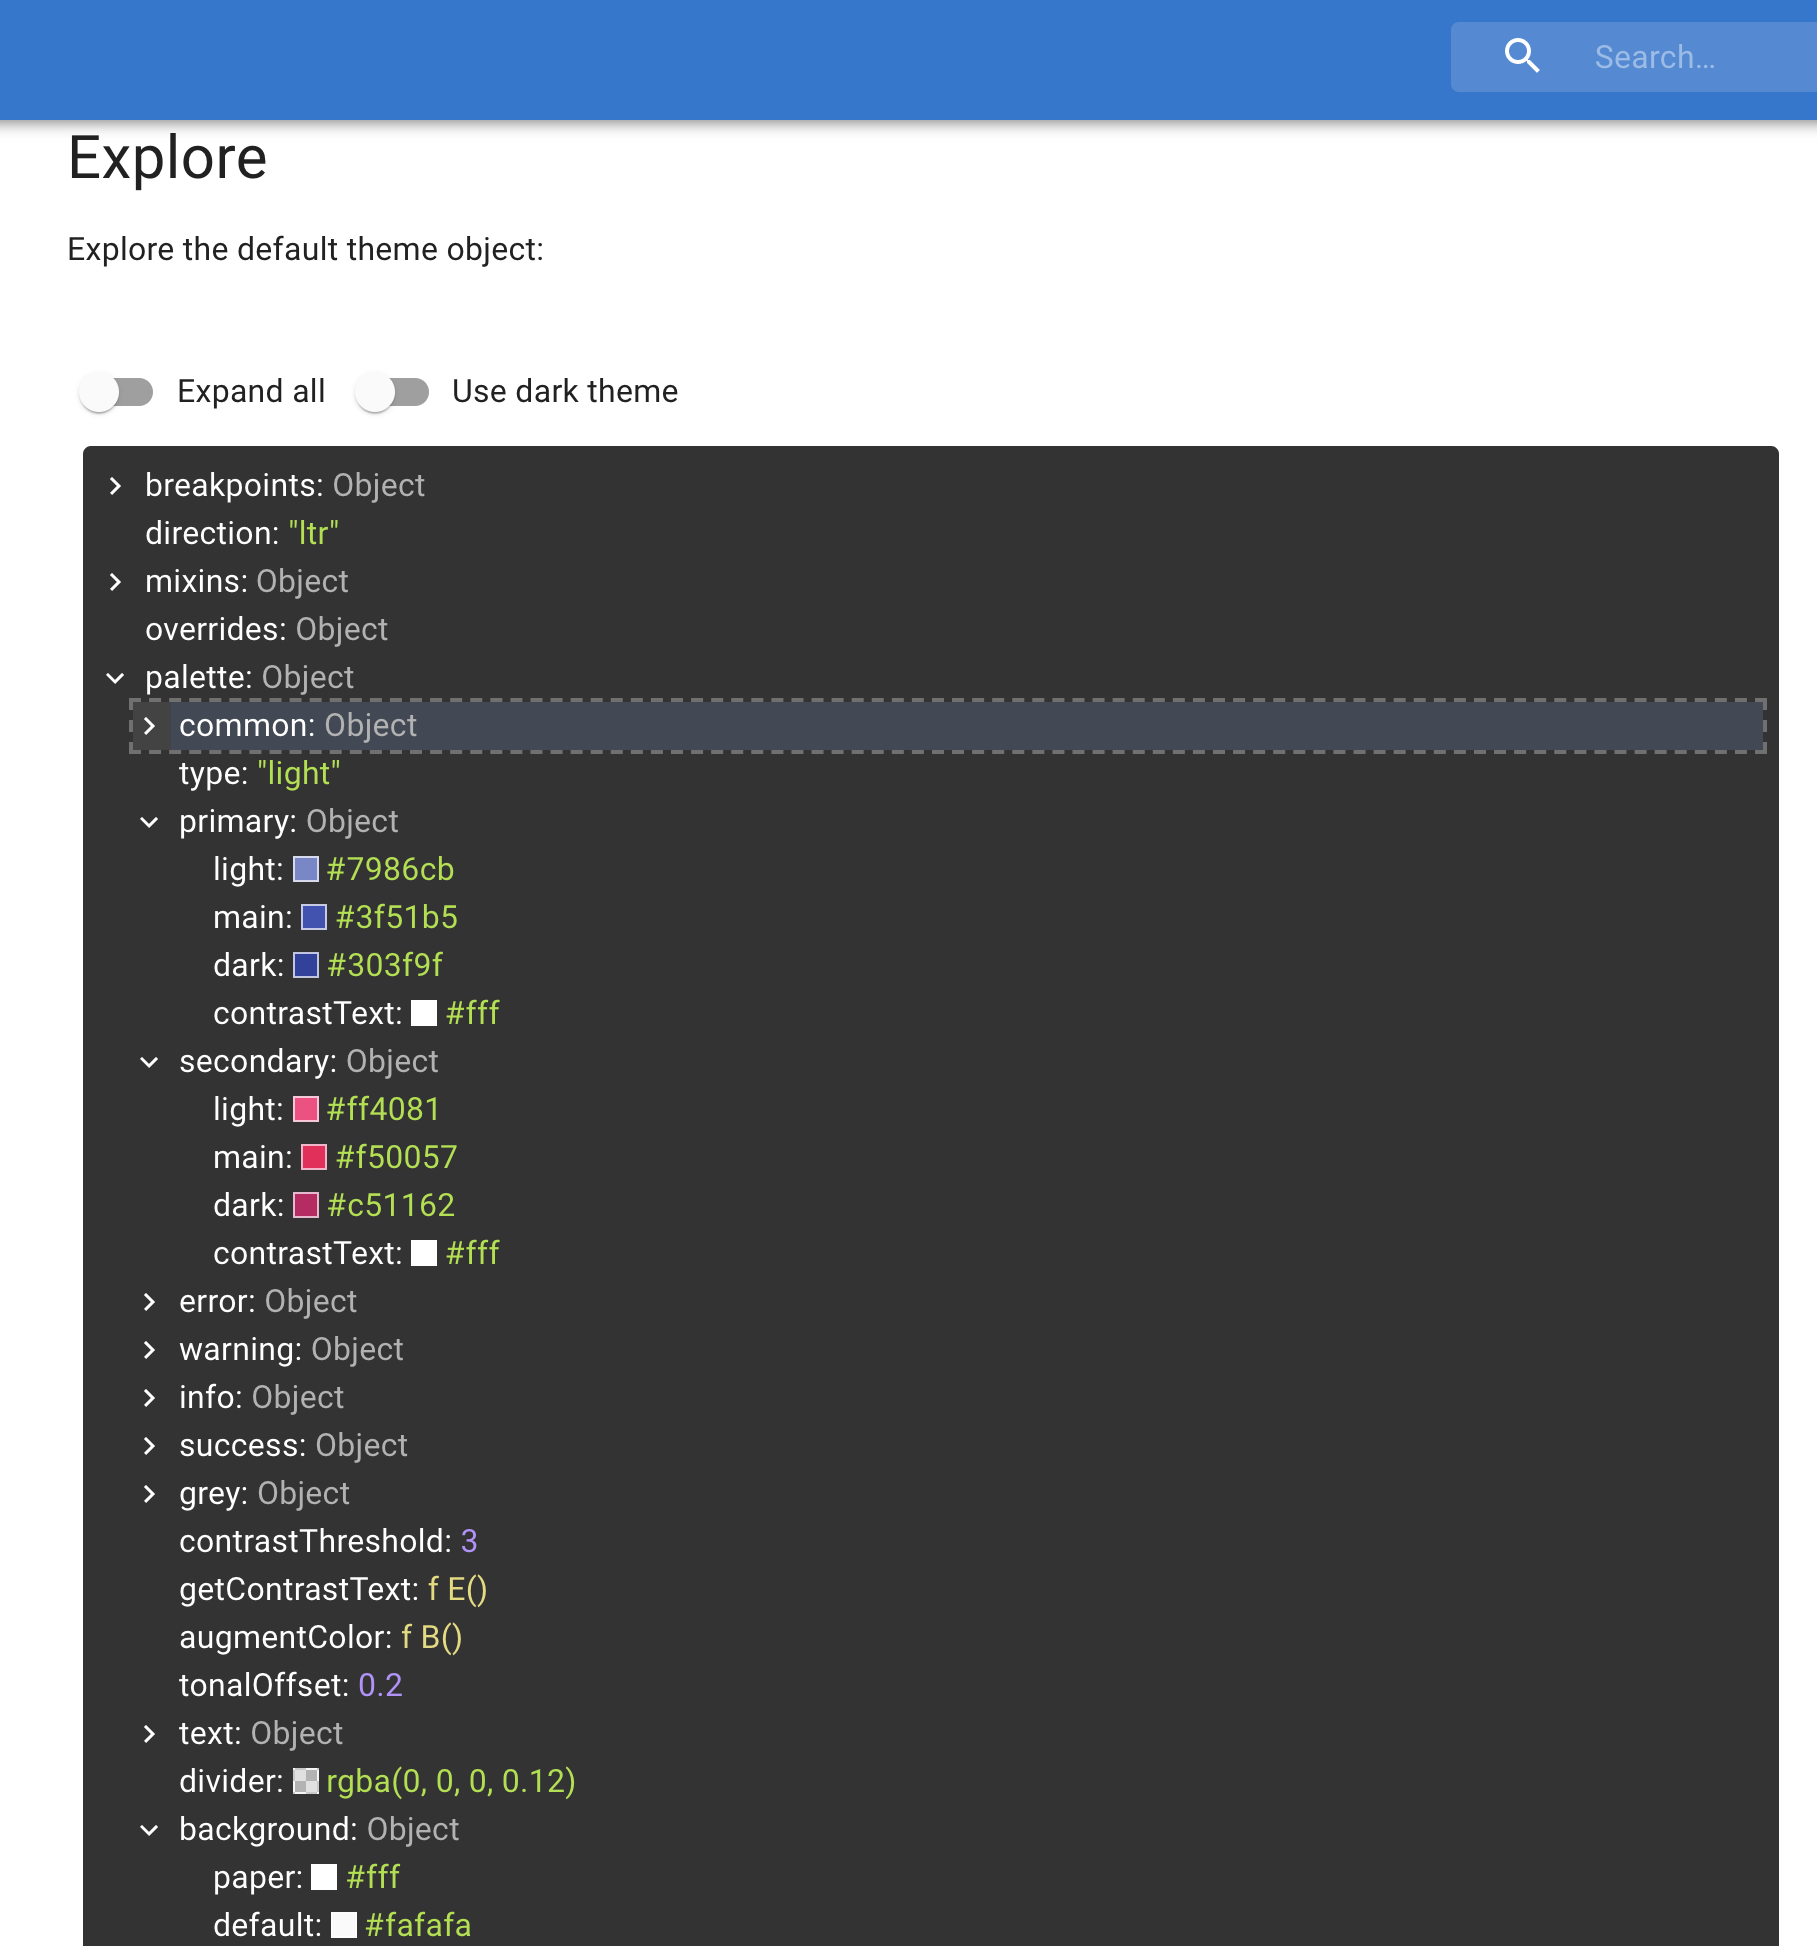
gatsbyでMaterial UIのthemeのcolorを変更する(primary,secondary,background※surface)
gatsby-browser.jsとgatsby-ssr.jsとにimport { createMuiTheme } from '@material-ui/core/styles' import { ThemeProvider } from '@material-ui/styles'して、
<ThemeProvider theme={theme}>でつつんであげると良い感じになります。※メモ:
gatsby-browser.jsとgatsby-ssr.jsは、
gatsbyさん的には「中身を同じにしてね」というファイルだそう。
(ssrはサーバサイドレンダリングしてくれるファイルだそう。)例えば下記のような形です。
import { CssBaseline } from '@material-ui/core'
import React from 'react'
import { RecoilRoot } from 'recoil'

import { createMuiTheme } from '@material-ui/core/styles'
import { ThemeProvider } from '@material-ui/styles'

const theme = createMuiTheme({
  palette: {
    primary: {
      main: '#EF2D29',
    },
    secondary: {
      main: '#00A7C1',
    },
    background: {
      default: '#fff',
    },
  },
})

export const wrapRootElement = ({ element }) => {
  return (
    <ThemeProvider theme={theme}>
      <RecoilRoot>
        <CssBaseline />
        {element}
      </RecoilRoot>
    </ThemeProvider>
  )
}
参考:
https://material-ui.com/customization/default-theme/#default-themeここからいじりたい値を参照してみよう!
- 投稿日:2020-10-22T22:18:25+09:00
react.js(next.js)とvue.js(nuxt.js)の違い
概要
最近人気のフロントエンドの言語である
react.js,vue.js,augular.jsがあります
angular.jsは下落傾向で、react.jsとvue.jsはほぼ同じように人気がありますこの記事では、
react.jsとvue.jsに対する違いと
next.jsとnuxt.jsに対する違いをソースで確認してみましょうnext.jsとnuxt.jsって何?
next.jsはreact.jsのSSR(ServerSideRender)フレームワークです
nuxt.jsはvue.jsのSSR(ServerSideRender)フレームワークです
react.jsとvue.jsは、基本的にCSR(Client Side Render)です
CSR(Client Side Render)の場合、検索エンジンに露出できない短所があり、
最初のスクリプトロード時間が長いという短所があります
react.jsとvue.jsのどちらもBtoBの場合、特別な問題はありませんが、
BtoCの場合、検索エンジンの露出が重要な要素となっているため、
結局はwebpackをカスタマイズするかnext.jsとnuxt.jsに変えることになります。プロジェクト作成の違い
yarn global add create-next-app
create-next-app next-tutorial
yarn dev
next.jsの場合、create-next-appモジュールを利用してプロジェクトを作成しますyarn global add create-nuxt-app create-nuxt-app nuxt-tutorial yarn dev
nuxt.jsの場合、create-nuxt-appモジュールを利用してプロジェクトを作成しますcomponent基本
next.jsとnuxt.jsはページディレクトリを利用してrouteします
基本的なコンポーネントソースの違いを確認してみましょうnext.js (react.js)
/pages/index.js
import { useEffect } from "react"

const Home = () => {
  useEffect(() => {
    console.log('mounted')
    return () => {
      console.log('unmounted')
    };
  }, []);

  return (
    <div>
      hello next.js
    </div>
  )
}

export default Home
nuxt.js (vue.js)
/pages/index.vue
<template>
  <div>
    hello nuxt.js
  </div>
</template>

<script>
export default {
  mounted() {
    console.log('mounted')
  },
  unmounted() {
    console.log('unmounted')
  }
}
</script>
react.jsの場合、JSXを使用してレンダリングします
vue.jsの場合、htmlを使用してレンダリングします
ライフサイクルは文法は少し違いますが、構造はほとんど似ています
react.jsの場合、JSXを学ぶ必要があるためパブリッシャーが作業が難しいため、
日本ではvue.jsが人気が高いと言われていますcomponent state
next.js (react.js)
/pages/index.js
import { useState, useEffect } from "react"

const Home = () => {
  const [count, setCount] = useState(0)

  return (
    <div>
      count : {count}
    </div>
  )
}

export default Home
nuxt.js (vue.js)
/pages/index.vue
<template>
  <div>
    count : {{count}}
  </div>
</template>

<script>
export default {
  data() {
    return {
      count: 0
    }
  }
}
</script>
react.jsの場合、react hooksであるuseStateを利用してstateを作成します
vue.jsの場合、データ関数を利用してstateを作成します
react.jsの場合、{}を利用して変数をレンダリングします
vue.jsの場合、{{ }}を利用して変数をレンダリングしますcounter
next.js (react.js)
/pages/index.js
import { useState, useEffect } from "react"

const Home = () => {
  const [count, setCount] = useState(0)

  const increaseCount = () => {
    setCount(count + 1)
  }

  const decreaseCount = () => {
    setCount(count - 1)
  }

  return (
    <>
      <div>
        count : {count}
      </div>
      <button onClick={increaseCount}>+</button>
      <button onClick={decreaseCount}>-</button>
    </>
  )
}

export default Home
nuxt.js (vue.js)
/pages/index.vue
<template>
  <div>
    <div>
      count : {{count}}
    </div>
    <button @click="increaseCount()">+</button>
    <button @click="decreaseCount()">-</button>
  </div>
</template>

<script>
export default {
  data() {
    return {
      count: 0
    }
  },
  methods: {
    increaseCount() {
      this.count +=  1
    },
    decreaseCount() {
      this.count -= 1
    }
  }
}
</script>
react.jsの場合、
setStateを使用してstateをアップデートします
vue.jsの場合、thisを使用してstateをアップデートしますreact.jsの場合、コンポーネント内部にイベント関数を作成します
vue.jsの場合、methods内部にイベント関数を作成しますreact.jsの場合、
onClickプロパティを利用してバインディングします
vue.jsの場合、@clickプロパティを利用してバインディングしますchildコンポーネントにsteteとイベント関数を伝達
next.js (react.js)
/components/sample.js
const Sample = (props) => {
  return (
    <>
      <div>
        count : {props.count}
      </div>
      <button onClick={props.increaseCount}>+</button>
      <button onClick={props.decreaseCount}>-</button>
    </>
  )
}

export default Sample
/pages/index.js
import { useState, useEffect } from "react"
import Sample from "../components/Sample"

const Home = () => {
  const [count, setCount] = useState(0)

  const increaseCount = () => {
    setCount(count + 1)
  }

  const decreaseCount = () => {
    setCount(count - 1)
  }

  return (
    <>
      <Sample
        count={count}
        increaseCount={increaseCount}
        decreaseCount={decreaseCount}
      />
    </>
  )
}

export default Home
nuxt.js (vue.js)
/components/sample.vue
<template>
  <div>
    <div>
      count : {{count}}
    </div>
    <button @click="$emit('increase-count')">+</button>
    <button @click="$emit('decrease-count')">-</button>
  </div>
</template>

<script>
export default {
  props: ['count'],
  emits: ['increase-count', 'decrease-count']
}
</script>
/pages/index.vue
<template>
  <div>
    <Sample
      :count="count"
      @increase-count="increaseCount()"
      @decrease-count="decreaseCount()"
    />
  </div>
</template>

<script>
export default {
  data() {
    return {
      count: 0
    }
  },
  methods: {
    increaseCount() {
      this.count +=  1
    },
    decreaseCount() {
      this.count -= 1
    }
  }
}
</script>
react.jsの場合、propsを利用してchildコンポーネントにstateやイベント関数を伝達します
vue.jsの場合、各属性を利用してchildコンポーネントにstateやイベント関数を伝達します
react.jsの場合、すぐにバインディングして使用できます
vue.jsの場合、$emitを利用してバインディングすると使用できますSSR function
next.js (react.js)
/pages/index.js
const Home = ({data}) => {
  return (
    <>
      {data}
    </>
  )
}

Home.getInitialProps = () => {
  return { data: 'SSR' }
}

export default Home
nuxt.js (vue.js)
/pages/index.vue
<template>
  <div>
    {{data}}
  </div>
</template>

<script>
export default {
  asyncData() {
    return { data: 'SSR' }
  },
}
</script>
SSRフレームワークの場合、htmlが構成される前にデータをfetchできる関数を提供します
next.jsの場合、getInitialPropsを使用します
nuxt.jsの場合asyncDataを使いますstate 管理
vue.jsの場合、vuexを主に使います
react.jsの場合、主にreduxを使用します
まとめ
最も人気のある言語を簡単に2つ比較してみました
ご覧のとおりvue.jsもreact.jsもメカニズムは似ています
またnext.jsとnuxt.jsもメカニズムが似ています
したがって、一つを勉強すれば他の言語も簡単にできます皆さんは
vue.jsとreact.js、どちらが好きですか?


- 投稿日:2020-10-22T22:18:25+09:00
react.js(next.js)とvue.js(nuxt.js)の違いをソースで確認してみましょう
概要
最近人気のフロントエンドの言語である
react.js,vue.js,augular.jsがあります
angular.jsは下落傾向で、react.jsとvue.jsはほぼ同じように人気がありますこの記事では、
react.jsとvue.jsに対する違いと
next.jsとnuxt.jsに対する違いをソースで確認してみましょうnext.jsとnuxt.jsって何?
next.jsはreact.jsのSSR(ServerSideRender)フレームワークです
nuxt.jsはvue.jsのSSR(ServerSideRender)フレームワークです
react.jsとvue.jsは、基本的にCSR(Client Side Render)です
CSR(Client Side Render)の場合、検索エンジンに露出できない短所があり、
最初のスクリプトロード時間が長いという短所があります
react.jsとvue.jsのどちらもBtoBの場合、特別な問題はありませんが、
BtoCの場合、検索エンジンの露出が重要な要素となっているため、
結局はwebpackをカスタマイズするかnext.jsとnuxt.jsに変えることになります。プロジェクト作成の違い
yarn global add create-next-app
create-next-app next-tutorial
yarn dev
next.jsの場合、create-next-appモジュールを利用してプロジェクトを作成しますyarn global add create-nuxt-app create-nuxt-app nuxt-tutorial yarn dev
nuxt.jsの場合、create-nuxt-appモジュールを利用してプロジェクトを作成しますcomponent基本
next.jsとnuxt.jsはページディレクトリを利用してrouteします
基本的なコンポーネントソースの違いを確認してみましょうnext.js (react.js)
/pages/index.js
import { useEffect } from "react"

const Home = () => {
  useEffect(() => {
    console.log('mounted')
    return () => {
      console.log('unmounted')
    };
  }, []);

  return (
    <div>
      hello next.js
    </div>
  )
}

export default Home
nuxt.js (vue.js)
/pages/index.vue
<template>
  <div>
    hello nuxt.js
  </div>
</template>

<script>
export default {
  mounted() {
    console.log('mounted')
  },
  unmounted() {
    console.log('unmounted')
  }
}
</script>
react.jsの場合、JSXを使用してレンダリングします
vue.jsの場合、htmlを使用してレンダリングします
ライフサイクルは文法は少し違いますが、構造はほとんど似ています
react.jsの場合、JSXを学ぶ必要があるためパブリッシャーが作業が難しいため、
日本ではvue.jsが人気が高いと言われていますcomponent state
next.js (react.js)
/pages/index.js
import { useState, useEffect } from "react"

const Home = () => {
  const [count, setCount] = useState(0)

  return (
    <div>
      count : {count}
    </div>
  )
}

export default Home
nuxt.js (vue.js)
/pages/index.vue
<template>
  <div>
    count : {{count}}
  </div>
</template>

<script>
export default {
  data() {
    return {
      count: 0
    }
  }
}
</script>
react.jsの場合、react hooksであるuseStateを利用してstateを作成します
vue.jsの場合、データ関数を利用してstateを作成します
react.jsの場合、{}を利用して変数をレンダリングします
vue.jsの場合、{{ }}を利用して変数をレンダリングしますcounter
next.js (react.js)
/pages/index.js
import { useState, useEffect } from "react"

const Home = () => {
  const [count, setCount] = useState(0)

  const increaseCount = () => {
    setCount(count + 1)
  }

  const decreaseCount = () => {
    setCount(count - 1)
  }

  return (
    <>
      <div>
        count : {count}
      </div>
      <button onClick={increaseCount}>+</button>
      <button onClick={decreaseCount}>-</button>
    </>
  )
}

export default Home
nuxt.js (vue.js)
/pages/index.vue
<template>
  <div>
    <div>
      count : {{count}}
    </div>
    <button @click="increaseCount()">+</button>
    <button @click="decreaseCount()">-</button>
  </div>
</template>

<script>
export default {
  data() {
    return {
      count: 0
    }
  },
  methods: {
    increaseCount() {
      this.count +=  1
    },
    decreaseCount() {
      this.count -= 1
    }
  }
}
</script>
react.jsの場合、
setStateを使用してstateをアップデートします
vue.jsの場合、thisを使用してstateをアップデートしますreact.jsの場合、コンポーネント内部にイベント関数を作成します
vue.jsの場合、methods内部にイベント関数を作成しますreact.jsの場合、
onClickプロパティを利用してバインディングします
vue.jsの場合、@clickプロパティを利用してバインディングしますchildコンポーネントにsteteとイベント関数を伝達
next.js (react.js)
/components/sample.js
const Sample = (props) => {
  return (
    <>
      <div>
        count : {props.count}
      </div>
      <button onClick={props.increaseCount}>+</button>
      <button onClick={props.decreaseCount}>-</button>
    </>
  )
}

export default Sample
/pages/index.js
import { useState, useEffect } from "react"
import Sample from "../components/Sample"

const Home = () => {
  const [count, setCount] = useState(0)

  const increaseCount = () => {
    setCount(count + 1)
  }

  const decreaseCount = () => {
    setCount(count - 1)
  }

  return (
    <>
      <Sample
        count={count}
        increaseCount={increaseCount}
        decreaseCount={decreaseCount}
      />
    </>
  )
}

export default Home
nuxt.js (vue.js)
/components/sample.vue
<template>
  <div>
    <div>
      count : {{count}}
    </div>
    <button @click="$emit('increase-count')">+</button>
    <button @click="$emit('decrease-count')">-</button>
  </div>
</template>

<script>
export default {
  props: ['count'],
  emits: ['increase-count', 'decrease-count']
}
</script>
/pages/index.vue
<template>
  <div>
    <Sample
      :count="count"
      @increase-count="increaseCount()"
      @decrease-count="decreaseCount()"
    />
  </div>
</template>

<script>
export default {
  data() {
    return {
      count: 0
    }
  },
  methods: {
    increaseCount() {
      this.count +=  1
    },
    decreaseCount() {
      this.count -= 1
    }
  }
}
</script>
react.jsの場合、propsを利用してchildコンポーネントにstateやイベント関数を伝達します
vue.jsの場合、各属性を利用してchildコンポーネントにstateやイベント関数を伝達します
react.jsの場合、すぐにバインディングして使用できます
vue.jsの場合、$emitを利用してバインディングすると使用できますSSR function
next.js (react.js)
/pages/index.js
const Home = ({data}) => {
  return (
    <>
      {data}
    </>
  )
}

Home.getInitialProps = () => {
  return { data: 'SSR' }
}

export default Home
nuxt.js (vue.js)
/pages/index.vue
<template>
  <div>
    {{data}}
  </div>
</template>

<script>
export default {
  asyncData() {
    return { data: 'SSR' }
  },
}
</script>
SSRフレームワークの場合、htmlが構成される前にデータをfetchできる関数を提供します
next.jsの場合、getInitialPropsを使用します
nuxt.jsの場合asyncDataを使いますstate 管理
vue.jsの場合、vuexを主に使います
react.jsの場合、主にreduxを使用します
まとめ
最も人気のある言語を簡単に2つ比較してみました
ご覧のとおりvue.jsもreact.jsもメカニズムは似ています
またnext.jsとnuxt.jsもメカニズムが似ています
したがって、一つを勉強すれば他の言語も簡単にできます皆さんは
vue.jsとreact.js、どちらが好きですか?
- 投稿日:2020-10-22T18:24:02+09:00
オリジナルsvg iconの色を変える
material-uiのオリジナルのアイコンのカラーを変える
親コンポーネント
import IconFishx1 from '../../../images/icons/IconFishx1'importして、使う
<IconFishx1 color="red" />propsで
colorにredを入れる。
子供に渡ってく。子コンポーネント
colorという種類の合言葉が渡ってくる。
中身はなんだろな。いろんな色で塗る場合
color が red の時は赤で塗られる
color が green の時は緑で塗られるimport React from 'react' const IconFixhx1 = ({ color }) => { let fillColor switch (color) { case 'red': return fillColor = '#ff0000' case 'green': return fillColor = '#008000' } return ( <svg width="24" height="24" viewBox="0 0 24 24" xmlns="http://www.w3.org/2000/svg" > <path d="M22.8957 7.77686L16.7441 11.9226C16.4313 10.6134 14.763 4.50391 8.92417 4.50391C2.25119 4.50391 1 12.1408 1 12.1408C1 12.1408 2.14692 19.7777 8.92417 19.7777C15.7014 19.7777 16.8483 12.1408 16.8483 12.1408L23 17.5957V7.77686H22.8957ZM4.64929 12.1408C3.81517 12.1408 3.08531 11.3771 3.08531 10.5043C3.08531 9.63153 3.81517 8.86784 4.64929 8.86784C5.48341 8.86784 6.21327 9.63153 6.21327 10.5043C6.21327 11.3771 5.48341 12.1408 4.64929 12.1408Z" fill={fillColor} fillOpacity="0.6" /> </svg> ) } export default IconFixhx1
redがどうかの2択の場合import React from 'react' const IconFixhx1 = ({ color }) => { return ( <svg width="24" height="24" viewBox="0 0 24 24" xmlns="http://www.w3.org/2000/svg" > <path d="M22.8957 7.77686L16.7441 11.9226C16.4313 10.6134 14.763 4.50391 8.92417 4.50391C2.25119 4.50391 1 12.1408 1 12.1408C1 12.1408 2.14692 19.7777 8.92417 19.7777C15.7014 19.7777 16.8483 12.1408 16.8483 12.1408L23 17.5957V7.77686H22.8957ZM4.64929 12.1408C3.81517 12.1408 3.08531 11.3771 3.08531 10.5043C3.08531 9.63153 3.81517 8.86784 4.64929 8.86784C5.48341 8.86784 6.21327 9.63153 6.21327 10.5043C6.21327 11.3771 5.48341 12.1408 4.64929 12.1408Z" fill={color === 'red' ? '#ff0000' : 'black'} fillOpacity="0.6" /> </svg> ) } export default IconFixhx1
- 投稿日:2020-10-22T18:24:02+09:00
material-ui オリジナルsvg iconの色を変える
material-uiのオリジナルのアイコンのカラーを変える
親コンポーネント
import IconFishx1 from '../../../images/icons/IconFishx1'importして、使う
<IconFishx1 color="red" />propsで
colorにredを入れる。
子供に渡ってく。子コンポーネント
colorという種類の合言葉が渡ってくる。
中身はなんだろな。いろんな色で塗る場合
colorがredの時は赤で塗られる
colorがgreenの時は緑で塗られるimport React from 'react' const IconFixhx1 = ({ color }) => { let fillColor switch (color) { case 'red': return fillColor = '#ff0000' case 'green': return fillColor = '#008000' } return ( <svg width="24" height="24" viewBox="0 0 24 24" xmlns="http://www.w3.org/2000/svg" > <path d="M22.8957 7.77686L16.7441 11.9226C16.4313 10.6134 14.763 4.50391 8.92417 4.50391C2.25119 4.50391 1 12.1408 1 12.1408C1 12.1408 2.14692 19.7777 8.92417 19.7777C15.7014 19.7777 16.8483 12.1408 16.8483 12.1408L23 17.5957V7.77686H22.8957ZM4.64929 12.1408C3.81517 12.1408 3.08531 11.3771 3.08531 10.5043C3.08531 9.63153 3.81517 8.86784 4.64929 8.86784C5.48341 8.86784 6.21327 9.63153 6.21327 10.5043C6.21327 11.3771 5.48341 12.1408 4.64929 12.1408Z" fill={fillColor} fillOpacity="0.6" /> </svg> ) } export default IconFixhx1
redがどうかの2択の場合import React from 'react' const IconFixhx1 = ({ color }) => { return ( <svg width="24" height="24" viewBox="0 0 24 24" xmlns="http://www.w3.org/2000/svg" > <path d="M22.8957 7.77686L16.7441 11.9226C16.4313 10.6134 14.763 4.50391 8.92417 4.50391C2.25119 4.50391 1 12.1408 1 12.1408C1 12.1408 2.14692 19.7777 8.92417 19.7777C15.7014 19.7777 16.8483 12.1408 16.8483 12.1408L23 17.5957V7.77686H22.8957ZM4.64929 12.1408C3.81517 12.1408 3.08531 11.3771 3.08531 10.5043C3.08531 9.63153 3.81517 8.86784 4.64929 8.86784C5.48341 8.86784 6.21327 9.63153 6.21327 10.5043C6.21327 11.3771 5.48341 12.1408 4.64929 12.1408Z" fill={color === 'red' ? '#ff0000' : 'black'} fillOpacity="0.6" /> </svg> ) } export default IconFixhx1
- 投稿日:2020-10-22T10:47:19+09:00
next.jsでurl pathを取得したい
共通のコンポーネント使っててpath別で処理したいときあるよね。
必要な度にググってるのでメモ。だめな例
SSRされたときはdocumentがないので下記ではだめ。
pages/my-component.jsimport React from 'react'; const MyComponent = props => { console.log(document.location); ...Server Error ReferenceError: document is not defined This error happened while generating the page. Any console logs will be displayed in the terminal window.だめな例2
client sideで使えって怒られた
pages/my-component.jsimport React from 'react'; import Router from 'next/router'; const MyComponent = props => { console.log(Router.pathname); ...Server Error Error: No router instance found. You should only use "next/router" inside the client side of your app.いい例
hookが提供されてるからこれ使おう
pages/my-component.jsimport React from 'react'; import { useRouter } from 'next/router'; const MyComponent = props => { const router = useRouter(); console.log(router.pathname); // '/example/mycomponent' ...Server Error Error: No router instance found. You should only use "next/router" inside the client side of your app.参考
next/router | Next.js - https://nextjs.org/docs/api-reference/next/router
- 投稿日:2020-10-22T10:38:22+09:00
【TypeScript】Reactでちゃんと型を指定したい
コールバックなどの型を
anyにしないために。Reactの範囲だけでなく一般のtsの記述もあります。
Reactは名前
Reactでimportしていることとします。
props,stateコンポーネント作成時にpropsで受け取る型とstateの型を指定する。
// ジェネリクスで<propsの型, stateの型>を指定する
class Hello extends React.Component<{user: string}, {greeting: string}> {
  constructor(props: {user: string}) {
    super(props);
    this.state = {greeting: 'Good morning'};
  }

  render() {
    return (<p>{this.state.greeting} {this.props.user}!</p>)
  }
}

// 使う側
class TestComponent extends React.Component {
  render() {
    const elem: React.ReactNode = <p>Hello React</p>
    return (
      <Hello user="kide"/>
    )
  }
}
事前に
typeを宣言しておくこともできる。type userInputPropsType = { name: string, onNameChanged: (arg0: React.ChangeEvent<HTMLInputElement>)=>void } class UserInput extends React.Component<userInputPropsType, {}> { render() { return ( <input value={this.props.name} onChange={this.props.onNameChanged} /> ) } }コールバック
イベントは
React.ChangeEvent,React.MouseEventなどで引数を受け取る。
ジェネリクスで要素を指定するが、ちゃんと指定しないとtarget.valueなどを参照できなくなる。受け取れるイベントの確認は公式ドキュメントで。
class UserButton extends React.Component<{}, {userName: string}> {
  nameChanged = (event: React.ChangeEvent<HTMLInputElement>)=>{
    this.setState({userName: event.target.value});
  }

  buttonPressed = (event: React.MouseEvent<HTMLButtonElement>)=>{
    alert(this.state.userName);
  }

  render() {
    return (
      <div>
        <input onChange={this.nameChanged} />
        <button onClick={this.buttonPressed}>Click!</button>
      </div>
    )
  }
}
要素の受け取り
childrenで描画する時はReact.ReactNode型で受け取る。// propsでchildrenを受け取るようにする。 // 他のプロパティも受け取れる(color) class ColorPane extends React.Component<{children: React.ReactNode, color: string}, {}> { render() { return ( <div style={{background: this.props.color}}> {this.props.children} </div> ) } } // 使う側 class TestComponent extends React.Component { render() { const elem: React.ReactNode = <p>Hello React</p> return ( <div> <ColorPane color="blue"> <h1>Blue Pane</h1> <p>This is blue pane text</p> </ColorPane> <ColorPane color="red"> <h1>Red Pane</h1> <p>This is red pane text</p> </ColorPane> </div> ) } }
- 投稿日:2020-10-22T08:27:17+09:00
【React⑦】import・export基本
モジュール活用
export
機能分割して切り分けたモジュールを他のコードで読み込み使えるようにする
名前付きexport
1モジュールから複数の関数をexportできる
classはexportできない//1ファイルで複数の関数を宣言、export export function Foo(){ return(<h1>Foo</h1>) } //アロー関数の場合 export const Bar = () => { return(<h1>Bar</h1>) }名前なしexport
1ファイル1モジュールexport(ES6推奨)
アロー関数宣言後export
classもexport可能export default function Foo(){ return(<h1>Foo</h1>) }//アロー関数の場合 const Bar = () => { return(<h1>Bar</h1>) } export default Bar//Fuga classを継承したHogeをexport export default class Hoge extends Fuga{ render(){ return(<h1>Fuga</h1>) } }import
モジュール全体import
名前なしexportしたモジュールを読み込む
npmで管理しているパッケージReactをimportする時もこれimport React from 'React'; import Article from "./Article";関数ごとにimport
名前付きexportされたモジュールをimport
{}にimportしたい関数名を書くimport { Foo,Bar } from './FooBar';別名でimport
import React from 'React';
//モジュール全体の場合
import * as MyArticle from './Article';
import { Foo as MyFoo } from './FooBar';
複数の関数をexportしているファイルを全部一気にimportして、関数をピリオドで指定することもできる
import * as FooBar from './FooBar';

render(){
    return(
        <>
            <FooBar.Foo />
            <FooBar.Bar />
        </>
    )
}
- 投稿日:2020-10-22T07:52:38+09:00
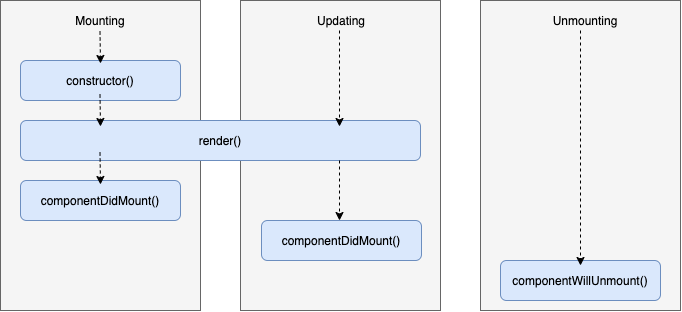
【React⑥】ライフサイクルで主要なメソッド
ライフサイクルとは
- コンポネントが生まれてから死ぬまでの時間の流れ(データやviewの変更など)
- 各段階で、必要な処理をライフサイクルメソッドで記述
- Mounting:コンポネントが配置される期間(URLにアクセスした時)
- Updating:コンポネントが変更される期間(画面クリック、データの操作を行った時)
- Unmounting:コンポネントが破棄される期間(画面を閉じた時)
ライフサイクルの必要性
*関数の外に影響を与える関数を記述するため(DOM変更、API通信、ログ出力、、)
*副作用のある処理を記述する(適切な場所に配置すべき処理)ことができるライフサイクルメソッド
Mounting
- constructor():stateなどを初期化。コンポネントの中で初めから使いたいものを宣言
- render():バーチャルDOMを描画する。JSXをリターンする。
- componentDidMount():render後に1度だけ呼ばれてイベントリスナー設定やAPI通信に使う
Updating:
- render():VDOMを再描画
- componentDidMount():再レンダー後に呼ばれる。(スクロールイベントでコンポネント表示など)
Unmounting
- componentWillUnmount():コンポネント破棄直前にリソースを開放、リスナーの解除など
ボタンがクリックされるといいねをカウントの実装
イベントリスナーで
Artucle.jsxのid={"counter"}のボタンに対してclickした時にcountUp関数を呼ぶ。
この時countUp()で渡すとrender無限ループになってしまうので関数型で書くか、関数名のみ渡してあげる。Blog.jsximport React from 'React'; import Article from "./Article"; class Blog extends React.Component{ constructor(props){ super(props); this.state ={ isPublished:false, count:0 } } componentDidMount(){ document.getElementById('counter').addEventListener('click', this.countUp) } togglePublished = () =>{ this.setState( {isPublished: !this.state.isPublished}) }; //呼び出されたらcountのstateを変更 countUp = () => { this.setState( {count: this.state.count + 1}) } render(){ return( <> <Article title={"React"} isPublished={this.state.isPublished} toggle = {() => this.togglePublished()} count={this.state.count} /> </> ) } } export default BlogArticle.jsxconst Article = (props) =>{ return( <div> <h2>{props.title}</h2> <label htmlFor="check">公開状態: </label> <input type="checkbox" checked={props.isPublished} id="check" onClick={() => props.toggle()}/> <LikeButton count={props.count} /> </div> ) };Likebutton.jsximport React from 'React'; //関数名はファイル名と合わせる const LikeButton = () =>{ return( <button id={"counter"}>いいね数:{props.count}</button> ) } export default LikeButtonstateを更新・リスナー設定を解除
//いいね数が10超えたら0に戻す
componentDidUpdate(){
    if (this.state.count >= 10){
        this.setState({count:0})
    }
}
リスナーを解除しておくとサーバの負荷が減る。
componentWillUnmount(){
    document.getElementById('counter').addEventListener('click', this.countUp)
}
- 投稿日:2020-10-22T02:19:35+09:00
ReactからBlocklyを使ってみた
Qiita初投稿です。ReactでBlocklyエディタを表示させるまでの手順を紹介します。
使用環境はこんな感じ。$ npm -v 6.14.8 $ create-react-app --version 3.4.11. create-react-appする
Reactプロジェクトの作成にはcreate-react-appを使用しました。
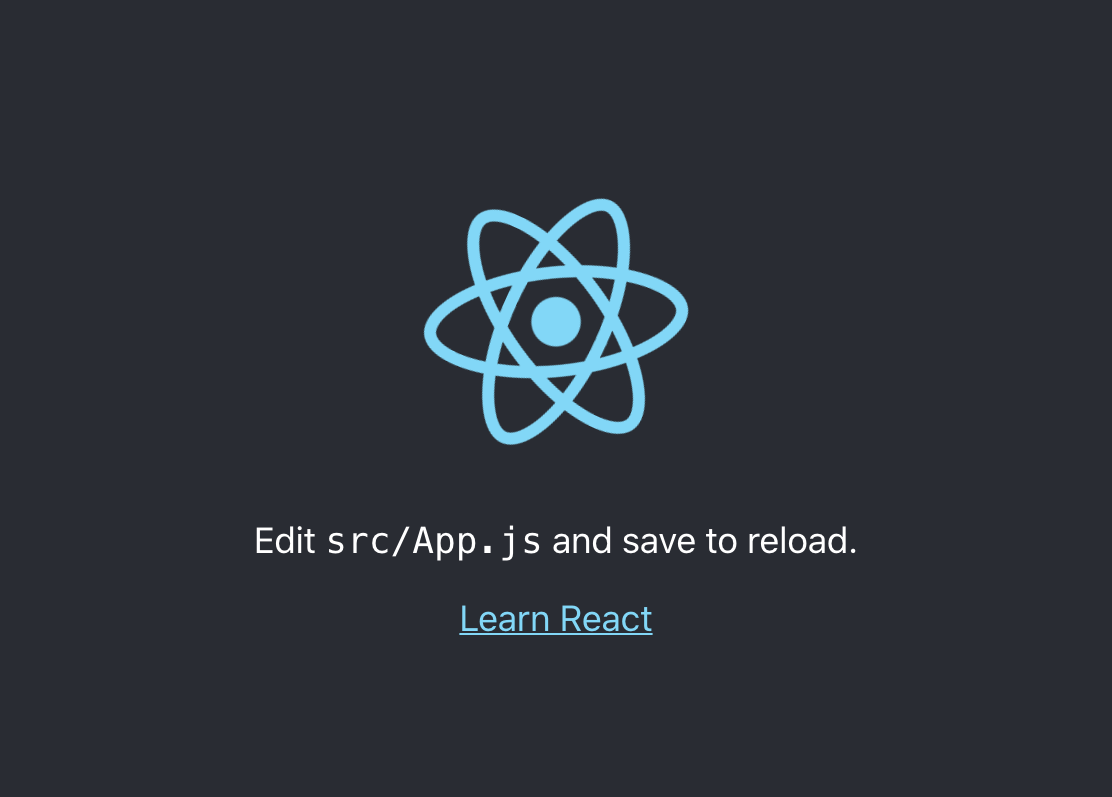
$ create-react-app blockly-react
(省略)
Happy hacking!
とりあえずちゃんと作成できているかテスト
$ cd blockly-react
$ npm start
自動的にブラウザが開いて以下の画面が出ていればOKです。
2. Blocklyのインストール
Blockly公式のnpmパッケージを入れます。
$ npm install blockly記事を書いている時点ではこのバージョンが入りました。
package.json{ "dependencies": { ... "blockly": "^3.20200924.3", ... }, }3. App.jsの編集
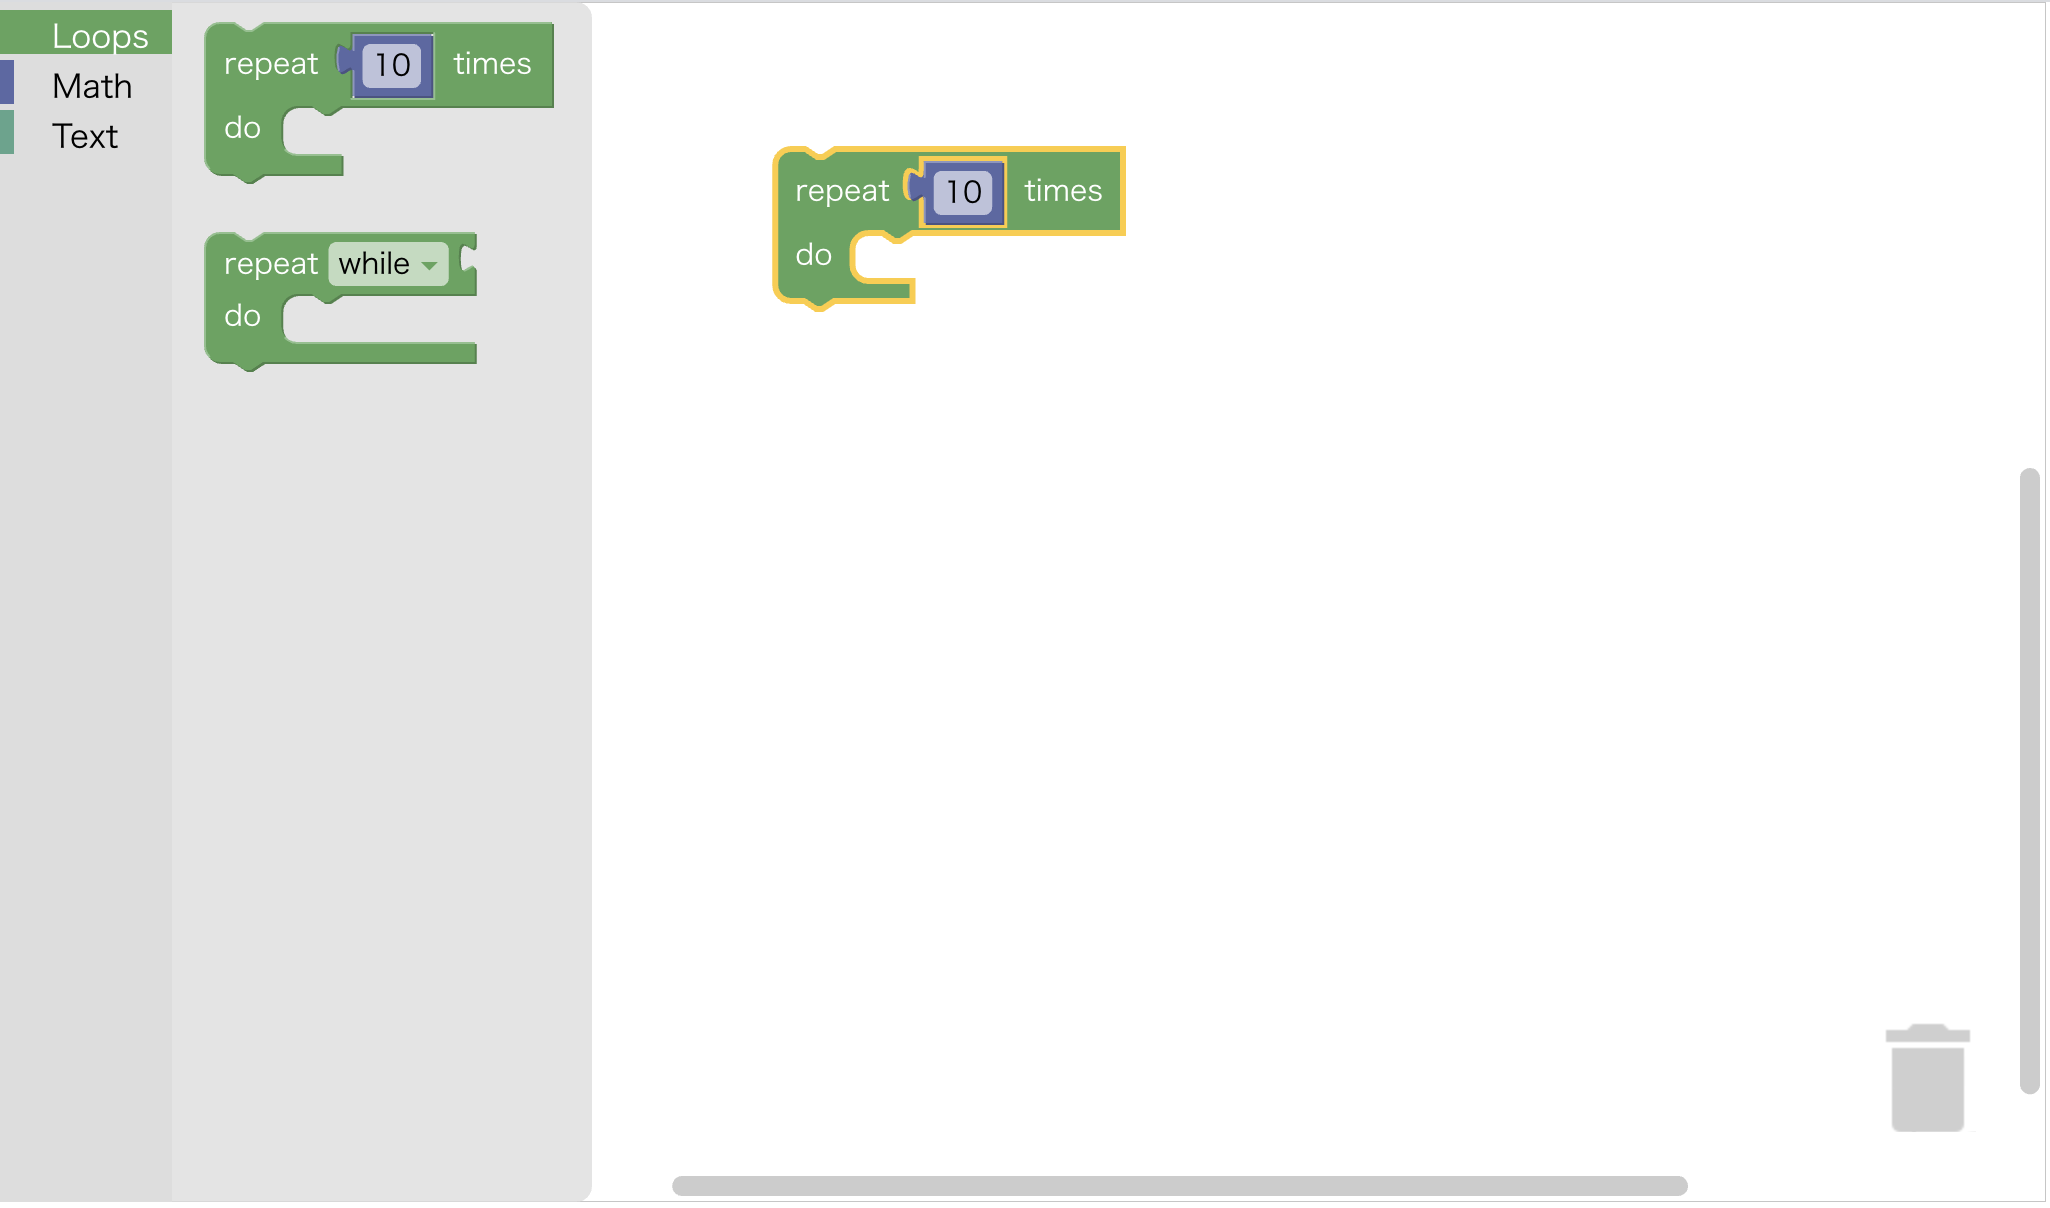
App.jsに元々入っているコードは使わないので消し、まずは愚直に以下のコードで試してみます。
App.jsimport React, { useEffect } from 'react'; import Blockly from "blockly"; function App() { useEffect(() => { Blockly.inject("blocklyDiv", { toolbox: document.getElementById("toolbox") }); }); return ( <div> <div id="blocklyDiv" style={{width: "1024px", height: "600px"}}></div> <xml id="toolbox" style={{display: "none"}}> <category name="Loops" colour="%{BKY_LOOPS_HUE}"> <block type="controls_repeat_ext"> <value name="TIMES"> <block type="math_number"> <field name="NUM">10</field> </block> </value> </block> <block type="controls_whileUntil"></block> </category> <category name="Math" colour="%{BKY_MATH_HUE}"> <block type="math_number"> <field name="NUM">123</field> </block> </category> <category name="Text" colour="%{BKY_TEXTS_HUE}"> <block type="text"></block> <block type="text_print"></block> </category> </xml> </div> ); } export default App;
Blockly.injectはblocklyDivやtoolboxの要素を参照するので、useEffectを使用することでDOMが更新された後に実行するようにしています。
画面は問題なく出ていますが、Chromeのコンソールを見ると大量のWarningが...。
そのうちの1つは、
Warning: The tag <xml> is unrecognized in this browser. If you meant to render a React component, start its name with an uppercase letter.
だそうです。
他のWarningも似たようなもので、xmlやcategory、blockなどのタグを使っているのが理由のようです。4. Warningを消す
App.jsimport React, { useEffect } from 'react'; import Blockly from "blockly"; function App() { const xml = ` <xml id="toolbox"> <category name="Loops" colour="%{BKY_LOOPS_HUE}"> <block type="controls_repeat_ext"> <value name="TIMES"> <block type="math_number"> <field name="NUM">10</field> </block> </value> </block> <block type="controls_whileUntil"></block> </category> <category name="Math" colour="%{BKY_MATH_HUE}"> <block type="math_number"> <field name="NUM">123</field> </block> </category> <category name="Text" colour="%{BKY_TEXTS_HUE}"> <block type="text"></block> <block type="text_print"></block> </category> </xml> `; const xmlParser = new DOMParser(); const xmlDom = xmlParser.parseFromString(xml, "text/xml"); useEffect(() => { Blockly.inject("blocklyDiv", { toolbox: xmlDom.getElementById("toolbox") }); }); return ( <div> <div id="blocklyDiv" style={{width: "1024px", height: "600px"}}></div> </div> ); } export default App;jsx内に直接xmlを書くのではなく、文字列からパースするアプローチで行きました。
これでWarningも出ずにBlocklyエディタの画面も問題なく使えます。