- 投稿日:2020-10-22T20:30:38+09:00
昔懐かしの Robots を TypeScript で実装する (CUI ver.)
TypeScriptとお友達になりたくて・・・
はじめに
Robots1 をTypeScript で実装してみた(でも、CUI)
Robots について
- robots - Wikipediaの説明を拝借すると下記の通り。
robots(ロボッツ)は、ターン制のコンピュータゲームである。プレイヤーキャラクターを追いかけて殺すようにプログラムされたロボットから逃げ、ロボット同士や障害物と衝突させて破壊するのが目的である。
- 百聞は一見にしかずということで、ゲームをプレイしている様子
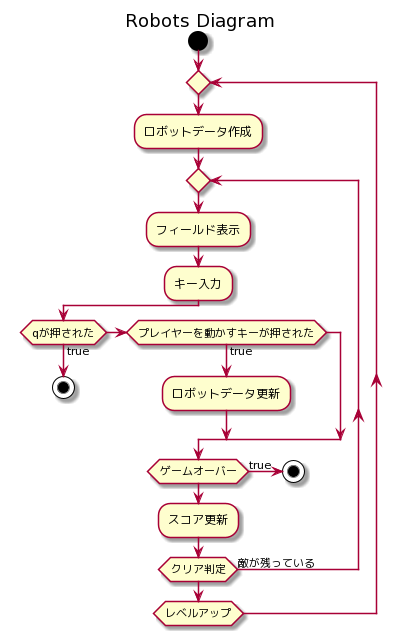
フローチャート
ざっくりこんな感じ (実際のコードとは微妙に違うかも)
処理
ロボットデータ作成
- フィールド上にはプレイヤー一体、敵(レベル×10体)、敵同士が衝突して発生するスクラップの3種類が存在し、フィールド上のロボットの状態を示す列挙体を定義
- フィールド上の全てのロボットをロボットの配列で表現し、InterfaceRobotで定義
- ロボットの座標は乱数で決め、初期配置ではすでにロボットが配置されている場所には配置しない
// ロボットの種類(プレイヤー、敵、スクラップ)
enum type {
    Player,
    Enemy,
    Scrap
}

// ロボットのインタフェース
interface InterfaceRobot {
    // x座標
    x: number
    // y座標
    y: number
    // ロボットの種類
    type: type
}
// プレイヤーロボット、敵ロボットの初期配置 function make_robots(robots: InterfaceRobot[], width: number, height: number, level: number) { let x = Math.floor((Math.random() * width) + 1) let y = Math.floor((Math.random() * height) + 1) robots.push({ x, y, type: type.Player }) const numOfEnemy = level * 10 let count = 0 while (count < numOfEnemy) { x = Math.floor((Math.random() * width) + 1) y = Math.floor((Math.random() * height) + 1) if (!check_put_robots(robots, x, y)) { // 同じ場所にロボットを置かない continue } robots.push({ x, y, type: type.Enemy }) count++ } }フィールド表示
- 幅60[px], 高さ20[px]のフィールドを作成 (print_field)
- フィールド内にロボット配列の内容に応じて、プレイヤー、敵を配置 (put_robots)
- フィールドの右に操作方法、レベル、スコアを表示 (print_guide)
// フィールドの表示
function print_field(width: number, height: number) {
    // tslint:disable-next-line: no-console
    console.clear()
    // top of field
    process.stdout.write("+")
    for (let i = 0; i < width; i++) {
        process.stdout.write("-")
    }
    process.stdout.write("+\n")

    // inside of field
    for (let j = 0; j < height; j++) {
        process.stdout.write("|")
        for (let i = 0; i < width; i++) {
            process.stdout.write(" ")
        }
        process.stdout.write("|\n")
    }

    // bottom of field
    process.stdout.write("+")
    for (let i = 0; i < width; i++) {
        process.stdout.write("-")
    }
    process.stdout.write("+")
}
// ロボットのタイプに応じて表示方法を変える function put_robots(robots: InterfaceRobot[]) { for (const item of robots) { process.stdout.cursorTo(item.x, item.y) if (item.type === type.Player) { // put player robot process.stdout.write('@') } else if (item.type === type.Enemy) { // put enemy robots process.stdout.write('+') } else if (item.type === type.Scrap) { // put scrap process.stdout.write('*') } else { ; } } }// 右端のゲームのガイドを表示 function print_guide(width: number, level: number, score: number) { // tslint:disable-next-line: variable-name const cursor_x = width + 3 // tslint:disable-next-line: variable-name let cursor_y = 0 process.stdout.cursorTo(cursor_x, cursor_y) process.stdout.write("\n") process.stdout.cursorTo(cursor_x, cursor_y++) cursor_y++ process.stdout.write("Directions:\n") process.stdout.cursorTo(cursor_x, cursor_y++) process.stdout.write("y k u\n") process.stdout.cursorTo(cursor_x, cursor_y++) process.stdout.write(" \\|/\n") process.stdout.cursorTo(cursor_x, cursor_y++) process.stdout.write("h- -l\n") process.stdout.cursorTo(cursor_x, cursor_y++) process.stdout.write(" /|\\ \n") process.stdout.cursorTo(cursor_x, cursor_y++) process.stdout.write("b j n\n\n") cursor_y++ process.stdout.cursorTo(cursor_x, cursor_y++) process.stdout.write("Commands:\n\n") cursor_y++ process.stdout.cursorTo(cursor_x, cursor_y++) process.stdout.write("w: wait for end\n") process.stdout.cursorTo(cursor_x, cursor_y++) process.stdout.write("t: teleport\n") process.stdout.cursorTo(cursor_x, cursor_y++) process.stdout.write("q: quit\n\n") cursor_y++ process.stdout.cursorTo(cursor_x, cursor_y++) process.stdout.write("Legend:\n\n") cursor_y++ process.stdout.cursorTo(cursor_x, cursor_y++) process.stdout.write("+: robot\n") process.stdout.cursorTo(cursor_x, cursor_y++) process.stdout.write("*: junk heap\n") process.stdout.cursorTo(cursor_x, cursor_y++) process.stdout.write("@: you\n\n") cursor_y++ process.stdout.cursorTo(cursor_x, cursor_y++) process.stdout.write("Level:" + level + "\n\n") process.stdout.cursorTo(cursor_x, cursor_y++) process.stdout.write("Score:" + score + "\n\n") }キー入力
- TypeScriptでキー入力のやり方がよく分からず、実はここが一番時間がかかってしまった(Node.js/JavaScriptなど周辺の事情が全くわからないまま、見様見真似で実装・・・)
通常移動
下記のキーが入力されたとき、プレイヤーを一コマ動かす
- y:左上
- k:上
- u:右上
- h:左
- l:右
- b:左下
- j:下
- n:右下
- w:待機 (wキーが押されたときは待機し、敵ロボットだけが動く)
テレポート
- tキーが押されたときはランダムでフィールドのどこかにプレイヤーを移動(テレポート)させる
- 運が悪いと敵の隣にテレポートして即死します
    // keypressライブラリを読み込む
    const keypress = require('keypress')

    // keypressを標準入力に設定
    // make `process.stdin` begin emitting "keypress" events
    keypress(process.stdin)

    // keypressイベントの購読を開始
    // listen for the "keypress" event
    process.stdin.on('keypress', (ch: any, key: any) => {
        let inputCheck = true
        let x = robots[0].x
        let y = robots[0].y

        // 入力情報を取得
        switch (ch) {
            case 'y':
                // 左上に1マス移動, スクラップの上には移動できない
                if (x - 1 <= 0 || y - 1 <= 0 || !check_scrap(robots, x - 1, y - 1)) {
                    inputCheck = false
                    break;
                }
                robots[0].x--
            case 'k':
                // 上に1マス移動
                if (y - 1 <= 0 || !check_scrap(robots, robots[0].x, y - 1)) {
                    inputCheck = false
                    break;
                }
                robots[0].y--
                break
            case 'u':
                // 右上に1マス移動
                if (x + 1 >= width + 1 || y - 1 <= 0 || !check_scrap(robots, x + 1, y - 1)) {
                    inputCheck = false
                    break
                }
                robots[0].y--
            case 'l':
                // 右に1マス移動
                if (x + 1 >= width + 1 || !check_scrap(robots, x + 1, robots[0].y)) {
                    inputCheck = false
                    break
                }
                robots[0].x++
                break
            case 'n':
                // 右下に1マス移動
                if (x + 1 >= width + 1 || y + 1 >= height + 1 || !check_scrap(robots, x + 1, y + 1)) {
                    inputCheck = false
                    break
                }
                robots[0].x++
            case 'j':
                // 下に1マス移動
                if (y + 1 >= height + 1 || !check_scrap(robots, robots[0].x, y + 1)) {
                    inputCheck = false
                    break
                }
                robots[0].y++
                break
            case 'b':
                // 左下に1マス移動
                if (x - 1 <= 0 || y + 1 >= height + 1 || !check_scrap(robots, x - 1, y + 1)) {
                    inputCheck = false
                    break
                }
                robots[0].y++
            case 'h':
                // 左に1マス移動
                if (x - 1 <= 0 || !check_scrap(robots, x - 1, robots[0].y)) {
                    inputCheck = false
                    break
                }
                robots[0].x--
                break
            case 't':
                // スクラップ以外にテレポート. 運が悪いと敵の隣にテレポートで即死.
                do {
                    x = Math.floor((Math.random() * width) + 1)
                    y = Math.floor((Math.random() * height) + 1)
                } while (!check_scrap(robots, x, y))
                robots[0].x = x
                robots[0].y = y
                break
            case 'w':
                // 待機
                break
            case 'q':
                // 終了
                inputCheck = false
                process.stdin.pause()
                break
            default:
                inputCheck = false
        }
        // プレイヤーロボットを動かせたとき
        // ・・・略
    })
ロボットデータ更新/ゲームオーバー
- プレイヤーを動かした位置をもとに敵を動かす(プレイヤーの向かうように敵を動かす)
- 敵同士がぶつかればスクラップ化
- プレイヤーと敵同士が衝突したらゲームオーバー
// 敵ロボットの移動、スクラップ確認、プレイヤーロボットと敵ロボット座標が一致したときゲームオーバー
function move_robots(robots: InterfaceRobot[]): boolean {
    for (const item of robots) {
        if (item.type === type.Player || item.type === type.Scrap) {
            continue
        }
        // プレイヤーの位置に向かうように敵を一マス動かす
        if (robots[0].x === item.x && robots[0].y > item.y) {
            item.y++
        } else if (robots[0].x === item.x && robots[0].y < item.y) {
            item.y--
        } else if (robots[0].x > item.x && robots[0].y === item.y) {
            item.x++
        } else if (robots[0].x < item.x && robots[0].y === item.y) {
            item.x--
        } else if (robots[0].x < item.x && robots[0].y < item.y) {
            item.x--
            item.y--
        } else if (robots[0].x < item.x && robots[0].y > item.y) {
            item.x--
            item.y++
        } else if (robots[0].x > item.x && robots[0].y < item.y) {
            item.x++
            item.y--
        } else if (robots[0].x > item.x && robots[0].y > item.y) {
            item.x++
            item.y++
        }
    }

    // 敵同士が衝突したらスクラップにする
    const length = robots.length
    for (let i = 1; i < length - 1; i++) {
        for (let j = i + 1; j < length; j++) {
            if ((robots[i].x === robots[j].x) && (robots[i].y === robots[j].y)) {
                robots[i].type = type.Scrap
                robots[j].type = type.Scrap
            }
        }
    }

    // プレイヤーと敵が衝突したらゲームオーバー
    for (let i = 1; i < length; i++) {
        if ((robots[0].x === robots[i].x && robots[0].y === robots[i].y)) {
            return false
        }
    }

    return true
}
スコア更新
- 敵をスクラップにしたらスコア加算
- 敵一体につき+10pt
// スコアの計算 (スクラップ1体あたり10点)
function calc_score(robots: InterfaceRobot[]): number {
    const length = robots.length
    let count = 0
    for (let i = 1; i < length; i++) {
        if (robots[i].type === type.Scrap) {
            count++
        }
    }
    return count * 10
}
クリア判定
- 全てのロボットを動かしたあとで、Enemyが0になっていればクリア
// 敵ロボットがいない場合クリア
function check_clear(robots: InterfaceRobot[]): boolean {
    for (let i = 1; i < robots.length; i++) {
        if (robots[i].type === type.Enemy) {
            return false
        }
    }
    return true
}
レベルアップ
- レベルを一つ上げて、ボーナスポイントをスコアに加算
- フローチャートの最初のロボットデータ作成に移り、新しいレベルのロボットデータを作成する
・・・(略)
                // プレイヤー、敵、スクラップ表示
                print_field(width, height)
                put_robots(robots)
                score = calc_score(robots)
                print_guide(width, level, sum_score + score)
                if (check_clear(robots)) {
                    // クリア判定
                    // レベルx100のボーナスポイント
                    sum_score += (score + level * 100)
                    // レベルアップステージ作成及び表示
                    robots = []
                    make_robots(robots, width, height, ++level)
                    print_field(width, height)
                    put_robots(robots)
                    print_guide(width, level, sum_score)
                }
・・・(略)
ソースコード
動作確認環境
- OS: macOS Catalina Version 10.15.7
- Node.js : v12.19.0
動作方法
- ソースコードをクローンもしくはダウンロード
- ts-robots-cui/フォルダへ移動し、
npm initで初期化npm install --save-dev typescript tslint @types/nodeで TypeScript をコンパイルする環境構築./node_modules/.bin/tscでコンパイルnode ./dist/index.jsで実行実行画面
おわりに
- TypeScriptでRobotsゲームのロジック部分ができたので、フロントエンドと組み合わせればブラウザ上でRobotsが動く・・・と思う
- 正直、TypeScriptの恩恵にあずかった書き方ではないような・・・そもそもアルゴリズムのセンスが微妙(もっとスマートに書けると思う)
- 少しはTypeScriptとお近づきになったと思いたい
参考資料
- keypress - npm
- O'Reilly Japan - プログラミングTypeScript
- Node.js + webpack+ TypeScript 超ざっくりブラウザゲーム制作入門 | 作っちゃうおじさん制作記録
余談ですが、高専在籍時に C++ で Robots を実装する課題があって、これがきっかけで Robots を知りました ↩

- 投稿日:2020-10-22T15:04:27+09:00
expressインストール[node.js - ejs]
- 投稿日:2020-10-22T14:03:17+09:00
ejsの立ち上げかた[node.js]
- 投稿日:2020-10-22T11:26:31+09:00
Nuxtjsでgenerate時に、公開しているページのtitleとurlのリストを作成する
※力技での解決法です。絶対もっと良い方法があるはず。
発端としては、
フロントのNuxt側でデータを受け取るだけでなく、
外部に渡せる形で書き出せないか?と思ったこと。
ググったけど、あまり情報が見当たらず、
「そもそもこの発想自体がズレてるのでは?」と思えてきたが、
とりあえず作ってみた。内容としてはシンプルに、
nuxt generateで生成された
distの中のhtmlファイル群をスクレイピングすること。まずはささっとモジュール作成。
generate-pages-info.jsconst {resolve} = require('path') const {readFileSync, writeFileSync} = require('fs') const requireContext = require('require-context'); module.exports = async function () { const {rootDir, generate: {dir: generateDir}} = this.options const fileName = 'pages.json' this.nuxt.hook('generate:done', async () => { const dir_path = resolve(rootDir, generateDir); const html_files = {}; const page_paths = requireContext(dir_path, true, /\.html$/).keys(); for (const page_path of page_paths) { const name = page_path .split("./") .pop() .split(".") .shift(); html_files[name] = await getPageInfo(dir_path, page_path); } const pages_json = JSON.stringify(html_files); const generate_file_path = resolve(rootDir, generateDir, fileName); writeFileSync(generate_file_path, pages_json); }) } async function getPageInfo(dir_path, page_path) { const file_path = resolve(dir_path, page_path); const content = await readFileSync(file_path, "utf-8"); const page_title = content.match(/<title>(.*?)<\/title>/)[1]; const page_metas = await pageMetas(content); return { "title": page_title, "metas": page_metas, "url": page_path } } async function pageMetas(content) { const regex_text = /<meta[^<>]*?name=\"(.*?)\"[^<>]*?content=\"(.*?)\"/; const metas = content.match(new RegExp(regex_text, 'g')); let result = []; for (const meta of metas) { const match = meta.match(new RegExp(regex_text)); result.push({ "name": match[1], "content": match[2] }) } return result; }nuxt.config.jsにモジュール登録。
nuxt.config.jsmodules: [ '~modules/generate-pages-info.js' ]あとは
nuxt generateして、
公開フォルダ(デフォルトではdist)にpages.jsonが出来ていればOK。パーサー使えばもっと上品にできるかも。
非同期処理関連が結構躓いた。
当たり前だけど、同じサイトだろうが別ファイルの読み込みは時間かかるのね。
- 投稿日:2020-10-22T09:30:24+09:00
Visual Studio CodeでChromeを起動してNode.jsをデバッグする設定
すぐ忘れるのでメモ
拡張機能より「Debugger for Chrome」をインストール
https://marketplace.visualstudio.com/items?itemName=msjsdiag.debugger-for-chrome.vscode/launch.jsonに以下を記述
{
    "version": "0.2.0",
    "configurations": [
        {
            "name": "Launch Chrome",
            "request": "launch",
            "type": "pwa-chrome",
            "url": "http://localhost:3000",
            "webRoot": "${workspaceFolder}"
        },
        {
            "name": "Run npm start",
            "command": "npm start",
            "request": "launch",
            "type": "node-terminal"
        },
    ],
    "compounds": [
        {
            "name": "Launch Chrome & npm start",
            "configurations": [
                "Launch Chrome",
                "Run npm start"
            ]
        }
    ]
}
- [Launch Chrome & npm start]をデバッグ実行
- 投稿日:2020-10-22T08:22:10+09:00
Node.jsについて超ミニマムに解説してみる
超ミニマムシリーズとは
様々な事柄に関して超短く解説するシリーズです。
これを読んであなたの興味が沸き、その飽くことのない知識欲を満たすことを願っています。Node.jsとは
「サーバー側で実行されるJavaScript」
プログラミング言語と言語処理系については➡プログラミング言語と言語処理系について超ミニマムに解説してみるchromeの言語処理系とNode.jsの言語処理系は同じ!?
chromeの言語処理系であるJSエンジンはV8です。
ただ実は、Node.jsの言語処理系もV8なんです!あれ?じゃぁブラウザと同じじゃん!と思いますよね?
ただ、前述したように「Node.jsはサーバー側で実行される」というとこがポイントです!
ブラウザはユーザーが立ち上げないとコードが実行されませんが、Node.jsはサーバーに常に存在しているのでコードをいつでも実行できます。おまけ(ブラウザのJSエンジン(言語処理系)との違い)
「ブラウザにはグローバル変数があるが、Node.jsには存在しない」
グローバル変数とは、いわゆるvarで宣言する変数です。
では、なぜNode.jsにはグローバル変数が存在しないのか?
それは、Node.jsには多くのモジュールが存在するため、モジュール間で変数が干渉するのを防ぐためにグローバル変数がないのです。
(※モジュールとは・・・関数などを機能ごとに分けたファイルのこと)
(※変数の干渉とは・・・同じ名前の変数が他のモジュールに存在した場合に、値を上書きしてしまったり予期せぬエラーを生むこと)