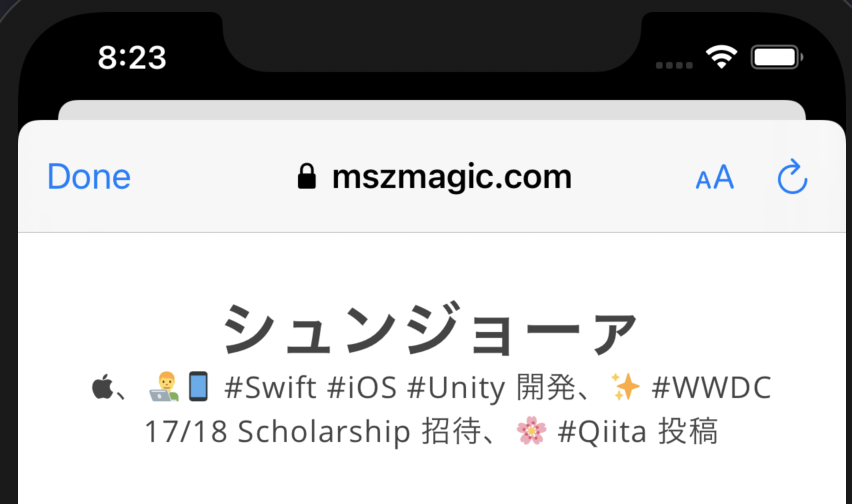
- 投稿日:2020-10-17T22:27:26+09:00
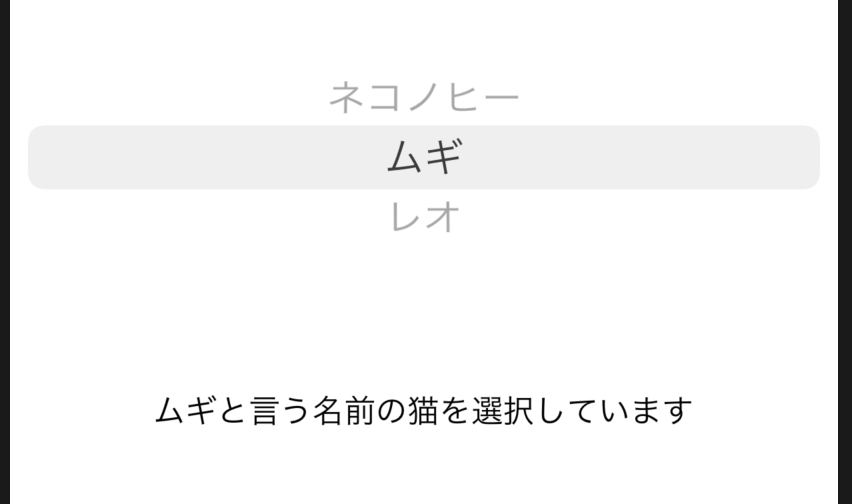
UIViewをコードからPreview可能にする。
先に結論
テストとかの時にデバッガからViewを見れたら便利になるよってお話。
実装
debugQuickLookObjectを実装する。Swift4.0あたりから
@objcをつけないと動かなくなってる。iOS
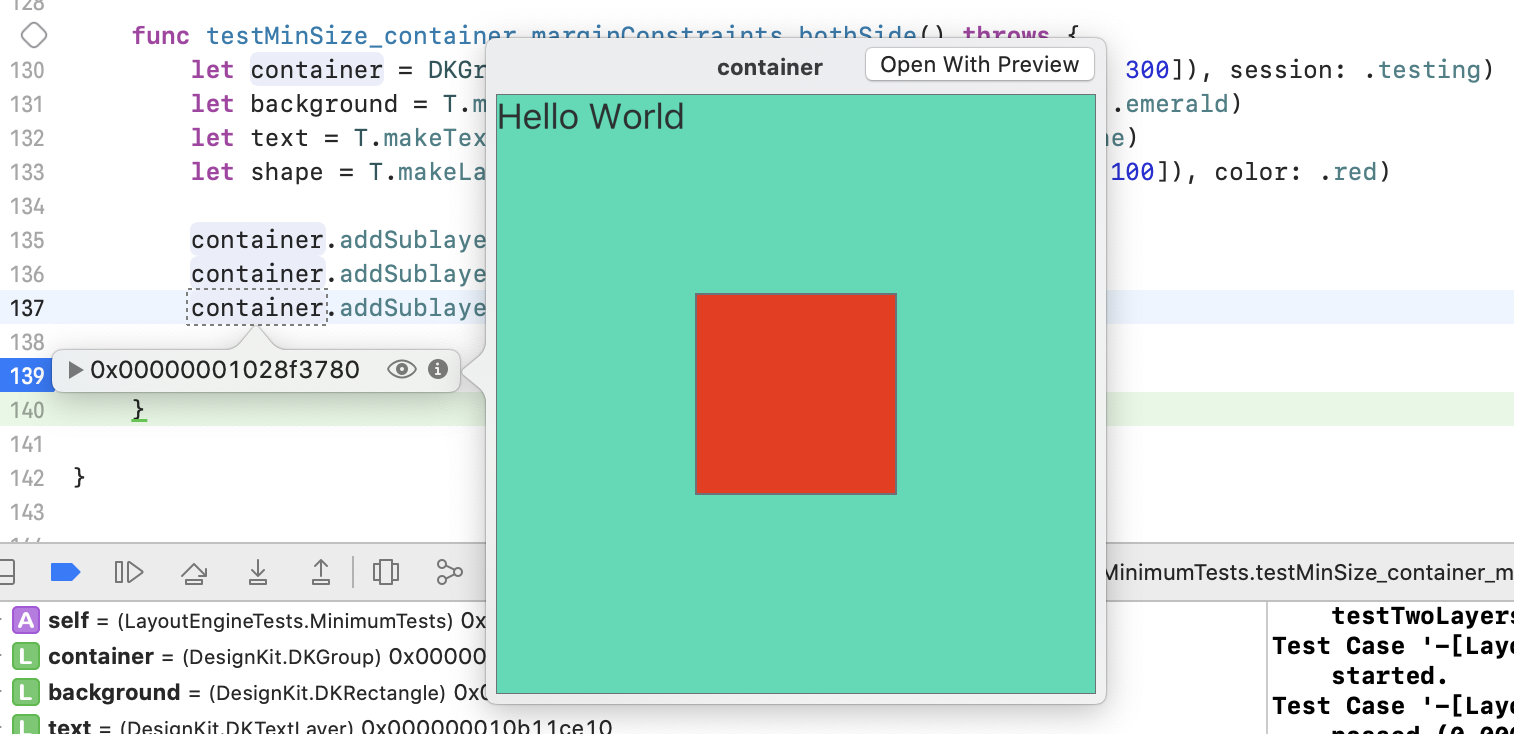
extension UIView {
    @objc func debugQuickLookObject() -> Any? {
        UIGraphicsBeginImageContextWithOptions(view.bounds.size, false, UIScreen.main.scale)
        drawViewHierarchyInRect(view.bounds, afterScreenUpdates: true)
        let image = UIGraphicsGetImageFromCurrentImageContext()
        UIGraphicsEndImageContext()

        return image
    }
}
mac
extension NSView {
    @objc func debugQuickLookObject() -> Any? {
        guard let rep = self.bitmapImageRepForCachingDisplay(in: bounds) else { return nil }
        self.cacheDisplay(in: self.bounds, to: rep)

        guard let cgImage = rep.cgImage else { return nil }
        return NSImage(cgImage: cgImage, size: bounds.size)
    }
}
これでLLDBデバッガでbreakpointを貼って止めて、目のマークを押すと
Viewの内容をPreviewできる。


- 投稿日:2020-10-17T21:48:18+09:00
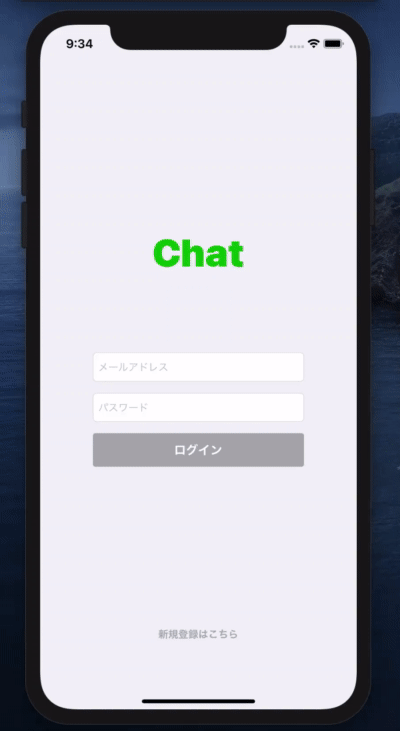
LINEのクローンアプリを作成してみた
はじめに
Firebaseの基本的な知識とチャット機能の学習を目的にLINEのクローンアプリを作成しました。アウトプットする場が特になかったので、学習のまとめと作成したアプリの紹介を兼ねて投稿させていただきます。ご興味があればお読み下さい。
関連記事
下記のYouTube動画のシリーズを参考にさせていただきました。
https://www.youtube.com/watch?v=XandgrGiV-8&list=PLJGQf09UDweLB6NGPoYnNL7j_z0Rzkpgrまた、記事のまとめ方はこちらを参考にさせていただきました。
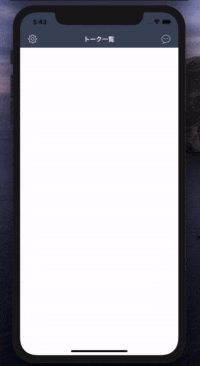
作成したアプリ
- 個人的な趣味にはなりますが、画面UIはできる限りLINEに近づけてみました。
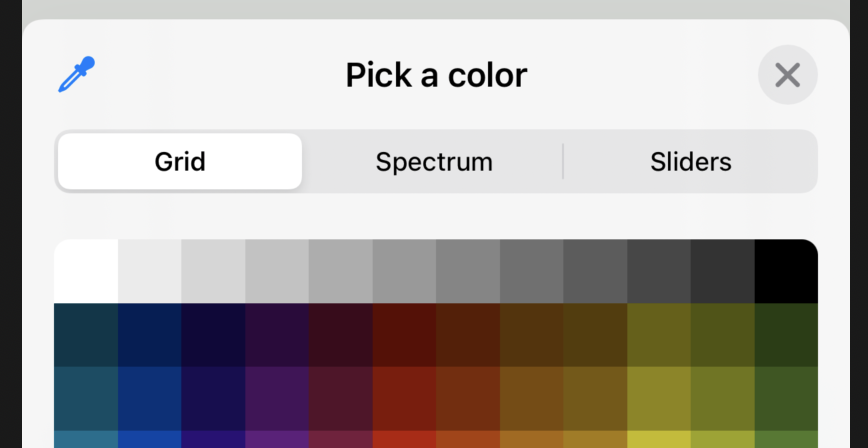
- 色は
Google Chromeの拡張機能Color Pickerを使うと簡単にわかりました。機能紹介
1.新規登録
- プロフィール画像は
フォトライブラリーから選択するようにしました。カメラの起動も可能でしたが、実機での動作確認は考えていなかったので省きました。メールアドレス、パスワード、ユーザーネームが記入されていれば新規登録可能としました。- 新規登録処理の際に
UIActivityIndicatorViewを表示、登録エラーの際はUIAlertControllerを表示するようにしました。2.ログイン
メールアドレス、パスワードが記入されていればログイン可能としました。- ログイン処理の際に
UIActivityIndicatorViewを表示、ログインエラーの際はUIAlertControllerを表示するようにしました。3.トークルーム表示・作成
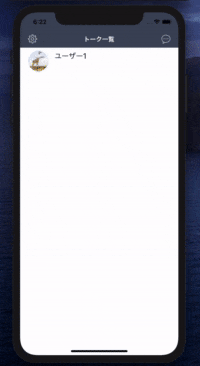
- トーク相手の
ユーザーネーム、プロフィール画像、最新のメッセージ内容と投稿時間をCellに表示するようにしております。- トークルームの作成時には
ログインユーザーを表示しないようにしています。4.リアルタイムチャット機能
addSnapshotListenerを用いてリアルタイムで更新がかかるようにしました。tableViewを反転させ下詰めでの表示も考えましたが、メッセージ量が少ない場合に上部にスペースが生まれてしまうので採用しませんでした。5.ログインユーザー情報表示・ログアウト
- ログインユーザーの情報がどこにも表示されていなかったので設けました。内容としましてはFirestoreからログインユーザーの情報を取得し表示しているのみです。
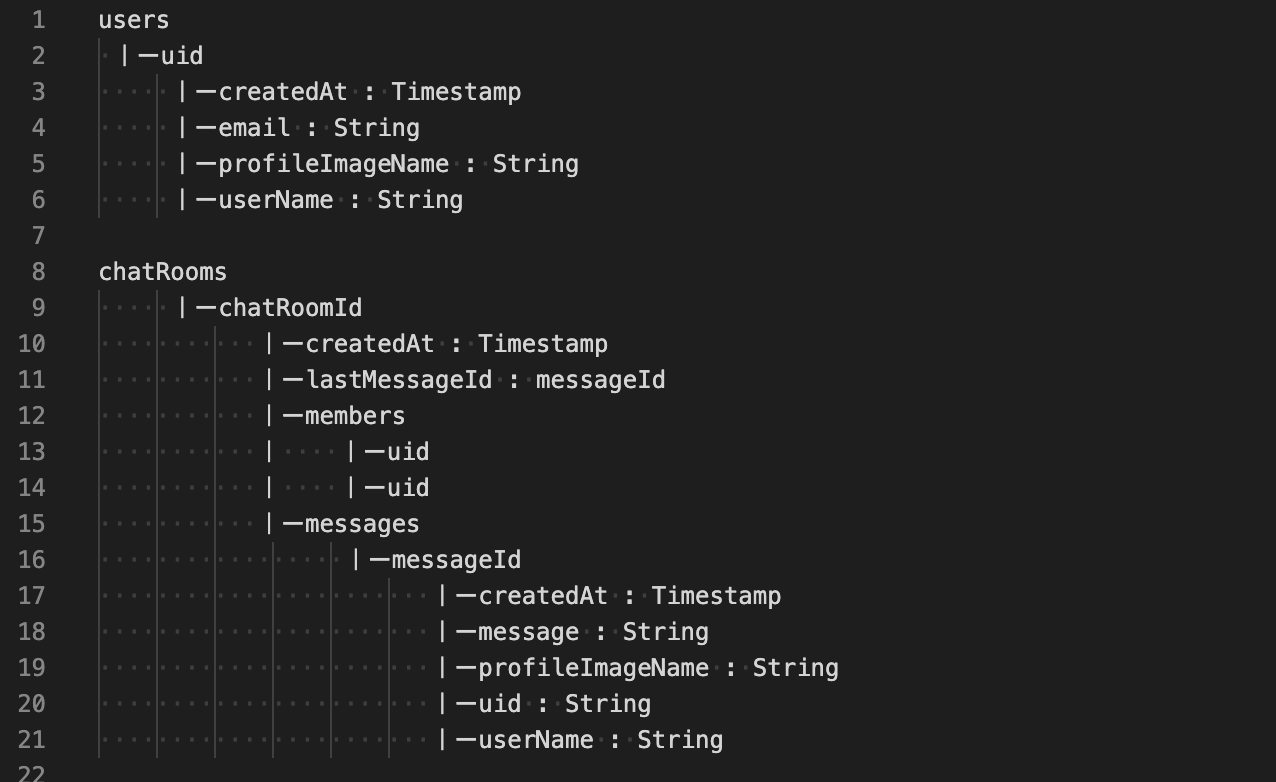
Auth.auth().signOut()のログアウト処理になります。ログアウト完了後メイン画面となるトークルーム画面に遷移し、ユーザーの認証状態を判別後にログイン画面へ遷移させるようにしております。6.Firestoreデータ構造
技術要素
1.アーキテクチャ
アーキテクチャを意識したことがなかったため、今回はMVCを採用してみました。
MVC
- Model・・・データの通信、保存、ビジネスロジックなどを扱うもの
- View・・・画面の描画
- Controller・・・ユーザーの操作を受けて
ModelやViewを書き換えるもの2.ライブラリ
Firebase
ユーザー認証、画像の保存、ユーザー情報の保存、メッセージ情報の保存に使用しています。IQKeyboardManagerSwift
新規登録画面、ログイン画面に使用してます。- 導入方法も簡単で、複数の
TextFieldのカーソル移動が容易になったり、キーボードとの干渉も自動で検知してくれるのですごく良いライブラリだなと感じました。3.その他
- ライブラリ管理は
CocoaPods、ソースコード管理はGitHubを使用しました。意識したこと
1.MVCの責務分割
書籍iOSアプリ設計パターンで設計についての知識を深めながら、
Model・View・Controllerの責務を分割し、FatViewControllerにならないように心がけました。2.変数名・メソッド名の意識
初歩的なことではありますが、初学者のレビュー指摘あるあるみたいな記事を読んでいると、直感的にわからない
変数名やどうのような処理を表しているのか分かりづらいメソッド名について書いてありましたので、なるべくわかりやすい命名をするように心がけました。今後の課題
追加で下記項目を実装しようと試みましたが、現状の自分のレベルではわからず断念しました。
悔しいですがいつか再チャレンジしようと思います。
- メッセージを日付でセクション?分けして表示(LINEのような表示方法)
- メッセージの既読・未読
- トークルームに未読のカウント数表示
まとめ
まだまだ初学者レベルの知識や理解にはなりますが、文法やXcodeやUIKit等少しずつ慣れてきました。
今回意識した、アーキテクチャを考えた設計・コードの書き方については、書籍や心優しい先人の方々の記事で概念等はインプットできましたが、やはり実際には責務を分割する作業に手こずりました。
MVCの概念は流派によって解釈に違いがあるとのことですが、初学者の私達は、わかりやすかった記事あるいは教えていただける人の意見を正にひとまず進んでいくことがベストかなと思います。学習を進めていく上で、自分の考えが生まれたり、認識の間違いに気づいたらその時に正せばいいかなと思います。
また、今回の学習目的にしておりましたFirebaseとチャット機能の基本的な学習も、あくまで基本的な内容にはなりますが力がついたかなと感じます。課題であげたように応用的な内容もこれから実装できるよう精進していこうと思いました。長々と感想文のような記事になってしまいましたが、最後まで読んで頂きありがとうございました。

- 投稿日:2020-10-17T19:43:28+09:00
ARKit+Metal で みんな超サイヤ人
People OcclusionのAppleのサンプルを調べる過程で超サイヤ人になったときのエフェクトが出来そうだったので挑戦。
※iOSがカメラに映る人をみんな超サイヤ人にしてくれる。
※ブラー部分をギザギザさせたかったが時間がかかりそうなので諦めた。参考にした記事:
・ARKit3とMetalで人体のみにエフェクトをかける
・Swift+Metalで発光エフェクト
・MetalKit で GPU を使いこなすオーラの作り方
超サイヤ人の画像を検索するとオーラ(?)のバリエーションは様々。
この記事では悟空がナメック星で超サイヤ人になった直後のオーラを参考にした(ギザギザがなくて簡単に出来そうだった。黄色いオーラで人体に近いほど明るさが増す感じ)。ベースはAppleのサンプルサンプル。
①人体部分を縁取りする
人体部分を拡大して、もともとの人体部分の色を抜いて、縁とする。
②①にブラーをかける
・黄色のブラーは大きめ、白のブラーは小さめにすることで、人体に近づくについれて明るくなるようにする
③②とカメラキャプチャ画像を合成する①人体部分を縁取りする
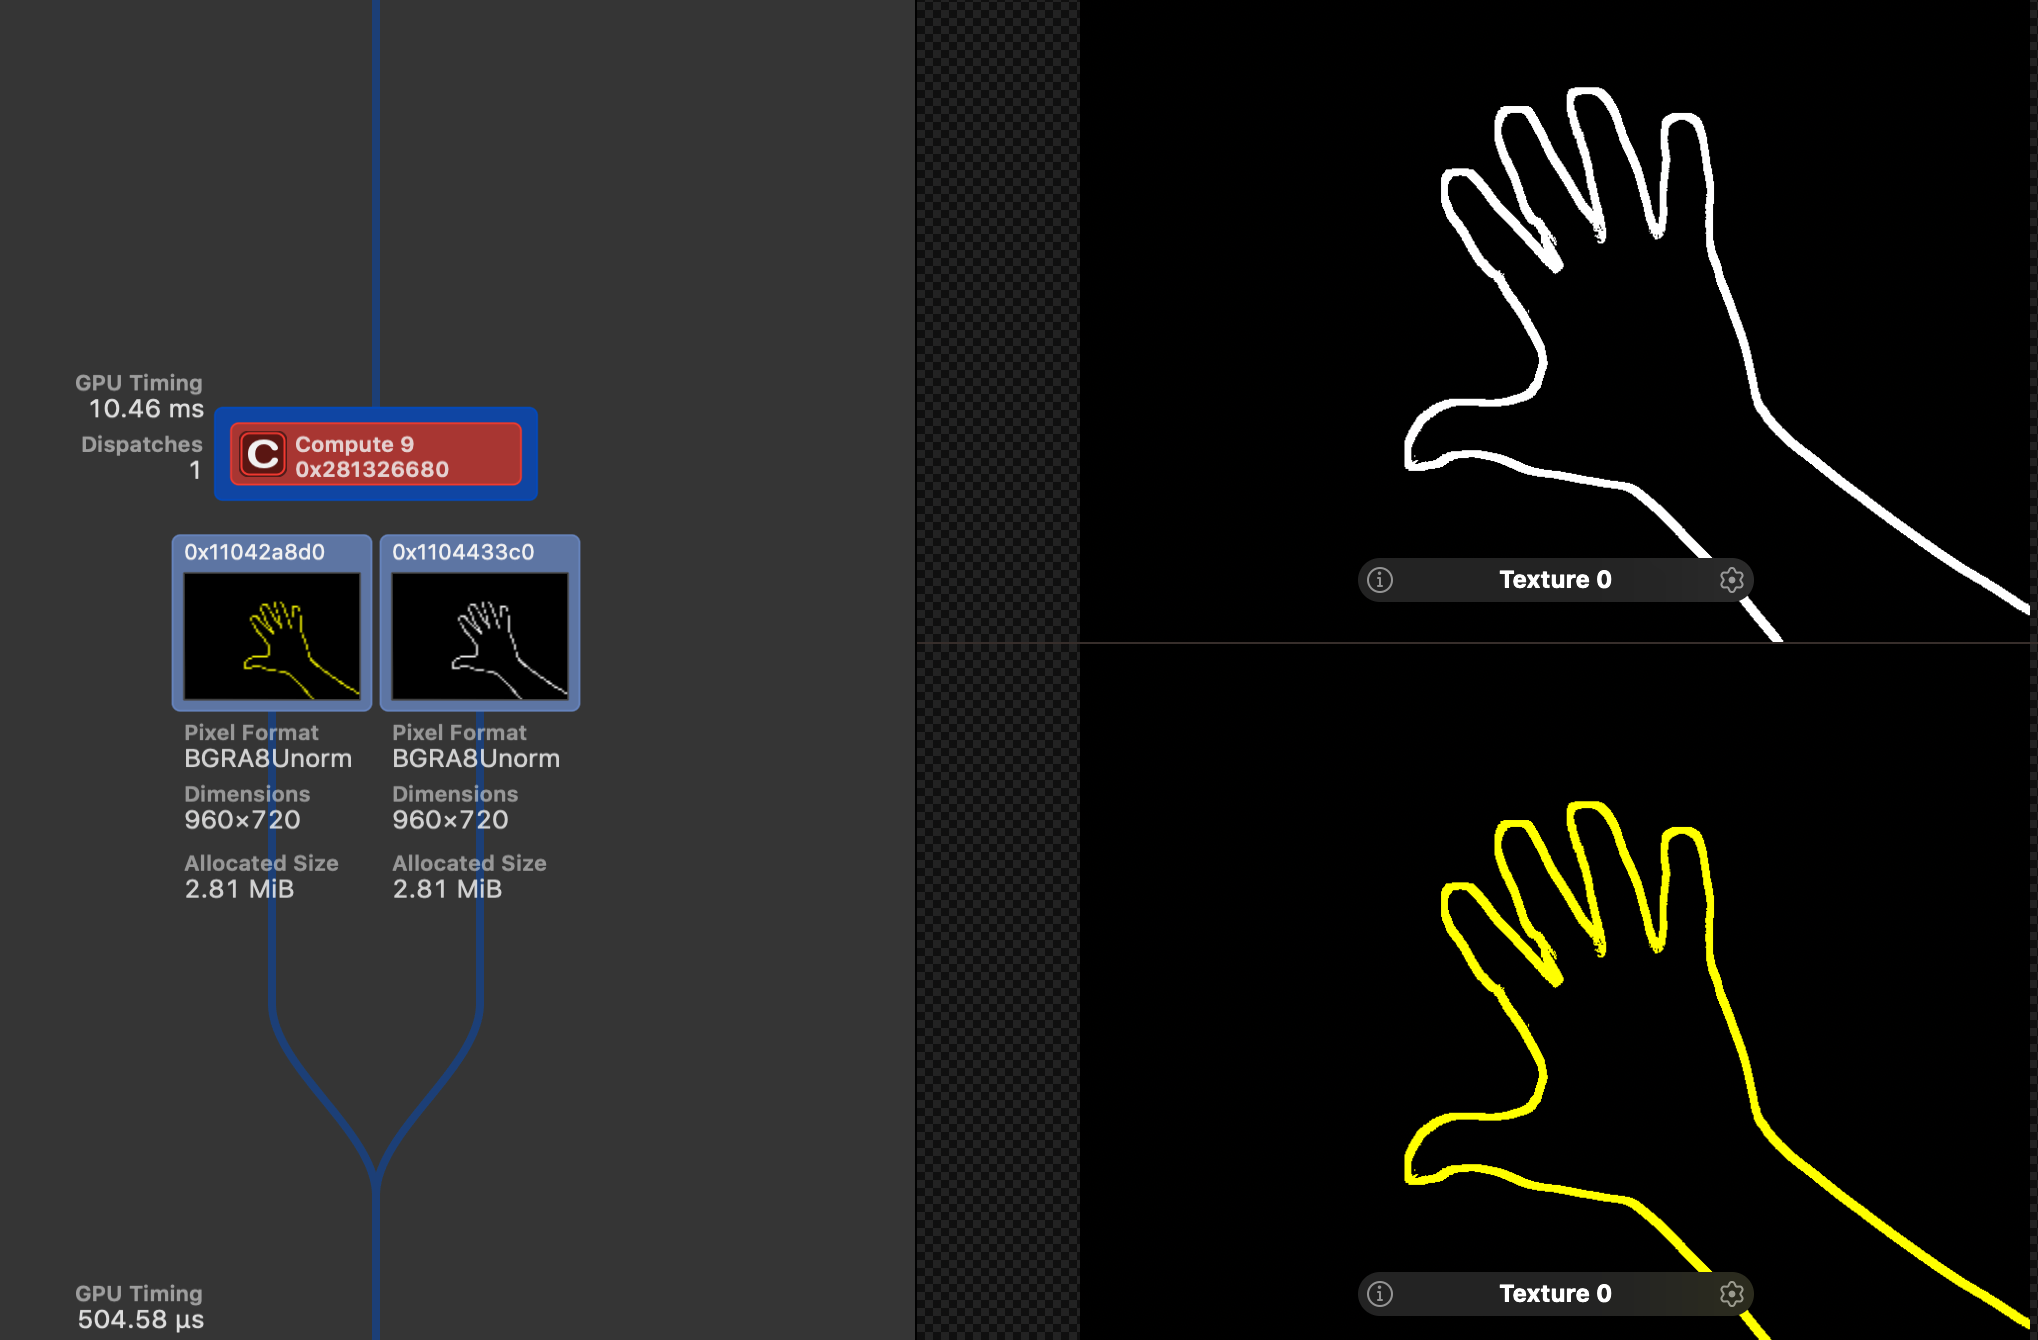
分厚く縁取りするいい方法が思い浮かばなかったので、人体画像を拡大して、もともとの人体部分の色を消すことで実現。コンピュートシェーダーで処理。
kernel void matteConvert(texture2d<half, access::read> inTexture [[ texture(0) ]],
                         texture2d<half, access::write> outWhiteTexture [[ texture(1) ]],
                         texture2d<half, access::write> outYellowTexture [[ texture(2) ]],
                         uint2 gid [[thread_position_in_grid]]) {

    uint2 textureIndex(gid);
    if (inTexture.read(textureIndex).r > 0.1) {
        // 人体部分は色なし
        outWhiteTexture.write(half4(0.0), gid);
        outYellowTexture.write(half4(0.0), gid);
        return;
    }

    // 拡大
    constexpr int scale = 15;
    constexpr int radius = scale / 2;
    half color = 0.0;

    for (int i=0; i<scale; i++) {
        for (int j=0; j<scale; j++) {
            uint2 textureIndex(gid.x + (i - radius), gid.y + (j - radius));
            half alpha = inTexture.read(textureIndex).r;
            if (alpha > 0.1) {
                color = 1.0;
                break;
            }
        }
        if (color > 0.0) {
            break;
        }
    }

    outWhiteTexture.write(half4(color, color, color, 1.0), gid);
    outYellowTexture.write(half4(color, color, 0.0, 1.0), gid);
}
人体画像の各ピクセルについて上下左右15px以内が人体だったら「人体」とすることで拡大する。
(1pxあたり225(=15x15)回ループするのでとても負荷が高い。どうせブラーをかけるので解像度を落としてから処理した方が良いのだろうが、頑張れなかった)
もともと人体だった部分は色なし(黒)とすることで、結果的に縁取り画像になる。
出力は白色と黄色のそれぞれに用意したテクスチャバッファに格納。縁取り結果(Xcode12の Capture GPU Frame で確認)
②①にブラーをかける
ブラーは Metal Performance Shader(Image Filter) を利用。 Metal Performance Shader は独自のシェーダーと簡単に組み合わせることができる。
// 時間でブラーの大きさを変える
time += 1
// ブラー(白)
let whiteIntensity = Int((sin(Float(time)/3) + 2) * 30) | 0x01  // MPSImageTentのサイズには奇数を指定する必要がある。
let kernel1 = MPSImageTent(device: device, kernelWidth: whiteIntensity, kernelHeight: whiteIntensity)
kernel1.encode(commandBuffer: commandBuffer,
              inPlaceTexture: &whiteBlurTexture!, fallbackCopyAllocator: nil)
// ブラー(黄)
let yellowIntensity = Int((sin(Float(time)/3) + 2) * 100) | 0x01
let kernel2 = MPSImageTent(device: device, kernelWidth: yellowIntensity, kernelHeight: yellowIntensity)
kernel2.encode(commandBuffer: commandBuffer,
              inPlaceTexture: &yellowBlurTexture!, fallbackCopyAllocator: nil)
Metal Performance Shader のフィルターは色々はあるが、いくつか試したところ
MPSImageTentが一番しっくりきたのでこれを採用。
白のブラーは小さめ、黄色のブラーは大きめにして、あとは、時間でブラーの大きさを変えている。③②とカメラキャプチャ画像を合成する
ここは単純にカメラキャプチャ画像と縁のブラー後画像(白、黄色)を加算。
fragment half4 compositeImageFragmentShader(CompositeColorInOut in [[ stage_in ]],
                                            texture2d<float, access::sample> capturedImageTextureY [[ texture(0) ]],
                                            texture2d<float, access::sample> capturedImageTextureCbCr [[ texture(1) ]],
                                            texture2d<float, access::sample> whiteColorTexture [[ texture(2) ]],
                                            texture2d<float, access::sample> yellowColorTexture [[ texture(3) ]],
                                            texture2d<float, access::sample> alphaTexture [[ texture(4) ]])
{
    constexpr sampler s(address::clamp_to_edge, filter::linear);

    float2 cameraTexCoord = in.texCoordCamera;

    // Sample Y and CbCr textures to get the YCbCr color at the given texture coordinate.
    float4 rgb = ycbcrToRGBTransform(capturedImageTextureY.sample(s, cameraTexCoord), capturedImageTextureCbCr.sample(s, cameraTexCoord));

    half4 cameraColor = half4(rgb);
    half4 whiteColor = half4(whiteColorTexture.sample(s, cameraTexCoord));
    half4 yellowColor = half4(yellowColorTexture.sample(s, cameraTexCoord)) * 2.0;

    return cameraColor + whiteColor + yellowColor;
}
加算結果はclampしなくても動作している。
ソースコード全体
・swift
ViewController.swiftclass ViewController: UIViewController, MTKViewDelegate { var session = ARSession() var renderer: Renderer! override func viewDidLoad() { super.viewDidLoad() if let view = self.view as? MTKView { view.device = MTLCreateSystemDefaultDevice() view.backgroundColor = UIColor.clear view.delegate = self renderer = Renderer(session: session, metalDevice: view.device!, mtkView: view) renderer.drawRectResized(size: view.bounds.size) } } override func viewWillAppear(_ animated: Bool) { super.viewWillAppear(animated) let configuration = ARWorldTrackingConfiguration() configuration.frameSemantics = .personSegmentation session.run(configuration) } func mtkView(_ view: MTKView, drawableSizeWillChange size: CGSize) { renderer.drawRectResized(size: size) } func draw(in view: MTKView) { renderer.update() } }Renderer.swiftlet kMaxBuffersInFlight: Int = 3 let kImagePlaneVertexData: [Float] = [ -1.0, -1.0, 0.0, 1.0, 1.0, -1.0, 1.0, 1.0, -1.0, 1.0, 0.0, 0.0, 1.0, 1.0, 1.0, 0.0 ] class Renderer { let session: ARSession let matteGenerator: ARMatteGenerator let device: MTLDevice let inFlightSemaphore = DispatchSemaphore(value: kMaxBuffersInFlight) var mtkView: MTKView var commandQueue: MTLCommandQueue! var imagePlaneVertexBuffer: MTLBuffer! // 最終画像合成用PipelineState var compositePipelineState: MTLRenderPipelineState! // 人体画像の拡大加工用PipelineState var computeState: MTLComputePipelineState! // キャプチャ画像テクスチャ var capturedImageTextureY: CVMetalTexture? var capturedImageTextureCbCr: CVMetalTexture? var capturedImageTextureCache: CVMetalTextureCache! // 人体画像テクスチャ var alphaTexture: MTLTexture? // 人体画像 var whiteBlurTexture: MTLTexture! // 人体画像を白色にして拡大・ブラーしたテクスチャ var yellowBlurTexture: MTLTexture! // 人体画像を黄色にして拡大・ブラーしたテクスチャ // 画面サイズ var viewportSize: CGSize = CGSize() var viewportSizeDidChange: Bool = false // 人体画像加工時のコンピュートシェーダーのスレッドグループサイズ var threadgroupSize = MTLSizeMake(32, 32, 1) // アニメーションカウント var time = 0 init(session: ARSession, metalDevice device: MTLDevice, mtkView: MTKView) { self.session = session self.device = device self.mtkView = mtkView matteGenerator = ARMatteGenerator(device: device, matteResolution: .half) loadMetal() } func drawRectResized(size: CGSize) { viewportSize = size viewportSizeDidChange = true } func update() { _ = inFlightSemaphore.wait(timeout: DispatchTime.distantFuture) let commandBuffer = commandQueue.makeCommandBuffer()! // レンダリング中にカメラキャプチャしたテクスチャが解放されないように保持 var textures = [capturedImageTextureY, capturedImageTextureCbCr] commandBuffer.addCompletedHandler { [weak self] commandBuffer in if let strongSelf = self { strongSelf.inFlightSemaphore.signal() } textures.removeAll() } // カメラキャプチャテクスチャ取得(Y、CbCrの2つ) guard let currentFrame = session.currentFrame else { return } let pixelBuffer = currentFrame.capturedImage if CVPixelBufferGetPlaneCount(pixelBuffer) < 2 { return } capturedImageTextureY = createTexture(fromPixelBuffer: pixelBuffer, pixelFormat: .r8Unorm, planeIndex: 0) capturedImageTextureCbCr = createTexture(fromPixelBuffer: pixelBuffer, pixelFormat: .rg8Unorm, planeIndex: 1) // 画面サイズに応じてuv座標を設定 if viewportSizeDidChange { viewportSizeDidChange = false // Update the texture coordinates of our image plane to aspect fill the viewport let displayToCameraTransform = currentFrame.displayTransform(for: .portrait, viewportSize: viewportSize).inverted() let vertexData = imagePlaneVertexBuffer.contents().assumingMemoryBound(to: Float.self) for index in 0...3 { let textureCoordIndex = 4 * index + 2 // kImagePlaneVertexData が 頂点座標(x,y) + uv座標(u,v)になっている。uv設定するので +2 let textureCoord = CGPoint(x: CGFloat(kImagePlaneVertexData[textureCoordIndex]), y: CGFloat(kImagePlaneVertexData[textureCoordIndex + 1])) let transformedCoord = textureCoord.applying(displayToCameraTransform) // キャプチャ画像 vertexData[textureCoordIndex] = Float(transformedCoord.x) vertexData[textureCoordIndex + 1] = Float(transformedCoord.y) } } // 人体画像取得 alphaTexture = matteGenerator.generateMatte(from: currentFrame, commandBuffer: commandBuffer) // ブラーの効果を人体より大きく見せたいので人体画像を拡大。ついでに白色、黄色の2色分のテクスチャを生成。 if let width = alphaTexture?.width, let height = alphaTexture?.height { let colorDesc = MTLTextureDescriptor.texture2DDescriptor(pixelFormat: .bgra8Unorm, width: width, height: height, mipmapped: false) colorDesc.usage = [.shaderRead, .shaderWrite] whiteBlurTexture = device.makeTexture(descriptor: colorDesc) yellowBlurTexture = device.makeTexture(descriptor: colorDesc) let threadCountW = (width + self.threadgroupSize.width - 1) / self.threadgroupSize.width let threadCountH = (height + self.threadgroupSize.height - 1) / self.threadgroupSize.height let threadgroupCount = MTLSizeMake(threadCountW, threadCountH, 1) let computeEncoder = commandBuffer.makeComputeCommandEncoder()! computeEncoder.setComputePipelineState(computeState) computeEncoder.setTexture(alphaTexture, index: 0) computeEncoder.setTexture(whiteBlurTexture, index: 1) computeEncoder.setTexture(yellowBlurTexture, index: 2) computeEncoder.dispatchThreadgroups(threadgroupCount, threadsPerThreadgroup: threadgroupSize) computeEncoder.endEncoding() } // 時間でブラーの大きさを変える time += 1 // ブラー(白) let whiteIntensity = Int((sin(Float(time)/3) + 2) * 30) | 0x01 // MPSImageTentのサイズには奇数を指定する必要がある。 let kernel1 = MPSImageTent(device: device, kernelWidth: whiteIntensity, kernelHeight: whiteIntensity) kernel1.encode(commandBuffer: commandBuffer, inPlaceTexture: &whiteBlurTexture!, fallbackCopyAllocator: nil) // ブラー(黄) let yellowIntensity = Int((sin(Float(time)/3) + 2) * 100) | 0x01 let kernel2 = MPSImageTent(device: device, kernelWidth: yellowIntensity, kernelHeight: yellowIntensity) kernel2.encode(commandBuffer: commandBuffer, inPlaceTexture: &yellowBlurTexture!, fallbackCopyAllocator: nil) // キャプチャ画像+ブラー(白・黄色)合成 guard let renderPassDescriptor = mtkView.currentRenderPassDescriptor, let currentDrawable = mtkView.currentDrawable else { return } let compositeRenderEncoder = commandBuffer.makeRenderCommandEncoder(descriptor: renderPassDescriptor)! compositeImagesWithEncoder(renderEncoder: compositeRenderEncoder) compositeRenderEncoder.endEncoding() commandBuffer.present(currentDrawable) commandBuffer.commit() } func loadMetal() { commandQueue = device.makeCommandQueue() let imagePlaneVertexDataCount = kImagePlaneVertexData.count * MemoryLayout<Float>.size imagePlaneVertexBuffer = device.makeBuffer(bytes: kImagePlaneVertexData, length: imagePlaneVertexDataCount, options: []) // カメラキャプチャ画像のキャッシュ var textureCache: CVMetalTextureCache? CVMetalTextureCacheCreate(nil, nil, device, nil, &textureCache) capturedImageTextureCache = textureCache // カメラキャプチャ画像+人体画像の合成パイプライン let defaultLibrary = device.makeDefaultLibrary()! let compositePipelineStateDescriptor = MTLRenderPipelineDescriptor() compositePipelineStateDescriptor.sampleCount = 1 compositePipelineStateDescriptor.vertexFunction = defaultLibrary.makeFunction(name: "compositeImageVertexTransform")! compositePipelineStateDescriptor.fragmentFunction = defaultLibrary.makeFunction(name: "compositeImageFragmentShader")! compositePipelineStateDescriptor.colorAttachments[0].pixelFormat = .bgra8Unorm try! compositePipelineState = device.makeRenderPipelineState(descriptor: compositePipelineStateDescriptor) // 人体縁取り用コンピュートシェーダー let edgeShader = defaultLibrary.makeFunction(name: "matteConvert")! computeState = try! self.device.makeComputePipelineState(function: edgeShader) } // キャプチャイメージからMTLTextureを生成 func createTexture(fromPixelBuffer pixelBuffer: CVPixelBuffer, pixelFormat: MTLPixelFormat, planeIndex: Int) -> CVMetalTexture? { let width = CVPixelBufferGetWidthOfPlane(pixelBuffer, planeIndex) let height = CVPixelBufferGetHeightOfPlane(pixelBuffer, planeIndex) var texture: CVMetalTexture? = nil let status = CVMetalTextureCacheCreateTextureFromImage(nil, capturedImageTextureCache, pixelBuffer, nil, pixelFormat, width, height, planeIndex, &texture) if status != kCVReturnSuccess { texture = nil } return texture } func compositeImagesWithEncoder(renderEncoder: MTLRenderCommandEncoder) { guard let textureY = capturedImageTextureY, let textureCbCr = capturedImageTextureCbCr else { return } renderEncoder.setCullMode(.none) renderEncoder.setRenderPipelineState(compositePipelineState) renderEncoder.setVertexBuffer(imagePlaneVertexBuffer, offset: 0, index: 0) renderEncoder.setFragmentTexture(CVMetalTextureGetTexture(textureY), index: 0) renderEncoder.setFragmentTexture(CVMetalTextureGetTexture(textureCbCr), index: 1) renderEncoder.setFragmentTexture(whiteBlurTexture, index: 2) renderEncoder.setFragmentTexture(yellowBlurTexture, index: 3) renderEncoder.setFragmentTexture(alphaTexture, index: 4) renderEncoder.drawPrimitives(type: .triangleStrip, vertexStart: 0, vertexCount: 4) } }・シェーダー
Shaders.metaltypedef struct { float2 position [[attribute(kVertexAttributePosition)]]; float2 texCoord [[attribute(kVertexAttributeTexcoord)]]; } ImageVertex; typedef struct { float4 position [[position]]; float2 texCoord; } ImageColorInOut; vertex ImageColorInOut capturedImageVertexTransform(ImageVertex in [[stage_in]]) { ImageColorInOut out; out.position = float4(in.position, 0.0, 1.0); out.texCoord = in.texCoord; return out; } // Convert from YCbCr to rgb float4 ycbcrToRGBTransform(float4 y, float4 CbCr) { const float4x4 ycbcrToRGBTransform = float4x4( float4(+1.0000f, +1.0000f, +1.0000f, +0.0000f), float4(+0.0000f, -0.3441f, +1.7720f, +0.0000f), float4(+1.4020f, -0.7141f, +0.0000f, +0.0000f), float4(-0.7010f, +0.5291f, -0.8860f, +1.0000f) ); float4 ycbcr = float4(y.r, CbCr.rg, 1.0); return ycbcrToRGBTransform * ycbcr; } // This defines the captured image fragment function. fragment float4 capturedImageFragmentShader(ImageColorInOut in [[stage_in]], texture2d<float, access::sample> capturedImageTextureY [[ texture(kTextureIndexY) ]], texture2d<float, access::sample> capturedImageTextureCbCr [[ texture(kTextureIndexCbCr) ]]) { constexpr sampler colorSampler(mip_filter::linear, mag_filter::linear, min_filter::linear); // Sample Y and CbCr textures to get the YCbCr color at the given texture coordinate. return ycbcrToRGBTransform(capturedImageTextureY.sample(colorSampler, in.texCoord), capturedImageTextureCbCr.sample(colorSampler, in.texCoord)); } typedef struct { float2 position; float2 texCoord; } CompositeVertex; typedef struct { float4 position [[position]]; float2 texCoordCamera; } CompositeColorInOut; // Composite the image vertex function. vertex CompositeColorInOut compositeImageVertexTransform(const device CompositeVertex* cameraVertices [[ buffer(0) ]], unsigned int vid [[ vertex_id ]]) { CompositeColorInOut out; const device CompositeVertex& cv = cameraVertices[vid]; out.position = float4(cv.position, 0.0, 1.0); out.texCoordCamera = cv.texCoord; return out; } // Composite the image fragment function. fragment half4 compositeImageFragmentShader(CompositeColorInOut in [[ stage_in ]], texture2d<float, access::sample> capturedImageTextureY [[ texture(0) ]], texture2d<float, access::sample> capturedImageTextureCbCr [[ texture(1) ]], texture2d<float, access::sample> whiteColorTexture [[ texture(2) ]], texture2d<float, access::sample> yellowColorTexture [[ texture(3) ]], texture2d<float, access::sample> alphaTexture [[ texture(4) ]]) { constexpr sampler s(address::clamp_to_edge, filter::linear); float2 cameraTexCoord = in.texCoordCamera; // Sample Y and CbCr textures to get the YCbCr color at the given texture coordinate. float4 rgb = ycbcrToRGBTransform(capturedImageTextureY.sample(s, cameraTexCoord), capturedImageTextureCbCr.sample(s, cameraTexCoord)); half4 cameraColor = half4(rgb); half4 whiteColor = half4(whiteColorTexture.sample(s, cameraTexCoord)); half4 yellowColor = half4(yellowColorTexture.sample(s, cameraTexCoord)) * 2.0; return cameraColor + whiteColor + yellowColor; } // (拡大した人体画像 - 人体画像)で人体の縁を作って、それを白、黄のテクスチャとして出力 kernel void matteConvert(texture2d<half, access::read> inTexture [[ texture(0) ]], texture2d<half, access::write> outWhiteTexture [[ texture(1) ]], texture2d<half, access::write> outYellowTexture [[ texture(2) ]], uint2 gid [[thread_position_in_grid]]) { uint2 textureIndex(gid); if (inTexture.read(textureIndex).r > 0.1) { // 人体部分は色なし outWhiteTexture.write(half4(0.0), gid); outYellowTexture.write(half4(0.0), gid); return; } // 拡大 constexpr int scale = 15; constexpr int radius = scale / 2; half color = 0.0; for (int i=0; i<scale; i++) { for (int j=0; j<scale; j++) { uint2 textureIndex(gid.x + (i - radius), gid.y + (j - radius)); half alpha = inTexture.read(textureIndex).r; if (alpha > 0.1) { color = 1.0; break; } } if (color > 0.0) { break; } } outWhiteTexture.write(half4(color, color, color, 1.0), gid); outYellowTexture.write(half4(color, color, 0.0, 1.0), gid); }

- 投稿日:2020-10-17T16:33:19+09:00
Swiftで割り算が0になる
Swiftで割合の計算をしようとしたら結構はまったのでメモ
起きたエラー
割合の計算をしようとしたら、
let int1: Int = 3
let int2: Int = 10
print("期待する値:0.3", "結果:", int1 / int2 * 100)

// 結果
// 期待する値:30% 結果: 0%
となり、小数点以下の値が表示されなかった。
解決方法
Double型またはFloat型を使う。
let double1: Double = 3
let double2: Double = 10
print("期待する値:0.3", "結果:", double1 / double2)
// => 期待する値:0.3 結果: 0.3

let float1: Float = 3
let float2: Float = 10
print("期待する値:0.3", "結果:", float1 / float2)
// => 期待する値:0.3 結果: 0.3
こんな感じで期待する値を取得することが出来た。
そもそもintegerとはTechTermsによると
An integer is a whole number (not a fraction) that can be positive, negative, or zero.
と定義されており、少数ではない数(整数)事を表すが分かる。なのでInt(Integer)型で小数が関わる数字を計算すると、計算結果の整数の部分である0だけが表示され、期待された値が帰ってこなかった。
整数とは
ちなみに整数の定義は
おおざっぱな解釈としては「小数でも分数でもない数」のこと。1、2、3、4、という数の連なり(自然数)と、0(ゼロ)、および負数(-1、-2、-3、-4、)を総称した言い方。
らしい。DoubleとFloat
Swiftでは小数扱う型として主にDouble型とFloat型が提供されていることが分かったが、どうやって使い分けたらいいか分からなかったので、調べてみた。
Swiftのドキュメントによると
Double has a precision of at least 15 decimal digits, whereas the precision of Float can be as little as 6 decimal digits. The appropriate floating-point type to use depends on the nature and range of values you need to work with in your code. In situations where either type would be appropriate, Double is preferred.
と書かれている。意訳すると、
Double型は小数15桁まで、Float型は小数6桁まで表すことができる。どちらの型が適切かどうかは状況によって異なるが、どちらでもOKな場合はDouble型が推奨です。
と書かれている。
感想
「integer = 整数 = 小数でも分数でもない数」という認識が頭にあったら15分も悩む必要がなかったので、
卍 英語と数学は大事 卍参考文献
- 投稿日:2020-10-17T10:48:37+09:00
Swiftでlog(1+x)の近似値を求める
なぜSwiftなの?
Swiftは環境構築などする必要がなく,MacかiPadがあればPlaygroundsをインストールするだけで使うことができる。
また,Playgroundsにはステップ実行やゆっくり実行という機能があり,for文やwhile分をステップごとに実行し,実行されている時の値の変化を確認することもできる。
さらに,ビューア機能を使えば変数の変化の様子を勝手にグラフ表示してくれる。
log(x+1)のマクローリン展開
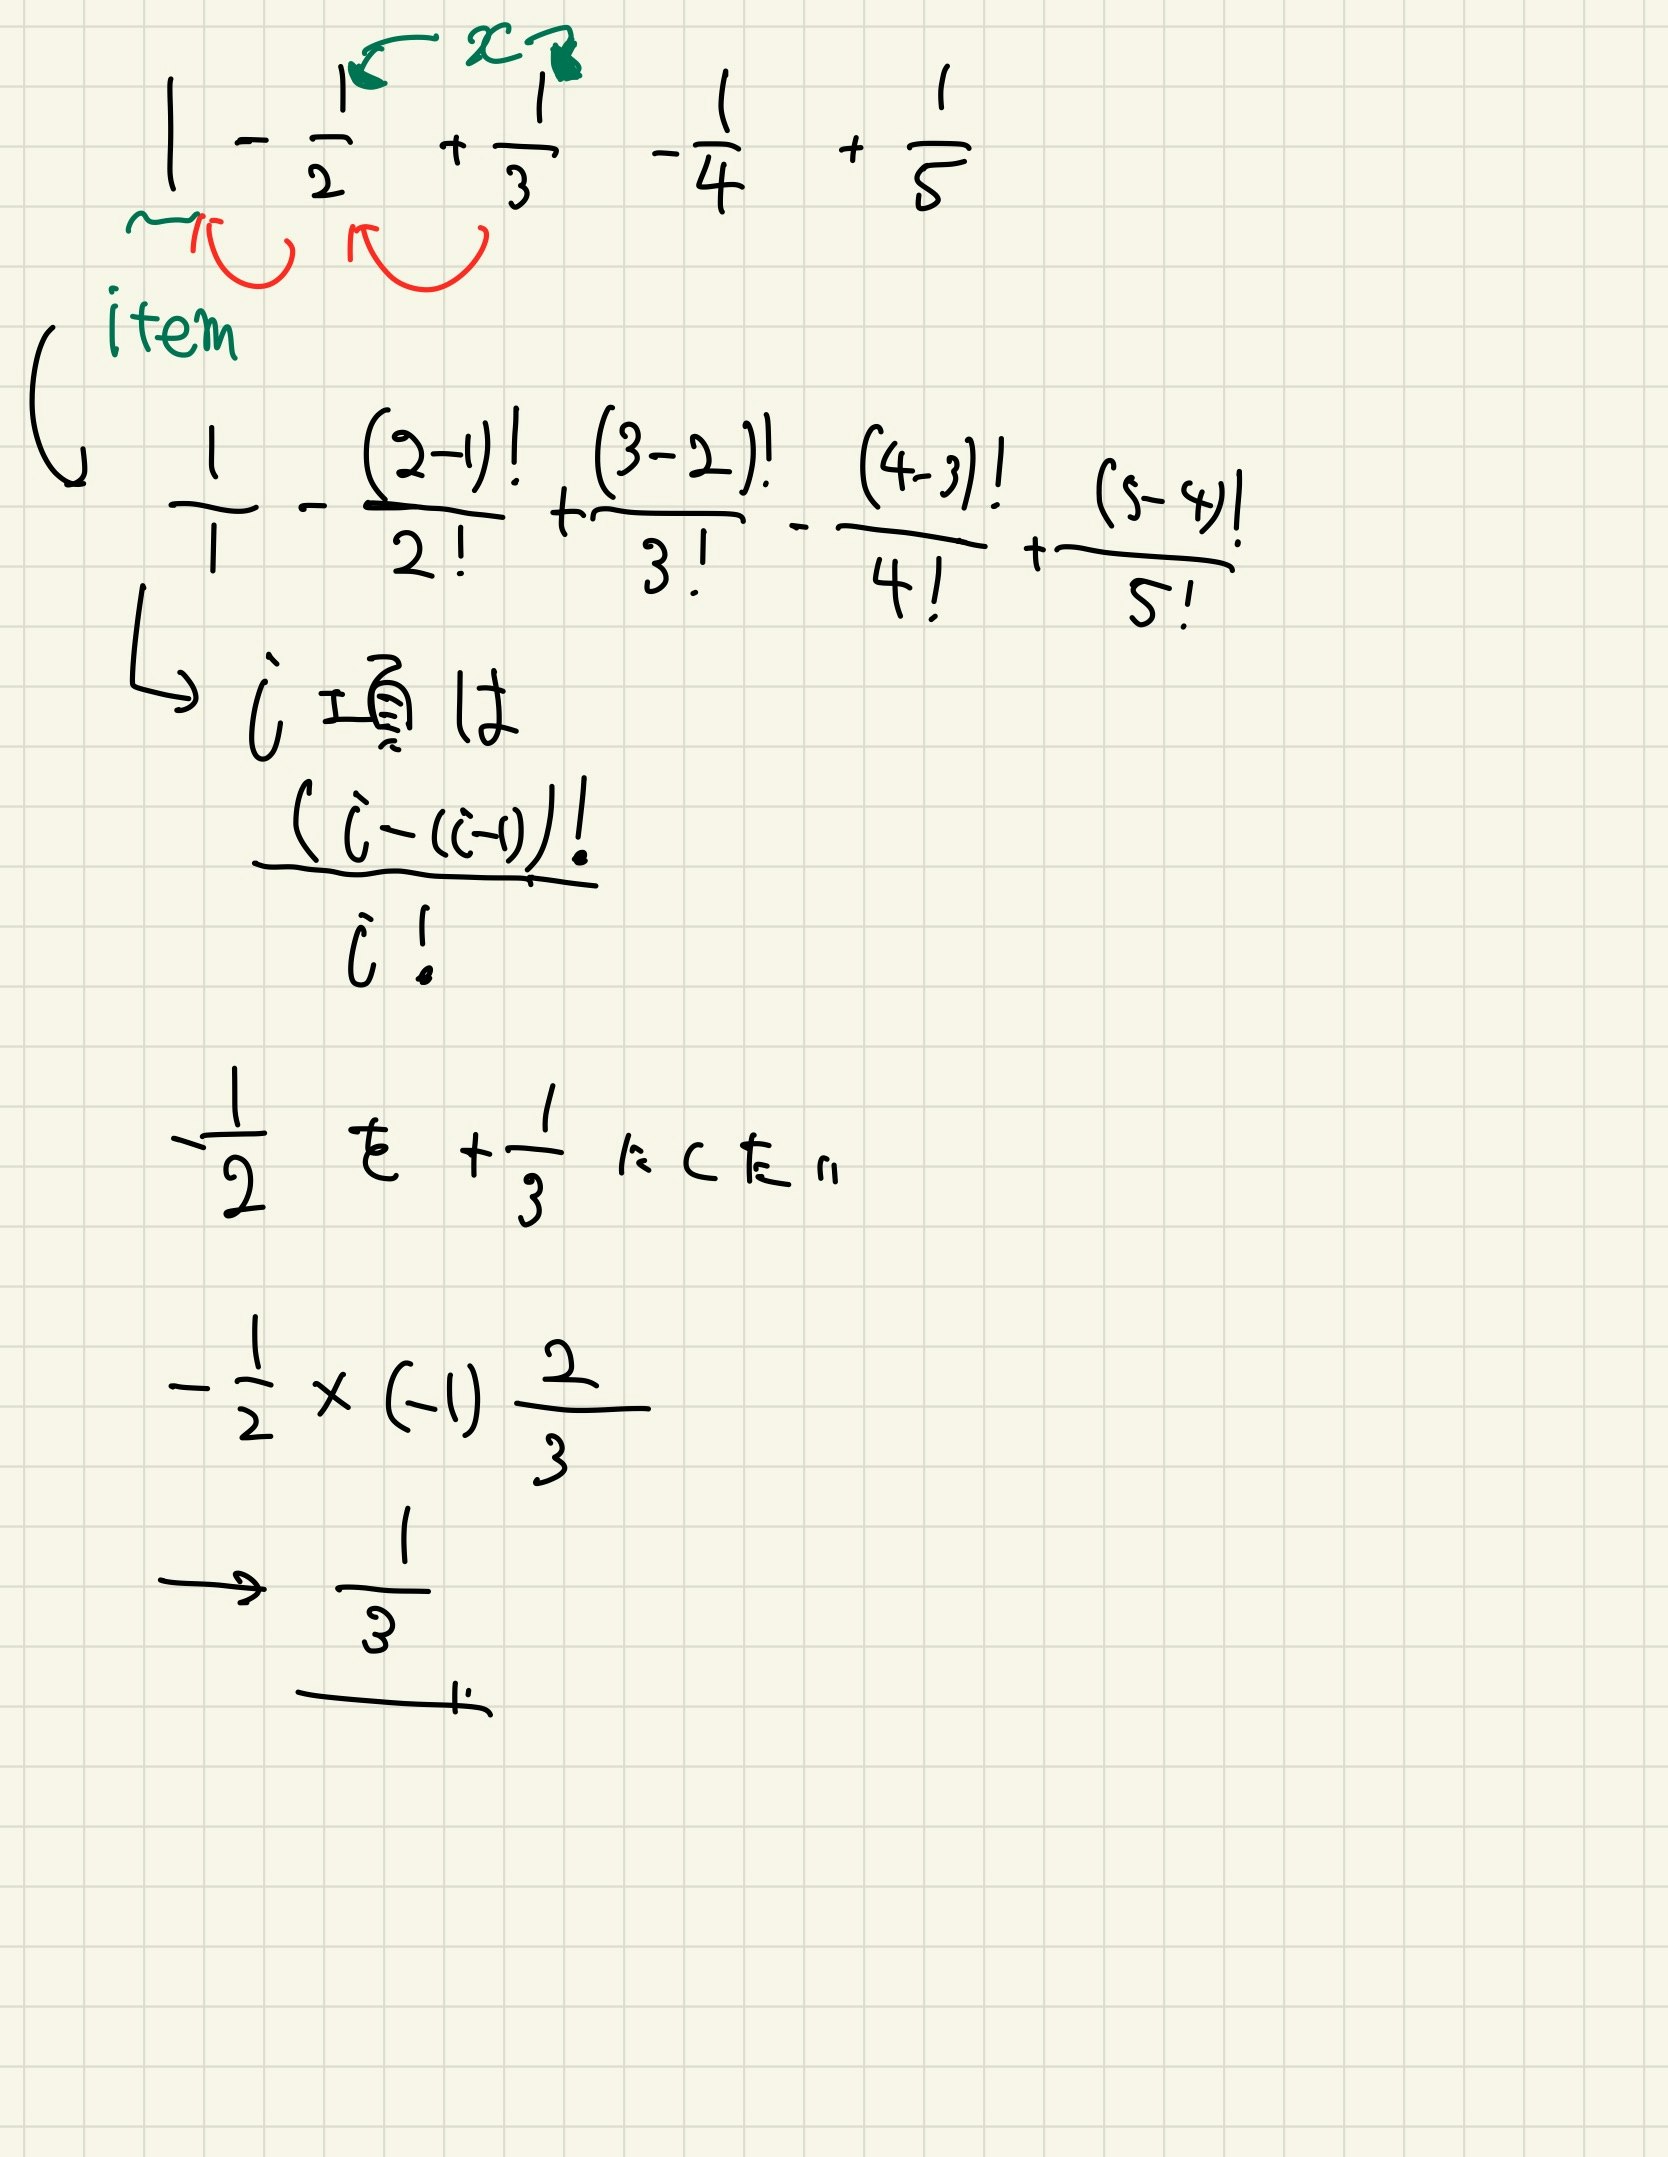
$\log(1+x)$のマクローリン展開は
$$
\log(1+x) = x-\frac{x^2}{2}+\frac{x^3}{3}-\frac{x^4}{4}+⋯+\frac{(-1)^{n-1}x^n}{n}+⋯
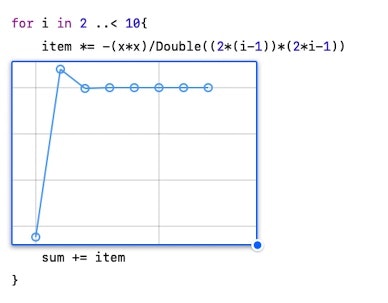
$$と表されるのであった。この記事では$\log (1+x)$の近似値をプログラミングを使って求めていく。(言語はSwift)ipadでも大丈夫。
1.変数を用意する
マクローリン展開は何回でも微分できる関数$f(x)$を$x$の冪乗関数の級数の展開式の和で近似させるものであるのであった。この記事では$\log (x+1)$の値を
sumとして,sumにだんだん値を加えていく。var sum = 0 print(sum) //0 sum += 1 print(sum) //1また,近似する$x$を入れる定数も用意しなければならない。
var sum = 0
let x = 1
さらに,項として更新され続ける変数を用意する。
var item = x第一項は定数と同じになるので,
xを入れておく。最終的なコードは以下のようになる。
var sum = 0.0  //int型とdouble型は足算できないので,0.0と書きdouble型にする。
let x = 1.0
var item = x
2.x=1として第二項までコーディングする
コーディングをする上で小さな値から始めることや具体的な値で試行錯誤することは重要だと思う。(個人の見解)。この記事でもその理念に則り$x=1$として第二項まで,つまり
$$
\log (1+x)=x-\frac{x^2}{2}
$$までコーディングする。
var sum = 0.0  //int型とdouble型は足算できないので,0.0と書きdouble型にする。
let x = 1.0
var item = x

sum += 1.0
sum += -(x*x)/Double(2*1)
最後に真値と比較する
import Foundation
var sum = 0.0  //int型とdouble型は足算できないので,0.0と書きdouble型にする。
let x = 1.0
var item = x

sum += 1.0
sum += -(x*x)/Double(2*1)
print(sum)//近似値0.5
print(log(2.0))//真値0.6931471805599453
3.一般化しやすいように工夫する
さっきは第二項を$-\frac{x^2}{2}$としたがこれでは項数が増えるたびに$x$を増やしたり分母をいじったりしなければならない。項数が増えても短くコーディングすることができるように工夫を加える。
import Foundation
var sum = 0.0  //int型とdouble型は足算できないので,0.0と書きdouble型にする。
var item = 1.0
let x = 1.0
sum += item

for i in 2 ..< 3{
    item *= -(x*Double(i-1))/Double(i)
    sum += item
}
print(sum)//近似値0.5
print(log(2.0))//真値0.6931471805599453
マクローリン展開された$\log (x+1)$を観察すると,項が大きくなるたび$x$と$1/n$がかけられているので,それをコードで表現する。
for文を使っているが,1度しか実行されないため,sumの値は変わらない。
4.項数をふやす
一般化することによって項数を増やしても対応できる。
import Foundation
var sum = 0.0  //int型とdouble型は足算できないので,0.0と書きdouble型にする。
var item = 1.0
let x = 1.0
sum += item

for i in 2 ..< 10{
    item *= -(x*Double(i-1))/Double(i)
    sum += item
}
print(sum)//近似値0.7456349206349205
print(log(2.0))//真値0.6931471805599453
第9項まで加えても真値とだいぶ差がある。$sinx,cosx$は第6項でほとんど同じだったので,$\log (x+1)$は$sin$や$cos$に比べ,収束するのが遅いことがわかる。
- 投稿日:2020-10-17T09:28:51+09:00
Composable Architecture を利用した Todo アプリの紹介(Part2)
前回書いた Composable Architecture を利用した Todo アプリの紹介(Part1)の続きで、 Part2 の部分について書きました。
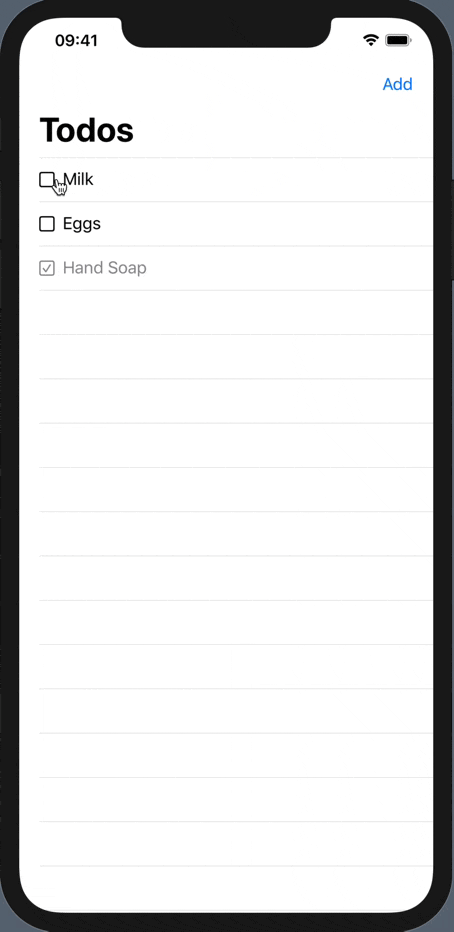
今回出来上がるもの
Composable Architecture を利用した Todo アプリ(Part2)
Part1 の最後まで終えた後の
ActionとReducerは以下のようになっていると思います。ContentView.swiftenum AppAction { case todoCheckboxTapped(index: Int) case todoTextFieldChanged(index: Int, text: String) } let appReducer = Reducer<AppState, AppAction, AppEnvironment> { state, action, _ in switch action { case let .todoCheckboxTapped(index: index): state.todos[index].isComplete.toggle() return .none case let .todoTextFieldChanged(index: index, text: text): state.todos[index].description = text return .none } }↑のままだと、
Actionを追加する度にindexを必要とするActionが増えていき、Viewからのindexのバインドも繰り返すことになってしまい非効率です。今は全てのTodoを対象にしてしまっているため、indexが必要となっていますが、一つのTodoのみを対象にしたReducerを作って、それをTodoのコレクションで動作するReducerに変換できたら効率化できそうです。(Todoのコレクション一つ一つに対して、一つのTodoのみを対象にしたReducerを適用するイメージです)
Composable Architecture では、このような ユースケースをサポートするためにforEachというオペレータがあります。これについては後で説明します。単一の Todo のための Action, Environment, Reducer の定義
まずは、一つの
Todoのみを対象としたReducerを作る準備を進めるために、新しく以下のようなActionを定義します。ContentView.swiftenum TodoAction { case checkboxTapped case textFieldChanged(String) }
AppActionにあったものから接頭辞であるtodoが切り取られ、indexもなくなりました。次に単一の
Todoのための依存関係であるEnvironmentも定義します。特に今は依存関係は存在しないので、空で良いです。ContentView.swiftstruct TodoEnvironment {}次に単一の
TodoとTodoActionのみで動作するReducerを定義します。ContentView.swiftlet todoReducer = Reducer<Todo, TodoAction, TodoEnvironment> { state, action, _ in switch action { case .checkboxTapped: state.isComplete.toggle() return .none case .textFieldChanged(let text): state.description = text return .none } }AppAction, appReducer をそれぞれ TodoAction, todoReducer と組み合わせて使用する
次に、
AppActionを先ほど定義した特定のTodoActionで動作するように書き換えます。ContentView.swiftenum AppAction { case todo(index: Int, action: TodoAction) }次に、一つの
Todoに対して動作するtodoReducerを、Todoのコレクション全体に対して動作するReducerに変換するために、forEachを使用します。ContentView.swiftlet appReducer = todoReducer.forEach( state: <#T##WritableKeyPath<GlobalState, MutableCollection>#>, action: <#T##CasePath<GlobalAction, (Comparable, TodoAction)>#>, environment: <#T##(GlobalEnvironment) -> TodoEnvironment#> )だいぶ複雑なので、
forEachが何をしようとしているかを説明していきます。
forEachには、state、action、environmentの三つの引数があり、いくつかの Generics やKeyPath,CasePathなどがあることがわかると思います。だいぶ複雑ではあるのですが、Composable Architecture では何度も使用することになるので、いずれ慣れるらしいです。(自分はまだ慣れていないですが...)元の記事では
forEachの中心的な考え方は、「ドメインの一部(今で言うと単一のTodoのみしか知らないtodoReducer)を、より複雑なドメイン(今で言うとtodoのコレクションを知っているappReducer)に変換したい」ということだと述べられています。
実際にそれを行っていくためには、単一のTodoのstate、action、environmentそれぞれを適切に変換していく必要があります。一つ一つの引数の埋め方について見ていきましょう。
まず、
stateです。state: <#T##WritableKeyPath<GlobalState, MutableCollection>#>
stateではグローバルなStateであるAppStateからコレクション(Todos)を取り出し、そのコレクション内の任意の要素を変更した上で、取り出したコレクション全体をAppStateに戻すことができるようにする必要があります。KeyPathについては詳しく説明しませんが(こちらの記事が参考になりました?♂️)、WritableKeyPathでこのようなことを実現することができます。そのため、
WritableKeyPathを利用してstateの部分は以下のように書くことができます。todoReducer.forEach( state: \AppState.todos, action: <#T##CasePath<GlobalAction, (Comparable, TodoAction)>#>, environment: <#T##(GlobalEnvironment) -> TodoEnvironment#> )次に、
actionです。action: <#T##CasePath<GlobalAction, (Comparable, TodoAction)>#>
actionでは、グローバルなActionであるAppActionのcaseを関心のある単一のindexと一緒になったTodoActionに分離する必要があります。ここではそのために、CasePathというものが使われています。CasePathは Composable Architecture の作者である Point-Free さんが作られているもので、struct に対してKeyPathを使うと struct のプロパティを分離できるのと似たように、enum に対してCasePathを使うと enum のcaseを分離することができます(参照)。
以上を踏まえて、actionは以下のように書くことができます。todoReducer.forEach( state: \AppState.todos, action: /AppAction.todo(index:action:), environment: <#T##(GlobalEnvironment) -> TodoEnvironment#> )
actionの部分は、自分で頑張って書くこともできますが、Composable Architecture には変換値を生成できる機能があるため、/AppAction.todo(index:action:)のように書くことができています。最後に、
environmentです。environment: <#T##(GlobalEnvironment) -> TodoEnvironment#>
environmentはstateやactionに比べると単純で、グローバルなEnvironmentをローカルなTodoEnvironmentに変換するだけです。今回はグローバルなEnvironmentは特に必要ないため、省略することができ以下のように書くことができます(ついでにstateの書き方も省略しています)。ContentView.swiftlet appReducer: Reducer<AppState, AppAction, AppEnvironment> = todoReducer.forEach( state: \.todos, action: /AppAction.todo(index:action:), environment: { _ in TodoEnvironment() } )もちろん、
todoReducerがもっと複雑になれば、ここでグローバルなEnvrionmentを使うことも出てきますが今回は省略で OK です。
forEach大変ですね...
実際大変だと思うのですが、forEach内で面倒なindexに関する作業を全て一箇所で処理してくれるため、Reducer内ではindexについて全く考える必要がなくなる利点があると作者は述べています。今はシンプルなTodoアプリであるため、その恩恵は感じることがあまりできませんが、Actionの数が増えたり、Effectを実行する必要が出てきたりして、todoReducerがより複雑になるとこの恩恵を感じることができるようです。
実際、複雑には見えますが、やっていることはappReducerとtodoReducerを繋ぐだけになっています。アーキテクチャによってはこのような部分を隠蔽するものもありますが、Composable Architecture でこのコードをコンパイルすることによって、正しくコードが動いていることを非常に強力に保証してくれるとのことです。また、(後の章にはなりますが)テストを書くとこの部分のコードは嫌でも実行されることになるため、テストカバレッジも得ることができるという仕組みになっているみたいです。View への適用
ここまでで、新たな
appReducerの準備は整ったので、いよいよ View に適用していきます。
まず、Button の部分は ↓ のように書き換えることができます。ContentView.swiftButton(action: { viewStore.send(.todo(index: index, action: .checkboxTapped)) }) {次に、TextField の部分は ↓ のように書き換えられます。
ContentView.swiftTextField( "Untitled Todo", text: viewStore.binding( get: { $0.todos[index].description }, send: { .todo(index: index, action: .textFieldChanged($0)) } ) )この状態でビルドすれば、Part1 の時と同様に動作していることを確認することができます。
appReducerとtodoReducerを利用することによって、単一のTodoのためのtodoReducerをTodoのコレクションにうまく適用することができました ?View ヘルパー ForEachStore の利用
しかし、View の書き方はもっと改善することができます。
ForEachでは直接ForEach内でindexをいじり回す必要がありますが、Composable Architecture の View ヘルパーであるForEachStoreを利用することでもっと綺麗に書くことができます。
ForEachStoreには、Actionがindexと ローカルアクション(今でいうとTodoAction)であるStoreを渡してあげる必要があります。ちょうど View で宣言されている ↓ のStoreはそのような構造になっていますね。let store: Store<AppState, AppAction>そのため、View 内で
ForEachStoreには以下のように渡してあげて、利用することができます。ForEachStore( self.store ) { todoStore in )今渡している
storeはAppState全てを保持していますが、今はTodoの State だけを保持するstoreを渡せれば良いです。また同様にAppActionの全ても保持していますが、TodoActionだけを知っているstoreを渡すことができれば良いです。Composable Architecture ではこのような変換をするための ↓ のように使うことができるscopeというものがあります。ForEachStore( self.store.scope( state: <#T##(AppState) -> LocalState#>, action: <#T##(LocalAction) -> AppAction#> ) ) { todoStore in )
stateの部分ではグローバルなAppStateをローカルなTodoに変換する必要がありますが、それは単純に ↓ のように実現することができます。ForEachStore( self.store.scope( state: { $0.todos }, action: <#T##(LocalAction) -> AppAction#> ), content: <#T##(Store<Identifiable, Action>) -> _#> )
actionの部分は ↓ のようになっていますね。action: <#T##(LocalAction) -> AppAction#>
stateはグローバルなものをローカルに変換していたのでスッと納得できましたが、actionはローカルなAction(TodoAction)をグローバルなAppActionに変換しているので少し奇妙に思えますが、グローバルなAppStoreをローカルなTodoStoreに変換するために、scopeではローカルアクションをグローバルアクションに埋め込む方法を伝える必要があります。そのため、actionでは、ローカルからグローバルなActionに変換するクロージャを引数にとっています(参照)。これで目的の
TodoStoreを手に入れることができたので、あとはindexを気にせず、WithViewStoreを用いて View を構築していくことになります。
全体像は ↓ のようになるかと思います。ContentView.swiftstruct ContentView: View { let store: Store<AppState, AppAction> var body: some View { NavigationView { WithViewStore(self.store) { viewStore in List { ForEachStore( self.store.scope(state: \.todos, action: AppAction.todo(index:action:)) ) { todoStore in WithViewStore(todoStore) { todoViewStore in HStack { Button(action: { todoViewStore.send(.checkboxTapped) }) { Image(systemName: todoViewStore.isComplete ? "checkmark.square" : "square") } .buttonStyle(PlainButtonStyle()) TextField( "Untitled Todo", text: todoViewStore.binding( get: \.description, send: TodoAction.textFieldChanged ) ) } .foregroundColor(todoViewStore.isComplete ? .gray : nil) } } } } } } }↑ だと View が大きすぎるので、View を分割しましょう。
todoStoreを利用しているWithViewStoreをちょうど分割することができそうなので、↓ のように分割します。ContentView.swiftstruct TodoView: View { let store: Store<Todo, TodoAction> var body: some View { WithViewStore(self.store) { viewStore in HStack { Button(action: { viewStore.send(.checkboxTapped) }) { Image(systemName: viewStore.isComplete ? "checkmark.square" : "square") } .buttonStyle(PlainButtonStyle()) TextField( "Untitled Todo", text: viewStore.binding( get: { $0.description }, send: { .textFieldChanged($0) } ) ) } .foregroundColor(viewStore.isComplete ? .gray : nil) } } }この
TodoViewはForEachStoreで ↓ のようにcontentの引数に取って扱うことができます。ContentView.swiftstruct ContentView: View { let store: Store<AppState, AppAction> var body: some View { NavigationView { WithViewStore(self.store) { viewStore in List { ForEachStore( self.store.scope(state: \.todos, action: AppAction.todo(index:action:)), content: TodoView.init(store:) ) } } } } }これで、全く同じものを綺麗な状態のコードで作り上げることができました。
Todo を増やす機能の追加
Reducerと View が綺麗になったので、機能を追加します。
現状は元々存在しているTodoが固定のものとなっており、Todoをそれ以上増やすことができないため、Todo追加機能を実装します。まずは
NavigationBarにTodo追加用のボタンを実装します。ContentView.swift.navigationBarItems(trailing: Button("Add") {})
Addボタンを押した時にActionを発火させたいので、AppActionを追加しましょう。ContentView.swiftenum AppAction { case addButtonTapped case todo(index: Int, action: TodoAction) }もちろん
ActionはReducerで処理してあげる必要があります。
現在のReducerは ↓ のようになっています。ContentView.swiftlet appReducer: Reducer<AppState, AppAction, AppEnvironment> = todoReducer.forEach( state: \.todos, action: /AppAction.todo(index:action:), environment: { _ in TodoEnvironment() } )このままだと、さらに
AppActionを扱うことができません。
扱うためには、新しいReducerを作成し、それをtodoReducerと組み合わせるようにします。その際にはcombineというものを以下のように使うことができます。ContentView.swiftlet appReducer = Reducer<AppState, AppAction, AppEnvironment>.combine( todoReducer.forEach( state: \.todos, action: /AppAction.todo(index:action:), environment: { _ in TodoEnvironment() } ), Reducer { state, action, environment in // ... } )
combineは同じドメインで動作している複数のReducerを引数に取ります。そしてその複数のReducerのリストを反復してそれぞれのReducerを実行し、最終的にReducerで返却される全てのEffectをマージして一つのReducerに結合します。
これに関しては、言葉の説明よりもcombineのコードを見た方がイメージがつきそうなので ↓ にも貼っておこうと思います。ComposableArchitecture/Reducer.swiftpublic static func combine(_ reducers: [Reducer]) -> Reducer { Self { value, action, environment in .merge(reducers.map { $0.reducer(&value, action, environment) }) } }
mergeはEffectの中で定義されていますが ↓ のようになっています。自分は Combine をあまり触ったことがないため、MergeMany も初めてみましたが個人的にはこちらが参考になりました。ComposableArchitecture/Effect.swiftpublic static func merge<S: Sequence>(_ effects: S) -> Effect where S.Element == Effect { Publishers.MergeMany(effects).eraseToEffect() }話が少し逸れてしまいましたが、新しく定義した
Reducerの中でActionを処理していきましょう。ContentView.swiftReducer { state, action, _ in switch action { case .addButtonTapped: state.todos.insert(Todo(id: UUID()), at: 0) return .none case .todo(index: _, action: _): return .none } }
Todoそれぞれはユニークなものにしたいため、idはUUIDで宣言するようにしています。最後に
Actionを View から送るようにすればTodoを追加できるようになったアプリが出来上がりです ?ContentView.swift.navigationBarItems(trailing: Button("Add") { viewStore.send(.addButtonTapped) })おわりに
前回同様ほぼ翻訳のようになってしまいましたが、ある程度理解できてすっきりしてきました。
次の Part3 は Composable Architecture の便利なテスト機能について紹介されています。
また気力があれば、そちらの紹介もできたらと思います!
- 投稿日:2020-10-17T07:56:21+09:00
(初心者向け) SwiftUIの共通のビュー要素のコレクション
これは、
SwiftUIの共通のビュー要素のコレクションです。SwiftUIを学び始めた初心者向けです。iOS 14 の新機能
TextEditor ColorPicker ToolbarItem 長いテキストを表示および編集 色を選択できるようにします。 バーにアイテムを表示します。 コード例を見る コード例を見る コード例を見る
Map DisclosureGroup ProgressView 注釈付きのマップを表示 コンテンツを表示および非表示 進捗状況を表示 コード例を見る コード例を見る コード例を見る
TextEditor DatePicker Sign in with Apple 長い文字列を表示して編集 日付を選択します Appleでサインイン コード例を見る コード例を見る コード例を見る 文字
Text TextField SecureField 1つの文字列を表示 編集可能なテキストフィールド パスワード入力用の編集可能 コード例を見る コード例を見る コード例を見る 画像
Image (ローカルファイル) Image (SFSymbol) 画像を表示 システム画像を表示 コード例を見る コード例を見る Table
List ForEach Form コード例を見る コード例を見る コード例を見る Navigations
NavigationView ナビゲーションビュー内に自前のViewを埋め込み コード例を見る アクションを実行するには/ユーザーに別のビューを表示するには
Button NavigationLink ビューシート クリックしてアクションを実行 クリックして別のビューに移動 ビューシートを表示 コード例を見る コード例を見る コード例を見る コード例を見る タブバー
TabView 画面の最下部にタブバーを表示 コード例を見る 指定したオプションから1つの値を選択
Toggle Picker ユーザーが機能をオン/オフできるようにする 指定したオプションから1つの値を選択 コード例を見る コード例を見る 画面に複数の要素を表示
上記ビューの複数を1つのビューに組み合わせて表示できます。
HStack VStack Form 水平配置 垂直配置 ログインフォームの例 コード例を見る コード例を見る コード例を見る
ZStack 奥行き配置(前後) コード例を見る アラート / アクションシート
Alert ActionSheet アラートウィンドウを表示 アクションシートを画面の最下部に表示 コード例を見る コード例を見る コード例を見る ViewModifier ビューモディファイア
ビューモディファイアを使ってビューの外観を変更することができます。
例:
Image(systemName: "wand.and.stars")
    .font(.largeTitle)
    .foregroundColor(.blue)
以下は一般的なビューモディファイアのリストです:
変数名 使用法 .font 文字とSFシンボル (SF Symbol) 画像のフォントサイズを変更 .frame 表示されるオブジェクトのサイズを変更 .padding() オブジェクトの周囲にスペースを追加 .foregroundColor(.blue) オブジェクトの色を変更 .onAppear 画面にビューが表示されたときに実行するアクション .onTapGesture ユーザーがビューをタップしたときにアクションを実行する UIKit + SwiftUI
UIHostingController
UIHostingControllerを使用して、UIKitビュー内にSwiftUIビューを表示することも可能です。
let swiftuiView = Map_Example()
let uiKitViewController = UIHostingController(rootView: swiftuiView)
self.present(uiKitViewController, animated: true, completion: nil)
UIViewControllerRepresentable
SwiftUI は新しいフレームワークであるので、フィーチャー UIKit の幾らかを欠いています。そららフィーチャー UIKit を活用する為には、UIViewControllerRepresentable を使用しなければなりません。
QuickLookView PhotoPickerView MailComposeView ファイル内容をプレビュー フォトピッカー メールコンポーザー コード例を見る コード例を見る コード例を見る
TextMessageComposerView SafariView DocumentPicker テキストメッセージコンポーザー ウェブ表示 ドキュメントピッカー コード例を見る コード例を見る コード例を見る SwiftUI ビューの基本フォーマット
SwiftUI ビューの基本構造は次のとおり:
import SwiftUI

struct TextField_Example: View {

    // 変数

    var body: some View {

        //UIコンポーネント
        //Text, Image, Form, VStack, List, ...

    }

}
var body: some Viewセクションで、ビューコードを入力。このWebページで提供されているサンプルコードでは、
bodyコードブロック内のコンテンツに注意を払う必要がある。
// 変数セクションで、変数を宣言する。変数の型
お気づきになられたかもしれませんが、
SwiftUIにはいくつもの型の変数があります。最もよく使われている変数の型2つを以下でご紹介します。
@Statestruct ButtonSheet_Example: View { @State var showAnotherView: Bool = false var body: some View { Button(action: { self.showAnotherView = true }, label: { Text("別のビューを表示") }) .sheet(isPresented: $showAnotherView, content: { AnotherView(textContent: "Hello World.") }) } }
@Stateの値を変更することで、ビューの見た目に影響を与えることができます。例えば、もしプログラムのどこかで
showAnotherViewがtrueに設定されていれば、ビューAnotherViewが表示されます。プログラムの中で
@State変数を使う時は、変数名の前に$記号を付け加える必要があるかもしれません。そうすることで、ビューにその変数を監視(および変数が変更されればビューのコンテンツを更新)させることができます。
@State変数の値を次の3つの方法で初期化できます:
@State var showAnotherView: Bool = false- ビュー
ButtonSheet_Exampleを初期化すると、変数を初期化できます。ButtonSheet_Example(showAnotherView: true)init関数の中で変数を初期化できます:struct ButtonSheet_Example: View { @State var showAnotherView: Bool init(...) { self.showAnotherView = .init(initialValue: false) } var body: some View { // TODO } }正規変数
正規変数は値を格納するために利用されます。正規変数を更新してもプログラムの見た目に影響はありません。
struct ButtonSheet_Example: View {

    var userTappedButton: () -> Void

    var body: some View {

        Button(action: {
            self.userTappedButton()
        }, label: {
            Text("別のビューを表示")
        })

    }
}
プレビュー
XcodeではSwiftUIファイルに加えた変更を直接プレビューすることができます。プレビューは以下のように宣言します。
struct TextField_Example_Previews: PreviewProvider {
    static var previews: some View {
        TextField_Example(textEntered: "SwiftUI_Components-Library")
    }
}
static var previews: some View内で、SwiftUI表示を初期化していただけます。Xコードの右側にあるResumeボタンをクリックするとプレビューが表示されます。出発点
新規
Xcodeプロジェクトを作成し、SwiftUI Appの使用を選択することをお勧めします。それにより、練習用プロジェクトで上記のコンポーネントをお試しいただけます。⭐️


- 投稿日:2020-10-17T07:56:21+09:00
(初心者向け) SwiftUIのビュー要素のコレクション
これは、
SwiftUIの共通のビュー要素のコレクションです。SwiftUIを学び始めた初心者向けです。iOS 14 の新機能
TextEditor ColorPicker ToolbarItem 長いテキストを表示および編集 色を選択できるようにします。 バーにアイテムを表示します。 コード例を見る コード例を見る コード例を見る
Map DisclosureGroup ProgressView 注釈付きのマップを表示 コンテンツを表示および非表示 進捗状況を表示 コード例を見る コード例を見る コード例を見る
TextEditor DatePicker Sign in with Apple 長い文字列を表示して編集 日付を選択します Appleでサインイン コード例を見る コード例を見る コード例を見る 文字
Text TextField SecureField 1つの文字列を表示 編集可能なテキストフィールド パスワード入力用の編集可能 コード例を見る コード例を見る コード例を見る 画像
Image (ローカルファイル) Image (SFSymbol) 画像を表示 システム画像を表示 コード例を見る コード例を見る Table
List ForEach Form コード例を見る コード例を見る コード例を見る Navigations
NavigationView ナビゲーションビュー内に自前のViewを埋め込み コード例を見る アクションを実行するには/ユーザーに別のビューを表示するには
Button NavigationLink ビューシート クリックしてアクションを実行 クリックして別のビューに移動 ビューシートを表示 コード例を見る コード例を見る コード例を見る コード例を見る タブバー
TabView 画面の最下部にタブバーを表示 コード例を見る 指定したオプションから1つの値を選択
Toggle Picker ユーザーが機能をオン/オフできるようにする 指定したオプションから1つの値を選択 コード例を見る コード例を見る 画面に複数の要素を表示
上記ビューの複数を1つのビューに組み合わせて表示できます。
HStack VStack Form 水平配置 垂直配置 ログインフォームの例 コード例を見る コード例を見る コード例を見る
ZStack 奥行き配置(前後) コード例を見る アラート / アクションシート
Alert ActionSheet アラートウィンドウを表示 アクションシートを画面の最下部に表示 コード例を見る コード例を見る コード例を見る ViewModifier ビューモディファイア
ビューモディファイアを使ってビューの外観を変更することができます。
例:
Image(systemName: "wand.and.stars")
    .font(.largeTitle)
    .foregroundColor(.blue)
以下は一般的なビューモディファイアのリストです:
変数名 使用法 .font 文字とSFシンボル (SF Symbol) 画像のフォントサイズを変更 .frame 表示されるオブジェクトのサイズを変更 .padding() オブジェクトの周囲にスペースを追加 .foregroundColor(.blue) オブジェクトの色を変更 .onAppear 画面にビューが表示されたときに実行するアクション .onTapGesture ユーザーがビューをタップしたときにアクションを実行する UIKit + SwiftUI
UIHostingController
UIHostingControllerを使用して、UIKitビュー内にSwiftUIビューを表示することも可能です。
let swiftuiView = Map_Example()
let uiKitViewController = UIHostingController(rootView: swiftuiView)
self.present(uiKitViewController, animated: true, completion: nil)
UIViewControllerRepresentable
SwiftUI は新しいフレームワークであるので、フィーチャー UIKit の幾らかを欠いています。そららフィーチャー UIKit を活用する為には、UIViewControllerRepresentable を使用しなければなりません。
QuickLookView PhotoPickerView MailComposeView ファイル内容をプレビュー フォトピッカー メールコンポーザー コード例を見る コード例を見る コード例を見る
TextMessageComposerView SafariView DocumentPicker テキストメッセージコンポーザー ウェブ表示 ドキュメントピッカー コード例を見る コード例を見る コード例を見る SwiftUI ビューの基本フォーマット
SwiftUI ビューの基本構造は次のとおり:
import SwiftUI

struct TextField_Example: View {

    // 変数

    var body: some View {

        //UIコンポーネント
        //Text, Image, Form, VStack, List, ...

    }

}
var body: some Viewセクションで、ビューコードを入力。このWebページで提供されているサンプルコードでは、
bodyコードブロック内のコンテンツに注意を払う必要がある。
// 変数セクションで、変数を宣言する。変数の型
お気づきになられたかもしれませんが、
SwiftUIにはいくつもの型の変数があります。最もよく使われている変数の型2つを以下でご紹介します。
@Statestruct ButtonSheet_Example: View { @State var showAnotherView: Bool = false var body: some View { Button(action: { self.showAnotherView = true }, label: { Text("別のビューを表示") }) .sheet(isPresented: $showAnotherView, content: { AnotherView(textContent: "Hello World.") }) } }
@Stateの値を変更することで、ビューの見た目に影響を与えることができます。例えば、もしプログラムのどこかで
showAnotherViewがtrueに設定されていれば、ビューAnotherViewが表示されます。プログラムの中で
@State変数を使う時は、変数名の前に$記号を付け加える必要があるかもしれません。そうすることで、ビューにその変数を監視(および変数が変更されればビューのコンテンツを更新)させることができます。
@State変数の値を次の3つの方法で初期化できます:
@State var showAnotherView: Bool = false- ビュー
ButtonSheet_Exampleを初期化すると、変数を初期化できます。ButtonSheet_Example(showAnotherView: true)init関数の中で変数を初期化できます:struct ButtonSheet_Example: View { @State var showAnotherView: Bool init(...) { self.showAnotherView = .init(initialValue: false) } var body: some View { // TODO } }正規変数
正規変数は値を格納するために利用されます。正規変数を更新してもプログラムの見た目に影響はありません。
struct ButtonSheet_Example: View {

    var userTappedButton: () -> Void

    var body: some View {

        Button(action: {
            self.userTappedButton()
        }, label: {
            Text("別のビューを表示")
        })

    }
}
プレビュー
XcodeではSwiftUIファイルに加えた変更を直接プレビューすることができます。プレビューは以下のように宣言します。
struct TextField_Example_Previews: PreviewProvider {
    static var previews: some View {
        TextField_Example(textEntered: "SwiftUI_Components-Library")
    }
}
static var previews: some View内で、SwiftUI表示を初期化していただけます。Xコードの右側にあるResumeボタンをクリックするとプレビューが表示されます。出発点
新規
Xcodeプロジェクトを作成し、SwiftUI Appの使用を選択することをお勧めします。それにより、練習用プロジェクトで上記のコンポーネントをお試しいただけます。⭐️


- 投稿日:2020-10-17T06:15:38+09:00
Core ML ToolsのチュートリアルをGoogle Colabで簡単に試す方法(環境構築不要)
Core ML Toolsのドキュメントサイトにある、チュートリアルであるQuick StartをGoogle Colabで試してみたので、その手順を書きます。環境構築が不要で、なるべくサクッと実行できる手順を書いています。
対象のサイトはこちらです。
Apple Core ML Tools Quick Start手順
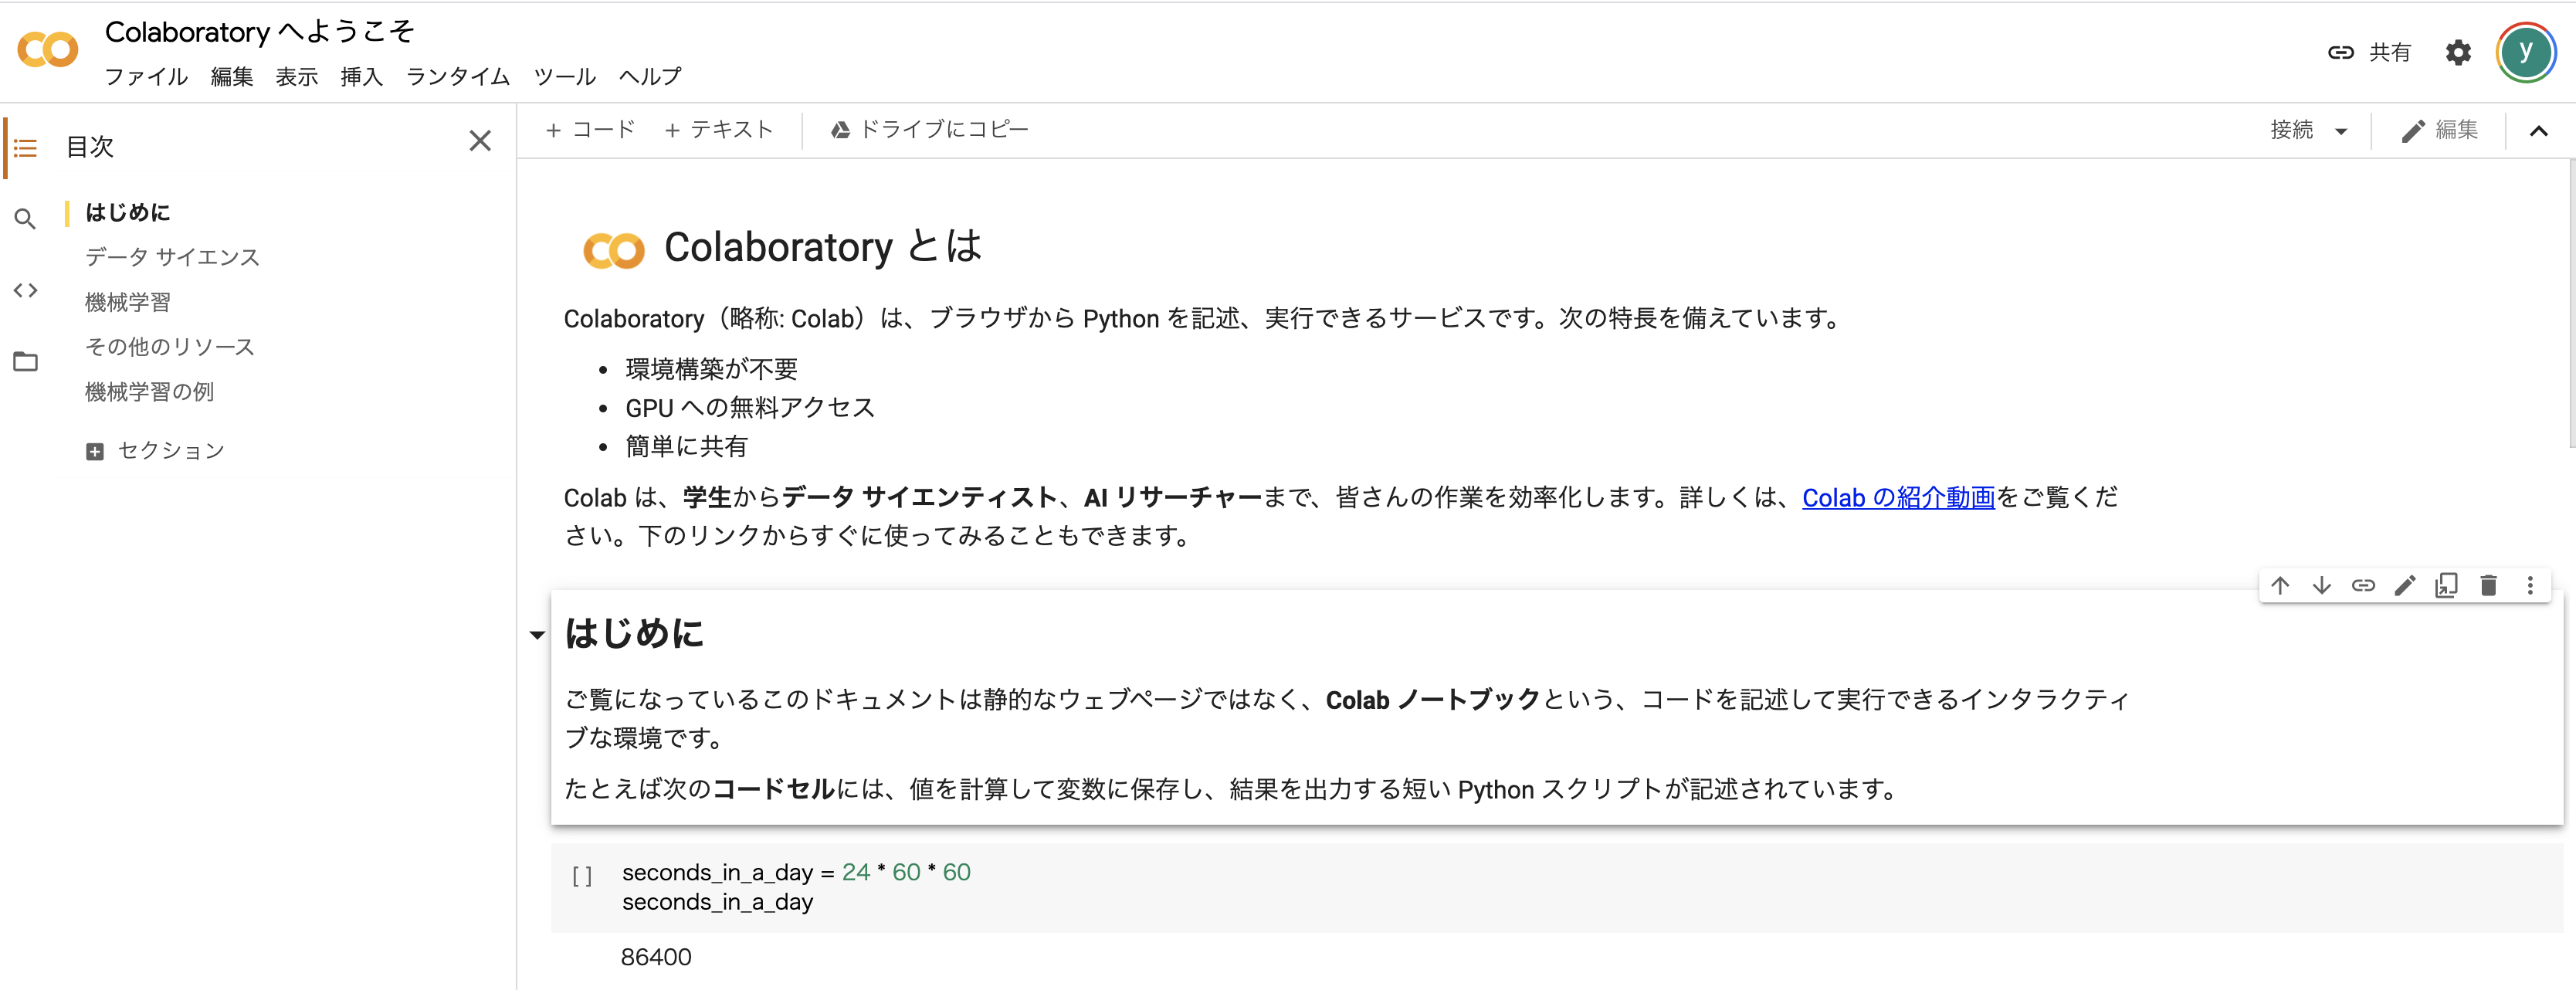
1.Google Colabを起動する
※Colab = Colaboratoryの略ですGoogle Colaboratoryのサイトにアクセスします。
Google Colaboratory
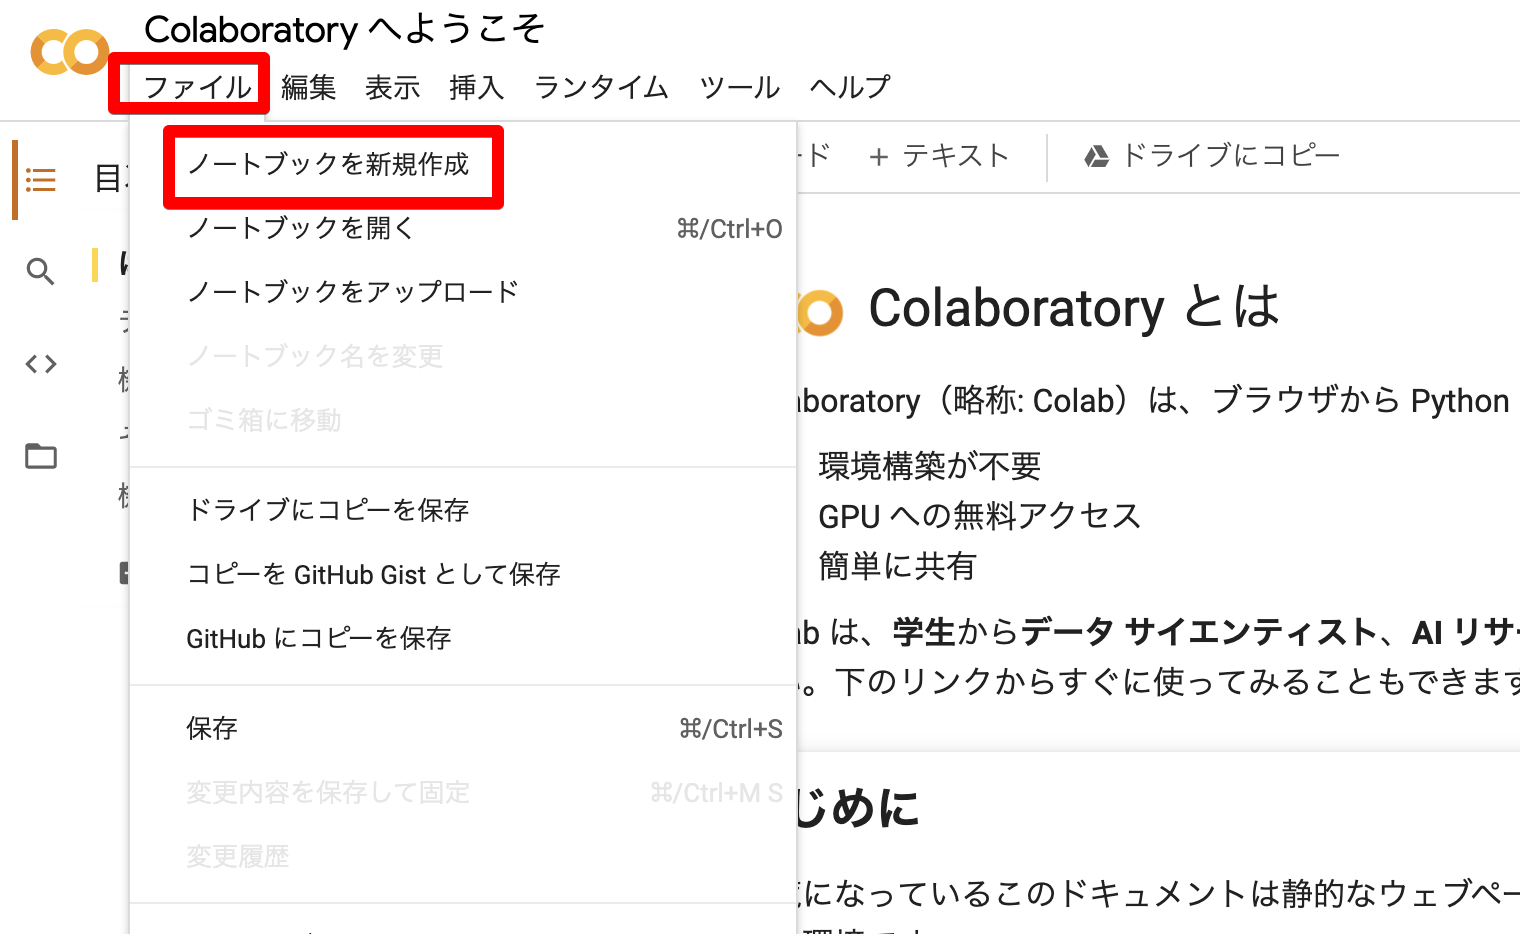
2. ファイル > ノートブックを新規作成 を選択する
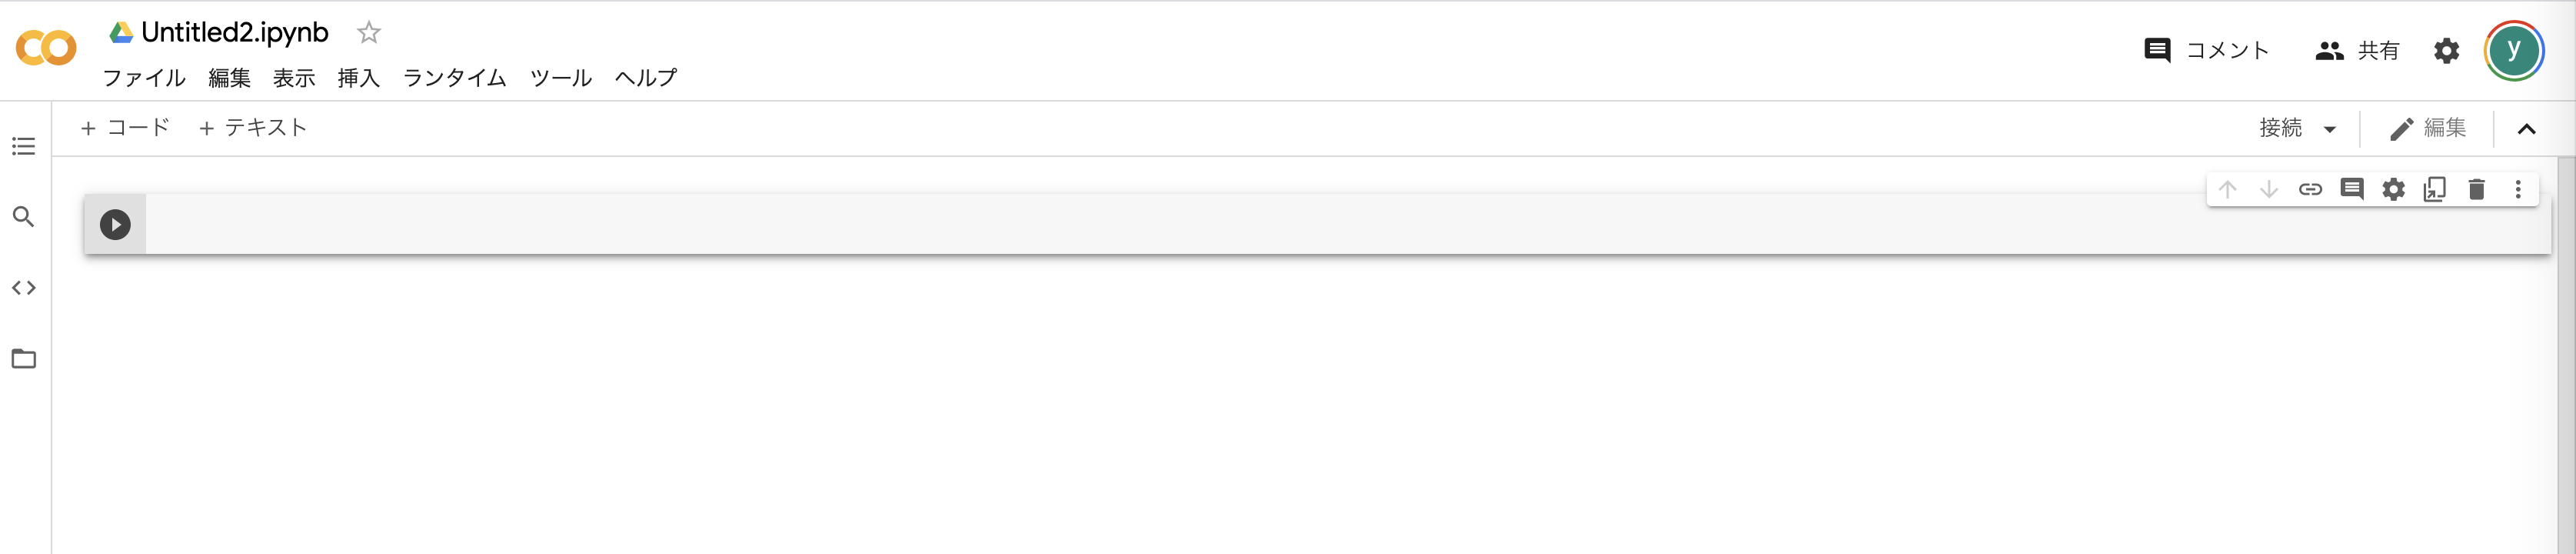
こんな感じでノートブックができます。
ここから先はGitHub gistに保存したものがあるので、こちらをみながらやるとわかりやすいです。
https://gist.github.com/TokyoYoshida/4eb34070911a3cfad1ddd34e400abb913. TensorFlowのバージョンを2系にする
ノートブックに書いていきます。
次のように書くとTensorFlowのバージョンを設定できます。
notebook%tensorflow_version 2.xバージョンの確認をしたいときは、次のようにします。
notebook!pip freeze | grep -i -e tensorflow # 出力: # tensorflow==2.3.0 # tensorflow-addons==0.8.3 # tensorflow-datasets==2.1.0 # tensorflow-estimator==2.3.0 # tensorflow-gcs-config==2.3.0 # tensorflow-hub==0.9.0 # tensorflow-metadata==0.24.0 # tensorflow-privacy==0.2.2 # tensorflow-probability==0.11.04. Quick Startの内容をノートブックに移す
あとは、Quick Startの内容を書いていくだけです。
notebookimport tensorflow as tf keras_model = tf.keras.applications.MobileNetV2( weights="imagenet", input_shape=(224, 224, 3,), classes=1000, )・
(続く)
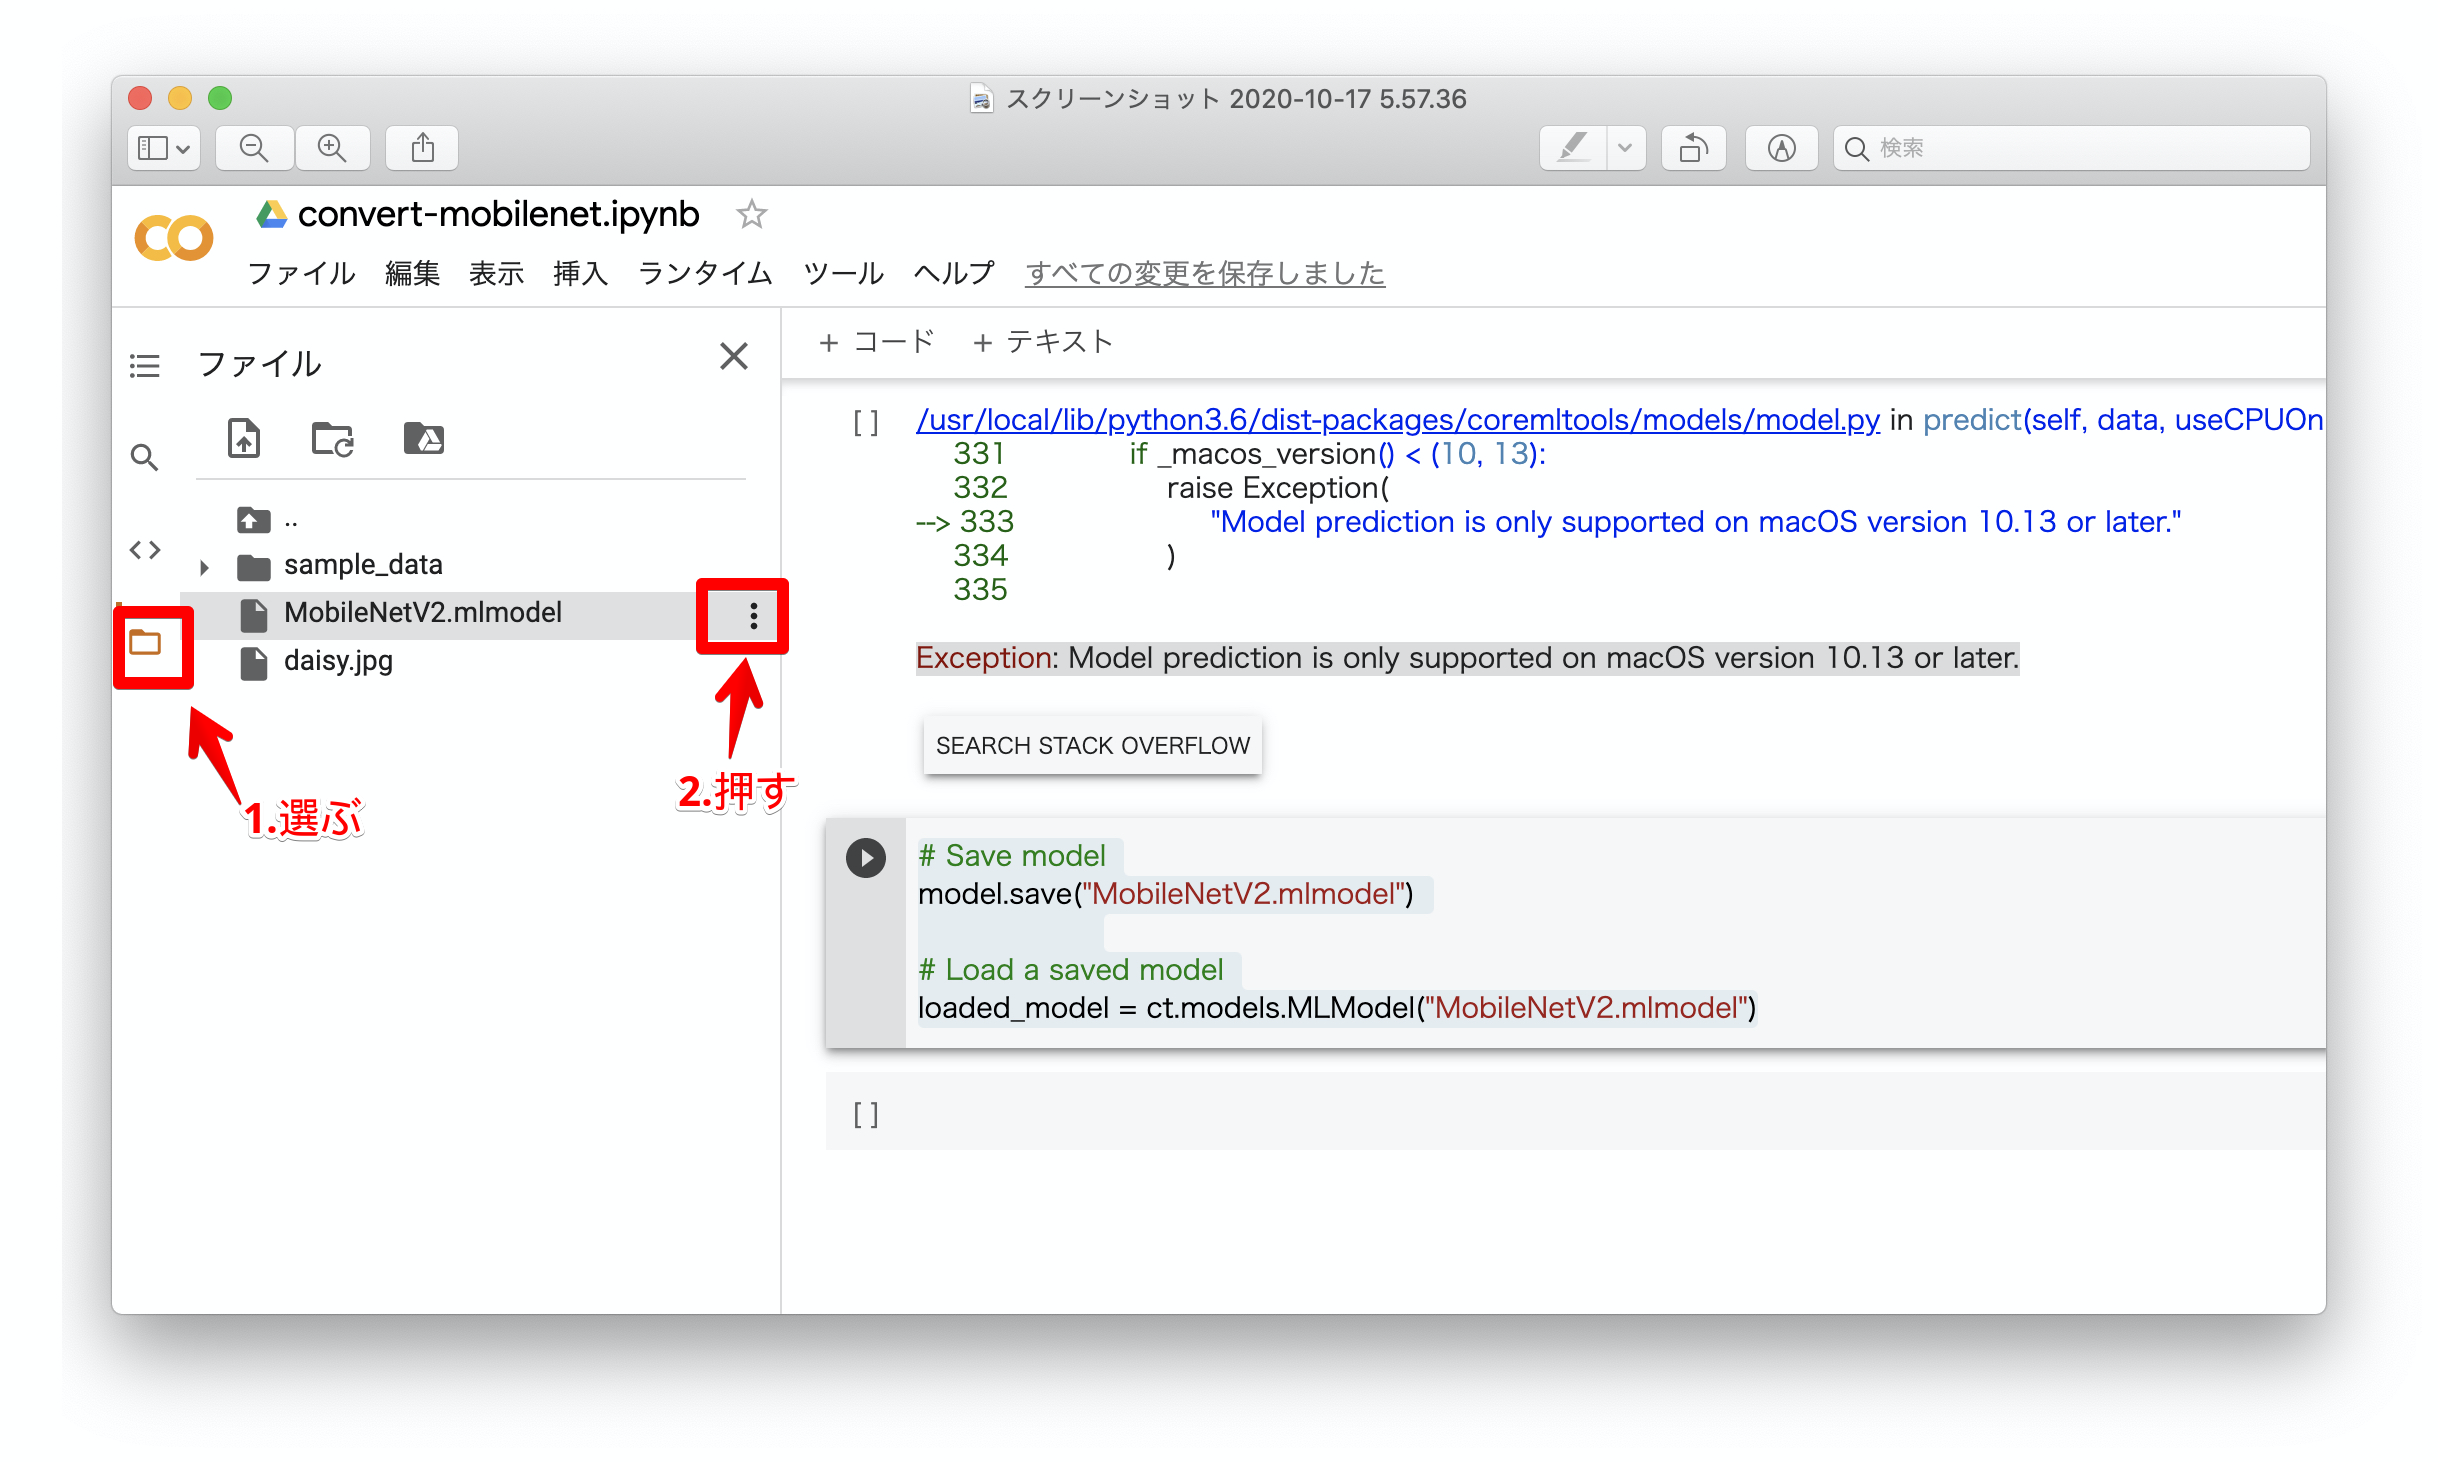
・なお、「Make Predictions」というセクションでは、ノートブック上で推論を行いますが、やろうとするとこんなエラーがでます。
Exception: Model prediction is only supported on macOS version 10.13 or later.
これは諦めましょう。5. modelを保存してダウンロードする
Quick Startの最後のセクションでモデルを保存しています。
notebook# Save model model.save("MobileNetV2.mlmodel") # Load a saved model loaded_model = ct.models.MLModel("MobileNetV2.mlmodel")保存したら、左側にあるメニューからフォルダのマークを選ぶと、フォルダの内容が見られるようになるので、出力したMobileNetV2.mlmodelを選択し、横にあるメニューからダウンロードを選択してダウンロードします。
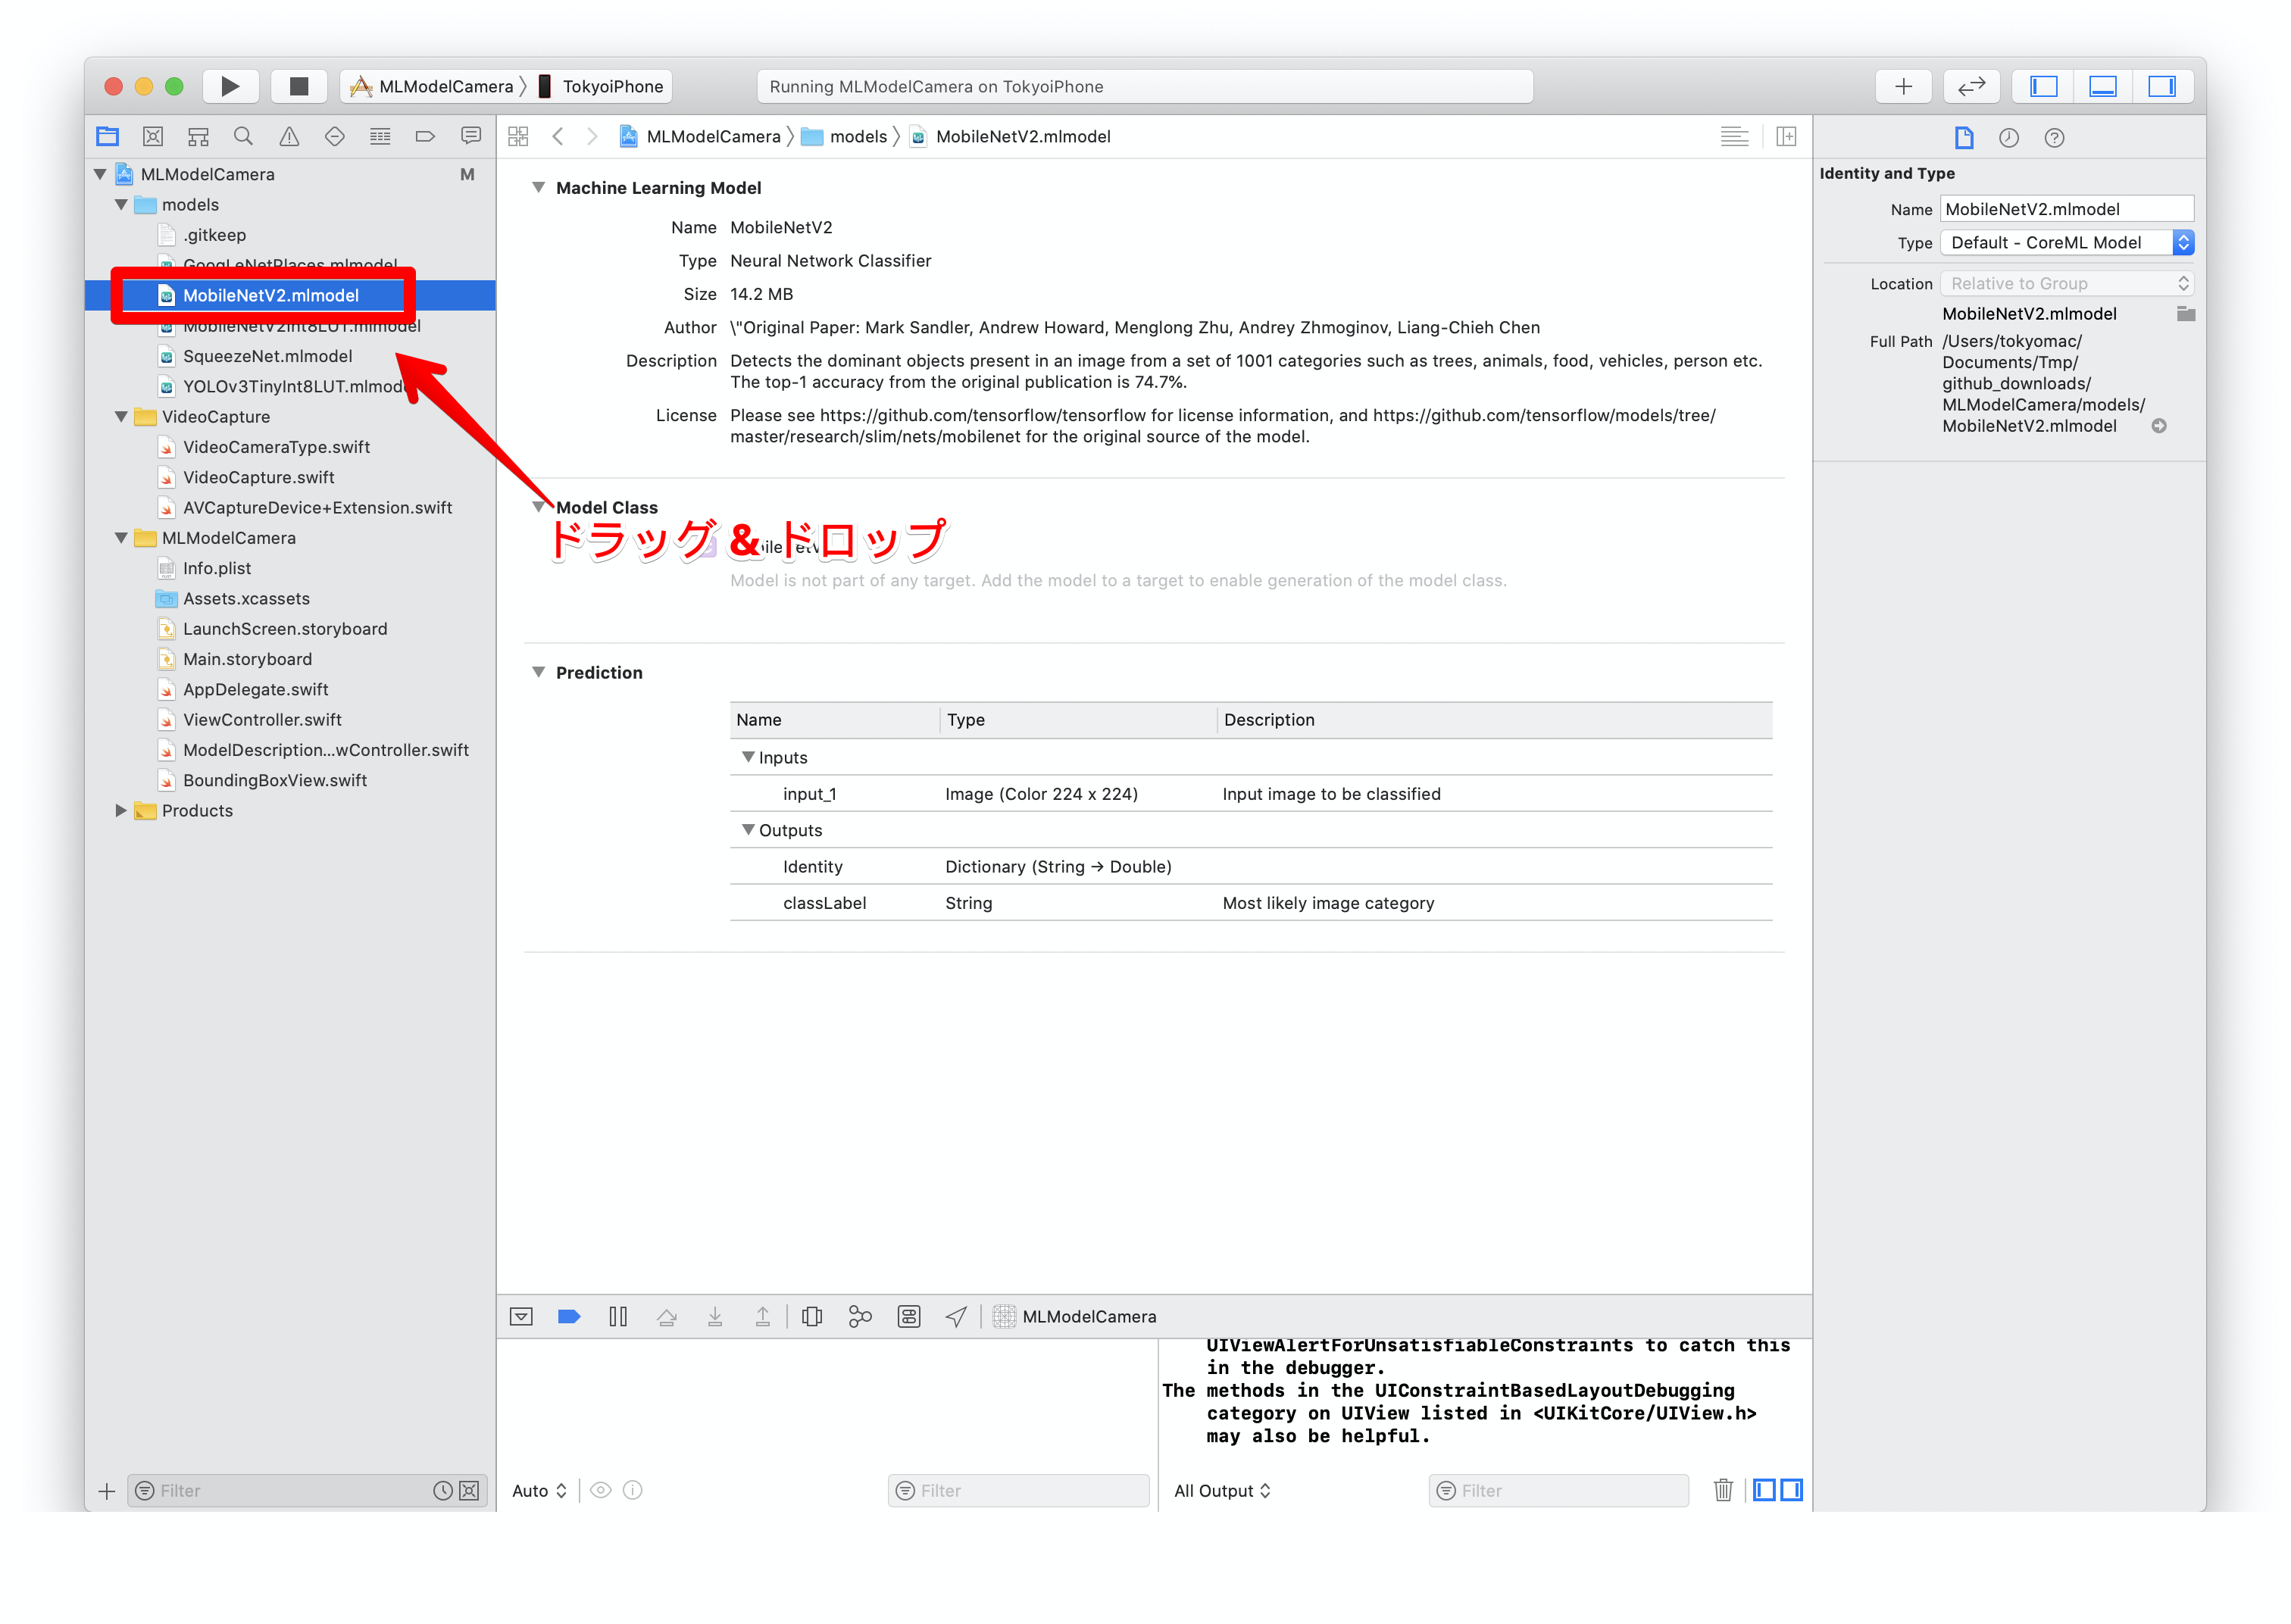
5. MLModelCameraをダウンロードする
CoreMLのモデルをiOS上で動作させるのは、MLModelCameraというOSSを使うと簡単です。
モデルファイルをDrag & Dropしてビルドするだけで、あとは自動的に読み込んで推論してくれます。こちらにあります。
MLModelCameraこのリポジトリをCloneしてプロジェクトをXcodeに読み込みます。
6. プロジェクトのmodelsの下にMobileNetV2.mlmodelをDrag & Dropする
すでに、MobileNetV2Int8LUT.mlmodelという同じようなモデルがありますが気にせずドロップします。
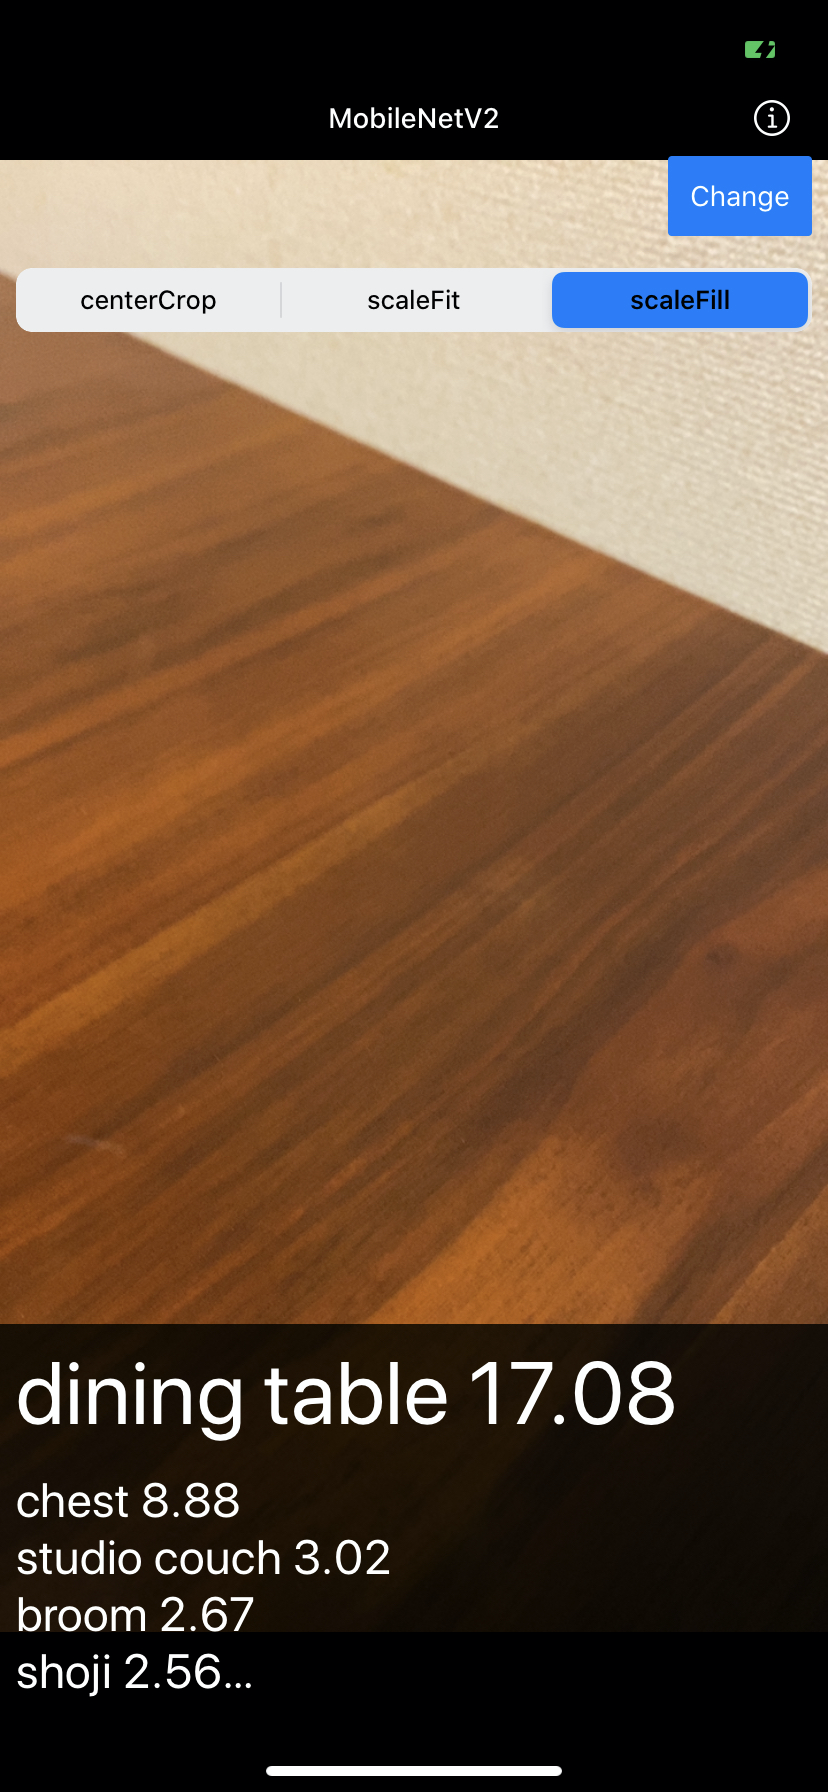
7. ビルドして実行する
仕上がり
うまく推論しているようでした。
ちょっとだけ障子にも見えたんですね?
NoteではiOS開発について定期的に発信していますので、フォローしていただけますと幸いです。
https://note.com/tokyoyoshidaTwitterでは簡単なtipsを発信しています。
https://twitter.com/jugemjugemjugem
- 投稿日:2020-10-17T00:43:42+09:00
iOSアプリ開発:タイマーアプリ(2.タイマーの表示)
記事内容
タイマーアプリを作成するためのポイントを複数記事に分けて掲載しています。
この記事では、メインの機能となるタイマー部分を表示させる方法について掲載します。開発環境
- OS: macOS 10.15.x
- エディタ: Xcode 11.x
- 言語: Swift
手順概要
- TimerViewを作成する
- TimerViewとPickerViewの表示切り替え用Boolean型プロパティをTimeManagerクラスに作成
- MainViewを作成する
- MainViewにPickerViewとTimerViewを配置する
1. TimerViewを作成する
TimerView.swiftという名前の新しいファイルを作成し、同名Viewのstructを用意します。
TimerView.swiftimport SwiftUI struct TimerView: View { var body: some View { } }次に必要なプロパティを用意します。
このTimerViewでも、TimeManagerクラスのPublishedプロパティの値を常に参照しますので、PickerView作成時と同様に、TimeManagerクラスのインスタンスtimeManagerを作成し、varの前にキーワード@EnvironmentObjectをつけます。またタイマー表示となるテキストコンポーネントのサイズも、PickerViewの時と同様、スクリーンサイズを基に指定するため、スクリーンの幅、高さを取得するプロパティをそれぞれscreenWidth、screenHeightとして用意します。
TimerView.swiftstruct TimerView: View { @EnvironmentObject var timeManager: TimeManager let screenWidth = UIScreen.main.bounds.width let screenHeight = UIScreen.main.bounds.height var body: some View { } }TimeManagerクラスですでに用意しているdisplayTimerメソッドの戻り値がタイマーの表示時間になります。
時間表示形式によって、文字サイズを変えたいので、これもTimeManagerクラスですでに用意しているdisplayedTimeFormatプロパティの値によってif文で条件分岐させます。
文字サイズはスクリーンサイズ x 倍率で指定します。
TimerView.swiftstruct TimerView: View { //(プロパティ省略) var body: some View { //時間表示形式が時間、分、秒によって、タイマーの文字サイズを条件分岐させる //表示形式が"時間"の場合 if self.timeManager.displayedTimeFormat == .hr { Text(self.timeManager.displayTimer()) //文字サイズをスクリーンサイズ x 0.15に指定 .font(.system(size: self.screenWidth * 0.15, weight: .thin, design: .monospaced)) //念の為、行数を1行に指定 .lineLimit(1) //デフォルトの余白を追加 .padding() //表示形式が"分"の場合 } else if self.timeManager.displayedTimeFormat == .min { Text(self.timeManager.displayTimer()) .font(.system(size: self.screenWidth * 0.23, weight: .thin, design: .monospaced)) .lineLimit(1) .padding() //表示形式が"秒"の場合 } else { Text(self.timeManager.displayTimer()) .font(.system(size: self.screenWidth * 0.5, weight: .thin, design: .monospaced)) .lineLimit(1) .padding() } } }2. TimerViewとPickerViewの表示切り替え用Boolean型プロパティをTimeManagerクラスに作成
isShowingPickerというプロパティをBool型で作成します。初期値としてtrueを入れているので、型指定のコードは不要です。Viewから常に監視する必要があるので、@Publishedのプロパティラッパーをvarの前につけておきます。
この変数の値がtrueのときは、MainViewでPickerViewを表示し、falseの場合はTimerViewを表示することにします。
TimeManager.swiftclass TimeManager: ObservableObject { //(先に作成していたプロパティ省略) //MainViewでPickerViewとTimerViewを切り替えるための変数 @Published var isShowingPicker = true //(先に作成していたメソッド省略) }3. MainViewを作成する
MainViewという名前の別のSwiftファイルを用意します。
このViewがカウントダウンタイマーアプリとしてのメイン画面になります。ここでもTimeManagerクラスのプロパティの値を常に参照するため、@EnvironmentObjectプロパティラッパーをvarの前につけて、TimeManagerクラスのインスタンスを作成します。
MainView.swiftimport SwiftUI struct MainView: View { @EnvironmentObject var timeManager: TimeManager var body: some View { } }4. MainViewにPickerViewとTimerViewを配置する
body内に、手順2で先にTimeManagerクラスに作成しておいたisShowingPickerプロパティの値による条件分岐を作ります。
そして、先に作成したPickerViewとTimerViewを、それぞれtrueの場合、falseの場合に表示するように追加します。
MainView.swiftstruct MainView: View { @EnvironmentObject var timeManager: TimeManager var body: some View { if timeManager.isShowingPicker == true { PickerView() } else { TimerView() } } }この先予定されている手順のうちを先に少し掲載しておきます。
のちに作成する「スタートボタン」をタップすると isShowingPicker プロパティが False になるようにコーディングしていきます。反対に「リセット」ボタンを押すか、タイマーの残り時間が 0 になったら isShowingPicker プロパティが True になるようにコーディングしていきます。