- 投稿日:2020-10-17T23:09:00+09:00
【HTML&CSS】レスポンシブで改行の位置を切り替える方法
プログラミング勉強日記
2020年10月17日
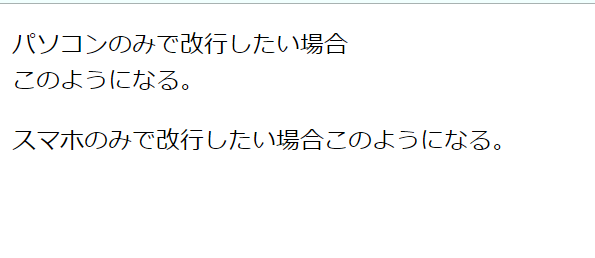
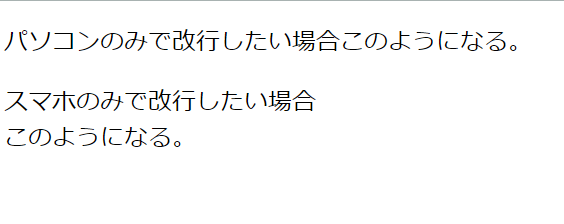
レスポンシブでサイトを作るときに、パソコンでみるときとスマホでみるときで改行の位置を変えたいときにメディアクエリを使うことで解決する方法を知ったのでまとめる。パソコンのみ・スマホのみで改行させる方法
まず、ブレイクポイントを680pxとしたとき、680px以下の時は
.pcは非表示に、.spは表示する。逆に、680px以上のときは.pcは表示に、.spは非表示にする。css@media screen and (min-width: 680px) { .pc { display:block; } .sp { display:none; } } @media screen and (max-width:680px) { .pc{ display:none; } .sp{ display:block; } }これを開業する
brのclassとして追加する。html<p>パソコンのみで改行したい場合<br class="pc">このようになる。</p> <p>スマホのみで改行したい場合<br class="sp">このようになる。</p>参考文献
- 投稿日:2020-10-17T21:50:51+09:00
【初心者でもわかる】<form>タグを外から動かす2つの方法
どうも7noteです。formタグのプチ応用の使い方について。
html要素の
<form>タグは、タグで囲まれた中のinputやselectの値をgetやpostで受け渡すことができます。
通常の使い方であれば、タグに囲まれた中にある<button>タグやを使って動かすのですが、今回は<form>タグの外から、formを動かして値の受け渡しを行います。方法1 HTMLのみでできる方法
<button>要素を作成し、そのform属性に動かしたい<form>のidを指定。form.html<form id="mainform" action="" method="post"> <input type="text" value=""> </form> <button type="submit" form="mainform">送信する</button> <!-- form属性に、動かしたい<form>のidを指定。 -->これで、
<form>外からもsubmit(送信)することができます。方法2 クリックやチェックなどのアクションした時に動作させる方法
javascriptを使用します。今回はjQueryも使用しています。
以下の例はクリックされた時の場合の書き方。form.html<form id="mainform" action="" method="post"> <input type="text" value=""> </form> <div class="btn">送信する</div> <script> $(".btn").on("click", function(e){ // クラスbtnがクリックされた時 document.forms.mainform.submit(); // mainformをsubmit(送信)する )}; </script>関数を作る方法であれば以下のような書き方もできます。
form.html<form id="mainform" action="" method="post"> <input type="text" value=""> </form> <div class="btn" onclick="clickEvent();">送信する</div> <!-- onclick属性で動かすjsを指定 --> <script> function clickEvent(){ document.forms.mainform.submit(); // mainformをsubmit(送信)する } </script>javascriptで書くメリットは、送信ボタンを押された瞬間に他の処理を動かしたり、条件分岐して動かすformを切り換えたり、値を入れなおしたりできるところです。
ややこしい処理が必要な場面でも対応が可能です。
また、前者の方法であれば、clickを別のものに変えることで、値が変更されたときや、他の任意のタイミングで動かすことができます。まとめ
HTMLだけでできる方法もありますが、しっかりと作りこんだサイトで細かい動きも入れるのであればjavascriptを使った動かし方の方をおすすめします。
簡易的でシンプルなフォームであれば、HTMLだけの方法で十分対応できると思います!おそまつ!
~ Qiitaで毎日投稿中!! ~
【初心者向け】HTML・CSSのちょいテク詰め合わせ
- 投稿日:2020-10-17T18:11:53+09:00
testareaの初期値(Value)が反映されない時の解決法
エラー状況
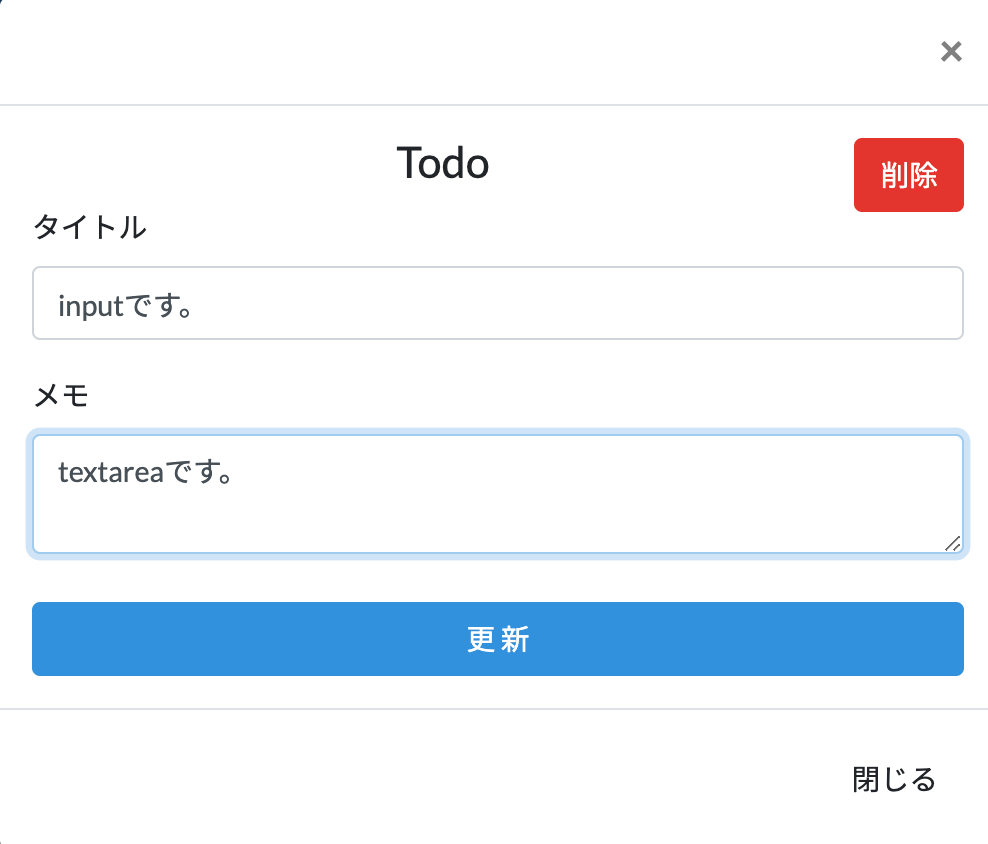
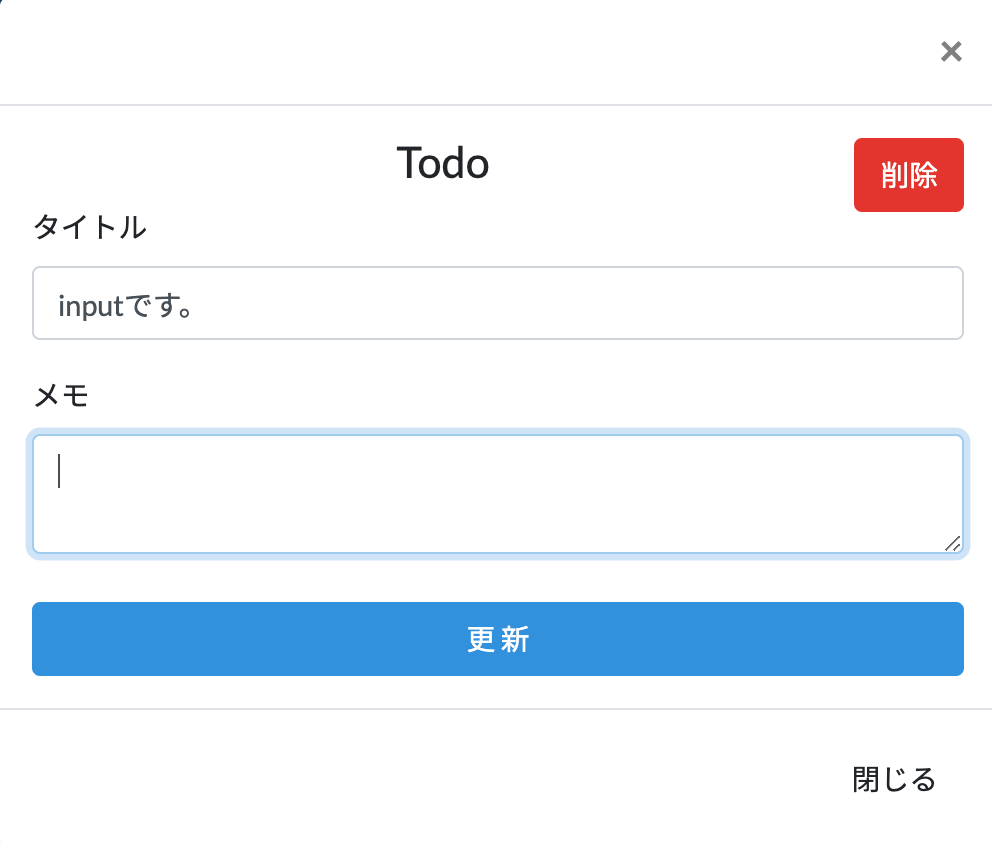
例えば下記のような入力フォームにinputエリアとtextareaエリアを実装したとする。
更新して再度開いた時に前回、更新した内容が表示できるようにしたい。
しかしinputエリアは通常に表示されているが、textareaは表示がされていない状況。修正作業
コードを確認してみると
<div class="title-area">
  <label for="test1">タイトル</label>
  <input id="test1" type="text" name="title" value="{{$sample->title}}">
</div>
<div class="text-area">
  <label for="test2">メモ</label>
  <textarea id="test2" type="text" name="memo" value="{{$sample->memo}}" row="5"></textarea>
</div>
一見、問題ないように見えますが、
textareaにvalueを設定するのではなく、開始タグと閉じタグの間に表示されたい変数などを入れるようにコードを修正すれば、表示されると思います。<div class="title-area"> <label for="test1">タイトル</label> <input id="test1" type="text" name="title" value="{{$sample->title}}"> </div> <div class="text-area"> <label for="test2">メモ</label> <textarea id="test2" type="text" name="memo" row="5">{{$sample->memo}}</textarea> </div>最後に
textareaはinputと同じように書きがちなので初学者の方がハマるエラーだと思い、執筆しました。
参考になれば幸いです。
- 投稿日:2020-10-17T16:48:41+09:00
電卓の作成
電卓を作成します
足し算と引き算と掛け算と割り算ができる電卓を作ります。
body要素にinput要素を2つ記述します。input要素に計算するときの数値を記入します。select要素を1つ記述しますが、ここで足し算をするか引き算をするかなどを選択します。button要素をクリックするとinput要素とselect要素で指定した内容で計算してくれます。button要素にはonclick属性を設定してクリックしたときにclicked( )関数が発火します。
<body>
  <input id="num1">
  <select id="s1">
    <option>+</option>
    <option>-</option>
    <option>×</option>
    <option>÷</option>
  </select>
  <input id="num2">
  <span>=</span>
  <span id="total"></span><br>
  <p>※半角数字を入力してください</p>
  <button onclick="clicked()">計算する</button>
</body>
script要素ではグローバル変数にnum1,num2,s1,totalを定義します。
clicked関数の最初にグローバル変数それぞれにbody要素側で取得したい要素を設定します。num1とnum2は計算するときの数値。s1は足し算、引き算などの計算方法。totalは計算結果を表示します。
「let t = 0;」は関数内での計算結果を後で代入します。
num1,num2,s1は「document.getElementById("id名")」の最後に「.value」をつけていますが、input要素やselect要素で記入したり選択した内容を変数に代入することができます。parseInt( )メソッドは引数に指定した値を数値に変換することができます。先ほどのnum1やnum2が取得している値は文字列として数字が代入されているので、数値に変換します。この後計算するためです。
switch構文は引数に指定しているものの値が「case」後の値ごとに処理を分岐できる構文です。例えば、s1 = "+"のときは「t = num1 + num2; break;」を実行します。"+"のときは足し算、"-"のときは引き算をするように分岐しています。
最後に「total.textContent = t;」で計算後の値tをtextContentを使ってid要素totalを持つspan要素に出力しています。
  <script>
    let num1, num2, s1, total;

    function clicked() {
      num1 = document.getElementById("num1").value;
      num2 = document.getElementById("num2").value;
      s1 = document.getElementById("s1").value;
      total = document.getElementById("total");
      let t = 0;

      num1 = parseInt(num1);
      num2 = parseInt(num2);

      switch(s1) {
        case "+":
          t = num1 + num2;
          break;
        case "-":
          t = num1 - num2;
          break;
        case "×":
          t = num1 * num2;
          break;
        case "÷":
          t = num1 / num2;
          break;
      }
      total.textContent = t;
    }
  </script>
以下のコードをコピーしてファイルに貼り付ければ試せます。select要素のoptionとswitch構文内のcaseを増やせばさらに計算方法を増やすこともできるので試してみてください。
<!DOCTYPE html>

<html>

<head>
  <meta charset="UTF-8">
  <title>calculater</title>

  <style>
    input {
      width: 100px;
      height: 30px;
      font-size: 25px;
      margin-right: 10px;
    }

    select {
      width: 50px;
      height: 30px;
      font-size: 25px;
      background-color: #eeeeee;
      margin-right: 10px;
    }

    span {
      width: 30px;
      height: 30px;
      font-size: 25px;
      margin-right: 10px;
    }
  </style>

  <script>
    let num1, num2, s1, total;

    function clicked() {
      num1 = document.getElementById("num1").value;
      num2 = document.getElementById("num2").value;
      s1 = document.getElementById("s1").value;
      total = document.getElementById("total");
      let t = 0;

      num1 = parseInt(num1);
      num2 = parseInt(num2);

      switch(s1) {
        case "+":
          t = num1 + num2;
          break;
        case "-":
          t = num1 - num2;
          break;
        case "×":
          t = num1 * num2;
          break;
        case "÷":
          t = num1 / num2;
          break;
      }
      total.textContent = t;
    }
  </script>
</head>

<body>
  <input id="num1">
  <select id="s1">
    <option>+</option>
    <option>-</option>
    <option>×</option>
    <option>÷</option>
  </select>
  <input id="num2">
  <span>=</span>
  <span id="total"></span><br>
  <p>※半角数字を入力してください</p>
  <button onclick="clicked()">計算する</button>
</body>
</html>
- 投稿日:2020-10-17T00:09:27+09:00
RailsにBootstrapを導入する方法
RubyにBootstrapを導入する方法
手順
- Bootstrapのインストール
- SCSSファイルの作成
- JSファイルの修正
- Rails(Puma)の再起動 ## Bootstrapをgemでインストール
Gemfilegem 'bootstrap', '~> 4.3.1' gem 'jquery-rails'ターミナルbundle installSCSSファイルを作成
ターミナルmv app/assets/stylesheets/application.css app/assets/stylesheets/application.scssapp/assets/stylesheets/application.scss/* * This is a manifest file that'll be compiled into application.css, which will include all the files * listed below. * * Any CSS and SCSS file within this directory, lib/assets/stylesheets, or any plugin's * vendor/assets/stylesheets directory can be referenced here using a relative path. * * You're free to add application-wide styles to this file and they'll appear at the bottom of the * compiled file so the styles you add here take precedence over styles defined in any other CSS/SCSS * files in this directory. Styles in this file should be added after the last require_* statement. * It is generally better to create a new file per style scope. * *= require_tree . <(削除) *= require_self <(削除) */ @import "bootstrap"; <(追加)JSファイルを修正
app/assets/javascripts/application.js# 以下の3つを追記 //= require jquery3 //= require popper //= require bootstrap # 元々のコード //= require rails-ujs //= require activestorage //= require turbolinksRails(Puma)を再起動
Dockerfile# Railsに必要なパッケージをインストール RUN apt-get update -qq && apt-get install -y nodejs RUN curl -sL https://deb.nodesource.com/setup_10.x | bash - \ && apt-get install -y nodejs # 以下の公式サイトの記述では、node.jsのバージョンが低くてbootstrapが使えない # RUN apt-get update -qq && apt-get install -y nodejsBootstrapの使い方(テンプレート)
app/views/layouts/application.html.erb<!DOCTYPE html> <html> <head> <title>App</title> <%= csrf_meta_tags %> <%= csp_meta_tag %> <%= stylesheet_link_tag 'application', media: 'all', 'data-turbolinks-track': 'reload' %> <%= javascript_include_tag 'application', 'data-turbolinks-track': 'reload' %> </head> <body> <div class="d-flex flex-column flex-md-row align-items-center p-3 px-md-4 mb-3 bg-white border-bottom shadow-sm"> <h5 class="my-0 mr-md-auto font-weight-normal">Company name</h5> <nav class="my-2 my-md-0 mr-md-3"> <a class="p-2 text-dark" href="#">Features</a> <a class="p-2 text-dark" href="#">Enterprise</a> <a class="p-2 text-dark" href="#">Support</a> <a class="p-2 text-dark" href="#">Pricing</a> </nav> <a class="btn btn-outline-primary" href="#">Sign up</a> </div> <p class="notice"><%= notice %></p> <p class="alert"><%= alert %></p> <%= yield %> </body> </html>こうなる!
現場からは以上です!


