- 投稿日:2020-10-15T19:24:04+09:00
React Hooksの強制再レンダリング方法
React Hooksでの強制サイレンダリング方法
クラスコンポーネントでは、
this.focusUpdate()が使えましたが、関数コンポーネントではそうは行きませんよね。
「形が不細工でもレンダーしたい!」という方にお勧めなのがこちらの方法です。//boolean型のstateを作成 const [update,setUpdata]=useState<boolean>(false) //レンダリングしたい場所でこれを差し込むだけ setUpdata(update?false:true)setUpdata(update?false:true)の役割は、updateステートがtrueだった場合"false"、falseだった場合"true"にするだけです。
ぜひ使っていきましょう。
- 投稿日:2020-10-15T18:02:20+09:00
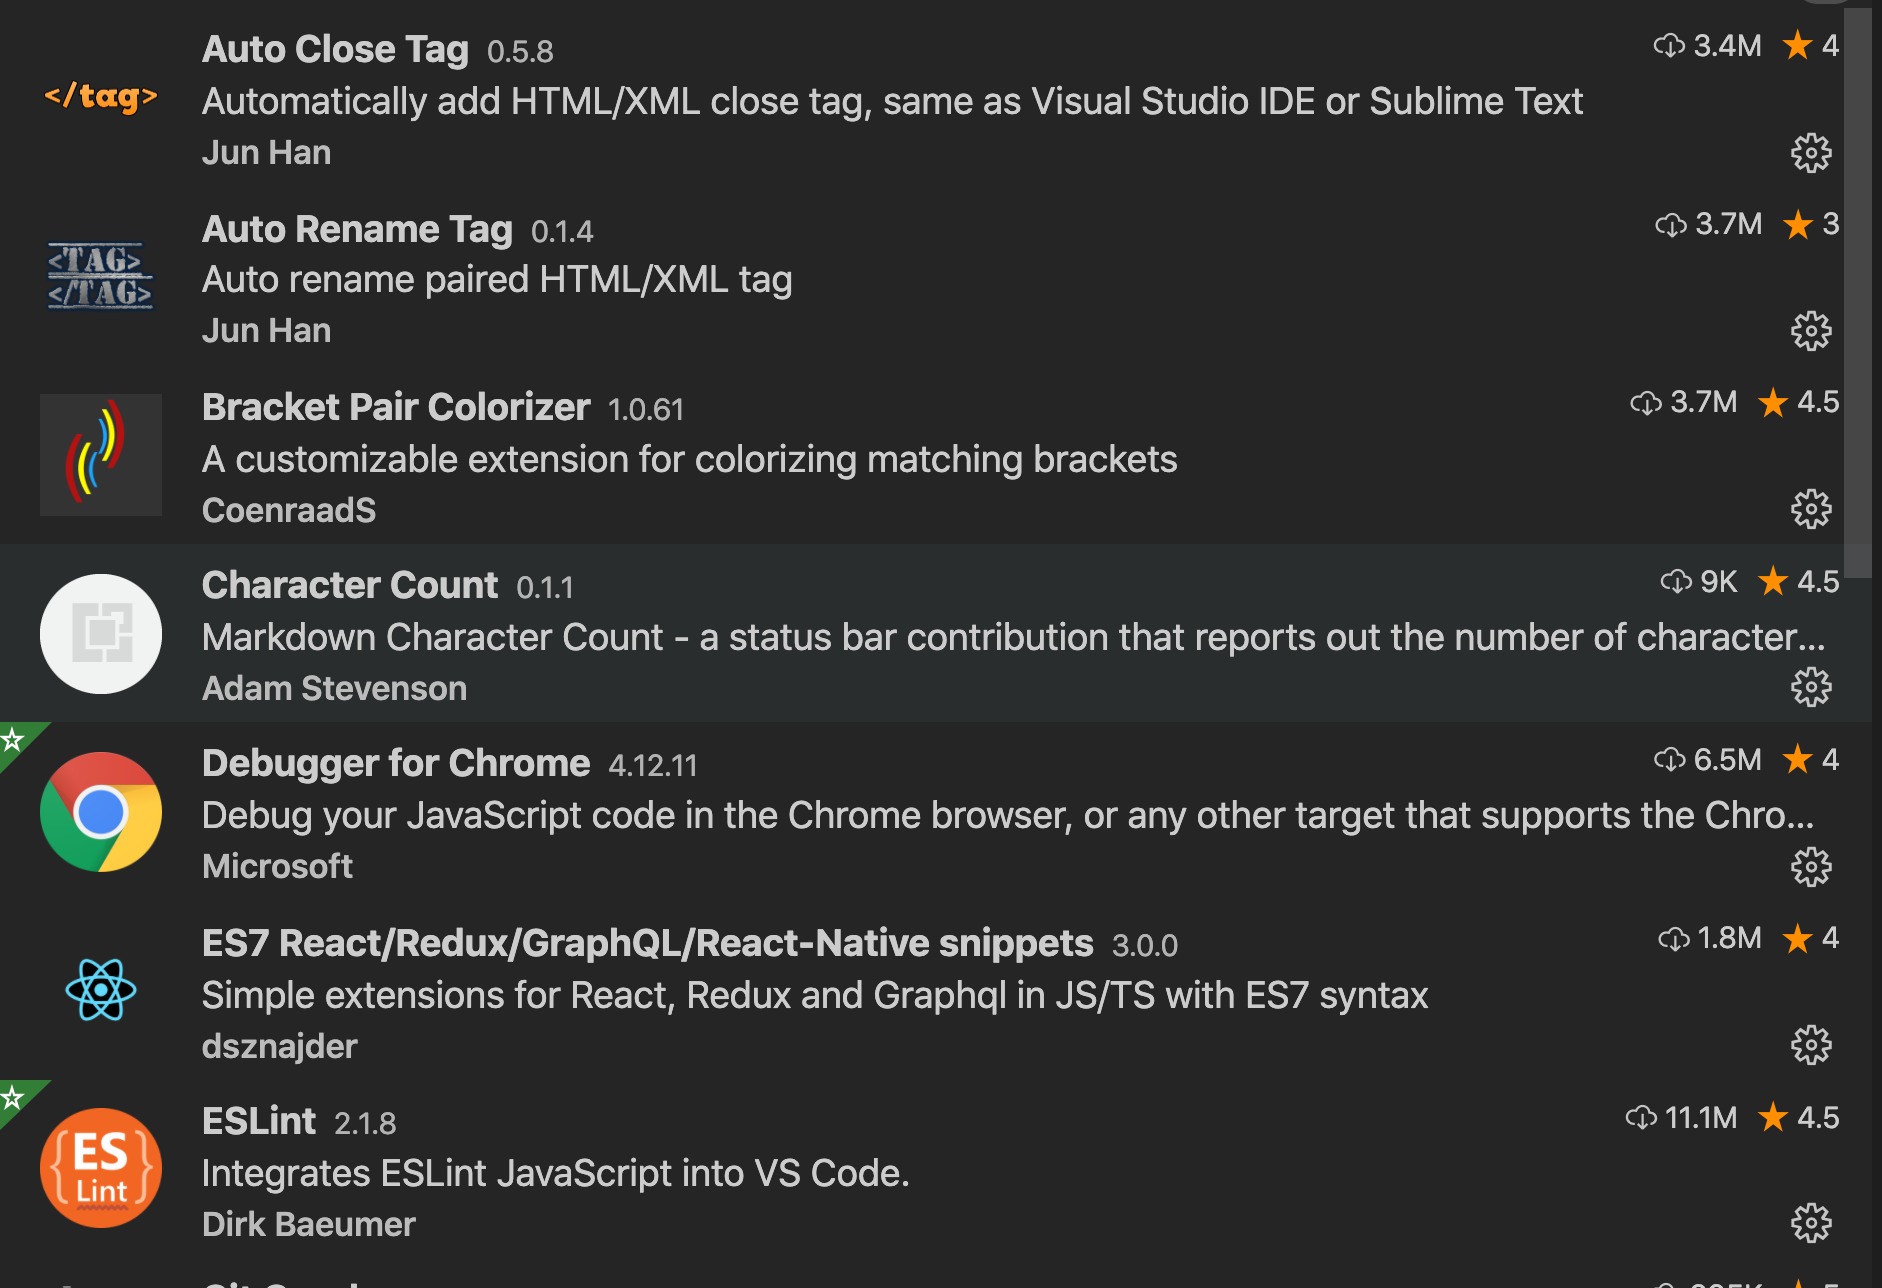
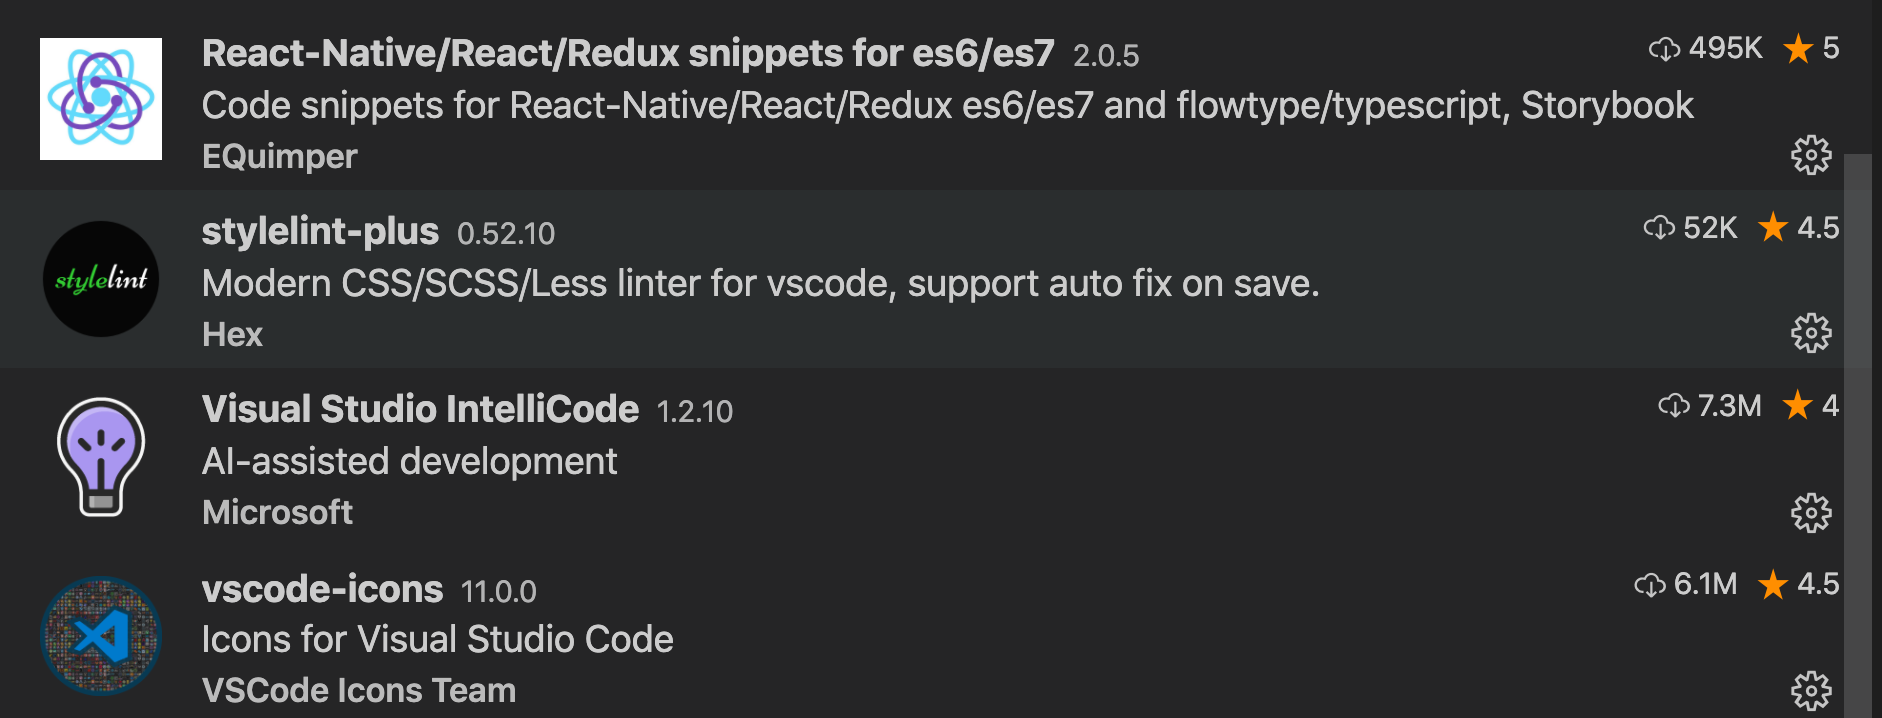
React開発のためのVSCode拡張機能セット
以前から愛用しているものに加え、りあクト!を参考にカスタマイズしました。
参考になれば。
参考


- 投稿日:2020-10-15T15:44:49+09:00
React + TypeScript + vte.cxで簡単なWebアプリを作ってみた⑤Bigquery連携編
はじめに
前回作ったReact + TypeScript + vte.cxで基本的なCRUDアプリを今までの条件検索機能やページネーション機能はそのままにGCPのBigqueryと連携してみました。
余談ですが詰まりまくって3週間くらいかかってしまいました。
今回作ったアプリ
やったことはデータの参照先をBigqueryに変えただけなので見た目は一ミリも変わっていません。
今までと何が違うのか
今まではvtecxプロジェクト内のエンドポイントにデータを保存していました。
これはvtecxですでに整備済みの内蔵の(api)サーバーサイドを使ってデータにアクセスしたりしていました。ただアプリによってはこの使いやすいapiだけでは届かないところも出てきます。
今回はGCPのBigqueryというデータ分析に特化したデータベースを使って、クライアント側でSQLを作ってデータを操作するアプリケーションを作成しました。
まず最初にBigqueryと連携するための流れを説明していき、次にアプリではどう実装していったかを説明していきます。
Bigqueryとの連携
こちらを参考にしていきますvte.cxドキュメント
初期設定(以下サンプル)
プロジェクトの中のsetup/_settingsフォルダの中に以下のようなbigquery.jsonファイルを作成後
setup/_settings/bigquery.json{ "type": "hoge_account", "project_id": "hoge-project", "private_key_id": "hogehogehoge1234", "private_key": "-----BEGIN PRIVATE KEY-----hogehogehogehogehogehogehogehogehogehogehogehogehogehogehogehogehogehogehogehogehogehogehogehogehogehogehogehogehogehogehogehogehogehogehogehogehogehogehogehogehogehogehogehogehogehogehogehogehogehogehogehogehogehoge---END PRIVATE KEY-----\n", "client_email": "hogehoge@hogehoge.example.com", "client_id": "123456789", "auth_uri": "hogehgoe", "token_uri": "https://hogehoge/token", "auth_provider_x509_cert_url": "https://www.hogehogoe.com/hogehoge2/v1/hoge", "client_x509_cert_url": "https://www.googleapis.com/robot/v1/metadata/x509/hogehoge.gserviceaccount.com" }setup/_settingsフォルダの中のproperties.xmlの
setup/_settings/properties.xml<link href="/_settings/properties" rel="self"/> <rights>_errorpage.1.login.html=^/_html/.*$ _errorpage.2.login.html=^/@/.*$ console.log=true console.warn=false console.error=true </rights>上記の部分(rights)に以下の3行を追加します
_bigquery.projectid=hogehoge
_bigquery.dataset=hoge_dataset
_bigquery.location=hoge-northeast1
追加後はこうなります
setup/_settings/properties.xml<rights>_errorpage.1.login.html=^/_html/.*$ _errorpage.2.login.html=^/@/.*$ console.log=true console.warn=false console.error=true _bigquery.projectid=hogehoge _bigquery.dataset=hoge_dataset _bigquery.location=hoge-northeast1 </rights>
setup/_settings/bigquery.jsonとsetup/_settings/properties.xmlに手を加えたらnpm run uploadを実行するとvtecxプロジェクトがbigqueryと連携されます。
自分はここの設定でかなり詰まりました。
rigthsの中身が改行されておらず、uploadしても認識されなく連携されずに原因特定にかなり時間がかかってしまいました。ではいくつかののデータを追加していきましょう
サーバーサイドJSを使ってみる
データを登録するにはサーバーサイドJavaScriptを使ってサーバーと通信する必要があります。
vte.cxによるバックエンドを不要にする開発(7.サーバサイドJavaScript)
概念としてはこちらのチュートリアルで知ることができます。
vte.cxのアーキテクチャーとサーバサイドJavaScript
これまでのサンプルは、エンドポイント/dに対してアクセスするもので、データの登録や参照だけを行うものでした。実は、vte.cxにはデータ登録/参照以外に、サーバサイドのJavaScript(以下、サーバサイドJS)を実行する機能があります。(下図のエンドポイント/sがこれに該当します)
サーバサイドJSはサーバサイドで実行されますが、これはBFF(Backends for Frontends)といって概念的にはフロントエンドの範疇です。
つまり、実行される場所が異なるだけで、クライアントサイドで実行されるJavaScriptの機能と同等であるというわけです。ただ、VtecxAPIを使ってサーバリソースに直接アクセスしたり、PDF生成、メール送信といったバックエンド機能を利用できるというメリットがあります。また、/dが返すリソースで不必要な項目が多い場合に通信量削減のためクライアントが必要とする最低限のものだけサーバサイドで編集して返したりすることはよくあります。集計などもサーバサイドJSを利用するとよいでしょう。今まではクライアントサイド(ブラウザ)から/dにアクセスして情報をとっていました。
でもサーバーサイドJSを通すことでカスタマイズしたデータに自分が好きなようにアクセスしたり、そのデータをPDFやCSVとして出力することができます。データの登録
サーバーサイドJSを使うにあたってプロジェクト直下のsrcフォルダの中にserverフォルダがあります。このフォルダの中にサーバーサイドとして働くファイルを作ります。
今回は例としてpostDataInformation.tsxを作ります。server/postDataInformation.tsx//サーバーサイドJSを使うには以下のモジュールをimportする import * as vtecxapi from 'vtecxapi' // データを登録するには以下のような構造にする必要がある。 const reqdata = { 'feed': { 'entry': [{ 'foo': { 'bar': 'test', 'baz': 'テスト' }, 'link': [{ '___rel': 'self', '___href': '/footest/1' }] } ] } } //この部分でBigqueryに登録している vtecxapi.postBQ(reqdata,false)vtecxapiメソッドについてはドキュメントに一覧があります。
メソッド 説明 postBQ(request: any, async: boolean): void BigQueryに対してデータを登録する 登録はこちらに使っていきます。
const reqdata = {
        'feed': {
            'entry': [{
// ここのfooの部分がテーブル名になってbarやbazがデータの項目、そのvalue側がデータ本体になります。
                'foo': { 'bar': 'test', 'baz': 'テスト' },
                'link':
                [{ '___rel': 'self', '___href': '/footest/1' }]
            }
            ]
        }
    }
またここの
fooとそのプロパティであるbarやbazはvtecxのスキーマテーブルに登録されていないとエラーが起きます。
具体的にはfooがスキーマテンプレートに登録されていなかった場合、
{"feed" : {"rights" : "ERROR","title" : "jp.sourceforge.reflex.exception.JSONException : JSON parse error: foo is not defined in the schema template."}}
上記のようなエラーが起きます。
fooがテンプレートに登録されていないというエラーです。もしこうなってしまった場合、以下の画像のようにテンプレートに登録しないといけません。
ちゃんと登録したいデータがスキーマにあることが確認できたら
npm run watch -- --env.entry=/server/postDataInformation.tsx上記のコマンドを実行してサーバにデプロイします
その後にブラウザから
http://{サービス名}/s/ファイル名を開く
今回だとhttp://{サービス名}/s/postDataInformation.tsxを開きます。
そうするとデータが登録されます。データが登録されたかBigqueryにログインしてコンソールに移動、保存したプロジェクトを選択したら以下のsql文を実行してみましょう。
select f.key,bar,baz,k.updated from my_dataset.foo as f right join (select key,max(updated) as updated from my_dataset.foo group by key) as k on f.updated=k.updated and f.key=k.key where f.deleted = false
上記のようなsql文を実行させるとちゃんと情報が登録されています。
でもこのままだとデータとして成り立ちません。
これらのデータにはそれぞれのデータを識別する主キーがありません。
主キーの説明はこちらのサイトをご参照ください今までエンドポイントに登録していた時はキーについて意識する必要がありませんでした。
なぜなら一意なキーが自動的にラベル付けされていたからです。今まではどうしていたかというと
        const req: VtecxApp.Entry[] = [
            {
                // ここにはFormで入力した値が入ってくる
                "users": {
                    "name": name,
                    "gender": gender,
                    "age": age,
                    "address": address,
                    "password": password,
                    "email": email,
                    "post_number": postNumber,
                    "like_residence_type": likeResidenceType,
                    "position": position,
                    "language": language,
                },
            }
        ]
await axios.post('/d/users', req)
このようにしていました。
reqにkeyを入れなくても自動的に一意のkeyを/d/が入力してくれていました。でもサーバーサイドJSでは自分で一意のkeyを作るためにvtecxapiメソッドを使う必要があります。
先ほど使った
server/postDataInformation.tsxに追加していきます。server/postDataInformation.tsx//サーバーサイドJSを使うには以下のモジュールをimportする import * as vtecxapi from 'vtecxapi' //ここでエンドポイントである/d/testを対象としてidを作ります。 const id = vtecxapi.allocids('/d/test', 1) // データを登録するには以下のような構造にする必要がある。 const reqdata = { 'feed': { 'entry': [{ 'foo': { 'bar': 'test', 'baz': 'テスト' }, 'link': // ここではallocidsメソッドを使って生成した一意のidを使って一意のkeyを登録しています。 [{ '___rel': 'self', '___href': '/footest/' + id }] } ] } } //この部分でBigqueryに登録している vtecxapi.postBQ(reqdata,false)上記のコードでは
vtecxapiメソッドの一つである、allocidsメソッドを使っています。allocids(採番)
GET|PUT /d/?_allocids={採番数}を実行することで採番処理を行います。
指定された採番数だけ番号を採番します。カウンタ値はエンドポイント(キー)ごとに管理します。
採番数にマイナスの値を指定することはできません。1以上の値の指定が必要です。
DatastoreのallocateIdsを使用するため値はランダム値になります。
エラーの場合はFeed.titleにエラーメッセージが返ります。
メソッド 説明 allocids(url: string, num: number): any 指定された採番数(num)だけ採番する 自分はこの採番でも結構詰まって時間がかかりました。(読み飛ばしていただいても構いません)
①aloccidsを使っていない(これがなければそもそも始まらない)
②クライアント側で数字を操作しようとしている(数字のバッティングが起こる可能性がある)
もし同じidをサーバーから違う端末で受け取ったとして、それをクライント側で操作してしまうと採番番号が同じになってしまい、主キーとして機能しなくなってしまいます。
③_addidsの参照先がエンドポイントではなくサーバーサイドJSになっている
`axios.get('/s/hogehoge')のようにしていました。
これは間違いで、エンドポイント(/d/hogehoge)のように指定しないといけません。採番の考え方
①addidsやallocidsを数字を返すただの道具として考えること(ちなみにallocidsはallocate ids idを割り当てるの意)
②urlはエンドポイント(例えば/d/hogehoge。これは頭ではわかっていたがサーバと通信して値を返すものだという思い込みがずっとあり/s/hogehogeとしてしまっていた。)
採番の考えとして同じ値になっては絶対だめであり、エンドポイント(/d/hogehogeで)1を使ったらもうその数字は一生使えない。元に戻せないカウンターのイメージ。
データの取得
Bigqeryのデータを取得するにはgetBQメソッドを使います
メソッド 説明 getBQ(sql: string,parent: string): any BigQueryのデータを取得する またサーバーサイドに渡ってくる値や生成した値を確認する時はvtecxapi.logを使います。
メソッド 説明 log(message: string, title?: string, subtitle?: string): void ログに記録する server/getDataInformation.tsximport * as vtecxapi from 'vtecxapi' // 最新のレコードのみ取得 const sql = 'select bar,baz,k.updated from my_dataset.foo as f right join (select key,max(updated) as updated from my_dataset.foo group by key) as k on f.updated=k.updated and f.key=k.key where f.deleted = false' const result = vtecxapi.getBQ(sql,'foo') vtecxapi.log(JSON.stringify(result)) vtecxapi.doResponse(result)データを取得する際にはsqlを使うのですが、ここでスキーマに登録していない項目をselectしてしまうと
JSON parse Errorを起こしてしまいます。例えばfooにはbarとbazが登録されているのですがここで
select hogeをしてしまうとテンプレートに登録されていないのでエラーを起こします。
hogeをselectしたいならばfooの配下にhoge項目を登録しましょう。
クライアント-サーバー間のデータの受け渡し方
そしてこの取得したデータをクライアント側に渡すためには
doResponseメソッドを使います
メソッド 説明 doResponse(feed: any, status_code?: number): void feed.entry[0] ~ feed.entry[n]をレスポンスする。ステータスコードstatus_codeを指定可能 クライアント側でこのデータを受け取るには
src/components/getDataInformation.tsxconst getDataInformation = async () => { try { axios.defaults.headers['X-Requested-With'] = 'XMLHttpRequest' await axios.get(`/s/getDataInformation`).then((res: any) => { console.log(res.data) } ) } catch (e) { alert('error:' + e) } }getメソッドでサーバーサイドJSのパスを指定することでデータを取得することができます。
このdoResponseメソッドでサーバーサイド=>クライアントサイドへの情報の受け渡しができます。
ではクライアントサイド=>サーバーサイドに情報を渡すにはどうすればよいかというと2つ方法があります。
メソッド 説明 getQueryString(param?: string): string URLパラメータ(クエリストリング)を取得する getRequest(): any リクエストオブジェクト(feed.entry[0] ~ feed.entry[n])を取得する
getQueryString()の方では
クライアント側でgetメソッドで第二引数に{params:{}}を指定します。src/components/getQueryString.tsxconst getDataInformation = async () => { try { axios.defaults.headers['X-Requested-With'] = 'XMLHttpRequest' await axios.get(`/s/getDataInformation`,{params:{bar:'bar',baz:'baz'}}).then((res: any) => { console.log(res.data) } ) } catch (e) { alert('error:' + e) } }サーバーサイド側では
server/getDataInformation.tsximport * as vtecxapi from 'vtecxapi' const foo = vtecxapi.getQueryString('bar') const bar = vtecxapi.getQueryString('baz') vtecxapi.log(bar) vtecxapi.log(baz)サーバーサイドでgetQueryStringメソッドを使用することでクライアント側から受け取ることができます。
また
getRequest()の方では
クライアント側でpostメソッドで第二引数にリクエストオブジェクト(feed.entry[0] ~ feed.entry[n])を渡します。src/components/getQueryString.tsxconst getDataInformation = async () => { const reqdata = { 'feed': { 'entry': [{ 'foo': { 'bar': 'bar', 'baz': 'baz' }, }] } } try { axios.defaults.headers['X-Requested-With'] = 'XMLHttpRequest' await axios.get(`/s/getDataInformation`,req).then((res: any) => { console.log(res.data) } ) } catch (e) { alert('error:' + e) } }サーバーサイド側では
server/getDataInformation.tsximport * as vtecxapi from 'vtecxapi' const req = vtecxapi.getRequest() const bar = req[0].foo.bar const baz = req[0].foo.baz vtecxapi.log(bar) vtecxapi.log(baz)とすることで値を受け取ることができます。
渡す値が少ない時はgetメソッドで渡して多い時はpostメソッドで渡すのが良いと思います。
データの削除
データの削除には
deleteBQメソッドを使用します。
メソッド 説明 deleteBQ(keys: string[], async: boolean): void BigQueryのデータを削除する(論理削除) 論理削除とは 実際にはデータを削除せずに、削除されたと見なすフラッグと呼ばれるカラムを設定することでユーザーには削除しているかのように振る舞うことができることをさします。
server/deleteDataInformation.tsximport * as vtecxapi from 'vtecxapi' const keys = ['/footest/1'] vtecxapi.deleteBQ(keys,true)deleteBQはkeysに第一引数に消したいidを入れた配列を指定して第二引数にtrueを渡すことで使用することができます。
今回作ったアプリではどうBigqueryと連携していったか
データの登録
まずデータの登録です。
流れとしてはFormに入力したデータをサーバーサイドJSに渡してサーバーサイドでBigqueryに登録します。
まずsrc/components/app.tsxconst postFormData = async (name: string, gender: string, age: number, address: string, password: string, email: string, postNumber: string, likeResidenceType: string, position: string, language: string) => { const req: VtecxApp.Entry[] = [ { // ここにはFormで入力した値が入ってくる users: { name: name, gender: gender, age: age, address: address, password: password, email: email, post_number: postNumber, like_residence_type: likeResidenceType, position: position, language: language, }, } ] try { dispatch({ type: 'SHOW_INDICATOR' }) axios.defaults.headers['X-Requested-With'] = 'XMLHttpRequest' await axios.post('/s/postUserInfo', req).then(() => { dispatch({ type: 'HIDE_INDICATOR' }) }) history.push('/') } catch (e) { alert('error:' + e) } }await axios.post('/s/postUserInfo', req)ここで/s/postUserInfoにrequestオブジェクトであるreqデータを渡しています。
ではpostUserInfoではどうなっているかというと
server/postUserInfo.tsximport * as vtecxapi from 'vtecxapi' const req = vtecxapi.getRequest() vtecxapi.log(JSON.stringify(req)) const name = req[0].users!.name || '登録なし' const gender = req[0].users!.gender || '登録なし' const age = req[0].users!.age || 0 const address = req[0].users!.address || '登録なし' const password = req[0].users!.password || '登録なし' const email = req[0].users!.email || '登録なし' const post_number = req[0].users!.post_number || '登録なし' const like_residence_type = req[0].users!.like_residence_type || '登録なし' const position = req[0].users!.position || '登録なし' const language = req[0].users!.language || '登録なし' const id = vtecxapi.allocids('/d/users', 1) const reqdata = { 'feed': { 'entry': [{ 'user': { 'user_query_name': name, 'user_query_gender': gender, 'user_query_age': age, 'user_query_address': address, 'user_query_password': password, 'user_query_email': email, 'user_query_post_number': post_number, 'user_query_like_residence_type': like_residence_type, 'user_query_position': position, 'user_query_language': language }, 'link': [{ '___rel': 'self', '___href': '/user/' + id }] } ] } } vtecxapi.postBQ(reqdata, false)今回はデータの渡す量が多いので
getRequest()を使用しています。
const id = vtecxapi.allocids('/d/users', 1)
でエンドポイントを指定して採番をして、'link': [{ '___rel': 'self', '___href': '/user/' + id }] } ]この部分で主キーとしています。
登録はこんな感じでシンプルに改修することができました。
データの取得
流れとしてはレンダリング時にデータを取得するサーバーサイドJSにアクセスして総件数を取得して、件数を取得したらuseEffectで中身のデータを取得するような流れです。
また条件検索をした時に条件自体をstateで管理して、stateが入っている状態でページネーション の数字を押すとその保存されている条件を使ったデータの取得が行われるようになっています。
取得したデータは子コンポーネントに渡してテーブルになるようになっています。
子コンポーネントの構造に関しては前に書いた記事に載っています。src/components/UserInfo.tsx// 初期描画の実行 useEffect(() => { getTotalUserInfoNumber() }, [])まず初期レンダリングの際にuseEffectを使ってgetTotalUserInfoNumberという関数を実行します
src/components/UserInfo.tsx// 総件数を取得する処理 const getTotalUserInfoNumber = async () => { if (searchConditions) { try { dispatch({ type: 'SHOW_INDICATOR' }) axios.defaults.headers['X-Requested-With'] = 'XMLHttpRequest' await axios.get(`/s/getTotalFilteredUserCount`).then((res: any) => { setSumPageNumber(res.data.length) console.log(res.data.length) }).then(() => { dispatch({ type: 'HIDE_INDICATOR' }) }) } catch (e) { dispatch({ type: 'HIDE_INDICATOR' }) alert('error:' + e) } } else { try { dispatch({ type: 'SHOW_INDICATOR' }) axios.defaults.headers['X-Requested-With'] = 'XMLHttpRequest' await axios.get(`/s/getTotalUserCount`).then((res: any) => { setSumPageNumber(res.data.length) console.log(res.data.length) }).then(() => { dispatch({ type: 'HIDE_INDICATOR' }) }) } catch (e) { dispatch({ type: 'HIDE_INDICATOR' }) alert('error:' + e) } } }この章の冒頭でも伝えた通り、searchConditions(検索条件)に値が格納されていたらその条件を使って総件数を取得する仕組みになっています。
次にこれで総件数が取得できたら
src/components/UserInfo.tsx// 総ページ数 const [sumPageNumber, setSumPageNumber] = useState(0) // 初期描画後handlePaginateで1ページを指定している const mounted = useRef(false) useEffect(() => { if (mounted.current) { if (sumPageNumber === 0) { setUsers([]) return } handlePaginate(1) console.log('初回レンダリング') } else { mounted.current = true handlePaginate(1) console.log('初回以降のレンダリング') } }, [sumPageNumber])sumPageNumberに総件数が格納され、総件数が変わるとuseEffectでhandlePaginate関数が実行されます。
src/components/UserInfo.tsxconst handlePaginate = async (page: number) => { if (searchConditions) { const req = [ { // ここにはFormで入力した値が入ってくる user: { user_query_name: nameParameter, user_query_gender: genderParameter, user_query_age: ageParameter, user_query_address: addressParameter, user_query_password: passwordParameter, user_query_email: emailParameter, user_query_post_number: postNumberParameter, user_query_like_residence_type: likeResidenceTypeParameter, user_query_position: positionParameter, user_query_language: languageParameter, user_query_page_number: page, user_query_display_page_number: displayPage } } ] try { dispatch({ type: 'SHOW_INDICATOR' }) axios.defaults.headers['X-Requested-With'] = 'XMLHttpRequest' await axios.post('/s/getUserFilteredInfo', req).then((res: any) => { if (res) { setUsers(res.data) } setCurrentPage(page) }).then(() => { dispatch({ type: 'HIDE_INDICATOR' }) }) } catch (e) { alert('error:' + e) dispatch({ type: 'HIDe_INDICATOR' }) } } else { await axios.get(`/s/getUserInfo`, { params: { displayPage, page } }).then((res: any) => { if (res) { setUsers(res.data) } setCurrentPage(page) }).then(() => { dispatch({ type: 'HIDE_INDICATOR' }) }) } }この関数も総件数取得関数と同じでsearchConditionsに値が格納されていると格納されている条件を使ったデータの取得を行います。
ではまず、総件数を取得するサーバーサイドJSをみてみましょう。
server/getTotalUserCount.tsximport * as vtecxapi from 'vtecxapi' // // 最新のレコードのみ取得 const sql = `select k.key,user_query_name,user_query_gender,user_query_age,user_query_address,user_query_password,user_query_email,user_query_post_number,user_query_like_residence_type,user_query_position,user_query_language from my_dataset.user as f right join (select key,max(updated) as updated from my_dataset.user group by key) as k on f.updated=k.updated and f.key=k.key where f.deleted = false order by k.key desc` const result = vtecxapi.getBQ(sql, 'user') vtecxapi.doResponse(result)sqlでデータを取得して、それをdoResponseメソッドでクライアントに渡しています。
次にデータ本体を渡しているサーバーサイドJSをみてみます。
server/getUserInfo.tsximport * as vtecxapi from 'vtecxapi' // limitは表示件数 offsetは取得開始位置 const displayPage = Number(vtecxapi.getQueryString('displayPage')) vtecxapi.log(String(displayPage)) const page = Number(vtecxapi.getQueryString('page')) vtecxapi.log(String(page)) const offset = (page - 1) * displayPage vtecxapi.log(String(offset)) // // 最新のレコードのみ取得 const sql = `select k.key,user_query_name,user_query_gender,user_query_age,user_query_address,user_query_password,user_query_email,user_query_post_number,user_query_like_residence_type,user_query_position,user_query_language from my_dataset.user as f right join (select key,max(updated) as updated from my_dataset.user group by key) as k on f.updated=k.updated and f.key=k.key where f.deleted = false order by key desc limit ${displayPage} offset ${offset}` const result = vtecxapi.getBQ(sql, 'user') vtecxapi.log('update') vtecxapi.log(JSON.stringify(result)) // まずgetBQでsqlを引数に渡し、resultとして格納する vtecxapi.doResponse(result)取得するのは条件なしのデータなのでuserテーブルに格納されてい削除されていない全てのデータが対象です。
こちらではクライアントからデータを取得する方法としてgetQueryメソッドで2つの値を受け取っています。
また前回はエンドポイントにデータを保存していて、ページネーションはクライアント側で操作していましたが、今回はクライアントから現在みているページデータと、1ページに表示する件数をサーバーサイドに渡して、それをSQL文にして実行することでページごとのデータを取得しています。
このSQL文を使ったページネーションの方法は以下の記事にわかりやすく載っています。
一覧画面のページングについていろいろ考えたでは次に検索条件がstateに保存されている場合に実行されるサーバーサイドをみてみましょう。
server/getuserFilteredInfo.tsximport * as vtecxapi from 'vtecxapi' import * as SqlString from 'sqlstring' const req = vtecxapi.getRequest() const user_query_name = req[0].user!.user_query_name ? `and user_query_name = ${SqlString.escape(req[0].user!.user_query_name)} ` : '' const user_query_gender = req[0].user!.user_query_gender ? `and user_query_gender = '${SqlString.escape(req[0].user!.user_query_gender)}' ` : '' const user_query_age = req[0].user!.user_query_age ? `and user_query_age = ${SqlString.escape(req[0].user!.user_query_age)} ` : '' const user_query_address = req[0].user!.user_query_address ? `and user_query_address = ${SqlString.escape(req[0].user!.user_query_address)} ` : '' const user_query_password = req[0].user!.user_query_password ? `and user_query_password = ${SqlString.escape(req[0].user!.user_query_password)} ` : '' const user_query_email = req[0].user!.user_query_email ? `and user_query_email = ${SqlString.escape(req[0].user!.user_query_email)} ` : '' const user_query_post_number = req[0].user!.user_query_post_number ? `and user_query_post_number = ${SqlString.escape(req[0].user!.user_query_post_number)} ` : '' const user_query_like_residence_type = req[0].user!.user_query_like_residence_type ? `and user_query_like_residence_type = ${SqlString.escape(req[0].user!.user_query_like_residence_type)} ` : '' const user_query_position = req[0].user!.user_query_position ? `and user_query_position = ${SqlString.escape(req[0].user!.user_query_position)} ` : '' const user_query_language = req[0].user!.user_query_language ? `and user_query_language = ${SqlString.escape(req[0].user!.user_query_language)} ` : '' const page = req[0].user!.user_query_page_number const display_page = req[0].user!.user_query_display_page_number const where_senctence: string = `${user_query_name}${user_query_gender}${user_query_age}${user_query_address}${user_query_password}${user_query_email}${user_query_post_number}${user_query_like_residence_type}${user_query_position}${user_query_language}` // limitは表示件数 offsetは取得開始位置 const offset = (page! - 1) * display_page! // // 最新のレコードのみ取得 const sql = `select k.key,user_query_name,user_query_gender,user_query_age,user_query_address,user_query_password,user_query_email,user_query_post_number,user_query_like_residence_type,user_query_position,user_query_language from my_dataset.user as f right join (select key,max(updated) as updated from my_dataset.user group by key) as k on f.updated=k.updated and f.key=k.key where f.deleted = false ${where_senctence} order by key desc limit ${display_page} offset ${offset}` const result = vtecxapi.getBQ(sql,'user') vtecxapi.doResponse(result)ここではまず
SqlStringというモジュールをインポートしています。
これはSQLインジェクションを防止するために使いますSQLインジェクション(英: SQL Injection)とは、アプリケーションのセキュリティ上の不備を意図的に利用し、アプリケーションが想定しないSQL文を実行させることにより、データベースシステムを不正に操作する攻撃方法のこと。 また、その攻撃を可能とする脆弱性のことである。
渡す情報が多いので条件なしのデータ取得とは違い、getRequestメソッドを使っています。
そして渡された情報にSqlString.escapeメソッドを使い、SQLインジェクションを防止します。
そしてそのSQLを実行して帰ってきた値をdoResponseすることでクライアント側に情報を渡しています。これがデータ取得の流れです。
データの削除
クライアント側ではreqでデータを渡していますが
(今考えたらgetQueryStringで渡すべきでした。)src/components/UserInfoEdit.tsxconst deleteFormData = async (event: React.ChangeEvent<HTMLInputElement>) => { try { event.preventDefault() dispatch({ type: 'SHOW_INDICATOR' }) axios.defaults.headers['X-Requested-With'] = 'XMLHttpRequest' await axios.put('/s/deleteUserInfo', req).then(() => { dispatch({ type: 'HIDE_INDICATOR' }) }) history.push('/') } catch (e) { alert('error' + e) dispatch({ type: 'HIDE_INDICATOR' }) } }server/deleteUserInfo.tsximport * as vtecxapi from 'vtecxapi' const item = vtecxapi.getQueryString('item') if (item) { const decodedItem = decodeURI(item) vtecxapi.log(decodedItem) const keys = [decodedItem] // vtecxapi.log(String(keys)) vtecxapi.deleteBQ(keys, true) } else { const req = vtecxapi.getRequest() vtecxapi.log(JSON.stringify(req)) const href = req[0].link![0].___href const keys = [href] vtecxapi.deleteBQ(keys, true) }サーバーサイドではif文で条件分岐させてそれにあった削除をしています。
目標(key)が定ったらそれを
vtecxapi.deleteメソッドの第一引数に格納して論理削除しています。まとめ
Bigqueryと連携したり、サーバーサイドレンダリングを使った痒いところに手を伸ばすことができたり、今回今まで使ったことがな買ったvtecxの機能を理解するまでにかなり時間がかかりましたがその分深く知ることができたのではと思います。


- 投稿日:2020-10-15T15:40:38+09:00
nextjsで新たなbuildをデプロイした際、既に古いページをキャッシュしていたクライアントへ強制的にページ更新させる方法
問題
nextjsはSPAなのでページ間移動でHTTPのロードが発生しない。
これによって古いページをキャッシュしていたクライアントは、新たなバージョンがサーバーにデプロイされている状態でも、明示的にページリロードをしてもらわない限りは古いページに居残ってしまう。解決方法
- generateBuildIdを使う(gitのcommit IDを自動で付与するpluginが便利)
- 下のようにHTMLソースからbuildIdを読み出す
- buildId配下のパスが存在すれば新たなbuildはデプロイされていない
- buildId配下のパスが存在しなければ新たなbuildと考えられる
- ページを移動した後にこのチェックを行い、リロードが必要な場合は
document.location.reload()でcacheを無視して読み込む- こうすることによってクライアント側は意識することなく、ページを移動した際に新たなバージョンであれば自動的にページ更新をして最新の状態に保てる。
事前設定
next.config.js// https://github.com/nexdrew/next-build-id const nextBuildId = require("next-build-id") module.exports = { generateBuildId: () => nextBuildId({ dir: __dirname }) }HTMLソース
変更点
basePathが設定されていることを考慮して
yarn add proper-url-joinsrc/utils/useBuildId.tsimport { useRouter } from "next/router" import urlJoin from "proper-url-join" import React from "react" const useBuildId = () => { const { basePath } = useRouter() const shouldReload = React.useCallback((): boolean => { if (process.env.NODE_ENV != "production") { return false } const buildId = JSON.parse( document.querySelector("#__NEXT_DATA__").textContent ).buildId const request = new XMLHttpRequest() request.open( "HEAD", urlJoin(basePath, `/_next/static/${buildId}/_buildManifest.js`), false ) request.setRequestHeader("Pragma", "no-cache") request.setRequestHeader("Cache-Control", "no-cache") request.setRequestHeader( "If-Modified-Since", "Thu, 01 Jun 1970 00:00:00 GMT" ) request.send(null) return request.status === 404 }, []) return { shouldReload, } } export default useBuildIdpages/_app.tsximport type { AppProps } from "next/app" import { useRouter } from "next/router" import React from "react" import { useBuildId } from "src/utils" function MyApp({ Component, pageProps }: AppProps) { const { shouldReload } = useBuildId() const router = useRouter() React.useEffect(() => { const handleRouteChange = (url: string) => { if (shouldReload()) { document.location.reload() } } router.events.on("routeChangeComplete", handleRouteChange) return () => { router.events.off("routeChangeComplete", handleRouteChange) } }, [shouldReload]) return <Component {...pageProps} /> } export default MyApp

- 投稿日:2020-10-15T14:19:13+09:00
自分用メモ babelとwebpackとは
はじめに
プログラミングを勉強し初めて3ヶ月ほど経ちました。私自身javascript、ライブラリのreactを中心に勉強してきました。
書き方自体はなんとなく理解はできてきたのですが、環境構築のツールとして利用されるbabelやwebpackについて全く理解できておりませんでしたのでここでまとめておこうと思い記事にしました。
ここでは、設定ファイルのカスタマイズなどは書いておりませんので、私と同じ初心者の方向けの記事になっていると思います。
間違っている点などあれば教えていただけると幸いです。Babel
javascriptなどの言語の新しい公文などをどのブラウザでも対応させるようにコンパイルさせるもの。
サポートしていないブラウザでも動くようにコンパイルしてくれるので、ブラウザを意識せずに書ける。ES6やES7の公文や機能をES5相当の機能を使ってブラウザで実行できるように変換している(ES5が現在ブラウザで広く使われているバージョンだから)
AltJS
コードをコンパイルするという点では、coffeescriptやtypescriptといった、javascriptのコードを生成するAltJSの仲間と言える
AltJSとは「alternative JavaScript」の略で、代替JavaScript言語のことです。 ... AltJSを使用するメリットは、JavaScriptで記述するよりも少ないコード量にできるため、コードの読みやすさや保守性が高まることです。
※違いは、AltJSはjavascriptではないものをjavascriptへコンパイル、babelはjavascriptのコードをどのブラウザでも対応できるバージョンのjavascriptへ変換するもの
インストール
npm install -g babel
babel input.js --out-file output.js--out-fileは出力するファイル名の指定をするオプション。これをしないと実際にコンパイルはされない!
webpack
役割は指定されたファイルを起点として、そこからimport文を頼りに1つにまとめてjavascriptファイルを出力する。
この1つにまとめる処理をバンドル(bundle)という。そしてそのツールをバンドラーという。
基本の機能、役割は1つでjavascriptファイルをまとめるということなぜまとめるのか
http/1.1接続ではブラウザとウェブサーバーの同時接続数が限られるため、複数のファイルの転送に時間がかかる。そのためバンドラーを使い、複数のjsファイルを1つにまとめることが一般的な解決策となっている。
インストール
npm init
npm install webpack webpack-clinpm initでpackage.jsonファイルが作られます。
そしてwebpackとwebpack-cli(コマンド操作ようのパッケージ)をインストールJSファイルバンドル以外の機能
ESModules
本来、jsファイルは他のjsファイルを読み込むことができず、htmlファイルで全てscriptタグを利用して書いていました。しかしESModulesを使うとjsファイル同士で読み込みができるため、jsファイルが単独で管理でき、変数の競合やグローバル汚染を防ぐことができる。これによりhtmlファイルとの結合も疎結合になります。また外部ファイルのimportも可能
JSだけでなく、cssや画像もバンドル可能
package.json
npx webpackコマンドでビルドするのもシンプルだが、実際の開発ではnpm scriptsと使う方法が便利と言える。
npm scriptsとはコマンドのショートカットを貼るための機能!
webpack.config.js
このファイルはwebpackの挙動を調整できる。
ファイルのエントリーポイントを指定するentryと出力フォルダーをカスタマイズするoutputがある。
指定がなければデファルトでsrc/index.jsがエントリーポイント、dist/main.jsが出力先になる。参考記事、参照
- 投稿日:2020-10-15T13:19:00+09:00
1コマンドでReact+Redux+TypeScriptアプリを作る
Create React Appを利用すればReactアプリケーションの開発環境を1コマンドで作成できます。
また、Create React Appには様々なカスタムテンプレートが作成されており、Redux+TypeScriptなテンプレートも存在します。
それを利用することで、React+Redux+TypeScriptなアプリケーションをすぐに作成できます。環境
以下のものをインストールしてください。
- Node.js(LTS推奨)
- yarn(利用するなら)
create-react-app
create-react-appコマンドでReactアプリケーションを作成します。
その際、--template redux-typescriptを付け加えて、React+Redux+TypeScriptなテンプレートを利用します。yarn未インストールの場合npx create-react-app my-app --template redux-typescriptもしくは
yarnインストール済みの場合yarn create react-app my-app --template redux-typescriptコマンドを実行します。
以上でReact+Redux+TypeScriptアプリが作成できました。ちなみに、カスタムテンプレートのリポジトリはこちら。
GitHub - reduxjs/cra-template-redux-typescript: The official Redux+TS template for Create React App
Redux公式のカスタムテンプレートなので安心ですね。実行
試しに実行してみましょう。
cd my-app作成したアプリのディレクトリに移動し、
yarn未インストールの場合npm startもしくは
yarnインストール済みの場合yarn startコマンドを実行します。
画像のようなページが表示されていれば成功です。
構成
このコマンドで作成されたアプリの構成について説明しておきます。
以下の内容は全て、作成した開発環境に含まれています。React
Reactとは、ユーザーインターフェースのためのJavaScriptフレームワークです。
Reactの公式ページは日本語化されており、読みやすく最新の情報が得られるので、学習にオススメです。react-scripts
create-react-appコマンドで作成されたアプリは、デバッグ実行やビルドなど、全てreact-scriptsというパッケージが管理しています。
Create React Appの公式ページには、この開発環境が持つ機能や設定について記載されています。
本格的に開発を始める前に環境や設定を整備しておくことをオススメします。Redux
Reduxとは、JavaScriptが扱う状態フレームワークです。
Reduxの公式ページではReduxの基本概念が詳しく説明されており、FAQなども充実しています。Redux Toolkit
Redux Toolkitは、Redux公式のツールセットです。
これを利用することで、Reduxに関わる開発がかなり楽になります。
Redux Toolkitの公式ページで使い方を学んでください。React Redux
ReactとReduxをうまく連携して利用するための機能がまとめられているライブラリです。
React Reduxの公式ページに書かれている内容は古いものが多いです。(2020年10月現在)
今から開発を始めるなら、関数コンポーネントでuseSelector()とuseDispatch()のフックを使うのが基本になります。TypeScript
JavaScriptに静的型付け機能を付け加えたプログラミング言語です。
2020年10月現在、TypeScript4.0がリリースされていますが、react-scriptsはTypeScript3.8までしか対応していません。
create-react-appコマンドでインストールされたTypeScriptのバージョンを上げてしまうと、ビルドに失敗するなどの不具合が発生します。(経験済み)TypeScriptについては、以下のようなページが参考になります。

- 投稿日:2020-10-15T02:46:46+09:00
react-cookieで有効期限を指定するのに詰まった
何がしたかったのか
https://www.npmjs.com/package/react-cookie
react-cookieで有効期限を指定してcookieを設定したかった。
maxAgeでの指定はうまくいったが、expiresでの指定でエラーが出る。環境
npm 6.14.6
react 16.13.1
react-cookie 4.0.3解決
Dateオブジェクトを生成してtoUTCStringメソッドを呼び出すって書いてたけど、これがダメだった。
https://techacademy.jp/magazine/35735普通にDataオブジェクト生成だけすればOK。
const cookieExpiration = '2020-11-11 23:59:59'
const cookieDate = new Date(cookieExpiration)

setCookie('user_id', data, { expires: cookieDate, path: '/' })
https://en.it1352.com/article/0de830993c3844598da151bfa307fb49.html
- 投稿日:2020-10-15T00:39:09+09:00
[MERN] 検索機能
1. SearhBox作成
components/layout/SearchBox.jsimport React, { useState } from 'react'; import { Form, Button } from 'react-bootstrap'; const SearchBox = ({ history }) => { const [keyword, setKeyword] = useState(''); const submitHandler = (e) => { e.preventDefault(); if (keyword.trim()) { history.push(`/search/${keyword}`); } else { history.push('/'); } }; return ( <Form onSubmit={submitHandler} inline> <Form.Control type="text" name="q" onChange={(e) => setKeyword(e.target.value)} placeholder="Search Products..." className="mr-sm-2 ml-sm-5" ></Form.Control> <Button type="submit" variant="outline-success" className="p-2"> Search </Button> </Form> ); }; export default SearchBox;2. search/:keywordのRoute設置
components/routing/Routes.js//... const Routes = () => { //... <Route exact path="/profile/:id" component={Profile} /> + <Route exact path="/search/:keyword" component={Posts} /> <Route exact path="/posts" component={Posts} /> <Route exact path="/posts/:id" component={Post} /> //...3. Navbarに検索フォーム設置
components/layout/Navbar.js//... import PropTypes from 'prop-types'; + import SearchBox from './SearchBox'; import { logout } from '../../actions/auth'; const Navbar = ({ auth: { isAuthenticated, loading }, logout }) => { //... return ( <nav className="navbar bg-dark"> <h1> <Link to="/posts"> <i className="fas fa-code" /> Refnote </Link> </h1> + <Route render={({ history }) => <SearchBox history={history} />} /> {!loading && ( <Fragment>{isAuthenticated ? authLinks : guestLinks}</Fragment> )} </nav> ); }; //...4. Posts一覧にkeyword Params設置
components/posts/Posts.js//... import { getPosts } from '../../actions/post'; + const Posts = ({ getPosts, post: { posts, loading }, match, auth }) => { + const keyword = match.params.keyword; useEffect(() => { + getPosts(keyword); + }, [getPosts, keyword]); return loading ? ( //... <div className="Posts"> {posts.map((post) => ( <PostItem key={post._id} post={post} /> ))} </div> </Fragment> ); }; //...5. getPostsアクションにKeyword Propsを設置
actions/post.js//... // Get posts + export const getPosts = (keyword = '') => async (dispatch) => { try { + const res = await axios.get(`/api/posts?keyword=${keyword}`); dispatch({ type: GET_POSTS, payload: res.data, }); } catch (err) { dispatch({ type: POST_ERROR, payload: { msg: err.response.statusText, status: err.response.status }, }); } }; //...6. postsAPIを編集
routes/api/posts.js//... // @route GET api/posts // @desc Get all posts // @access Public router.get('/', async (req, res) => { + const keyword = req.query.keyword + ? { + text: { + $regex: req.query.keyword, + $options: 'i', + }, + } + : {}; try { + const posts = await Post.find({ ...keyword }).sort({ date: -1 }); res.json(posts); } catch (err) { console.error(err.message); res.status(500).send('Server Error'); } }); //...
- 投稿日:2020-10-15T00:32:46+09:00