- 投稿日:2020-10-15T19:39:34+09:00
[Android]apkへの署名
キーワード
キーワード 説明 アプリ署名鍵 apkファイルを端末にインストールする際に必要になる署名をするための鍵。 アップロード鍵 GooglePlayストアに公開する際に必要になる署名をするための鍵。
生成には署名情報(氏名/会社・部署/国・都道府県・市区町村)と、キーエイリアス、キーパスワードを設定する必要あり。キーストア アプリ署名鍵 または アップロード鍵を保管しているファイル(.jks or .keystore)。
何らかの鍵を内蔵したキーストアを生成する際にはストアパスワードが必要。ざっくり説明
apkファイルを端末にインストールしたい場合、アプリ署名鍵でビルド時にapkファイルにデジタル署名しておかないといけない。
debugビルドする場合
Android SDK ツールで生成されたデバッグ証明書で自動的にデジタル署名してくれる。
「アプリ署名鍵とか作った覚えないのに・・・」という疑問への回答である。releaseビルドする場合
一般にはアプリ署名鍵でのデジタル署名はGooglePlayストア側でやってもらい、
開発者はアプリ署名鍵によるデジタル署名ではなく、アップロード鍵でデジタル署名する。アップロード鍵で署名する際には、アップロード鍵を内蔵するキーストアが必要になる。
アップロード鍵を作成する際には、Android Studioで「キーワード」で上げたアップロード鍵、キーストアの生成に必要な情報を入力して、
アップロードキーの作成 + キーストアへの内蔵 => キーストアファイルの生成をまず行う。
それから、キーストアファイルにキーエイリアス、キーパスワード、ストアパスワードを与えてreleaseビルドする。
- 投稿日:2020-10-15T18:55:04+09:00
Firebase Crashlytics SDK 導入時にあった Gradle エラー
firebase crashlytics SDK の導入時に以下のようなエラーがありました。
> Task :app:compileDebugKotlin FAILED
e: Supertypes of the following classes cannot be resolved. Please make sure you have the required dependencies in the classpath:
    class com.google.android.gms.location.LocationResult, unresolved supertypes: com.google.android.gms.internal.zzbej


e: Supertypes of the following classes cannot be resolved. Please make sure you have the required dependencies in the classpath:
com.google.android.gms.location.LocationResultクラスの継承元のcom.google.android.gms.internal.zzbejクラス が見つからないようです。gradle ファイル
build.gradle ファイル
// Top-level build file where you can add configuration options common to all sub-projects/modules.
buildscript {

    // 移行中のため古い環境です
    //ext.kotlin_version = "1.4.0"
    ext.kotlin_version = "1.3.10"
    repositories {
        google()
        jcenter()
    }
    dependencies {

        // 移行中のため古い環境です
        //classpath "com.android.tools.build:gradle:4.0.1"
        classpath "com.android.tools.build:gradle:3.5.0"
        classpath "org.jetbrains.kotlin:kotlin-gradle-plugin:$kotlin_version"

        classpath 'com.google.gms:google-services:4.3.4'
        classpath 'com.google.firebase:firebase-crashlytics-gradle:2.3.0'
        // NOTE: Do not place your application dependencies here; they belong
        // in the individual module build.gradle files
    }
}

allprojects {
    repositories {
        google()
        jcenter()
    }
}

task clean(type: Delete) {
    delete rootProject.buildDir
}
app/build.gradle ファイル
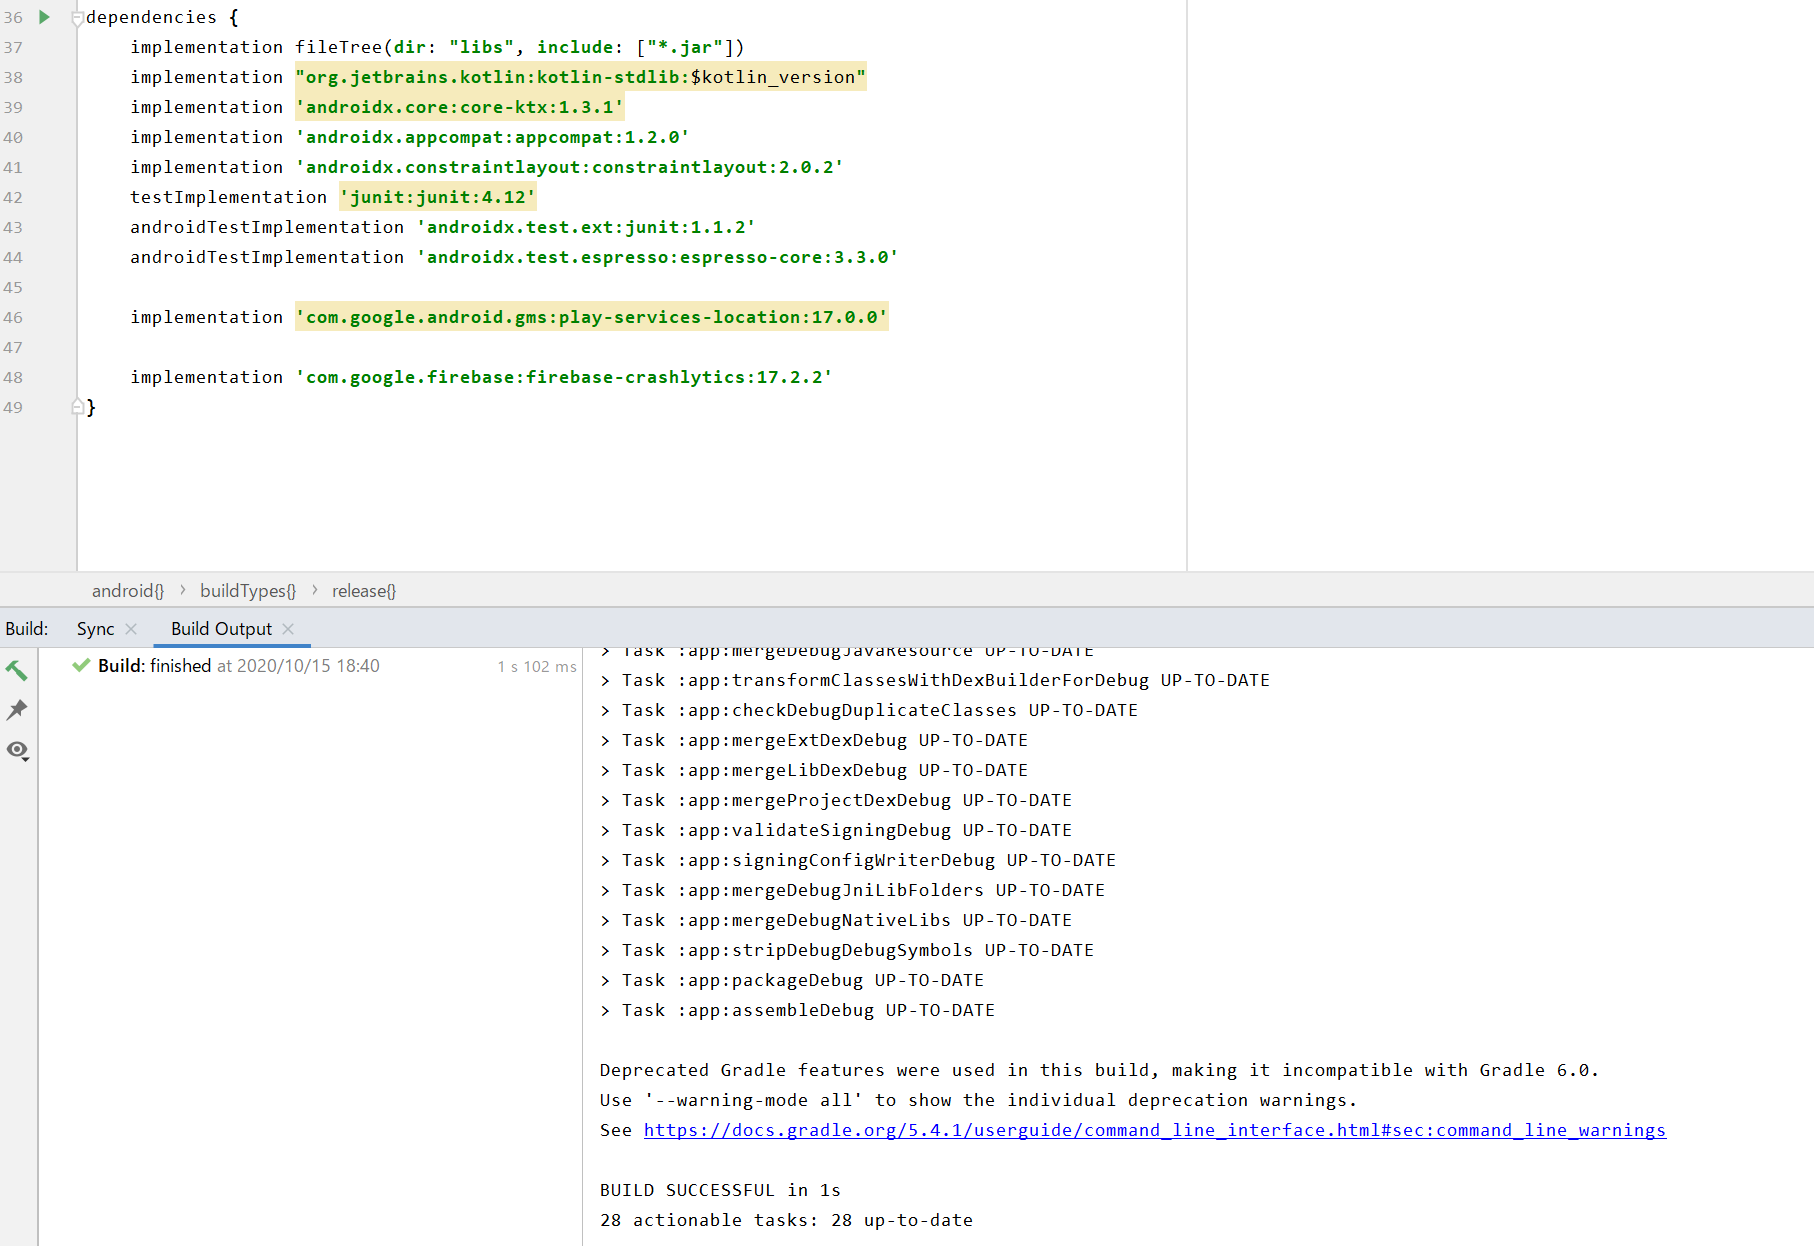
apply plugin: 'com.android.application'
apply plugin: 'kotlin-android'
apply plugin: 'kotlin-android-extensions'

apply plugin: 'com.google.gms.google-services'
apply plugin: 'com.google.firebase.crashlytics'

android {
    compileSdkVersion 30
    buildToolsVersion "30.0.2"

    defaultConfig {
        applicationId "com.example.gradleerrorsample"
        minSdkVersion 28
        targetSdkVersion 30
        versionCode 1
        versionName "1.0"

        testInstrumentationRunner "androidx.test.runner.AndroidJUnitRunner"
    }

    buildTypes {
        release {
            minifyEnabled false
            proguardFiles getDefaultProguardFile('proguard-android-optimize.txt'), 'proguard-rules.pro'
        }
        debug {
            firebaseCrashlytics {
                mappingFileUploadEnabled false
            }
        }
    }
}

dependencies {
    implementation fileTree(dir: "libs", include: ["*.jar"])
    implementation "org.jetbrains.kotlin:kotlin-stdlib:$kotlin_version"
    implementation 'androidx.core:core-ktx:1.3.1'
    implementation 'androidx.appcompat:appcompat:1.2.0'
    implementation 'androidx.constraintlayout:constraintlayout:2.0.2'
    testImplementation 'junit:junit:4.12'
    androidTestImplementation 'androidx.test.ext:junit:1.1.2'
    androidTestImplementation 'androidx.test.espresso:espresso-core:3.3.0'

    implementation 'com.google.android.gms:play-services-location:11.6.2'

    implementation 'com.google.firebase:firebase-crashlytics:17.2.2'
}
調査
(1)
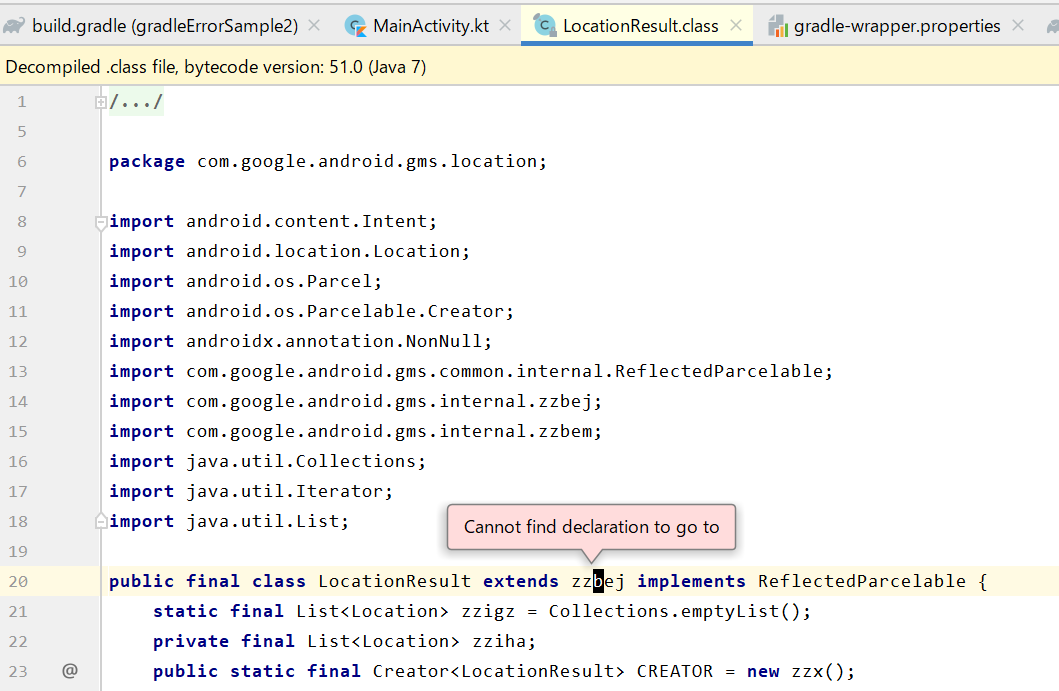
android studio から LocationResult クラスを参照してみました。
確かに zzbej クラスは見つかりません。
(2)
ビルドが通る状態まで戻しました (
implementation 'com.google.firebase:firebase-crashlytics:17.2.2'をコメントアウト)。
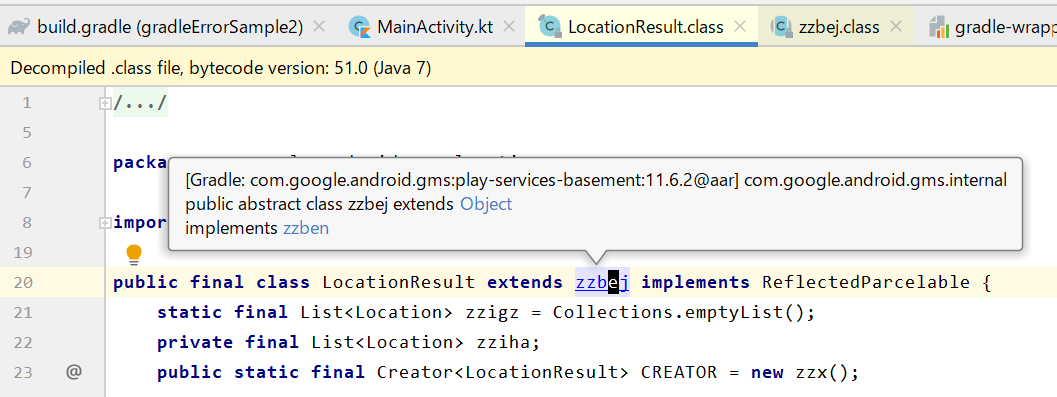
zzbej クラスは、
com.google.android.gms:play-services-basement:11.6.2で定義されているようです。(3)
(2) のコメントアウトを解除後、
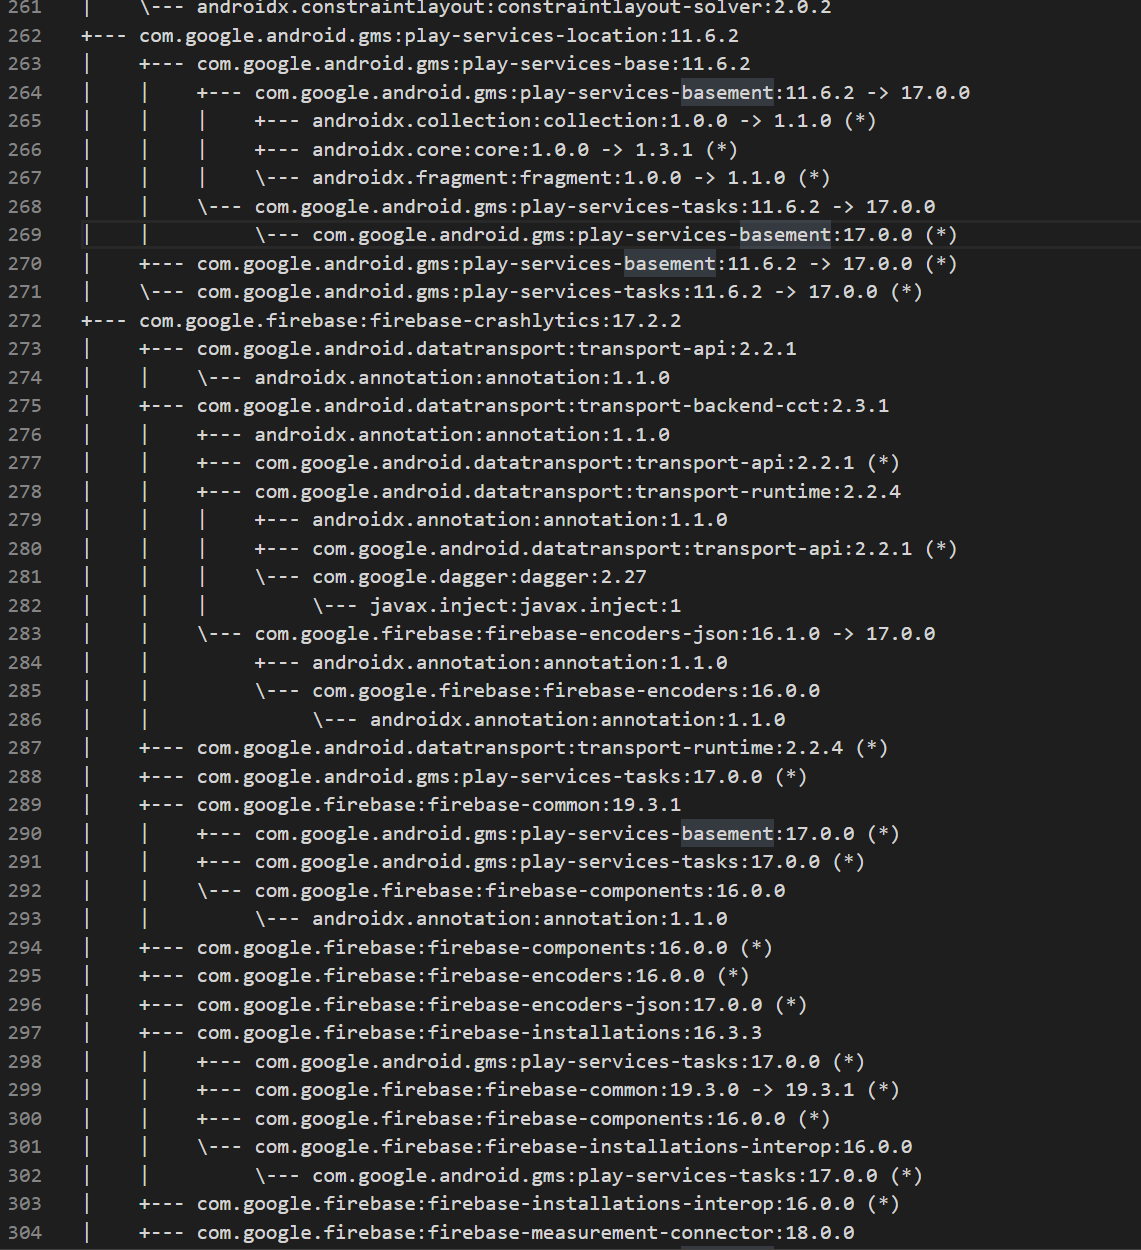
gradle app:dependenciesを実行し、ライブラリの依存関係を出力しました。
262 - 271行は、
play-services-locationの依存関係です。
play-services-basement(264行など) やplayservices-tasks(268行など) が 11.6.2 から 17.0.0 に変更されています。272行からは、
com.google.firebase:firebase-crashlyticsの依存関係です。
以下の依存関係があるようです。
- 288行より
play-services-tasksの 17.0.0- 290行より
play-services-basementの 17.0.0
play-services-locationの同名のライブラリは、推移的な依存関係の解決により、新しいバージョンが使用されます。対応
play-services-locationを 17.0.0 に変更することで、ビルド自体はできるようになります。
参考
その他
(ライブラリの更新はまめにしましょう)
- 投稿日:2020-10-15T17:14:38+09:00
gradle "Error: Program type already present: "
ライブラリのバージョン更新中に以下のようなエラーが出ました。
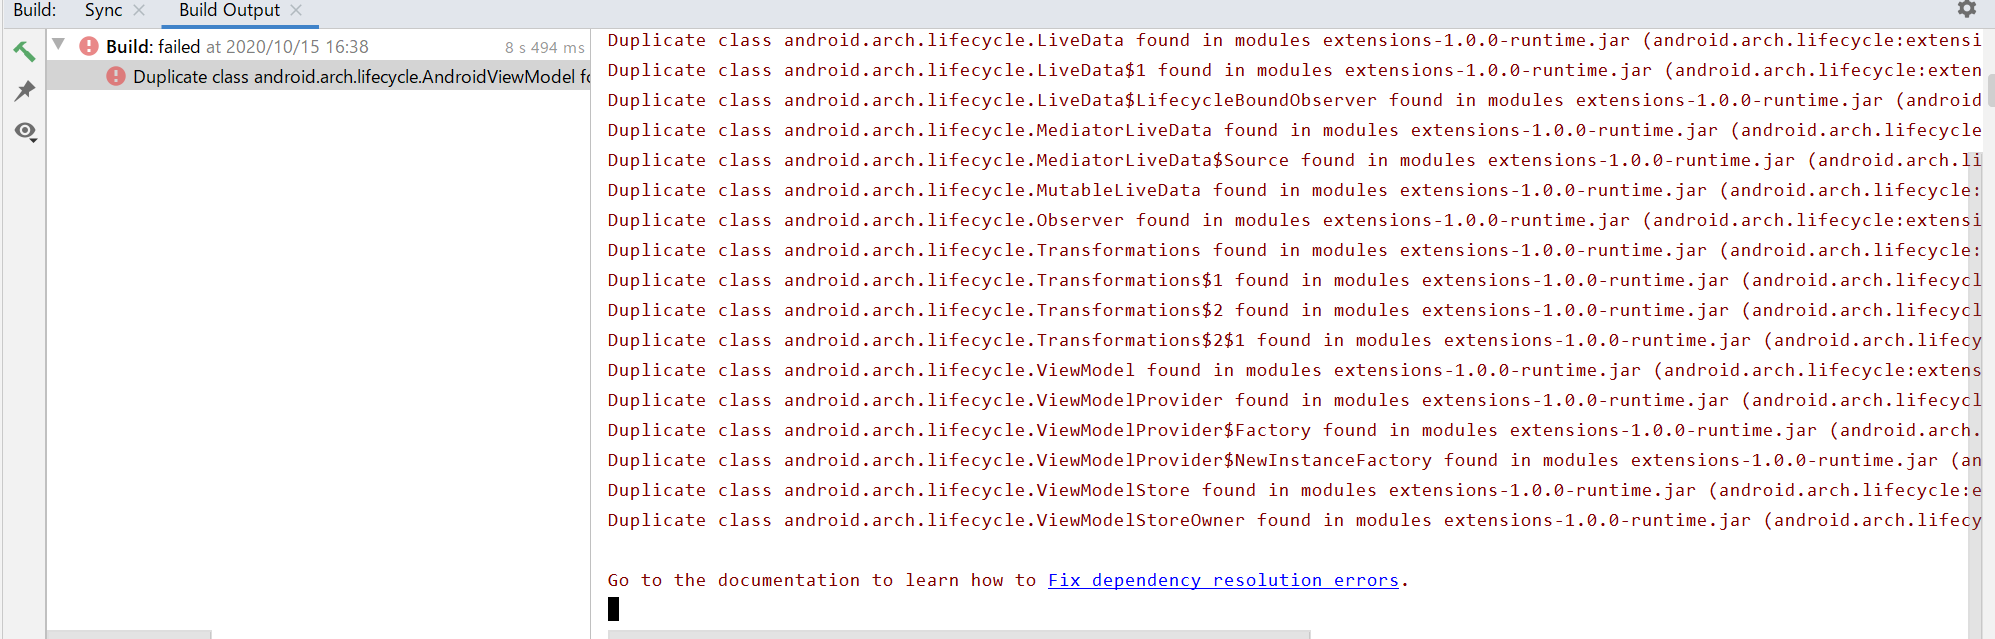
Error: Program type already present: android.arch.lifecycle.ViewModelエラーについて
このエラーについて、Android Studio ユーザーガイド : 重複クラスエラーを修正する に説明があります。
Program type already present com.example.MyClassこのエラーは通常、以下のいずれかの状況で発生します。
・バイナリ依存関係に含まれているライブラリが、直接的な依存関係としてアプリにも含まれている場合。たとえば、アプリでライブラリ A とライブラリ B に対する直接的な依存関係が宣言されているものの、すでにライブラリ A のバイナリにライブラリ B が含まれている場合などです。この問題を解決するには、ライブラリ B を直接的な依存関係から削除します。
* アプリにローカル バイナリ依存関係があり、同じライブラリに対するリモート バイナリ依存関係も存在する場合。この問題を解決するには、バイナリ依存関係の一方を削除します。例
build.gradleファイル// Top-level build file where you can add configuration options common to all sub-projects/modules. buildscript { // 移行中の古い環境です //ext.kotlin_version = "1.4.0" ext.kotlin_version = "1.2.51" repositories { google() jcenter() } dependencies { // 移行中の古い環境です //classpath "com.android.tools.build:gradle:4.0.1" classpath "com.android.tools.build:gradle:3.2.1" classpath "org.jetbrains.kotlin:kotlin-gradle-plugin:$kotlin_version" // NOTE: Do not place your application dependencies here; they belong // in the individual module build.gradle files } } allprojects { repositories { google() jcenter() } } task clean(type: Delete) { delete rootProject.buildDir }
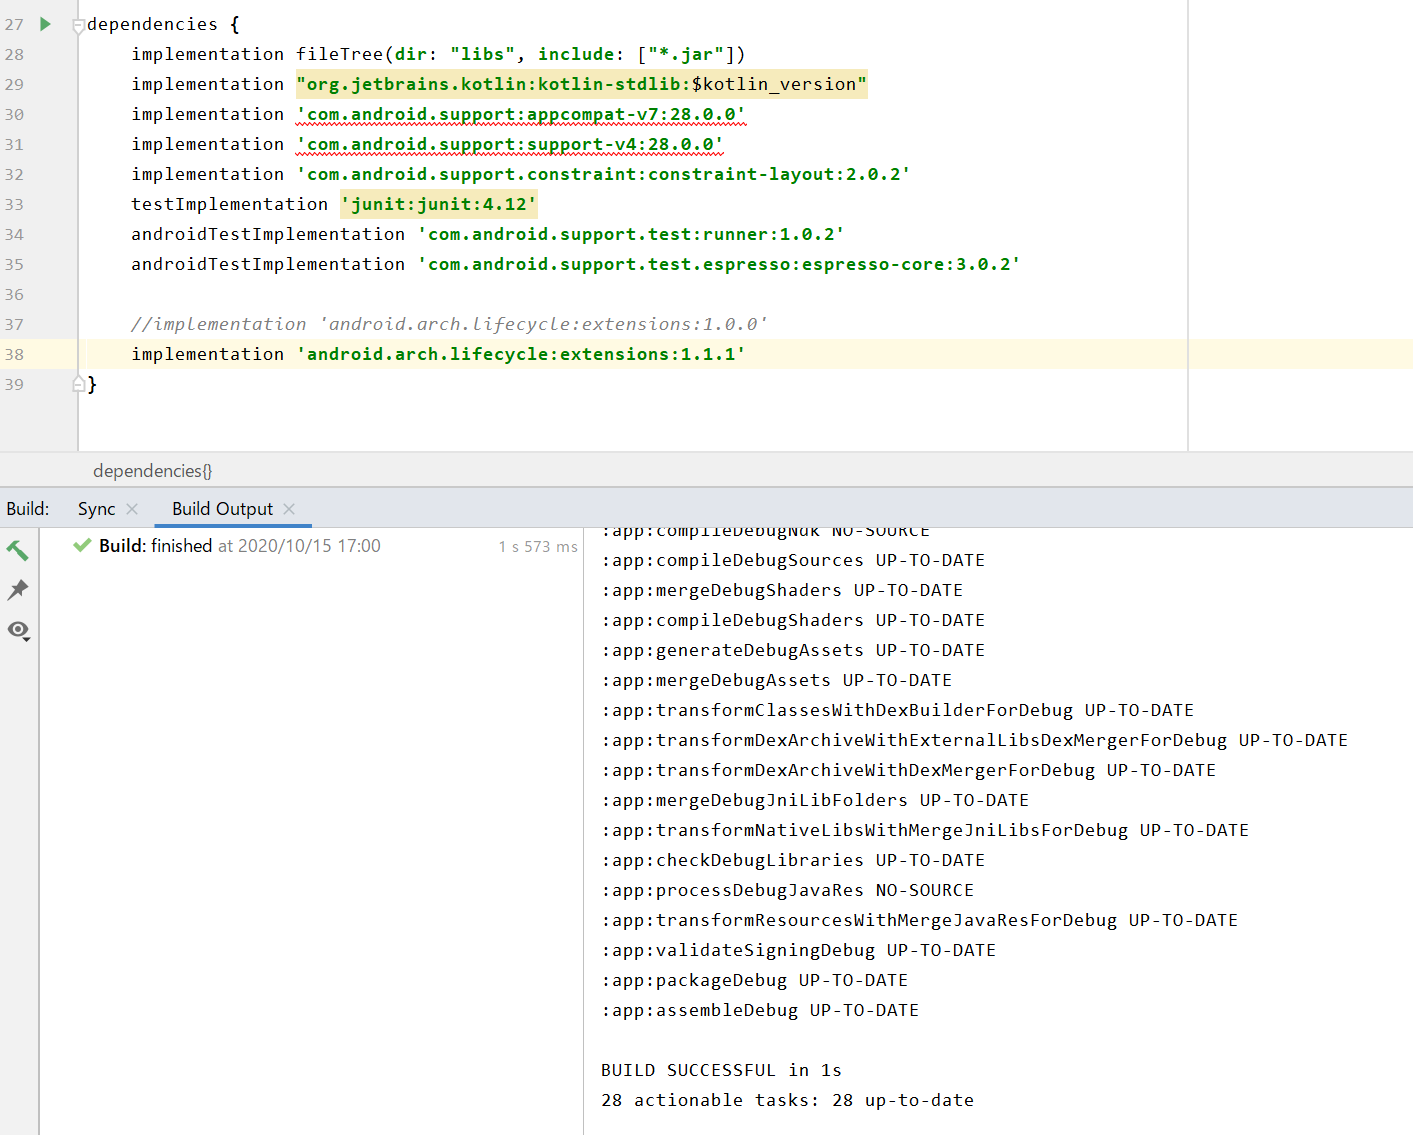
app/build.gradleファイルapply plugin: 'com.android.application' apply plugin: 'kotlin-android' apply plugin: 'kotlin-android-extensions' android { compileSdkVersion 30 buildToolsVersion "30.0.2" defaultConfig { applicationId "com.example.gradleerrorsample" minSdkVersion 24 targetSdkVersion 30 versionCode 1 versionName "1.0" testInstrumentationRunner "android.support.test.runner.AndroidJUnitRunner" } buildTypes { release { minifyEnabled false proguardFiles getDefaultProguardFile('proguard-android-optimize.txt'), 'proguard-rules.pro' } } } dependencies { implementation fileTree(dir: "libs", include: ["*.jar"]) implementation "org.jetbrains.kotlin:kotlin-stdlib:$kotlin_version" implementation 'com.android.support:appcompat-v7:28.0.0' implementation 'com.android.support:support-v4:28.0.0' implementation 'com.android.support.constraint:constraint-layout:2.0.2' testImplementation 'junit:junit:4.12' androidTestImplementation 'com.android.support.test:runner:1.0.2' androidTestImplementation 'com.android.support.test.espresso:espresso-core:3.0.2' implementation 'android.arch.lifecycle:extensions:1.0.0' }
Make Project等、ビルドを行うと以下のようなエラーになります。
Error: Program type already present: android.arch.lifecycle.ViewModel調査 1
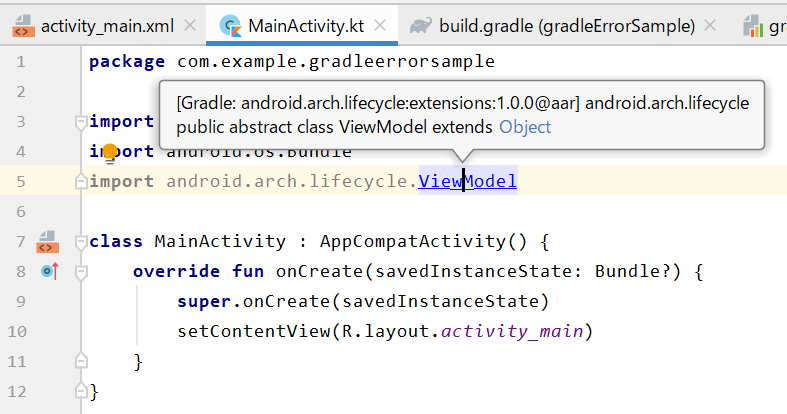
該当するクラスを import してみました。
android.arch.lifecycle.ViewModelは
android.arch.lifecycle:extensions:1.0.0に定義されているようです。調査 2
gradle app:dependenciesを実行し、依存関係を出力してみました。
151行目に
android.arch.lifecycle:viewmodel:1.1.1があります。
依存先をたどるとcom.android.support:appcompat-v7:28.0.0が依存しています。
これにより、クラス名が衝突しているようです。また、Lifecycle リリース # バージョン1.1.0 を参照すると、lifecycle:extensions はviewmodel を含めることをやめているようです。
対応
android.arch.lifecycle:extension:1.1.1に更新して、ビルド自体は解決です。
その他
新しいビルドツールでは、このエラーは以下のように出力されます。
わかりやすくなってます。
(ライブラリの更新はまめにしましょう)


- 投稿日:2020-10-15T12:05:20+09:00
AndroidのListViewに文字が表示されないとお怒りのあなたへ 続編(もう私は焦らない)==>SimpleAdapterの使い方
1.きっかけ
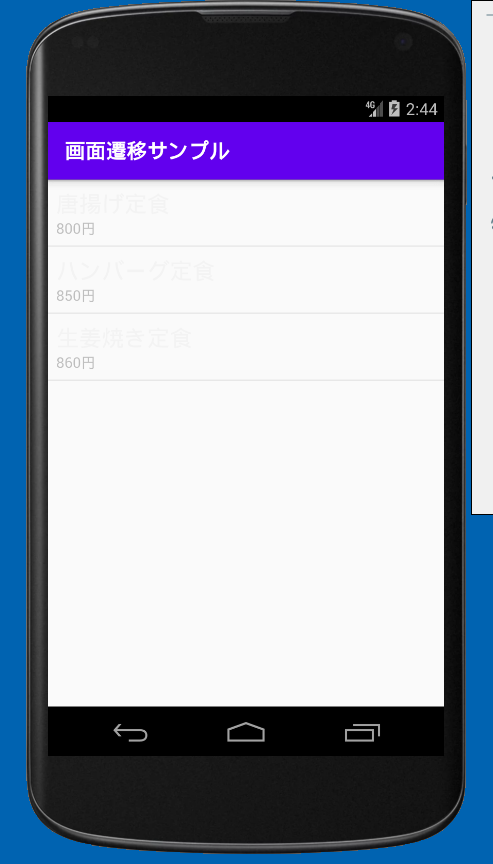
斎藤新三著『Androidアプリ開発の教書(Kotlin版)初版第2刷』のp150の「2行のリストとSimpleAdapter]を写経していた際、ListViewに文字が表示されない(正確には、表示されているが、バックグラウンドと(ほぼ)同色で見えない)事象を発見したので報告します。この事象は先にご紹介したArrayAdapterの使い方の場合と同様の原因と考えます。
下の写真は、エミュレータAPIレベル19で動作させた状態です。
2.対策
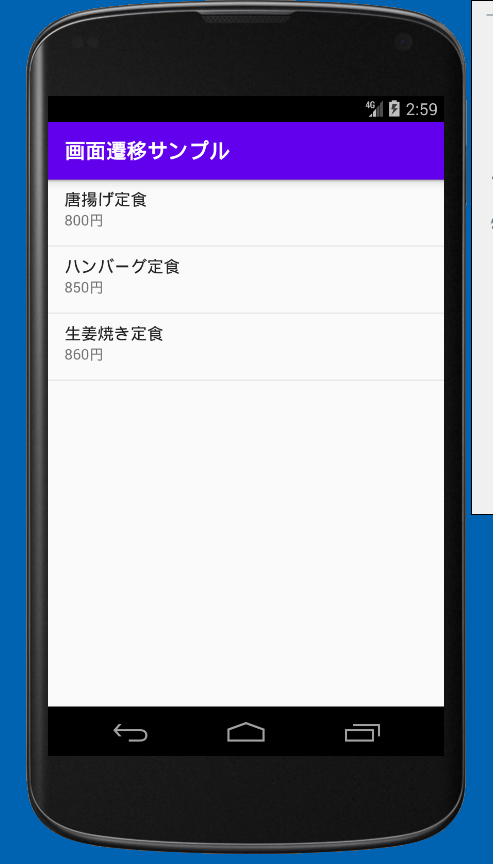
対策は本書のリスト7.3のSimpleAdapterの第1引数をapplicationContextからthisに変更します。
//リスト7.3抜粋
class MainActivity : AppCompatActivity() {
    override fun onCreate(savedInstanceState: Bundle?) {
        ~省略~
        //SimpleAdapterを生成
        // (元)val adapter = SimpleAdapter(applicationContext, menuList, android.R.layout.simple_list_item_2, from, to)
        val adapter = SimpleAdapter(this, menuList, android.R.layout.simple_list_item_2, from, to)
        //applicationContextからthisに変更

        //アダプタの登録
        lvMenu.adapter = adapter

    }
        ~省略~
}
3.結果
見事に思い通り、可読できる表示になりました。
4.動作環境
Android Studio 4.1
Build #AI-201.8743.12.41.6858069, built on September 24, 2020
Runtime version: 1.8.0_242-release-1644-b01 amd64
VM: OpenJDK 64-Bit Server VM by JetBrains s.r.o
Windows 10 10.0
GC: ParNew, ConcurrentMarkSweep
Memory: 1237M
Cores: 8
Registry: ide.new.welcome.screen.force=true
Non-Bundled Plugins: com.thoughtworks.gauge
- 投稿日:2020-10-15T07:37:59+09:00
#7 Kotlin Koans Introduction/Nullable types 解説
1 はじめに
Kotlin公式リファレンスのKotlin Koans/Nullable typesの解説記事です。
Kotlin Koansを通してKotlinを学習される人の参考になれば幸いです。
ただし、リファレンスを自力で読む力を養いたい方は、
すぐにこの記事に目を通さないで下さい!一度各自で挑戦してから、お目通し頂ければと思います
2 null許容型・セーフコール(安全呼び出し)
Kotlinでは変数にnullを代入できない設定になっており、それによってNulllPointerExceptionという例外が発生するのを防いでいます。
どうしても変数にnullを代入したいときは、変数の型名の後ろに ? を配置します。
nullが代入できる変数のことをnull許容型の変数と言います。
ただ、null許容型の変数を扱うとNullPointerExceptionが発生してしまう可能性が出てきます。
そこでnull許容型の変数が関数もしくはプロパティを参照するときは、変数名の後に ? を配置しないといけません。
このように関数もしくはプロパティを参照することをセーフコール(安全呼び出し)と言います。
3 Introduction/Nullable typesの解説
Kotlin Koans Introduction/Nullable typesの解説です。
随時本サイトの内容を引用させていただきます。右側の本文を見てみましょう。
Read about null safety and safe calls in Kotlin and rewrite the following Java code using only one if expression:
public void sendMessageToClient(
    @Nullable Client client,
    @Nullable String message,
    @NotNull Mailer mailer
) {
    if (client == null || message == null) return;

    PersonalInfo personalInfo = client.getPersonalInfo();
    if (personalInfo == null) return;

    String email = personalInfo.getEmail();
    if (email == null) return;

    mailer.sendMessage(email, message);
}
null safety and safe callsを読んで、以下のJavaのコードをifを1つだけ使用して書き換えなさい。
まずは、Javaのコードの内容を整理しましょう。
①sendMessageToClient()関数は引数として、
・ Client型のclient
・ String型のmessage
・ Mailer型のmailer上記3種を受け取ります。
②clientとmessageがnullでないかの確認、どちらか一方でもnullだったら関数の呼び出しもとに戻ります。
③PersonalInfoクラスのインスタンスを生成しnullでないかの確認、nullなら関数の呼び出しもとに戻ります。
③String型のemailにgetEmail()関数の戻り値を代入しnullでないかの確認、nullなら関数の呼び出しもとに戻ります。
④sendMessage()関数に引数emailとmessageを渡し参照する。
といった流れになります。
つまり、
client,message,personalInfo,emailがすべてnullで無ければ、sendMessage()関数にemailとmessageを渡す。
というわけです。これをKotlinを用いてかつ、ifが1つになるように書き換えます。
Kotlinのコードは、以下の通りです。
fun sendMessageToClient(
        client: Client?, message: String?, mailer: Mailer
){
    TODO()
}

class Client (val personalInfo: PersonalInfo?)
class PersonalInfo (val email: String?)
interface Mailer {
    fun sendMessage(email: String, message: String)
}
Javaのコードと同様の3種の引数がsendMessageToClient()関数に渡されていますが、
clientとmessageには型名の後ろに、null許容型を宣言するための ? が添えられています。なので、client,messageが関数もしくはプロパティを参照するときには、変数名の後に ? をつける必要があります。
次にnullかどうか確認すべきclient,message,personalInfo,emailについて考えてみましょう。
clientとmessaggeはsendMessageToClient()が引数として受け取るので、定義する必要なくif文の条件として使用できます。
personalInfoはClientクラスのコンストラクタとして使用されているので、
val personalInfo = client?.personalInfoのように定義することができます。
clientはnull許容型の変数なのでプロパティを参照するのに ? が添えられます。emailはPersonalInfoクラスのコンストラクタとして使用されているので、
val email = personalInfo?.emailのように定義できます。
personalInfoもnull許容型の変数なのでプロパティを参照するのに ? が添えられます。4種のプロパティが揃いました。あとは、if文の条件式にすべてnullでないという内容を記述し、
sendMessage()の引数にemail,messageを渡せばよいですね。なので解答は
    val personalInfo = client?.personalInfo
    val email = personalInfo?.email
    if(email != null && message != null && client != null && personalInfo != null){
        mailer.sendMessage(email,message)
    }
となります。
【参考】
今回の私の解説では、4個のプロパティがすべてnullでないかを確認しました。
ただ、実際は2個のプロパティ(emailとmessage)がnullでないかを確認するだけでもOKです。emailについて考えてみましょう。
emailはPersonalInfoクラスで定義されており、PersonalInfo型のpersonalInfoはClinetクラスで定義されています。
なので、
val email = client?.personalInfo?.emailのように参照することができます。このように参照しif文の条件式でnullでないか調べると何がわかるのでしょうか?
それは、emailがnullでないなら、参照元のpersonalInfo,clientともにnullではないということです。
なので、以下のような解答となります。
val email = client?.personalInfo?.email
    if (email != null && message != null) {
        mailer.sendMessage(email, message)
    }
4 最後に
次回はKotlin Koans Introducion/Smart castsの解説をします
- 投稿日:2020-10-15T01:12:26+09:00
KotlinでRealmを使って複数のデータベースを保存する
はじめに
KotlinでRealmを使って複数のデータベースを保存する方法がわからずつらかったのでまとめておきます。
Realmの導入方法や使用方法などは書いていません、他にいい記事がたくさんあるのでそちらを参照してください。1.モデルクラスの作成
今回は例としてTeacherクラスとStudentクラスの2つを作ります。
Teacher.ktpackage com.example.sandbox01 import io.realm.RealmObject open class Teacher : RealmObject() { var name: String = "" var department: String = "" }Student.ktpackage com.example.sandbox01 import io.realm.RealmObject open class Student : RealmObject() { var name: String = "" var grade: Int = 0 }2.Configの設定
Realmを初期化するためにConfigを作成します。
.nameはユニークな名前 + ".realm"なら何でもいいと思います。
.schemaVersionにもユニークな値を設定します。
最後にRealm.getInstanceに作成したConfigを渡してRealmオブジェクトを生成します。MainActivity.ktval teacherConfig = RealmConfiguration.Builder() .name("Teacher.realm") .schemaVersion(1) .build() val teacherRealm = Realm.getInstance(teacherConfig)後は普通に使うことができます。
また、同じConfigで生成したRealmオブジェクトなら他のActivityからでも同じデータベースを操作できます。同じようにStudentも作成します。
MainActivity.ktval studentConfig = RealmConfiguration.Builder() .name("Student.realm") .schemaVersion(2) .build() val studentRealm = Realm.getInstance(studentConfig)3.データの保存
それぞれにデータを保存してみます。
MainActivity.ktteacherRealm.executeTransaction { db: Realm -> val teacher = db.createObject<Teacher>() teacher.name = "aoken_teacher" teacher.department = "cs" } studentRealm.executeTransaction { db: Realm -> val student = db.createObject<Student>() student.name = "aoken_student" student.grade = 1 }4.データの読み込み
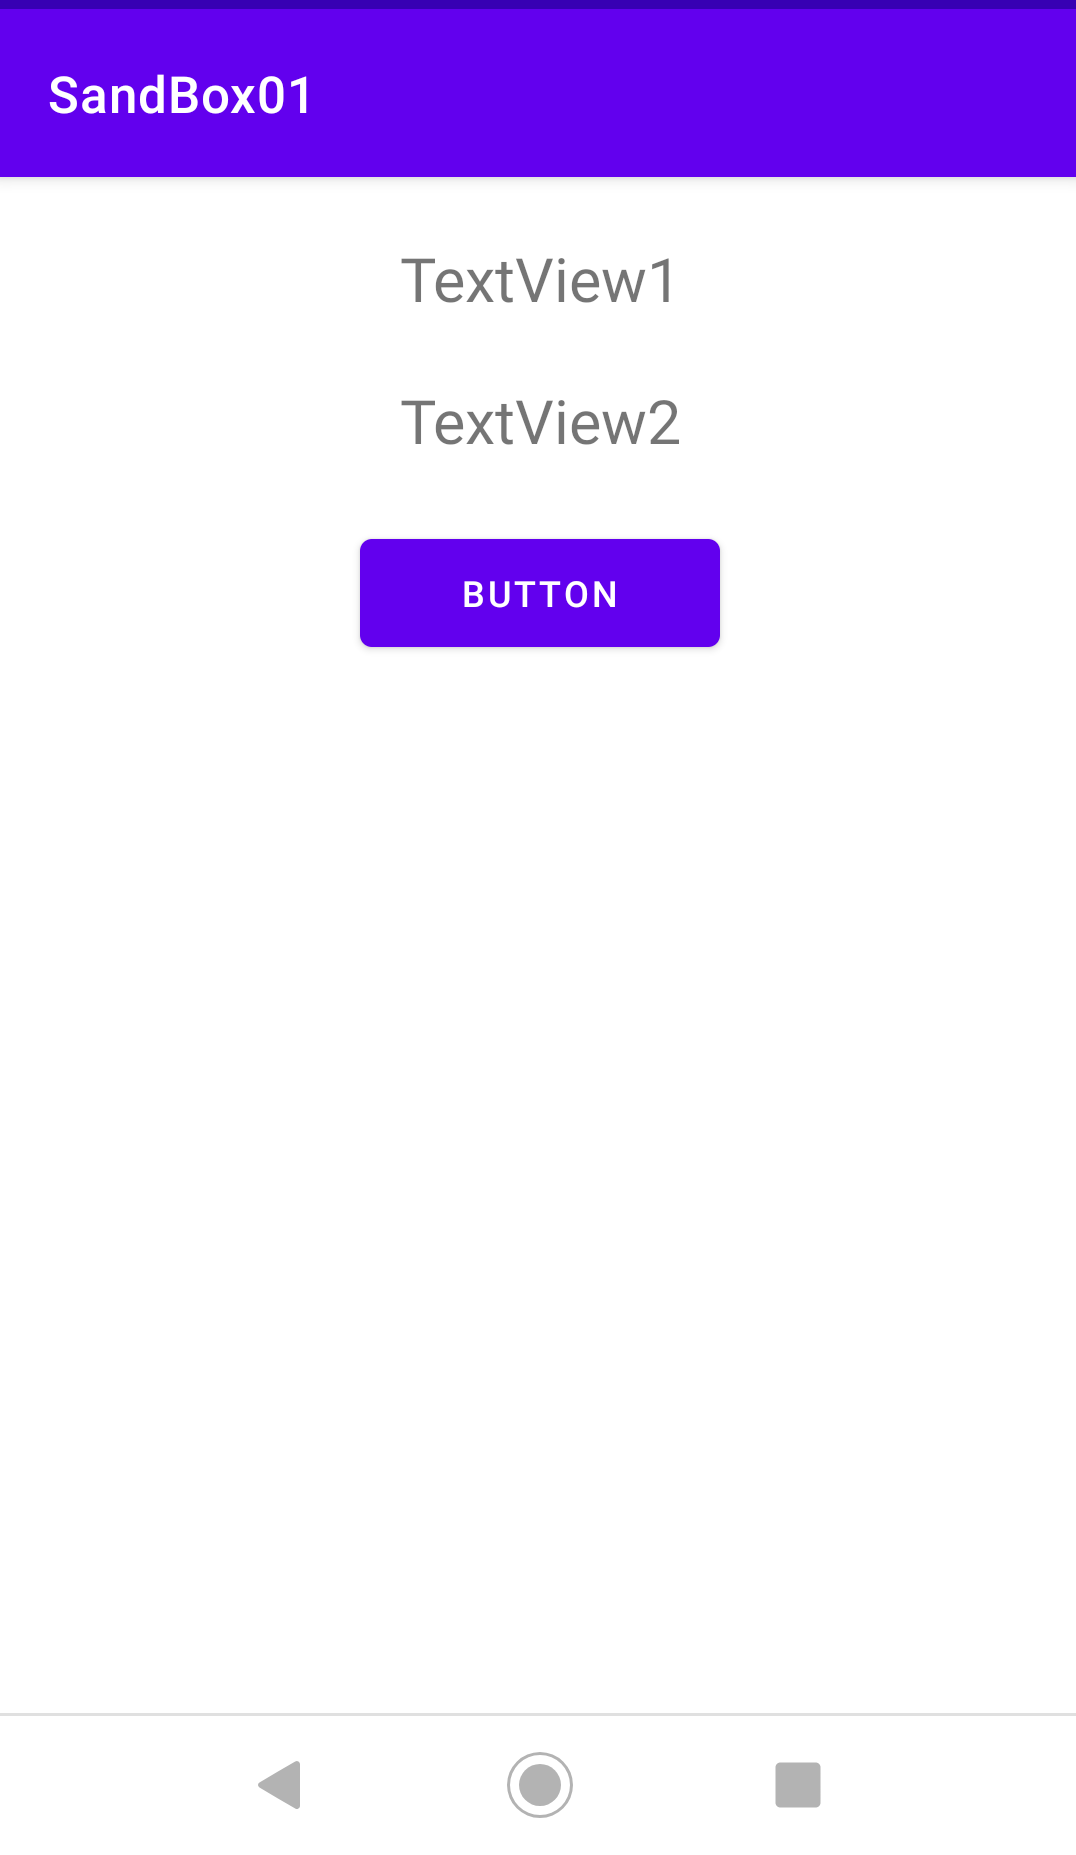
ちゃんと保存されているか確認してみます。
ボタンが押されるとTextViewにそれぞれのnameが入ります。MainActivity.ktbutton.setOnClickListener{ val t = teacherRealm.where<Teacher>() .equalTo("name","aoken_teacher").findFirst() val s = studentRealm.where<Student>() .equalTo("name","aoken_student").findFirst() textView1.text = t?.name textView2.text = s?.name }
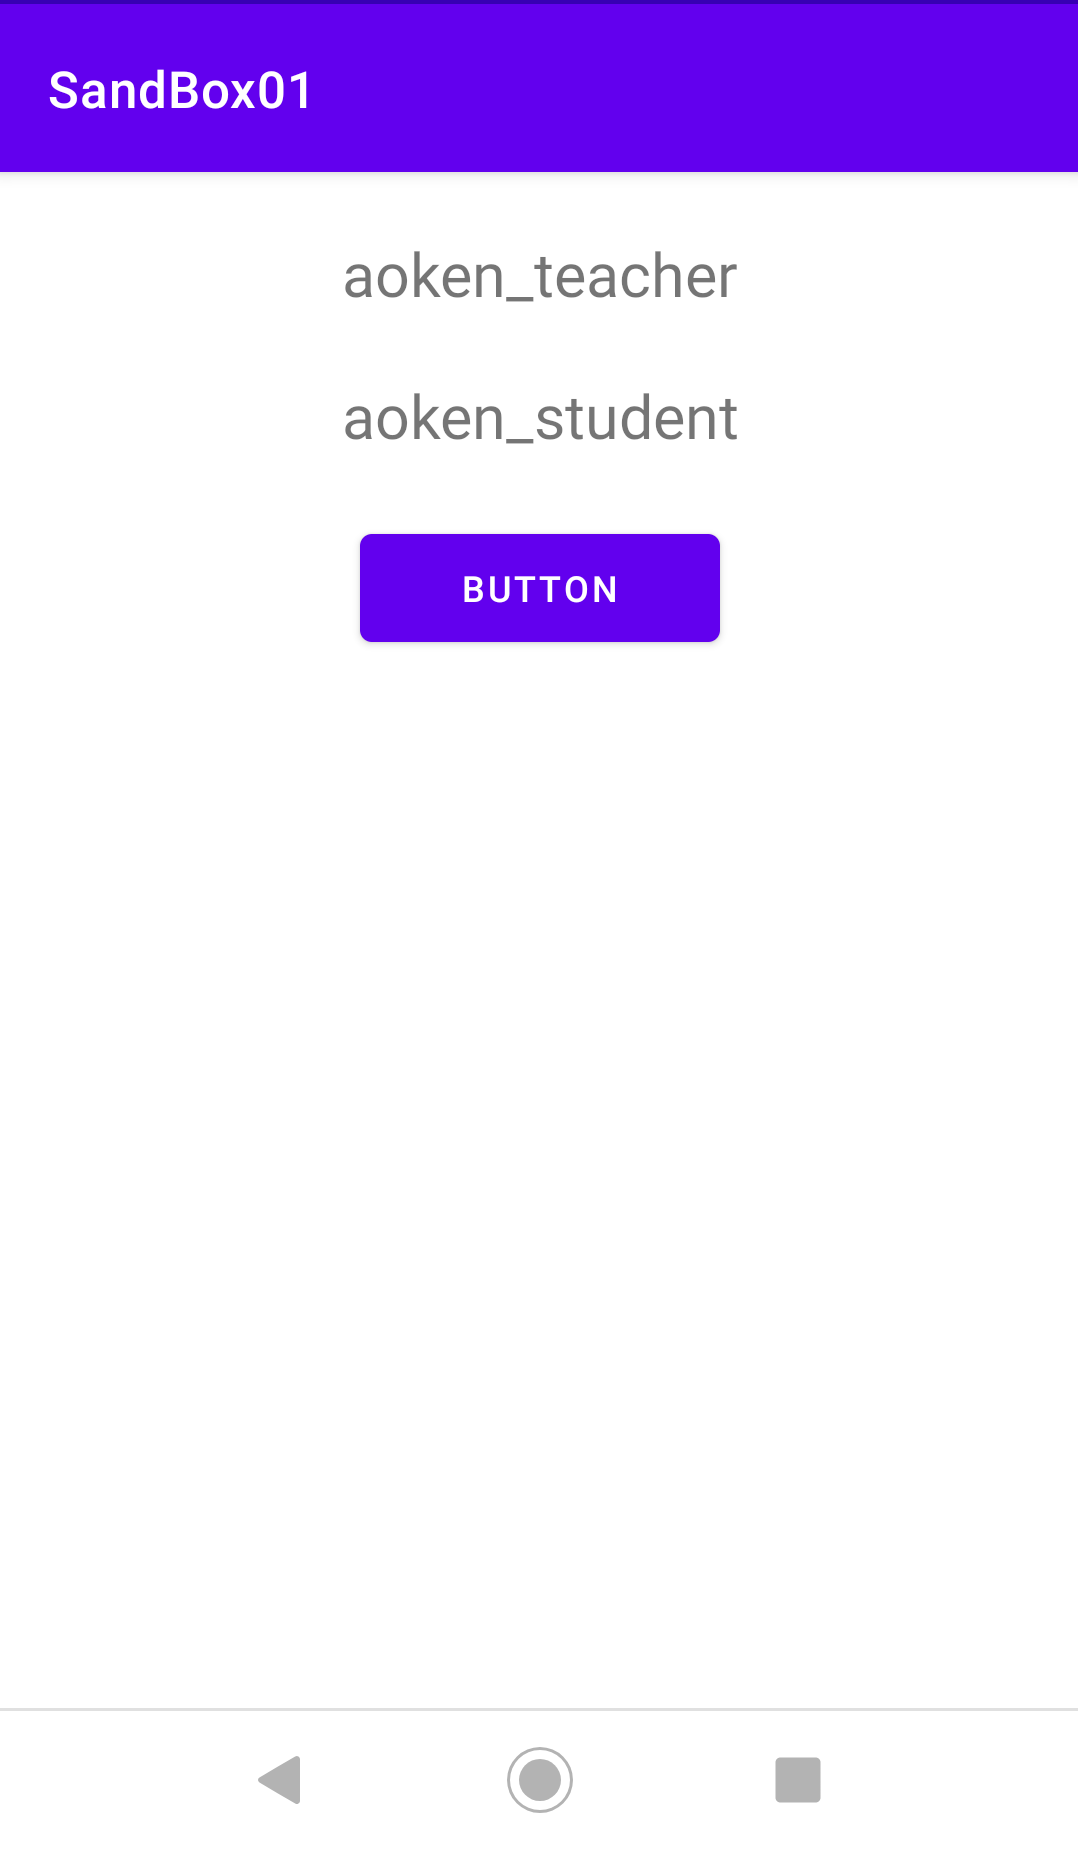
ボタンを押すと
ちゃんと複数のデータが扱えてますね!おわりに
KotlinでRealmを使う際に複数のデータモデルの保存方法がわからずハマったのでまとめました。
公式のドキュメントに詳しく書いてあるのでそっちを読んだほうがわかりやすいかもです。
KotlinもRealmもよくわかってないので間違っているところがあれば気軽に指摘してください。
最後にMainActivity.ktの全体を上げておきます。MainActivity.ktpackage com.example.sandbox01 import ... class MainActivity : AppCompatActivity() { override fun onCreate(savedInstanceState: Bundle?) { super.onCreate(savedInstanceState) setContentView(R.layout.activity_main) Realm.init(this) val teacherConfig = RealmConfiguration.Builder() .name("Teacher.realm") .schemaVersion(1) .build() val teacherRealm = Realm.getInstance(teacherConfig) teacherRealm.executeTransaction { db: Realm -> val teacher = db.createObject<Teacher>() teacher.name = "aoken_teacher" teacher.department = "cs" } val studentConfig = RealmConfiguration.Builder() .name("Student.realm") .schemaVersion(2) .build() val studentRealm = Realm.getInstance(studentConfig) studentRealm.executeTransaction { db: Realm -> val student = db.createObject<Student>() student.name = "aoken_student" student.grade = 1 } button.setOnClickListener{ val t = teacherRealm.where<Teacher>() .equalTo("name","aoken_teacher").findFirst() val s = studentRealm.where<Student>() .equalTo("name","aoken_student").findFirst() textView1.text = t?.name textView2.text = s?.name } } }参考文献