- 投稿日:2020-10-12T21:13:24+09:00
Koinを使ってActivity/Fragment間で共有するViewModelをDIする
- build.gradle
buildscript {
    ext.kotlin_version = '1.4.10'
    ext.koin_version = '2.1.6'
    repositories {
        google()
        jcenter()
    }
    dependencies {
        classpath 'com.android.tools.build:gradle:4.0.2'
        classpath "org.jetbrains.kotlin:kotlin-gradle-plugin:$kotlin_version"
        classpath "org.koin:koin-gradle-plugin:$koin_version"
    }
}
- app/build.gradle
dependencies {
    implementation "org.koin:koin-android:$koin_version"
    implementation "org.koin:koin-androidx-scope:$koin_version"
    implementation "org.koin:koin-androidx-viewmodel:$koin_version"
}
- MainActivity
class MainActivity : AppCompatActivity() {

    private val viewModel: MainViewModel by viewModel()

    override fun onCreate(savedInstanceState: Bundle?) {
        super.onCreate(savedInstanceState)
        setContentView(R.layout.activity_main)

        supportFragmentManager.beginTransaction()
            .replace(R.id.content_layout, MainFragment())
            .commit()
    }
}
- MainFragment
class MainFragment : Fragment() {

    private val viewModel by sharedViewModel<MainViewModel>()

    ...
}
- 投稿日:2020-10-12T18:42:15+09:00
Android SIP API : keep alive の動作について
SipProfile.getSendKeepAlive は、keep alive を行うかどうかを取得します。
keep alive について、リファレンスでは以下のようにあるだけです。
the flag of sending SIP keep-alive messages
SipProfile.Builder setSendKeepAlive
boolean:true if sending keep-alive message is required, false otherwise
以下も、keep alive の記述はありません。
ので、android のソースコードから動作を調べることにしました。
参考にしたバージョン
android 7.0 のソースコードを参考にすることにしました。以下のサイトで調べました。
結論
- REGISTER リクエストの成功後、定期的に OPTIONS リクエストを送信する。
- 送信間隔は、20 ~ 120 秒。
- OPTIONS リクエストの応答がない場合、OPTIONS レスポンスを確認し RPORT の変更があった場合、REGISTER リクエストを送信する。
- WIFI を使用していると判断される場合 (※1) は、SipProfile.getKeepAlive が false でもこの動作をする。
※1 ... SipService.isBehindNAT を参照。WIFI を使用しているかどうかは、IP アドレスにより判断している。
ソースコードの調査
SipProfile.getSendKeepAlive の呼び出し箇所
SipProfile.getSendKeepAlive メソッドを呼び出す個所は SipAutoReg.onRegistrationDone 。
SipService.isBehindNAT メソッドが true を返す、または、SipProfile.getSendKeepAlive メソッドが true を返す、場合、SipAutoReg.startKeepAliveProcess メソッドを実行。
以降の呼び出しは以下の通り。
SipAutoReg.onRegistrationDone
→ SigAutoReg.startKeepAliveProcess
→ SipSessionImpl.startKeepAliveProcess
→ SipKeepAlive.startSipKeepAlive クラス start メソッド
SipKeepAlive.start
引数 interval により、タイマ (mWakeupTimer) を開始。SipKeepAlive.run
タイマにより、run メソッドが実行。SipKeepAlive.sendKeepAlive メソッドを実行。SipKeepAlive.sendKeepAlive
SipHelper.sendOptions メソッドを実行。SipHelper.sendOptions は OPTIONS リクエストを送信している。
SipSessionImple.startSessionTimer メソッドでは、SessionTimer を作成。SessionTimer は start メソッドの引数 timeout が経過すると SipSessionImpl.onError を実行する。(応答のタイムアウト判定)SessionTimer クラス
onError を実行されないためには、SessionTimer.cancel を実行する必要がある。
SipSessionTimer.cancel メソッドの呼び出し元 (keep alive に関連するものだけ) をたどると
SipSessionTimer.cancel
← SipSessionImpl.cancelSessionTimer
← SipKeepAlive.process
← SipSessionImpl.process
← SipSessionGroup.process
← SipSessionGroup.processResponse … レスポンスの受信の際に呼ばれるはずまた、タイムアウト時の呼び出しは以下の通り。
SessionTimer.timeout
→ SipSessionImpl.onError
→ SipSessionImpl.endCallOnError
→ SipSessionListenerProxy.onError (SipSessionImpl.startKeepAlive で SipKeepAlive をセット)
→ SipKeepAlive.onError
→ SipAutoReg.onError (SipKeepAlive.startKeepAliveProcess の引数 callback へ通知)SipKeepAlive.process
SipKeepAlive.process メソッドは、レスポンスを解析する。
RPORTが変更されている場合、SipKeepAlive.stop にて、mWakeupTimer を停止。SipSessionImpl.reset も呼ばれ、SipSessionImpl.cancelSessionTimer も呼ばれる。(Keep Alive 動作の停止)
RPORTが変更されていない場合、SipSessionImpl.cancelSessionTimer を呼ぶ。(応答タイムアウト判定のキャンセル)KeepAliveProccessCallback.onResponse を呼び出し。 これは SipAutoReg が実装している。
SipAutoReg.onResponse , SipAutoReg.onError
SipAutoReg.onResponse
portChanged が true であれば、SipSessionImpl.register を実行。
SipSessionImpl.register は、REGISTER リクエストの送信を行う。SipAutoReg.onError
SipAutoReg.onResponse(true) を実行。その他
SipService.isBehindNAT
引数に String 型の変数をとり、
10.*.*.*、172.16.*.*、192.168.*.*のいずれかに該当する場合、true を返す。wifi を使用している場合は、大抵これらのアドレスに該当する。SipProfile.getSendKeepAlive によらず、keep alive が有効になる。
keep alive の送信間隔の変更
送信間隔の変更は、SipKeepAliveProcessCallback で行っている。
このクラスも OPTIONS リクエストを送信している。
(このあたりよくわからないが、SipServiceで保持されるインスタンスは1つだけなのでいいのかな)送信間隔変更時は以下のような呼び出しになる。
SipKeepAliveProcessCallback.onResponse
→ SipService.onKeepAliveIntervalChanged()
→ SipSessionGroupExt.onKeepAliveIntervalChanged
→ SipAutoReg.onKeepAliveIntervalChanged
→ SipAutoReg.startKeepAliveProcessTODO
keep alive の動作は大体わかったので、SipAutoReg の使用箇所を調べる。
SipAutoReg の使用箇所
SipAutoReg クラスは、SipSessionGroupExt クラスで使用されている。
SipSessionGroupExt クラスは、SipService.createGroup , SipService.createGroup で作成される。
これらは、SipService.createSession , SipService.open , SipService.open3 で使用される。
- 投稿日:2020-10-12T18:13:19+09:00
Android Navigation ComponentのNested Graphのargumentをxmlの1階層目に置く理由を調べてみた
NestedGraphに値を渡す方法は2パターンあるらしい。。
NavigationComponentを使いはじめの頃、
画面遷移図がややこしくなってきた時にレイアウトxmlと同様にincludeできることを知って、
startDestinationに指定されたfragmentタグの中にargmentを置いてみて動かなかったことがあると思いますが、
[参考リンク] によると別ファイルか同一ファイル内かで書き方が別れてしまうらしい。。。なぜこんなにも覚えづらい実装なんだろう。。

脳死で覚えるのもいいのですが、複雑な画面遷移ロジックのタスクが2〜3ヶ月来ない間に忘れてしまいそうなので、
何故こんなことになってしまったのかをきちんと内部実装から確認してみることにしました。まずxmlからインスタンスに変換している部分を探してみる。。。
レイアウトxmlを使う時には皆さまお馴染みのinflate関数がありますが、
NavigationComponentのxmlをインスタンス化する時には内部的にinflateという名前の関数を使っているようです。/** * Inflate a NavGraph from the given XML resource id. * * @param graphResId * @return */ @SuppressLint("ResourceType") public NavGraph inflate(@NavigationRes int graphResId) { Resources res = mContext.getResources(); XmlResourceParser parser = res.getXml(graphResId); final AttributeSet attrs = Xml.asAttributeSet(parser); try { int type; while ((type = parser.next()) != XmlPullParser.START_TAG && type != XmlPullParser.END_DOCUMENT) { // Empty loop } if (type != XmlPullParser.START_TAG) { throw new XmlPullParserException("No start tag found"); } String rootElement = parser.getName(); NavDestination destination = inflate(res, parser, attrs); if (!(destination instanceof NavGraph)) { throw new IllegalArgumentException("Root element <" + rootElement + ">" + " did not inflate into a NavGraph"); } return (NavGraph) destination; } catch (Exception e) { throw new RuntimeException("Exception inflating " + res.getResourceName(graphResId) + " line " + parser.getLineNumber(), e); } finally { parser.close(); } }この中の
NavDestination destination = inflate(res, parser, attrs);部分を見てみると、
下記のようにxmlのタグごとに処理を振り分ける処理になっており、ここを見れば原因が特定できそうです。private NavDestination inflate(Resources res, XmlResourceParser parser, AttributeSet attrs) throws XmlPullParserException, IOException { Navigator navigator = mNavigatorProvider.getNavigator(parser.getName()); final NavDestination dest = navigator.createDestination(); dest.onInflate(mContext, attrs); final int innerDepth = parser.getDepth() + 1; int type; int depth; while ((type = parser.next()) != XmlPullParser.END_DOCUMENT && ((depth = parser.getDepth()) >= innerDepth || type != XmlPullParser.END_TAG)) { if (type != XmlPullParser.START_TAG) { continue; } if (depth > innerDepth) { continue; } final String name = parser.getName(); if (TAG_ARGUMENT.equals(name)) { inflateArgument(res, dest, attrs); } else if (TAG_DEEP_LINK.equals(name)) { inflateDeepLink(res, dest, attrs); } else if (TAG_ACTION.equals(name)) { inflateAction(res, dest, attrs); } else if (TAG_INCLUDE.equals(name) && dest instanceof NavGraph) { final TypedArray a = res.obtainAttributes(attrs, R.styleable.NavInclude); final int id = a.getResourceId(R.styleable.NavInclude_graph, 0); ((NavGraph) dest).addDestination(inflate(id)); a.recycle(); } else if (dest instanceof NavGraph) { ((NavGraph) dest).addDestination(inflate(res, parser, attrs)); } } return dest; }ネストを処理している部分の解説
こちらがネストをハンドリングしている部分の実態になるのですが、
            } else if (TAG_INCLUDE.equals(name) && dest instanceof NavGraph) {
                final TypedArray a = res.obtainAttributes(attrs, R.styleable.NavInclude);
                final int id = a.getResourceId(R.styleable.NavInclude_graph, 0);
                ((NavGraph) dest).addDestination(inflate(id));
                a.recycle();
            } else if (dest instanceof NavGraph) {
                ((NavGraph) dest).addDestination(inflate(res, parser, attrs));
            }
1つ目のelse ifはTAG_INCLUDEとある通り他のファイルをincludeした時の分岐で、
2つ目のelse ifはdest instanceof NavGraphとある通り<navigation>タグでさらにnavGraphになっている時の処理です。
1つ目の分岐でも2つ目の分岐でもinflateされたものをaddDestinationしています。
ちなみに1つ目のinflateは当記事1つ目のコードブロックの関数へ、
2つ目は2つ目のコードブロックの関数にそれぞれ再帰的にinflateし続けています。そして
addDestination関数のコードがこちらです。public final void addDestination(@NonNull NavDestination node) { if (node.getId() == 0) { throw new IllegalArgumentException("Destinations must have an id." + " Call setId() or include an android:id in your navigation XML."); } NavDestination existingDestination = mNodes.get(node.getId()); if (existingDestination == node) { return; } if (node.getParent() != null) { throw new IllegalStateException("Destination already has a parent set." + " Call NavGraph.remove() to remove the previous parent."); } if (existingDestination != null) { existingDestination.setParent(null); } node.setParent(this); mNodes.put(node.getId(), node); }このコードブロックに出てくるmNodesというのは
final SparseArrayCompat<NavDestination> mNodes = new SparseArrayCompat<>();
という型のプロパティで、見慣れない型ですがkeyがIntegerでvalueがNavDestinationのHashMapになっています。それで、
addDestination関数がのException以外の部分を抜き出してみると、node.setParent(this); mNodes.put(node.getId(), node);となっていて、ネストをハンドリングしていた
((NavGraph) dest).addDestinationのdestを自分の親に登録し、
ナビゲーショングラフxmlのidで整理されたNavDestinationのHashMapに自分を登録する処理となっています。
この時登録しているインスタンスがNavGraphとNavDestinationと別インスタンスになっていて、
NavGraphはNavDestinationと配列のインターフェースを継承したクラスになっています。ここで、先ほどのXMLのタグごとに処理を切り分けた場所のどの分岐で<argument>タグが処理されているか見てみると、
        if (TAG_ARGUMENT.equals(name)) {
            inflateArgument(res, dest, attrs);
        }
こちらから、
private void inflateArgument(Resources res, NavDestination dest, AttributeSet attrs) throws XmlPullParserException { final TypedArray a = res.obtainAttributes(attrs, R.styleable.NavArgument); String name = a.getString(R.styleable.NavArgument_android_name); TypedValue value = sTmpValue.get(); if (value == null) { value = new TypedValue(); sTmpValue.set(value); } if (a.getValue(R.styleable.NavArgument_android_defaultValue, value)) { switch (value.type) { case TypedValue.TYPE_STRING: dest.getDefaultArguments().putString(name, value.string.toString()); break; case TypedValue.TYPE_DIMENSION: dest.getDefaultArguments().putInt(name, (int) value.getDimension(res.getDisplayMetrics())); break; case TypedValue.TYPE_FLOAT: dest.getDefaultArguments().putFloat(name, value.getFloat()); break; case TypedValue.TYPE_REFERENCE: dest.getDefaultArguments().putInt(name, value.data); break; default: if (value.type >= TypedValue.TYPE_FIRST_INT && value.type <= TypedValue.TYPE_LAST_INT) { dest.getDefaultArguments().putInt(name, value.data); } else { throw new XmlPullParserException("unsupported argument type " + value.type); } } } a.recycle(); }こちらに飛ぶと、何やらswitch文で型ごとに
dest.getDefaultArguments().put~~~~としていますね。この中では下記のように
private Bundle mDefaultArguments;

〜省略〜

/**
 * Gets the argument bundle to be used by default when navigating to this action.
 * @return bundle of default argument values
 */
@Nullable
public Bundle getDefaultArguments() {
    return mDefaultArguments;
}
のようにBundle型のインスタンスを取ってきてデータを追加するという昔ながらの画面遷移時にやっていた処理をしているようです。
となると、根本原因はXMLを再帰的にパースしていく過程で<include>タグを区切りに違うインスタンスのBundleに <arguments>を保存しているから。
なぜかと言えば、推測ですがBundleに入れるデータが大きくなりすぎるとTransactionTooLargeExceptionが起きるから仕方がないのかなと思いました。以上になります。
- 投稿日:2020-10-12T18:13:01+09:00
Android Navigation Componentのツールバーのタイトル挿入機能の内部実装について調べてみた
ToolBarにsetTitle時に変数を挿入できる。。じゃあ変数以外の部分の多言語化は?
実際に挿入している箇所は下記のコードブロックに抜き出してある通り、
labelというCharSequence型の変数に
Pattern fillInPattern = Pattern.compile("\\{(.+?)\\}");の
正規表現にマッチする文字が無くなるまでループを回して、
StringBuffer title = new StringBuffer();に連結していき
最終的な文字列をsetTitle(title);しています。CharSequence label = destination.getLabel(); if (!TextUtils.isEmpty(label)) { // Fill in the data pattern with the args to build a valid URI StringBuffer title = new StringBuffer(); Pattern fillInPattern = Pattern.compile("\\{(.+?)\\}"); Matcher matcher = fillInPattern.matcher(label); while (matcher.find()) { String argName = matcher.group(1); if (arguments != null && arguments.containsKey(argName)) { matcher.appendReplacement(title, ""); //noinspection ConstantConditions title.append(arguments.get(argName).toString()); } else { throw new IllegalArgumentException("Could not find " + argName + " in " + arguments + " to fill label " + label); } } matcher.appendTail(title); setTitle(title); }AbstractAppBarOnDestinationChangedListener
ではlabelをどこで作っているか調べてみると、
下記のコードブロックにある通り
setLabel(a.getText(R.styleable.Navigator_android_label));という関数でxmlから呼び出しています。@CallSuper public void onInflate(@NonNull Context context, @NonNull AttributeSet attrs) { final TypedArray a = context.getResources().obtainAttributes(attrs, R.styleable.Navigator); setId(a.getResourceId(R.styleable.Navigator_android_id, 0)); mIdName = getDisplayName(context, mId); setLabel(a.getText(R.styleable.Navigator_android_label)); a.recycle(); }では
R.styleable.Navigator_android_labelを探してみると、
こちらはコンパイル時にスネークケースに置き換えられる名前で定義されている場所は、<declare-styleable name="Navigator"> <attr name="android:id"/> <attr name="android:label" /> </declare-styleable>の箇所になります。
以上からnavGraphのxml上のandroid:labelにR.stringのリソースを連結できる仕組みになっていなかったため、
変数を埋め込んだタイトルを多言語対応させるには、
1. 遷移前の画面であらかじめgetString(int resId, Object... formatArgs)でタイトルを作りlabelを丸ごと変数にする
2. 変数を埋め込む画面のnavGraphだけNestedNavGraphで別ファイルにして固定文字列部分を各ファイルで実装するになるかと思います。
- 投稿日:2020-10-12T18:01:48+09:00
モダンなアニメーションを実装してみた
はじめに
現在のモバイル開発においてモダンなアニメーションはなくてはならないものです。
画面遷移の際、共通要素が途切れてしまうとユーザーが困惑してしまうことがあります。一覧画面から詳細画面へ遷移する際に共通要素を途切れさせないように表示することで実際にユーザーがUIに手を触れているような感覚になります。
以下の動画の通りです。
— どすこい@Android Engineer (@dosukoi_android) September 25, 2020このアニメーションはSharedElementTransitionというものを使います。
環境
NavigationComponentを使います。
appレベルのbuild.gradleに依存関係を記述していきます。build.gradle(app)dependencies { def nav_version = "2.3.0" implementation "androidx.navigation:navigation-fragment-ktx:$nav_version" implementation "androidx.navigation:navigation-ui-ktx:$nav_version" }説明しないこと
Jetpackの説明
NavigationComponentの説明やり方
1. NavGraphを作る
res/navigationディレクトリを作り、navGraphファイルを作ります。
<navigation xmlns:android="http://schemas.android.com/apk/res/android"
    xmlns:app="http://schemas.android.com/apk/res-auto" android:id="@+id/main_navigation"
    app:startDestination="@id/topFragment">

    <fragment
        android:id="@+id/exampleFragment"
        android:name="com.example.motionlayoutsample.view.fragment.ExampleFragment"
        android:label="ExampleFragment" >
        <action
            android:id="@+id/action_example2Fragment_to_example2DetailFragment"
            app:destination="@id/exampleDetailFragment" />
    </fragment>
    <fragment
        android:id="@+id/exampleDetailFragment"
        android:name="com.example.motionlayoutsample.view.fragment.ExampleDetailFragment"
        android:label="ExampleDetailFragment" >
        <argument
            android:name="transitionName"
            app:argType="string"/>
    </fragment>

</navigation>
2. NavHostFragmentを設定する
<?xml version="1.0" encoding="utf-8"?>
<androidx.constraintlayout.widget.ConstraintLayout xmlns:android="http://schemas.android.com/apk/res/android"
    xmlns:app="http://schemas.android.com/apk/res-auto"
    xmlns:tools="http://schemas.android.com/tools"
    android:layout_width="match_parent"
    android:layout_height="match_parent"
    tools:context=".view.activity.MainActivity">

    <androidx.appcompat.widget.Toolbar
        android:id="@+id/toolbar"
        android:layout_width="match_parent"
        android:layout_height="wrap_content"
        android:background="@color/colorAccent"
        android:elevation="4dp"
        android:minHeight="?attr/actionBarSize"
        android:theme="@style/ThemeOverlay.AppCompat.ActionBar"
        app:layout_constraintTop_toTopOf="parent" />

    <fragment
        android:id="@+id/top_fragment"
        android:name="androidx.navigation.fragment.NavHostFragment"
        android:layout_width="match_parent"
        android:layout_height="0dp"
        app:defaultNavHost="true"
        app:layout_constraintBottom_toBottomOf="parent"
        app:layout_constraintTop_toBottomOf="@id/toolbar"
        app:navGraph="@navigation/main_navigation" />


</androidx.constraintlayout.widget.ConstraintLayout>
3. Fragmentを作成する
アニメーションの始まりのFragmentとアニメーション終わりのFragmentを作成します。
今回は動画のように一覧画面から詳細画面にいきたいので、一覧画面と詳細画面を作成します。
その際、共通要素がないと遷移した際にかっこいいアニメーションにならないので、なるべく共通した要素を作りましょう。一覧画面
RecyclerViewのアイテムのxmlを載せておきます
<?xml version="1.0" encoding="utf-8"?>
<layout xmlns:android="http://schemas.android.com/apk/res/android"
    xmlns:app="http://schemas.android.com/apk/res-auto">

    <androidx.constraintlayout.widget.ConstraintLayout
        android:id="@+id/constraintLayout2"
        android:layout_width="match_parent"
        android:layout_height="wrap_content">

        <androidx.cardview.widget.CardView
            android:id="@+id/cardView"
            android:layout_width="match_parent"
            android:layout_height="wrap_content"
            app:cardCornerRadius="10dp"
            app:cardElevation="4dp"
            app:cardUseCompatPadding="true"
            app:layout_constraintTop_toTopOf="parent">

            <androidx.constraintlayout.widget.ConstraintLayout
                android:layout_width="match_parent"
                android:layout_height="match_parent">

                <FrameLayout
                    android:id="@+id/frameLayout"
                    android:layout_width="match_parent"
                    android:layout_height="140dp"
                    android:background="@color/cardview_color"
                    app:layout_constraintTop_toTopOf="parent" />

                <LinearLayout
                    android:layout_width="match_parent"
                    android:layout_height="wrap_content"
                    android:orientation="horizontal"
                    android:padding="16dp"
                    app:layout_constraintBottom_toBottomOf="parent"
                    app:layout_constraintTop_toBottomOf="@id/frameLayout">

                    <FrameLayout
                        android:layout_width="wrap_content"
                        android:layout_height="wrap_content"
                        android:layout_gravity="center_vertical"
                        android:background="@drawable/gray_circle" />

                    <LinearLayout
                        android:layout_width="match_parent"
                        android:layout_height="match_parent"
                        android:layout_marginStart="20dp"
                        android:orientation="vertical">

                        <FrameLayout
                            android:layout_width="match_parent"
                            android:layout_height="16dp"
                            android:background="@drawable/gray_80" />

                        <FrameLayout
                            android:layout_width="120dp"
                            android:layout_height="16dp"
                            android:layout_marginTop="10dp"
                            android:background="@drawable/gray_80" />

                    </LinearLayout>

                </LinearLayout>

            </androidx.constraintlayout.widget.ConstraintLayout>

        </androidx.cardview.widget.CardView>

    </androidx.constraintlayout.widget.ConstraintLayout>

</layout>
詳細画面
<?xml version="1.0" encoding="utf-8"?>
<layout xmlns:android="http://schemas.android.com/apk/res/android"
    xmlns:app="http://schemas.android.com/apk/res-auto">

    <data>
    </data>

    <androidx.constraintlayout.widget.ConstraintLayout
        android:id="@+id/constraintLayout3"
        android:layout_width="match_parent"
        android:layout_height="match_parent">

        <ScrollView
            android:id="@+id/scrollView"
            android:layout_width="match_parent"
            android:layout_height="match_parent"
            android:fillViewport="true">

            <LinearLayout
                android:layout_width="match_parent"
                android:layout_height="wrap_content"
                android:orientation="vertical">

                <androidx.cardview.widget.CardView
                    android:id="@+id/cardView"
                    android:layout_width="match_parent"
                    android:layout_height="wrap_content"
                    app:cardElevation="4dp">

                    <androidx.constraintlayout.widget.ConstraintLayout
                        android:layout_width="match_parent"
                        android:layout_height="match_parent">

                        <FrameLayout
                            android:id="@+id/frameLayout"
                            android:layout_width="match_parent"
                            android:layout_height="260dp"
                            android:background="@color/cardview_color"
                            app:layout_constraintTop_toTopOf="parent" />

                        <LinearLayout
                            android:layout_width="match_parent"
                            android:layout_height="wrap_content"
                            android:orientation="horizontal"
                            android:padding="16dp"
                            app:layout_constraintBottom_toBottomOf="parent"
                            app:layout_constraintTop_toBottomOf="@id/frameLayout">

                            <FrameLayout
                                android:layout_width="wrap_content"
                                android:layout_height="wrap_content"
                                android:layout_gravity="center_vertical"
                                android:background="@drawable/gray_circle" />

                            <LinearLayout
                                android:layout_width="match_parent"
                                android:layout_height="match_parent"
                                android:layout_marginStart="20dp"
                                android:orientation="vertical">

                                <FrameLayout
                                    android:layout_width="match_parent"
                                    android:layout_height="16dp"
                                    android:background="@drawable/gray_80" />

                                <FrameLayout
                                    android:layout_width="120dp"
                                    android:layout_height="16dp"
                                    android:layout_marginTop="10dp"
                                    android:background="@drawable/gray_80" />

                            </LinearLayout>

                        </LinearLayout>

                    </androidx.constraintlayout.widget.ConstraintLayout>

                </androidx.cardview.widget.CardView>

                <LinearLayout
                    android:layout_width="match_parent"
                    android:layout_height="match_parent"
                    android:background="#f9fbe7"
                    android:orientation="vertical"
                    android:paddingStart="16dp"
                    android:paddingTop="30dp"
                    android:paddingEnd="16dp"
                    android:paddingBottom="30dp">

                    <FrameLayout
                        android:layout_width="200dp"
                        android:layout_height="35dp"
                        android:background="@drawable/gray_80"
                        app:delayAnimation="@{100L}" />

                    <FrameLayout
                        android:layout_width="match_parent"
                        android:layout_height="20dp"
                        android:layout_marginTop="16dp"
                        android:background="@drawable/gray_80"
                        app:delayAnimation="@{200L}" />

                    <FrameLayout
                        android:layout_width="200dp"
                        android:layout_height="20dp"
                        android:layout_marginTop="16dp"
                        android:background="@drawable/gray_80"
                        app:delayAnimation="@{220L}" />

                    <FrameLayout
                        android:layout_width="300dp"
                        android:layout_height="20dp"
                        android:layout_marginTop="16dp"
                        android:background="@drawable/gray_80"
                        app:delayAnimation="@{240L}" />

                    <FrameLayout
                        android:layout_width="100dp"
                        android:layout_height="20dp"
                        android:layout_marginTop="16dp"
                        android:background="@drawable/gray_80"
                        app:delayAnimation="@{260L}" />

                </LinearLayout>

            </LinearLayout>
        </ScrollView>

    </androidx.constraintlayout.widget.ConstraintLayout>
</layout>
BindingAdapter
@BindingAdapter("delayAnimation")
fun View.animation(delayTime: Long) {
    visibility = View.INVISIBLE
    val slideInAnimation = TranslateAnimation(0F, 0F, 1000F, 0F)
    slideInAnimation.let {
        it.duration = 100
        it.fillAfter = true
    }

    postDelayed({
        startAnimation(slideInAnimation)
        visibility = View.VISIBLE
    }, delayTime)
}
4. Fragmentの実装
読むのがめんどくさい方はonBindViewHolderの中をご覧ください
一覧画面
package com.example.motionlayoutsample.view.fragment

import android.os.Bundle
import android.view.LayoutInflater
import android.view.View
import android.view.ViewGroup
import androidx.fragment.app.Fragment
import androidx.navigation.findNavController
import androidx.navigation.fragment.FragmentNavigator
import androidx.navigation.fragment.findNavController
import androidx.recyclerview.widget.LinearLayoutManager
import androidx.recyclerview.widget.RecyclerView
import com.example.motionlayoutsample.databinding.FragmentExample2Binding
import com.example.motionlayoutsample.databinding.ItemExample2Binding
import com.google.android.material.floatingactionbutton.FloatingActionButton

class Example2Fragment : Fragment() {

    override fun onCreateView(
        inflater: LayoutInflater,
        container: ViewGroup?,
        savedInstanceState: Bundle?
    ): View? = FragmentExample2Binding.inflate(inflater, container, false).let {
        it.recyclerView.apply {
            adapter = ListAdapter()
            layoutManager = LinearLayoutManager(context)
        }
        it.root
    }

    override fun onViewCreated(view: View, savedInstanceState: Bundle?) {
        super.onViewCreated(view, savedInstanceState)

        postponeEnterTransition()

        view.viewTreeObserver.addOnPreDrawListener {
            startPostponedEnterTransition()
            true
        }
    }

    inner class ListAdapter : RecyclerView.Adapter<ListItemViewHolder>() {
        override fun onCreateViewHolder(parent: ViewGroup, viewType: Int): ListItemViewHolder = ListItemViewHolder(
            ItemExample2Binding.inflate(LayoutInflater.from(context), parent, false)
        )

        override fun onBindViewHolder(holder: ListItemViewHolder, position: Int) {
            holder.binding.also {
                // transitionNameをxml側で設定してしまうと全て同じアイテムということになってしまったのでpositionをtransitionNameにしましょう
                it.cardView.transitionName = position.toString()
                it.cardView.setOnClickListener {  v ->
                    Example2FragmentDirections.actionExample2FragmentToExample2DetailFragment(it.cardView.transitionName).let { direction ->
                        mapOf<View, String>(it.cardView to it.cardView.transitionName).let {
                            it.forEach { sharedElement ->
                                FragmentNavigator.Extras.Builder().apply {
                                    addSharedElement(sharedElement.key, sharedElement.value)
                                }.build().also { sharedExtras ->
                                    v.findNavController().navigate(direction, sharedExtras)
                                }
                            }
                        }
                    }
                }
            }
        }

        override fun getItemCount(): Int = 10
    }

    inner class ListItemViewHolder(val binding: ItemExample2Binding): RecyclerView.ViewHolder(binding.root)
}
詳細画面
package com.example.motionlayoutsample.view.fragment

import android.os.Bundle
import android.transition.TransitionInflater
import android.util.Log
import android.view.LayoutInflater
import android.view.View
import android.view.ViewGroup
import android.widget.Button
import androidx.appcompat.widget.ButtonBarLayout
import androidx.core.content.res.ResourcesCompat
import androidx.fragment.app.Fragment
import androidx.fragment.app.viewModels
import androidx.lifecycle.Observer
import androidx.navigation.fragment.navArgs
import com.example.motionlayoutsample.R
import com.example.motionlayoutsample.databinding.FragmentExample2DetailBinding
import com.example.motionlayoutsample.view.extension.popUpButton
import com.example.motionlayoutsample.view.extension.shrinkingButton
import com.example.motionlayoutsample.viewmodel.Example2DetailViewModel
import com.google.android.material.floatingactionbutton.FloatingActionButton
import kotlinx.android.synthetic.main.fragment_practice.*

class Example2DetailFragment : Fragment() {

    private val args: Example2DetailFragmentArgs by navArgs()

    override fun onCreate(savedInstanceState: Bundle?) {
        super.onCreate(savedInstanceState)
        sharedElementEnterTransition = TransitionInflater.from(context).inflateTransition(android.R.transition.move)
        sharedElementReturnTransition = TransitionInflater.from(context).inflateTransition(android.R.transition.move)
    }

    override fun onCreateView(
        inflater: LayoutInflater,
        container: ViewGroup?,
        savedInstanceState: Bundle?
    ): View? = FragmentExample2DetailBinding.inflate(inflater, container, false).let {
        it.cardView.transitionName = args.transitionName
        it.lifecycleOwner = viewLifecycleOwner
        it.root
    }
}
5. 説明
めんどくさい方は上記コピペでそれなりのことできます。
共通要素にtransitionNameを設定する
it.cardView.transitionName = position.toString()まずはSharedElementTransitionとして扱うViewにTransitionNameを設定します。
単体のViewだったら決め打ちでTransitionNameをつけていいんですが、今回はRecyclerViewでアイテムを使い回しているので同じ名前は使用できません。
なのでpositonをtransitionNameとしてつけています。ViewをSharedElementTransitionに登録する
FragmentNavigator.Extras.Builder().apply {
    addSharedElement(sharedElement.key, sharedElement.value)
}
遷移先のFragmentでSharedElementTransitionを登録する
遷移先のFragmentoverride fun onCreate(savedInstanceState: Bundle?) { super.onCreate(savedInstanceState) sharedElementEnterTransition = TransitionInflater.from(context).inflateTransition(android.R.transition.move) sharedElementReturnTransition = TransitionInflater.from(context).inflateTransition(android.R.transition.move) }まとめ
今回は途切れない画面遷移としてSharedElementTransitionを紹介しました。
次回はMotionLayoutあたりかな?参考にした記事
- 投稿日:2020-10-12T18:00:26+09:00
Github ActionsでAndroidのビルドをする
はじめに
今回はGithub ActionsでAndroidのビルドをする
準備
1. AndroidのProjectレベルに.github/workflowディレクトリを作る
2. build.yamlを作る(名前はなんでも良い)
name: CI

on:
  pull_request:
    branches: [ master ]

jobs:
  build:

    runs-on: ubuntu-latest

    steps:
    - uses: actions/checkout@v2
    - name: set up JDK 1.8
      uses: actions/setup-java@v1
      with:
        java-version: 1.8
    - name: Build with Gradle
      run: ./gradlew assembleDebug
3. プッシュする
4. 終わり!
説明
on:
  pull_request:
    branches: [ master ]
pull_requestの部分はトリガーといい、githubのプッシュ、プルリクエスト、issueなどです。
branchesは任意のブランチを指定すれば、指定したブランチにトリガーが走った時に処理を始めてくれます。- uses: actions/checkout@v2 - name: set up JDK 1.8 uses: actions/setup-java@v1 with: java-version: 1.8Javaの環境を用意します。
- name: Build with Gradle
  run: ./gradlew assembleDebug
ビルドします
- 投稿日:2020-10-12T17:03:19+09:00
巨大な aar を分割し、ビルド時に復元する
こんなときに
- Android アプリ開発で、aar 形式で提供されるライブラリーを使用しているが、aar ファイルが巨大すぎてそのまま commit & push すると GitHub に怒られるとき
どうする
- aar ファイルを分割した状態で Git にコミットし、gradle でアプリをビルドする時に自動的に元の aar ファイルが復元される様にする
くわしく
普通に aar ファイルをライブラリーとしてインポートすると、build.gradle ファイルは以下の様になってるはずです。
configurations.maybeCreate("default")
artifacts.add("default", file('foo.aar'))
これを、以下の様に変更します。(ファイル名
foo.aarは適宜調整のこと)plugins { id "base" } task archiveAar(type: Zip) { group = "Build" description = "Creates the aar archive." archiveFileName = "foo.aar" destinationDirectory = project.projectDir inputs.files { fileTree(".") { include "foo.aar.*" } } inputs.files.each { from zipTree(it) } } configurations.maybeCreate("default") artifacts.add("default", archiveAar.archiveFile)さらに、aar ファイルを一旦 unzip し、出てきたファイル群を適当な複数の部分集合に分割したあと、それぞれを zip ファイルとして圧縮し直します。
圧縮後のファイル名はinclude "foo.aar.*"のところにマッチする様にfoo.aar.1,foo.aar.2, ... とかそんな感じにしておきます。
元の aar ファイル内のディレクトリー構成が新しい zip ファイル内でも保たれる様に気を付けてください。
最後に、分割後のファイルと build.gradle を Git にコミットして完了です。(GitHub に push した時に怒られない様にするには、分割 zip 後の各ファイルが 50 MB 未満となる様にすべきです。)あとは普通にアプリをビルドすれば OK です。
(初回ビルド時のみ、まだ aar ファイルが復元されてないためにビルドが失敗することがあります。その場合は先にgradle archiveAarを単体で実行すると aar ファイルが生成されます)
筆者環境は Gradle バージョン 6.3 です。他のバージョンの Gradle では結果が異なる可能性があります。
- 投稿日:2020-10-12T16:53:31+09:00
【2020年10月】Retrofitで Multipart アップロードする時に参考になる記事まとめ
情報が揃っている記事がなかったので、ここに整理します。
android - Retrofit(2.0 beta2) Multipart file upload doesn't work - Stack Overflow
https://stackoverflow.com/questions/33473213/retrofit2-0-beta2-multipart-file-upload-doesnt-work
@Multipartが動かない時は↓これを使いましょう↓Retrofit2でMultipartPOST - Qiita
https://qiita.com/satsukies/items/822db4f68094dad4951d
良記事!RequestBody.createが廃止になったので、その部分は↓を参考にしましょうokhttp3 - RequestBody.create(contentType、content)非推奨
http://www.366service.com/jp/qa/de8d3f15061dd674fda31b1c81356662
AndroidでのBitmap/JPEG/byte配列の相互変換 - Qiita
https://qiita.com/aymikmts/items/7139fa6c4da3b57cb4fc
アップロード時に色々変換する時に参考にしましょうAndroidでmultipartで画像とテキストを同時送信 - Qiita
https://qiita.com/hisakioomae/items/9588e41ead50bd62f186
RxJAVAを使ってる方はこれがわかりやすいかも!
- 投稿日:2020-10-12T16:52:20+09:00
【フロント・ネイティブエンジニア必見】マイクロインタラクションの参考になるサイト7選
マイクロインタラクションの参考になる情報サイトまとめ
UX改善に欠かせないマイクロインタラクション
フロントエンド・ネイティブアプリエンジニアはこのような細部へのこだわりにワクワクすること間違いなし!
どんな実装があるのか、参考になる情報をまとめます。まずは書籍紹介
これは結構読むのが大変でした!
書籍をいきなり買うのはちょっと。。。という方は以下のサイトを厳選しましたので、さらっとみてからの購入をお勧めしますサイト紹介
マイクロインタラクションを感覚的に理解できるサイト
マイクロインタラクションとは?注意すべきポイントや事例を徹底解説! | Web Design Trends
マイクロインタラクションを考慮すべき4つの理由 | UX MILK
UIにマイクロインタラクションを! より良いUXのための7つの秘訣 | UX MILK
より良いUIのためのマイクロインタラクション入門|Blog|Goodpatch グッドパッチ
小さな動きで大きな効果!マイクロインタラクションを使って優れたUXを実現する | Web Design Trends
これらのサイトをざっと眺めれば、15分程度でどのようなものがマイクロインタラクションかわかります。
見てるだけで楽しいのでぜひ眺めてみましょう!効果検証はどうするのか!
マイクロインタラクションの効果を数値化する|鈴木慎吾 / TSUMIKI INC.
ただ綺麗で楽しいだけじゃビジネス上意味はありません。
数字で効果を把握して、ビジネスに貢献するにはどうすればいいのか参考になります!デザイナーはどうやってつくるのか!
マイクロインタラクションを活かしたコンセプトデザインの作成 @Adobe MAX Japan 2019|鈴木慎吾 / TSUMIKI INC.
デザイナーの方がどのように設計するのか、動画で多くのサンプルが見れます。
工程を把握することでデザイナーの方とのコミュニケーションがスムーズになること間違いなし!最後に
読んでくださったみなさんが感動したUX・UIもぜひコメントで紹介してください!
よろしくおねがいします!!

- 投稿日:2020-10-12T16:51:42+09:00
【Smart Cast】Android Kotlinでよくつかうnullの対処法
- 投稿日:2020-10-12T16:27:18+09:00
【Android】EditTextのハンドル部分の色変更
しずくの形をしたハンドル部分(つまみ・カーソル・コントロール)の色変更方法
styles.xml<style name="AppTheme" parent="Hoge"> <item name="colorAccent">@color/red</item> </style>
- 投稿日:2020-10-12T09:27:12+09:00
2. Android学習 Layout、View編
勉強できること
LayoutとViewの関係性
基本的なLayout、Viewの種類前提
AndroidStudioのバージョン:4.0.1
言語:Java1. HelloWorldの実装内容の確認
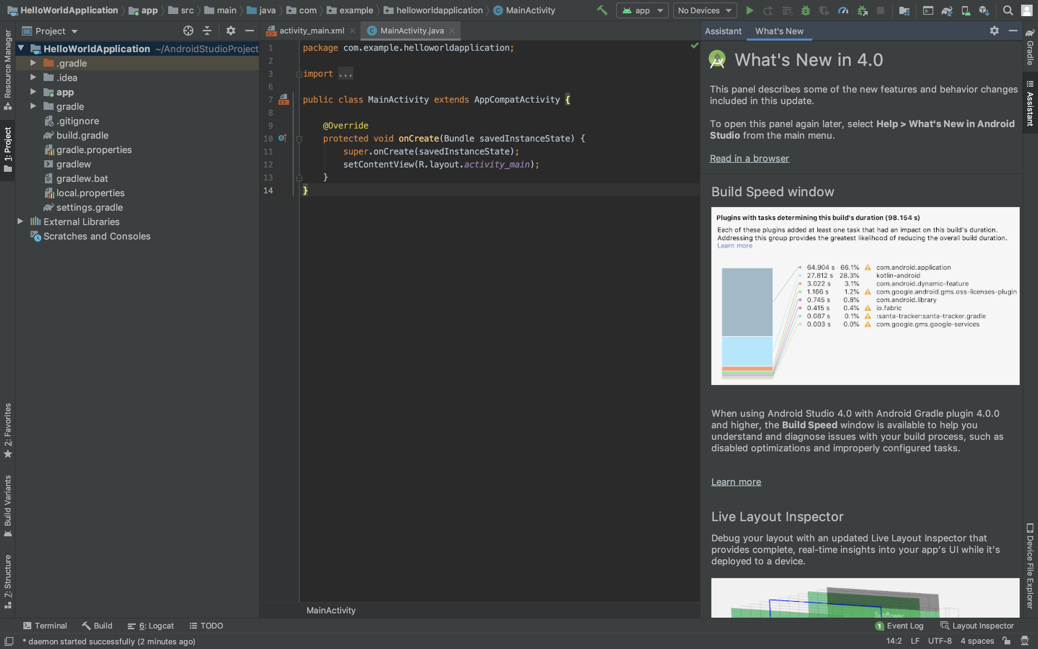
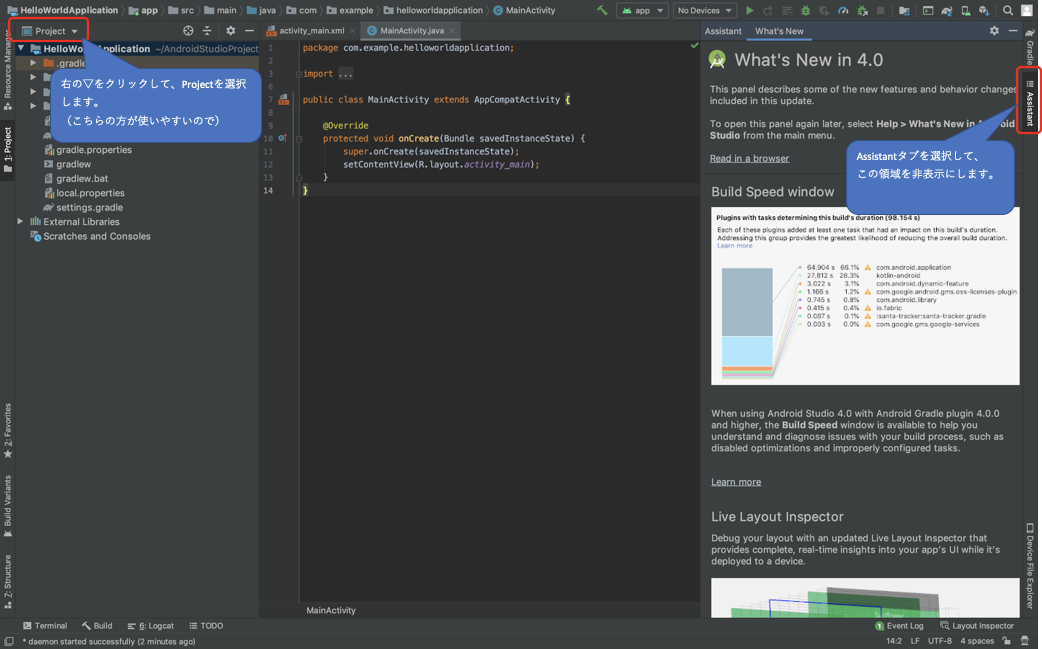
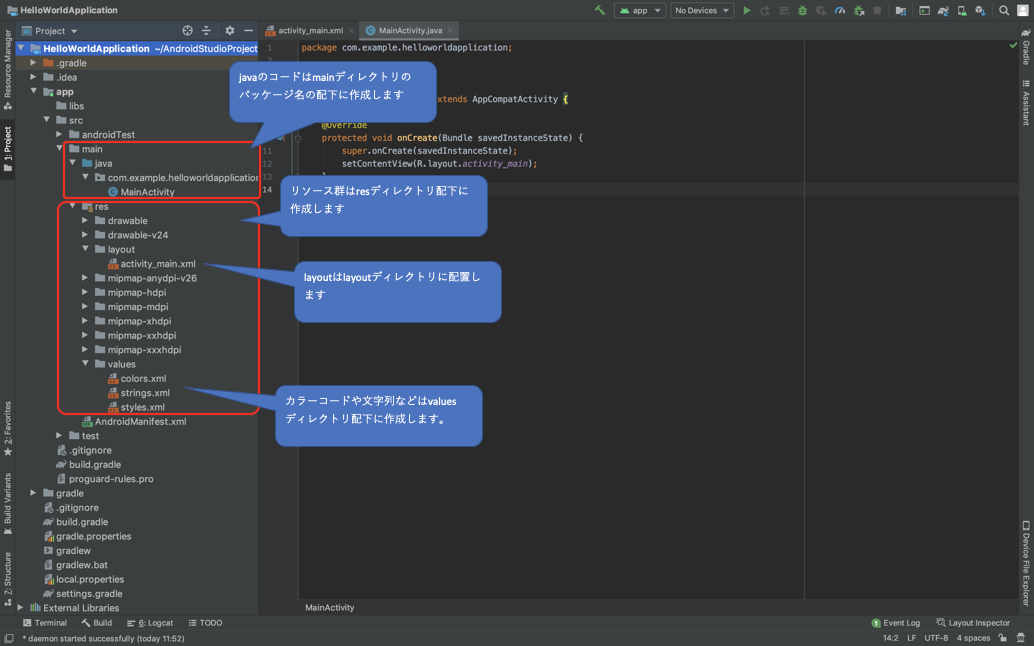
前回の1. Android学習 AndroidStudioのインストール〜HelloWorld編 からの続きとなります。
上記で作成したプロジェクトを開きます。
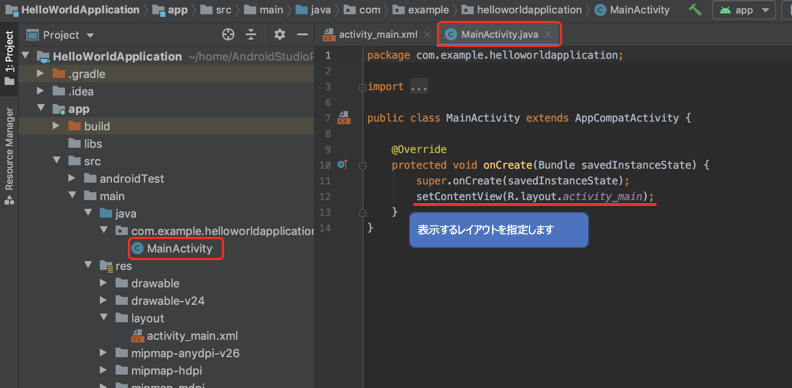
MainActivityファイルを開きます。
このファイルがアプリの土台となっているActivityクラスとなります。
(Activityについては別の章で説明する予定なので、ここでは割愛します)MainActivityファイルには下記のようにコードが書かれています。
末尾の行の"setContentView(R.layout.activity_main);"が
アプリで表示するレイアウトファイルを指定するコードです。
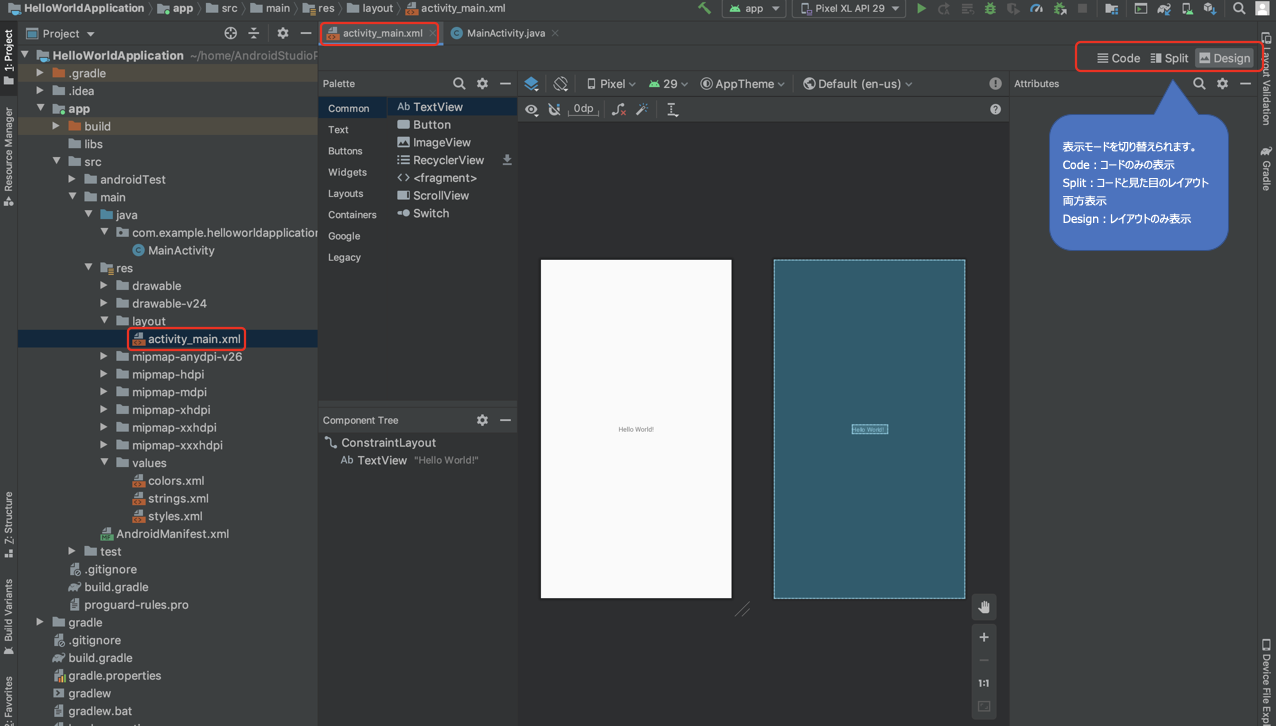
レイアウトのmain_activityファイルを開きます。
初期設定されているレイアウトが表示されます。
右上のタブで「Split」に切り替え、コードとレイアウトの両方が確認できる表示にします。
レイアウトはXMLでの記述となります。
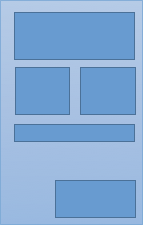
Androidの画面レイアウトは基本的にLayout(土台) + View(パーツ)という構成となります。
初期設定のレイアウトの場合だと、
まず1行目にXMLの宣言を記述します。
(新しくファイルを作成する際は自動的に挿入されるため、あまり意識する必要はないです)
2行目に記載されている「androidx.constraintlayout.widget.ConstraintLayout〜」が土台となるレイアウトになります。
そのレイアウトに入れ子になっているもの(9行目から記載されているTextView)がViewです。レイアウトの詳細
レイアウトの詳細な設定を見ていきます。
ConstraintLayoutは、Viewに対してConstraint(制約)を設定して画面を構成するレイアウトになります。
あるViewの上にこのViewを設置して、さらにそのViewの右にはこのViewを設置するという構成になります。
(少し慣れるまでは難しいので、後述の「2. Layoutの種類」で紹介するLinearLayoutなどの
扱いやすいものから初めていくといいかもしれません。)main_activity.xml<androidx.constraintlayout.widget.ConstraintLayout xmlns:android="http://schemas.android.com/apk/res/android" //① xmlns:app="http://schemas.android.com/apk/res-auto" //① xmlns:tools="http://schemas.android.com/tools" //① android:layout_width="match_parent" //② android:layout_height="match_parent" //② tools:context=".MainActivity"> //③①XMLの名前空間の定義
XMLの名前空間を定義し、設定ファイルのタグや属性が正しく認識されるようにしています。②レイアウトのサイズ設定
android:layout_width・・・レイアウトの横幅を指定します。
android:layout_height・・・レイアウトの高さを指定します。
この設定項目の設定値としては下記のような設定が可能です。
設定値 詳細 match_parent 表示できる最大のサイズで表示します。
土台となるLayoutであれば画面最大まで表示し、
子のViewであれば、親のLayout,Viewと同じサイズにします(最大)wrap_content 中身を表示するのに十分なサイズを表示します。 数値の指定 指定する単位はdpで、200dpといった感じで指定します。※ ※ dpは端末の解像度に依存しない単位となります。
Androidは様々な解像度の端末が存在しており、どの端末で見てもレイアウトが崩れないようにするため、このdpを使って指定する必要があります。
dp以外にもpxで指定することも可能ですが、pxだと端末の解像度に依存するため端末により見え方が異なります。
基本的に数値を指定する場合はこのdpを指定してレイアウトを作成します。③Activityとの関連付け
レイアウトを関連付けるActivityを指定します。Viewの詳細
次にViewの詳細な設定を見ていきます。
TextViewなのでその名の通り、文字を表示するViewとなります。main_activity.xml<TextView android:layout_width="wrap_content" //④ android:layout_height="wrap_content" //④ android:text="Hello World!" //⑤ app:layout_constraintBottom_toBottomOf="parent" //⑥ app:layout_constraintLeft_toLeftOf="parent" //⑥ app:layout_constraintRight_toRightOf="parent" //⑥ app:layout_constraintTop_toTopOf="parent" /> //⑥④Viewのサイズ設定
レイアウトで説明したものと同じ属性となります。
wrap_contentが指定されているので、中身の"Hello World!"という文字列を表示することが可能なサイズとなっています。
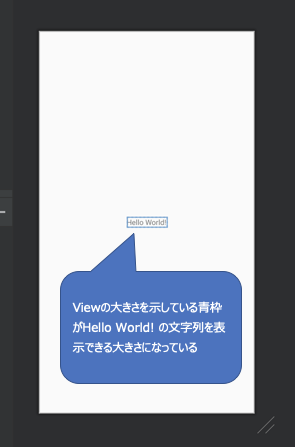
エディターのデザインの"Hello World!"にカーソルを当てるとViewの大きさがわかります。
⑤表示する文字を設定
textに表示する文字を指定します。⑥Viewの配置設定
親のレイアウトがConstraintLayoutなので、Viewの配置設定(制約設定)が必要となります。
他のレイアウトの場合はそのレイアウトに応じた設定が必要となる場合があります。
ConstraintLayoutの制約はViewのどの辺にどのViewを設置するかという制約があります。
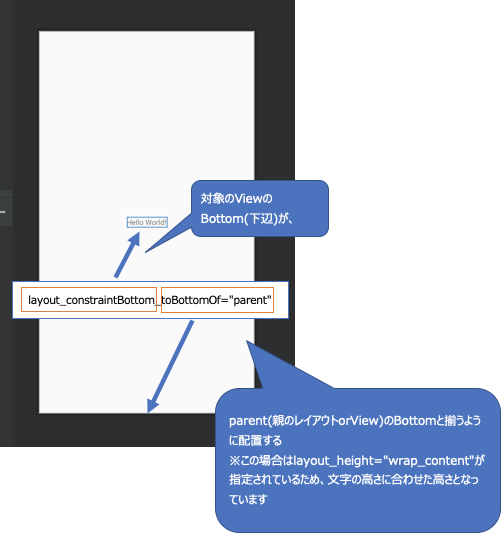
TextViewの「layout_constraintBottom_toBottomOf="parent"」場合は、
TextViewの下辺に親レイアウトの下辺が設定されています。
他の属性も同じように設定されています。
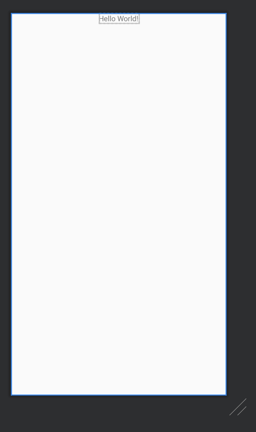
この場合、親(parent)に対して中央に配置する制約となります。試しに「layout_constraintBottom_toBottomOf="parent"」という制約を消してみます。
縦の中央配置の制約がなくなり、親レイアウトの上辺に配置され、
横の中央配置の制約は残ったままなので、横位置は中央配置のままとなります。
他にも色々な制約がありますが、一旦ここまでの説明とします。
2. Layoutの種類
次に基本的なLayoutの種類を紹介します。
レイアウトには大きく2種類あり、それぞれの特徴は下記の通りです。
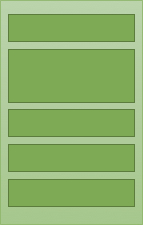
Layoutの種類 Layout名 概要 イメージ 線形レイアウト LinearLayout すべての子ビューを、垂直または水平の一方向に揃えるレイアウトです。
相対レイアウト RelativeLayout
ConstraintLayoutViewの位置を相対的に指定するレイアウトです。
2つレイアウトを紹介しましたが、ConstraintLayoutの方がパフォーマンスが優れているためConstraintLayoutを使って開発することをお勧めします。3. Viewの種類
最後に基本的なViewの種類を紹介します。
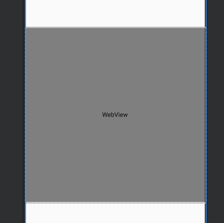
View名 概要 イメージ TextView テキストを表示するViewです。 ImageView 画像を表示するViewです。 Button ボタンを表示するViewです。 WebView Webページを表示するViewです。 上記で紹介したLayout,View以外にも様々な種類があります。
開発しながら触っていくとだんだんそれぞれの特徴がわかってくるので、
作りたいレイアウトに応じて適したLayout、Viewを見つけてみてください。今回はここまでとなります。
お疲れさまでした!d(´∀`)b


- 投稿日:2020-10-12T09:26:16+09:00
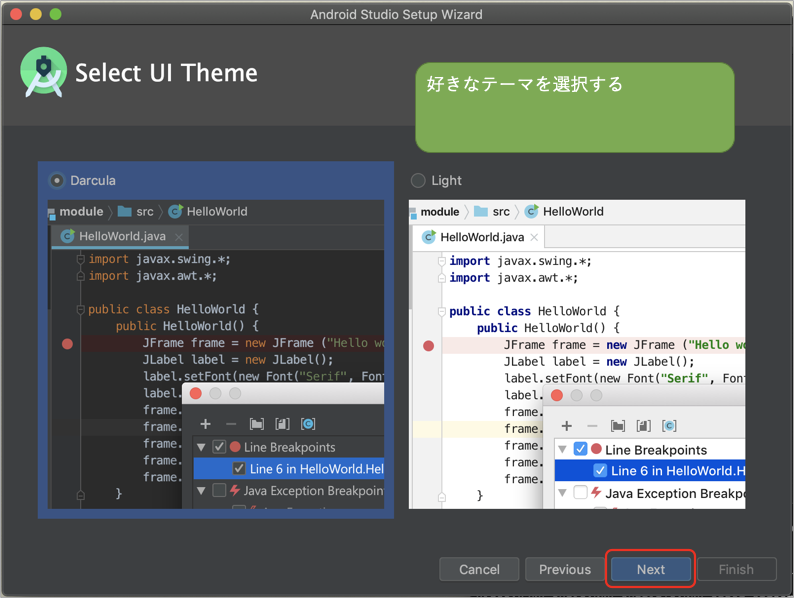
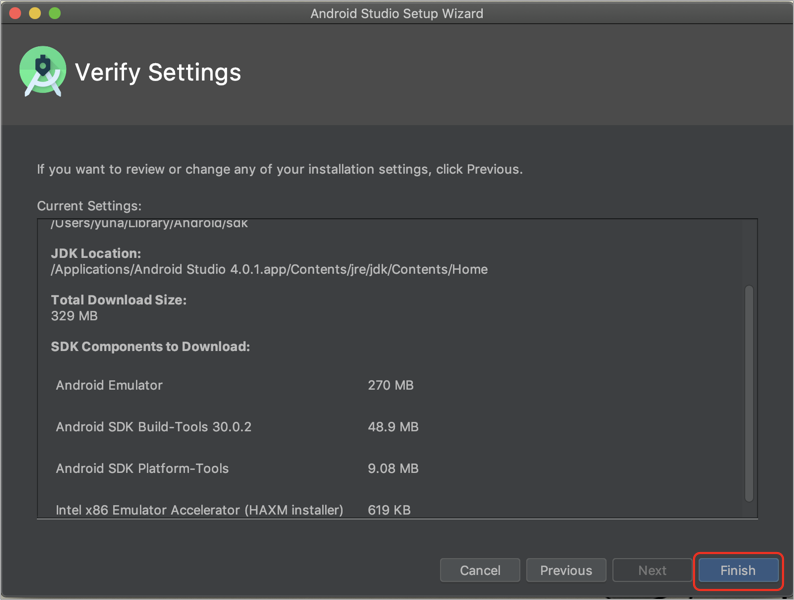
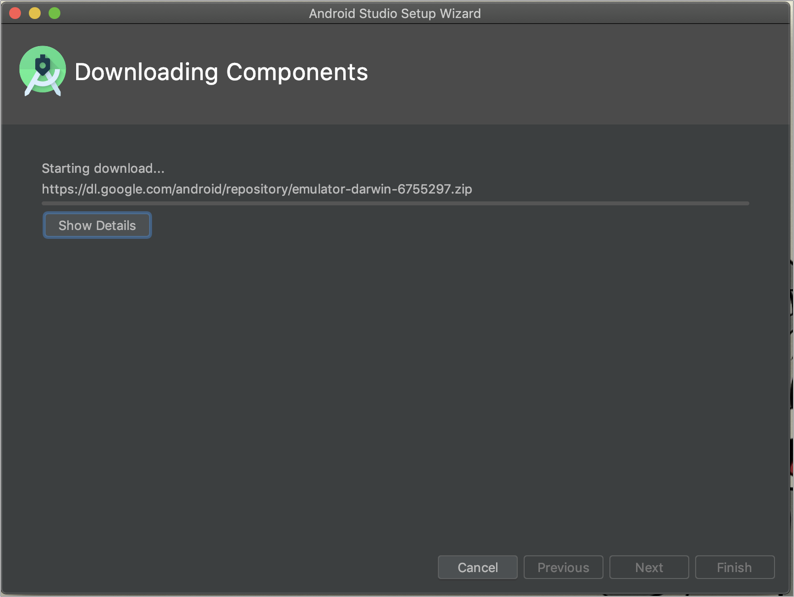
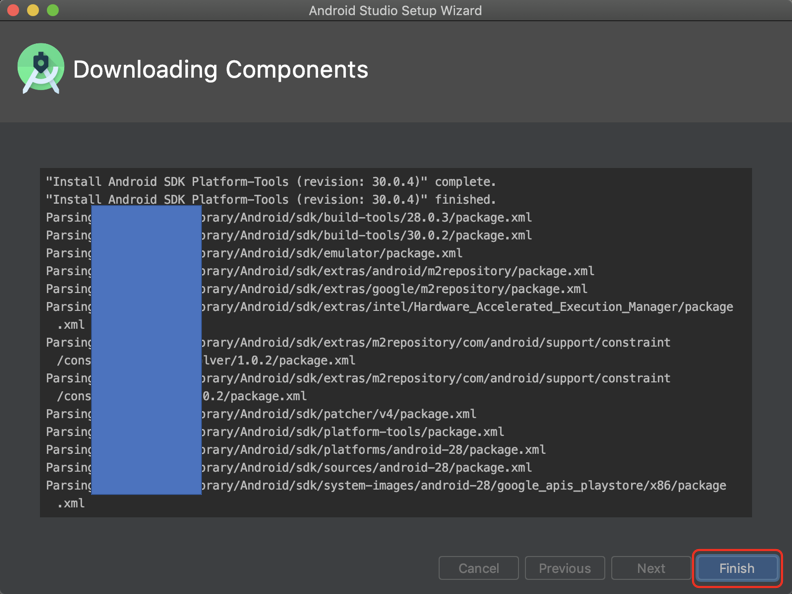
1. Android学習 AndroidStudioのインストール〜HelloWorld編
勉強できること
AndroidStudioのインストール方法
プロジェクトの作成方法
基本的なAndroidStudioの使い方
エミュレータでアプリの実行前提
AndroidStudioのバージョン:4.0.1
言語:Java
環境:作成者の環境はMacです。
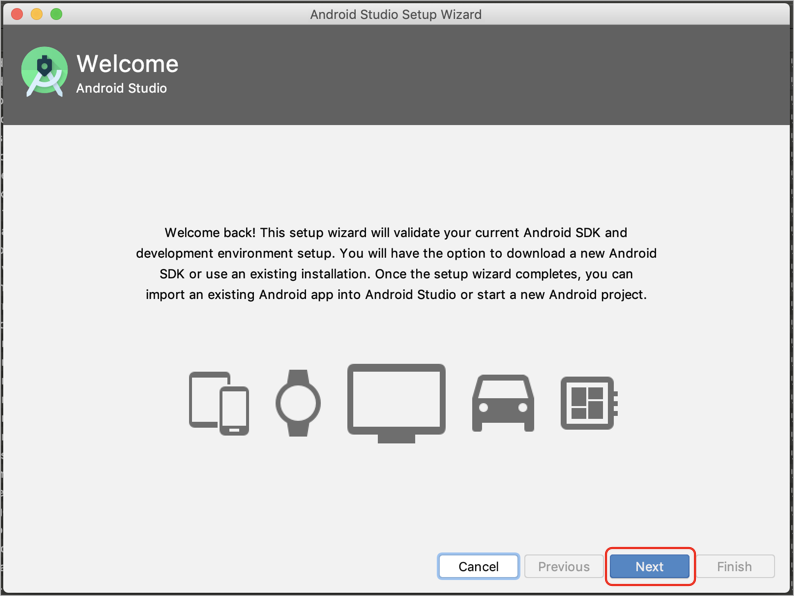
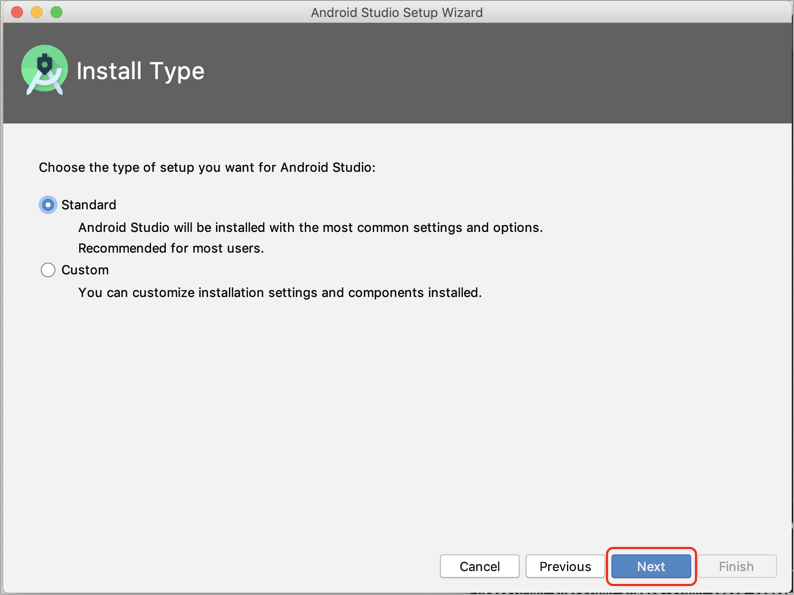
Windowsだと少し見た目や環境の設定方法が違うかもしれませんが基本的には同じです。1.AndroidStudioのインストール
公式サイトへアクセスして最新のAndroidStudioをダウンロードします。
https://developer.android.com/studio?hl=ja公式サイトの手順にしたがってインストールを進めます。
https://developer.android.com/studio/install?hl=ja基本的には「Next」を押して進めていけば問題ないです。
上記の画面が表示されたらインストール完了です。2.プロジェクトの作成方法
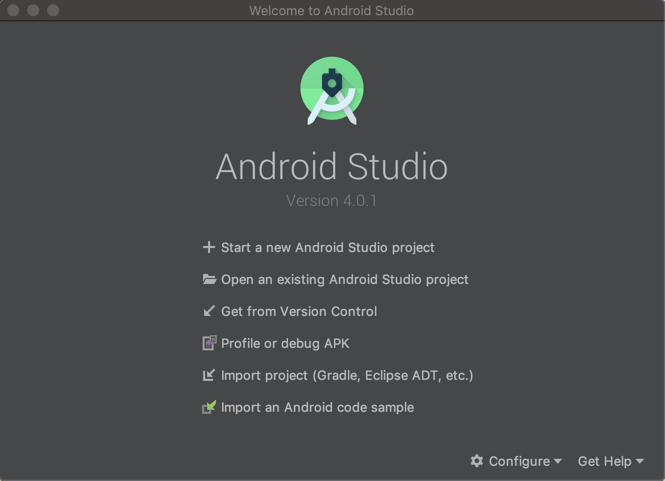
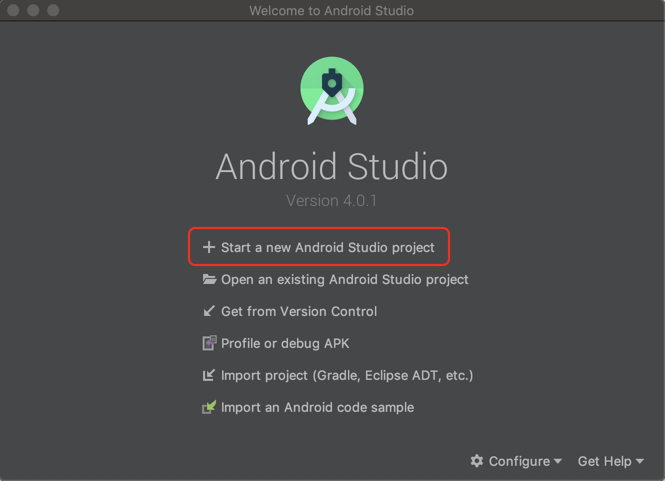
プロジェクトを新規に作成します。
「Start a new Android Studio project」を選択します。
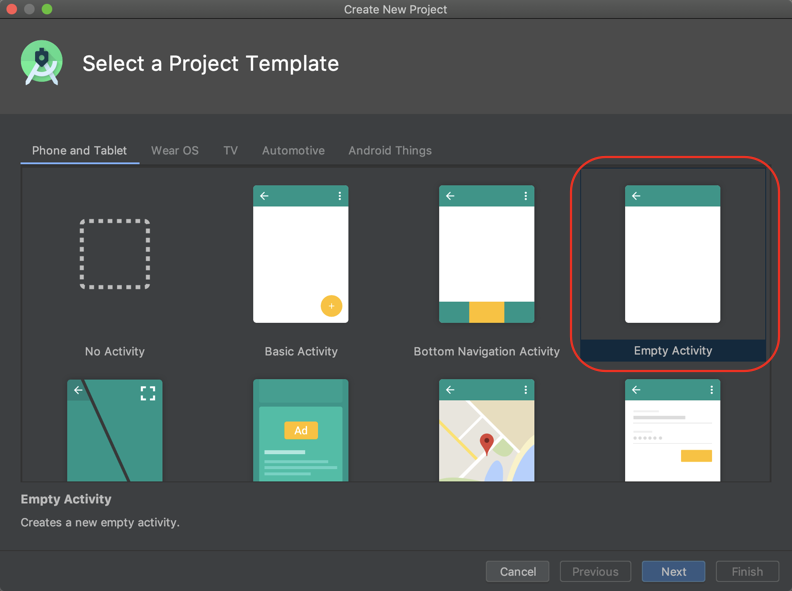
AndroidStudioで提供されるプロジェクトテンプレート一覧が表示されます。
スマートフォンアプリを作成するので「Phone and Tablet」タブの「Empty Activity」を選択します。
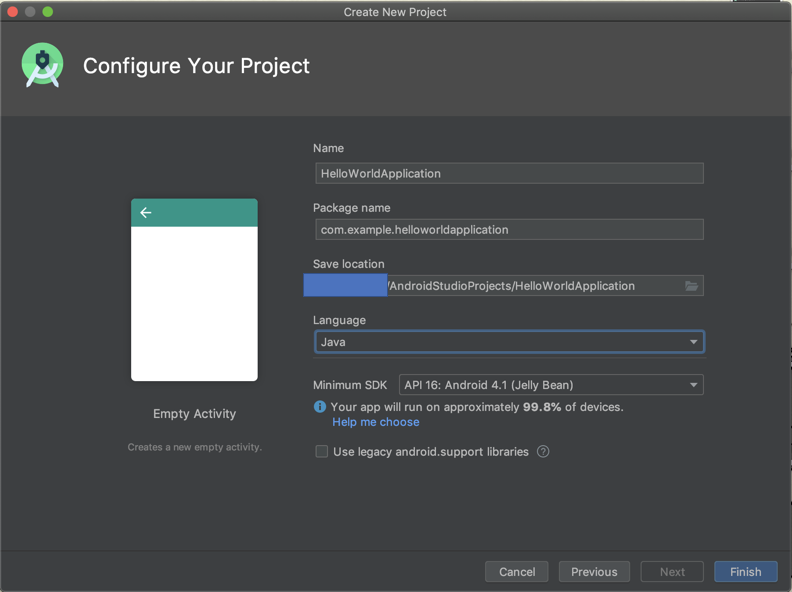
次にプロジェクト設定です。
必要な項目を設定します。
設定項目 詳細 Name プロジェクト名を指定します。
今回はHelloWorldApplicationと指定します。Package name アプリケーションのパッケージ名を指定します。
今回は特に設定は不要です。Save location プロジェクトの保存先を指定します。 Language 使用する言語を指定します。
今回はJavaを指定します。Minimum SDK アプリをインストールできる最低のAPIレベル※を指定します。
デフォルトのままとします。※APIレベルとは、Androidプラットフォームのバージョンによって提供されるフレームワークAPIリビジョンを特定するユニークな整数です。
AndroidOS10であれば、APIレベル29となります。
APIレベルとOSバージョンの対応表が記載されているサイト:
https://feel-log.net/android/developer/api-level/
上記設定後、Finishを押下するとプロジェクトが起動します。3.AndroidStudioの使い方
プロジェクトが起動できたでしょうか?
少し使いやすく整えます。
基本的な使い方、見方を説明します。
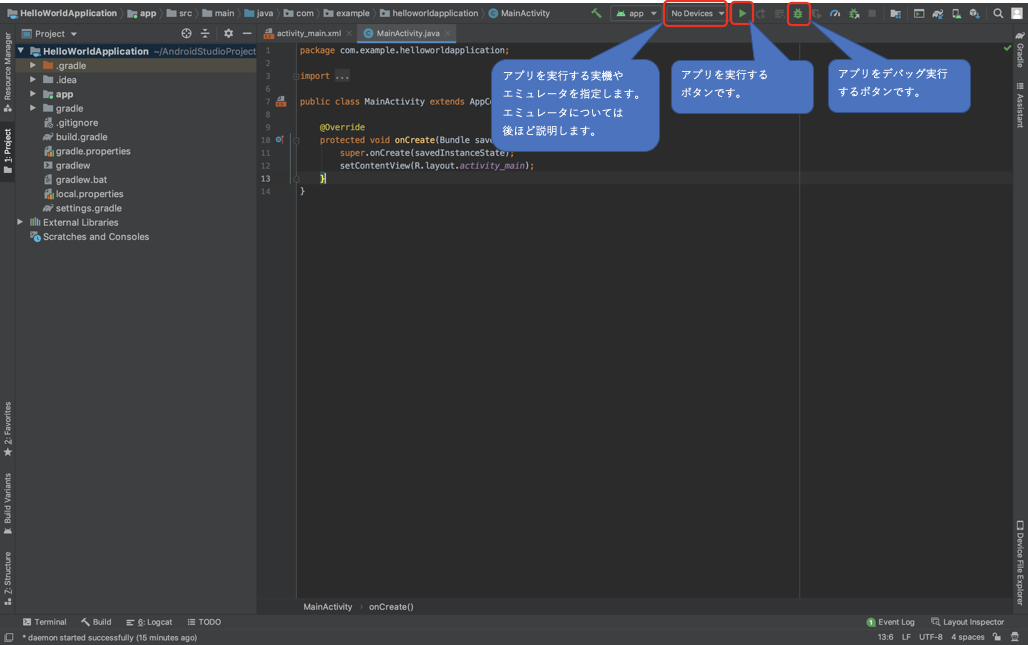
画面上部には、実行する実機・エミュレータの指定や、実行ボタンなどが配置されています。
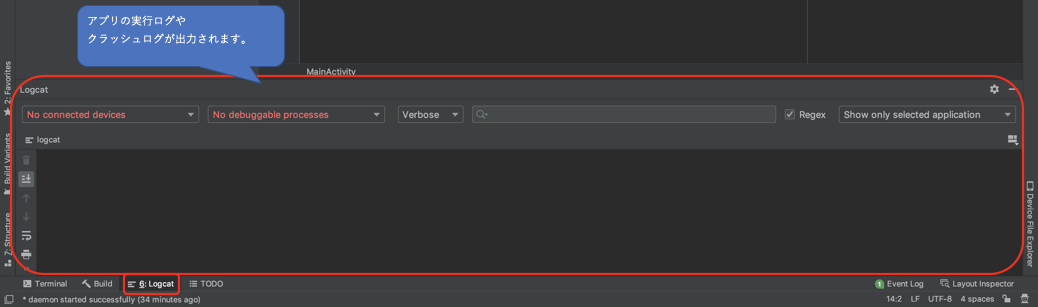
画面下部にはビルド、アプリ実行ログが確認できます。
次にプロジェクトの構成について説明していきます。
今全て覚えなくても使っているうちに覚えていくので問題ありません。
他にも色々な機能はありますがここでは割愛します。4. エミュレータ実行
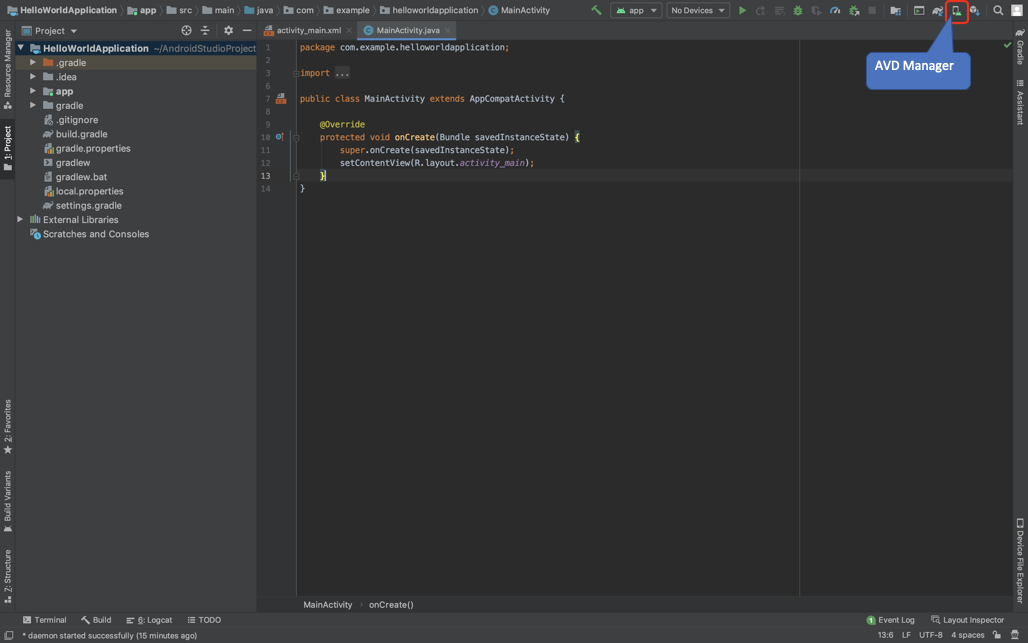
最後にエミュレーターでアプリを実行してみます。
画面右上に「AVD Manager」があるのでそれをクリックします。
AVDは Android Virtual Device の略で、手元にAndroid端末がなくても
エミュレータを使ってアプリの動作を確認することができます。
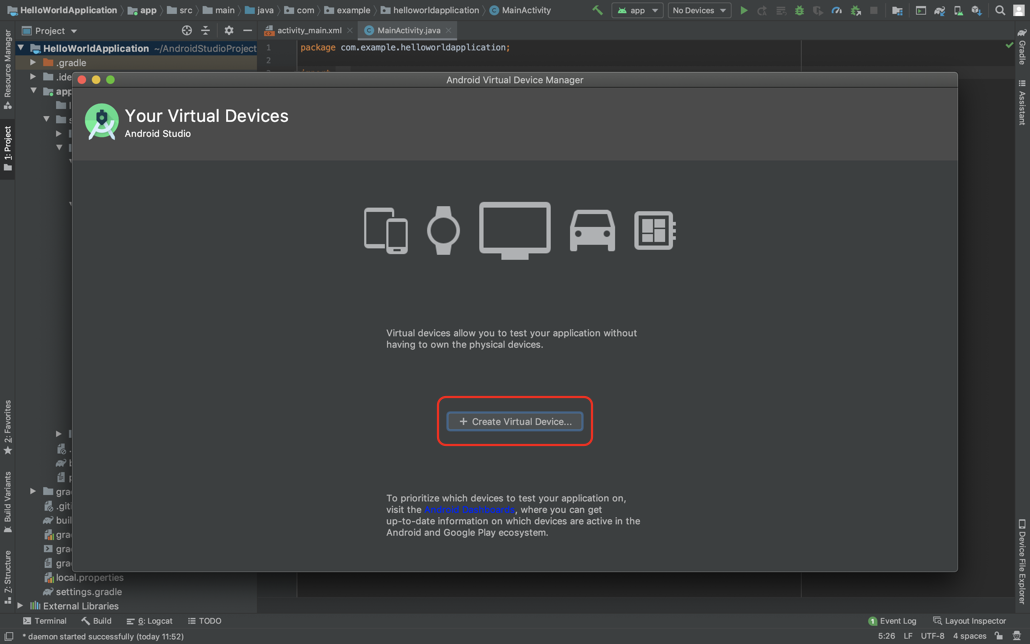
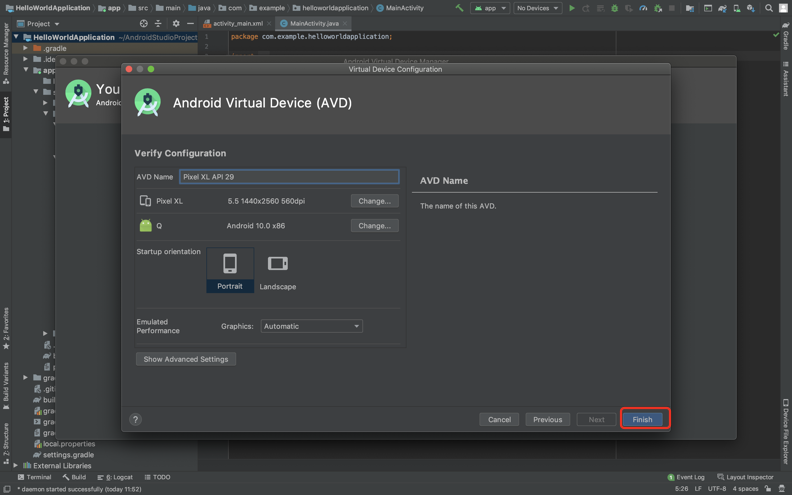
AVD Managerが起動したら、「Create Virtual Device」をクリックします。
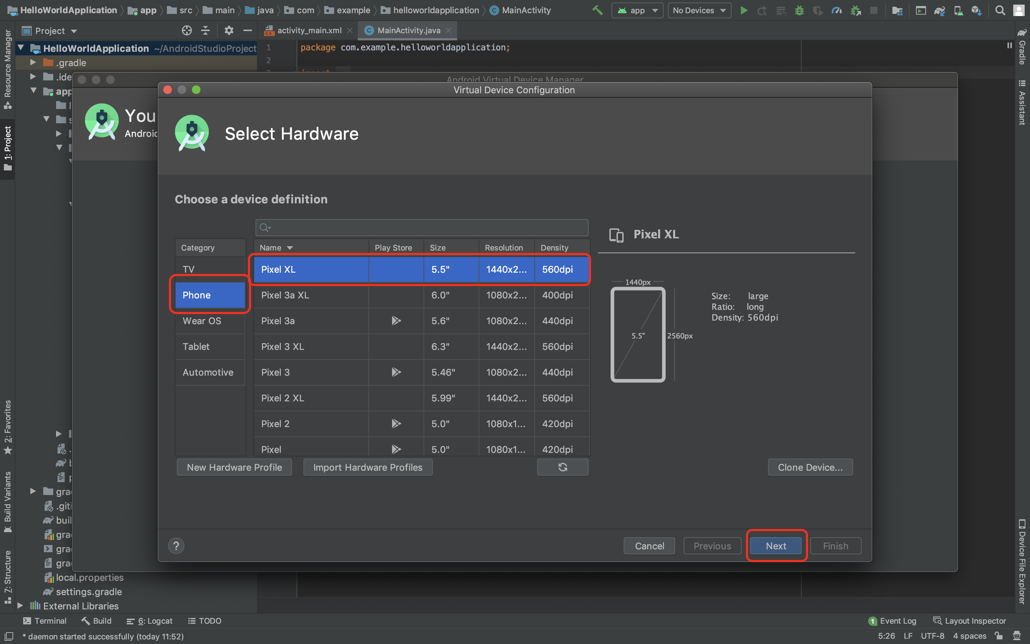
エミュレータの端末サイズを設定します。
CategoryはPhoneを選択します。
表示を確認したいサイズの端末を選択します。
今回はPixel XLを選択します。
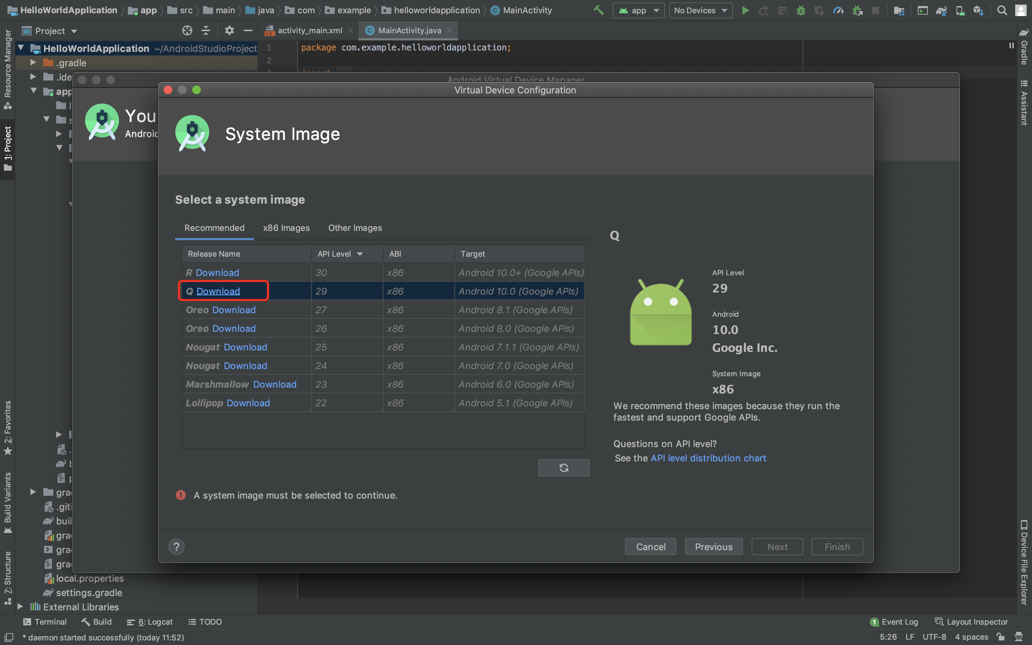
エミュレータのAPIレベル(OSバージョン)を指定します。
OS10で実行しようと思うので、APIレベル29をダウンロードします。
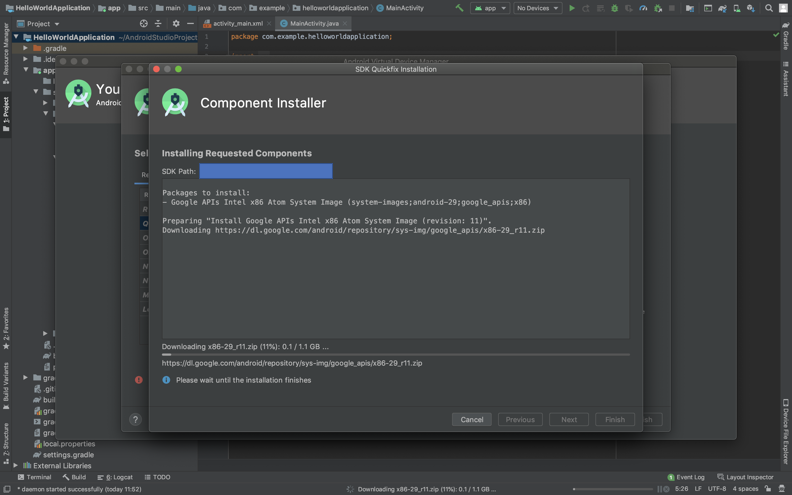
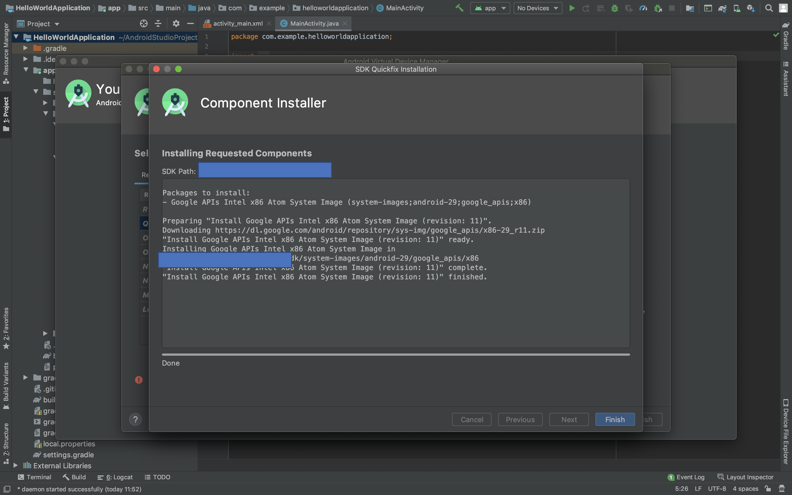
「Download」をクリックします。
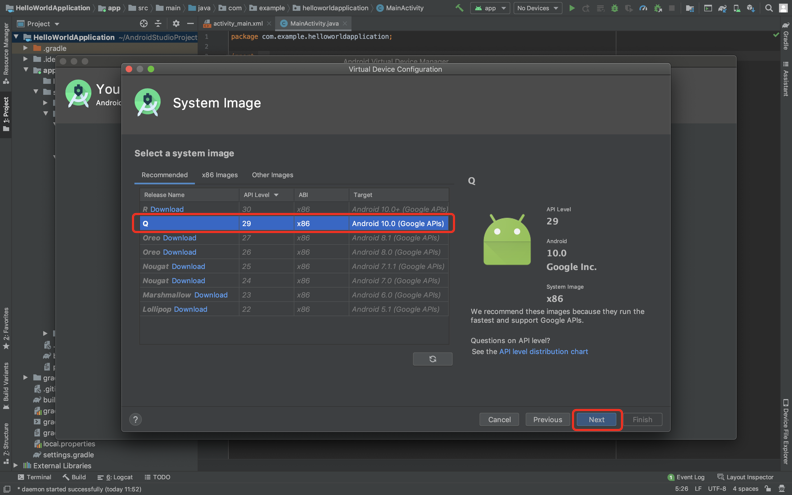
ダウンロード完了後、Qを選択して、次に進みます。
設定情報を確認します。
Nameは任意の名前を入力できます。デフォルトのままでも問題ありません。
問題なければ設定を終了します。
エミュレータが作成できました。
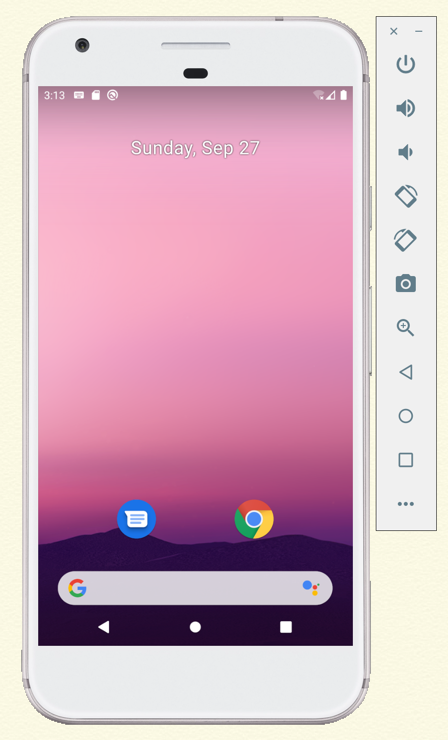
起動ボタンをクリックしてエミュレータを起動します。
起動するとこのような画面が表示されます。
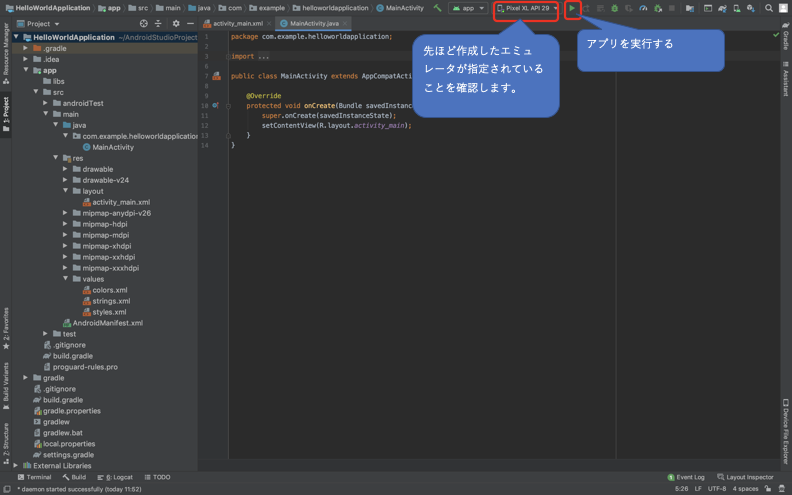
この状態で先ほど作成したプロジェクトを実行してみます。
AVDManagerを閉じて、AndroidStudioの実行ボタンをクリックします。
エミュレータに下記のような画面が表示されたら実行成功です。
今回はここまでとなります。
お疲れさまでした!d(´∀`)b


- 投稿日:2020-10-12T05:05:16+09:00
ちょっと便利にするRxJava
割とよく使う小技。
リジューム可能なsubcribe
一度、onErrorが呼ばれるとそのストリームに値を流せません。(すでにエラーが起きているよ。と値を流すと例外が飛んでくる)
イベントハンドラ的にobservableを使っていると、一度エラーが起きても復帰させて継続的にイベントを受けたいような時があると思います。
エラー → dispose → 再度subscribeなんていちいちやってられないので、そんな時は、一度 materialize すれば大丈夫です。// T型を受けるコールバック関数 typealias OnNext<T> = (T) -> Unit typealias OnError = (Throwable) -> Unit typealias OnComplete = () -> Unit @CheckReturnValue fun <T> Observable<T>.resumeSubscribeBy( onError: OnError? = null, onComplete: OnComplete? = null, onNext: OnNext<T>? = null ): Disposable { return materialize() .subscribe { when { it.isOnError -> onError?.invoke(it.error!!) it.isOnNext -> { // 例外時はonErrorに渡す try { onNext?.invoke(it.value!!) } catch (e: Throwable) { onError?.invoke(e) } } it.isOnComplete -> { onComplete?.invoke() } } } }Notificationと合わせて使う
処理内容に応じて、通知を出し分けたい!
みたいなときありますよね。拡張メソッドを利用して、以下な感じで。
notificationにしていますが、timberとかに変えてログを残すだけでもおすすめ。
特にスタックをログに残すようにすれば、どの処理かの特定がしやすくなります。fun <T> Single<T>.withNotification(context: context, notificationBuilder: NotificationCompat.Builder, notificationContent: String): Single<T> { // val stack = Throwable() // スタックトレース用 return this.doOnSubscribe { notificationBuilder.setContentText("${notificationContent}の処理開始") val notificationManager = context.getSystemService(Context.NOTIFICATION_SERVICE) as NotificationManager notificationManager.notify(notificationId, notificationBuilder.build()) } .doOnError { err -> notificationBuilder.setContentText("${notificationContent}の処理中にエラーが発生しました") val notificationManager = context.getSystemService(Context.NOTIFICATION_SERVICE) as NotificationManager notificationManager.notify(notificationId, notificationBuilder.build()) } .doOnSuccess { notificationBuilder.setContentText("${notificationContent}の処理中にエラーが発生しました") val notificationManager = context.getSystemService(Context.NOTIFICATION_SERVICE) as NotificationManager notificationManager.notify(notificationId, notificationBuilder.build()) } }リトライ
リトライ回数とリトライ間隔を調整したい!
見たな時はよくあるケースです。flowable .take(10) // リトライ数 .flatMapSingle { err -> // 間隔 return@flatMapSingle Single.timer(1000, TimeUnit.MILLISECONDS) }分岐
分岐して実行されるストリームを変える。みたいな時。flatMapを使いましょう!
val a = Random.nextInt(10)

Observable.just(a)
    .flatMap {
        if(it == 1) {
            return@flatMap Observable.just("a は 1です!!")
        }
        else {
            return@flatMap Observable.just("1じゃなかったーーー")
        }
    }
    .subscribe {
        Timber.d("結果:${it}")
    }
- 投稿日:2020-10-12T05:05:16+09:00
ちょっと便利にするRx
割とよく使う小技。
リジューム可能なsubcribe
一度、onErrorが呼ばれるとそのストリームに値を流せません。(すでにエラーが起きているよ。と値を流すと例外が飛んでくる)
イベントハンドラ的にobservableを使っていると、一度エラーが起きても復帰させて継続的にイベントを受けたいような時があると思います。
エラー → dispose → 再度subscribeなんていちいちやってられないので、そんな時は、一度 materialize すれば大丈夫です。// T型を受けるコールバック関数 typealias OnNext<T> = (T) -> Unit typealias OnError = (Throwable) -> Unit typealias OnComplete = () -> Unit @CheckReturnValue fun <T> Observable<T>.resumeSubscribeBy( onError: OnError? = null, onComplete: OnComplete? = null, onNext: OnNext<T>? = null ): Disposable { return materialize() .subscribe { when { it.isOnError -> onError?.invoke(it.error!!) it.isOnNext -> { // 例外時はonErrorに渡す try { onNext?.invoke(it.value!!) } catch (e: Throwable) { onError?.invoke(e) } } it.isOnComplete -> onComplete?.invoke() } } }Notificationと合わせて使う
処理内容に応じて、通知を出し分けたい!
みたいなときありますよね。拡張メソッドを利用して、以下な感じで。
notificationにしていますが、timberとかに変えてログを残すだけでもおすすめ。
特にスタックをログに残すようにすれば、どの処理かの特定がしやすくなります。fun <T> Single<T>.withNotification(context: context, notificationBuilder: NotificationCompat.Builder, notificationContent: String): Single<T> { // val stack = Throwable() // スタックトレース用 return this.doOnSubscribe { notificationBuilder.setContentText("${notificationContent}の処理開始") val notificationManager = context.getSystemService(Context.NOTIFICATION_SERVICE) as NotificationManager notificationManager.notify(notificationId, notificationBuilder.build()) } .doOnError { err -> notificationBuilder.setContentText("${notificationContent}の処理中にエラーが発生しました") val notificationManager = context.getSystemService(Context.NOTIFICATION_SERVICE) as NotificationManager notificationManager.notify(notificationId, notificationBuilder.build()) } .doOnSuccess { notificationBuilder.setContentText("${notificationContent}のを実行しました") val notificationManager = context.getSystemService(Context.NOTIFICATION_SERVICE) as NotificationManager notificationManager.notify(notificationId, notificationBuilder.build()) } }リトライ
リトライ回数とリトライ間隔を調整したい!
みたな時はよくあるケースです。flowable .take(10) // リトライ数 .flatMapSingle { err -> // 間隔 return@flatMapSingle Single.timer(1000, TimeUnit.MILLISECONDS) }分岐
分岐して実行されるストリームを変える。みたいな時。flatMapを使いましょう!
val a = Random.nextInt(10)

Observable.just(a)
    .flatMap {
        if(it == 1) {
            return@flatMap Observable.just("a は 1です!!")
        }
        else {
            return@flatMap Observable.just("1じゃなかったーーー")
        }
    }
    .subscribe {
        Timber.d("結果:${it}")
    }