- 投稿日:2020-10-09T14:55:51+09:00
Error BoundaryをFunction Componentで扱う
この記事の要約
- Reactではv16からReact Hooksの登場でFunction Componentがスタンダードになっている
- Error Boundaryを実装する際はライフサイクルメソッドの
static getDerivedStateFromError()かcomponentDidCatch()のいずれか(または両方)を使わないといけない、つまりClass Componentが必須になっている- react-error-boundarではError BoundaryをFunction Componentで扱えるラッパーを提供してくれる
Error Boundaryとは
Error Boundaryについて知っている方はこの章は読み飛ばして構いません。
ReactではError Boundaryという子コンポーネントツリーでエラーが発生した際にクラッシュしたUIを表示させる代わりに、フォールバック用の UI を表示するコンポーネントがあります。これはユーザーが壊れた画面で操作することにより、サービスに問題が起こることを防ぐことができます。
このようなエラーハンドリングは
try/catchで行うことが一般的ですが、これは命令型のコード(関数の実行など)でしか動作しません。そのため、コンポーネントのような宣言型でエラーに応じた処理を行うためには別の方法を取らなければなりません。reactではライフサイクルメソッドのstatic getDerivedStateFromError()かcomponentDidCatch()のいずれか(または両方)を使うことで実装できます。以下は公式ドキュメントからの抜粋です。
class ErrorBoundary extends React.Component {
  constructor(props) {
    super(props);
    this.state = { hasError: false };
  }

  static getDerivedStateFromError(error) {
    // Update state so the next render will show the fallback UI.
    return { hasError: true };
  }

  componentDidCatch(error, errorInfo) {
    // You can also log the error to an error reporting service
    logErrorToMyService(error, errorInfo);
  }

  render() {
    if (this.state.hasError) {
      // You can render any custom fallback UI
      return <h1>Something went wrong.</h1>;
    }
    return this.props.children;
  }
}
// 使い方 <ErrorBoundary> <MyWidget /> </ErrorBoundary>これらを関数型でうまく扱える方法がないか探したところ、
react-error-boundaryというパッケージがありました。
なので実装例とともに紹介します。Function ComponentでError Boundaryを試す
react-error-boundaryというレンダリング時のエラーを扱いやすくするラッパーを提供してくれています。
試しに定期的にエラーを引き起こすコンポーネントを作成します。import React from "react"; import ReactDOM from "react-dom"; // 定期的にエラーを起こすコンポーネント const App: React.FC = () => { const rnd = Math.random(); if (rnd <= 0.7) { throw new Error("Something went wrong!"); } return <div>OK</div>; }; ReactDOM.render( <App />, document.getElementById("root") );現状のままだと
<App />がエラーを出した場合、真っ白な画面(壊れたUI)が表示されてしまいます。
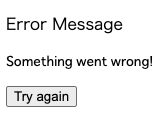
react-error-boundaryを使うことでエラー時のコンポーネントを関数コンポーネントとして別に用意し、エラー時のフォールバック用のコンポーネントとして表示できます。以下が簡単な実装例です。import React from "react"; import ReactDOM from "react-dom"; import { ErrorBoundary, FallbackProps } from "react-error-boundary"; // 定期的にエラーを起こすコンポーネント const App: React.FC = () => { const rnd = Math.random(); if (rnd <= 0.7) { throw new Error("Something went wrong!"); } return <div>OK</div>; }; // エラー時のフォールバック用のコンポーネント const ErrorFallback: React.FC<FallbackProps> = ({ error, resetErrorBoundary }) => { return ( <div role="alert"> <p>Error Message</p> <pre>{error!.message}</pre> <button onClick={resetErrorBoundary}>Try again</button> </div> ); }; ReactDOM.render( <ErrorBoundary FallbackComponent={ErrorFallback}> <App /> </ErrorBoundary>, document.getElementById("root") );これによりエラーの際に、
<ErrorFallback/>で定義した代わりのUIを表示させることができます。
より詳しく知りたい方は参考資料をご覧ください。参考資料
- 投稿日:2020-10-09T14:21:29+09:00
【React】ライブラリを使わずにページネーションを実装する方法
はじめに
備忘録。Reactを使って、ライブラリを使わずにページネーション機能を実装する手順を書いていきます。
ここではいくつかの記事を載せられるWebアプリを想定して進めますが、記事のデータは「{JSON} Placeholder」と言うサイトからサンプルデータを引っ張ってくる事にします。
実装するページネーション機能は主に以下の様にします。
- 1ページに表示させる記事数は5つ
- 「次へ」ボタンと「前へ」ボタンを設置する
- 基本的に10ページ分の目次を表示させる
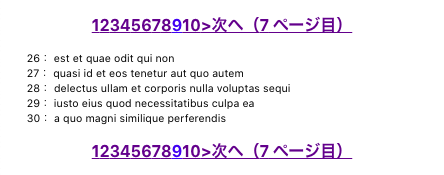
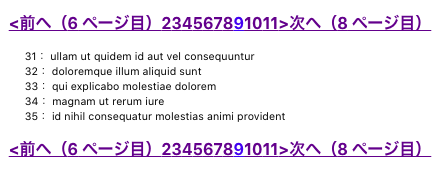
- 7ページ以降は、ページネーションバーでその番号が真ん中に表示される様にする
- 実装結果は以下の様な感じです(スタイリングは省略)
●6ページ目を表示させている時
●7ページ目を表示させている時
参考ソース
※上記の資料では、無限に増えるデータについては触れられていないかったのでこの記事ではそこを補ってます。
環境
- React(React Hooksを使うのでv.16.8以降)
- react-router-dom
- axios
実装手順
1.Reactセットアップ
$ npx create-react-app pagination-app$ yarn add react-router-dom axios2. App.js内の記述
src/App.jsimport React from 'react'; import './App.css'; import {BrowserRouter as Router, Route, Switch, Redirect} from 'react-router-dom' import Posts from './components/Posts'; function App() { return ( <Router> <Switch> <Route exact path={"/Articles/:article_id"} render={props => ( <Home {...props} articleId={props.match.params.article_id} /> )} /> <Redirect from="/" to="/Article/1" /> </Switch> </Router> ); } export default App;ここでは全ての記事をレンダルングするHomeというコンポーネントに、パラメータとして
article_idを渡していますが、これは「現在表示されているページ」のパラメータとして扱います。3. srcディレクトリ配下にHome.jsコンポーネントを作成する。
src/Home.jsimport React, {useState, useEffect} from 'react' import axios from 'axios' import Pagination from './Pagination' // srcディレクトリ配下にPaginationコンポーネントを作成する function Home({ articleId }) { const [articles, setArticles] = useState([]) const [currentPage] = useState(articleId) // 現在のページのパラメータ const [articlesPerPage] = useState(5) // 1ページ内に表示させる記事数 // 記事の取得 useEffect(() => { const getArticles = () => { axios .get("https://jsonplaceholder.typicode.com/posts") .then( res => setArticles(res.data) ) } getArticles() }, []) // 1ページ内に表示させる記事の取得。以下のコードは後で解説 const indexOfLastArticle = currentPage * articlesPerPage const indexOfFirstArticle = indexOfLastArticle - articlesPerPage const currentArticles = articles.slice(indexOfFirstArticle, indexOfLastArticle) return ( <React.Fragment> <div> <Pagination articlesPerPage={articlesPerPage} //1Pに表示する記事の数 totalArticles={articles.length} // 記事の総数数 currentPage={currentPage} // 現在のページ /> <ul> {currentArticles.map(article => ( <li key={article.id}>{article.id}: {article.title}</li> ))} </ul> <Pagination articlesPerPage={articlesPerPage} //1Pに表示する記事の数 totalArticles={articles.length} // 記事の総数 currentPage={currentPage} // 現在のページ /> </div> </React.Fragment> ) } export default Home● axiosでアクセスしているURL (https://jsonplaceholder.typicode.com/posts) 先のデータはこんな感じです。
● 1ページ内に表示させる記事の取得
    const indexOfLastArticle = currentPage * articlesPerPage
    const indexOfFirstArticle = indexOfLastArticle - articlesPerPage
    const currentArticles = articles.slice(indexOfFirstArticle, indexOfLastArticle)
上記のコード解説
indexOfLastArticle:現在表示されているページのIDに、表示させる記事数を掛けることで、そのページの最後の記事のIDを取得indexOfFirstArticle:最後の記事IDから表示させる記事数を引くことで最初の記事のID取得currentArticles:最初の記事IDから最後の記事IDの直前の数の記事を取得【例】
currentPage = 3, articlesPerPage = 5だと、indexOfLastArticle = 15indexOfLastArticle=15, articlesPerPage = 5で、indexOfFirstArticle = 10- そして最終的に
articles.slice(10, 15)となるので、3ページ目ではIDが10, 11, 12, 13, 14の記事が取得される事になる※自身のアプリケーションでここを実装する際はarticlesを配列型であるかどうかを確認してください。例えばオブジェクト型になっていたりするとslice()メソッドを使った場合にnot a functionエラーが出てしまいます。
● Paginationコンポーネントについてはこの後記述します。
4.srcディレクトリ配下にPagination.jsコンポーネントを作成する。
src/Pagination.jsimport React from 'react' function Pagination({ articlesPerPage, totalArticles, currentPage }) { const makePaginationHref = () => { const totalPages = [] // ページの総数を取得 for (let i = 1; i <= Math.ceil(totalArticles / articlesPerPage); i++) { // 記事総数÷5=ページの総数として取得 totalPages.push(i) } const activePage = parseInt(currentPage) // 現在のページ var startIndex, endIndex // 目次の最初と最後 let pages = totalPages.length // ページの総数を数値で取得 if (pages <= 10) { // ページ総数が10以下の場合 startIndex = 1 // 最初の目次=1 endIndex = pages // 最後の目次=ページの最後のID(2〜10のどれか) } else { if (activePage <= 6) { // 現在のページが6以下の場合 startIndex = 1 // 最初の目次=1 endIndex = 10 // 最後の目次=10 } else if (activePage + 4 >= pages) { // 現在のページがページ総数のラスト4に差し掛かった場合 startIndex = pages - 9 // 最初の目次=ページ総数の-9 endIndex = pages // 最後の目次=ページの最後のID // 例えば総ページ数 = 25で、 現在のページが21の場合 // 【 前へ 16 17 18 19 20 [21] 22 23 24 25 】 } else { // それ以外(現在のページが7ページ以降の場合) startIndex = activePage - 5 // 最初の目次=現在のページの-5 endIndex = activePage + 4 // 最後の目次=現在のページの+5 // 例えば現在のページが7の場合は // 【 前へ 2 3 4 5 6 [7] 8 9 10 11 次へ 】 となる } } const pageNumbers = [] // ページネーションの目次に使用する配列 if (startIndex > 1) { // 最初の目次が1以上なら「前へ」を表示させる pageNumbers.push( <a href={`/Articles/` + (activePage - 1)} key="1"> <span>≦前へ</span> </a> ) } for (let i = startIndex; i <= endIndex; i++) { // 最初の目次から最後の目次までのIDを取得 pageNumbers.push( <a href={"/Articles/" + i} key={i} className={activePage === i ? "active" : ""}> // "active"というクラス名にスタイリングを記述する事で現在のページを目立たせることができる。 <span>{i}</span> </a> ) } if (endIndex < pages) { // 最後の目次がページ総数以下の場合「次へ」を表示 pageNumbers.push( <a href={"/Articles/" + (activePage + 1)} key={pages}> <span>≧次へ</span> </a> ) } return pageNumbers // ページネーションの配列を返す } return ( <nav> {/* ページネーションのレンダリング */} <h2>{makePaginationHref()}</h2> </nav> ) } export default Pagination最後に
以上で、ページネーションの実装が完了しました!
何らかの不備や、もっと良いアイデアなどあればご教示頂けると幸いです?♂️

- 投稿日:2020-10-09T13:34:57+09:00
Kintone-cliでKintone-UI-Component+React+Typescript+Firebaseのアプリカストマイズ
今回はKintone-cliを使用してKintone-UI-Component+React+Typescript+Firebaseのアプリのカストマイズを作成したいんです。
kintone-cli
kintone-cliを使用するのでインストールします:PowerShell$ npm install -g git://github.com/kintone/kintone-cli.gitプロジェクトの初期化
kintone-cli initでプロジェクトを初期化します、対話式で下記の質問されます:
-Project name:プロジェクト名を決めて入力し、
-Version:バージョン番号を決めて入力し、
-Description:プロジェクトの詳細を入力し、
-Author:プロジェクトの作者を入力し、
-License:ライセンスの種類を入力し、
-Do you want to use @kintone/kintone-ui-component?(kintone UI Componentを利用するかどうか:
利用したいから「Y」を入力し、
-Do you want to use @kintone/kintone-js-sdk?(kintone JS SDKを使用するかどうか):
@kintone/kintone-js-sdkは既にdeprecatedですので「n」を入力し、現在の最新のkintoneのSDKを使いたっかった後から@kintone/rest-api-clientを手動で追加すれば良いです。PowerShell$ kintone-cli init Welcome to kintone-cli! Please, input below information so we can get started! ? Project name user-management ? Version 0.0.1 ? Description App to manage users ? Author LETEXIER Loic ? License Copyrights Meister Guild 2020 ? Do you want to use @kintone/kintone-ui-component? Yes ? Do you want to use @kintone/kintone-js-sdk? Noここまでの手順で:
- プロジェクトを格納するフォルダを作成し、
- その中にpackage.jsonファイルを作成し、
-gitリポジトリの初期化しました。プロジェクトの作成
次は実際にプロジェクトを作成します、対話式で下記の質問されます:
-What type of app you want to create ?(アプリ向けのカスタマイズ開発か、プラグイン開発か):アプリ向けを選択し、今回はカスタマイズ開発がしたい、
-Do you want to set authentication credentials ?(認証情報をセットするかどうか): 認証を利用したいから「Y」を入力し、
-What is your kintone domain ?:カスタマイズを適用する先のkintoneドメイン(○○.cybozu.com)の指定し、
-What is your kintone username ?:当該環境にログインするためのユーザー名(私はメールアドレスと一緒にしてた)を入力し、
-What is your kintone password ?:当該環境にログインするためのパスワードを入力し、
-Do you use proxy ?(接続にプロキシを使うかどうか):「n」を入力し、
-Do you want to use React ?(開発フレームワークとしてReactを使うかどうか):kintone UI Componentを使う場合はReactが必よから「Y」を入力し、
-Do you want to use TypeScript ?(TypeScriptを使用するかどうか):TypeScriptを使用したいから「Y」を入力し、
-Do you want to use webpack ?(バンドラーとしてWebpackを使うかどうか):使用したいから「Y」を入力し、
-What is the entry for webpack ?:Webpackを使用する際のエントリポイントとなるファイルの名前(「index.tsx」のデフォルトは良かったからそのままにした)を入力し、
-What is the app name ?(ローカルプレビュー時やビルド・デプロイ時にも必要なアプリのフォルダーの名前):プロジェクトと同じ名前に入力し、
-Do you want to use @cybozu/eslint-config for syntax checking ?(サイボウズ謹製の eslint 設定を利用するかどうか):「n」を入力したけど「Y」を入力してもよいと思います、
-What is the app ID ?:カスタマイズを適用するアプリの「アプリ ID」を入力し、
-What is the scope of customization ?(カスタマイズをアプリの利用者全員に適用するか、管理者だけにするか、適用しないか):「ALL」を選択しました。PowerShell> cd user-management > kintone-cli create-template ? What type of app you want to create ? Customization ? Do you want to set authentication credentials ? Yes ? What is your kintone domain ? ○○.cybozu.com ? What is your kintone username ? □□@○○.com ? What is your kintone password ? [hidden] ? Do you use proxy ? No ? Do you want to use React ? Yes ? Do you want to use TypeScript ? Yes ? Do you want to use webpack ? Yes ? What is the entry for webpack ? index.tsx ? What is the app name ? user-management ? Do you want to use @cybozu/eslint-config for syntax checking ? No ? What is the app ID ? 123 ? What is the scope of customization ? ALL@kintone/dts-gen
TypeScriptの開発ではJavaScriptで書かれたAPIを使用するためにd.tsファイル(型定義ファイル)は大事です。
@kintone/dts-genはこの型定義ファイルを作成してくれるツールです:@kintone/dts-genはkintoneのJavaScriptカスタマイズ用の関数定義に加えて、指定したアプリからフィールド情報を取り出すコマンドラインツールが同梱されています。
TypeScriptでkintoneの開発をするなら必須なものですのでインストールします:PowerShell$ npm install --save-dev @kintone/dts-gen使い方は:
npx kintone-dts-gen --host https://(サブドメイン).cybozu.com
                      -u (ユーザー名)
                      -p (パスワード)
                      --app-id (アプリID)
                      --namespace (名前空間プレフィクス)
                      -o (ファイル出力先)
下記のコマンドでアプリのフィールド定義情報を取得して、
d.tsファイルを作成します:PowerShell$ npx kintone-dts-gen --host https://mgild.cybozu.com -u l.loic@m-gild.com -p ******** --app-id 123 --namespace userFields.types -o user-management/source/users.fields.d.ts
d.tsの型定義ファイルを作成して、エディタ上でその効果を発揮させるためプロジェクトの直下にあるtsconfig.jsonで型定義ファイルの参照を指定する必要です:tsconfig.json... "files": [ "../node_modules/@kintone/dts-gen/kintone.d.ts", "./source/users.fields.d.ts" ], "exclude": [ "node_modules", "dist" ] ...これを TypeScript で参照可能にします。
常に、ビルドしたファイルが格納される
distフォルダーをexcludeに追加します。firebase
このアプリで
firebaseも利用したいのでインストールします:PowerShell$ npm install --save firebaseビルド + デプロイ
ビルドします:
PowerShell$ kintone-cli build --app-name user-managementデプロイします:
PowerShell$ kintone-cli deploy --app-name user-managementアプリ側にはちゃんとビルドされたファイルが適用されます。
結果のファイルの一覧
プロジェクト設定完了!
プロジェクトフォルダー
package.json
user-management/package.json{ "name": "user-management", "version": "0.0.1", "description": "App to manage users", "author": "LETEXIER Loic", "license": "Copyrights Meister Guild 2020", "dependencies": { "@kintone/kintone-ui-component": "^0.6.0", "firebase": "^7.22.1", "react": "^16.8.6", "react-dom": "^16.7.0" }, "devDependencies": { "@babel/core": "^7.3.3", "@babel/plugin-proposal-class-properties": "^7.3.3", "@babel/plugin-syntax-dynamic-import": "^7.2.0", "@babel/preset-env": "^7.3.1", "@babel/preset-react": "^7.0.0", "@babel/preset-typescript": "^7.3.3", "@kintone/customize-uploader": "^2.0.5", "@kintone/dts-gen": "^3.0.5", "@types/react": "^16.8.16", "@types/react-dom": "^16.8.4", "babel-loader": "^8.0.5", "core-js": "^3.2.1", "css-loader": "^2.1.0", "dotenv-webpack": "^3.0.0", "local-web-server": "^2.6.1", "regenerator-runtime": "^0.13.3", "style-loader": "^0.23.1", "typescript": "^3.6.3", "webpack": "^4.30.0", "webpack-cli": "^3.2.3" }, "scripts": { "dev": "ws", "build-user-management": "webpack --config user-management/webpack.config.js" }.gitignore
user-management/.gitignorenode_modules user-management/auth.jsonアプリフォルダー
webpack.config.js
user-management/user-management/webpack.config.jsconst path = require('path'); const config = { entry: path.resolve('user-management/source/index.tsx'), resolve: { extensions: ['.ts', '.tsx', '.js'], }, output: { path: path.resolve('user-management/dist'), filename: 'user-management.min.js', }, module: { rules: [ { test: /.ts?$/, exclude: /node_modules/, use: { loader: 'babel-loader', options: { presets: ['@babel/preset-typescript'], }, }, }, { test: /.tsx?$/, exclude: /node_modules/, use: { loader: 'babel-loader', options: { presets: ['@babel/react', '@babel/preset-typescript'], }, }, }, { test: /.css$/, use: ['style-loader', 'css-loader'], }, ], }, performance: { maxEntrypointSize: 10000000, maxAssetSize: 10000000, }, }; module.exports = (env, argv) => { 'use strict'; if (argv.mode === 'development') { config.devtool = 'source-map'; false; } if (argv.mode === 'production') { //... } return [config]; };tsconfig.json
user-management/user-management/tsconfig.json{ "compilerOptions": { "typeRoots": [ "../node_modules/@types", "./source/global.d.tsx" ], "noImplicitAny": false, "jsx": "react" }, "include": [ "source/**/*.ts", "source/**/*.tsx" ], "files": [ "../node_modules/@kintone/dts-gen/kintone.d.ts", "./source/users.fields.d.ts" ], "exclude": [ "node_modules", "dist" ] }config.json
user-management/user-management/config.json{ "appID": 123, "appName": "user-management", "type": "Customization", "scope": "ALL", "uploadConfig": { "desktop": { "js": [ "user-management/dist/user-management.min.js" ], "css": [] }, "mobile": { "js": [ "user-management/dist/user-management.min.js" ] } } }.babelrc
user-management/user-management/.babelrc{ "plugins": [ "@babel/plugin-proposal-class-properties", "@babel/plugin-syntax-dynamic-import" ], "presets": [ [ "@babel/preset-env", { "useBuiltIns": "usage", "corejs": { "version": 3, "proposals": true } } ] ] }ソースフォルダー
users.fields.d.ts
user-management/user-management/source/users.fields.d.tsdeclare namespace userFields.types { interface Fields { password: kintone.fieldTypes.SingleLineText; email_address: kintone.fieldTypes.SingleLineText; user_name: kintone.fieldTypes.DropDown; idToken: kintone.fieldTypes.SingleLineText; } interface SavedFields extends Fields { $id: kintone.fieldTypes.Id; $revision: kintone.fieldTypes.Revision; 更新者: kintone.fieldTypes.Modifier; 作成者: kintone.fieldTypes.Creator; レコード番号: kintone.fieldTypes.RecordNumber; 更新日時: kintone.fieldTypes.UpdatedTime; 作成日時: kintone.fieldTypes.CreatedTime; } }
- 投稿日:2020-10-09T13:28:52+09:00
useEffect 初回レンダリングで走るな!!!
useEffectって初回に走るんですよ、
これが面倒で面倒で....
かつてのcomponentWillmountやらcomponentDidUpdateやらを使ったclassコンポーネントを
functionコンポーネントに置き換えようとすると悲劇が起こりやすいです。。(今朝の話)デモンストレーション
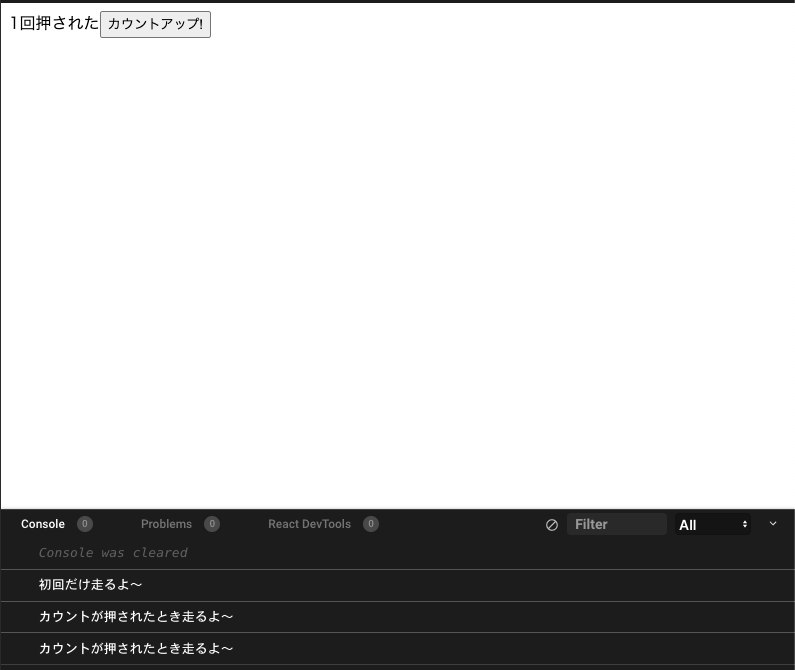
import React, { useEffect, useState } from "react";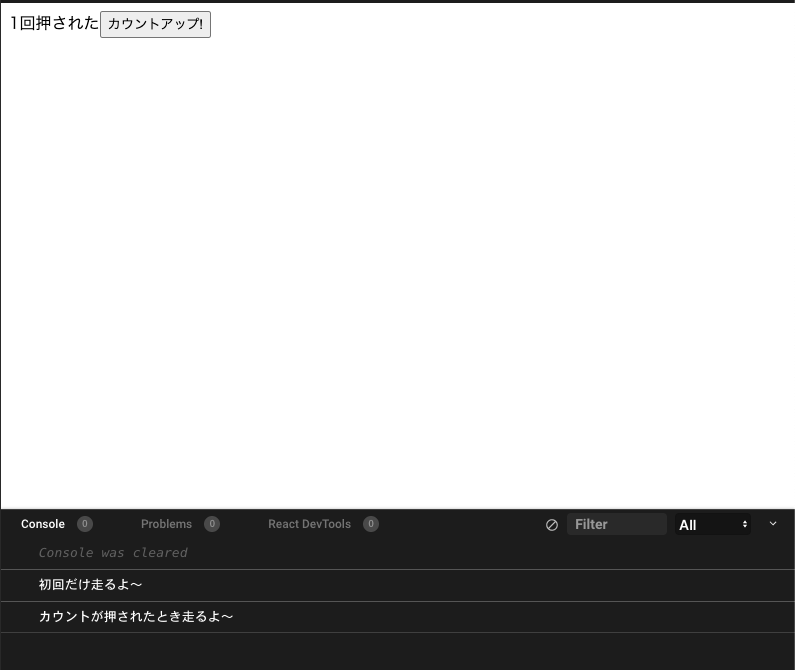 export default function App() { const [count, setCount] = useState(0); useEffect(() => { console.log("初回だけ走るよ〜"); }, []); useEffect(() => { console.log("カウントが押されたとき走るよ〜"); }, [count]); return ( <div> <span>{count}回押された</span> <button onClick={() => setCount(count + 1)}>カウントアップ!</button> </div> ); }ボタンが押されるとcountが1upするよくあるやつです。
2回目に出てくるuseEffectはカウントが押された時だけ走って欲しいとします。
しかし、実際にコンソールをみてみると....ボタンを一度しか押していないのに、
console.log("カウントが押されたとき走るよ〜");
が二回走ってしまっています。
componentDidUpdateと全く同じ挙動を期待するなら、一手間必要です。解決作
フラグを持たせます。
この場合は無駄なレンダリングを避けるためuseRefを使うのが適切でしょう。- import React, { useEffect, useState } from "react"; + import React, { useEffect, useState, useRef } from "react"; export default function App() { const [count, setCount] = useState(0); + const renderFlgRef = useRef(false) useEffect(() => { console.log("初回だけ走るよ〜"); }, []); useEffect(() => { + if(renderFlgRef.current) { console.log("カウントが押されたとき走るよ〜"); + } else { + renderFlgRef.current = true + } }, [count]); return ( <div> <span>{count}回押された</span> <button onClick={() => setCount(count + 1)}>カウントアップ!</button> </div> ); }
ちゃんとカウントアップ時のみ走らせることができました。
毎度フラグを作るのだるい~
useEffectがたくさんあるような場合は、その個数分フラグ処理が必要ですね。
正直面倒なのでカスタムフックにします。useEffectCustom// 絶対に初回走るな import { useEffect, useRef } from "react"; const useEffectCustom = (func, dependencyList) => { const fisrtFlgRef = useRef(true); useEffect(() => { if (!fisrtFlgRef.current) { func(); } else { fisrtFlgRef.current = false; } }, dependencyList); }; export default useEffectCustom;indeximport React, { useEffect, useState } from "react"; import useEffectCustom from "./useEffectCustom"; export default function App() { const [count, setCount] = useState(0); useEffect(() => { console.log("初回だけ走るよ〜"); }, []); useEffectCustom(() => { console.log("カウントが押されたとき走るよ〜"); }, [count]); return ( <div> <span>{count}回押された</span> <button onClick={() => setCount(count + 1)}>カウントアップ!</button> </div> ); }これで毎度フラグ処理を実装せずに済みます!
参考資料

- 投稿日:2020-10-09T13:27:44+09:00
Reactインストール for Mac
前提条件
- MacOS Catalina 10.15.4
- Node.jsインストール済み
Node.jsのアップデート
Node.jsのバージョン管理方法の一つに
nがある。
Node.jsはnコマンドを利用してアップデートするのが楽なので、nをインストールする。
nのインストール以下のコマンドを実行する。
$ npm install -g nnの使い方
nではNode.jsの最新バージョン・推奨バージョンを調べることができる。
以下のコマンドを実行する。$ n --latest # 最新バージョン $ n --stable # 推奨バージョン推奨バージョンにアップデートする。以下のコマンドを実行する。
$ n stable権限の問題で以下のエラーが出ることがある。
  installing : node-v12.19.0
       mkdir : /usr/local/n/versions/node/12.19.0
mkdir: /usr/local/n/versions/node/12.19.0: Permission denied

  Error: sudo required (or change ownership, or define N_PREFIX)
上記の場合は素直に
sudoで実行する。$ sudo n stableyarnをインストールする
npmでも実行できるが、yarnの方がメリットが多いのでyarnをインストールする。
参考: npmとは yarnとは以下のコマンドを実行する。
$ npm install -g yarncreate-react-appをインストールする
別途インストールが必要かと思ったのですが、
yarnをインストールした時点で既に入っているよう。
以下のパスにcreate-react-appが存在した。/usr/local/binちなみに上記のパスは
npmのインストール場所と同じ。
npmのインストール場所は以下のコマンドで調べられる。$ npm bin -gReactプロジェクトを作成
以下のコマンドでプロジェクトを開始する。実行例はプロジェクト名を
sampleAppとした場合のもの。$ create-react-app sampleAppReactを開始
Reactプロジェクトを開始すると
create-react-appしたディレクトリに、プロジェクト名のついたフォルダが作成される。上記の例だとsampleAppというディレクトリが作成されるので以下のコマンドで移動する。$ cd sampleApp移動先で以下のコマンドを実行するとReactプロジェクトが開始される。
$ yarn startブラウザに以下の画面が表示されると成功。

- 投稿日:2020-10-09T13:27:44+09:00
【React】Reactインストール for Mac
前提条件
- MacOS Catalina 10.15.4
- Node.jsインストール済み
Node.jsのアップデート
Node.jsのバージョン管理方法の一つに
nがある。
Node.jsはnコマンドを利用してアップデートするのが楽なので、nをインストールする。
nのインストール以下のコマンドを実行する。
$ npm install -g nnの使い方
nではNode.jsの最新バージョン・推奨バージョンを調べることができる。
以下のコマンドを実行する。$ n --latest # 最新バージョン $ n --stable # 推奨バージョン推奨バージョンにアップデートする。以下のコマンドを実行する。
$ n stable権限の問題で以下のエラーが出ることがある。
  installing : node-v12.19.0
       mkdir : /usr/local/n/versions/node/12.19.0
mkdir: /usr/local/n/versions/node/12.19.0: Permission denied

  Error: sudo required (or change ownership, or define N_PREFIX)
上記の場合は素直に
sudoで実行する。$ sudo n stableyarnをインストールする
npmでも実行できるが、yarnの方がメリットが多いのでyarnをインストールする。
参考: npmとは yarnとは以下のコマンドを実行する。
$ npm install -g yarncreate-react-appをインストールする
別途インストールが必要かと思ったのですが、
yarnをインストールした時点で既に入っているよう。
以下のパスにcreate-react-appが存在した。/usr/local/binちなみに上記のパスは
npmのインストール場所と同じ。
npmのインストール場所は以下のコマンドで調べられる。$ npm bin -gReactプロジェクトを作成
以下のコマンドでプロジェクトを開始する。実行例はプロジェクト名を
sampleAppとした場合のもの。$ create-react-app sampleAppReactを開始
Reactプロジェクトを開始すると
create-react-appしたディレクトリに、プロジェクト名のついたフォルダが作成される。上記の例だとsampleAppというディレクトリが作成されるので以下のコマンドで移動する。$ cd sampleApp移動先で以下のコマンドを実行するとReactプロジェクトが開始される。
$ yarn startブラウザに以下の画面が表示されると成功。
- 投稿日:2020-10-09T09:24:26+09:00
reduxの簡単な流れ
流れ
1,actionで行いたい処理を記述
action/index.jsimport axios from 'axios'; export const READ_MEMOS = 'READ_MEMOS'; //reducerに渡したいtypeを定数にしてexportする export const readMemos = () => async dispatch => { const response = await axios.get('/api/memos'); dispatch({ type: READ_MEMOS, response }); //dispatchはreducerに値を渡す人みたいなイメージ }; //ここではreducerにactionのtypeとget通信で取得した値を渡している2,reducerでstoreに渡す値を記述
reducers/memos.jsimport _ from "lodash"; //storeにkeyを整形した値を渡したいため、lodashを使用する import { READ_MEMOS } from "../actions"; export default (memos = [], action) => { //配列memosの中にsotoreに渡す値を格納する switch (action.type) { // actionの定数で定義したtypeによって処理を分ける case READ_MEMOS: return { memos: _.mapKeys(action.response.data.memos, "id") //第一引数のobjecのkeyを第二引数で指定したものにする。 //_.mapKeysを使用する前、 0: {id: 1, name: "foo"} 1: {id: 2, name: "bar"} //_.mapKeysを使用した後、 1: {id: 1, name: "foo"} 2: {id: 2, name: "bar"} }; default: return memos; //action.typeがない場合は何も返さない } };3,combineReducersに各reducerを渡す
combineは組み合わせるという意味の英単語である
ここで各reducerを統合するreducers/index.jsimport { combineReducers } from "redux"; import lists from "./foo"; import memos from "./memos"; export default combineReducers({ foo, memos });4,createStoreにreducerを渡す
下記のcomponentはroot componentである。
components.Index.jsimport React, { Component } from 'react'; import ReactDOM from 'react-dom'; import { createStore, applyMiddleware } from 'redux'; import { Provider } from 'react-redux'; import thunk from 'redux-thunk'; import reducer from '../reducers/index'; export default class Index extends Component { render() { const store = createStore(reducer, applyMiddleware(thunk)); //第一に引数にreducer //第二引数にapplyMiddlewareメソッドにredux-thunkを渡している。 //これをすることで、storeの機能を拡張し、非同期ロジックを記述できるおようになる。 return ( <div> <Provider store={store}> //上記で作成したstoreで全コンポーネントをwrapすることで各コンポーネント内でstoreを使用することができる。 </Provider> </div> ); } } if (document.getElementById('index')) { ReactDOM.render(<Index />, document.getElementById('index')); }5,storeに格納されている値を取り出して画面に出力させる
components/Memo.jsimport React, { Component } from "react"; import { connect } from "react-redux"; import { readMemos } from "../actions"; class Top extends Component { componentDidMount() { //componentがmountされた時にthis.props.readMemosが呼び出される this.props.readMemos(); } renderMemos() { return _.map(this.props.memos, memo => ( //objectの数だけ第二引数のメソッドを繰り返す。 第二引数のmemoの値は第一引数のもの <React.Fragment key={memo.id}> <Button className="text-center mt-5 pt-3 pb-3 mx-auto memo" variant="contained" color="secondary" >{memo.name} </Button> </React.Fragment> )); } render() { return ( <h2 className="text-center mt-5">メモ</h2> {this.renderMemos()} ); } } const mapStateToProps = state => ({ //reducerでreturnしたstateをこのcomponentで使用できるようにしている memos: state.memos.memos }); const mapDispatchToProps = { //actionで定義したreadMemosメソッドをこのcomponentで使用できるようにしている readMemos }; export default connect(mapStateToProps, mapDispatchToProps)(Top); //上記二つをこのcomponentで使用できるようにconnectする