- 投稿日:2020-09-28T19:53:24+09:00
【vue-moment】vueでtimer設定する方法
目次
・vueでtimer設定をしたい
・timer設定するために必要なもの
・vue-momentのインストール
・vue-momentのtsファイル作成
・moment.tsを読み込む
・vueファイルでmomentを試してみる
・momentでtimer設定を試してみるvueでtimer設定をしたい
vueで一定期間表示する枠や時期が来たら表示または非表示にするためにタイマー設定をして実装したい場合ってありますよね?
実際、私はその事例に当たったので今回対応したことをお伝えしたいと思います。timer設定するために必要なもの
vueでtimer設定するために
vue-momentを使用します。
vue-momentは、日付の解析・検証等をするライブラリで、
日付のフォーマットを「YYYY-MM-DD」に変更した場合や、日付の期間を検証するのに便利なメソッドが揃っています。
Vue.jsプロジェクトに便利なmoment.jsフィルターを提供してくれます。vue-momentのインストール
npm
$ npm install vue-momentyarn
$ yarn add vue-momentインストールが終わったら共通で使えるようにjsファイルを作成します。
vue-momentのtsファイル作成
src/plugins/moment.tsimport Vue from 'vue' Vue.use(require('vue-moment'))ファイルを作成したらnuxt.configで読み込んでおきましょう。
moment.tsを読み込む
nuxt.config.tsplugins: [{ src: '~/plugins/moment.ts' }],pluginsに先ほど作成したmoment.tsを読み込んでおきます。
ここまでできたらあとは、vue側での実装です。
vueファイルでmomentを試してみる
<template>
    <p>
      {{ now }}
    </p>
    <p>
      {{ end }}
    </p>
  </div>
</template>

<script>
export default {
  data() {
    return {
      now: this.$moment().format('YYYYMMDDHHmmss'),
      end: this.$moment().format('20200825150000'),
    }
  },
}
</script>
このようなファイルを作ると
nowは今の日時・時間・分・秒まで取得します。
今回はendとしてますが、表示を開始するなどの場合はstartなどにするといいと思います。
endには表示を終了する日時・時間・分・秒を設定しておきます。この状態で上記を表示すると
See the Pen vue-moment by miyawash (@miyawash) on CodePen.
これをベースにタイマー設定をしてみます。
momentでtimer設定を試してみる
<template>
    <p>
      {{ now }}
    </p>
    <p>
      {{ end }}
    </p>
    <p v-if="now < end">まだ設定時間ではない</p>
    <p v-else>設定時間をすぎた</p>
  </div>
</template>

<script>
export default {
  data() {
    return {
      now: this.$moment().format('YYYYMMDDHHmmss'),
      end: this.$moment().format('20200825150000'),
    }
  },
}
</script>
このように実装すると設定時間までは
「まだ設定時間ではない」が表示され、設定時間後は「設定時間をすぎた」が表示される
これにより、設定時間までの表示や設定時間からの表示などができるようになりました!See the Pen vue-moment timer by miyawash (@miyawash) on CodePen.
参考資料
https://classic.yarnpkg.com/ja/package/vue-moment
https://www.npmjs.com/package/vue-moment
https://momentjs.com/
https://qiita.com/taizo/items/3a5505308ca2e303c099
https://blog.capilano-fw.com/?p=908#24_8_20
- 投稿日:2020-09-28T13:38:54+09:00
Vue.jsでGeocoder APIを使ってみた (vue2-geocoder)
はじめに
Vue.jsでGeocoder APIを呼び出し緯度/経度を取得してみた。
Geocoder APIとは
住所を地理座標(緯度/経度)に変換できるAPIです。
参照 : https://developers.google.com/maps/documentation/geocoding/overview使用ライブラリと詳細
使用ライブラリ : @pderas/vue2-geocoder
使用理由 : vue2のgeocoding用プラグインでよく使われている。
参照 : https://github.com/PDERAS/vue2-geocoder#readmequery時に設定できるパラメータの説明
(address_line_1) : 住所での検索時使用するパラメータ
(address_line_2) : こちらも住所での検索時使用するパラメータですが、(address_line_1)だけで検索できます。
(city) : 都市の名前などで検索したいときのパラメータ
(state): 国をアメリカなどの州を持つ国にした場合の、州検索時に使用するパラメータ
(zip_code) : 郵便番号で検索したいときのパラメータ
(country) : 検索対象になる国の名前を絞り込むためのパラメータ[今回は日本に限定]上記パラメータを利用し、入力した際に緯度/経度を絞り込みます。Geocoder API Request / Response
handleSetCity.tsprivate async handleSetCity() { let lat = 0 let lon = 0 const addressObj = { address_line_1: '東京都庁', address_line_2: '', city: '', state: '', zip_code:'', country: '日本' } (Vue as any).$geocoder.send(addressObj, (response: any) => { if (response.results) { lat = response.results[0].geometry.location.lat lon = response.results[0].geometry.location.lng } }) }
- Response
[
    {
        "address_components": [
            {
                "long_name": "45階",
                "short_name": "45階",
                "types": [
                    "subpremise"
                ]
            },
            {
                "long_name": "第一本庁舎",
                "short_name": "第一本庁舎",
                "types": [
                    "establishment",
                    "point_of_interest"
                ]
            },
            {
                "long_name": "東京都庁",
                "short_name": "東京都庁",
                "types": [
                    "premise"
                ]
            },
            {
                "long_name": "1",
                "short_name": "1",
                "types": [
                    "premise"
                ]
            },
            {
                "long_name": "8",
                "short_name": "8",
                "types": [
                    "political",
                    "sublocality",
                    "sublocality_level_4"
                ]
            },
            {
                "long_name": "2丁目",
                "short_name": "2丁目",
                "types": [
                    "political",
                    "sublocality",
                    "sublocality_level_3"
                ]
            },
            {
                "long_name": "西新宿",
                "short_name": "西新宿",
                "types": [
                    "political",
                    "sublocality",
                    "sublocality_level_2"
                ]
            },
            {
                "long_name": "新宿区",
                "short_name": "新宿区",
                "types": [
                    "locality",
                    "political"
                ]
            },
            {
                "long_name": "東京都",
                "short_name": "東京都",
                "types": [
                    "administrative_area_level_1",
                    "political"
                ]
            },
            {
                "long_name": "日本",
                "short_name": "JP",
                "types": [
                    "country",
                    "political"
                ]
            },
            {
                "long_name": "163-8001",
                "short_name": "163-8001",
                "types": [
                    "postal_code"
                ]
            }
        ],
        "formatted_address": "日本、〒163-8001 東京都新宿区西新宿2丁目8−1 東京都庁 45階 第一本庁舎",
        "geometry": {
            "location": {
                "lat": 35.6898531,
                "lng": 139.6917321
            },
            "location_type": "ROOFTOP",
            "viewport": {
                "northeast": {
                    "lat": 35.6912020802915,
                    "lng": 139.6930810802915
                },
                "southwest": {
                    "lat": 35.6885041197085,
                    "lng": 139.6903831197085
                }
            }
        },
        "place_id": "ChIJnctryNSMGGARLv4MknPFseU",
        "plus_code": {
            "compound_code": "MMQR+WM 日本、東京都新宿区",
            "global_code": "8Q7XMMQR+WM"
        },
        "types": [
            "establishment",
            "point_of_interest",
            "tourist_attraction"
        ]
    }
]
ただ、実際に緯度/経度を取得する場合に使用するのは、Responseのgeometry.locationの中身になります。
"geometry": {
  "location": {
    "lat": 35.6898531,
    "lng": 139.6917321
  },
・
・
・
Geocoder APIのエラーハンドリング
Geocoder APIを使用した時のエラーハンドリングには、Geocoder APIに標準で返ってくる[エラーメッセージ]を使用すると良さげです。
- statusがOK以外のステータスコードを返す場合、Geocodingレスポンスオブジェクト内にerror_messageフィールドがある可能性があります。 このフィールドには、特定のステータスコードの背後にある理由に関する詳細情報が含まれています。
参照 : https://developers.google.com/maps/documentation/geocoding/overview#StatusCodesvue2-geocoderを使用した時のエラー検証結果
検索が引っかからない場合
response : {"results":[],"status":"ZERO_RESULTS"}API_KEYを無効にした場合
response : {"error_message":"This API project is not authorized to use this API.","results":[],"status":"REQUEST_DENIED"}Geocoder APIの回数制限
GCP上でAPIごとに(Geocodingのみを)回数制限を設定することできます。

- 投稿日:2020-09-28T11:26:52+09:00
Vue.js+Vuetify.jsを使ったWEBアプリケーション構築 ~多言語対応(Vue I18n)~
はじめに
Vueアプリケーションの多言語対応には、Vue I18nプラグインを使います。
Vue I18nプラグインの設定方法、使い方について、以前投稿した記事「Vue.js+Vuetify.jsを使ったWEBアプリケーション構築」のサンプルアプリケーションを基に説明したいと思います。
説明
Vue I18nの設定
Vue I18nの設定はとても簡単です。
以下の3ステップとなります。
- メッセージ情報を作成
- VueI18nインスタンスの生成(デフォルト表示言語と、メッセージ情報を指定)
- Vueインスタンス生成時にVueI18nインスタンスを渡す
1. メッセージ情報を作成
/src/configs/message.json{ // ja, enはVue18nに設定する言語 "ja": { // caption, messegeに分けているのは個人的な趣味なのでお好みで。 "caption": { // メッセージコード:メッセージの形で。メッセージコードを日本語にしているのは個人的な趣味なのでお好みで。 "VUEサンプル": "VUEサンプル", // ・・・省略 "": "" }, "message": { "M00001": "システムエラーが発生しました。\nエラーコード:{0}", // ・・・省略 "": "" } }, "en": { "caption": { "VUEサンプル": "VUE SAMPLE", // ・・・省略 "": "" }, "message": { "M00001": "An system error has occurred.\nError Code: {0}", // ・・・省略 "": "" } } }2. VueI18nインスタンスの生成(デフォルト表示言語と、メッセージ情報を指定)
/src/i18n.jsimport Vue from 'vue' import VueI18n from 'vue-i18n'; // VueアプリケーションでVueI18nプラグインを使う宣言 Vue.use(VueI18n); // メッセージ定義ファイルの読み込み const messages = require('./configs/message.json'); // デフォルト言語の設定 export const DEFAULT_LANG = 'ja'; // 言語切替用の定義 export const enableLangs = Object.keys(messages); export const langCodes = { "ja": "日本語", "en": "English" }; // VueI18nインスタンスの生成(言語とメッセージオブジェクトを渡す) const i18n = new VueI18n({ locale: DEFAULT_LANG, messages: messages }); export default i18n;3. Vueインスタンス生成時にVueI18nインスタンスを渡す
/src/main.jsimport Vue from 'vue' import './plugins/vuetify' import router from "./router"; // VueI18nインスタンスを読み込む import i18n from "./i18n"; // ・・・省略 new Vue({ render: h => h(App), router, // VueI18nインスタンスを渡す。 i18n, store }).$mount('#app');Vue I18nの使い方
今回VueI18nの基本的な使い方として以下を説明します。
- Vueテンプレート構文内でメッセージを取得する
- Javascrpit内でメッセージを取得する
- 言語を切り替える
Vueテンプレート構文内でメッセージを取得する
/src/components/parts/NyuryokuCard.vue<template> <v-card> <v-card-text> <!-- $tメソッドにmessage.jsonで定義したメッセージコードを渡す。 --> <div class="subheading">{{ $t(`caption['登録情報']`) }}</div> <hr /> <!-- 省略 --> </v-card-text> </v-card> </template>Javascrpit内でメッセージを取得する
/src/components/parts/JohoList.vue<script> import Tooltip from "@/components/base/Tooltip"; export default { // ・・・省略 computed: { headers: function() { let headers = [ // this.$i18n.t(メッセージコード)メソッドを呼び出す。 // computedで定義することでVueI18nで言語切替を行ったときにリアクティブに表示が変わる。 // dataで定義するとVueI18nで言語切替を行っても表示が変わらないので注意。 { text: this.$i18n.t('caption["名前"]'), enableSort: true, align: 'center', value: 'name'}, { text: this.$i18n.t('caption["メールアドレス"]'), enableSort: true, align: 'center', value: 'mailAddress'}, { text: this.$i18n.t('caption["電話番号"]'), enableSort: true, align: 'center', value: 'phoneNo'}, { text: this.$i18n.t('caption["登録日時"]'), enableSort: true, align: 'center', value: 'torokuNichiji'}, ]; if (this.isNeedDeleteButton) headers.push({ text: '', enableSort: false, align: 'center', value: 'delete'}); return headers; }, }, // ・・・省略 } </script>言語を切り替える
/src/store/index.js// VueI18nインスタンスをインポート import {default as i18n, enableLangs, DEFAULT_LANG} from '@/i18n'; // ・・・省略 const store = new Vuex.Store({ // ・・・省略 actions: { [aTypes.CHANGE_LANG](context, lang) { // VueI18nインスタンスのlocaleプロパティの値を変える。 // サンプルアプリケーションはURLの変更により言語切替を行っている都合で、javascriptからlocaleを変更しているが、 // Vueコンポーネントから言語を切り替える場合は、$i18n.localeプロパティを変更すればよい。 i18n.locale = lang; // htmlのlang属性とtitleの表示の切替も行う。(VueI18nは関係ない) document.documentElement.setAttribute('lang', i18n.locale); document.title = i18n.t('caption.VUEサンプル'); context.commit(mTypes.SET_LANG, lang); }, // ・・・省略おわりに
所感として、Vueアプリケーションの多言語対応はとても簡単と思いました。
但し、言語切替の際に動的にメッセージが変わらなかった時にどう対応すれば良いかは迷いました。
Vueの初心者には、「算出プロパティを使って対応する」というところは、なかなか気付かないところかもしれません。それと、大規模システムになるとメッセージファイルの肥大化に伴う性能問題が懸念されます。
規模が大きくなってくるとメッセージをWebAPIで必要なものだけ取得するなどの仕組みを自前で作成する必要があると思いました。
- 投稿日:2020-09-28T08:44:25+09:00
Nuxt.jsで認証認可入り掲示板APIのフロントエンド部分を構築する #5 ログイン・ログアウトの実装
←Nuxt.jsで認証認可入り掲示板APIのフロントエンド部分を構築する #4 サインアップページの作成
ログアウト機能の実装
先にログアウトを作ります。
layouts/default.vue... <v-btn v-if="logged_in" icon + @click="logOut" > <v-icon>mdi-logout</v-icon> </v-btn> ... export default { ... this.$store.commit('setAuth', {}) }) } + }, + methods: { + logOut () { + this.$store.dispatch('logOut') + } } } </script>store/index.js... export const actions = { async signUp (_c, user) { return await this.$axios.$post('/v1/auth', user) + }, + async logOut ({ commit }) { + await this.$axios.$delete('/v1/auth/sign_out') + commit('setUser', null) + commit('setAuth', {}) + + this.$router.push('/') } }
v1/auth/sign_outすることでバックエンドでログアウトとします。
そしてフロントエンド側もstoreから削除し(同時にlocalStorageもクリアされます)、トップページに飛ばします。ログイン機能の実装
$ touch pages/log_in.vuepages/log_in.vue<template> <v-app id="inspire"> <v-main> <v-container class="fill-height" fluid > <v-row align="center" justify="center" > <v-col cols="12" sm="8" md="4" > <form @submit.prevent="logIn"> <v-card class="elevation-12"> <v-toolbar color="primary" dark flat > <v-toolbar-title>LogIn form</v-toolbar-title> </v-toolbar> <v-card-text> <ul v-if="errors"> <li v-for="(message, i) in errors" :key="i"> {{ message }} </li> </ul> <v-text-field id="email" v-model="email" label="email" name="email" prepend-icon="mdi-email" type="email" /> <v-text-field id="password" v-model="password" label="Password" name="password" prepend-icon="mdi-lock" type="password" /> </v-card-text> <v-card-actions> <v-spacer /> <v-btn color="primary" type="submit"> ログイン </v-btn> </v-card-actions> </v-card> </form> </v-col> </v-row> </v-container> </v-main> </v-app> </template> <script> export default { data () { return { email: '', password: '', errors: [] } }, methods: { async logIn () { try { const data = await this.$store.dispatch('logIn', { email: this.email, password: this.password }) this.$store.commit('setUser', data.data) this.$router.push('/') } catch (e) { this.errors = e.data.errors } } } } </script>store/index.js... export const actions = { ... async logOut ({ commit }) { await this.$axios.$delete('/v1/auth/sign_out') commit('setUser', null) commit('setAuth', {}) this.$router.push('/') + }, + async logIn (_c, user) { + return await this.$axios.$post('/v1/auth/sign_in', user) }layouts/default.vue... <v-icon>mdi-account-plus</v-icon> </v-btn> + <v-btn + v-if="!logged_in" + icon + to="/log_in" + nuxt + > + <v-icon>mdi-login</v-icon> + </v-btn> </v-app-bar> ...ほとんどsignUpのコピペでいけます。
未ログインだと以下のようになります。
そしてログイン中だと以下のようになります。
これでログイン周りの必要最低限の機能は揃いましたね。
次回は連載最終回。記事の投稿・削除を行います。
続き


- 投稿日:2020-09-28T00:48:44+09:00
Gridsome で始めるスプレッドシート生活 ~スプレッドシートからデータを取得してみる~
ゴール
こんな感じのスプレッドシートのデータをWebサイトに表示させたいと思います。
動作環境
- @gridsome/cli v0.3.4
- gridsome v0.7.21
- yarn 1.22.0
- macOS 10.14.6
プロジェクト作成&準備
- Gridsome
- vue.jsの静的サイトジェネレーター
- gridsome-source-google-sheets
- GridsomeのプラグインでスプレッドシートのデータをGraphQLで取得できるようになります。
やる前にGraphQLがどういったものかを知るために下の記事を参考にさせていただきました。
ありがとうございます。1.Gridsome CLI インストール
# yarn を使う場合
$ yarn global add @gridsome/cli
# npm を使う場合
$ npm install --global @gridsome/cli
2.プロジェクト作成
$ gridsome create sheetSample
$ cd  sheetSample
3.サイト表示
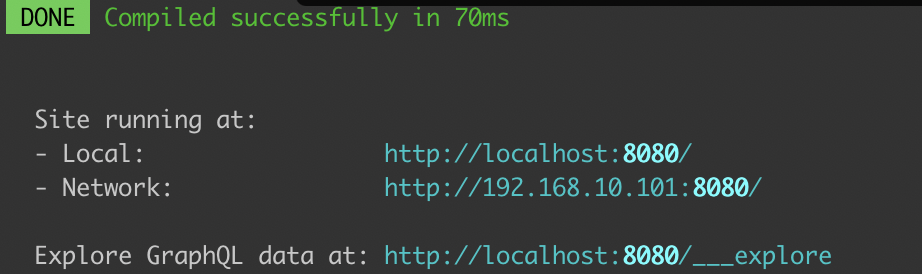
$ gridsome develop
アクセスしてサイトが表示されたらOK
静的ファイル生成
/distフォルダに生成されます。$ gridsome build3.スプレッドシートのデータを利用するのに必要なプラグインのインストール
# yarn を使う場合
yarn add gridsome-source-google-sheets
# npm を使う場合
npm install gridsome-source-google-sheets
4. sheetIdとapiKeyを準備
gridsome.config.jsmodule.exports = { siteName: 'Gridsome', plugins: [ { use: 'gridsome-source-google-sheets', options: { sheetId: 'GOOGLE_SHEET_ID', apiKey: 'GOOGLE_API_KEY', // type: 'TYPE_NAME', //Optional - default is googleSheet. Used for graphql queries. } } ] }
sheetIdとapiKeyを準備します。
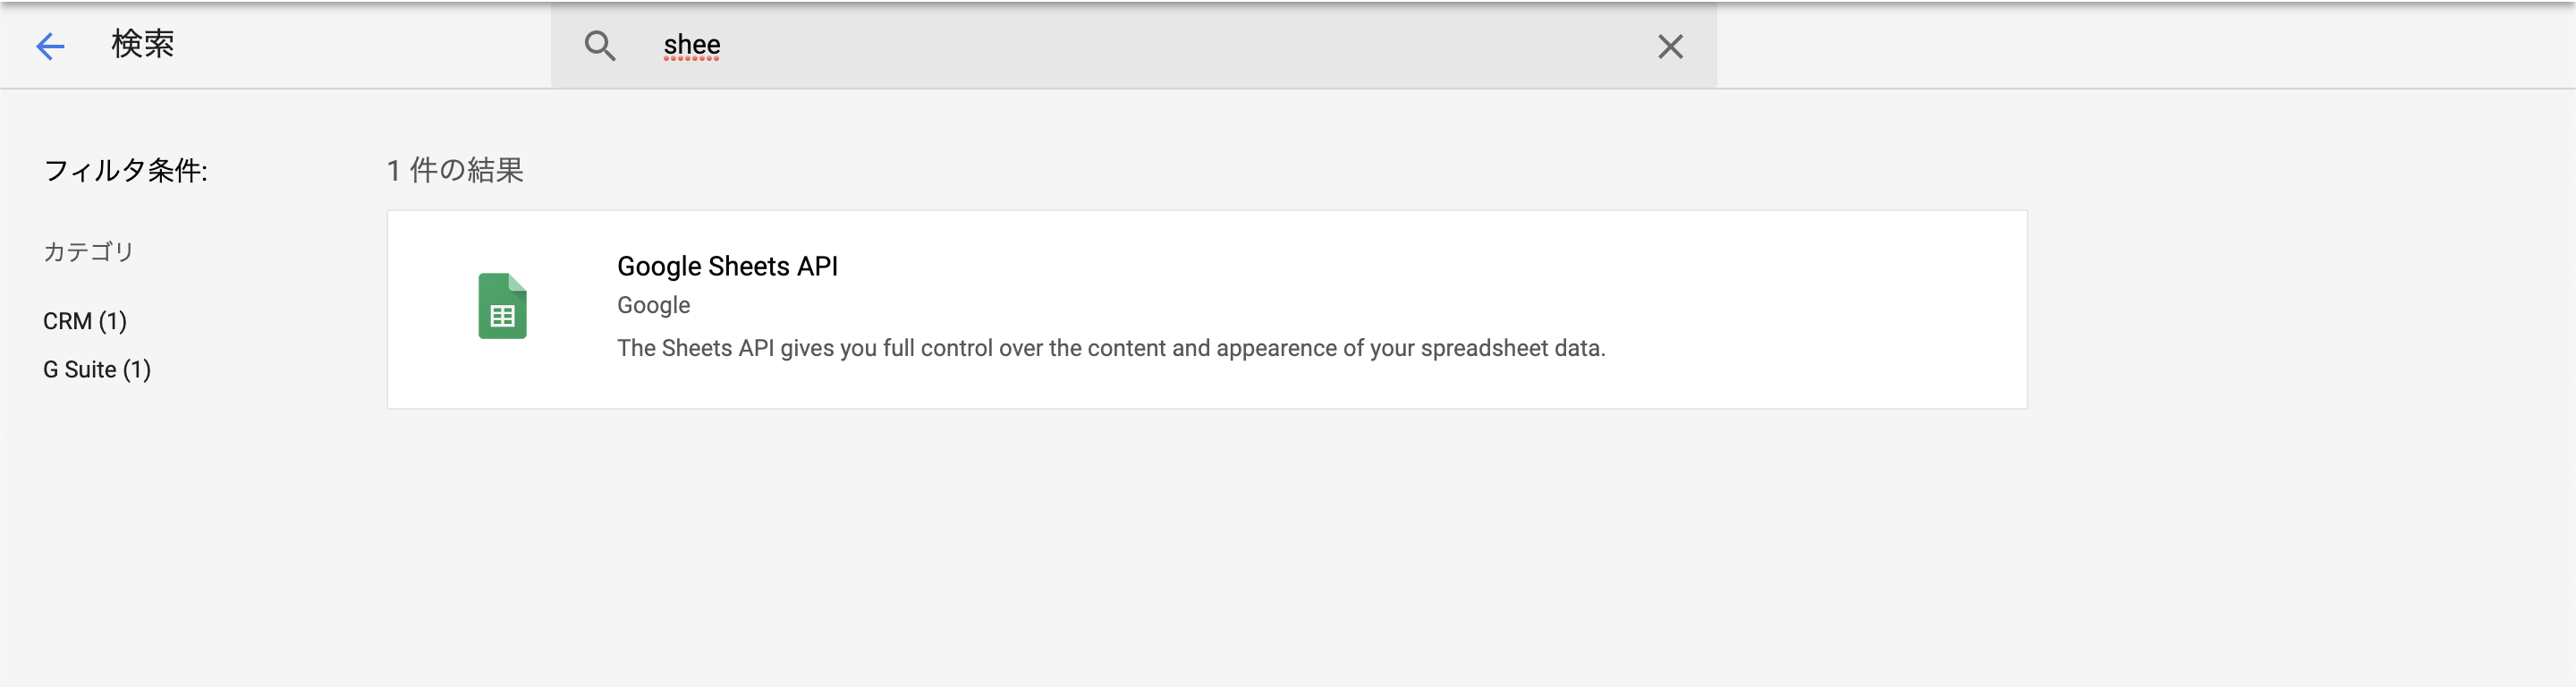
apiKeyを設定APIキーを作成
https://console.developers.google.com/apis/credentials
Google Sheets APIを有効にする
https://console.developers.google.com/apis/library
作成したAPIキーを
gridsome.config.jsのGOOGLE_SHEET_IDの部分に貼り付けます
sheetIdを設定作成したスプレッドシートの共有リンクを作成します。
スプレッドシートのURLを確認します。
https://docs.google.com/spreadsheets/d/GOOGLE_SHEET_ID/edit#gid=0GOOGLE_SHEET_IDの部分が
sheetIdになります。
取得したsheetIdをgridsome.config.jsのGOOGLE_SHEET_IDの部分に貼り付けますスプレッドシートからデータを取得する
1.GraphQL でデータを取得してみる
Introduction to GraphQL | GraphQL
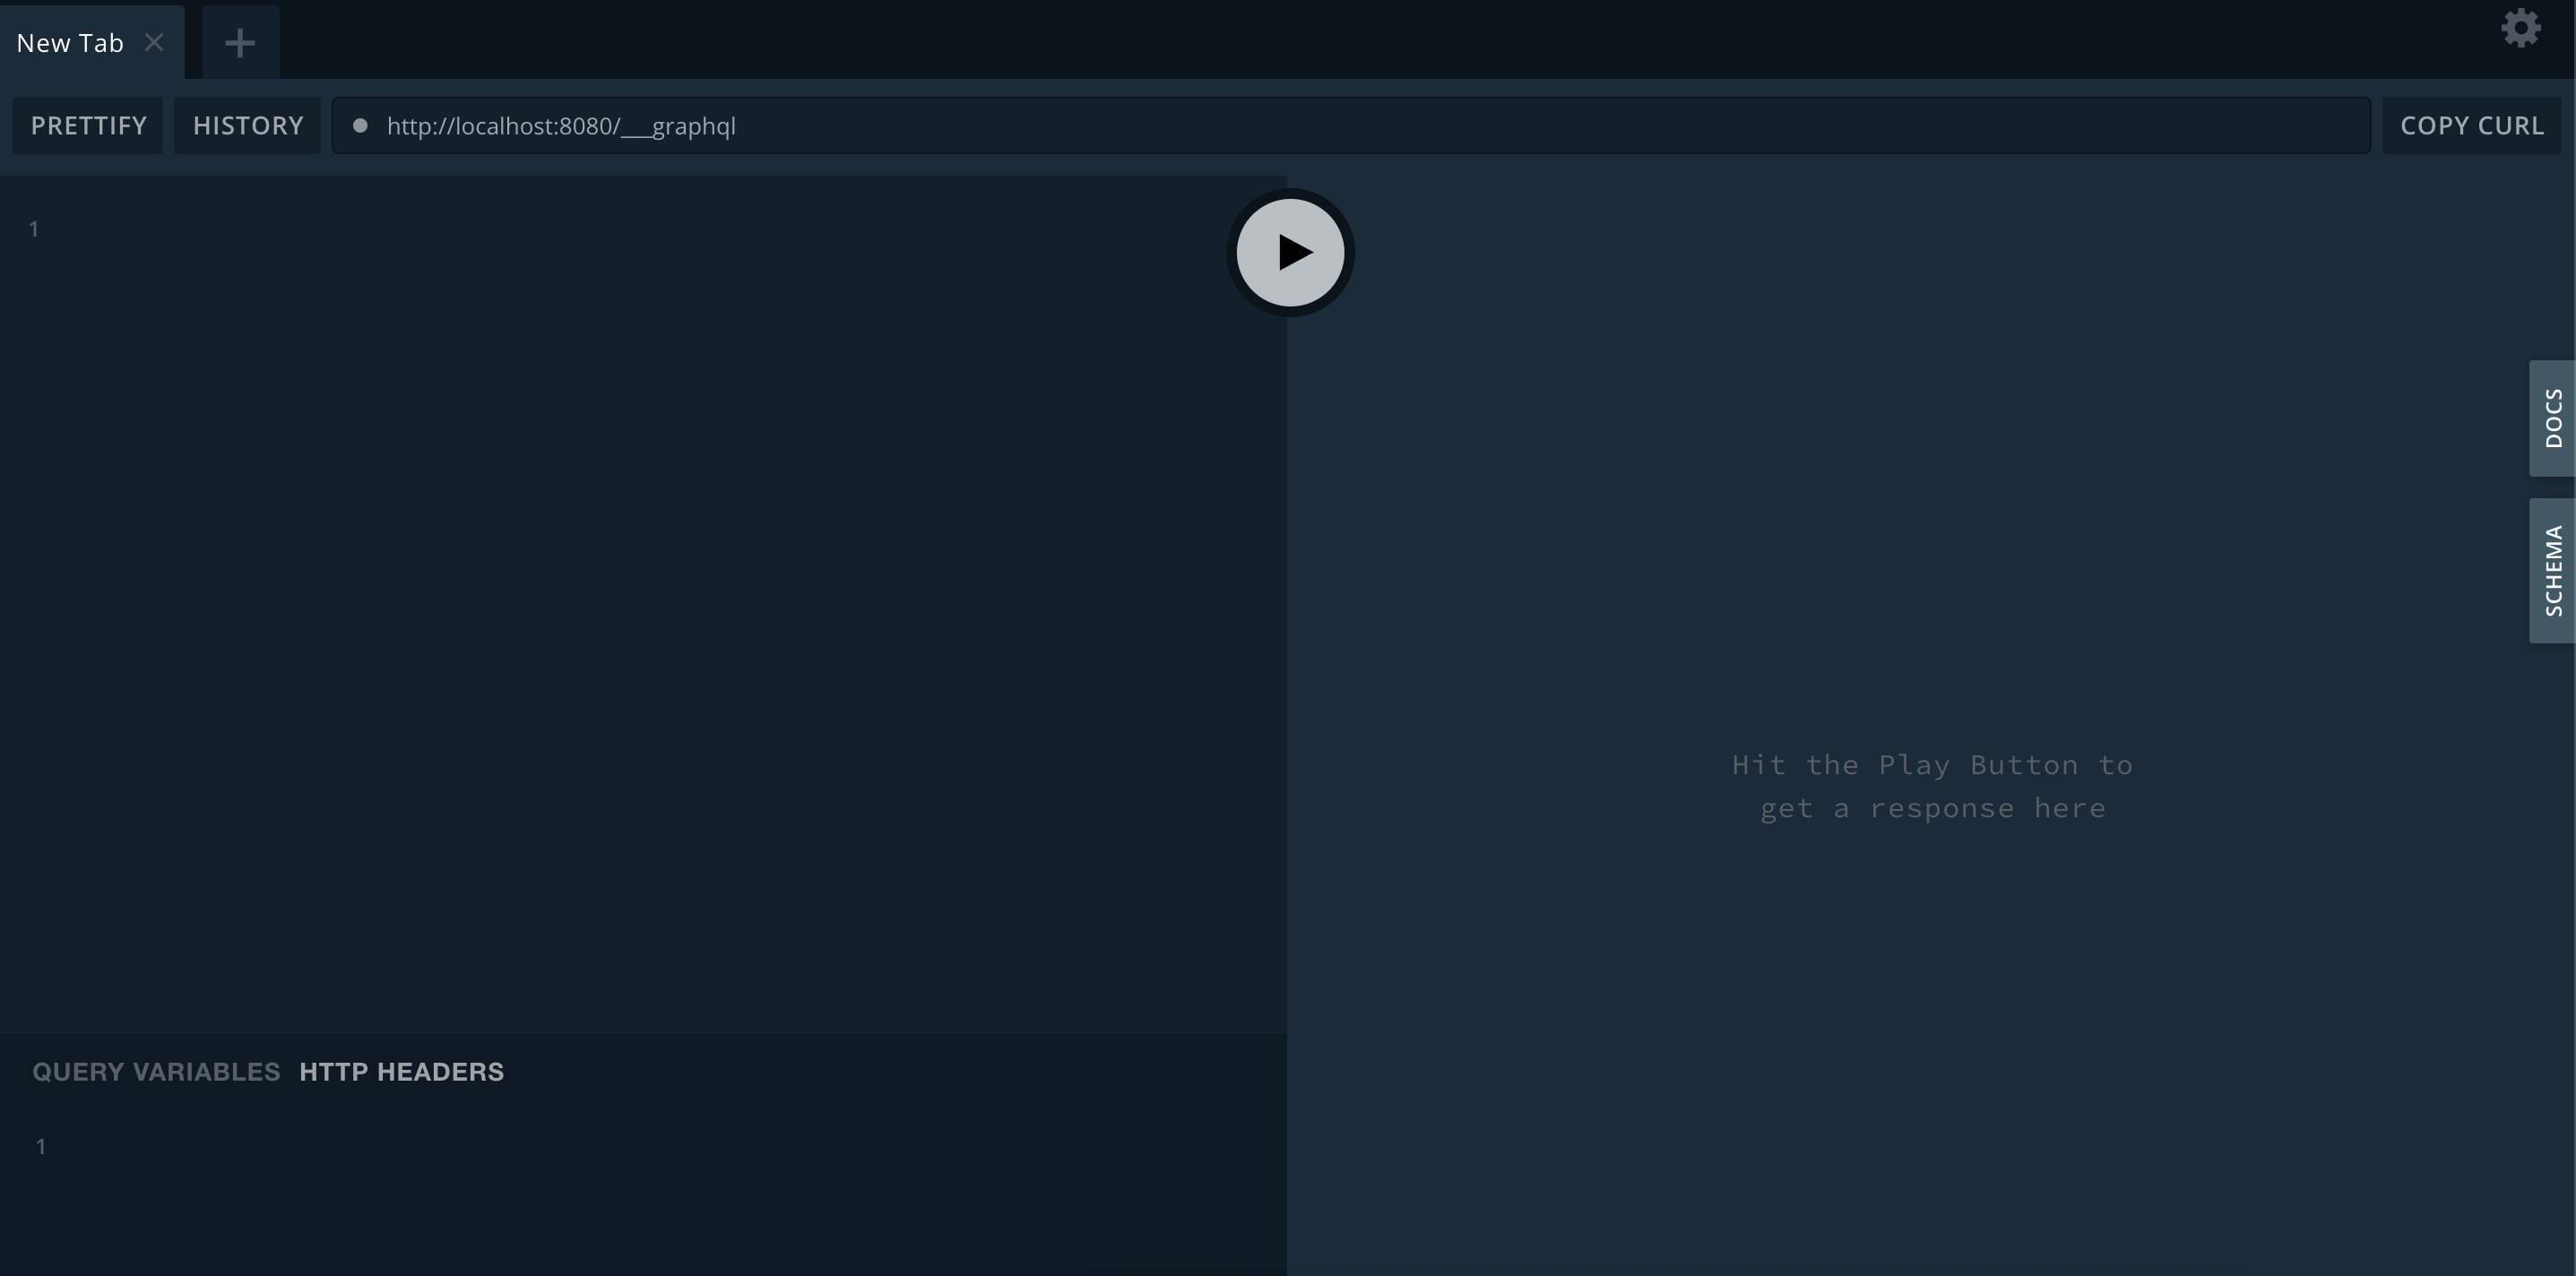
$ gridsome develop
http://localhost:8080/___explore
ここにアクセスしましょう
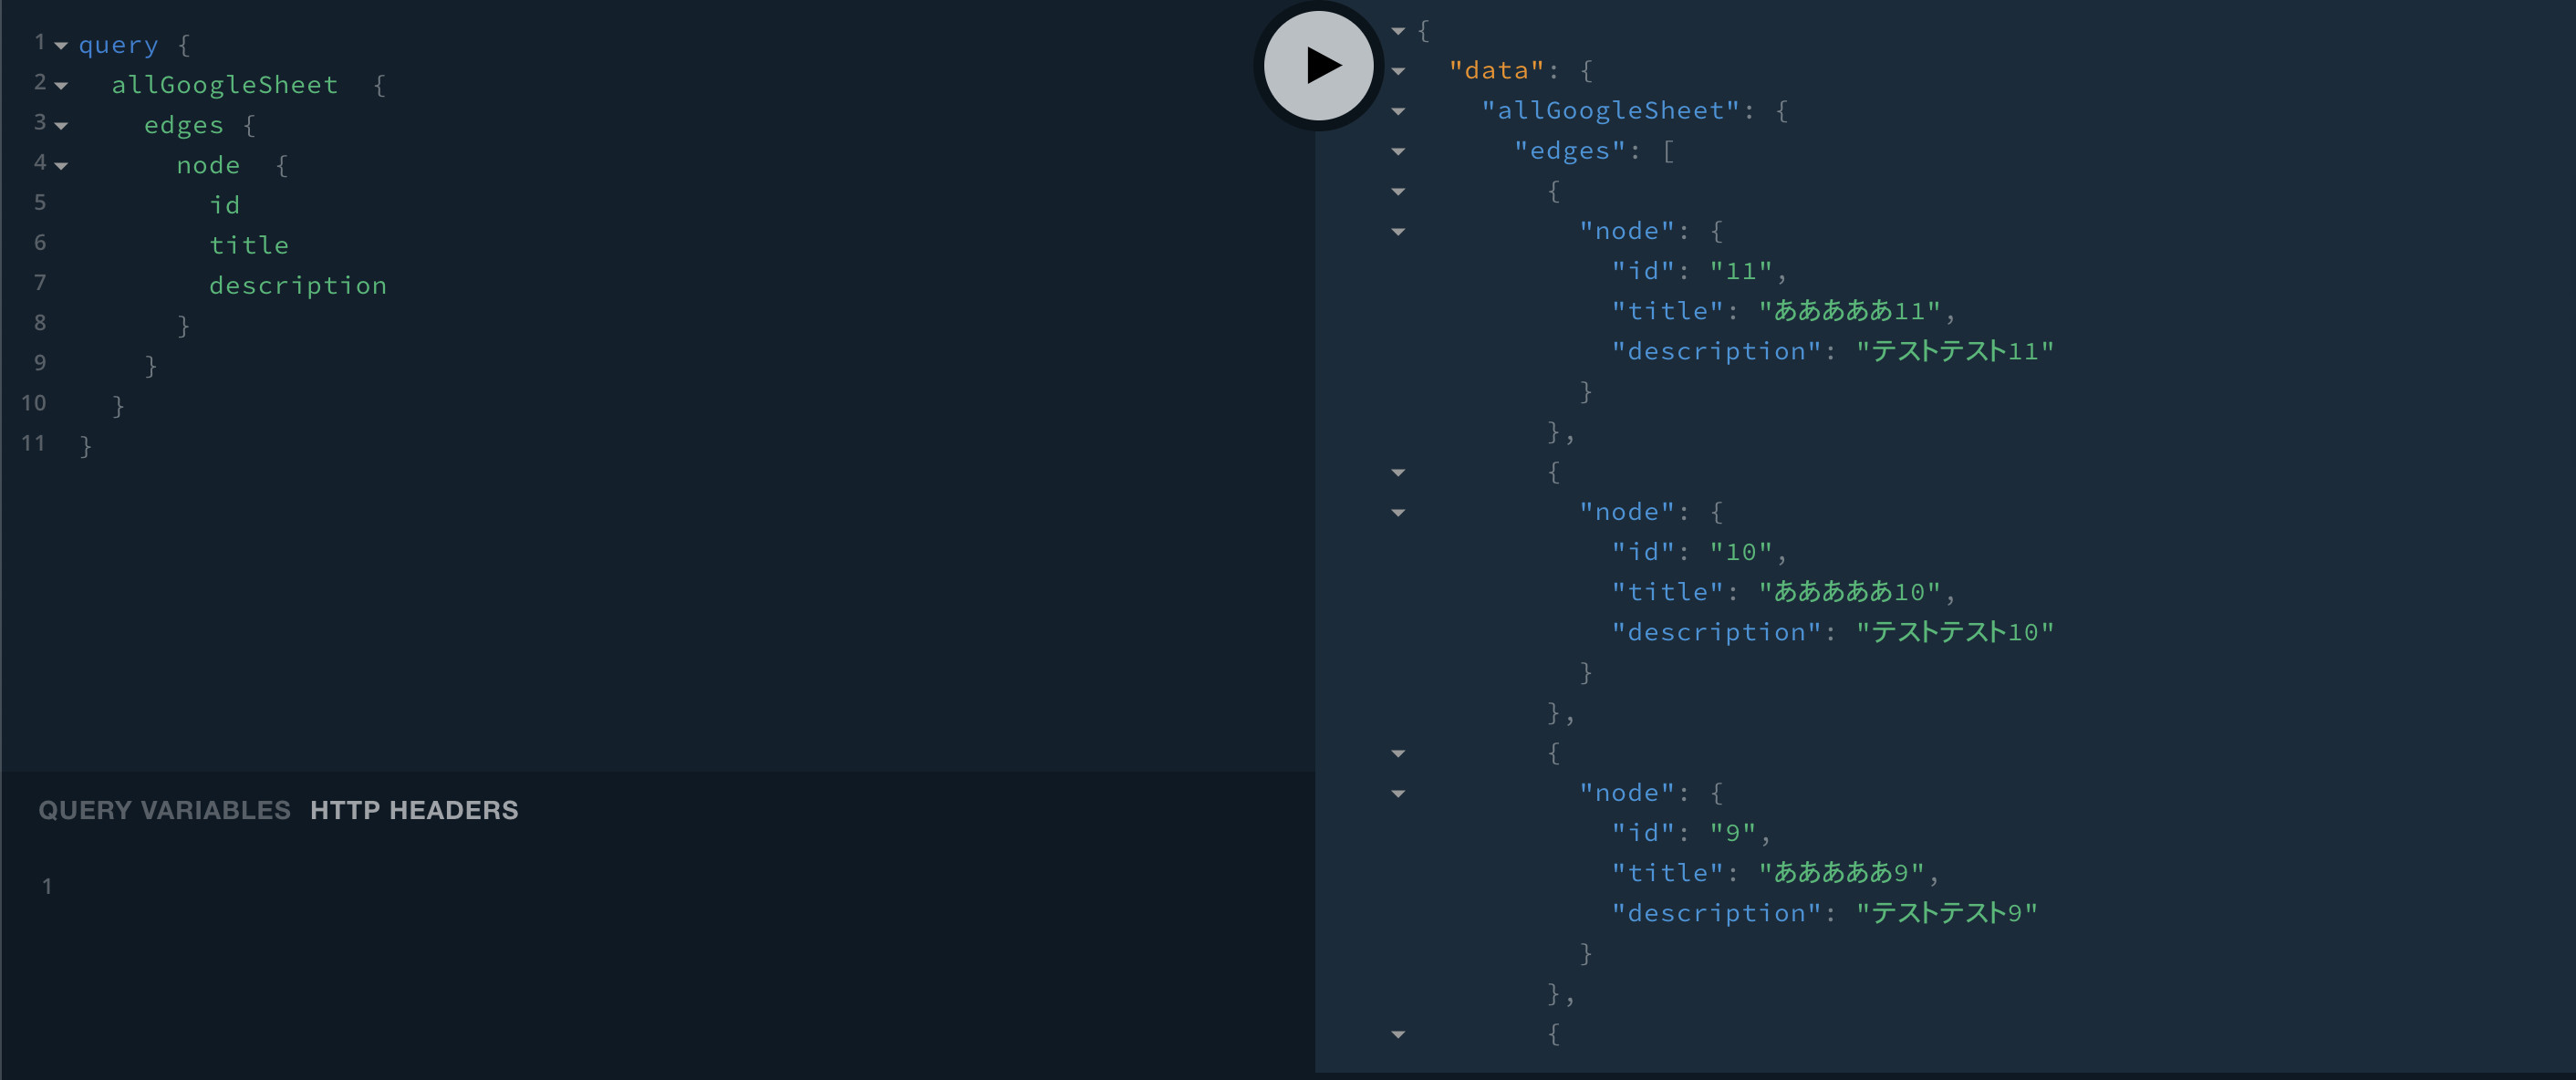
実際にサイト内でアクセスする際に使用するクエリーを作って確認してみましょう
query {
  allGoogleSheet  {
    edges {
      node  {
        id
        title
        description
      }
    }
  }
}
これを実行すると下記のような結果が得られます。
{
  "data": {
    "allGoogleSheet": {
      "edges": [
        {
          "node": {
            "id": "11",
            "title": "あああああ11",
            "description": "テストテスト11"
          }
        },
        {
          "node": {
            "id": "10",
            "title": "あああああ10",
            "description": "テストテスト10"
          }
        },
        {
          "node": {
            "id": "9",
            "title": "あああああ9",
            "description": "テストテスト9"
          }
        },
        {
          "node": {
            "id": "8",
            "title": "あああああ8",
            "description": "テストテスト8"
          }
        },
        {
          "node": {
            "id": "7",
            "title": "あああああ7",
            "description": "テストテスト7"
          }
        },
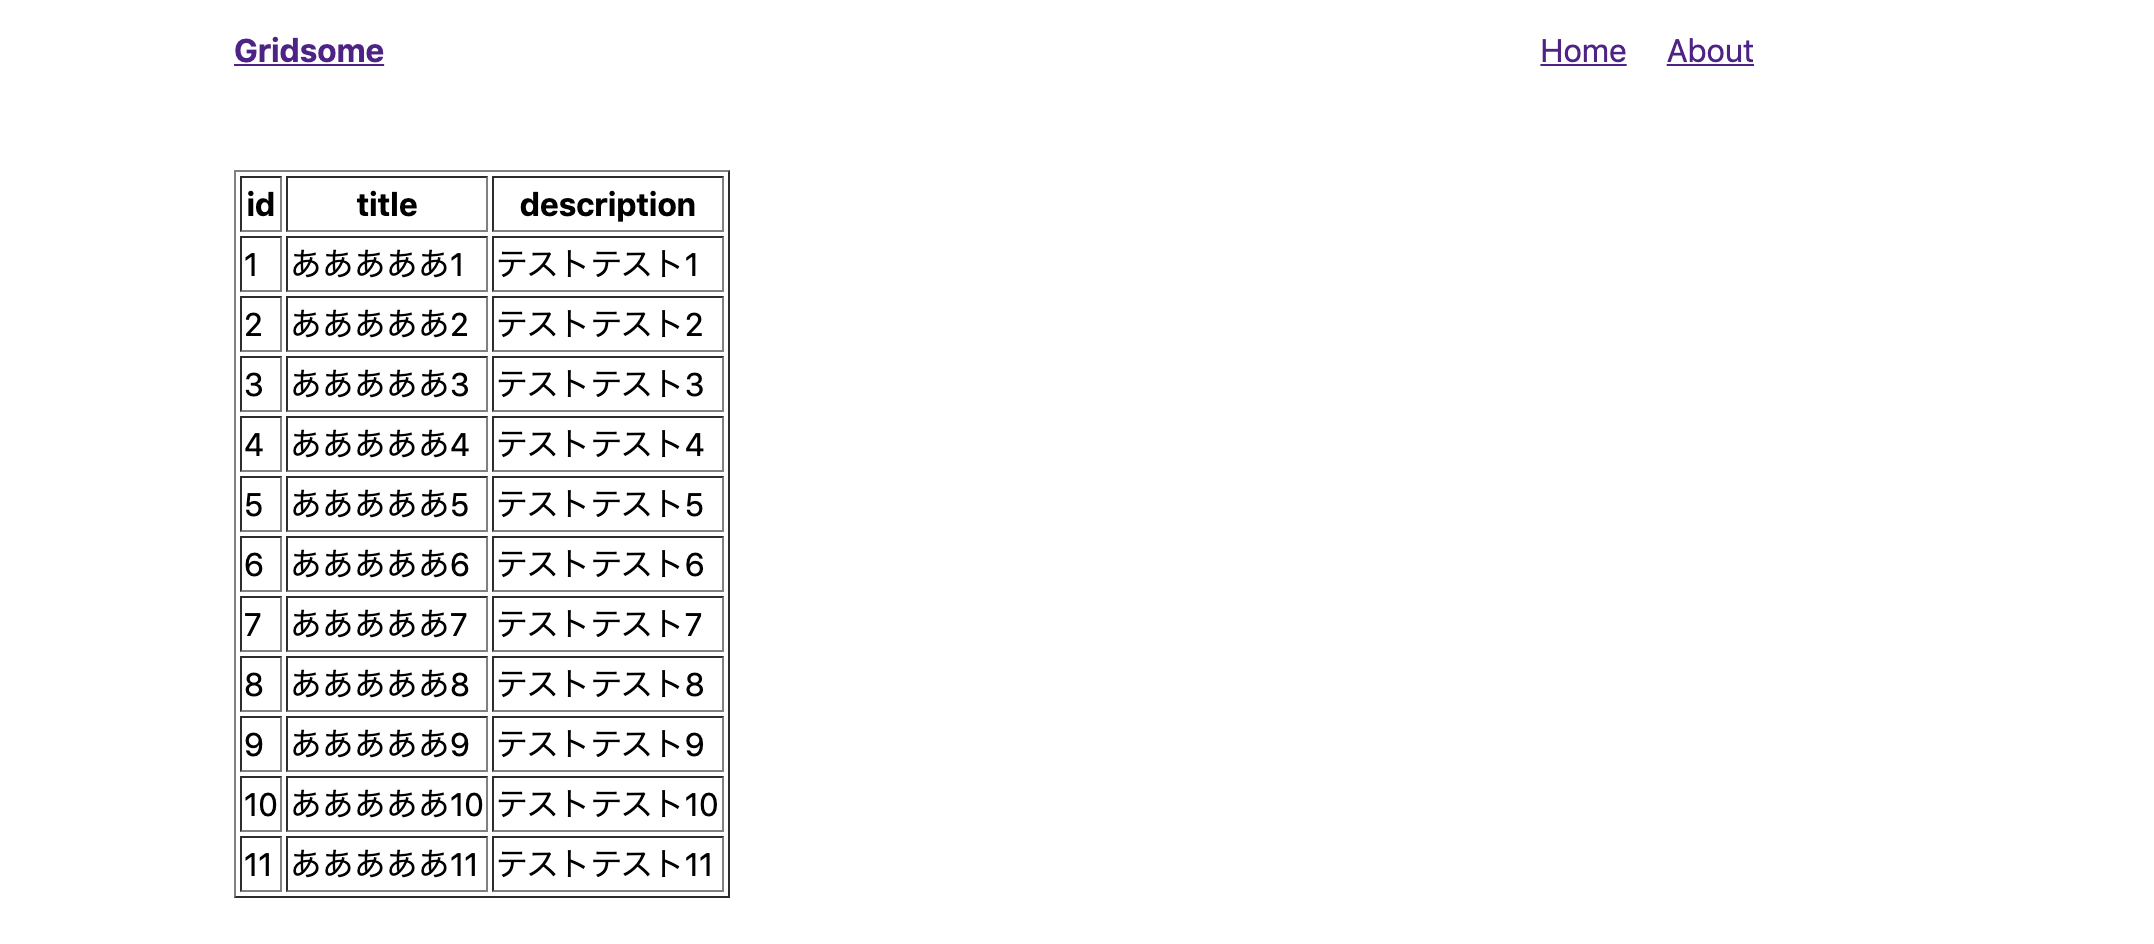
2.スプレッドシートのデータをサイトに表示させる
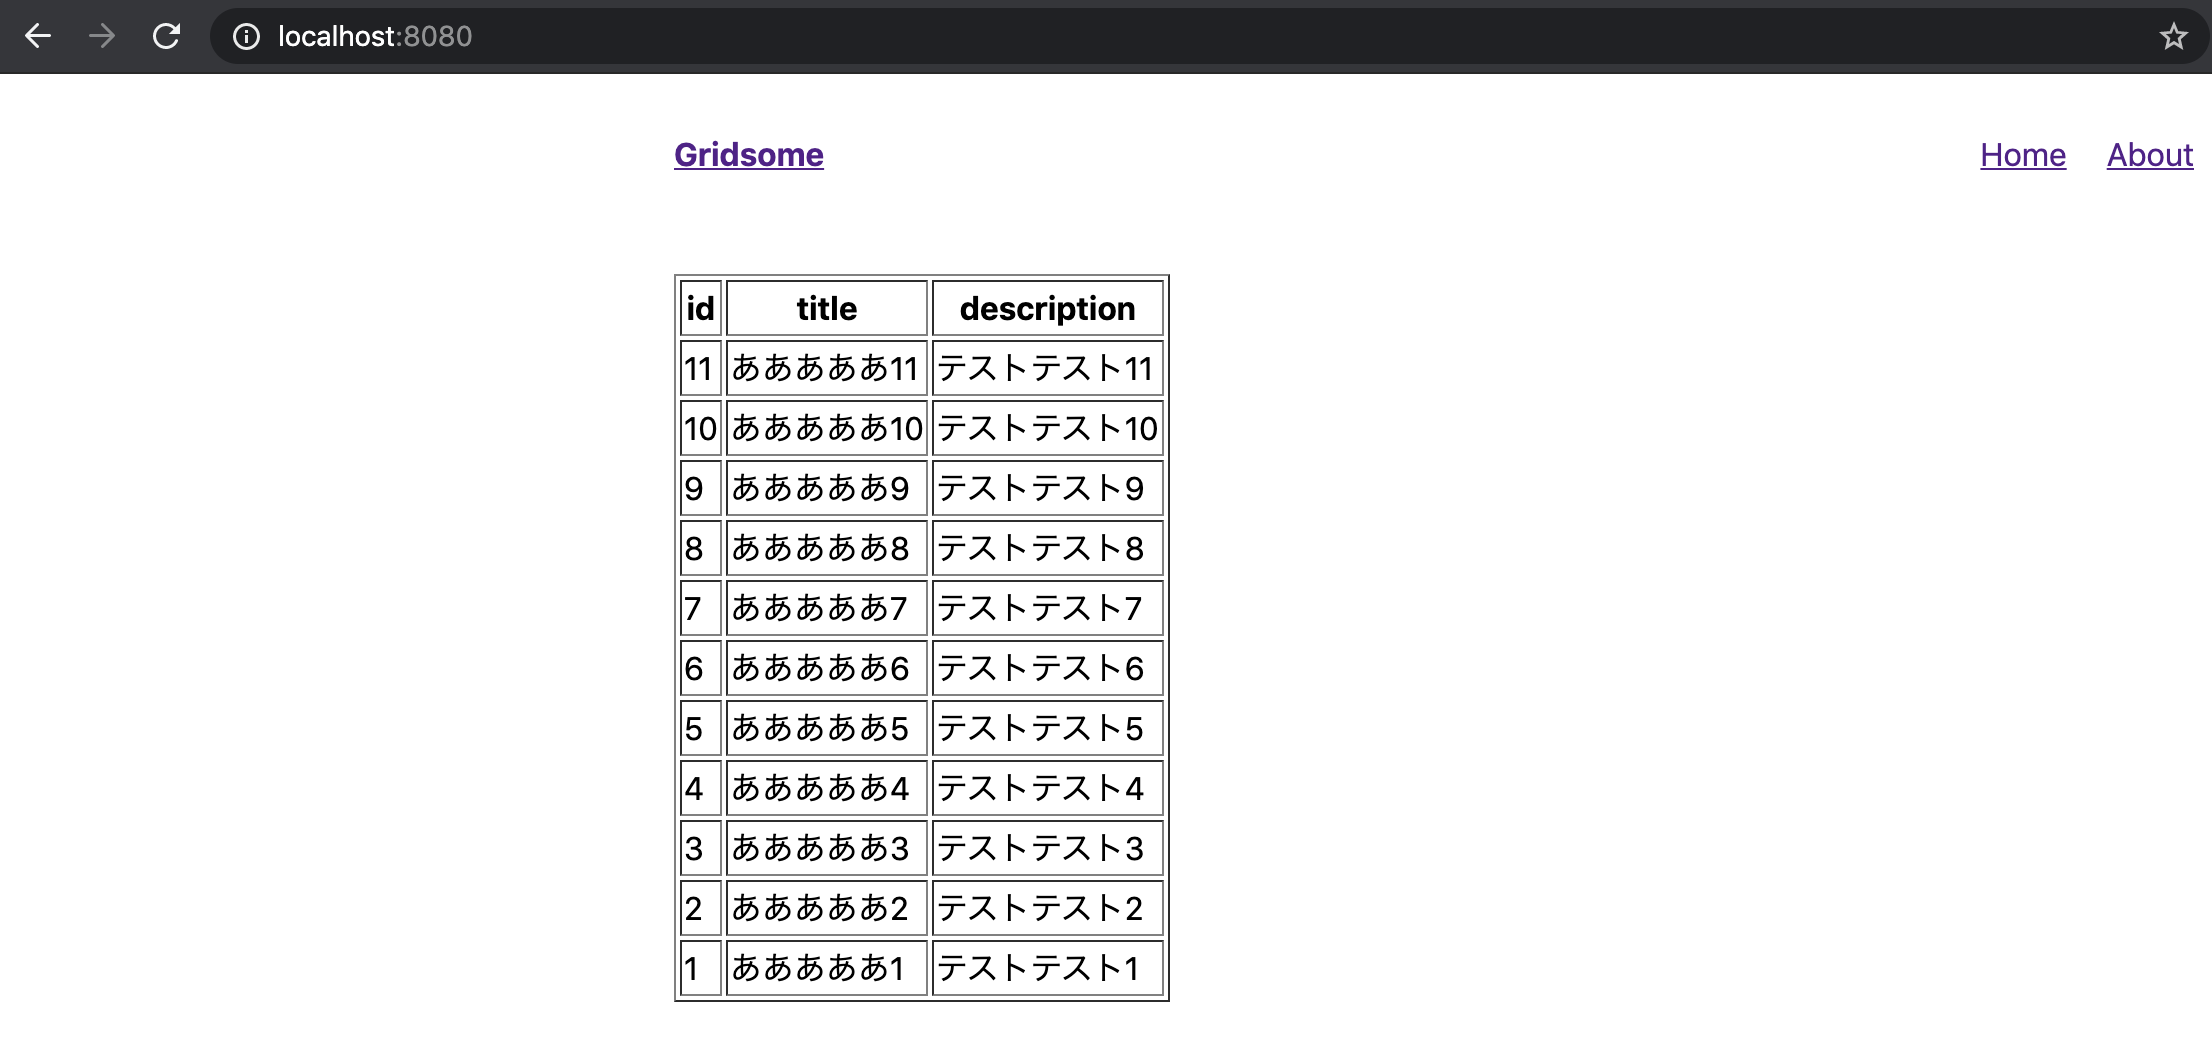
<page-query>ここのブロックに目的のquery(1.GraphQL でデータを取得してみるで作成したやつ)を記載します。/src/pages/Index.vue<template> <Layout> <table border="1"> <thead> <tr> <th>id</th> <th>title</th> <th>description</th> </tr> </thead> <tbody> <tr v-for="page in $page.allGoogleSheet.edges" :key="page.id"> <td>{{ page.node.id }}</td> <td>{{ page.node.title }}</td> <td>{{ page.node.description }}</td> </tr> </tbody> </table> </Layout> </template> <page-query> query { allGoogleSheet { edges { node { id title description } } } } </page-query>結果
表示できました。
でもidが降順ではなく昇順がいいので昇順にしてみます。
query {
  allGoogleSheet(order: ASC, sortBy: "id")  {
    edges {
      node  {
        id
        title
        description
      }
    }
  }
}
並び替えられていますね!
templateを使ってみる
templateを使ってよくある詳細画面を作ってみましょう
1.template作成
/src/templates/googleSheet.vue<template> <layout> <div>{{$page.googleSheet.title}}</div> <div>{{$page.googleSheet.description}}</div> </layout> </template> <page-query> query Post ($path: String!) { googleSheet (path: $path) { title description } } </page-query>gridsome.config.jsmodule.exports = { siteName: 'Gridsome', plugins: [ { use: 'gridsome-source-google-sheets', options: { sheetId: 'GOOGLE_SHEET_ID', apiKey: 'GOOGLE_API_KEY', // type: 'TYPE_NAME', //Optional - default is googleSheet. Used for graphql queries. } } ], templates: { googleSheet: [ { path: '/:id', component: './src/templates/googleSheet.vue' } ] } }作成したtemplateのパスを指定します。
pathは/:idとすることで
http://localhost:8080/:id=>http://localhost:8080/1これでアクセスするとidが1のデータを取得し templateに表示されます。2.リンク作成
/src/pages/Index.vue<template> <Layout> <table border="1"> <thead> <tr> <th>id</th> <th>title</th> </tr> </thead> <tbody> <tr v-for="page in $page.allGoogleSheet.edges" :key="page.id"> <td><g-link :to="page.node.id">{{ page.node.id }}</g-link></td> <td>{{ page.node.title }}</td> </tr> </tbody> </table> </Layout> </template> <page-query> query { allGoogleSheet(order: ASC, sortBy: "id") { edges { node { id title description } } } } </page-query>
idのリンクを押すと対応したtitleと詳細が出るようになりました。
最後に
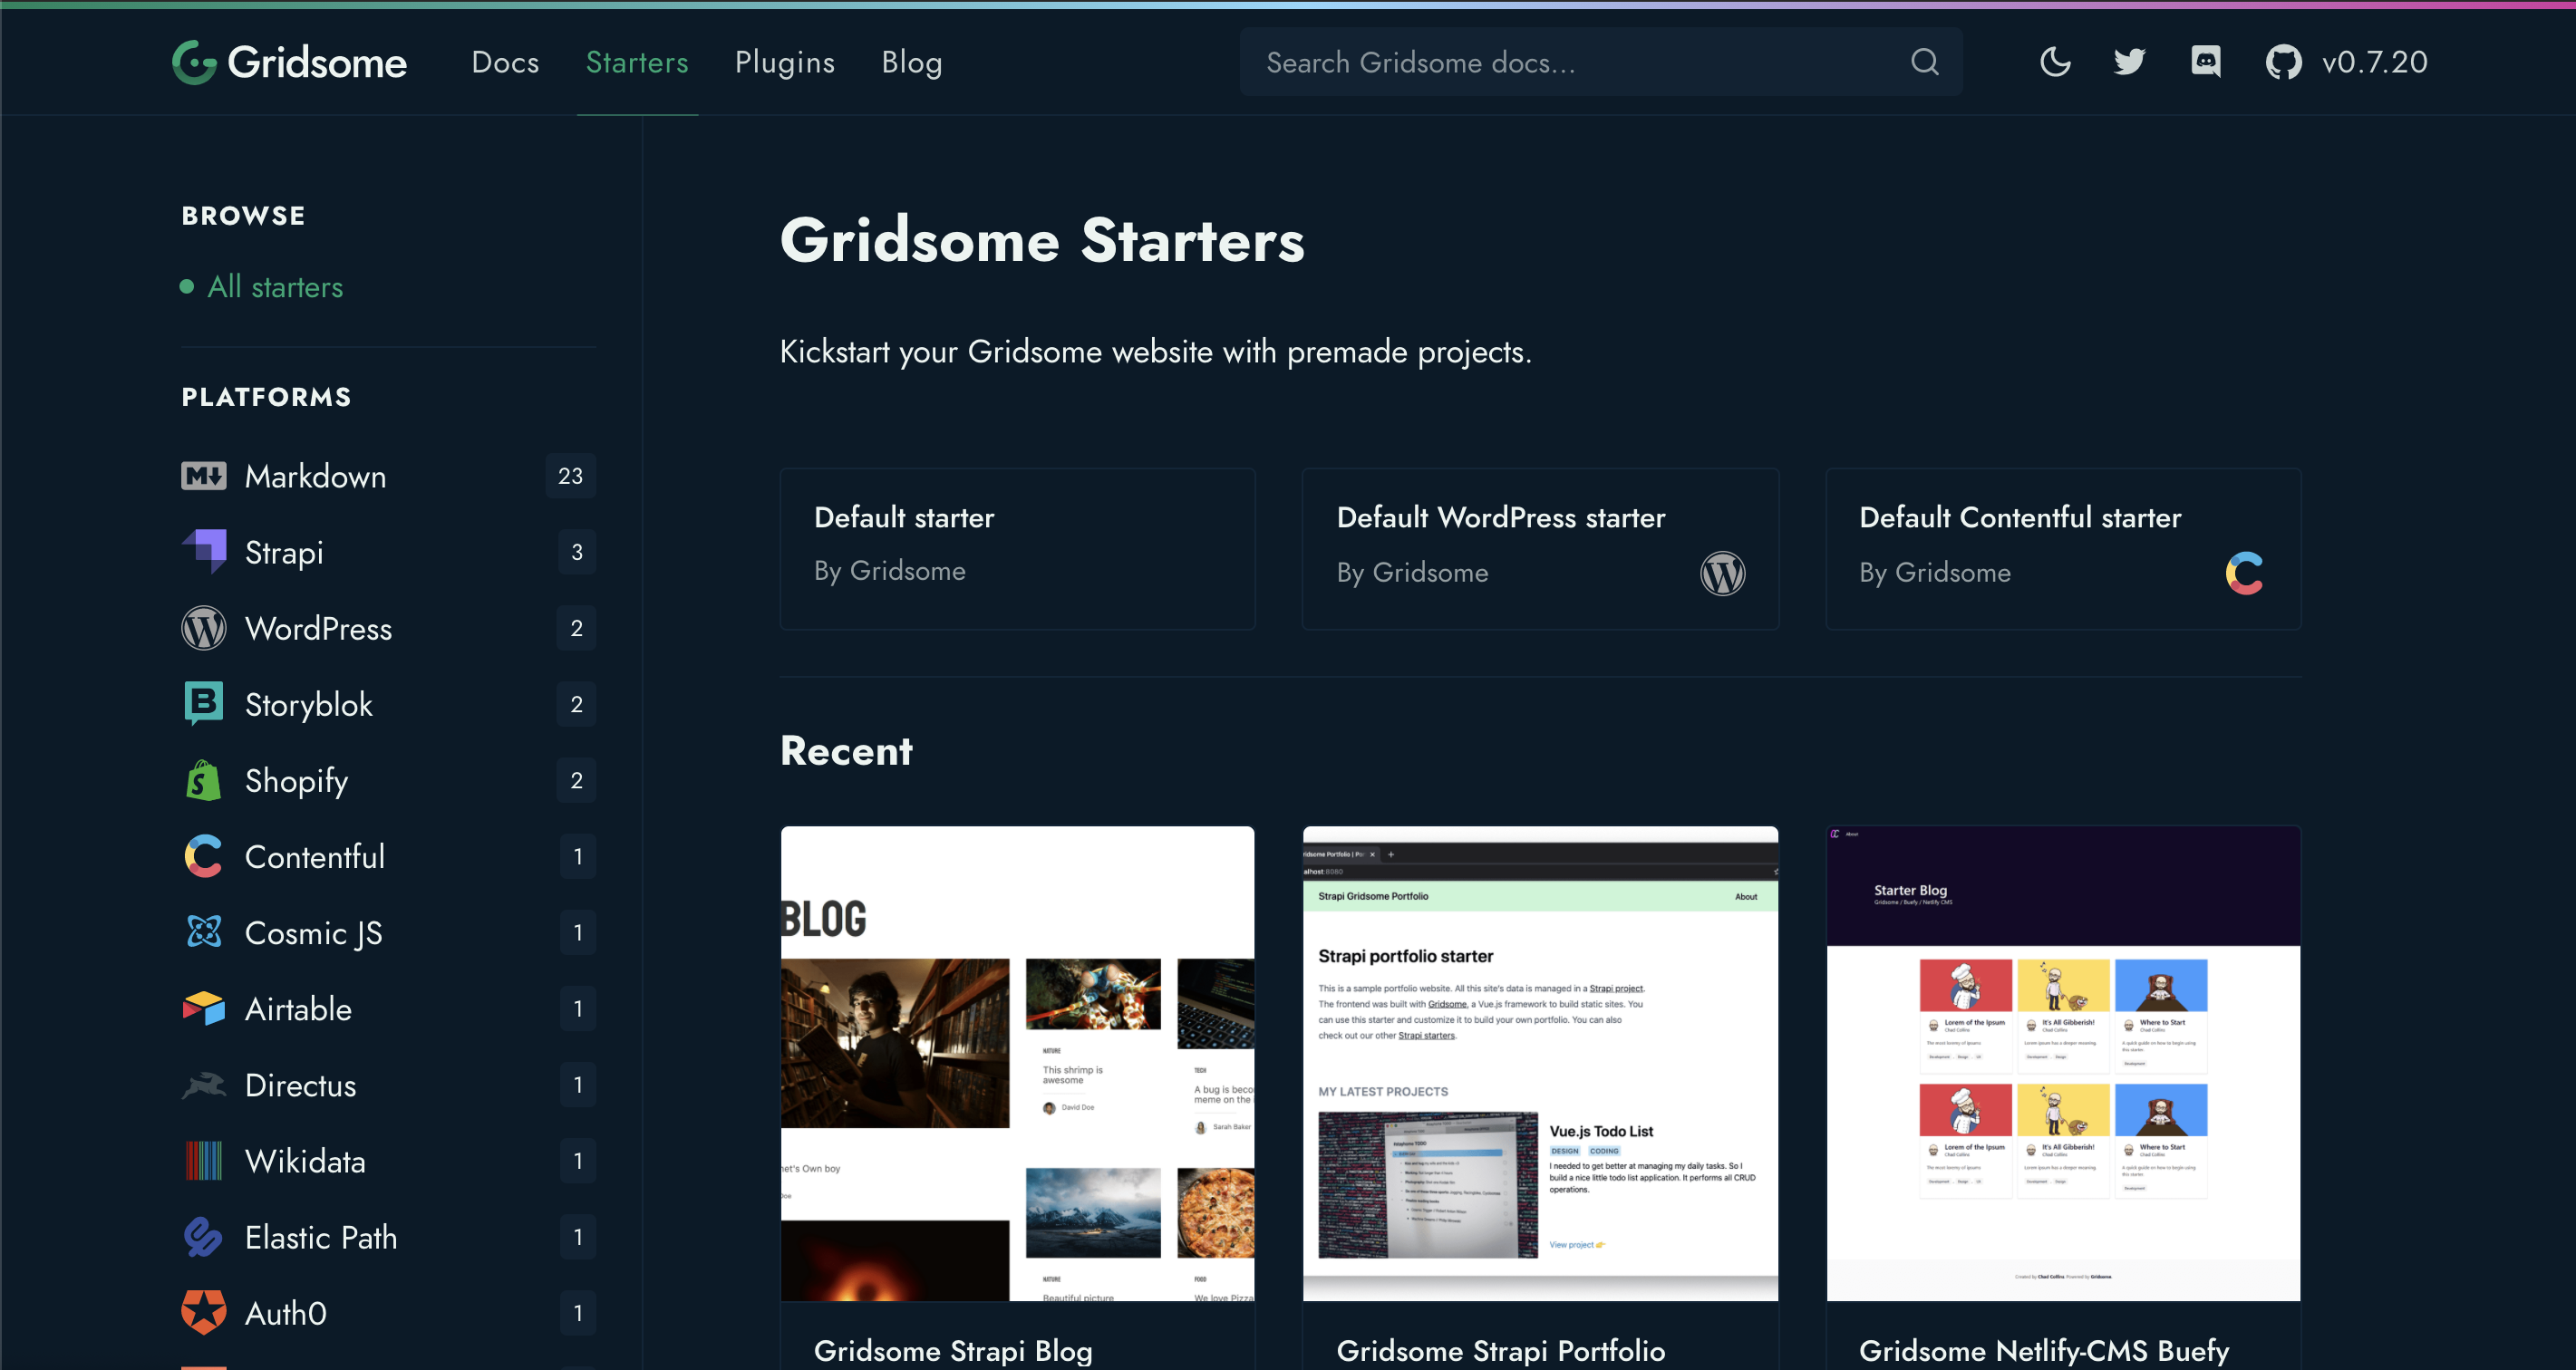
Gridsomeのプロジェクト作成は特に指定なして今回は作成しましたが公式でstarterがいくつか用意されているのでより効率よく目的のサイトを作成できると思います。
blog系のスターター + Headless CMSとかでJamStackなブログを作ってもいいですね.
gridsome-source-google-sheetsのプラグインを利用すると,
スプレッドシートAPIをそのまま利用してシートデータを取得するのではなく、Graphqlを利用してデータを取得するので扱いやすく、フロントエンドに集中できると感じたのでよかったです。
また、スプレッドシートでデータを用意できれば個人で開発する小規模のものや、短期間でサクッとものを作りたい時などに良さそうと感じました。$ gridsome buildで静的サイト生成するときにスプレッドシートのデータを取得してくれるのでvercelやnetlifyを利用してデプロイ時にbuildコマンドを走らせるようにすればサイトが最新の状態に更新されかつサクサク快適に動くサイトが作れそうですね。
Gridsomeに関しては今回スプレッドシートのプラグインを使いたくて使ってみたばかりなので
このプラグインおすすめだよなどありましたら教えてくださるとありがたいです。
参考させていただいたもの


- 投稿日:2020-09-28T00:10:03+09:00
お手頃・高機能スライダーはSwiper使っておけばいい
概要
実装をする中で実装可能だけど、そこに時間あんまり費やしたくないなぁって時結構ありますよね。
画像のスライダー機能の実装でそのような状況になりました。
自作実装もできるけど。。アニメーションを場面ごと切り替えたりするのが結構手間><
そこで、よく使われているライブラリを探していたところSwiperを見つけて実装がとても楽だったので共有したいと思います。実装例
スライダーで使うcssをimportする
index.tsximport "swiper/swiper.scss"; import 'swiper/components/pagination/pagination.scss';スライダー用のコンポーネントを実装する
SwiperComponent.tsximport * as React from 'react'; import SwiperCore, { Pagination, Autoplay } from "swiper"; import { Swiper, SwiperSlide } from "swiper/react"; SwiperCore.use([Pagination, Autoplay]); interface Props { imageData: Array<string>; // trueで自動でスライダーアニメーションが動く isAuto: boolean; // trueでpaginationクリックでスライダーアニメーションが動く clickable: boolean } const SwiperComponent: React.FC<Props> = (props) => { return ( <div> <Swiper pagination={{ clickable: props.clickable }} autoplay={props.isAuto}> {props.imageData.map((imageSrc, i) => { return ( <SwiperSlide key={`${imageSrc}${i}`}> <img key={`${imageSrc}`} src={imageSrc} /> </SwiperSlide> ); })} </Swiper> </div> ); }; export default SwiperComponent;これだけ!!
あとはスライダー用のコンポーネントをスライダー実装したい箇所に組み込んであげるだけ!
<SwiperComponent imageData={["image/image1.jpg", "image/image2.jpg"]} isAuto={true} clickable={false} />これで画像スライダーの完成!
とても簡単。他にも便利な機能が山ほどあります。
スライドアニメーションもたくさんありますので色々と試してみるといいかもです。まとめ
今回は一番シンプルなスライダーを
Swiperを使って簡単な実装例と共に紹介しました。
ちょっと実装に時間かかりそうなところがめちゃくちゃシンプルに実装できましたね。
Vueにも対応しているみたい※注意点
ライブラリは便利な反面、何気なく使ってしまうと危険な時があります。
急に開発元が開発をやめたり、特定のバージョンや環境でしか動かなこともザラにあります。
ライブラリを使うときはドキュメントをしっかり読み、ライセンスの確認、使っているユーザーの数(githubスターの数)
さらには開発状況などを確認した上で慎重に使うことをお勧めします。
個人で試す、勉強で使う場合は問題ないと思いますが、
仕事として今後世に出ていくようなサービスで使う場合はその辺りは意識してライブラリは使っていくといいと思います。参照