- 投稿日:2020-09-28T17:54:24+09:00
使用中のポートを調べてプロセス削除する
- 投稿日:2020-09-28T07:49:41+09:00
MacとSSHでさくっとIPアドレスと国判定を変える
Amazonプライムである作品が「このビデオは、現在、 お住まいの地域では視聴できません」となっていました。ではアメリカからアクセスしたら利用可能になるのか調べてみました。
今回はAWSのLightsailを使い、リージョンをus-east-1にすることで、バージニア州からのアクセスとすることを目標とします。
サーバーと秘密鍵がスタンバイできたら、以下のコマンドでSSHしましょう。ホスト名(IP)と秘密鍵のパス等は置き換えてください。
ssh ec2-user@10.87.131.119 -i ~/Downloads/LightsailDefaultKey-us-east-1.pem -D 10000もしSSHが失敗し、原因がダウンロードしたての秘密鍵を利用して以下のようなWarningが出たことによるものであったら、
chmod 600 ~/Downloads/LightsailDefaultKey-us-east-1.pem
で解消します。@@@@@@@@@@@@@@@@@@@@@@@@@@@@@@@@@@@@@@@@@@@@@@@@@@@@@@@@@@@ @ WARNING: UNPROTECTED PRIVATE KEY FILE! @ @@@@@@@@@@@@@@@@@@@@@@@@@@@@@@@@@@@@@@@@@@@@@@@@@@@@@@@@@@@ Permissions 0644 for '/Users/umihico/Downloads/LightsailDefaultKey-us-east-1.pem' are too open. It is required that your private key files are NOT accessible by others. This private key will be ignored.無事SSHが成功している間に、別のターミナルを開いて以下を実行します。
networksetup -setsocksfirewallproxy Wi-fi localhost 10000
このコマンドはMacでWi-Fiを利用中の場合の設定になります。もとに戻したいときは以下のコマンドです。インスタンスの削除も忘れずに。
networksetup -setsocksfirewallproxystate Wi-fi offipinfo.ioでも無事に変更が確認できました。
しかし、Amazonプライムの該当作品は引き続き同じ文言で視聴できませんでした\(^o^)/
IP以前にamazon.co.jpである時点で弾くのが正しいですよね。多分そうなっているんでしょう。
- 投稿日:2020-09-28T01:16:33+09:00
【入門】iOS アプリ開発 #10【ゲームの各種設定(難易度やスピードレベル)】
はじめに
今回はラウンドによって変化する難易度やスピードレベルの詳細を作り込み、#5【シーケンスの設計】で作成した各画面モードを結合して、ほぼ完成の状態に持っていく(以下がイメージ動画)。ソースコードは GitHub に公開しているので参照してほしい。
※YouTube動画
仕様書
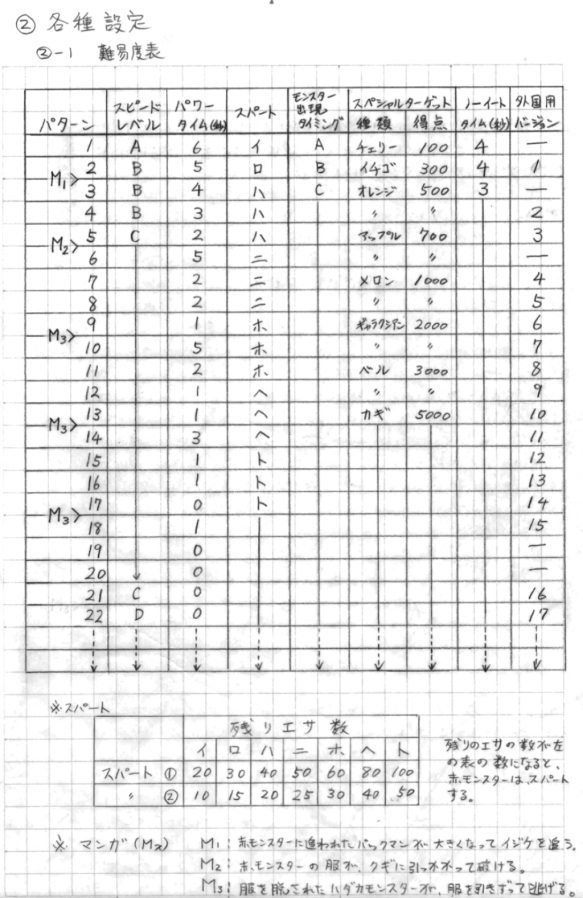
ラウンドによって変化する難易度やスピードレベルの仕様は以下の通り。
今回、難易度表の外国用バージョンと、スパート②設定は作成しない。
難易度表とスピード表の実装
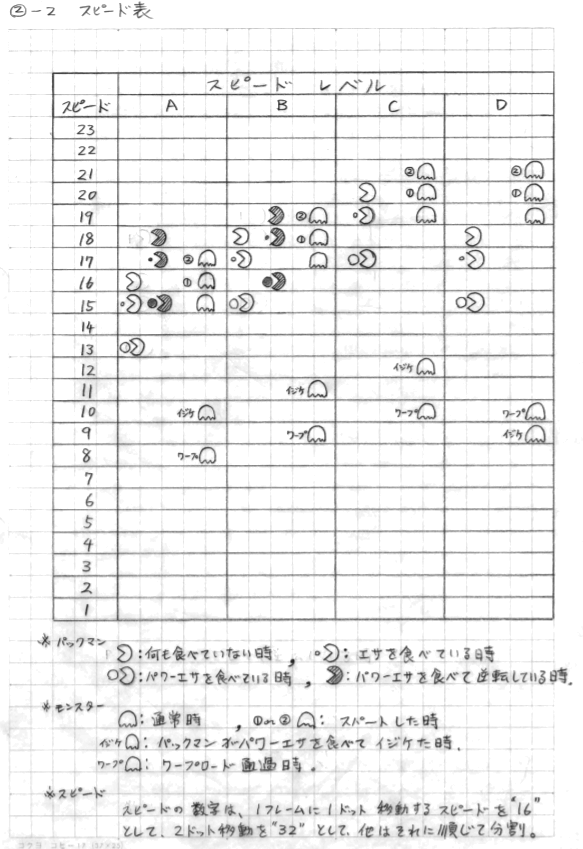
タプルの配列として、難易度表とスピード表を実装する。
以下、各画面モードの結合を除き、全て CgContextクラスに含める。enum EnLevel: Int { case Level_A = 0, Level_B, Level_C, Level_D } let table_difficultySettings: [(round: Int, levelOfSpeed: EnLevel, timeWithPower: Int, numberOfFeedsRemaingToSpurt: Int, levelOfAppearance: EnLevel, kindOfSpecialTarget: CgSpecialTarget.EnSpecialTarget, timeNotToEat: Int, intermission: Int)] = [ //round, speedLevel, PowerTime[ms], Spurtfeeds, GhostAppear, SpecialTarget, NoEatTime[ms], Intermission ( 1, .Level_A, 6000, 20, .Level_A, .Cherry, 4000, 0 ), ( 2, .Level_B, 5000, 30, .Level_B, .Strawberry, 4000, 1 ), ( 3, .Level_B, 4000, 40, .Level_C, .Orange, 3000, 0 ), ( 4, .Level_B, 3000, 40, .Level_C, .Orange, 3000, 0 ), ( 5, .Level_C, 2000, 40, .Level_C, .Apple, 3000, 2 ), ( 6, .Level_C, 5000, 50, .Level_C, .Apple, 3000, 0 ), ( 7, .Level_C, 2000, 50, .Level_C, .Melon, 3000, 0 ), ( 8, .Level_C, 2000, 50, .Level_C, .Melon, 3000, 0 ), ( 9, .Level_C, 1000, 60, .Level_C, .Galaxian, 3000, 3 ), ( 10, .Level_C, 5000, 60, .Level_C, .Galaxian, 3000, 0 ), ( 11, .Level_C, 2000, 60, .Level_C, .Bell, 3000, 0 ), ( 12, .Level_C, 1000, 80, .Level_C, .Bell, 3000, 0 ), ( 13, .Level_C, 1000, 80, .Level_C, .Key, 3000, 3 ), ( 14, .Level_C, 3000, 80, .Level_C, .Key, 3000, 0 ), ( 15, .Level_C, 1000, 100, .Level_C, .Key, 3000, 0 ), ( 16, .Level_C, 1000, 100, .Level_C, .Key, 3000, 0 ), ( 17, .Level_C, 0, 100, .Level_C, .Key, 3000, 3 ), ( 18, .Level_C, 1000, 100, .Level_C, .Key, 3000, 0 ), ( 19, .Level_C, 0, 100, .Level_C, .Key, 3000, 0 ), ( 20, .Level_C, 0, 100, .Level_C, .Key, 3000, 0 ), ( 21, .Level_C, 0, 100, .Level_C, .Key, 3000, 0 ), ( 22, .Level_D, 0, 100, .Level_C, .Key, 3000, 0 ) ] let table_speedSettings: [ (eatNone: Int, eatFeed: Int, eatPow: Int, eatNoneInPow: Int, eatFeedInPow: Int, eatPowInPow: Int, ghost: Int, ghostInSpurt: Int, ghostInPow: Int, ghostInWarp: Int) ] = [ // Level A ( eatNone: 16, eatFeed: 15, eatPow: 13, eatNoneInPow: 18, eatFeedInPow: 17, eatPowInPow: 15, ghost: 15, ghostInSpurt: 16, ghostInPow: 10, ghostInWarp: 8 ), // Level B ( eatNone: 18, eatFeed: 17, eatPow: 15, eatNoneInPow: 19, eatFeedInPow: 18, eatPowInPow: 16, ghost: 17, ghostInSpurt: 18, ghostInPow: 11, ghostInWarp: 9 ), // Level C ( eatNone: 20, eatFeed: 19, eatPow: 17, eatNoneInPow: 20, eatFeedInPow: 19, eatPowInPow: 17, ghost: 19, ghostInSpurt: 20, ghostInPow: 12, ghostInWarp: 10 ), // Level D ( eatNone: 18, eatFeed: 17, eatPow: 15, eatNoneInPow: 18, eatFeedInPow: 17, eatPowInPow: 15, ghost: 19, ghostInSpurt: 20, ghostInPow: 10, ghostInWarp: 9 ) ]このタプルの配列からラウンドに合わせたデータを取り出して、CgContext クラスのメンバにそれぞれ設定する。
    /// Set difficulty of the round
    func setDifficulty() {
        let index = demo ? 0 : round-1
        let count = table_difficultySettings.count
        let table = (index < count) ? table_difficultySettings[index] : table_difficultySettings[count-1]

        levelOfSpeed = table.levelOfSpeed
        timeWithPower = table.timeWithPower
        numberOfFeedsRemaingToSpurt = table.numberOfFeedsRemaingToSpurt
        levelOfAppearance = table.levelOfAppearance
        kindOfSpecialTarget = table.kindOfSpecialTarget
        timeNotToEat = table.timeNotToEat
        intermission = table.intermission
    }
プレイヤー(パックマン)のスピードを取得するメソッドについては以下の通り。パワーエサを食べて逆転している時と、そうでない時で取得する値を変える。
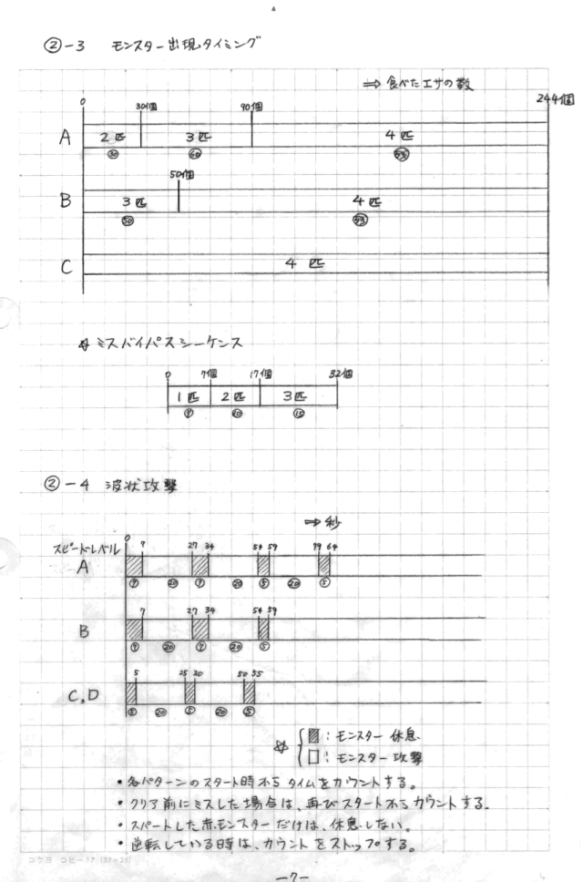
    func getPlayerSpeed(action: CgPlayer.EnPlayerAction, with power: Bool ) -> Int {
        let index = levelOfSpeed.rawValue
        let count = table_speedSettings.count
        let table = (index < count) ? table_speedSettings[index] : table_speedSettings[count-1]

        switch action {
            case .Walking where !power : return table.eatNone
            case .Walking where  power : return table.eatNoneInPow
            case .EatingFeed where !power : return table.eatFeed
            case .EatingFeed where  power : return table.eatFeedInPow
            case .EatingPower where !power : return table.eatPow
            case .EatingPower where  power : return table.eatPowInPow
            case .EatingFruit where !power : return table.eatNone
            case .EatingFruit where  power : return table.eatNoneInPow
            default: return 16
        }
    }
モンスター(ゴースト)出現タイミングの実装
パックマンがプレイ開始からエサを食べた数 numberOfFeedsEated によって、レベル毎に出現するゴーストの数を返す。
    func getNumberOfGhostsForAppearace() -> Int {
        let numberOfGhosts: Int
        // Miss Bypass Sequence
        if playerMiss {
            if numberOfFeedsEatedByMiss < 7 {
                numberOfGhosts = 1
            } else if numberOfFeedsEatedByMiss < 17 {
                numberOfGhosts = 2
            } else if numberOfFeedsEatedByMiss < 32 {
                numberOfGhosts = 3
            } else {
                playerMiss = false
                numberOfGhosts = getNumberOfGhostsForAppearace()
            }
        } else {
            switch levelOfAppearance {
                case .Level_A:
                    if numberOfFeedsEated < 30 {
                        numberOfGhosts = 2
                    } else if numberOfFeedsEated < 90 {
                        numberOfGhosts = 3
                    } else {
                        numberOfGhosts = 4
                    }
                case .Level_B:
                    if numberOfFeedsEated < 50 {
                        numberOfGhosts = 3
                    } else {
                        numberOfGhosts = 4
                    }
                case .Level_C: fallthrough
                default:
                    numberOfGhosts = 4
            }
        }
        return numberOfGhosts
    }
波状攻撃の実装
スタート時からカウントしている時間によって、ChaseMode と ScatterMode を切り替える。レベル毎に ChaseMode の時間を判定する。
    func judgeGhostsWavyChase(time: Int) -> Bool {
        var chaseMode: Bool = false
        switch levelOfSpeed {
            case .Level_A:
                chaseMode = (time >= 7000 && time < 27000) || (time >= 34000 && time < 54000)
                         || (time >= 59000 && time < 79000) || (time >= 84000)
            case .Level_B:
                chaseMode = (time >= 7000 && time < 27000) || (time >= 34000 && time < 54000)
                         || (time >= 59000)
            case .Level_C: fallthrough
            case .Level_D:
                chaseMode = (time >= 5000 && time < 25000) || (time >= 30000 && time < 50000)
                         || (time >= 55000)
        }
        return chaseMode
    }
各画面モードの結合
最後に CgGameMainクラスに、今まで作成した各モードを結合していく。
- アトラクトモード:CgSceneAttractMode
- クレジットモード:CgSceneCreditMode ※今回作成 GameSequences.swift に追加
- スタートモード:CgSceneMaze
- プレイモード:CgSceneMaze実行中
class CgGameMain : CgSceneFrame {

    enum EnMainMode: Int {
        case AttractMode = 0, CreditMode, WaitForStartButton, StartMode, PlayMode
    }

    enum EnSubMode: Int {
        case Character = 0, StartDemo, PlayDemo
    }

    private var scene_attractMode: CgSceneAttractMode!
    private var scene_creditMode: CgSceneCreditMode!
    private var scene_maze: CgSceneMaze!
    private var subMode: EnSubMode = .Character

    init(skscene: SKScene) {
        super.init()

        // Create SpriteKit managers.
        self.sprite = CgSpriteManager(view: skscene, imageNamed: "pacman16_16.png", width: 16, height: 16, maxNumber: 64)
        self.background = CgCustomBackgroundManager(view: skscene, imageNamed: "pacman8_8.png", width: 8, height: 8, maxNumber: 2)
        self.sound = CgSoundManager(binding: self, view: skscene)
        self.context = CgContext()

        scene_attractMode = CgSceneAttractMode(object: self)
        scene_creditMode = CgSceneCreditMode(object: self)
        scene_maze = CgSceneMaze(object: self)
    }

    /// Event handler
    /// - Parameters:
    ///   - sender: Message sender
    ///   - id: Message ID
    ///   - values: Parameters of message
    override func handleEvent(sender: CbObject, message: EnMessage, parameter values: [Int]) {
        if message == .Touch {
            if let mode: EnMainMode = EnMainMode(rawValue: getSequence()) {
                if mode == .AttractMode || mode == .WaitForStartButton {
                    goToNextSequence()
                }
            }
        }
    }

    /// Handle sequence
    /// To override in a derived class.
    /// - Parameter sequence: Sequence number
    /// - Returns: If true, continue the sequence, if not, end the sequence.
    override func handleSequence(sequence: Int) -> Bool {
        guard let mode: EnMainMode = EnMainMode(rawValue: sequence) else { return false }

        switch mode {
            case .AttractMode: attarctMode()
            case .CreditMode: creditMode()
            case .WaitForStartButton: break // Forever loop
            case .StartMode: startMode()
            case .PlayMode: playMode()
        }

        // Continue running sequence.
        return true
    }

    // ============================================================
    //  Execute each mode.
    // ============================================================

    func attarctMode() {
        switch subMode {
            case .Character:
                scene_attractMode.resetSequence()
                scene_attractMode.startSequence()
                subMode = .StartDemo

            case .StartDemo:
                if !scene_attractMode.enabled {
                    context.demo = true
                    sound.enableOutput(false)
                    scene_maze.resetSequence()
                    scene_maze.startSequence()
                    subMode = .PlayDemo
                }

            case .PlayDemo:
                if !scene_maze.enabled {
                    subMode = .Character
                }
        }
    }

    func creditMode() {
        context.demo = false
        if scene_attractMode.enabled {
            scene_attractMode.stopSequence()
            scene_attractMode.clear()
        }
        if scene_maze.enabled {
            scene_maze.stopSequence()
            scene_maze.clear()
        }

        context.credit += 1
        scene_creditMode.resetSequence()
        scene_creditMode.startSequence()
        sound.enableOutput(true)
        sound.playSE(.Credit)
        goToNextSequence()
    }

    func startMode() {
        context.credit -= 1
        scene_creditMode.stopSequence()
        scene_maze.resetSequence()
        scene_maze.startSequence()
        goToNextSequence()
    }

    func playMode() {
        if !scene_maze.enabled {
            subMode = .Character
            goToNextSequence(EnMainMode.AttractMode.rawValue)
        }
    }

}
またアトラクトモードにはキャラクター紹介に加えてプレイのデモがある。
こちらは、demo のフラグで、スワイプ操作と予め用意した操作テーブルを切り替えることで簡単に実装できた。操作テーブルと取得メソッドは CgContextクラスに実装。
スタートからのフレーム数によって方向を取り出す。let table_operationInDemo: [ (frameCount: Int, direction: EnDirection) ] = [ (9, .Left), (36, .Down), (61, .Right), (82, .Down), (109, .Right), (133, .Up), (162, .Right), (189, .Up), (215, .Right), (238, .Down), (261, .Right), (308, .Down), (335, .Left), (523, .Up), (555, .Right), (569, .Up), (609, .Left), (632, .Up), (648, .Right), (684, .Up), (732, .Left), (831, .Down), (864, .Left), (931, .Up), (948, .Left), (970, .Up), (1063, .Right), (1113, .Down), (1157, .Right), (1218, .Down) ] func getOperationForDemo() -> EnDirection { guard(demoSequence < table_operationInDemo.count) else { return .None } let table = table_operationInDemo[demoSequence] var direction: EnDirection = .None if counterByFrame >= table.frameCount { direction = table.direction demoSequence += 1 } return direction }getOperationForDemo メソッドで操作方向を取得してプレイヤーに設定する。CgSceneMazeクラスの sequenceUpdating シーケンスに追加実装。
    func sequenceUpdating() {
        // Operate player in demonstration automatically.
        if context.demo {
            let direction = context.getOperationForDemo()
            if direction != .None {
                player.targetDirecition = direction
            }
        }

        // 以下、省略
まとめ
ようやく、ほぼ完成の状態になった。
ゲームの動作スピードも問題ない。
ソースコードも 5000行程度のままで、結構簡単にできるものだ。次回は、せっかく自作しているので色々とアレンジを行って完成としたい。
- 投稿日:2020-09-28T00:28:19+09:00
Mac HomebrewでPHPをインストールする
目的
- MacにHomebrewを使ってPHPを導入する方法をまとめる
実施環境
- ハードウェア環境
項目 情報 OS macOS Catalina(10.15.5) ハードウェア MacBook Pro (13-inch, 2020, Four Thunderbolt 3 ports) プロセッサ 2 GHz クアッドコアIntel Core i5 メモリ 32 GB 3733 MHz LPDDR4 グラフィックス Intel Iris Plus Graphics 1536 MB
- ソフトウェア環境
項目 情報 備考 Homebrew バージョン 7.4.8 Homwbrewを用いて導入 前提条件
- Homebrewが導入され
$ brewコマンドを実行できること。前提情報
- 本記事ではPHP 7.4をインストールするがインストール時のバージョン指定で他のバージョンもインストール可能である。
詳細
下記コマンドを実行してHomebrewを最新状態にする。
$ brew upgrade下記コマンドを実行してPHP 7.4をインストールする。
$ brew install php@7.4下記コマンドを実行してインストールされたPHPのバージョンを確認する。
$ php -v