- 投稿日:2020-09-22T18:46:55+09:00
Prism コードサンプル学習:03-CustomRegions
Prism コードサンプル学習:03-CustomRegions
はじめに
以下の記事の続きです。
https://qiita.com/mngreen/items/14ad9c89fef988d7c4e503-CustomRegions
本サンプルではRegionAdapterBaseクラスを用いて、既存のコントロールに領域の名称を与えるサンプルのようです。
<Window x:Class="Regions.Views.MainWindow"
        xmlns="http://schemas.microsoft.com/winfx/2006/xaml/presentation"
        xmlns:x="http://schemas.microsoft.com/winfx/2006/xaml"
        xmlns:prism="http://prismlibrary.com/"
        Title="Shell" Height="350" Width="525">
    <Grid>
        <StackPanel prism:RegionManager.RegionName="ContentRegion" />
    </Grid>
</Window>
public class StackPanelRegionAdapter : RegionAdapterBase<StackPanel> { public StackPanelRegionAdapter(IRegionBehaviorFactory regionBehaviorFactory) : base(regionBehaviorFactory) { } protected override void Adapt(IRegion region, StackPanel regionTarget) { region.Views.CollectionChanged += (s, e) => { if (e.Action == System.Collections.Specialized.NotifyCollectionChangedAction.Add) { foreach (FrameworkElement element in e.NewItems) { regionTarget.Children.Add(element); } } //handle remove }; } protected override IRegion CreateRegion() { return new AllActiveRegion(); } } /// <summary> /// Interaction logic for App.xaml /// </summary> public partial class App : PrismApplication { ... (省略) ... protected override void ConfigureRegionAdapterMappings(RegionAdapterMappings regionAdapterMappings) { base.ConfigureRegionAdapterMappings(regionAdapterMappings); regionAdapterMappings.RegisterMapping(typeof(StackPanel), Container.Resolve<StackPanelRegionAdapter>()); } }
- ConfigureRegionAdapterMappingsメソッドで、領域のマッピングが登録される
- ConfigureRegionAdapterMappingsメソッドはBootstrap.Runメソッド内で呼び出される
- RegionAdapterBase<T>クラスはこちら
- AdaptメソッドはInitializeメソッドの中で呼び出される
- AdaptメソッドでViewに追加された子要素に対して、追加・削除時の処理を実装できそう
- IRegionAdapter.Initializeメソッドの中でこのクラスで実装されているInitializeメソッドで呼び出される。
- 上記のインターフェース+メソッド名で定義されるのは明示的なインターフェースの実装
- CreateRegionメソッドも同様にInitialilzeメソッドの中で呼び出される。
- AllActiveRegionクラスはこちら
- Regionはアクティブである状態と非アクティブである状態を持つ
- プロパティの意味が定義先を見ても分からなかった。ただ、字面から推測する限り、アクティブなRegionであるか状態を管理することで、パフォーマンスを向上させられたりできる?と思われる。
おわりに
今回はRegionAdapterBaseクラスのソースコードを中心に読みました。
一部現段階ではわからない実装もあるため、それを明らかにできるように引き続き読んでいきます。
次回、04-ViewDiscoveryについて見ていこうと思います。
- 投稿日:2020-09-22T17:45:52+09:00
C# UDPブロードキャスト送受信
ソース
ソースコードは以下の丸パクリで、ソースコードにコメントを入れたものになります。
https://www.it-swarm-ja.tech/ja/c%23/udp%E3%83%96%E3%83%AD%E3%83%BC%E3%83%89%E3%82%AD%E3%83%A3%E3%82%B9%E3%83%88%E3%82%92%E4%BD%BF%E7%94%A8%E3%81%97%E3%81%A6%E3%83%8D%E3%83%83%E3%83%88%E3%83%AF%E3%83%BC%E3%82%AF%E6%A4%9C%E5%87%BA%E3%82%92%E8%A1%8C%E3%81%86%E6%96%B9%E6%B3%95/1046508993/IPEndPoint / UdpClient
- IPEndPoint
エンドポイント(通信する口)の情報(IP アドレス / ポート番号)- UdpClient
UDPの各種制御を行うためのコントローラのようなモノサーバ
クライアントからのリクエストをポート番号8888で待ち受け、
リクエスト受信が発生すると、送信元エンドポイントに対してレスポンスを返します。static void Main(string[] args) { var Server = new UdpClient(8888); // 待ち受けポートを指定してUdpClient生成 var ResponseData = Encoding.ASCII.GetBytes("SomeResponseData"); // 適当なレスポンスデータ while (true) { var ClientEp = new IPEndPoint(IPAddress.Any, 0); // クライアント(通信相手)のエンドポイントClientEp作成(IP/Port未指定) var ClientRequestData = Server.Receive(ref ClientEp); // クライアントからのパケット受信、ClientEpにクライアントのエンドポイント情報が入る var ClientRequest = Encoding.ASCII.GetString(ClientRequestData); Console.WriteLine("Recived {0} from {1}, sending response", ClientRequest, ClientEp.Address.ToString()); // ClientEp.Address:クライアントIP Server.Send(ResponseData, ResponseData.Length, ClientEp); // クライアント情報の入ったClientEpに対してパケット送信 } }クライアント
ポート番号8888に対してリクエストをブロードキャスト送信し、
自身にレスポンスが返ってくるのを待ちます。static void Main(string[] args) { var Client = new UdpClient(); // UdpClient作成(ポート番号は適当に割当) var RequestData = Encoding.ASCII.GetBytes("Request"); // 適当なリクエストデータ var ServerEp = new IPEndPoint(IPAddress.Any, 0); // サーバ(通信相手)のエンドポイントServerEp作成(IP/Port未指定) Client.EnableBroadcast = true; // ブロードキャスト有効化 Client.Send(RequestData, RequestData.Length, new IPEndPoint(IPAddress.Broadcast, 8888)); // ポート8888にブロードキャスト送信 // 送信データを受信した相手は、自分(クライアント)のエンドポイント情報を知ったはずなので、 // そこに対してパケットを送信してくれるのを待つ var ServerResponseData = Client.Receive(ref ServerEp); // サーバからのパケット受信、ServerEpにサーバのエンドポイント情報が入る var ServerResponse = Encoding.ASCII.GetString(ServerResponseData); // ServerEp.Address / ServerEp.Port でサーバのIP/ポート番号を取得 Console.WriteLine("Recived {0} from {1}:{2}", ServerResponse, ServerEp.Address.ToString(), ServerEp.Port.ToString()); Client.Close(); }
- 投稿日:2020-09-22T17:14:28+09:00
T4を使った固定サイズ配列を含む構造体の生成
やりたいこと
byte配列 から 固定サイズの配列を含む構造体 に変換(デシリアライズ)したいです。
固定サイズの配列を含む構造体 は、『他の言語またはプラットフォームのデータ ソースと相互運用する』のような場面で有用かと思います。(MS公式 の文言を拝借)
データ構造
今回は以下のデータ構造を想定しています。
先頭に 4Byte の単一データがあり、以降に 3Byte のデータが隙間なく 128個 並んでいます。
対象データ構造の実装イメージ
直観的には以下のように書きたいですが、C#8.0 ではビルドできません。
// 3Byteの構造体(ここはビルドできます)
[StructLayout(LayoutKind.Sequential, Size = 3)]
readonly struct My3Bytes
{
    public readonly byte b0, b1, b2;
}

// データ構造の実装(C#8.0ではビルドできません)
[StructLayout(LayoutKind.Sequential, Size = 4 + (3 * 128))]
readonly struct DeserializedData
{
    public readonly int Param;
    public readonly My3Bytes FixedBuffer[128];  // これで固定サイズ配列を定義できない
}
実装方法
実装1. 固定サイズバッファ
構造体内に固定サイズ配列を定義する手段として、固定サイズバッファ(fixed T[])が用意されています。
これを使えば良いのですが、制約が多く扱い難い印象です…
- 配列型 に 組み込み型(byte, short, int, ...)しか指定できない(3Byteの配列を作れない)
- 当該フィールドを(構造体全体を) readonly にできない
- unsafe必須
// 固定サイズバッファ
[StructLayout(LayoutKind.Sequential)]
unsafe struct DeserializedData          // unsafe必須 / readonly不可
{
    public readonly int Param;
    public fixed int FixedBuffer[128];  // 組み込み型限定なので3Byte指定不可 / readonly不可
}
実装2. べた書き
固定サイズの配列を分解して1行ずつべたで書けば、固定サイズバッファ を使用せずに同じデータ構造を定義できます。
固定サイズバッファの制約(組み込み型 / readonly / unsafe)がなく自由度は高いですが、想像するだけで げんなり します。(宣言だけでなくgetterも必要ですし…)
// べた書き
[StructLayout(LayoutKind.Sequential, Size = 4 + (3 * 128))]
readonly struct DeserializedData
{
    public readonly int Param;
    public readonly My3Bytes FixedBuffer0;
    /* 宣言略(げんなり) */
    public readonly My3Bytes FixedBuffer127;
    public readonly My3Bytes GetFixedBuffer(int index) =>
        index switch
        {
            0 => FixedBuffer0,
            /* getter略(うんざり) */
            127 => FixedBuffer127,
            _ => throw new IndexOutOfRangeException()
        };
}
実装3. その他
良い方法ありましたら教えて下さい!
どう対応したか?
T4 テキスト テンプレート を使ってべた書きしました。 力こそパワー?
T4テキストテンプレートとは?
詳細は MS公式 で確認して下さい。(私は全部読まずに雰囲気で使っちゃっています…)
ポイントは以下と思っています。
- T4 テキスト テンプレートには、"実行時" と "デザイン時" の 2 種類があり、今回使うのは "デザイン時" の方
- テンプレートテキスト(.tt)から テキストファイル (.cs や .txt)を作成できる
- テキストファイルは即時作成される(ビルド時でない。テンプレートファイルを変更しただけで保存しなくても作成される)
テキストテンプレート
プロジェクトにファイルを追加します。
追加 → 新しい項目 → テキストテンプレート(.tt)テンプレートを書きます。
C# と同じノリで書けて、また変換テキストをすぐに確認できるので雰囲気で使えます。
今回は対応していませんが、GetEnumerator() や インデクサ も書いておくと便利そうです。<#@ template debug="false" hostspecific="false" language="C#" #> <#@ assembly name="System.Core" #> <#@ import namespace="System.Linq" #> <#@ import namespace="System.Text" #> <#@ import namespace="System.Collections.Generic" #> <#@ output extension=".cs" #> //★出力するファイルの拡張子を指定(デフォは .txt) <# //★ソース生成に使用されるコード Func<int, int, string> CreateDeclarationFields = (start, count) => { return string.Join(Environment.NewLine, Enumerable.Range(start, count) .Select(i => "public readonly My3Bytes FixedBuffer" + i.ToString() + ";")); }; Func<int, int, string> CreateSwitchFields = (start, count) => { return string.Join(Environment.NewLine, Enumerable.Range(start, count) .Select(i => i.ToString() + " => FixedBuffer" + i.ToString() + ",")); }; #> //★以降がテキストファイルとして生成される // <auto-generated> // THIS (.cs) FILE IS GENERATED BY T4. DO NOT CHANGE IT. CHANGE THE .tt FILE INSTEAD. // </auto-generated> using System; using System.Runtime.InteropServices; namespace CSharpT4Samples { [StructLayout(LayoutKind.Sequential, Size = 3)] readonly struct My3Bytes { public readonly byte b0, b1, b2; } <# { int count = 128; //★固定配列のサイズ #> //★<#= #> 内がソースコードに展開される [StructLayout(LayoutKind.Sequential, Size = 4 + (3 * <#= count #>))] readonly struct DeserializedData { public readonly int Param; <#= CreateDeclarationFields(0, count) #> //★固定配列分フィールドを定義 public readonly My3Bytes GetFixedBuffer(int index) => index switch { <#= CreateSwitchFields(0, count) #> //★Indexのフィールドを参照 _ => throw new IndexOutOfRangeException() }; } <# } #> }生成されたテキストファイル
// <auto-generated>
// THIS (.cs) FILE IS GENERATED BY T4. DO NOT CHANGE IT. CHANGE THE .tt FILE INSTEAD.
// </auto-generated>

using System;
using System.Runtime.InteropServices;

namespace CSharpT4Samples
{
    [StructLayout(LayoutKind.Sequential, Size = 3)]
    readonly struct My3Bytes
    {
        public readonly byte b0, b1, b2;
    }

    [StructLayout(LayoutKind.Sequential, Size = 4 + (3 * 128))]
    readonly struct DeserializedData
    {
        public readonly int Param;
        public readonly My3Bytes FixedBuffer0;
        /* 宣言略(べた書きだけど手書きじゃないのでOK) */
        public readonly My3Bytes FixedBuffer127;

        public readonly My3Bytes GetFixedBuffer(int index) =>
            index switch
            {
                0 => FixedBuffer0,
                /* getter略(べた書きだけど手書きじゃないのでOK) */
                127 => FixedBuffer127,
                _ => throw new IndexOutOfRangeException()
            };
    }
}
困ったこと
テンプレートコード内で、ローカル関数 や 文字列補間($"") を使うと、VSにシンタックスエラーを指摘されました。(コードは生成されますが、エラーが取れないので気持ち悪い…)
今回は以下でお茶を濁しました。
- ローカル関数 → Func を使う
- 文字列補間 → 使わない
まとめ
固定サイズの配列を持つ構造体 の実装で、T4 を使ってフィールドをべた書きしてみました。
固定サイズバッファ(fixed T[])を使用しないことで、奇数サイズの配列 や readonly属性 に対応することができます。
よりスマートな実装がありましたらコメントで教えて頂きたいです。
環境
Visual Studio Community 2019 16.7.4
.NET Core 3.1
C# 8.0
参考にさせて頂いたページ

- 投稿日:2020-09-22T15:40:22+09:00
ASP.NET Coreでログイン認証付きMVCアプリ
はじめに
概要
前回記事ではASP.NET Coreの開発環境構築・Hello Worldを表示するWebアプリケーションを作成しました。
今回はASP.NET Coreを用いMVCアプリケーションを開発したいと思います。本記事のスコープ
- ASP.NET Core MVCアプリ開発
- SQLite連携
- ユーザーアカウント認証
ASP.NET Core MVCアプリ開発
プロジェクト作成
1.Visual Studioを開く
2.[新しいプロジェクトの作成]を選択する
3.[ASP.NET Core Web アプリケーション]を選択する
4.任意のプロジェクト名を入力し、[作成]を選択する
5.認証の項目の[変更]を選択する
6.[個別のユーザーアカウント]・[アプリ内のストアユーザーアカウント]・[OK]を選択する
7.[Web アプリケーション(モデルビューコントローラー)]・[作成]を選択する
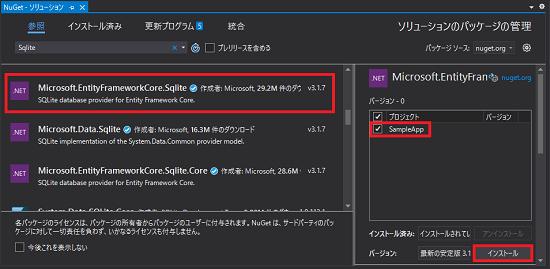
SQLiteソリューショのインストール
1.[Visual Studio]-[ツール]-[NuGetパッケージマネージャ]-[ソリューションのNuGetパッケージの管理]を開く
2.[Microsoft.EntityFrameworkCore.Sqlite]を選択する
3.インストールするプロジェクトを選択する
4.[インストール]を選択する
SQLiteの使用準備
1.Startup.csの下記箇所を変更する
Beforeservices.AddDbContext<ApplicationDbContext>(options => options.UseSqlServer(Configuration.GetConnectionString("DefaultConnection")));Afterservices.AddDbContext<ApplicationDbContext>(options => options.UseSqlite(Configuration.GetConnectionString("DefaultConnection")));2.DBへの接続情報を管理しているappsettings.jsonの下記箇所を変更する
Before"DefaultConnection": "Server=(localdb)\\mssqllocaldb;Database=aspnet-Delete2-9D2AC501-24A9-42B7-9482-DB0EC43700ED;Trusted_Connection=True;MultipleActiveResultSets=true"After"DefaultConnection": "Data Source=sample.db"3.[Visual Studio]-[ツール]-[NuGetパッケージマネージャ]-[パッケージマネージャコンソール]を開く
4.下記2つのコマンドを実行する
PM> Add-Migration Initial
PM> Update-Databaseコントローラの作成
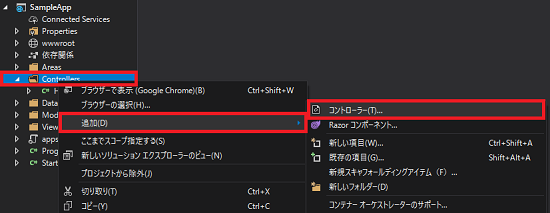
1.[Controller右クリック]-[追加]-[コントローラ]を選択する
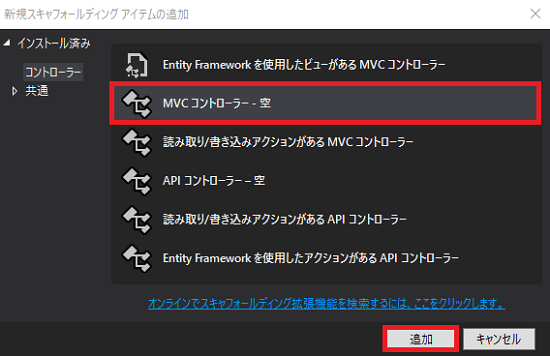
2.[MVCコントローラー・空]・[追加]を選択する
3.[コントローラークラス-空]を選択する
4.名前を[SampleController.cs]とする
5.[追加]を選択する
6.今回はログインせず開けるAuthNotRequiredと、ログイン必須なAuthRequiredの2画面を作成する。そのため、SampleControllerに2つの画面を返すメソッドをそれぞれ定義する。SampleController.csusing Microsoft.AspNetCore.Authorization; using Microsoft.AspNetCore.Mvc; namespace SampleApp.Controllers { public class SampleController : Controller { // [AllowAnonymous]を付与するとログイン不要となる [AllowAnonymous] public IActionResult AuthNotRequired() { ViewData["Message"] = "ログインが不要なページです。"; return View(); } // [Authorize]を付与するとログイン必要となる [Authorize] public IActionResult AuthRequired() { ViewData["Message"] = "ログインが必要なページです。"; return View(); } } }ビューの作成
1.画面ファイルを格納するフォルダを作成するため、[Views]フォルダを右クリックし[追加]-[新しいフォルダー]を選択する。今回は仮にSampleフォルダを作成する。
2.[Sample]フォルダを右クリックし[追加]-[ビュー]を選択し、画面ファイルを作成する。
前述の通り2画面作成するためAuthNotRequired.cshtmlとAuthRequired.cshtmlを作成する。
3.ログイン不要な画面のソースは作成する。
コントローラ作成時に変数 ViewData["Message"] にメッセージを格納したが、下記のよう記述する事で画面上に表示できる。AuthNotRequired.cshtml<div class="text-center"> <h1>@ViewData["Message"]</h1> </div>4.ログインが必要な画面のソースを作成する。
1行の記述はC#で言うところのusingで、本モデルを読み込む事でログイン情報を扱えるようになる。
そのため5行目の様に @(User.Identity.Name) と短い記述でログイン情報が表示できる。AuthRequired.cshtml@model Microsoft.AspNetCore.Identity.UI.V4.Pages.Account.Manage.Internal.IndexModel <div class="text-center"> <h1>@ViewData["Message"]</h1> <h1>Emailアドレス:@(User.Identity.Name)</h1> </div>おわりに
それでは実際に動かしてみましょう。
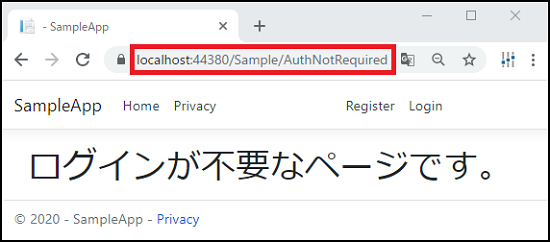
実行ボタンを押し、ログイン不要な画面 localhost:44380/Sample/AuthNotRequired にアクセスしてみます。
下画像の様にソースに記載したメッセージが表示されれば成功です。
次にログインが必要な画面 localhost:44380/Sample/AuthRequired にアクセスしてみます。ログインしていないため、ログイン画面に飛ばされれば成功です。
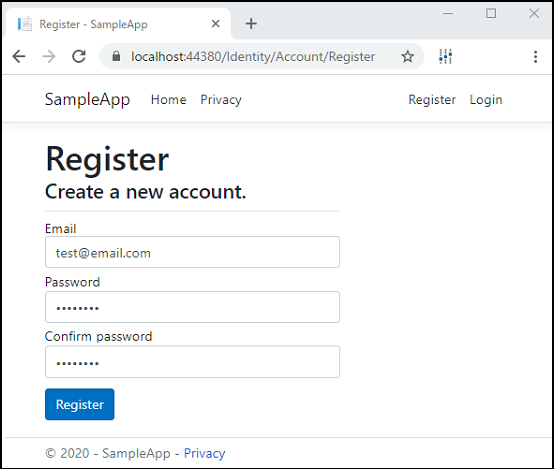
[Register as a new user]を選択してアカウントを作成してみましょう。
ご自身のEmail・パスワードを入力しRegisterを選択します。
[Click here to confirm your account]を選択しアドレスの確認処理をします。
最後に作成したアカウントでログインし、再度ログインが必要な画面にlocalhost:44380/Sample/AuthRequired にアクセスしてみます。
ログイン画面に飛ばされず、ソースに記載したメッセージと登録したメールアドレスが表示されれば成功です。


- 投稿日:2020-09-22T12:48:47+09:00
C# async / await / Taskの使い方(備忘録)
きっかけ
https://qiita.com/takmot/items/83ca6350b10af959f3db
上記記事で書いた以下コードusing Microsoft.AspNetCore.SignalR; using System.Threading.Tasks; using SignalRChat.Hubs; namespace SignalRChat { public class app { private IHubContext<ChatHub> Hub { get; set; } public app(IHubContext<ChatHub> hub) { Hub = hub; // ハブコンテキストを取得 } public async Task pushMessage(string msg) { await Hub.Clients.All.SendAsync("pushMessage", msg); // メッセージ送信 } } }
pushMessageコールの際にawaitを付けないと、この呼び出しを待たないため、現在のメソッドの実行は、呼び出しが完了するまで続行します。呼び出しの結果に 'await' 演算子を適用することを検討してください。と警告が出ます。
このTaskの扱いに困ったため、色々記事は読んでみたものの、完全には理解できなかった。
とりあえず、現在の自分の理解と対処について記載しようと思います。(補足..)
警告が出るのはasync Taskのメソッドコール時で、
SendAsyncは、awaitを付けずにコールしても警告は出ませんでした。
しかし、awaitを付けないとasync voidパターンと同様にタスクの終了が待てない、投げっぱなしになることなのでよろしくないようです。async / await / Task
上記警告が出るため、Taskに対してawaitを付ける。
awaitを使用しているメソッドにはasyncを付ける必要があるため、asyncを付ける。(下記例method_A())
そのメソッドをコールしようとすると同様に警告が出る。
そのため、コール元もawait/asyncを付ける。
async voidを使えばawaitはいらなくなるが、async voidは使うなと言われている。static async Task method_A() { await Task.Run(() => { Console.WriteLine($"task contents : {Thread.CurrentThread.ManagedThreadId}"); }); Console.WriteLine("method_A Completed"); } static async Task method_B() { await method_A(); Console.WriteLine("method_B Completed"); }
async voidを使わない理由としては以下になります。
- awaitで待ち受けできなくなり、そのためスレッドの終了を知ることが出来ない、投げっぱなし(fire and forget)になる。
- 例外を捕獲できない
そこで、以下のような実装にしました。
コメントは実行順番と、実行されるスレッドです。
ContinueWithでタスク終了後にタスクの状態を見ています。using System; using System.Threading; using System.Threading.Tasks; namespace task_sample { class Program { static void Main(string[] args) { Console.WriteLine($"Main start : {Thread.CurrentThread.ManagedThreadId}"); // 1 (スレッドA) AsyncMethod().ContinueWith((task) => { Console.WriteLine($"task.status {task.Status} : {Thread.CurrentThread.ManagedThreadId}"); // 6 (スレッドC) }); Console.WriteLine($"Main end : {Thread.CurrentThread.ManagedThreadId}"); // 4 (スレッドA) Console.ReadLine(); } static async Task AsyncMethod() { Console.WriteLine($"AsyncMethod start : {Thread.CurrentThread.ManagedThreadId}"); // 2 (スレッドA) await Task.Run(() => { Console.WriteLine($"task contents : {Thread.CurrentThread.ManagedThreadId}"); // 3 (スレッドB) }); Console.WriteLine($"AsyncMethod end : {Thread.CurrentThread.ManagedThreadId}"); // 5 (スレッドB) } } }
task.statusで以下のようなタスクのステータスが確認できます。
- TaskStatus.RanToCompletion : 正常終了した
- TaskStatus.Canceled : キャンセルされた
- TaskStatus.Faulted : 例外が発生した
Taskが戻り値を持っている場合
task.Resultで戻り値を取得できます。
using System;
using System.Threading;
using System.Threading.Tasks;

namespace task_sample
{
    class Program
    {
        static void Main(string[] args)
        {
            Console.WriteLine($"Main start : {Thread.CurrentThread.ManagedThreadId}");                      // 1 (スレッドA)
            AsyncMethod().ContinueWith((task) => {
                Console.WriteLine($"task.status {task.Status} : {Thread.CurrentThread.ManagedThreadId}");   // 6 (スレッドC)
                Console.WriteLine($"task.Result {task.Result} : {Thread.CurrentThread.ManagedThreadId}");
            });
            Console.WriteLine($"Main end : {Thread.CurrentThread.ManagedThreadId}");                        // 4 (スレッドA)

            Console.ReadLine();
        }

        static async Task<string> AsyncMethod()
        {
            Console.WriteLine($"AsyncMethod start : {Thread.CurrentThread.ManagedThreadId}");               // 2 (スレッドA)
            await Task.Run(() => {
                Console.WriteLine($"task contents : {Thread.CurrentThread.ManagedThreadId}");               // 3 (スレッドB)
            });
            Console.WriteLine($"AsyncMethod end : {Thread.CurrentThread.ManagedThreadId}");                 // 5 (スレッドB)

            return "Task Completed";
        }
    }
}
Task.Run()
Task.Run()は、
何かの通信で受信待ち→受信処理を繰り返す
無限ループを使用するような場合だけ使用するイメージで理解しました。以下記事でUDPパケット受信タスクを作りました。
https://qiita.com/takmot/items/6287911115575ab84b05参考記事
https://qiita.com/acple@github/items/8f63aacb13de9954c5da
https://qiita.com/inew/items/0126270bca99883605de
https://qiita.com/hiki_neet_p/items/d6b3addda6c248e53ef0
https://qiita.com/4_mio_11/items/f9b19c04509328b1e5c1
https://qiita.com/rawr/items/5d49960a4e4d3823722f
http://neue.cc/2013/10/10_429.html
https://stackoverflow.com/questions/62444555/can-i-omit-await-of-clients-all-sendasync-in-net-core-signalr
- 投稿日:2020-09-22T05:29:18+09:00
RazorPagesで1Form内の複数SubmitボタンでPostハンドラメソッドを切り分ける方法
1Form内の複数SubmitボタンでPostハンドラメソッドを切り分ける方法
環境:ASP.NET core 3.1, Visual Studio 2019Index.cshtml<form method="post"> <button type="submit" asp-page-handler="View">View</button> <button type="submit" asp-page-handler="Prev">Prev</button> <button type="submit" asp-page-handler="Next">Next</button> </form>Index.cshtml.cspublic class IndexPage : PageModel { public void OnPostView() { } public void OnPostPrev() { } public void OnPostNext() { } }参考:
ASP.NET Core MVCで、複数ボタンを区別するには?
https://ja.stackoverflow.com/questions/47925/asp-net-core-mvc%E3%81%A7-%E8%A4%87%E6%95%B0%E3%83%9C%E3%82%BF%E3%83%B3%E3%82%92%E5%8C%BA%E5%88%A5%E3%81%99%E3%82%8B%E3%81%AB%E3%81%AF複数ボタンのあるFormで押されたボタンを判断する
https://qiita.com/echoprogress/items/17e85ad489bddf07b540ASP.NET Core MVC 複数ボタンのあるFormでSubmit先を変えたい
http://heinlein.hatenablog.com/entry/2018/02/21/151026
- 投稿日:2020-09-22T04:03:09+09:00
MagicLeapで床にオブジェクトを配置する方法
開発環境
Unity : 2019.3.7f1
LuminOS : 0.98.11, APILevel 8
MagicLeap : UnitySDK 0.24.1
MagicLeap : ToolKit 特にバージョン表記等はないので現時点(2020/09/22)での最新今回開発したアプリのリポジトリはこちらになります
完成するもの
床を判定するやつ pic.twitter.com/zzhb4lk5g2
— 松本隆介 (@matsumotokaka11) September 21, 2020下準備
ProjectSettings > MagicLeap > ManifestSettingsにて以下の項目にチェックを入れました
- ControllerPose
- LowLatencyLightwear
- WorldReconstruction
スクリプト等
今回のスクリプトはMagicLeap ToolKitのPlaceOnFloorを改造したものです
素のPlaceOnFloorのままだと初回の床判定以降は床判定を行わないので何度でも床判定を行えるようにしました。
改造したFloorChecker.cs
using System.Collections;
using System.Collections.Generic;
using UnityEngine;

#if PLATFORM_LUMIN
using UnityEngine.XR.MagicLeap;
#endif


namespace FloorCheck
{
    /// <summary>
    /// MagicLeapToolsのFloorOnPlaceを改造したクラス.
    /// 床検知を何度もにできるようにする.
    /// </summary>
    public class FloorChecker : MonoBehaviour
    {
        readonly float HeadLocationIdleThreshold = 0.003f;
        readonly float HeadRotationIdleThreshold = .3f;
        readonly int HistoryCount = 5;
        readonly float HeadIdleRequiredDuration = .2f;

        // Public Properties:
        public Vector3 Location
        {
            get;
            private set;
        }


        [Tooltip("Does content's content match it's transform forward?")]
        [SerializeField] bool flippedForward;


        List<Vector3> headLocationHistory;
        List<Quaternion> headRotationHistory;
        float headLocationVelocity;
        float headRotationVelocity;
        Transform mainCamera;
        bool headLocationIdle;
        bool headRotationIdle;
        bool headTemporarilyIdle;
        bool headIdle;
        bool placementValid;


        //Init:
        void Awake()
        {
            //refs:
            mainCamera = Camera.main.transform;

            //requirements:
            if (FindObjectOfType<MLSpatialMapper>() == null)
            {
                Debug.LogError("PlaceOnFloor requires and instance of the MLSpatialMapper in your scene.");
            }
        }


        //Flow:
        void OnEnable()
        {
            //sets:
            headLocationHistory = new List<Vector3>();
            headRotationHistory = new List<Quaternion>();
        }


        //Loops:
        void Update()
        {
            //let headpose warmup a little:
            if (Time.frameCount < 3)
            {
                return;
            }

            HeadActivityDetermination();
        }


        //Coroutines:
        IEnumerator HeadIdleTimeout()
        {
            yield return new WaitForSeconds(HeadIdleRequiredDuration);
            headIdle = true;
        }


        void HeadActivityDetermination()
        {
            //history:
            headLocationHistory.Add(mainCamera.position);
            if (HistoryCount < headLocationHistory.Count)
                headLocationHistory.RemoveAt(0);

            headRotationHistory.Add(mainCamera.rotation);
            if (HistoryCount < headRotationHistory.Count)
                headRotationHistory.RemoveAt(0);

            //location velocity:
            if (headLocationHistory.Count == HistoryCount)
            {
                headLocationVelocity = 0;
                for (int i = 1; i < headLocationHistory.Count; i++)
                {
                    headLocationVelocity += Vector3.Distance(headLocationHistory[i], headLocationHistory[i - 1]);
                }
                headLocationVelocity /= headLocationHistory.Count;

                //idle detection:
                if (headLocationVelocity <= HeadLocationIdleThreshold)
                {
                    if (!headLocationIdle)
                    {
                        headLocationIdle = true;
                    }
                }
                else
                {
                    if (headLocationIdle)
                    {
                        headLocationIdle = false;
                    }
                }
            }

            //rotation velocity:
            if (headRotationHistory.Count == HistoryCount)
            {
                headRotationVelocity = 0;
                for (int i = 1; i < headRotationHistory.Count; i++)
                {
                    headRotationVelocity += Quaternion.Angle(headRotationHistory[i], headRotationHistory[i - 1]);
                }
                headRotationVelocity /= headRotationHistory.Count;

                //idle detection:
                if (headRotationVelocity <= HeadRotationIdleThreshold)
                {
                    if (!headRotationIdle)
                    {
                        headRotationIdle = true;
                    }
                }
                else
                {
                    if (headRotationIdle)
                    {
                        headRotationIdle = false;
                    }
                }
            }

            //absolute idle head determination:
            if (headLocationIdle && headRotationIdle)
            {
                if (!headTemporarilyIdle)
                {
                    headTemporarilyIdle = true;
                    StartCoroutine(HeadIdleTimeout());
                }
            }
            else
            {
                if (headTemporarilyIdle)
                {
                    headIdle = false;
                    headTemporarilyIdle = false;
                    StopCoroutine(HeadIdleTimeout());
                }
            }
        }


        /// <summary>
        /// 指定したRayの位置に床があるか否か、ある場合はその座標も返す.
        /// </summary>
        /// <param name="ray"></param>
        /// <returns></returns>
        public (bool, Vector3) LookingAtFloorDetermination(
            Ray ray)
        {
            //cast to see if we are looking at the floor:
            RaycastHit hit;
            if (Physics.Raycast(ray, out hit))
            {
                MagicLeapTools.SurfaceType surface = MagicLeapTools.SurfaceDetails.Analyze(hit);

                if (surface == MagicLeapTools.SurfaceType.Floor)
                {
                    Location = hit.point;
                    placementValid = true;
                    return (true, Location);
                }
                else
                {
                    placementValid = false;
                    return (false, Vector3.zero);
                }
            }
            else
            {
                placementValid = false;
                return (false, Vector3.zero);
            }
        }


    }
}
FloorCheckerを利用するFloorCheckOnPlaceContent.cs
using System;
using MagicLeapTools;
using UnityEngine;

namespace FloorCheck
{

    /// <summary>
    /// トリガを入力したときに床を判定し、床の場合はオブジェクトを配置するサンプル.
    /// </summary>
    [RequireComponent(typeof(FloorChecker),typeof(AudioSource))]
    public class FloorCheckOnPlaceContent : MonoBehaviour
    {

        [SerializeField] AudioClip pressClip;
        [SerializeField] AudioClip successClip;
        [SerializeField] AudioClip failedClip;
        [SerializeField] GameObject content;
        [SerializeField] Pointer pointer;
        FloorChecker floorChecker;
        AudioSource audio;


        void Start()
        {
            floorChecker = GetComponent<FloorChecker>();
            audio = GetComponent<AudioSource>();
        }


        public void OnTriggerDown()
        {
            audio.PlayOneShot(pressClip);
            (bool onFloor, Vector3 pos ) result = floorChecker.LookingAtFloorDetermination(new Ray(pointer.Origin, pointer.Direction));
            if (result.onFloor)
            {
                audio.PlayOneShot(successClip);
                content.transform.position = result.pos;
            }
            else
            {
                audio.PlayOneShot(failedClip);
            }
        }


    }
}
シーンの構成
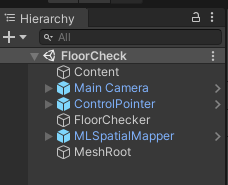
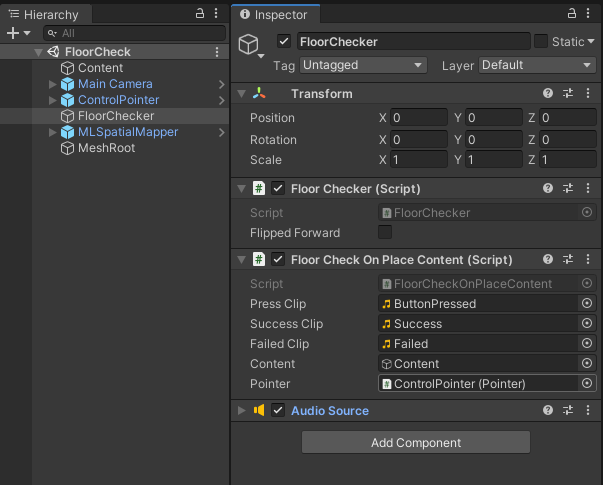
シーンの構成は以下の画像の通りになっています
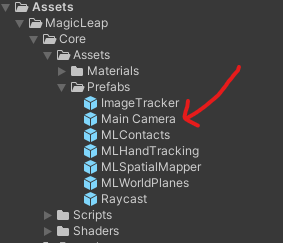
MainCameraは
Assets > MagicLeap > Core > Assets > Prefabsにある物を使いました
ControlPointerは
Assets > MagicLeap-Tools > Prefabs > Inputから
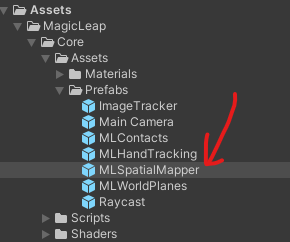
今回はSpatialMapperを表示してどのメッシュの判定が通っているかをわかりやすくするので
Assets > MagicLeap > Core > Assets > PrefabsのMLSpatialMapperも利用します
MLSpatialMapperにはメッシュを生成するルートとなるオブジェクトが必要なのでシーン上にMeshRootオブジェクトを作成しそれをあてがっています
FloorCheckerを利用するクラス等はこのような構成になります
効果音は魔王魂さんから拝借
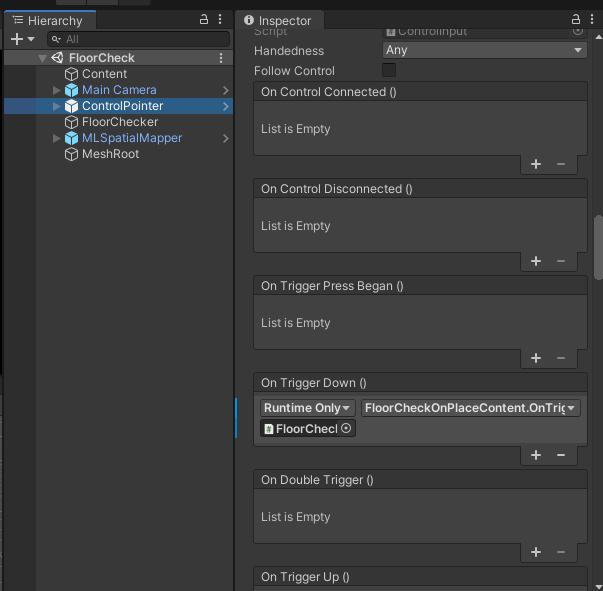
トリガ入力に対応して床判定を行うためにControlPointerのイベントにFloorCheckOnPlaceContentのOnTriggerDownを登録しています
完成
実機にビルド or ZeroIterationで動作確認をすれば
床を判定するやつ pic.twitter.com/zzhb4lk5g2
— 松本隆介 (@matsumotokaka11) September 21, 2020これで床を判定し、床だけに配置したいオブジェクトとかの実装ができるようになります
感想
この判定を使えば床判定の入ってるメッシュだけAgentのNavMeshを晴れたりできるかも?
まだやってない、出来たら記事にするかもしれません


- 投稿日:2020-09-22T03:01:06+09:00
C#でbase62から10進整数への変換
タイトル通り、C#でBase62から10進整数へ変換。
static int Convert62To10(string input)
{
    string BASE62STRING = "ABCDEFGHIJKLMNOPQRSTUVWXYZabcdefghijklmnopqrstuvwxyz0123456789";

    int retval = 0;

    foreach (char c in input)
    {
        retval *= 62;
        retval += BASE62STRING.IndexOf(c);
    }
    return retval;
}