- 投稿日:2020-09-10T12:56:53+09:00
Hooks(useRef) + TypeScriptで親から子コンポーネントの関数を発火する
前提
Reactにおいて親コンポーネントから子コンポーネントを操作(DOMをさわる、関数を発火させる)のはアンチパターン。
いつもの話ですが、ref を使った手続き的なコードはほとんどの場合に避けるべきです。
by https://ja.reactjs.org/docs/hooks-reference.html#useimperativehandlerefを使わずに実装するのであれば、状態を親コンポーネントに寄せるか、あるいはReduxやRecoilに頼るしかない。だけど、それでもどうしてもやりたいという場合は下記の通り。
親コンポーネント
import React, { useRef } from 'react';

const Parent = () => {
  const ref = useRef(null); // 初期化

  const hogeFunction = () => {
    ref.current.fire(); //refオブジェクトからfire()を実行
  }

  return (
    <Child ref={ref}> // refオブジェクトをそのまま渡す
  )
}
子コンポーネント
import React, { FC, useImperativeHandle } from 'react';

interface Props {
  ref: RefObject<void>;
}

const Child: FC<Props> = ({
  ref
}) => {

  useImperativeHandle(ref, () => ({
    fire() {
      // 発火させたい処理
    }
  }));

  // ...(省略)...
}
useImperativeHandleの使い方は下記の通り。useImperativeHandle(ref, createHandle, [deps])参考
- 投稿日:2020-09-10T10:49:45+09:00
Reactの特徴
プログラミング勉強日記
2020年9月10日
JSには色々なフレームワークがあって、開発の用途によって使用するフレームワークが違うと思うので、まとめてみようと思う。まずReactについてまとめる。Reactとは
Reactはサイトの見た目を作れるJavaScriptのライブラリ。Reactのモバイル版であるReact Nativeを使うとiOSとAndroidのアプリを作ることもできる。
一言でいうとUIを作るためのJS用のライブラリである。コンセプト
Reactの公式ホームページでは以下の3つのコンセプトがある。これらがReactの中核といえる考えである。
- Declarative
- Component-Based
- Learn Once, Write Anywhere
Declarative(宣言的である)
宣言的であることが、Reactの最大の特徴であるといえる。他人のコードを読んでも理解しやすい仕組みになっている。
(jQueryではイベントに対して手続き的に処理を書くのでデバックもしにくく、読みにくいコードになってしまう)Component-Based(コンポーネント指向である)
コンポーネント指向は、ソフトウェアを機能ごとに部品(コンポーネント)として分割して、必要に応じて組み合わせて使う考えのことである。
機能を小さい部品にして持たせているので、状態の管理もしやすくて再利用も容易にできる。Learn Once, Write Anywhere(一度の学習で何度でも書ける)
Reactを習得するとWEBアプリだけでなく、他の分野に適応することができる。例えば、React Nativeを使うことでモバイルアプリを開発することもできる。
特徴
Reactは以下の3つの特徴がある。
- レンダリングが高速
- 大規模なアプリほど向いている
- ドキュメントは英語が多い
- JSの基本構文を理解していればすぐに書ける
レンダリングが高速
Webページを描画することをレンダリングという。Reactでは更新された一部のみを変更するという効率的な仕組みによって、レンダリングする箇所は一部でよく高速で表示を切り替えることができる。
大規模なアプリほど向いている
この理由としては以下の5つの理由がある
- 管理しやすい設計(見やすい設計)
- 複雑な条件を組み込める
- 長期の運用ができる
- カスタマイズ性が高い
参考文献
- 投稿日:2020-09-10T10:08:08+09:00
Next.js+TypeScript+AWS Amplify+RecoilでToDoリストを作る
本記事ではNext.js+TypeScript+AWS Amplify+Recoilを使って、モダンなToDoリストを作る方法を紹介します。
作ったアプリケーションは公開しています。
https://master.d182t7iqbd44r9.amplifyapp.comGithubリポジトリを公開しますので、不具合や不適切な実装を見つけた場合はドシドシIssueかPull-Requestいただけると幸いです。
https://github.com/yuuu/next-ts-amplify-recoil-todolist
背景
私自身普段はRuby on Railsを使って開発しています。JavaScriptは正直まだ苦手です。
Railsは爆速でアプリを開発出来る点が魅力的ですが、一方でモバイルアプリとの連携やリッチなUIが求められる案件では、フロントエンドとバックエンドを分離した構成にせざるをえないケースがあります。
そのような構成だと、かえってRailsがリッチ過ぎるとも感じており、AWS Amplifyのようにバックエンドをスピーディーに構築してくれるサービスを一度使ってみたいと思っていました。そのため、Next.js+AWS Amplisyで簡単なアプリを作ってみて、いわゆるモダンなアプリ開発のノウハウを学んでみることにしました。
使用する技術要素
- Next.js(React.js)
- AWS Amplify
- TypeScript
- Recoil
- React Hook Form
プロジェクトの作成
Next.jsのexamplesにwith-typescript-eslint-jestが公開されているので、これをベースにしました。
$ create-next-app
✔ What is your project named? … next-ts-amplify-recoil-todolist
✔ Pick a template › Example from the Next.js repo
✔ Pick an example › with-typescript-eslint-jest
# 省略
Amplifyのセットアップ
続いて、AWS Amplifyをセットアップします。
初期化
amplify initを実行して初期化します。$ cd next-ts-amplify-recoil-todolist $ amplify init ? Enter a name for the project todolist ? Enter a name for the environment dev ? Choose your default editor: Visual Studio Code ? Choose the type of app that you\'re building javascript Please tell us about your project ? What javascript framework are you using react ? Source Directory Path: src ? Distribution Directory Path: out ? Build Command: npm run-script build ? Start Command: npm run-script start ? Do you want to use an AWS profile? Yes ? Please choose the profile you want to use (使用するprofile)Hostingのときにハマらないよう、Distribution Directory Pathは
outにしています。
詳細は こちらの記事 を参照ください。ホスティング(CI/CD含む)
経験上、後からホスティングを追加するとトラブルシューティングが難しくなるので、できるだけ早い段階でCI/CDによるホスティングを設定しておきます。
❯ amplify add hosting
? Select the plugin module to execute Hosting with Amplify Console (Managed hosting with custom domains, Continuous deployment)
? Choose a type Continuous deployment (Git-based deployments)
? Continuous deployment is configured in the Amplify Console. Please hit enter once you connect your repository
# ブラウザでAWS Amplify Consoleが表示されるので諸々設定をした後、Enterを入力
Amplify hosting urls:
┌──────────────┬──────────────────────────────────────────────┐
│ FrontEnd Env │ Domain                                       │
├──────────────┼──────────────────────────────────────────────┤
│ master       │ https://master.d14mfq14xzgfle.amplifyapp.com │
└──────────────┴──────────────────────────────────────────────┘
buildの出力先をoutに変更するため、手元の環境でpackage.jsonを一部修正する必要があります。
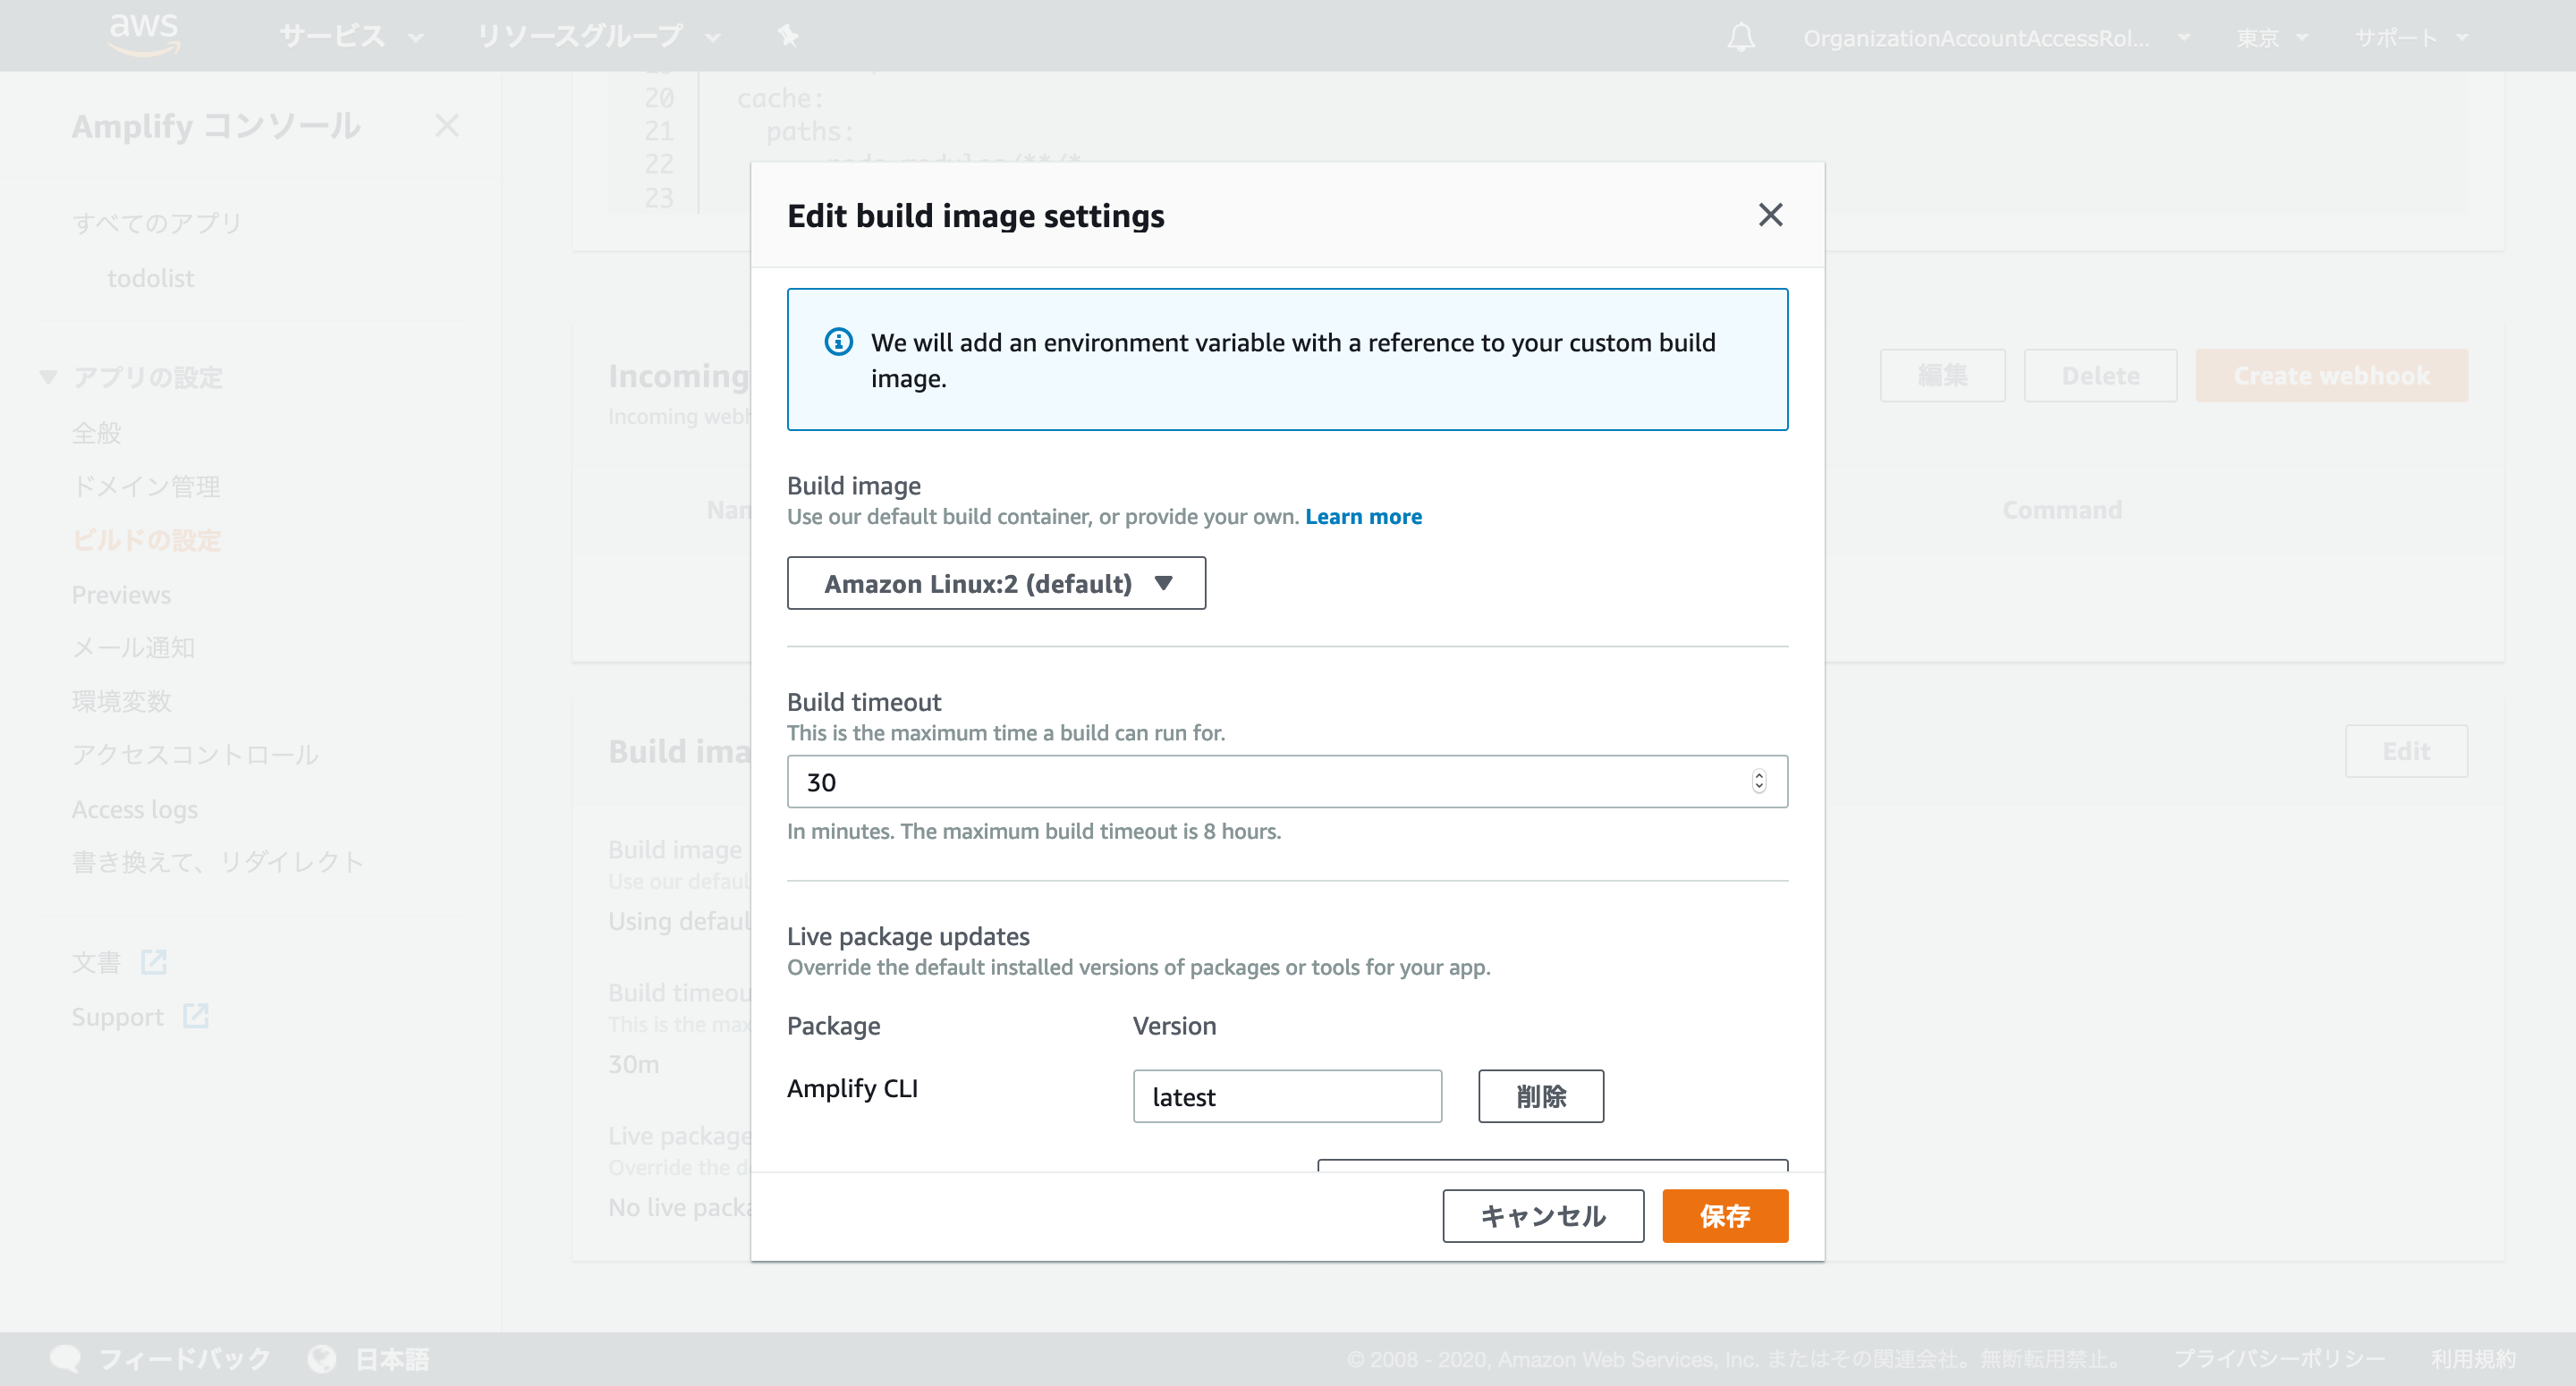
詳細は こちらの記事 を参照ください。また、Amplify Consoleの「ビルドの設定」からamplify.ymlを次のように修正します。
amplify.ymlversion: 1 backend: phases: build: commands: - '# Execute Amplify CLI with the helper script' - amplifyPush --simple frontend: phases: preBuild: commands: - yarn install build: commands: - yarn run build artifacts: baseDirectory: out files: - '**/*' cache: paths: - node_modules/**/*さらに、「ビルドの設定」→「Build image settings」→「Edit」→「Live package updates」で
Amplify CLIをlatestとする必要があります。これをしていないと、デプロイに失敗するので要注意です。
デプロイが終わり、表示されたURLにアクセスすると、ページが表示されます。
認証基盤
以下コマンドで認証基盤を追加します。
$ amplify add auth
? Do you want to use the default authentication and security configuration? Default configuration
? How do you want users to be able to sign in? Username
? Do you want to configure advanced settings? No, I am done.
# 省略

$ amplify push
✔ Successfully pulled backend environment production from the cloud.

Current Environment: production

| Category | Resource name        | Operation | Provider plugin   |
| -------- | -------------------- | --------- | ----------------- |
| Auth     | besttodolistf818478c | Create    | awscloudformation |
| Hosting  | amplifyhosting       | No Change |                   |
? Are you sure you want to continue? Yes
# 省略
GraphQL API
予めGraphQLのスキーマファイルを作成しておきます。
./schema.graphqltype Todo @model { id: ID! name: String! completed: Boolean! timestamp: AWSTimestamp! }以下コマンドでバックエンドのGraphQL APIを追加します。
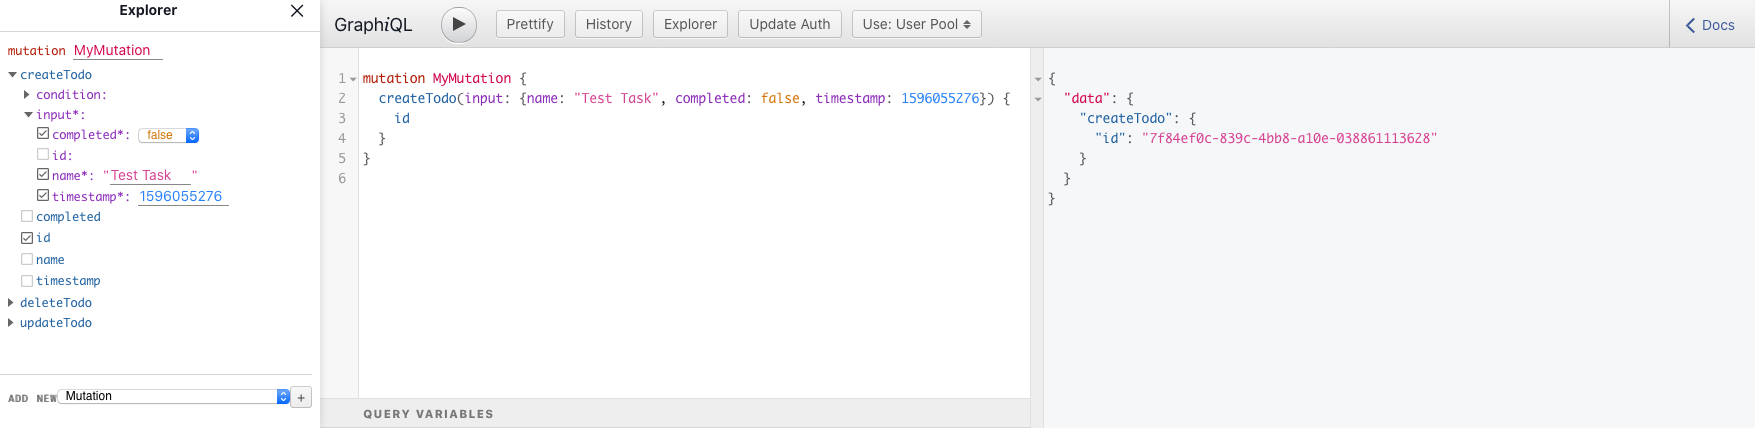
$ amplify add api
? Please select from one of the below mentioned services: GraphQL
? Provide API name: todolist
? Choose the default authorization type for the API Amazon Cognito User Pool
Use a Cognito user pool configured as a part of this project.
? Do you want to configure advanced settings for the GraphQL API No, I am done.
? Do you have an annotated GraphQL schema? Yes
? Provide your schema file path: ./schema.graphql
# 省略
念の為mockサーバを起動して動作確認をしておきます。
このとき、クライアントのコードも生成されます。$ amplify mock api # 省略 Running GraphQL codegen ? Choose the code generation language target typescript ? Enter the file name pattern of graphql queries, mutations and subscriptions src/graphql/**/*.ts ? Do you want to generate/update all possible GraphQL operations - queries, mutations and subscriptions Yes ? Enter maximum statement depth [increase from default if your schema is deeply nested] 2 ? Enter the file name for the generated code src/API.ts ? Do you want to generate code for your newly created GraphQL API Yes # 省略 AppSync Mock endpoint is running at http://xxx.xxx.xxx.xxx:20002表示されたURLにアクセスすると、Graphiqlの画面が表示され、GraphQLのリクエストを試すことができます。
特に問題がなければ、
amplify pushしておきましょう。❯ amplify push ✔ Successfully pulled backend environment production from the cloud. Current Environment: production | Category | Resource name | Operation | Provider plugin | | -------- | -------------------- | --------- | ----------------- | | Api | bestTodolist | Create | awscloudformation | | Hosting | amplifyhosting | No Change | | | Auth | besttodolistf818478c | No Change | awscloudformation | ? Are you sure you want to continue? Yes # 省略 ? Do you want to update code for your updated GraphQL API Yes ? Do you want to generate GraphQL statements (queries, mutations and subscription) based on your schema types? This will overwrite your current graphql queries, mutations and subscriptions Yes # 省略フロントエンドの実装
npmパッケージのインストール
以下コマンドでインストールします。
$ yarn add @material-ui/core @material-ui/icons aws-amplify @aws-amplify/ui-react react-hook-form recoilLint/Formatterのignoreを追加
Next.jsがexportしたファイルやAWS Amplifyで自動生成したコードはLint/Formatterの対象外にしておきます。
.eslintignore**/node_modules/* **/out/* **/.next/* src/aws-exports.js.prettierignorenode_modules .next yarn.lock package-lock.json public out一覧ページの実装
以下ファイルを所定のディレクトリへコピペしてください。
ページ
ベースとなる
_app.tsxと_document.tsxも必要です。
_document.tsxは、まだFunction Componentでは書けないようです。https://github.com/yuuu/next-ts-amplify-recoil-todolist/blob/master/pages/_app.tsx
https://github.com/yuuu/next-ts-amplify-recoil-todolist/blob/master/pages/_document.tsx
https://github.com/yuuu/next-ts-amplify-recoil-todolist/blob/master/pages/index.tsxコンポーネント
各ページの部品となるコンポーネントを作成します。
https://github.com/yuuu/next-ts-amplify-recoil-todolist/blob/master/src/component/Header.tsx
https://github.com/yuuu/next-ts-amplify-recoil-todolist/blob/master/src/component/Footer.tsx
https://github.com/yuuu/next-ts-amplify-recoil-todolist/blob/master/src/component/Todo.tsxストア
正直TodoListのレベルであれば、ストアを使う必要は無いのですが、前々から使ってみたいと思っていたRecoilを使うことにしました。
https://github.com/yuuu/next-ts-amplify-recoil-todolist/blob/master/src/store/todos.ts
テーマ
Material UIのベースとなるテーマを定義します。
https://github.com/yuuu/next-ts-amplify-recoil-todolist/blob/master/src/theme.ts
動作確認
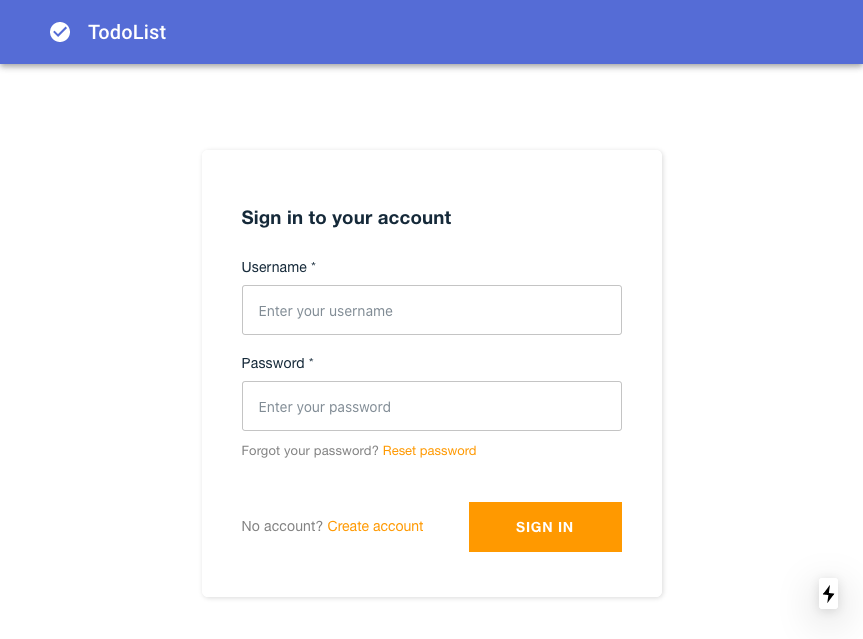
CI/CDが無事に完了し、ページにアクセスするとログイン画面が表示されます。
Create Accountでアカウント作成するとログインができるようになります。
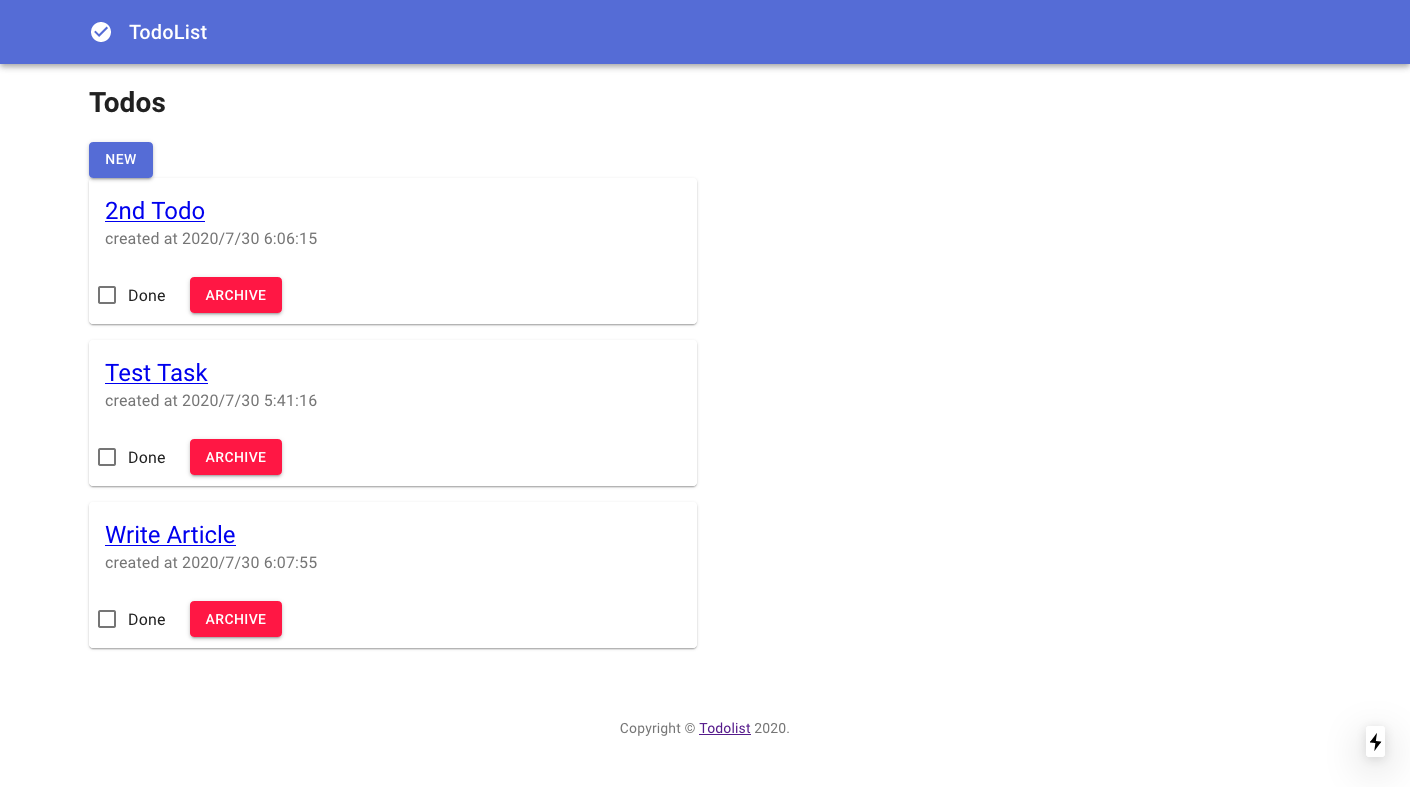
無事、一覧画面が無事表示されました。
その他の画面の実装
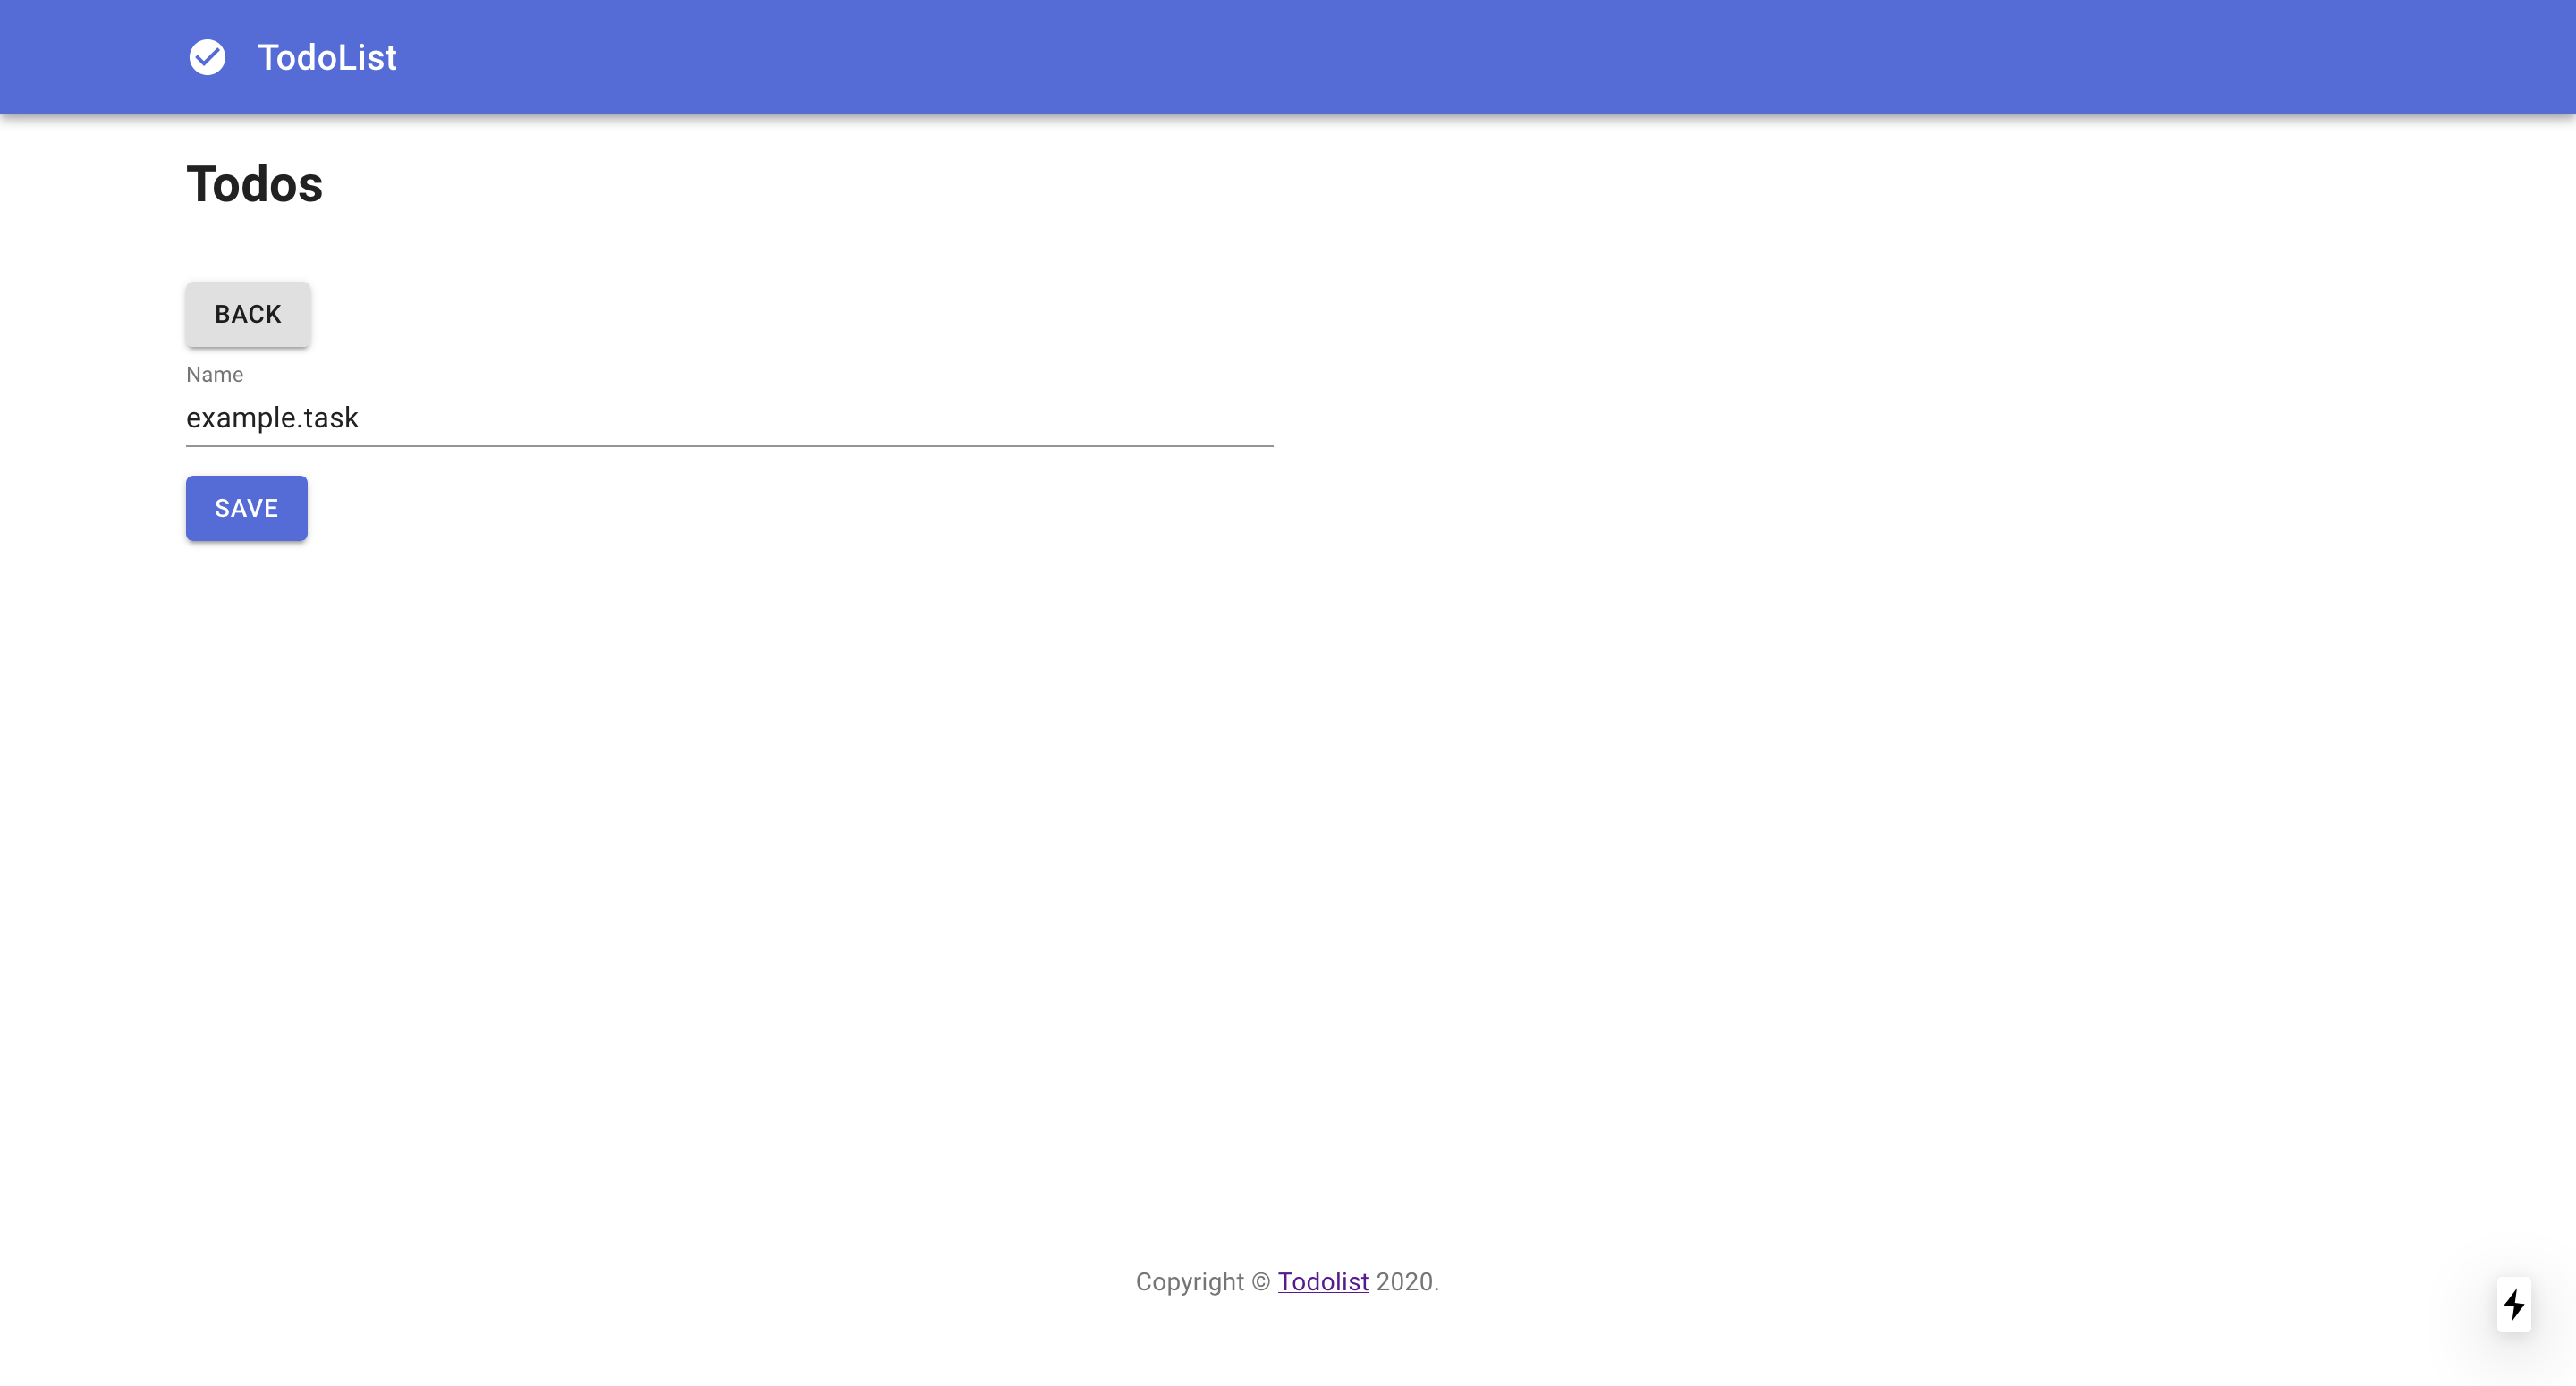
新規登録画面
次のファイルを
pagesに追加します。https://github.com/yuuu/next-ts-amplify-recoil-todolist/blob/master/pages/todos/new.tsx
フォームは編集画面でも使うためコンポーネント化しておきます。
https://github.com/yuuu/next-ts-amplify-recoil-todolist/blob/master/src/component/Form.tsx
詳細画面
次のファイルを
pagesに追加します。https://github.com/yuuu/next-ts-amplify-recoil-todolist/blob/master/pages/todos/%5Bid%5D.tsx
編集画面
次のファイルを
pagesに追加します。https://github.com/yuuu/next-ts-amplify-recoil-todolist/blob/master/pages/todos/%5Bid%5D/edit.tsx
まとめ
手元の環境でアプリを開発して画面を揃えるところまでは順調に進んだのですが、CI/CDでハマりどころが多く苦労しました。
ここまでの環境が揃っていれば、あとはスピーディーに開発していけそうな気がしています。ぜひ、お試しください。