- 投稿日:2020-09-07T23:42:22+09:00
GatsbyJS faviconファイル設定
以下のディレクトリにファイルを配置する
{プロジェクト名}/static/favicon.ico
※ 変更されない場合は再ビルド or キャッシュ削除
manifestを追加する場合は、公式チュートリアル参考にしてください
https://www.gatsbyjs.com/tutorial/part-eight/#-using-gatsby-plugin-manifest
- 投稿日:2020-09-07T23:33:03+09:00
GatsbyJS よく使うコマンド
プロジェクト作成
gatsby new {プロジェクト名} {雛形}
例
gatsby new hello-blog https://github.com/gatsbyjs/gatsby-starter-hello-world
開発サーバーを起動する
gatsby develop本番用のビルド
gatsby build本番用サーバーを起動する
gatsby serveキャッシュの削除
gatsby clean都度追加しますーーー

- 投稿日:2020-09-07T23:14:58+09:00
Reactでnpm startができなくなった話。
React.js Node.js環境でnpm start実行時にエラー発生。
解決策だけ見たい人は最後に載せてます。(予定)
問題編
【React】いまどきのJSプログラマーのためのNode.jsとReactアプリケーション開発テクニックという参考書
の写本・実践をやっていると、
React.js Node.js環境でnpm startできなくなった。
経緯編
create-react-appでreactのアプリを作った。
app.jsを編集し、いざ起動する。
npm startそうすると、以下のようなエラーが発生。
> cycle@0.1.0 start /Users/user/Documents/ubuntu/cycle
> react-scripts start


There might be a problem with the project dependency tree.
It is likely not a bug in Create React App, but something you need to fix locally.

The react-scripts package provided by Create React App requires a dependency:

  "webpack": "4.42.0"

Don't try to install it manually: your package manager does it automatically.
However, a different version of webpack was detected higher up in the tree:

  /Users/user/Documents/ubuntu/node_modules/webpack (version: 4.44.1)

Manually installing incompatible versions is known to cause hard-to-debug issues.

If you would prefer to ignore this check, add SKIP_PREFLIGHT_CHECK=true to an .env file in your project.
That will permanently disable this message but you might encounter other issues.

To fix the dependency tree, try following the steps below in the exact order:

  1. Delete package-lock.json (not package.json!) and/or yarn.lock in your project folder.
  2. Delete node_modules in your project folder.
  3. Remove "webpack" from dependencies and/or devDependencies in the package.json file in your project folder.
  4. Run npm install or yarn, depending on the package manager you use.

In most cases, this should be enough to fix the problem.
If this has not helped, there are a few other things you can try:

  5. If you used npm, install yarn (http://yarnpkg.com/) and repeat the above steps with it instead.
     This may help because npm has known issues with package hoisting which may get resolved in future versions.

  6. Check if /Users/user/Documents/ubuntu/node_modules/webpack is outside your project directory.
     For example, you might have accidentally installed something in your home folder.

  7. Try running npm ls webpack in your project folder.
     This will tell you which other package (apart from the expected react-scripts) installed webpack.

If nothing else helps, add SKIP_PREFLIGHT_CHECK=true to an .env file in your project.
That would permanently disable this preflight check in case you want to proceed anyway.

P.S. We know this message is long but please read the steps above :-) We hope you find them helpful!

npm ERR! code ELIFECYCLE
npm ERR! errno 1
npm ERR! cycle@0.1.0 start: `react-scripts start`
npm ERR! Exit status 1
npm ERR!
npm ERR! Failed at the cycle@0.1.0 start script.
npm ERR! This is probably not a problem with npm. There is likely additional logging output above.

npm ERR! A complete log of this run can be found in:
npm ERR!     /Users/user/.npm/_logs/2020-09-07T13_28_49_449Z-debug.log
(base) user-no-MacBook-Air:cycle user$ SKIP_PREFLIGHT_CHECK=true npm start

> cycle@0.1.0 start /Users/user/Documents/ubuntu/cycle
> react-scripts start

Attempting to bind to HOST environment variable: x86_64-apple-darwin13.4.0
If this was unintentional, check that you haven't mistakenly set it in your shell.
Learn more here: https://bit.ly/CRA-advanced-config

dyld: lazy symbol binding failed: Symbol not found: _FSEventStreamCreate
  Referenced from: /Users/user/Documents/ubuntu/cycle/node_modules/webpack-dev-server/node_modules/fsevents/build/Release/fse.node
  Expected in: flat namespace

dyld: Symbol not found: _FSEventStreamCreate
  Referenced from: /Users/user/Documents/ubuntu/cycle/node_modules/webpack-dev-server/node_modules/fsevents/build/Release/fse.node
  Expected in: flat namespace

npm ERR! code ELIFECYCLE
npm ERR! errno 1
npm ERR! cycle@0.1.0 start: `react-scripts start`
npm ERR! Exit status 1
npm ERR!
npm ERR! Failed at the cycle@0.1.0 start script.
npm ERR! This is probably not a problem with npm. There is likely additional logging output above.

npm ERR! A complete log of this run can be found in:
npm ERR!     /Users/user/.npm/_logs/2020-09-07T13_29_11_414Z-debug.log
(base) user-no-MacBook-Air:cycle user$ eact-scripts start
-bash: eact-scripts: command not found
(base) user-no-MacBook-Air:cycle user$ react-scripts start

There might be a problem with the project dependency tree.
It is likely not a bug in Create React App, but something you need to fix locally.

The react-scripts package provided by Create React App requires a dependency:

  "webpack": "4.42.0"

Don't try to install it manually: your package manager does it automatically.
However, a different version of webpack was detected higher up in the tree:

  /Users/user/Documents/ubuntu/node_modules/webpack (version: 4.44.1)

Manually installing incompatible versions is known to cause hard-to-debug issues.

If you would prefer to ignore this check, add SKIP_PREFLIGHT_CHECK=true to an .env file in your project.
That will permanently disable this message but you might encounter other issues.

To fix the dependency tree, try following the steps below in the exact order:

  1. Delete package-lock.json (not package.json!) and/or yarn.lock in your project folder.
  2. Delete node_modules in your project folder.
  3. Remove "webpack" from dependencies and/or devDependencies in the package.json file in your project folder.
  4. Run npm install or yarn, depending on the package manager you use.

In most cases, this should be enough to fix the problem.
If this has not helped, there are a few other things you can try:

  5. If you used npm, install yarn (http://yarnpkg.com/) and repeat the above steps with it instead.
     This may help because npm has known issues with package hoisting which may get resolved in future versions.

  6. Check if /Users/user/Documents/ubuntu/node_modules/webpack is outside your project directory.
     For example, you might have accidentally installed something in your home folder.

  7. Try running npm ls webpack in your project folder.
     This will tell you which other package (apart from the expected react-scripts) installed webpack.

If nothing else helps, add SKIP_PREFLIGHT_CHECK=true to an .env file in your project.
That would permanently disable this preflight check in case you want to proceed anyway.

P.S. We know this message is long but please read the steps above :-) We hope you find them helpful!
検索すると、
SKIP_PREFLIGHT_CHECK=trueを.envファイルに記載すると良いと出てきた。(勘違いかも。。)
だが、まずcreate-react-appで作ったアプリのフォルダ内に.envファイルが見つからない。。。
どうしようと悩み、調べ続けるとnpm startの後に、直接打てば良いのでは? との記事を発見。。
試してみる。
SKIP_PREFLIGHT_CHECK=true npm start結果。
> cycle@0.1.0 start /Users/user/Documents/ubuntu/cycle
> react-scripts start

Attempting to bind to HOST environment variable: x86_64-apple-darwin13.4.0
If this was unintentional, check that you haven't mistakenly set it in your shell.
Learn more here: https://bit.ly/CRA-advanced-config

dyld: lazy symbol binding failed: Symbol not found: _FSEventStreamCreate
  Referenced from: /Users/user/Documents/ubuntu/cycle/node_modules/webpack-dev-server/node_modules/fsevents/build/Release/fse.node
  Expected in: flat namespace

dyld: Symbol not found: _FSEventStreamCreate
  Referenced from: /Users/user/Documents/ubuntu/cycle/node_modules/webpack-dev-server/node_modules/fsevents/build/Release/fse.node
  Expected in: flat namespace

npm ERR! code ELIFECYCLE
npm ERR! errno 1
npm ERR! cycle@0.1.0 start: `react-scripts start`
npm ERR! Exit status 1
npm ERR!
npm ERR! Failed at the cycle@0.1.0 start script.
npm ERR! This is probably not a problem with npm. There is likely additional logging output above.

npm ERR! A complete log of this run can be found in:
npm ERR!     /Users/user/.npm/_logs/2020-09-07T13_29_11_414Z-debug.log
(base) user-no-MacBook-Air:cycle user$ eact-scripts start
-bash: eact-scripts: command not found
(base) user-no-MacBook-Air:cycle user$ react-scripts start

There might be a problem with the project dependency tree.
It is likely not a bug in Create React App, but something you need to fix locally.

The react-scripts package provided by Create React App requires a dependency:

  "webpack": "4.42.0"

Don't try to install it manually: your package manager does it automatically.
However, a different version of webpack was detected higher up in the tree:

  /Users/user/Documents/ubuntu/node_modules/webpack (version: 4.44.1)

Manually installing incompatible versions is known to cause hard-to-debug issues.

If you would prefer to ignore this check, add SKIP_PREFLIGHT_CHECK=true to an .env file in your project.
That will permanently disable this message but you might encounter other issues.

To fix the dependency tree, try following the steps below in the exact order:

  1. Delete package-lock.json (not package.json!) and/or yarn.lock in your project folder.
  2. Delete node_modules in your project folder.
  3. Remove "webpack" from dependencies and/or devDependencies in the package.json file in your project folder.
  4. Run npm install or yarn, depending on the package manager you use.

In most cases, this should be enough to fix the problem.
If this has not helped, there are a few other things you can try:

  5. If you used npm, install yarn (http://yarnpkg.com/) and repeat the above steps with it instead.
     This may help because npm has known issues with package hoisting which may get resolved in future versions.

  6. Check if /Users/user/Documents/ubuntu/node_modules/webpack is outside your project directory.
     For example, you might have accidentally installed something in your home folder.

  7. Try running npm ls webpack in your project folder.
     This will tell you which other package (apart from the expected react-scripts) installed webpack.

If nothing else helps, add SKIP_PREFLIGHT_CHECK=true to an .env file in your project.
That would permanently disable this preflight check in case you want to proceed anyway.

P.S. We know this message is long but please read the steps above :-) We hope you find them helpful!
んーうまくいかない。。。。
さらに調べる。
そうすると、今度はホームディレクトリのnode_modulesを全削除すればうまくいくとの記事を発見。
試してみる。
create-react-appで作った該当node_modulesのみ、一時名前を変えて退避。
そして、それ以外のnode_modulesをホームに戻って全削除。
以下全削除のcommand
find . -name 'node_modules' -type d -prune -exec rm -rf '{}' +そして、create-react-appで作ったアプリのディレクトリに戻って、npm startを再度実行。
またエラーになった。
でもエラー文は変わった。
> cycle@0.1.0 start /Users/user/Documents/ubuntu/cycle
> react-scripts start

internal/modules/cjs/loader.js:895
  throw err;
  ^

Error: Cannot find module 'entities/maps/entities.json'
Require stack:
- /Users/user/Documents/ubuntu/cycle/node_modules/htmlparser2/lib/Tokenizer.js
- /Users/user/Documents/ubuntu/cycle/node_modules/htmlparser2/lib/Parser.js
- /Users/user/Documents/ubuntu/cycle/node_modules/htmlparser2/lib/index.js
- /Users/user/Documents/ubuntu/cycle/node_modules/renderkid/lib/tools.js
- /Users/user/Documents/ubuntu/cycle/node_modules/renderkid/lib/renderKid/styleApplier/inline.js
- /Users/user/Documents/ubuntu/cycle/node_modules/renderkid/lib/RenderKid.js
- /Users/user/Documents/ubuntu/cycle/node_modules/pretty-error/lib/PrettyError.js
- /Users/user/Documents/ubuntu/cycle/node_modules/html-webpack-plugin/lib/errors.js
- /Users/user/Documents/ubuntu/cycle/node_modules/html-webpack-plugin/index.js
- /Users/user/Documents/ubuntu/cycle/node_modules/react-scripts/config/webpack.config.js
- /Users/user/Documents/ubuntu/cycle/node_modules/react-scripts/scripts/start.js
    at Function.Module._resolveFilename (internal/modules/cjs/loader.js:892:15)
    at Function.Module._load (internal/modules/cjs/loader.js:742:27)
    at Module.require (internal/modules/cjs/loader.js:964:19)
    at require (internal/modules/cjs/helpers.js:88:18)
    at Object.<anonymous> (/Users/user/Documents/ubuntu/cycle/node_modules/htmlparser2/lib/Tokenizer.js:4:17)
    at Module._compile (internal/modules/cjs/loader.js:1075:30)
    at Object.Module._extensions..js (internal/modules/cjs/loader.js:1096:10)
    at Module.load (internal/modules/cjs/loader.js:940:32)
    at Function.Module._load (internal/modules/cjs/loader.js:781:14)
    at Module.require (internal/modules/cjs/loader.js:964:19) {
  code: 'MODULE_NOT_FOUND',
  requireStack: [
    '/Users/user/Documents/ubuntu/cycle/node_modules/htmlparser2/lib/Tokenizer.js',
    '/Users/user/Documents/ubuntu/cycle/node_modules/htmlparser2/lib/Parser.js',
    '/Users/user/Documents/ubuntu/cycle/node_modules/htmlparser2/lib/index.js',
    '/Users/user/Documents/ubuntu/cycle/node_modules/renderkid/lib/tools.js',
    '/Users/user/Documents/ubuntu/cycle/node_modules/renderkid/lib/renderKid/styleApplier/inline.js',
    '/Users/user/Documents/ubuntu/cycle/node_modules/renderkid/lib/RenderKid.js',
    '/Users/user/Documents/ubuntu/cycle/node_modules/pretty-error/lib/PrettyError.js',
    '/Users/user/Documents/ubuntu/cycle/node_modules/html-webpack-plugin/lib/errors.js',
    '/Users/user/Documents/ubuntu/cycle/node_modules/html-webpack-plugin/index.js',
    '/Users/user/Documents/ubuntu/cycle/node_modules/react-scripts/config/webpack.config.js',
    '/Users/user/Documents/ubuntu/cycle/node_modules/react-scripts/scripts/start.js'
  ]
}
npm ERR! code ELIFECYCLE
npm ERR! errno 1
npm ERR! cycle@0.1.0 start: `react-scripts start`
npm ERR! Exit status 1
npm ERR!
npm ERR! Failed at the cycle@0.1.0 start script.
npm ERR! This is probably not a problem with npm. There is likely additional logging output above.

npm ERR! A complete log of this run can be found in:
npm ERR!     /Users/user/.npm/_logs/2020-09-07T13_38_20_165Z-debug.log
エラー文のいかに注目。。。
Error: Cannot find module 'entities/maps/entities.json'
このエラー文で検索をかけると、
install entities: npm i entities
create a new index.js file with: require("entities/maps/entities.json")
run it
とすれば良いのでは? との記事を発見。
実行してみる。
結果。
> cycle@0.1.0 start /Users/user/Documents/ubuntu/cycle
> react-scripts start

Attempting to bind to HOST environment variable: x86_64-apple-darwin13.4.0
If this was unintentional, check that you haven't mistakenly set it in your shell.
Learn more here: https://bit.ly/CRA-advanced-config

dyld: lazy symbol binding failed: Symbol not found: _FSEventStreamCreate
  Referenced from: /Users/user/Documents/ubuntu/cycle/node_modules/webpack-dev-server/node_modules/fsevents/build/Release/fse.node
  Expected in: flat namespace

dyld: Symbol not found: _FSEventStreamCreate
  Referenced from: /Users/user/Documents/ubuntu/cycle/node_modules/webpack-dev-server/node_modules/fsevents/build/Release/fse.node
  Expected in: flat namespace

npm ERR! code ELIFECYCLE
npm ERR! errno 1
npm ERR! cycle@0.1.0 start: `react-scripts start`
npm ERR! Exit status 1
npm ERR!
npm ERR! Failed at the cycle@0.1.0 start script.
npm ERR! This is probably not a problem with npm. There is likely additional logging output above.

npm ERR! A complete log of this run can be found in:
npm ERR!     /Users/user/.npm/_logs/2020-09-07T22_44_27_537Z-debug.log
また別のエラー。。。
はぁ。。。
エラー文のなかで、
Attempting to bind to HOST environment variable: x86_64-apple-darwin13.4.0
If this was unintentional, check that you haven't mistakenly set it in your shell.
に注目し、このエラー文で検索をかける。
そうすると、原因が
「HOST環境変数にバインドしようとしています:x86_64-apple-darwin13.4.0
これが意図的でない場合は、誤ってシェルに設定していないことを確認してください。」らしい。
HostをBindから解放するには
unset HOSTをすれば良いらしい。
実行。
エラー消えた!!!!
解決編
以下僕の場合の解決手順
ホームディレクトリのnode_modulesを全削除(create-react-appで作ったディレクトリのnode_modulesを除く。)
entitiesのinstall
HostのBindからの解放
以下実際のコマンド
find . -name 'node_modules' -type d -prune -exec rm -rf '{}' +install entities: npm i entities create a new index.js file with: require("entities/maps/entities.json") run itunset HOST参考文献
https://teratail.com/questions/177560
https://qiita.com/yuta0801/items/118d9478ad536a443f3f
https://mebee.info/2020/03/03/post-6791/
https://github.com/davideicardi/live-plugin-manager/issues/14
- 投稿日:2020-09-07T21:22:19+09:00
流行りのReactを使って,レスポンシブな(Qiita)ヘッダーを作成してみる。
はじめに
React記事の一環として、レスポンシブデザインのヘッダーを作成してみます。今回はわかりやすいように、Qiitaと同じヘッダーを作成していきます。
Qiitaのようなヘッダーのデザインもよくありますよね。
ソースコード:https://github.com/TokyoProgramming/qiita__navbar
- この記事で学べる事
- ReactでのレスポンシブWebデザイン
- MediaQueries
- よくあるヘッダーのデザイン方法
- Material-UI
1.React構造
- Componentsディレクトリ内
- Header.js
- Header.css
以下のようなシンプルな構造にしています。
2.Material-UI
それでは今回使用する。Material-UIをインストールしていきます。
npm install @material-ui/core
npm install @material-ui/iconsこれで、Material-uiのアイコンを使用できます。
今回使用するMaterial-uiのアイコンたちです。
import ArrowDropDownIcon from '@material-ui/icons/ArrowDropDown';

import SearchIcon from '@material-ui/icons/Search';

import BeenhereIcon from '@material-ui/icons/Beenhere';

import CreateIcon from '@material-ui/icons/Create';

import NotificationsNoneIcon from '@material-ui/icons/NotificationsNone';

import {Avatar} from "@material-ui/core";
3.ヘッダー 左側
Header.jsimport React from 'react'; import './Header.css'; //ここにMaterial-uiをインポートする function Header() { return ( <div className="header"> <div className='headerLeft'> <div className='headerLeft__object'> <h1>Qiita</h1> <ArrowDropDownIcon /> </div> <div className='headerLeft__object'> <div className='header__community'> <p>コミュニティ</p> <ArrowDropDownIcon /> </div> </div> <div className='headerLeft__object'> <div className='search__form'> <SearchIcon /> <input className="headerLeft__input" placeholder="キーワードを入力" /> </div> <div className="search__form__media"> <SearchIcon /> </div> </div> </div> <div className='headerRight'> ... </div> </div> ) } export default Headerスタイリング何もしないとこのような結果になります。
悲惨です。外人が見たら、catastropheと叫ぶことでしょう。
ヘッダー左側cssスタイリング
まずは、親要素の.headerのスタイリングからです。
.header{
    display: flex;
    margin-top: 0;
    position: sticky;
    background-color: #55c500;
    width: 100vw;
    height: 60px;
    justify-content: space-around;
}
なんとも言えませんね。。。
親要素に収まってもいないし。。
どんどんいきます。.headerLeft { display: flex; }
Header.css.headerLeft__object > h1{ margin: 0 10px 5px 3px; color: white; cursor: pointer; } .headerLeft__object > .MuiSvgIcon-root{ border: 1px solid #3a8a00; font-size: 15px !important; color: white!important; background-color: #3a8a00!important; padding: 2px; border-radius: 5px; } .headerLeft__object > .MuiSvgIcon-root:hover{ border: 1px solid #3a8a00; font-size: 15px !important; color: #b8dfdf!important; background-color: #337600!important; padding: 2px; border-radius: 5px; cursor: pointer; }
headerLeft__object > .MuiSvgIcon-rootで、Material-UIのアイコンを指定できます。
!importantは、material-uiなどのアイコンはもともとアイコンのスタイルが設定されているため、こちらのスタイルが"重要"であることを伝えるために、記述しなければなりません。左側から順番に仕上がりつつあります。
Header.css//コミュニティ+アイコン .header__community{ display: flex; align-items: center; } .header__community > .MuiSvgIcon-root { color: #3a8a00!important; cursor: pointer; } .header__community > p{ color: white; font-size: 12px; cursor: pointer; } .header__community > .MuiSvgIcon-root:hover { color: white !important; } @media screen and (max-width: 990px){ .header__community { display: none } }ここで、mediaQueriesがでてきましたが、恐れることはありません。
990pxより小さくなったら、今、仕上げた コミュニティ+アイコンを表示しなくする設定です。
モニターが大きいデバイスを持っている方は、Qiitaで試してみればわかりますが、横幅を小さくしていくと、コミュニティ+アイコンが表示されなくなります。
Header.css//検索フォーム .search__form { display: flex; border: 1px solid coral; background-color: white; padding: 5px; border-radius: 5px; } .search__form > .MuiSvgIcon-root{ color: #baaeaa!important; font-size: 20px !important; } .search__form > input { border: none; } .search__form > input:focus{ outline-width: 0; } .search__form > input::placeholder{ color: #baaeaa; font-size: 12px; } .search__form:hover{ display: flex; border: 2px solid black; background-color: white; } @media screen and (max-width: 990px){ .search__form { display: none } .search__form__media > .MuiSvgIcon-root{ color: white!important; font-size: 23px !important; margin-top: 5px; } } @media screen and (min-width: 991px) { .search__form__media > .MuiSvgIcon-root{ display: none; } }検索フォームの作り方はこちらの記事で詳しく書いているのこちらでは割愛します。
流行りのReactでFlexboxを利用して、検索フォーム内にアイコンを入れてみる。
https://qiita.com/Yusuke_Yoshioka/items/5d0ba245b70e524e755e
ここまでくるとヘッダーの左側は完成しました。
残り半分頑張っていきます。4.ヘッダー右側
Header.jsimport React from 'react'; import './Header.css'; function Header() { return ( <div className="header"> <div className='headerLeft'> ... </div> //ここから追加 <div className='headerRight'> <div className='headerRight__object'> <BeenhereIcon /> <p className="headerRight__p">ストック一覧</p> </div> <div className='headerRight__object'> <div className='headerRight__publish'> <CreateIcon /> <p>投稿する</p> <ArrowDropDownIcon /> </div> </div> <div className='headerRight__object'> <div className='headerRight__notification'> <NotificationsNoneIcon /> <p>0</p> </div> </div> <div className='headerRight__object'> <div className='headerRight__avatar'> <Avatar /> <ArrowDropDownIcon /> </div> </div> {/* Media */} <div className='headerRight__object__media'> <BeenhereIcon /> </div> <div className='headerRight__object__media'> <div className='headerRight__notification'> <NotificationsNoneIcon /> <p>0</p> </div> </div> <div className='headerRight__object__media'> <div className='headerRight__avatar'> <Avatar /> <ArrowDropDownIcon /> </div> </div> </div> </div> ) } export default Header
それでは、スタイリングしていきます。
Header.css.headerRight{ display: flex; } .headerRight__object{ display: flex; align-items: center; margin-right: 20px; } .headerRight__object > p{ color: white; font-size: 12px; cursor: pointer; } .headerRight__object > .MuiSvgIcon-root { cursor: pointer; color: white !important; font-size: 15px !important; margin-right: 5px; } .headerRight__p:hover{ text-decoration: underline; }.headerRight__p:hover{ text-decoration: underline; }この記事でもちょくちょく出てくる、hoverですが、これは、指定した要素にマウスが乗ったら起こるイベントです。
この場合は、ストック一覧にマウスを乗せるとストック一覧にアンダーラインがかかります。
あとは、投稿とお知らせ、アバター部分のスタイリングですが、特に新しいことはないので、載せるだけにさせてもらいます。
Hader.css//投稿する .headerRight__publish{ display: flex; border: 1px solid #3e9200; background-color: #3e9200; padding: 5px; border-radius: 5px; align-items: center; } .headerRight__publish > .MuiSvgIcon-root { color: white !important; font-size: 15px !important; margin-right: 5px; } .headerRight__publish > p { color: white; font-size: 12px; cursor: pointer; margin-right: 3px; } .headerRight__publish:hover{ background-color: #367e00; }
Header.css.headerRight__notification{ display: flex; border: 1px solid #edfce2; padding: 3px; background-color: #edfce2; border-radius: 5px; align-items: center; } .headerRight__notification > .MuiSvgIcon-root { color: #55c500 !important; font-size: 20px !important; margin-right: 5px; } .headerRight__notification > p { color: #55c500; font-size: 12px; cursor: pointer; margin-right: 3px; }
Header.css//headerRight Avatar .headerRight__avatar{ display: flex; align-items: center; } .headerRight__avatar > .MuiSvgIcon-root { cursor: pointer; color: #3a8a00!important; font-size: 20px !important; } .headerRight__avatar > .MuiSvgIcon-root:hover { cursor: pointer; color: white!important; margin-right: 3px; }
さて、なんとか、アバター部分まで、仕上げることができました。
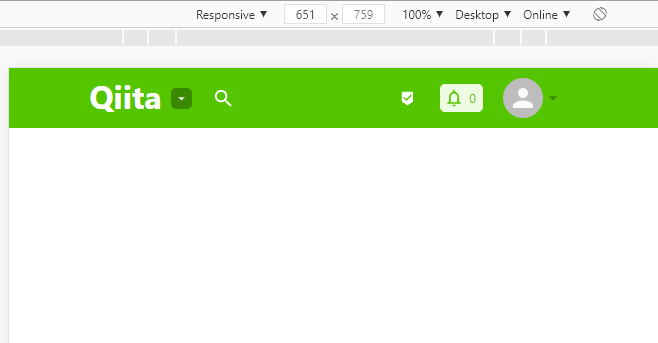
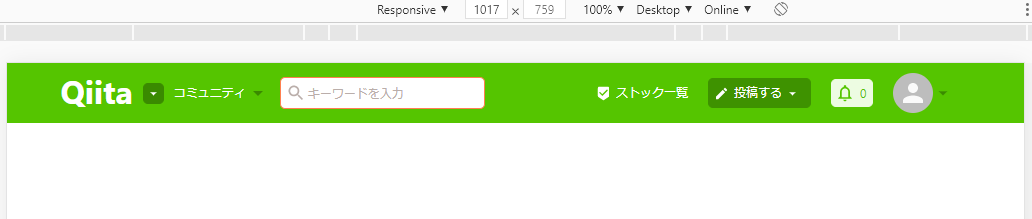
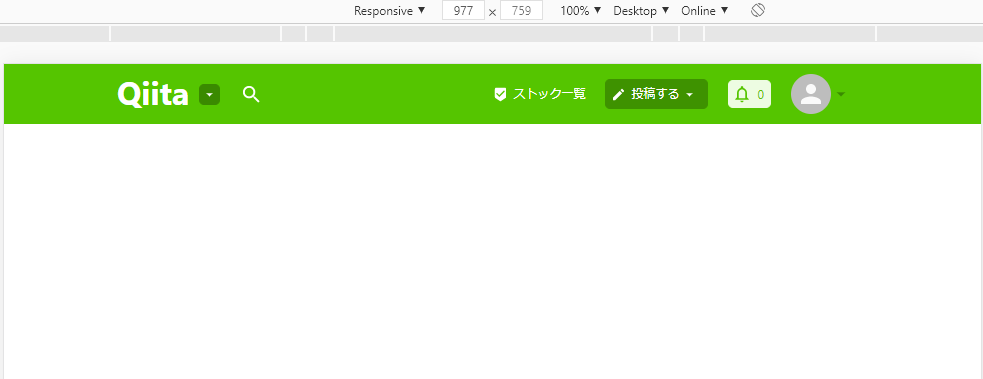
あとはメディアケリーでスタイリングすれば完成です。Header.css//mediaQueries @media screen and (max-width: 757px) { .headerRight__object { display: none; } .headerRight__object__media{ display: flex; align-items: center; margin-right: 20px; } .headerRight__object__media > .MuiSvgIcon-root{ cursor: pointer; color: white !important; font-size: 15px !important; margin-right: 5px; } } @media screen and (min-width: 758px){ .headerRight__object__media { display: none; } }完成
モニター大きめ
モニター中くらい
モニター小さめ
お疲れさまでした。


- 投稿日:2020-09-07T19:22:24+09:00
【JavaScript】fill()で横着して初期化しない
初めに
fill()でずぼらして初期化したら思った挙動にならなかったので備忘録。
実際のコードを引っこ抜いてちょっと変えてるので変な感じになってるかも。JavaScriptは最近やり始めましたがよくわからんですね。
起こったこと
以下のような変数を作成した
sub.tsexport const FuncA = (): HogeHoge => { const [a, setA] = useState("0"); const [b, setB] = useState("0"); retunrn { parameter: {a,b}, setter: {setA,setB} }; }
fill(funcA)をしたparameters配列のそれぞれの要素を突っ込んだテーブルを以下みたいな感じで作る。main.tsxfunction TableBody(params: Params){ const parameters = Array(params.lineCount).fill((FuncA)); return ( <table> <thead>...</thead> <tbody> { getLines(params.lineCount,parameters) } </tbody> </table> ); } ... function getLines(cnt: number,foo: Array<FuncA>) { return ([...Array<number>(cnt)].map((_, i) => { return ( <tr> <td>{ i + 1}</td> <td> <label>A: <input type="number" value={foo.parameter.a} onChange={(e) => foo.setter.setA(e.target.value)} /></label><br /> <label>B: <input type="number" value={foo.parameter.b} onChange={(e) => foo.setter.setB(e.target.value)} /></label> </td> </tr> ) })); }全てのinputが独立して変更されることを想定していたが、
画面上でinputの値を変更したばあい全ての行の値が変更された。
FuncAの定義をexport const FuncA(){...}にしてfill( ()=> FuncA())とかにもしたけど同じだった。よくわからないけど直した
fill()をやめてmap()で割り当てたら独立した。
fill(0)をしている場合上記みたいなことにならないので、
非プリミティブ型の場合は参照で引きたわされるのだろうか。
(そもそも関数を変数に入れること自体がこれまでなかったのでそこの挙動の把握も実は微妙)const parameters = [...Array(params.lineCount)].map(() => FuncA());おそらくこの部分の記載に基づくもの
https://developer.mozilla.org/ja/docs/Web/JavaScript/Reference/Global_Objects/Array/fill
Polyfillのが同等の実装らしいので少し見たところ
var O = Object(this);のところが多分そうかなとは思った。Objectのコンストラクタのページは404だったが、Objectクラスの説明に以下の記載があった。
https://developer.mozilla.org/ja/docs/Web/JavaScript/Reference/Global_Objects/Object
Object コンストラクターは、指定された値のオブジェクトラッパーを生成します。
- 値が null または undefined である場合、空のオブジェクトを生成して返します。
- それ以外の場合は、与えられた値に関連する型のオブジェクトを返します。
- 値がすでにオブジェクトであった場合は、その値を返します。少し調べた感じJavaScriptもプリミティブ型はオブジェクトではなさそうなので、
プリミティブ型は2つ目の挙動、それ以外の場合は3つ目の挙動になるのだろうか。
この「その値」というのが複製ではなく引き渡したオブジェクト自体がかえるという意味であれば納得できる。
- 投稿日:2020-09-07T19:22:24+09:00
【JavaScript】何も考えずfill()で横着して初期化しない
初めに
fill()でずぼらして初期化したら思った挙動にならなかったので備忘録。
実際のコードを引っこ抜いてちょっと変えてるので変な感じになってるかも。JavaScriptは最近やり始めましたがよくわからんですね。
起こったこと
以下のような変数を作成した
sub.tsexport const FuncA = (): HogeHoge => { const [a, setA] = useState("0"); const [b, setB] = useState("0"); retunrn { parameter: {a,b}, setter: {setA,setB} }; }
fill(funcA)をしたparameters配列のそれぞれの要素を突っ込んだテーブルを以下みたいな感じで作る。main.tsxfunction TableBody(params: Params){ const parameters = Array(params.lineCount).fill((FuncA)); return ( <table> <thead>...</thead> <tbody> { getLines(parameters) } </tbody> </table> ); } ... function getLines(foo: Array<FuncA>) { return ([...Array<number>(foo.length)].map((_, i) => { return ( <tr> <td>{ i + 1}</td> <td> <label>A: <input type="number" value={foo.parameter.a} onChange={(e) => foo.setter.setA(e.target.value)} /></label><br /> <label>B: <input type="number" value={foo.parameter.b} onChange={(e) => foo.setter.setB(e.target.value)} /></label> </td> </tr> ) })); }全てのinputが独立して変更されることを想定していたが、
画面上でinputの値を変更したばあい全ての行の値が変更された。
FuncAの定義をexport const FuncA(){...}にしてfill( ()=> FuncA())とかにもしたけど同じだった。よくわからないけど直した
fill()をやめてmap()で割り当てたら独立した。
fill(0)をしている場合上記みたいなことにならないので、
非プリミティブ型の場合は参照で引きたわされるのだろうか。
(そもそも関数を変数に入れること自体がこれまでなかったのでそこの挙動の把握も実は微妙)const parameters = [...Array(params.lineCount)].map(() => FuncA());おそらくこの部分の記載に基づくもの
https://developer.mozilla.org/ja/docs/Web/JavaScript/Reference/Global_Objects/Array/fill
Polyfillのが同等の実装らしいので少し見たところ
var O = Object(this);のところが多分そうかなとは思った。Objectのコンストラクタのページは404だったが、Objectクラスの説明に以下の記載があった。
https://developer.mozilla.org/ja/docs/Web/JavaScript/Reference/Global_Objects/Object
Object コンストラクターは、指定された値のオブジェクトラッパーを生成します。
- 値が null または undefined である場合、空のオブジェクトを生成して返します。
- それ以外の場合は、与えられた値に関連する型のオブジェクトを返します。
- 値がすでにオブジェクトであった場合は、その値を返します。少し調べた感じJavaScriptもプリミティブ型はオブジェクトではなさそうなので、
プリミティブ型は2つ目の挙動、それ以外の場合は3つ目の挙動になるのだろうか。
この「その値」というのが複製ではなく引き渡したオブジェクト自体がかえるという意味であれば納得できる。
- 投稿日:2020-09-07T17:21:27+09:00
【React -- jsx】jsxでスタイル付け(CSS)をする際のメモ
スクールのチーム開発の際に学んだ、jsxでスタイル(CSS)付けをする方法について記載します。
初学者が作業を進める上で知ったこと/ぶち当たったことが主で、jsxの注意点が網羅されているわけではありません。ご容赦ください。対象読者
・ほぼ初めてjsxに触れる方
(ごく初歩的な内容のため、すでにReactを使いこなしているという方には既知の内容と思われます)環境
React.js 16.13.1
Node.js 12.13.1
1、スタイルのつけ方
・ライブラリ'emotion'をインポートしてcssという名前をつける
(※スタイル付けをするためのライブラリは他にもあるようです)
・スタイルを付けたいタグに任意のclassNameをつける。(この場合、”titleClass”)
・つけたclassNameを定義する形で `` の内にスタイルを記述。example.jsimport React from 'react'; import { css } from 'emotion'; const App = () => { return( <div className={hoge}> <h1 className={titleClass}>Hello World</h1> </div> ); }; const textClass = css` color:red; `;2、通常のHTMLやCSSと違うこと
・1つのコンポーネントにつき、大元の親となるタグは1つだけ。
(上記のexample.jsでいうと、return()の一つ下の階層に配置できる要素は<div className={hoge}>の一つだけで、その<div>の内部の階層なら複数のタグを配置できる。)
・<img>や<input>など、通常のHTMLでは閉じタグがないタグでも、セルフクロージングタグが必要。<img>NO <img>NO</img> <img />Available!3、スタイルのつけ方---タグ内に記述する場合
style={{プロパティ名:"値"}}
・{{}}内はオブジェクトである
・プロパティ名にハイフンが含まれる場合は、キャメルケースの記載に直す
例: margin-bottom => marginBottom
・プロパティが複数ある場合は、","でつなぐexample2.js<div style={{marginBottom:"20px", color:"white"}}>example2</div>4、タグの属性の値に、JSの記述を使う
単純なことですが、つまづいたのでメモ。
例:オブジェクト"user"の、プロパティ"friendName"の値を、placeholderに表示されるようにする。
方法1<input type="text" placeholder={"友達の" + user.friendName + "さんを紹介する"}></input>方法2
<input type="text" placeholder={`友達の${user.friendName}さんを紹介する`}></input>以上。
アウトプットの練習も兼ねて、学んだことを記事にしました。
React自体の理解が不十分な状態で書いておりますので、記事中に誤りなどあればご指摘頂けますと幸いです。
- 投稿日:2020-09-07T13:05:53+09:00
【ReactNative】Androidの[◀︎戻る]ボタンによるコンポーネントの再マウントを防ぐ方法
はじめに
アプリをバックグラウンドから復帰した際に、Androidだけコンポーネントが再マウントされることがあります。
conponentDidMountなど、ライフサイクルへの対応がReact(ReactNative)では重要ですが、iOSとAndroidで挙動が異なっていることがあるので注意が必要です。戻るボタンによるバックグラウンド移行に注意
バックグラウンドへの移行操作には、主に3つの方法があります。
- [■ボタン]を押す
- [●ボタン]を押す
- [◀︎ボタン]を押す(アプリ内で戻り先がない場合、アプリを閉じる)
最後の[◀︎ボタン]を押した場合、タスクは残っているのに復帰時にコンポーネントが再マウントされることがあります。
予期しないライフサイクルメソッドが起動したり、イベントリスナーが重複して登録されたり等、様々な弊害が考えられます。
再マウントを防ぐ方法
以下を追加することで、再マウントを防ぐことができます。
- [◀︎ボタン]は必ずタスクをバックグラウンド移行する(タスクキルしない)
MainActivity.java@Override public void invokeDefaultOnBackPressed() { moveTaskToBack(true); }
- ひとつのタスクが複数のインスタンスを保持しないようにする
AndroidManifest.xml<activity ... android:launchMode="singleTop">まとめ
バックグラウンドへの移行時および復帰時に、バックグラウンドのスタックを使用するよう設定することで、予期しないコンポーネントの再マウントを防ぐことができます。
参考

- 投稿日:2020-09-07T10:17:05+09:00
Cloud Run上でLaravel×React(Mix使用)のサイトを爆速で動かす - 必要な設定と料金関連
サーバレスVPCで関連サービスと繋ぐ
Laravelをサーバレスで動かすに当たって、最低限使う、かつ、少し考慮が必要と思われるのは
- データベース(MySQL)
- セッション
- ログ
あたりだと思います。ここについては設定方法が公式にありますのでここではその情報だけまとめておきます。
データベース(MySQL)
当然、データベースの情報はどこからでも直接アクセスさせるとマズいですよね。なので、IP制限をするケースなどもあるかと思います。
ただ、Cloud SQLにはローカルIPを付与してCloud RunからそのIPへ向けてアクセスすることも可能です。
設定方法については、Cloud Run(フルマネージド)から Cloud SQL に接続する
を参考にすると良いと思います。
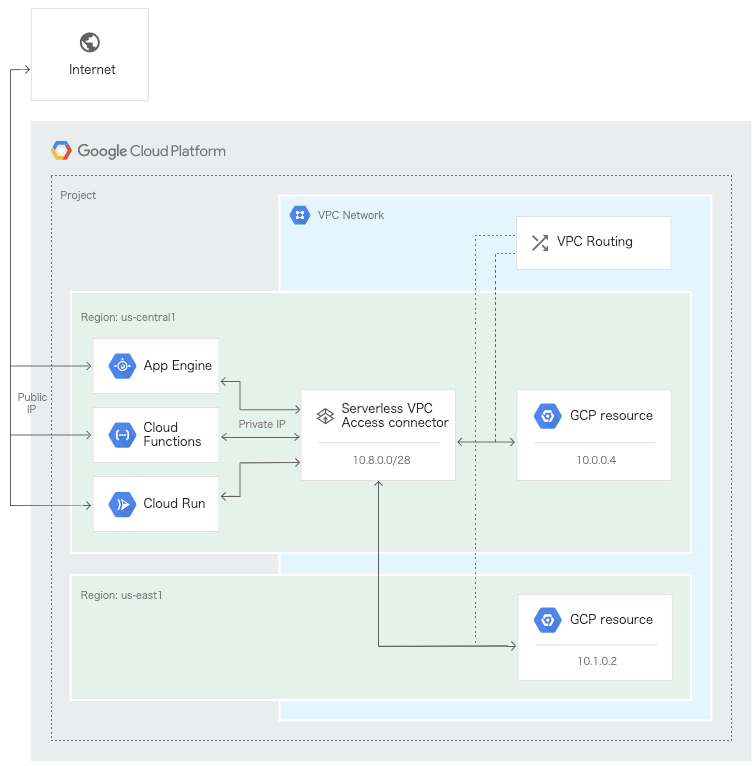
ここで重要担ってくるのが、サーバーレス VPC アクセスの構成です。このサービスは下記のような構成を実現します。(画像は公式ページから引用)
非常にわかりやすい図解ですね。中心にある「サーバレスVPCアクセスコネクタ」を使うことで、Cloud SQLをはじめとするGCPのリソースをグローバルに晒すことなくセキュアに使えます。
セッションはMemory Store(Redis)を使う
サーバレスでログインなどのセッションを使う場合は必須のサービスですね。これをやらないと、コンテナが変わるたびにセッションも無効になるので、ログイン状態が度々無効になってしまいます。。。
こちらもCloud Run(フルマネージド)サービスから Redis インスタンスへの接続として公式に情報があります。
Laravelはセッションに
memcachedやredisを使う機能が標準で備わっているのでそれを利用しましょう。configを変更するだけなので非常に簡単に対応できます。HTTP Session(英語)
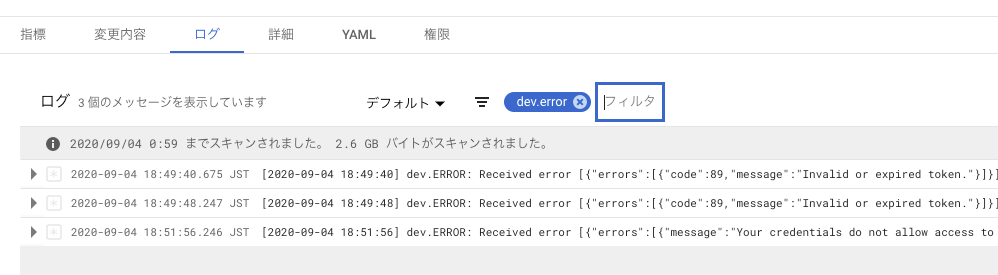
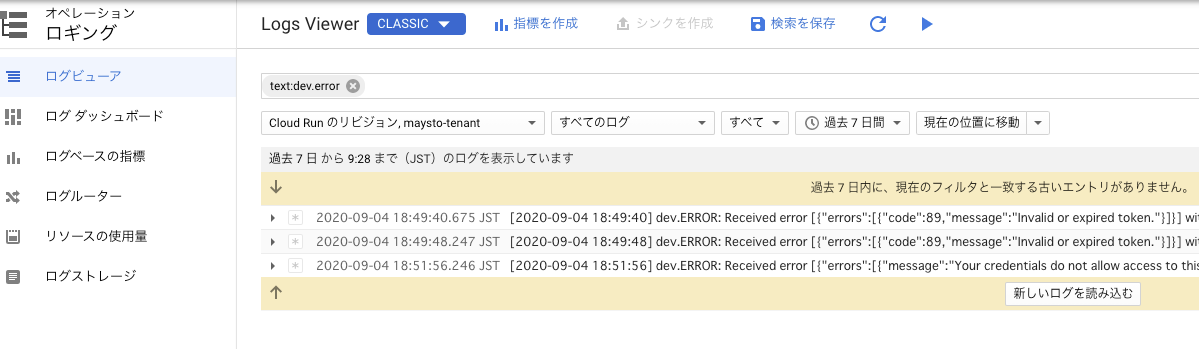
HTTPセッション(日本語)ログは標準出力にする
コンテナ×サーバレスなので、当然の事ながらコンテナ内に
laravel.logなどを作ったとしても意味はありません。ログを追えるようにするためには、ログの出力方法をファイルから標準出力に変更する必要があります。弊社の場合には下記のような設定をして、ワーニング以上のログを標準出力するようにしています。'custom' => [ 'driver' => 'monolog', 'handler' => StreamHandler::class, 'with' => [ 'stream' => 'php://stdout', ], 'level' => 'warning', ],こうする事でログビューからエラーやログを探すことが簡単になります。
Cloud Runでみた時
Logs Viewerでみた時
上記の構成を実現する上で最低限、必要になると思われる料金
※あくまで現時点で弊社が考える目安です。
サービス名 用途 月額 Cloud Run フロントとバックエンド 従量課金 Memorystore laravelのセッション保持 5,162 Cloud SQL For MySQL MySQL 1,357 Severless VPC Access Connector Cloud RUNとMySQLの接続 1,480 Container Registory デプロイに利用(Cloud Storageに対して課金) 10 Cloud Runは無料枠が大きいのも魅力的ですね。(2020/9/7時点 公式サイトより引用)
どちらかということ、固定費用が必要なのはMy SQLやRedis関係のサービス。サーバレスVPCコネクタもかかります。
ちなみに、サーバレスVPCコネクタはMicro Instance with burstable CPUとして請求が上がるのでこちらも注意が必要です。(最初分からなくてGCPのサポートに問い合わせてしまいました。。。料金に記載はきっちりとあります)
階層 CPU メモリ リクエスト ネットワーキング 無料 最初の 180,000 vCPU 秒は無料 最初の 360,000 GiB 秒は無料 200 万リクエストまで無料 北米内の下り(外向き)は、1 GiB まで無料 まとめ
インフラに対する意識をほとんどすることなく、ここまでスケーラブルかつ低料金でサービスを開始できる
Cloud Runは本当に素晴らしい製品だと思います。
デプロイまでの手順も非常にシンプルなので、学習コストも低いことが特徴的ですね。(Developer Experience高い)ここまでお付き合いいただきまして、ありがとうございました!
- 投稿日:2020-09-07T07:52:27+09:00
ReactでプレーンなLeafletとMapbox GL JSとOpenLayersの開発環境を構築してみた
ReactでプレーンなLeafletとMapbox GL JSとOpenLayersの開発環境を構築してみました

ReactでLeafletとMapbox GL JSとOpenLayersを利用する時に、ラッパーライブラリを利用しているかたもいると思いますが、今回はプレーンな開発環境を構築してみました!
1. 事前準備
- Reactの環境準備
- React #002 – TypeScript環境構築
- node v14.8.0
- npm v6.14.8
- React v16.13.1
- TypeScript v3.7.5
2. 共通設定
tsconfig.json
{
    "compilerOptions": {
        "target": "es5",
        "lib": ["dom", "dom.iterable", "esnext"],
        "allowJs": true,
        "skipLibCheck": true,
        "esModuleInterop": true,
        "allowSyntheticDefaultImports": true,
        "strict": true,
        "forceConsistentCasingInFileNames": true,
        "module": "esnext",
        "moduleResolution": "node",
        "resolveJsonModule": true,
        "isolatedModules": true,
        "noEmit": true,
        "jsx": "react",
        // 暗黙のany型をエラーにしない
        "noImplicitAny": false
    },
    "include": ["src"]
}
ライブラリがうまく動作しないので、今回は暗黙のany型をエラーにしない設定をします。
// 暗黙のany型をエラーにしない
"noImplicitAny": false
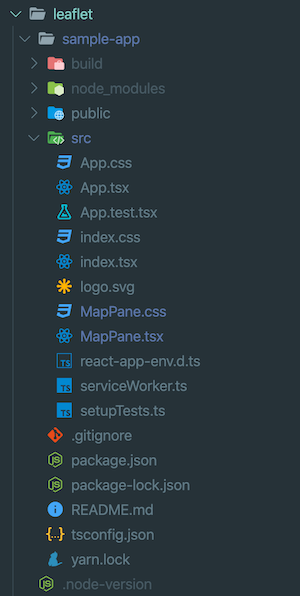
/src
index.tsx
import React from 'react';
import ReactDOM from 'react-dom';
import './index.css';
import App from './App';
import MapPane from './MapPane';
import * as serviceWorker from './serviceWorker';

ReactDOM.render(
    <React.StrictMode>
        <App />
        <MapPane />
    </React.StrictMode>,
    document.getElementById('root')
);

serviceWorker.unregister();
新規作成する「MapPane.tsx」を、「index.tsx」で読み込みます。
import MapPane from './MapPane';

<MapPane />
3. 各ライブラリ設定
React x Leaflet
ライブラリをインストールします。
npm install leaflet
npm install @types/leaflet
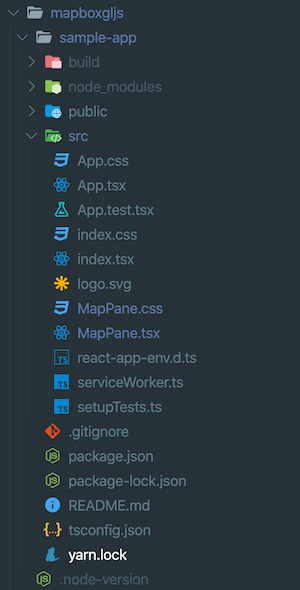
次に、地図を表示させるためのコードを書きます。今回は、「MapPane.tsx」と「MapPane.css」を作成します。
/src
MapPane.tsx
import React, { Component } from 'react';
// Leaflet読み込み
import L from 'leaflet';
import 'leaflet/dist/leaflet.css';
import './MapPane.css';

class MapPane extends Component {
    map: any;
    container: any;
    m_streets: any;

    componentDidMount() {
        // 背景地図設定
        this.m_streets = L.tileLayer(
            'https://api.maptiler.com/maps/jp-mierune-streets/256/{z}/{x}/{y}.png?key=[APIキー]',
            {
                attribution:
                    '<a href="https://maptiler.jp/" target="_blank">© MIERUNE</a> <a href="https://www.maptiler.com/copyright/" target="_blank">© MapTiler</a> <a href="https://www.openstreetmap.org/copyright" target="_blank">© OpenStreetMap contributors</a>',
            }
        );

        // マップ設定
        this.map = L.map(this.container, {
            center: [35.681, 139.767],
            zoom: 14,
            zoomControl: true,
            layers: [this.m_streets],
        });
    }

    render() {
        return <div className={'map'} ref={(e) => (this.container = e)} />;
    }
}

export default MapPane;
Leaflet関係のライブラリを読み込みます。
// Leaflet読み込み
import L from 'leaflet';
import 'leaflet/dist/leaflet.css';
背景地図を設定します。
// 背景地図設定
this.m_streets = L.tileLayer(
    'https://api.maptiler.com/maps/jp-mierune-streets/256/{z}/{x}/{y}.png?key=[APIキー]',
    {
        attribution:
            '<a href="https://maptiler.jp/" target="_blank">© MIERUNE</a> <a href="https://www.maptiler.com/copyright/" target="_blank">© MapTiler</a> <a href="https://www.openstreetmap.org/copyright" target="_blank">© OpenStreetMap contributors</a>',
    }
);
マップを設定します。
// マップ設定
this.map = L.map(this.container, {
    center: [35.681, 139.767],
    zoom: 14,
    zoomControl: true,
    layers: [this.m_streets],
});
/src
MapPane.css
.map {
    z-index: 0;
    height: 1000px;
    text-align: left;
}
ローカルサーバーで確認
npm start
ローカルサーバーを立ち上げると、マップが表示されます。
React x Mapbox GL JS
ライブラリをインストールします。
npm install mapbox-gl
npm install @types/mapbox-gl
次に、地図を表示させるためのコードを書きます。今回は、「MapPane.tsx」を作成します。
/src
MapPane.tsx
import React, { Component } from 'react';
// Mapbox GL JS読み込み
import mapboxgl from 'mapbox-gl';
import 'mapbox-gl/dist/mapbox-gl.css';
import './MapPane.css';

class MapPane extends Component {
    map: any;
    container: any;

    componentDidMount() {
        this.map = new mapboxgl.Map({
            container: this.container,
            style:
                'https://api.maptiler.com/maps/jp-mierune-streets/style.json?key=[APIキー]',
            center: [139.767, 35.681],
            zoom: 13,
        });

        // コントロール関係表示
        this.map.addControl(
            new mapboxgl.NavigationControl({
                visualizePitch: true,
            })
        );
    }

    render() {
        return <div className={'map'} ref={(e) => (this.container = e)} />;
    }
}

export default MapPane;
Mapbox GL JS関係のライブラリを読み込みます。
// Mapbox GL JS読み込み
import mapboxgl from 'mapbox-gl';
import 'mapbox-gl/dist/mapbox-gl.css';
マップを設定します。
// マップ設定
this.map = new mapboxgl.Map({
    container: this.container,
    style:
        'https://api.maptiler.com/maps/jp-mierune-streets/style.json?key=[APIキー]',
    center: [139.767, 35.681],
    zoom: 13,
});
コントロール関係を表示します。
// コントロール関係表示
this.map.addControl(
    new mapboxgl.NavigationControl({
        visualizePitch: true,
    })
);
/src
MapPane.css
.map {
    z-index: 0;
    height: 1000px;
    text-align: left;
}
ローカルサーバーで確認
npm start
ローカルサーバーを立ち上げると、マップが表示されます。
React x OpenLayers
ライブラリをインストールします。
npm install ol
npm install @types/ol
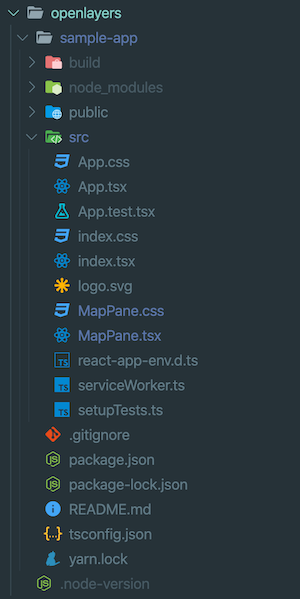
次に、地図を表示させるためのコードを書きます。今回は、「MapPane.tsx」と「MapPane.css」を作成します。
/src
MapPane.tsx
import React, { Component } from 'react';
// OpenLayers読み込み
import Map from 'ol/Map';
import View from 'ol/View';
import TileLayer from 'ol/layer/Tile';
import XYZ from 'ol/source/XYZ';
import { fromLonLat } from 'ol/proj';
import 'ol/ol.css';
import './MapPane.css';

class MapPane extends Component {
    map: any;
    container: any;

    componentDidMount() {
        // マップ設定
        this.map = new Map({
            target: this.container,
            layers: [
                new TileLayer({
                    source: new XYZ({
                        url:
                            'https://api.maptiler.com/maps/jp-mierune-streets/256/{z}/{x}/{y}.png?key=[APIキー]',
                        attributions:
                            '<a href="https://maptiler.jp/" target="_blank">© MIERUNE</a> <a href="https://www.maptiler.com/copyright/" target="_blank">© MapTiler</a> <a href="https://www.openstreetmap.org/copyright" target="_blank">© OpenStreetMap contributors</a>',
                        attributionsCollapsible: false,
                        tileSize: [256, 256],
                        minZoom: 0,
                        maxZoom: 18,
                    }),
                }),
            ],
            view: new View({
                center: fromLonLat([139.767, 35.681]),
                zoom: 14,
            }),
        });
    }

    render() {
        return <div className={'map'} ref={(e) => (this.container = e)} />;
    }
}

export default MapPane;
OpenLayers関係のライブラリを読み込みます。
// OpenLayers読み込み
import Map from 'ol/Map';
import View from 'ol/View';
import TileLayer from 'ol/layer/Tile';
import XYZ from 'ol/source/XYZ';
import { fromLonLat } from 'ol/proj';
import 'ol/ol.css';
マップを設定します。
// マップ設定
this.map = new Map({
    target: this.container,
    layers: [
        new TileLayer({
            source: new XYZ({
                url:
                    'https://api.maptiler.com/maps/jp-mierune-streets/256/{z}/{x}/{y}.png?key=[APIキー]',
                attributions:
                    '<a href="https://maptiler.jp/" target="_blank">© MIERUNE</a> <a href="https://www.maptiler.com/copyright/" target="_blank">© MapTiler</a> <a href="https://www.openstreetmap.org/copyright" target="_blank">© OpenStreetMap contributors</a>',
                attributionsCollapsible: false,
                tileSize: [256, 256],
                minZoom: 0,
                maxZoom: 18,
            }),
        }),
    ],
    view: new View({
        center: fromLonLat([139.767, 35.681]),
        zoom: 14,
    }),
});
/src
MapPane.css
.map {
    z-index: 0;
    height: 1000px;
    text-align: left;
}
ローカルサーバーで確認
npm start
ローカルサーバーを立ち上げると、マップが表示されます。
ReactでプレーンなLeafletとMapbox GL JSとOpenLayersの開発環境の構築ができました

用途により直接読み込むかラッパーライブラリを利用するかの選択は必要となりそうですが、どちらにしてもReactでマップライブラリを利用することが可能です。実案件では、プレーンな機能やプラグインを利用できる今回の直接読み込むパターンを利用するのが自由度が高そうですが、マーカーを表示するなどのシンプルな用途であればラッパーライブラリを利用したほうが手軽で操作しやすいかもしれません
お好きなマップライブラリでゼヒ試してみてください!
以前、「ReactでLeafletとMapbox GL JSとOpenLayersの開発環境を構築してみた」で紹介したラッパーライブラリの方法と比べてみて頂ければと思います!
React・Leaflet・Mapbox GL JS・OpenLayersについて、他にも記事を書いています。よろしければぜひ
tags - React
tags - Leaflet
tags - Mapbox GL JS
tags - OpenLayers


- 投稿日:2020-09-07T06:51:34+09:00
【JS/Firebase】React周りを学習した時のメモ
マウント
componentDidMountコンポーネントがマウントされた(ツリーに挿入された)直後に呼び出されます。DOM ノードを必要とする初期化はここで行われるべきです
React.Component – React より引用
componentWillUnmountここで、componentDidMount と componentWillUnmount とがお互いに鏡のように対応していないといけないことに注意してください。ライフサイクルメソッドを使うと、2 つのメソッドに書かれているコードが概念上は同一の副作用に関連しているとしても、それらを分割して書かないといけません。
副作用フックの利用法 – React より引用Props と State の違い
State: そのコンポーネントが持っている状態
Props: 親コンポーネントから渡されたプロパティ
React における State と Props の違い - Qiita より引用Reactのpropsとstateの違いについて. フロントエンドを勉強中でReact、Vue、Angularの中から一つ身につけた… | by itsukichan | Medium
JSX に書かれている属性と子要素を単一のオブジェクトとしてこのコンポーネントに渡します。このオブジェクトのことを “props” と呼びます。
コンポーネントと props – ReactRedux
ActionCreatorでActionを作成StoreへActionを渡す(dispatch)Reducerが 受け取ったAction,Stateを使って 新しいStateを作成する- 新しい
StateをStoreが保存するRedux入門【ダイジェスト版】10分で理解するReduxの基礎 - Qiita
Reduxによる状態管理の仕組みを理解しよう - Qiitaconnect
Semantic-UI
Layout examples - Semantic UI React
Firebase
登録
createUserWithEmailAndPassword
引数はメールアドレスとパスワードよく使うメソッド
signInWithEmailAndPasswordonAuthStateChangedなどリッスン
this.state.channelsRef.on('child_added', snap => {
  loadedChannels.push(snap.val());
  this.setState({ channels: loadedChannels });
})
リスナーのデタッチ
off()ServerValue
ServerValue | JavaScript SDK | Firebase
Component
設計
フロントエンドのコンポーネント設計に立ち向かう - Qiita
今更だけど「Function Component」 と 「Class Component」の違いをざっくり。 - Qiita遭遇したエラー
Cannot read property 'push' of undefined
- 投稿日:2020-09-07T06:51:34+09:00
【JS/Firebase】よく検索するReact周りのメモ
マウント
componentDidMountコンポーネントがマウントされた(ツリーに挿入された)直後に呼び出されます。DOM ノードを必要とする初期化はここで行われるべきです
React.Component – React より引用
componentWillUnmountここで、componentDidMount と componentWillUnmount とがお互いに鏡のように対応していないといけないことに注意してください。ライフサイクルメソッドを使うと、2 つのメソッドに書かれているコードが概念上は同一の副作用に関連しているとしても、それらを分割して書かないといけません。
副作用フックの利用法 – React より引用Props と State の違い
State: そのコンポーネントが持っている状態
Props: 親コンポーネントから渡されたプロパティ
React における State と Props の違い - Qiita より引用Reactのpropsとstateの違いについて. フロントエンドを勉強中でReact、Vue、Angularの中から一つ身につけた… | by itsukichan | Medium
JSX に書かれている属性と子要素を単一のオブジェクトとしてこのコンポーネントに渡します。このオブジェクトのことを “props” と呼びます。
コンポーネントと props – ReactRedux
ActionCreatorでActionを作成StoreへActionを渡す(dispatch)Reducerが 受け取ったAction,Stateを使って 新しいStateを作成する- 新しい
StateをStoreが保存するRedux入門【ダイジェスト版】10分で理解するReduxの基礎 - Qiita
Reduxによる状態管理の仕組みを理解しよう - Qiitaconnect
Semantic-UI
Layout examples - Semantic UI React
Firebase
登録
createUserWithEmailAndPassword
引数はメールアドレスとパスワードよく使うメソッド
signInWithEmailAndPasswordonAuthStateChangedなどリッスン
this.state.channelsRef.on('child_added', snap => {
  loadedChannels.push(snap.val());
  this.setState({ channels: loadedChannels });
})
リスナーのデタッチ
off()ServerValue
ServerValue | JavaScript SDK | Firebase
Component
設計
フロントエンドのコンポーネント設計に立ち向かう - Qiita
今更だけど「Function Component」 と 「Class Component」の違いをざっくり。 - Qiita
- 投稿日:2020-09-07T03:29:39+09:00
useRefをTypeScriptで使うと Object is possibly 'null'. と怒られる件の対策
TypeScript で useRef を使おうとすると初期値に null を渡していることもあり useEffect の中で Object is possibly 'null'. 怒られてしまう
個人的なケースとして、 hogehoge.current.scrollTo(0, 0) を要素に適用したかったのだがタイトルの通りとなった
Object is possibly 'null'.
- useRefにDOMの型をつける
- nullの場合の処理をいれる
上記ですぐに解決できた。
今回のサンプル
scrollTo()を使うサンプルです。
sample.tsximport React, { FC, useRef } from "react"; import "./styles.css"; const App: FC = () => { const refSample = useRef(null); const resetScroll = () => refSample.current.scrollTo(0, 0); return ( <div ref={refSample} className="scroll"> <div className="scroll__box">スクロールできます</div> <button onClick={resetScroll}>スクロールトップ</button> </div> ); }; export default App;style.css.scroll { width: 300px; height: 100px; background-color: #e0e0e0; overflow-x: scroll; } .scroll__box { width: 300px; height: 500px; color: #fff; background-color: blue; }この状態ではタイトルのエラーが生じます。
1. useRefを使うタイミングで型をつける
sample.tsxconst refSample = useRef(null); //からの const refSample = useRef<HTMLDivElement>(null);useRef を初期化するには null が一般的で、 null に対して HTMLDivElement の型付けを行う。
初期化された後にDOMの中で ref={sampleRef} として HTMLDivElement が sampleRef.current の中に格納されることとなる。
.current は useRef のデフォルトで決まっているプロパティのキーのこと。しかしこれだけではまだエラーは消えない。
2. nullの場合の処理をいれる
TypeScriptの型推論として HTMLDivElement or null の可能性があるため、まだ怒られてしまう。
sample.tsxconst resetScroll = (): void => refSample.current.scrollTo(0, 0); //からの const resetScroll = (): void => refSample.current?.scrollTo(0, 0);そのため refSample.current?.hogehoge と ? を追加することで短いコードで null の可能性を表すことで怒られなくなる。
codesandbox: https://codesandbox.io/s/vigorous-bas-e3f5l?fontsize=14&hidenavigation=1&theme=dark
- 投稿日:2020-09-07T00:55:49+09:00
ブラウザでTesseract.js使ってOCRしてみた
概要
少し前にOCRという存在を知り、実際に触ってみたいなと思ってはや2ヶ月。。。。
やっとこさっと重い腰を上げてブラウザで機能するOCRライブラリがないかなと探していたところ、、、、
OSSでTesseract.jsを見つけて少し使ってみたので紹介したいと思います。そもそもOCRってなんぞや
OCRは、Optical Character Reader/Recognitionの略で、
画像データのテキスト部分を認識して、文字データに変換する光学文字認識機能のことを意味します。これを活用すると、データ入力という非常に効率の悪い作業をなくすことができます。
最近だと、QRコードのOCRもあるのでなかなか面白い技術になってきています。Tesseract.jsで簡単OCR
早速
Tesseract.jsを使ってブラウザでできるOCRを実装してみましょう。
今回はReactを使います。$ npx create-react-app sample-ocr $ cd sample-ocr // Tesseract.jsをインストール $ yarn add tesseract.jsこれで実装の準備は整いました。
今回は必要最低限の実装しかしません。
あくまで、Tesseract.jsを使う為だけのものです。App.jsimport React, { useState } from 'react'; import { createWorker } from 'tesseract.js'; import './App.css'; function App() { const [file, setFile] = useState(); const [textOcr, setTextOcr] = useState(''); const worker = createWorker({ logger: m => console.log(m) }) const tryOcr = async() => { await worker.load(); await worker.loadLanguage('eng'); await worker.initialize('eng'); const { data: { text } } = await worker.recognize(file); setTextOcr(text); await worker.terminate(); } // fileData 取得 const handleChange = (e) => { console.log(e.target.files[0]); setFile(e.target.files[0]) } const handleClick = async() => { if (!file) return setTextOcr('Recognizing...') await tryOcr(); } return ( <div className="App"> <input type="file" onChange={handleChange} /><br /> <button className="button" onClick={handleClick}>Try OCR</button> <div> {textOcr} </div> </div> ); } export default App;さぁ早速英語の画像を上げてみよう
結果↓↓
なんとか読み取れたみたい><
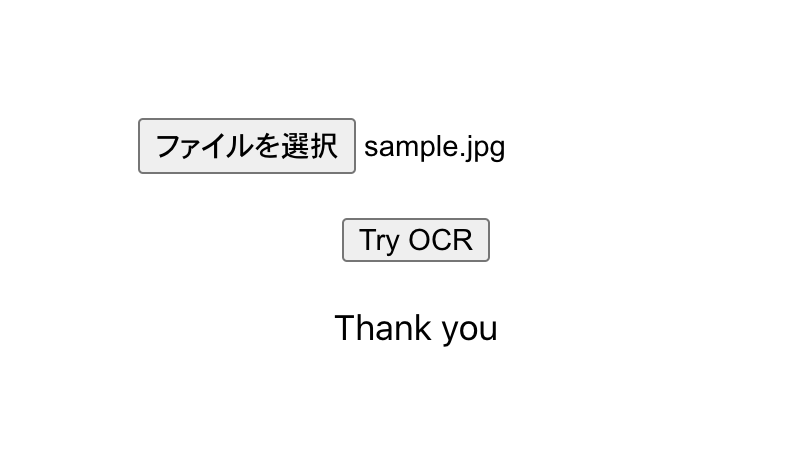
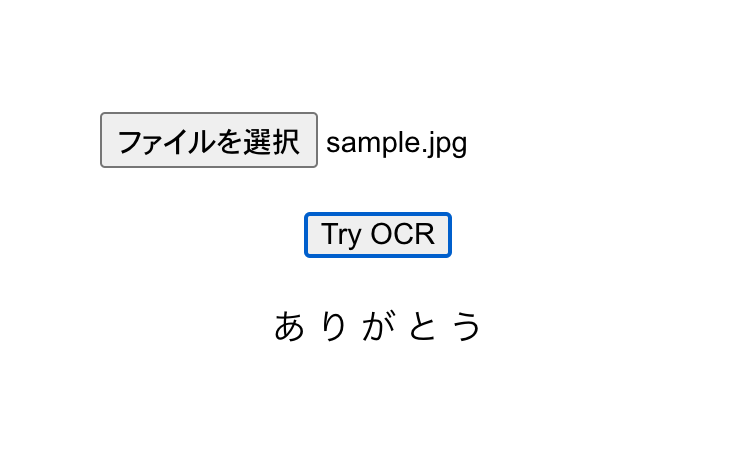
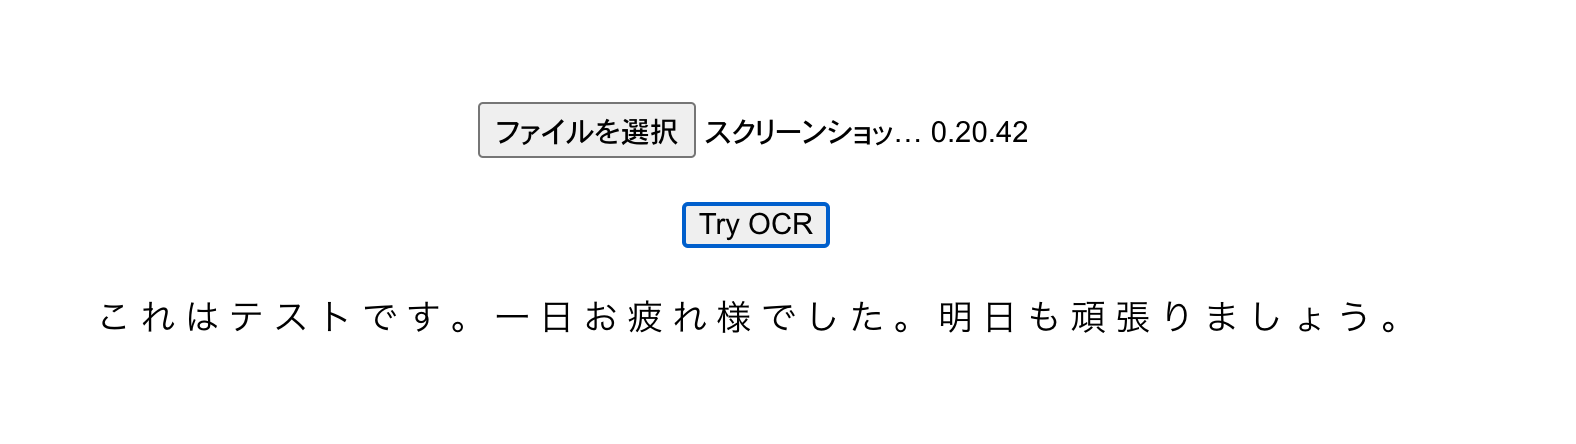
次は日本語で読み取ってみよう
下記の箇所を変える必要があるので注意!!await worker.loadLanguage('eng'); await worker.initialize('eng'); ↓↓↓ await worker.loadLanguage('jpn'); await worker.initialize('jpn');読み取る画像はこれ
結果↓↓
このくらい綺麗な画像で、短文だとしっかり読み込めるということがわかりました。
少し長文
結果↓↓
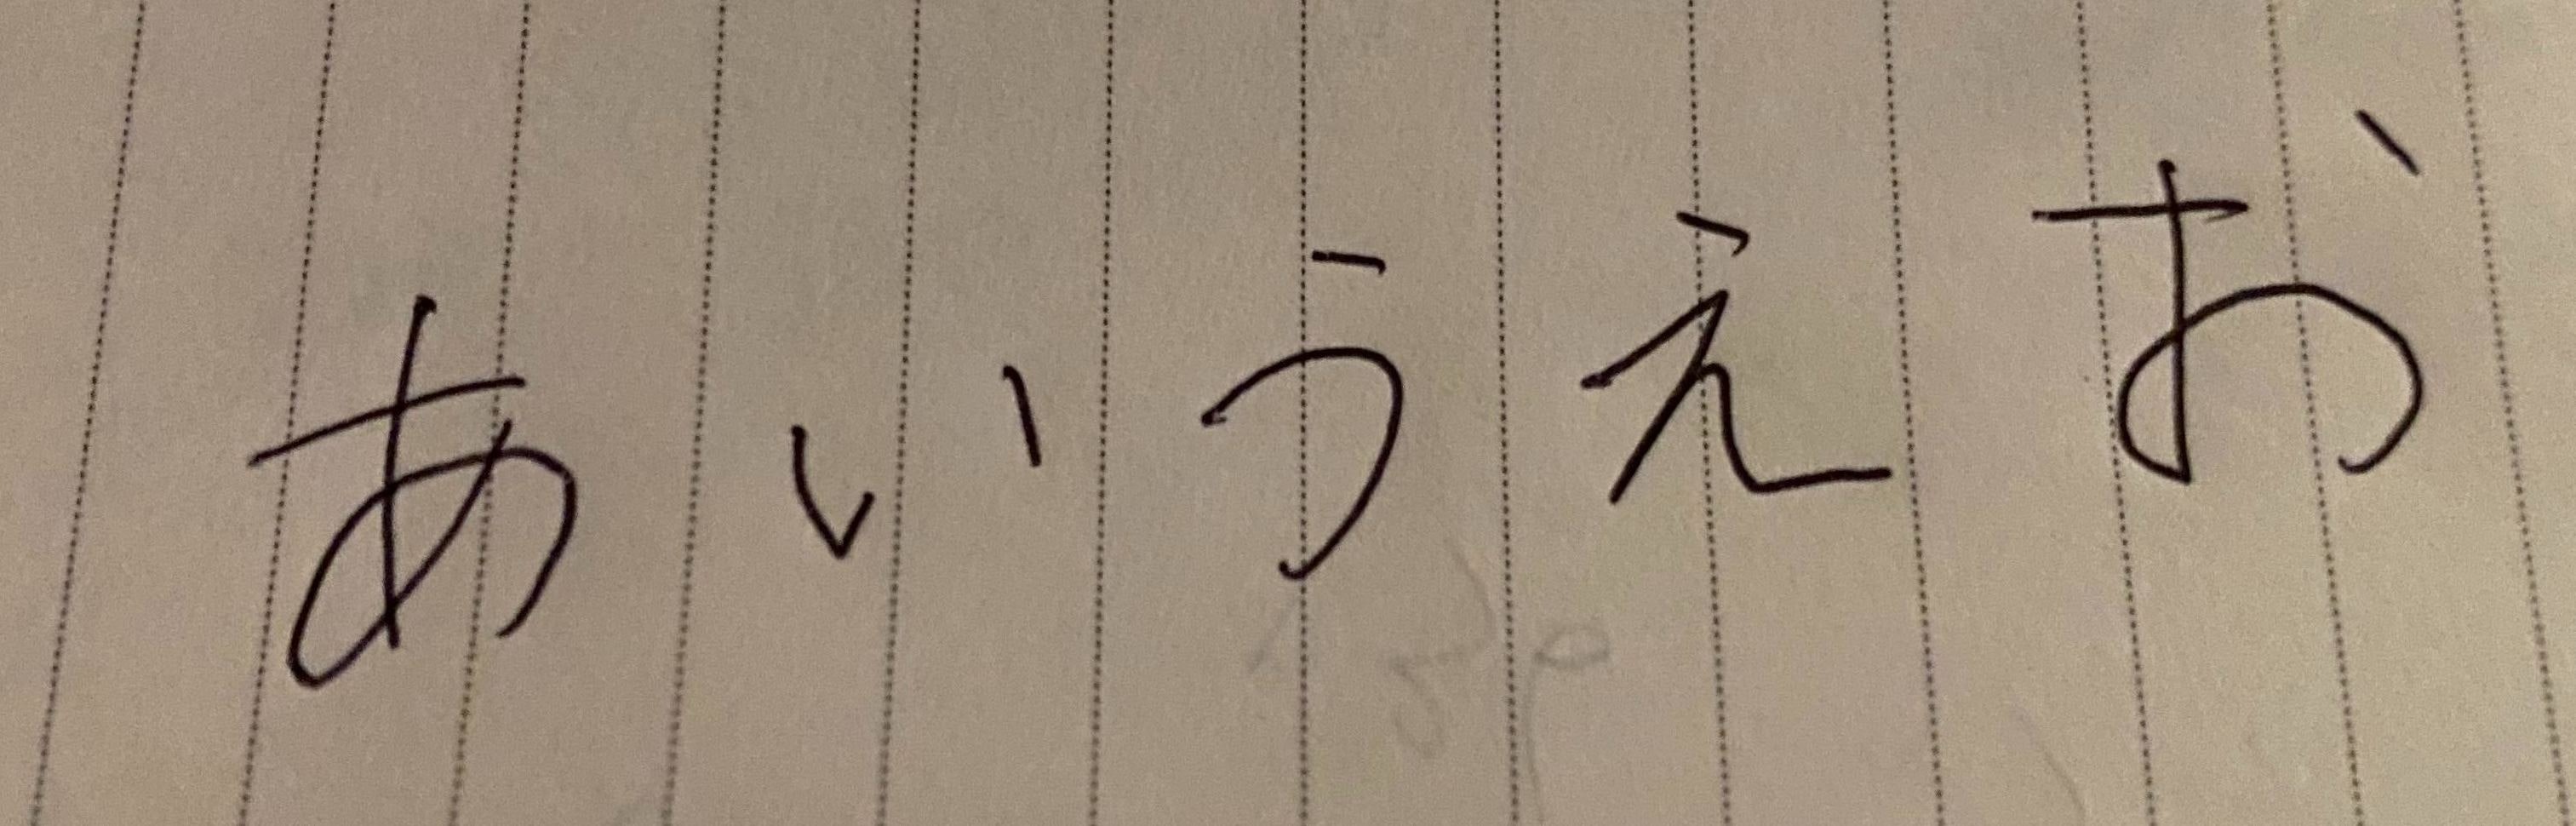
すごい!! 解析できてる!!手書きは??
結果↓↓
あれれ><まとめ
ブラウザでもOCRは結構簡単に実現できました。
精度の面で言うと画像が綺麗だと解析結果は良い気はしましたが、
縦文字や、手書きの解析の精度が低いような気がしました。(英語だと精度高いのかな??)
今回はTesseract.jsの最低限の機能しか使ってないので、何かしらのオプション機能などを使えばもう少し精度を上げることはできそうだ。
実際の公式githubには、リアルタイムで打った文字を解析してくれるサンプルもあ流ので興味ある方は少し触ってみるといいかと思います!参照


- 投稿日:2020-09-07T00:40:29+09:00
React Appを新規作成してHerokuにデプロイ
Reactで新規アプリを作成して、Herokuにデプロイするまでの手順をメモ。
環境
macOS Catalina 10.15.6
Herokuの導入
せっかくなのでHerokuの導入から書きます
Herokuをインストール
brewで Heroku をインストール
$ brew install heroku/brew/herokuHeroku がインストールできたか確認
$ heroku --versionHerokuのユーザ設定
Heroku にログインしてそれぞれ入力
$ heroku login
Enter your Heroku credentials:
Email: katsube@example.com
Password: ****************
Logged in as hogehoge@example.com
公式サイト https://devcenter.heroku.com/articles/heroku-cli
参考 https://blog.katsubemakito.net/macos/setup_heroku-cliReact Appを作成
ReactでAppを新規作成するところから
Node.jsをインストール
以下の公式サイトからインストーラをインストールして、ダウンロードを実行
公式サイト https://nodejs.org/ja/Yarnをインストール
yarn は brew でインストール(楽だから)
$ brew install yarnReactアプリを新規作成
アプリの名前は my-app で新規作成
$ npx create-react-app my-app
& cd my-app
Gitのステージングまであげる
$ git init.
$ git add .
$ git commit -m 'create: myapp'
サーバーを起動
$ yarn start以下にアクセス
http://localhost:3000/参考 https://qiita.com/taskooh/items/f67d34f9f5c8eab08dc0
Herokuにデプロイ
Herokuにログイン
$ heroku login // Enterを押すHerokuアプリ作成
$ heroku createHeroku buildpacks
$ heroku buildpacks:set https://github.com/mars/create-react-app-buildpack.gitデプロイ
$ heroku push heroku master
$ heroku open
以上です!
起きたエラーたち
画面が真っ白
原因: rootを設定していない
対策: rootを設定するpackage.json"homepage": "./" # 追加Two different lockfiles found: package-lock.json and yarn.lock
remote: -----> Build failed
remote:  !     Two different lockfiles found: package-lock.json and yarn.lock
原因: package-lock.json と yarn.lock が競合
対策: package-lock.jsonを削除してデプロイ$ rm -rf package-lock.json $ yarn install $ git add yarn.lock $ git commit -m "Updated Yarn lockfile" $ git push heroku master $ heroku open
