- 投稿日:2020-09-07T23:41:58+09:00
Layoutタップ時にRecyclerViewもタップ対象とする方法
親のLayoutに
android:clickable="true"してもRecyclerView領域タップに反応してくれない。そんなときの対応方法。setAdapterの後に
suppressLayout(true)をするだけでOK。
※setLayoutFrozen(boolean)は Deprecated になりました。
https://developer.android.com/reference/kotlin/androidx/recyclerview/widget/RecyclerView#suppresslayoutタッチイベントやスクロールが無効になるので、当然RecyclerViewのアイテムがClickListener等のイベントを持っていても反応しなくなります。
setAdapterの後なのは、setAdapter内でfalseに設定されているためです。
// recyclerview-1.1.0-sources.jar
public void setAdapter(@Nullable Adapter adapter) {
    // bail out if layout is frozen
    setLayoutFrozen(false);
    setAdapterInternal(adapter, false, true);
    processDataSetCompletelyChanged(false);
    requestLayout();
}

@Deprecated
public void setLayoutFrozen(boolean frozen) {
    suppressLayout(frozen);
}
suppressLayout(true)の1行を追加するだけで良いですが、ソースコード上で行う必要があるためレイアウトXML上からは分からなくなってしまいます。なので私が実装する際にはCustomViewを作成しています。package com.example.myapp import android.annotation.SuppressLint import android.content.Context import android.util.AttributeSet import androidx.recyclerview.widget.RecyclerView class SuppressRecyclerView @JvmOverloads constructor( context: Context, attrs: AttributeSet? = null, @SuppressLint("PrivateResource") defStyleAttr: Int = R.attr.recyclerViewStyle ) : RecyclerView(context, attrs, defStyleAttr) { override fun setAdapter(adapter: Adapter<*>?) { super.setAdapter(adapter) suppressLayout(true) } }<com.example.myapp.SuppressRecyclerView android:id="@+id/list" android:layout_width="match_parent" android:layout_height="wrap_content" android:orientation="vertical" app:layoutManager="androidx.recyclerview.widget.LinearLayoutManager" tools:itemCount="3" tools:listitem="@layout/list_card" />以上
- 投稿日:2020-09-07T23:33:44+09:00
React Native Gesture Handler を Android で使用するのに必要な設定
Android で react-native-gesture handler が一部動かなくなって詰まっていたので忘備録。
tl;dr;
- Android にて、Modal Component の中でreact-native-gesture-handler を使うには、
gestureHandlerRootHOCを Modal の中で使う必要がある。- https://docs.swmansion.com/react-native-gesture-handler/docs/#usage-with-modals-on-android
import * as React from 'react'
import { Text, Modal } from 'react-native'
import { TouchableOpacity, gestureHandlerRootHOC } from 'react-native-gesture-handler'

const ModalChild = gestureHandlerRootHOC(()=>{
  return (
    <TouchableOpacity onPress={()=>{/* some event */}}>
      <Text>Button with Gesture</Text>
    </TouchableOpacity>
  )
})

export const GestureInModal = () => {
  return (
  <Modal>
    <ModalChild />
  </Modal>
  )
}
react-native-gesture-handler について。
React Native は基本的に画面の描画は JS 層で書いた React のコードをうまく変換して描画されます。(2020年9月現在)
どの様に描画されるかは JS のコードを読み込んで、それを ViewConfig という json に変換してそれぞれ iOS や Android のコードに変換すると言った処理が走ります。(これらの描画は、現在進行中の Fabric プロジェクトによって方針が変わって速度も改善されますが今の所は話を進めます。)これは Animation や Gesture など、ユーザーの動きに合わせて画面を動かすのには適していなく、特に Android ではそのまま書くと大きなパフォーマンス減少の原因になりがちとなります。
react-native-gesture-handler はこの問題を解決すべく作成されたライブラリで、今では react-navigation など、多くの react-native の主要ライブラリで使用されています。
react-native-gesture-handler はスワイプやフリックなどの gesture を行った際に行われる処理をネイティブ層に閉じ込めることによって、本来のネイティブのパフォーマンスで動作が行えるようにするライブラリです。メール一覧で左にスワイプすることで削除するなどと言ったユースケースの時に使用されます。
詰まった箇所
react-native-gesture-handler が提供している
SwipeableやTouchableOpacityを使って、ボタンを押したら遷移、スワイプしたら削除のような動作を行おうとした時、一部の画面で iOS では問題なく動いていたのが Android では Touch event も Swipe event も発生していなかった。今まで他の箇所では問題なく動いていたのだが、どうやら react-native が提供している
ModalComponent のみ Android で動作していなかった。Android では、最初に react-native-gesture-handler を読み込んだ際、Gesture が行える範囲が MainActivity の1画面に限られているようで、react-nativeのModalを使った画面はそれとは別画面扱いになり、react-native-gesture-handlerの適応範囲外になっていた模様。
React Native Gesture Handler の公式ドキュメントによれば、もし Modal の中で react-native-gesture-handler を使う必要がある場合は、Modal の中でさらに
gestureHandlerHOCを使って、Modal のページの中でも gesture handler を読み込む様に設定する必要がある模様。import * as React from 'react' import { Text, Modal } from 'react-native' import { TouchableOpacity, gestureHandlerRootHOC } from 'react-native-gesture-handler' const ModalChild = gestureHandlerRootHOC(()=>{ return ( <TouchableOpacity onPress={()=>{/* some event */}}> <Text>Button with Gesture</Text> </TouchableOpacity> ) }) export const GestureInModal = () => { return ( <Modal> <ModalChild /> </Modal> ) }これで問題なく Android の modal の中でも Gesture Handler を動かすことができた。
参考
- 投稿日:2020-09-07T21:34:03+09:00
Androidメモ すぐ忘れる自分のための備忘録
Androidメモ置き場
物忘れが激しい自分のためのAndroidテクニックメモ。
調べた当時の情報で記載しております。
たまにサンプルコード書いてますがkotlinで書いています。
ググってもJavaのコードが多くてぐぬぬってなりがちなので・・・。
動作保証はしません。自分用メモですのでご了承願います。Spinner で同じItemを再選択しても反応しない場合の対処方法
CustomSpinnerを作成する。デフォルトのSpinnerでは同じItemを選択してもonItemSelectedが呼び出されないので
Customspinner.ktimport android.content.Context import android.util.AttributeSet import androidx.appcompat.widget.AppCompatSpinner // デフォルトのSpinnerだと同じItemを再選択した場合に、onItemSelectedListenerが発動しないため、自前でSpinnerを作成している class CustomSpinner : AppCompatSpinner { constructor(context: Context) : super(context) constructor(context: Context, attrs: AttributeSet) : super(context, attrs) constructor(context: Context, attrs: AttributeSet, defStyle: Int) : super( context, attrs, defStyle ) override fun setSelection(position: Int, animate: Boolean) { val isSameSelected = position == selectedItemPosition super.setSelection(position, animate) if (isSameSelected) { // 同じ項目が選択された場合もonItemSelectedを呼ぶようにしている onItemSelectedListener!!.onItemSelected(this, selectedView, position, selectedItemId) } } override fun setSelection(position: Int) { val isSameSelected = position == selectedItemPosition super.setSelection(position) if (isSameSelected) { // 同じ項目が選択された場合もonItemSelectedを呼ぶようにしている onItemSelectedListener!!.onItemSelected(this, selectedView, position, selectedItemId) } } }レイアウトファイルに作成したCustomSpinnerを設定する。
後はコードで作成したCustomSpinnerを取得して設定すればOK。クラス差し替えるだけでいけるはず。画面初期表示時にSpinnerのonItemSelectedが2回呼ばれるのを防ぐ方法
Spinner作成時に、spinner.isFocusable = falseにし、onItemSelectedが初めて呼ばれたタイミングでspinner.isFocusable = trueで戻してあげると良い
// Spinnerの取得
val spinner = findViewById<CustomSpinner>(R.id.spinner)

// 初回起動時の対応
spinner.isFocusable = false

// OnItemSelectedListenerの実装
spinner.onItemSelectedListener = object : AdapterView.OnItemSelectedListener {
            // 項目が選択された時に呼ばれる
            override fun onItemSelected(
                parent: AdapterView<*>?,
                view: View?,
                position: Int,
                id: Long
            ) {
                // 初回のみ動作
                if (!spinner.isFocusable) {
                    // ここでtrueに戻す
                    spinner.isFocusable = true
                    return
                }
                // TODO onItemSelectedでやりたい処理を書いてね

            }
            override fun onNothingSelected(parent: AdapterView<*>?) {
                // NOP
            }
        }
OTAからダウンロードしたapkファイルをインストールしてアップデートできない件
【結論】署名ファイル作る。buildTypes release でビルドする。debugでビルドすると新規にインストールできるけど、アップデートできないよ。アプリアンインストールからの再インストールはできる。
https://developer.android.com/studio/publish/app-signing?hl=ja#debug-modeGoogle Maps Platformが提供している Directions APIのレスポンスで返却されるpoints使ってPolyLineで経路の線引こうとして絶望したら・・・読むと救われるかも
google map で2点間の経路を返却してくれるDirections APIだけど経路をPolyLineで引こうとしたら下記のような(一例)値が返却され絶望した。。。
Response抜粋(例です)"overview_polyline": { "points": "a~l~Fjk~uOnzh@vlbBtc~@tsE`vnApw{A`dw@~w\\|tNtqf@l{Yd_Fblh@rxo@b}@xxSfytA blk@xxaBeJxlcBb~t@zbh@jc|Bx}C`rv@rw|@rlhA~dVzeo@vrSnc}Axf]fjz@xfFbw~@dz{A~d{A|zOxbrBbdUvpo@` cFp~xBc`Hk@nurDznmFfwMbwz@bbl@lq~@loPpxq@bw_@v|{CbtY~jGqeMb{iF|n\\~mbDzeVh_Wr|Efc\\x`Ij{kE}mAb ~uF{cNd}xBjp]fulBiwJpgg@|kHntyArpb@bijCk_Kv~eGyqTj_|@`uV`k|DcsNdwxAott@r}q@_gc@nu`CnvHx`k@dse @j|p@zpiAp|gEicy@`omFvaErfo@igQxnlApqGze~AsyRzrjAb__@ftyB}pIlo_BflmA~yQftNboWzoAlzp@mz`@|}_ @fda@jakEitAn{fB_a]lexClshBtmqAdmY_hLxiZd~XtaBndgC" },頑張ってデコードできるようだけどMaps SDK for Android Utility Libraryが提供している「Poly decoding and encoding」を使えば頑張らずに済むよって話。
// poliyUtilを使ってデコードできるよ!やったね。
PolyUtil.decode(引数にDirections APIで返却されたpointsを設定する)
https://github.com/googlemaps/android-maps-utils
以下随時更新
- 投稿日:2020-09-07T20:36:13+09:00
【Android】Contextについて
【Android】Contextについて
- Contextとは
- Androidによって、実装が提供されているクラス
- アプリケーションとのインターフェースの役割をしていて、アプリ名の取得(getPackageName)などのアプリのリソースなどを取得できる
- AppCompatActivity(Activityが継承するクラス)もContextを継承しているので、intentなどの引数にAcitivity.thisで渡せる
Contextの2つの取得方法
Contextを取得する方法は、2つあります。
- 1つめは、Activityでthis 例: MainActivity.this
- 2つめは、getApplicationContextを使う
以下に、それぞれについてまとめる
それぞれの使い分け
ApplicationContextを使うタイミング
- Acitivityのライフサイクルより長い時間使いたい場合
- Acitivityから取得するContextはActivityのライフサイクル依存するため、それよりも長い期間使用したい場合は、こちらを使う感じになると思います。
ActivityのContextを使うタイミング
- いろいろ調べたところ、基本的にはこちらを使うので問題ないのではと思っています。
- 例えば、viewに渡すcontextはこちらの方がよく、なぜならActivityに適用したテーマなどが反映されなくなるためです。
まとめ
- Contextとは、アプリケーションとのインターフェースになるクラス
- 取得方法は、2つ( getApplicationContext, Activity.this)
- 大体は、Activity.thisで取得する方がいいんじゃないのか。
参考記事
- 投稿日:2020-09-07T19:48:42+09:00
Androidアプリのアダプティブアイコンに対応
概要
AndroidのOS 8.0からAdaptiveアイコン(アダプティブアイコン)というアイコンでてきました。これまでの通常のアイコン、ラウンドアイコンに加えて、アダプティブアイコンも必要になりました。アダプティブアイコンの仕方について備忘録としてまとめました。
対応の経緯
Androidのアプリの申請時、googleのフューチャー枠獲得を行おうとした際に、任意対応項目としてアダプティブ アイコンの対応が必要になりました。
詳細
アプリのランチャー アイコンがアダプティブ アイコンの形状向けに最適化されていません。空白のバックグラウンド層の上に、既存のアプリのタイルが切り取られて表示されているか、ランチャーアイコンの主要な部分がマスクの形状によって切り取られて表示されております。アダプティブ アイコン機能は Android 8.0 で導入され、OEM がデバイス上で一貫してランチャー アイコンの形状をマスクすることができるようになりました。8.0 以降搭載のデバイスでアプリのアイコンが適切に表示されるように、下記をご確認ください。
- サイズ 108 dp x 108 dp のアセットレイヤを 2 つ用意します。
- 前景のアイコンレイヤは、中心から 72 dp x 72 dp の範囲に焦点を置き、キャンバスの残りの部分はシステム マスキングで操作できるようにします。
- AndroidManifest.xml と res/mipmap XML で前景と背景の要素の場所を宣言し、関連する android:icon 属性と android:drawable 属性を更新し、新しいアイコン リソースを定義します。
詳細についてはこちらをご覧ください:
https://developer.android.com/guide/practices/ui_guidelines/icon_design_adaptive.html
https://medium.com/google-design/designing-adaptive-icons-515af294c783対応方法
AndroidManifest.xmlのandroid:icon設定を変更
AndroidManifest.xml<?xml version="1.0" encoding="utf-8"?> <manifest xmlns:android="http://schemas.android.com/apk/res/android" package="com.example.test" > <application android:icon="@mipmap/ic_launcher" android:label="@string/app_name" > <activity android:name=".MainActivity" android:icon="@mipmap/ic_activity" android:label="@string/app_name" > <intent-filter android:icon="@mipmap/ic_activity_intent_filter" android:label="@string/app_name" > <action android:name="android.intent.action.MAIN" /> <category android:name="android.intent.category.LAUNCHER" /> </intent-filter> </activity> </application> </manifest>resフォルダにアイコンとxmlファイルを設定する
フォルダ名 種類 サイズ mipmap-mdpi 中密度(従来の HVGA)ランチャー アイコン 48 × 48 mipmap-hdpi 高密度ランチャー アイコン 72 × 72 mipmap-xhdpi 超高密度ランチャー アイコン (API レベル 8以降) 96 × 96 mipmap-xxhdpi 超超高密度ランチャー アイコン (API レベル 16以降) 144 × 144 mipmap-xxxhdpi 超超高密度ランチャー アイコン (API レベル 18以降) 192 × 192
ic_launcher_round.xml<?xml version="1.0" encoding="utf-8"?> <adaptive-icon xmlns:android="http://schemas.android.com/apk/res/android"> <background android:drawable="@drawable/ic_launcher_background"/> <foreground android:drawable="@drawable/ic_launcher_foreground"/> </adaptive-icon>ic_launcher.xml<?xml version="1.0" encoding="utf-8"?> <adaptive-icon xmlns:android="http://schemas.android.com/apk/res/android"> <background android:drawable="@drawable/ic_launcher_background"/> <foreground android:drawable="@drawable/ic_launcher_foreground"/> </adaptive-icon>


- 投稿日:2020-09-07T18:04:27+09:00
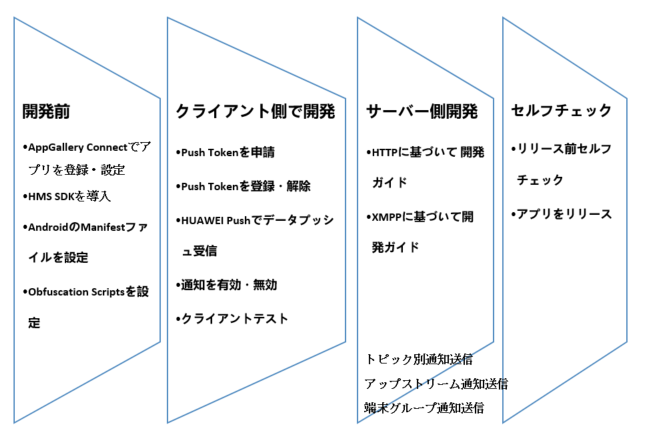
Huawei Push Kit - ユーザーのアプリ認知度と通知を向上
Push Kitとは
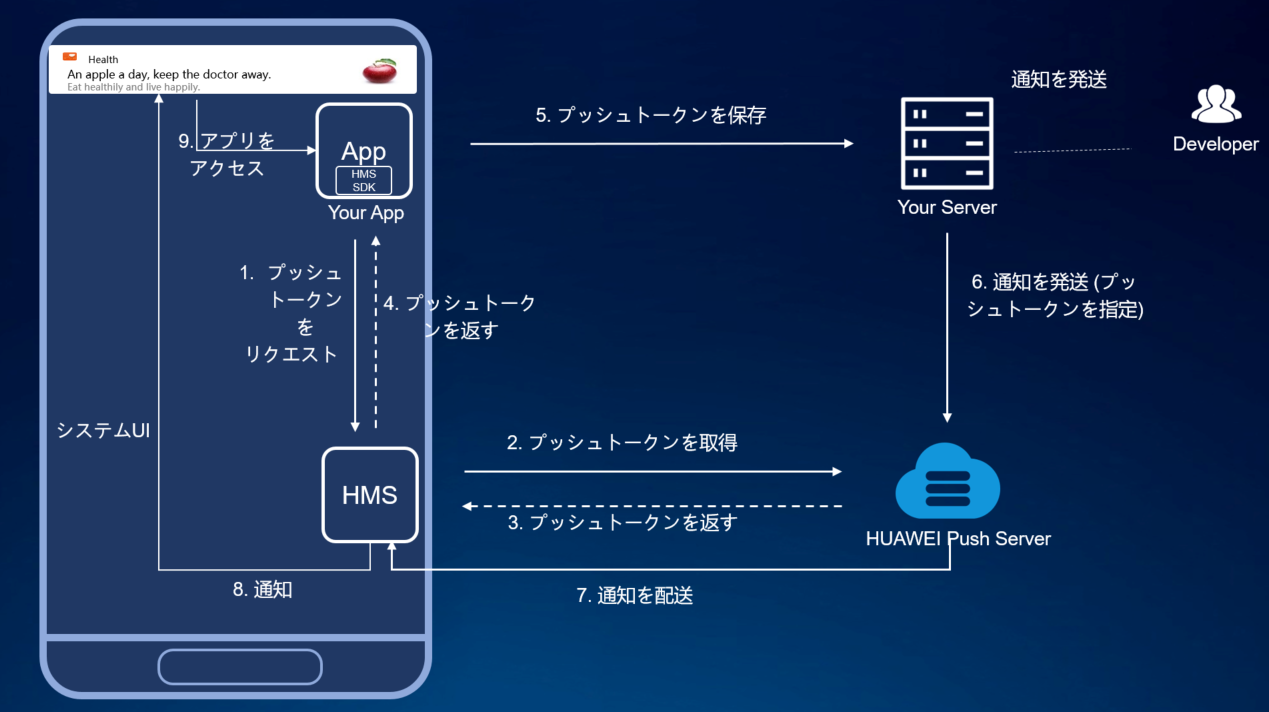
Huawei Push KitはHuaweiの開発者向けのメッセージサービスです。クラウドと端末とコミュニケーションチャネルを確立します。Push Kitを使うと、ユーザーへ最新のメッセージが送信できます。これにより、開発者はユーザーとのクロスな関係を維持し、ユーザーの意識と活動を向上させることができます。
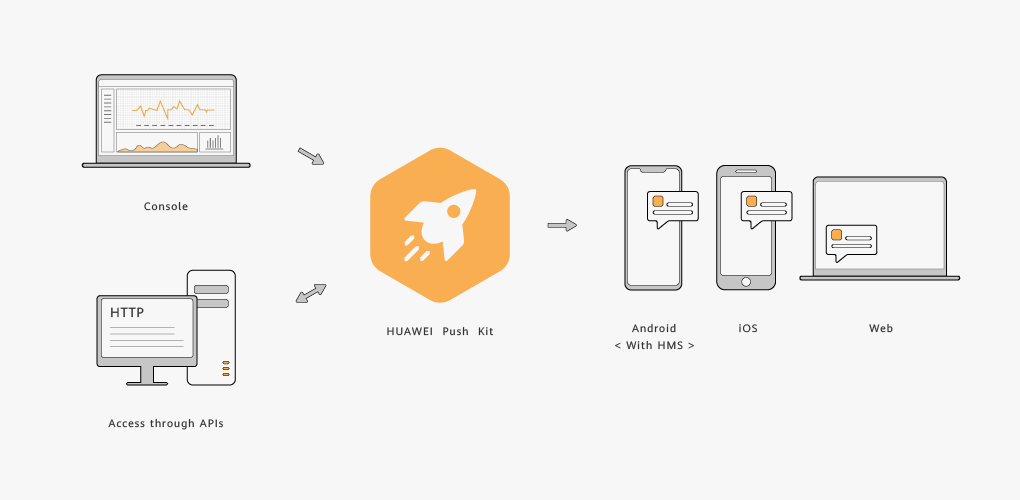
以下の図は、クラウドから端末にメッセージを送信するプロセスを示しています。ユーザーは通知メッセージをタップすると、アプリ、ウェブページ、またはアプリ内の特定の画面を開くことができます。ユーザーへの連絡には、Huawei Push Kitが推奨される方法です。
特徴
信頼性高い
- 受診率が99%です。
- 毎秒1000万メッセージまで送信できます。
- 200国以上対応します。
精確
- トピック別またはユーザータグ別で通知が送信できます。
- 日程プッシュ設定も可能です。

多種フォーマット
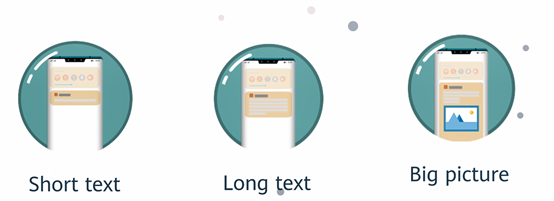
複数のスタイルをサポートされます。
- 短いテキストスタイル
- 大きいテキストスタイル
- 大きい画像スタイル
また、音声通知とマルチ言語表示も対応します。
リアルタイムフィードバック
リアルタイムのフィードバックにより、アプリケーションはプッシュメッセージの損失率を即座に取得できます。開発者は、プッシュメッセージを受信していないユーザーを正確に把握し、ユーザーがクローズドマーケティングループを作成するための再マーケティング戦略を策定することができます。
便利なオペレーション
オペレーションモードが二つをサポートされます。
- 便利なHuaweiAGCのプッシュコンソールでタスク管理、ユーザー種別、プッシュプラン作成または分析のリポートが確認できます。
- Huaweiプッシュサーバーと連携したの開発コンソールでカスタマイズな動作もサポートされます。
プッシュ通知流れ
ワークケース
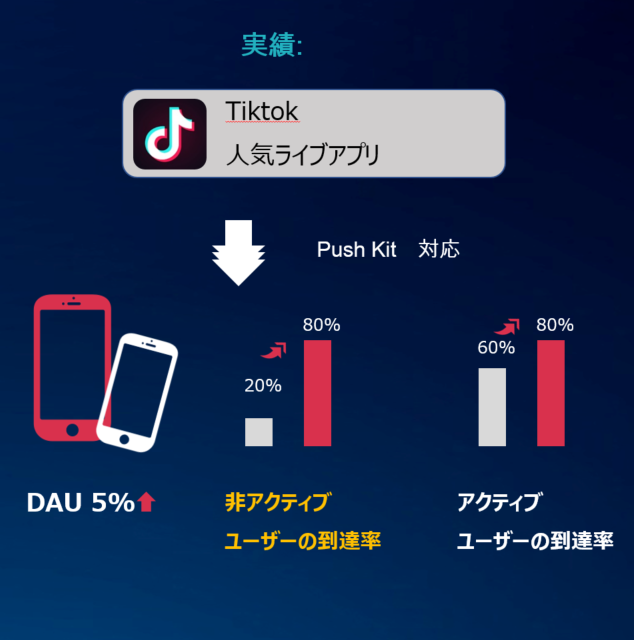
Tiktokアプリで、PushKit対応次第、KPIを改善しました。
導入ステップ
開発前、Huaweiデベロッパーサイトをアクセスし、デベロッパーアカウントを登録必要があります。登録次第、AppGallery Connectサイトをアクセス、アプリが作成できます。
完全な手順は以下となります。
ステップバイステップ開発ガイドはコードラボを参考できます。
また以下のリソースも参考可能です。
- Githubリポジトリ
- 開発向けフォーラム
- Stack Overflow
- Youtube


- 投稿日:2020-09-07T15:38:30+09:00
AWS AmplifyでAndroid アプリを作るときの操作(Auth, S3, API->Lambda)[メモ]
AWSのAmplifyを使ってモバイルアプリを作ることになったので、その環境構築手順をメモしておく。基本は自分のための備忘録だが、誰かの参考になれば幸い。
前提
amplifyはインストール済み
pipenvが入っている
python 3.8.5がインストールされている参考
amplifyのインストール
npm install -g @aws-amplify/cli
amplify configure
pythonの設定
pip install pipenv
pipenv --python 3.8.5
pipenv shell
Androidでの開発
Android Studioでプロジェクトを作成した後にamplify cliでバックエンドの設定を行う。1
Android Studioでのプロジェクト作成
一般的な方法と同じなため、省略。
ただし、.gitignoreの内容が上書きされてしまうのでプロジェクト作成後はどこかにコピーを退避させておく。(最近は上書きされなくなった??)amplify cliでバックエンド設定
ここでは、チュートリアルに倣いProdとDevの2stageで開発する想定とする。
Prod作成
まずはProdの作成。
$ amplify init
Note: It is recommended to run this command from the root of your app directory
? Enter a name for the project fxxxxxxx
? Enter a name for the environment prod
? Choose your default editor: IntelliJ IDEA
? Choose the type of app that you're building android
Please tell us about your project
? Where is your Res directory:  app/src/main/res
Using default provider  awscloudformation
...<snip>
auth設定
$ amplify add auth
Using service: Cognito, provided by: awscloudformation

 The current configured provider is Amazon Cognito.

 Do you want to use the default authentication and security configuration? Default configuration with Social Provider (Federation)
 Warning: you will not be able to edit these selections.
 How do you want users to be able to sign in? Username
 Do you want to configure advanced settings? No, I am done.
 What domain name prefix do you want to use? fxxxxxx796012f-9796012f
 Enter your redirect signin URI: myapp://callback/
? Do you want to add another redirect signin URI No
 Enter your redirect signout URI: myapp://signout/
? Do you want to add another redirect signout URI No
 Select the social providers you want to configure for your user pool:
Successfully added resource fxxxxx96012f locally
S3設定
$ amplify add storage
? Please select from one of the below mentioned services: Content (Images, audio, video, etc.)
? Please provide a friendly name for your resource that will be used to label this category in the project: fxxxx
? Please provide bucket name: fxxxx028f5691d9734f96b9559b3c1fbba634
? Who should have access: Auth users only
? What kind of access do you want for Authenticated users? create/update, read, delete
? Do you want to add a Lambda Trigger for your S3 Bucket? No
Successfully added resource fxxxxx locally
API Gateway & Lambda設定
$ amplify add api
? Please select from one of the below mentioned services: REST
? Provide a friendly name for your resource to be used as a label for this category in the project: fxxxx
? Provide a path (e.g., /book/{isbn}): /markers/{id}
? Choose a Lambda source Create a new Lambda function
? Provide a friendly name for your resource to be used as a label for this category in the project: fxxx12c31e67
? Provide the AWS Lambda function name: fxxxx12c31e67
? Choose the runtime that you want to use: Python
... <snip>
Githubへ登録
ここで一度ProdブランチをGithubに登録
予め、amplifyにより作成された.gitignoreを退避させたAndroid Studioの.gitignoreをマージしておく。
$ git init
$ git add <all project related files>
$ git commit -m "Creation of a prod amplify environment"
$ git checkout -b prod
$ curl -u xxxxx --header 'x-github-otp: xxxxx' https://api.github.com/user/repos -d '{"name":"fxxxx"}'
$ git remote add origin git@github.com:xxxx/xxxx.git
$ amplify push
Dev作成
$ amplify env add
? Do you want to use an existing environment? No
? Enter a name for the environment dev
Github
$ git add .
$ git commit -m "Creation of a dev amplify environment"
$ git push -u origin prod
$ git checkout -b dev
$ git push -u origin dev
環境切り替え
envをcheckoutすることで、それぞれ異なるバックエンドに接続するように
awsconfiguration.jsonやamplifyconfiguration.jsonが書き換わってくれる。$ amplify env checkout dev
逆の順番、つまり、amplify cliで環境を作ってからAndroid studioで同じフォルダにプロジェクトを作成すると、「すでにemptyではないフォルダがある」といったニュアンスの警告が出て、appのbuild.gradleやその他resourceが作成されない。復旧の仕方がよくわからないので、やめたほうがいい。やり方を知っている方がいらっしゃったら教えてください。 ↩
- 投稿日:2020-09-07T15:38:30+09:00
AWS AmplifyでAndroid アプリを作るときの作業(Auth, S3, API->Lambda)[メモ]
AWSのAmplifyを使ってモバイルアプリを作ることになったので、その環境構築手順をメモしておく。基本は自分のための備忘録だが、誰かの参考になれば幸い。
前提
amplifyはインストール済み
pipenvが入っている
python 3.8.5がインストールされている参考
amplifyのインストール
npm install -g @aws-amplify/cli
amplify configure
pythonの設定
pip install pipenv
pipenv --python 3.8.5
pipenv shell
Androidでの開発
Android Studioでプロジェクトを作成した後にamplify cliでバックエンドの設定を行う。1
Android Studioでのプロジェクト作成
一般的な方法と同じなため、省略。
ただし、.gitignoreの内容が上書きされてしまうのでプロジェクト作成後はどこかにコピーを退避させておく。(最近は上書きされなくなった??)amplify cliでバックエンド設定
ここでは、チュートリアルに倣いProdとDevの2stageで開発する想定とする。
Prod作成
まずはProdの作成。
Androidのプロジェクトのrootで(配下にappがあるフォルダ)下記を実施。$ amplify init Note: It is recommended to run this command from the root of your app directory ? Enter a name for the project fxxxxxxx ? Enter a name for the environment prod ? Choose your default editor: IntelliJ IDEA ? Choose the type of app that you're building android Please tell us about your project ? Where is your Res directory: app/src/main/res Using default provider awscloudformation ...<snip>auth設定
$ amplify add auth
Using service: Cognito, provided by: awscloudformation

 The current configured provider is Amazon Cognito.

 Do you want to use the default authentication and security configuration? Default configuration with Social Provider (Federation)
 Warning: you will not be able to edit these selections.
 How do you want users to be able to sign in? Username
 Do you want to configure advanced settings? No, I am done.
 What domain name prefix do you want to use? fxxxxxx796012f-9796012f
 Enter your redirect signin URI: myapp://callback/
? Do you want to add another redirect signin URI No
 Enter your redirect signout URI: myapp://signout/
? Do you want to add another redirect signout URI No
 Select the social providers you want to configure for your user pool:
Successfully added resource fxxxxx96012f locally
S3設定
$ amplify add storage
? Please select from one of the below mentioned services: Content (Images, audio, video, etc.)
? Please provide a friendly name for your resource that will be used to label this category in the project: fxxxx
? Please provide bucket name: fxxxx028f5691d9734f96b9559b3c1fbba634
? Who should have access: Auth users only
? What kind of access do you want for Authenticated users? create/update, read, delete
? Do you want to add a Lambda Trigger for your S3 Bucket? No
Successfully added resource fxxxxx locally
API Gateway & Lambda設定
$ amplify add api
? Please select from one of the below mentioned services: REST
? Provide a friendly name for your resource to be used as a label for this category in the project: fxxxx
? Provide a path (e.g., /book/{isbn}): /markers/{id}
? Choose a Lambda source Create a new Lambda function
? Provide a friendly name for your resource to be used as a label for this category in the project: fxxx12c31e67
? Provide the AWS Lambda function name: fxxxx12c31e67
? Choose the runtime that you want to use: Python
... <snip>
Githubへ登録
ここで一度ProdブランチをGithubに登録
予め、amplifyにより作成された.gitignoreを退避させたAndroid Studioの.gitignoreをマージしておく。
$ git init
$ git add <all project related files>
$ git commit -m "Creation of a prod amplify environment"
$ git checkout -b prod
$ curl -u xxxxx --header 'x-github-otp: xxxxx' https://api.github.com/user/repos -d '{"name":"fxxxx"}'
$ git remote add origin git@github.com:xxxx/xxxx.git
$ amplify push
Dev作成
$ amplify env add
? Do you want to use an existing environment? No
? Enter a name for the environment dev
Github
$ git add .
$ git commit -m "Creation of a dev amplify environment"
$ git push -u origin prod
$ git checkout -b dev
$ git push -u origin dev
環境切り替え
envをcheckoutすることで、それぞれ異なるバックエンドに接続するように
awsconfiguration.jsonやamplifyconfiguration.jsonが書き換わってくれる。$ amplify env checkout devAndroid側の設定
build.gradle(Module:app)に下記のセクションを追加
    compileOptions {
        // Support for Java 8 features
        coreLibraryDesugaringEnabled true
        sourceCompatibility JavaVersion.VERSION_1_8
        targetCompatibility JavaVersion.VERSION_1_8

    }
dependenciesのセクションに下記を追加
    implementation 'com.amplifyframework:core:1.3.1'
    coreLibraryDesugaring 'com.android.tools:desugar_jdk_libs:1.0.10'
    implementation 'com.amplifyframework:aws-auth-cognito:1.3.1'
    implementation 'com.amplifyframework:aws-api:1.3.1'
    implementation 'com.amplifyframework:aws-storage-s3:1.3.1'
    implementation "com.amazonaws:aws-android-sdk-apigateway-core:2.18.0"
逆の順番、つまり、amplify cliで環境を作ってからAndroid studioで同じフォルダにプロジェクトを作成すると、「すでにemptyではないフォルダがある」といったニュアンスの警告が出て、appのbuild.gradleやその他resourceが作成されない。復旧の仕方がよくわからないので、やめたほうがいい。やり方を知っている方がいらっしゃったら教えてください。 ↩
- 投稿日:2020-09-07T13:05:53+09:00
【ReactNative】Androidの[◀︎戻る]ボタンによるコンポーネントの再マウントを防ぐ方法
はじめに
アプリをバックグラウンドから復帰した際に、Androidだけコンポーネントが再マウントされることがあります。
conponentDidMountなど、ライフサイクルへの対応がReact(ReactNative)では重要ですが、iOSとAndroidで挙動が異なっていることがあるので注意が必要です。戻るボタンによるバックグラウンド移行に注意
バックグラウンドへの移行操作には、主に3つの方法があります。
- [■ボタン]を押す
- [●ボタン]を押す
- [◀︎ボタン]を押す(アプリ内で戻り先がない場合、アプリを閉じる)
最後の[◀︎ボタン]を押した場合、タスクは残っているのに復帰時にコンポーネントが再マウントされることがあります。
予期しないライフサイクルメソッドが起動したり、イベントリスナーが重複して登録されたり等、様々な弊害が考えられます。
再マウントを防ぐ方法
以下を追加することで、再マウントを防ぐことができます。
- [◀︎ボタン]は必ずタスクをバックグラウンド移行する(タスクキルしない)
MainActivity.java@Override public void invokeDefaultOnBackPressed() { moveTaskToBack(true); }
- ひとつのタスクが複数のインスタンスを保持しないようにする
AndroidManifest.xml<activity ... android:launchMode="singleTop">まとめ
バックグラウンドへの移行時および復帰時に、バックグラウンドのスタックを使用するよう設定することで、予期しないコンポーネントの再マウントを防ぐことができます。
参考

- 投稿日:2020-09-07T12:55:23+09:00
AndroidのViewをSceneformでAR空間上に表示する方法
SceneformではAndroidのViewをAR空間上に簡単に出力することができます。
自前でViewからOpenGLを使って描画する仕組みを作ってもいいですし、Sceneformは開発が止まっているのであまり使わない方がいいとは思っていますが、試しに少し使ってみました。
今回billboardというレイアウトファイルに書いたViewをViewRenderableクラスのインスタンスとしてして取得して描画します。
billboardのレイアウトはこんな感じです。
<?xml version="1.0" encoding="utf-8"?>
<TextView xmlns:android="http://schemas.android.com/apk/res/android"
    android:id="@+id/planetInfoCard"
    android:layout_width="wrap_content"
    android:layout_height="wrap_content"
    android:background="@drawable/bg_billboard"
    android:gravity="center"
    android:orientation="vertical"
    android:padding="6dp"
    android:text="Hello World!"
    android:textAlignment="center" />
Mainctivity内で次のようにしてこのTextViewのRendeerableをインスタンス化します。
インスタンス化したViewRenderableはtextViewメンバとして持っておきます。ViewRenderable.builder() .setView(this, R.layout.billboard) .build() .thenAccept({ renderable -> textView = renderable }) .exceptionally({ throeable -> null })これをタップした平面に張り付けるには、平面をタップしたときのHitResultからアンカーを作成して、そこに配置します。
        arFragment.setOnTapArPlaneListener { hitResult, plane, motionEvent ->

            val anchor = hitResult.createAnchor()
            val anchorNode = AnchorNode(anchor)
            anchorNode.setParent(arFragment.arSceneView.scene)

            val text = TransformableNode(arFragment.transformationSystem)
            text.setParent(anchorNode)
            text.renderable = textView
            text.select()
        }
ちなみにサイズはAR上の1mがViewのサイズでいうと250dpに相当するそうです。
https://developers.google.com/sceneform/reference/com/google/ar/sceneform/rendering/ViewRenderable

- 投稿日:2020-09-07T10:55:55+09:00
KotlinでAndroid
Androidの勉強をしたいけどJavaが全然頭に入ってこないのでKotlinを使うことにしました。自分用の覚書です。
Kotlin
log
print("hogeohoge")
println("HOGEHOGE")
//=> hogehogeHOGEHOGE改行するまで出力されません。最初、print()でログに表示されないので困ってました。
配列
listとかarrayとか。この辺、Java分かってないとダメっぽい。あとで調べる。
val list = listOf(0, 1, 2)
println(list.javaClass)
//=> class java.util.Arrays$ArrayListval mutableList = mutableListOf(0, 1, 2)
println(mutableList.javaClass)
//=> class java.util.ArrayListval array = arrayOf(0, 1, 2)
println(array.javaClass)
//=> class [Ljava.lang.Integer;最後のカンマはエラーになる。個人的にこれは痛い。
val list = listOf(0, 1, 2, 3, 4,)
immutable read-only
val list = listOf(0, 1, 2, 3, 4)
//list[2] = 0 //エラーprintln(list)
//=> [0, 1, 2, 3, 4]
varにしても中身はimmutable read-only。var list = listOf(0, 1, 2, 3, 4)
//list[2] = 0 //エラーなぜimmutableではないかと言うと、
読み取り専用とイミュータブルの違い
‥ということらしい。ようするに、
kotlin
val list = listOf(0, 1, 2, 3, 4)
println(list)
//=> [0, 1, 2, 3, 4]//MutableListにコピー(Shallow copy)して書き換えると
val mutableList = list as MutableList
mutableList[2] = 999//listが書き換えられてる!!
println(list)
//=> [0, 1, 999, 3, 4]ということ。(たぶん)
SwiftはDeep copyなので上記のようなことにはならない。
swift
let immutableArray = [0, 1, 2, 3, 4]
//immutableArray[2] = 999 //エラー
print(immutableArray)
//=> [0, 1, 2, 3, 4]var mutableArray = immutableArray
mutableArray[2] = 999
print(mutableArray)
//=> [0, 1, 999, 3, 4] //こっちは当然書き換えられる
print(immutableArray)
//=> [0, 1, 2, 3, 4] //元の方は書き換わっていない
mutable
val list = mutableListOf(0, 1, 2, 3, 4)
list[2] = 0
println(list)
//=> [0, 1, 0, 3, 4]
mapとか
val list = listOf(0, 3, 2, 4, 1)
println(list.map {it * 2})
//=> [0, 6, 4, 8, 2]
println(list.sorted())
//=> [0, 1, 2, 3, 4]
withIndex()
val ordinals = listOf("first", "second", "third")
for ((index, value) in ordinals.withIndex()) {
println("$index: $value")
}
//=> 0: first
//=> 1: second
//=> 2: third
辞書
val hashMap = hashMapOf("key" to "value")
println(hashMap["key"])
//=> value
println(hashMap.javaClass)
//=> class java.util.HashMap
lateinit
iOSのStoryboardの定番。swift
class Hoge: UIViewController {
@IBOutlet weak var button: UIButton!
}
こうやる。kotlin
class Hoge : AppCompatActivity() {
lateinit var button : Button
override fun onCreate(savedInstanceState: Bundle?) {
:
button = findViewById(R.id.button) as Button
}
}Android
View取得
activity_main.xml
android:id="@+id/text_view"val textView = findViewById(R.id.text_view) as TextView
println(textView.text)
//=> Hello World!
Kotlin Android Extensionsを使うとidで直接アクセス出来るようですが、あまりそういうのに依存するのもアレかと思うので使わないことにします。println(text_view.text) //いきなり使える(らしい)
//=> Hello World!リソース取得
String
strings.xml
Hello Kotlin!
.kt
println(getString(R.string.string_hello))
//=> Hello Kotlin!
Color
API23未満がえらい面倒だったのでメモ。colors.xml
#ff0000
.kt
ContextCompat.getColor(this, R.color.red)
API23以上はgetColor(R.color.red)で取れる。(たぶん)Button
SAM (Single Abstract Method)
val button = findViewById(R.id.button) as Button
button.text = "push me"
button.setTextColor(BLUE)
//button.textColor = BLUE //これはダメだった
button.setOnClickListener { view ->
val button = view as Button
button.text = "thanks!"
}
SAM+引数省略
button.setOnClickListener {
(it as Button).text = "thanks!"
}
関数化‥じゃなくて変数化?
val listener: (View) -> Unit = {
(it as Button).text = "thanks!"
}
button.setOnClickListener(listener)
この辺はあとでちゃんと調べる。遷移
普通に遷移
MainActivity.kt
//val intent = Intent(this@MainActivity, javaClass()) //エラー。古い書き方?
val intent = Intent(this@MainActivity, SecondActivity::class.java)
startActivity(intent)
this@MainActivityはクラスを明示せずthisだけでOK。SecondActivity
finish()
戻る。すげ替え
setContentView(R.layout.activity_second)
ListView
超基本的な部分だけ。
更新はadapterにお願いする。val weekdays = mutableListOf(
"Sunday", "Monday", "Tuesday", "Wednesday", "Thursday", "Friday", "Saturday"
)
val adapter = ArrayAdapter(this, android.R.layout.simple_list_item_1, weekdays)
val listView = findViewById(R.id.list_view) as ListView
listView.adapter = adapter//更新
weekdays[1] = "HOGEHOGE"
adapter.notifyDataSetChanged()//これでもいける(けどキャストが‥)
(listView.adapter as ArrayAdapter<*>).notifyDataSetChanged()
参考:[Android] ListView と ArrayAdapter 簡単なテキストリストの表示Preference
取得
val pref = getSharedPreferences("Hoge", MODE_PRIVATE)
基本形。nameとmodeを指定して取得。modeのMODE_WORLD_READABLEやMODE_WORLD_WRITEABLEはdeprecatedになっている。val pref = getPreferences(MODE_PRIVATE)
アクティビティのクラス名で取得。例えば、nameに"MainActivity"を指定するのと同じこと。val pref = PreferenceManager.getDefaultSharedPreferences(this)
パッケージ名で取得出来る。modeはMODE_PRIVATE固定。MODE_WORLD_READABLEやMODE_WORLD_WRITEABLEが無くなっているので、これだけでいいんじゃないかと思う。書き込み
pref.edit().putString("key", "hoge").commit()
Editorを通して書き込む。型は、int、long、float、boolean、String。
commit()は同期、apply()は非同期で書き込む。読み込み
println(pref1.getString("key", "default"));
//=> hoge
println(pref1.getString("undefinedKey", "default"));
//=> default
第2引数でキーが未定義の場合の値を指定する。xml
com.example.testpreference.xml
<?xml version='1.0' encoding='utf-8' standalone='yes' ?>
hoge
参考:SharedPreferencesに出力したデータの保存場所時間差処理
とりあえずメインスレッド用。UI触りたいときに。.kt
Handler(mainLooper).postDelayed({
//処理
}, 3000) //3000ms後
- 投稿日:2020-09-07T01:20:06+09:00
[Android] Jetpack Compose (alpha) で Hello World を表示する
はじめに
最近やっと Jetpack Compose ですが alpha 版がリリースされたみたいですね。良い機会なので Jetpack Compose で宣言的な UI をどんな感じで記述できるのかやってみたいと思います。
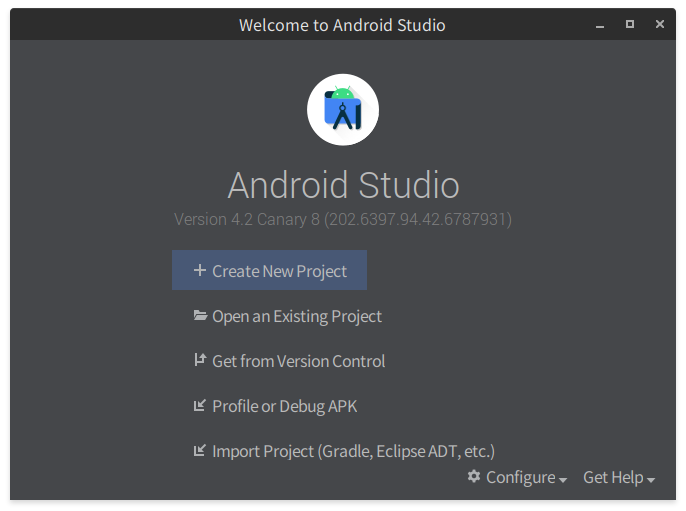
準備
まず Jetpack Compose での開発をサポートするツールは Android Studio Canary (v4.2.0) にて対応されるみたいです。Jetpack Compose を始める際には Android Studio Canary (v4.2.0) をインストールする必要があるようです。
なので Android Studio Canary は Android Studio Preview からダウンロードしてインストールしました。インストール方法は OS によって異なりますが 筆者の環境は Ubuntu なので [Android]Android Studio をインストールしショートカットを作成する を参考にしてインストールしました。
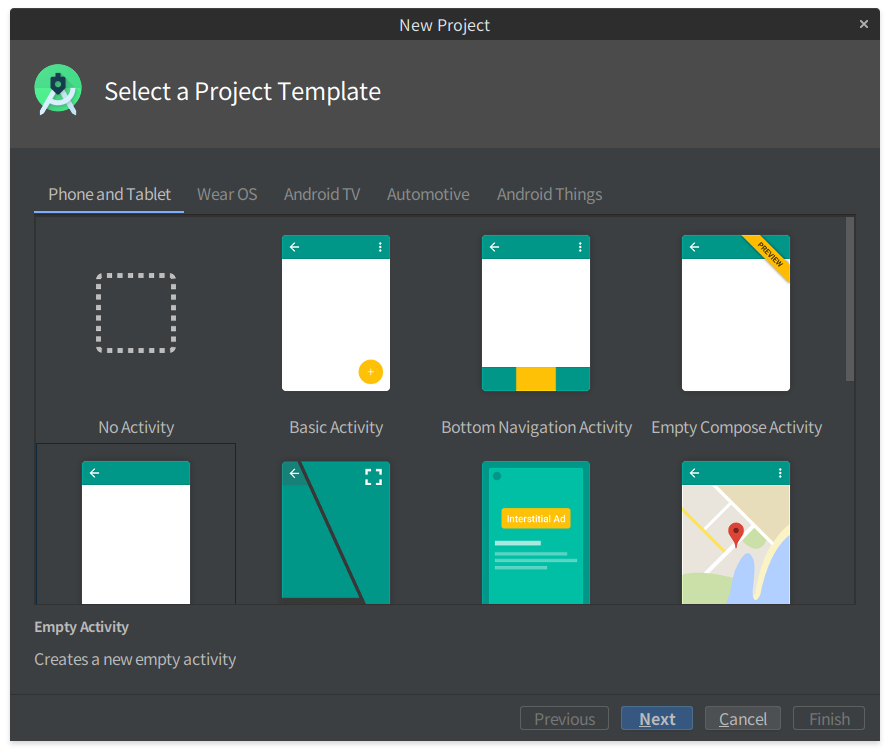
プロジェクトを作る
開発環境が整ったのでさっそく Jetpack Compose を試すためのプロジェクトを作成します。Android Studio Canary (v4.2.0) だと Empty Compose Activity というのが用意されてたので選択してプロジェクトを作成します。
あとは通常の Android プロジェクトと同様に Name や Package.name などを指定して Finish をすべればプロジェクトの作成は完了です。
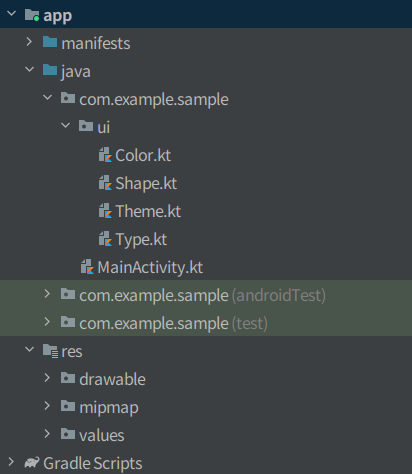
作成したプロジェクトは次のようなファイル構造になっていました。通常の
res/layoutにレイアウトを記述する XML ファイルが生成されますが Jetpack Compose ではもちろん XML でレイアウトを記述しないのでファイルが生成されていないですね。
レイアウトを作成する
それでは Jetpack Compose でレイアウトを作成してみたいと思います。Jetpack Compose では
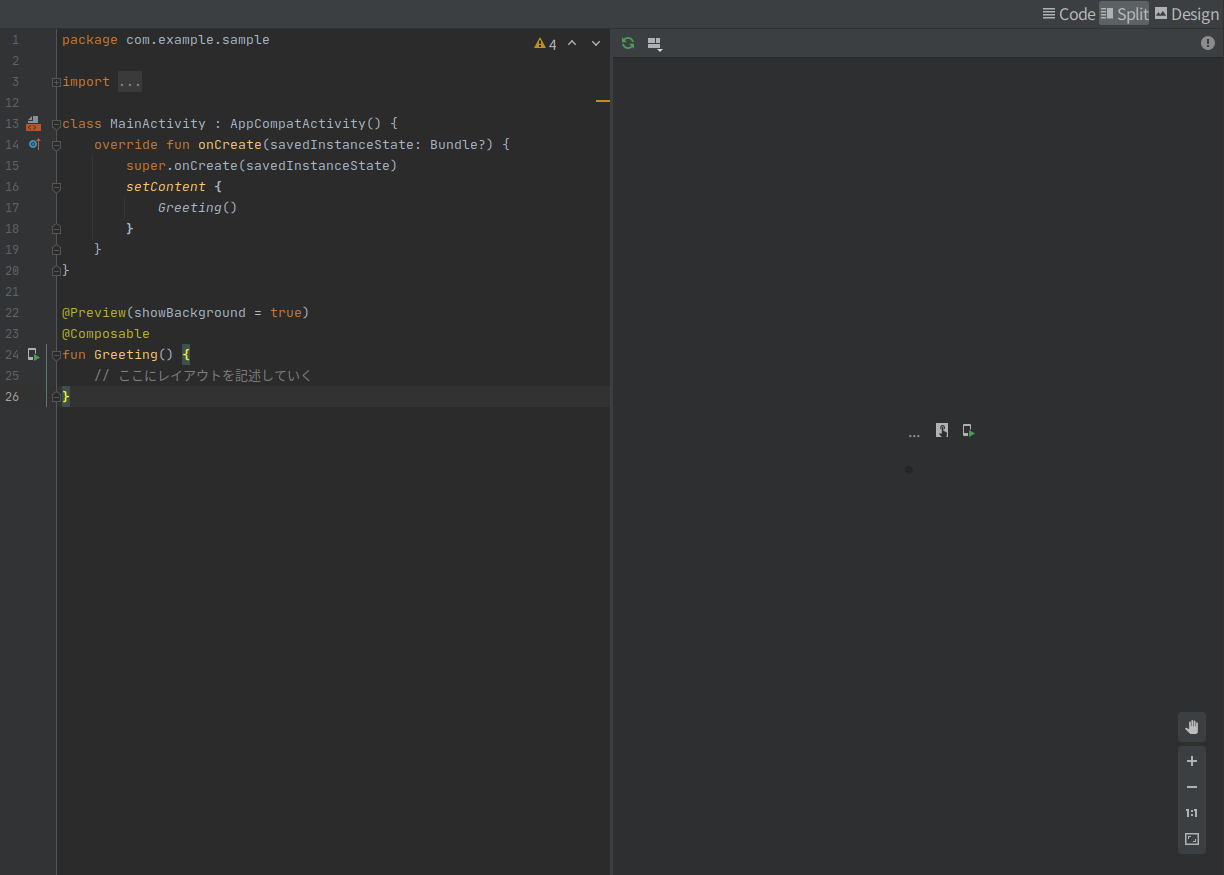
ActivityのonCreateのsetContentにレイアウトを記述していくようになっています。class MainActivity : AppCompatActivity() { override fun onCreate(savedInstanceState: Bundle?) { super.onCreate(savedInstanceState) setContent { // ここにレイアウトを記述していく } } }
setContentのブロックにレイアウトを記述するだけじゃなく関数に記述することもできます。関数にレイアウトを記述する場合は@composableをつける必要があるみたいです。class MainActivity : AppCompatActivity() { override fun onCreate(savedInstanceState: Bundle?) { super.onCreate(savedInstanceState) setContent { Greeting() } } } @Composable fun Greeting() { // ここにレイアウトを記述していく }また
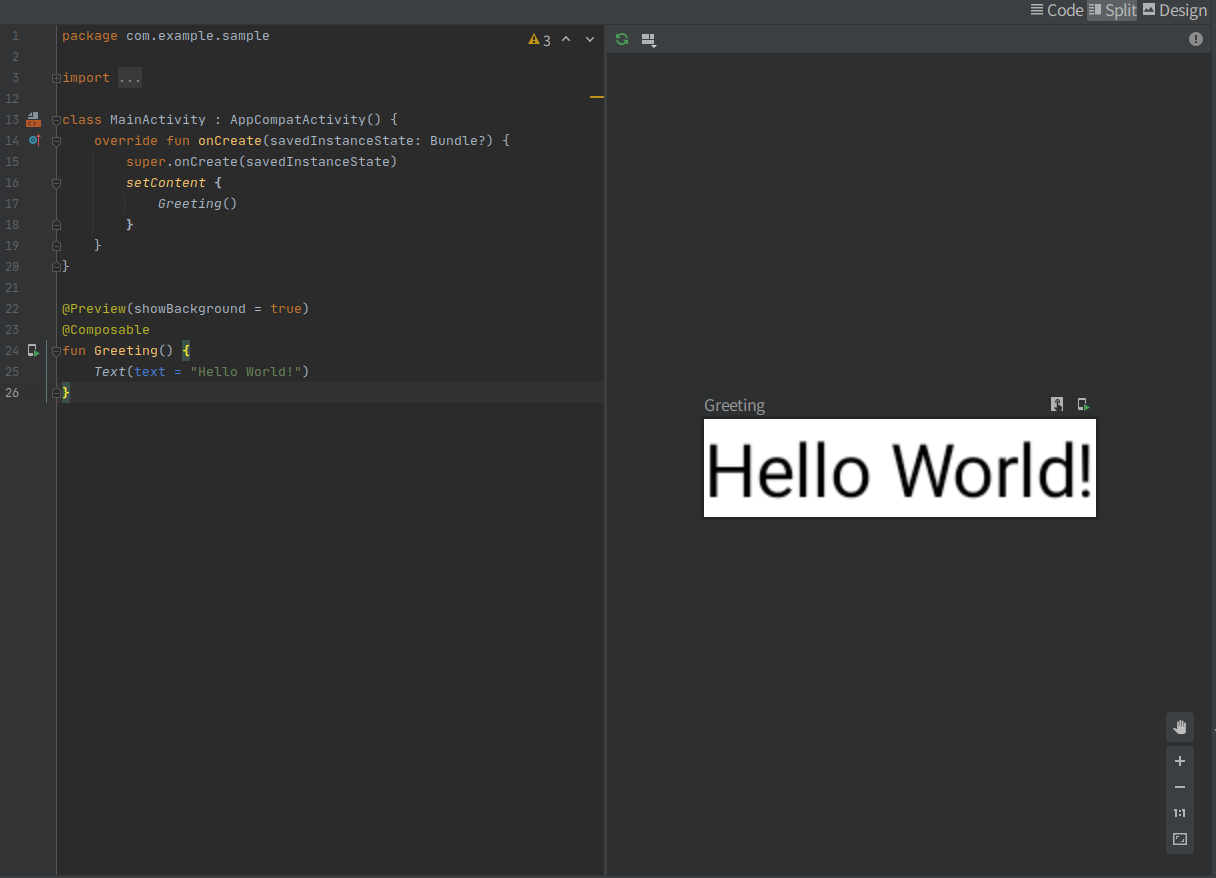
@Previewをつけると関数で生成されるレイアウトのプレビューができるようになっています。次のようにActivityの隣にプレビュー画面が表示されてレイアウトが確認できるようになります。今まではActivityとXMLを切り替えてレイアウトを確認する必要がありましたが切り替えの必要がなくなってかなり便利ですね。@Preview(showBackground = true) @Composable fun Greeting() { // ここにレイアウトを記述していく }
今回は Hello world !! と表示できるようにレイアウトを組んでいきます。Jetpack Compose では Text を定義することで TextView に相当するものが定義されるようにです。なので Text を定義して Hello world!! を表示するようにします。
@Preview(showBackground = true)
@Composable
fun Greeting() {
    Text(text = "Hello World!")
}
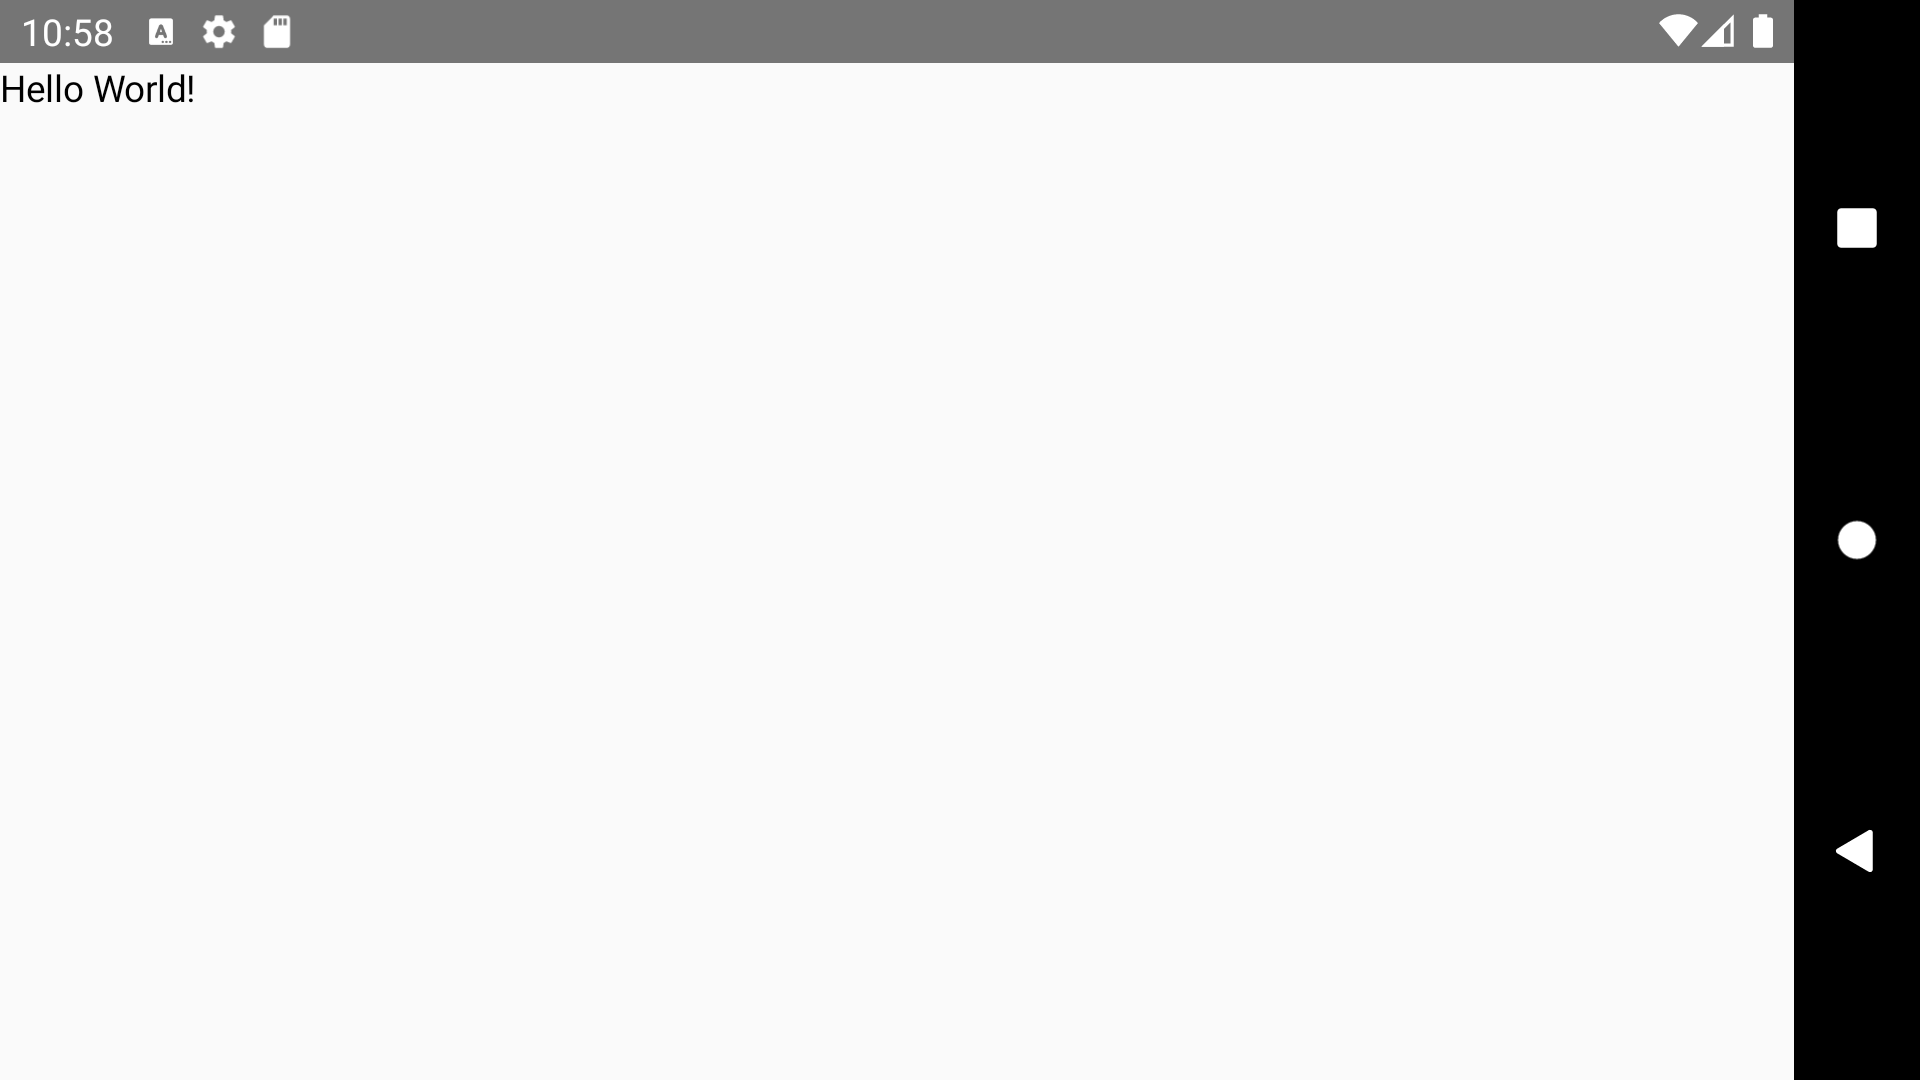
ここまで実行すればあとはアプリを起動するだけです。
起動すると次のように Hello World! が表示されるようになります。
おわりに
Jetpack Compose (alpha) を使って Hello World を表示してみましたが宣言的に書けるというのはかなりメリットがありそうですね。特に
ActivityやXMLを分けなくても記述できるというのはかなり便利だと思いました。ですが alpha のためかプレビューに上手く反映されないこともあり Jetpack Compose だけではなく Android Studio のツール周りに関してもまだまだ改善が必要かなという感じですね。ですがかなり好感触でした alpha が取れてプロダクトで使えるようになるが楽しみですね。参考文献