- 投稿日:2020-06-01T23:08:51+09:00
iOSアプリ ノッチ判定
はじめに
アプリ完成間際、ノッチの存在に気付き実装しました。
忘れがちなので、気をつけたいです。やりたいこと
iPhoneX以降、ノッチが出現したことにより、画面上部ぎりぎりに配置すると、
ノッチと被ってしまい画面上に表示されなくなってしまいます。
なので、ノッチがあるかないかを判定して、
ノッチがある場合 → ノッチ分(44pixel)ずらす
ノッチがない場合 → 画面上部ギリギリに配置という方法をとることにしました。
実装
view.swiftclass view: UIViewController { let text = UILabel() override func viewDidLoad() { //safeAreaの値を取得します。 let safeAreaInsets = UIApplication.shared.keyWindow?.safeAreaInsets.left super.viewDidLoad() //safeAreaの値が44.0以上であれば、ノッチがあるので、x位置をずらします。 if(safeAreaInsets! >= 44.0){ text.frame = CGRect(x:50,y:width/2, width:self.view.frame.height,height: 50) } //ノッチがない場合の処理 else{ text.frame = CGRect(x:10,y:width/2, width:self.view.frame.height,height: 50) } }ノッチの値が44なので、今回は50ずらしました。
- 投稿日:2020-06-01T21:42:13+09:00
【Swift5�】 特定画面で縦画面/横画面に固定させる
はじめに
初投稿です。
ついにやってみたかったiPhoneのアプリを完成できました!
その備忘録です〜やりたかったこと
ゲーム設定画面は縦、ゲーム画面自体は横画面としたかったので、
画面の向きを判定して、縦だったら横に、横だったら縦に向きを固定する。
※便宜上、
ホームボタン左 = 左横画面
ホームボタン右 = 右横画面 とします。やってみたこと
supportedInterfaceOrientationsの単純な画面の向きを指定だけだと、
自動回転しちゃうのでそれも制御しないとだめなんですよね。view.swift// 画面の向きを指定 override var supportedInterfaceOrientations: UIInterfaceOrientationMask { return .portrait } // 画面を回転させるかどうか override var shouldAutorotate: Bool { return true }単純にこれでいけそう!とか思ってたんですけど、
どうも処理の順番が
shouldAutorotate(自動回転) → supportedInterfaceOrientations(向き指定)らしく
自動回転OFF → 縦画面に変更
になって、回転できないんですよね〜とほほなので、代案として現在の画面向きを取得して、以下の通りの処理を考えました。
画面 現在の画面向き 実装 縦 縦の場合 自動回転OFF 縦 横の場合 画面向きを縦にして自動回転をOFF 横 縦の場合 画面向きを横にして自動回転をOFF 横 横の場合 自動回転させる 実装コード
縦画面
TateViewController.swiftclass TateViewController: UIViewController{ // 自動回転はOFFで縦に固定 override var shouldAutorotate: Bool { //縦画面なので縦に固定 UIDevice.current.setValue(1, forKey: "orientation") return false } override func viewDidLoad() { <<Code>> } }画面を縦に固定なら自動回転ON/OFF決めるときに
縦にして自動回転OFFにすればいいじゃん!と思ってゴリ押しでオーバーライドしました。解決!横画面
YokoViewController.swiftclass YokoViewController: UIViewController { override var supportedInterfaceOrientations: UIInterfaceOrientationMask { //最初の画面呼び出しで画面を右横画面に変更させる。 UIDevice.current.setValue(3, forKey: "orientation") return .landscapeRight } // 画面を自動で回転させるかを決定する。 override var shouldAutorotate: Bool { //画面が縦だった場合は回転させない if(UIDevice.current.orientation.rawValue == 1){ return false } else{ return true } } }横画面のほうはちょっとめんどくさくなりました。
shouldAutorotateは画面回転ごとに呼び出されるので、画面回転すれば、横画面にすることができます。if条件で縦のとき自動回転OFFにすれば、縦に回転しません。ただ、最初の画面遷移時に、自動回転OFF→縦画面に変更の順に処理されるので、先に横画面の変更処理をする必要があります。どうしたものか...
横画面 自動回転先呼び出し
適当にTry&Errorを繰り返してたら、viewDidLoad()内でprint()することで
画面の自動回転定義(shouldAutorotate)より先に呼び出すことができました。いい子。YokoViewController.swiftoverride func viewDidLoad() { //画面の向きを変更させるために呼び出す。 print(supportedInterfaceOrientations) <<Code>> }横画面 右左判定
ただ、横向きでまとめてしまうと、現在の画面向きが左横画面なのに、右横画面だと逆向きになってしまいます。なので左横画面とそれ以外で場合分けしました。
YokoViewController.swiftoverride var supportedInterfaceOrientations: UIInterfaceOrientationMask { //左横画面に変更 if(UIDevice.current.orientation.rawValue == 4){ UIDevice.current.setValue(4, forKey: "orientation") return .landscapeLeft } //左横画面以外の処理 else { //右横画面に変更させる。 UIDevice.current.setValue(3, forKey: "orientation") return .landscapeRight } }それでうまく行くと思いきや、前画面で縦に指定しているので
画面向き判定が「縦」になってしまいます。なので強制的に右向き画面になります。こまった。横画面 左横画面にセット
そこでviewDidLoad()内で以下の処理をします。
YokoViewController.swiftoverride func viewDidLoad() { //画面向きを左横画面でセットする UIDevice.current.setValue(4, forKey: "orientation") //画面の向きを変更させるために呼び出す。 print(supportedInterfaceOrientations) <<Code>> }縦画面で遷移している前提ですが、一度強制的に左横画面にセットします。
自動回転は縦画面でなければ、回転するので左横画面になった後右横画面に自動的に回転します。解決!以下横画面のソースコード全文です。
YokoViewController.swiftclass YokoViewController: UIViewController { override var supportedInterfaceOrientations: UIInterfaceOrientationMask { //左横画面に変更 if(UIDevice.current.orientation.rawValue == 4){ UIDevice.current.setValue(4, forKey: "orientation") return .landscapeLeft } //左横画面以外の処理 else { //最初の画面呼び出しで画面を右横画面に変更させる。 UIDevice.current.setValue(3, forKey: "orientation") return .landscapeRight } } // 画面を自動で回転させるかを決定する。 override var shouldAutorotate: Bool { //画面が縦だった場合は回転させない if(UIDevice.current.orientation.rawValue == 1){ return false } else{ return true } } override func viewDidLoad() { //画面向きを左横画面でセットする UIDevice.current.setValue(4, forKey: "orientation") //画面の向きを変更させるために呼び出す。 print(supportedInterfaceOrientations) <<Code>> } }なんとかできました。
参考にした記事
- 投稿日:2020-06-01T19:29:38+09:00
【iOS】あるようでなかった UINavigationBar prompt の色変更
はじめに、
navigationBar
について色々調べていたのですが、iOS13 以降からナビゲーションの挙動がおかしいなと思って色々調べていくうちにどハマりしてしまった案件になります。iOS13 から結構いろんなパーツがクラス化されたような感じになってるのですね。
環境
iOS バージョン 13
Xcode 11.3該当コード
/// 呼び出し
- (void)viewDidLoad {
   self.navigationItem.prompt = @"ナビゲーションバープロンプト";
   // navigationBar の promptColor を変更する
   [self promptColor:UIColor.whiteColor];
}

/// navigationBar の promptColor を変更する
- (void)promptColor:(UIColor *)promptColor {
    /// 参考(appearance)
    Class promptClass = NSClassFromString(@"_UINavigationBarModernPromptView");
    if (promptClass) {
        UILabel *promptLabel = [UILabel appearanceWhenContainedInInstancesOfClasses:@[promptClass]];
        promptLabel.textColor = promptColor;
    }

    // Promptを探し出して、色を変更する
    [self searchPromptSubviews:self.view promptColor:promptColor];
}

/// Promptを探し出して、色を変更する
- (void)searchPromptSubviews:(UIView *)superView promptColor:(UIColor *)promptColor {
    /// 参考(__kindof)
    for (__kindof UIView *view in [superView subviews]) {
        /// 参考(_UINavigationBarModernPromptView)
        if ([superView isKindOfClass:NSClassFromString(@"_UINavigationBarModernPromptView")]) {
            if ([view isKindOfClass:[UILabel class]]) {
                UILabel *promptLabel = view;
                promptLabel.textColor = promptColor;
            }
        }
        [self searchPromptSubviews:view promptColor:promptColor];
    }
}
抑えておきたいポイント
_UINavigationBarModernPromptView
今回のメインテーマであります prompt はどこにあるのか?というところで、self.view の上にいくつかの subviews の上にpromptViewやpromptLabel があるはず!!
というのを信じて、Apple で、定義されているものがあったりと、いろんなクラス定義で、作られています。もちろんpromptも例外ではないですが、そもそも一度も生成していないと設定していないと、変更されません。。。
参考(_UINavigationBarModernPromptView)if ([superView isKindOfClass:NSClassFromString(@"_UINavigationBarModernPromptView")]) { if ([view isKindOfClass:[UILabel class]]) { UILabel *promptLabel = view; promptLabel.textColor = promptColor; } }appearance
今回これが結構キーな気がします。最初の状態では、promptを設定していない場合は、以下の書き方が必要になります。
実は、共通で指定するクラスへアプローチをかけれる(appearance)ですが、以下のように指定するクラスに対して絞り込みをすることが可能です。
※ これは生成されてしまうと呼ばれないようなので、今回ここでつまづきました。appearanceWhenContainedInInstancesOfClasses
参考(appearance)Class promptClass = NSClassFromString(@"_UINavigationBarModernPromptView"); if (promptClass) { UILabel *promptLabel = [UILabel appearanceWhenContainedInInstancesOfClasses:@[promptClass]]; promptLabel.textColor = promptColor; }__kindof
この辺りは結構テクニックなのですが、__kindof を用いることで、似たような類似のクラスという定義にすることができます。
参考(appearance)for (__kindof UIView *view in [superView subviews]) { /// 処理を行う }おわり
上記のように 表示されているビュー全部をみる時などは、メソッド内メソッドの呼び出しは、テクニックが必要になってきます。
最悪の場合、ループに入ってしまったりするので、呼び出しの際注意が必要だったりしますね!!ちなみに、iOS12 デザインを採用したい場合は以下を参考に
- iOS 13 の Large Title 表示を iOS 12 までと同じデザインにする関連記事
【ObjectiveC】- ナビゲージョンバー 背景を変更する
【ObjectiveC】- ナビゲージョンバー prompt の色変更
制作チーム:サンストライプ
http://sunstripe.main.jp/
(月1WEBコンテンツをリリースして便利な世の中を作っていくぞ!!ボランティアプログラマー/デザイナー/イラストレーター/その他クリエイター声優募集中!!)地域情報 THEメディア
THE メディア 地域活性化をテーマに様々なリリース情報も含め、記事をお届けしてます!!
https://the.themedia.jp/ゼロからはじめる演劇ワークショップ
多様化の時代に向けて他者理解を鍛える
ただいま、コロナの影響で中止中 6月ごろまで延期
https://workshop.themedia.jp/プログラミングワークショップ・ウェブ塾の開講!!!
様々なテーマでプログラミングに囚われずに取り組んでいきます。
詳しくはこちら ↓ ↓ ↓ ↓ ↓ ↓ ↓ ↓
プログラミングサロン 月1だけのプログラミング学習塾青空プログラミング
まずはリフレッシュして考えてみようIoTの未来の社会を考えながらも社会問題などにも取り組む活動しています。
以下を用いています。
actcoin:SDGsを知るきっかけとなりました社会貢献の見える化を実現しているアプリケーションサービス
SDGs:持続可能な開発目標
Zoom:オンライン会議(Zoomを用いて会議をしたりしてます)https://note.com/thecardgame/n/ndf387cacca47
協力応援 / 支援者の集い
トラストヒューマン
http://trusthuman.co.jp/
私たちは何よりも信頼、人と考えてます。「コンサルティング」と「クリエイティブ」の両角度から「人材戦略パートナー」としてトータル的にサポートします!!
ネリム
https://nerim.co.jp/
配信事業などを映像コンテンツなどのサポートしております。ビヨンドXプロジェクト
- 投稿日:2020-06-01T18:47:51+09:00
UICollectionViewCompositionalLayoutで正確なItem Spacingを確保する
以前 potatotips #67 でこんな内容を発表しました。
その際「Itemの大きさが正確なGrid Layout」にする方法を紹介したのですが、「Item Spacingを正確にするには?」という課題の解決法を紹介したいと思います。Item Sizeを揃えることとItem Spacingを揃えることは両立しない
Collection ViewのGrid Layoutは
- Collection View(Content Size)の幅
- 分割数
- 要素の間隔(Item Spacing)
によって各要素の
frameが決まりますが、
- 要素のItem Sizeを揃えること
- 要素間のItem Spacingを揃えること
は両立しない場合があります。
Item Sizeが「端数のない大きさ」でないと、スクリーン座標系にマップしたときに丸められ、要素のサイズないし要素の間隔に視覚的な「ずれ」が生じるためです。
デザイン要件としてどちらが重要なのかを確認し、それに準じた最適化を選択することになります。
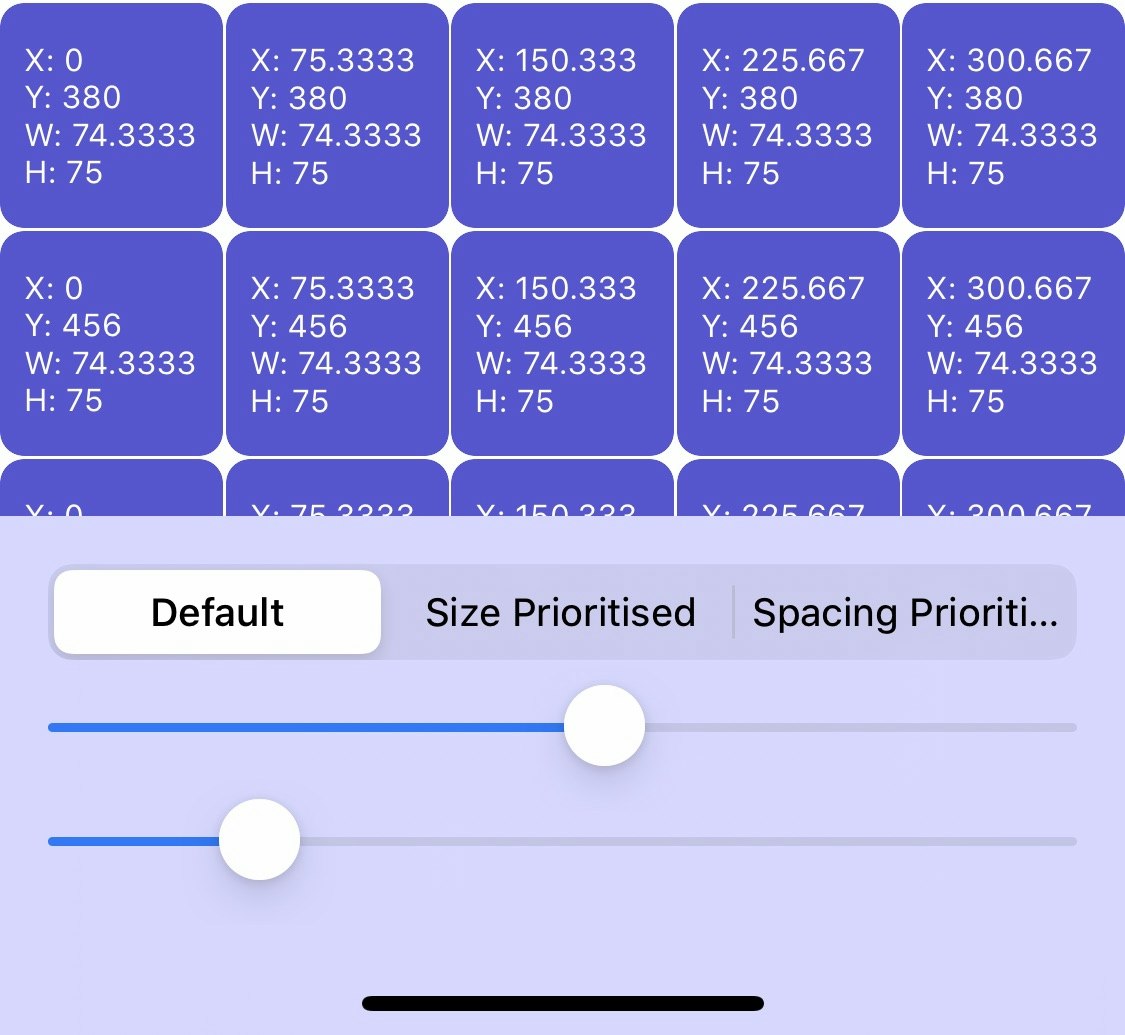
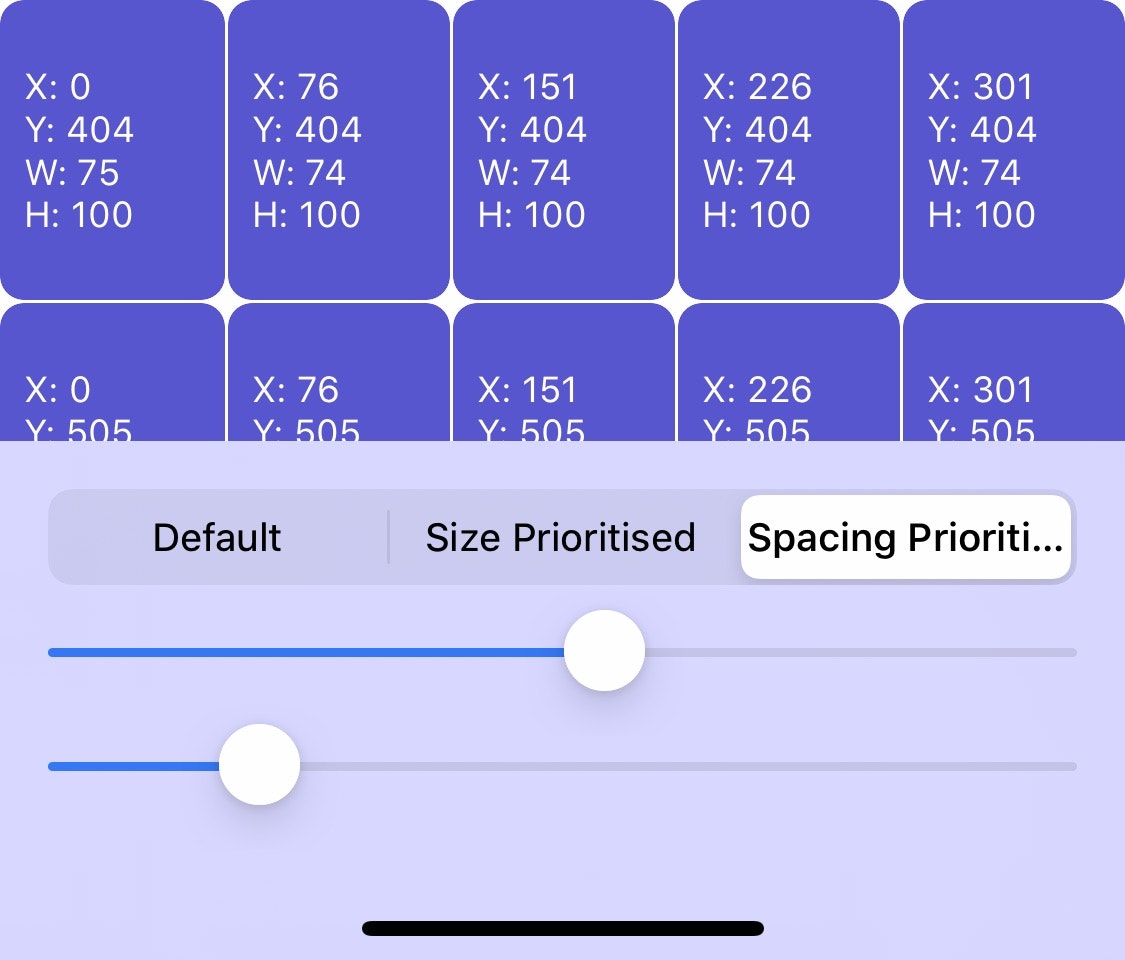
NSCollectionLayoutGroup.custom()による正確なItem Spacing
NSCollectionLayoutGroup.horizontal()では、上記のような端数が生じるケースがあるため、正確なItem Spacingとならないことがあります。
そこでNSCollectionLayoutGroup.custom()を利用し、要素のframeを独自計算する方法を採ります。NSCollectionLayoutSection+Extension.swiftextension NSCollectionLayoutSection { /// Item Spacingが正確なレイアウトを生成する /// - Parameters: /// - count: 列数 /// - height: セルの高さ /// - spacing: セルの間隔 static func column(count: Int, height: CGFloat, spacing: CGFloat) -> Self { let group = NSCollectionLayoutGroup.custom( layoutSize: .init( widthDimension: .fractionalWidth(1.0), heightDimension: .estimated(height) ) ) { layoutEnvironment in let contentSize = layoutEnvironment.container.contentSize let fCount = CGFloat(count) // Item Spacingを除く、要素が入る領域幅の和(TODO: Content Inset考慮) let fillWidth = count == 1 ? contentSize.width : contentSize.width - (spacing * (fCount - 1)) // 要素の大きさは端数を切り捨て let baseItemWidth = (fillWidth / fCount).rounded(.down) // 端数切り捨てによって生じる余り let residue = Int(fillWidth - (baseItemWidth * fCount)) return (0..<count).reduce(into: [NSCollectionLayoutGroupCustomItem]()) { items, n in // x, widthは常に整数 // 正確なItem Spacingを確保するため、「余り」は要素幅に加える let x = n == 0 ? 0 : items[n - 1].frame.maxX + spacing let width = baseItemWidth + (n < residue ? 1 : 0) items.append(NSCollectionLayoutGroupCustomItem(frame: .init( x: x, y: 0, width: width, height: contentSize.height ))) } } let section = self.init(group: group) section.interGroupSpacing = spacing return section } }
custom()メソッドを用いる場合interItemSpacingプロパティは無視されます。比較
.horizontal()でレイアウトした場合各要素の位置と大きさに端数があるため、見かけ上のItem Spacingにバラつきがあります。
.custom()でレイアウトした場合各要素の位置と大きさに端数はなく、Item Spacingが均一です。
但し要素の大きさは帳尻合わせのため、すべて同じにならない場合があります。
その他気になったこと
.custom()でレイアウトを組む際はセクションのContent Insetも考慮すべきですが、NSCollectionLayoutEnvironment#contentInsetは常に0です...不具合なのかどうか分かりませんが、Content Insetがあるレイアウトの場合は注意が必要ですね。
- 投稿日:2020-06-01T15:04:49+09:00
`if (a == 1 && a == 2 && a == 3)` は真か?
背景
なんだか面白そうな記事を見つけた
(a == 1 && a == 2 && a == 3)は真と評価できますか?
のでSwiftでやってみたコード
var b = 0

var a: Int {
    get {
        b += 1
        return b
    }
}

if (a == 1 && a == 2 && a == 3) {
    print("Complete!")
}
解説
aとは別で変数を用意(ここではb)して、aのgetterでbをインクリメントし、bをreturnする。
if文でaを3回取得するが、その度にaのgetterを通るため、取得されるaの値は1ずつ増えていく。結果
できた。?
まとめ
getterを使うと、if文の中で同じ変数でも、異なる値を取得できる?
p.s. 他にいい方法があれば教えてください!

- 投稿日:2020-06-01T14:59:49+09:00
[Swift] クロージャ(Closures)の記法
クロージャ(Closures)ってなんだか色々書き方あってややこしいですよね。
というわけで整理してみます。想定読者
- Swiftの基本的な文法はなんとなく理解しているが、クロージャはややこしいな、という人
- Swiftはある程度書けるようになったけど、いまいちクロージャの書き方に自信がない人
- 他言語でプログラミング経験があり、これからSwiftを学びたい人
クロージャとは
Closures are self-contained blocks of functionality that can be passed around and used in your code.
Closures in Swift are similar to blocks in C and Objective-C and to lambdas in other programming languages.https://docs.swift.org/swift-book/LanguageGuide/Closures.html
クロージャは、コードの中で渡したり使用したりすることができる自己完結型の機能ブロックです。
Swiftのクロージャは、CやObjective-Cのブロックや他のプログラミング言語のラムダに似ています。クロージャの書き方
基本構文(全部盛り)
まずはこれをしっかりと覚えると、後に紹介する省略記法が理解しやすくなります。
{ (引数名1: 型, 引数名2: 型...) -> 戻り値の型 in
     実行するコード...
}
例
// 定義
let intToString = { (a: Int, b: Int) -> String in
    return "\(a)と\(b)です"
}

// 利用する
let sample1 = intToString(1, 5)
print(sample1) // 1と5です
省略
型表記
型が推論できるケースでは、引数や戻り値の型表記を省略できます。
- 型が推論できるケース
- 代入する変数の型が明確
- 関数の引数(関数定義で明確に記載される)
// 代入する変数の型が明確
var sample2: ((Int, Int) -> String)

// 引数の()も省略可能
sample2 = { a, b in
    return "\(a)と\(b)です"
}

print(sample2(2, 3)) // 2と3です
return
クロージャ内の文がひとつしかない場合は
return省略可能// return省略 let intToString = { (a: Int, b: Int) -> String in "\(a)と\(b)です" }下記コードはコンパイルエラーとなります。
// 2つ以上文があると省略不可
let sum = { (a: Int, b: Int) -> Int in
    let sum = a + b
    sum
}

// ;で1行にしてもダメ
let sum = { (a: Int, b: Int) -> Int in
    let sum = a + b; sum
}
Shorthand Argument Names
型表記を省略できるケースでは、さらに引数名も省略可能です。
Shorthand Argument Namesは$に引数のindexを合わせ、$0や$1と記載します。// 引数名も省略可能 // 型の表記も省略 -> in も省略しないとコンパイルエラー sample2 = { "\($0)と\($1)です" }
- 投稿日:2020-06-01T10:37:33+09:00
cocos2d-x-3rd-party-libs-src (v3-deps-161) を bitcode 有効にしてビルド
cocos2d-x の v3 ブランチ の external を bitcode 有効にしてビルド
環境
- macOS 10.15.4 (英語)
- Xcode 11.5
手順
cocos2d-x-3rd-party-libs-src を git clone
$ git clone https://github.com/cocos2d/cocos2d-x-3rd-party-libs-src.git
Cloning into 'cocos2d-x-3rd-party-libs-src'...
remote: Enumerating objects: 2700, done.
remote: Total 2700 (delta 0), reused 0 (delta 0), pack-reused 2700
Receiving objects: 100% (2700/2700), 515.98 KiB | 517.00 KiB/s, done.
Resolving deltas: 100% (1463/1463), done.
$ cd cocos2d-x-3rd-party-libs-src
v3 ブランチ用に git checkout
- 2020-05-31 時点で cocos2d-x の v3 ブランチの external のバージョンは v3-deps-172 (2019-11-08)
- cocos2d-x-3rd-party-libs-src の最終コミットは 2019-07-26 で
- cocos2d-x-3rd-party-libs-bin の v3-deps-161 (2019-08-20) より古い
- cocos2d-x-3rd-party-libs-bin をビルドしたソースが cocos2d-x-3rd-party-libs-src にコミットされてなさそう
- cocos2d-x-external レポジトリはコミットメッセージ ( remove tiff )から metal 用と思われる
- 仕方がないので cocos2d-x-3rd-party-libs-src の最終コミット(コミットメッセージ
update luajitからv3-deps-161と思われる)をビルドREADME.md に従ってビルド用のツールをインストール
$ brew update
$ brew install cmake
$ brew install autoconf
$ brew install automake
$ brew install libtool
$ brew list --versions
autoconf 2.69
automake 1.16.2
cmake 3.17.3
git 2.16.1
libtool 2.4.6_1
gitは/usr/bin/git(2.24.3 (Apple Git-128))をそのまま使ったREADME.md に従って bitcode を有効に
build/ios.ini の
cfg_build_bitcode=を
cfg_build_bitcode="-fembed-bitcode"に変更
また curl でビルドエラーが出るので
connect.c:1087:12: error: 'connectx' is only available on iOS 9.0 or newer [-Werror,-Wunguarded-availability]
      rc = connectx(sockfd, &endpoints, SAE_ASSOCID_ANY,
           ^~~~~~~~
/Applications/Xcode.app/Contents/Developer/Platforms/iPhoneOS.platform/Developer/SDKs/iPhoneOS13.5.sdk/usr/include/sys/socket.h:723:5: note: 'connectx' has been marked as being introduced in iOS 9.0 here, but the deployment target is
      iOS 7.0.0
int connectx(int, const sa_endpoints_t *, sae_associd_t, unsigned int,
    ^
connect.c:1087:12: note: enclose 'connectx' in a __builtin_available check to silence this warning
      rc = connectx(sockfd, &endpoints, SAE_ASSOCID_ANY,
           ^~~~~~~~
1 error generated.
make[2]: *** [libcurl_la-connect.lo] Error 1
- contrib/bootstrap 内の
-miphoneos-version-min=7.0を-miphoneos-version-min=10.0に置換( 3 箇所)iOS 用に release ビルド
$ cd build
$ ./build.sh -p=ios --libs=png,zlib,websockets,curl,freetype,jpeg,tiff,webp,chipmunk,openssl,bullet,box2d,uv --arch=all
--libs=allだと lua でビルドエラーが起きるloslib.c:39:22: error: 'system' is unavailable: not available on iOS lua_pushinteger(L, system(luaL_optstring(L, 1, NULL)));
rapidjsonを指定するとビルドエラーが起きるchecking rapidjson is in png zlib lua luajit websockets curl freetype jpeg tiff webp chipmunk openssl rapidjson, bullet box2d uv glsl_optimizer Invalid library names! Only png zlib lua luajit websockets curl freetype jpeg tiff webp chipmunk openssl rapidjson, bullet box2d uv glsl_optimizer is acceptable!
glsl_optimizerはcocos2d-x/externalに存在しないのでビルドしないまた bullet の i386 と x86_64 でビルドエラーが出るので
In file included from /Users/kenichi/butaimeguri/cocos2d-x-3rd-party-libs-src/contrib/ios-i386/bullet/src/BulletCollision/BroadphaseCollision/btAxisSweep3.cpp:20:
In file included from /Users/kenichi/butaimeguri/cocos2d-x-3rd-party-libs-src/contrib/ios-i386/bullet/src/BulletCollision/BroadphaseCollision/btAxisSweep3.h:22:
/Users/kenichi/butaimeguri/cocos2d-x-3rd-party-libs-src/contrib/ios-i386/bullet/src/LinearMath/btVector3.h:330:7: error: argument value 10880 is outside the valid range [0, 255] [-Wargument-outside-range]
                y = bt_splat_ps(y, 0x80);
                    ^~~~~~~~~~~~~~~~~~~~
/Users/kenichi/butaimeguri/cocos2d-x-3rd-party-libs-src/contrib/ios-i386/bullet/src/LinearMath/btVector3.h:46:32: note: expanded from macro 'bt_splat_ps'
#define bt_splat_ps( _a, _i )  bt_pshufd_ps((_a), BT_SHUFFLE(_i,_i,_i,_i) )
                               ^~~~~~~~~~~~~~~~~~~~~~~~~~~~~~~~~~~~~~~~~~~~
/Users/kenichi/butaimeguri/cocos2d-x-3rd-party-libs-src/contrib/ios-i386/bullet/src/LinearMath/btVector3.h:44:35: note: expanded from macro 'bt_pshufd_ps'
#define bt_pshufd_ps( _a, _mask ) _mm_shuffle_ps((_a), (_a), (_mask) )
                                  ^~~~~~~~~~~~~~~~~~~~~~~~~~~~~~~~~~~~
/Applications/Xcode.app/Contents/Developer/Toolchains/XcodeDefault.xctoolchain/usr/lib/clang/11.0.3/include/xmmintrin.h:2596:11: note: expanded from macro '_mm_shuffle_ps'
  (__m128)__builtin_ia32_shufps((__v4sf)(__m128)(a), (__v4sf)(__m128)(b), \
          ^
In file included from /Users/kenichi/butaimeguri/cocos2d-x-3rd-party-libs-src/contrib/ios-i386/bullet/src/BulletCollision/BroadphaseCollision/btAxisSweep3.cpp:20:
In file included from /Users/kenichi/butaimeguri/cocos2d-x-3rd-party-libs-src/contrib/ios-i386/bullet/src/BulletCollision/BroadphaseCollision/btAxisSweep3.h:27:
In file included from /Users/kenichi/butaimeguri/cocos2d-x-3rd-party-libs-src/contrib/ios-i386/bullet/src/BulletCollision/BroadphaseCollision/btDbvtBroadphase.h:20:
In file included from /Users/kenichi/butaimeguri/cocos2d-x-3rd-party-libs-src/contrib/ios-i386/bullet/src/BulletCollision/BroadphaseCollision/btDbvt.h:22:
In file included from /Users/kenichi/butaimeguri/cocos2d-x-3rd-party-libs-src/contrib/ios-i386/bullet/src/LinearMath/btTransform.h:21:
/Users/kenichi/butaimeguri/cocos2d-x-3rd-party-libs-src/contrib/ios-i386/bullet/src/LinearMath/btMatrix3x3.h:861:17: error: argument value 10880 is outside the valid range [0, 255] [-Wargument-outside-range]
    __m128 vk = bt_splat_ps(_mm_load_ss((float *)&k), 0x80);
                ^~~~~~~~~~~~~~~~~~~~~~~~~~~~~~~~~~~~~~~~~~~
/Users/kenichi/butaimeguri/cocos2d-x-3rd-party-libs-src/contrib/ios-i386/bullet/src/LinearMath/btVector3.h:46:32: note: expanded from macro 'bt_splat_ps'
#define bt_splat_ps( _a, _i )  bt_pshufd_ps((_a), BT_SHUFFLE(_i,_i,_i,_i) )
                               ^~~~~~~~~~~~~~~~~~~~~~~~~~~~~~~~~~~~~~~~~~~~
/Users/kenichi/butaimeguri/cocos2d-x-3rd-party-libs-src/contrib/ios-i386/bullet/src/LinearMath/btVector3.h:44:35: note: expanded from macro 'bt_pshufd_ps'
#define bt_pshufd_ps( _a, _mask ) _mm_shuffle_ps((_a), (_a), (_mask) )
                                  ^~~~~~~~~~~~~~~~~~~~~~~~~~~~~~~~~~~~
/Applications/Xcode.app/Contents/Developer/Toolchains/XcodeDefault.xctoolchain/usr/lib/clang/11.0.3/include/xmmintrin.h:2596:11: note: expanded from macro '_mm_shuffle_ps'
  (__m128)__builtin_ia32_shufps((__v4sf)(__m128)(a), (__v4sf)(__m128)(b), \
          ^
2 errors generated.
- 以下のファイルへ 7638b7c を適用して再ビルド
- contrib/ios-i386/bullet/src/LinearMath/btVector3.h
- contrib/ios-x86_64/bullet/src/LinearMath/btVector3.h
ビルド結果を cocos2d-x の v3 ブランチの external へ配置
$ cd cocos2d-x/externalpng
$ cd png/prebuilt/ios

$ diff -r ../../include/ios ../../../../../cocos2d-x-3rd-party-libs-src/build/ios/png/include

$ mv libpng.a libpng.a.dist
$ cp -p ../../../../../cocos2d-x-3rd-party-libs-src/build/ios/png/prebuilt/libpng.a .

$ cd ../../..
- 差異はなかった
zlib
- zlib/prebuilt/ios は存在しない
websockets
$ cd websockets/prebuilt/ios

$ diff -r ../../include/ios ../../../../../cocos2d-x-3rd-party-libs-src/build/ios/websockets/include
Only in ../../include/ios: lws_config-arm32.h
Only in ../../include/ios: lws_config-arm64.h
Only in ../../include/ios: lws_config-i386.h
Only in ../../include/ios: lws_config-x86_64.h
Only in ../../include/ios: lws_config.h

$ mv libwebsockets.a libwebsockets.a.dist
$ cp -p ../../../../../cocos2d-x-3rd-party-libs-src/build/ios/websockets/prebuilt/libwebsockets.a .

$ cd ../../..
- lws_config*.h が external にしか存在しないが libwebsockets.h は同じ
- この差異はとりあえず無視
curl (with crypto and ssl)
$ cd curl/prebuilt/ios

$ diff -rq ../../include/ios ../../../../../cocos2d-x-3rd-party-libs-src/build/ios/curl/include
Only in ../../include/ios/curl: curlbuild-arm32.h
Only in ../../include/ios/curl: curlbuild-arm64.h
Only in ../../include/ios/curl: curlbuild-i386.h
Only in ../../include/ios/curl: curlbuild-x86_64.h
Files ../../include/ios/curl/curlbuild.h and ../../../../../cocos2d-x-3rd-party-libs-src/build/ios/curl/include/curl/curlbuild.h differ

$ cat ../../include/ios/curl/curlbuild.h
#ifdef __arm64__
#include "curlbuild-arm64.h"
#elif __arm__
#include "curlbuild-arm32.h"
#elif __i386__
#include "curlbuild-i386.h"
#elif __x86_64__
#include "curlbuild-x86_64.h"
#else
#error "Unsupported architecture!"
#endif
$ diff ../../include/ios/curl/curlbuild-arm64.h ../../../../../cocos2d-x-3rd-party-libs-src/build/ios/curl/include/curl/curlbuild.h
$ diff ../../include/ios/curl/curlbuild-arm32.h ../../../../../cocos2d-x-3rd-party-libs-src/build/ios/curl/include/curl/curlbuild.h
136c136
< #define CURL_PULL_STDINT_H 1
---
> /* #undef CURL_PULL_STDINT_H */
143c143
< #define CURL_PULL_INTTYPES_H 1
---
> /* #undef CURL_PULL_INTTYPES_H */
163c163
< #define CURL_SIZEOF_LONG 4
---
> #define CURL_SIZEOF_LONG 8
175c175
< #define CURL_TYPEOF_CURL_OFF_T int64_t
---
> #define CURL_TYPEOF_CURL_OFF_T long
181c181
< #define CURL_FORMAT_CURL_OFF_T "lld"
---
> #define CURL_FORMAT_CURL_OFF_T "ld"
184c184
< #define CURL_FORMAT_CURL_OFF_TU "llu"
---
> #define CURL_FORMAT_CURL_OFF_TU "lu"
187c187
< #define CURL_FORMAT_OFF_T "%lld"
---
> #define CURL_FORMAT_OFF_T "%ld"
193c193
< #define CURL_SUFFIX_CURL_OFF_T LL
---
> #define CURL_SUFFIX_CURL_OFF_T L
196c196
< #define CURL_SUFFIX_CURL_OFF_TU ULL
---
> #define CURL_SUFFIX_CURL_OFF_TU UL
$ diff ../../include/ios/curl/curlbuild-i386.h ../../include/ios/curl/curlbuild-arm32.h
$ diff ../../include/ios/curl/curlbuild-x86_64.h ../../include/ios/curl/curlbuild-arm64.h

$ mv libcurl.a libcurl.a.dist
$ cp -p ../../../../../cocos2d-x-3rd-party-libs-src/build/ios/curl/prebuilt/libcurl.a .

$ cd ../../..
- external の curlbuild.h は他のファイルを読み込んでおり、64 ビット用は元のファイルと同一
- この差異もとりあえず無視
freetype
$ cd freetype2/prebuilt/ios

$ diff -r ../../include/ios ../../../../../cocos2d-x-3rd-party-libs-src/build/ios/freetype/include

$ mv libfreetype.a libfreetype.a.dist
$ cp -p ../../../../../cocos2d-x-3rd-party-libs-src/build/ios/freetype/prebuilt/libfreetype.a .

$ cd ../../..
- 差異はなかった
jpeg
$ cd jpeg/prebuilt/ios

$ diff -r ../../include/ios ../../../../../cocos2d-x-3rd-party-libs-src/build/ios/jpeg/include
diff -r ../../include/ios/jconfig.h ../../../../../cocos2d-x-3rd-party-libs-src/build/ios/jpeg/include/jconfig.h
21c21
< /* Define "boolean" as unsigned char, not int, on Windows systems. */
---
> /* Define "boolean" as unsigned char, not enum, on Windows systems. */
25a26,31
> #ifndef FALSE         /* in case these macros already exist */
> #define FALSE 0       /* values of boolean */
> #endif
> #ifndef TRUE
> #define TRUE  1
> #endif
diff -r ../../include/ios/jmorecfg.h ../../../../../cocos2d-x-3rd-party-libs-src/build/ios/jpeg/include/jmorecfg.h
5c5
<  * Modified 1997-2012 by Guido Vollbeding.
---
>  * Modified 1997-2013 by Guido Vollbeding.
17a18,20
>  *   9   for 9-bit sample values
>  *   10  for 10-bit sample values
>  *   11  for 11-bit sample values
19,21c22,30
<  * Only 8 and 12 are legal data precisions for lossy JPEG according to the
<  * JPEG standard, and the IJG code does not support anything else!
<  * We do not support run-time selection of data precision, sorry.
---
>  * Only 8, 9, 10, 11, and 12 bits sample data precision are supported for
>  * full-feature DCT processing.  Further depths up to 16-bit may be added
>  * later for the lossless modes of operation.
>  * Run-time selection and conversion of data precision will be added later
>  * and are currently not supported, sorry.
>  * Exception:  The transcoding part (jpegtran) supports all settings in a
>  * single instance, since it operates on the level of DCT coefficients and
>  * not sample values.  The DCT coefficients are of the same type (16 bits)
>  * in all cases (see below).
24c33
< #define BITS_IN_JSAMPLE  8    /* use 8 or 12 */
---
> #define BITS_IN_JSAMPLE  8    /* use 8, 9, 10, 11, or 12 */
79a89,130
> #if BITS_IN_JSAMPLE == 9
> /* JSAMPLE should be the smallest type that will hold the values 0..511.
>  * On nearly all machines "short" will do nicely.
>  */
>
> typedef short JSAMPLE;
> #define GETJSAMPLE(value)  ((int) (value))
>
> #define MAXJSAMPLE    511
> #define CENTERJSAMPLE 256
>
> #endif /* BITS_IN_JSAMPLE == 9 */
>
>
> #if BITS_IN_JSAMPLE == 10
> /* JSAMPLE should be the smallest type that will hold the values 0..1023.
>  * On nearly all machines "short" will do nicely.
>  */
>
> typedef short JSAMPLE;
> #define GETJSAMPLE(value)  ((int) (value))
>
> #define MAXJSAMPLE    1023
> #define CENTERJSAMPLE 512
>
> #endif /* BITS_IN_JSAMPLE == 10 */
>
>
> #if BITS_IN_JSAMPLE == 11
> /* JSAMPLE should be the smallest type that will hold the values 0..2047.
>  * On nearly all machines "short" will do nicely.
>  */
>
> typedef short JSAMPLE;
> #define GETJSAMPLE(value)  ((int) (value))
>
> #define MAXJSAMPLE    2047
> #define CENTERJSAMPLE 1024
>
> #endif /* BITS_IN_JSAMPLE == 11 */
>
>
255c306,309
< #ifdef HAVE_BOOLEAN
---
> #ifndef HAVE_BOOLEAN
> #if defined FALSE || defined TRUE || defined QGLOBAL_H
> /* Qt3 defines FALSE and TRUE as "const" variables in qglobal.h */
> typedef int boolean;
264a319
> #endif
302,306c357,362
< /* Note: if you selected 12-bit data precision, it is dangerous to turn off
<  * ENTROPY_OPT_SUPPORTED.  The standard Huffman tables are only good for 8-bit
<  * precision, so jchuff.c normally uses entropy optimization to compute
<  * usable tables for higher precision.  If you don't want to do optimization,
<  * you'll have to supply different default Huffman tables.
---
> /* Note: if you selected more than 8-bit data precision, it is dangerous to
>  * turn off ENTROPY_OPT_SUPPORTED.  The standard Huffman tables are only
>  * good for 8-bit precision, so arithmetic coding is recommended for higher
>  * precision.  The Huffman encoder normally uses entropy optimization to
>  * compute usable tables for higher precision.  Otherwise, you'll have to
>  * supply different default Huffman tables.
317c373
< #define IDCT_SCALING_SUPPORTED        /* Output rescaling via IDCT? */
---
> #define IDCT_SCALING_SUPPORTED        /* Output rescaling via IDCT? (Requires DCT_ISLOW)*/
diff -r ../../include/ios/jpeglib.h ../../../../../cocos2d-x-3rd-party-libs-src/build/ios/jpeg/include/jpeglib.h
5c5
<  * Modified 2002-2012 by Guido Vollbeding.
---
>  * Modified 2002-2015 by Guido Vollbeding.
42c42
< #define JPEG_LIB_VERSION_MINOR  0
---
> #define JPEG_LIB_VERSION_MINOR  2
46,47c46,47
<  * All of these are specified by the JPEG standard, so don't change them
<  * if you want to be compatible.
---
>  * All of these are specified by the JPEG standard,
>  * so don't change them if you want to be compatible.
160c160,161
<    * downsampled_width = ceil(image_width * Hi/Hmax * DCT_h_scaled_size/DCTSIZE)
---
>    * downsampled_width =
>    *   ceil(image_width * Hi/Hmax * DCT_h_scaled_size/block_size)
165,167c166,172
<   /* This flag is used only for decompression.  In cases where some of the
<    * components will be ignored (eg grayscale output from YCbCr image),
<    * we can skip most computations for the unused components.
---
>   /* For decompression, in cases where some of the components will be
>    * ignored (eg grayscale output from YCbCr image), we can skip most
>    * computations for the unused components.
>    * For compression, some of the components will need further quantization
>    * scale by factor of 2 after DCT (eg BG_YCC output from normal RGB input).
>    * The field is first set TRUE for decompression, FALSE for compression
>    * in initial_setup, and then adapted in color conversion setup.
169c174
<   boolean component_needed;   /* do we need the value of this component? */
---
>   boolean component_needed;
218,219c223,224
<   JCS_RGB,        /* red/green/blue */
<   JCS_YCbCr,      /* Y/Cb/Cr (also known as YUV) */
---
>   JCS_RGB,        /* red/green/blue, standard RGB (sRGB) */
>   JCS_YCbCr,      /* Y/Cb/Cr (also known as YUV), standard YCC */
221c226,228
<   JCS_YCCK        /* Y/Cb/Cr/K */
---
>   JCS_YCCK,       /* Y/Cb/Cr/K */
>   JCS_BG_RGB,     /* big gamut red/green/blue, bg-sRGB */
>   JCS_BG_YCC      /* big gamut Y/Cb/Cr, bg-sYCC */
975c982
<                 unsigned char * inbuffer,
---
>                 const unsigned char * inbuffer,

$ mv libjpeg.a libjpeg.a.dist
$ cp -p ../../../../../cocos2d-x-3rd-party-libs-src/build/ios/jpeg/prebuilt/libjpeg.a .

$ cd ../../..
- 差異があるが、とりあえず無視
tiff
$ cd tiff/prebuilt/ios

$ diff -rq ../../include/ios ../../../../../cocos2d-x-3rd-party-libs-src/build/ios/tiff/include
Only in ../../include/ios: tiffconf-32.h
Only in ../../include/ios: tiffconf-64.h
Files ../../include/ios/tiffconf.h and ../../../../../cocos2d-x-3rd-party-libs-src/build/ios/tiff/include/tiffconf.h differ
$ diff ../../include/ios/tiffconf-64.h ../../../../../cocos2d-x-3rd-party-libs-src/build/ios/tiff/include/tiffconf.h

$ mv libtiff.a libtiff.a.dist
$ cp -p ../../../../../cocos2d-x-3rd-party-libs-src/build/ios/tiff/prebuilt/libtiff.a .

$ cd ../../..
- external の tiffconf.h は
__LP64__が定義されてると tiffconf-64.h を読み込み、それが cocos2d-x-3rd-party-libs-src の tiffconf.h と同一
- この差異もとりあえず無視
webp
$ cd webp/prebuilt/ios

$ diff -r ../../include/ios ../../../../../cocos2d-x-3rd-party-libs-src/build/ios/webp/include/webp

$ mv libwebp.a libwebp.a.dist
$ cp -p ../../../../../cocos2d-x-3rd-party-libs-src/build/ios/webp/prebuilt/libwebp.a .

$ cd ../../..
- これも差異はなかった
chipmunk
$ cd chipmunk/prebuilt/ios

$ diff -r ../../include ../../../../../cocos2d-x-3rd-party-libs-src/build/ios/chipmunk/include
diff -r ../../include/chipmunk/chipmunk.h ../../../../../cocos2d-x-3rd-party-libs-src/build/ios/chipmunk/include/chipmunk/chipmunk.h
31,35c31
<     #if !defined(WINAPI_FAMILY) || (WINAPI_FAMILY == WINAPI_FAMILY_DESKTOP_APP)
<         #define CP_EXPORT __declspec(dllexport)
<     #else
<       #define CP_EXPORT
<     #endif
---
>   #define CP_EXPORT __declspec(dllexport)

$ mv libchipmunk.a libchipmunk.a.dist
$ cp -p ../../../../../cocos2d-x-3rd-party-libs-src/build/ios/chipmunk/prebuilt/libchipmunk.a .

$ cd ../../..
- diff で差異が見つかった
- external のバージョンは cocos2d-x-3rd-party-libs-bin 固有のコードで、本家には存在しないし chipmunk/cocos2d.patch にも存在しない
- cocos2d-x-3rd-party-libs-bin は cocos2d-x-3rd-party-libs-src からビルドしているものではないのかも・・・
#ifdef WIN32で囲まれた部分での差異なのでコンパイル結果には影響ないはず
- この差異はとりあえず無視
openssl
$ cd openssl/prebuilt/ios

$ diff -rq ../../include/ios ../../../../../cocos2d-x-3rd-party-libs-src/build/ios/ssl/include
Only in ../../include/ios/openssl: opensslconf-arm32.h
Only in ../../include/ios/openssl: opensslconf-arm64.h
Only in ../../include/ios/openssl: opensslconf-i386.h
Only in ../../include/ios/openssl: opensslconf-x86_64.h
Files ../../include/ios/openssl/opensslconf.h and ../../../../../cocos2d-x-3rd-party-libs-src/build/ios/ssl/include/openssl/opensslconf.h differ

$ cat ../../include/ios/openssl/opensslconf.h
#ifdef __arm64__
#include "opensslconf-arm64.h"
#elif __arm__
#include "opensslconf-arm32.h"
#elif __i386__
#include "opensslconf-i386.h"
#elif __x86_64__
#include "opensslconf-x86_64.h"
#else
#error "Unsupported architecture!"
#endif
$ diff ../../include/ios/openssl/opensslconf-arm64.h ../../../../../cocos2d-x-3rd-party-libs-src/build/ios/ssl/include/openssl/opensslconf.h
171c171
< #define RC4_INT unsigned char
---
> #define RC4_INT unsigned int
$ diff ../../include/ios/openssl/opensslconf-arm32.h ../../../../../cocos2d-x-3rd-party-libs-src/build/ios/ssl/include/openssl/opensslconf.h
164c164
< # define BN_LLONG
---
> # undef BN_LLONG
166c166
< # undef SIXTY_FOUR_BIT_LONG
---
> # define SIXTY_FOUR_BIT_LONG
168c168
< # define THIRTY_TWO_BIT
---
> # undef THIRTY_TWO_BIT
171c171
< #define RC4_INT unsigned char
---
> #define RC4_INT unsigned int
$ diff ../../include/ios/openssl/opensslconf-i386.h ../../../../../cocos2d-x-3rd-party-libs-src/build/ios/ssl/include/openssl/opensslconf.h
164c164
< # define BN_LLONG
---
> # undef BN_LLONG
166c166
< # undef SIXTY_FOUR_BIT_LONG
---
> # define SIXTY_FOUR_BIT_LONG
168c168
< # define THIRTY_TWO_BIT
---
> # undef THIRTY_TWO_BIT
$ diff ../../include/ios/openssl/opensslconf-x86_64.h ../../../../../cocos2d-x-3rd-party-libs-src/build/ios/ssl/include/openssl/opensslconf.h

$ mv libcrypto.a libcrypto.a.dist
$ cp -p ../../../../../cocos2d-x-3rd-party-libs-src/build/ios/crypto/prebuilt/libcrypto.a .

$ mv libssl.a libssl.a.dist
$ cp -p ../../../../../cocos2d-x-3rd-party-libs-src/build/ios/ssl/prebuilt/libssl.a .

$ cd ../../..
- diff で差異が見つかったが、これも無視
bullet
$ cd bullet/prebuilt/ios

$ diff -r ../../include ../../../../../cocos2d-x-3rd-party-libs-src/build/ios/bullet/include
Only in ../../../../../cocos2d-x-3rd-party-libs-src/build/ios/bullet/include/bullet/BulletMultiThreaded/GpuSoftBodySolvers/DX11: HLSL
Only in ../../../../../cocos2d-x-3rd-party-libs-src/build/ios/bullet/include/bullet/BulletMultiThreaded/GpuSoftBodySolvers/OpenCL: AMD
Only in ../../../../../cocos2d-x-3rd-party-libs-src/build/ios/bullet/include/bullet/BulletMultiThreaded/GpuSoftBodySolvers/OpenCL: Apple
Only in ../../../../../cocos2d-x-3rd-party-libs-src/build/ios/bullet/include/bullet/BulletMultiThreaded/GpuSoftBodySolvers/OpenCL: Intel
Only in ../../../../../cocos2d-x-3rd-party-libs-src/build/ios/bullet/include/bullet/BulletMultiThreaded/GpuSoftBodySolvers/OpenCL: MiniCL
Only in ../../../../../cocos2d-x-3rd-party-libs-src/build/ios/bullet/include/bullet/BulletMultiThreaded/GpuSoftBodySolvers/OpenCL: NVidia
Only in ../../../../../cocos2d-x-3rd-party-libs-src/build/ios/bullet/include/bullet/BulletMultiThreaded/GpuSoftBodySolvers/OpenCL: OpenCLC10

$ for i in "libBulletCollision.a" "libBulletDynamics.a" "libBulletMultiThreaded.a" "libLinearMath.a" "libMiniCL.a"; do mv $i $i.dist; cp -p ../../../../../cocos2d-x-3rd-party-libs-src/build/ios/bullet/prebuilt/$i .; done

$ cd ../../..
- 差異はあったが、全てからディレクトリ
- 投稿日:2020-06-01T08:09:36+09:00
【Ionic+Firebaseでアプリ開発】お気に入り登録機能を実装する
はじめに
【Ionic+Firebaseでアプリ開発】Firestoreの中身を一覧表示するの続きです。
今回はFirestoreの中身を一覧表示するだけのiOSアプリに、お気に入り登録機能を追加します。以下のように実装します。
・追加したいアイテムを左から右にスライドすると、登録ボタンが現れ、タップするとお気に入りに登録できる
・「お気に入りに登録しました」と表示する(ion-toast)
・お気に入りに登録したアイテムはお気に入り一覧画面に表示される
・お気に入り一覧画面から削除したい場合はアイテムを右から左にスライドすると、削除ボタンが現れ、タップすると削除できる
お気に入りアイテムを一覧表示するページを実装する
1.お気に入り一覧表示ページを生成する
$ ionic g page favoriteList2.お気に入り一覧表示ページを作成する
app/favorite-list/favorite-list.page.html<ion-header> <ion-toolbar> <ion-buttons slot="start"> <ion-back-button text="戻る" defaultHref="home"></ion-back-button> </ion-buttons> <ion-title>お気に入り</ion-title> </ion-toolbar> </ion-header> <ion-content fullscreen> <ion-card *ngFor="let favorite of favoriteList; let i = index" class="activated"> <ion-item-sliding > <ion-item-options side="end"> <ion-item-option (click)="deleteFavorite(i)" color="danger">削除</ion-item-option> </ion-item-options> <ion-item (click)="openPage(favorite.url)" class="activated"> <ion-card-header> <ion-img src = "{{favorite.image}}" class="image"></ion-img> </ion-card-header> <ion-card-content> <p><font size="2">レベル:{{ favorite.level }}</font></p><br> <p><font size="4" color="#000000">{{ favorite.name }}</font></p> </ion-card-content> </ion-item> </ion-item-sliding> </ion-card> </ion-content>3.お気に入り一覧表示ページの処理を実装する
app/favorite-list/favorite-list.page.tsimport { Component} from '@angular/core'; import { ActivatedRoute} from '@angular/router'; @Component({ selector: 'app-favorite-list', templateUrl: './favorite-list.page.html', styleUrls: ['./favorite-list.page.scss'], }) export class FavoriteListPage { favoriteList = []; constructor( private activatedRoute: ActivatedRoute, ) { this.activatedRoute.queryParams.subscribe(params => { this.favoriteList = JSON.parse(params.favoriteList); }); } deleteFavorite(i) { this.favoriteList.splice(i,1); } }一覧表示ページにお気に入り登録機能を実装する
1.一覧表示ページにお気に入り登録のUIを追加する
app/home/home.page.ts<ion-header [translucent]="true"> <ion-toolbar> <ion-title> 記事一覧 </ion-title> <ion-button (click)="presentFavorite()" slot="end"> <ion-icon name="star-outline"></ion-icon> </ion-button> </ion-toolbar> </ion-header> <ion-content [fullscreen]="true"> <ion-card *ngFor="let trick of groundtricks" class="activated"> <ion-item-sliding #slidingItem> <ion-item (click)="openPage(trick.url)" class="activated"> <ion-card-header> <ion-img src = "{{trick.image}}" class="image"></ion-img> </ion-card-header> <ion-card-content> <p><font size="2">レベル:{{ trick.level }}</font></p><br> <p><font size="3" color="#000000">{{ trick.name }}</font></p> </ion-card-content> </ion-item> <ion-item-options side="start"> <ion-item-option (click)="favorite(trick); slidingItem.close()"><ion-icon size="large" name="star-outline"></ion-icon></ion-item-option> </ion-item-options> </ion-item-sliding> </ion-card> </ion-content>2.一覧表示ページにお気に入り登録の処理を追加する
app/home/home.page.tsimport { Component, OnInit} from '@angular/core'; import { Router, NavigationExtras } from '@angular/router'; import { AngularFirestore } from '@angular/fire/firestore'; import { InAppBrowser } from '@ionic-native/in-app-browser/ngx'; import { ToastController} from '@ionic/angular'; @Component({ selector: 'app-home', templateUrl: 'home.page.html', styleUrls: ['home.page.scss'], }) export class HomePage implements OnInit{ groundtricks = []; favoriteList = []; constructor( private firestore: AngularFirestore, private inAppBrowser: InAppBrowser, public toastController: ToastController, private router: Router, ) {} ngOnInit() { this.readGroundtrick().subscribe(data => { this.groundtricks = data.map(e => { return { genre: e.payload.doc.data()['genre'], image: e.payload.doc.data()['image'], level: e.payload.doc.data()['level'], rotation: e.payload.doc.data()['rotation'], name: e.payload.doc.data()['name'], url: e.payload.doc.data()['url'], }; }); }); } async favorite(item) { const toast = await this.toastController.create({ color: 'dark', duration: 2000, message: 'お気に入りに登録しました。' }); await toast.present(); this.favoriteList.push(item); } presentFavorite(){ const navigationExtras: NavigationExtras = { queryParams:{ favoriteList: JSON.stringify(this.favoriteList), } }; this.router.navigate(['favorite-list'], navigationExtras); } openPage(url){ this.inAppBrowser.create(url); } readGroundtrick() { return this.firestore.collection('groundtrick').snapshotChanges(); } }おわりに
今回は、一覧表示するページにお気に入り登録機能を実装しました。
しかし、今回の実装ではアプリを再起動するとお気に入り登録したアイテムが消えてしまいます。
次回は再起動しても消えないようにする実装を紹介します。
- 投稿日:2020-06-01T07:11:05+09:00
UITableView セルのサイズを自動的に変更する
スタータープロジェクト
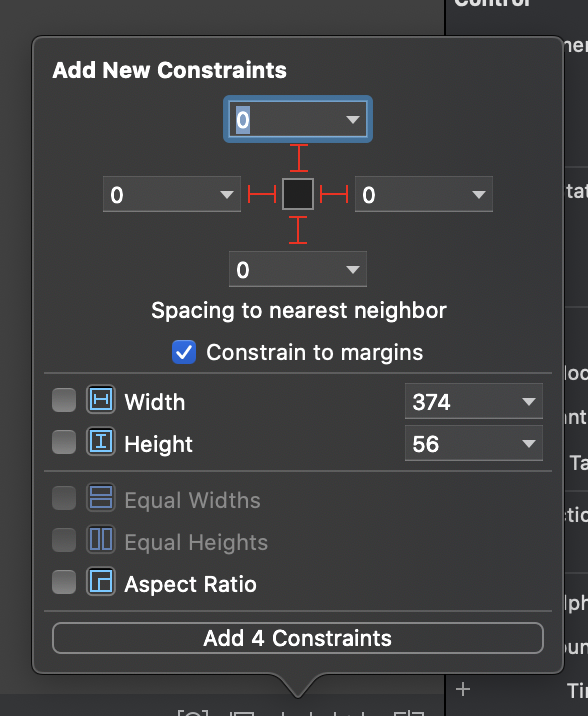
スタータープロジェクトでは、テーブルビューのセルに
UITextViewが一つだけあり、それには次のようなビューの制約(レイアウト)が含まれています:
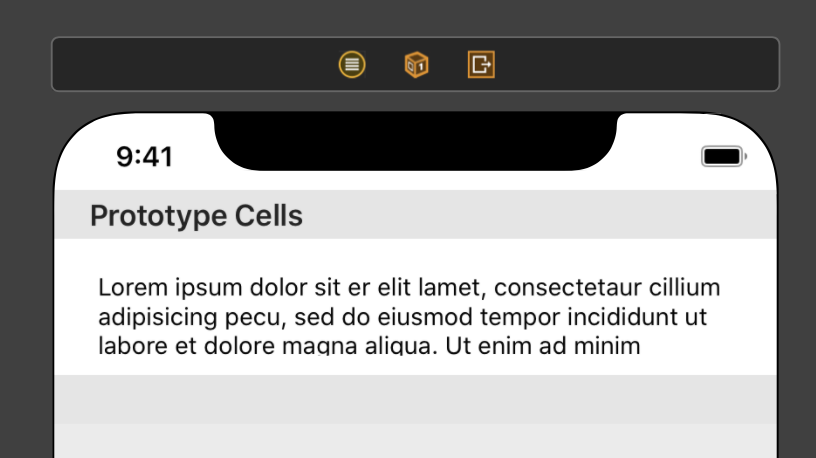
このプログラムビュー
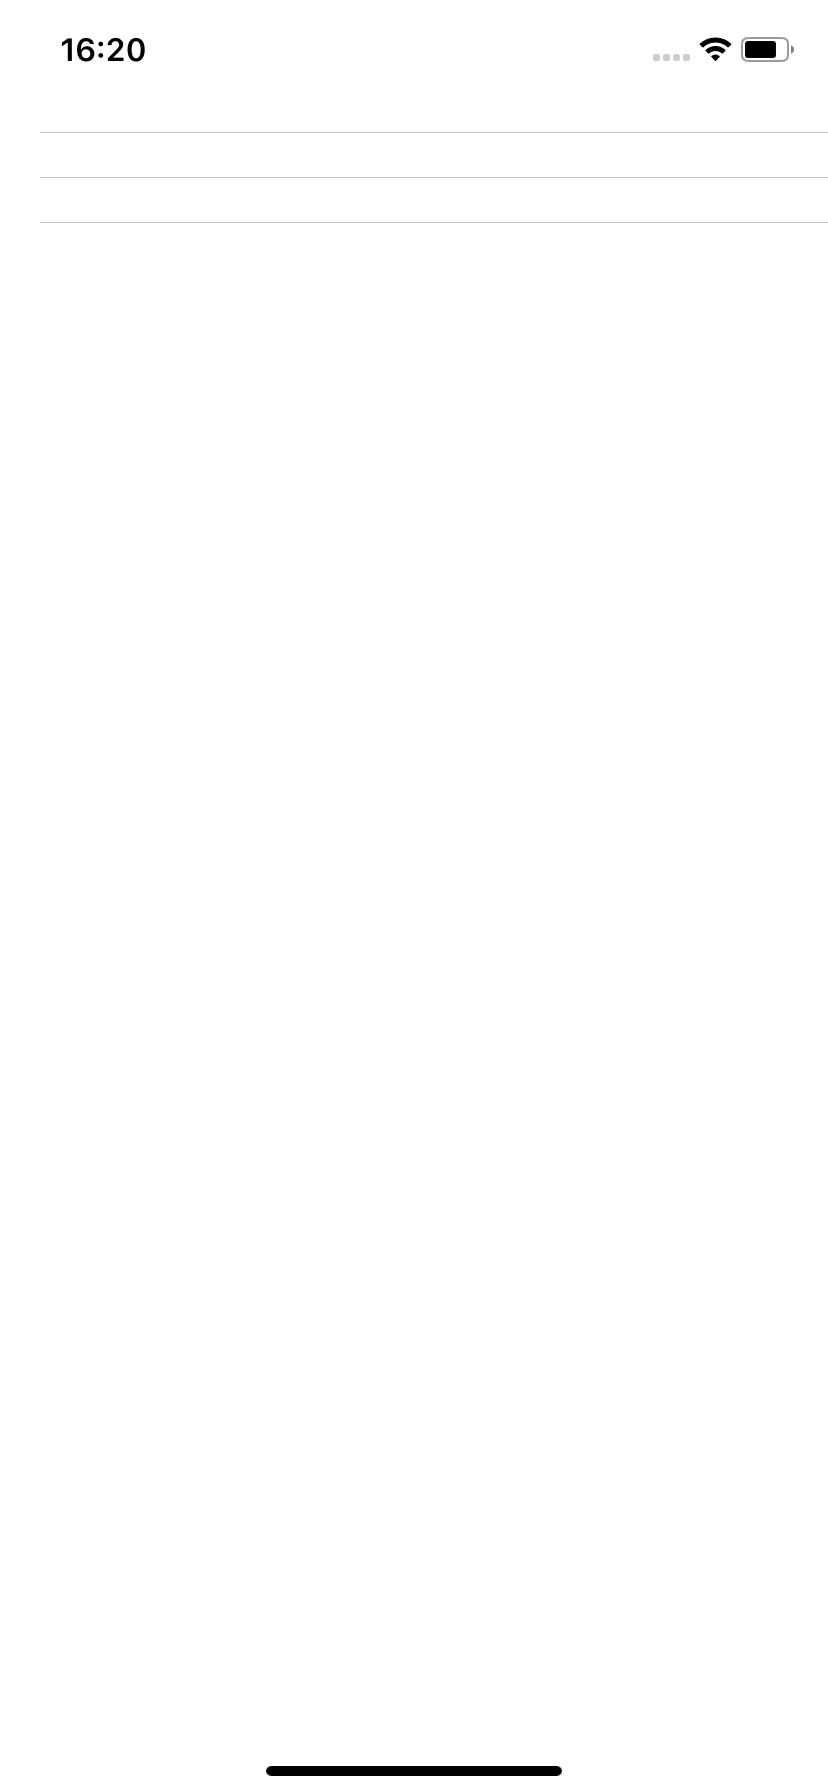
Storyboardでは、テキストが表示されるはずです。
しかしプログラムを実行しても画面には何も表示されません。テーブルビューのセルの高さが0になっているようです。
この記事ではこの問題の修正の仕方について学んでいきます。
問題を修正する
スクロールを無効化する
デフォルトでは
UITextViewはスクロールが有効になっています。固定した高さにするためにそれを無効化する必要があります。もともと、次のようなテーブルビューのクラスコードになっています。
class demoCell: UITableViewCell {
    @IBOutlet weak var textField: UITextView!
}
このコードを次のように更新します。
class demoCell: UITableViewCell {

    @IBOutlet weak var textField: UITextView!

    override func awakeFromNib() {
        super.awakeFromNib()
        textField.isScrollEnabled = false
    }

}
再びシミュレーターでプログラムを実行すれば、
UITextViewのコンテンツが正常に表示されているのがわかります。
テキストの内容が変更された時にビューの高さを更新する。
UITextView]内のテキストを編集しようとしても、テーブルビューのセルの高さは変わりません。しかし、高さは動的に変更する必要があります。自動で高さを設定する
テーブルビューのセルの高さを自動的に設定するようにシステムに指示することができます。
tableView.rowHeight = UITableView.automaticDimensionテキストの編集と連動させる
UITextViewDelegateを設定して、テキストが変更されたときにイベントが連動するようにしますclass demoCell: UITableViewCell, UITextViewDelegate { @IBOutlet weak var textField: UITextView! override func awakeFromNib() { super.awakeFromNib() textField.isScrollEnabled = false textField.delegate = self } func textViewDidChange(_ textView: UITextView) { //新しいテキスト } }テキスト編集をテーブルビューコントローラに報告する
この変更を
UITableViewControllerに報告すると、UITableViewControllerがテーブルビューをリフレッシュしてセルの高さが更新されます。プロトコルを作成する
protocol demoCellDelegate : AnyObject {
    func textDidChange()
}
テーブルビューのセルで、
demoCellDelegate.textDidChange()の関数を呼び出しますclass demoCell: UITableViewCell, UITextViewDelegate { @IBOutlet weak var textField: UITextView! weak var delegate: demoCellDelegate? override func awakeFromNib() { super.awakeFromNib() textField.isScrollEnabled = false textField.delegate = self } func textViewDidChange(_ textView: UITextView) { //新しいテキスト delegate?.textDidChange() } }そして、テーブルビューのクラスで、デリゲートを設定します:
override func tableView(_ tableView: UITableView, cellForRowAt indexPath: IndexPath) -> UITableViewCell {
    let cell = tableView.dequeueReusableCell(withIdentifier: "demo") as! demoCell
    cell.textField.text = "テスト テスト テスト テスト テスト テスト テスト テスト テスト テスト テスト"
    cell.delegate = self
    return cell
}
extension ViewController: demoCellDelegate { func textDidChange() { //TODO } }テーブルをリロードせずにテーブルビューを更新する
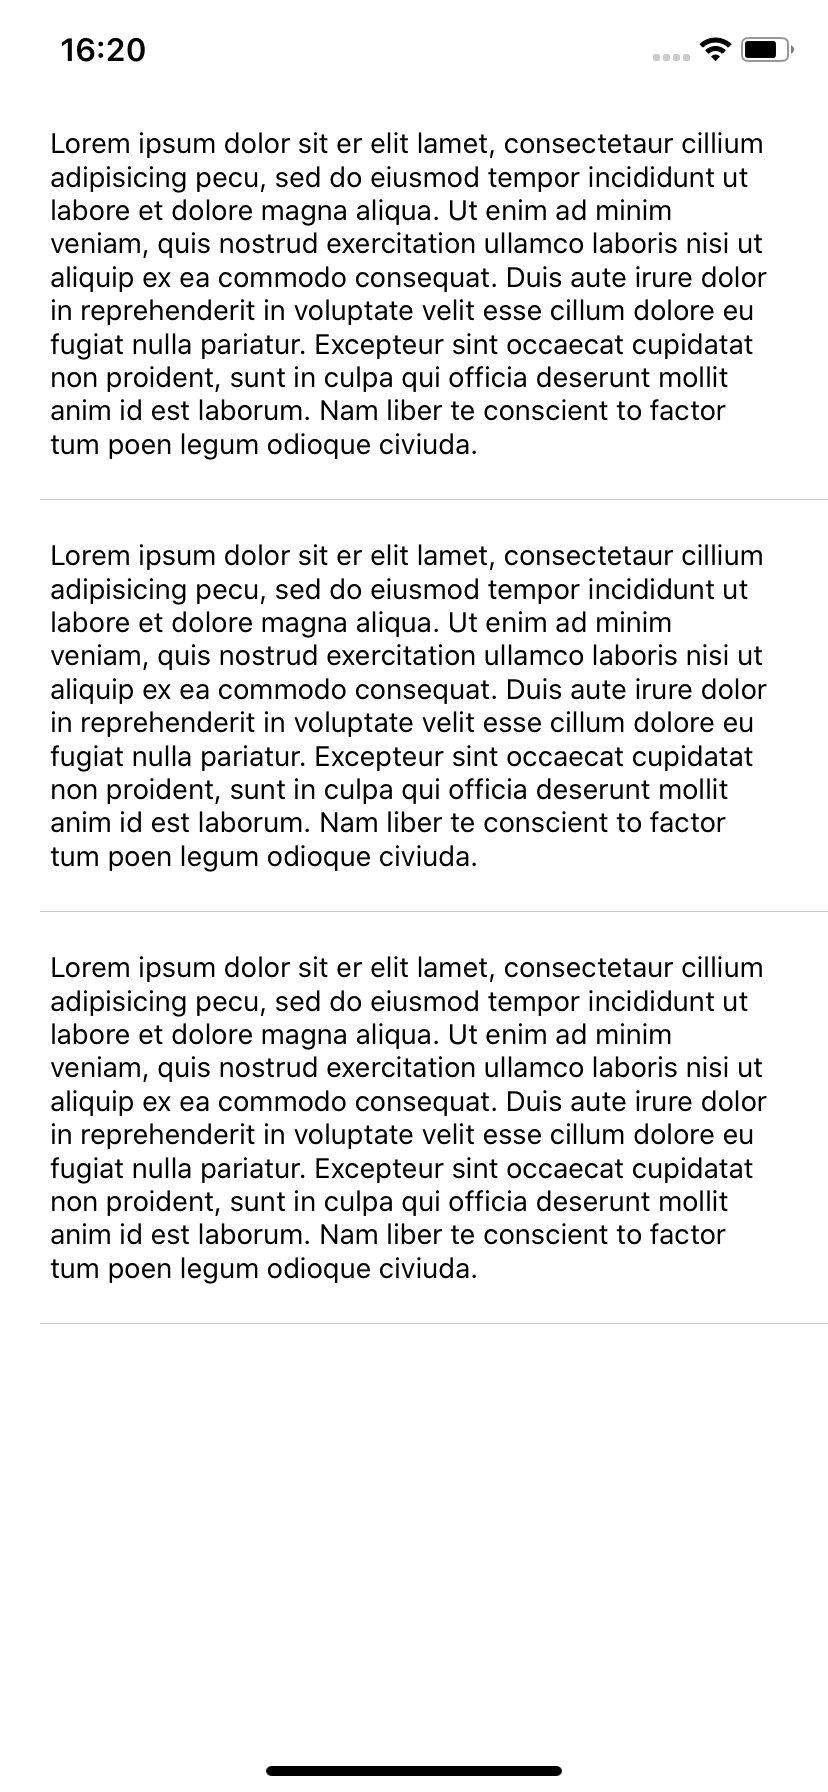
ここで、テーブルの高さを更新するために、
reloadData()を使用しないでください。代わりにtableView.beginUpdates()とtableView.endUpdates()を使用してください。extension ViewController: demoCellDelegate { func textDidChange() { tableView.beginUpdates() tableView.endUpdates() } }そして、このプログラムをシミュレータで再度実行すると、次のようになります。