- 投稿日:2020-06-01T22:51:11+09:00
FlutterアプリをCodemagicでCDしてみた(App Store Connect)
Google Playストア版の続きになります。
FlutterアプリをCodemagicでCDしてみた(Google Playストア)
https://qiita.com/kasa_le/items/17720a02ea0a4de2b66eCodemagicへは、すでにtagトリガーなどで動くワークフローがあるものとします。
(こちらの記事などを参照して下さい。)
また、App Store Connectにて、アプリを登録済で、かつTestFlightへ手動でアプリ公開をしたことがあることが前提です。
(こちらの記事などを参照して下さい。)手順
基本的には以下のページの通りです。
https://docs.codemagic.io/publishing/publishing-to-app-store/ただ、Apple ID(アプリケーションID)とApple ID(開発者アカウント)、等のように用語で混乱するので、このページでは以下のように統一します。
- App ID
- アプリケーション固有のID(10桁の数字)
- App Store Connectで確認可能
- 開発者アカウント
- App Store Connectにログインする時のメールアドレス
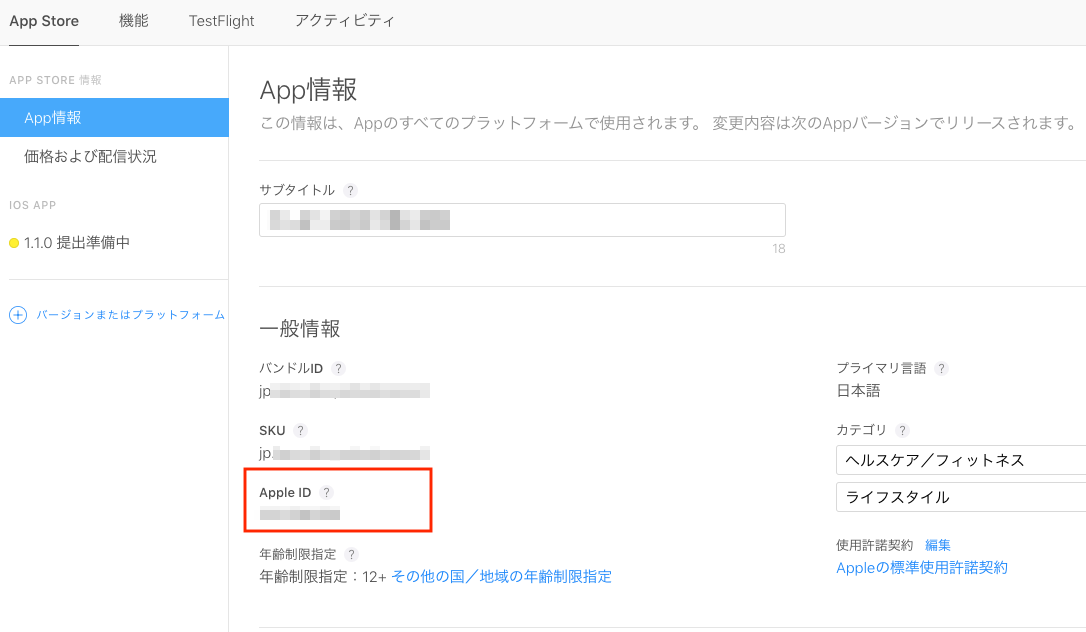
1.App IDを取得
App Store Connectにアプリを登録済であれば、以下のような場所に見つかるはずです。
2.開発者アカウントのapp-specificパスワードを作成する
app-specificパスワードについては、詳しくはこちらのページにあります。
https://support.apple.com/en-us/HT204397要するに、サードパーティー製アプリからApp Store Connectに接続できるようにするためのパスワードですね。
(1)二段階認証を有効にする
開発者アカウントを登録する時に必須なので、設定済みなはずですので、割愛します。
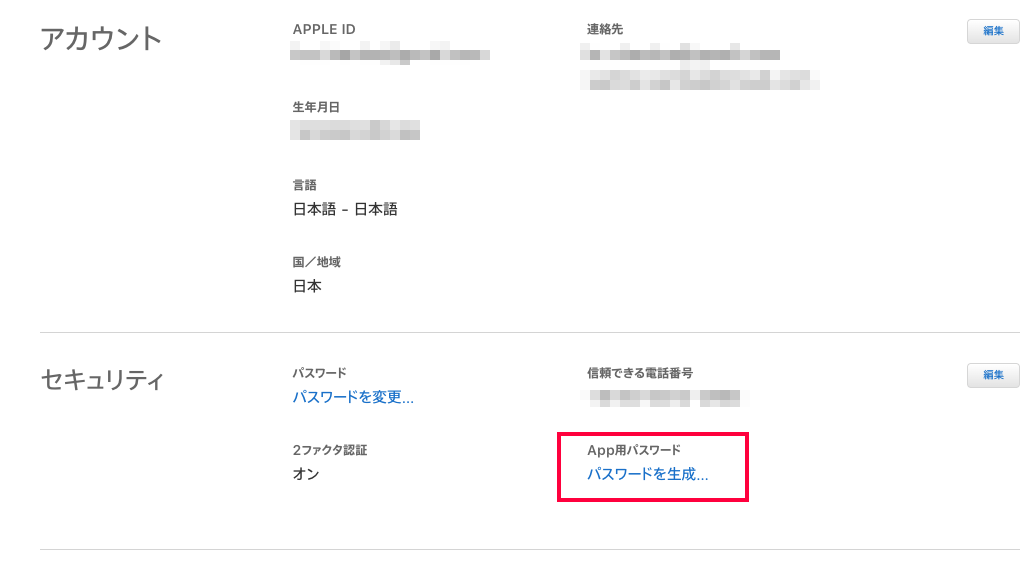
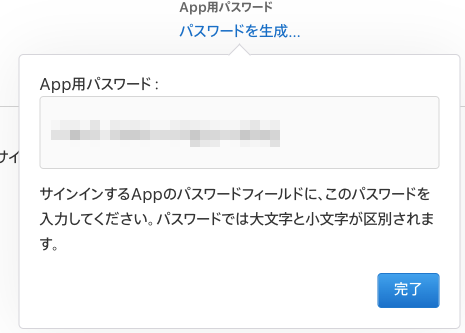
(2)app-specificパスワードを作成する
こちらのページよりログインします。ここで二段階認証が必要になるので、iOS/MacOSデバイスが必要です。
https://appleid.apple.com/
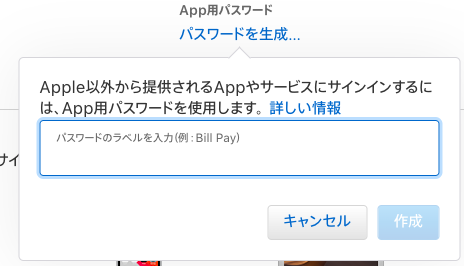
- 「セキュリティ」セクションの「App用パスワード」を探し、[パスワードを生成]をクリック
- 任意のラベル名を付ける
- 例えば、「Codemagic用」とか
- 表示されたパスワードをコピー
※過去に作成したAppパスワードは、「編集」ボタンから「履歴を表示」で確認できます。
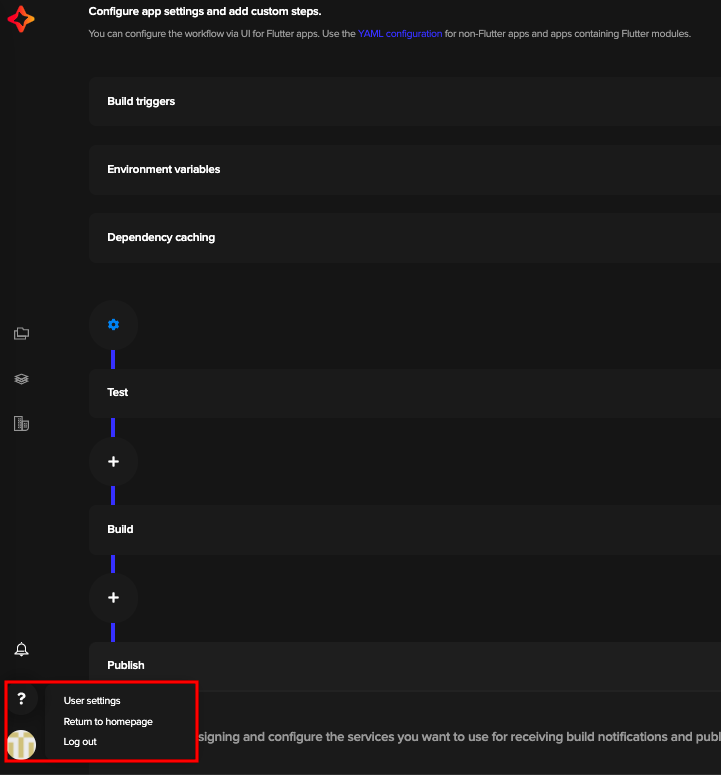
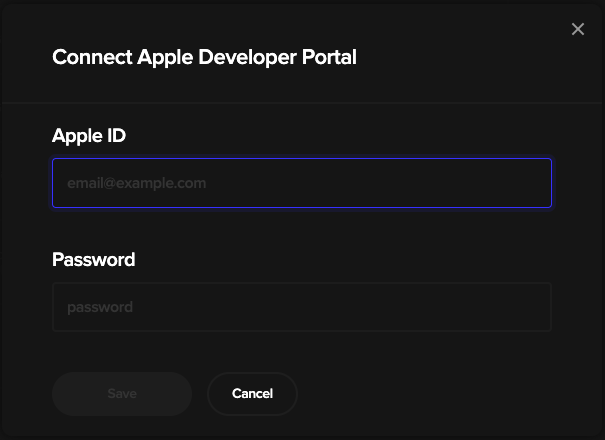
3.ユーザー設定でApple Developerと接続する
- 左下のプロフィールアイコンから[User Settings]を選ぶ
- 開発者アカウントのメールアドレスとパスワードを入力する
- [Save]をクリック
4.ワークフローに設定する
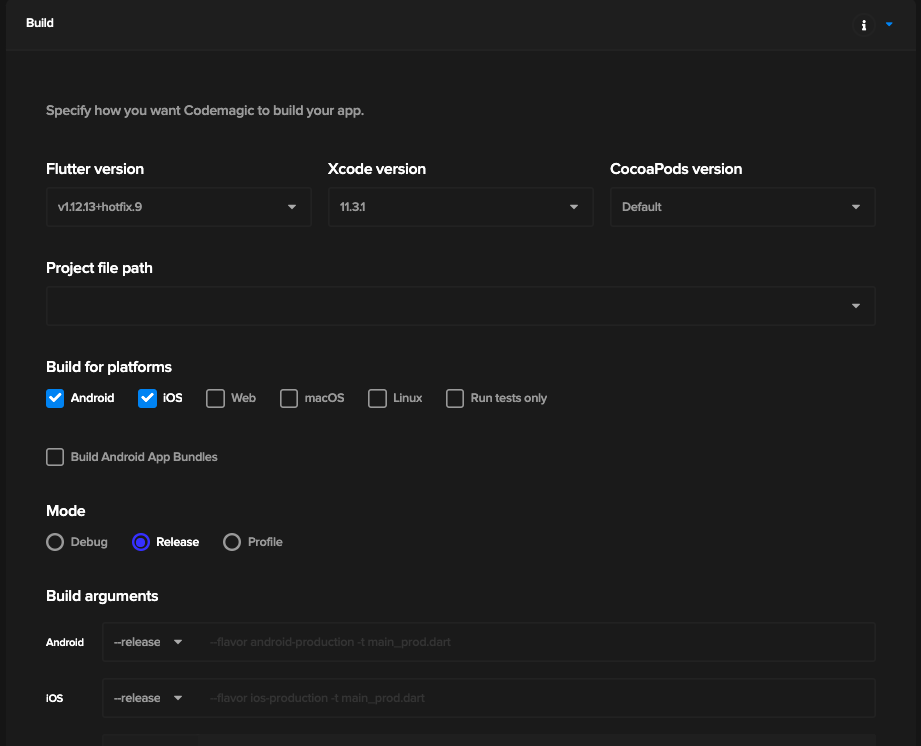
(1)リリースビルド設定
- [Build]セクションで、Releaseビルドの設定にする
- iOSにチェックを入れるのを忘れずに
[Save]を忘れずにクリック。
(2)iOS Code signing設定
- [Publish]セクションを開く
- [iOS code signing]を開く
Select code signing method:
Automatic
- 個人開発なら
Automaticで良いかと思います。- 業務で開発チームのプロビジョニングファイルがある場合は
Manualにするのかと思います。(こちらは経験無いので、詳しくは分かりません。すみません)Developer portal team (using credentials from user settings): ドロップダウンから選ぶ
- Apple Developerへの接続が上手くいっていれば、ここでチームを選べます。
- 基本的には、Xcodeで選択したのと同じものを選べば良いです。
Provisioning profile type: TestFlightに上げるならば
App storeBundle identifier (optional): debugビルドとreleaseビルドでBundle Idを変えている場合、ここにリリースビルド用のBundle Idを記入する
- しておかないとビルド中に「複数のBundle Idが設定にあるよ」的なエラーで失敗します。
- [Save]をクリック!
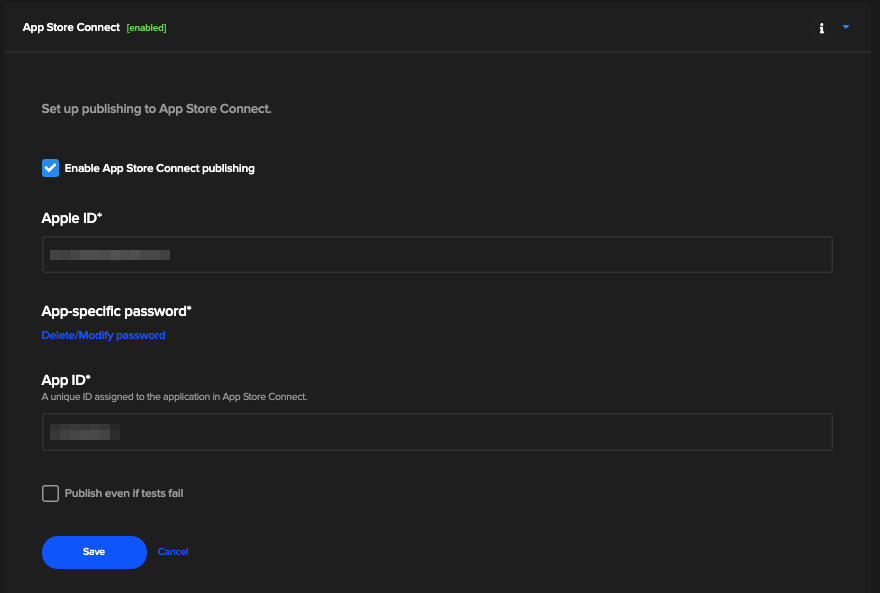
(3)App Store Connect設定
[App Store Connect]を開く
- [Publish]セクションの下の方にあります
AppleID: 開発者アカウントのメールアドレス
App-specific password: 先ほどコピーしたApp用パスワードを貼り付ける
App ID: App IDを貼り付ける
- Enable App Store Connect publishingにチェックを入れる
- [Save]をクリック!!
以上で設定は終わりです。
ビルドを流してみましょう!App Store Connectでの作業
GoogleのPlayストアへのpublishと違い、App Store Connectへのpublishは、
ipaファイルというアプリ実行ファイルをアップロードするだけで終わりのようです。
TestFlightでテストを有効にしたり、リリースをAppleに審査申請するのは、App Store Connectのページで手動で行う必要があります。
ipaファイルのビルド・アップロードは、私のマシンだとかなりCPU使って重たくなり、他の作業が出来なくなるので、Codemagicがアップロードまでやってくれればかなり軽減になりますね。まとめ
Google Playストア版と合わせ、これで「tagがpushされたら自動でリリースビルドしてデプロイ」が両OSで出来るようになりました。
Codemagic、マジでオススメです。Flutterに特化というのが面白いですよね。一応YAML編集してネイティブなAndroidアプリも出来そうではあるんですが、CIまでしかまだ試してなくて(しかもエミュレーターテストはどうやら出来ない)、CDとなるとどうなるか未知数です。
サポートはSlackですがだいたい直ぐに返事が来るので、凄く助かります。もちろん英語のみですが、中学生レベルでなんとかなります。時差に気をつけるくらいかな?
ただ、ちょっと大きめのプロジェクトになると、Mac Miniでのビルドでは時間がかかって無料枠をあっという間に使い切りそうなので、その場合は課金してMac Proコースにするか、増量枠を都度課金して使うといったことが必要そうです。
Mac Proは無料で3回までお試しで使えるので私も試しましたが、圧倒的にビルドが早いので快適でした^-^
FlutterのMeetup(Tokyo)が再開されたら、ちょっと参加してCodemagic推してみようかな?

- 投稿日:2020-06-01T19:32:14+09:00
Android Fragmentの中にタブ付きスワイプビューを作る(kotlin)
はじめに
完成イメージはこんな感じ
Android kotlin
— げん げんと (@gento34165638) May 31, 2020
fragmentの中にViewPageでスワイプできる画面を作る pic.twitter.com/uayDvUnmIr「
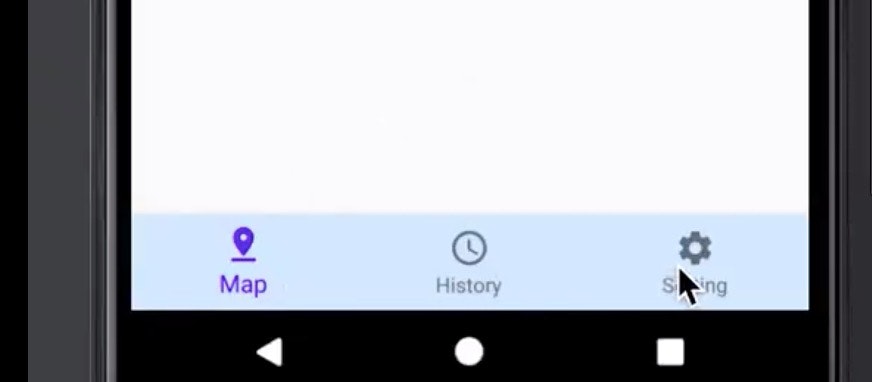
BottomNavigationViewのボタンから遷移した先の、fragmentのページの中で、さらにfragmentで3つのページを作る」みたいな感じです。(Androidネイティブ開発は初心者なので、文章がおかしいかもしれませんが、、、)前提
すでに画面下の3つのタブがある状態。このタブに作りかたについては、こちらを参考に!(僕もこの動画を見ながら作りました。。)
3つのタブは以下のようなFragmentを表示する。
・fragment_first.xml
・fragment_second.xml
・fragment_third.xml
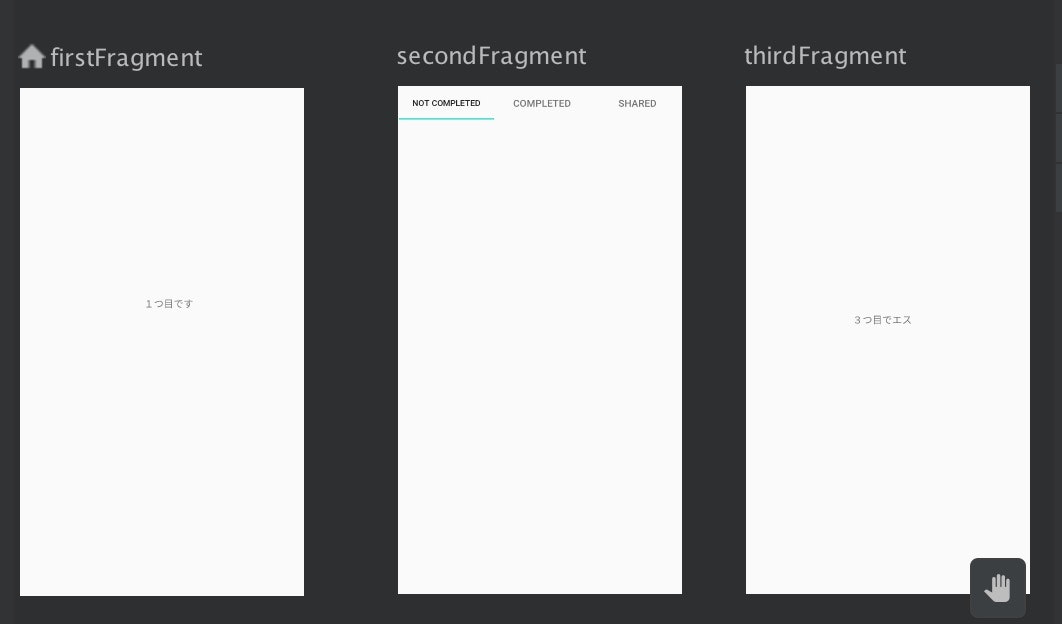
こちらと全く同じ作りにすると、
res/navigation/my_nav.xmlはこんな感じ。(secondFragmentの上部については、この記事でやっていきます)
真ん中のsecondFragmentの中に、さらにスワイプ可能な3つのFragmentを作る。
スワイプ可能な3つのFragmentを作る
File>New>Fragment>Fragment(Blank)より、3つ新たにFragmentを作成
作るFragmentは以下の3つ
・fragment_completed_.xml
・fragment_not_completed_.xml
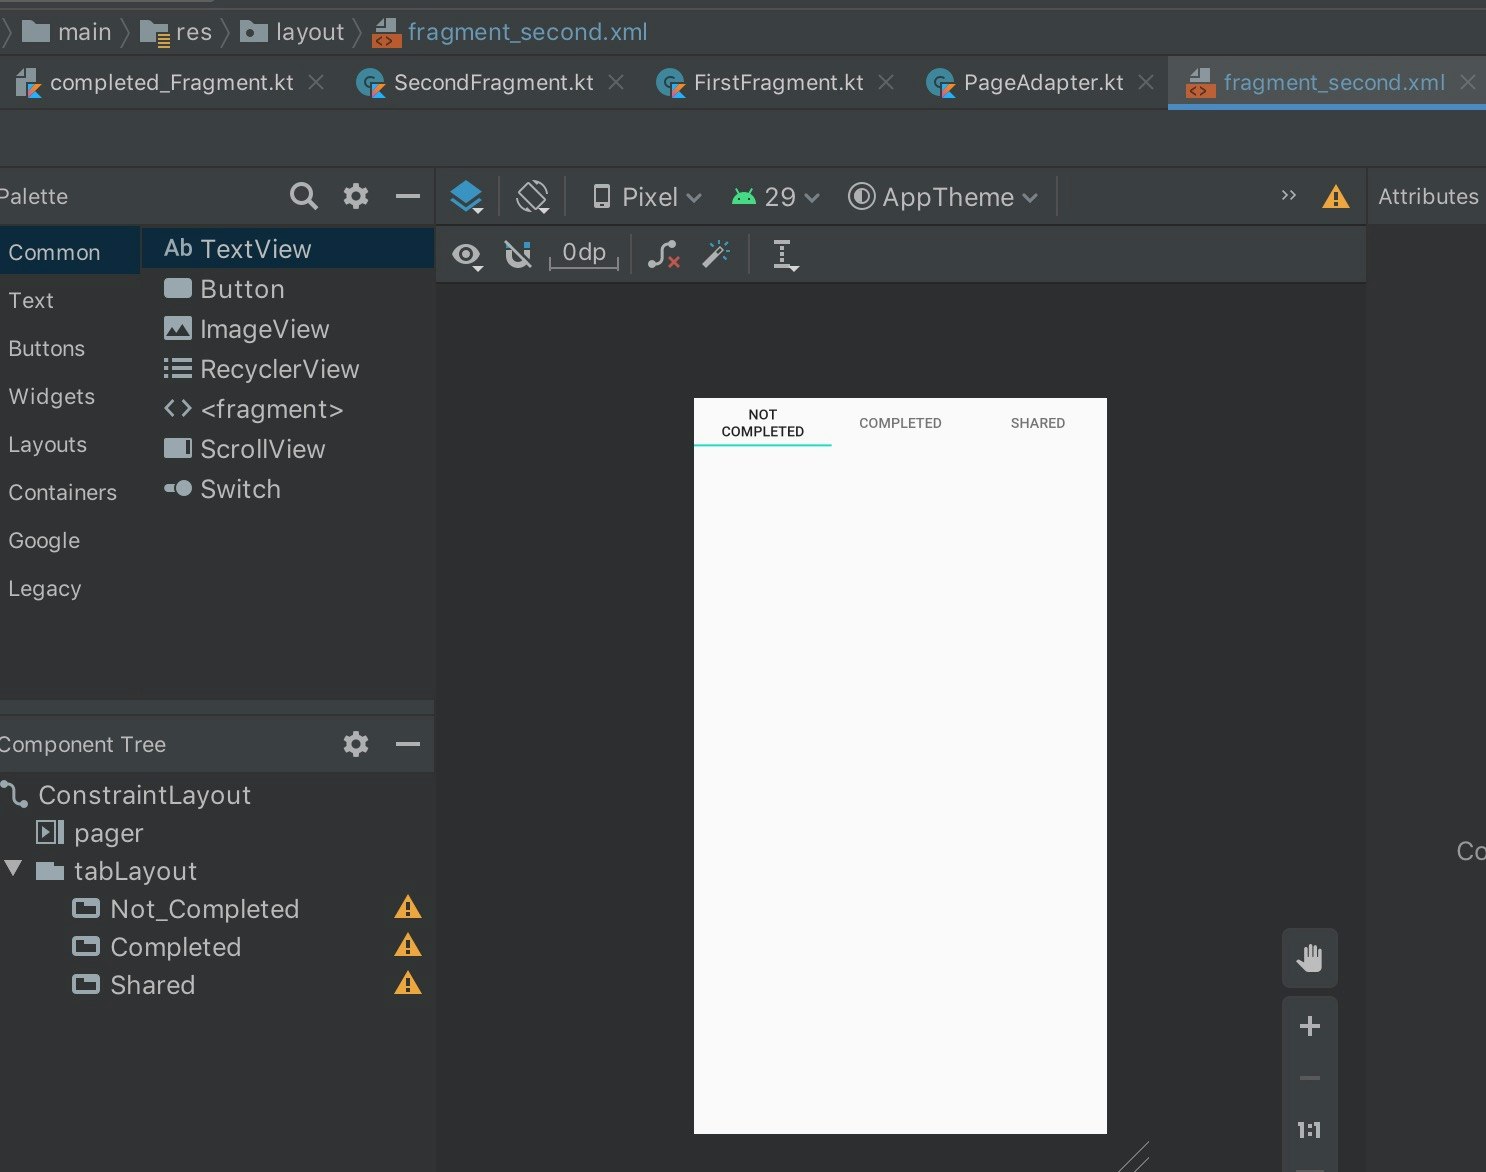
・fragment_shared_.xmlタブ付きスワイプビューのFragmentを作成するとこんな感じ。
secondFragmentの上部に、TabLayoutとViewPagerを使ったタブ付きスワイプビューを作成する
一応公式ドキュメントはこちら(これを読んで実装できる初心者は、初心者ではない!)
fragment_second.xml<?xml version="1.0" encoding="utf-8"?> <androidx.constraintlayout.widget.ConstraintLayout xmlns:android="http://schemas.android.com/apk/res/android" xmlns:app="http://schemas.android.com/apk/res-auto" xmlns:tools="http://schemas.android.com/tools" android:layout_width="match_parent" android:layout_height="match_parent" tools:context=".SecondFragment"> <androidx.viewpager.widget.ViewPager android:id="@+id/pager" android:layout_width="wrap_content" android:layout_height="wrap_content" app:layout_constraintBottom_toBottomOf="parent" app:layout_constraintEnd_toEndOf="parent" app:layout_constraintStart_toStartOf="parent" app:layout_constraintTop_toBottomOf="@+id/tabLayout" app:layout_constraintTop_toTopOf="parent" /> <com.google.android.material.tabs.TabLayout android:id="@+id/tabLayout" android:layout_width="match_parent" android:layout_height="wrap_content" app:layout_constraintEnd_toEndOf="parent" app:layout_constraintStart_toStartOf="parent" app:layout_constraintTop_toTopOf="parent"> <com.google.android.material.tabs.TabItem android:id="@+id/Not_Completed" android:layout_width="wrap_content" android:layout_height="wrap_content" android:text="Not Completed" /> <com.google.android.material.tabs.TabItem android:id="@+id/Completed" android:layout_width="wrap_content" android:layout_height="wrap_content" android:text="Completed" /> <com.google.android.material.tabs.TabItem android:id="@+id/Shared" android:layout_width="wrap_content" android:layout_height="wrap_content" android:text="Shared" /> </com.google.android.material.tabs.TabLayout> </androidx.constraintlayout.widget.ConstraintLayout>これで一旦見た目はできた。。
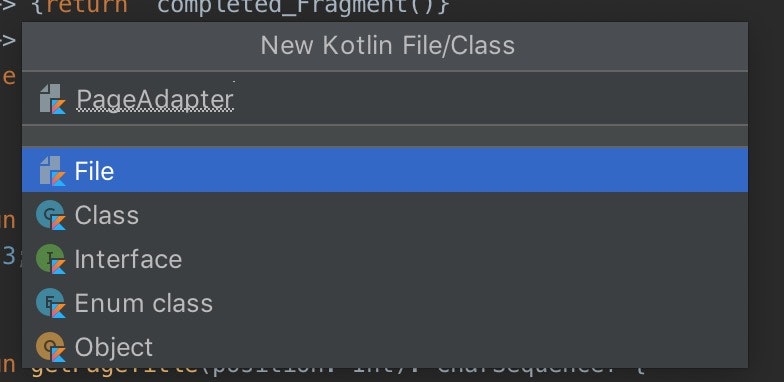
スワイプビューの処理をするクラスを作る
New>Kotlin File/ClassよりFileを作成。(クラスと言いつつFileを作る。。)
PageAdapter.ktpackage com.example.myapplication import android.content.Context import androidx.fragment.app.Fragment import androidx.fragment.app.FragmentManager import androidx.fragment.app.FragmentPagerAdapter import com.example.myapplication.completed_Fragment import com.example.myapplication.not_completed_Fragment import com.example.myapplication.shared_Fragment class PageAdapter(fm: FragmentManager) : FragmentPagerAdapter(fm) { override fun getItem(position: Int): Fragment { when (position) { // どのFragmentを表示するか 0 -> {return not_completed_Fragment()} 1 -> {return completed_Fragment()} 2 -> {return shared_Fragment()} else -> {return not_completed_Fragment()} } } // スワイプビューの数が3つだから override fun getCount(): Int { return 3; } // スワイプビューのタイトルを決める override fun getPageTitle(position: Int): CharSequence? { when(position){ 0 -> {return "Not Completed"} 1 -> {return "Completed"} 2 -> {return "Shared"} else -> {return null} } } }secondFragmentでタブ付きスワイプビューを動作するようにする
SecondFragment.ktpackage com.example.myapplication import android.os.Bundle import androidx.fragment.app.Fragment import android.view.LayoutInflater import android.view.View import android.view.ViewGroup import androidx.appcompat.app.AppCompatActivity import androidx.fragment.app.FragmentActivity import androidx.fragment.app.FragmentManager import androidx.viewpager.widget.ViewPager import kotlinx.android.synthetic.main.fragment_second.* /** * A simple [Fragment] subclass. */ class SecondFragment : androidx.fragment.app.Fragment() { override fun onCreateView( inflater: LayoutInflater, container: ViewGroup?, savedInstanceState: Bundle? ): View? { // Inflate the layout for this fragment return inflater.inflate(R.layout.fragment_second, container, false) } override fun onViewCreated(view: View, savedInstanceState: Bundle?) { super.onViewCreated(view, savedInstanceState) // ActionBarを隠す (activity as AppCompatActivity).supportActionBar?.hide() val fragmentManager = (activity as FragmentActivity).supportFragmentManager //ここの「pager」はfragment_second.xmlのViewPagerのidの事! pager.adapter = PageAdapter(fragmentManager) tabLayout.setupWithViewPager(pager) } }この時点で恐らくタブ付きスワイプビューは動作するかと。。。。
fragment_firstとfragment_thirdで、タイトルバーが再表示されるようにする
・fragment_first.xml
・fragment_second.xml
・fragment_third.xml
こちらの3つのFragmentだが、
SecondFragment.ktのonViewCreatedの関数で、タイトルバーを隠すようしているので、他のFragmentでは再表示させないといけません。SecondFragment.ktoverride fun onViewCreated(view: View, savedInstanceState: Bundle?) { super.onViewCreated(view, savedInstanceState) // ActionBarを隠す (activity as AppCompatActivity).supportActionBar?.hide() val fragmentManager = (activity as FragmentActivity).supportFragmentManager //ここの「pager」はfragment_second.xmlのViewPagerのidの事! pager.adapter = PageAdapter(fragmentManager) tabLayout.setupWithViewPager(pager) } }なので、
FirstFragment.ktとthirdFragment.ktを以下のようにするpackage com.example.myapplication import android.os.Bundle import androidx.fragment.app.Fragment import android.view.LayoutInflater import android.view.View import android.view.ViewGroup import androidx.appcompat.app.AppCompatActivity /** * A simple [Fragment] subclass. */ class FirstFragment : androidx.fragment.app.Fragment() { override fun onCreateView( inflater: LayoutInflater, container: ViewGroup?, savedInstanceState: Bundle? ): View? { // Inflate the layout for this fragment return inflater.inflate(R.layout.fragment_first, container, false) } override fun onViewCreated(view: View, savedInstanceState: Bundle?) { super.onViewCreated(view, savedInstanceState) // ActionBarを出す (activity as AppCompatActivity).supportActionBar?.show() } }最後に
Fragmentの中に、さらにFragmentを作って表示、と言うのがなかなか情報がなく、苦戦しました。。。
onViewCreatedの関数が重要なようです!


- 投稿日:2020-06-01T17:33:23+09:00
GitHub ActionsでAndroidアプリのCIを構築する方法
はじめに
GitHub Actionsを使い、Androidアプリのビルドと単体テスト、静的解析を行うCIを構築します。
本記事で書かないこと
- GitHub Actionsの概要や基本的な操作方法
私が以前書いた記事 が参考になると思います設定ファイルの紹介
設定ファイルの内容を上から順に紹介します。
name
ワークフローの名前を設定します。
私は単純に「CI」としています。
ci.ymlname: CIon
ワークフローを実行するトリガーを設定します。
私はGit-flowモデルで開発しており、以下のように設定しています。
ci.ymlon: push: branches: - master - develop paths-ignore: - docs/** - README.md - LICENSE pull_request: branches: - develop paths-ignore: - docs/** - README.md - LICENSE他の人からPull request(以下、「PR」と呼ぶ)を頂いたときにもCIが動くように、
developブランチへのPRをトリガーにしています。
PRのマージ時にもCIが動くように、developとmasterブランチへのプッシュもトリガーにしています。
feature/**ブランチへのプッシュをトリガーにしていない理由は、developブランチへPRを出したときにCIが二重に動作するのを防ぐためです。
早めにCIを動かしたい場合、「WIP:」を付けてPRを出します(GitHubではドラフト機能があるので、それを使うのもありです)。
README.mdやLICENSEなど、Androidアプリに直接関係ないファイルは、単体でコミットしてもCIが動かないようにしています。
(README.mdのみ更新してプッシュしてもCIが動くような気がします…。私の設定が誤っているのでしょうか?)jobs
今回はジョブを3つ用意して並行に実行しているので、順に紹介します。
test
ビルドと単体テストを実行するジョブです。
基本的には『Androidテスト全書』を参考にしてGradleタスクを実行しているだけなので、詳細は省略します。
Gradleのキャッシュは、READMEの例をそのままコピペしています。
https://github.com/actions/cache/blob/master/examples.md#java---gradleci.ymljobs: test: runs-on: ubuntu-latest steps: # チェックアウト - uses: actions/checkout@v2 # JDKのセットアップ - name: set up JDK 1.8 uses: actions/setup-java@v1 with: java-version: 1.8 # Gradleのキャッシュ復元 - uses: actions/cache@v2 with: path: ~/.gradle/caches key: ${{ runner.os }}-gradle-${{ hashFiles('**/*.gradle*') }} restore-keys: | ${{ runner.os }}-gradle- # 依存関係の出力 - name: Displays the Android dependencies of the project run: ./gradlew androidDependencies # コンパイル - name: Run Compile run: ./gradlew assembleDebug # テスト - name: Test with Gradle run: ./gradlew test --stacktracelint
Android Lintを使って静的解析するジョブです。
./gradlew lintを実行しているだけなので、詳細は省略します。ci.ymljobs: lint: runs-on: ubuntu-latest steps: # チェックアウト - uses: actions/checkout@v2 # 静的解析 - name: Run Inspection run: ./gradlew lintdetekt
detekt を使って静的解析するジョブです。
./gradlew detektを実行しているだけなので、詳細は省略します。ci.ymljobs: detekt: runs-on: ubuntu-latest steps: # チェックアウト - uses: actions/checkout@v2 # 静的解析 - name: Lint with detekt run: ./gradlew detektAndroid Lintにはない観点で静的解析するため、両方とも使うのがオススメです。
設定ファイルの全体図
最後に設定ファイルの全体図を載せます。
ci.ymlname: CI on: push: branches: - master - develop paths-ignore: - docs/** - README.md - LICENSE pull_request: branches: - develop paths-ignore: - docs/** - README.md - LICENSE jobs: test: runs-on: ubuntu-latest steps: # チェックアウト - uses: actions/checkout@v2 # JDKのセットアップ - name: set up JDK 1.8 uses: actions/setup-java@v1 with: java-version: 1.8 # Gradleのキャッシュ復元 - uses: actions/cache@v2 with: path: ~/.gradle/caches key: ${{ runner.os }}-gradle-${{ hashFiles('**/*.gradle*') }} restore-keys: | ${{ runner.os }}-gradle- # 依存関係の出力 - name: Displays the Android dependencies of the project run: ./gradlew androidDependencies # コンパイル - name: Run Compile run: ./gradlew assembleDebug # テスト - name: Test with Gradle run: ./gradlew test --stacktrace lint: runs-on: ubuntu-latest steps: # チェックアウト - uses: actions/checkout@v2 # 静的解析 - name: Run Inspection run: ./gradlew lint detekt: runs-on: ubuntu-latest steps: # チェックアウト - uses: actions/checkout@v2 # 静的解析 - name: Lint with detekt run: ./gradlew detektシンプルなYAMLファイルなので、慣れれば読みやすいと思います。
おわりに
GitHub Actionsで基本的なAndroidアプリのCIを回すことができました!
参考リンク
- 投稿日:2020-06-01T16:51:28+09:00
Activityへ値を渡し戻り値も得る
はじめに
空のActivityに値を渡すことが出来るまでを書いていきます。
ActivityへはGson形式で受渡を行い。
さらにメインのアクティビティとサブのアクティビティにはFragmentを使って同じ画面を表示します。準備
strings.xmlを編集
strings.xmlを下記の様に編集します。
strings.xml<?xml version="1.0" encoding="utf-8" ?> <resources> <string name="app_name">QiitaActivityFragmentSample</string> <string name="btEdit">編集</string> <string name="tvStr">String型</string> <string name="tvInt">Int型</string> <string name="tvDouble">Double型</string> </resources>Gsonを扱えるようにする
左のプロジェクトのGradleツリーからbuild.gradle(app)を開きます。
build.gradledependencies { 省略 implementation 'com.google.code.gson:gson:2.8.6' }上記の一文を追加してGsonを使えるようにします。
空のFragmentを作成する
左のプロジェクトで右クリック→新規→フラグメント→空のフラグメントを指定します。
Fragmentの名称を指定するダイアログが表示されますが初期値のBlankFragmentで進めます。Fragmentをデザインする。
FragmentにString型、Int型、Double型を編集出来るレイアウトを作成しました。
fragment_blank.xml<?xml version="1.0" encoding="utf-8"?> <FrameLayout xmlns:android="http://schemas.android.com/apk/res/android" xmlns:tools="http://schemas.android.com/tools" android:layout_width="match_parent" android:layout_height="match_parent" tools:context=".BlankFragment"> <LinearLayout android:id="@+id/llv" android:layout_width="match_parent" android:layout_height="match_parent" android:orientation="vertical"> <LinearLayout android:layout_width="match_parent" android:layout_height="wrap_content" android:orientation="horizontal"> <TextView android:id="@+id/textView" android:layout_width="100dp" android:layout_height="wrap_content" android:layout_weight="1" android:gravity="right" android:text="@string/tvStr" /> <EditText android:id="@+id/etString" android:layout_width="wrap_content" android:layout_height="wrap_content" android:layout_weight="1" android:ems="10" android:inputType="text" /> </LinearLayout> <LinearLayout android:layout_width="match_parent" android:layout_height="wrap_content" android:orientation="horizontal"> <TextView android:id="@+id/textView2" android:layout_width="100dp" android:layout_height="wrap_content" android:layout_weight="1" android:gravity="right" android:text="@string/tvInt" /> <EditText android:id="@+id/etInt" android:layout_width="wrap_content" android:layout_height="wrap_content" android:layout_weight="1" android:ems="10" android:inputType="number" /> </LinearLayout> <LinearLayout android:layout_width="match_parent" android:layout_height="wrap_content" android:orientation="horizontal"> <TextView android:id="@+id/textView3" android:layout_width="100dp" android:layout_height="wrap_content" android:gravity="right" android:layout_weight="1" android:text="@string/tvDouble" /> <EditText android:id="@+id/etDouble" android:layout_width="wrap_content" android:layout_height="wrap_content" android:layout_weight="1" android:ems="10" android:inputType="numberDecimal" /> </LinearLayout> </LinearLayout> </FrameLayout>MainActivityにFragmentを配置する
レイアウトデザインを行います。
MainActivityにはボタン1つとFragmentを1つ配置する予定なのでLinearLayout(vertical)を配置してボタン1つとFragmentを1つ配置します。MainActivityにてパレットのcontainersのFragmentを配置するとどのFragmentを配置するのか聞いてきますのでBlankFragmentを指定します。
activity_main.xml<?xml version="1.0" encoding="utf-8"?> <androidx.constraintlayout.widget.ConstraintLayout xmlns:android="http://schemas.android.com/apk/res/android" xmlns:app="http://schemas.android.com/apk/res-auto" xmlns:tools="http://schemas.android.com/tools" android:layout_width="match_parent" android:layout_height="match_parent" tools:context=".MainActivity"> <LinearLayout android:layout_width="0dp" android:layout_height="0dp" android:orientation="vertical" app:layout_constraintBottom_toBottomOf="parent" app:layout_constraintEnd_toEndOf="parent" app:layout_constraintStart_toStartOf="parent" app:layout_constraintTop_toTopOf="parent"> <Button android:id="@+id/button" android:layout_width="match_parent" android:layout_height="wrap_content" android:onClick="onButtonClick" android:text="@string/btEdit" /> <fragment android:id="@+id/fragment" android:name="com.example.qiitaactivityfragmentsample.BlankFragment" android:layout_width="wrap_content" android:layout_height="wrap_content" /> </LinearLayout> </androidx.constraintlayout.widget.ConstraintLayout>Fragmentの配置が終わったら問題無いか表示を確認しましょう。
空のActivityを作成する
左のプロジェクトで右クリック→新規→アクティビティ→空のアクティビティを指定します。
Activityの名称を指定するダイアログが表示されますので名称をSubActivityと設定して完了をクリックします。空のActivityにFragmentを配置する
SubActivityにてパレットのcontainersのFragmentを配置するとどのFragmentを配置するのか聞いてきますのでBlankFragmentを指定します。
SubActivityにはFragmentを1つ配置して終了です。activity_sub.xml<?xml version="1.0" encoding="utf-8"?> <androidx.constraintlayout.widget.ConstraintLayout xmlns:android="http://schemas.android.com/apk/res/android" xmlns:app="http://schemas.android.com/apk/res-auto" xmlns:tools="http://schemas.android.com/tools" android:layout_width="match_parent" android:layout_height="match_parent" tools:context=".SubActivity"> <fragment android:id="@+id/fragment2" android:name="com.example.qiitaactivityfragmentsample.BlankFragment" android:layout_width="wrap_content" android:layout_height="wrap_content"/> </androidx.constraintlayout.widget.ConstraintLayout>追加したActivityに戻るボタンを追加
SubActivity.ktclass SubActivity : AppCompatActivity() { override fun onCreate(savedInstanceState: Bundle?) { super.onCreate(savedInstanceState) setContentView(R.layout.activity_sub) supportActionBar?.setDisplayHomeAsUpEnabled(true) }SubActivity.klには戻るボタンを表示させておきます。
Actionbar.ktsupportActionBar?.setDisplayHomeAsUpEnabled(true)こう書いておくとSubActibity表示の時に戻るボタンが表示されます。
追加したActivityを表示する
MainActivity.ktにボタンクリックイベントを作ります。
MainActivity.ktfun onButtonClick(view : View){ val intent = Intent(applicationContext,SubActivity::class.java) startActivityForResult(intent,1) }このようにすると追加したイベント内でActivityを表示することができます。
実行してボタンを押すとMainActivityからSubActivityへ表示が変わり、SubActivity内の「←」戻るボタンでMainActivityに戻れば成功です。Fragmentから値を取得する
FragmentはMainActivityとSubActivityから呼び出されています。以前の失敗編ではこの2つが区別出来ずに自滅しました。
今回はMainActivityとSubActivityに配置したFragmentのidがそれぞれMainがFragment SubがFragment2になっていることをデザインしたXMLファイルで確認しましょう。この差で区別出来るようです。デバッグ用に値を入れておく
いちいち値を入力するのはデバッグしづらいので生成時に値を入れてしまいます。
MainActivity.ktclass MainActivity : AppCompatActivity() { private val data = gsonFile() override fun onCreate(savedInstanceState: Bundle?) { super.onCreate(savedInstanceState) setContentView(R.layout.activity_main) val etString = findViewById<EditText>(R.id.etString) val etInt = findViewById<EditText>(R.id.etInt) val etDouble = findViewById<EditText>(R.id.etDouble) etString.setText("test") etInt.setText("1234") etDouble.setText("987.65") }Fragmentを参照する
デザイン時に作られたFragmentは
MainActivity.ktfun onButtonClick(view : View){ val flg = supportFragmentManager.findFragmentById(R.id.fragment) as BlankFragment Log.d("Sample","flg = $flg") }このようにして実行するとfragmentが取得できていることがわかります。
※このやり方が正しいのかどうかわかりません。Fragmentと値をやりとりする
Fragmentのプログラムに色々追加して簡単にやりとりできるようにします。
メソッド名 内容 toGsonString Fragmentの編集内容をGson形式の文字列で返します fromGsonString 渡されたGson形式の文字列に従いFragmentの表示に反映します 準備
BlankFragment内で使用するクラスを宣言します。
BlankFragment.ktclass BlankFragment : Fragment() { private val data = gsonFile() override fun onCreate(savedInstanceState: Bundle?) { super.onCreate(savedInstanceState) }Fragmentの内容からGson文字列の変換
toGsonString.ktfun toGsonString() : String{ val dStr : EditText? = activity?.findViewById<EditText>(R.id.etString) val dInt : EditText? = activity?.findViewById<EditText>(R.id.etInt) val dDouble : EditText? = activity?.findViewById<EditText>(R.id.etDouble) data.dStr = dStr?.text.toString() data.dInt = dInt?.text.toString().toInt() data.dDouble = dDouble?.text.toString().toDouble() return data.gsonString() }Fragment内でレイアウト上のidを取得するためにはこれまでのfindViewByIdの前にactivity?としてactivity経由の参照に変わります。
EditTextのidを参照してtext部分を読み取り、それをGson形式の文字列にして返します。※gsonString()は後で完成したものを参考にして下さい。Gson文字列からFragmentの内容に変換
fromGsonString.ktfun fromGsonString(str : String){ data.fromData(str) val dStr : EditText? = activity?.findViewById<EditText>(R.id.etString) val dInt : EditText? = activity?.findViewById<EditText>(R.id.etInt) val dDouble : EditText? = activity?.findViewById<EditText>(R.id.etDouble) dStr?.setText(data.dStr.toString()) dInt?.setText(data.dInt.toString()) dDouble?.setText(data.dDouble.toString()) }完成したBlankFragment.kt
BlankFragment.ktclass BlankFragment : Fragment() { private val data = gsonFile() override fun onCreate(savedInstanceState: Bundle?) { super.onCreate(savedInstanceState) } override fun onCreateView( inflater: LayoutInflater, container: ViewGroup?, savedInstanceState: Bundle? ): View? { // Inflate the layout for this fragment return inflater.inflate(R.layout.fragment_blank, container, false) } fun toGsonString() : String{ Log.d("Sample","toGsonString = $activity") val dStr : EditText? = activity?.findViewById<EditText>(R.id.etString) val dInt : EditText? = activity?.findViewById<EditText>(R.id.etInt) val dDouble : EditText? = activity?.findViewById<EditText>(R.id.etDouble) data.dStr = dStr?.text.toString() data.dInt = dInt?.text.toString().toInt() data.dDouble = dDouble?.text.toString().toDouble() return data.gsonString() } fun fromGsonString(str : String){ data.fromData(str) val dStr : EditText? = activity?.findViewById<EditText>(R.id.etString) val dInt : EditText? = activity?.findViewById<EditText>(R.id.etInt) val dDouble : EditText? = activity?.findViewById<EditText>(R.id.etDouble) dStr?.setText(data.dStr.toString()) dInt?.setText(data.dInt.toString()) dDouble?.setText(data.dDouble.toString()) } } open class gsonData(){ var dStr : String = "" var dInt : Int = 0 var dDouble : Double = 0.0 var backColor : Int = android.R.color.background_light fun assign(a : gsonData){ dStr = a.dStr dInt = a.dInt dDouble = a.dDouble backColor = a.backColor } fun gsonString() : String{ return Gson().toJson(this) } } class gsonFile() : gsonData(){ fun fromData(str : String){ if (str == "") return val data = Gson().fromJson<gsonData>(str, gsonData::class.java) as gsonData super.assign(data) } fun fileSave(filename : String,str : String){ File(SingletonContext.applicationContext().filesDir, filename).writer().use { it.write(str) } } fun fileLoad(filename : String) : String?{ val readFile = File(SingletonContext.applicationContext().filesDir, filename) if(!readFile.exists()){ Log.d("debug","No file exists") return null } else{ return readFile.bufferedReader().use(BufferedReader::readText) } } } private class SingletonContext : Application() { init { instance = this } companion object { private var instance: SingletonContext? = null fun applicationContext() : Context {return instance!!.applicationContext} } }FragmentをGson文字列にしてActivityに渡す
MainActivity.ktのボタンクリックにSubActivityへ渡す処理を追加します。
MainActivity.ktfun onButtonClick(view : View){ val flg = supportFragmentManager.findFragmentById(R.id.fragment) as BlankFragment val str = flg.toGsonString() val intent = Intent(applicationContext,SubActivity::class.java) intent.putExtra("data",str) startActivityForResult(intent,1) }Gson文字列にしたものをintent.putExtra("data",str)としてキー「data」の文字列として渡します。
SubActivityから値を返す
SubActivityから値を取得するためにstartActivityではなくstartActivityResultを使っています。これを使って呼び出さないとSubActivity側でいくら頑張ってもMainActivityには値が返ってきません。
SubActivityで値を受け取る
MainActivityから値を渡されたのでSubActivityで値を受け取ります。
SubActivityは自動的に色々作られますが、この例で使用するのはほんのわずかです。SubActivity.ktclass SubActivity : AppCompatActivity() { private val data = gsonFile() override fun onCreate(savedInstanceState: Bundle?) { super.onCreate(savedInstanceState) setContentView(R.layout.activity_sub) supportActionBar?.setDisplayHomeAsUpEnabled(true) var str = intent.getStringExtra("data") val flg = supportFragmentManager.findFragmentById(R.id.fragment2) as BlankFragment flg.fromGsonString(str) } }たった三行追加しただけで済みました。
1.ktvar str = intent.getStringExtra("data")MainActivityから渡されたデータを受け取ります
2.ktval flg = supportFragmentManager.findFragmentById(R.id.fragment2) as BlankFragmentSubActivityが表示しているFragmentを参照します
3.ktflg.fromGsonString(str)Fragmentに値を反映させます
ここまで書けたら実行してMainActivityからSubActivityに値が渡されているか確認してみましょうSubActivityからMainActivityへ値を渡す
SubActivityの「戻る」ボタンをクリックしたときに発生するイベントを受け取ります。
SubActivity.ktoverride fun onOptionsItemSelected(item: MenuItem): Boolean { if (item.itemId == android.R.id.home) { val flg = supportFragmentManager.findFragmentById(R.id.fragment2) as BlankFragment val result: Intent = Intent(applicationContext, SubActivity::class.java) val str = flg.toGsonString() result.putExtra("data", str) setResult(Activity.RESULT_OK, result) finish() } return super.onOptionsItemSelected(item) }順番に説明していきます。
home.ktif (item.itemId == android.R.id.home) {押されたのが「戻る」ボタンかを判断しています。
Fragment.ktval flg = supportFragmentManager.findFragmentById(R.id.fragment2) as BlankFragmentSubActivityのFragment2を参照します。
Intent.ktval result: Intent = Intent(applicationContext, SubActivity::class.java)SubActivityから値を返すIntent型を定義します。
putExtra.ktresult.putExtra("data", str)Intent型に返すべき値を渡します。
setResult.ktsetResult(Activity.RESULT_OK, result)MainActivityに対してSubActivityはどのような状態で終了したのかを設定します。
finishi.ktfinish()SubActivityを終了します。
MainActivityにてSubActivityの値を受け取る
Activity.ktにてSubActivityの値を受け取ります。
SubActivityから戻るとonActivityResultイベントが発生しますのでこれを継承します。onActivityResult.ktoverride fun onActivityResult(requestCode: Int, resultCode: Int, data: Intent?) { super.onActivityResult(requestCode, resultCode, data) if (resultCode === Activity.RESULT_OK && requestCode === 1) { val flg = supportFragmentManager.findFragmentById(R.id.fragment) as BlankFragment val str = data?.extras?.getString("data").toString() flg.fromGsonString(str) } }それぞれ説明します。
result.ktif (resultCode === Activity.RESULT_OK && requestCode === 1) {resultCodeはSubActivityにてsetResult(Activity.RESULT_OK, result)と返り値を指定された値が返りますのでこれと比較しています。
さらにMainActivityからSubActivityを呼び出す時に** startActivityForResult(intent,1)**とrequestCodeを指定していてこれが返ってきますので比較しています。
Fragment.ktval flg = supportFragmentManager.findFragmentById(R.id.fragment) as BlankFragmentFragmentを参照します。
extras.ktval str = data?.extras?.getString("data").toString()onActivityRsultの引数としてIntent型の dataが渡されますのでここからSubActivityで設定した文字列を取得します。
Gson.ktflg.fromGsonString(str)FragmentにSubActivityから返ってきたGson形式の文字列を渡して反映させます。
最後に
Fragmentにて編集すべきデータクラスと、さらにFragmentのレイアウトに設定しているidに従って値の取得と反映処理を作っておくと、使う側が非常に楽になりました。
またActivity間を移動する場合でもGson型の文字列として渡すことが出来て便利です。
これで1つのレイアウトを複数から参照も出来そうです。
- 投稿日:2020-06-01T16:33:26+09:00
Android関連 利用頻度高い製品のバージョン (2020-06-01)
2020-06-01 現在 Android関連 利用頻度高い製品のバージョン
個人的に特定時期のバージョン情報がまとまっていると嬉しいのでまとめたものです。
Android Studio
4.0.0 (2020-05-28)
Download Android Studio and SDK tools | Android Developers
https://developer.android.com/studioAndroid Studio release notes | Android Developers
https://developer.android.com/studio/releasesGradle
6.4.1 (2020-05-15)
Gradle Build Tool
https://gradle.org/Gradle | Releases
https://gradle.org/releases/Android Gradle plugin
4.0.0 (April 2020)
Android Gradle plugin release notes | Android Developers
https://developer.android.com/studio/releases/gradle-plugin?hl=enKotlin
Kotlin 1.3.70 (2020-03-03)
Kotlin Programming Language
https://kotlinlang.org/Kotlin 1.3.70 Released | Kotlin Blog
https://blog.jetbrains.com/kotlin/2020/03/kotlin-1-3-70-released/Kotlin コルーチンでアプリのパフォーマンスを改善する | Android デベロッパー | Android Developers
https://developer.android.com/kotlin/coroutines?hl=jaRxKotlin
RxKotlin 3.0.0 (2020-03-21)
ReactiveX/RxKotlin: RxJava bindings for Kotlin
https://github.com/ReactiveX/RxKotlinReleases · ReactiveX/RxKotlin
https://github.com/ReactiveX/RxKotlin/releasesOkHttp
Version 4.7.2 (2020-05-20)
square/okhttp: Square’s meticulous HTTP client for Java and Kotlin.
https://github.com/square/okhttp/releasesokhttp/CHANGELOG.md at master · square/okhttp
https://github.com/square/okhttp/blob/master/CHANGELOG.mdRetrofit
Version 2.9.0 (2020-05-20)
Retrofit
https://square.github.io/retrofit/retrofit/CHANGELOG.md at master · square/retrofit
https://github.com/square/retrofit/blob/master/CHANGELOG.mdMoshi
Version 1.9.2 (2019-11-17)
square/moshi: A modern JSON library for Kotlin and Java.
https://github.com/square/moshimoshi/CHANGELOG.md at master · square/moshi
https://github.com/square/moshi/blob/master/CHANGELOG.mdRealm
7.0.0(2020-05-16)
Realm: Create reactive mobile apps in a fraction of the time
https://realm.io/realm-java/CHANGELOG.md at master · realm/realm-java
https://github.com/realm/realm-java/blob/master/CHANGELOG.mdTimber
Version 4.7.1 (2018-06-28)
JakeWharton/timber: A logger with a small, extensible API which provides utility on top of Android's normal Log class.
https://github.com/JakeWharton/timbertimber/CHANGELOG.md at master · JakeWharton/timber
https://github.com/JakeWharton/timber/blob/master/CHANGELOG.md
- 投稿日:2020-06-01T13:51:57+09:00
Android Studioのオススメ初期セットアップ(Mac)
はじめに
Android Studioのオススメ初期セットアップを紹介します
セットアップ完了前後でこのように変わります。
before
after
環境
- OS:macOS Catalina 10.15.3
- Android Studio:4.0
インストール
公式サイトから.dmgファイルをダウンロードして実行し、.appファイルを「アプリケーション」フォルダにコピーします。
https://developer.android.com/studio/?hl=ja環境設定
Android Studioを起動して
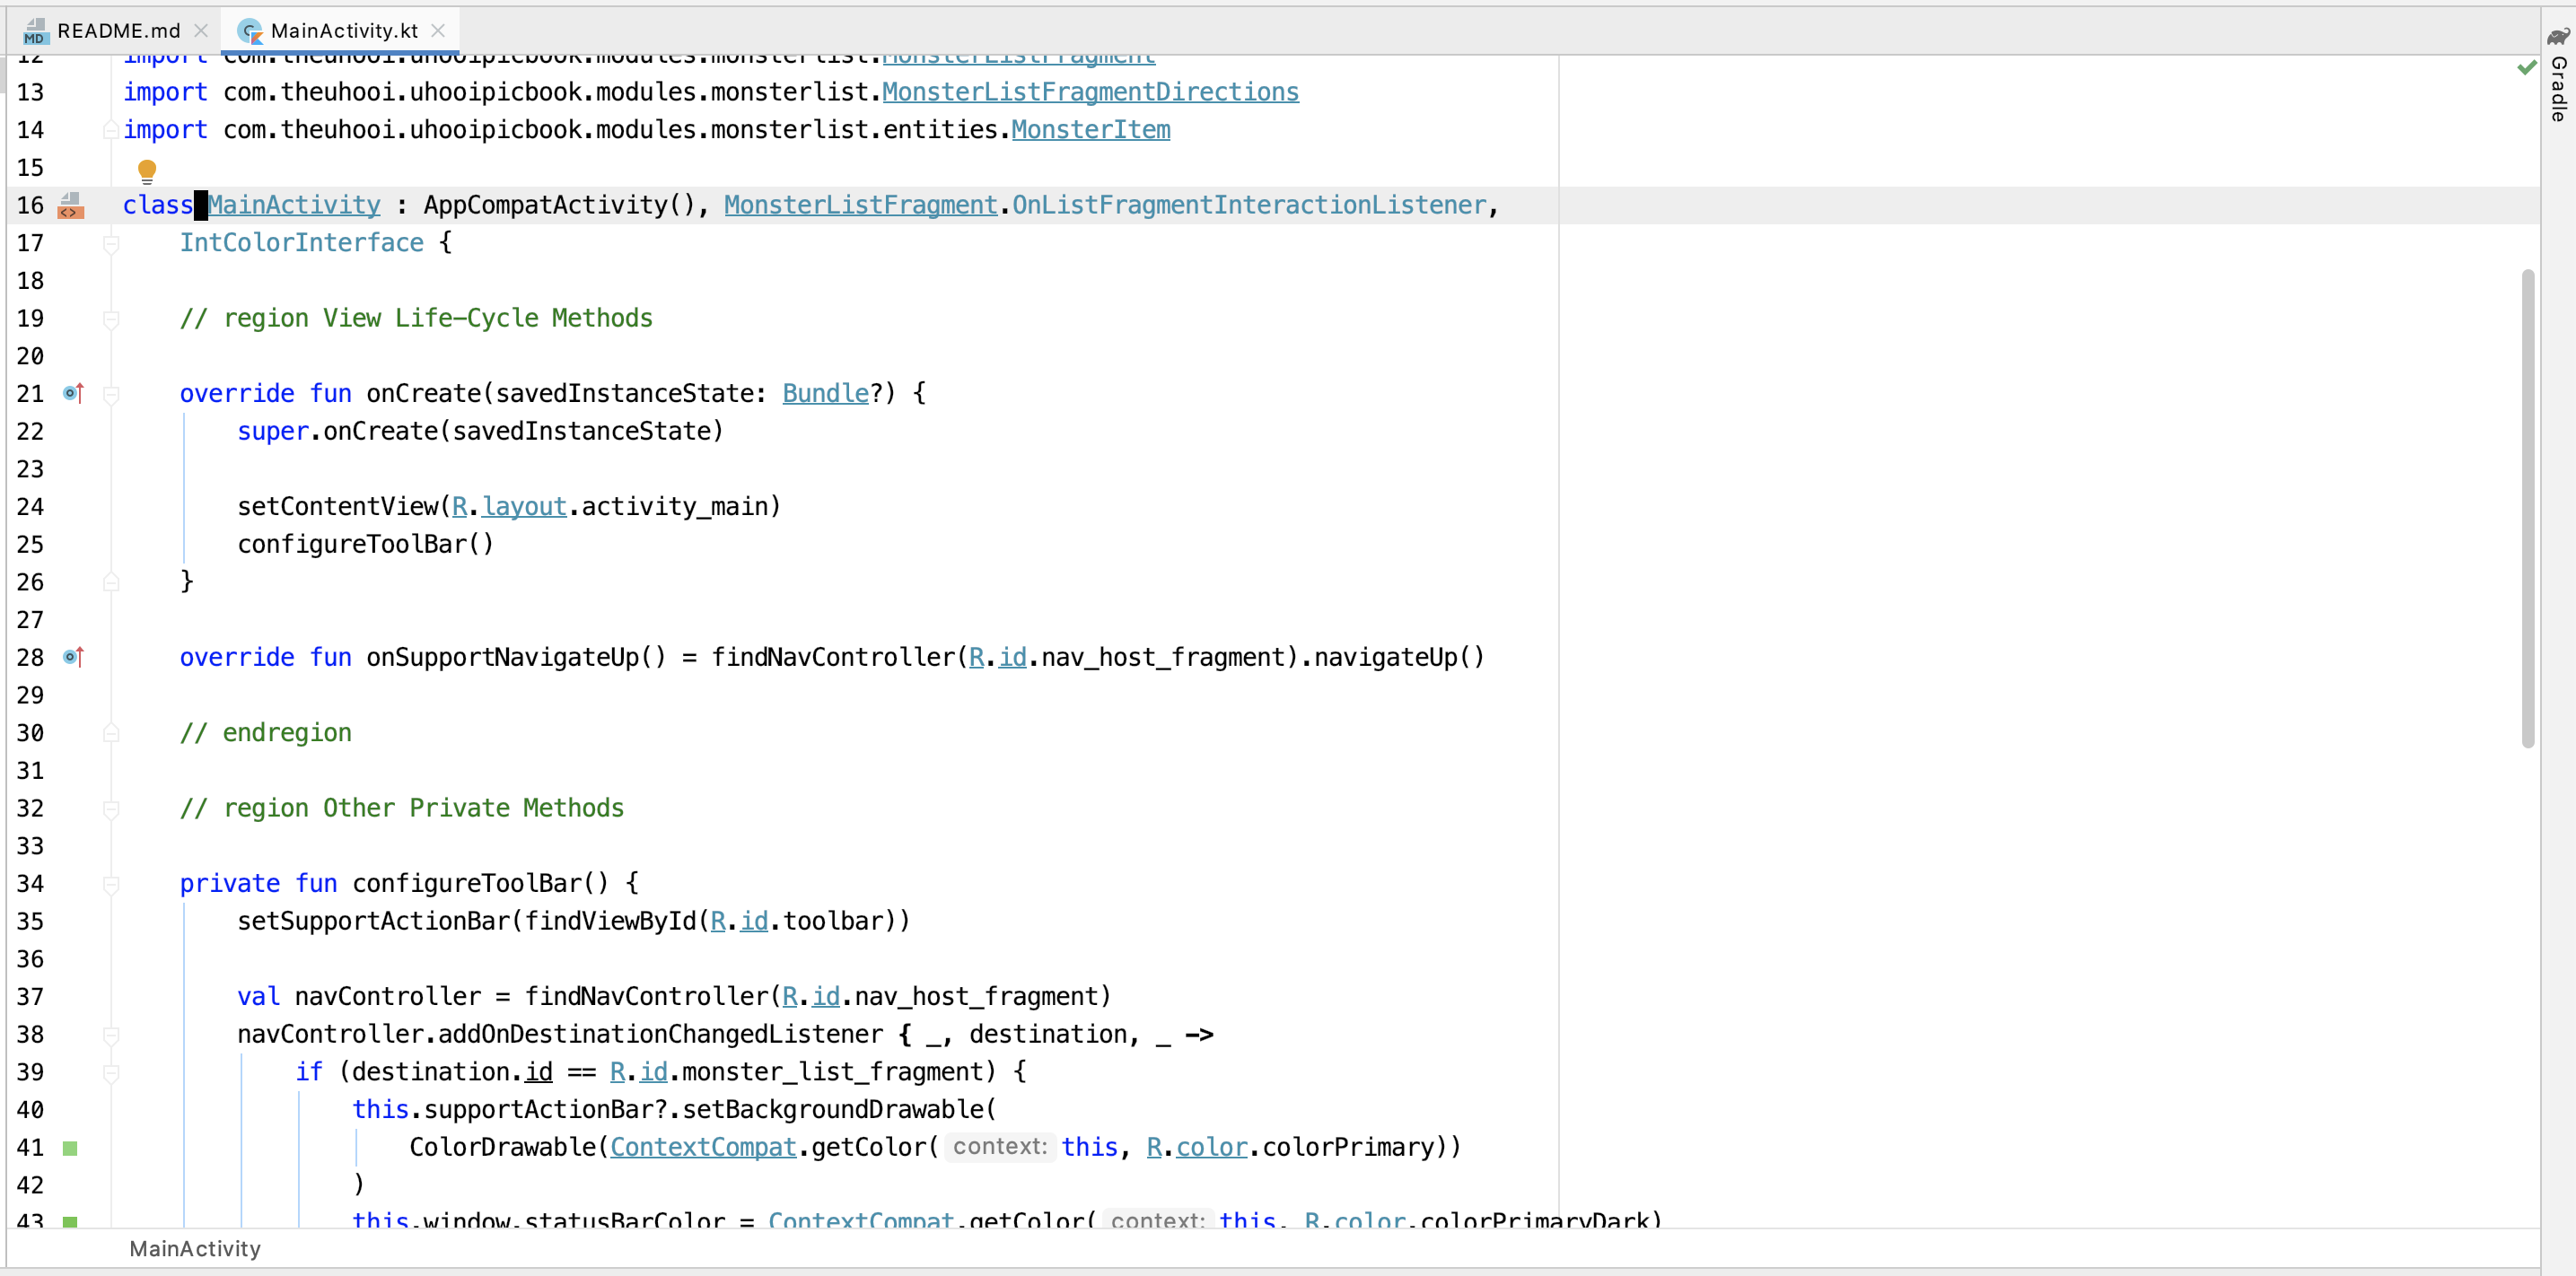
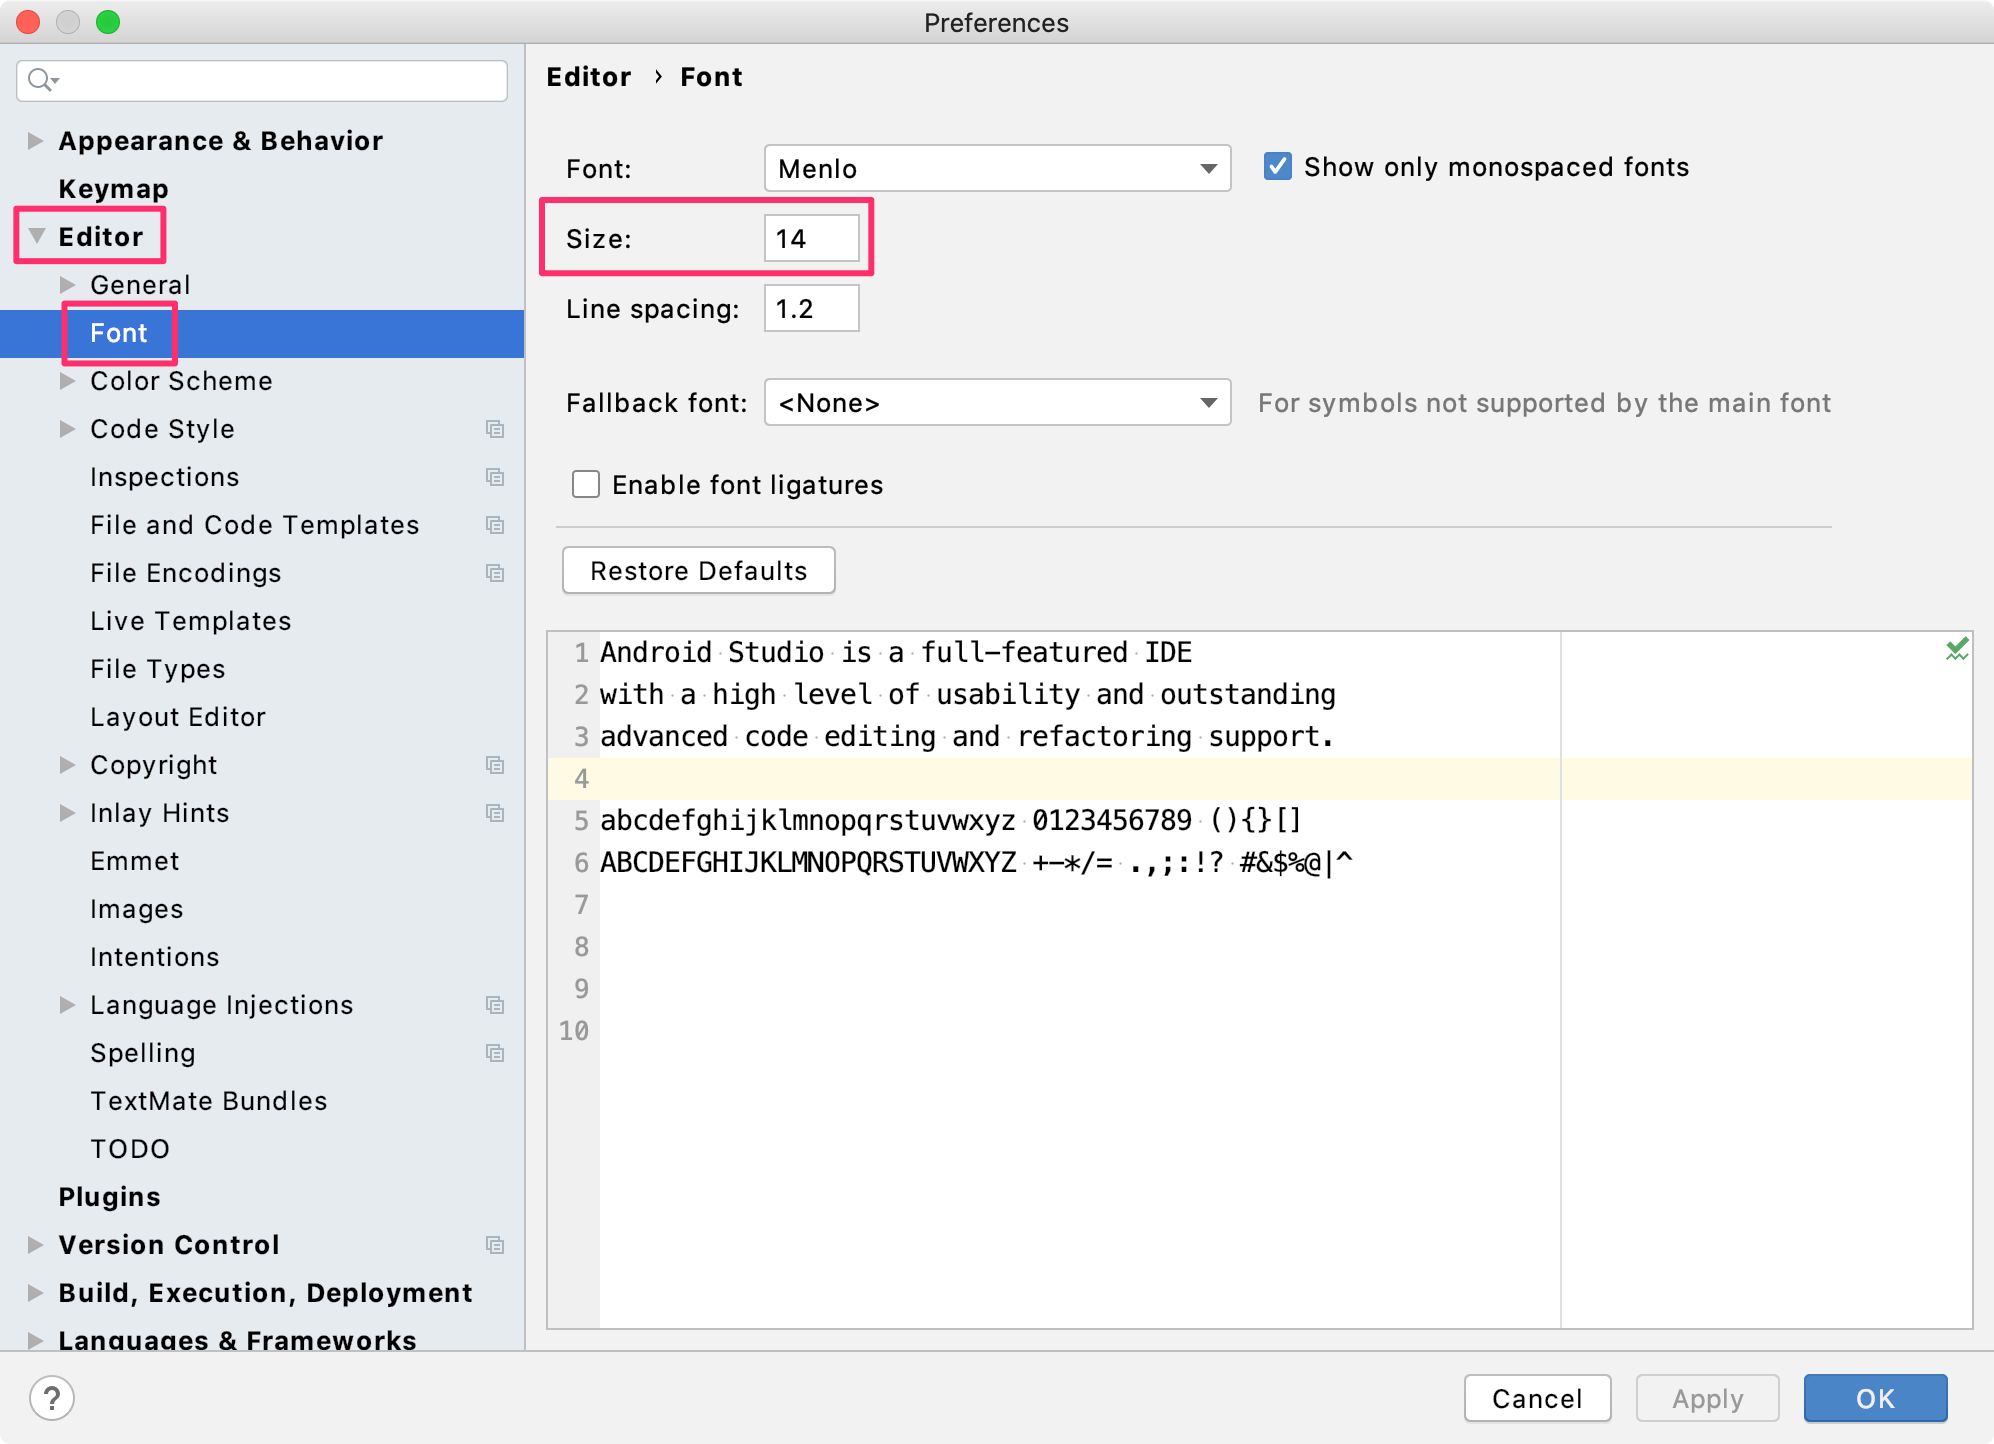
⌘,で環境設定を開きます。文字サイズを大きくする
Editor > Font
Size:12→14
私は文字サイズは14がちょうどいいです。
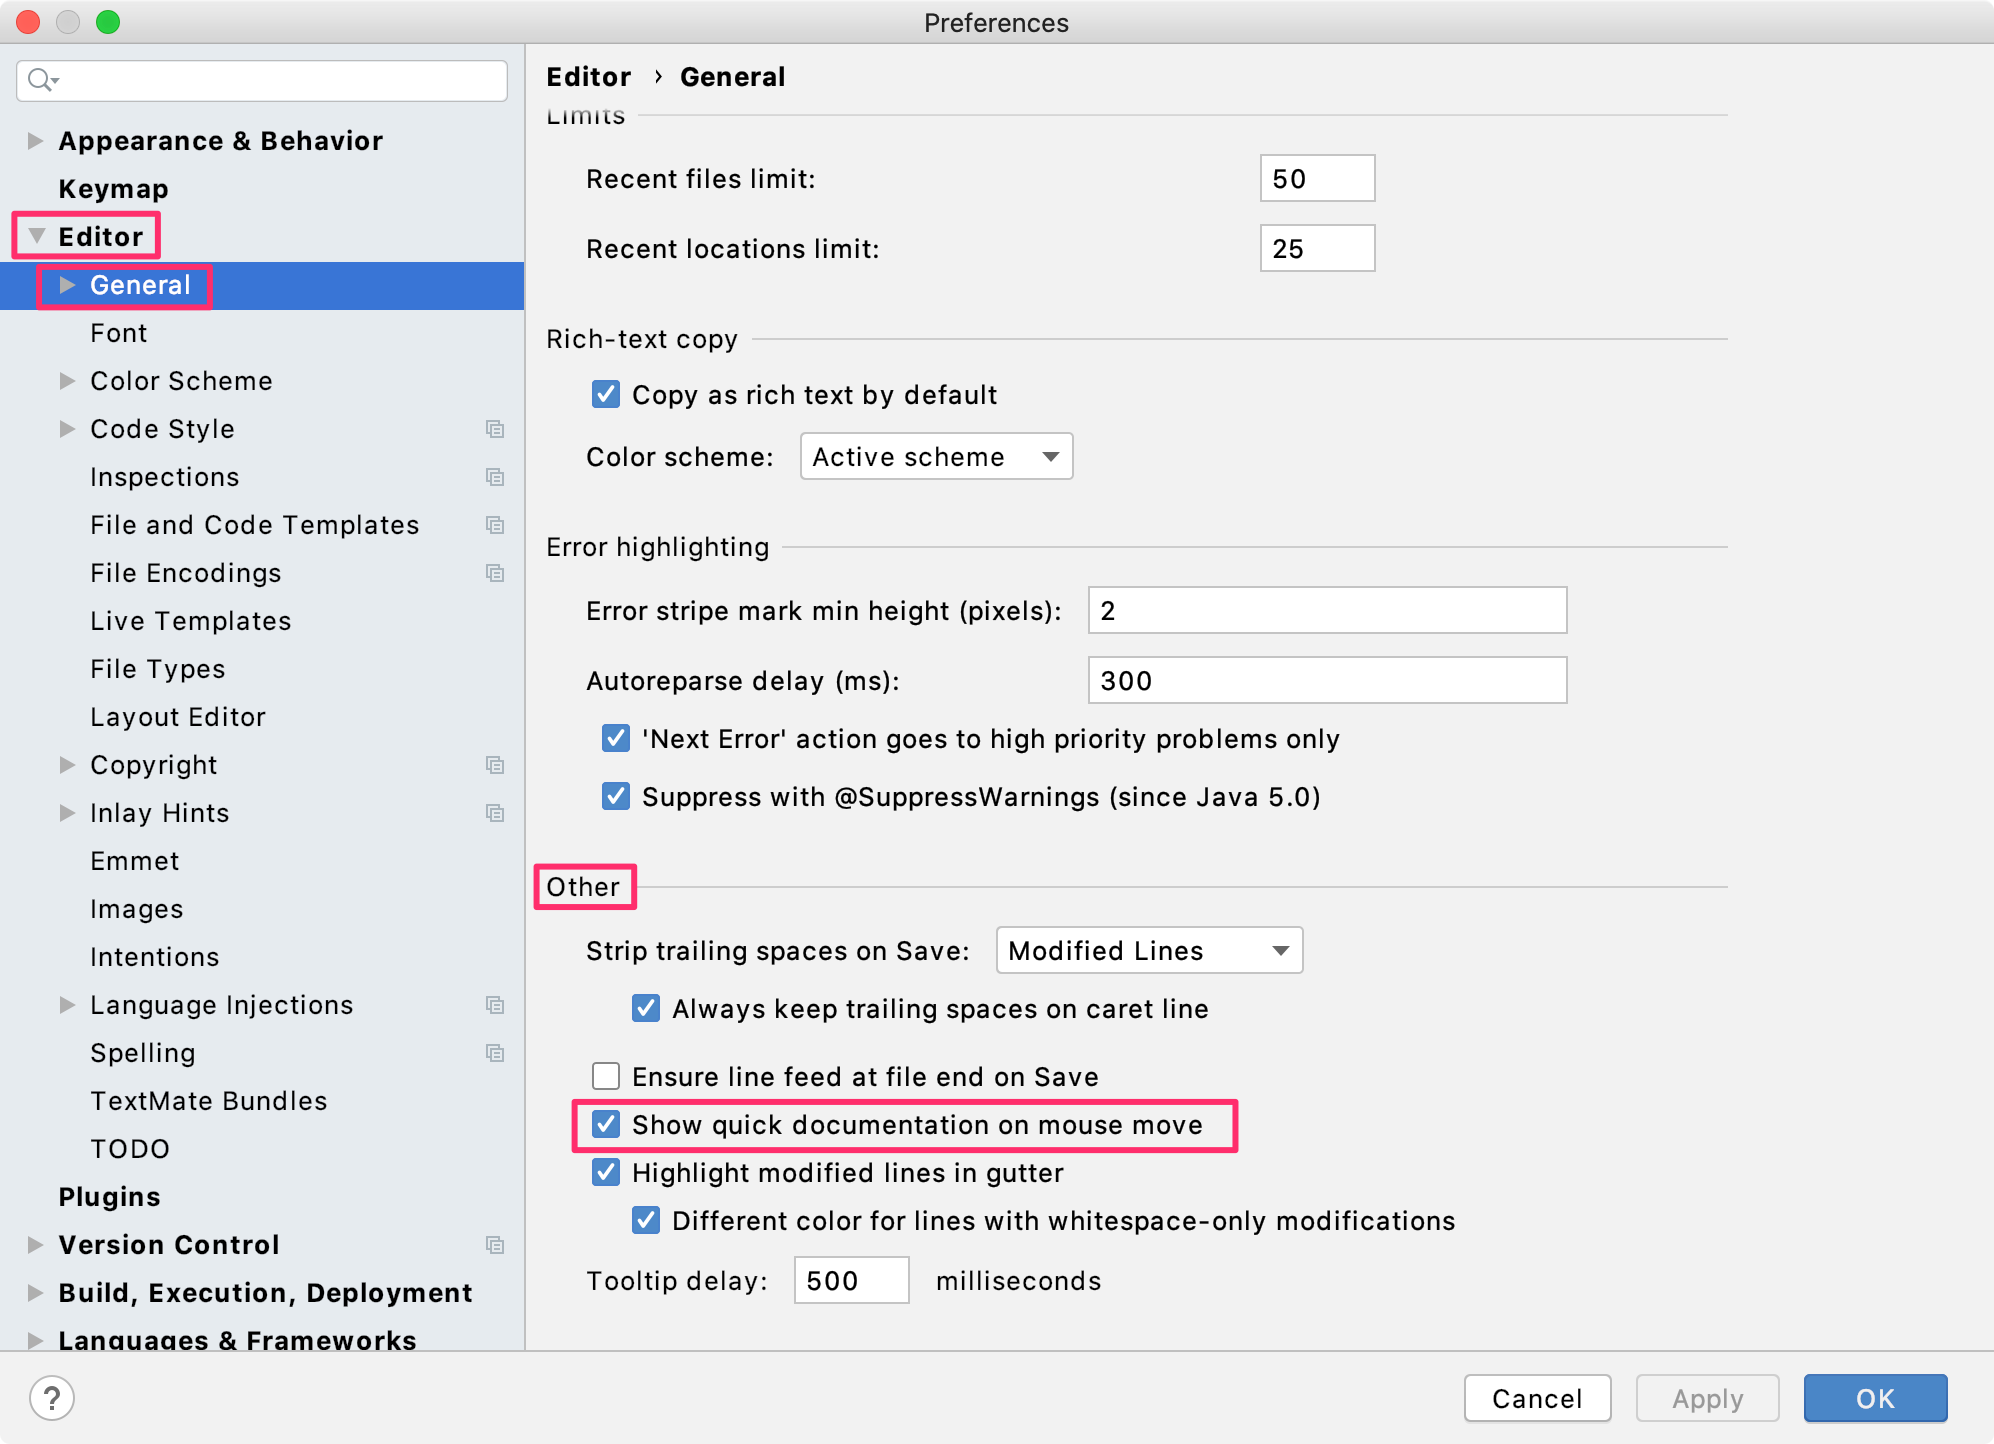
マウスオーバーでドキュメントを表示する
Editor > General > Other
[Show quick documentation on mouse move]チェック:OFF→ON
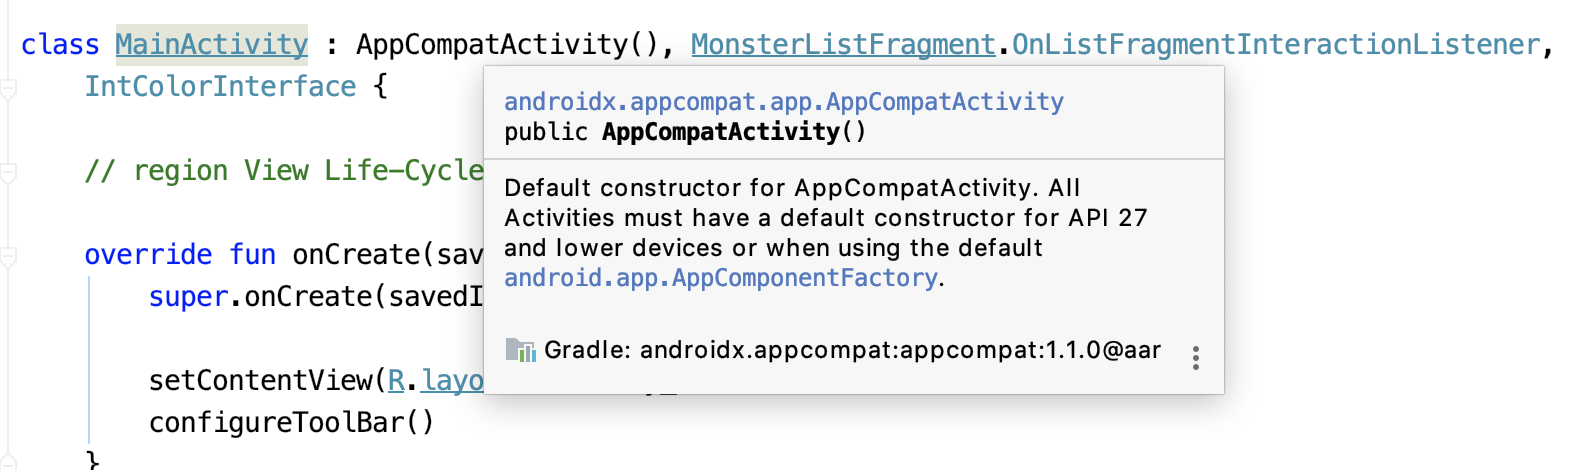
コード上のクラスなどをマウスオーバーするだけでドキュメントが表示されるようになります。
↓ではAppCompatActivity()をマウスオーバーしています。
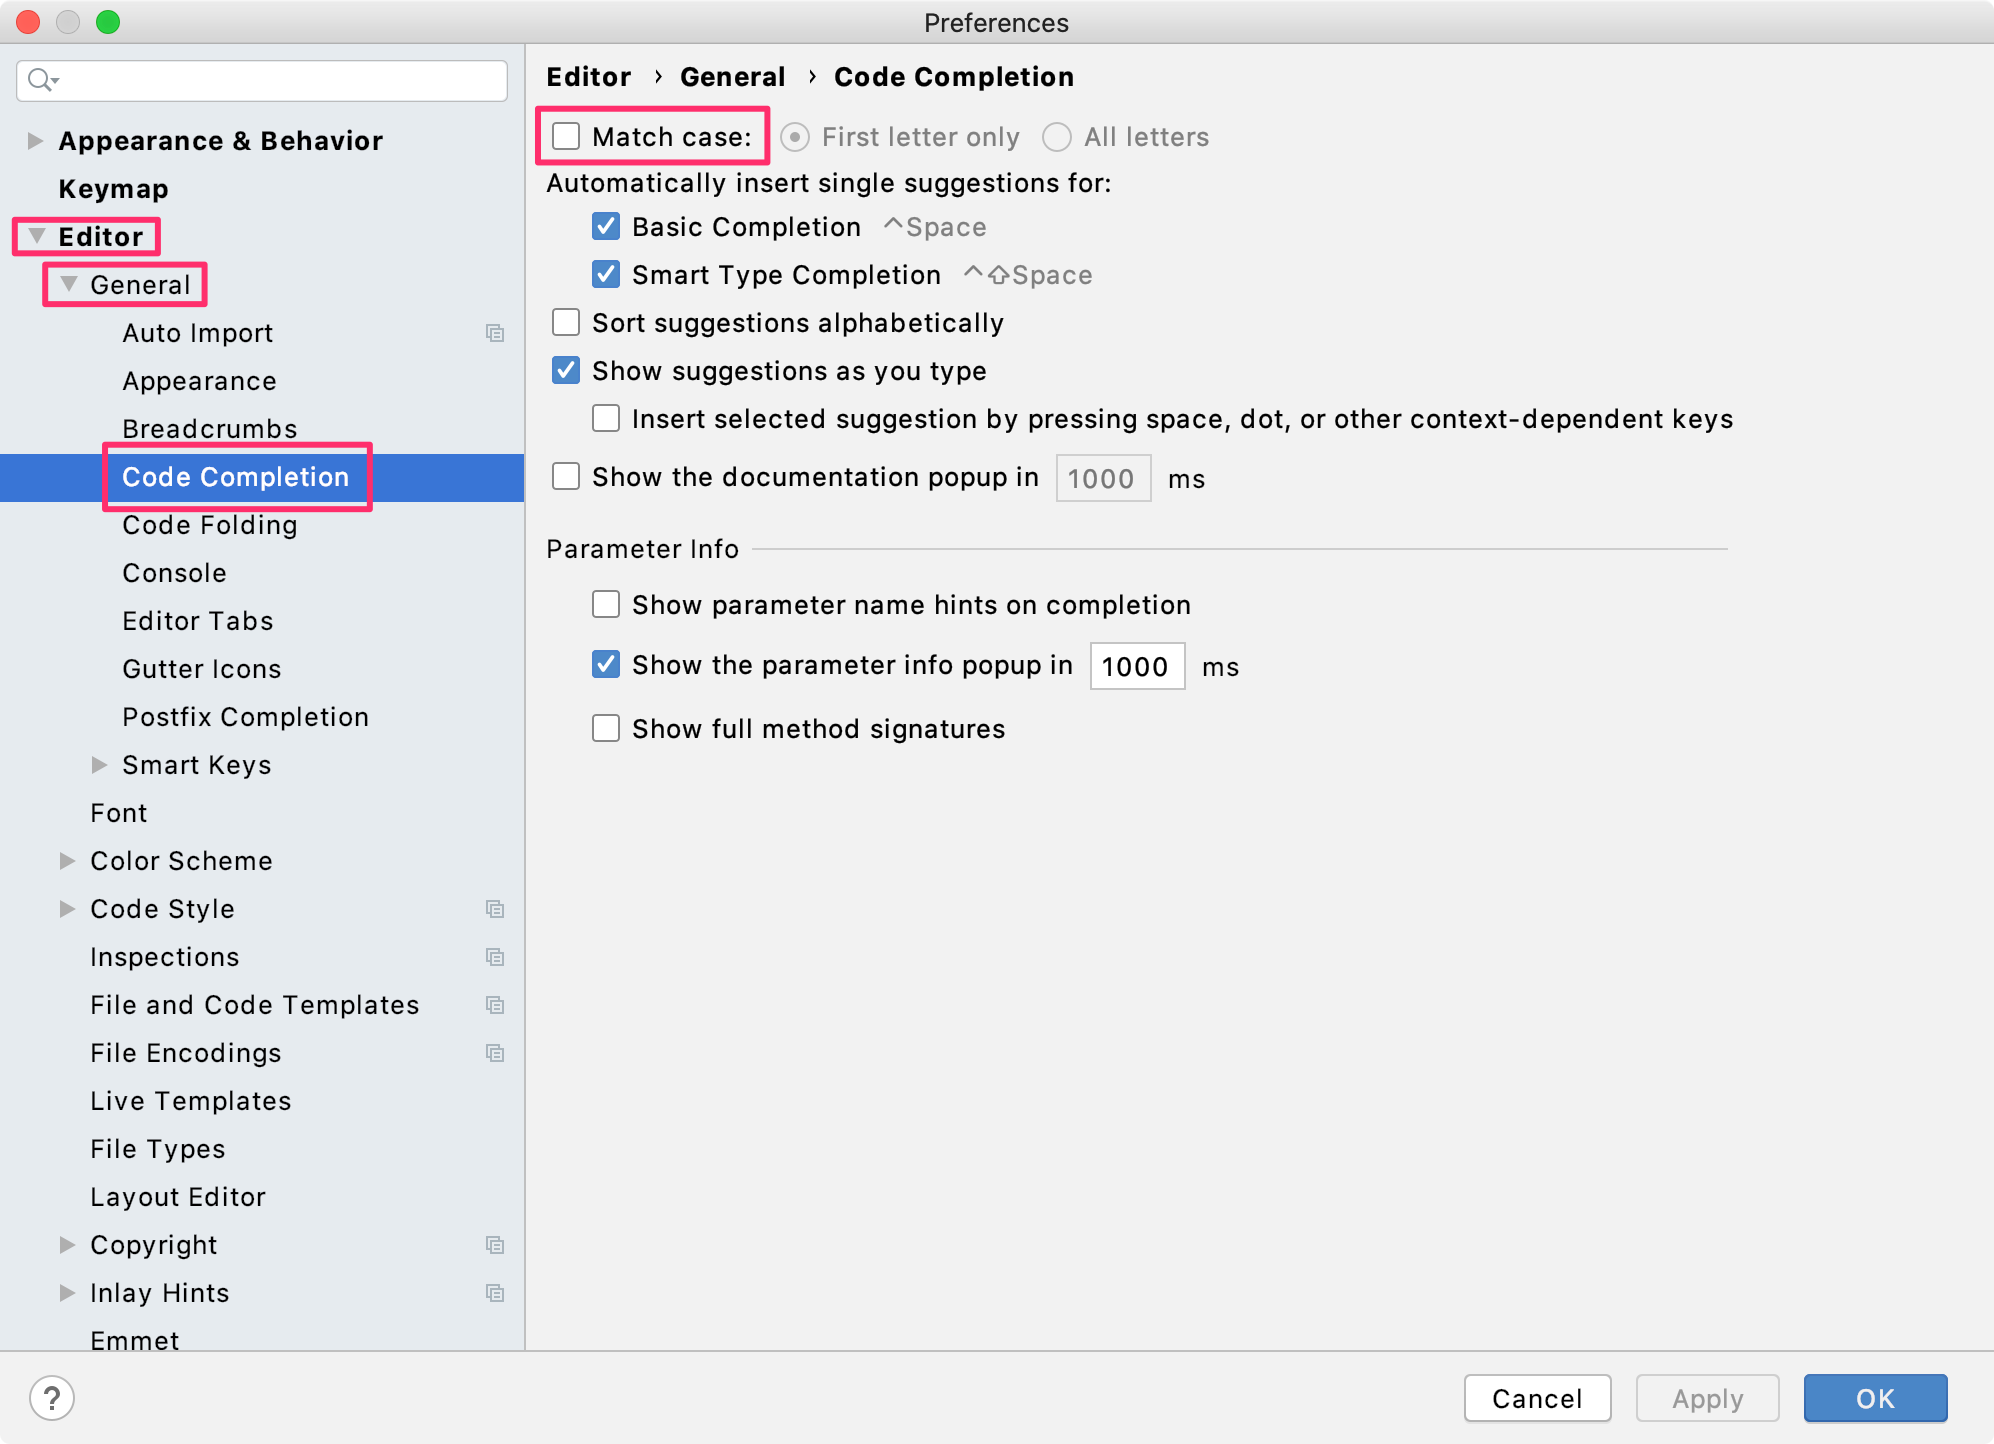
補完時に大文字小文字を区別しない
Editor > General > Code Completion
Match case:ON→OFF
補完時に大文字小文字を区別しないことで、わざわざShiftキーを押下しなくてもクラス名などを補完できるようになります。
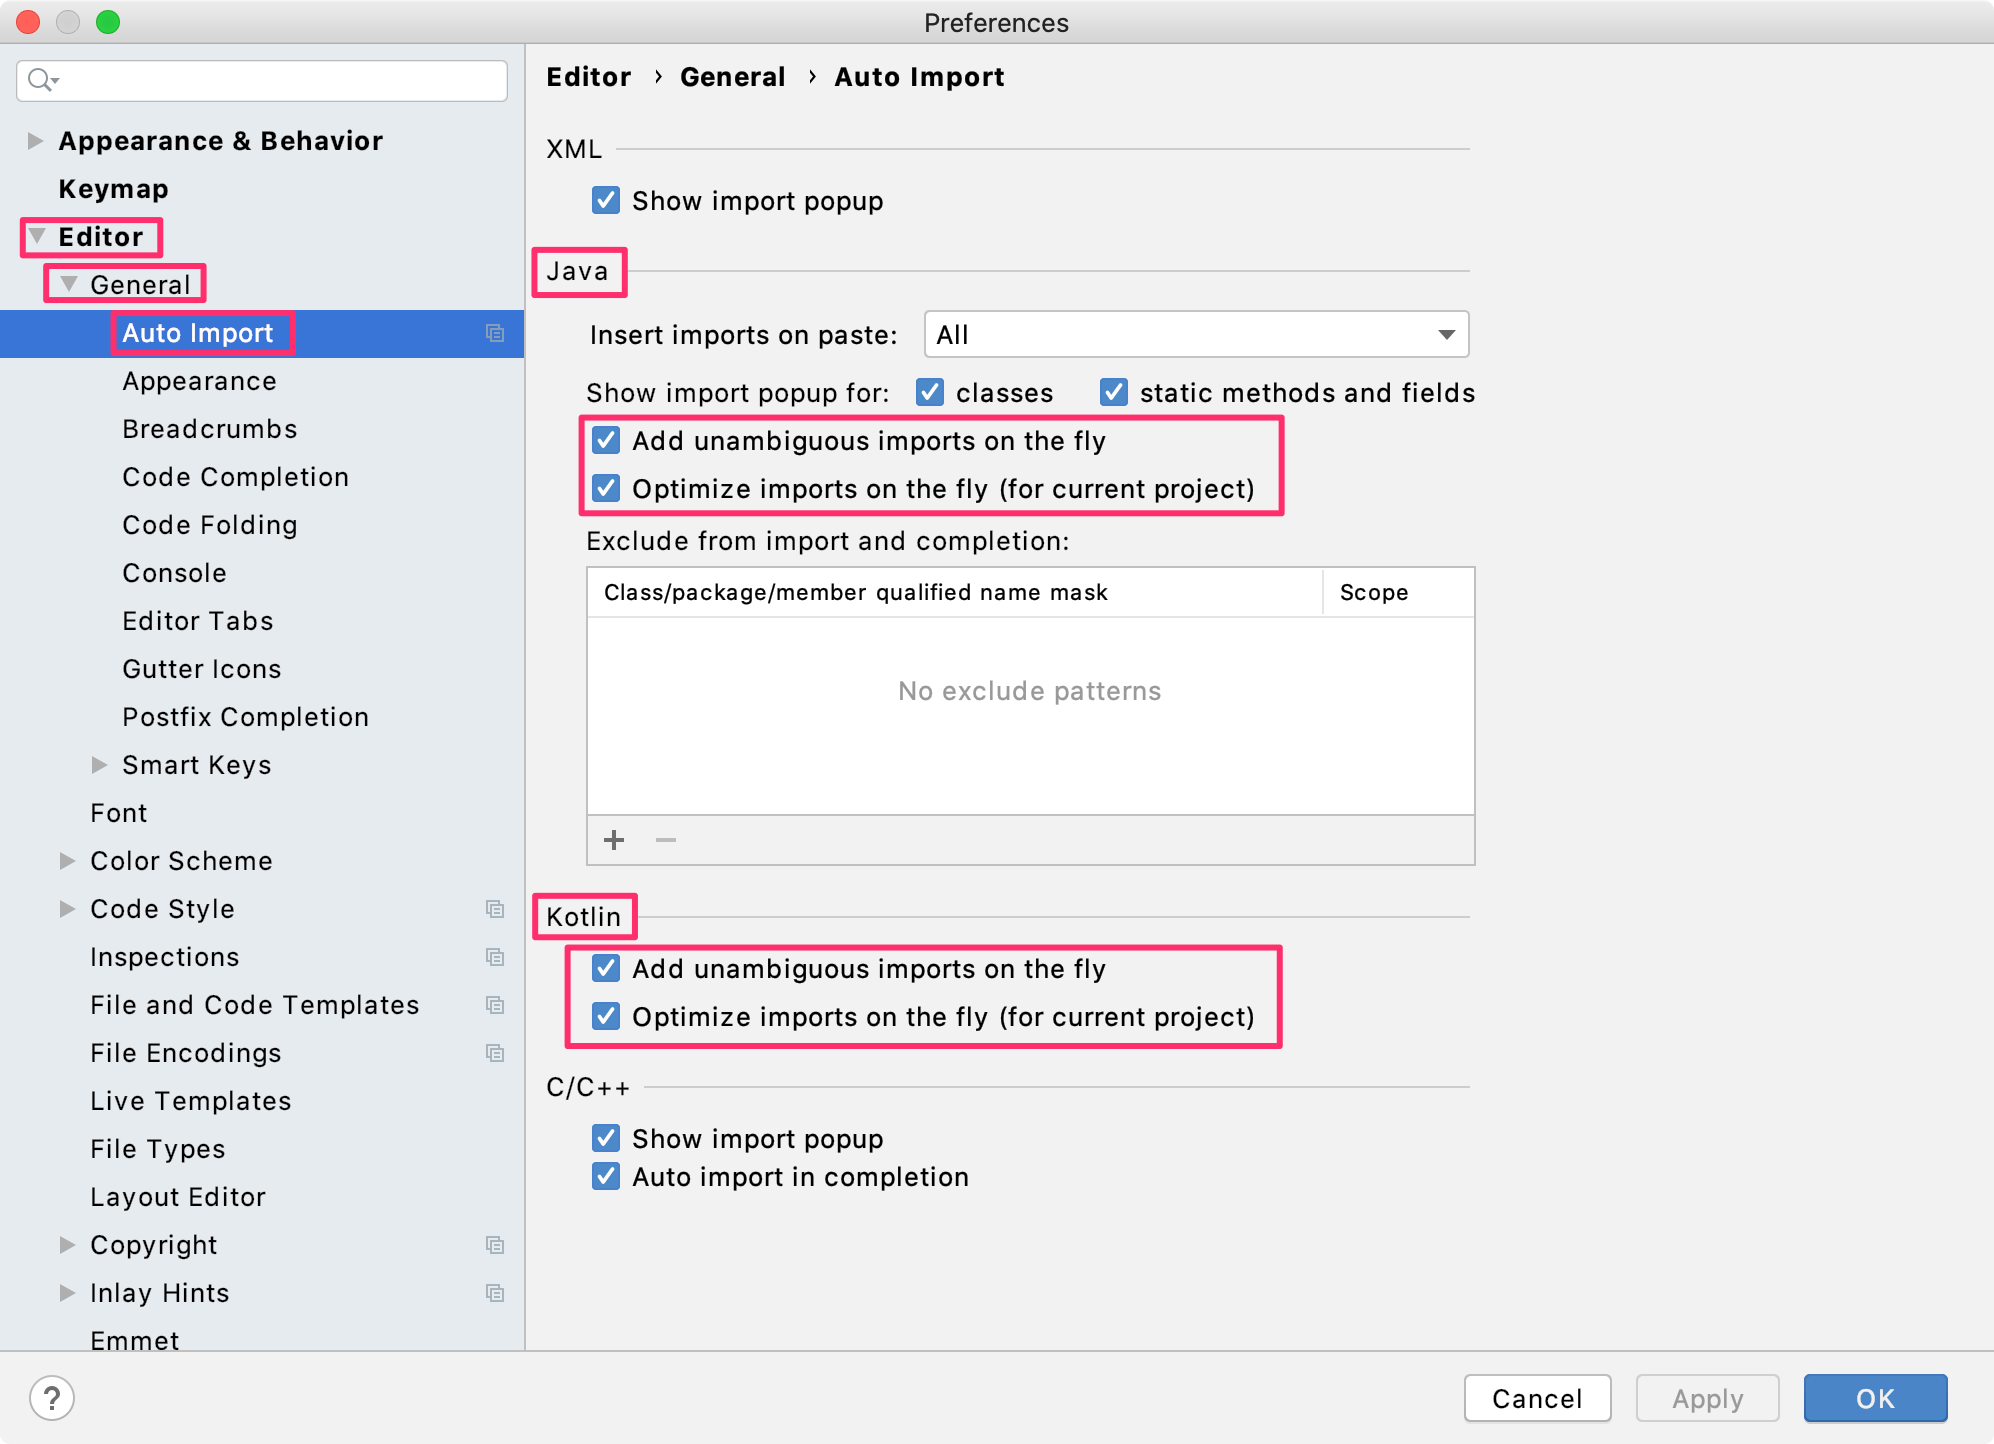
インポート文を自動で挿入・削除する
Editor > General > Auto Import > Kotlin (Java)
[Add unambiguous imports on the fly]チェック:OFF→ON
[Optimize imports on the fly (for current project)]チェック:OFF→ON
手動でインポートする手間を省けます。
使っている言語に合わせて設定してください。私はKotlinしか使っていませんが、Javaも設定しています。
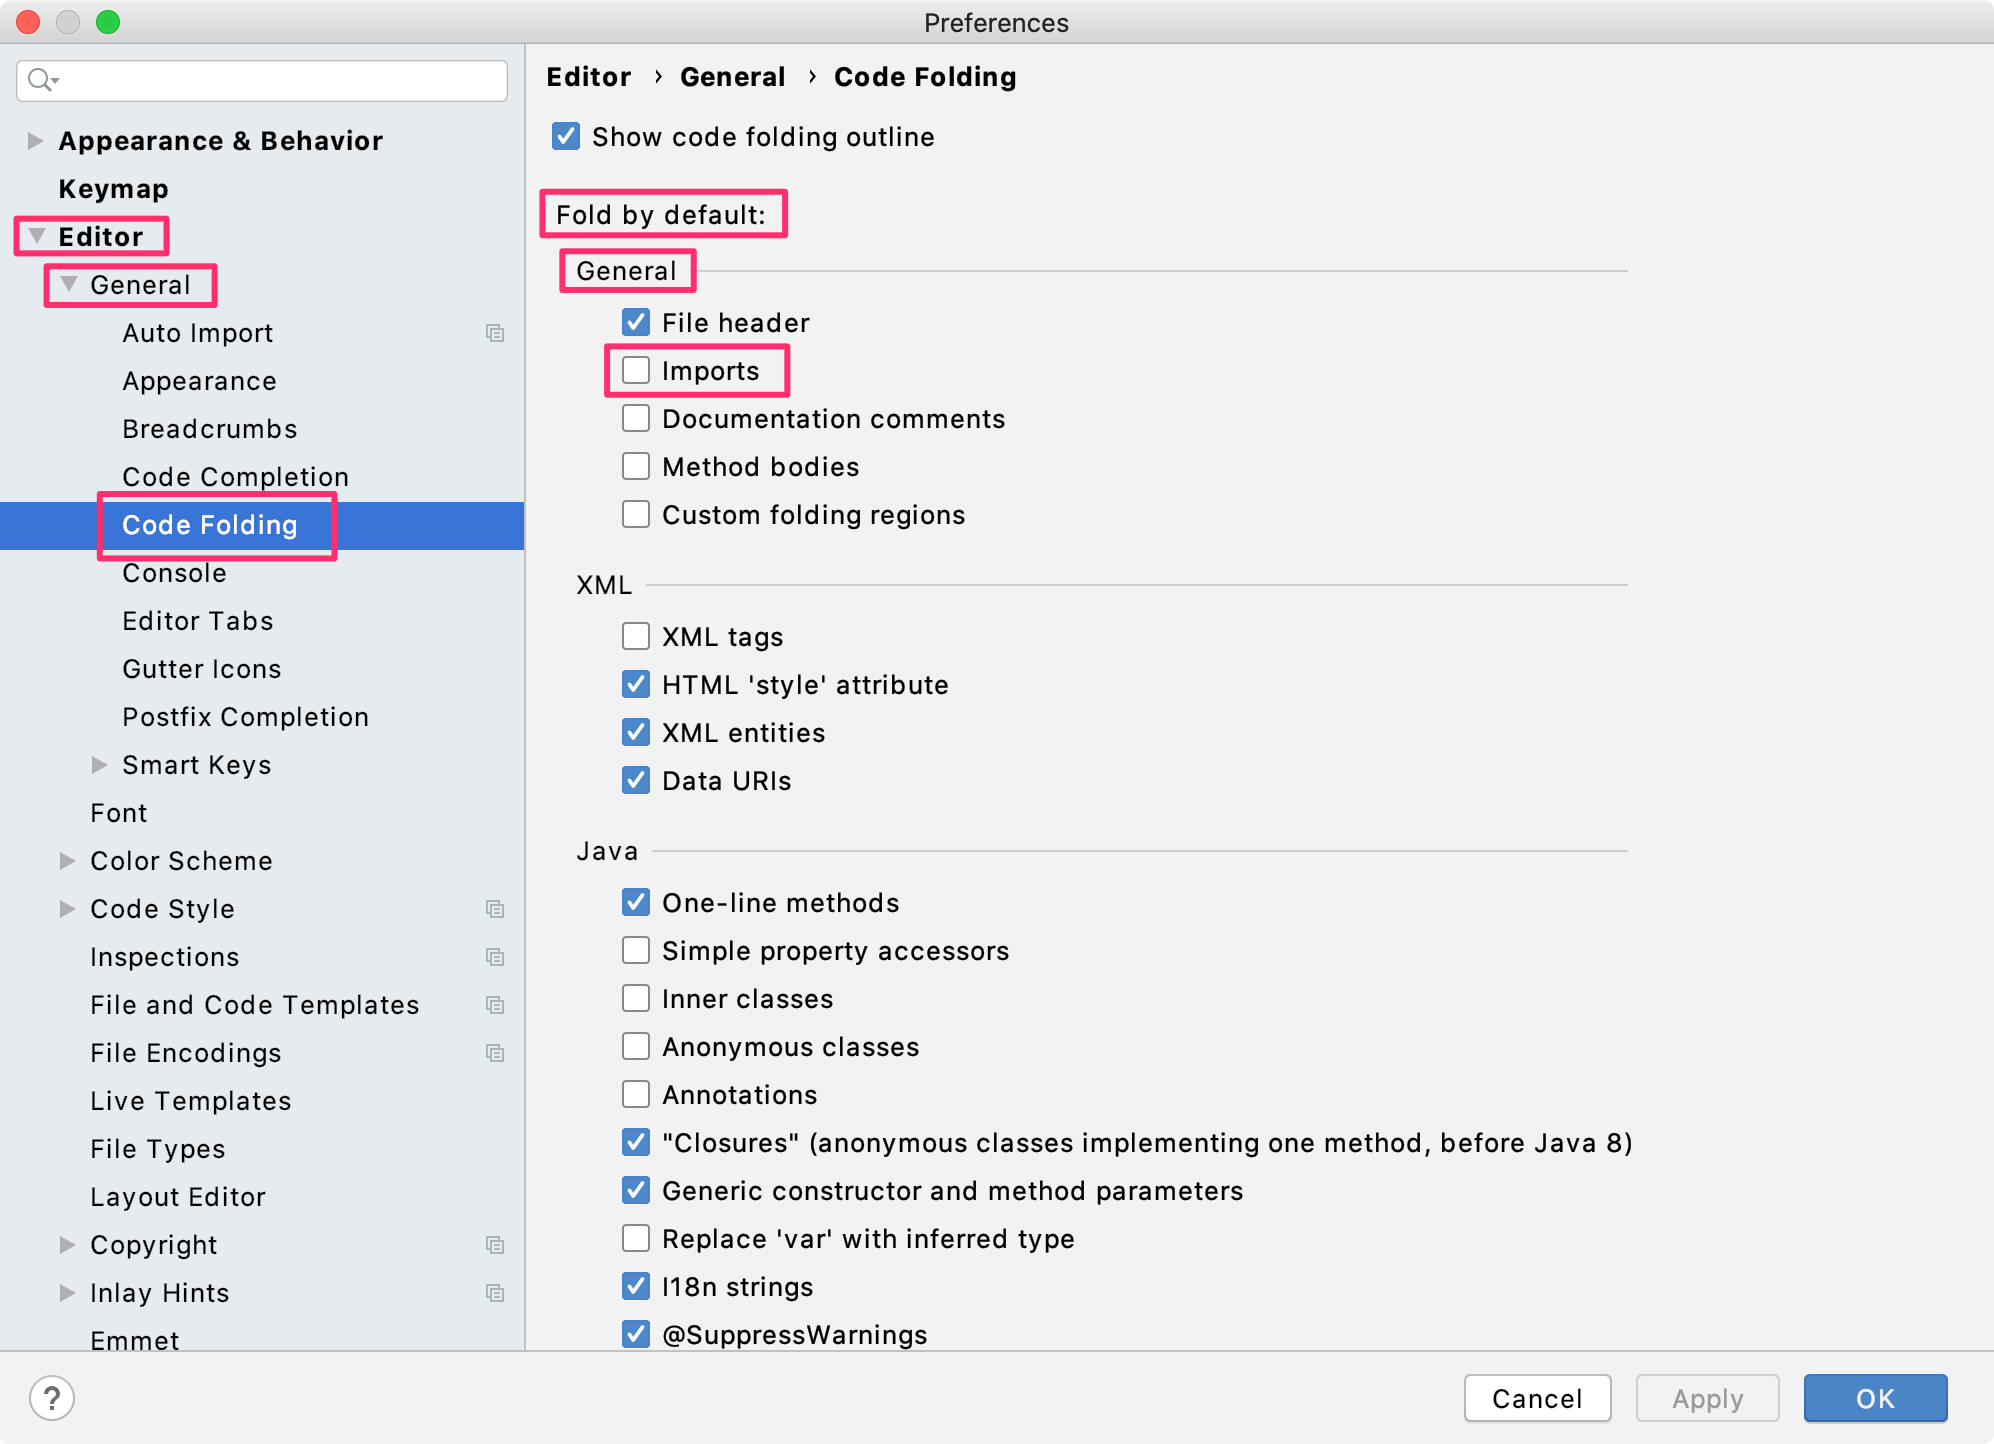
インポート文を自動で隠さない
Editor > General > Code Folding > Fold by default: > General
[Imports]チェック:ON→OFF
インポート文が隠れていると実装しづらいので、私は常に表示しています。
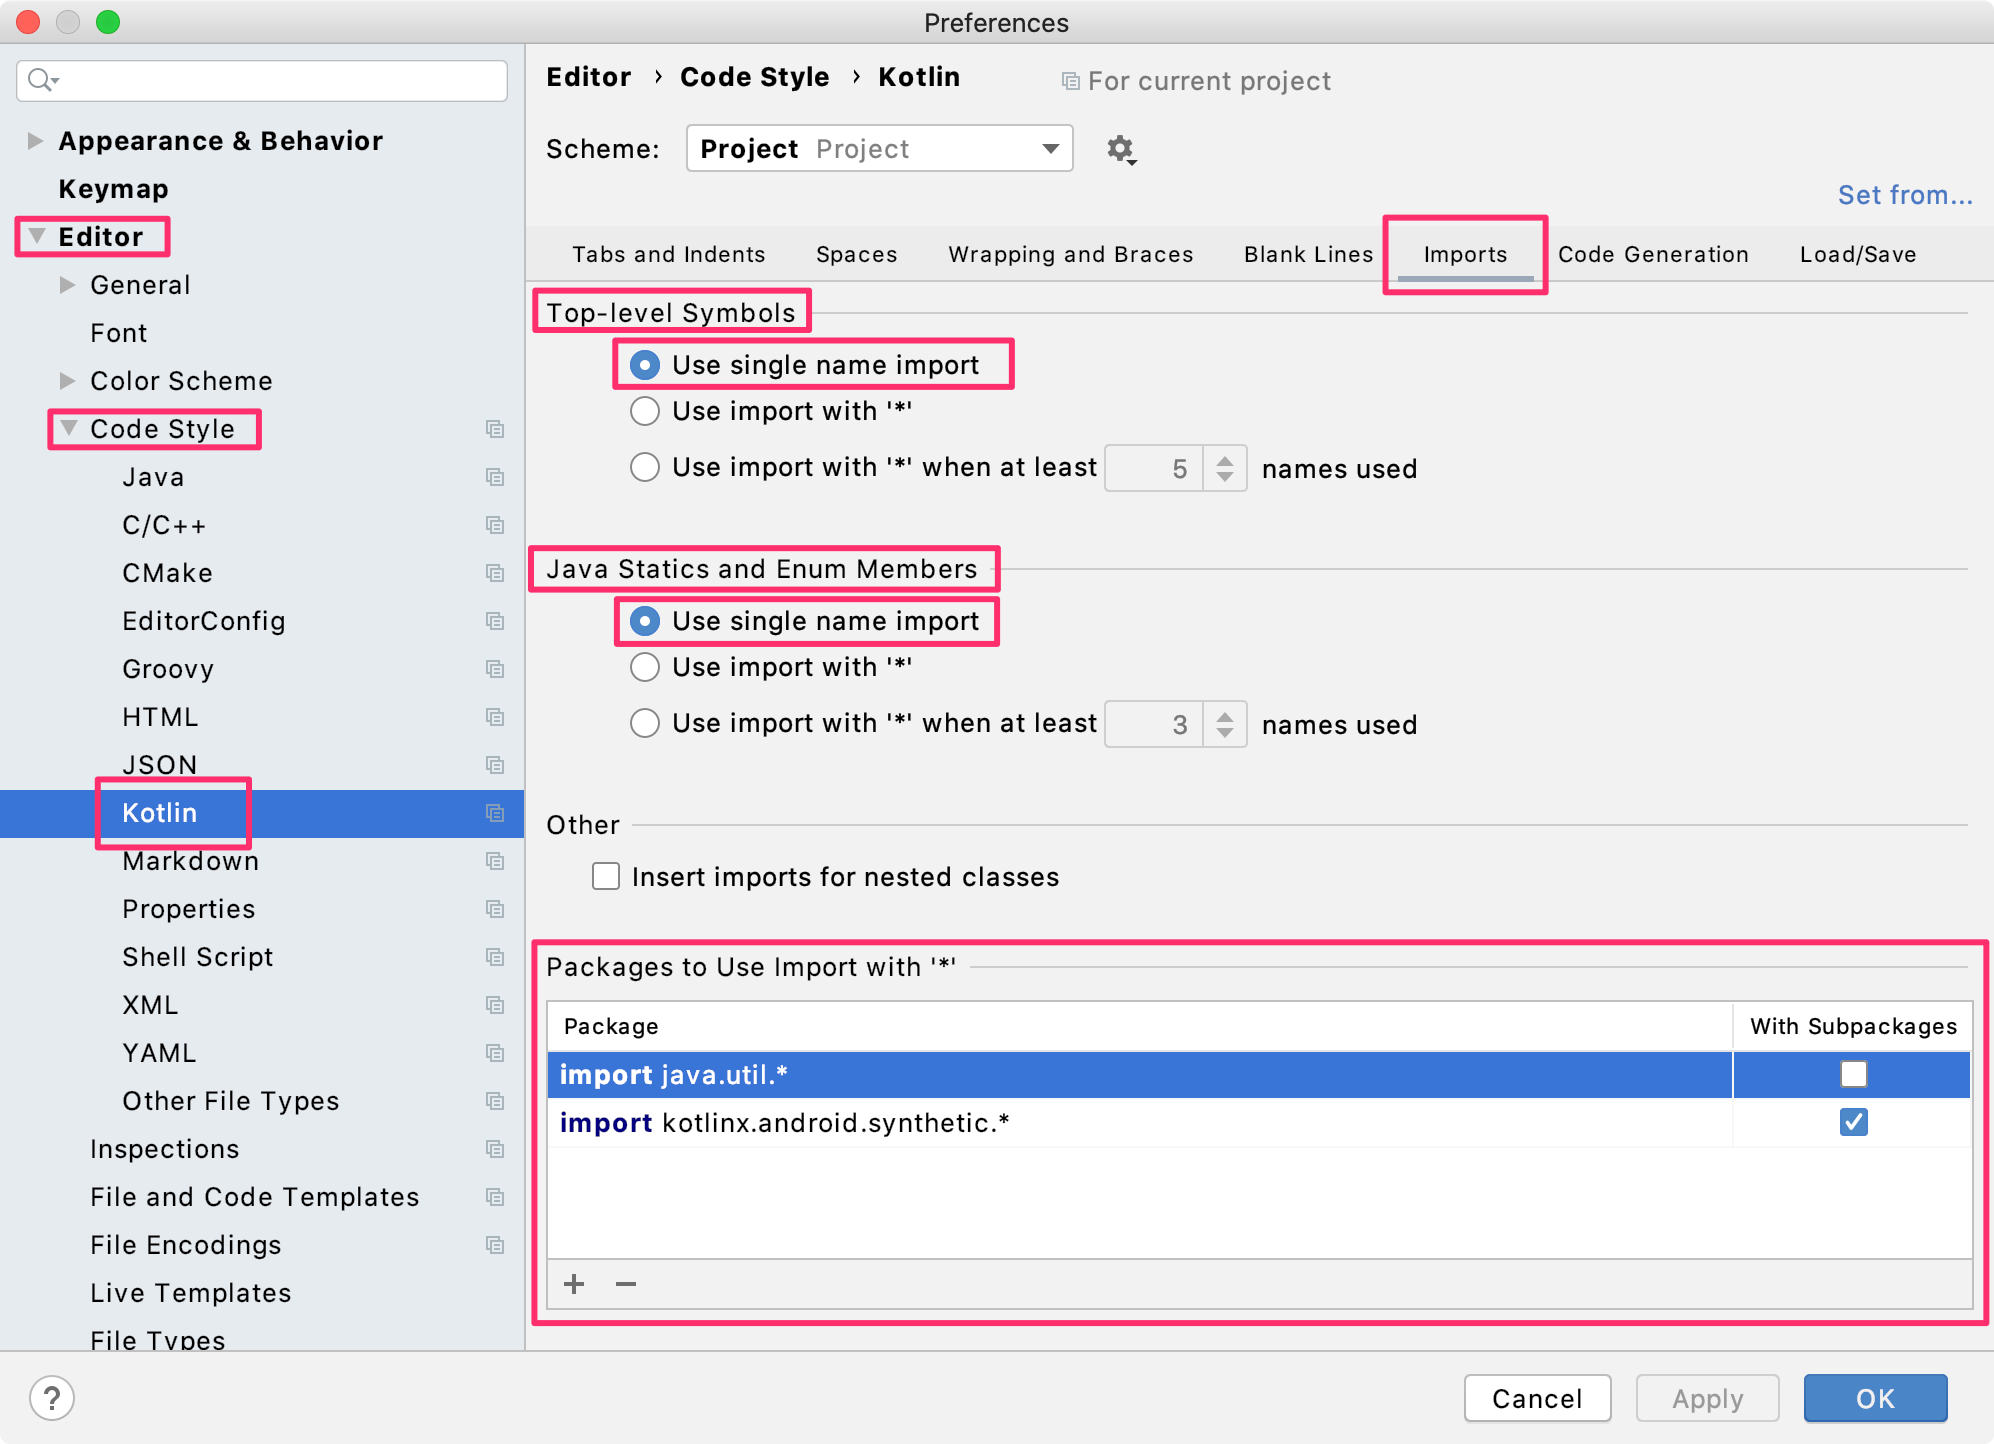
Kotlinでワイルドカードインポートを使わない
Editor > Code Style > Kotlin > [imports]タブ
Top-level Symbols:Use import with '*' when at least 5 names used→Use single name import
Java Statics and Enum Members:Use import with '*' when at least 3 names used→Use single name import
detektのWildcardImportルールに反するため、ワイルドカードでのインポートを使わないようにします。
Android Studio 4.0だとデフォルトで設定されていたので、確認だけ行いました。
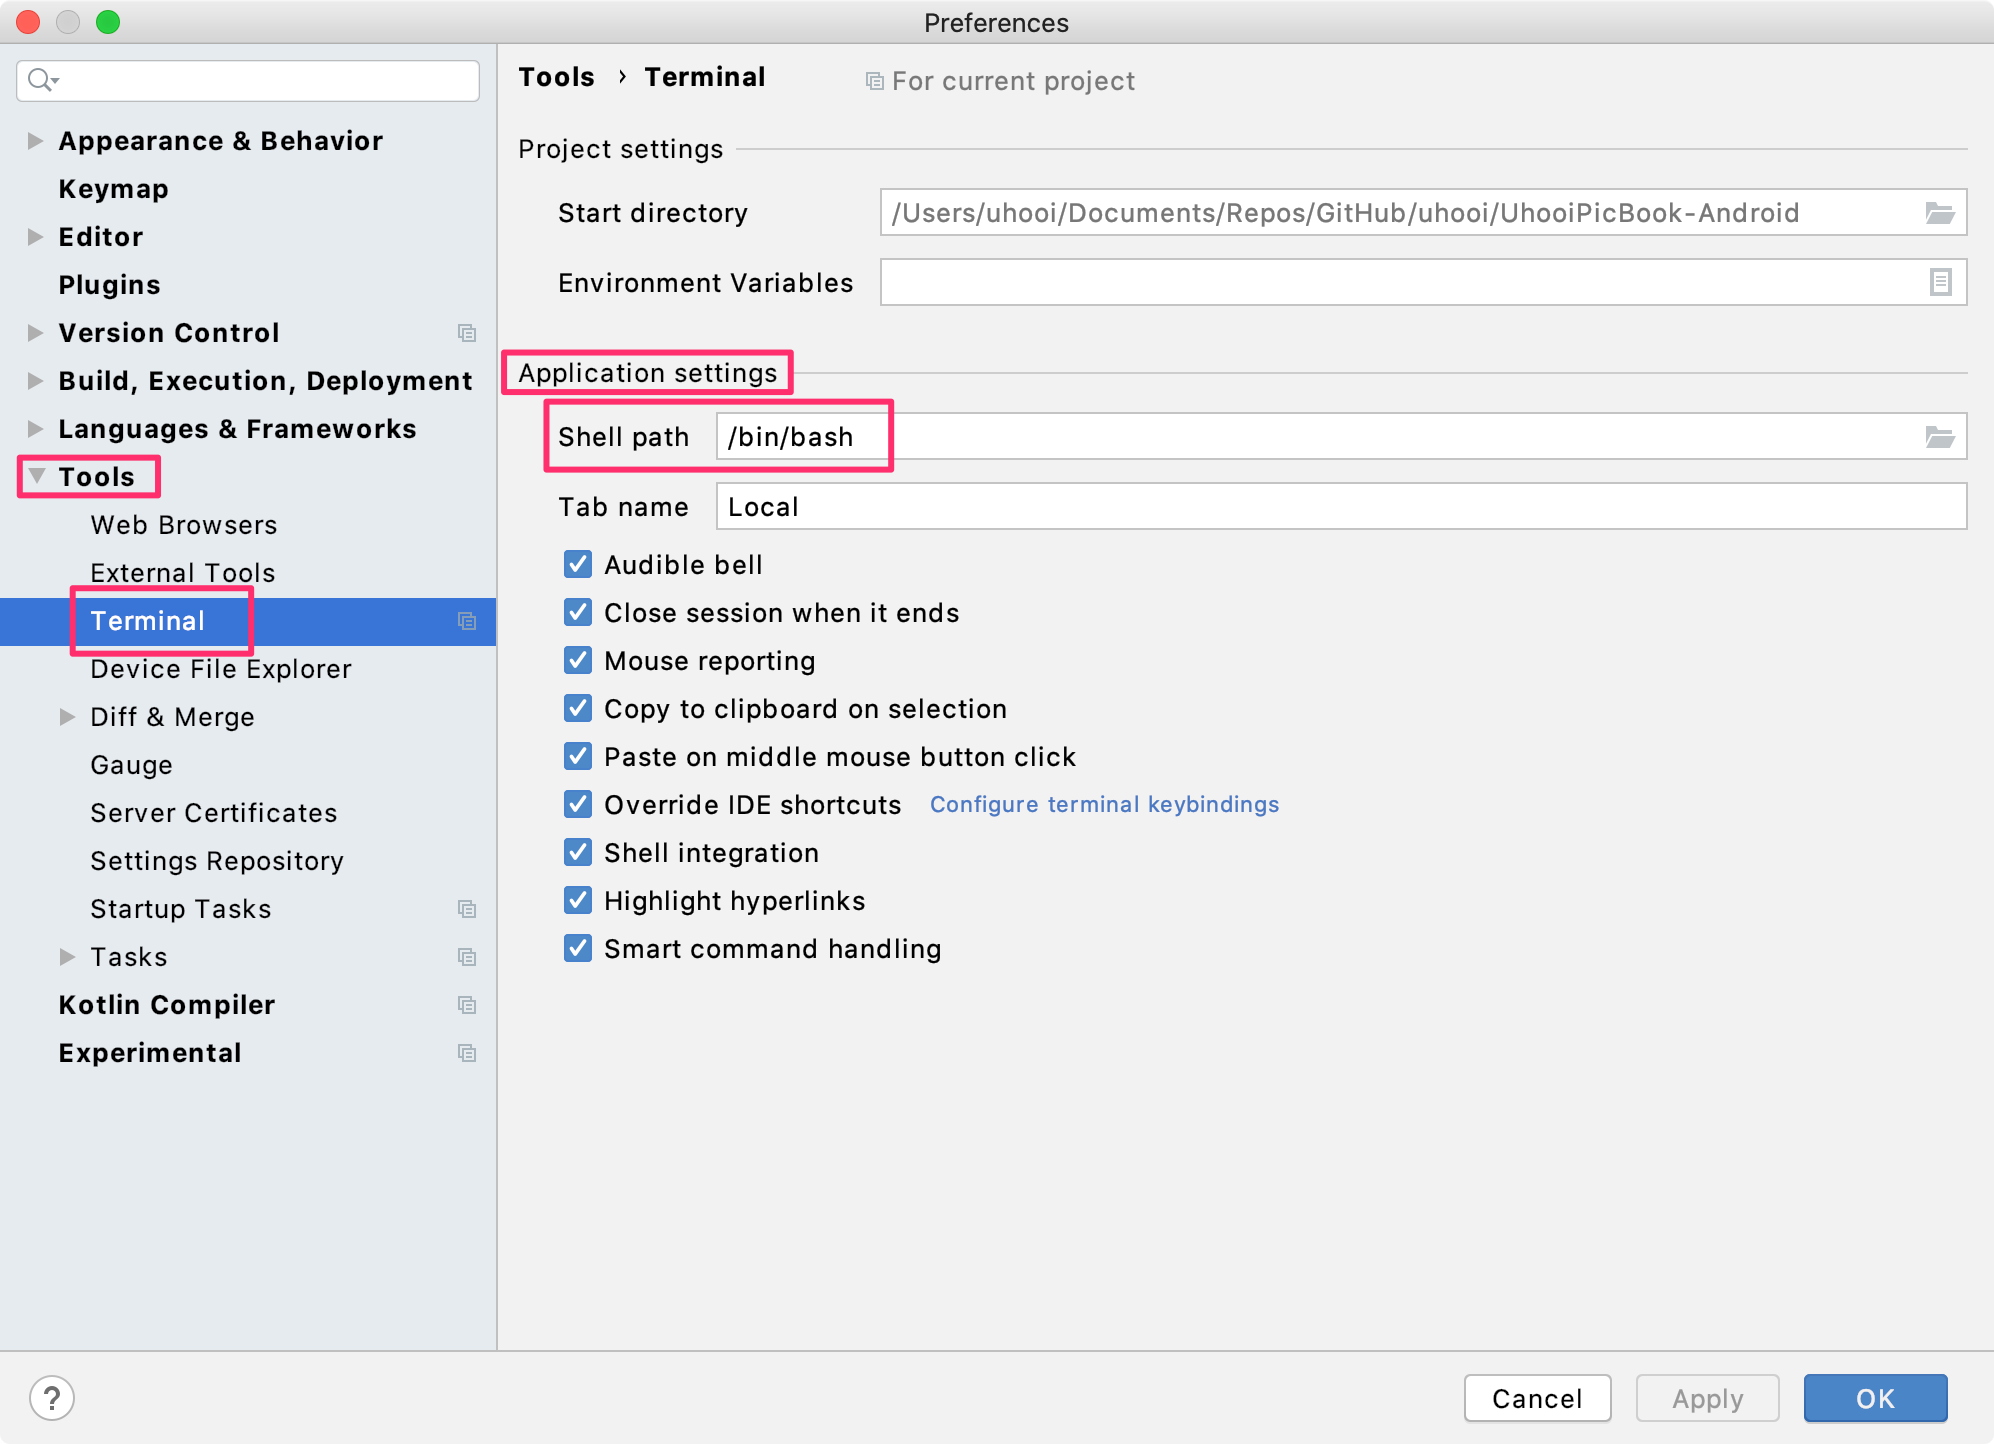
シェルをzshからbashに変更する
Tools > Terminal > Application settings
Shell path:/bin/zsh→/bin/bash
macOSではCatalinaから標準のシェルがbashからzshに変更されました。
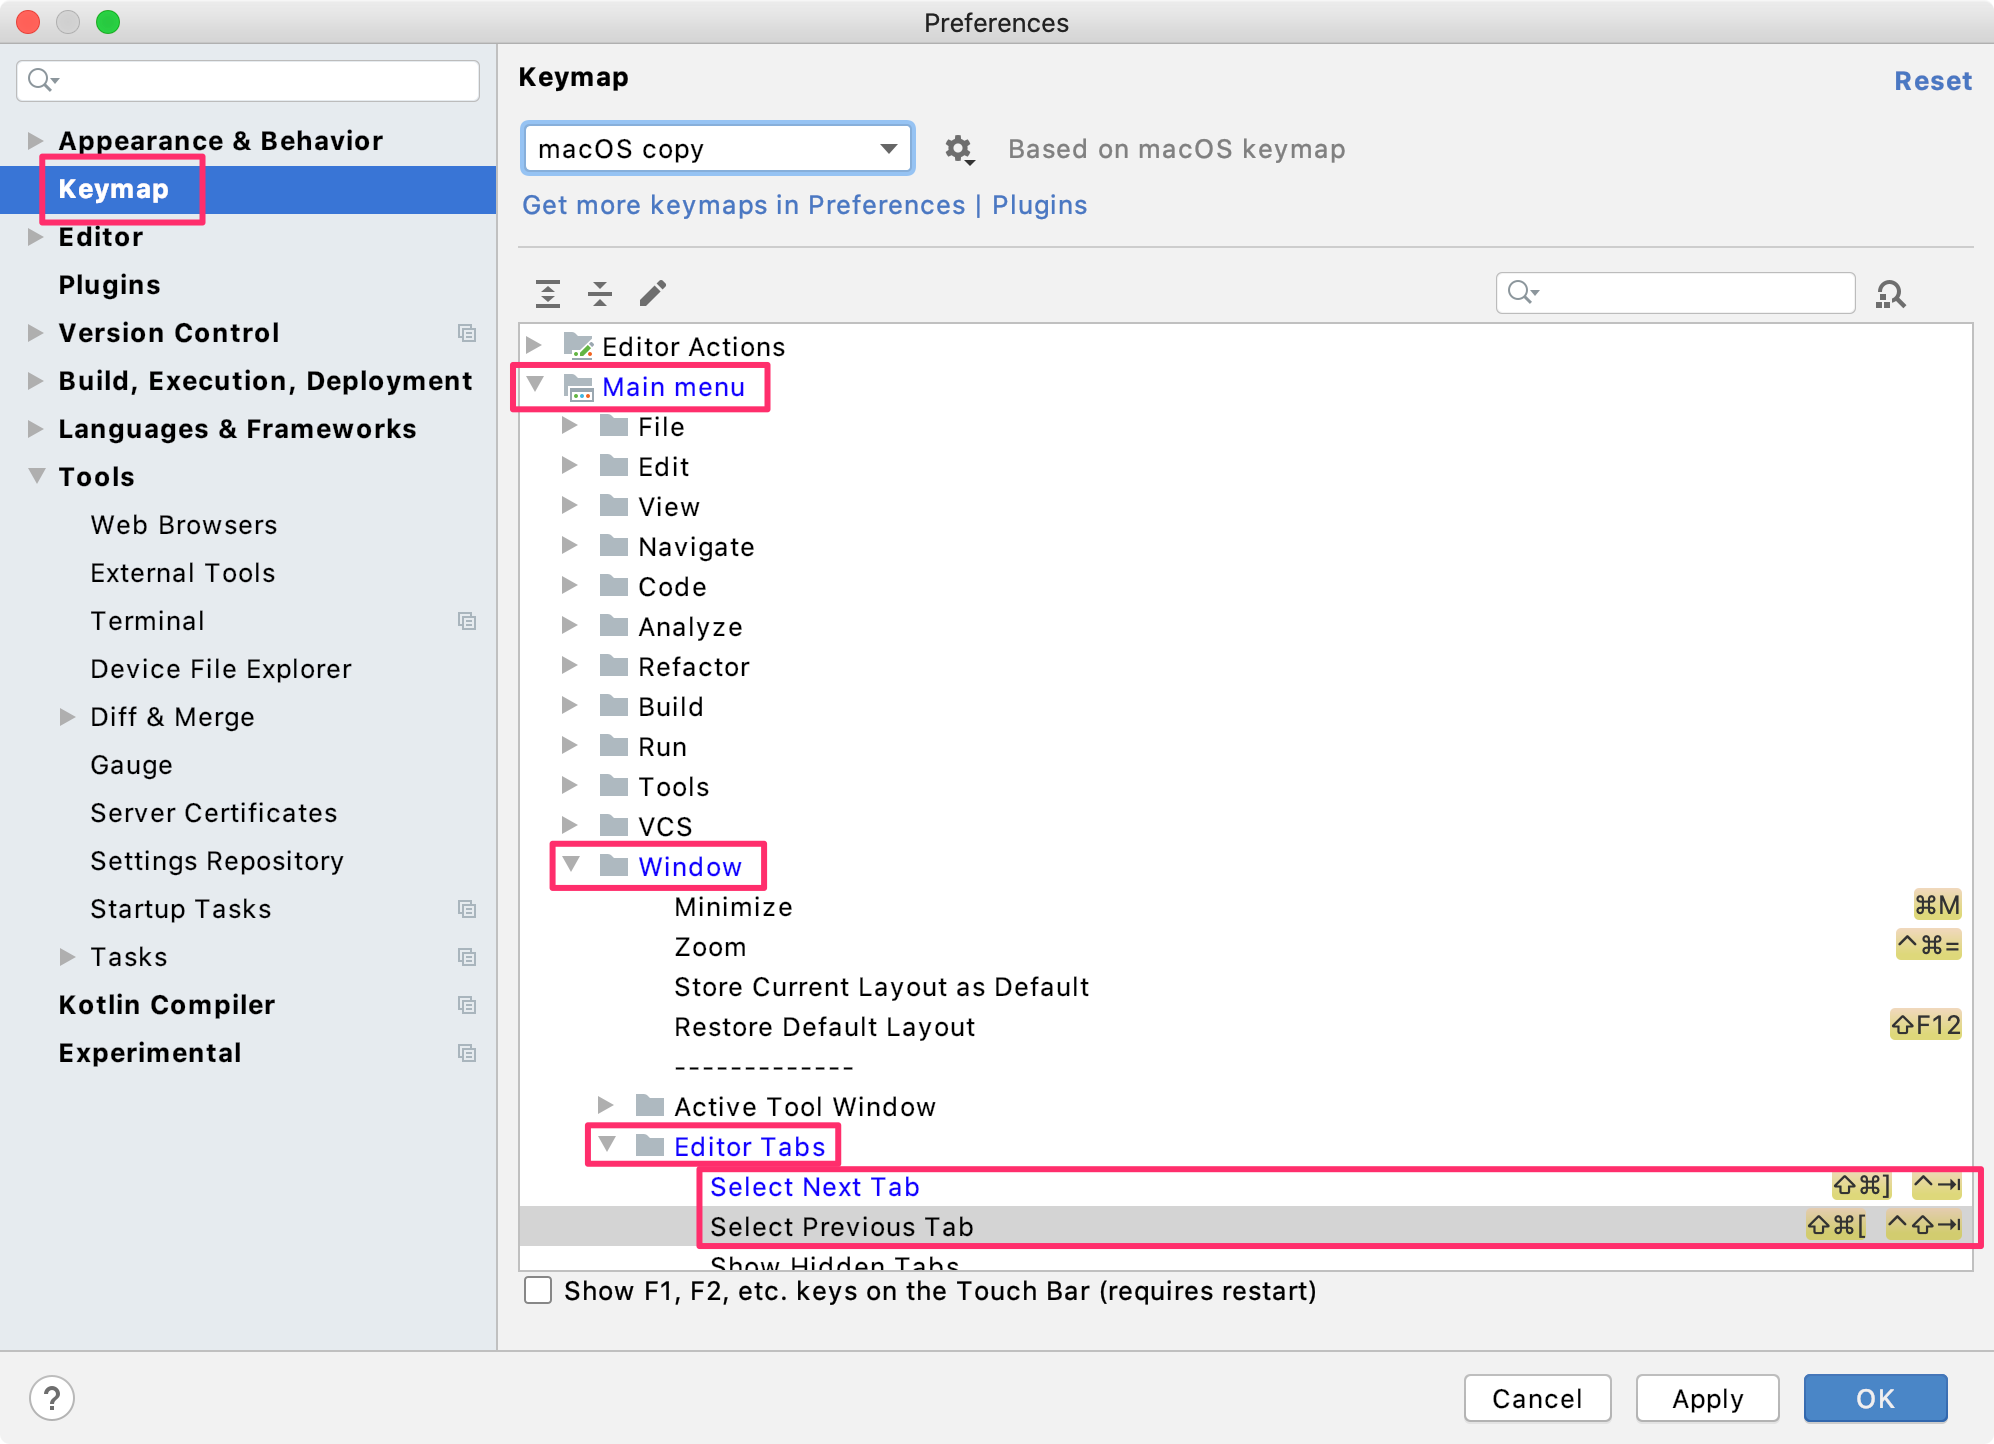
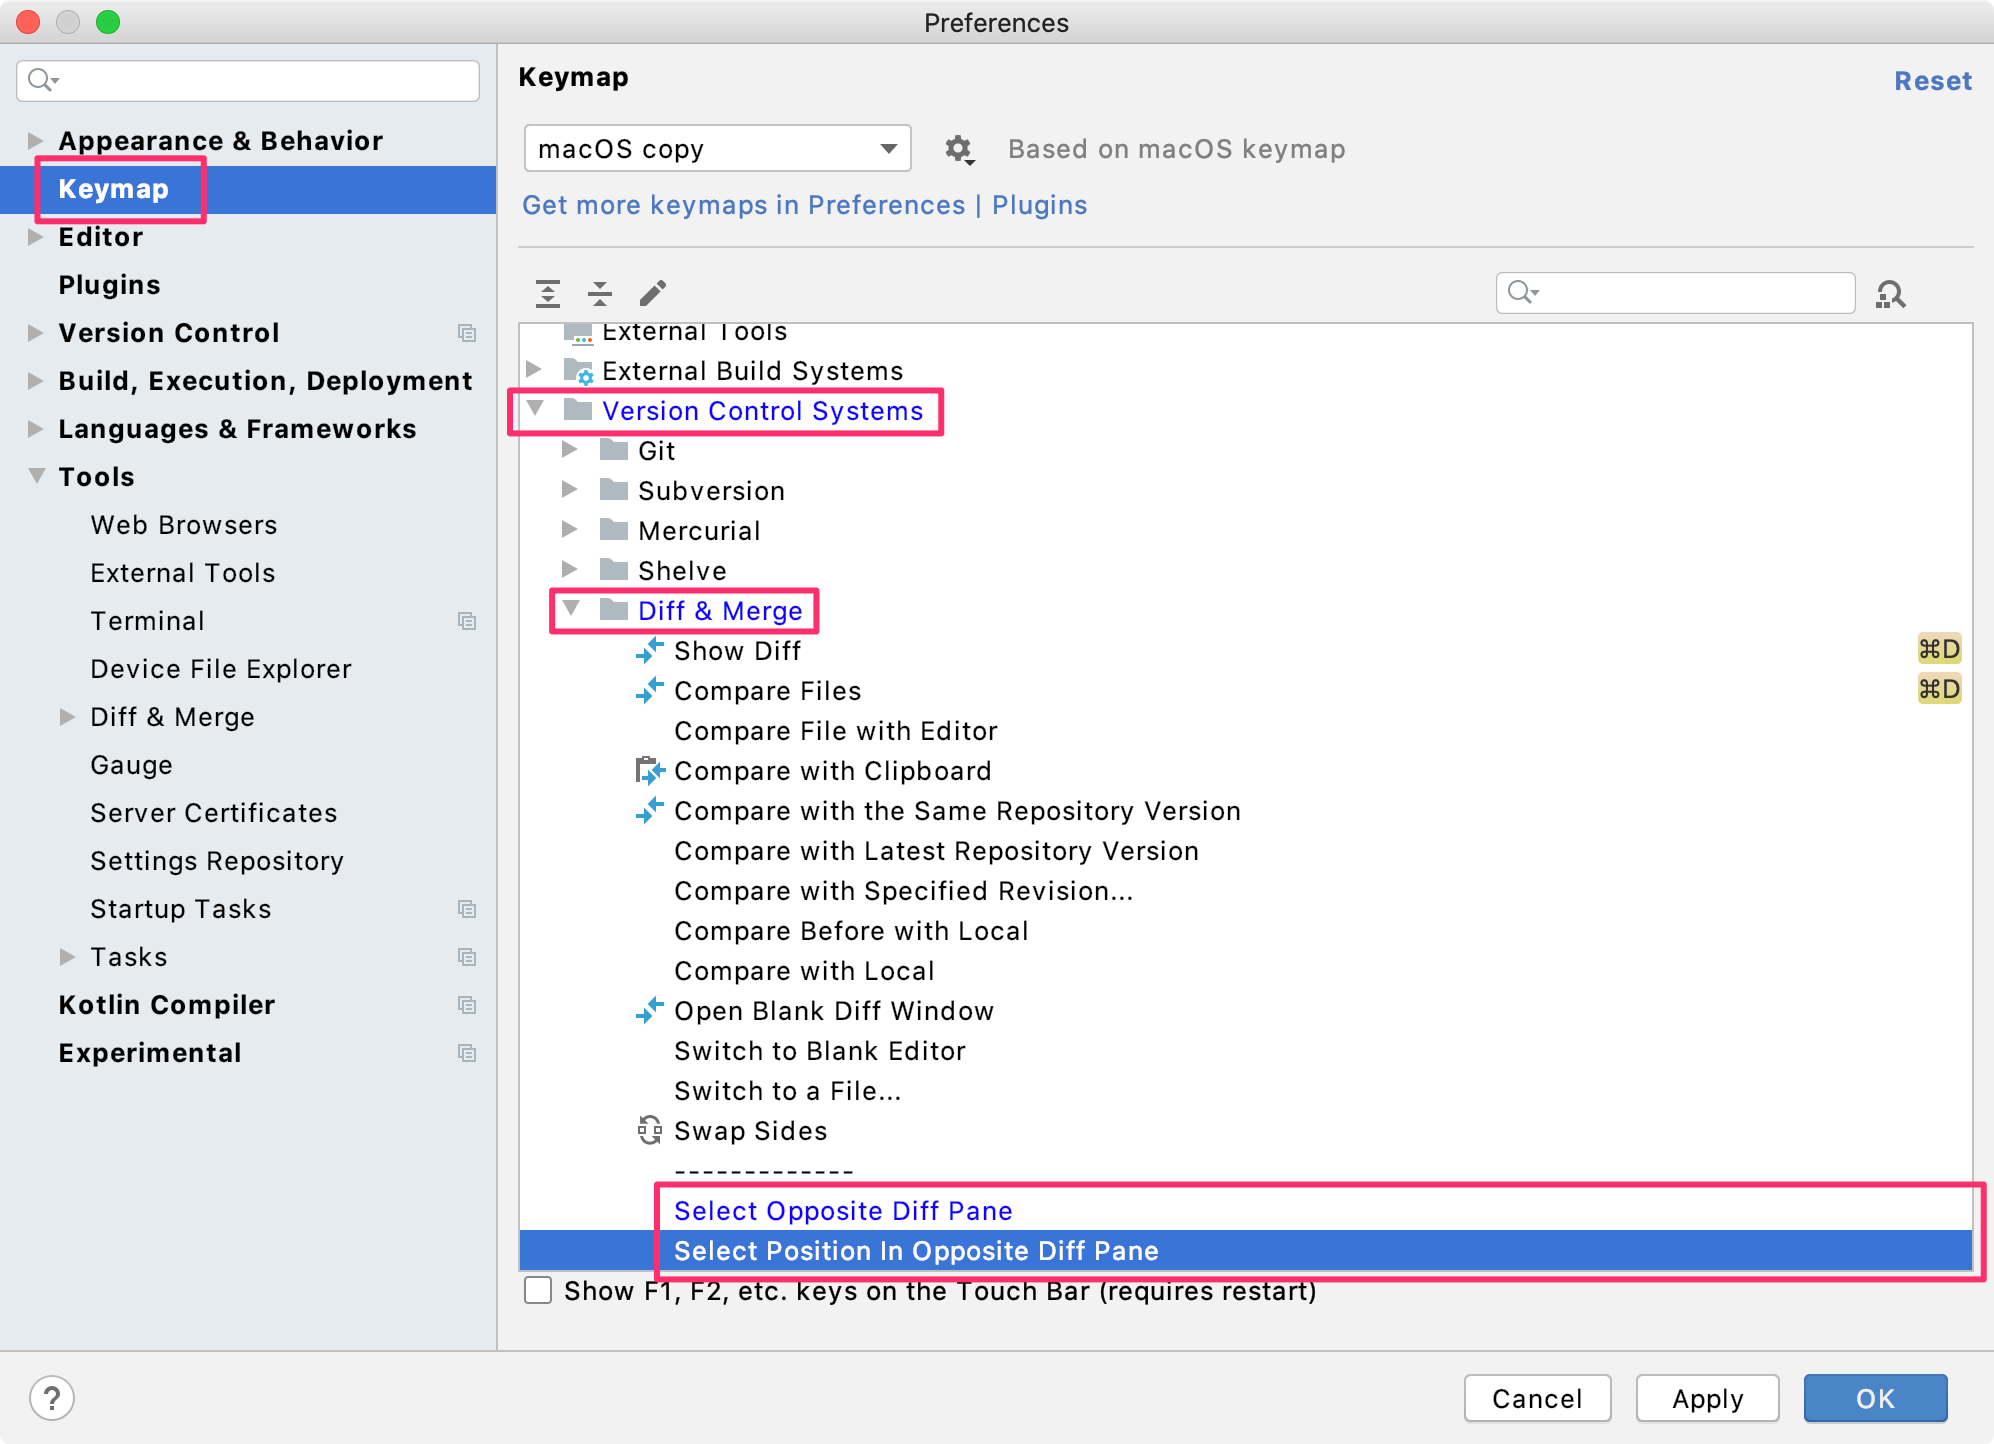
私はbashに慣れているので戻します。Ctrl + Tabで横のタブに移動するようにする
Keymap > Main menu > Window > Editor Tabs
Select Next Tab:^→→^ Tab
Select Previous Tab:^←→^ Shift Tab
私はCtrl + Tabでサッと横のタブに移動したいため、キーマップを変えています。
Keymap > Version Control Systems > Diff & Merge
Select Opposite Diff Pane:^ Tab→ なし
Select Position In Opposite Diff Pane:^ Shift Tab→ なし
それぞれ
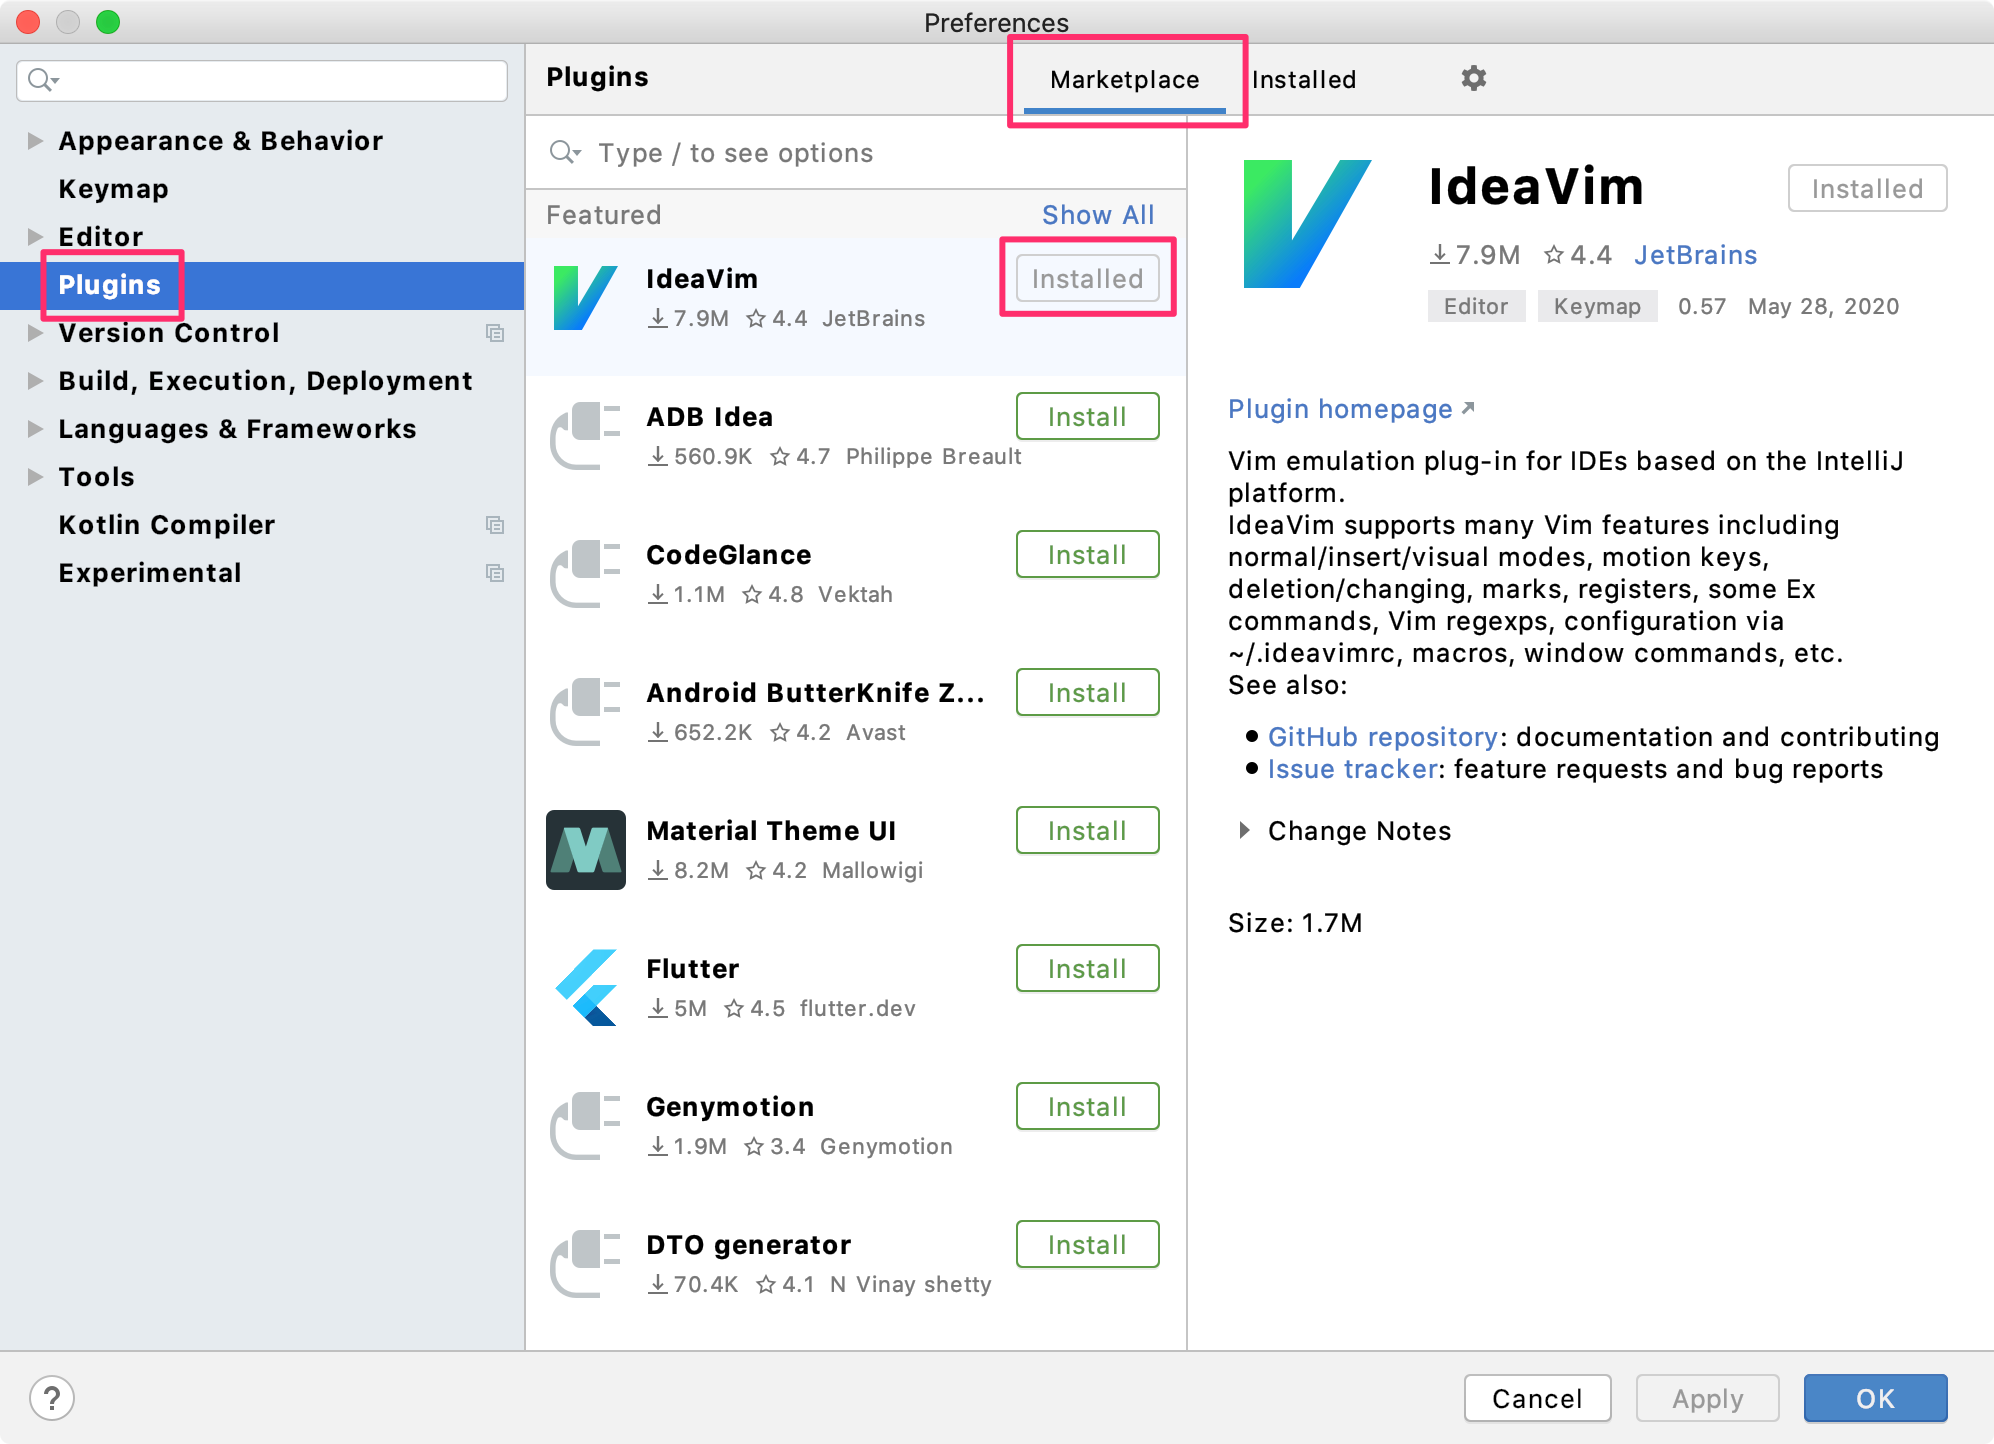
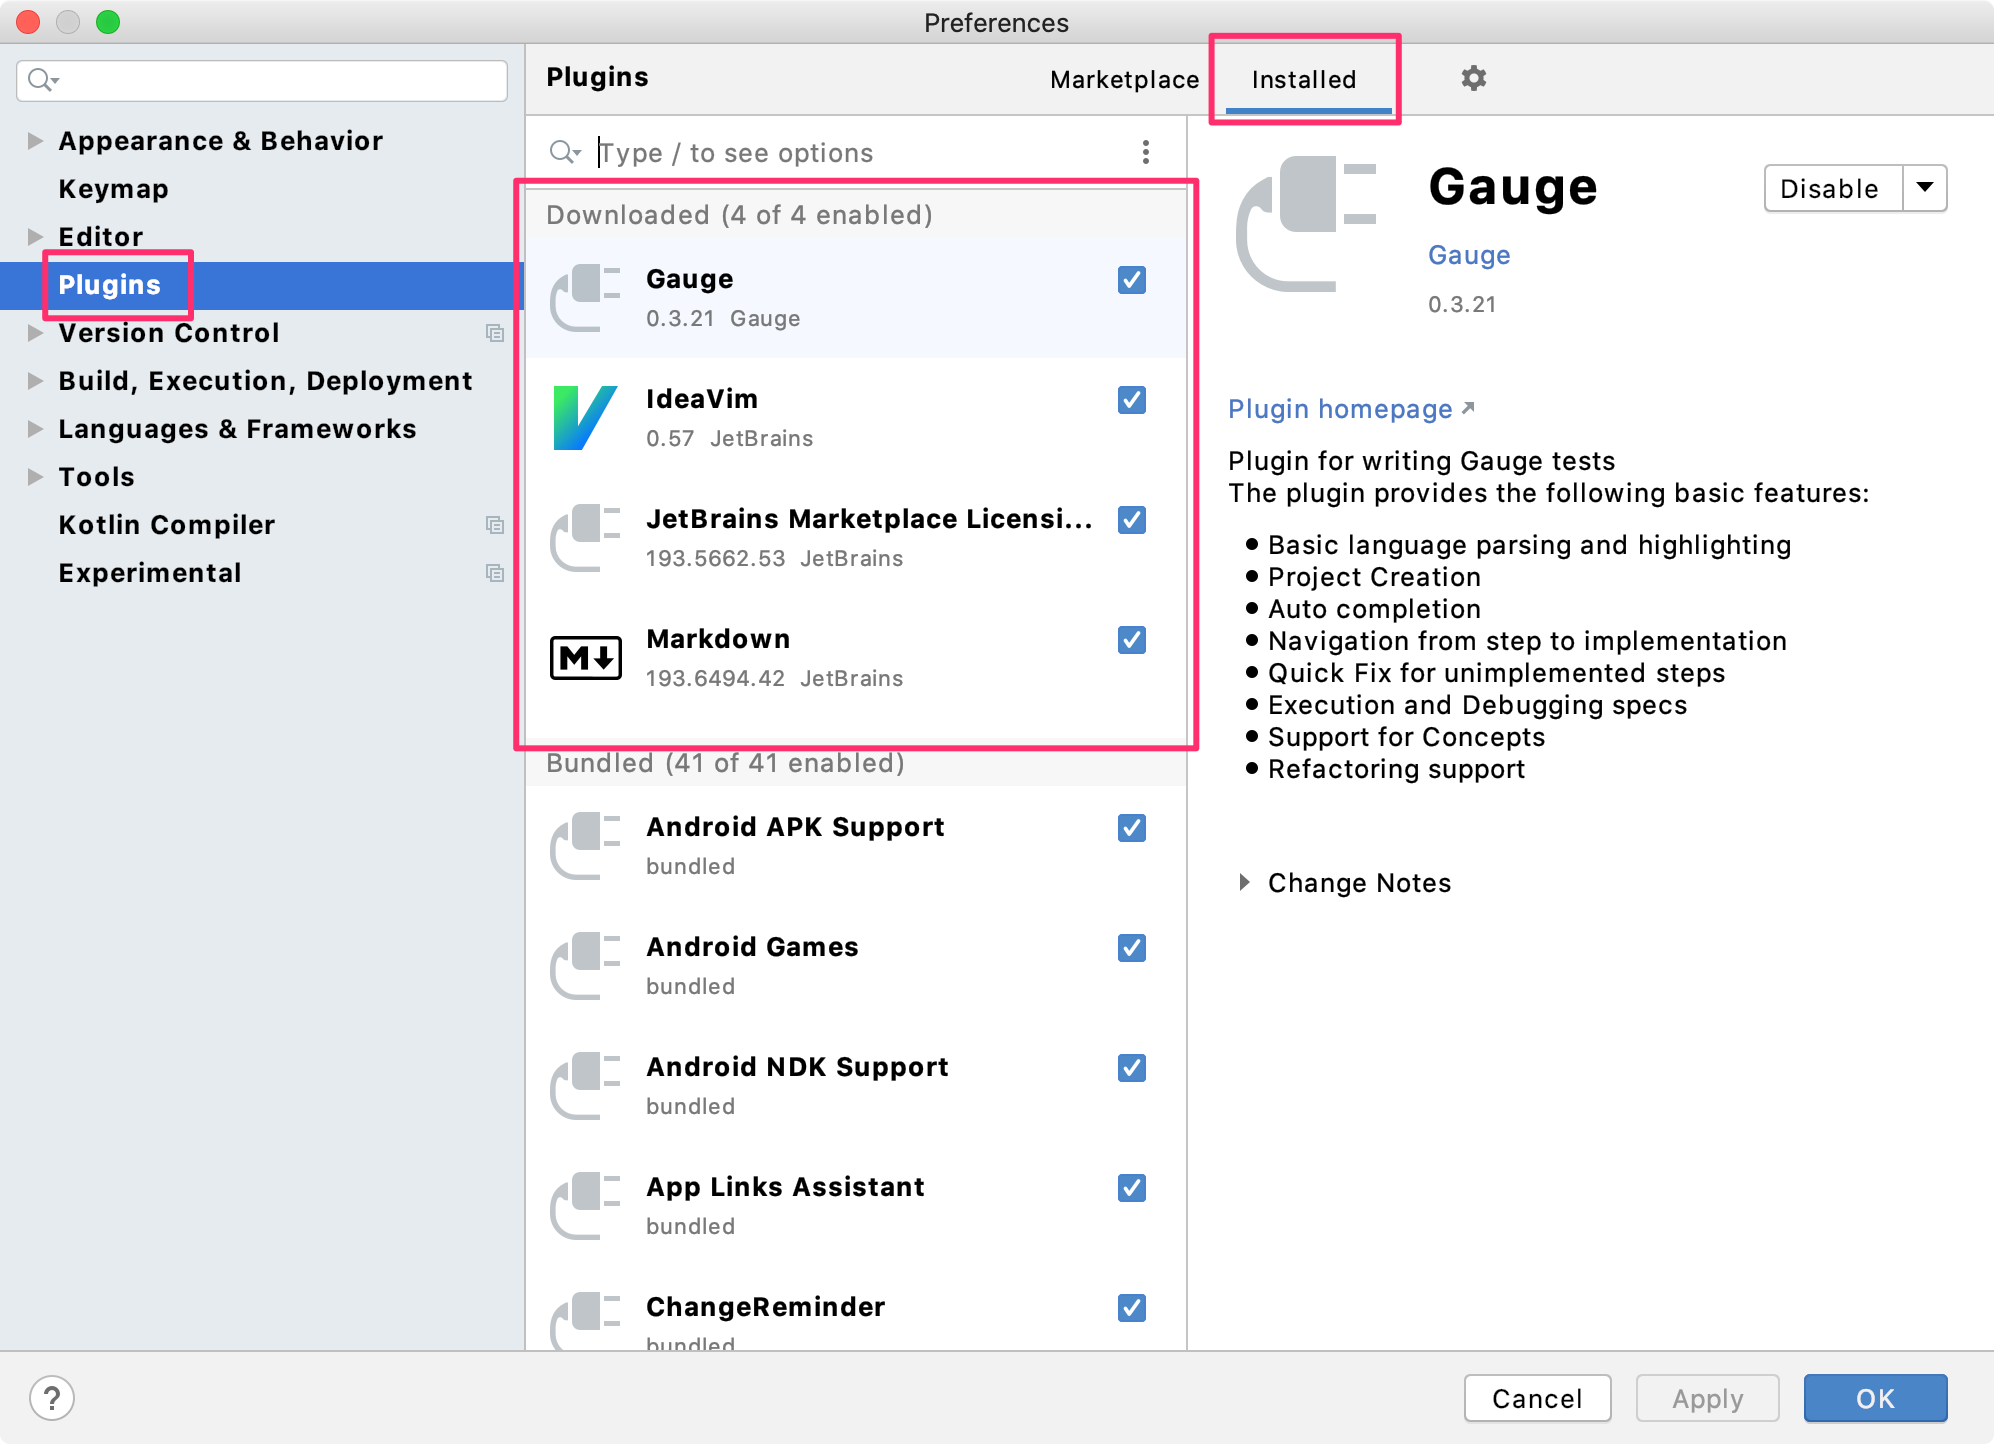
^→,^←を割り当てたいのですが、入力できなくて諦めました、、プラグインを追加する
Plugins > [Marketplace]タブ
追加したいプラグインを検索し、[Install]ボタンを押下
私はIdeaVimと自動でインストールされるプラグインしか追加していません。
オススメのプラグインがあれば、教えていただけると嬉しいです
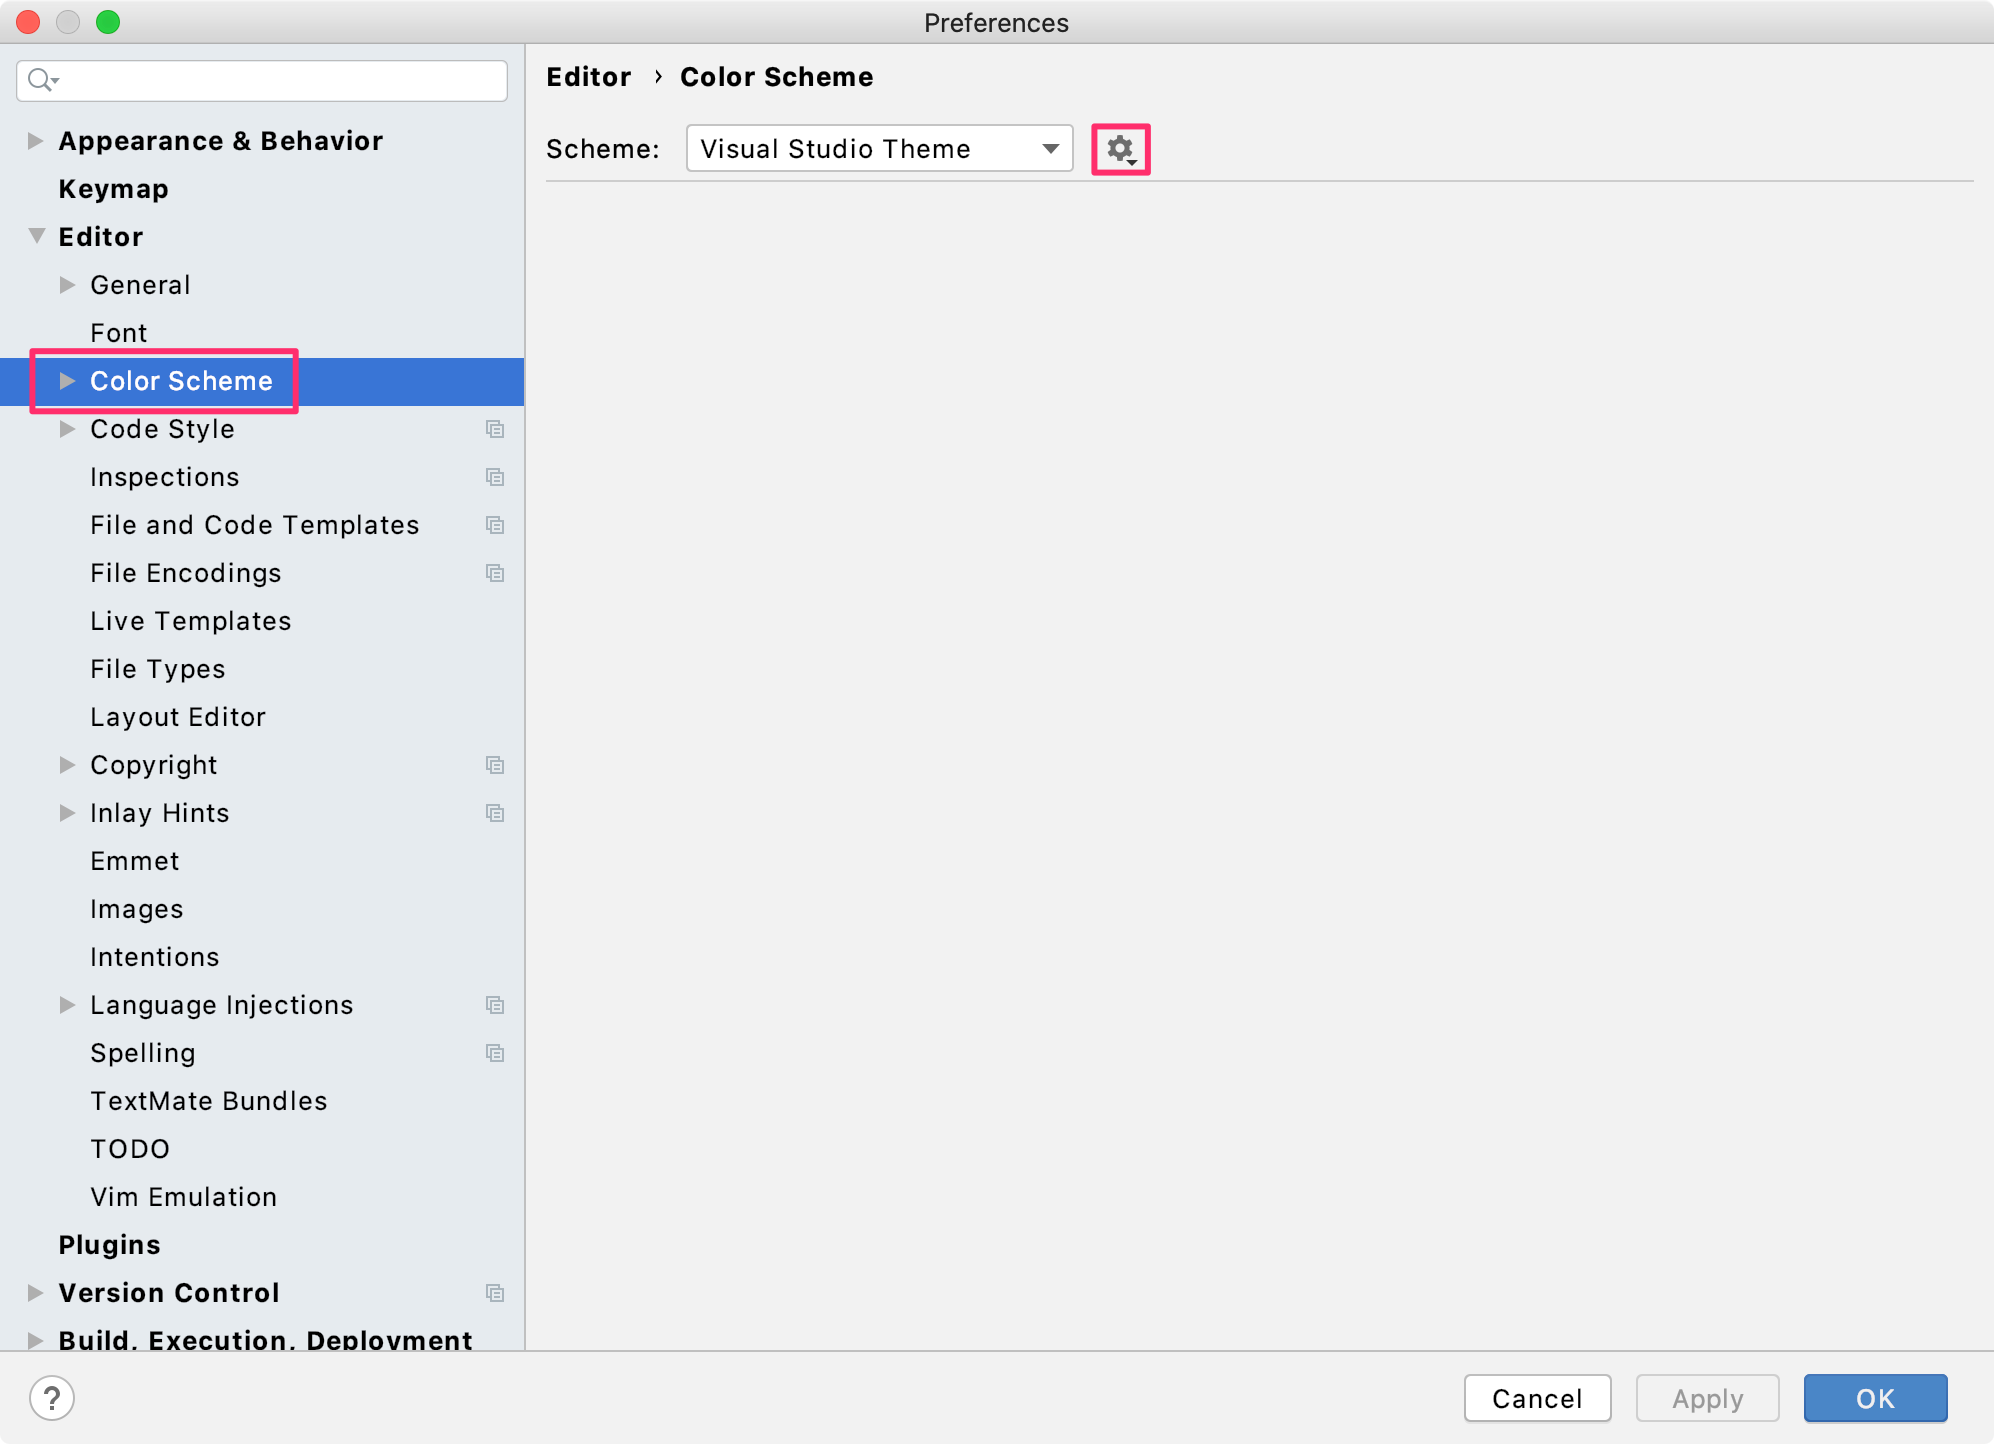
Visual Studio風のカラースキームを設定する
私はVisual Studioの文字色に慣れているので、それに近い色合いのカラースキームを設定します。
完全に私の好みのため、必要に応じて設定してください。以下からVisual Studio風のカラースキームをダウンロードします。
http://color-themes.com/?view=theme&id=563a1a6780b4acf11273ae55Editor > Color Scheme
歯車のアイコンをクリック > Import Scheme…
ダウンロードした.jarファイルを選択
背景色が白でコメントの文字色が緑でないと落ち着きません
カラースキームでなくデフォルトの文字サイズを使う
Editor > Color Scheme > Color Scheme Font
[Use color scheme font instead of default]チェック:ON→OFF
Visual Studio風のカラースキームには文字サイズも含まれています。
先ほど設定したデフォルトの文字サイズ(14)のままにしたいため、こちらのチェックを外します。コメントの文字色を変更する
Editor > Color Scheme > Language Defaults
Comments
Block comment:808080(グレー)→008000(緑)
Doc Comment
Markup:000000(黒)→808080(グレー)
Tag:0000FF(青)→808080(グレー)
Tag value:3D3D3D(黒)→808080(グレー)
Text:008000(緑)→808080(グレー)
Visual Studioと同様、通常のコメントを緑、ドキュメンテーションコメントの文字色をグレーにします。
フォントの斜体と太字を変更する
Editor > Color Scheme > Language Defaults
Itaricをすべて外す
TagのみBold、それ以外はBoldを外す文字色を変更したときと同じ画面なので、スクリーンショットは省略します。
Xcodeでは斜体を一切使っておらず、太字もタグでしか使われていません(違ったらすみません)。
私はXcodeに慣れているため、同じように設定します。その他の設定
保存時にインポート文の最適化とコード整形を行う
以下の記事を参考に設定します。
https://qiita.com/chocomelon/items/46810763a5be0a433158私はIdeaVimを使っていて
:wで保存しているため設定していませんが、Command + Sで保存している方にはオススメです。
私もIdeaVimを使う前までは設定していました。上記の記事ではマクロで設定していますが、プラグインを使う方法もあるようです。
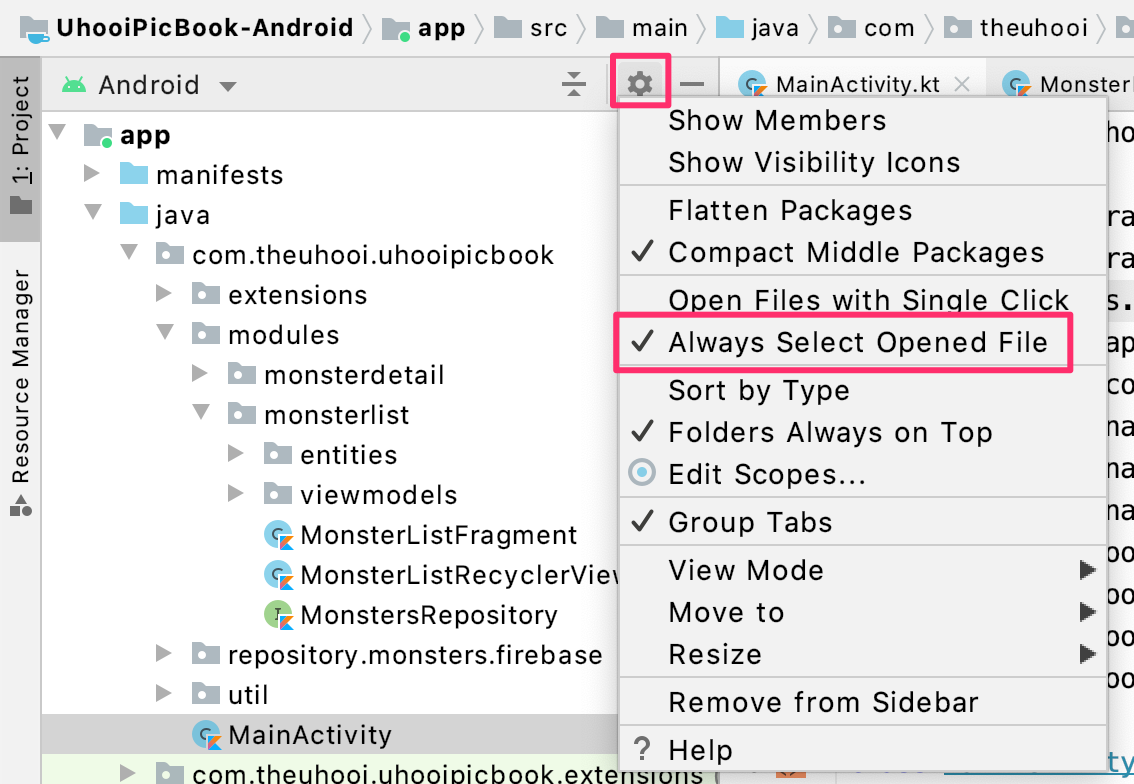
https://qiita.com/ikemura23/items/9a33c1b2bdb5a65d29a5開いているファイルをプロジェクトツリーで選択状態にする
プロジェクトツリーの右上にある歯車のアイコンを押下
[Always Select Opened File]チェック:OFF→ON
開いているファイルを常にプロジェクトツリーで選択状態にします。
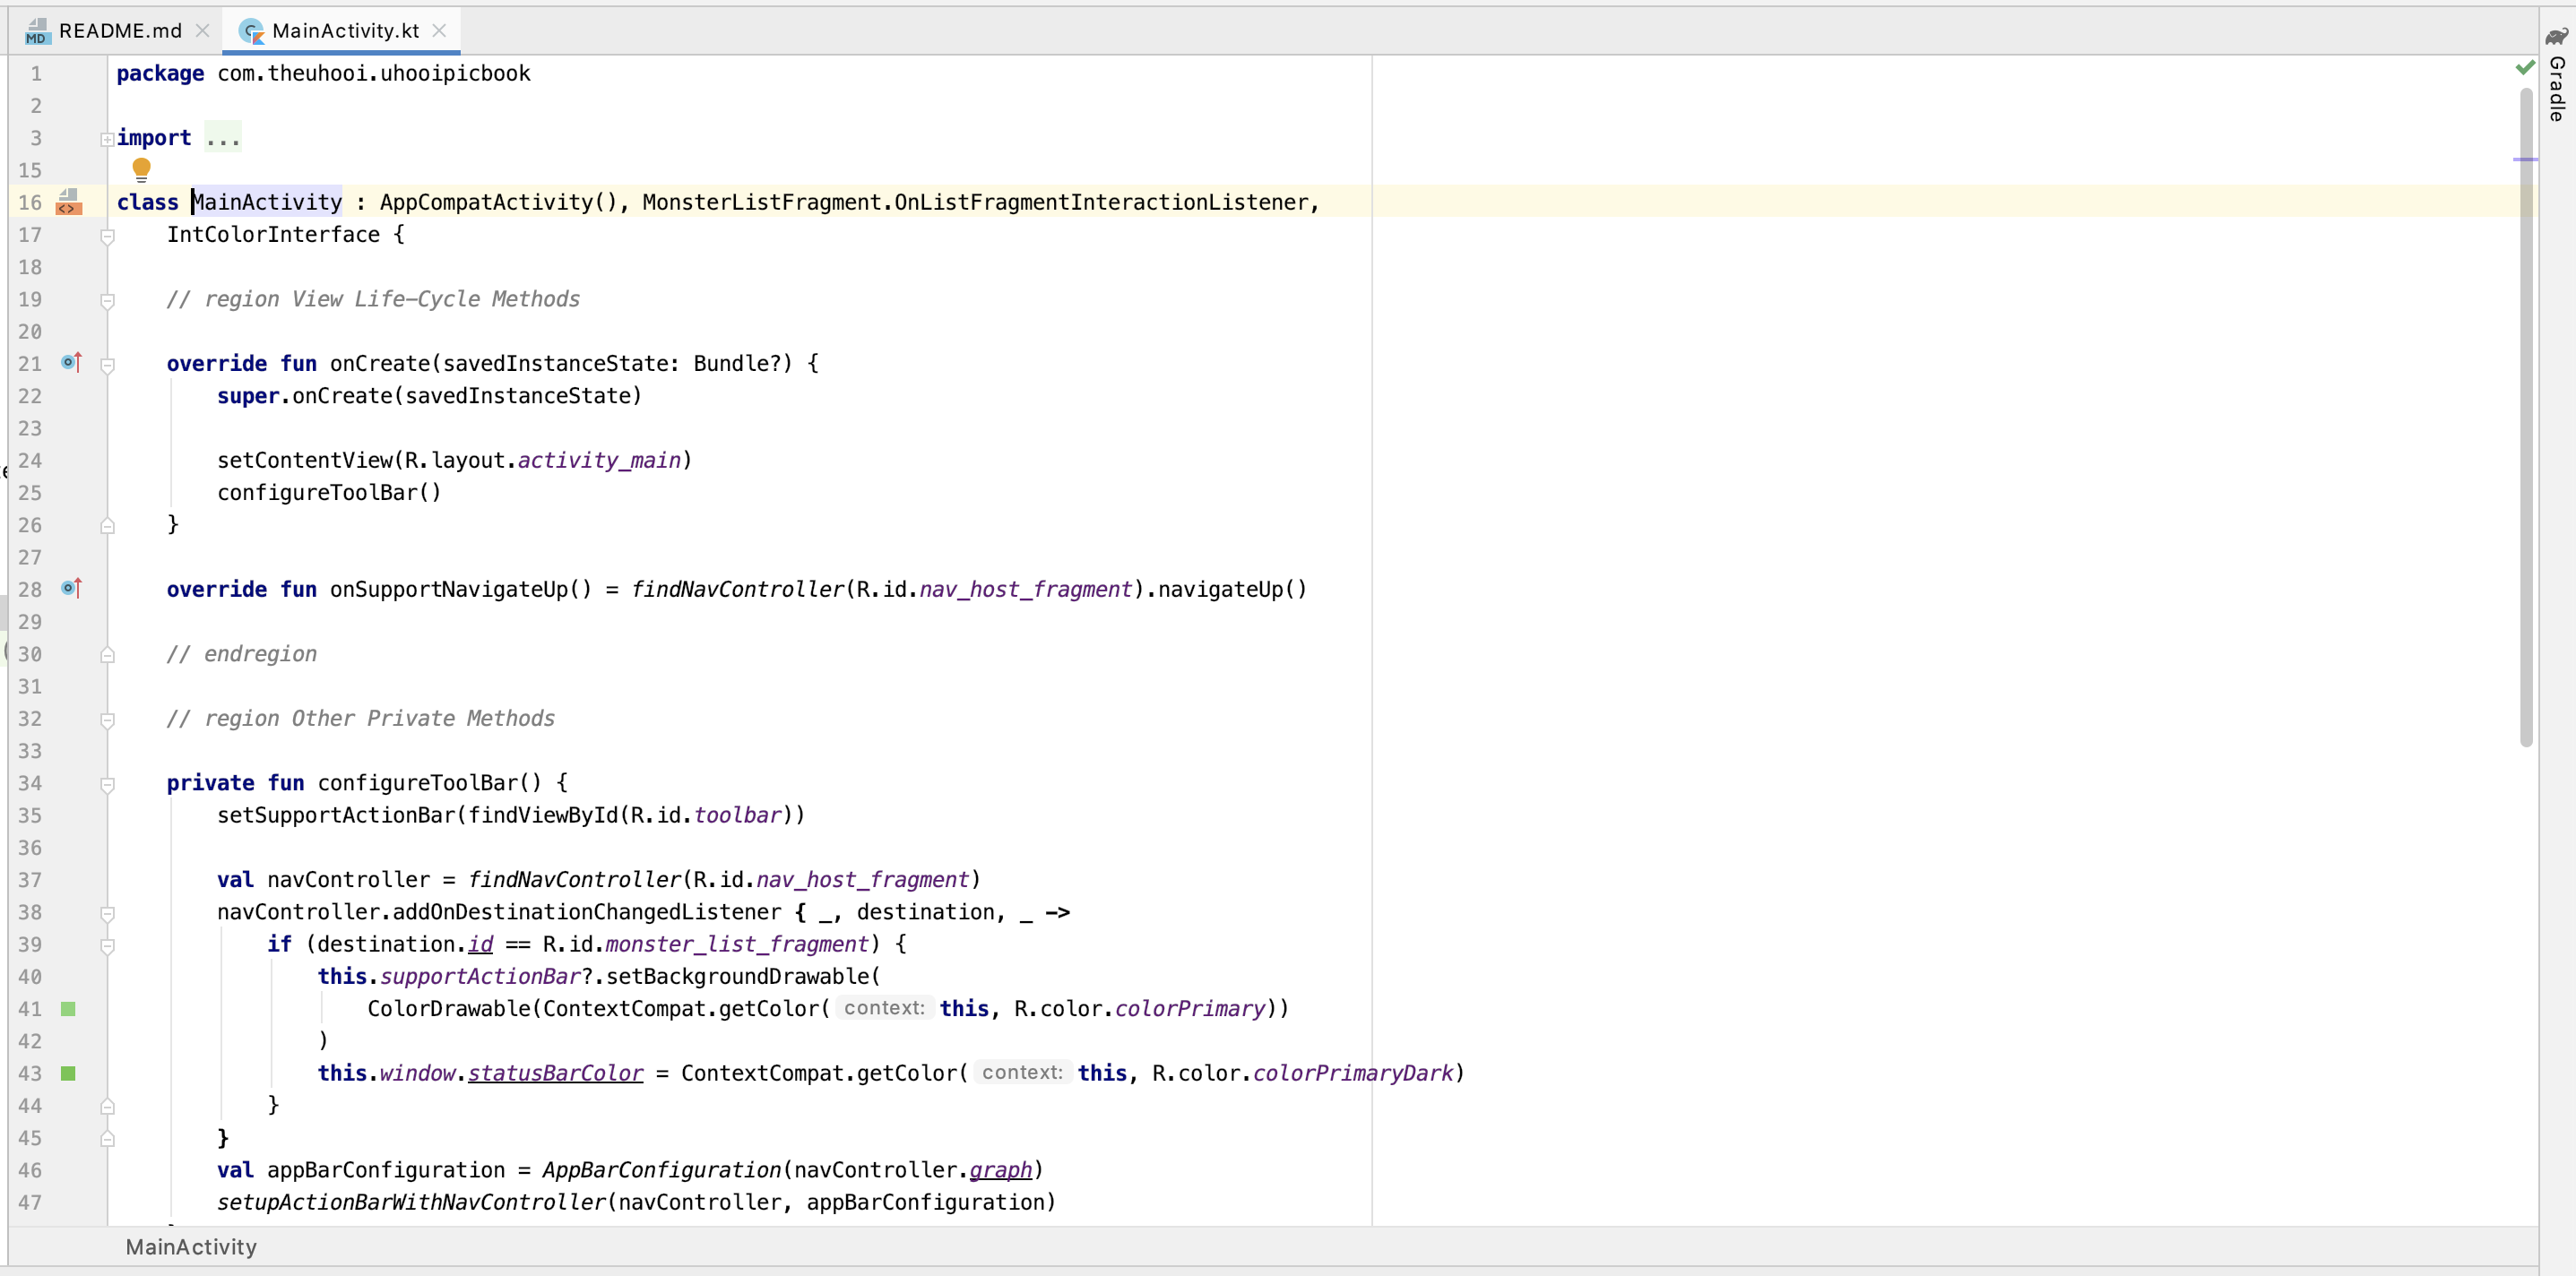
スクリーンショットだとわかりづらいかもしれませんが、MainActivity.ktをタブで開いているので、プロジェクトツリーでもMainActivityが選択されています。おわりに
これで今日から楽しいAndroidアプリ開発ライフの始まりです
メモらずに変更していて漏れている設定や、他にもオススメの設定がありましたらコメントなどでご連絡いただけると嬉しいです
参考リンク


- 投稿日:2020-06-01T12:16:12+09:00
画面遷移で別のアクティビティを開始するやり方 - Android
今回学ぶこと
・画面遷移の実装方法
目指す成果物
このようにボタンをタップしたら,別のActivityに画面遷移する実装をしてみたいと思います.
ディレクトリ構成
ポイントは「MainActivity.kt」のようなActivityを2つ作ることと、レイアウトXMLファイルを2つ作ることです.
ステップ
実装方法は2パターンあります
ポイントは画面遷移での必須の,「Intent」クラスと「startActivity」メソッドの使い方が方法①と②で異なります1. 方法① 基本的な実装
MainActivity.ktpackage com.example.android_transition_page import android.content.Intent import androidx.appcompat.app.AppCompatActivity import android.os.Bundle import kotlinx.android.synthetic.main.activity_main.* class MainActivity : AppCompatActivity() { override fun onCreate(savedInstanceState: Bundle?) { super.onCreate(savedInstanceState) setContentView(R.layout.activity_main) //ここが方法②と異なります button_next_activity.setOnClickListener { val intent = Intent(this, NextActivity::class.java) startActivity(intent) } } }NextActivity.ktpackage com.example.android_transition_page import androidx.appcompat.app.AppCompatActivity import android.os.Bundle class NextActivity : AppCompatActivity() { override fun onCreate(savedInstanceState: Bundle?) { super.onCreate(savedInstanceState) setContentView(R.layout.activity_next) } }activity_main.xml<?xml version="1.0" encoding="utf-8"?> <LinearLayout xmlns:android="http://schemas.android.com/apk/res/android" xmlns:tools="http://schemas.android.com/tools" android:layout_width="match_parent" android:layout_height="match_parent" android:gravity="center" android:orientation="vertical" tools:context=".MainActivity"> <TextView android:layout_width="wrap_content" android:layout_height="wrap_content" android:text="MainActivity" /> <Button android:id="@+id/button_next_activity" android:layout_width="wrap_content" android:layout_height="wrap_content" android:text="Move to Next Activity" /> </LinearLayout>activity_next.xml<?xml version="1.0" encoding="utf-8"?> <LinearLayout xmlns:android="http://schemas.android.com/apk/res/android" xmlns:app="http://schemas.android.com/apk/res-auto" xmlns:tools="http://schemas.android.com/tools" android:layout_width="match_parent" android:layout_height="match_parent" android:gravity="center" tools:context=".NextActivity"> <TextView android:layout_width="wrap_content" android:layout_height="wrap_content" app:layout_constraintBottom_toBottomOf="parent" app:layout_constraintLeft_toLeftOf="parent" app:layout_constraintRight_toRightOf="parent" app:layout_constraintTop_toTopOf="parent" android:text="NextActivity"/> </LinearLayout>2. 方法② コード量を減らして省略した実装
MainActivity.ktpackage com.example.android_transition_page import android.content.Intent import androidx.appcompat.app.AppCompatActivity import android.os.Bundle import kotlinx.android.synthetic.main.activity_main.* class MainActivity : AppCompatActivity() { override fun onCreate(savedInstanceState: Bundle?) { super.onCreate(savedInstanceState) setContentView(R.layout.activity_main) //ここが方法①と異なります button_next_activity.setOnClickListener { startActivity(Intent(this, NextActivity::class.java)) } } }NextActivity.ktpackage com.example.android_transition_page import androidx.appcompat.app.AppCompatActivity import android.os.Bundle class NextActivity : AppCompatActivity() { override fun onCreate(savedInstanceState: Bundle?) { super.onCreate(savedInstanceState) setContentView(R.layout.activity_next) } }activity_main.xml<?xml version="1.0" encoding="utf-8"?> <LinearLayout xmlns:android="http://schemas.android.com/apk/res/android" xmlns:tools="http://schemas.android.com/tools" android:layout_width="match_parent" android:layout_height="match_parent" android:gravity="center" android:orientation="vertical" tools:context=".MainActivity"> <TextView android:layout_width="wrap_content" android:layout_height="wrap_content" android:text="MainActivity" /> <Button android:id="@+id/button_next_activity" android:layout_width="wrap_content" android:layout_height="wrap_content" android:text="Move to Next Activity" /> </LinearLayout>activity_next.xml<?xml version="1.0" encoding="utf-8"?> <LinearLayout xmlns:android="http://schemas.android.com/apk/res/android" xmlns:app="http://schemas.android.com/apk/res-auto" xmlns:tools="http://schemas.android.com/tools" android:layout_width="match_parent" android:layout_height="match_parent" android:gravity="center" tools:context=".NextActivity"> <TextView android:layout_width="wrap_content" android:layout_height="wrap_content" app:layout_constraintBottom_toBottomOf="parent" app:layout_constraintLeft_toLeftOf="parent" app:layout_constraintRight_toRightOf="parent" app:layout_constraintTop_toTopOf="parent" android:text="NextActivity"/> </LinearLayout>まとめ
・画面遷移には「Intent」というクラスを使う
ソースコード
Github:
https://github.com/syuheifujita/android_transition_page言葉の定義
おわりに:他にもっとわかりやすい方法あれば教えてください
画面遷移の実装方法をまとめてみました.
もしかすると,情報が古かったり間違っていたり,他にもっとわかりやすい方法があるのかもしれません.
皆さんの中で上手に実装方法をまとめているかたがいればぜひ教えてください!Twitterやコメントなどでお待ちしています.質問でもお気軽に!