- 投稿日:2020-05-28T23:30:17+09:00
ViewModel と移譲コマンド
はじめに
オレオレ解釈の覚え書き その8
移譲コマンドについてまとめます。
本文
移譲コマンドとは ViewModel で宣言されるデリゲートです。View からバインドされることを前提にしており、コントロールの決められたプロパティとバインドすることで、コントロールへの操作に対応する処理を ViewModel で実装することができます。
移譲コマンドは ICommand インターフェースとして公開され、これを実装するクラスは、Prism であれば DelegateCommand、Livet であれば ViewModelCommand、MVVM Light Toolkit であれば RelayCommand といった具合にフレームワーク独自の形で提供されています。
今回は Prism を使い、画面上のボタンがクリックされたときに実行される処理を ViewModel に移譲してみます。ViewModel に ICommand インターフェースのプロパティを宣言し、DelegateCommand クラスで初期化します。View には Button コントロールを配置し、Command プロパティでバインドします。これにより、画面に配置されたボタンがクリックされると、ViewModel のメソッドが呼び出されるようになります。
ViewModelusing Prism.Commands; using System.Windows.Input; namespace TestApp.ViewModels { public class MainWindowViewModel { public ICommand ShowMessageCommand { get; } public MainWindowViewModel() { this.ShowMessageCommand = new DelegateCommand(() => this.ShowMessage()); } private void ShowMessage() { // メッセージを表示する処理 } } }View<Window x:Class="TestApp.Views.MainWindow" xmlns="http://schemas.microsoft.com/winfx/2006/xaml/presentation" xmlns:x="http://schemas.microsoft.com/winfx/2006/xaml" xmlns:i="http://schemas.microsoft.com/xaml/behaviors" xmlns:p="http://prismlibrary.com/" p:ViewModelLocator.AutoWireViewModel="True"> <Grid> <Button Command="{Binding ShowMessageCommand, Mode=Onetime}" Content="メッセージ表示" VerticalAlignment="Center" HorizontalAlignment="Center"/> </Grid> </Window>おわりに
View を起点にした処理を定義するための移譲コマンドについてでした。
原則的には View はビジネスロジックを扱えないため、処理を ViewModel に任せる必要があり、本稿の移譲コマンドを使用します。逆に ViewModel では描画ロジックを扱えないため、前回の相互作用処理を使い View に依頼します。これらを組み合わせて両層でやり取りをしつつ、処理を組み立てていきましょう。次回は MVVM を語るうえで特に重要な仕組みである、変更通知プロパティについてまとめます。(これがなければ ViewModel のプロパティの変更を View に反映できません。本来は最初にやるべきでした。)
- 投稿日:2020-05-28T23:05:11+09:00
Windows10+VSCode+.NET CoreでC#開発環境を作ろう!
C#を用いてプロジェクトを進めることになりました。
プロフィールにもある通り、私のメイン言語はC言語。
レガシー脱却への追い風をいただけたと思い、このチャンスをフル活用させていただきます!Visual StudioではなくVSCodeを使う
普段からWindowsアプリケーション等を作成しているのであれば
本家Visual Studioを使用している方も多いと思いますが、
言語学習としてあちこちの言語を切り替える身としてはVSCodeが沁みついております。
今回もVSCodeでC#開発環境を作成してみようと思います。※注:2020/05/28現在、Visual Studioを使用する方はVisual Studio 2019 16.4以降が推奨となります。理由は.NET Core 3.1との連携となります。
VSCodeのインストール
こちらからインストールできます。
オフラインPCで使用する場合はこちらを参照ください。.NET Core SDKのインストール
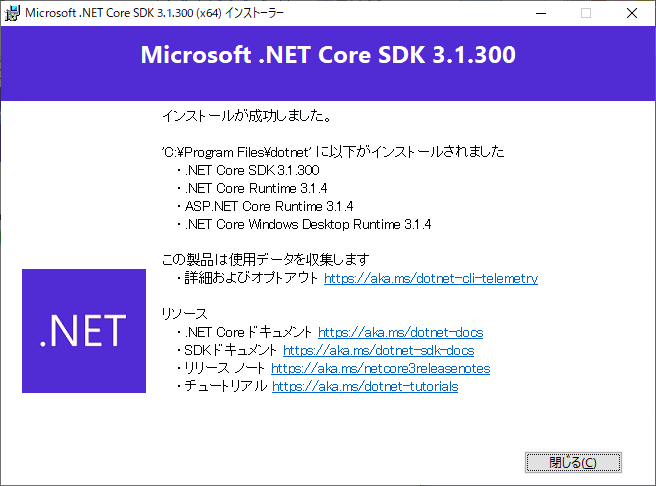
こちらから.NET Core SDKをダウンロードします。
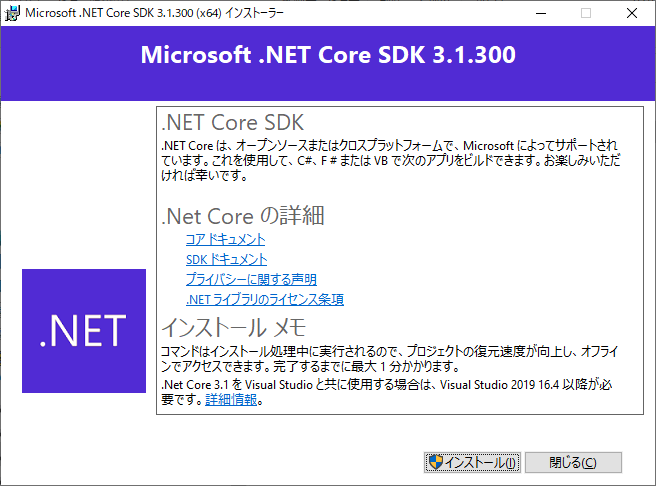
2020/05/28現在では.NET Core SDK3.1.3が推奨されています。インストールは選択肢もなく簡単でした。
拡張機能のインストール
C#用の拡張機能として以下をインストールしました。
C#
C# FixFormat
※formatterでC#とC# FixFormatどちらも認識するのでC#のみインストールしました。Hello World!!
いざ、Hello World!!
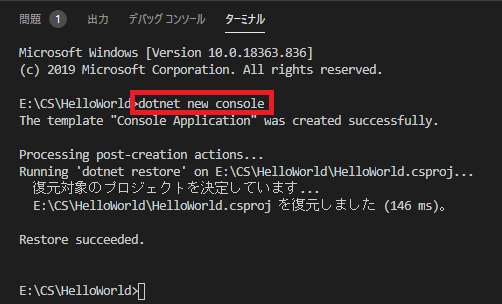
- HelloWorldフォルダを作成する(プロジェクト名/namespace名)
- コンソールにて作成したフォルダで
dotnet new consoleを実行する- フォルダ内でProgram.csを作成する(クラス名)
- Console.WriteLineの行にブレークポイントを設定してF5でデバッグ実行
まずは.NET Core SDKでプロジェクトを作ります。
そのプロジェクトにソースを追加してデバッグ実行するわけですね。
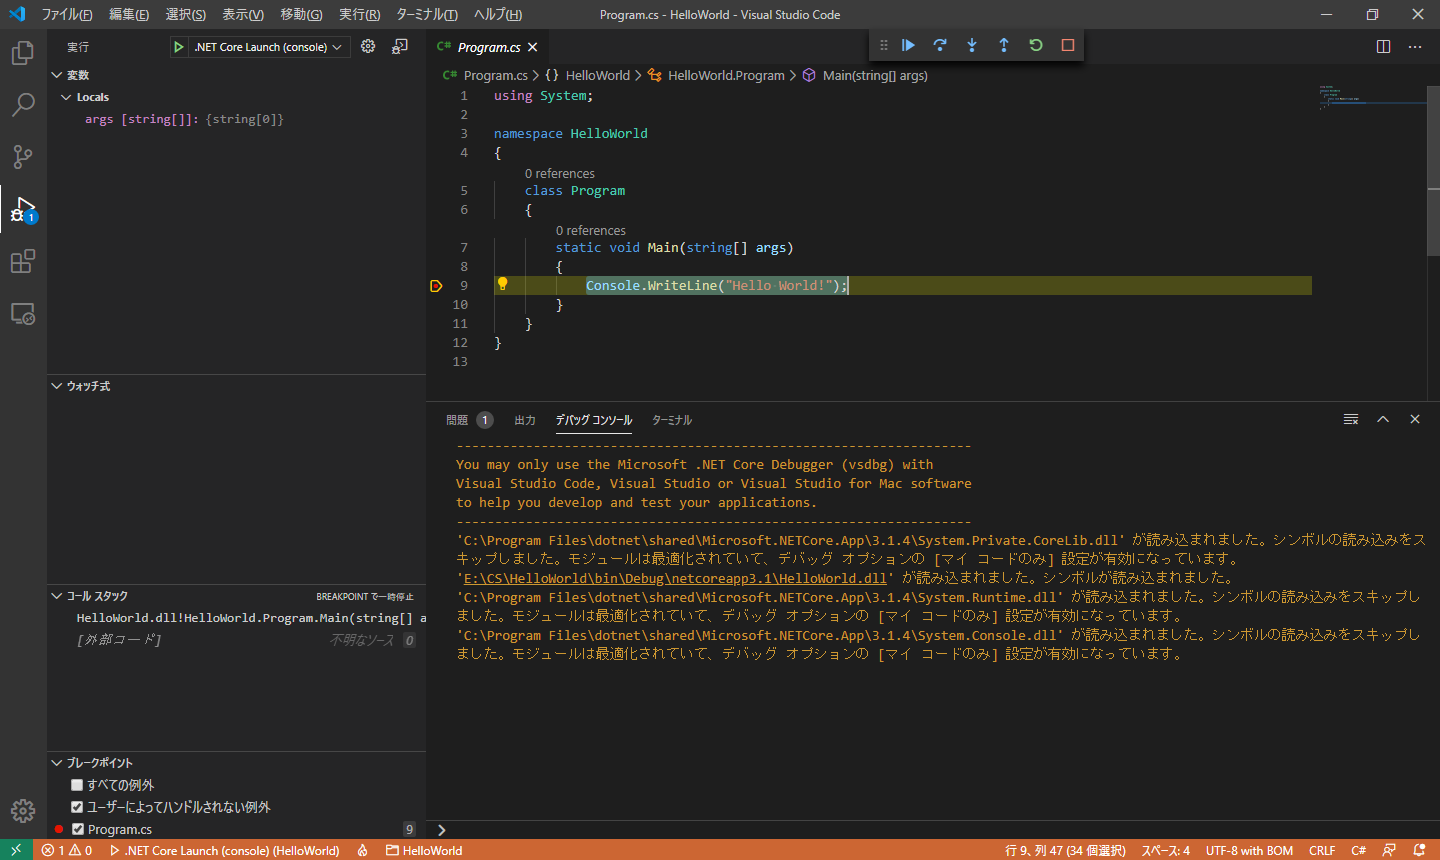
ソースは以下です。
Program.csusing System; namespace HelloWorld { class Program { static void Main(string[] args) { Console.WriteLine("Hello World!"); } } }F5を押した結果、
止まりました!
コンソール出力ばっちり!
実行だけの場合はコンソールで
dotnet runで動きます。まとめ
Hello Worldだけですが、環境を作成して確認するのに
ググる時間を入れても1時間かかりませんでした。
環境作成のみであれば5分程度とお手軽でした。
Let's C#!!参考

- 投稿日:2020-05-28T21:05:02+09:00
C# 値の入出力について
入力
ユーザーからの入力を受け取りたい場合は、Console.ReadLineを使います。
例:文字列を一行読み込む
string str = Console.ReadLine();例:整数を読み込む
int n = int.Parse(Console.ReadLine());例:実数を読み込む
double d = double.Parse(Console.ReadLine());
と簡単なものはあるが一体入力と出力だけでどれくらいあるか見てみた。Read()
概要:標準入力ストリームから次の文字を読み取る。
戻り値:
入力ストリームの次の文字。または次の文字がない場合は-1。例外処理:
・System.IO.IOExcetption:I/O エラーが発生しました。ReadLine()
概要:標準入力ストリームから次の1行分の文字を読み取る。
戻り値:
入力ストリームの次の行。または次の行がない場合はNULL。例外処理:
・System.IO.IOExcetption:I/O エラーが発生しました。
・System.OutOfMemoryException:返却された文字列にバッファーを割り当てるには、メモリが不足しています。
・System.ArgumentOutOfRangeException:次の文字行の文字数がSystem.Int32.MaxValueを超えています。出力
Write(string value)
概要:指定した文字列値を標準出力ストリームに書き込む。
Write(int value)
概要:指定した32ビット符号付き整数値のテキスト形式を標準出力ストリームに書き込む。
Write(uint value)
概要:指定した32ビットなし付き整数値のテキスト形式を標準出力ストリームに書き込む。
Write(long value)
概要:指定した64ビット符号月整数値のテキスト形式を標準出力ストリームに書き込む。
Write(ulong value)
概要:指定した64ビット符号なし整数値のテキスト形式を標準出力ストリームに書き込む。
Write(bool value)
概要:指定したBoolean値のテキスト形式を標準出力ストリームに書き込む。
Write(char value)
概要:指定したUnicode文字値を標準出力ストリームに書き込む。
Write(decimal value)
概要:指定した System.Decimal 値のテキスト形式を標準出力ストリームに書き込む。
Write(float value)
概要:指定した単精度浮動小数点値のテキスト形式を標準出力ストリームに書き込む。
Write(double value)
概要:指定した倍精度浮動小数点値のテキスト形式を標準出力ストリームに書き込む。
パラメーター:
value:書き込む値。例外処理:
・System.IO.IOExcetption:I/O エラーが発生しました。Write(object value)
概要:指定したオブジェクトのテキスト形式をを標準出力ストリームに書き込む。
パラメーター:
value:書き込む値またはNULL。例外処理:
・System.IO.IOExcetption:I/O エラーが発生しました。Write(char[] buffer)
概要:指定した Unicode 文字配列を標準出力ストリームに書き込む。
パラメーター:
buffer:Unicode文字配列。例外処理:
・System.IO.IOExcetption:I/O エラーが発生しました。Write(char[] buffer, int index, int count)
概要:指定した Unicode 文字の部分配列を標準出力ストリームに書き込む。
パラメーター:
buffer:Unicode文字の配列。
index:buffer内の開始位置。
count:書き込む文字数.例外処理:
・System.ArgumentNullException:bufferはnullです。
・System.ArgumentOutOfRangeException:indexまたはcountが0未満です。
・System.ArgumentException:indexとcountの合計が指定する位置は、buffer内ではありません。
・System.IO.IOExcetption:I/O エラーが発生しました。Write(string format, object arg0)
概要:指定した書式情報を使用して、指定したオブジェクトのテキスト表現を標準出力ストリームに書き込む。
パラメーター:
format:複合書式指定文字列
arg0:formatを使用して書き込む最初のオブジェクト。例外処理:
・System.IO.IOExcetption:I/O エラーが発生しました。
・System.ArgumentNullException:formatはnullです。
・System.FormatException;formatの書式指定が正しくありません。Write(string format, object arg0, ~ object arg3)
概要:指定した書式情報を使用して、指定したオブジェクトのテキスト表現を標準出力ストリームに書き込む。
パラメーター:
format:複合書式指定文字列
arg0:formatを使用して書き込む最初のオブジェクト。
↓
arg3:formatを使用して書き込む3番目のオブジェクト。例外処理:
・System.IO.IOExcetption:I/O エラーが発生しました。
・System.ArgumentNullException:formatはnullです。
・System.FormatException;formatの書式指定が正しくありません。Write(string format, params object[] arg)
概要:指定された書式情報を使用して、指定したオブジェクトのテキスト表現を標準出力ストリームに書き込む。
パラメーター:
format:複合書式指定文字列
arg:formatを使用して書き込むオブジェクトの配列。例外処理:
・System.IO.IOExcetption:I/O エラーが発生しました。
・System.ArgumentNullException:formatまたはargがnullです。
・System.FormatException;formatの書式指定が正しくありません。メッチャあった。。簡単な入出力だけでどんだけ~
参考資料
・C#の絵本
・Visual Statioのメソッド参照先
- 投稿日:2020-05-28T19:20:12+09:00
Unity で xsd(xml Schema)ファイルを用いて Xml ファイルを検証する
本記事は Unity 2019.3.3f1 及び Microsoft Visual Studio Community 2019 version 16.5.4 を使用しております。
本記事の内容
タイトルの通り、xsd ファイルを用いて xmlファイルの検証をします。
第1項 では、外部 xml,xsd ファイルから読み込み、検証を行い、
第2項 では、Resource.Load を用いて検証を行います。本記事で使う xsd,xml ファイルは以下になります。
Event.xsd<?xml version="1.0" encoding="utf-8"?> <xs:schema targetNamespace="hogehoge/Event" elementFormDefault="qualified" xmlns="http://tempuri.org/XMLSchema.xsd" xmlns:xs="http://www.w3.org/2001/XMLSchema" xmlns:Event="hogehoge/Event" xmlns:Status="hogehoge/Status"> <xs:import schemaLocation="Status.xsd" namespace="hogehoge/Status"/> <xs:element name="Event"> <xs:complexType> <xs:sequence> <xs:element name="Message"> <xs:complexType mixed="true"> <xs:attribute name="Name" type="Status:Name"/> </xs:complexType> </xs:element> </xs:sequence> </xs:complexType> </xs:element> </xs:schema>Status.xsd<?xml version="1.0" encoding="utf-8"?> <xs:schema targetNamespace="hogehoge/Status" elementFormDefault="qualified" xmlns="http://tempuri.org/XMLSchema.xsd" xmlns:xs="http://www.w3.org/2001/XMLSchema" xmlns:Status="hogehoge/Status"> <xs:simpleType name="Name"> <xs:restriction base="xs:string"> <xs:enumeration value="Anyone"/> <xs:enumeration value="Someone" /> </xs:restriction> </xs:simpleType> </xs:schema>Message.xml<?xml version="1.0" encoding="utf-8"?> <Event xmlns="hogehoge/Event"> <Message Name="Anyone"> 私はどこかにいるだれか </Message> <Message Name="Someone"> 僕はここにいるだれか </Message> </Event>1.外部 xsd,xml ファイルを読み込み、検証する
まず、外部 xsd,xml ファイルを読み込む場合には以下のようになります。
XmlGetter.cs/// 変数の先頭の p は passed(引数) /// l は local(メソッドスコープ内) /// m は member(プロパティ)の略語です。 public static class XmlGetter { public static XmlSchemaSet AddSchemaFromXsd(string pSchemaPath) { XmlSchemaSet lSchemas = new XmlSchemaSet(); XmlReader lSchemaReader = null; string targetNamespace = "hogehoge/Event"; try { lSchemas.Add(targetNamespace, lSchemaReader = XmlReader.Create(pSchemaPath)); } catch (XmlSchemaValidationException e) { Debug.LogError(e.Message); Debug.LogError("error line : " + e.LineNumber); Debug.LogError("error position : " + e.LinePosition); } finally { if (lSchemaReader.ReadState != ReadState.Closed) { lSchemaReader.Close(); } } return schemas; } public static XDocument GetXDocumentFromXml(string pXmlPath, XmlSchemaSet pSchemas) { XmlReaderSettings lSettings = new XmlReaderSettings(); lSettings.ValidationType = ValidationType.Schema; lSettings.Schemas = pSchemas; XmlReader lXmlReader = null; XDocument pEventXml = null; try { lXmlReader = XmlReader.Create(pXmlPath, lSettings); pEventXml = XDocument.Load(lXmlReader); } catch (XmlSchemaValidationException e) { Debug.LogError(e.Message); Debug.LogError("error line : " + e.LineNumber); Debug.LogError("error position : " + e.LinePosition); } catch (Exception e) { Debug.Log(e.Message); } finally { if (lXmlReader.ReadState != ReadState.Closed) { lXmlReader.Close(); } } return pEventXml; } }XmlGetTest.cspublic class XmlGetTest:MonoBehavior { public void Awake() { string lSchemaPath = "Event.xsd"; XmlSchemaSet lSchemas = AddSchemaFromXsd(lSchemaPath); string lXmlPath = "Event.xml"; XDocument lXDocument = GetXDocumentFromXml(lXmlPath, lSchemas); } }これは、Unity のプロジェクトの外に XML,XSD ファイルが共にある場合に使えます。
その代わりに、プロジェクトをビルドした後に、自分でフォルダをビルドフォルダに加えなければいけません。
path は自分のファイルへのパスに適時置き換えて下さい。xmlReaderSetting の ValidationType に Schema をセットすることで、Load 時に検証も行っています。
2.Resource.Load で xsd ファイルを読み込む
しかし、Unity で Resource フォルダ下に XML,XSD ファイルを置きたい場合があります。今回はその例を紹介します。
Resouce.Load を使う場合、そのファイル形式は Unity で対応していなければいけません。
2-1.ScriptedImporter を使う
Unity が対応していないファイルを使う場合、ScriptedImporter クラスを使います。
ScriptedImporter の詳しい説明はテラシュールブログさんを
参照して下さい。
テラシュールブログさん:
http://tsubakit1.hateblo.jp/entry/2017/12/14/012746ScriptedImporter を使って xsd を TextAsset として扱うクラスを作ります。
XsdImporter.cs[ScriptedImporter(1, "xsd")] public class XSDImporter : ScriptedImporter { public override void OnImportAsset(AssetImportContext ctx) { TextAsset lXsd; try { lXsd = new TextAsset( File.ReadAllText(ctx.assetPath) ); ctx.AddObjectToAsset("XSD", lXsd); ctx.SetMainObject(lXsd); } catch (Exception e) { Debug.LogError(e.Message); } } }これで xsd ファイルを Resource.Load で読み込むことが出来るようになりました。
2-2.TextAsset を StringReader を経由して XmlReader インスタンスを生成する。
xsd ファイルを TextAsset として使う場合、StringReader クラスを使い、XmlReader インスタンスを生成します。
XmlGetter.cspublic static XmlSchemaSet AddSchemaFromTextAsset(TextAsset pSchemaAsset) { XmlSchemaSet lSchemas = new XmlSchemaSet(); XmlReader lSchemaReader = null; StringReader lStringReader = null; string lTargetNamespace = "hogehoge/Event"; try { lStringReader = new StringReader(pSchemaAsset.text); lSchemas.Add(lTargetNamespace, lSchemaReader =XmlReader.Create( lStringReader)); } catch (XmlSchemaValidationException e) { Debug.LogError(e.Message); Debug.LogError("error line : " + e.LineNumber); Debug.LogError("error position : " + e.LinePosition); } finally { if (lSchemaReader.ReadState != ReadState.Closed) { lSchemaReader.Close(); } } return lSchemas; }AddSchemaFromTextAsset メソッドが、渡された TextAsset の text プロパティを使った StringReader を経由して XmlReader インスタンスを作成し、 XmlSchemaSet に変換します。
xml も同様に TextAsset から StringReader を用いて XmlReader インスタンスを作成して下さい。
2-3. import する xsd ファイルを XmlSchemaSet クラスに Add する
しかし、ここでエラーが発生します。
StringReader を使って XmlReader を作成すると、import した xsd ファイルを SchemaSet に Add する事が出来ません。
そこで、少々周りくどいですが、一つづつ SchemaSet を Add していく手段を取ります。
ついでにパスを一つづつ設定するのが嫌なのでパスジェネレーターも作りました。
PathGenerator.cspublic class PathGenerator { string mBasePath; public PathGenerator(string pBaseath) { mBasePath = pBasepath; } public string GeneratePath(params string[] pPathes) { StringBuilder lGeneratePath =new StringBuilder().Append(mBasePath); foreach (string path in pPathes) { lGeneratePath.Append("/").Append(path); } return lGeneratePath.ToString(); } }XmlGetter.cspublic enum eSchema { Event, Status } public class XmlGetter { /// 中略 /// SchemaPath は自分のスキーマフォルダへのパスを入れて下さい。 public Dictionary<string,string> GeneratePathPair() { string lEventStr = eSchema.Event.ToString(); string lStatusStr = eSchema.Status.ToString(); PathGenerator lTnsGenerator = new PathGenerator("hogehoge"); PathGenerator lPathGenerator = new PathGenerator(SchemaPath); Dictionary<string, string> lTnsPathPairInXsd = new Dictionary<string, string> { [lTnsGenerator.GeneratePath(lEvent)] = lPathGenerator.GeneratePath(lEvent), [lTnsGenerator.GeneratePath(lStatus)] = lPathGenerator.GeneratePath(lStatus) }; return lTnsPathPairInXsd; } public static XmlSchemaSet GetSchemaFromXSD(Dictionary<string,string> pXsd) { XmlSchemaSet lSchemas = new XmlSchemaSet(); StringReader lStringReader = null; XmlReader lSchemaReader = null; foreach (KeyValuePair<string, string> item in pXsd) { try { TextAsset xsdAsset = Resources.Load<TextAsset>(item.Value); lStringReader = new StringReader(xsdAsset.text); lSchemaReader = XmlReader.Create(lStringReader); lSchemas.Add(item.Key, lSchemaReader); } catch (XmlSchemaValidationException e) { Debug.LogError(e.Message); Debug.LogError("error line : " + e.LineNumber); Debug.LogError("error position : " + e.LinePosition); } finally { if (lStringReader != null) { lStringReader.Close(); } if (lSchemaReader.ReadState != ReadState.Closed) { lSchemaReader.Close(); } } } return lSchemas; } }何か指摘ありましたら宜しくお願いします。
参考にしたサイト。
xmlSchemaSet
https://docs.microsoft.com/ja-jp/dotnet/api/system.xml.schema.xmlschemaset?view=netcore-3.1XmlReader
https://docs.microsoft.com/ja-jp/dotnet/api/system.xml.xmlreader?view=netcore-3.1StringReader
https://docs.microsoft.com/ja-jp/dotnet/api/system.io.stringreader?view=netcore-3.1XDocument
https://docs.microsoft.com/ja-jp/dotnet/api/system.xml.linq.xdocument?view=netcore-3.1XmlSchema,Xml に関して参考にした書籍(「基礎 XML」著:山田祥寛)
- 投稿日:2020-05-28T19:20:12+09:00
Unity で xsd(xml Schema)ファイルを用いて xml ファイルを検証する
本記事は Unity 2019.3.3f1 及び Microsoft Visual Studio Community 2019 version 16.5.4 を使用しております。
本記事の内容
タイトルの通り、xsd ファイルを用いて xmlファイルの検証をします。
第1項 では、外部 xml,xsd ファイルから読み込み、検証を行い、
第2項 では、Resource.Load を用いて検証を行います。本記事で使う xsd,xml ファイルは以下になります。
Event.xsd<?xml version="1.0" encoding="utf-8"?> <xs:schema targetNamespace="hogehoge/Event" elementFormDefault="qualified" xmlns="http://tempuri.org/XMLSchema.xsd" xmlns:xs="http://www.w3.org/2001/XMLSchema" xmlns:Event="hogehoge/Event" xmlns:Status="hogehoge/Status"> <xs:import schemaLocation="Status.xsd" namespace="hogehoge/Status"/> <xs:element name="Event"> <xs:complexType> <xs:sequence> <xs:element name="Message"> <xs:complexType mixed="true"> <xs:attribute name="Name" type="Status:Name"/> </xs:complexType> </xs:element> </xs:sequence> </xs:complexType> </xs:element> </xs:schema>Status.xsd<?xml version="1.0" encoding="utf-8"?> <xs:schema targetNamespace="hogehoge/Status" elementFormDefault="qualified" xmlns="http://tempuri.org/XMLSchema.xsd" xmlns:xs="http://www.w3.org/2001/XMLSchema" xmlns:Status="hogehoge/Status"> <xs:simpleType name="Name"> <xs:restriction base="xs:string"> <xs:enumeration value="Anyone"/> <xs:enumeration value="Someone" /> </xs:restriction> </xs:simpleType> </xs:schema>Message.xml<?xml version="1.0" encoding="utf-8"?> <Event xmlns="hogehoge/Event"> <Message Name="Anyone"> 私はどこかにいるだれか </Message> <Message Name="Someone"> 僕はここにいるだれか </Message> </Event>1.外部 xsd,xml ファイルを読み込み、検証する
まず、外部 xsd,xml ファイルを読み込む場合には以下のようになります。
XmlGetter.cs/// 変数の先頭の p は passed(引数) /// l は local(メソッドスコープ内) /// m は member(プロパティ)の略語です。 public static class XmlGetter { public static XmlSchemaSet AddSchemaFromXsd(string pSchemaPath) { XmlSchemaSet lSchemas = new XmlSchemaSet(); XmlReader lSchemaReader = null; string targetNamespace = "hogehoge/Event"; try { lSchemas.Add(targetNamespace, lSchemaReader = XmlReader.Create(pSchemaPath)); } catch (XmlSchemaValidationException e) { Debug.LogError(e.Message); Debug.LogError("error line : " + e.LineNumber); Debug.LogError("error position : " + e.LinePosition); } finally { if (lSchemaReader.ReadState != ReadState.Closed) { lSchemaReader.Close(); } } return schemas; } public static XDocument GetXDocumentFromXml(string pXmlPath, XmlSchemaSet pSchemas) { XmlReaderSettings lSettings = new XmlReaderSettings(); lSettings.ValidationType = ValidationType.Schema; lSettings.Schemas = pSchemas; XmlReader lXmlReader = null; XDocument pEventXml = null; try { lXmlReader = XmlReader.Create(pXmlPath, lSettings); pEventXml = XDocument.Load(lXmlReader); } catch (XmlSchemaValidationException e) { Debug.LogError(e.Message); Debug.LogError("error line : " + e.LineNumber); Debug.LogError("error position : " + e.LinePosition); } catch (Exception e) { Debug.Log(e.Message); } finally { if (lXmlReader.ReadState != ReadState.Closed) { lXmlReader.Close(); } } return pEventXml; } }XmlGetTest.cspublic class XmlGetTest:MonoBehavior { public void Awake() { string lSchemaPath = "Event.xsd"; XmlSchemaSet lSchemas = AddSchemaFromXsd(lSchemaPath); string lXmlPath = "Event.xml"; XDocument lXDocument = GetXDocumentFromXml(lXmlPath, lSchemas); } }これは、Unity のプロジェクトの外に XML,XSD ファイルが共にある場合に使えます。
その代わりに、プロジェクトをビルドした後に、自分でフォルダをビルドフォルダに加えなければいけません。
path は自分のファイルへのパスに適時置き換えて下さい。xmlReaderSetting の ValidationType に Schema をセットすることで、Load 時に検証も行っています。
2.Resource.Load で xsd ファイルを読み込む
しかし、Unity で Resource フォルダ下に XML,XSD ファイルを置きたい場合があります。今回はその例を紹介します。
Resouce.Load を使う場合、そのファイル形式は Unity で対応していなければいけません。
2-1.ScriptedImporter を使う
Unity が対応していないファイルを使う場合、ScriptedImporter クラスを使います。
ScriptedImporter の詳しい説明はテラシュールブログさんを
参照して下さい。
テラシュールブログさん:
http://tsubakit1.hateblo.jp/entry/2017/12/14/012746ScriptedImporter を使って xsd を TextAsset として扱うクラスを作ります。
XsdImporter.cs[ScriptedImporter(1, "xsd")] public class XSDImporter : ScriptedImporter { public override void OnImportAsset(AssetImportContext ctx) { TextAsset lXsd; try { lXsd = new TextAsset( File.ReadAllText(ctx.assetPath) ); ctx.AddObjectToAsset("XSD", lXsd); ctx.SetMainObject(lXsd); } catch (Exception e) { Debug.LogError(e.Message); } } }これで xsd ファイルを Resource.Load で読み込むことが出来るようになりました。
2-2.TextAsset を StringReader を経由して XmlReader インスタンスを生成する。
xsd ファイルを TextAsset として使う場合、StringReader クラスを使い、XmlReader インスタンスを生成します。
XmlGetter.cspublic static XmlSchemaSet AddSchemaFromTextAsset(TextAsset pSchemaAsset) { XmlSchemaSet lSchemas = new XmlSchemaSet(); XmlReader lSchemaReader = null; StringReader lStringReader = null; string lTargetNamespace = "hogehoge/Event"; try { lStringReader = new StringReader(pSchemaAsset.text); lSchemas.Add(lTargetNamespace, lSchemaReader =XmlReader.Create( lStringReader)); } catch (XmlSchemaValidationException e) { Debug.LogError(e.Message); Debug.LogError("error line : " + e.LineNumber); Debug.LogError("error position : " + e.LinePosition); } finally { if (lSchemaReader.ReadState != ReadState.Closed) { lSchemaReader.Close(); } } return lSchemas; }AddSchemaFromTextAsset メソッドが、渡された TextAsset の text プロパティを使った StringReader を経由して XmlReader インスタンスを作成し、 XmlSchemaSet に変換します。
xml も同様に TextAsset から StringReader を用いて XmlReader インスタンスを作成して下さい。
2-3. import する xsd ファイルを XmlSchemaSet クラスに Add する
しかし、ここでエラーが発生します。
StringReader を使って XmlReader を作成すると、import した xsd ファイルを SchemaSet に Add する事が出来ません。
そこで、少々周りくどいですが、一つづつ SchemaSet を Add していく手段を取ります。
ついでにパスを一つづつ設定するのが嫌なのでパスジェネレーターも作りました。
PathGenerator.cspublic class PathGenerator { string mBasePath; public PathGenerator(string pBaseath) { mBasePath = pBasepath; } public string GeneratePath(params string[] pPathes) { StringBuilder lGeneratePath =new StringBuilder().Append(mBasePath); foreach (string path in pPathes) { lGeneratePath.Append("/").Append(path); } return lGeneratePath.ToString(); } }XmlGetter.cspublic enum eSchema { Event, Status } public class XmlGetter { /// 中略 /// SchemaPath は自分のスキーマフォルダへのパスを入れて下さい。 public Dictionary<string,string> GeneratePathPair() { string lEventStr = eSchema.Event.ToString(); string lStatusStr = eSchema.Status.ToString(); PathGenerator lTnsGenerator = new PathGenerator("hogehoge"); PathGenerator lPathGenerator = new PathGenerator(SchemaPath); Dictionary<string, string> lTnsPathPairInXsd = new Dictionary<string, string> { [lTnsGenerator.GeneratePath(lEvent)] = lPathGenerator.GeneratePath(lEvent), [lTnsGenerator.GeneratePath(lStatus)] = lPathGenerator.GeneratePath(lStatus) }; return lTnsPathPairInXsd; } public static XmlSchemaSet GetSchemaFromXSD(Dictionary<string,string> pXsd) { XmlSchemaSet lSchemas = new XmlSchemaSet(); StringReader lStringReader = null; XmlReader lSchemaReader = null; foreach (KeyValuePair<string, string> item in pXsd) { try { TextAsset xsdAsset = Resources.Load<TextAsset>(item.Value); lStringReader = new StringReader(xsdAsset.text); lSchemaReader = XmlReader.Create(lStringReader); lSchemas.Add(item.Key, lSchemaReader); } catch (XmlSchemaValidationException e) { Debug.LogError(e.Message); Debug.LogError("error line : " + e.LineNumber); Debug.LogError("error position : " + e.LinePosition); } finally { if (lStringReader != null) { lStringReader.Close(); } if (lSchemaReader.ReadState != ReadState.Closed) { lSchemaReader.Close(); } } } return lSchemas; } }何か指摘ありましたら宜しくお願いします。
参考にしたサイト。
xmlSchemaSet
https://docs.microsoft.com/ja-jp/dotnet/api/system.xml.schema.xmlschemaset?view=netcore-3.1XmlReader
https://docs.microsoft.com/ja-jp/dotnet/api/system.xml.xmlreader?view=netcore-3.1StringReader
https://docs.microsoft.com/ja-jp/dotnet/api/system.io.stringreader?view=netcore-3.1XDocument
https://docs.microsoft.com/ja-jp/dotnet/api/system.xml.linq.xdocument?view=netcore-3.1XmlSchema,Xml に関して参考にした書籍(「基礎 XML」著:山田祥寛)
- 投稿日:2020-05-28T17:41:58+09:00
【DOTS】Havok Physicsを使ってみよ~
記事の環境
- Unity 2019.3.0f6
- Unity Hub 2.3.2
- Havok Physics for Unity 0.2.2
- Unity Physics 0.3.2
- Hybrid Renderer 0.4.0
諸注意
この記事はUnityの公式ガイドに沿って書いてます。
わしは公式がええんじゃ!!という方は公式ガイドを推奨します。Havok Physicsって??
アイルランドにあるHavok社が開発を行っている物理エンジンで、モバイルからコンシューマー、PCまで様々なタイトルで多数の採用実績があります。
現在はMicrosoftの傘下だそう。そんな超有名物理エンジンがUnityで採用されることになったんだからやるしかねぇ!!ということでやっていきます。
[ミッション1] 公式のGitからサンプルコードを入手せよ!
- こ↑こ↓をクリック
- Clone or downloadをクリック
- Download ZIPをクリック
[ミッション2]解凍してUnity Hubに追加せよ!
- 先ほどダウンロードしたZipファイルを任意のフォルダに解凍
- Unity Hubを起動
- リストに追加をクリック
- 先ほど解凍したフォルダの中にあるUnityPhysicsSamplesというフォルダをクリックして、フォルダの選択をクリック
- 初期バージョンがない人は任意のUnityバージョンを指定(本記事ではUnity2019.3.0f1が無かったため3.0f6にアップグレードしました)
[ミッション3]Havok Physicsをプロジェクトに追加せよ!
- Unity Hubからプロジェクトをクリック(開くまで待つべし!待つべし!)
- Window > Package Managerの順でクリックしてPackage Managerを開く
- Advanced > Show preview packagesの順でクリックしてプレビューパッケージを表示するように
- 検索欄にHavokと入力
- 出てくるHavok Physics for Unityを選択して右下のInstallをクリック(インストールできるまで待つべし!待つべし!)
[ミッション4]まずはUnity Physicsを体感せよ!
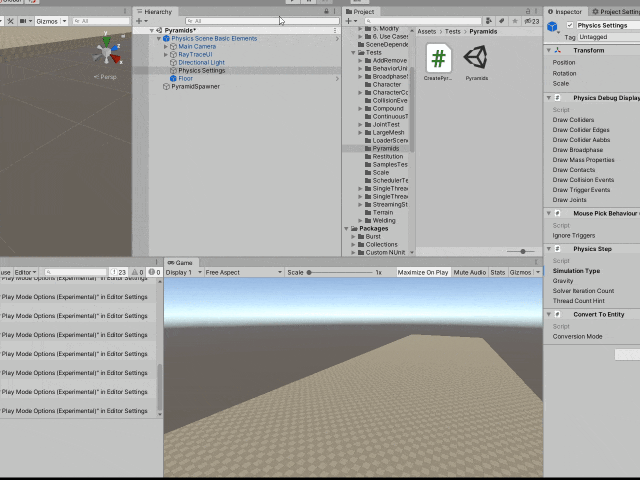
- Assets / Tests / Pyramidsの中にあるPyramidsシーンをクリック
- HierarchyビューのPhysics Scene Basic ElementsにあるMain CameraのTransformを変更

- できたら実行してみよう!
※一番最初の実行時はちょっと重くなる可能性あるので、重かったら一旦止めてもう一回実行してみて下さい。
ふむ。。。
特になんも力を加えてないのにピラミッドが崩れてしまった。。。。
※なんか赤い部分がチラチラ見えますがエンコが上手く行かなかったようで、、、実際は赤くないですw[ミッション5]Havok Physicsを体感せよ!
- HierarchyビューのPhysics Scene Basic ElementsにあるPhysics Settingsをクリック
- そのオブジェクトにくっ付いてるPhysics StepコンポーネントにあるSimulation TypeをUnity PhysicsからHavok Physicsに変更
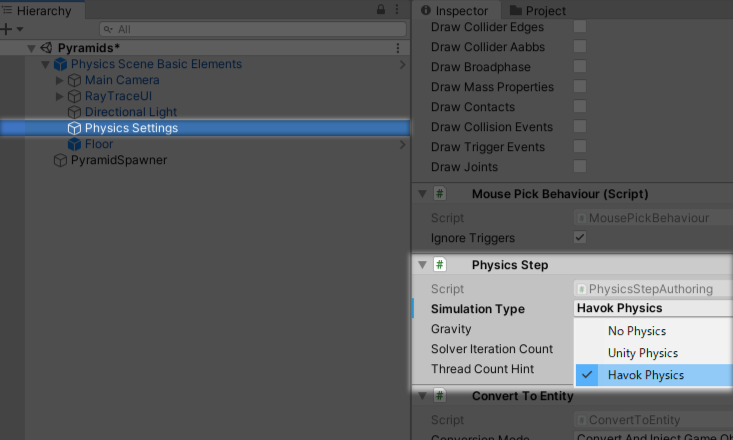
- できたら実行!!
今度は触ってない時ちゃんとピラミッドは形を保っていますね。
さすがHavok Physics!!
20年以上に渡る歴史は伊達じゃないです。
密になってるオブジェクトの山からブロックを引き抜く動作も見事に出来てます。(ジェンガとか作れそう)あとがき
いかがだったでしょうか?
個人的にはなかなか感動しましたw
こういうサンプルは他にもいっぱいあって、気になる方はAssets / LoaderSceneフォルダにあるLoaderSceneシーンファイルを実行してみて下さい。
ここから全サンプルへ飛ぶことが出来ます。
物理エンジンとしてのクオリティがどえりゃぁたけぇHavok Physicsですが将来的には有償での提供になるそうな。。?
Unity Physicsは物理エンジンとしての精度はHavok Physicsに劣りますが、ステートレス物理演算なことや100%C#で記述されたオープンソースなエンジンであること。
また無償で使用できることなどこの辺りでHavok Physicsと差別化を図っていくのではないかと思います。参考文献

- 投稿日:2020-05-28T15:29:30+09:00
ASP.NET Core で Web API の結合テストをしよう
ちゃんとやったことなかった(存在は知ってた)ので覚書です。
ASP.NET Core で Controller を作ったけど、結合テストしないとなぁ…と思ってたけど、単体テストしてるしなぁめんどくさいなぁ…とも思ってたりしてたけど、便利な機能なのでやります!やりますよ。テスト対象のプロジェクトの作成
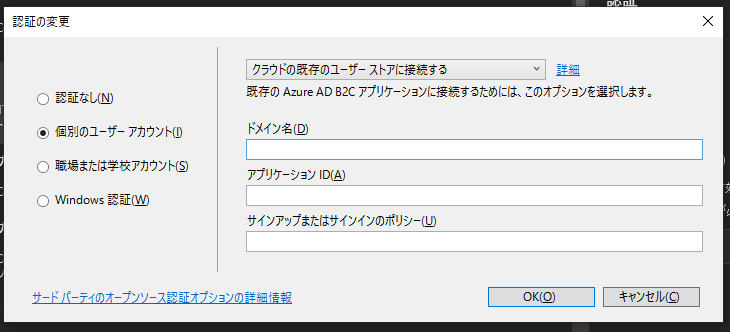
ASP.NET Core の API のプロジェクトテンプレートを作成します。
認証は個別のユーザー アカウント(Azure AD B2C を使うやつ)を設定しました。
前はここにアプリ内でユーザー管理するやつがあった気がするけど…、変わったのかな?
今回はテスト用なので、ドメイン名やアプリケーション ID などは適当なものを入れました。Entity Framework Core 系の以下のパッケージを追加して DB 操作のコードを追加します。
- Microsoft.EntityFrameworkCore.SqlServer
- Microsoft.EntityFrameworkCore.Design
とりあえず DbContext は以下のようにしました。
using Microsoft.EntityFrameworkCore;
using System;

namespace ApiTest.Models
{
    public class WeatherContext : DbContext
    {
        public DbSet<WeatherForecast> WeatherForecasts { get; set; }

        public WeatherContext()
        {
        }

        public WeatherContext(DbContextOptions<WeatherContext> options) : base(options)
        {

        }

        protected override void OnModelCreating(ModelBuilder modelBuilder)
        {
            modelBuilder.Entity<WeatherForecast>(b =>
            {
                b.Property(x => x.Id);
                b.HasKey(x => x.Id);
                b.Property(x => x.City).IsRequired();
                b.Property(x => x.TemperatureC).IsRequired();
                b.Property(x => x.Date).IsRequired();
                b.Property(x => x.Summary).IsRequired();
            });
        }
    }

    public class WeatherForecast
    {
        public int Id { get; set; }
        public string City { get; set; }
        public int TemperatureC { get; set; }
        public DateTime Date { get; set; }
        public string Summary { get; set; }
    }
}
Startup.cs に追加しましょう。
public void ConfigureServices(IServiceCollection services)
{
    services.AddAuthentication(AzureADB2CDefaults.BearerAuthenticationScheme)
        .AddAzureADB2CBearer(options => Configuration.Bind("AzureAdB2C", options));
    services.AddControllers();

    services.AddDbContext<WeatherContext>(optiosnBuilder =>
    {
        optiosnBuilder.UseSqlServer(
            Configuration.GetConnectionString("DefaultDb"),
            options => options.EnableRetryOnFailure());
    });
}
最後に WeatherForecastController を DB を使うように書き換えます。
using System.Collections.Generic;
using System.Linq;
using System.Threading.Tasks;
using ApiTest.Models;
using Microsoft.AspNetCore.Authorization;
using Microsoft.AspNetCore.Mvc;
using Microsoft.EntityFrameworkCore;
using Microsoft.Extensions.Logging;

namespace ApiTest.Controllers
{
    [Authorize]
    [ApiController]
    [Route("[controller]")]
    public class WeatherForecastController : ControllerBase
    {
        private readonly ILogger<WeatherForecastController> _logger;
        private readonly WeatherContext _weatherContext;

        public WeatherForecastController(ILogger<WeatherForecastController> logger, WeatherContext weatherContext)
        {
            _logger = logger;
            _weatherContext = weatherContext;
        }

        [HttpGet]
        public async Task<IEnumerable<WeatherForecastResponse>> Get([FromQuery]string city)
        {
            _logger.LogDebug($"Get weather forecasts for {city}");
            IQueryable<WeatherForecast> query = _weatherContext.WeatherForecasts;
            if (!string.IsNullOrWhiteSpace(city))
            {
                query = query.Where(x => x.City == city);
            }

            var forecasts = await query.ToArrayAsync();
            return forecasts.Select(x => new WeatherForecastResponse
            {
                City = x.City,
                Date = x.Date,
                Summary = x.Summary,
                TemperatureC = x.TemperatureC,
            });
        }
    }
}
これで下準備完了です。
テストプロジェクトの作成
テストプロジェクトを作ります!xUnit にしましょう(なんとなく
追加するパッケージは以下のパッケージです。
- Microsoft.AspNetCore.Mvc.Testing
- Microsoft.EntityFrameworkCore.InMemory
最初のものは、ASP.NET Core MVC のテスト時に使うもので、2 つ目のものは結合テスト時に SQL Server ではなく InMemory の DB を今回使おうと思ったので追加しています。SQL Server の localdb とかでやるなら追加しなくてもいいです。
今回は本番コードが SQL Server を想定しているのに、テスト用に別 DB を使うケースを試したかったのでそうしています。
WebApplicationFactory の作成
では、結合テストで起動する Web サーバーを構成していきましょう。
WebApplicationFactory クラスを継承して ConfigureWebHost をオーバーライドします。using Microsoft.AspNetCore.Hosting; using Microsoft.AspNetCore.Mvc.Testing; namespace ApiTest.Tests { public class CustomWebApplicationFactory<TStartup> : WebApplicationFactory<TStartup> where TStartup: class { protected override void ConfigureWebHost(IWebHostBuilder builder) { // ここで起動する Web サーバーの構成をテスト用に変える } } }では、コードを追加していきましょう。追加するコードは WeatherContext を InMemory のものに置き換える処理と、DB にテストデータを追加する処理です。ざくっと追加しました。
using ApiTest.Models;
using Microsoft.AspNetCore.Hosting;
using Microsoft.AspNetCore.Mvc.Testing;
using Microsoft.EntityFrameworkCore;
using Microsoft.Extensions.DependencyInjection;
using System;
using System.Linq;
using System.Security.Cryptography;

namespace ApiTest.Tests
{
    public class CustomWebApplicationFactory<TStartup> : WebApplicationFactory<TStartup>
        where TStartup: class
    {
        protected override void ConfigureWebHost(IWebHostBuilder builder)
        {
            builder.ConfigureServices(services =>
            {
                // DB を SQL Server からインメモリーにする
                var descriptor = services.SingleOrDefault(
                    x => x.ServiceType == typeof(DbContextOptions<WeatherContext>));
                if (descriptor != null)
                {
                    services.Remove(descriptor);
                }
                services.AddDbContext<WeatherContext>(options =>
                {
                    options.UseInMemoryDatabase("Testing");
                });

                var sp = services.BuildServiceProvider();
                // Scope を作っておくことで DbContext が使いまわされないようにする
                using (var scope = sp.CreateScope())
                {
                    var db = scope.ServiceProvider.GetRequiredService<WeatherContext>();

                    // DB を作り直し
                    db.Database.EnsureDeleted();
                    db.Database.EnsureCreated();
                    // テストデータの投入
                    db.WeatherForecasts.AddRange(new WeatherForecast
                    {
                        City = "Tokyo",
                        Summary = "Cold",
                        Date = new DateTime(2020, 1, 1),
                        TemperatureC = 0,
                    },
                    new WeatherForecast
                    {
                        City = "Tokyo",
                        Summary = "Hot",
                        Date = new DateTime(2020, 8, 6),
                        TemperatureC = 35,
                    },
                    new WeatherForecast
                    {
                        City = "Hiroshima",
                        Summary = "Cold",
                        Date = new DateTime(2020, 1, 1),
                        TemperatureC = -1,
                    },
                    new WeatherForecast
                    {
                        City = "Hiroshima",
                        Summary = "Hot",
                        Date = new DateTime(2020, 8, 6),
                        TemperatureC = 32,
                    });
                    db.SaveChanges();
                }
            });
        }
    }
}
テストコードの追加
では、テストコードを追加していきます。
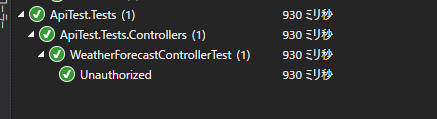
認証されてないと呼べないコードなので、普通に呼んだら Unauthorized になるはずです。まずは、それを試してみます。先ほどの CustomWebApplicationFactory クラスを使って xUnit のテストを書くと以下のようになります。IClassFixture で CustomWebApplicationFactory を作ってもらって下準備をしてもらいます。そして CustomWebApplicationFactory から HttpClient を作って、そいつに対して GetAsync などを呼ぶことで Web API が呼び出せます。以下のようなコードになります。
using Microsoft.AspNetCore.Mvc.Testing;
using System.Net;
using System.Threading.Tasks;
using Xunit;

namespace ApiTest.Tests.Controllers
{
    public class WeatherForecastControllerTest : IClassFixture<CustomWebApplicationFactory<Startup>>
    {
        private readonly CustomWebApplicationFactory<Startup> _factory;

        public WeatherForecastControllerTest(CustomWebApplicationFactory<Startup> factory)
        {
            _factory = factory;
        }

        [Fact]
        public async Task Unauthorized()
        {
            var client = _factory.CreateClient(new WebApplicationFactoryClientOptions
            {
                AllowAutoRedirect = false,
            });
            var forecasts = await client.GetAsync("/WeatherForecast");
            Assert.Equal(HttpStatusCode.Unauthorized, forecasts.StatusCode);
        }
    }
}
このテストを実行すると GREEN!!
いいですね。
認証に対応
認証通らないと機能のテストが出来ないので、そこの対応をしていきましょう。まず、テスト用の認証情報を作って返すクラスを AuthenticationHandler を継承して作成します。
中味は、基本クラスのコンストラクタに引数をそのまま渡すためのコンストラクタと、ダミーのテスト用認証情報を返す処理だけで大丈夫です。今回は名前だけ設定していますが、追加のクレームを足したい場合は、ここに足すといいでしょう。以下のようになります。
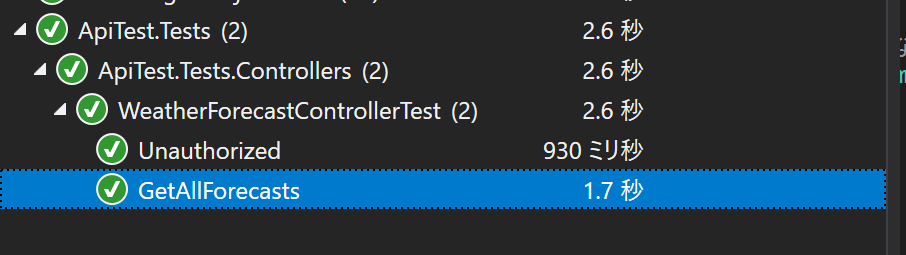
using Microsoft.AspNetCore.Authentication;
using Microsoft.Extensions.Logging;
using Microsoft.Extensions.Options;
using System.Security.Claims;
using System.Text.Encodings.Web;
using System.Threading.Tasks;

namespace ApiTest.Tests
{
    public class TestAuthHandler : AuthenticationHandler<AuthenticationSchemeOptions>
    {
        public TestAuthHandler(IOptionsMonitor<AuthenticationSchemeOptions> options,
            ILoggerFactory logger, UrlEncoder encoder, ISystemClock clock) :
            base(options, logger, encoder, clock)
        {
        }

        protected override Task<AuthenticateResult> HandleAuthenticateAsync()
        {
            // 含めたいクレームを作る
            var claims = new[]
            {
                new Claim(ClaimTypes.Name, "Test user"),
            };
            var identity = new ClaimsIdentity(claims, "Test");
            var principal = new ClaimsPrincipal(identity);
            var ticket = new AuthenticationTicket(principal, "Test");

            return Task.FromResult(AuthenticateResult.Success(ticket));
        }
    }
}
では、テストを書いていこうと思います。先ほど作った認証用のハンドラーを仕込んで HttpClient を作成してから `/WeatherForecast の URL を叩けば OK です。やってみましょう。
[Fact]
public async Task GetAllForecasts()
{
    var client = _factory.WithWebHostBuilder(b =>
        {
            // テスト用の認証ハンドラーを設定する
            b.ConfigureTestServices(services =>
            {
                services.AddAuthentication("Test")
                    .AddScheme<AuthenticationSchemeOptions, TestAuthHandler>(
                        "Test", options => { });
            });
        })
        .CreateClient(new WebApplicationFactoryClientOptions
        {
            AllowAutoRedirect = false,
        });

    var res = await client.GetAsync("/WeatherForecast");
    Assert.Equal(HttpStatusCode.OK, res.StatusCode);
}
実行すると GREEN!!!
ついでにレスポンスの中身も思った通りの結果かどうか確認しましょう。DB には Tokyo が 2 件、Hiroshima が 2 件あるのでそういうアサーションを書かないといけないのですがメンドクサイ。
そんな時楽させてくれるライブラリとして neuecc さん作の ChainingAssertion があります。NuGet 上での最新は jsakamoto さんがメンテしているバージョンがあるので、そちらを使いたいと思います。https://www.nuget.org/packages/ChainingAssertion-xUnit.Bin/
アサート処理が凄くシンプルになります。ついでに都市での絞り込みのテストも追加して最終的にはテストコードは以下のようになりました。
using Microsoft.AspNetCore.Authentication;
using Microsoft.AspNetCore.Mvc.Testing;
using Microsoft.AspNetCore.TestHost;
using Microsoft.Extensions.DependencyInjection;
using System;
using System.Linq;
using System.Net;
using System.Text.Json;
using System.Threading.Tasks;
using Xunit;

namespace ApiTest.Tests.Controllers
{
    public class WeatherForecastControllerTest : IClassFixture<CustomWebApplicationFactory<Startup>>
    {
        private readonly CustomWebApplicationFactory<Startup> _factory;

        public WeatherForecastControllerTest(CustomWebApplicationFactory<Startup> factory)
        {
            _factory = factory;
        }

        [Fact]
        public async Task Unauthorized()
        {
            var client = _factory.CreateClient(new WebApplicationFactoryClientOptions
            {
                AllowAutoRedirect = false,
            });
            var forecasts = await client.GetAsync("/WeatherForecast");
            forecasts.StatusCode.Is(HttpStatusCode.Unauthorized);
        }

        [Fact]
        public async Task GetAllForecasts()
        {
            var client = _factory.WithWebHostBuilder(b =>
                {
                    // テスト用の認証ハンドラーを設定する
                    b.ConfigureTestServices(services =>
                    {
                        services.AddAuthentication("Test")
                            .AddScheme<AuthenticationSchemeOptions, TestAuthHandler>(
                                "Test", options => { });
                    });
                })
                .CreateClient(new WebApplicationFactoryClientOptions
                {
                    AllowAutoRedirect = false,
                });

            var res = await client.GetAsync("/WeatherForecast");
            res.StatusCode.Is(HttpStatusCode.OK);

            var responseContent = await JsonSerializer.DeserializeAsync<WeatherForecastResponse[]>(
                await res.Content.ReadAsStreamAsync(),
                new JsonSerializerOptions { PropertyNameCaseInsensitive = true });
            // サーバー側では、順序保障してないのでローカルでソートしてアサート
            responseContent = responseContent.OrderBy(x => x.TemperatureC).ToArray();
            responseContent.Is(
                new[]
                {
                    new WeatherForecastResponse { City = "Hiroshima", Summary = "Cold", Date = new DateTime(2020, 1, 1), TemperatureC = -1 },
                    new WeatherForecastResponse { City = "Tokyo", Summary = "Cold", Date = new DateTime(2020, 1, 1), TemperatureC = 0 },
                    new WeatherForecastResponse { City = "Hiroshima", Summary = "Hot", Date = new DateTime(2020, 8, 6), TemperatureC = 32 },
                    new WeatherForecastResponse { City = "Tokyo", Summary = "Hot", Date = new DateTime(2020, 8, 6), TemperatureC = 35 },
                },
                (x, y) => x.City == y.City &&
                    x.Date == y.Date &&
                    x.Summary == y.Summary &&
                    x.TemperatureC == y.TemperatureC &&
                    x.TemperatureF == y.TemperatureF);
        }

        [Fact]
        public async Task GetTokyoForecasts()
        {
            var client = _factory.WithWebHostBuilder(b =>
                {
                    // テスト用の認証ハンドラーを設定する
                    b.ConfigureTestServices(services =>
                    {
                        services.AddAuthentication("Test")
                            .AddScheme<AuthenticationSchemeOptions, TestAuthHandler>(
                                "Test", options => { });
                    });
                })
                .CreateClient(new WebApplicationFactoryClientOptions
                {
                    AllowAutoRedirect = false,
                });

            var res = await client.GetAsync("/WeatherForecast?city=Tokyo");
            res.StatusCode.Is(HttpStatusCode.OK);

            var responseContent = await JsonSerializer.DeserializeAsync<WeatherForecastResponse[]>(
                await res.Content.ReadAsStreamAsync(),
                new JsonSerializerOptions { PropertyNameCaseInsensitive = true });
            // サーバー側では、順序保障してないのでローカルでソートしてアサート
            responseContent = responseContent.OrderBy(x => x.TemperatureC).ToArray();
            responseContent.Is(
                new[]
                {
                    new WeatherForecastResponse { City = "Tokyo", Summary = "Cold", Date = new DateTime(2020, 1, 1), TemperatureC = 0 },
                    new WeatherForecastResponse { City = "Tokyo", Summary = "Hot", Date = new DateTime(2020, 8, 6), TemperatureC = 35 },
                },
                (x, y) => x.City == y.City &&
                    x.Date == y.Date &&
                    x.Summary == y.Summary &&
                    x.TemperatureC == y.TemperatureC &&
                    x.TemperatureF == y.TemperatureF);
        }
    }
}
まとめ
ということで、結合テストをしてみました。
やってみるとテストまで、きちんと考えられて作られてるんだなぁということを感じました。ということで、意外と低コストで出来るので是非みんなやってみてね!
完全なソースコードのリポジトリーはこちら。
- 投稿日:2020-05-28T05:32:52+09:00
.NETCoreで静的にCOMを使う
TL;DR;
Windows10組み込みの文章読み上げエンジンをCOM経由で操作してみます。
StaticComTest.csproj<Project Sdk="Microsoft.NET.Sdk"> <PropertyGroup> <OutputType>Exe</OutputType> <TargetFramework>netcoreapp3.1</TargetFramework> </PropertyGroup> <ItemGroup> <COMReference Include="SpeechLib.dll"> <!-- ?これでCOMInteropをリンク --> <Guid>c866ca3a-32f7-11d2-9602-00c04f8ee628</Guid> <VersionMajor>5</VersionMajor> <VersionMinor>4</VersionMinor> </COMReference> </ItemGroup> </Project>Program.csclass { // COMのクラスが使える static void Main(string[] args) => new SpeechLib.SpVoice().Speak("Hello world"); }console# VSについてくるやつ(dotnet msbuildでは駄目) msbuild /t:restore msbuild /t:rebuild StaticComTest.exe # ? はろぅわぁるど(ねっとり片言ボイス)COMの呼び出し
私自身、まだCOMへの理解が甘いのですが、何となくこんな感じ…というのをメモします。
.NetにおけるCOMの静的リンク(VSでいう参照の追加>COM)というのは、実際にはCOMをリンクしているわけではなく、COMIntropのDLLをリンクすることを指しています。そもそも、COMというのは原則GUIDをKeyとしてOS登録して、使うときに
CoInitializeするインターフェイスです。(Registration-Free COMというのもあるらしい)COMIntropはCOMをラッピングしたDLLでありCOMではありません。実際にDirectX12のようなIntropが存在しないCOMは、VSの参照の追加ダイアログの中にもありません。まとめると、以下のようになります。
- コンパイル時に、ユーザーコードに
Introp.Speech.dll(COMIntropのDLL)をリンクnew SpVoice()でSpVoiceインターフェイスを取得。(インターフェイスだが、CoClass属性付きなのでnewできる)- SpVoice(の基底のISpeechVoice)の
Speakメソッドを呼び出し- SpVoiceの実体となるSpVoiceClassの
ISpeechVoice.Speakメソッドが呼び出されるISpeechVoice.Speakから、SpVoice.Speakが呼び出される。SpVoice.SpeakはexternメソッドでCOMのメソッドのコール(DispID:12)に置き換えられる。一度、SpVoiceインターフェイスを経由するのは、SpVoiceClassの実装を隠蔽するためです。SpVoiceClassはCOMと直接つながっているダーティな存在のため、COMの仕様が変わった場合、ユーザーCOMIntropライブラリの利用側に変更が必要にならないようにインターフェイスをかませています。まぁ、アクセス修飾子と名前衝突をかわしてexternメソッドを外から呼べないようにすれば隠蔽できますが…なんだかそういうルールらしいです。
COM 呼び出し可能ラッパー クラス インターフェイスの概要 (MSDN)
.NETCoreのコンパイラではコンパイルできない
COMを静的にリンクしたとしても、.NETCoreをターゲットにコンパイルすることはできます。そのため、CsProjには.NETCore3.1を指定しています。
しかし、COMReferenceは通常のMSBuildのみの機能のため、.NET Coreのdotnet msbuildでは利用できません。console$ dotnet build C:\Program Files\dotnet\sdk\3.1.101\Microsoft.Common.CurrentVersion.targets(2726,5) : error : MSB4803: タスク "ResolveComReference" は .NET Core バージョンの MSBuild ではサポートされていません。 .NET Framework バージョンの MSBuild をご使用ください。 詳細については、https://aka.ms/msbuild/MSB4803 をご覧ください。ちなみに、
dotnet msbuildはmsbuild.exeと同じ機能を提供するものではなく、msbuild.exeと同じオプションで.NETCoreのコンパイラを使うものらしいです。以下の一文を読むと、互換なコンパイラに切り替える(内蔵の
msbuild.exe相当のコンパイラに切り替えると思っていた)ように聞こえますが…The command has the exact same capabilities as the existing MSBuild command-line client for SDK-style projects only.
https://docs.microsoft.com/ja-jp/dotnet/core/tools/dotnet-msbuild#descriptionそこで、VisualStudioのコンパイラであるところの
msbuild.exeを利用します。
(VisualStudioでコンパイルすればいいのですが…VSCodeとCLIでやりたい)参考
- COM への .NET Core コンポーネントの公開 (MSDN)
- dotnet/samples COM Server Demo(Github)
- dotnet msbuild (MSDN)
- MSBuild プロジェクトの共通項目 (MSDN)
- COM Interop (Wikipedia)
- COM Interop in .NET (MSDN)
- COM Interop (Visual Basic) (MSDN)
- COM 呼び出し可能ラッパー クラス インターフェイスの概要 (MSDN)
- COMの基礎 (HSPからのCOM操作)
- Registration-Free COM Interop (MSDN)
- COM クラスの例 (C# プログラミング ガイド) (MSDN)
PS
@Midoliy さん、編集リクエストありがとうございました。
「COMはWindowsの機能である」旨の誤りと記述ミスをご指摘いただきました。COMはWindows固有の機能と位置付けられたものではありません。プロトコルであり、それを実装して利用できる状態で提供されているのが主にWindwosとなります。
- 投稿日:2020-05-28T00:49:08+09:00
Blazor WebAssembly を触ってみる - その②デバッグしてみる
デバッグしよう
Blazor WebAssembly を触ってみる - その①環境を整える、サンプルを動かす の続きです。
今回は以下の記事を参考にデバッグ操作を試してみたいと思います。ASP.NET Core Blazor WebAssembly をデバッグする
https://docs.microsoft.com/ja-jp/aspnet/core/blazor/debug?view=aspnetcore-3.1#visual-studio-codeVisual Studio Code でやってみる
1. launch.json の確認
.vscode\launch.json がない状態で Run -> Start Debugging (F5) でデバッグ実行をクリックすると、以下のように環境の選択肢が表示されたと思います。
ここで .NET Core を選択すると以下のようなデバッグ設定が自動的に行われます。
".NET Core Debug Blazor Web Assembly in Chrome" の構成が重要なので、もしこれがない場合には前回の記事 Blazor WebAssembly を触ってみる - その①環境を整える、サンプルを動かす を参考に環境を見直していただければと思います。vscode\launch.json{ // Use IntelliSense to learn about possible attributes. // Hover to view descriptions of existing attributes. // For more information, visit: https://go.microsoft.com/fwlink/?linkid=830387 "version": "0.2.0", "configurations": [ { "name": ".NET Core Launch (Blazor Standalone)", "type": "coreclr", "request": "launch", "program": "dotnet", "args": [ "run" ], "cwd": "${workspaceFolder}", "env": { "ASPNETCORE_ENVIRONMENT": "Development" } }, { "name": ".NET Core Debug Blazor Web Assembly in Chrome", "type": "pwa-chrome", "request": "launch", "timeout": 30000, "url": "https://localhost:5001", "webRoot": "${workspaceFolder}", "inspectUri": "{wsProtocol}://{url.hostname}:{url.port}/_framework/debug/ws-proxy?browser={browserInspectUri}" } ] }2. ブレークポイントを置く
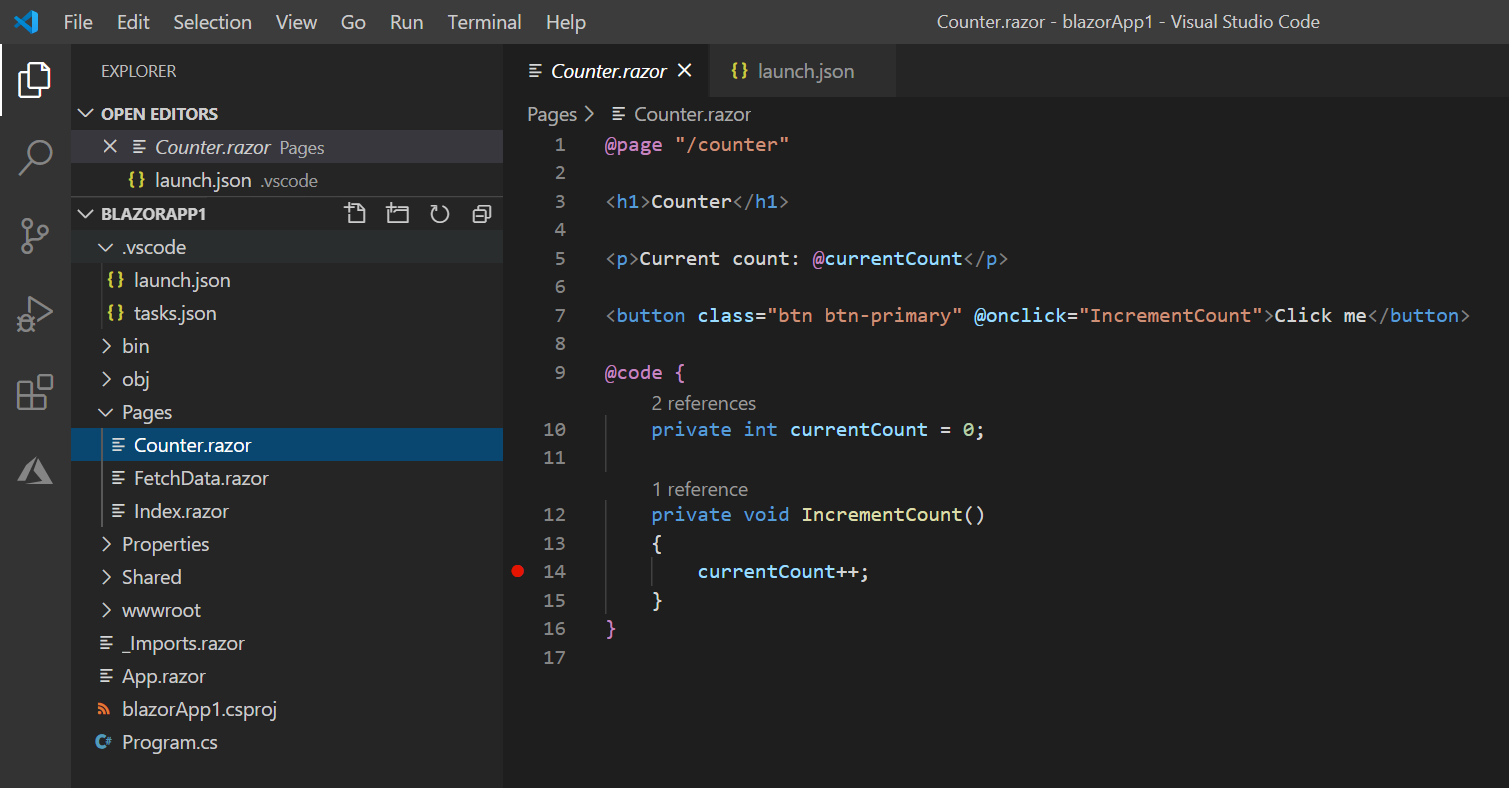
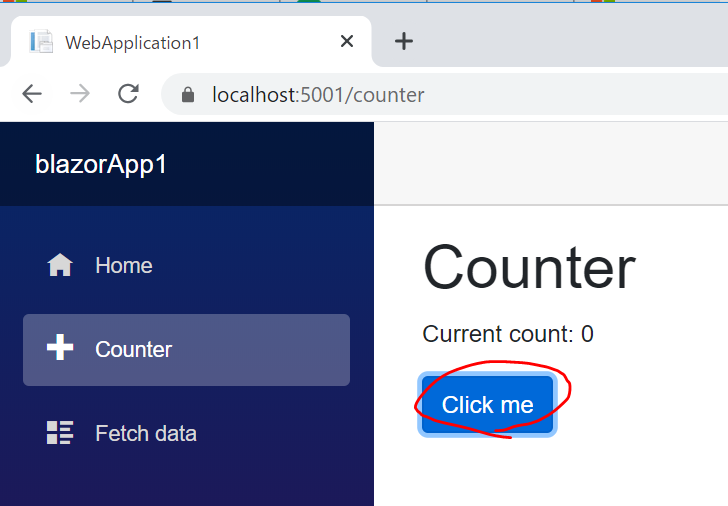
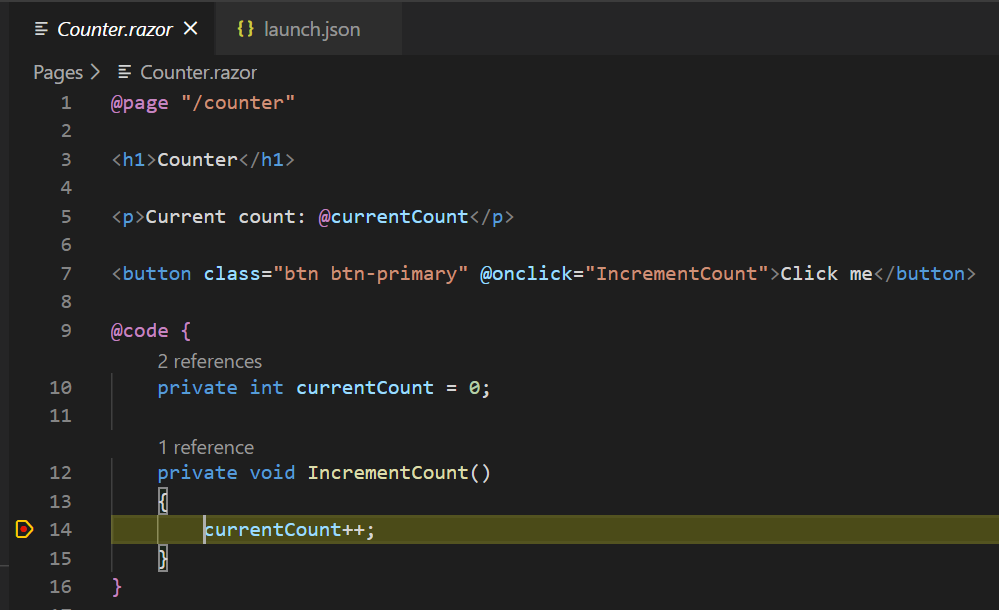
Pages\Counter.razor というカウントアップしそうな C# のコードにブレークポイントを張ってみます。
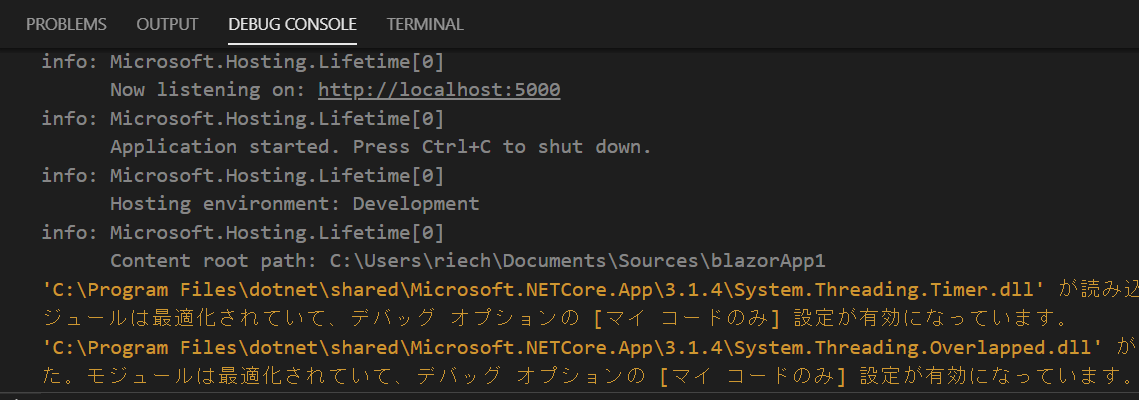
3. デバッグ実行する
Run -> Start Debugging をクリックして、DEBUG CONSOLE でアプリが起動していそうな出力がされていることを確認します。
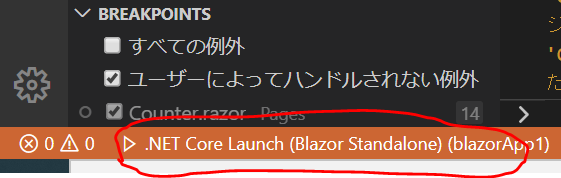
4. デバッグ設定の選択
Visual Studio Code の画面の左下のこの部分をクリックします。
以下のようにデバッグ設定の選択肢が出てくるので、".NET Core Debug Blazor Web Assembly in Chrome" というのを選択します。
すると、勝手に Chrome が開いてびっくりします。
5. ブレークポイントで止まることを確認
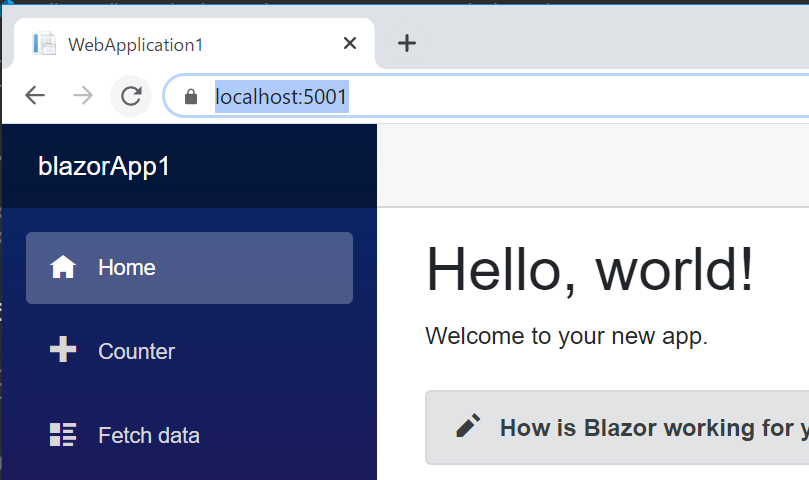
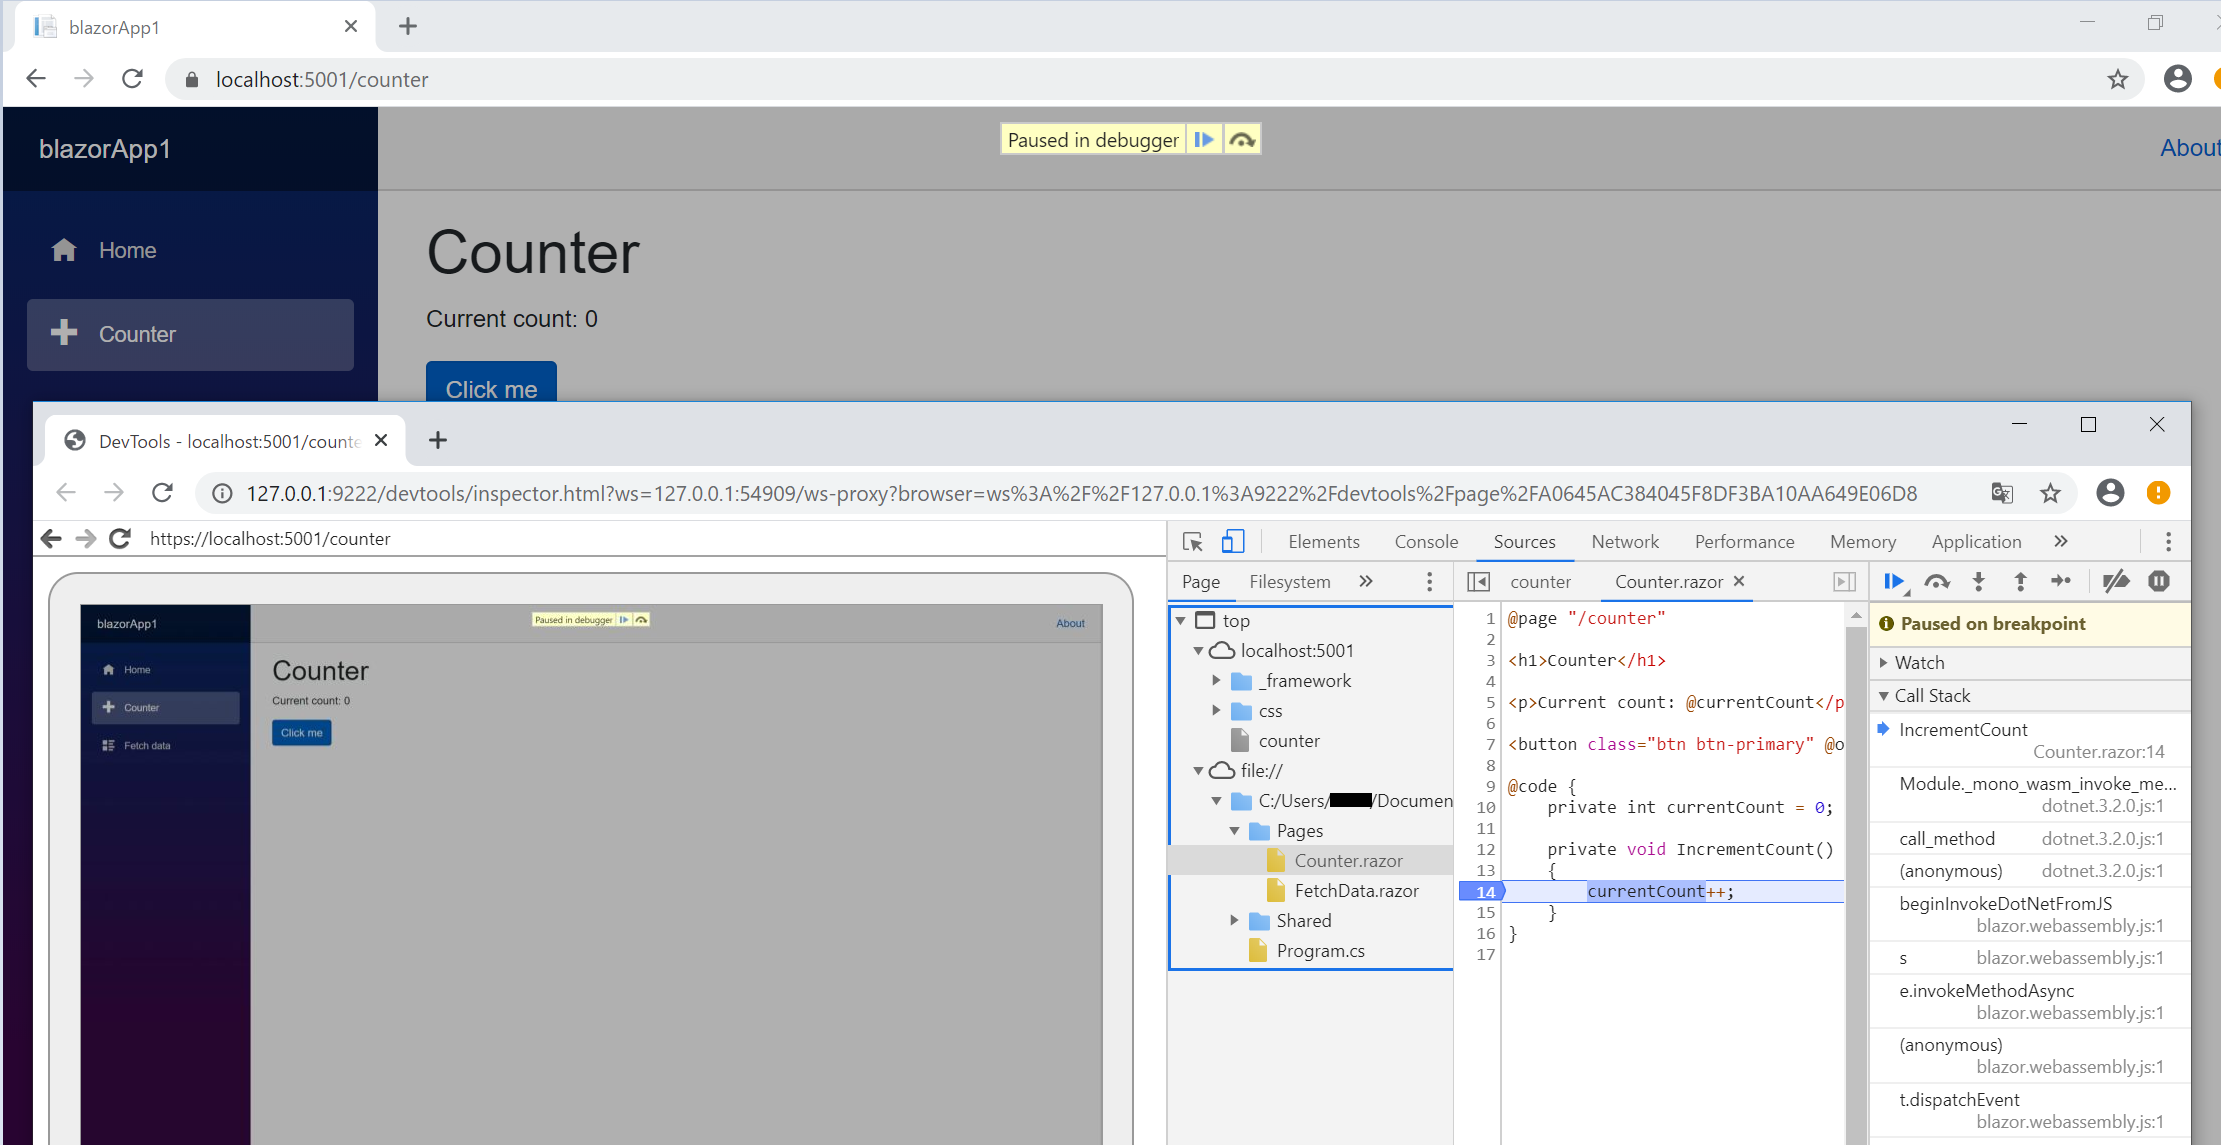
Counter のページの Click me をクリックすると、それっぽいところで止まります。
Google Chrome でやってみる
1. 上の Visual Studio Code でデバッグ実行中に Chrome の画面を開き、Shift + Fn + D をクリックします。
2. リモートデバッグを有効にする
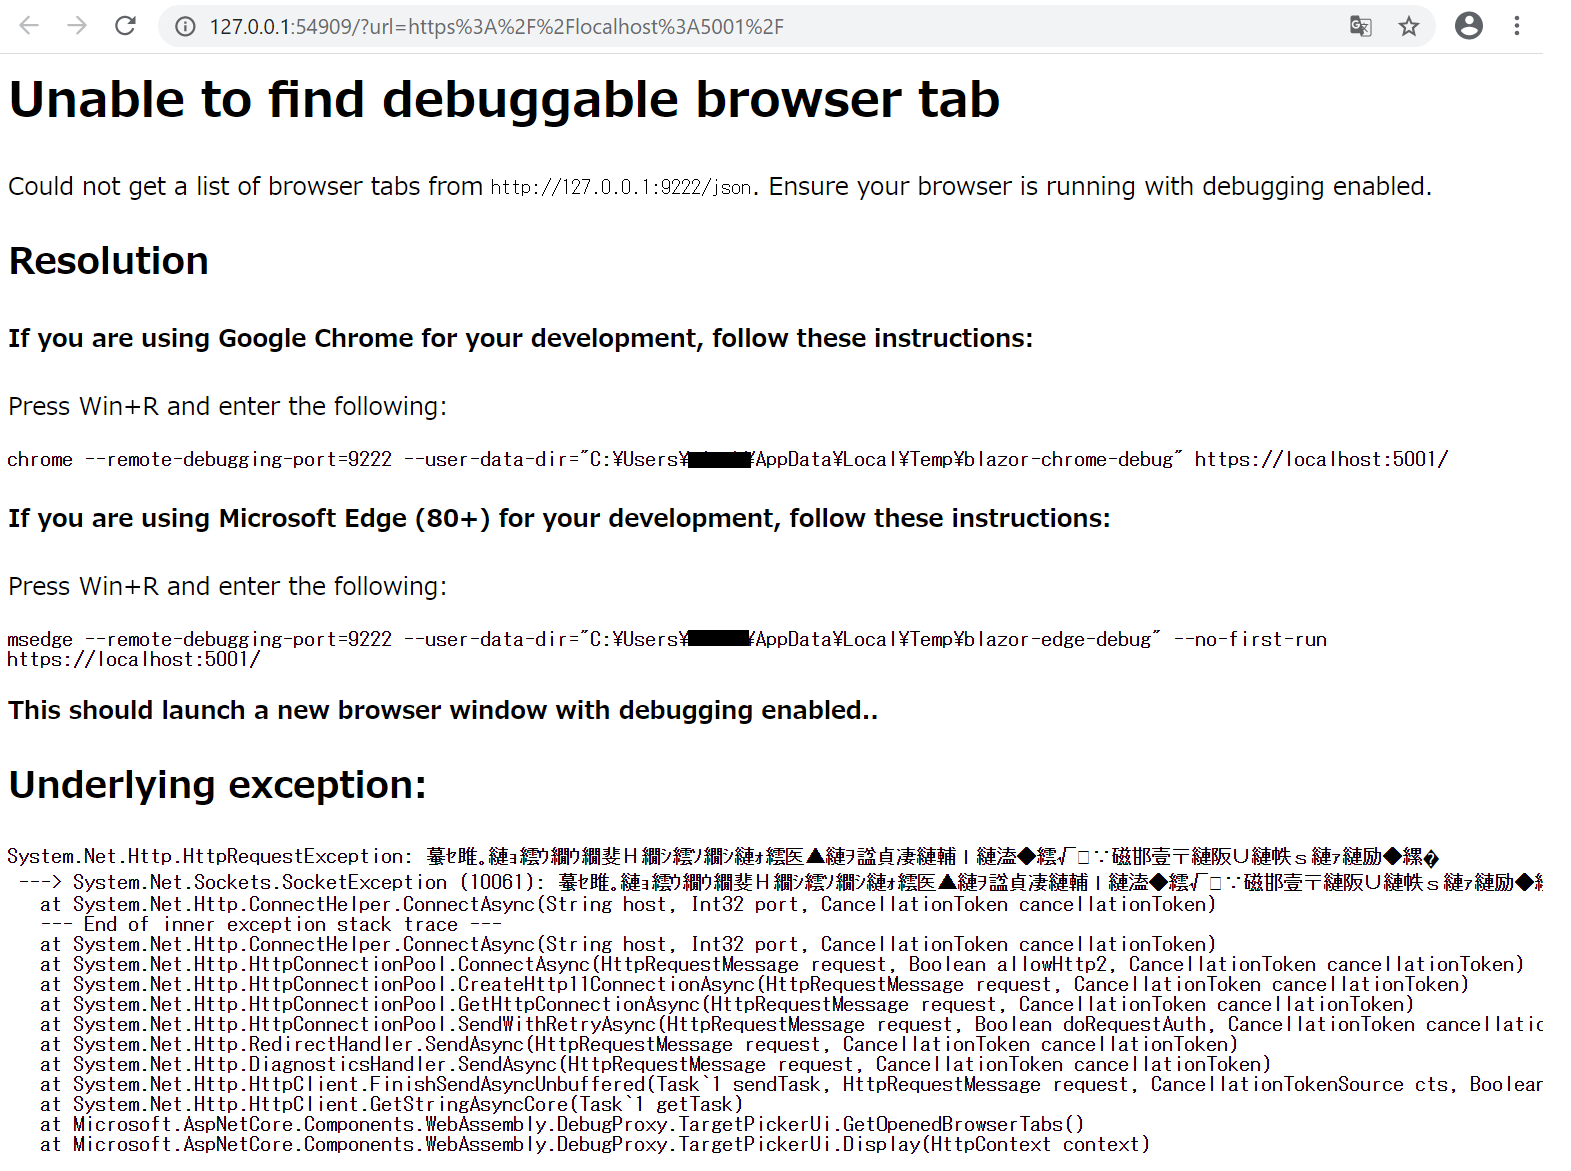
以下のように Unable to find debuggable browser tab というエラーが出たときは、画面の指示に従って
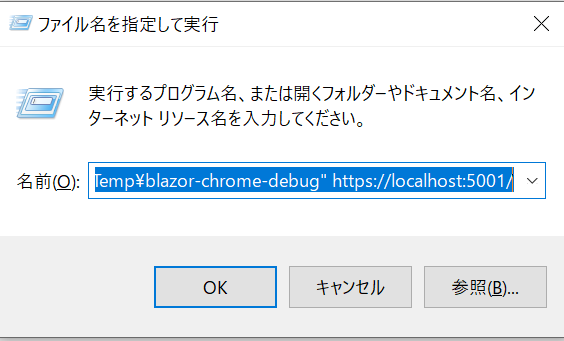
Windows の場合、Win + R キーで "ファイル名を指定して実行" を開き、
以下のようなコマンドを実行します。(エラー画面の表示をコピペしてください)
chrome --remote-debugging-port=9222 --user-data-dir="C:\Users\<Username>\AppData\Local\Temp\blazor-chrome-debug" https://localhost:5001/そうするとデバッグできそうな画面が開くはずです。
3. 動かす
あとは、ディベロッパーツールの Source タブを開いて、.razor のソース内にブレークポイントを張って、Web 画面の操作をします。
先の画面キャプチャでタブを分けて表示しましたが、上の画面で操作、下の画面でデバッグみたいな感じです。今日はここまで。