- 投稿日:2020-04-05T23:28:21+09:00
Dockerを使ってrailsのAPIモードの環境構築
はじめに
今回は、Dockerを使ってRailsのAPIモードの環境構築をしていく記事です。
コマンド、設定などを詳細に書いていきます。記事の最後までの所要時間は30分以内です。意外と簡単でした。
APIモードとは
APIモードとはRails5から追加された機能で、APIのようなRailsアプリケーションを作れる機能だそうです。
MVCのうち、モデルとコントローラーのみが作成されます。
APIモードで作成されたアプリのURLにリクエストを送ると、json形式のデータがレスポンスとして返ってきます。環境構築
では、環境構築をしていきます。
$ mkdir sample_app
$ cd sample_app
$ docker pull ruby:2.5.1
$ docker run --rm -v "$PWD":/usr/src/sample_app -w /usr/src/sample_app ruby:2.5.1 bundle init
$ docker build -t developer_name/sample_app .
ここで、
Dockerfile、docker-compose.yml、Gemfile、Gemfile.lockの4つのファイルが必要となるので、sample_app以下にそれぞれ作っていきます。$ touch 各ファイル
Dockerfileのsample_appはそれぞれのディレクトリ名に変更してください。Dockerfile# Debianがベースのrubyイメージを指定 FROM ruby:2.5.1 # 必要なものをインストール RUN apt-get update -qq && apt-get -y install \ build-essential \ libpq-dev \ nodejs \ mysql-client # rails用のディレクトリを作成 RUN mkdir /sample_app # ローカルマシン(Mac)からコンテナの中にファイルをコピー COPY Gemfile /API_sample COPY Gemfile.lock /sample_app # 作業ディレクトリを指定 WORKDIR /sample_app # 上でコピーしたGemfileに従ってGemをインストール RUN gem install bundler && bundle install続いて、
docker-compose.ymlです。
MYSQL_ROOT_PASSWORDは、後で作成するdatabase.ymlのパスワードに合わせます。docker-compose.ymlversion: '3' services: web: build: . ports: - "3000:3000" depends_on: - db volumes: - .:/API_sample command: bundle exec rails s -p 3000 -b '0.0.0.0' db: image: mysql:5.7 volumes: - mysql_data:/var/lib/mysql/ environment: MYSQL_ROOT_PASSWORD: password ports: - "3306:3306" volumes: mysql_data:Railsアプリの作成
新規アプリ作成時に、後ろに
--apiをつけるとAPIモードでアプリが作成されます。$ docker-compose run web rails new . --force --database=mysql --api $ docker-compose run --rm web rails generate scaffold User name:string $ docker-compose run --rm web rails db:create $ docker-compose run --rm web rails db:migratescaffoldでUserを作ったら、ファイルを見てみましょう。
普通のrailsアプリで作られるassetsやviewが無いことが確認できると思います。ページを開く
それでは、アプリをlocalhostで開いてみましょう。
http://localhost:3000/users真っ白なページに、
[]とだけ表示されているはずです。
これは、データが空であるということを表しています。では、
curlコマンドでデータのリクエストを送ってみます。curlはURLシンタックスを用いてファイルを送信または受信するコマンドラインツールである。(Wikipediaより)
下記の例を簡単に説明すると、指定したURLに対して、POSTメソッドを使用してターミナルからjsonファイルを送信しているということです。
$ curl -X POST -H "Content-Type: application/json" -d '{"name": "hoge"}' http://localhost:3000/usersそして、http://localhost:3000/users に接続すると
[{"id":1,"name":"hoge","created_at":"","updated_at":""}]というデータが表示されると思います。(日付はカットしました)これで完了です!意外とあっさりできますよね。
他にも、GET、PUT、DELETEも使えるので色々と試してみてください。感想
APIモードと聞いて最初はよくわからないな、怖いなと思っていました。
ですが、やってみると簡単ですし、今まで深く考えていなかったHTTPについて調べたり知ったりするきっかけになったので良かったです。駆け出しエンジニアにとっても簡単なのでぜひやってみてはいかがでしょうか?
- 投稿日:2020-04-05T23:02:57+09:00
Docker for MacのLaravel アプリケーションのが遅い?それ、ファイルをいっぱいマウントしてるからかもです。
はじめに
皆さんこんにちは!
tyamahoriです。普段はLaravel/PHPを利用してシステム開発しています。基本的にLocal開発環境はDocker for Macを使って構築しています。
お恥ずかしい話しながらこれまでDocker for Mac、遅いなぁ。。と思いながら開発をしていました。ただ、さすがに我慢できなくなってきたので色々と調べながらある程度速度を改善することができたので、コチラにまとめて行きたいと思います。
結論
ファイルのマウントを極力少なくする!
これです。今までのLocalのDocker環境の構築に追いて、無頓着にファイルのマウントを行っていました。これは遅いわけです。。先人の知恵を参考にさせていだきました。
その他にもよくあるのがdocker-syncを導入する案。これに関してはそのとおりなのですが、docker-syncを導入しなくては行けなかったり、それ用にymlファイルなどを書かなくてはいけないので、ちょっと面倒なんですよね。。
というわけで
Laravel プロジェクトに以下のファイルをローカルのMacにマウントしないやり方で改善ができました。
- vendorディレクトリ
- storageディレクトリ
実際の方法
docker-compose.yml を見てもらった方が速いかと思います。
コードはコチラ
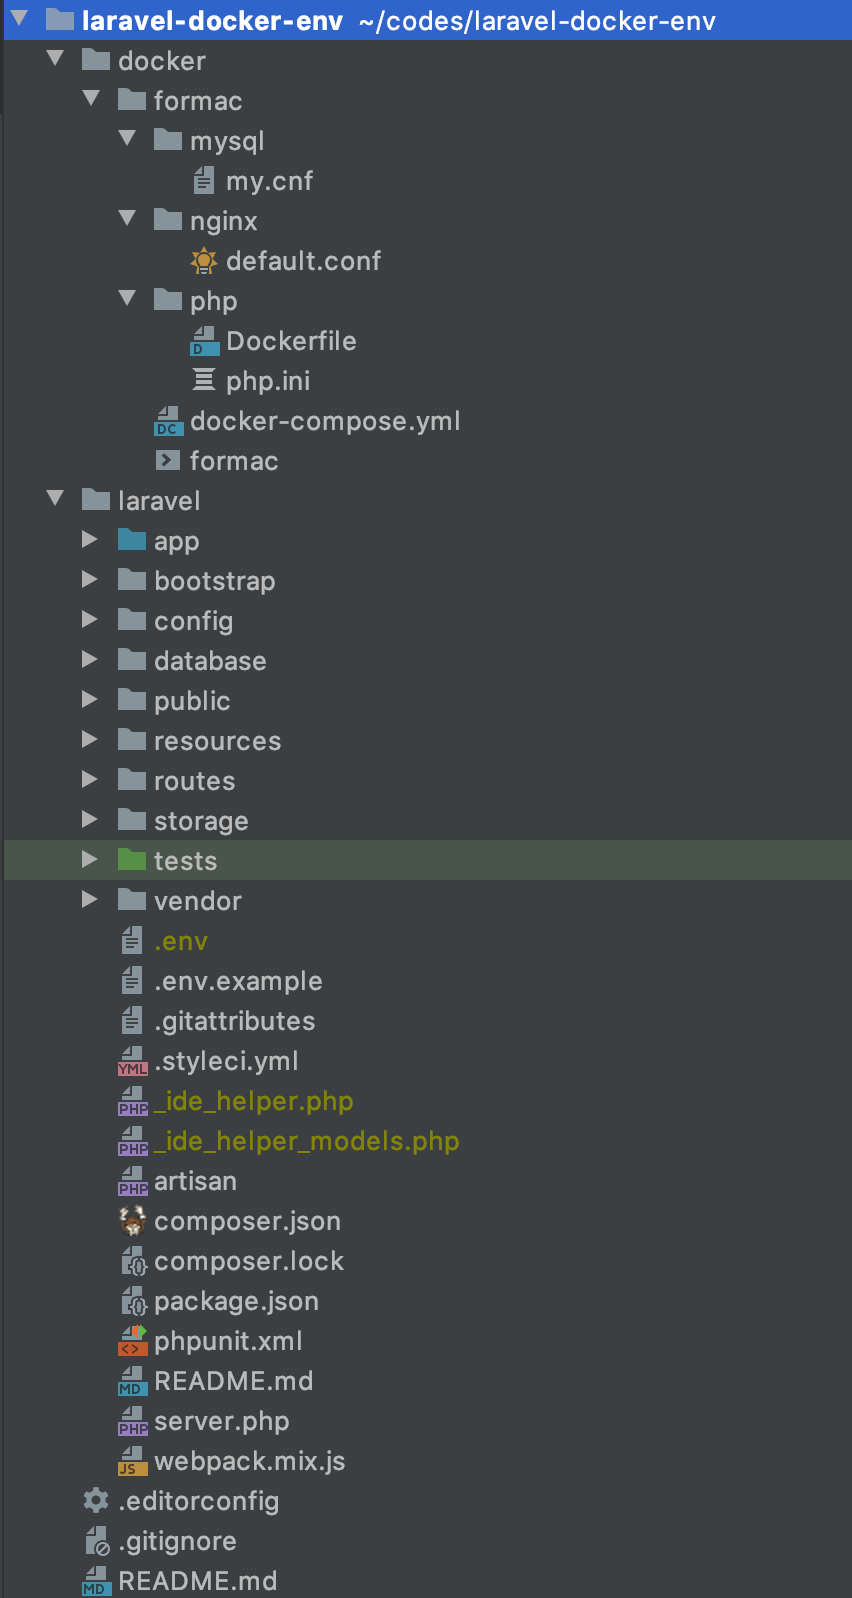
docker-compose.ymlversion: '3' services: laravel-docker-for-mac-nginx: image: nginx:1.17.9 container_name: laravel-docker-for-mac-nginx ports: - 80:80 environment: TZ: Asia/Tokyo volumes: - ./nginx/default.conf:/etc/nginx/conf.d/default.conf - ../../laravel/public:/opt/laravel/public - storage-volume:/opt/laravel/storage #ここがポイント depends_on: - laravel-docker-for-mac-php laravel-docker-for-mac-php: build: php container_name: laravel-docker-for-mac-php volumes: - ../../laravel:/opt/laravel - vendor-volume:/opt/laravel/vendor #ここがポイント - storage-volume:/opt/laravel/storage #ここがポイント - ./php/php.ini:/usr/local/etc/php/php.ini working_dir: /opt/laravel environment: APP_NAME: laravel-docker-for-mac APP_KEY: base64:I7Rrg/XK0hG//wlbPdvURt7+VXXSDS2F+QYK3R45k/M= DB_CONNECTION: mysql DB_HOST: laravel-docker-for-mac-mysql DB_PORT: 3306 DB_DATABASE: laravel DB_USERNAME: laravel DB_PASSWORD: laravel LOG_CHANNEL: daily APP_DEBUG: 'true' APP_ENV: local APP_URL: http://localhost TZ: Asia/Tokyo laravel-docker-for-mac-mysql: image: mysql:8.0 container_name: laravel-docker-for-mac-mysql command: --default-authentication-plugin=mysql_native_password ports: - 3306:3306 volumes: - db-volume:/var/lib/mysql - ./mysql/my.cnf:/etc/mysql/conf.d/my.cnf environment: MYSQL_USER: laravel MYSQL_ROOT_PASSWORD: laravel MYSQL_PASSWORD: laravel MYSQL_DATABASE: laravel MYSQL_ALLOW_EMPTY_PASSWORD: 'no' TZ: Asia/Tokyo volumes: #ここがポイント storage-volume: driver: local vendor-volume: driver: local db-volume: driver: localディレクトリ構成はこんな感じです。
GitHubにソースをアップしてますのでコチラも確認ください。
https://github.com/tyamahori/laravel-docker-envポイント
- volumesを利用し、storageディレクトリとvendorディレクトリのファイル群を格納する用にしています。Macのローカルに直接マウントしないように対応しています。
- これでDocker for Mac のスピード改善が見られます。
注意点あり!!
ただ単純にdocker-compose up を行い、Laravelお決まりのセットアップコマンドを行おうとするとエラーがあったり、IDE(自分の場合はPhpStorm)の補完が効かなくなったりします。ちょっとした対応が必要です。
stroageディレクトリの扱い
上記のdocker-compose.ymlでそのまま
docker-compose upすると、コンテナ内部のLaravelプロジェクトの中に、storageディレクトリがありません。docker cpコマンドを利用して、初回の立ち上げ時に storageディレクトリをコンテナ内部に作るようにしました。Laravelのcache関連のファイルやDebugbarの関連ファイルがコンテナ内で保存されるようになります。vendorディレクトリの扱い
PhpStormを使っている場合、ローカルにvendorディレクトリがないと補完が効いてくれません。。(
コンテナ内部のvendorディレクトリをうまく見に行く方法があれば誰か教えてください。。自分はそこまでPhpStormを使いこなせてません。。。。)ではどうするのか、
docker cpコマンドを使ってコンテナ内部のvendorの中身をローカルのMacに持ってきます。docker cpの時間と、PhoStormが cpされたvendorディレクトリの中身を読み込む時間がどうしてもかかってしまいますが、それが終わればDocker for Macの速度が改善されます。でもそれをコマンド叩いてやるのめんどくさい。。
安心してください!シェルスクリプトでコマンド処理をラップしました。短いコマンドでいい感じにdocker cpをしてくれるように作り込みました。その他コマンドをいくつか作ってあります。詳細はコチラ
最後に
ぜひ、お手元で試してほしいです!色々とツッコミどころあったら遠慮なくご連絡ください。
# コピペ用
$ git clone git@github.com:tyamahori/laravel-docker-env.git
$ cd laravel-docker-env/docker/formac
$ ./formac setup
$ ./formac logs # ログを出したい人用
$ ./formac down
- 投稿日:2020-04-05T22:48:46+09:00
ローカル(Docker)でDynamoDBの環境構築
概要
- DynamoDBをローカル環境でテストするためのDockerを用いたDynamoDB localについて解説します
- AWS CLIの設定などはすでに済んでいる前提なので、もしまだの場合ドキュメントを見てください
- Dockerの基礎的な知識とDockerの設定などはすでに済んでいる前提なので、もしまだの場合ドキュメントを見てください
- 対象読者はサクッとDynamoDBをローカルで試してみたいと考えている方です
- この記事はdynamodb-localを参考にしています
DynamoDB localとは
DynamoDB localは開発者が自身の開発環境で動作しているDynamoDBのバージョンを用いて開発・テストできるように作成されダウンロードが可能にされたもの
DynamoDB localの利点
- DynamoDB localの新しいDockerイメージでは、全てのDynamoDB localの依存関係とそれに必要な構成要素を組み込んだDockerイメージを用いることで、DynamoDB localを素早く開始することができる
- DynamoDB localの新しいDockerイメージでは、コンテナ化されたビルドに継続的な統合テストの一部としてDynamoD localを含めることができる
- DynamoDB localを使うためにインターネット接続は不要で、DynamoDB localは既存のDynamoDB APIで呼び出すことが出来る
- DynamoDB localではプロビジョニングされたスループット、データストレージ、データ転送のコストがない
DynamoDB localのイメージをプル
$ docker pull amazon/dynamodb-local立ち上げ
ただ立ち上げるだけ
$ docker run -p 8000:8000 amazon/dynamodb-local
- ローカルの8000番ポートで立ち上げるだけ
Ctr+Cで止めることが出来る- 止めたあとは
$ docker rm #{CONTAINER_NAME}で削除
$ docker ps -aで起動&停止中のコンテナを確認できる- コンテナを消すとデータは消える
--rmオプションをつけると、Ctr+Cで停止すると削除する必要なく自動で消える-dオプションをつけるとバックグランドで実行してくれる
- この場合、停止するために
$ docker stop #{CONTAINER_NAME}を実行する必要があるローカルにデータをマウント(ボリューム)して立ち上げ
$ docker run -p 8000:8000 -v #{LOCAL_DYRECTORY}:/home/dynamodblocal/data amazon/dynamodb-local -jar DynamoDBLocal.jar -dbPath /home/dynamodblocal/data
- #{LOCAL_DYRECTORY}にはdb情報を保存しておきたいディレクトリ名を指定
-dオプションと--rmオプションについては上記同様適宜--rmオプションをつけなければ、停止(docker stop)させておきさえすれば、いつでも呼び出し(docker start)できる- #{LOCAL_DYRECTORY}ディレクトリに
#{ACCESS_KEY}_#{REGION}.dbファイルが作成されたことを確認する- コンテナ名(#{CONTAINER_NAME})を命名したいときは
--nameオプションを利用して--name #{CONTAINER_NAME}を追加
- こうしておけばいちいち
$ docker ps -aでコンテナ名を調べなくても$ docker stop #{CONTAINER_NAME}や$ docker start #{CONTAINER_NAME}を実行できる確認
$ aws dynamodb list-tables --endpoint-url http://localhost:8000
- 上記コマンド(AWS CLI)で以下のようなテーブル情報が出てくれば接続ができている
{
    "TableNames": []
}
- 投稿日:2020-04-05T20:47:02+09:00
PostgreSQLのNotifyを使ってGraphQL Subscriptionを実装する(バックエンド構築編)
前置き
前提
- prisma2インストール済み
- docker環境インストール済み
- 記事内のgqlgenはエイリアスに登録して使っています。
- gqlgenとprisma2のliftをある程度使っている人向け
サンプル
https://github.com/graphql-lab/subscription-with-postgres-notifyこんな感じの作っていきます
最終的にpythonのスクリプトを叩くと
異なる端末の画面がリアルタイムに更新されるというもの
これを応用すればスクレイピングした結果を定期的にwebサイトにつぶやかせる、というbotが
作れるかと
下準備
gqlgen initからビルドし、必要なディレクトリを作って...とやっても良いのですが
今回はgqlgenの使い方の記事という事ではないので割愛します。
という事で今回は
gqlkitというdockerベースのgraphqlサービスフレームワークを使っていきます。
gqlkitの内容としては
マイグレーションツールにprisma2のliftを、
サーバー構築にgqlgenを使っていて
あとは、handlerやmiddlewareなど、
よく使うであろう機能のディレクトリを詰め合わせただけの他愛もないシンプルなフレームワークです。
任意のディレクトリで下記のリポジトリをクローンします。git clone git@github.com:gqlkit-lab/gqlkit.git subscription-with-postgres-notifyクローンできたらPostgreSQLとDB確認用のpgwebをdocker-composeで立ち上げましょう。
cd subscription-with-postgres-notify
docker-compose up -d
schema.prisma
PostgreSQLサーバーが立ち上がったら
早速、DBへのマイグレーション作業をやっていきます。schema.prismadatasource db { provider = "postgresql" url = "postgresql://postgres:postgres@localhost:5432/postgres?schema=public" } model messages { id String @default(cuid()) @id text String created_at DateTime @default(now()) updated_at DateTime @updatedAt }cd gqlkit-server/lift prisma2 lift save prisma2 lift upこれでpgwebで確認すると
Tablesのところにmessagesというテーブルが追加されているはずです。
ちなみに今回、ORMはgormを使うのでテーブル名の命名規則は複数形にしなければならない点に注意です。schema.graphql
次に、
schema.graphqlを書きgqlgenでresolver等をビルドしていきます。
ここまで来れば、もうサーバー側の実装は半分は終わった感じです。schema.graphqltype Query { readMessages: [Message!]! } type Subscription { messageCreated: Message! } type Message { id: ID! text: String! created_at: String updated_at: String! }cd ../ # gqlkit-serverのルート gqlgenPostgreSQLのテーブルを監視するためのSQL関数を用意する
※ここからが今回の本題となります。
PostgreSQLの監視、通知の仕組みを有効にするためには以下のようなSQLを実行する必要があるようです。
下記のSQLは簡単に言えば
INSERTやUPDATE文が実行された際の
イベントを検知するトリガーと、イベントをキャッチして何らかの処理を行うハンドラを
PostgreSQLデータベースに組み込む為のSQLといったところです。
参考にさせて頂いたのはこちらです。begin; create or replace function 「イベント名」_handler () returns trigger language plpgsql as $$ declare channel text := TG_ARGV[0]; payload_json json; begin payload_json = json_build_object(「ペイロード」); PERFORM pg_notify(channel, payload_json::text); RETURN NULL; end; $$; CREATE TRIGGER 「イベント名」_trigger AFTER 「SQLのメソッド名(INSERT、UPDATE、DELETEなど)」 ON 「テーブル名」 FOR EACH ROW EXECUTE PROCEDURE 「イベント名」_handler('「テーブル名」'); commit;これをpgwebのqueryのところで叩いてしまっても良いとは思うのですが
それでは、少々不格好ですのでgormで叩いてやるというふうにしてみます。
servantというディレクトリを作りPGNotifyBuilderというパッケージを作ります
dropTriggerという関数はこれによって
graphqlサーバーを起動した際に一旦、古いトリガーを全て削除し
throwNotificationSQLに書いてあるSQLで再度トリガーを作り直します。
dropTriggerが無いとトリガーの重複でエラーが発生してしまうのでここがポイントです。servant/PGNotifyBuilder/PGNotifyBuilder.gopackage PGNotifyBuilder import ( "fmt" "log" "github.com/jinzhu/gorm" _ "github.com/lib/pq" ) type Receive struct { DBConnect string EventName string Table string SqlMethod string Payload string } type PgTrigger struct { Tgname string } func dropTrigger(db *gorm.DB, tableName string) { var triggers []*PgTrigger db.Table("pg_trigger").Select("tgname").Scan(&triggers) for _, trigger := range triggers { sql := fmt.Sprintf(`DROP TRIGGER IF EXISTS %s ON %s CASCADE;`, trigger.Tgname, tableName) db.Exec(sql) } } func throwNotificationSQL(eventName string, table string, sqlMethod string, payload string) string { re := fmt.Sprintf( ` begin; create or replace function %s_handler () returns trigger language plpgsql as $$ declare channel text := TG_ARGV[0]; payload_json json; begin payload_json = json_build_object(%s); PERFORM pg_notify(channel, payload_json::text); RETURN NULL; end; $$; CREATE TRIGGER %s_trigger AFTER %s ON %s FOR EACH ROW EXECUTE PROCEDURE %s_handler('%s'); commit; `, eventName, payload, eventName, sqlMethod, table, eventName, table) return re } func Serve(r *Receive) { db, err := gorm.Open("postgres", r.DBConnect) defer db.Close() if err != nil { log.Fatal(err) } dropTrigger(db, r.Table) db.Exec(throwNotificationSQL(r.EventName, r.Table, r.SqlMethod, r.Payload)) }続いて、
servant/PGNotifyBuilder/PGNotifyBuilder.goを
server.goに読み込みます。package main import ( "gqlkit/env" "gqlkit/handler" pgnb "gqlkit/servant/PGNotifyBuilder" "log" "net/http" "github.com/go-chi/chi" "github.com/go-chi/chi/middleware" "github.com/rs/cors" ) func main() { // Payloadはschema.prismaのmessagesモデルを参考に pgnb.Serve(&pgnb.Receive{ DBConnect: env.DB_CONNECT, EventName: "message_created", Table: "messages", SqlMethod: "INSERT", Payload: ` 'id', NEW.id, 'text', NEW.text, 'created_at', NEW.created_at, 'updated_at', NEW.updated_at `, }) r := chi.NewRouter() cors := cors.New(cors.Options{ AllowedOrigins: []string{env.GQL_SERVER_ALLOW_ORIGIN}, AllowedMethods: []string{"GET", "POST", "OPTIONS"}, AllowedHeaders: []string{"Accept", "Authorization", "Content-Type", "X-CSRF-Token"}, }) r.Use(middleware.SetHeader("Content-Type", "application/json")) r.Use(cors.Handler) r.Handle("/", handler.Playground()) r.Handle("/query", handler.Graphql()) log.Printf("connect to http://localhost:%s/ for GraphQL playground", env.GQL_SERVER_PORT) log.Fatal(http.ListenAndServe(":"+env.GQL_SERVER_PORT, r)) }GraphQLサーバーのresolverを書く
まずは、resolver.go
resolver.gopackage graph import "gqlkit/graph/model" // This file will not be regenerated automatically. // // It serves as dependency injection for your app, add any dependencies you require here. type Resolver struct { messages []*model.Message message *model.Message }続いて
schema.resolvers.goReadMessages
schema.resolvers.gofunc (r *queryResolver) ReadMessages(ctx context.Context) ([]*model.Message, error) { db, err := gorm.Open("postgres", env.DB_CONNECT) defer db.Close() if err != nil { return nil, fmt.Errorf(err.Error()) } db.Order("created_at desc").Find(&r.messages) return r.messages, nil }MessageCreated
schema.resolvers.gofunc (r *subscriptionResolver) MessageCreated(ctx context.Context) (<-chan *model.Message, error) { event := make(chan *model.Message) reportProblem := func(ev pq.ListenerEventType, err error) { if err != nil { fmt.Println(err.Error()) } } listener := pq.NewListener(env.DB_CONNECT, 10*time.Second, time.Minute, reportProblem) err := listener.Listen("messages") if err != nil { panic(err) } go func() { for { select { case n := <-listener.Notify: err = json.Unmarshal([]byte(n.Extra), &r.message) if err != nil { fmt.Println(err) } event <- r.message } } }() return event, nil }テスト用のPython scriptを用意する
以上でGraphQLサーバーの構築はできましたので
GraphQLサーバーがちゃんと、Subscriptionの通知結果を返すのかテストする為のスクリプトを書きます。
別にpythonでなくてもいいですし
GraphQLサーバーにCreateMessageというmutationを作ってテストしてもいいのですが
今回は、pythonでスクレイピングした内容をPostgreSQLにINSERTした際に
通知をするという今後の想定もあるという事で敢えてpythonを使います。docker-compose.ymlファイルがある階層にcreate-messageというディレクトリを作ります。
mkdir create-message cd create-message touch main.pymain.pyimport psycopg2 import uuid from datetime import datetime, timedelta, timezone def db_connect(): return psycopg2.connect("host=localhost port=5432 user=postgres dbname=postgres password=postgres sslmode=disable") def main(): with db_connect() as conn: with conn.cursor() as db: _id = uuid.uuid4() jst = timezone(timedelta(hours=+9), 'JST') now = datetime.now(jst) now = now.isoformat(timespec='seconds') db.execute(""" INSERT INTO messages ( id, text, created_at, updated_at ) VALUES (%s,%s,%s,%s); """,( str(_id), "test from python script", now, now )) if __name__ == '__main__': main()GraphQLサーバーを起動する
GraphQLサーバーを起動する前にenv.goファイルの
godotenvのコメントアウトを外します。
ここまでのソースコード内で登場していたenv.〇〇がこれで読み込めるようになります。
gqlkit-serverのルートで下記を実行します。go run server.gohttp://localhost:8080 でGraphQL Playgroundを開きます。
Playgroundで下記Queryを実行します。
ローダーが回り出し
通知待ち状態になります。subscription{ messageCreated{ id text created_at updated_at } }実際にpythonのscriptを実行してみます。
textにはtest from python scriptとでも入れておきましょう。python main.pyするとこんな感じに通知が取れるはずです。
まとめ
以上が、PostgreSQLのNotifyを使ってGraphQL Subscriptionを実装する方法の
バックエンド実装部分でした。
次回はnuxt.jsでのフロントエンド実装例をご紹介します。
- 投稿日:2020-04-05T20:24:35+09:00
【Ethereum】Docker環境でCryptoZombies
今、Ethereum、Solidity に非常に興味がありますが、そのきっかけがCryptoZombiesを一度やってみたことにあるのは間違いありません。
ただ、整えられた環境で練習しているという感じで、そこからどう展開できるのかよく分かりませんでした。
そこで、自分の環境で作ってみることができるのか、試してみたいと思います。
Truffle Boxes
環境は、Truffle Boxes で作成します。
Truffle Boxesといっても色々ある訳ですが、今回は、DRIZZLE-VUE-BOX を使用してみます。Vueももう少し鍛えたいので。
CryptoZombiesフォルダに、docker-compose.yml、Dockerfile を作成します。docker-compose.ymlversion: '3' services: truffle: build: context: ./trufflebox/ dockerfile: Dockerfile volumes: - ./trufflebox:/usr/src/app command: sh -c "cd vapp && npm run serve" ports: - "8004:8080"DockerfileFROM node:8-alpine RUN apk add --update alpine-sdk RUN apk add --no-cache git python g++ make \ && npm i -g --unsafe-perm=true --allow-root truffle WORKDIR /usr/src/appこの2ファイルを下記構成で作成。
CryptoZombies
├── docker-compose.yml
└── trufflebox
    └── Dockerfile
CryptoZombies フォルダで、ビルドしてイメージ作成。
$ docker-compose build
Building truffle
Step 1/4 : FROM node:8-alpine
 ---> 2b8fcdc6230a
Step 2/4 : RUN apk add --update alpine-sdk
 ---> Using cache
 ---> 761342077e72
Step 3/4 : RUN apk add --no-cache git python g++ make     && npm i -g --unsafe-perm=true --allow-root truffle
 ---> Using cache
 ---> 82200b1b0c8f
Step 4/4 : WORKDIR /usr/src/app
 ---> Using cache
 ---> 4eb121f5853d
Successfully built 4eb121f5853d
Successfully tagged cryptozombies_truffle:latest
vue-box トリュフボックスをインストール。
大量にログが出てしまったので、一部省略します。$ docker-compose run truffle truffle unbox vue-box Creating network "cryptozombies_default" with the default driver You can improve web3's peformance when running Node.js versions older than 10.5.0 by installing the (deprecated) scrypt package in your project This directory is non-empty... ? Proceed anyway? (Y/n) Starting unbox... ================= ? Proceed anyway? Yes ✔ Preparing to download box ✔ Downloading npm notice created a lockfile as package-lock.json. You should commit this file. npm WARN drizzle-vue-box@0.0.1 No description npm WARN drizzle-vue-box@0.0.1 No repository field. npm WARN deprecated mkdirp@0.5.4: Legacy versions of mkdirp are no longer supported. Please update to mkdirp 1.x. (Note that the API surface has changed to use Promises in 1.x.) npm WARN deprecated request@2.88.2: request has been deprecated, see https://github.com/request/request/issues/3142 npm WARN deprecated core-js@2.6.11: core-js@<3 is no longer maintained and not recommended for usage due to the number of issues. Please, upgrade your dependencies to the actual version of core-js@3. npm WARN deprecated circular-json@0.3.3: CircularJSON is in maintenance only, flatted is its successor. npm WARN deprecated resolve-url@0.2.1: https://github.com/lydell/resolve-url#deprecated npm WARN deprecated urix@0.1.0: Please see https://github.com/lydell/urix#deprecated In file included from /root/.cache/node-gyp/8.17.0/include/node/node.h:63, from ../src/addon.cc:1: /root/.cache/node-gyp/8.17.0/include/node/v8.h: In static member function 'static void v8::V8::SetAllowCodeGenerationFromStringsCallback(v8::DeprecatedAllowCodeGenerationFromStringsCallback)': /root/.cache/node-gyp/8.17.0/include/node/v8.h:10304:19: warning: cast between incompatible function types from 'v8::DeprecatedAllowCodeGenerationFromStringsCallback' {aka 'bool (*)(v8::Local<v8::Context>)'} to 'v8::FreshNewAllowCodeGenerationFromStringsCallback' {aka 'bool (*)(v8::Local<v8::Context>, v8::Local<v8::String>)'} [-Wcast-function-type] 10304 | callback)); | ^ (省略) 9313 | reinterpret_cast<Callback>(callback), type); | ^~~~~~~~~~~~~~~~~~~~~~~~~~~~~~~~~~~~ /root/.cache/node-gyp/8.17.0/include/node/v8.h: In instantiation of 'void v8::PersistentBase<T>::SetWeak(P*, typename v8::WeakCallbackInfo<P>::Callback, v8::WeakCallbackType) [with P = Nan::ObjectWrap; T = v8::Object; typename v8::WeakCallbackInfo<P>::Callback = void (*)(const v8::WeakCallbackInfo<Nan::ObjectWrap>&)]': ../../nan/nan_object_wrap.h:65:61: required from here /root/.cache/node-gyp/8.17.0/include/node/v8.h:9313:16: warning: cast between incompatible function types from 'v8::WeakCallbackInfo<Nan::ObjectWrap>::Callback' {aka 'void (*)(const v8::WeakCallbackInfo<Nan::ObjectWrap>&)'} to 'Callback' {aka 'void (*)(const v8::WeakCallbackInfo<void>&)'} [-Wcast-function-type] You can improve the performance of scrypt by upgrading to Node.js version 10.5.0 or newer, or by installing the (deprecated) scrypt package in your project npm notice created a lockfile as package-lock.json. You should commit this file. npm WARN notsup Unsupported engine for mkdirp@1.0.3: wanted: {"node":">=10"} (current: {"node":"8.17.0","npm":"6.13.4"}) npm WARN notsup Not compatible with your version of node/npm: mkdirp@1.0.3 npm WARN optional SKIPPING OPTIONAL DEPENDENCY: fsevents@^1.2.7 (node_modules/chokidar/node_modules/fsevents): npm WARN notsup SKIPPING OPTIONAL DEPENDENCY: Unsupported platform for fsevents@1.2.12: wanted {"os":"darwin","arch":"any"} (current: {"os":"linux","arch":"x64"}) (省略) npm WARN enoent SKIPPING OPTIONAL DEPENDENCY: ENOENT: no such file or directory, rename '/usr/src/app/vapp/node_modules/fsevents/node_modules/yallist' -> '/usr/src/app/vapp/node_modules/fsevents/node_modules/.yallist.DELETE' ✔ cleaning up temporary files ✔ Setting up box Unbox successful, sweet! Commands: Compile contracts: truffle compile Migrate contracts: truffle migrate Test contracts: truffle test成功はしているので大丈夫なのだろうか。
ここでできた、truffle-config.js は次のようになっています。ネットワークの記述はないです。
truffle-config.jsconst path = require('path') module.exports = { // See <http://truffleframework.com/docs/advanced/configuration> // to customize your Truffle configuration! contracts_build_directory: path.join(__dirname, "vapp/src/contracts"), };いったん、メッセージ、および、DRIZZLE-VUE-BOXのページにしたがって、migrateします。
$ docker-compose run truffle truffle migrate
You can improve web3's peformance when running Node.js versions older than 10.5.0 by installing the (deprecated) scrypt package in your project

Compiling your contracts...
===========================
> Compiling ./contracts/ComplexStorage.sol
> Compiling ./contracts/Migrations.sol
> Compiling ./contracts/SimpleStorage.sol
> Compiling ./contracts/TutorialToken.sol
> Compiling openzeppelin-solidity/contracts/GSN/Context.sol
> Compiling openzeppelin-solidity/contracts/math/SafeMath.sol
> Compiling openzeppelin-solidity/contracts/token/ERC20/ERC20.sol
> Compiling openzeppelin-solidity/contracts/token/ERC20/IERC20.sol
> Artifacts written to /usr/src/app/vapp/src/contracts
> Compiled successfully using:
   - solc: 0.5.16+commit.9c3226ce.Emscripten.clang

> Something went wrong while attempting to connect to the network. Check your network configuration.

Could not connect to your Ethereum client with the following parameters:
    - host       > 127.0.0.1
    - port       > 7545
    - network_id > 5777
Please check that your Ethereum client:
    - is running
    - is accepting RPC connections (i.e., "--rpc" option is used in geth)
    - is accessible over the network
    - is properly configured in your Truffle configuration file (truffle-config.js)

Truffle v5.1.18 (core: 5.1.18)
Node v8.17.0
コンパイルは成功しましたが、やはりネットワークに接続できませんので、truffle-config.js を修正します。
truffle-config.js(変更)const path = require('path') module.exports = { // See <http://truffleframework.com/docs/advanced/configuration> // to customize your Truffle configuration! contracts_build_directory: path.join(__dirname, "vapp/src/contracts"), networks: { development: { host: "10.200.10.1", port: 7545, network_id: "*" // Match any network id } } };※port7545に接続するあたりは、Dockerで構築するEthereum PET-SHOP TRUFFLE BOXES(その1)をご参照ください。
もう一度migration。
$ docker-compose run truffle truffle migrate
You can improve web3's peformance when running Node.js versions older than 10.5.0 by installing the (deprecated) scrypt package in your project

Compiling your contracts...
===========================
> Everything is up to date, there is nothing to compile.


Starting migrations...
======================
> Network name:    'development'
> Network id:      5777
> Block gas limit: 0x6691b7


1_initial_migration.js
======================

   Deploying 'Migrations'
   ----------------------
   > transaction hash:    0x06542d04e9a633fdb9e67c0cefe89eca782af6dd2b0c8ad16702d3129a2e0465
   > Blocks: 0            Seconds: 0
   > contract address:    0xE0f904185d649bb178312968f8f304C46254b22A
   > block number:        1
   > block timestamp:     1585745130
   > account:             0xc55F3d6C444ca88f529F3413EDEd85a39e38609C
   > balance:             99.99623034
   > gas used:            188483
   > gas price:           20 gwei
   > value sent:          0 ETH
   > total cost:          0.00376966 ETH


   > Saving migration to chain.
   > Saving artifacts
   -------------------------------------
   > Total cost:          0.00376966 ETH


2_deploy_contracts.js
=====================

   Deploying 'SimpleStorage'
   -------------------------
   > transaction hash:    0x4d4f1762f60a44c8d5b80c6620911504a991b264dd62fd655b8ccae8df823f21
   > Blocks: 0            Seconds: 0
   > contract address:    0x1B520b74895deE2c71512071863f56fC62CF3A8b
   > block number:        3
   > block timestamp:     1585745131
   > account:             0xc55F3d6C444ca88f529F3413EDEd85a39e38609C
   > balance:             99.99270882
   > gas used:            134075
   > gas price:           20 gwei
   > value sent:          0 ETH
   > total cost:          0.0026815 ETH


   Deploying 'TutorialToken'
   -------------------------
   > transaction hash:    0x7360523d1806ff66ff5e673f7b8bc445b2637a4f9789e11931b04299b53a9849
   > Blocks: 0            Seconds: 0
   > contract address:    0x7F5D4B8B3D379A2c60b76e813B392266a936B51b
   > block number:        4
   > block timestamp:     1585745131
   > account:             0xc55F3d6C444ca88f529F3413EDEd85a39e38609C
   > balance:             99.96507908
   > gas used:            1381487
   > gas price:           20 gwei
   > value sent:          0 ETH
   > total cost:          0.02762974 ETH


   Deploying 'ComplexStorage'
   --------------------------
   > transaction hash:    0x819f1e8cc4ce76c3d5478aa6d39fd65fa731d2c322510138e5e3c21cd6815b9b
   > Blocks: 0            Seconds: 0
   > contract address:    0xF88b3D9805da39D094178f2ba0dCc38a0610d214
   > block number:        5
   > block timestamp:     1585745132
   > account:             0xc55F3d6C444ca88f529F3413EDEd85a39e38609C
   > balance:             99.93307126
   > gas used:            1600391
   > gas price:           20 gwei
   > value sent:          0 ETH
   > total cost:          0.03200782 ETH


   > Saving migration to chain.
   > Saving artifacts
   -------------------------------------
   > Total cost:          0.06231906 ETH


Summary
=======
> Total deployments:   4
> Final cost:          0.06608872 ETH
できました!
では、起動します。こちらも、大量のログは省略。
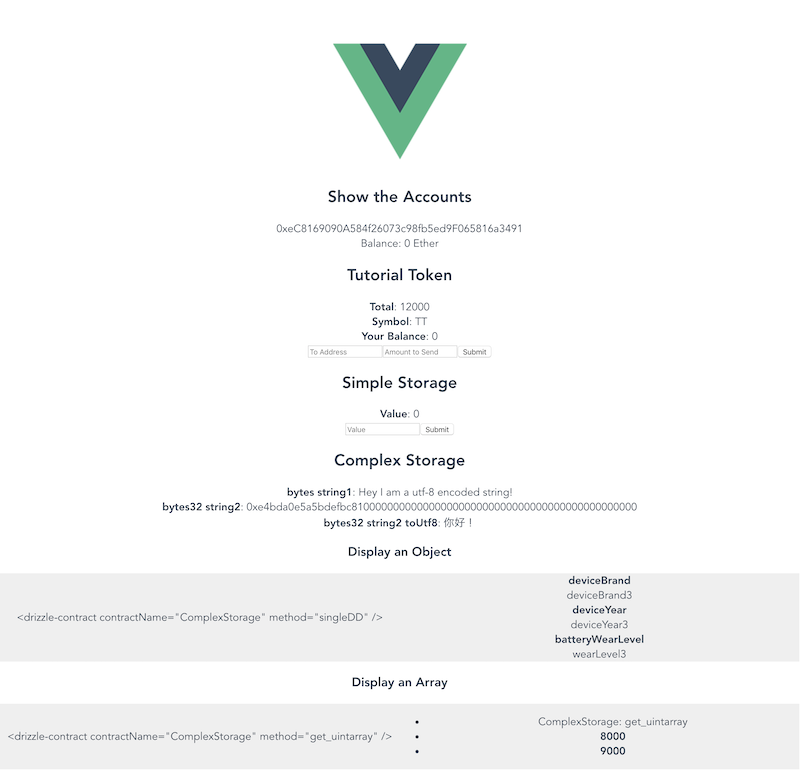
$ docker-compose up
(省略)
truffle_1  |  DONE  Compiled successfully in 52507ms12:53:10
truffle_1  |
truffle_1  | <s> [webpack.Progress] 100%
truffle_1  |
truffle_1  |
truffle_1  |   App running at:
truffle_1  |   - Local:   http://localhost:8080/
truffle_1  |
truffle_1  |   It seems you are running Vue CLI inside a container.
truffle_1  |   Access the dev server via http://localhost:<your container's external mapped port>/
truffle_1  |
truffle_1  |   Note that the development build is not optimized.
truffle_1  |   To create a production build, run npm run build.
truffle_1  |
できました!
ブラウザで、
http://localhost:8004/
を開きます。画面が開きます!
Truffle Boxes で、基礎となる環境ができました。
Lesson 1 ゾンビファクトリーの作成
CryptoZombies の、Lesson 1 ゾンビファクトリーの作成からやっていきます。
といっても、一度やっているので、一気に最後まで書き上げます。
trufflebox/contracts/Contract.sol ファイルを作成します。Contract.solpragma solidity ^0.4.19; contract ZombieFactory { event NewZombie(uint zombieId, string name, uint dna); uint dnaDigits = 16; uint dnaModulus = 10 ** dnaDigits; struct Zombie { string name; uint dna; } Zombie[] public zombies; function _createZombie(string _name, uint _dna) private { uint id = zombies.push(Zombie(_name, _dna)) - 1; NewZombie(id, _name, _dna); } function _generateRandomDna(string _str) private view returns (uint) { uint rand = uint(keccak256(_str)); return rand % dnaModulus; } function createRandomZombie(string _name) public { uint randDna = _generateRandomDna(_name); _createZombie(_name, randDna); } }キーワードとしては、配列、構造体、関数、イベント、といったところです。
Lesson 2 ゾンビが人間を襲う
まずは、Contract.sol に、さらに機能を追加します。
Contract.solpragma solidity ^0.4.19; contract ZombieFactory { event NewZombie(uint zombieId, string name, uint dna); uint dnaDigits = 16; uint dnaModulus = 10 ** dnaDigits; struct Zombie { string name; uint dna; } Zombie[] public zombies; mapping (uint => address) public zombieToOwner; mapping (address => uint) ownerZombieCount; function _createZombie(string _name, uint _dna) private { uint id = zombies.push(Zombie(_name, _dna)) - 1; zombieToOwner[id] = msg.sender; ownerZombieCount[msg.sender]++; NewZombie(id, _name, _dna); } function _generateRandomDna(string _str) private view returns (uint) { uint rand = uint(keccak256(_str)); return rand % dnaModulus; } function createRandomZombie(string _name) public { require(ownerZombieCount[msg.sender] == 0); uint randDna = _generateRandomDna(_name); _createZombie(_name, randDna); } } contract ZombieFeeding is ZombieFactory { }キーワードとしては、アドレス、Mappings(マッピング)、msg.sender、Require、継承、といったものです。
そして、ここで継承を使って、Contract を二つに分けましたので、ファイルも分けます。
Contract.sol は、名前をzombiefactory.sol とします。
さらに、zombiefeeding.sol を作成し、以下のようにします。zombiefactory.solpragma solidity ^0.4.19; contract ZombieFactory { event NewZombie(uint zombieId, string name, uint dna); uint dnaDigits = 16; uint dnaModulus = 10 ** dnaDigits; struct Zombie { string name; uint dna; } Zombie[] public zombies; mapping (uint => address) public zombieToOwner; mapping (address => uint) ownerZombieCount; function _createZombie(string _name, uint _dna) internal { uint id = zombies.push(Zombie(_name, _dna)) - 1; zombieToOwner[id] = msg.sender; ownerZombieCount[msg.sender]++; NewZombie(id, _name, _dna); } function _generateRandomDna(string _str) private view returns (uint) { uint rand = uint(keccak256(_str)); return rand % dnaModulus; } function createRandomZombie(string _name) public { require(ownerZombieCount[msg.sender] == 0); uint randDna = _generateRandomDna(_name); randDna = randDna - randDna % 100; _createZombie(_name, randDna); } }zombiefeeding.solpragma solidity ^0.4.19; import "./zombiefactory.sol"; contract KittyInterface { function getKitty(uint256 _id) external view returns ( bool isGestating, bool isReady, uint256 cooldownIndex, uint256 nextActionAt, uint256 siringWithId, uint256 birthTime, uint256 matronId, uint256 sireId, uint256 generation, uint256 genes ); } contract ZombieFeeding is ZombieFactory { address ckAddress = 0x06012c8cf97BEaD5deAe237070F9587f8E7A266d; KittyInterface kittyContract = KittyInterface(ckAddress); function feedAndMultiply(uint _zombieId, uint _targetDna, string _species) public { require(msg.sender == zombieToOwner[_zombieId]); Zombie storage myZombie = zombies[_zombieId]; _targetDna = _targetDna % dnaModulus; uint newDna = (myZombie.dna + _targetDna) / 2; if (keccak256(_species) == keccak256("kitty")) { newDna = newDna - newDna % 100 + 99; } _createZombie("NoName", newDna); } function feedOnKitty(uint _zombieId, uint _kittyId) public { uint kittyDna; (,,,,,,,,,kittyDna) = kittyContract.getKitty(_kittyId); feedAndMultiply(_zombieId, kittyDna, "kitty"); } }キーワードとしては、Interface、複数の返り値、などです。
Lesson 3 Solidityの高度なコンセプト
ここで、OpenZeppelin が登場します。Ownable コントラクトを使うためです。
Ownable のコードは、ownable.sol にコピーして使うそうです。ownable.sol/** * @title Ownable * @dev The Ownable contract has an owner address, and provides basic authorization control * functions, this simplifies the implementation of "user permissions". */ contract Ownable { address public owner; event OwnershipTransferred(address indexed previousOwner, address indexed newOwner); /** * @dev The Ownable constructor sets the original `owner` of the contract to the sender * account. */ function Ownable() public { owner = msg.sender; } /** * @dev Throws if called by any account other than the owner. */ modifier onlyOwner() { require(msg.sender == owner); _; } /** * @dev Allows the current owner to transfer control of the contract to a newOwner. * @param newOwner The address to transfer ownership to. */ function transferOwnership(address newOwner) public onlyOwner { require(newOwner != address(0)); OwnershipTransferred(owner, newOwner); owner = newOwner; } }そして、ZombieFactory は、Ownable を継承し、onlyOwner関数修飾子 を使えるようにします。
さらに機能追加。キーワードは、ガス、時間計算。zombiefactory.solpragma solidity ^0.4.19; import "./ownable.sol"; contract ZombieFactory is Ownable { event NewZombie(uint zombieId, string name, uint dna); uint dnaDigits = 16; uint dnaModulus = 10 ** dnaDigits; uint cooldownTime = 1 days; struct Zombie { string name; uint dna; uint32 level; uint32 readyTime; } Zombie[] public zombies; mapping (uint => address) public zombieToOwner; mapping (address => uint) ownerZombieCount; function _createZombie(string _name, uint _dna) internal { uint id = zombies.push(Zombie(_name, _dna, 1, uint32(now + cooldownTime))) - 1; zombieToOwner[id] = msg.sender; ownerZombieCount[msg.sender]++; NewZombie(id, _name, _dna); } function _generateRandomDna(string _str) private view returns (uint) { uint rand = uint(keccak256(_str)); return rand % dnaModulus; } function createRandomZombie(string _name) public { require(ownerZombieCount[msg.sender] == 0); uint randDna = _generateRandomDna(_name); randDna = randDna - randDna % 100; _createZombie(_name, randDna); } }zombiefeeding.solpragma solidity ^0.4.19; import "./zombiefactory.sol"; contract KittyInterface { function getKitty(uint256 _id) external view returns ( bool isGestating, bool isReady, uint256 cooldownIndex, uint256 nextActionAt, uint256 siringWithId, uint256 birthTime, uint256 matronId, uint256 sireId, uint256 generation, uint256 genes ); } contract ZombieFeeding is ZombieFactory { KittyInterface kittyContract; function setKittyContractAddress(address _address) external onlyOwner { kittyContract = KittyInterface(_address); } function feedAndMultiply(uint _zombieId, uint _targetDna, string _species) public { require(msg.sender == zombieToOwner[_zombieId]); Zombie storage myZombie = zombies[_zombieId]; _targetDna = _targetDna % dnaModulus; uint newDna = (myZombie.dna + _targetDna) / 2; if (keccak256(_species) == keccak256("kitty")) { newDna = newDna - newDna % 100 + 99; } _createZombie("NoName", newDna); } function feedOnKitty(uint _zombieId, uint _kittyId) public { uint kittyDna; (,,,,,,,,,kittyDna) = kittyContract.getKitty(_kittyId); feedAndMultiply(_zombieId, kittyDna, "kitty"); } }そして、さらに、zombiehelper.sol
zombiehelper.solpragma solidity ^0.4.19; import "./zombiefeeding.sol"; contract ZombieHelper is ZombieFeeding { modifier aboveLevel(uint _level, uint _zombieId) { require(zombies[_zombieId].level >= _level); _; } function changeName(uint _zombieId, string _newName) external aboveLevel(2, _zombieId) { require(msg.sender == zombieToOwner[_zombieId]); zombies[_zombieId].name = _newName; } function changeDna(uint _zombieId, uint _newDna) external aboveLevel(20, _zombieId) { require(msg.sender == zombieToOwner[_zombieId]); zombies[_zombieId].dna = _newDna; } function getZombiesByOwner(address _owner) external view returns(uint[]) { uint[] memory result = new uint[](ownerZombieCount[_owner]); uint counter = 0; for (uint i = 0; i < zombies.length; i++) { if (zombieToOwner[i] == _owner) { result[counter] = i; counter++; } } return result; } }キーワードとしては、関数修飾子、View 関数でガスを節約、Storageのコストは高い、memory、For ループ、といった内容。
Lesson 4 ゾンビのバトルシステム
バトルのためのロジックを書くために、zombieattack.sol を作成します(コントラクトの名前は、ZombieBattle なんですけどね)。
それに伴い、zombiehelper.sol に支払い関係の記述を追加し、zombiefeeding.sol には、呼び出し制限のためのmodifierを追加。zombiefactory.sol のZombie構造体にこれらの情報を保持するプロパティを追加。zombiehelper.solpragma solidity ^0.4.19; import "./zombiefeeding.sol"; contract ZombieHelper is ZombieFeeding { uint levelUpFee = 0.001 ether; modifier aboveLevel(uint _level, uint _zombieId) { require(zombies[_zombieId].level >= _level); _; } function withdraw() external onlyOwner { owner.transfer(this.balance); } function setLevelUpFee(uint _fee) external onlyOwner { levelUpFee = _fee; } function changeName(uint _zombieId, string _newName) external aboveLevel(2, _zombieId) ownerOf(_zombieId) { zombies[_zombieId].name = _newName; } function changeDna(uint _zombieId, uint _newDna) external aboveLevel(20, _zombieId) ownerOf(_zombieId) { zombies[_zombieId].dna = _newDna; } function getZombiesByOwner(address _owner) external view returns(uint[]) { uint[] memory result = new uint[](ownerZombieCount[_owner]); uint counter = 0; for (uint i = 0; i < zombies.length; i++) { if (zombieToOwner[i] == _owner) { result[counter] = i; counter++; } } return result; } }zombiefeeding.solpragma solidity ^0.4.19; import "./zombiefactory.sol"; contract KittyInterface { function getKitty(uint256 _id) external view returns ( bool isGestating, bool isReady, uint256 cooldownIndex, uint256 nextActionAt, uint256 siringWithId, uint256 birthTime, uint256 matronId, uint256 sireId, uint256 generation, uint256 genes ); } contract ZombieFeeding is ZombieFactory { KittyInterface kittyContract; modifier ownerOf(uint _zombieId) { require(msg.sender == zombieToOwner[_zombieId]); _; } function setKittyContractAddress(address _address) external onlyOwner { kittyContract = KittyInterface(_address); } function _triggerCooldown(Zombie storage _zombie) internal { _zombie.readyTime = uint32(now + cooldownTime); } function _isReady(Zombie storage _zombie) internal view returns (bool) { return (_zombie.readyTime <= now); } function feedAndMultiply(uint _zombieId, uint _targetDna, string _species) internal ownerOf(_zombieId) { Zombie storage myZombie = zombies[_zombieId]; require(_isReady(myZombie)); _targetDna = _targetDna % dnaModulus; uint newDna = (myZombie.dna + _targetDna) / 2; if (keccak256(_species) == keccak256("kitty")) { newDna = newDna - newDna % 100 + 99; } _createZombie("NoName", newDna); _triggerCooldown(myZombie); } function feedOnKitty(uint _zombieId, uint _kittyId) public { uint kittyDna; (,,,,,,,,,kittyDna) = kittyContract.getKitty(_kittyId); feedAndMultiply(_zombieId, kittyDna, "kitty"); } }zombiefactory.solpragma solidity ^0.4.19; import "./ownable.sol"; contract ZombieFactory is Ownable { event NewZombie(uint zombieId, string name, uint dna); uint dnaDigits = 16; uint dnaModulus = 10 ** dnaDigits; uint cooldownTime = 1 days; struct Zombie { string name; uint dna; uint32 level; uint32 readyTime; uint16 winCount; uint16 lossCount; } Zombie[] public zombies; mapping (uint => address) public zombieToOwner; mapping (address => uint) ownerZombieCount; function _createZombie(string _name, uint _dna) internal { uint id = zombies.push(Zombie(_name, _dna, 1, uint32(now + cooldownTime), 0, 0)) - 1; zombieToOwner[id] = msg.sender; ownerZombieCount[msg.sender]++; NewZombie(id, _name, _dna); } function _generateRandomDna(string _str) private view returns (uint) { uint rand = uint(keccak256(_str)); return rand % dnaModulus; } function createRandomZombie(string _name) public { require(ownerZombieCount[msg.sender] == 0); uint randDna = _generateRandomDna(_name); randDna = randDna - randDna % 100; _createZombie(_name, randDna); } }zombieattack.solpragma solidity ^0.4.19; import "./zombiehelper.sol"; contract ZombieBattle is ZombieHelper { uint randNonce = 0; uint attackVictoryProbability = 70; function randMod(uint _modulus) internal returns(uint) { randNonce++; return uint(keccak256(now, msg.sender, randNonce)) % _modulus; } function attack(uint _zombieId, uint _targetId) external onlyOwnerOf(_zombieId) { Zombie storage myZombie = zombies[_zombieId]; Zombie storage enemyZombie = zombies[_targetId]; uint rand = randMod(100); if (rand <= attackVictoryProbability) { myZombie.winCount++; myZombie.level++; enemyZombie.lossCount++; feedAndMultiply(_zombieId, enemyZombie.dna, "zombie"); } else { myZombie.lossCount++; enemyZombie.winCount++; _triggerCooldown(myZombie); } } }Lesson 5 ERC721とクリプト収集物
ERC721メソッド用のzombieownership.sol と、用意してくれている、erc721.sol を追加。
zombiefeeding.sol で定義していたownerOfという修飾詞名はERC721トークン規格と被るので同じ名前の修飾詞と関数を持つことはできないとエラーを出すそうです。
ここまでのところで一度コンパイルしてみます。erc721.solcontract ERC721 { event Transfer(address indexed _from, address indexed _to, uint256 _tokenId); event Approval(address indexed _owner, address indexed _approved, uint256 _tokenId); function balanceOf(address _owner) public view returns (uint256 _balance); function ownerOf(uint256 _tokenId) public view returns (address _owner); function transfer(address _to, uint256 _tokenId) public; function approve(address _to, uint256 _tokenId) public; function takeOwnership(uint256 _tokenId) public; }zombieownership.solpragma solidity ^0.4.19; import "./zombieattack.sol"; import "./erc721.sol"; contract ZombieOwnership is ZombieAttack, ERC721 { function balanceOf(address _owner) public view returns (uint256 _balance) { return ownerZombieCount[_owner]; } function ownerOf(uint256 _tokenId) public view returns (address _owner) { return zombieToOwner[_tokenId]; } function transfer(address _to, uint256 _tokenId) public { } function approve(address _to, uint256 _tokenId) public { } function takeOwnership(uint256 _tokenId) public { } }起動してあったdocker-compose up で起動中の環境を、Ctrl+Cで終了。バックグラウンド起動して、Docker環境のshellに入ります。
$ docker-compose up -d
$ docker-compose run truffle sh
/usr/src/app # truffle compile
You can improve web3's peformance when running Node.js versions older than 10.5.0 by installing the (deprecated) scrypt package in your project

Compiling your contracts...
===========================
> Compiling ./contracts/erc721.sol
> Compiling ./contracts/ownable.sol
> Compiling ./contracts/zombieattack.sol
> Compiling ./contracts/zombiefactory.sol
> Compiling ./contracts/zombiefeeding.sol
> Compiling ./contracts/zombiehelper.sol
> Compiling ./contracts/zombieownership.sol

/usr/src/app/contracts/zombieattack.sol:1:1: ParserError: Source file requires different compiler version (current compiler is 0.5.16+commit.9c3226ce.Emscripten.clang - note that nightly builds are considered to be strictly less than the released version
pragma solidity ^0.4.19;
^----------------------^
,/usr/src/app/contracts/zombiefactory.sol:1:1: ParserError: Source file requires different compiler version (current compiler is 0.5.16+commit.9c3226ce.Emscripten.clang - note that nightly builds are considered to be strictly less than the released version
pragma solidity ^0.4.19;
^----------------------^
,/usr/src/app/contracts/zombiefeeding.sol:1:1: ParserError: Source file requires different compiler version (current compiler is 0.5.16+commit.9c3226ce.Emscripten.clang - note that nightly builds are considered to be strictly less than the released version
pragma solidity ^0.4.19;
^----------------------^
,/usr/src/app/contracts/zombiehelper.sol:1:1: ParserError: Source file requires different compiler version (current compiler is 0.5.16+commit.9c3226ce.Emscripten.clang - note that nightly builds are considered to be strictly less than the released version
pragma solidity ^0.4.19;
^----------------------^
,/usr/src/app/contracts/zombieownership.sol:1:1: ParserError: Source file requires different compiler version (current compiler is 0.5.16+commit.9c3226ce.Emscripten.clang - note that nightly builds are considered to be strictly less than the released version
pragma solidity ^0.4.19;
^----------------------^

Error: Truffle is currently using solc 0.5.16, but one or more of your contracts specify "pragma solidity ^0.4.19".
Please update your truffle config or pragma statement(s).
(See https://truffleframework.com/docs/truffle/reference/configuration#compiler-configuration for information on
configuring Truffle to use a specific solc compiler version.)

Compilation failed. See above.
Truffle v5.1.18 (core: 5.1.18)
Node v8.17.0
おっと。
全部サンプルに合わせて
pragma solidity >=0.4.21 <0.6.0;
に変更して再度。/usr/src/app # truffle compile You can improve web3's peformance when running Node.js versions older than 10.5.0 by installing the (deprecated) scrypt package in your project Compiling your contracts... =========================== > Compiling ./contracts/erc721.sol > Compiling ./contracts/ownable.sol > Compiling ./contracts/zombieattack.sol > Compiling ./contracts/zombiefactory.sol > Compiling ./contracts/zombiefeeding.sol > Compiling ./contracts/zombiehelper.sol > Compiling ./contracts/zombieownership.sol > Compilation warnings encountered: /usr/src/app/contracts/erc721.sol:1:1: Warning: Source file does not specify required compiler version! Consider adding "pragma solidity ^0.5.16;" contract ERC721 { ^ (Relevant source part starts here and spans across multiple lines). ,/usr/src/app/contracts/ownable.sol:6:1: Warning: Source file does not specify required compiler version! Consider adding "pragma solidity ^0.5.16;" contract Ownable { ^ (Relevant source part starts here and spans across multiple lines). ,/usr/src/app/contracts/ownable.sol:15:3: Warning: This declaration shadows an existing declaration. function Ownable() public { ^ (Relevant source part starts here and spans across multiple lines). /usr/src/app/contracts/ownable.sol:6:1: The shadowed declaration is here: contract Ownable { ^ (Relevant source part starts here and spans across multiple lines). /usr/src/app/contracts/ownable.sol:15:3: SyntaxError: Functions are not allowed to have the same name as the contract. If you intend this to be a constructor, use "constructor(...) { ... }" to define it. function Ownable() public { ^ (Relevant source part starts here and spans across multiple lines). ,/usr/src/app/contracts/zombiefactory.sol:27:28: TypeError: Data location must be "storage" or "memory" for parameter in function, but none was given. function _createZombie(string _name, uint _dna) internal { ^----------^ ,/usr/src/app/contracts/zombiefactory.sol:34:33: TypeError: Data location must be "storage" or "memory" for parameter in function, but none was given. function _generateRandomDna(string _str) private view returns (uint) { ^---------^ ,/usr/src/app/contracts/zombiefactory.sol:39:33: TypeError: Data location must be "memory" for parameter in function, but none was given. function createRandomZombie(string _name) public { ^----------^ Compilation failed. See above. Truffle v5.1.18 (core: 5.1.18) Node v8.17.0そもそも、wnable.sol がエラーになってしまっている。そうね、0.4からだと色々変わっているかもですね。最新だとかなり変わっているように見えるので、ほどほどっぽい(なんだそれ)こちらのを参考にさせていただきます。
https://takuyafujita.hatenablog.com/entry/2018/08/04/173529
また、erc721.sol と、ownable.sol にも、
pragma solidity >=0.4.21 <0.6.0;
は付けておきます。
さらに、0.5ではmemoryの記述が必要になっているということで、zombiefactory.sol、zombiefeeding.sol、zombiehelper.sol も修正しておきます。
その他、色々ありました!!(順番に書いているというよりは、最終ソースから消していった感じかな・・・ZombieAttackはやはりZombieAttackだよねとか)などなど、エラーメッセージを見ながら対応していくと、こんなエラーが出て、これが言いたかったことだなと思います。
/usr/src/app # truffle compile
You can improve web3's peformance when running Node.js versions older than 10.5.0 by installing the (deprecated) scrypt package in your project

Compiling your contracts...
===========================
> Compiling ./contracts/erc721.sol
> Compiling ./contracts/ownable.sol
> Compiling ./contracts/zombieattack.sol
> Compiling ./contracts/zombiefactory.sol
> Compiling ./contracts/zombiefeeding.sol
> Compiling ./contracts/zombiehelper.sol
> Compiling ./contracts/zombieownership.sol

/usr/src/app/contracts/zombiefeeding.sol:24:3: DeclarationError: Identifier already declared.
  modifier ownerOf(uint _zombieId) {
  ^ (Relevant source part starts here and spans across multiple lines).
/usr/src/app/contracts/zombieownership.sol:12:3: The previous declaration is here:
  function ownerOf(uint256 _tokenId) public view returns (address _owner) {
  ^ (Relevant source part starts here and spans across multiple lines).
,/usr/src/app/contracts/zombiefeeding.sol:24:3: TypeError: Override changes modifier to function.
  modifier ownerOf(uint _zombieId) {
  ^ (Relevant source part starts here and spans across multiple lines).
,/usr/src/app/contracts/zombiefactory.sol:31:9: TypeError: Event invocations have to be prefixed by "emit".
        NewZombie(id, _name, _dna);
        ^------------------------^
,/usr/src/app/contracts/zombiefactory.sol:35:36: TypeError: Invalid type for argument in function call. Invalid implicit conversion from string memory to bytes memory requested. This function requires a single bytes argument. Use abi.encodePacked(...) to obtain the pre-0.5.0 behaviour or abi.encode(...) to use ABI encoding.
        uint rand = uint(keccak256(_str));
                                   ^--^
,/usr/src/app/contracts/zombiefeeding.sol:46:19: TypeError: Invalid type for argument in function call. Invalid implicit conversion from string memory to bytes memory requested. This function requires a single bytes argument. Use abi.encodePacked(...) to obtain the pre-0.5.0 behaviour or abi.encode(...) to use ABI encoding.
    if (keccak256(_species) == keccak256("kitty")) {
                  ^------^
,/usr/src/app/contracts/zombiehelper.sol:15:20: TypeError: Member "balance" not found or not visible after argument-dependent lookup in contract ZombieHelper. Use "address(this).balance" to access this address member.
    owner.transfer(this.balance);
                   ^----------^

Compilation failed. See above.
Truffle v5.1.18 (core: 5.1.18)
Node v8.17.0
抜粋するとここですね。
/usr/src/app/contracts/zombiefeeding.sol:24:3: DeclarationError: Identifier already declared.
  modifier ownerOf(uint _zombieId) {
  ^ (Relevant source part starts here and spans across multiple lines).
/usr/src/app/contracts/zombieownership.sol:12:3: The previous declaration is here:
  function ownerOf(uint256 _tokenId) public view returns (address _owner) {
といういことで、zombiefeeding.sol も修正しましょうという流れですが、0.5対応の方が大変じゃないかという流れではあります。いったん、このエラーだけは解消しておきます。
ここまでのキーワードとしては、ERC20トークンとERC721トークン、多重継承、など。
さて、ここで、ソースを0.5対応板にしてしまったので、連続性が途絶えます。
今普通に公開されているのは、Lesson6 までですが、githubでは9まで行ってますし、英語だと13まで行っています。
https://github.com/loomnetwork/cryptozombie-lessons/tree/master/jp
https://github.com/loomnetwork/cryptozombie-lessons/tree/master/en是非そこまで続けてみようと思いますし、そう考えると、動くか動かないかわからないものをただ書き続けるのも辛いので、ここで一度切って、ここからは、solidity0.5対応版として、改めて、続けていきたいと思います。
- 投稿日:2020-04-05T18:01:05+09:00
DockerのUbuntuを通常のUbuntuに戻す
これはなに
DockerでインストールしたUbuntuは、最小限のパッケージしかインストールされていないので、コマンドを叩くと大半が
command not foundと怒られます。
これを通常のUbuntuに戻したいです。解決策
コンテナ内で、
$ unminimizeと入力すると、プリインストールのパッケージがほとんどインストールされます。
Dockerfile
Dockerfileに
FROM ubuntu
RUN unminimize
と記述すると
The command '/bin/sh -c unminimize' returned a non-zero code: 1と怒られてしまいました。
代わりに、FROM ubuntu RUN yes | unminimizeとすることでパッケージがインストールされます。
- 投稿日:2020-04-05T17:39:12+09:00
windows10 homeのwsl2でdocker
ご報告
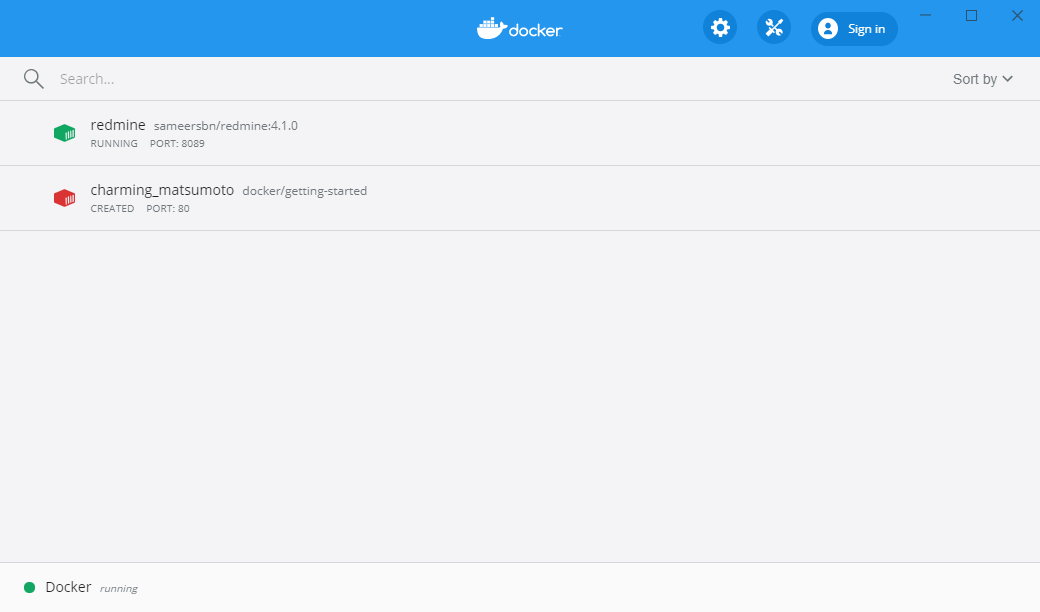
windows 10 homeでdockerでredmineを動かしました。
すんばらしいですねえ。
内容
windows10 2004というのが、これから(2020/4以降)リリースされる予定で、そこでは「本物のubuntu」が動くようです。
私の場合は、「windows insider preview」から持ってきて、やっていますが、安定しているかどうかはわからないので、今はwindows updateを少し待った方がいいでしょうねえ。私はFASTを選んでしまったので、
「Version 10.0.19592.1001」まで進んでしまった(2020/4/4現在)ので、多分Slowで十分なんじゃないでしょうかね?(インストールのための必須条件は「Windows 10 ビルド18917以降」)なんで、無謀に進んでしまってますね。wsl2の魅力
wsl(windows subsystem linux)ってのは、要するに、半分以上windowsをlinuxにする仕組みで、windows10には、「拡張インストール」でインストールできます。
前のwslはdockerを動かすのに、windows 10 proが必要とかで、困ってたんですけど、今回のosバージョンアップで無事、homeで最新のdockerを動かせました。
これには、なんとkubernetesの設定まで動くようになっていて、windowsでサーバになっちゃうなあという感じです。今まで、vmwareでubuntuを動かしてたんですけど、ちょっとこれでvmwareの出番がすくなくなりますねえ。
vmwareとの比較
wsl内には私はubuntuを入れましたが、「bash」と入力するだけで、ubunntuに切り替わるというwindowsをやっていると、自然にlinuxになるという変な状況です。
当然同じファイルシステムは見れるので、curlやwgetをwindowsにインストールする手間もなくなります。成程、こういうことなのか・・という感じです。ubuntuの起動は、2,3秒でvmwareと比較するのは問題外です。メモリも全然使いません。ただ、guiはデフォルトでは入っていないので、これも別に起動するとなると、けっこう同じようになるのかもしれないですが、まあ、ubuntuでguiが必要なのって、gimpぐらいなもんですかねえ?
そういうわけでけっこう満足してます。本当にもう、仮想からdockerに移行してるんですねえという話でした。以上終わり。
- 投稿日:2020-04-05T17:20:13+09:00
初心者がKaggle用にGCP+Dockerで環境構築して大変だった話
背景
kaggleにはkernelというjupyter-notebookみたいな環境が用意されていてそれなりに便利なのですが、やはり制約も結構あったりでガッツリやるには専用の環境を用意したほうがいいなと思い色々と調べてGCPとDockerで環境構築をしようと思い立ちやってみました。
概要
kaggle用の環境をGCP+Dockerで構築しようしたけど色々と詰まったのでつまずきポイントを備忘録としてまとめました。
基本的には下記記事を参考に進めていましたが、いくつかつまずいたところがあったのでその部分の説明をメインにしています。
http://scitaku.hatenablog.com/entry/2019/06/09/005657ちなみに自分はGCPもDockerも今まで触ったこともない初心者ですのであしからず。
つまずきポイント①
GCPでVMインスタンスを作成するのですが、いざ作成してみると何故か失敗してしまいます。
下記のような通知が出るのですが、選択したゾーンのリソースが不足しているようで作成が出来ませんとのことです。取り敢えず別のゾーン選択したら作成出来ました。ただ別の日に再度同じゾーンで作成したら問題なく出来たのでどうしても東京を選択したい!という思いがあるのであれば別日時を試してみると良いです。The zone 'projects/kaggle-272812/zones/asia-northeast1-b' does not have enough resources available to fulfill the request. Try a different zone, or try again later.
つまずきポイント②
VM作成時にkaggle公式のDocker Imageを導入してくれる設定があるのですが、これがなかなかDLされませんでした。
参考にした記事にもしばらく待ってくださいとあったので1時間ほど待ったのですがだめでした。
色々と調べたところkaggleのDockerのイメージが24GBくらいだそうで、私が作成したVMのストレージが10GBだったのでそれが原因かなと思い再度VMを作り直ししてストレージも100GB(参考にしたサイトも100GBだったので)にしたところ無事導入出来ました。
ただ、やり直した時もすぐにDLされたわけではなく、一旦諦めて自分で導入するかと色々と弄っている時にふと見たらあったので結構時間はかかりそうです。まあ24GBあるので当たり前かもしれませんが。つまずきポイント③
コンテナも無事作成できてあと少しというところでしたが最後にもう一つ問題が発生しました。
コンテナに入って
jupyter notebook --ip=0.0.0.0 --allow-root
と打つとjupyter notebookが起動してtokenが表示されるまでは良いのですがVMにsshしている状態だとsdkのshellが操作出来ません。
なのでVMに入る段階で
gcloud compute ssh "インスタンス名" -- -L 8888:localhost:8888
にしておくと良いです。
あとはローカルPCのブラウザで http://localhost:8888 に繋げばリモートホスト側のJupyter Notebookにアクセスできるようになります。ちなみ
gcloud compute ssh "インスタンス名" -- -L 8888:localhost:8888
の意味としては localhost:8888 に繋げばリモートホストの 8888 にポートフォワードするよということらしです。
ポートフォワードせずにSSHでログインすると http://localhost:8888 に繋げた時にローカル側にアクセスしてしまうので、ポートフォワードによりリモートホスト側の8888に転送してあげる必要があるようです。
https://kuune.org/text/2017/05/14/use-jupyter-notebook-on-server-through-ssh-port-forwarding/
https://blog.mosuke.tech/entry/2014/12/31/170545/最後に
なんとか環境構築が出来てひとまず安心しました。
と言ってもまだ本命のkaggleには手を出せていないのでやっとスタートラインに立てたところですが。。。
ただ、今回の構築でGCPとかDockerとか流行りのものに触れてみたりできてい色々と勉強になりました。
あと個人的にはSSHのポートフォワードについて知っているようで全然しらなかったので、その点の理解が深まったのがよかったです。
取り敢えず環境構築は完了したのkaggleでばしばし機械学習していきたいです。
- 投稿日:2020-04-05T15:44:28+09:00
docker image「appium/appium」ではandroid webviewのテスト実行がエラーとなるので対処
結論
- docker(appium/appium)で立てたappium serverを通してwebviewの項目にswitchするとエラーになる
- 対処するにはapium server内にchromedriverをインストールしておく必要がある
エラー:appium-serverにchromedriverをイントールしていない状態
# pytest -s test_main.py
================================================== test session starts ===================================================
platform linux -- Python 3.6.9, pytest-5.4.1, py-1.8.1, pluggy-0.13.1
rootdir: /root/project/appium-script
plugins: forked-1.1.3, xdist-1.31.0
collected 1 item

    def test_ehlo(self):

        self.driver = webdriver.Remote('http://yourappium-server-address:4723/wd/hub', self.desired_caps)

        webview = self.driver.contexts[-1]
>       self.driver.switch_to.context(webview)

test_main.py:41:
_ _ _ _ _ _ _ _ _ _ _ _ _ _ _ _ _ _ _ _ _ _ _ _ _ _ _ _ _ _ _ _ _ _ _ _ _ _ _ _ _ _ _ _ _ _ _ _ _ _ _ _ _ _ _ _ _ _ _ _ _
/usr/local/lib/python3.6/dist-packages/appium/webdriver/switch_to.py:30: in context
    self._driver.execute(MobileCommand.SWITCH_TO_CONTEXT, {'name': context_name})
/usr/local/lib/python3.6/dist-packages/selenium/webdriver/remote/webdriver.py:321: in execute
    self.error_handler.check_response(response)
/usr/local/lib/python3.6/dist-packages/appium/webdriver/errorhandler.py:29: in check_response
    raise wde
/usr/local/lib/python3.6/dist-packages/appium/webdriver/errorhandler.py:24: in check_response
    super(MobileErrorHandler, self).check_response(response)
_ _ _ _ _ _ _ _ _ _ _ _ _ _ _ _ _ _ _ _ _ _ _ _ _ _ _ _ _ _ _ _ _ _ _ _ _ _ _ _ _ _ _ _ _ _ _ _ _ _ _ _ _ _ _ _ _ _ _ _ _

self = <appium.webdriver.errorhandler.MobileErrorHandler object at 0x7fcf44ee8908>
response = {'status': 500, 'value': '{"value":{"error":"unknown error","message":"An unknown server-side error occurred while pro...    at asyncHandler (/usr/lib/node_modules/appium/node_modules/appium-base-driver/lib/protocol/protocol.js:388:37)"}}'}

    def check_response(self, response):
        """
        Checks that a JSON response from the WebDriver does not have an error.

        :Args:
         - response - The JSON response from the WebDriver server as a dictionary
           object.

        :Raises: If the response contains an error message.
        """
        status = response.get('status', None)
        if status is None or status == ErrorCode.SUCCESS:
            return
        value = None
        message = response.get("message", "")
        screen = response.get("screen", "")
        stacktrace = None
        if isinstance(status, int):
            value_json = response.get('value', None)
            if value_json and isinstance(value_json, basestring):
                import json
                try:
                    value = json.loads(value_json)
                    if len(value.keys()) == 1:
                        value = value['value']
                    status = value.get('error', None)
                    if status is None:
                        status = value["status"]
                        message = value["value"]
                        if not isinstance(message, basestring):
                            value = message
                            message = message.get('message')
                    else:
                        message = value.get('message', None)
                except ValueError:
                    pass

        exception_class = ErrorInResponseException
        if status in ErrorCode.NO_SUCH_ELEMENT:
            exception_class = NoSuchElementException
        elif status in ErrorCode.NO_SUCH_FRAME:
            exception_class = NoSuchFrameException
        elif status in ErrorCode.NO_SUCH_WINDOW:
            exception_class = NoSuchWindowException
        elif status in ErrorCode.STALE_ELEMENT_REFERENCE:
            exception_class = StaleElementReferenceException
        elif status in ErrorCode.ELEMENT_NOT_VISIBLE:
            exception_class = ElementNotVisibleException
        elif status in ErrorCode.INVALID_ELEMENT_STATE:
            exception_class = InvalidElementStateException
        elif status in ErrorCode.INVALID_SELECTOR \
                or status in ErrorCode.INVALID_XPATH_SELECTOR \
                or status in ErrorCode.INVALID_XPATH_SELECTOR_RETURN_TYPER:
            exception_class = InvalidSelectorException
        elif status in ErrorCode.ELEMENT_IS_NOT_SELECTABLE:
            exception_class = ElementNotSelectableException
        elif status in ErrorCode.ELEMENT_NOT_INTERACTABLE:
            exception_class = ElementNotInteractableException
        elif status in ErrorCode.INVALID_COOKIE_DOMAIN:
            exception_class = InvalidCookieDomainException
        elif status in ErrorCode.UNABLE_TO_SET_COOKIE:
            exception_class = UnableToSetCookieException
        elif status in ErrorCode.TIMEOUT:
            exception_class = TimeoutException
        elif status in ErrorCode.SCRIPT_TIMEOUT:
            exception_class = TimeoutException
        elif status in ErrorCode.UNKNOWN_ERROR:
            exception_class = WebDriverException
        elif status in ErrorCode.UNEXPECTED_ALERT_OPEN:
            exception_class = UnexpectedAlertPresentException
        elif status in ErrorCode.NO_ALERT_OPEN:
            exception_class = NoAlertPresentException
        elif status in ErrorCode.IME_NOT_AVAILABLE:
            exception_class = ImeNotAvailableException
        elif status in ErrorCode.IME_ENGINE_ACTIVATION_FAILED:
            exception_class = ImeActivationFailedException
        elif status in ErrorCode.MOVE_TARGET_OUT_OF_BOUNDS:
            exception_class = MoveTargetOutOfBoundsException
        elif status in ErrorCode.JAVASCRIPT_ERROR:
            exception_class = JavascriptException
        elif status in ErrorCode.SESSION_NOT_CREATED:
            exception_class = SessionNotCreatedException
        elif status in ErrorCode.INVALID_ARGUMENT:
            exception_class = InvalidArgumentException
        elif status in ErrorCode.NO_SUCH_COOKIE:
            exception_class = NoSuchCookieException
        elif status in ErrorCode.UNABLE_TO_CAPTURE_SCREEN:
            exception_class = ScreenshotException
        elif status in ErrorCode.ELEMENT_CLICK_INTERCEPTED:
            exception_class = ElementClickInterceptedException
        elif status in ErrorCode.INSECURE_CERTIFICATE:
            exception_class = InsecureCertificateException
        elif status in ErrorCode.INVALID_COORDINATES:
            exception_class = InvalidCoordinatesException
        elif status in ErrorCode.INVALID_SESSION_ID:
            exception_class = InvalidSessionIdException
        elif status in ErrorCode.UNKNOWN_METHOD:
            exception_class = UnknownMethodException
        else:
            exception_class = WebDriverException
        if value == '' or value is None:
            value = response['value']
        if isinstance(value, basestring):
            if exception_class == ErrorInResponseException:
                raise exception_class(response, value)
            raise exception_class(value)
        if message == "" and 'message' in value:
            message = value['message']

        screen = None
        if 'screen' in value:
            screen = value['screen']

        stacktrace = None
        if 'stackTrace' in value and value['stackTrace']:
            stacktrace = []
            try:
                for frame in value['stackTrace']:
                    line = self._value_or_default(frame, 'lineNumber', '')
                    file = self._value_or_default(frame, 'fileName', '<anonymous>')
                    if line:
                        file = "%s:%s" % (file, line)
                    meth = self._value_or_default(frame, 'methodName', '<anonymous>')
                    if 'className' in frame:
                        meth = "%s.%s" % (frame['className'], meth)
                    msg = "    at %s (%s)"
                    msg = msg % (meth, file)
                    stacktrace.append(msg)
            except TypeError:
                pass
        if exception_class == ErrorInResponseException:
            raise exception_class(response, message)
        elif exception_class == UnexpectedAlertPresentException:
            alert_text = None
            if 'data' in value:
                alert_text = value['data'].get('text')
            elif 'alert' in value:
                alert_text = value['alert'].get('text')
            raise exception_class(message, screen, stacktrace, alert_text)
>       raise exception_class(message, screen, stacktrace)
E       selenium.common.exceptions.WebDriverException: Message: An unknown server-side error occurred while processing the command. Original error: Trying to use a chromedriver binary at the path /usr/bin/chromedriver, but it doesn't exist!
対処:chromedriverを含めた状態でappium-serverを作成(Dockerfile)
FROM    appium/appium

WORKDIR /tmp

RUN     apt-get update && \
        apt-get install -y --no-install-recommends wget unzip

RUN     wget https://chromedriver.storage.googleapis.com/80.0.3987.106/chromedriver_linux64.zip && \
        unzip chromedriver_linux64.zip && \
        mv chromedriver /usr/bin/. && \
        chmod +x /usr/bin/chromedriver
よく考えたら、、、
ホストからchromedriverをマウントして渡せばできたな、、、
- 投稿日:2020-04-05T15:30:00+09:00
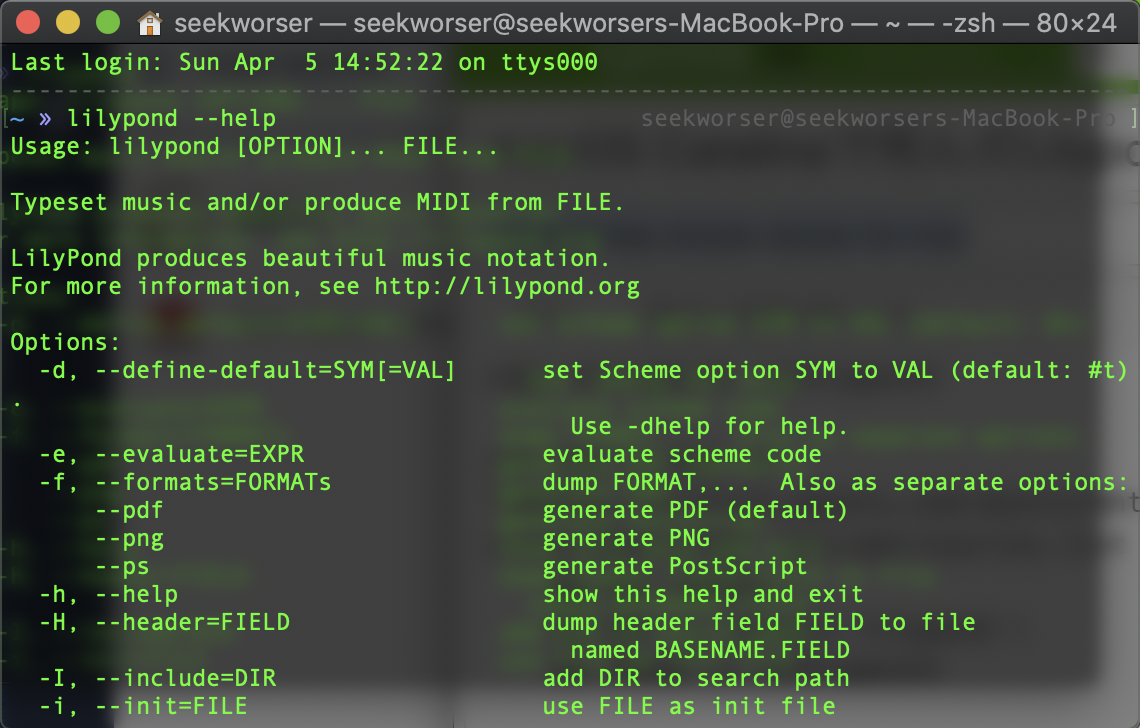
macOS Catalinaで死んだLilypondをDocker上で動かす
背景
macOS Catalinaにおいて、32-bit アプリケーションが切り捨てられたことを受けてLilyPondが死にました。
ということでDockerを使って動かそうという話です。
使用したDockerfile等はseekworser/lilypond-dockerfileに登録してあります。Implementation
基本的にはDocker image上でLilyPondを動かすだけですが、なるべく意識せずに動かせるように、
- Docker image上に/lilypondディレクトリを作成
- Host側のカレントワーキングディレクトリを/lilypondにマウントし、container起動時に/lilypond内でlilypondコマンドを実行
ということをしています。実際に使用したDockerfileは次の通りです。
Dockerfilefrom ubuntu:bionic copy entrypoint /entrypoint run sed -i.bak -e "s%http://archive.ubuntu.com/ubuntu/%http://ftp.jaist.ac.jp/pub/Linux/ubuntu/%g" /etc/apt/sources.list \ && apt update \ && apt -y install lilypond \ && chmod +x /entrypoint entrypoint ["/entrypoint"]entrypoint#! /bin/bash cd /lilypond lilypond "$@"また、起動時にいちいちdockerコマンドを打つのは面倒なのでHost側のlilypondを書き換えておきます。(Host側にインストールしていたlilypondはアンインストールしておきます。)
lilypond#! /bin/bash docker run --rm -v $(pwd):/lilypond seekworser/lilypond "$@"上記のファイルを作成して/usr/local/binに置き、chmod +xすれば完成です。
macOS Catalina上でlilypondが動きました!
やってみて
○ 元々、別でインストールしていたLaTeXのghostscriptとLilyPondのghostscriptが2つあって、参照がぐちゃぐちゃになっていた(一回それでハマった)ので、Docker上で環境を分離できたのはよかった。
○ 想定していたほど起動が遅いわけではない。× Docker image上にLaTeXを別でインストールする関係で、Docker imageのサイズが1.3 GBくらいある。(確か元々はlocalのLaTeXが使えてた...はず)
- 投稿日:2020-04-05T14:58:46+09:00
docker-composeでFastAPIの環境を構築する
FastAPI?
モダンで高速なPythonのWebフレームワークだそうです。
最近人気らしいので業務で採用してました。公式ドキュメント
https://github.com/tiangolo/fastapiメンバーによって環境が違って導入をスムーズに進められなかったんですが、
Dockerを使ってみんなで同じ作業環境を共有できるようになったのでそのメモです。作成したファイル
公式の手順に沿って進めていきます。
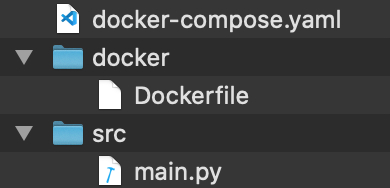
最終的にこんなファイル構造になっていればOKです。
超シンプル。
Dockerfile
公式ドキュメントのInstallationの項目に記載されているモジュールをインストールさせます。
ビルト時に勝手に走るので手動で必要モジュールを探す必要なくて便利ですね。DockerfileFROM python:3.7 WORKDIR /var/www/html RUN pip install fastapi uvicornmain.py
こちらもExampleの項目を参考に書きます。
ルートにアクセスされるとHelloWorldのオブジェクトを返却するAPIですね。main.pyfrom fastapi import FastAPI app = FastAPI() @app.get("/") def read_root(): return {"Hello": "World"}docker-compose.yaml
Dockerfileとmain.pyの橋渡し的なことをしています。Dockerfileを使ってPythonのモジュールをインストールした後、
Run itの項目を参考にしてFastAPIサーバを起動するコマンドを叩かせます。ここではポート9004で起動するよう設定しています。
docker-compose.yamlversion: '3' services: app: container_name: FastAPI build: ./docker volumes: - ./src:/var/www/html ports: - "9004:9004" command: uvicorn main:app --reload --host 0.0.0.0 --port 9004動作確認
docker-composeでコンテナを起動・ビルドします。
$ docker-compose up --build

Creating network "docker_fastapi_default" with the default driver
Building app
Step 1/3 : FROM python:3.7
 ---> 879165535a54
Step 2/3 : WORKDIR /var/www/html
 ---> Using cache
 ---> 31d5c58e6177
Step 3/3 : RUN pip install fastapi uvicorn
 ---> Using cache
 ---> 430430eecf7f
Successfully built 430430eecf7f
Successfully tagged docker_fastapi_app:latest
Creating FastAPI ... done
Attaching to FastAPI
FastAPI | INFO:     Uvicorn running on http://0.0.0.0:9004 (Press CTRL+C to quit)
FastAPI | INFO:     Started reloader process [1]
FastAPI | INFO:     Started server process [7]
FastAPI | INFO:     Waiting for application startup.
FastAPI | INFO:     Application startup complete.
必要なモジュールがインストールされ、FastAPIサーバが起動しました。
curlコマンドでアクセスしてみましょう。
$ curl http://localhost:9004

{"Hello":"World"}
main.pyの定義通りの反応!まとめ
FastAPIを使って簡単にAPIサーバを立ち上げられました!
Dockerを使えば少ないファイルで同じ環境を共有できるのもいいですねPythonではシェルスクリプトも実行できるので、
自動デプロイ用のコマンドとか実装して「擬似Jenkins」みたいなこともできて便利です。
Jenkins使えばいいじゃんとか言ってはいけない参考URL
- 投稿日:2020-04-05T11:44:02+09:00
【Docker】Railsサーバが起動しない場合の対処
はじめに
とあるDockerの教材を学習していた時に表題の通り
railsサーバが起動しなかったため備忘録として記載していますrails&Docker初心者のため間違った見解があればご指摘いただけると嬉しいです。結論
忙しい人のために先にどうやって解決したかを記載します
▼server.pidファイルを削除
$ rm tmp/pids/server.pid▼削除確認されるので「yes」
$remove tmp/pids/server.pid? #yes▼コンテナを立ち上げる
$docker-compose up -dサーバー起動で無事解決♪
問題
【Docker】を使ったrailsの環境構築を以下の流れで設定
$docker-compose run web rails new . --force --database=mysql
//省略//

$docker-compose build
//dockerfileからイメージをビルド//

$docker-compose up -d
//現在のディレクトリにあるdocker-compose.ymlに基づいて
コンテナを起動する//

$docker-compose run web bundle exec rake db:create
//railsで使用するデータベースをMySQLサーバ上に作成//

$rails s
//立ち上がらない...//
状態
▼
$docker-compose psでコンテナの起動状態を確認$docker-compose ps Name Command State Ports ----------------------------------------------------------------------------- original_db_1 docker-entrypoint.sh mysqld Up 3306/tcp, 33060/tcp original_web_1 bundle exec rails s -p 300 Exit 1
original_web_1のStateがExit1になっていました...▼
$docker logs original_web_1でログを確認$docker logs original_web_1 => Booting Puma => Rails 5.0.7.2 application starting in development on http://0.0.0.0:3000 => Run `rails server -h` for more startup options A server is already running. Check /app/tmp/pids/server.pid. Exitingサーバはすでに立ち上がっていて
Check /app/tmp/pids/server.pid.を確認してくれーと言われていますserver.pid とは
WEB開発サーバを起動するときに書き込まれ、停止すると削除されるファイルみたいです。
server.pid に pid が書かれていると開発用WEBサーバが起動中と判断されてしまいます。
今回はこのserver.pidが書き込まれている状態のため、railsサーバーが起動しなかったんですね〜解決策
ということで
$ rm tmp/pids/server.pidでserver.pidファイルを削除で無事解決しました♪
- 投稿日:2020-04-05T05:00:18+09:00
Dockerやってる人向けのVagrant超入門
Vagrantがどういう仕組みで動いてるのか理解するために、馴染みのあるDockerと比較してみるのが分かりやすかったのでまとめます。
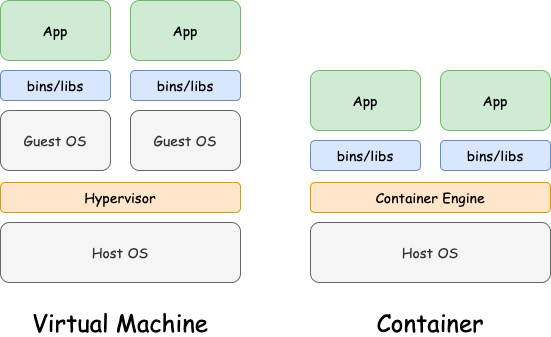
VagrantはOSの仮想化、Dockerはコンテナ化の技術
Dockerはコンテナ化によって、アプリの実行環境を他のプロセスから隔離させることができますが、親マシンのOSがLinuxでないと動きません。Macや他のOSでDockerが動いているのは、例えばDocker for Macというアプリをインストールした時に、裏でLinuxを仮想マシンとして動かすことができるようになるので、その仮想マシン内でDockerを利用しているからです。
反対にVagrantだと、Mac上でもWindowsやLinuxを動かすことができ、これがVagrantとDockerの主な違いです。
Vagrantの仮想マシンの場合だとGuest OS上でアプリを動かしていますが、コンテナ化の場合だとOSはホストマシンのOSに依存しています。仮想マシンの場合は「ハイパーバイザー(Hypervisor)」というレイヤーがOSの仮想化を可能にしていて、VirtualboxやVMWareがこの機能を担っています。
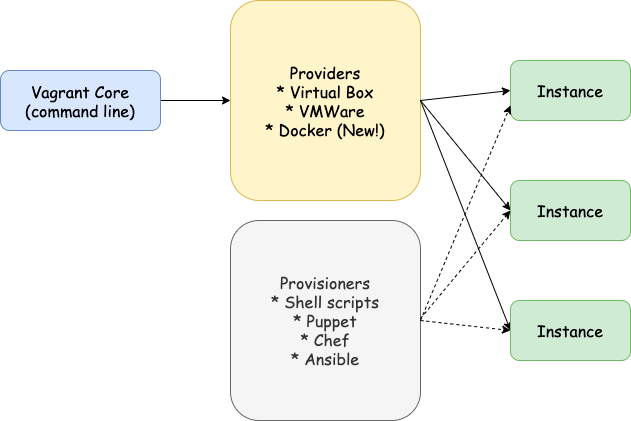
Vagrantをもっと詳しく
このハイパーバイザー層を担うvagrantのプロバイダーには、VirtualBox/VMWareなどがあり、vagrantのほとんどの機能はプロバイダーも事前にインストールしないと使えません。
公式DocではVMWareが推奨されていますね。Dockerもプロバイダーとして使えるようです。各インスタンスの設定や必要なライブラリのインストールは、vagrantのプロビジョニングに設定します。shellや、Ansible/Chef/Puppetなどのツールを使います。
どう違う?
DockerよりVagrantの方が初心者には理解しやすいと思います。Dockerはswarmやcomposeなど複数のコンテナを動かすための独特の概念がたくさんありますが、Vagrantは基本的にprovider/box/provisionの概念を押さえればなんとなく使える気がします。
リソース的には、OS全体を仮想化するのでVagrant環境の方が重く、起動も遅いです。DockerではOSは仮想化しないので、起動も早いです。Docker for Macは重いですが、Dockerの方が基本的にリソースの消費が少ないです。
まとめ
- VagrantはOSレベルの仮想化。Dockerはコンテナレベルの仮想化。
- Vagrantは理解しやすいが、RAM/ディスク容量など親マシンのリソースを圧迫する場合がある。起動が遅い。
- Dockerのアーキテクチャの方が複雑だが、CPU/RAM/ディスク容量の消費が少なくて済む。起動が早い。
- dockerでのimageと同じようにvagrantにはboxというパッケージがあるので、環境構築が楽
参考
https://www.docker.com/resources/what-container
https://www.vagrantup.com/intro/index.html
https://deliciousbrains.com/vagrant-docker-wordpress-development/
https://rancher.com/playing-catch-docker-containers
https://www.slideshare.net/AnatolyBubenkov/vagrant-are-you-still-develop-in-a-nonvirtual-environment
- 投稿日:2020-04-05T04:32:11+09:00
vagrantとdockerについてメモ書き
背景
最近、自分の周りで流行っているDockerについて知りたくなった
筆者は、Vagrantのが好きだが、最近、Dockerに興味を持ったので調べ程度です。次回は実際に試してみようと思います。
前提
Docker for Windowsもありますが、最終的にVagrantで仮想ホストを構築して、その上でDockerを使えるようにしていきたい
今回のゴール
Dockerコンテナを内容把握までの前提の前提メモ資料レベルです
概要
Vagrant
仮想マシンの構築や管理をするためのコマンドラインツール
構成情報を記述した設定ファイルを元に、仮想マシンの構築から設定までを自動的に行うことができる
Vagrant単体では仮想化はできない(VirtualBoxなどの仮想化ソフトウェアが必要)Docker
Dockerとは
https://kitsune.blog/docker-summary
コンテナ型のアプリケーション実行環境
実行環境を他のプロセスから隔離し、その中でアプリケーションを動作させる
VirtualBoxなどでOSをまるっと仮想化するのと比較して、ホストOS上の1つのプロセスとして実行されているためリソース消費が少ないDocker古いバージョンがある場合は、アンインストールします
ドッカーの古いバージョンが呼び出されたdockerまたは、docker-engine。これらがインストールされている場合は、それらを関連する依存関係とともにアンインストールします。
$ sudo yum remove docker \
                  docker-client \
                  docker-client-latest \
                  docker-common \
                  docker-latest \
                  docker-latest-logrotate \
                  docker-logrotate \
                  docker-engine
参考
https://docs.docker.com/install/linux/docker-ce/centos/
↑ 公式
参考になったURL ↓
https://www.techceed-inc.com/engineer_blog/2807/
- 投稿日:2020-04-05T03:09:47+09:00
これだけ知っていれば大丈夫。Docker の主要コンポーネント
これだけ知っていれば大丈夫。Docker の主要コンポーネント
これから本腰をいれてDockerを学習したいなと思っている人がDockerを学習すると、いろいろな単語出てきて混乱すると思いますが、最低限これだけ知っていれば、これからDockerを学習していく上で必ず役に立つと思いますので、下記のDockerの主要コンポーネントについて紹介ます。
- Docker Engine
- image
- container
- Repository (DockerHub)
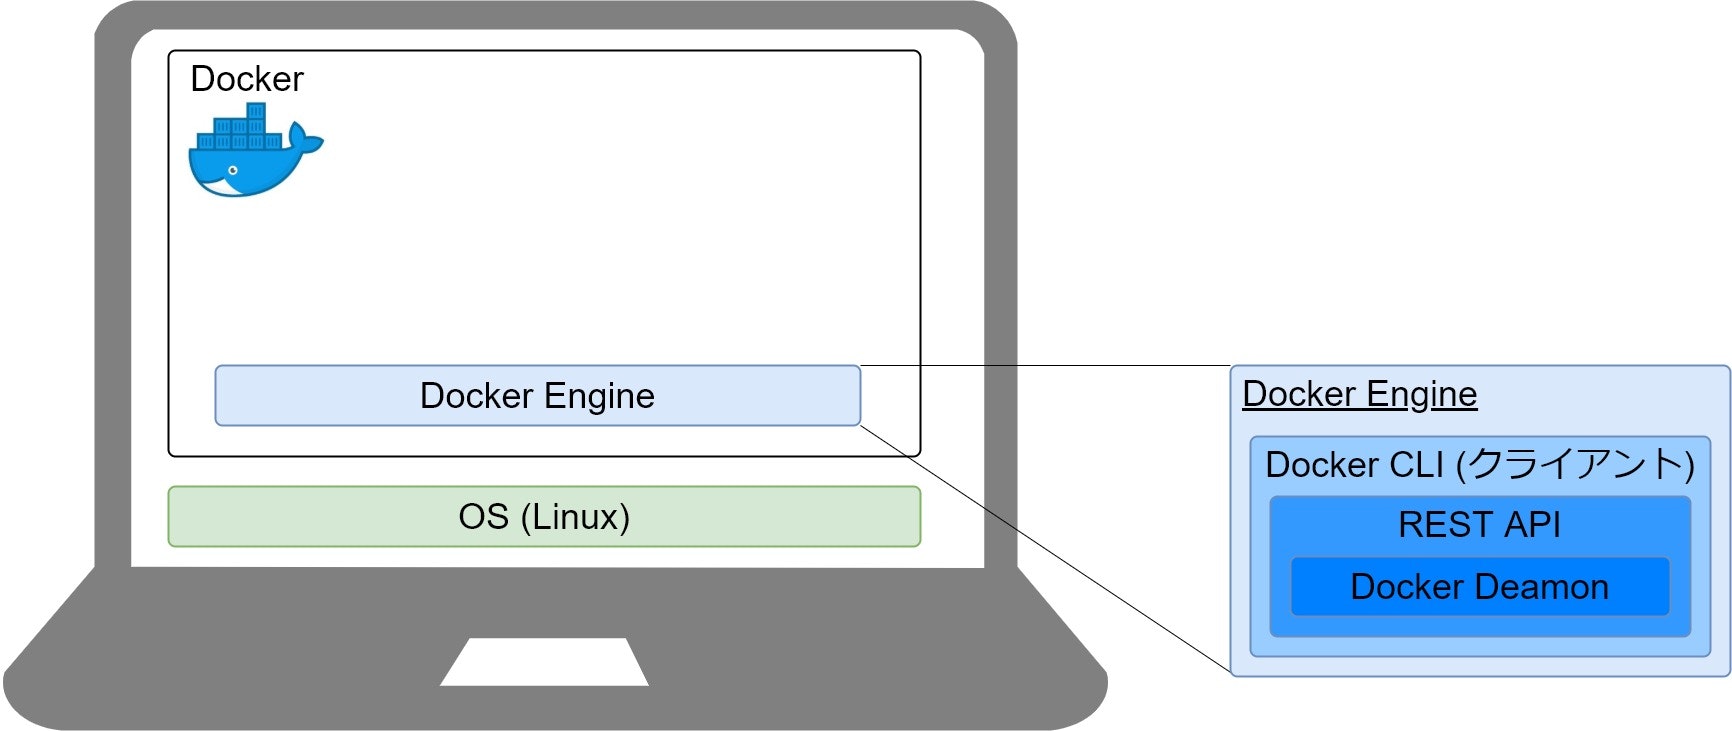
Docker Engine(Docker エンジン)
Docker EngineがDockerと言われているものの実態となり下記を含んでいます。
- Docker Daemon
- REST API
- Docker CLI(クライアント)
Docker DaemonはLinuxの1つのプロセスとして起動し動作します。Docker を利用する際は、Docker CLIのコマンドを使ってDocker Daemonへの命令を行います。REST APIはDaemonとCLIの架け橋の役割を担っています。
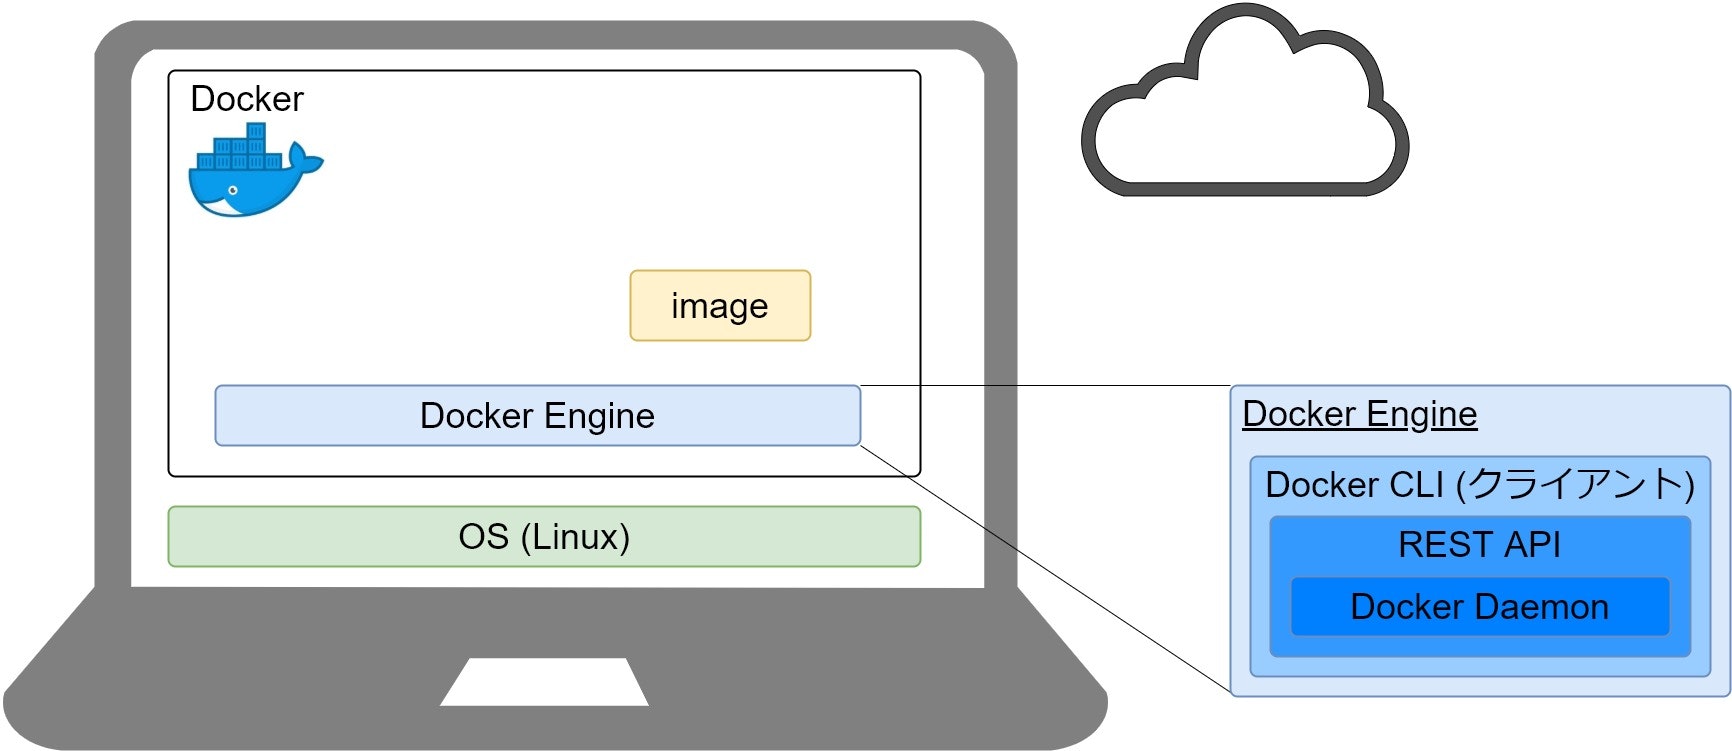
image(Docker イメージ)
imageとは、一言で説明すると読み込み専用(read-only)のテンプレートです。
ポイントは、read-onlyという点です。Dockerでは、このimageを基にcontainerを起動して利用します。詳細は後述しますが、今は、imageといのがread-onlyのテンプレートなんだという事だけ覚えておいてください。
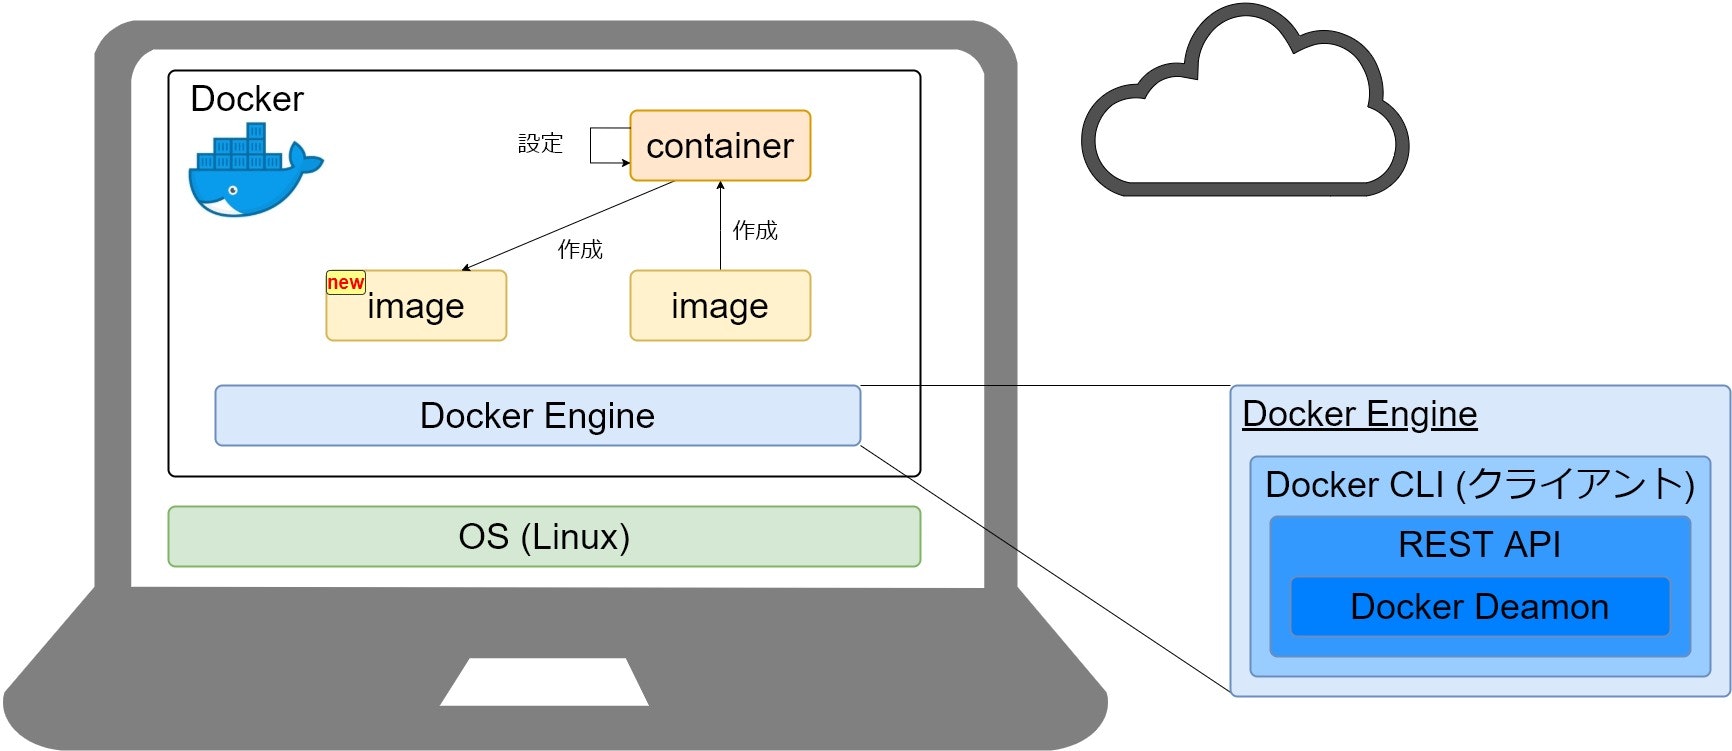
container(Docker コンテナ)
containerはimageを基に作成するアプリケーションの実行環境です。
Docker 公式のimageは数多くあるのですが、例えばDocker公式のapacheのimageがあるのですが、このapacheのimageからcontainerを実行すると、apacheを簡単に利用する事ができます。公式のapacheのimageから起動したcontainerには、設定が何もなされていないので個別の設定を加えて利用します。
Dockerでは、変更を加えたcontainerを基に新しいimageを作成することが可能です。
containerの特徴としては、1つのimageから複数のcontainerを作成することができ、かつContainer間は互いに分離されるため、個々のcontainerを安全に実行することが可能です。
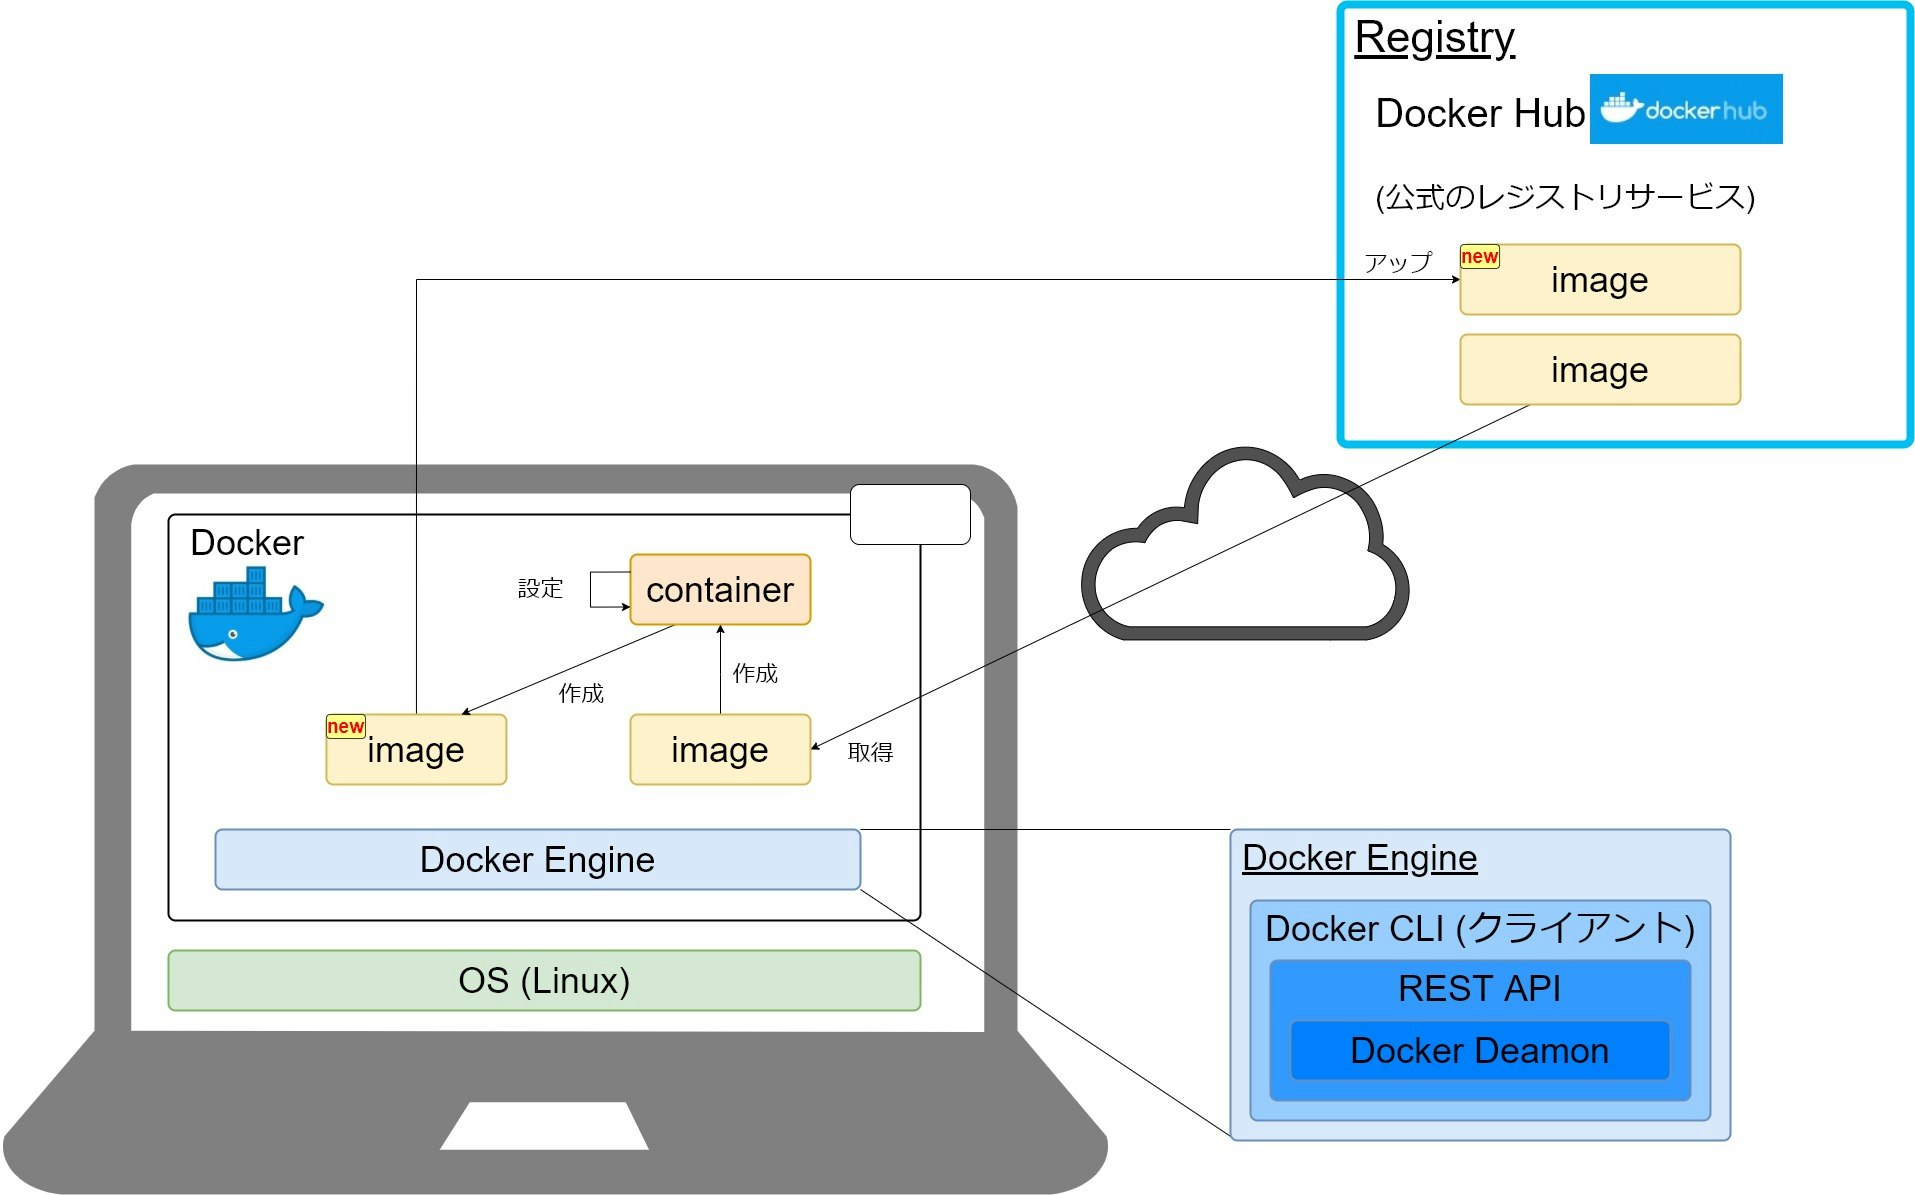
registry(Docker レジストリ)
registryとは、imageを格納・配布する場所のことを指します。registryと混同しそうなコンポーネントとしてrepositoryがあります。
repositoryに関しては明確な定義はないですが、一般的には1つのアプリケーションのimageを管理し、TAGでバージョンを管理するのがrepositoryです。
registryは複数のrepositoryを管理する場所というイメージです。
通常はregistry に格納されているimageを自身のDocker Engine 上に持ってきてcontainerを起動し利用します。containerに設定を行い新しいimageを作成することが可能ですが、保存されるのは自身のDocker Engine上となり、このままでは自身のDocker Engine上でしか新しいimageを利用する事ができません。そこで、作成したimageをregistry上にアップすることが可能なのですが、そうすることで、作成したimageを別の任意のDocker Engine上で利用する事が可能となります。
Docker の公式レジストリサービス
Dockerの公式レジストリサービスとしてDocker Hubというサービスがあります。
Docker Hubで公開しているimageには、Dockerが公開しているOffical Imageとベンダーが公開しているVerified Publisherというimageがあり、2020年4月現在においては、Offical Imageとして161個、Verified Publisherとして305個のimageが公開されています。
Docker Hub の repositoryの種類
自身で作成したimageをDocker Hub にアップする際は、repositoryを作成しその中にimageをアップするのですが、Docker Hubには下記の2種類のrepositoryがあります。
- Public repository(一般公開されるレポジトリ)
- Private repository(一般公開されず、所有者しか利用できないリポジトリ)
用途に応じてPublicかPrivateを考慮しrepositoryを作成しましょう。
メジャーなレジストリサービス
Docker HubはDocker公式のレジストリサービスですが、他にもメジャーなレジストリサービスがあります。
- Amazon Elastic Container Registry(AWS)
- Container Registry(Google Cloud)
- Container Registry(Azure)
- Container Registry(Oracle Cloud)
メジャーどころのクラウドサービスも独自のレジストリサービスを提供しているので、ご自身の用途に合ったサービスを利用するとよいかと思います。
tips
チップスとなりますが、こちらのDocker blogの記事にある通り、2018年までは Docker Cloud、Docker Storeというサービスが利用可能でしたが、2019年からDocker Hubに統合されました。

- 投稿日:2020-04-05T01:40:43+09:00
CakePHP3でTODOアプリを作ってみる
CakePHP3でTODOアプリを作ってみます
作ったもの: https://github.com/kshiva1126/cakephp3_todo.gitsetup
Gitクローンからコンテナの立ち上げまで
$ git clone https://github.com/kshiva1126/cakephp3_docker.git
$ cd cakephp3_docker
$ docker-compose build
$ docker-compose up -d
$ docker-compose exec app composer install
Databaseの設定
config/app.php の下記4項目を修正します
    'Datasources' => [
        'default' => [
            ...
            'host' => 'db',
            'username' => 'user',
            'password' => 'password',
            'database' => 'cake_db',
            ...
        ]
    ]
http://localhost:3000 でページが確認できます
migration
下記コマンドでマイグレーションファイルを生成します
config/Migrations/に出力されますbin/cake bake migration CreateTasks name:string decription:text done:boolean created modifiedちなみに
bin/cake migrations createでも作成できるらしいけど今回はスキップ<?php use Migrations\AbstractMigration; class CreateTasks extends AbstractMigration { public function change() { $table = $this->table('tasks'); $table->addColumn('name', 'string', [ 'default' => null, 'limit' => 255, 'null' => false, ]); $table->addColumn('decription', 'text', [ 'default' => null, 'null' => false, ]); $table->addColumn('done', 'boolean', [ 'default' => false, // nullからfalseに変更した 'null' => false, ]); $table->addColumn('created', 'datetime', [ 'default' => null, 'null' => false, ]); $table->addColumn('modified', 'datetime', [ 'default' => null, 'null' => false, ]); $table->create(); } }マイグレートします
bin/cake migrations migratemysql> desc tasks; +------------+--------------+------+-----+---------+----------------+ | Field | Type | Null | Key | Default | Extra | +------------+--------------+------+-----+---------+----------------+ | id | int(11) | NO | PRI | NULL | auto_increment | | name | varchar(255) | NO | | NULL | | | decription | text | NO | | NULL | | | done | tinyint(1) | NO | | 0 | | | created | datetime | NO | | NULL | | | modified | datetime | NO | | NULL | | +------------+--------------+------+-----+---------+----------------+マイグレーションファイルにはなかった
idは自動的に追加されるようですbake
CakePHPといえば、
bakeですね!!!
bakeにはたくさんのサブコマンドがありますが、今回はallを利用してMVCすべてのスケルトンを生成します
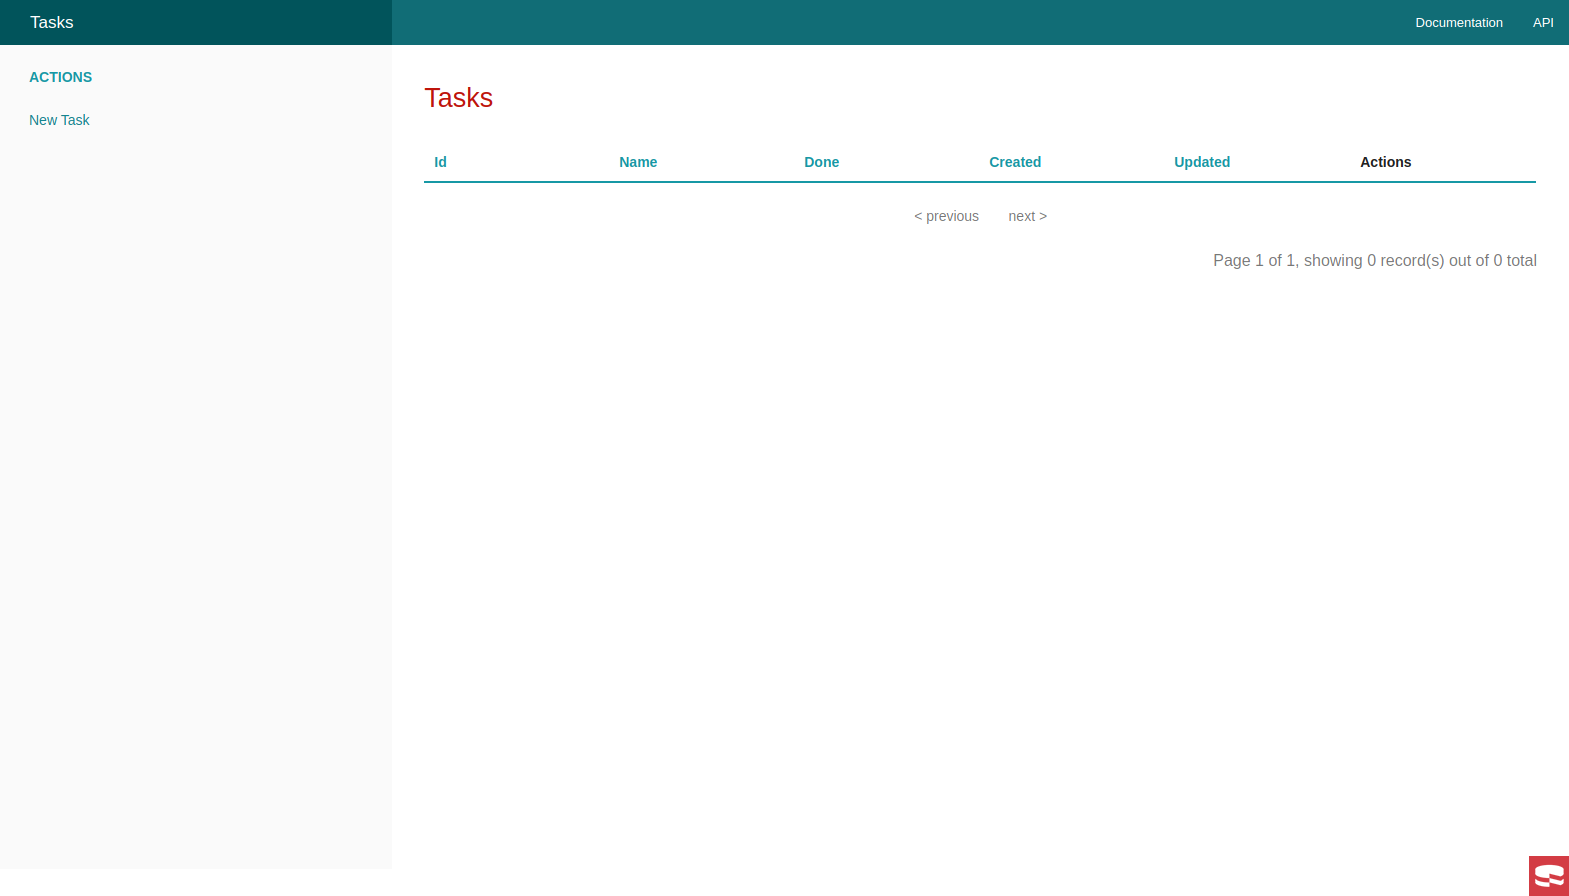
先程作成したtasksを指定しますbin/cake bake all tasksここで http://localhost:3000/tasks にアクセスしてみます
もうそれっぽい画面が表示されました
左カラムの
New Taskから追加画面にいけます
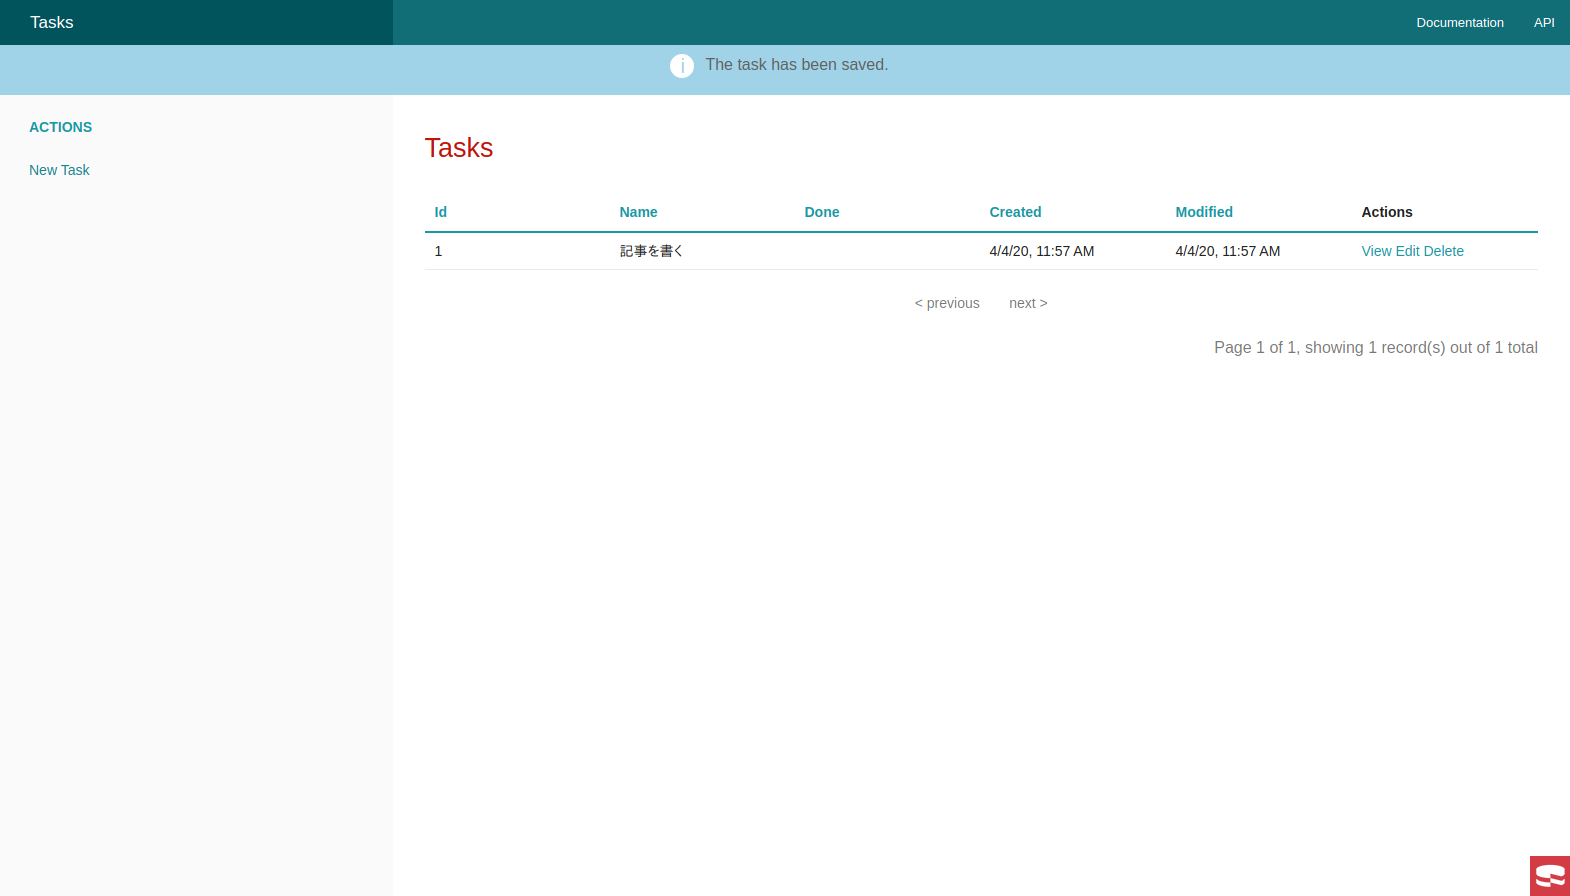
追加後です
customize
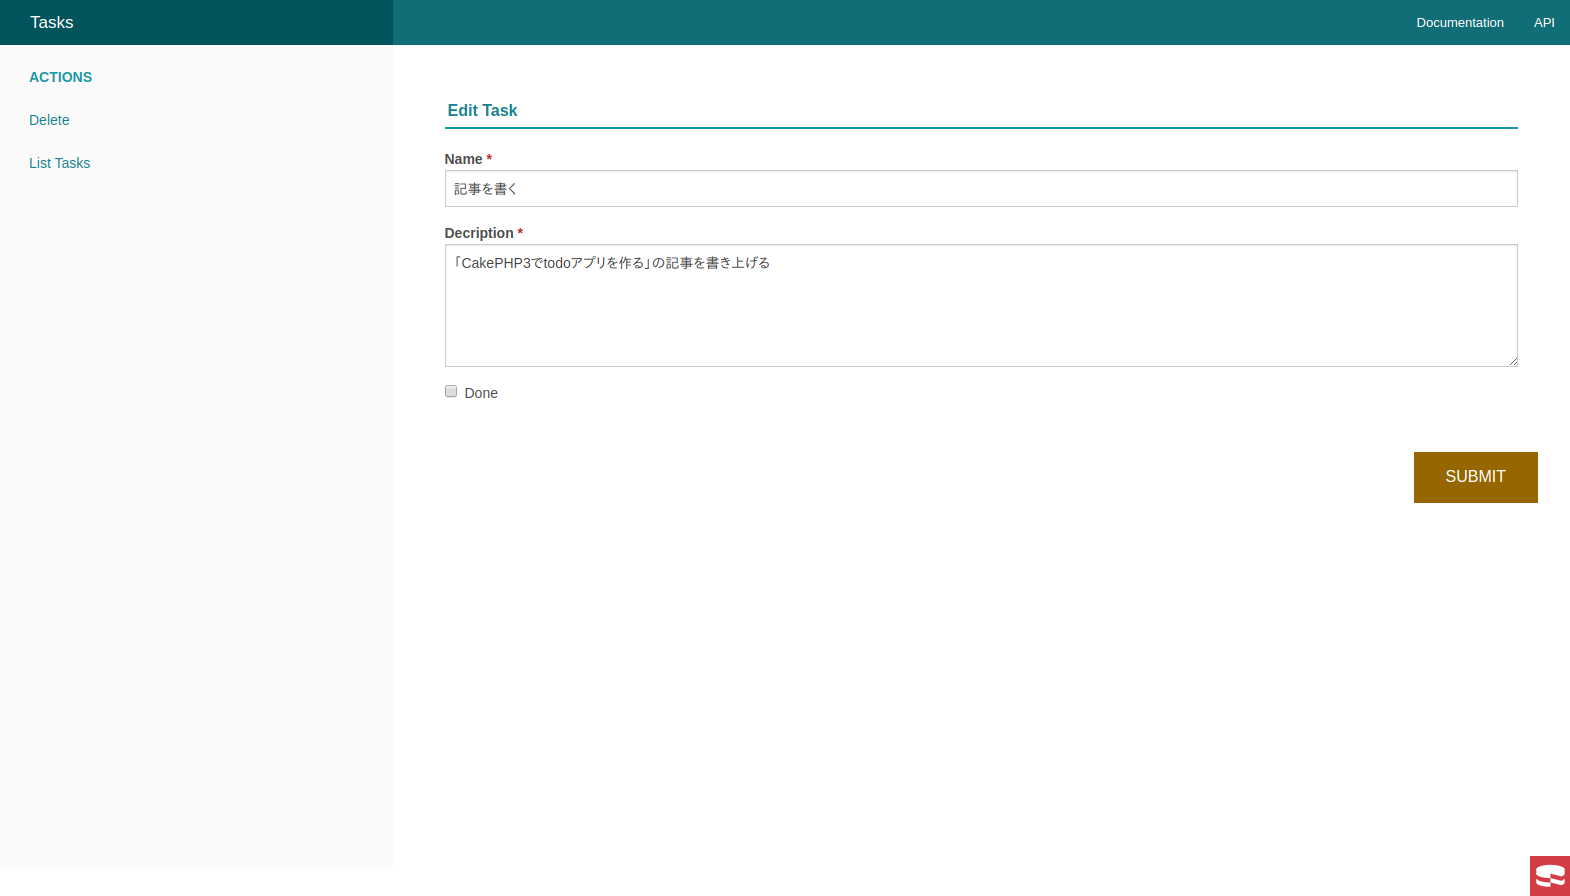
このまま終了だとかなり味気ないので、ちょっとしたカスタマイズを加えます
現状、Doneを 更新するためには編集画面で行うしかありません
これを、TOP画面からでも更新できるようにします
まずViewを編集します
Doneを Checkbox で表示させます
参考: https://book.cakephp.org/3/ja/views/helpers/form.html#checkbox-radio-select-optionssrc/Template/Tasks/index.ctp
<tbody>
    <?php foreach ($tasks as $task): ?>
    <tr>
        <td><?= $this->Number->format($task->id) ?></td>
        <td><?= h($task->name) ?></td>
        <!-- <td><?= h($task->done) ?></td> -->
        <!-- Checkboxで表示させるように修正 -->
        <td><?= $this->Form->checkbox('done', [
            'value' => h($task->done),
            'checked' => h($task->done),
            'data-id' => $this->Number->format($task->id),
            'hiddenField' => false,
        ]) ?></td>
        <td><?= h($task->created) ?></td>
        <td><?= h($task->modified) ?></td>
        .. 省略 ..
</tbody>
jQueryのAjaxを使いたいので、CDNで読み込ませます
src/Template/Layout/default.ctp
<head>
    <?= $this->Html->charset() ?>
    <meta name="viewport" content="width=device-width, initial-scale=1.0">
    <title>
        <?= $cakeDescription ?>:
        <?= $this->fetch('title') ?>
    </title>
    .. 省略 ..

    <!-- jQuery読み込み -->
    <script src="https://ajax.googleapis.com/ajax/libs/jquery/3.4.1/jquery.min.js"></script>
</head>
Doneを更新するためにAjaxでPOSTする処理を追加しますsrc/Template/Tasks/index.ctp
<script>
$(function () {
    const csrfToken = <?= json_encode($this->request->getParam("_csrfToken")) ?>;
    $("input[name='done']").on("change", function (event) {
        const data = {
            id: $(this).data('id'),
            done: $(this).prop('checked') ? 1 : 0,
        };
        $.ajax({
            type: 'POST',
            dataType: "json",
            url: '/tasks/changeDone',
            headers: {
                'X-CSRF-Token': csrfToken
            },
            data,
        })
        .fail(function (err) {
            console.log(err)
        });
    });
});
</script>
Controllerに更新処理を追加します
TasksControllerに新たにchangeDone()メソッドを追加することで/tasks/changeDoneでアクセスできるようになりますsrc/Controller/TasksController
public function changeDone()
{
    // postのみ許可する
    $this->request->allowMethod('post');
    $id = (int) $this->request->getData('id');
    $done = (int) $this->request->getData('done');

    // idに合致するTaskを取得
    $task = $this->Tasks->get($id);
    $task->done = $done;
    $this->Tasks->save($task);

    exit;
}
(CakePHP的にこの書き方で正しいのかはわからない... (特に最後の
exit;))これでTOP画面から
Doneの更新が行えるようになりました