- 投稿日:2020-03-30T18:26:17+09:00
Goでgoogle analytics apiからpv数取りたい
Detail
記事は多いけどちょうどやりたい事の記事がなかったので、サクッと
analyticsの準備とか、パッケージの導入は他の記事見て下さいTL;DR
// 本番運用ではSSMとかから取る
key, _ := ioutil.ReadFile("secret.json")

jwtConf, err := google.JWTConfigFromJSON(
    key,
    // スコープ(Readonly以外見た事ない)
    analytics.AnalyticsReadonlyScope,
)
if err != nil {
}

httpClient := jwtConf.Client(oauth2.NoContext)
svc, err := analytics.New(httpClient)
if err != nil {
}

res, err := svc.Data.Ga.Get("ga:viewId入れてね", "いつから", "いつまで","ga:pageviews").Dimensions("ga:pagePath").Sort("-ga:pageviews").MaxResults(最大取得件数).SamplingLevel("HIGHER_PRECISION").Do()

// resに全部入ってるよ
ハマるのはGa.Get()からのチェーンぐらいですね!
https://developers.google.com/analytics/devguides/reporting/core/v3/reference
ここ参考にすれば良いです!
- 投稿日:2020-03-30T15:46:09+09:00
MFAとAssume IAM Roles を使って環境でAWS SDKをGoで操作する
はじめに
マルチアカウント運用でAssumeRoleするかつ、MFA入力必須な場合、awscli等の操作も含めてややこしいですよね。awscliはともかく、AWS SDK for Goを使った上記の例が少いように見受けられたので残しておきます。
結論
MFAとAssume IAM Roles を使って環境でAWS SDKをGoで操作する方法は...
AssumeRoleTokenProviderを用います- MFAトークンを標準入力する場合は
stscreds.StdinTokenProviderを利用すると良いです
- そうすると、下記のような入力を求められるようになります
コード
例として、LambdaのCloudWatchLogsのLogStreamを検索するコードです。
AssumeRoleしつつMFAを利用する場合func main() { var ( logGroup = "/aws/lambda/<YourAppName>" logStreamPrefix = "2020/04/01" // 適当な日付 ) svc := cloudwatchlogs.New( session.Must(session.NewSessionWithOptions(session.Options{ SharedConfigState: session.SharedConfigEnable, AssumeRoleTokenProvider: stscreds.StdinTokenProvider, // MFAのときは必須 })), &aws.Config{ Region: aws.String(os.Getenv("AWS_REGION")), }, ) stm, err := svc.DescribeLogStreamsWithContext(ctx, &cloudwatchlogs.DescribeLogStreamsInput{ LogGroupName: aws.String(logGroup), LogStreamNamePrefix: aws.String(logStreamPrefix), NextToken: nil, }) if err != nil { log.Fatal(err) } for _, v := range stm.LogStreams { fmt.Println(aws.StringValue(v.LogStreamName), aws.Int64Value(v.CreationTime)) } }MFAトークンを正しく入力さえできれば、ログストリームの一覧を取得できたと思います。
参考
https://aws.amazon.com/jp/blogs/developer/assume-aws-iam-roles-with-mfa-using-the-aws-sdk-for-go/

- 投稿日:2020-03-30T13:48:59+09:00
envファイル管理はこれ一択!
環境変数管理
背景
秘密鍵を使うこともあり,
sample用の.env.sampleと開発用の.envファイルを分けている
.env.sampleをコミットに残すため、こちらを正として.envを管理したいインストール方法
go get github.com/locona/envdef/cmd/envdef使い方
テストデータ準備
プロジェクトのルートにある.envファイルにアプリケーション構成を追加します。
S3_BUCKET=YOURS3BUCKET
SECRET_KEY=YOURSECRETKEYGOESHERE
プロジェクトのルートにある
.env.sampleファイルS3_BUCKET=YOURS3BUCKET SECRET_KEY=YOURSECRETKEYGOESHERE REGION=REGION実行
次に実行します
envdefその結果、
.env.newファイルが作成されますREGION=REGION S3_BUCKET=YOURS3BUCKET SECRET_KEY=YOURSECRETKEYGOESHEREconsole にも変更点が表示されます
まとめ
envdef を使うことにより、不要になった環境変数や追加された環境変数の管理が楽になりました
- 投稿日:2020-03-30T13:48:59+09:00
環境変数管理の便利ツール
環境変数管理
背景
秘密鍵を使うこともあり,
sample用の.env.sampleと開発用の.envファイルを分けている
.env.sampleをコミットに残すため、こちらを正として.envを管理したいインストール方法
go get github.com/locona/envdef/cmd/envdef使い方
テストデータ準備
プロジェクトのルートにある.envファイルにアプリケーション構成を追加します。
S3_BUCKET=YOURS3BUCKET
SECRET_KEY=YOURSECRETKEYGOESHERE
プロジェクトのルートにある
.env.sampleファイルS3_BUCKET=YOURS3BUCKET SECRET_KEY=YOURSECRETKEYGOESHERE REGION=REGION実行
次に実行します
envdefその結果、
.env.newファイルが作成されますREGION=REGION S3_BUCKET=YOURS3BUCKET SECRET_KEY=YOURSECRETKEYGOESHEREconsole にも変更点が表示されます
まとめ
envdef を使うことにより、不要になった環境変数や追加された環境変数の管理が楽になりました
- 投稿日:2020-03-30T10:36:45+09:00
Goでインターネット上のものではなくローカルのパッケージを使う
背景
Goで開発をしていて、依存ライブラリの挙動を確認するために色々仕込みたかったのでローカルにソースコードを持ってきたのですが、参照先をそっちに切り替えるのに少々ハマったので備忘録的に書きます。
やったこと
go.modファイルを書き換えました。
以下が元々のgo.modファイル。
https://github.com/mura123yasu/cloudevents-go-helloworld/blob/master/go.modmodule github.com/mura123yasu/cloudevents-go-helloworld go 1.14 require ( github.com/cloudevents/sdk-go v1.1.2 github.com/kelseyhightower/envconfig v1.4.0 )sdkの挙動を確かめたくてローカルを参照するように変更したかったのですが、必要なのは
replaceの記載でした。module github.com/mura123yasu/cloudevents-go-helloworld go 1.14 require ( github.com/cloudevents/sdk-go v1.1.2 github.com/kelseyhightower/envconfig v1.4.0 ) replace github.com/cloudevents/sdk-go v1.1.2 => <PATH to YOUR LOCAL DIR>/github.com/cloudevents/sdk-goこれで無事にローカルでsdkをいじって挙動確認しつつ開発を進めることができました。
- 投稿日:2020-03-30T09:25:51+09:00
HULFT IoT EdgeStreamingでプラグインを作成してみた【実行編】(3/3)
はじめに
こんにちは。よろず相談担当 すぎもん
です。
今回は、HULFT IoT EdgeStreamingのSDKを使用したコンポーネント(アダプタ)の開発をやってみようと思います。全3部作で完結するよう記載してます。今回やること
今回は、第3弾としてHULFT IoT EdgeStreaming Plugin SDKで開発したプラグインのビルドと実行をしてみようと思います。第1弾、第2弾の記事は、下記にありますので参考にしてみてください。
HULFT IoT EdgeStreamingでプラグインを作成してみた【セットアップ編】(1/3)
プラグインのビルド
今回、作成したプラグインをビルドしてみます。※Windows PCを使用して試しています。
なお、
$SDK_HOMEは、EdgeStreaming SDKホームディレクトリを指します。
$DATASPIDER_HOMEは、EdgeStreamingのホームディレクトリを指します。ビルド
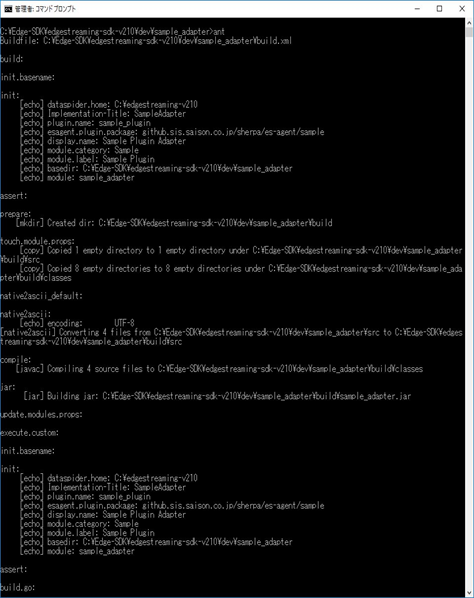
プラグインのビルドは、
$SDK_HOME/dev/sample_adapterから以下のコマンドを実行します。
$ ant
コマンド実行後、
BUILD SUCCESSFULと出力され、下記のファイル類が作成されていればビルドは成功です。・
$SDK_HOME/dev/sample_adapter/build
sample_adapter.jar
・$SDK_HOME/dev/sample_adapter/build/plugin/sample_plugin
各ターゲット向けのgoの実行ファイル
アイコンファイルのコピー
実際にEdgeStreaming Studio画面で使用するアイコンファイルを作成します。
ビルドに成功後、$SDK_HOME/dev/sample_adapter/META-INFが生成されるので、アイコンのサンプルファイルをコピーしリネームします。・Source Operation用アイコンのコピー
$SDK_HOME/dev/conf/operation.source.icon
⇒$SDK_HOME/dev/sample_adapter/META-INF/operation.sample_source.icon・Sink Operation用アイコンのコピー
$SDK_HOME/dev/conf/operation.sink.icon
⇒$SDK_HOME/dev/sample_adapter/META-INF/operation.sample_sink.icon・UDSF Operation用アイコンのコピー
$SDK_HOME/dev/conf/operation.udsf.icon
⇒$SDK_HOME/dev/sample_adapter/META-INF/operation.sample_udsf.iconmodule.propertiesファイルの確認
$SDK_HOME/dev/sample_adapter/META-INF/module.propertiesファイルが正常に作成されたことを確認します。このプロパティファイルは、
$SDK_HOME/dev/sample_adapter/config.propertiesファイルで定義されているプロパティを基に作成されています。
プラグインのインストール
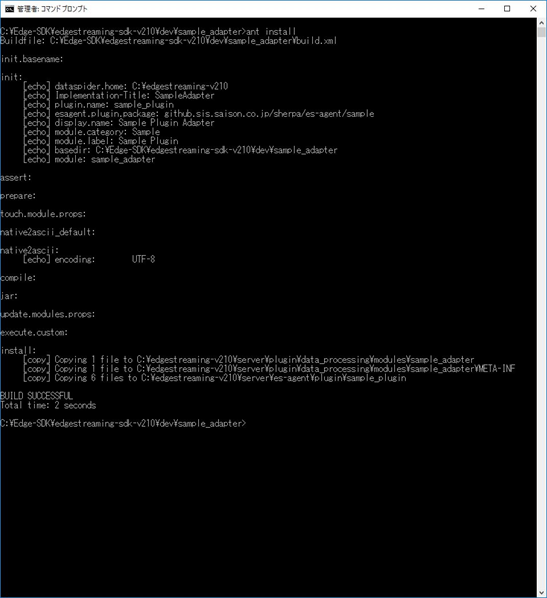
アダプタのインストールは
$SDK_HOME/dev/sample_adapterからantコマンドの第一引数にinstallターゲットを指定して実行します。
$ ant install
ant installを実行後、下記のようにインストールがされます。
・Javaモジュールがインストールされます。
$DATASPIDER_HOME/server/plugin/data_processing/modules配下・Golangモジュールがインストールされます。
$DATASPIDER_HOME/server/es-agent/plugin配下※インストールしたプラグインを有効にするには、EdgeStreaming Studioの再起動が必要です。
実行してみましょう
それでは、作成したプラグインの実行をしてみましょう。
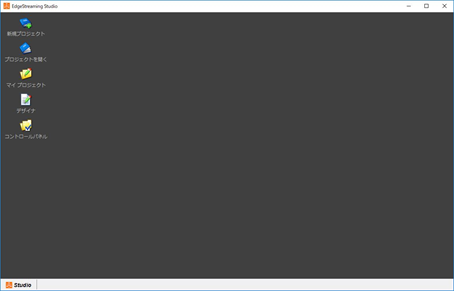
EdgeStreamingの起動
・EdgeStreamingを起動します。
・作成したプラグインを確認してみましょう。
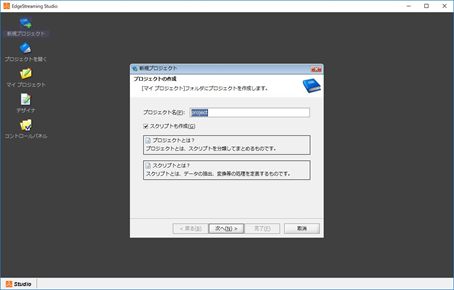
新規プロジェクトから、プロジェクトを作成します。
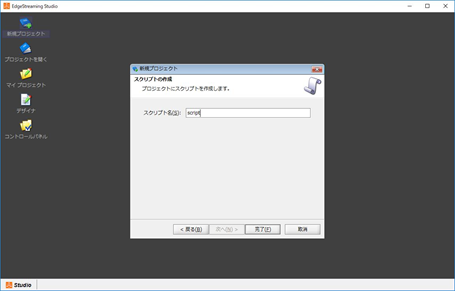
スクリプトを作成します。
プラグインの確認
作成したプラグインが、「ツールパレット」にできていることを確認します。
「ツールパレット」の「Sample」配下に、それぞれ以下のプラグインができていると思います。
簡単な処理を作成してみましょう
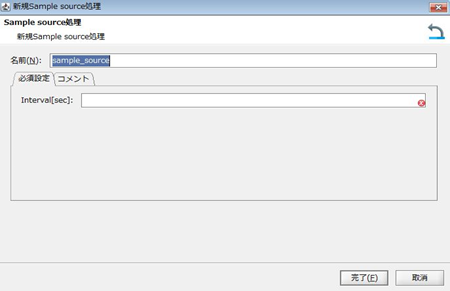
・入力処理(一定時間間隔で疑似乱数を生成するオペレーション)
Source Operationで作成した処理を配置します。
ツールパレットのSampleからSample sourceをドラッグ&ドロップで中央へ移動させます。
※Intervalには、取得する間隔を指定してください。
・出力処理(有効小数点桁数で切り捨ててログに出力するオペレーション)
Sample Sinkで作成した処理を配置します。
ツールパレットのSampleからSample sinkをドラッグ&ドロップで中央へ移動させます。
※Decimalには、任意の有効小数点桁数を指定してください。
マッピング処理
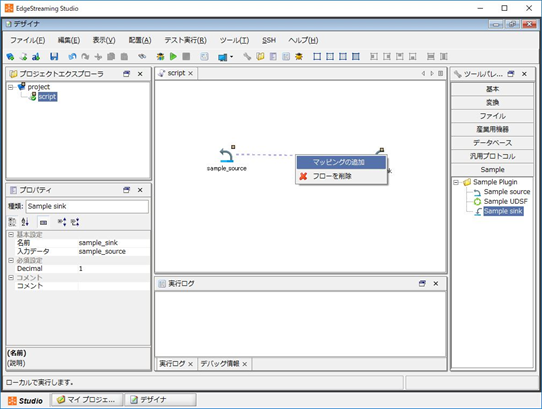
入力処理アイコンをドラッグ&ドロップして、出力処理までアイコンをつなげます。
つなげた線を右クリックし、マッピングの追加を選択します。
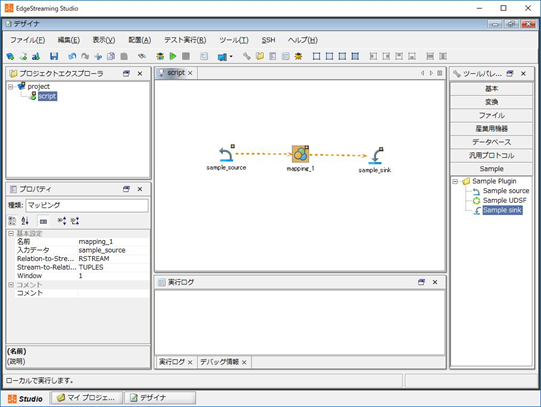
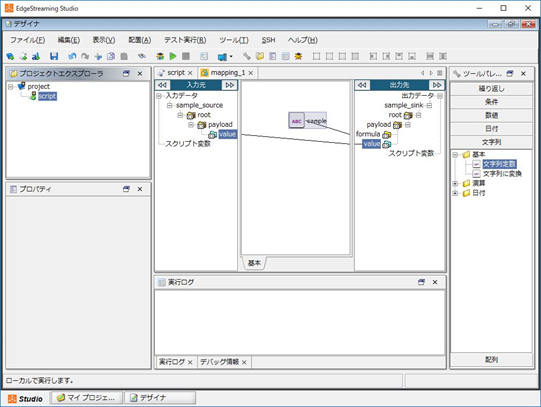
マッピングアイコンを開きます。
・入力元の「value」と出力先の「value」をつなげます。
・出力先の「formula」にツールパレット->文字列->基本->文字列定数を配置し、
任意の文字列を指定し、「formula」につなげます。
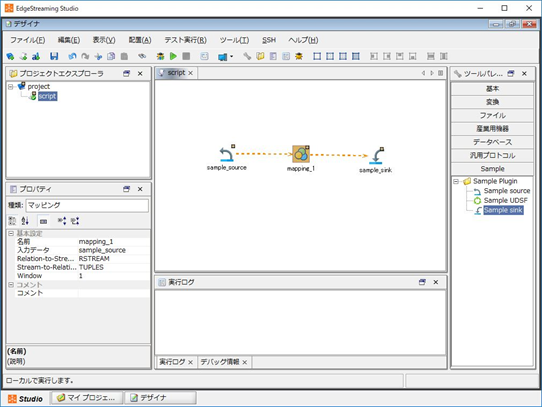
スクリプト全体
このようにスクリプトが作成できました。
実行してみましょう
画面メニューの緑矢印から作成したスクリプトを実行してみましょう。
疑似乱数が指定したIntervalごとに生成され、指定した小数点桁数で値が出力されることが確認できると思います。
また、作成したUDSFのオペレーションアイコンを使用することで、取得した値に対して四則演算ができますので、
組み合わせて、いろいろと試してみてください。最後に
3部作の最終編として、今回はプラグインのビルドから実行までやってみました。
このようにSDKを使用してプラグインの処理を実装することが可能です。本記事がプラグイン開発の道しるべになれたら幸いです。このブログでは、今後も技術の「よろず相談窓口」で相談を受けた内容や、誕生したワザをご紹介していけたらな、と思っています。
これからも是非チェックいただき、宜しければフォローをお願いします。
それでは、また!


- 投稿日:2020-03-30T09:25:37+09:00
HULFT IoT EdgeStreamingでプラグインを作成してみた【開発編】(2/3)
はじめに
こんにちは。よろず相談担当 すぎもん
今回は、HULFT IoT EdgeStreamingのSDKを使用したコンポーネント(アダプタ)の開発をやってみようと思います。全3部作で完結するよう記載してます。今回やること
今回は、第2弾としてHULFT IoT EdgeStreaming Plugin SDKを使用してプラグインを開発してみます。他にセットアップ編、実行編の記事もあるので是非参考にしてみてください。
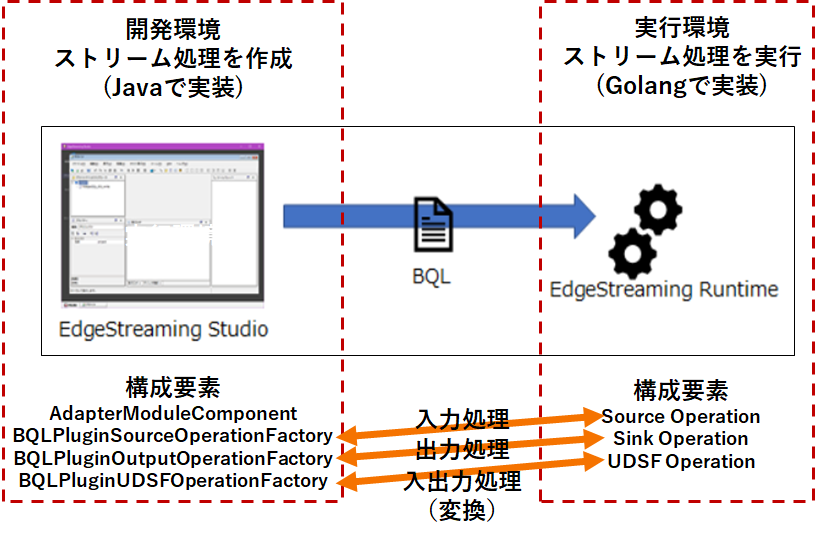
プラグインの作成概要
EdgeStreamingのプラグイン作成の構成は、以下のようになります。
実行環境構成
Studioから指定されたStreaming処理を実行するRuntime部分になります。
SourceOperation
Streamingデータ(Tuple)を生成するオペレーションです。「入力処理」となります。

 ※JSON形式となります
SinkOperation
Streamingデータ(Tuple)を外部へ出力するオペレーションです。「出力処理」となります。UDSFOperation
Streamingデータ(Tuple)の変換を行うオペレーションです。

また、変換されたStreming(Tuple)を出力します。「入出力(変換)処理」
開発環境構成
RunTimeにStreaming処理をどのように行うかを指示するBQL(SQLライクな文法)を生成します。
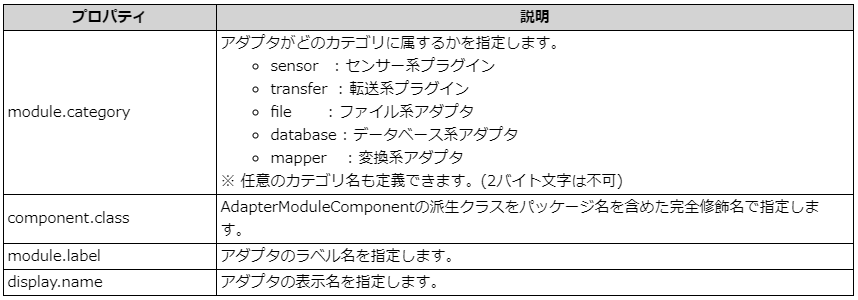
AdapterModuleComponent
コンポーネント(アダプタ)を表すクラスです。オペレーションと多対1となります。BQLPluginSourceOperationFactory
SourceOperartionのプロパティを定義します。「入力処理」

Sourceオペレーションを生成するBQL(Create Source文)を出力します。
BQLPluginOutputOperationFactory
SinkOperationのプロパティを定義します。「出力処理」

Sinkオペレーションを生成するBQL(Create Sink文)を出力します。
BQLPluginUDSFOperationFactory
UDSFのプロパティを定義します。「入出力(変換)処理」

UDSFオペレーションを生成するBQL(Select文)を出力します。
プラグインの作成
今回は、以下のような形でプラグイン作成をしてみました。
・基本情報
・オペレーション情報
実行環境側(Golang)の実装
Studioから指定されたStreaming処理の実装をします。
環境準備
1. モジュールディレクトリの作成
・$SDK_HOME/dev/go/src/github.sis.saison.co.jp/sherpa/es-agent/sample
※ここに、ソースファイルを格納しました。(source.go, sink.go, udsf.go)
2. pluginディレクトリの作成
・$SDK_HOME/dev/go/src/github.sis.saison.co.jp/sherpa/es-agent/sample/plugin
3. externalディレクトリの作成
・$SDK_HOME/dev/go/src/github.sis.saison.co.jp/sherpa/es-agent/sample/externalソースファイルの作成
モジュールディレクトリ(ここではsample)に以下のファイル名でソースファイルを作成していってみます。・ファイル構成は、以下のとおりです。
├─sample
│   ├─source.go(入力処理)
│   ├─sink.go(出力処理)
│   ├─udsf.go(入出力変換処理)
│   │
│   ├─external
│   │   ├─plugin_main.go(main関数)
│   │   │
│   └─plugin
│   │   ├─plugin.go(各sample配下のソースファイルを登録)
│   │   │
では、ソースファイルを作成していってみましょう。
・source.go(入力処理)
一定時間間隔で疑似乱数を生成する処理を作成します。
主な流れは、以下のとおりです。
1. 整数型のパラメータ”interval”を受け取る
2. intervalの時間間隔で疑似乱数を生成する
3. JSONスキーマのデータを持つTupleを生成するTuple{ "type": "object", "required": ["payload"], "properties": { "payload": { "type": "object", "required": ["value"], "properties": { "value": { "type": "number" } } } } }出力されるTupleのJSONデータは、以下のような形になります。
{"payload": {"value": 3.5423242}}source.goは、以下のように作成してみました。
source.gopackage sample import ( "math/rand" "time" "gopkg.in/sensorbee/sensorbee.v0/bql" "gopkg.in/sensorbee/sensorbee.v0/core" "gopkg.in/sensorbee/sensorbee.v0/data" ) type source struct { interval time.Duration term chan struct{} } func (s *source) GenerateStream(ctx *core.Context, w core.Writer) error { rand.Seed(time.Now().UnixNano()) next := time.Now() for { val := rand.Float64() m := data.Map{"value": data.Float(val)} t := core.NewTuple(data.Map{"payload": m}) if s.interval > 0 { t.Timestamp = next } ctx.Log().Debug("generation: ", val) if err := w.Write(ctx, t); err != nil { return err } if s.interval > 0 { now := time.Now() next = next.Add(s.interval) if next.Before(now) { next = now.Add(s.interval) } select { case <-s.term: return core.ErrSourceStopped case <-time.After(next.Sub(now)): } } } return nil } func (s *source) Stop(ctx *core.Context) error { s.term <- struct{}{} return nil } func CreateSource(ctx *core.Context, ioParams *bql.IOParams, params data.Map) (core.Source, error) { interval, err := getInterval(params) if err != nil { return nil, err } return &source{ interval: interval, term: make(chan struct{}), }, nil } func getInterval(params data.Map) (time.Duration, error) { interval := 1 * time.Second if v, ok := params["interval"]; ok { i, err := data.ToDuration(v) if err != nil { return interval, err } interval = i } return interval, nil }・sink.go(出力処理)
有効小数点桁数で切り捨ててログに出力する処理を作成します。主な流れは、以下のとおりです。
1. 整数型のパラメータ「decimal」を受け取る
2. 「decimal」の有効小数点桁数で、受け取った値を標準出力に出力
3. JSONデータのスキーマのデータを持つTupleを受け取る`Tuple{ "type": "object", "required": ["payload"], "properties": { "payload": { "type": "object", "required": ["value", "formula"], "properties": { "value": { "type": "number" } "formula": { "type": "string" } } } } }sink.goは、以下のように作成してみました。
sink.gopackage sample import ( "fmt" "math" "gopkg.in/sensorbee/sensorbee.v0/bql" "gopkg.in/sensorbee/sensorbee.v0/core" "gopkg.in/sensorbee/sensorbee.v0/data" ) type sink struct { decimal int } func (s *sink) Write(ctx *core.Context, tuple *core.Tuple) error { p, ok := tuple.Data["payload"] if !ok { return fmt.Errorf("the tuple doesn't have the required field: payload") } payload, err := data.AsMap(p) if err != nil { return err } v, ok := payload["value"] if !ok { return fmt.Errorf("the tuple doesn't have the required field: value") } value, err := data.AsFloat(v) if err != nil { return err } f, ok := payload["formula"] if !ok { return fmt.Errorf("the tuple doesn't have the required field: formula") } formula, err := data.AsString(f) if err != nil { return err } shift := math.Pow(10, float64(s.decimal)) value = math.Floor(value*shift) / shift ctx.Log().Infof("formula: %s", formula) ctx.Log().Infof("value: %f", value) return nil } func (s *sink) Close(ctx *core.Context) error { return nil } func CreateSink(ctx *core.Context, ioParams *bql.IOParams, params data.Map) (core.Sink, error) { decimal, err := getDecimal(params) if err != nil { return nil, err } return &sink{ decimal: decimal, }, nil } func getDecimal(params data.Map) (int, error) { node, ok := params["decimal"] if !ok { return 0, fmt.Errorf("decimal is required") } decimal, err := data.AsInt(node) if err != nil { return 0, fmt.Errorf("decimal must be a int:%s", err) } return int(decimal), nil }・udsf.go(入出力変換処理)
udsfオブジェクトは、以下をデータを受け取ります。
- 文字列型のパラメータ:stream_name(入力Stream名)
- operaror(演算子)
- 浮動小数点型パラメータ: initial_value(初期値)udsfオブジェクトは、受け取ったTupleのvalue要素の値を、現在の値(スタート時はinitial_value(初期値))に指定した演算子で、演算し続けます。
udsf.goは、以下のように作成してみました。
udsf.gopackage sample import ( "fmt" "gopkg.in/sensorbee/sensorbee.v0/bql/udf" "gopkg.in/sensorbee/sensorbee.v0/core" "gopkg.in/sensorbee/sensorbee.v0/data" ) type operator byte const ( none = ' ' plus = '+' minus = '-' times = '*' divided = '/' ) type udsf struct { cur float64 ope operator } func (u *udsf) Process(ctx *core.Context, tuple *core.Tuple, w core.Writer) error { p, ok := tuple.Data["payload"] if !ok { return fmt.Errorf("the tuple doesn't have the required field: payload") } payload, err := data.AsMap(p) if err != nil { return err } v, ok := payload["value"] if !ok { return fmt.Errorf("the tuple doesn't have the required field: value") } value, err := data.AsFloat(v) if err != nil { return err } var formula string newVal := u.cur switch u.ope { case plus: newVal += value case minus: newVal -= value case times: newVal *= value case divided: newVal /= value } formula = fmt.Sprintf("%f %s %f", u.cur, string(u.ope), value) ctx.Log().Debug("calculate: " + formula) m := data.Map{ "value": data.Float(newVal), "formula": data.String(formula), } if err := w.Write(ctx, core.NewTuple(data.Map{"payload": m})); err != nil { return err } u.cur = newVal return nil } func (u *udsf) Terminate(ctx *core.Context) error { return nil } func CreateUDSF(decl udf.UDSFDeclarer, params data.Map) (udf.UDSF, error) { inputStream, err := getStreamName(params) if err != nil { return nil, err } operator, err := getOperator(params) if err != nil { return nil, err } initialValue, err := getInitialValue(params) if err != nil { return nil, err } if err := decl.Input(inputStream, nil); err != nil { return nil, err } return &udsf{ ope: operator, cur: initialValue, }, nil } func getStreamName(params data.Map) (string, error) { node, ok := params["stream_name"] if !ok { return "", fmt.Errorf("stream_name is required") } streamName, err := data.AsString(node) if err != nil { return "", fmt.Errorf("stream_name must be a string:%s", err) } return streamName, nil } func getOperator(params data.Map) (operator, error) { node, ok := params["operator"] if !ok { return none, fmt.Errorf("operator is required") } operatorStr, err := data.AsString(node) if err != nil { return none, fmt.Errorf("operator must be a string:%s", err) } switch operatorStr { case "plus": return plus, nil case "minus": return minus, nil case "times": return times, nil case "divided": return divided, nil default: return none, fmt.Errorf("invalid oparator") } } func getInitialValue(params data.Map) (float64, error) { initialValue := 0.0 node, ok := params["initial_value"] if !ok { return initialValue, nil } initialValue, err := data.AsFloat(node) if err != nil { return initialValue, fmt.Errorf("initial_value is invalid") } return initialValue, nil }ソースファイルの登録
pluginディレクトリに、plugin.goを作成し、Source、Sink、 UDSF Operationの登録処理(BQLとして使用するため)を実装します。
plugin.goは、以下のように作成してみました。
plugin.gopackage plugin import ( "github.sis.saison.co.jp/sherpa/es-agent/sample" "gopkg.in/sensorbee/sensorbee.v0/bql" "gopkg.in/sensorbee/sensorbee.v0/bql/udf" ) func init() { bql.MustRegisterGlobalSourceCreator("sample_source", bql.SourceCreatorFunc(sample.CreateSource)) bql.MustRegisterGlobalSinkCreator("sample_sink", bql.SinkCreatorFunc(sample.CreateSink)) udf.MustRegisterGlobalUDSFCreator("sample_udsf", udf.MustConvertToUDSFCreator(sample.CreateUDSF)) }main関数の作成
最後に、単体の実行モジュールとして処理を呼び出すmain関数をexternalディレクトリに、plugin_main.goを作成し実装します。plugin_main.goは、以下のように作成してみました。
plugin_main.gopackage main import ( "os" "github.sis.saison.co.jp/sherpa/es-agent/external/plugin" _ "github.sis.saison.co.jp/sherpa/es-agent/sample/plugin" ) func main() { if err := plugin.NewServer().ListenAndServe(); err != nil { os.Exit(1) } }ここまでで、Runtime側の準備が完了しました。
次に、開発環境側の実装をしていきます。開発環境側(Java)の実装
RuntimeにStreaming処理をどのように行うかを指示するBQL(SQLライクな文法)の生成を実装します。
環境準備
モジュールディレクトリの作成
・$SDK_HOME/dev/sample_adapterディレクトリを作成します。ファイルのコピー
・$SDK_HOME/dev/confディレクトリにある、build.xml、config.propertiesをモジュールディレクトリにコピーします。
$SDK_HOME/dev/conf/build.xml
⇒$SDK_HOME/dev/sample_adapter/build.xml
$SDK_HOME/dev/conf/config.properties
⇒$SDK_HOME/dev/sample_adapter/config.propertitesコピーしたconfig.propertiesファイルを編集します。
Implementation-Title=SampleAdapter
Implementation-Vendor=sugimon
Implementation-Version=0

module.category=Sample
module.label=Sample Plugin
display.name=Sample Plugin Adapter

plugin.name=sample_plugin
esagent.plugin.package=github.sis.saison.co.jp/sherpa/es-agent/sample
ソースファイル用ディレクトリを作成
$SDK_HOME/dev/sample_adapterにsrcディレクトリを作成します。
($SDK_HOME/dev/sample_adapter/src)次に作成するjavaファイルのパッケージ
com/appresso/ds/dp/modules/adapter/sample
になるように、以下のようなパッケージ用のディレクトリを作成します。
($SDK_HOME/dev/sample_adapter/src/com/appresso/ds/dp/modules/adapter/sample)ソースファイルの作成
パッケージディレクトリに以下のファイル名でソースファイルを作成します。・SampleAdapterModuleComponent.java
・SampleSinkOperationFactory.java
・SampleSourceOperationFactory.java
・SampleUDSFOperationFactory.java├─ sample_adapter │ │ build.xml │ │ config.properties │ ├─ src │ │ └com │ │ └appresso │ │ └ds │ │ └dp │ │ └modules │ │ └adapter │ │ └sample │ │ SampleAdapterModuleComponent.java │ │ SampleSinkOperationFactory.java │ │ SampleSourceOperationFactory.java │ │ SampleUDSFOperationFactory.javaこちらもそれぞれ、ソースファイルを作成していってみましょう。
・SampleSourceOperationFactory.java(入力処理)
Sourceオペレーションのプロパティを保持するオブジェクトを返したり、オペレーションオブジェクトを返したりします。(継承元クラス:BQLPluginSourceOperationFactoryクラス)SampleSourceOperationFactory.javaは、以下のように作成してみました。
SampleSourceOperationFactory.javapackage com.appresso.ds.dp.modules.adapter.sample; import com.appresso.ds.common.spi.constraint.NumberFillin; import com.appresso.ds.common.spi.param.SimpleParameter; import com.appresso.ds.common.xmlfw.xml.XmlHandler; import com.appresso.ds.dp.share.adapter.bql.common.BQLPluginSourceOperationFactory; import com.appresso.ds.dp.spi.OperationConfiguration; import com.appresso.ds.dp.spi.OperationConfigurator; import org.xml.sax.SAXException; import static com.appresso.ds.common.bql.BQLSimpleParameterType.FLOAT; public class SampleSourceOperationFactory extends BQLPluginSourceOperationFactory { @Override protected String getLabel() { return "Sample source"; } @Override protected String getPluginName() { return "sample_plugin"; } @Override public String getOperationName() { return "sample_source"; } @Override protected String getTypeName() { return "sample_source"; } @Override protected void setupOperationConfigurator(OperationConfigurator operationConfigurator) { operationConfigurator.addSimpleParameter(createIntervalParameter()); } @Override protected void setupOutputSchema(XmlHandler handler, OperationConfiguration conf) throws Exception { handler.startElement("", "payload", "payload", EMPTY_ATTRIBUTE); writeElement(handler, "value"); handler.endElement("", "payload", "payload"); } protected void writeElement(XmlHandler handler, String name) throws SAXException { handler.startElement("", name, name, EMPTY_ATTRIBUTE); handler.endElement("", name, name); } static SimpleParameter createIntervalParameter() { NumberFillin fillin = new NumberFillin(); fillin.setMinValue(0.001); fillin.setMaxValue(1314000); fillin.setAllowMin(true); fillin.setAllowMax(true); fillin.setPrecision(10); fillin.setDecimal(3); fillin.setAllowDouble(true); fillin.setLabel("Interval[sec]"); fillin.setRequired(true); return new SimpleParameter(FLOAT.toParameterKey("interval"), fillin); } }・SampleSinkOperationFactory.java(出力処理)
Sinkオペレーションのプロパティを保持するオブジェクトを返したり、オペレーションオブジェクトを返したりします。(継承元クラス:BQLPluginSinkOperationFactoryクラス)SampleSinkOperationFactory.javaは、以下のように作成してみました。
SampleSinkOperationFactory.javapackage com.appresso.ds.dp.modules.adapter.sample; import com.appresso.ds.common.spi.constraint.NumberFillin; import com.appresso.ds.common.spi.param.SimpleParameter; import com.appresso.ds.common.xmlfw.xml.XmlHandler; import com.appresso.ds.dp.share.adapter.bql.common.BQLPluginOutputOperationFactory; import com.appresso.ds.dp.spi.OperationConfiguration; import com.appresso.ds.dp.spi.OperationConfigurator; import com.appresso.ds.dp.spi.OperationContext; import org.xml.sax.SAXException; import static com.appresso.ds.common.bql.BQLSimpleParameterType.INTEGER; public class SampleSinkOperationFactory extends BQLPluginOutputOperationFactory { @Override protected String getLabel() { return "Sample sink"; } @Override protected String getPluginName() { return "sample_plugin"; } @Override public String getOperationName() { return "sample_sink"; } @Override protected String getTypeName() { return "sample_sink"; } @Override protected void setupOperationConfigurator(OperationConfigurator operationConfigurator) { operationConfigurator.addSimpleParameter(createDecimalParameter()); } protected void setupInputSchema(XmlHandler handler, OperationConfiguration conf, OperationContext context) throws Exception { handler.startElement("", "payload", "payload", EMPTY_ATTRIBUTE); writeElement(handler, "formula"); writeElement(handler, "value"); handler.endElement("", "payload", "payload"); } protected void writeElement(XmlHandler handler, String name) throws SAXException { handler.startElement("", name, name, EMPTY_ATTRIBUTE); handler.endElement("", name, name); } static SimpleParameter createDecimalParameter() { NumberFillin fillin = new NumberFillin(); fillin.setMinValue(0); fillin.setMaxValue(10); fillin.setAllowMin(true); fillin.setAllowMax(true); fillin.setLabel("Decimal"); fillin.setRequired(true); return new SimpleParameter(INTEGER.toParameterKey("decimal"), fillin); } }・SampleUDSFOperationFactory
UDSFオペレーションのプロパティを保持するオブジェクトを返したり、オペレーションオブジェクトを返したりします。SampleUDSFOperationFactory.javaは、以下のように作成してみました。
SampleUDSFOperationFactory.javapackage com.appresso.ds.dp.modules.adapter.sample; import com.appresso.ds.common.bql.UDSFFromArgument; import com.appresso.ds.common.bql.UDSFFromTemplate; import com.appresso.ds.common.spi.constraint.Item; import com.appresso.ds.common.spi.constraint.Multi; import com.appresso.ds.common.spi.constraint.NumberFillin; import com.appresso.ds.common.spi.param.SimpleParameter; import com.appresso.ds.common.xmlfw.xml.XmlHandler; import com.appresso.ds.dp.share.adapter.bql.common.BQLPluginUDSFOperationFactory; import com.appresso.ds.dp.spi.OperationConfiguration; import com.appresso.ds.dp.spi.OperationConfigurator; import com.appresso.ds.dp.spi.OperationContext; import org.xml.sax.SAXException; import java.util.stream.Stream; import static com.appresso.ds.common.bql.BQLSimpleParameterType.FLOAT; import static com.appresso.ds.common.bql.BQLSimpleParameterType.STRING; public class SampleUDSFOperationFactory extends BQLPluginUDSFOperationFactory { @Override protected String getLabel() { return "Sample UDSF"; } @Override public String getPluginName() { return "sample_plugin"; } @Override protected String getTypeName() { return "sample_udsf"; } @Override public String getOperationName() { return "sample_udsf"; } @Override protected void addArgs(UDSFFromTemplate template) { template.addArg(new UDSFFromArgument(STRING.toParameterKey("operator"))); template.addArg(new UDSFFromArgument(FLOAT.toParameterKey("initial_value"))); } @Override protected void setupOperationConfigurator(OperationConfigurator operationConfigurator) { setStreamConfigurationParameter(operationConfigurator); operationConfigurator.addSimpleParameter(createOperatorParameter()); operationConfigurator.addSimpleParameter(createInitialValueParameter()); } @Override protected void setupInputSchema(XmlHandler handler, OperationConfiguration conf, OperationContext context) throws Exception { handler.startElement("", "payload", "payload", EMPTY_ATTRIBUTE); writeElement(handler, "value"); handler.endElement("", "payload", "payload"); } @Override protected void setupOutputSchema(XmlHandler handler, OperationConfiguration conf, OperationContext context) throws Exception { handler.startElement("", "payload", "payload", EMPTY_ATTRIBUTE); writeElement(handler, "formula"); writeElement(handler, "value"); handler.endElement("", "payload", "payload"); } protected void writeElement(XmlHandler handler, String name) throws SAXException { handler.startElement("", name, name, EMPTY_ATTRIBUTE); handler.endElement("", name, name); } static SimpleParameter createInitialValueParameter() { NumberFillin fillin = new NumberFillin(); fillin.setPrecision(10); fillin.setDecimal(3); fillin.setAllowDouble(true); fillin.setLabel("Initial value"); fillin.setRequired(true); return new SimpleParameter(FLOAT.toParameterKey("initial_value"), fillin); } static SimpleParameter createOperatorParameter(){ Multi multi = new Multi(Operator.getItems()); multi.setLabel("Operator"); multi.setRequired(true); SimpleParameter param = new SimpleParameter(STRING.toParameterKey("operator"), multi); return param; } enum Operator { Plus("+","plus"), Minus("-","minus"), Times("*","times"), Divided("/","divided"); public String getDisplayName() { return displayName; } public String getValue() { return value; } private final String displayName; private final String value; private Operator(String displayName, String value) { this.displayName = displayName; this.value=value; } Item toItem(){ return new Item(value,displayName); } static Item[] getItems(){ return Stream.of(Operator.values()).map(s->s.toItem()).toArray(Item[]::new); } } }・SampleAdapterModuleComponent
コンポーネント(アダプタ)を表すクラスです。SampleAdapterModuleComponent.javaは、以下のように作成してみました。
SampleAdapterModuleComponent.javapackage com.appresso.ds.dp.modules.adapter.sample; import java.util.ArrayList; import java.util.List; import com.appresso.ds.common.kernel.modules.LicenseManager; import com.appresso.ds.common.license.LicensePackageType; import com.appresso.ds.dp.spi.AdapterModuleComponent; import com.appresso.ds.dp.spi.OperationFactory; import com.appresso.ds.dp.spi.ResourceFactory; public class SampleAdapterModuleComponent extends AdapterModuleComponent { private static final String MODULE_COMPONENT_NAME = "Sample Adapter"; @Override public OperationFactory[] getOperationFactories() throws Exception { List<OperationFactory> operationFactories = new ArrayList<>(); operationFactories.add(new SampleSourceOperationFactory()); operationFactories.add(new SampleUDSFOperationFactory()); operationFactories.add(new SampleSinkOperationFactory()); return operationFactories.toArray(new OperationFactory[operationFactories.size()]); } @Override public ResourceFactory[] getResourceFactories() throws Exception { return new ResourceFactory[]{}; } public void checkLicense() throws Exception { LicenseManager licenseManager = getContext().getProxy(LicenseManager.class); licenseManager.checkLicense(getModuleComponentName(), getPermittedPackageType()); } private String getModuleComponentName() { return MODULE_COMPONENT_NAME; } private int[] getPermittedPackageType() { return new int[]{LicensePackageType.TYPE_BASIC_SERVER}; } }最後に
今回は、実際に実行環境側と開発環境側に分けて処理の実装をしてみました。ここまででプラグインの作成処理が完了しました。次回はこれらをビルドして実行をしてみたいと思います。
このブログでは、今後も技術の「よろず相談窓口」で相談を受けた内容や、誕生したワザをご紹介していけたらな、と思っています。
これからも是非チェックいただき、宜しければフォローをお願いします。
それでは、また!


- 投稿日:2020-03-30T09:25:23+09:00
HULFT IoT EdgeStreamingでプラグインを作成してみた【セットアップ編】(1/3)
はじめに
こんにちは。よろず相談担当 すぎもん
今回は、HULFT IoT EdgeStreamingのSDKを使用したコンポーネント(アダプタ)の開発をやってみようと思います。全3部作で完結するよう記載してます。今回やること
今回は、第1弾としてHULFT IoT EdgeStreaming SDKを使用するためのセットアップ編として環境準備をしてみようと思います。既に環境あるよ~って方は、読み飛ばしていただき下記の【開発編】、【実行編】の記事を参考にしてみてください。
環境準備
今回、プラグインを作成してみた際に事前に必要となる事項を記載します。
※Windows PCを使用して試しています。必要なソフトウェア
各ソフトウェアをダウンロードし、インストールします。
ソフトウェア 今回インストールしたバージョン JDK AdoptOpenJDK 11 (HotSpot) ビルドツール Apache ant 1.10.0 以降 Golang Go 1.13 以降 EdgeStreaming HULFT IoT EdgeStreaming Ver.2.1.0 SDK HULFT IoT EdgeStreaming-sdk Ver.2.1.0 ちなみにですが、私が試した環境は以下のとおりです。
・JDK(jdk 11.0.6.10 HotSpot)
・ビルドツール(Ant 1.10.7)
・Golang(1.13.7)
・HULFT IoT EdgeStreamingとHULFT IoT EdgeStreaming SDK(2.1.0)環境変数の設定
各インストールしたソフトウェアの環境変数を設定します。
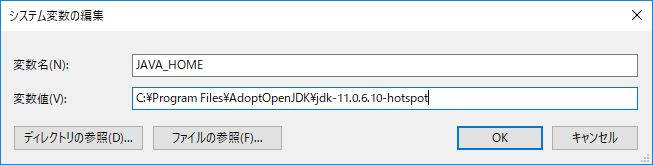
・JDKのパスを設定します。
JAVA_HOMEに、JDKがインストールされているパスを指定します。
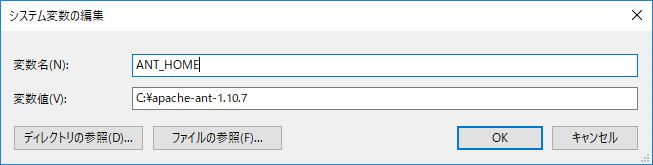
・ビルドツールのパスを設定します。
ANT_HOMEに、ANTがインストールされているパスを指定します。
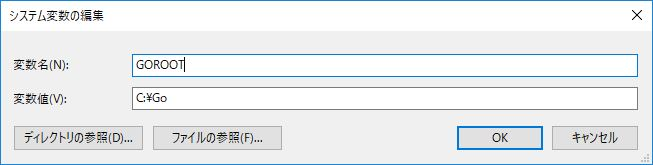
・Golangのパスを設定します。
GOROOTにGolangがインストールされているパスを指定します。・PATH環境変数の設定
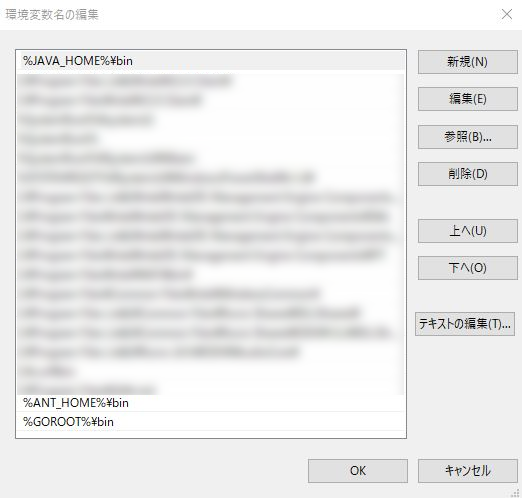
コマンドの実行パスを通すためPATH環境変数を設定します。
%JAVA_HOME%\bin
%ANT_HOME%\bin
%GOROOT%\bin(設定例)
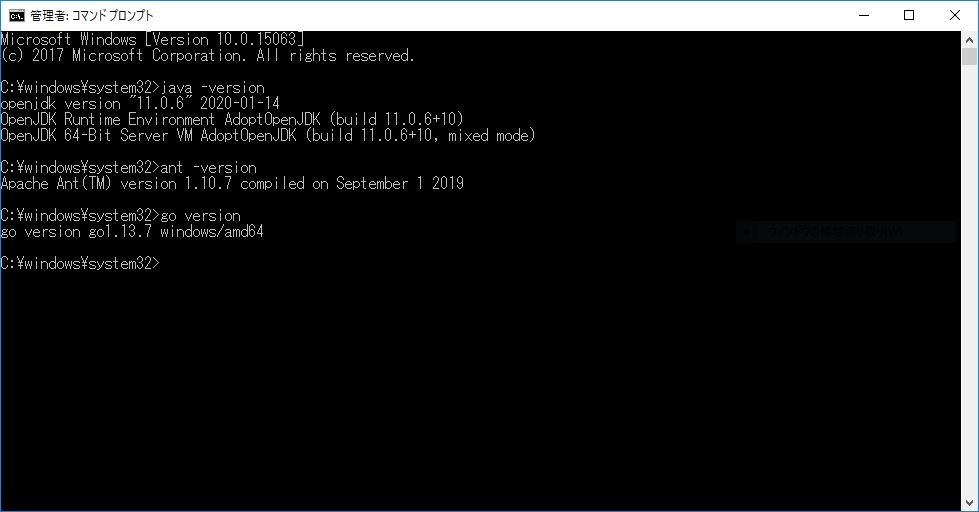
コマンドプロンプトから、各ソフトウェアのコマンドを実行し実行パスの確認をします。
java –version
ant –version
go version(実行結果)
画像のように、それぞれのバージョンが表示されていれば問題ありません。
HULFT IoT EdgeStreamingのパスを設定
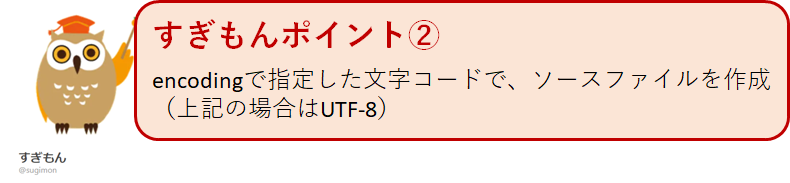
SDKを解凍した先にある「$SDK_HOME\dev\build.properties」ファイルを編集します。
dataspider.homeプロパティに、HULFT IoT EdgeStreaming Ver.2.1.0をインストールしたディレクトリパスを設定します。###################################################################### # Build Configuration # #dataspider.home=<dataspider.server.installed.directory> #encoding=<file.encoding> # ###################################################################### dataspider.home=C:\\EdgeStreaming-v210 encoding=UTF-8
ここまでで、プラグイン作成の環境準備が完了しました。
次回以降、実際にプラグインの開発をしていきたいと思います。最後に
今回は、プラグイン作成前に必要となる環境構築をやってみました。必要となるソフトウェアのセットアップとパスが通れば開発環境の準備が完了です。開発編の方で実装をしてみたいと思います。
このブログでは、今後も技術の「よろず相談窓口」で相談を受けた内容や、誕生したワザをご紹介していけたらな、と思っています。
これからも是非チェックいただき、宜しければフォローをお願いします。
それでは、また!
- 投稿日:2020-03-30T05:52:20+09:00
Golangで、デザインパターン「Memento」を学ぶ
GoFのデザインパターンを学習する素材として、書籍「増補改訂版Java言語で学ぶデザインパターン入門」が参考になるみたいですね。
取り上げられている実例は、JAVAベースのため、Pythonで同等のプラクティスに挑んだことがありました。
Qiita記事: "Pythonで、デザインパターン「Memento」を学ぶ"今回は、Pythonで実装した”Memento”のサンプルアプリをGolangで実装し直してみました。
■ Memento(メメント・パターン)
「Memento」という英単語は、「形見・記念」を意味します。
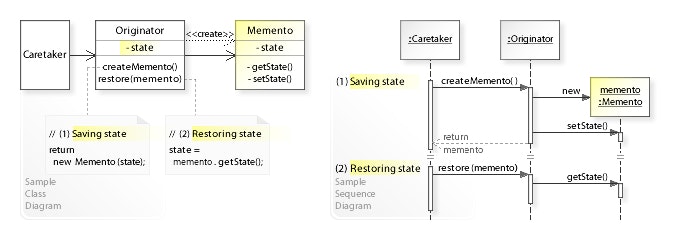
このパターンは、あるオブジェクトの任意の時点の状態を覚えておき(保存)、 後でその状態にオブジェクトを戻すための工夫を提供するパターンです。(カプセル化を破壊せずに、状態を元に戻せる)つまり、テキストエディタ等で実装されているような「アンドゥ」(操作をキャンセルして操作前の状態に戻す)機能を提供するためのパターンです。
注意すべきことは状態を元に戻すための必要最小限の情報(フィールド値)のみを保存すると言うことです。
(以上、「ITエンジニアのための技術支援サイト by IT専科」より引用)UML class and sequence diagram
■ "Memento"のサンプルプログラム
実際に、Mementoパターンを活用したサンプルプログラムを動かしてみて、次のような動作の様子を確認したいと思います。なお、サンプルプログラム「フルーツを集めていくサイコロゲーム」は、次のような動作を想定するものとします。
- このゲームは自動的に進みます
- ゲームの主人公は、サイコロを振り、サイコロの目に応じて動作が決定します
- ゲームの都度、現在の状況を表示します(所持金、所持しているフルーツ)
- ゲームの開始時点では、所持金100円からスタート
- 現時点の所持金が、保存しておいた所持金を上回った場合は、その状況(所持金と所持している"おいしいフルーツ")を保存します
- 現時点の所持金が、保存しておいた所持金の半分を下回った場合は、以前に保存したその状況(所持金、所持している"おいしいフルーツ")を現在の状況として復元します
- お金がなくなったら終了します。
- 最大100回、ゲームを繰り返します
<サイコロの目に応じた動作>
1. サイコロの目が"1"が出たとき、所持金が100円増えます
2. サイコロの目が"2"が出たとき、所持金が半分になります(端数は、切り捨て)
3. サイコロの目が"6"が出たとき、フルーツが貰えます
(普通の"フルーツ"が貰えるが、"おいしいフルーツ"が貰えるか、確率は、50%です)
4. その他のサイコロの目が出た場合は、何も起こりません$ go run Main.go ==== 0 現状:[money = 100, fruits = []] 所持金が増えました 所持金は200円になりました (だいぶ増えたので、現在の状態を保存しておこう) ==== 1 現状:[money = 200, fruits = []] 何も起こりませんでした 所持金は200円になりました ==== 2 現状:[money = 200, fruits = []] 何も起こりませんでした 所持金は200円になりました ==== 3 現状:[money = 200, fruits = []] 所持金が増えました 所持金は300円になりました (だいぶ増えたので、現在の状態を保存しておこう) ==== 4 現状:[money = 300, fruits = []] フルーツ(リンゴ)をもらいました 所持金は300円になりました ==== 5 現状:[money = 300, fruits = [リンゴ]] 何も起こりませんでした 所持金は300円になりました ...(snip) ==== 33 現状:[money = 600, fruits = [おいしいみかん おいしいぶどう ぶどう おいしいぶどう]] 所持金が増えました 所持金は700円になりました (だいぶ増えたので、現在の状態を保存しておこう) ==== 34 現状:[money = 700, fruits = [おいしいみかん おいしいぶどう ぶどう おいしいぶどう]] 所持金が半分になりました 所持金は350円になりました ==== 35 現状:[money = 350, fruits = [おいしいみかん おいしいぶどう ぶどう おいしいぶどう]] フルーツ(バナナ)をもらいました 所持金は350円になりました ==== 36 現状:[money = 350, fruits = [おいしいみかん おいしいぶどう ぶどう おいしいぶどう バナナ]] 所持金が増えました 所持金は450円になりました ==== 37 現状:[money = 450, fruits = [おいしいみかん おいしいぶどう ぶどう おいしいぶどう バナナ]] 所持金が増えました 所持金は550円になりました ==== 38 現状:[money = 550, fruits = [おいしいみかん おいしいぶどう ぶどう おいしいぶどう バナナ]] 所持金が増えました 所持金は650円になりました ==== 39 現状:[money = 650, fruits = [おいしいみかん おいしいぶどう ぶどう おいしいぶどう バナナ]] 所持金が半分になりました 所持金は325円になりました (だいぶ減ったので、以前の状態に復帰しよう) ==== 40 現状:[money = 700, fruits = [おいしいみかん おいしいぶどう おいしいぶどう]] 所持金が増えました 所持金は800円になりました (だいぶ増えたので、現在の状態を保存しておこう) ...(snip)最後の方で、
Mementoパターンを使った動作が確認できました。■ サンプルプログラムの詳細
Gitリポジトリにも、同様のコードをアップしています。
https://github.com/ttsubo/study_of_design_pattern_with_golang/tree/master/Memento
- ディレクトリ構成
.
├── Main.go
└── memento
    ├── game.go
    └── memento.go
(1) Originator(作成者)の役
Originator役は、自分の現在の状態を保存したいときに、Memento役を作ります。Originator役はまた、以前のMemento役を渡されると、そのMemento役を作った時点の状態に戻る処理を行います。
サンプルプログラムでは、Gamer構造体が、この役を努めます。memento/game.gopackage memento import ( "fmt" "math/rand" "strings" "time" ) // Gamer is struct type Gamer struct { fruitname, fruits []string money int } // NewGamer func for initializing Game func NewGamer(money int) *Gamer { return &Gamer{ fruitname: []string{"リンゴ", "ぶどう", "バナナ", "みかん"}, money: money, } } // GetMoney func for fetching money in Gamer func (g *Gamer) GetMoney() int { return g.money } // Bet func for betting func (g *Gamer) Bet() { rand.Seed(time.Now().UnixNano()) dice := rand.Intn(6) + 1 if dice == 1 { g.money += 100 fmt.Println("所持金が増えました") } else if dice == 2 { g.money /= 2 fmt.Println("所持金が半分になりました") } else if dice == 6 { f := g.getFruit() fmt.Printf("フルーツ(%s)をもらいました\n", f) g.fruits = append(g.fruits, f) } else { fmt.Println("何も起こりませんでした") } } // CreateMemento func for creating Memento func (g *Gamer) CreateMemento() *Memento { m := &Memento{money: g.money} for _, f := range g.fruits { if strings.HasPrefix(f, "おいしい") { m.addFruit(f) } } return m } // RestoreMemento func for restoring from Memento func (g *Gamer) RestoreMemento(memento *Memento) { g.money = memento.money g.fruits = memento.GetFruits() } // Print func for printing current value in Gamer func (g *Gamer) Print() string { return fmt.Sprintf("[money = %d, fruits = %s]", g.money, g.fruits) } func (g *Gamer) getFruit() string { prefix := "" if rand.Int()%2 == 0 { prefix = "おいしい" } return prefix + g.fruitname[rand.Intn(len(g.fruitname))] }(2) Memento(記念品)の役
Memento役は、Originator役の内部情報をまとめます。Memento役は、Originator役の内部情報を持っていますが、その情報を誰にでも公開するわけではありません。
サンプルプログラムでは、Memento構造体が、この役を努めます。memento/memento.gopackage memento // Memento is struct type Memento struct { money int fruits []string } // GetMoney func for fetching money in Memento func (m *Memento) GetMoney() int { return m.money } func (m *Memento) addFruit(fruit string) { m.fruits = append(m.fruits, fruit) } // GetFruits func for fetching current fruits list in Memento func (m *Memento) GetFruits() []string { return m.fruits }(3) Caretaker(世話をする人)の役
Caretaker役は、現在のOriginator役の状態を保存したいときに、そのことをOriginator役に伝えます。Originator役は、それを受けてMemento役を作り、Caretaker役に渡します。
Caretaker役は将来の必要に備えて、そのMemento役を保存しておきます。
サンプルプログラムでは、startMain関数が、この役を努めます。Main.gopackage main import ( "fmt" "time" "./memento" ) func startMain() { gamer := memento.NewGamer(100) memento := gamer.CreateMemento() for i := 0; i < 100; i++ { fmt.Printf("==== %d\n", i) fmt.Printf("現状:%s\n", gamer.Print()) gamer.Bet() fmt.Printf("所持金は%d円になりました\n", gamer.GetMoney()) if gamer.GetMoney() > memento.GetMoney() { fmt.Println(" (だいぶ増えたので、現在の状態を保存しておこう)") memento = gamer.CreateMemento() } else if gamer.GetMoney() < memento.GetMoney()/2 { fmt.Println(" (だいぶ減ったので、以前の状態に復帰しよう)") gamer.RestoreMemento(memento) } time.Sleep(time.Second * 1) fmt.Println("") } } func main() { startMain() }■ 参考URL
- 投稿日:2020-03-30T05:24:06+09:00
Golangで、デザインパターン「Mediator」を学ぶ
GoFのデザインパターンをGolangで学習してみたいと思います。
今回は、Qiita記事: "Pythonで、デザインパターン「Mediator」を学ぶ"で取り上げた、Pythonベースの”Mediator”のサンプルアプリをGolangで実装し直してみました。■ Mediator(メディエーター・パターン)
「Mediator」という英単語は、「仲介者」を意味します。
このパターンは、複雑に絡み合った複数のオブジェクト間の関係を、必ず「仲介者」を介して処理を行う様にすることで単純かつ明快なインタフェースを提供するパターンです。つまり、「Mediator」パターンとは、管轄下にある複数のオブジェクト各々からの問い合わせを受け、適宜判断を行い、管轄下にあるオブジェクト全体、または一部へ指示を出す「仲介人」の役割を果たすクラスを利用するパターンです。UML class and sequence diagram
UML class diagram
(以上、「ITエンジニアのための技術支援サイト by IT専科」より引用)■ "Mediator"のサンプルプログラム
実際に、Mediatorパターンを活用したサンプルプログラムを動かしてみて、次のような動作の様子を確認したいと思います。ここでは、"なんちゃって、ユーザ認証画面"を想像してください。
- ユーザ名"hoge", パスワード"fuga"のユーザが存在するとする
- ユーザ名とパスワードが入力されると、"login button"がアクティブになる
- "login button"をクリックして、ユーザ認証が成功したか、どうか判定する
なお、サンプルプログラムでは、第一引数:ユーザ名、第二引数:パスワードを指定することにより、"なんちゃって、ユーザ認証画面"に、ユーザ名とパスワードを入力したものとします。
(事例1) 誤ったパスワードを指定して、ユーザ認証が失敗する
ユーザ名は正しく入力されたので、"login button"が有効になりましたが、ユーザ認証は失敗しました。
$ go run Main.go hoge huga
(Active login button)
(ID/PW is incorrect)
Login Failed!!
(事例2) パスワードが未指定だったので、ユーザ認証が失敗する
"login button"が有効ならずに、ユーザ認証は失敗しました。
$ go run Main.go hoge
Login Failed!!
(事例3) 正しいユーザ名, パスワードを指定して、ユーザ認証が成功する
ユーザ名は正しく入力されたので、"login button"が有効になり、ユーザ認証も成功しました。
$ go run Main.go hoge fuga
(Active login button)
(ID/PW is confirmed)
Login Succeed!!
以上で、想定どおり、サンプリプログラムが動作しました。
■ サンプルプログラムの詳細
Gitリポジトリにも、同様のコードをアップしています。
https://github.com/ttsubo/study_of_design_pattern_with_golang/tree/master/Mediator
- ディレクトリ構成
.
├── Main.go
└── mediator
    ├── colleague.go
    └── mediator.go
(1) Mediator(調停者、仲介者)の役
Mediator役は、Colleague役と通信を行なって、調整を行うためのインタフェースを定めます。
サンプルプログラムでは、Mediatorインタフェースが、この役を努めます。mediator/mediator.gopackage mediator import "fmt" // Mediator is interface type Mediator interface { onChange(component *colleague) SetColleagues(inputIDObj, inputPwObj *ConcreteColleagueTextArea, buttonObj *ConcreteColleagueButton) getAuthentication() bool }(2) ConcreteMediator(具体的な調停者、仲介者)の役
ConcreteMediator役は、Mediator役のインタフェースを実装し、実際の調整を行います。
サンプルプログラムでは、ConcreteMediator構造体が、この役を努めます。mediator/mediator.go// ConcreteMediator is struct type ConcreteMediator struct { authentication bool inputIDObj, inputPwObj *ConcreteColleagueTextArea buttonObj *ConcreteColleagueButton } // NewConcreteMediator func for initializing ConcreteMediator func NewConcreteMediator() Mediator { return &ConcreteMediator{ authentication: false, } } // SetColleagues func for setting Objects func (c *ConcreteMediator) SetColleagues(inputIDObj, inputPwObj *ConcreteColleagueTextArea, buttonObj *ConcreteColleagueButton) { c.inputIDObj = inputIDObj c.inputPwObj = inputPwObj c.buttonObj = buttonObj } func (c *ConcreteMediator) onChange(component *colleague) { if component.name == "ID" || component.name == "PW" { c.refreshButton() } else if component.name == "Login" { c.tryAuthentication() } } func (c *ConcreteMediator) refreshButton() { if c.inputIDObj.text != "" && c.inputPwObj.text != "" { fmt.Println("(Active login button)") c.buttonObj.active = true } } func (c *ConcreteMediator) tryAuthentication() { if c.inputIDObj.text == "hoge" && c.inputPwObj.text == "fuga" { fmt.Println("(ID/PW is confirmed)") c.authentication = true } else { fmt.Println("(ID/PW is incorrect)") } } func (c *ConcreteMediator) getAuthentication() bool { return c.authentication }(3) Colleague(同僚)の役
Colleague役は、Mediator役と通信を行うインタフェースとを紐付けます。
サンプルプログラムでは、colleague構造体が、この役を努めます。mediator/colleague.gopackage mediator type colleague struct { mediator Mediator name string } func (c *colleague) onChange() { if c.mediator != nil { c.mediator.onChange(c) } }(4) ConcreteColleague(具体的な同僚)の役
ConcreteColleague役は、Colleague役と紐付けます。
サンプルプログラムでは、ConcreteColleagueButton構造体と、ConcreteColleagueTextArea構造体が、この役を努めます。mediator/colleague.go// ConcreteColleagueButton is struct type ConcreteColleagueButton struct { *colleague active bool } // NewConcreteColleagueButton func for initializing ConcreteColleagueButton func NewConcreteColleagueButton(mediatorObj Mediator, name string) *ConcreteColleagueButton { return &ConcreteColleagueButton{ colleague: &colleague{ mediator: mediatorObj, name: name}, active: false, } } // ClickButton func for detecting whether button is active or not func (c *ConcreteColleagueButton) ClickButton() bool { if c.active { c.onChange() } return c.mediator.getAuthentication() } // CheckButtonStatus func for detecting whether button is active or not func (c *ConcreteColleagueButton) CheckButtonStatus() bool { return c.active }mediator/colleague.go// ConcreteColleagueTextArea is struct type ConcreteColleagueTextArea struct { *colleague text string } // NewConcreteColleagueTextArea func for initializing ConcreteColleagueTextArea func NewConcreteColleagueTextArea(mediatorObj Mediator, name string) *ConcreteColleagueTextArea { return &ConcreteColleagueTextArea{ colleague: &colleague{ mediator: mediatorObj, name: name}, text: "", } } // InputText func for putting text func (c *ConcreteColleagueTextArea) InputText(text string) { c.text = text c.onChange() }(5) Client(依頼人)の役
サンプルプログラムでは、
startMain関数が、この役を努めます。Main.gopackage main import ( "fmt" "os" "./mediator" ) func startMain(userid, password string) { m := mediator.NewConcreteMediator() inputIDObj := mediator.NewConcreteColleagueTextArea(m, "ID") inputPwObj := mediator.NewConcreteColleagueTextArea(m, "PW") pushButtonObj := mediator.NewConcreteColleagueButton(m, "Login") m.SetColleagues(inputIDObj, inputPwObj, pushButtonObj) inputIDObj.InputText(userid) inputPwObj.InputText(password) if pushButtonObj.ClickButton() { fmt.Println("Login Succeed!!") } else { fmt.Println("Login Failed!!") } } func checkInputData(params []string) (userid, password string) { if len(params) == 3 { userid = params[1] password = params[2] } else if len(params) == 2 { userid = params[1] password = "" } else if len(params) == 1 { userid = "" password = "" } return userid, password } func main() { userid, password := checkInputData(os.Args) startMain(userid, password) }■ 参考URL