- 投稿日:2020-03-29T19:59:13+09:00
Rails 自作アプリへの道 Part2
Rails 自作アプリを作った時の経過をまとめていきます。
環境
OS Ruby Rails Mac Mojave 10.14.16 2.6.3p62 6.0.2.2 参考
https://qiita.com/aplifyjp/items/ea0d9236d89fa24a7a1c前提
環境構築済項番1 『devise』の導入
code1.rb# Gemfileに『devise』を追加する $ cat Gemfile (省略) # gem 'bcrypt', '~> 3.1.7' # Use Active Storage variant # gem 'image_processing', '~> 1.2' (省略) $ vi Gemfile (省略) # gem 'bcrypt', '~> 3.1.7' gem 'devise' # Use Active Storage variant # gem 'image_processing', '~> 1.2' (省略) $ cat Gemfile (省略) # gem 'bcrypt', '~> 3.1.7' gem 'devise' # Use Active Storage variant # gem 'image_processing', '~> 1.2' (省略) $ bundle install # Gemfileに記述した『devise』をインストールする (省略) Using devise 4.7.1 (省略)項番2 アプリへの『devise』の機能の導入
code2.rb# アプリに『devise』の機能を導入する $ rails g devise:install create config/initializers/devise.rb create config/locales/devise.en.yml =============================================================================== Some setup you must do manually if you haven't yet: 1. Ensure you have defined default url options in your environments files. Here is an example of default_url_options appropriate for a development environment in config/environments/development.rb: config.action_mailer.default_url_options = { host: 'localhost', port: 3000 } In production, :host should be set to the actual host of your application. 2. Ensure you have defined root_url to *something* in your config/routes.rb. For example: root to: "home#index" 3. Ensure you have flash messages in app/views/layouts/application.html.erb. For example: <p class="notice"><%= notice %></p> <p class="alert"><%= alert %></p> 4. You can copy Devise views (for customization) to your app by running: rails g devise:views ===============================================================================項番3 モデル絡みの操作
code3.rb#『devise』の機能を取り込んだ『Sellerモデル』の作成 $ rails g devise Seller invoke active_record identical db/migrate/20200330100615_devise_create_sellers.rb create app/models/seller.rb invoke test_unit create test/models/seller_test.rb create test/fixtures/sellers.yml insert app/models/seller.rb route devise_for :sellers # db/migrate/20200330100615_devise_create_sellers.rbのt.confirmableのコメントを外す # インデックスも有効にする $ vi db/migrate/20200330100615_devise_create_sellers.rb $ rails db:migrate #『Sellerモデル』に必要なカラムを追加する $ rails g migration add_columns_to_sellers name:string admin_flag:boolean invoke active_record create db/migrate/20200330101922_add_columns_to_sellers.rb $ rails db:migrate # 初期データを作成する $ vi db/seeds.rb sellers = ["橋本"] sellers.each_with_index do |user, i| Seller.create( name: "#{user}", email: "#{i + 1}@gamil.com", password: "password", admin_flag: true ) end # 初期データを投入する $ rails db:seed項番4『devise』とは関係ない『controller』と『routes.rb』の操作
code4.rb$ rails g controller Home index show $ vi config/routes.rb Rails.application.routes.draw do get 'home/index' get 'home/show' end root to: "home#index"項番5『view』の操作
code5.rb# 基本となる『view』の作成 $ vi app/views/layouts/application.html.erb <!DOCTYPE html> <html> <head> <title>Ticket2App</title> <%= csrf_meta_tags %> <%= csp_meta_tag %> <%= stylesheet_link_tag 'application', media: 'all', 'data-turbolinks-track': 'reload' %> <%= javascript_pack_tag 'application', 'data-turbolinks-track': 'reload' %> </head> <body> <header> <nav> <!-- seller_signed_in? はセラーがログインしているか調べるdeviseのHelperメソッド --> <% if seller_signed_in? %> <!-- current_seller は現在ログインしているSellerオブジェクトを返すdeviseのHelperメソッド --> <!-- *_path はSellerモデルを作成したときに、 deviseにより自動で作成されてますので、rails routesで確認できます --> Logged in as <strong><%= current_seller.email %></strong>. <%= link_to 'プロフィール変更', edit_seller_registration_path %> | <%= link_to "ログアウト", sign_out_path %> <% else %> <%= link_to "サインイン", new_seller_registration_path %> | <%= link_to "ログイン", new_seller_session_path %> <% end %> </nav> </header> <p class="notice"><%= notice %></p> <p class="alert"><%= alert %></p> </body> </html>
- 投稿日:2020-03-29T19:59:13+09:00
Rails 自作アプリへの道 Part1
Rails 自作アプリを作った時の経過をまとめていきます。
環境
OS Ruby Rails Mac Mojave 10.14.16 2.6.3p62 5.0.7.2 参考
https://qiita.com/cigalecigales/items/f4274088f20832252374前提
環境構築済【devise】
1.Gemのインストール
①プロジェクトの作成
プロジェクトを作成する。
$ rails _5.0.0.1_ new ticket2_app -d mysql
$ cd ticket2_app
$ rails -v
(省略)
Rails 5.0.7.2
②Gemfileの編集とインストール
以下ファイルにdeviseとomniauth-twitterを追加する。
Gemfilesource 'https://rubygems.org' (省略)... # Devise gem 'devise'gemをインストールする。
$ bundle install2.deviseの設定
①devise関連ファイルを追加する。
$ rails g devise:install

Running via Spring preloader in process 48887
      create  config/initializers/devise.rb
      create  config/locales/devise.en.yml
===============================================================================

Some setup you must do manually if you haven't yet:

  1. Ensure you have defined default url options in your environments files. Here
     is an example of default_url_options appropriate for a development environment
     in config/environments/development.rb:

       config.action_mailer.default_url_options = { host: 'localhost', port: 3000 }

     In production, :host should be set to the actual host of your application.

  2. Ensure you have defined root_url to *something* in your config/routes.rb.
     For example:

       root to: "home#index"

  3. Ensure you have flash messages in app/views/layouts/application.html.erb.
     For example:

       <p class="notice"><%= notice %></p>
       <p class="alert"><%= alert %></p>

  4. You can copy Devise views (for customization) to your app by running:

       rails g devise:views

===============================================================================
②デフォルトURLの指定
config/environments/development.rbRails.application.configure do # Settings specified here will take precedence over those in config/application.rb. (省略)... # mailer setting config.action_mailer.default_url_options = { host: 'localhost', port: 3000 } end③root_urlの指定
$ rails g controller Pages index showconfig/routes.rbRails.application.routes.draw do root 'pages#index' get 'pages/show' (省略)... end④flashメッセージの設定
app/views/layouts/application.html.erb<!DOCTYPE html> <html> <head> <title>DeviseRails5</title> <%= csrf_meta_tags %> <%= stylesheet_link_tag 'application', media: 'all', 'data-turbolinks-track': 'reload' %> <%= javascript_include_tag 'application', 'data-turbolinks-track': 'reload' %> </head> <body> <p class="notice"><%= notice %></p> <p class="alert"><%= alert %></p> <%= yield %> </body> </html>⑤DeviseのViewを生成
$ rails g devise:views3.Userモデルの設定
①Userモデルの作成
$ rails g devise Sellerdb/migrate/20200331113140_devise_create_sellers.rbclass DeviseCreateSellers < ActiveRecord::Migration[5.0] def change create_table :sellers do |t| ## Database authenticatable t.string :email, null: false, default: "" t.string :encrypted_password, null: false, default: "" ## Recoverable t.string :reset_password_token t.datetime :reset_password_sent_at ## Rememberable t.datetime :remember_created_at ## Trackable t.integer :sign_in_count, default: 0, null: false t.datetime :current_sign_in_at t.datetime :last_sign_in_at t.string :current_sign_in_ip t.string :last_sign_in_ip ## Confirmable # t.string :confirmation_token # t.datetime :confirmed_at # t.datetime :confirmation_sent_at # t.string :unconfirmed_email # Only if using reconfirmable ## Lockable # t.integer :failed_attempts, default: 0, null: false # Only if lock strategy is :failed_attempts # t.string :unlock_token # Only if unlock strategy is :email or :both # t.datetime :locked_at t.timestamps null: false end add_index :sellers, :email, unique: true add_index :sellers, :reset_password_token, unique: true # add_index :sellers, :confirmation_token, unique: true # add_index :sellers, :unlock_token, unique: true end endapp/models/user.rbclass User < ApplicationRecord # Include default devise modules. Others available are: # :confirmable, :lockable, :timeoutable and :omniauthable devise :database_authenticatable, :registerable, :recoverable, :rememberable, :trackable, :validatable end②Userモデルの編集
app/models/user.rbclass User < ApplicationRecord # Include default devise modules. Others available are: # :confirmable, :lockable, :timeoutable and :omniauthable devise :database_authenticatable, :registerable, :recoverable, :rememberable, :trackable, :validatable, :confirmable, :lockable, :timeoutable end③マイグレーションファイルの編集
db/migrate/20200331113140_devise_create_sellers.rbclass DeviseCreateSellers < ActiveRecord::Migration[5.0] def change create_table :sellers do |t| ## Database authenticatable t.string :email, null: false, default: "" t.string :encrypted_password, null: false, default: "" ## Recoverable t.string :reset_password_token t.datetime :reset_password_sent_at ## Rememberable t.datetime :remember_created_at ## Trackable t.integer :sign_in_count, default: 0, null: false t.datetime :current_sign_in_at t.datetime :last_sign_in_at t.string :current_sign_in_ip t.string :last_sign_in_ip ## Confirmable t.string :confirmation_token t.datetime :confirmed_at t.datetime :confirmation_sent_at t.string :unconfirmed_email # Only if using reconfirmable ## Lockable t.integer :failed_attempts, default: 0, null: false # Only if lock strategy is :failed_attempts t.string :unlock_token # Only if unlock strategy is :email or :both t.datetime :locked_at t.timestamps null: false end add_index :sellers, :email, unique: true add_index :sellers, :reset_password_token, unique: true add_index :sellers, :confirmation_token, unique: true add_index :sellers, :unlock_token, unique: true end end$ rails g migration add_columns_to_sellers admin_flag provider uid sellernamedb/migrate/20200331114600_add_columns_to_sellers.rbclass AddColumnsToSellers < ActiveRecord::Migration[5.0] def change change_column :sellers, :admin_flag, :boolean, default: 'false', add_column :sellers, :sellername, :string end end$ rails db:migrate == 20200331113140 DeviseCreateSellers: migrating ============================== -- create_table(:sellers) -> 0.0155s -- add_index(:sellers, :email, {:unique=>true}) -> 0.0471s -- add_index(:sellers, :reset_password_token, {:unique=>true}) -> 0.0201s -- add_index(:sellers, :confirmation_token, {:unique=>true}) -> 0.0180s -- add_index(:sellers, :unlock_token, {:unique=>true}) -> 0.0342s == 20200331113140 DeviseCreateSellers: migrated (0.1353s) ===================== == 20200331114600 AddColumnsToSellers: migrating ============================== -- add_column(:sellers, :admin_flag, :boolean) -> 0.0165s -- add_column(:sellers, :sellername, :string) -> 0.0171s == 20200331114600 AddColumnsToSellers: migrated (0.0709s) =====================4.viewの編集
app/views/layouts/application.html.erb<!DOCTYPE html> <html> <head> <title>Seller's Pages</title> <%= csrf_meta_tags %> <%= stylesheet_link_tag 'application', media: 'all', 'data-turbolinks-track': 'reload' %> <%= javascript_include_tag 'application', 'data-turbolinks-track': 'reload' %> </head> <body> <header> <nav> <% if seller_signed_in? %> <strong><%= link_to current_seller.sellername, pages_show_path %></strong> <%= link_to 'プロフィール変更', edit_seller_registration_path %> <%= link_to 'ログアウト', destroy_seller_session_path, method: :delete %> <% else %> <%= link_to 'サインアップ', new_seller_registration_path %> <%= link_to 'ログイン', new_seller_session_path %> <% end %> </nav> </header> <p class="notice"><%= notice %></p> <p class="alert"><%= alert %></p> <%= yield %> </body> </html>app/views/pages/index.html.erb<h1>ようこそ</h1> <p>トップページです。</p>app/views/pages/show.html.erb<h1>こんにちは、<%= current_seller.sellername %>さん</h1> <p>ユーザー用ページです。</p>4.deviseの日本語化
①Gemfileの編集とインストール
以下ファイルにdeviseとomniauth-twitterを追加する。
Gemfilesource 'https://rubygems.org' (省略)... # Devise gem 'devise-i18n' gem 'devise-i18n-views'gemをインストールする。
$ bundle install$rails g devise:views:locale ja②設定ファイルの変更
devise.views.ja.ymla: activerecord: errors: models: seller: # モデル名に合わせる attributes: email: taken: "は既に使用されています。" blank: "が入力されていません。" too_short: "は%{count}文字以上に設定して下さい。" too_long: "は%{count}文字以下に設定して下さい。" invalid: "は有効でありません。" password: taken: "は既に使用されています。" blank: "が入力されていません。" too_short: "は%{count}文字以上に設定して下さい。" too_long: "は%{count}文字以下に設定して下さい。" invalid: "は有効でありません。" confirmation: "が内容とあっていません。" attributes: seller: # モデル名に合わせる current_password: "現在のパスワード" name: 名前 email: "メールアドレス" password: "パスワード" password_confirmation: "確認用パスワード" remember_me: "次回から自動的にログイン" models: seller: "取扱者" # モデル名に合わせる devise: confirmations: new: resend_confirmation_instructions: "アカウント確認メール再送" mailer: confirmation_instructions: action: "アカウント確認" greeting: "ようこそ、%{recipient}さん!" instruction: "次のリンクでメールアドレスの確認が完了します:" reset_password_instructions: action: "パスワード変更" greeting: "こんにちは、%{recipient}さん!" instruction: "誰かがパスワードの再設定を希望しました。次のリンクでパスワードの再設定が出来ます。" instruction_2: "あなたが希望したのではないのなら、このメールは無視してください。" instruction_3: "上のリンクにアクセスして新しいパスワードを設定するまで、パスワードは変更されません。" unlock_instructions: action: "アカウントのロック解除" greeting: "こんにちは、%{recipient}さん!" instruction: "アカウントのロックを解除するには下のリンクをクリックしてください。" message: "ログイン失敗が繰り返されたため、アカウントはロックされています。" passwords: edit: change_my_password: "パスワードを変更する" change_your_password: "パスワードを変更" confirm_new_password: "確認用新しいパスワード" new_password: "新しいパスワード" new: forgot_your_password: "パスワードを忘れましたか?" send_me_reset_password_instructions: "パスワードの再設定方法を送信する" registrations: edit: are_you_sure: "本当に良いですか?" cancel_my_account: "アカウント削除" currently_waiting_confirmation_for_email: "%{email} の確認待ち" leave_blank_if_you_don_t_want_to_change_it: "空欄のままなら変更しません" title: "%{resource}編集" unhappy: "気に入りません" update: "更新" we_need_your_current_password_to_confirm_your_changes: "変更を反映するには現在のパスワードを入力してください" new: sign_up: "アカウント登録" sessions: new: sign_in: "ログイン" shared: links: back: "戻る" didn_t_receive_confirmation_instructions: "アカウント確認のメールを受け取っていませんか?" didn_t_receive_unlock_instructions: "アカウントの凍結解除方法のメールを受け取っていませんか?" forgot_your_password: "パスワードを忘れましたか?" sign_in: "ログイン" sign_in_with_provider: "%{provider}でログイン" sign_up: "アカウント登録" unlocks: new: resend_unlock_instructions: "アカウントの凍結解除方法を再送する"【補足】
『devise.views.ja.yml』ではなくても、『devise.ja.yml』でも日本語化は可能みたい②設定ファイルの変更2
config/application.rbequire_relative 'boot' require 'rails/all' # Require the gems listed in Gemfile, including any gems # you've limited to :test, :development, or :production. Bundler.require(*Rails.groups) module Ticket2App class Application < Rails::Application # Settings in config/environments/* take precedence over those specified here. # Application configuration should go into files in config/initializers # -- all .rb files in that directory are automatically loaded. config.i18n.default_locale = :ja # 追記 config.i18n.load_path += Dir[Rails.root.join('config', 'locales', '**', '*.{rb,yml}').to_s] # 追記 end end
- 投稿日:2020-03-29T15:50:19+09:00
Macでアカウント名変更したらpipやipythonが使えなくなったので、pythonごと再インストールしたら治った
概要
macのアカウント名を変更したらpyenvでインストールしたpipやipythonが使えなくなったので、pythonを再インストールしたら使えるようになりました。
環境
macOS Catalina 10.15.4
Homebrew 2.2.11
pyenv 1.2.17
python 3.8.0経緯
macにbrewを使ってpyenvをインストールし、そのpyenvでpythonをインストールして使っていました。
そのあと諸事情でmacのアカウント名(とホームディレクトリ名)を変更しました。アカウント名の変更方法は公式の説明に従いました。
変更自体はうまくできたのですが、pipやipythonを実行するときに下記のエラーが出て使えなくなってしまいました。>> ipython /usr/local/Cellar/pyenv/1.2.17/pyenv.d/exec/pip-rehash/pip: /Users/[new home directory name]/.pyenv/versions/3.8.0/bin/pip: /Users/[old home directory name]/.pyenv/versions/3.8.0/bin/python3.8: bad interpreter: No such file or directory古いホームディレクトリ名のpythonを探しに行って見つからないと怒られているようです。
どこかに古い設定が残っているのだと思いますが、"/Users/[old home directory name]/.pyenv/versions/3.8.0/bin/python3.8"がどこで定義されているのかよく分からなかったので、諦めてpyenvでpython 3.8.0を再インストールしたら治りました。pyenv uninstall 3.8.0 pyenv install 3.8.0
- 投稿日:2020-03-29T00:35:25+09:00
MacでMaximaの環境構築を行った時の備忘録メモ
過去記事(第1回 AI実装検定【A級】に合格したので色々まとめてみた)で投稿した様に、AI実装検定を受検しましたが、受験時に線形代数学の内容を忘れてしまっていることを痛感しました。機械学習の専門書も少し高度な内容の書籍となると、行列やベクトルで記載した数式が大量に登場します。今後を見据え、改めて線形代数学を再学習しようと思い立ちました。手計算も良いですが、数式処理ソフトの力を借りるのも悪くないと思い、Maximaをセットアップした時の内容を備忘録メモとしてまとめておくことにしました。
Maximaとは?
MITで元々開発されたMacsymaを基にした数式処理ソフトのOSSです。最近はPythonで行列やベクトルの演算が可能ですが、微分や積分が入ってくると現状お手上げ状態です。その点MaximaはPythonの様に汎用的に何でも出来る訳ではありませんが、数値計算、微分積分、ベクトル解析と言った解析的な用途には威力を発揮します。大学時代愛用していた時期が有りますが、いつの間にか使わなくなっていました。
インストール方法
最終的にMaximaのGUI環境wxMaximaを動作できる様にすることが目標です。インストールするアプリケーションは以下の通りです。
- Maxima本体
- wxMaxima(GUI環境)
- gnuplot(グラフ描画用)
Maxima本体 + gnuplotのインストール
まずはMaxima本体とgnuplotをインストールします。この2つはCLIで利用することを前提に設計されています。インストールにはHomebrewを用います。
brew install maxima gnuplot
インストール後の確認
$ maxima
Maxima 5.43.2 http://maxima.sourceforge.net
using Lisp SBCL 2.0.0
Distributed under the GNU Public License. See the file COPYING.
Dedicated to the memory of William Schelter.
The function bug_report() provides bug reporting information.
(%i1)
$ gnuplot G N U P L O T Version 5.2 patchlevel 8 last modified 2019-12-01 Copyright (C) 1986-1993, 1998, 2004, 2007-2019 Thomas Williams, Colin Kelley and many others gnuplot home: http://www.gnuplot.info faq, bugs, etc: type "help FAQ" immediate help: type "help" (plot window: hit 'h') Terminal type is now 'qt' gnuplot>wxMaximaのインストール
MaximaのGUI版もインストールします。CLI版とまた違った使いやすさが魅力です。
インストーラーをダウンロード
ダウンロードページよりダウンロードします。パッケージマネージャーとしてHomebrewを利用している場合はMaxima 5.38.0のイメージでインストールすることをお薦めします。5.40.0以降はパッケージマネージャーMacPortsの利用を前提としています。Homebrewとの共存は推奨されていません。
インストーラーの起動
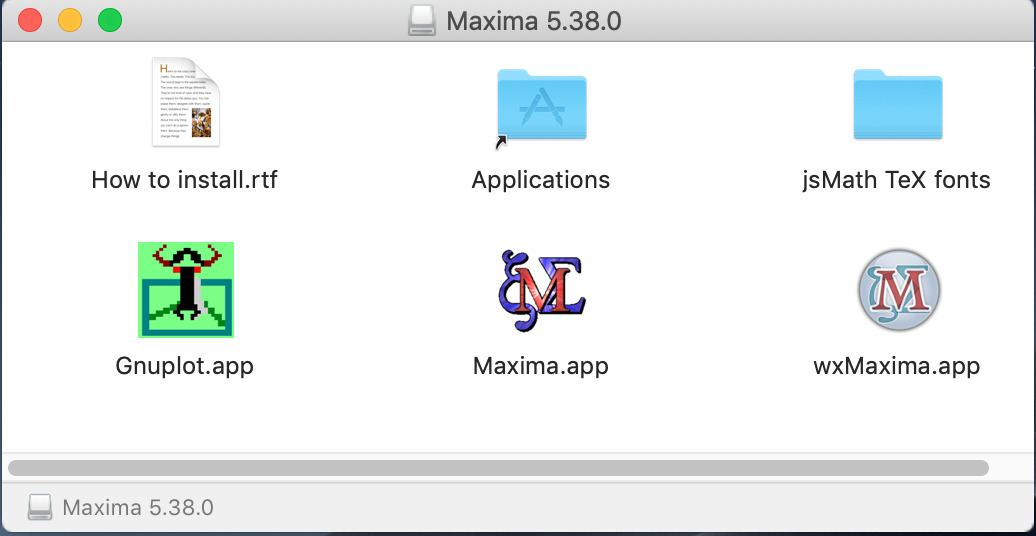
ダウンロードした
Maxima 5.38.0.dmgをダブルクリックし、マウントします。マウントが完了すると以下の様なウィンドウが起動します。
ウィンドウ内の
wxMaxima.appとMaxima.appを選択し、Applicationsディレクトリのショートカットにドラッグ&ドロップします。Applicationsディレクトリにコピーが格納されます。格納が完了したら、wxMaximaを起動します。セキュリティー警告が表示されますが、起動を許可します。因みにApplicationsに格納したMaximaはwxMaximaを動作させる為に必要です。wxMaximaにMaxima本体を関連付ける
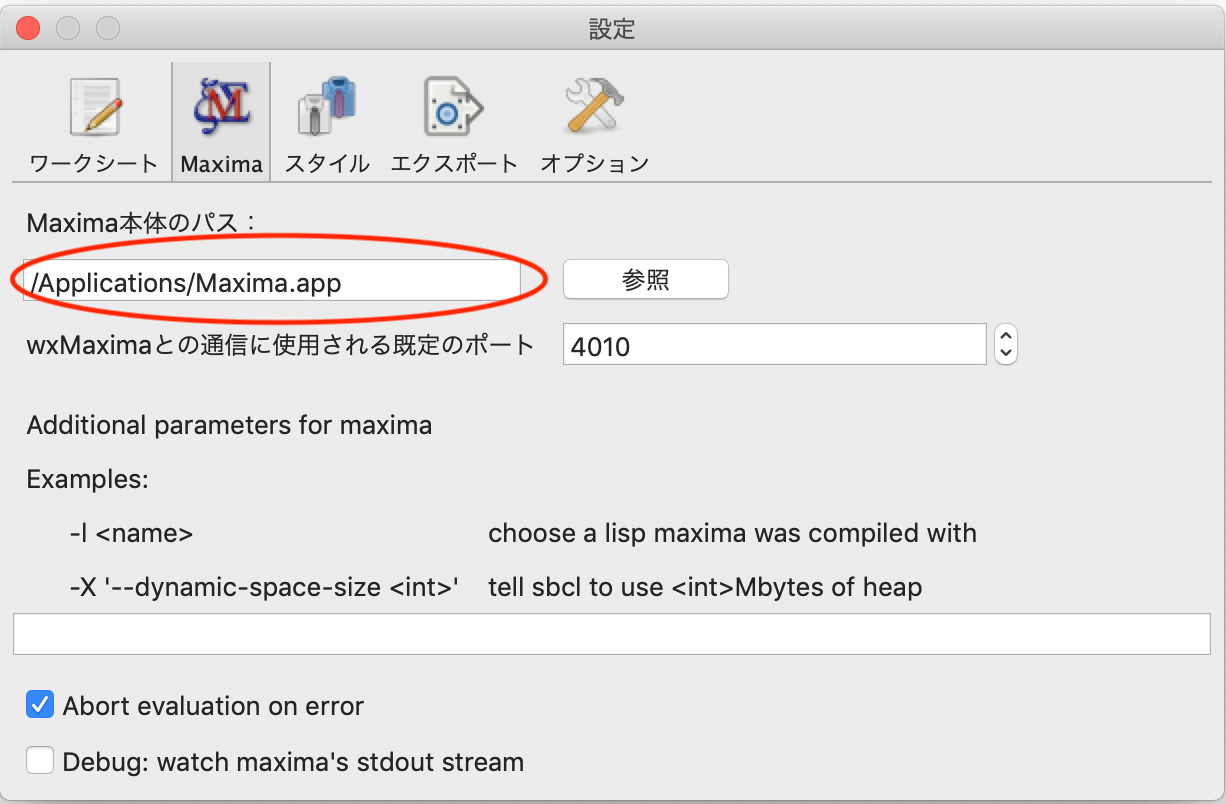
wxMaximaが起動したら、
wxMaxima/設定を順にクリックし、設定ウィンドウを起動します。Maximaをクリックし、下図の様にMaxima本体のパスを設定します。
CLI上でgnuplotを利用する時の設定の管理
設定ファイルを作り、そこに設定を記載します。ユーザー毎に設定する方式にしたいので、Homeディレクトリに
/usr/local/Cellar/gnuplot/5.2.8/share/gnuplot/5.2/gnuplotrcをコピーします。この時、.gnuplotというファイル名でコピーします。
show loadpathコマンドで起動時に読み込む設定を記述するgnuplotrcの格納先が分かるので確認する。$ gnuplot G N U P L O T Version 5.2 patchlevel 8 last modified 2019-12-01 Copyright (C) 1986-1993, 1998, 2004, 2007-2019 Thomas Williams, Colin Kelley and many others gnuplot home: http://www.gnuplot.info faq, bugs, etc: type "help FAQ" immediate help: type "help" (plot window: hit 'h') Terminal type is now 'qt' gnuplot> show loadpath loadpath is empty gnuplotrc is read from /usr/local/Cellar/gnuplot/5.2.8/share/gnuplot/5.2$ cp /usr/local/Cellar/gnuplot/5.2.8/share/gnuplot/5.2/gnuplotrc ~/.gnuplot
.gnuplotの中身### ### Gnuplot version 5.0 intialization file ### This file is loaded by gnuplot at the start of each run. ### It is provided as a template, with all commands commented out. ### Uncomment and customize lines for local use. ### Any commands placed here will affect all users. ### To customize gnuplot's initial state for an individual user, ### place commands in a private file ~/.gnuplot instead. ### ### Language initialization ### # set locale # set encoding locale ### ### Default line colors and repeat cycle ### # set linetype 1 lc rgb "dark-violet" lw 1 # set linetype 2 lc rgb "#009e73" lw 1 # set linetype 3 lc rgb "#56b4e9" lw 1 # set linetype 4 lc rgb "#e69f00" lw 1 # set linetype 5 lc rgb "#f0e442" lw 1 # set linetype 6 lc rgb "#0072b2" lw 1 # set linetype 7 lc rgb "#e51e10" lw 1 # set linetype 8 lc rgb "black" lw 1 # set linetype cycle 8 ### ### Initialize the default loadpath for shared gnuplot scripts and data. ### Please confirm that this path is correct before uncommented the line below. ### # set loadpath "/usr/local/share/gnuplot/4.7/demo" ### ### Some commonly used functions that are not built in ### # sinc(x) = sin(x)/x # rgb(r,g,b) = sprintf("#%06x",256.*256.*255.*r+256.*255.*g+255.*b) # hsv(h,s,v) = sprintf("#%06x",hsv2rgb(h,s,v)) ### ### Other preferences ### # set clip two試しに線形代数の計算をやってみる
逆行列と固有値・固有ベクトルの計算をさせてみました。矢張り専用ソフトということも有り、計算結果が見やすいです。
まとめ
Mac上でOSS数式処理ソフトのMaximaのセットアップを行いました。機械学習工学の更なる深い理解に向けて線形代数学を再勉強する為に利用していこうと思います。

- 投稿日:2020-03-29T00:10:28+09:00
Mac Nodebrewを用いてNode.jsをインストールした時にエラーが出た話
目的
- Nodebrewを用いたNode.jsインストール時に出たエラーを解決した話をまとめる
実施環境
- ハードウェア環境
項目 情報 備考 OS macOS Catalina(10.15.3) ハードウェア MacBook Air (11-inch ,2012) プロセッサ 1.7 GHz デュアルコアIntel Core i5 メモリ 8 GB 1600 MHz DDR3 グラフィックス Intel HD Graphics 4000 1536 MB エラー内容
- Nodebrewを使用してNode.jsの最新の安定バージョンをインストールしようとした時に下記のエラーが発生した。
実行コマンドをとエラー内容を下記に記載する。
$ nodebrew install-binary stable
Fetching: https://nodejs.org/dist/v12.16.1/node-v12.16.1-darwin-x64.tar.gz
Warning: Failed to create the file
Warning: /Users/ユーザ名/.nodebrew/src/v12.16.1/node-v12.16.1-darwin-x64.tar.gz:
Warning: No such file or directory

curl: (23) Failed writing body (0 != 1016)
download failed: https://nodejs.org/dist/v12.16.1/node-v12.16.1-darwin-x64.tar.gz
エラー原因
- 原因は単純でインストール先のディレクトリがみなさんのPCに存在しないためインストールできないと言われている。
解決方法
下記コマンドを実行してインストール用のディレクトリを作成する。
$ mkdir ~/.nodebrew/srcもう一度問題のコマンドを実行する。
$ nodebrew install-binary stable
Fetching: https://nodejs.org/dist/v12.16.1/node-v12.16.1-darwin-x64.tar.gz ###################################################################################################################### 100.0%
Installed successfully
正常に実行された。