- 投稿日:2020-03-25T20:28:17+09:00
[PlayFab] データをクラウドセーブしたい時のAPIの選び方
前置き
- クラウドにファイルをセーブする機能を実装するために関連するPlayFabの仕様を調べました
- 2019/Dec時点の仕様です。調べてから時間が空いてますが書く時間が取れたので記事にしたということで。
- 実装自体は大きくつまづく箇所もなく、リリース済みアプリ内で利用中です。
2系統のAPI
クラウドセーブを実装する場合に使うことになるPlayFab提供APIは、大きく分けると2つの系統があります。クラシックとエンティティEntityです。
クラシックAPIの特徴
- 「ユーザー1人あたり」がサイズ制限になっていることが多い
- ファイルを扱う場合はstringに変換する必要がある
- 2018年以前はこの系統のAPIのみが提供されていたので系統名がなかった。Entityが登場したのでクラシックと呼ばれることに。本命登場で幼なじみと呼ばれるようになった感ある。
Entity APIの特徴
- 2018年に導入されたAPI
- JSONファイルやオブジェクトを直接扱える
- 「アプリ全体が利用している量」がサイズ制限になっていることが多い
- PlayFabは、同じことができる場合こちらを使うことを推奨している
2つのAPIをTier毎に比較
ESSENTIAL Tier PRO/Indie Tier クラシック API 10000Byte/ユーザー※ (運営に相談/ユーザー) Entity API 1GB/プロジェクト 50TB/プロジェクト
- プロジェクトに必要なスペック&財布に応じて選ぶといいと思います
- ※だいたい10000byteでなく、本当にきっちり10000byteです1byteでも超えていると、超えているのではじきましたというメールまで届きます。ちょっとくらい超えても大丈夫かなと淡く期待していましたがそんなことなかったです。
Tier
PlayFabの料金プランはTierで分かれている
ESSENTIAL 無料 Indie/PRO 有料 月99$/299$ ENTERPRIZE 有料、法人向け ※IndieはMAU10万超えでPROに自動移行、受けられるサービスは同じ
詳しい記事 => PlayFab 各プランのAPI制限値とか比較してみたどちらを選んだか
- 自分は、Essential Tierで利用中で、ユーザー数がどこまで増えるのか予測が難しかったので、10000byteと極小容量ですがユーザー数が増えても同容量使えるクラシックAPIを選びました。実際にどんなコードを組んでいるのかも時間がある時に記事にします。
- 投稿日:2020-03-25T18:30:34+09:00
ARFoundationのHumanDepthTextureをVFXGraphにぶち込む方法
はじめに
こんにちは、XR系Unityエンジニアのやうです。Twitterはこちら
今回は、こんな感じで人からパーティクルを出すやつを作ります!
簡単に仕組みを説明すると、
ARFoundation(ARKit3)で、人のいる位置の深度情報を持った画像(HumanDepthTexture)が取得できるので、それをワールド座標に変換したTextureを作成し、VFXGraphに渡してパーティクル(Cube)を出現させています。では、早速作っていきましょう!
今回のサンプルのリポジトリはこちらになります↓
https://github.com/YoHana19/HumanParticleEffect環境
- Unity2019.3.4f1
- Universal RP 7.2.1
- AR Foundation preview.3 - 3.1.0
- ARKit XR Plugin preview.4 - 3.1.0
- XR Legacy Input Helpers 2.0.6
- Visual Effect Graph 7.2.1
- Xcode 11.3.1
- iPhone 11 pro (iOS 13.3.1)
HumanDepthTextureを取得してみる
まずは、下準備として環境構築と、HumanDepthTextureの取得をします。
ARFoundationのインストール
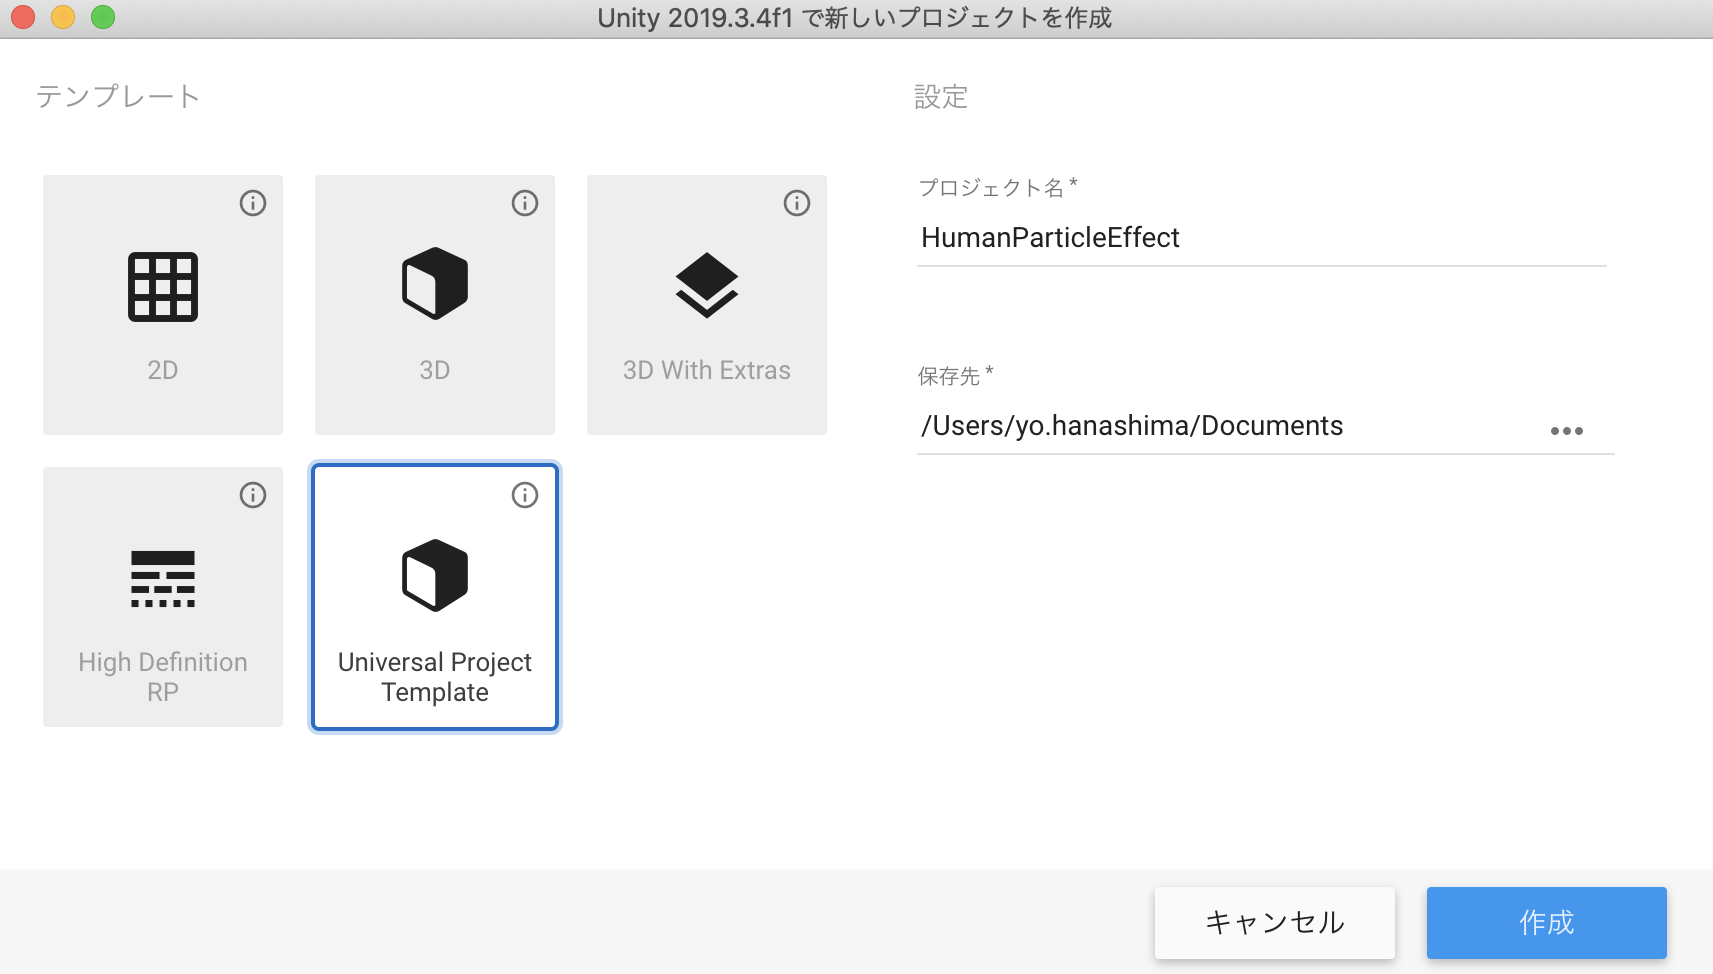
Universal Project Templateのプロジェクトを作成します。
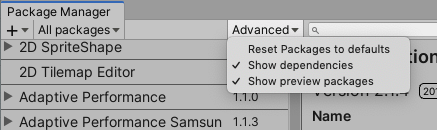
続いてPackage Managerで、以下のものをインストールします。
- AR Foundation
- ARKit XR Plugin
- XR Legacy Input Helpers
- Visual Effect Graph
パッケージのversionは、上述の環境を見て適宜選択してください。
(previewのversionを表示するには、上部のAdvancedタブをクッリクし、show preview packagesを選択します)
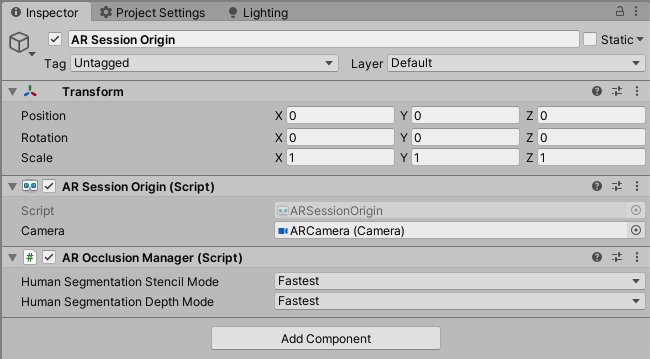
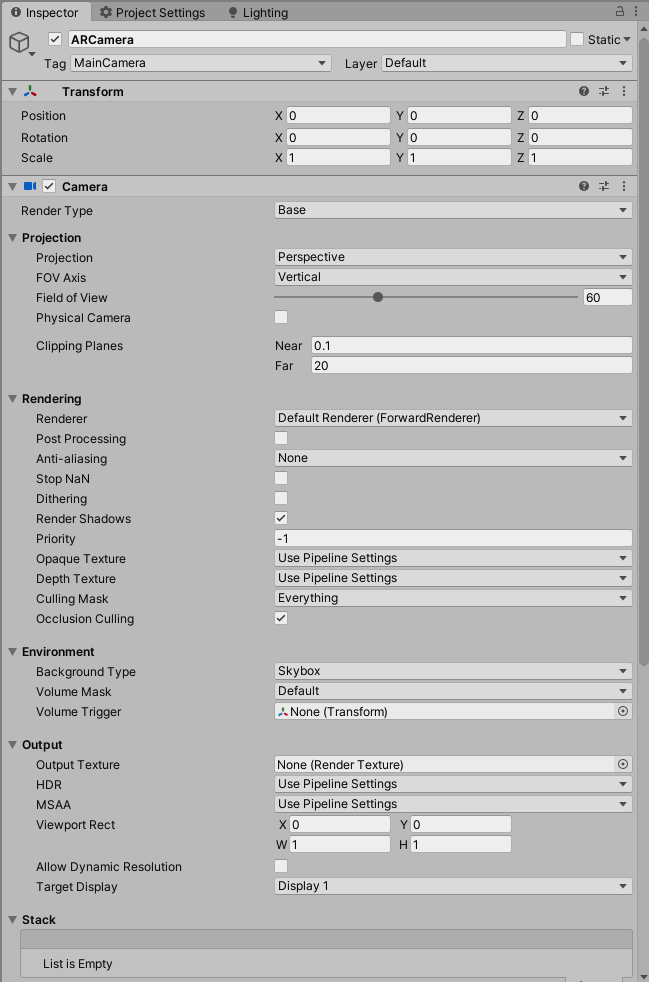
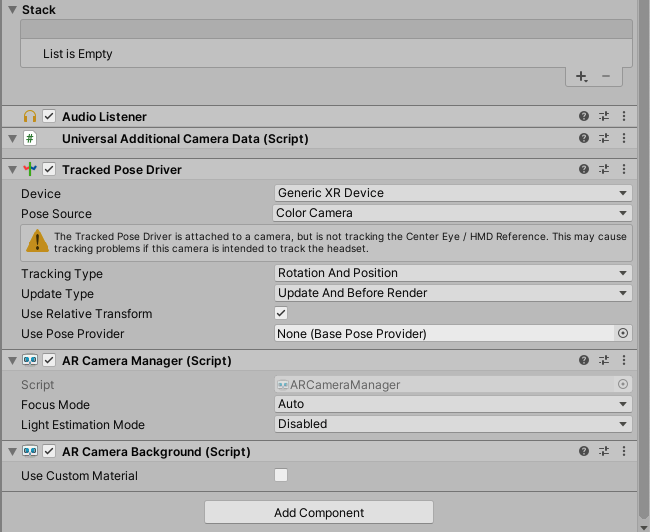
シーンのセットアップ
以下の画像を参考に、ヒエラルキー及びコンポーネントの設定を行ってください。
CanvasとRawImageは、今回はHumanDepthTextureの表示に使うだけなので、適当に設定してください。
パイプラインアセットの作成
ARFoundationをURPなどのSRPで使うためには、もう一手間必要です。
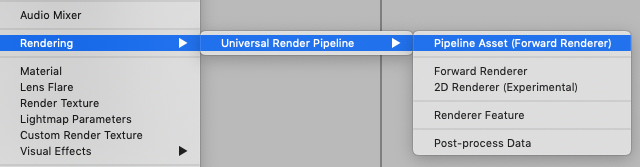
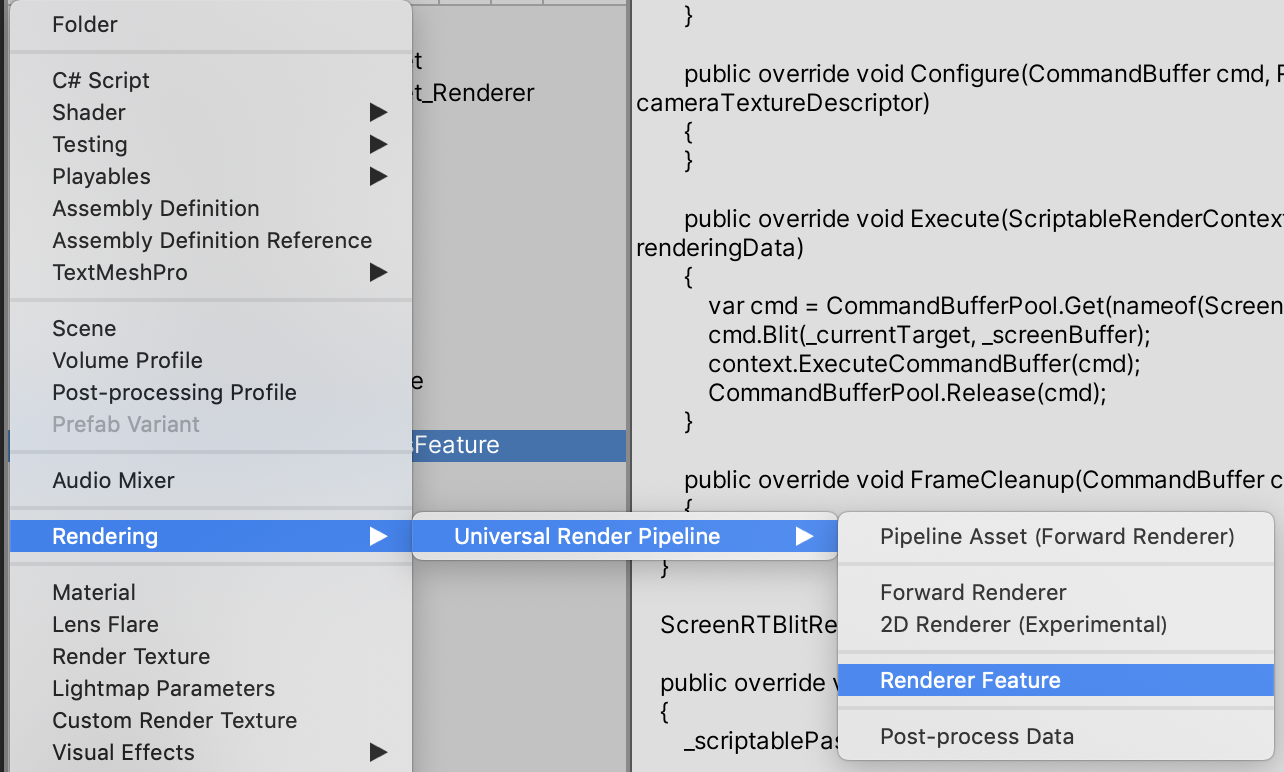
Projectウィンドウで、Rendering > Universal Render Pipeline > Pipeline Asset(Forward Renderer) を新規追加します。
すると、名前、名前_Rendererという二つのアセットが生成されます。(自分はCustomRenderPipelineAssetと命名しました)
名前_Rendererのインスペクターの、Renderer FeaturesにAR Background Renderer Featureを追加します。
次に、Project SettingsのGraphicsを開きます。
その中の、Scriptable Render PipelineSettingsの項目に、先ほど作成したPipeline Assetを設定します。
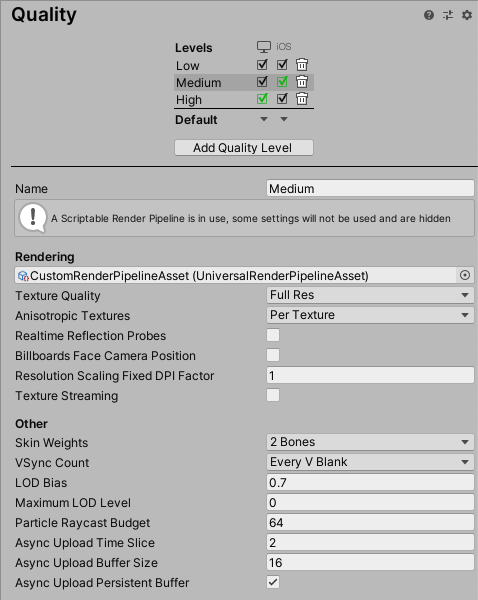
続いて、Project Settingsの Qualityを開き、Renderingの項目に作成したPipeline Assetを設定します。
この時、iOSにチェックが入っているレベルを選択するのを忘れないようにしましょう。(自分はこれで2時間くらい無駄にしましたorz)
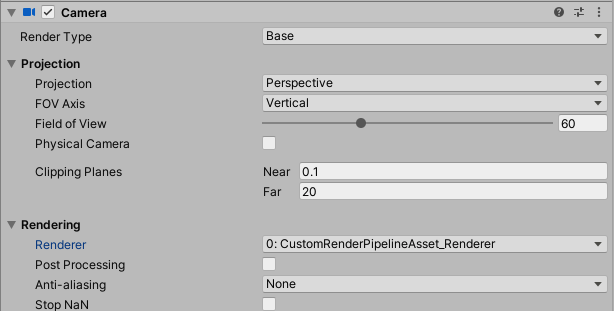
最後に、カメラのインスペクターのRendering内のRendererのドロップダウンで、作成したRendererを選択します。
これで、ARFoundationを動かす準備が整いました。※ちなみに、このパイプラインアセットの作成が必要な理由は、ARFoundationが実機のカメラ画像を描画するのに
Command Bufferを使用するのですが、レガシーパイプラインはカメラに直接Command Bufferを追加できたのに対し、SRPの場合は、ScriptableRendererFeature及びScriptableRenderPassを継承したクラスを自分で作って、そこでCommand Bufferなど、描画に関する様々なカスタマイズをするようになっているためです。
また、ARBackgroundRendererFeature.csのスクリプトを見れば、ARFoundationがどのように実機のカメラ画像を描画しているかわかります。HumanDepthTextureの取得
さて、本命のHumanDepthTextureの取得ですが、とっても簡単です。
以下にスクリプトをのせます。Sample.csusing UnityEngine; using UnityEngine.UI; using UnityEngine.XR.ARFoundation; public class Sample : MonoBehaviour { [SerializeField] private AROcclusionManager _arOcclusionManager; [SerializeField] private RawImage _rawImage; private void Update() { _rawImage.texture = _arOcclusionManager.humanDepthTexture; } }
AROcclusionManagerのhumanDepthTextureで、人の深度画像が取れるので、それを毎フレーム取得してRawImageに表示するだけです。
このスクリプトを適当な所につけて、ビルドします。実機で確認
ビルドする際に、カメラ使用の許可が必要なので、Player SettingsのCamera Usage Descriptionに適当な文言を入力します。
さらに、ARKit3を使うので、Target minimum iOS Versionを13.0にし、ArchitectureをARM64にします。
人間の部分だけ赤い画像が取得できるのが確認できます。よく見ると、赤い部分にも微かに明暗があるのが分かります。それが、深度を表してます。r値に深度を示す数値が格納されており、相対値ではなく絶対値なので、0~1ではなく0以上の値をとります。実装の流れ
今回の実装の流れを説明します。
- ComputeShaderを使って、HumanDepthTextureを元に、スクリーンの各ピクセルの深度情報を取得する
- ピクセルの位置と深度情報を元にワールド座標に変換し、各ピクセルにその座標を格納したTextureを作成する
- Visual Effect GraphのSet Position From Mapに2で作成したTextureを渡して、パーティクルを発生させる
- Command Bufferを使ってカメラ画像を取得し、Set Color From Mapに渡して、パーティクルのカラーをつける
肝はやはり1,2の手順です。iPhone 11 proのスクリーンサイズ1125×2436の全ピクセル分処理するので、ComputeShaderを使って並列化します。
ComputeShaderで各ピクセルの深度情報を取得する
まず、厄介なのがHumanDepthTextureとスクリーンのUVが全く異なることです。上の画像でも、スクリーンでは手が左から出てるのに対し、デプス画像では上から出てます。さらに、解像度も異なるし、キャプチャしている範囲も若干異なることがわかります(カメラ画像では人差し指とかほとんど映ってないが、デプス画像はそこそこ映っている)。
しかし、そこは先人の方々がUVを調整する計算式をあげてくれているので、それを利用します。また、ここではComputeShaderの説明は割愛しますが、以下の二つの記事がとても分かり易いのでおすすめです。
Unity : ComputeShader のシンプルなサンプル(1)
Unity : ComputeShader のシンプルなサンプル(2)では、まずc#スクリプトとComputeShaderのコード全文をのせます。
HumanParticle.csusing UnityEngine; using UnityEngine.UI; using UnityEngine.VFX; using UnityEngine.XR.ARFoundation; [RequireComponent(typeof(Camera))] public class HumanParticle : MonoBehaviour { public RenderTexture LatestCameraFeedBuffer { get { if (_lastDeviceOrientation == DeviceOrientation.Portrait) { return _colorMapPortrait; } return _colorMapLandscape; } } [SerializeField] private AROcclusionManager _arOcclusionManager; [SerializeField] private ComputeShader _computeShader; [SerializeField] private RenderTexture _positionMapPortrait; [SerializeField] private RenderTexture _positionMapLandscape; [SerializeField] private RenderTexture _colorMapPortrait; [SerializeField] private RenderTexture _colorMapLandscape; [SerializeField] private VisualEffect _visualEffect; private RenderTexture _tempRenderTexture; private Camera _camera; private DeviceOrientation _lastDeviceOrientation; private uint _threadSizeX, _threadSizeY, _threadSizeZ; private int _portraitKernel, _landscapeKernel; private Matrix4x4 _viewportInv; // Compute Shader private readonly int PropertyID_CameraPos = Shader.PropertyToID("cameraPos"); private readonly int PropertyID_Converter = Shader.PropertyToID("converter"); private readonly int PropertyID_Target = Shader.PropertyToID("target"); private readonly int PropertyID_Origin = Shader.PropertyToID("origin"); private readonly int PropertyID_IsWide = Shader.PropertyToID("isWide"); private readonly int PropertyID_UVFlip = Shader.PropertyToID("uVFlip"); private readonly int PropertyID_UVMultiplierPortrait = Shader.PropertyToID("uVMultiplierPortrait"); private readonly int PropertyID_UVMultiplierLandScape = Shader.PropertyToID("uVMultiplierLandScape"); // Visual Effect Graph private readonly int PropertyID_PositionMap = Shader.PropertyToID("PositionMap"); private readonly int PropertyID_ColorMap = Shader.PropertyToID("ColorMap"); void Start() { _camera = GetComponent<Camera>(); _portraitKernel = _computeShader.FindKernel("Portrait"); _landscapeKernel = _computeShader.FindKernel("Landscape"); // Init Portrait at first _lastDeviceOrientation = DeviceOrientation.Portrait; _computeShader.SetInt(PropertyID_IsWide, 0); } void Update() { var humanDepthTexture = _arOcclusionManager.humanDepthTexture; if (humanDepthTexture) { if (_lastDeviceOrientation != Input.deviceOrientation) { if (Input.deviceOrientation == DeviceOrientation.LandscapeRight) { _computeShader.SetFloat(PropertyID_UVFlip, 0); _computeShader.SetInt(PropertyID_IsWide, 1); } else if (Input.deviceOrientation == DeviceOrientation.LandscapeLeft) { _computeShader.SetFloat(PropertyID_UVFlip, 1); _computeShader.SetInt(PropertyID_IsWide, 1); } else { _computeShader.SetInt(PropertyID_IsWide, 0); } _lastDeviceOrientation = Input.deviceOrientation; InitSetup(humanDepthTexture); } if (_tempRenderTexture) { _computeShader.SetVector(PropertyID_CameraPos, _camera.transform.position); _computeShader.SetMatrix(PropertyID_Converter, GetConverter()); if (_lastDeviceOrientation == DeviceOrientation.Portrait) { _computeShader.SetTexture(_portraitKernel, PropertyID_Origin, humanDepthTexture); _computeShader.Dispatch(_portraitKernel, Screen.width / (int) _threadSizeX, Screen.height / (int) _threadSizeY, (int) _threadSizeZ); Graphics.CopyTexture(_tempRenderTexture, _positionMapPortrait); } else { _computeShader.SetTexture(_landscapeKernel, PropertyID_Origin, humanDepthTexture); _computeShader.Dispatch(_landscapeKernel, Screen.width / (int) _threadSizeX, Screen.height / (int) _threadSizeY, (int) _threadSizeZ); Graphics.CopyTexture(_tempRenderTexture, _positionMapLandscape); } } else { InitSetup(humanDepthTexture); } } } private void InitSetup(Texture humanDepthTexture) { if (_lastDeviceOrientation == DeviceOrientation.Portrait) { _tempRenderTexture = new RenderTexture(_positionMapPortrait.width, _positionMapPortrait.height, 0, _positionMapPortrait.format) {enableRandomWrite = true}; _tempRenderTexture.Create(); _computeShader.SetTexture(_portraitKernel, PropertyID_Target, _tempRenderTexture); _computeShader.GetKernelThreadGroupSizes(_portraitKernel, out _threadSizeX, out _threadSizeY, out _threadSizeZ); _computeShader.SetFloat(PropertyID_UVMultiplierPortrait, CalculateUVMultiplierPortrait(humanDepthTexture)); _visualEffect.SetTexture(PropertyID_PositionMap, _positionMapPortrait); _visualEffect.SetTexture(PropertyID_ColorMap, _colorMapPortrait); } else { _tempRenderTexture = new RenderTexture(_positionMapLandscape.width, _positionMapLandscape.height, 0, _positionMapLandscape.format) {enableRandomWrite = true}; _tempRenderTexture.Create(); _computeShader.SetTexture(_landscapeKernel, PropertyID_Target, _tempRenderTexture); _computeShader.GetKernelThreadGroupSizes(_landscapeKernel, out _threadSizeX, out _threadSizeY, out _threadSizeZ); _computeShader.SetFloat(PropertyID_UVMultiplierLandScape, CalculateUVMultiplierLandScape(humanDepthTexture)); _visualEffect.SetTexture(PropertyID_PositionMap, _positionMapLandscape); _visualEffect.SetTexture(PropertyID_ColorMap, _colorMapLandscape); } SetViewPortInv(); } private float CalculateUVMultiplierLandScape(Texture textureFromAROcclusionManager) { float screenAspect = (float) Screen.width / Screen.height; float cameraTextureAspect = (float) textureFromAROcclusionManager.width / textureFromAROcclusionManager.height; return screenAspect / cameraTextureAspect; } private float CalculateUVMultiplierPortrait(Texture textureFromAROcclusionManager) { float screenAspect = (float) Screen.height / Screen.width; float cameraTextureAspect = (float) textureFromAROcclusionManager.width / textureFromAROcclusionManager.height; return screenAspect / cameraTextureAspect; } private void SetViewPortInv() { _viewportInv = Matrix4x4.identity; _viewportInv.m00 = _viewportInv.m03 = Screen.width / 2f; _viewportInv.m11 = Screen.height / 2f; _viewportInv.m13 = Screen.height / 2f; _viewportInv.m22 = (_camera.farClipPlane - _camera.nearClipPlane) / 2f; _viewportInv.m23 = (_camera.farClipPlane + _camera.nearClipPlane) / 2f; _viewportInv = _viewportInv.inverse; } private Matrix4x4 GetConverter() { Matrix4x4 viewMatInv = _camera.worldToCameraMatrix.inverse; Matrix4x4 projMatInv = _camera.projectionMatrix.inverse; return viewMatInv * projMatInv * _viewportInv; } }HumanDepthMapper.compute#pragma kernel Portrait #pragma kernel Landscape RWTexture2D<float4> target; Texture2D<float4> origin; float3 cameraPos; float4x4 converter; int isWide; float uVFlip; float uVMultiplierPortrait; float uVMultiplierLandScape; SamplerState _LinearClamp; float2 adjustUV(float2 uv) { if (isWide == 1) { float2 forMask = float2(uv.x, (1.0 - (uVMultiplierLandScape * 0.5f)) + (uv.y / uVMultiplierLandScape)); return float2(lerp(1.0 - forMask.x, forMask.x, uVFlip), lerp(forMask.y, 1.0 - forMask.y, uVFlip)); } else { float2 forMask = float2((1.0 - (uVMultiplierPortrait * 0.5f)) + (uv.x / uVMultiplierPortrait), uv.y); return float2(1.0 - forMask.y, 1.0 - forMask.x); } } float3 getWorldPosition(uint2 screenPos, float distanceFromCamera) { float4 pos = float4((float)screenPos.x, (float)screenPos.y, 0, 1); float4 converted = mul(converter, pos); float3 onNearClip = converted.xyz / converted.w; float3 vec = onNearClip - cameraPos; float dist = sqrt(vec.x * vec.x + vec.y * vec.y + vec.z * vec.z); return cameraPos + vec * distanceFromCamera / dist; } [numthreads(25,29,1)] void Portrait (uint3 id : SV_DispatchThreadID) { float tWidth, tHeight; target.GetDimensions(tWidth, tHeight); float2 uvOrigin = adjustUV(float2((float)id.x/tWidth, (float)id.y/tHeight)); float4 t = origin.SampleLevel(_LinearClamp, uvOrigin, 0); if (t.x > 0) { float4 depth = float4(getWorldPosition(id.xy, t.x * 0.625f), 1); // 0.625 hack occlusion depth based on real world observation target[id.xy] = depth; } else { target[id.xy] = float4(0, -10, 0, 1); // Just make sure to be outside of view sight } } [numthreads(29,25,1)] void Landscape (uint3 id : SV_DispatchThreadID) { float tWidth, tHeight; target.GetDimensions(tWidth, tHeight); float2 uvOrigin = adjustUV(float2((float)id.x/tWidth, (float)id.y/tHeight)); float4 t = origin.SampleLevel(_LinearClamp, uvOrigin, 0); if (t.x > 0) { float4 depth = float4(getWorldPosition(id.xy, t.x * 0.625f), 1); // 0.625 hack occlusion depth based on real world observation target[id.xy] = depth; } else { target[id.xy] = float4(0, -10, 0, 1); // Just make sure to be outside of view sight } }深度情報を取得するところから見ていきましょう。
HumanDepthMapper.computeRWTexture2D<float4> target; Texture2D<float4> origin;まずこの
targetが、最終的にスクリーンの各ピクセルに、人がいる位置のワールド座標を格納するTextureです。c#側のスクリプトでスクリーンと同サイズのRenderTextureを生成して、ここにセットします(後述します)。また書き込む必要があるのでRWTexture2Dとして宣言します。
次にoriginが、深度情報を取得する元となるHumanDepthTextureをセットするものです。そして、実際に深度情報を取得する処理は以下の通りです。
HumanDepthMapper.computeSamplerState _LinearClamp; [numthreads(25,29,1)] void Portrait (uint3 id : SV_DispatchThreadID) { float tWidth, tHeight; target.GetDimensions(tWidth, tHeight); float2 uvOrigin = adjustUV(float2((float)id.x/tWidth, (float)id.y/tHeight)); float4 t = origin.SampleLevel(_LinearClamp, uvOrigin, 0); ... } int isWide; float uVFlip; float uVMultiplierPortrait; float uVMultiplierLandScape; float2 adjustUV(float2 uv) { if (isWide == 1) { float2 forMask = float2(uv.x, (1.0 - (uVMultiplierLandScape * 0.5f)) + (uv.y / uVMultiplierLandScape)); return float2(lerp(1.0 - forMask.x, forMask.x, uVFlip), lerp(forMask.y, 1.0 - forMask.y, uVFlip)); } else { float2 forMask = float2((1.0 - (uVMultiplierPortrait * 0.5f)) + (uv.x / uVMultiplierPortrait), uv.y); return float2(1.0 - forMask.y, 1.0 - forMask.x); } }カーネルの引数の
uint3 id : SV_DispatchThreadIDには、実行スレッドの3次元のidが入ってきて、カーネルを実行するスレッド数とグループ数を適切に設定すれば、Textureの各テクセル座標がid.x, id.yとして取得できます。
target.GetDimensions(tWidth, tHeight)でスクリーンサイズを取得し、テクセル座標を幅及び高さで割ってあげれば、スクリーン上のUVが求められます。それを、先人が作ってくれた計算式に通せば、HumanDepthTextureに調整されたUVになるので、そのUVを使って、
float4 t = origin.SampleLevel(_LinearClamp, uvOrigin, 0)で、HumanDepthTextureから該当するテクセルの値、つまり深度情報を取得します。
ちなみに、このUV調整の計算式の仕組みは正直わからないです(笑)。では、次にc#側でのComputeShaderへ各値をセットしているコードを見ていきましょう。
HumanParticle.cs[SerializeField] private ComputeShader _computeShader; // スクリーンサイズに合わせたRenderTextureをあらかじめ用意(これをVisual Effect Graphにセットする) [SerializeField] private RenderTexture _positionMapPortrait; [SerializeField] private RenderTexture _positionMapLandscape; private int _portraitKernel, _landscapeKernel; // ComputeShaderで処理する用のRenderTexture private RenderTexture _tempRenderTexture; void Start() { // カーネル取得 _portraitKernel = _computeShader.FindKernel("Portrait"); _landscapeKernel = _computeShader.FindKernel("Landscape"); ... } void Update() { var humanDepthTexture = _arOcclusionManager.humanDepthTexture; if (humanDepthTexture) { // 端末のOerientationが変わる度に値をセット if (_lastDeviceOrientation != Input.deviceOrientation) { if (Input.deviceOrientation == DeviceOrientation.LandscapeRight) { _computeShader.SetFloat(PropertyID_UVFlip, 0); _computeShader.SetInt(PropertyID_IsWide, 1); } else if (Input.deviceOrientation == DeviceOrientation.LandscapeLeft) { _computeShader.SetFloat(PropertyID_UVFlip, 1); _computeShader.SetInt(PropertyID_IsWide, 1); } else { _computeShader.SetInt(PropertyID_IsWide, 0); } _lastDeviceOrientation = Input.deviceOrientation; InitSetup(humanDepthTexture); } ... } } private void InitSetup(Texture humanDepthTexture) { if (_lastDeviceOrientation == DeviceOrientation.Portrait) { // 該当するOrientationのRenderTextureと同じものを複製 _tempRenderTexture = new RenderTexture(_positionMapPortrait.width, _positionMapPortrait.height, 0, _positionMapPortrait.format) {enableRandomWrite = true}; _tempRenderTexture.Create(); _computeShader.SetTexture(_portraitKernel, PropertyID_Target, _tempRenderTexture); // カーネルのスレッド数を取得 _computeShader.GetKernelThreadGroupSizes(_portraitKernel, out _threadSizeX, out _threadSizeY, out _threadSizeZ); _computeShader.SetFloat(PropertyID_UVMultiplierPortrait, CalculateUVMultiplierPortrait(humanDepthTexture)); ... } else { _tempRenderTexture = new RenderTexture(_positionMapLandscape.width, _positionMapLandscape.height, 0, _positionMapLandscape.format) {enableRandomWrite = true}; _tempRenderTexture.Create(); _computeShader.SetTexture(_landscapeKernel, PropertyID_Target, _tempRenderTexture); _computeShader.GetKernelThreadGroupSizes(_landscapeKernel, out _threadSizeX, out _threadSizeY, out _threadSizeZ); _computeShader.SetFloat(PropertyID_UVMultiplierLandScape, CalculateUVMultiplierLandScape(humanDepthTexture)); _visualEffect.SetTexture(PropertyID_PositionMap, _positionMapLandscape); ... } ... } private float CalculateUVMultiplierLandScape(Texture textureFromAROcclusionManager) { float screenAspect = (float) Screen.width / Screen.height; float cameraTextureAspect = (float) textureFromAROcclusionManager.width / textureFromAROcclusionManager.height; return screenAspect / cameraTextureAspect; } private float CalculateUVMultiplierPortrait(Texture textureFromAROcclusionManager) { float screenAspect = (float) Screen.height / Screen.width; float cameraTextureAspect = (float) textureFromAROcclusionManager.width / textureFromAROcclusionManager.height; return screenAspect / cameraTextureAspect; }端末のOrientationが変わると、UV調整も変える必要があるので、変わる度に値をセットします。
また、スクリーンサイズが変わるので、書き込むRenderTextureも変える必要があり、それに伴ってカーネルのスレッド数も変えなければならなくなったので、今回はPortraitとLandscapeの二つのカーネルを用意しています。ただ、中身の処理は全く一緒です。次に、ComputeShaderの実行呼び出しを見てみましょう。
HumanParticle.csvoid Update() { var humanDepthTexture = _arOcclusionManager.humanDepthTexture; if (humanDepthTexture) { ... if (_tempRenderTexture) { ... if (_lastDeviceOrientation == DeviceOrientation.Portrait) { // HumanDepthTextureをComputeShaderにセット _computeShader.SetTexture(_portraitKernel, PropertyID_Origin, humanDepthTexture); // ComputeShaderを実行 _computeShader.Dispatch(_portraitKernel, Screen.width / (int) _threadSizeX, Screen.height / (int) _threadSizeY, (int) _threadSizeZ); // 書き込み終わった_tempRenderTextureをVisual Effect GraphにセットするRenderTextureにコピー Graphics.CopyTexture(_tempRenderTexture, _positionMapPortrait); } else { _computeShader.SetTexture(_landscapeKernel, PropertyID_Origin, humanDepthTexture); _computeShader.Dispatch(_landscapeKernel, Screen.width / (int) _threadSizeX, Screen.height / (int) _threadSizeY, (int) _threadSizeZ); Graphics.CopyTexture(_tempRenderTexture, _positionMapLandscape); } } } }ComputeShaderの実行は、
Dispatch (int kernelIndex, int threadGroupsX, int threadGroupsY, int threadGroupsZ)で行います。
今回Portraitの場合は、スレッド数を[numthreads(25,29,1)]にしています。
これは、スクリーンの幅、高さを割り切れる値を適当に選択しています。そうした上で、スレッドグループ数のxを幅 / スレッド数x、yを幅 / スレッド数yとすれば、1125×2436のテクセル全てにアクセスすることができます。
詳しくは、上述の記事を読んでみてください。ピクセル位置と深度情報からワールド座標に変換する
さて、以上までで1125×2436のテクセル全ての深度情報が取得できました(人が映っていないテクセルは0になります)。
これをワールド座標に変換していきます。c#であれば、Camera.ScreenToWorldPoint(Vector3 position)という素晴らしいメソッドがありますが、今回は、これと同様のことをComputeShader内で行います。
ネットで探すと、ドンピシャな記事がありましたので、これを参考にしていきます。
UnityのCamera#ScreenToWorldPointを自前で計算してみる詳しい説明は、上述の記事に任せますが、簡単に説明するとオブジェクト空間の座標がいくつかの座標変換を経てスクリーン空間の座標に描画されるので、その変換を遡るように変換行列の逆行列をかけてあげれば良いということです。
ただ、自分の理解が浅いこともあって、記事内で紹介されていたコードをそのまま使ってもうまく行かない部分があったので、少し力技で改変しています。では、早速コードをみていきましょう。
HumanDepthMapper.computefloat3 cameraPos; float4x4 converter; float3 getWorldPosition(uint2 screenPos, float distanceFromCamera) { float4 pos = float4((float)screenPos.x, (float)screenPos.y, 0, 1); float4 converted = mul(converter, pos); float3 onNearClip = converted.xyz / converted.w; float3 vec = onNearClip - cameraPos; float dist = sqrt(vec.x * vec.x + vec.y * vec.y + vec.z * vec.z); return cameraPos + vec * distanceFromCamera / dist; } [numthreads(25,29,1)] void Portrait (uint3 id : SV_DispatchThreadID) { ... float4 t = origin.SampleLevel(_LinearClamp, uvOrigin, 0); // t.x > 0 => 人がいるテクセル if (t.x > 0) { float4 depth = float4(getWorldPosition(id.xy, t.x * 0.625f), 1); // 0.625 hack occlusion depth based on real world observation target[id.xy] = depth; } else { // 人がいないテクセルはとりあえず見えないだろう適当な座標を入れる(あんまり良くないが...) target[id.xy] = float4(0, -10, 0, 1); } }
cameraPosには、カメラのワールド座標が入り、converterには、上述の必要な変換行列の逆行列を掛け合わせたものが入ります。
これを、スクリーンのピクセル位置と深度を表したベクトルにかければワールド座標が出ると思っていたのですが、z値(深度)がうまく反映されませんでした。(この辺情報提供してくれる方いたら嬉しいです!!)
ただ色々試した結果、深度を0としてやれば、nearClipの視錐台面上で正しいワールド座標が取れたので、そこからカメラまでの距離を計算し、それと実際の深度との比で正しいワールド座標を出すという力技的なことをしています。float4 depth = float4(getWorldPosition(id.xy, t.x * 0.625f), 1); // 0.625 hack occlusion depth based on real world observation target[id.xy] = depth;以上のコードで、スクリーンのピクセル座標と深度を使って、ワールド座標を計算し、それをRenderTextureの各テクセルに格納しています。
また、HumanDepthTextureから取得した深度値を0.625倍しているのは、上述のフォーラムを参考にして調整したものです。c#側の実装は以下の通りです。
HumanParticle.csprivate Matrix4x4 _viewportInv; void Update() { var humanDepthTexture = _arOcclusionManager.humanDepthTexture; if (humanDepthTexture) { if (_tempRenderTexture) { _computeShader.SetVector(PropertyID_CameraPos, _camera.transform.position); _computeShader.SetMatrix(PropertyID_Converter, GetConverter()); ... } ... } } private void InitSetup(Texture humanDepthTexture) { ... SetViewPortInv(); } private void SetViewPortInv() { _viewportInv = Matrix4x4.identity; _viewportInv.m00 = _viewportInv.m03 = Screen.width / 2f; _viewportInv.m11 = Screen.height / 2f; _viewportInv.m13 = Screen.height / 2f; _viewportInv.m22 = (_camera.farClipPlane - _camera.nearClipPlane) / 2f; _viewportInv.m23 = (_camera.farClipPlane + _camera.nearClipPlane) / 2f; _viewportInv = _viewportInv.inverse; } private Matrix4x4 GetConverter() { Matrix4x4 viewMatInv = _camera.worldToCameraMatrix.inverse; Matrix4x4 projMatInv = _camera.projectionMatrix.inverse; return viewMatInv * projMatInv * _viewportInv; }ビューポート変換行列は、スクリーンサイズが変わる度に計算し、他は、毎フレーム計算しComputeShaderにセットしています。
中身は上述の記事の通りなので割愛します。これで、HumanDepthTextureからワールド座標に変換したTextureを作成することができました。
あとは、これをVisual Effect Graphに渡してやればOKです。Visual Effect GraphでTextureを元にParticleを発生させる
以上で作成したTextureは、rgb値にワールド座標が入っています。その値を使って、Particleを発生させるには、
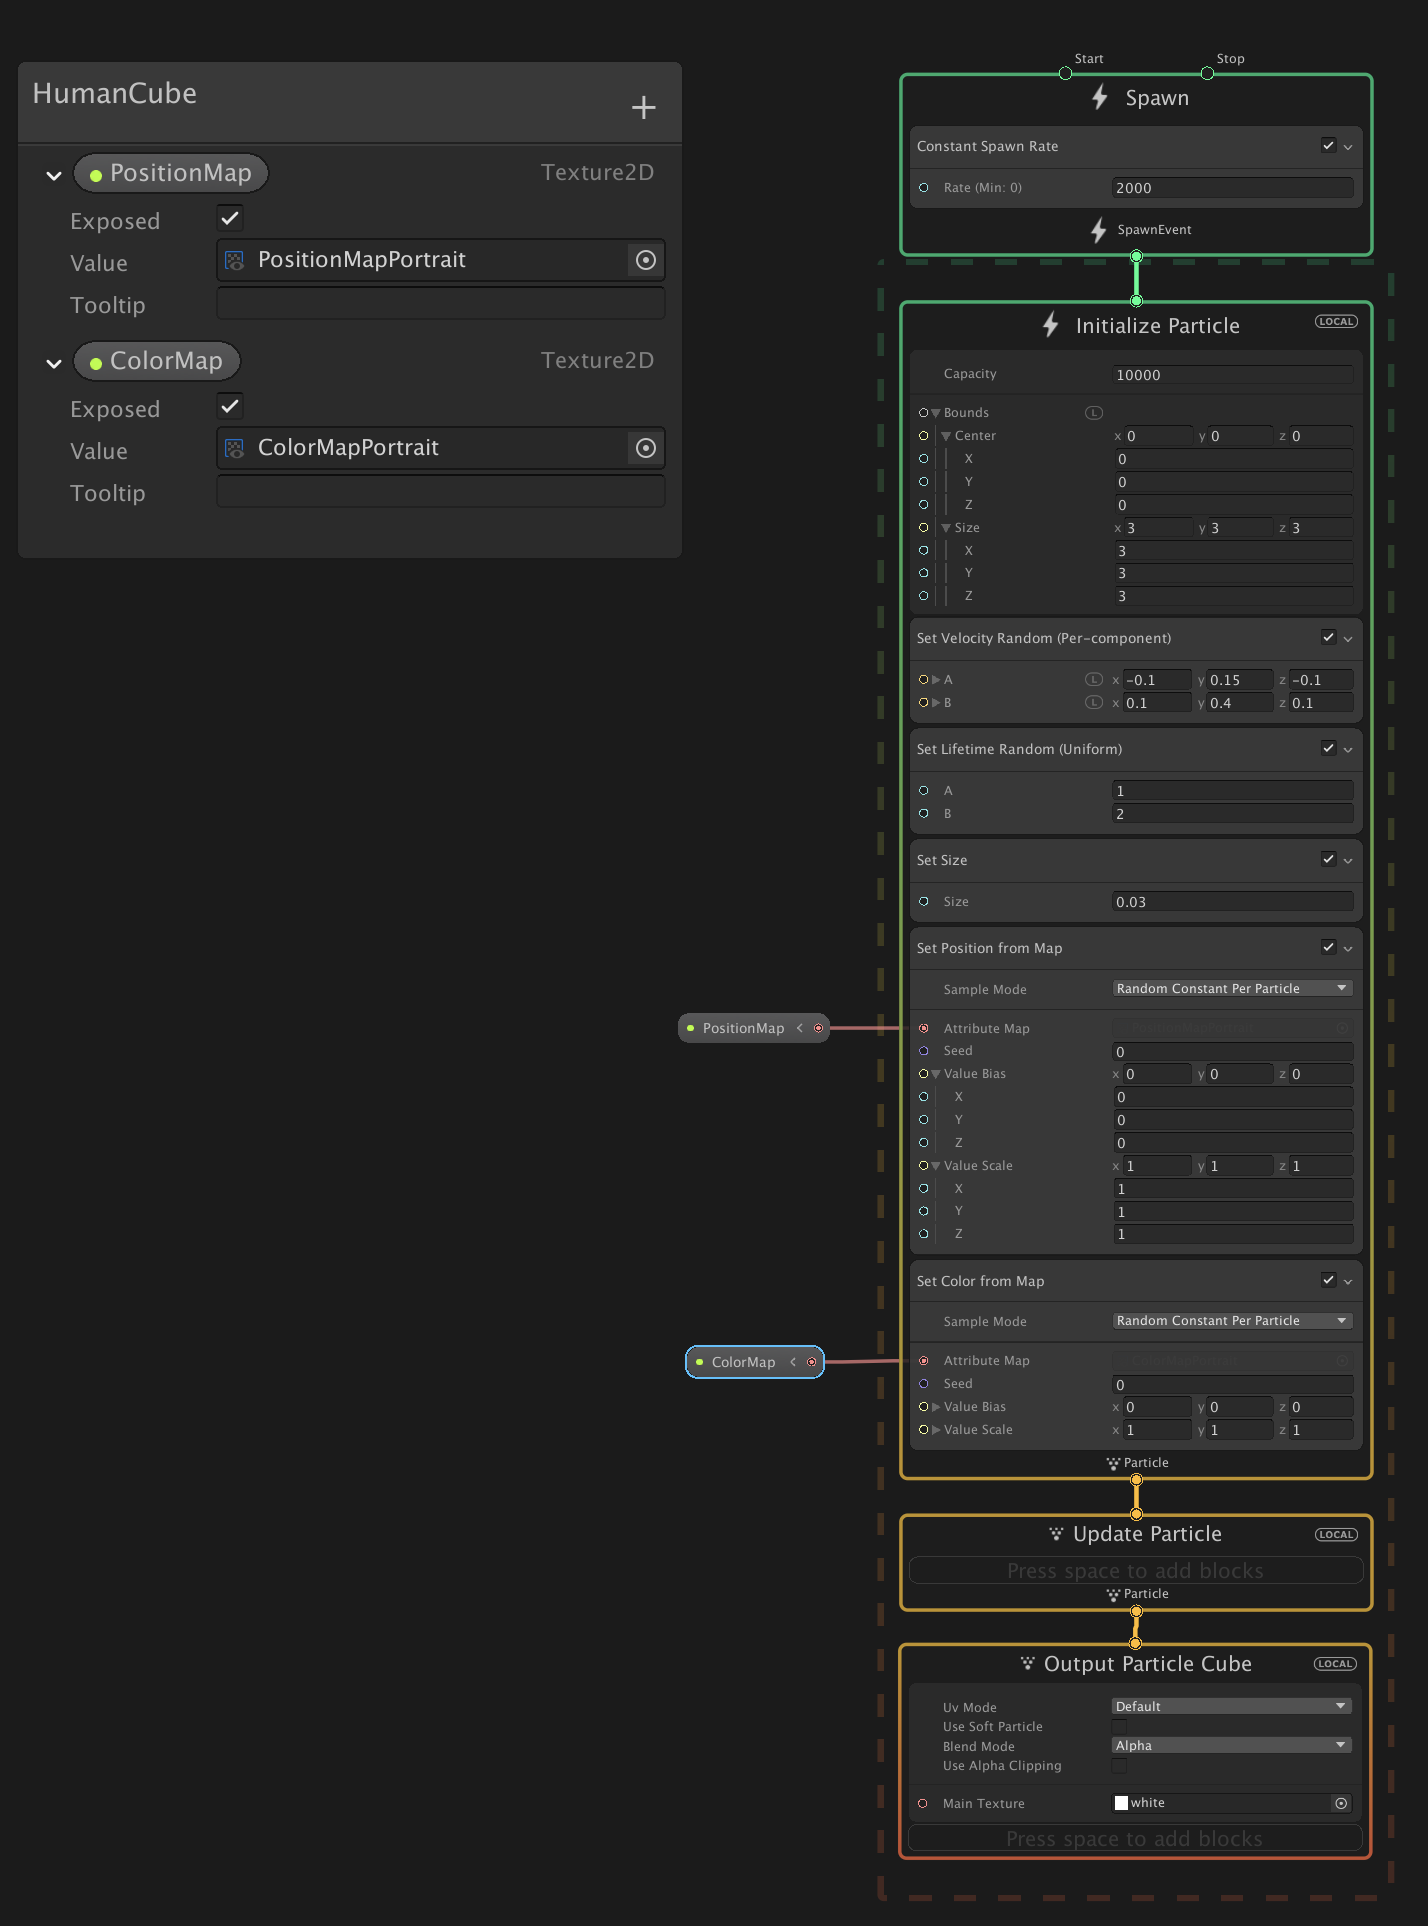
Set Position From Mapを使います。
Initialize ParticleのコンテキストにSet Position From Mapブロックを追加します。
また、Texture2Dのプロパティを作って外部から設定できるようにし、それをSet Position From MapのAttribute Mapにセットします。
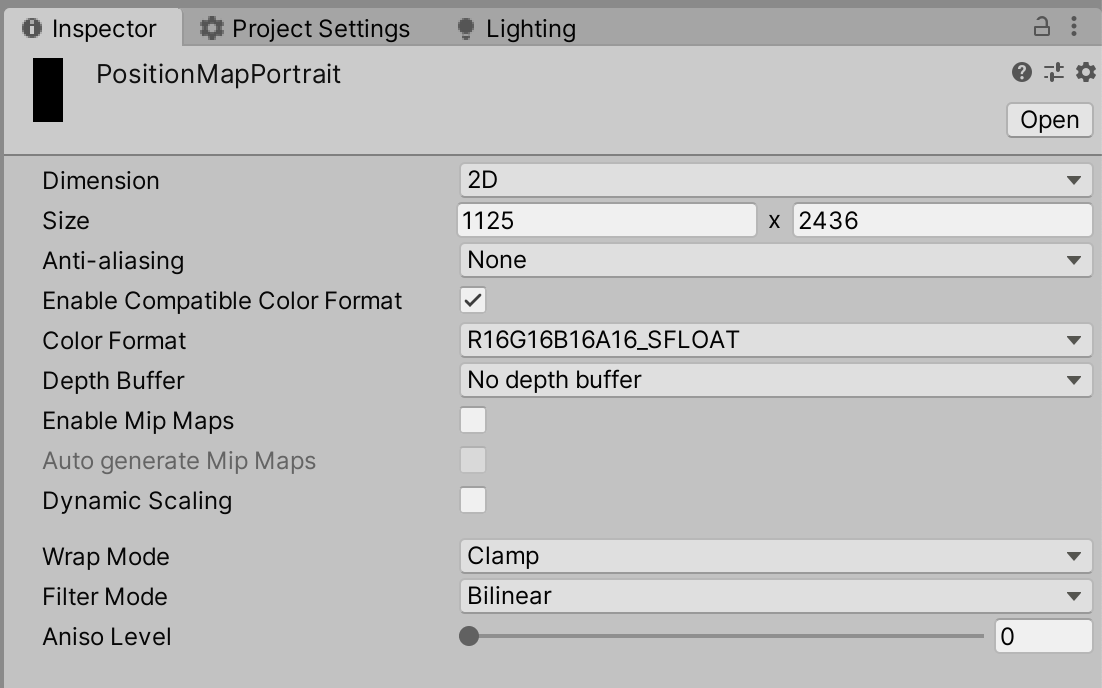
これで、セットしたTextureのrgb値を読んでParticleがその座標から発生するようになります。Position Mapには、あらかじめ作ったRenderTextureをセットします。
ここで気をつける必要があるのが、RenderTextureのColor Formatです。
今回は、R16G16B16A16_SFLOATを選択していますが、これを下手な値にするとrbg値が0~1にclampされたりしてしまうので気をつけてください。SFLOATのSはsignedの意味で負の値を受け付けることができます。
ちなみに自分は、最初はスクリプトでRenderTextureを生成し、その際Color FormatをARGB32にしていたのですが、これが0~1にclampされるのに気づかず、2時間くらい無駄にしました。あとは、端末のOrientationが変わる度に、セットするRenderTextureを切り替えます。
private void InitSetup(Texture humanDepthTexture)
{
    if (_lastDeviceOrientation == DeviceOrientation.Portrait)
    {
        ...
        _visualEffect.SetTexture(PropertyID_PositionMap, _positionMapPortrait);
        ...
    }
    else
    {
        ...
        _visualEffect.SetTexture(PropertyID_PositionMap, _positionMapLandscape);
        ...
    }
}
Command Bufferでカメラ画像を取得し、パーティクルにカラーをつける
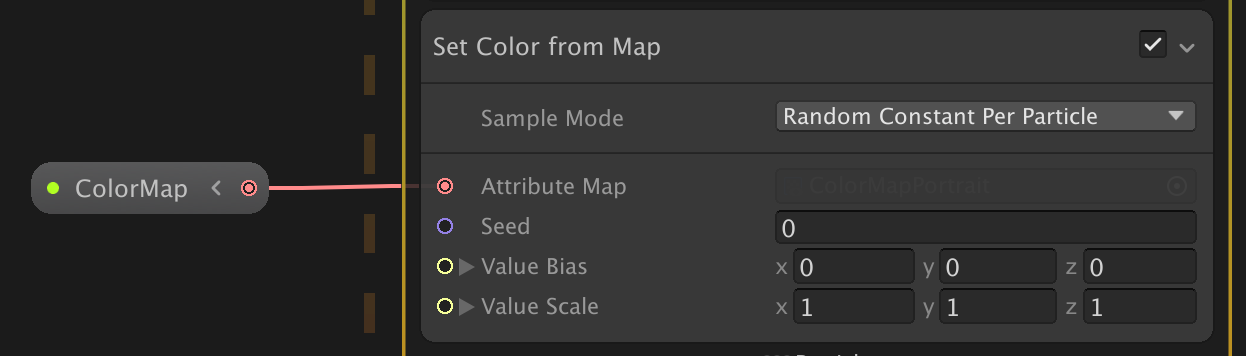
最後に発生させたパーティクルに、その発生元の位置の色を反映させます。
Visual Effect GraphのSet Color From Mapで、Positionと同じようにTextureを読み込んで色をつけることができます。
あとは、このColorMapにセットするRenderTextureにカメラ画像をコピーします。
カメラ画像のコピーはいくつか方法がありますが、今回は、ARFoundationがカメラ画像をスクリーンに描画した後に、CommandBuffer.Blitで、スクリーンをコピーすることでカメラ画像をコピーします。Rendere Featureを実装してカメラ画像を取得する
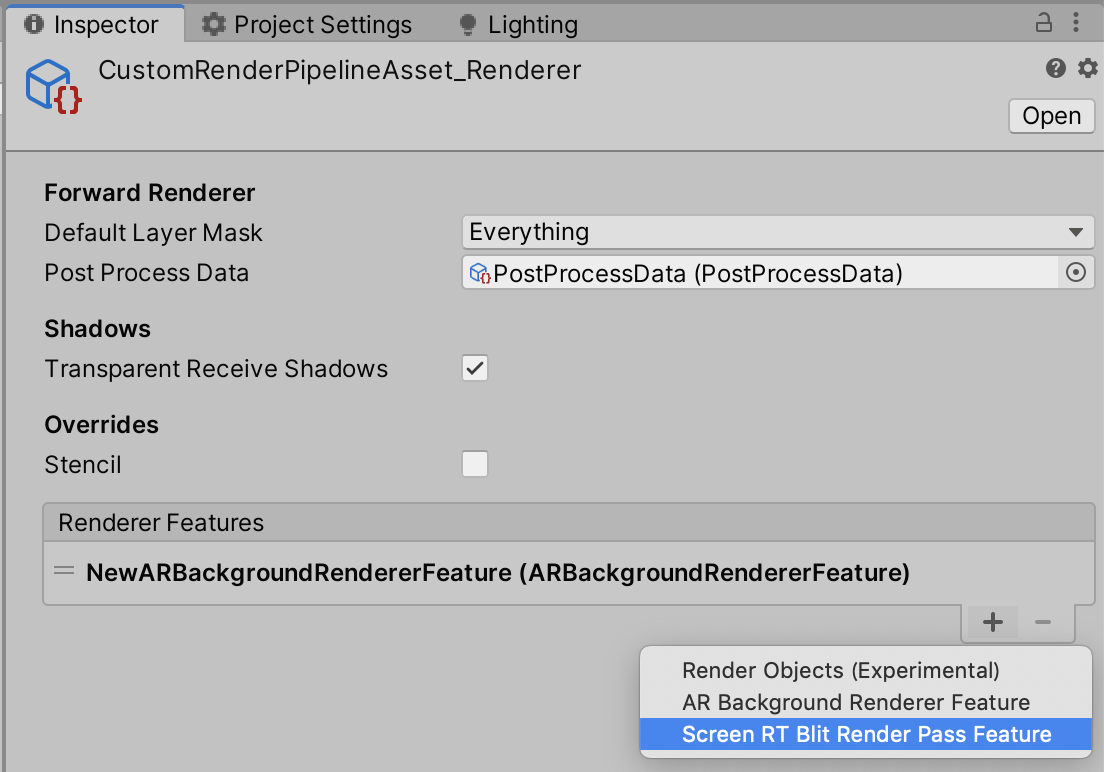
まず、CommandBufferを使うために、Render Featureを作成します。(ScreenRTBlitRenderPassFeatureと命名しています)
そして、それを下準備の際に作成したCustomRenderPipelineAsset_RendererのRenderer Featuresに追加します。
あとは、このRender Featureの中身を実装していきます。
まずコード全文をのせます。c#ScreenRTBlitRenderPassFeature.csusing UnityEngine; using UnityEngine.Rendering; using UnityEngine.Rendering.Universal; public class ScreenRTBlitRenderPassFeature : ScriptableRendererFeature { class ScreenRTBlitRenderPass : ScriptableRenderPass { private RenderTargetIdentifier _currentTarget; private RenderTexture _screenBuffer; public void Setup(RenderTargetIdentifier target, RenderTexture buffer) { _currentTarget = target; _screenBuffer = buffer; } public override void Configure(CommandBuffer cmd, RenderTextureDescriptor cameraTextureDescriptor) { } public override void Execute(ScriptableRenderContext context, ref RenderingData renderingData) { var cmd = CommandBufferPool.Get(nameof(ScreenRTBlitRenderPass)); cmd.Blit(_currentTarget, _screenBuffer); cmd.SetRenderTarget(_currentTarget); context.ExecuteCommandBuffer(cmd); CommandBufferPool.Release(cmd); } public override void FrameCleanup(CommandBuffer cmd) { } } ScreenRTBlitRenderPass _scriptablePass; public override void Create() { _scriptablePass = new ScreenRTBlitRenderPass(); _scriptablePass.renderPassEvent = RenderPassEvent.BeforeRenderingOpaques; } public override void AddRenderPasses(ScriptableRenderer renderer, ref RenderingData renderingData) { var currentCamera = renderingData.cameraData.camera; if (currentCamera != null && currentCamera.cameraType == CameraType.Game) { var humanParticle = currentCamera.GetComponent<HumanParticle>(); if (humanParticle == null) return; if (humanParticle.LatestCameraFeedBuffer == null) return; _scriptablePass.Setup(renderer.cameraColorTarget, humanParticle.LatestCameraFeedBuffer); renderer.EnqueuePass(_scriptablePass); } } }HumanParticle.cspublic RenderTexture LatestCameraFeedBuffer { get { if (_lastDeviceOrientation == DeviceOrientation.Portrait) { return _colorMapPortrait; } return _colorMapLandscape; } }詳しい説明は割愛しますが、コピー先のRenderTextureを取得し、以下の部分で、スクリーンに描画されているものをBlitしています。
public override void Execute(ScriptableRenderContext context, ref RenderingData renderingData)
{
    var cmd = CommandBufferPool.Get(nameof(ScreenRTBlitRenderPass));
    cmd.Blit(_currentTarget, _screenBuffer);
    cmd.SetRenderTarget(_currentTarget);
    context.ExecuteCommandBuffer(cmd);
    CommandBufferPool.Release(cmd);
}
この処理を、
RenderPassEvent.BeforeRenderingOpaquesのタイミングで行うようにしています。_scriptablePass.renderPassEvent = RenderPassEvent.BeforeRenderingOpaques;その理由は、ARFoundationがカメラ画像を描画するタイミングが同じく
RenderPassEvent.BeforeRenderingOpaquesで(ARBackgroundRendererFeature.cs参照のこと)、これより後だと発生させたパーティクルも描画された後になってしまうため都合がよくないからです。
また、同じRenderPassEventに設定した場合、その順番はRenderer Featuresに追加した順番で実行されるようです(たぶん)。なので、この場合はうまくカメラ画像のコピーをすることができます。これで、カメラ画像のコピーはできましたが、Blitするとカメラのレンダリング先が第2引数に設定したRenderTextureに変わってしまうので、再度
cmd.SetRenderTarget(_currentTarget)をして、レンダリング先を元に戻します。以上で、今回の実装の解説は終わりです!
おわりに
かなり長めの内容になって、最後めっちゃ駆け足になってしまいすいません。m( )m
所々微妙な実装があるので、もっと良い方法を知っている方がいれば教えてもらえると幸いです!!これを使えば、あとはVFXGraphをゴリゴリ実装していけば面白い表現が色々できると思うので、今後はその辺りがんばっていきたいと思います。
作ったものをどんどんアップしていくので、よければフォローお願いします! → Twitter以上!


- 投稿日:2020-03-25T17:10:10+09:00
[Unity] .gitignoreを使用して、いらないファイルを除外する
1. 手順
- Source Treeを開く。
- 設定タブを開き、詳細をクリック。
- リポジトリ固有の無視リストの編集をクリック。
- 下のコードをコピーし、貼り付ける。
2. コード
[Ll]ibrary/
[Tt]emp/
[Oo]bj/
[Bb]uild/
[Bb]uilds/

# Visual Studio cache directory
.vs/

# Autogenerated VS/MD/Consulo solution and project files
ExportedObj/
.consulo/
*.csproj
*.csproj.user
*.unityproj
*.sln
*.suo
*.tmp
*.user
*.userprefs
*.pidb
*.booproj
*.svd
*.pdb

# Unity3D generated meta files
*.pidb.meta
*.pdb.meta

# Unity3D Generated File On Crash Reports
sysinfo.txt

*~
.DS_Store
*[! -~]*

*.apk
3. 参考資料
- 投稿日:2020-03-25T00:58:24+09:00
OculusQuest のハンドトラッキングで摘んでVR空間を移動する
Update の中身はわずか10行程度で、こんな感じで、空間を摘んで移動できるようになります。
空中も自由自在ですね。さらっとご紹介。
解説
ほんと簡単です。
まずはつまんでいる状態を検知します
こんな感じで、つまみ始めるとキューブが小さくなり、摘んだを検出するとキューブが緑色に変わるようにしました。
プログラム
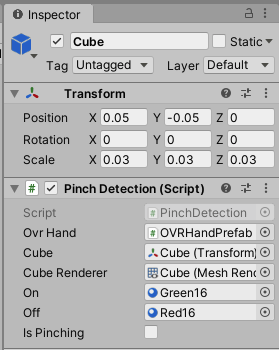
using UnityEngine;

public class PinchDetection : MonoBehaviour
{
    [SerializeField] private OVRHand ovrHand;

    [SerializeField] private Transform cube;
    [SerializeField] private MeshRenderer cubeRenderer;

    [SerializeField] private Material on;  // キューブの色変更用
    [SerializeField] private Material off; // キューブの色変更用

    public bool IsPinching = false;

    void Update()
    {
        // つまみの強さを取得、0から1の間で変化し、1は完全に親指と人指し指がくっついている状態
        var strength = ovrHand.GetFingerPinchStrength(OVRHand.HandFinger.Index);
        // 5cm x つまみの強さを取得していて、消えないように 0.1cm は残るようにしています
        var scale = Mathf.Max(0.05f * (1 - strength), 0.01f);
        // 人差し指のピンチングの強さに応じて cube の scale を変更します
        cube.localScale = new Vector3(scale, scale, scale);

        // キューブが 2cm 未満になっていることを検出
        IsPinching = cube.localScale.x < 0.02f;
        // 検出したら、キューブの色を変えます
        cubeRenderer.materials = IsPinching ? new[] {on} : new[] {off};
    }
}
そして、摘んでいるときに移動できるようにします
1フレーム前の手の位置と、現在の手の位置との差分を取得して、その変化量に応じて自分自身を移動させます。
using UnityEngine;

public class PinchingMover : MonoBehaviour
{
    [SerializeField] private GameObject me;
    [SerializeField] private GameObject hand;
    [SerializeField] private PinchDetection detection; // 上のプログラム

    private float speed = 20f; // 移動スピード、適当な値です
    private Vector3 previous;

    void Update()
    {
        // 摘んでいるときは
        if (detection.IsPinching)
        {
            // 1フレーム前の手の位置と、現在の手の位置との差分を移動量のベースに、speed を積算します
            var movement = (previous - hand.transform.localPosition) * speed;
            // 自分自身を移動させます
            me.transform.position += movement;
        }

        // Update の最後で、再び自分の手の位置を設定
        previous = hand.transform.localPosition;
    }
}
注意
- hand.transform.
localPosition にしないと、自分(me)と一緒に手(hand)が動くので、ぶっ飛んで死にます。- previous は Start で初期化しておいた方がいいとか、細かいところは見やすさ重視で割愛しています。
Unity の設定
PinchingMover
PinchingDetection
Green16, Red16 とかは適当にMaterialを作って設定してもらえれば大丈夫です。
備考
- 摘むの補足は、前に書いた OculusQeust のハンドトラッキングの摘むを試しみた を参照ください。
- 本当は指だけで移動できるようにしたかったり、ボルダリングみたいなのを考えていたりしていく中で、デバッグ用ならこれでいいかってなった結果の産物です。


- 投稿日:2020-03-25T00:03:30+09:00
Unityで画像読み込みの負荷をどうにかしたかったお話
Unity製Androidアプリのパフォーマンスチューニングをしていた時に、画像読み込みの負荷が気になり色々と試したのでまとめてみました。参考になることがあれば幸いです。
画像を読み込むと言うと、ビルドインアセットなどいくつか方法がありますが、内容としてはダウンロードしてローカルに保存してある画像を読み込む時のお話です。
環境
macOS Catalina 10.15
Unity 2018.4.9f1
Pixel3(検証端末)経緯
画像はUnityWebRequestなどでローカルに取得済みとして、読み込みは簡単に以下のようになっていました。
string filePath = Application.persistentDataPath + "/image/hoge.png";
byte[] byteData = File.ReadAllBytes(filePath);
Texture2D texture = new Texture2D(0, 0, TextureFormat.RGBA32, false);
texture.LoadImage(byteData);
そこで、画面遷移時など負荷のかかるタイミングをプロファイラで見てみます。
リソースの展開やデータの整形など様々な処理が含まれますが、大きなスパイクがあり処理落ちしていることが分かります。
詳細を確認すると、気になったのはGC.Allocというやつです。
メモリ確保が行われているわけですが、追っていくと原因はTexture2Dを生成する過程で、一時的に読み込んだ画像データをbyte配列で保持してしまうためでした。ローディング中などの待ち時間であっても、可能な限り画面のカクつきは防ぎたいところです。
GC.Allocを避ける理由
https://qiita.com/mao_/items/8f95bc9dbeb3179ba4b9
こちらの記事にメモリのことがとても分かりやすく書かれていますが、「大きなGC.Alloc → ヒープ領域が拡張される → GCのパフォーマンスが悪くなる」ということがあるようです。GC(ガベージコレクション)が搭載されている言語で開発する際は、なるべくそれが発生しないように意識するかと思います。それに加えて、ヒープ領域が無駄に拡張されないように、過度なメモリ使用を抑えることも考える必要がありそうです。
このことから、大きいサイズになりがちである画像の扱いは、マネージドヒープと相性が悪そうな印象を受けます。対策
https://qiita.com/mao_/items/8f95bc9dbeb3179ba4b9
こちらの記事に全面的にお世話になりますが、、
マネージドヒープではなくアンマネージドメモリで処理できれば、不要なメモリ管理の負荷を回避できます。
少々リスクは感じますが、メモリの確保と解放を自分で行うことで、マネージドヒープがやっていた管理のコストを無くします。また、上記記事で紹介されているAsyncReadManagerを使用して、ファイル読み込みを非同期にします。
最初に載せたサンプルコードだと、File.ReadAllBytesでのファイル読み込みを非同期で処理するため、1フレームにかけてしまっていた負荷の分散が期待できます。
- テクスチャ生成時に発生する一時的なメモリ使用をアンマネージドメモリで処理する
- ファイル読み込みを非同期で行う
これらを実装したサンプルプロジェクトを作成してみました。Android向けにビルドしても動作します。(iOSも一応対応していますが動作未確認です。)
プラットフォームをAndroidかiOSのどちらかに切り替えて確認してください。
https://github.com/ToshikiOno/AsyncTextureReader成果
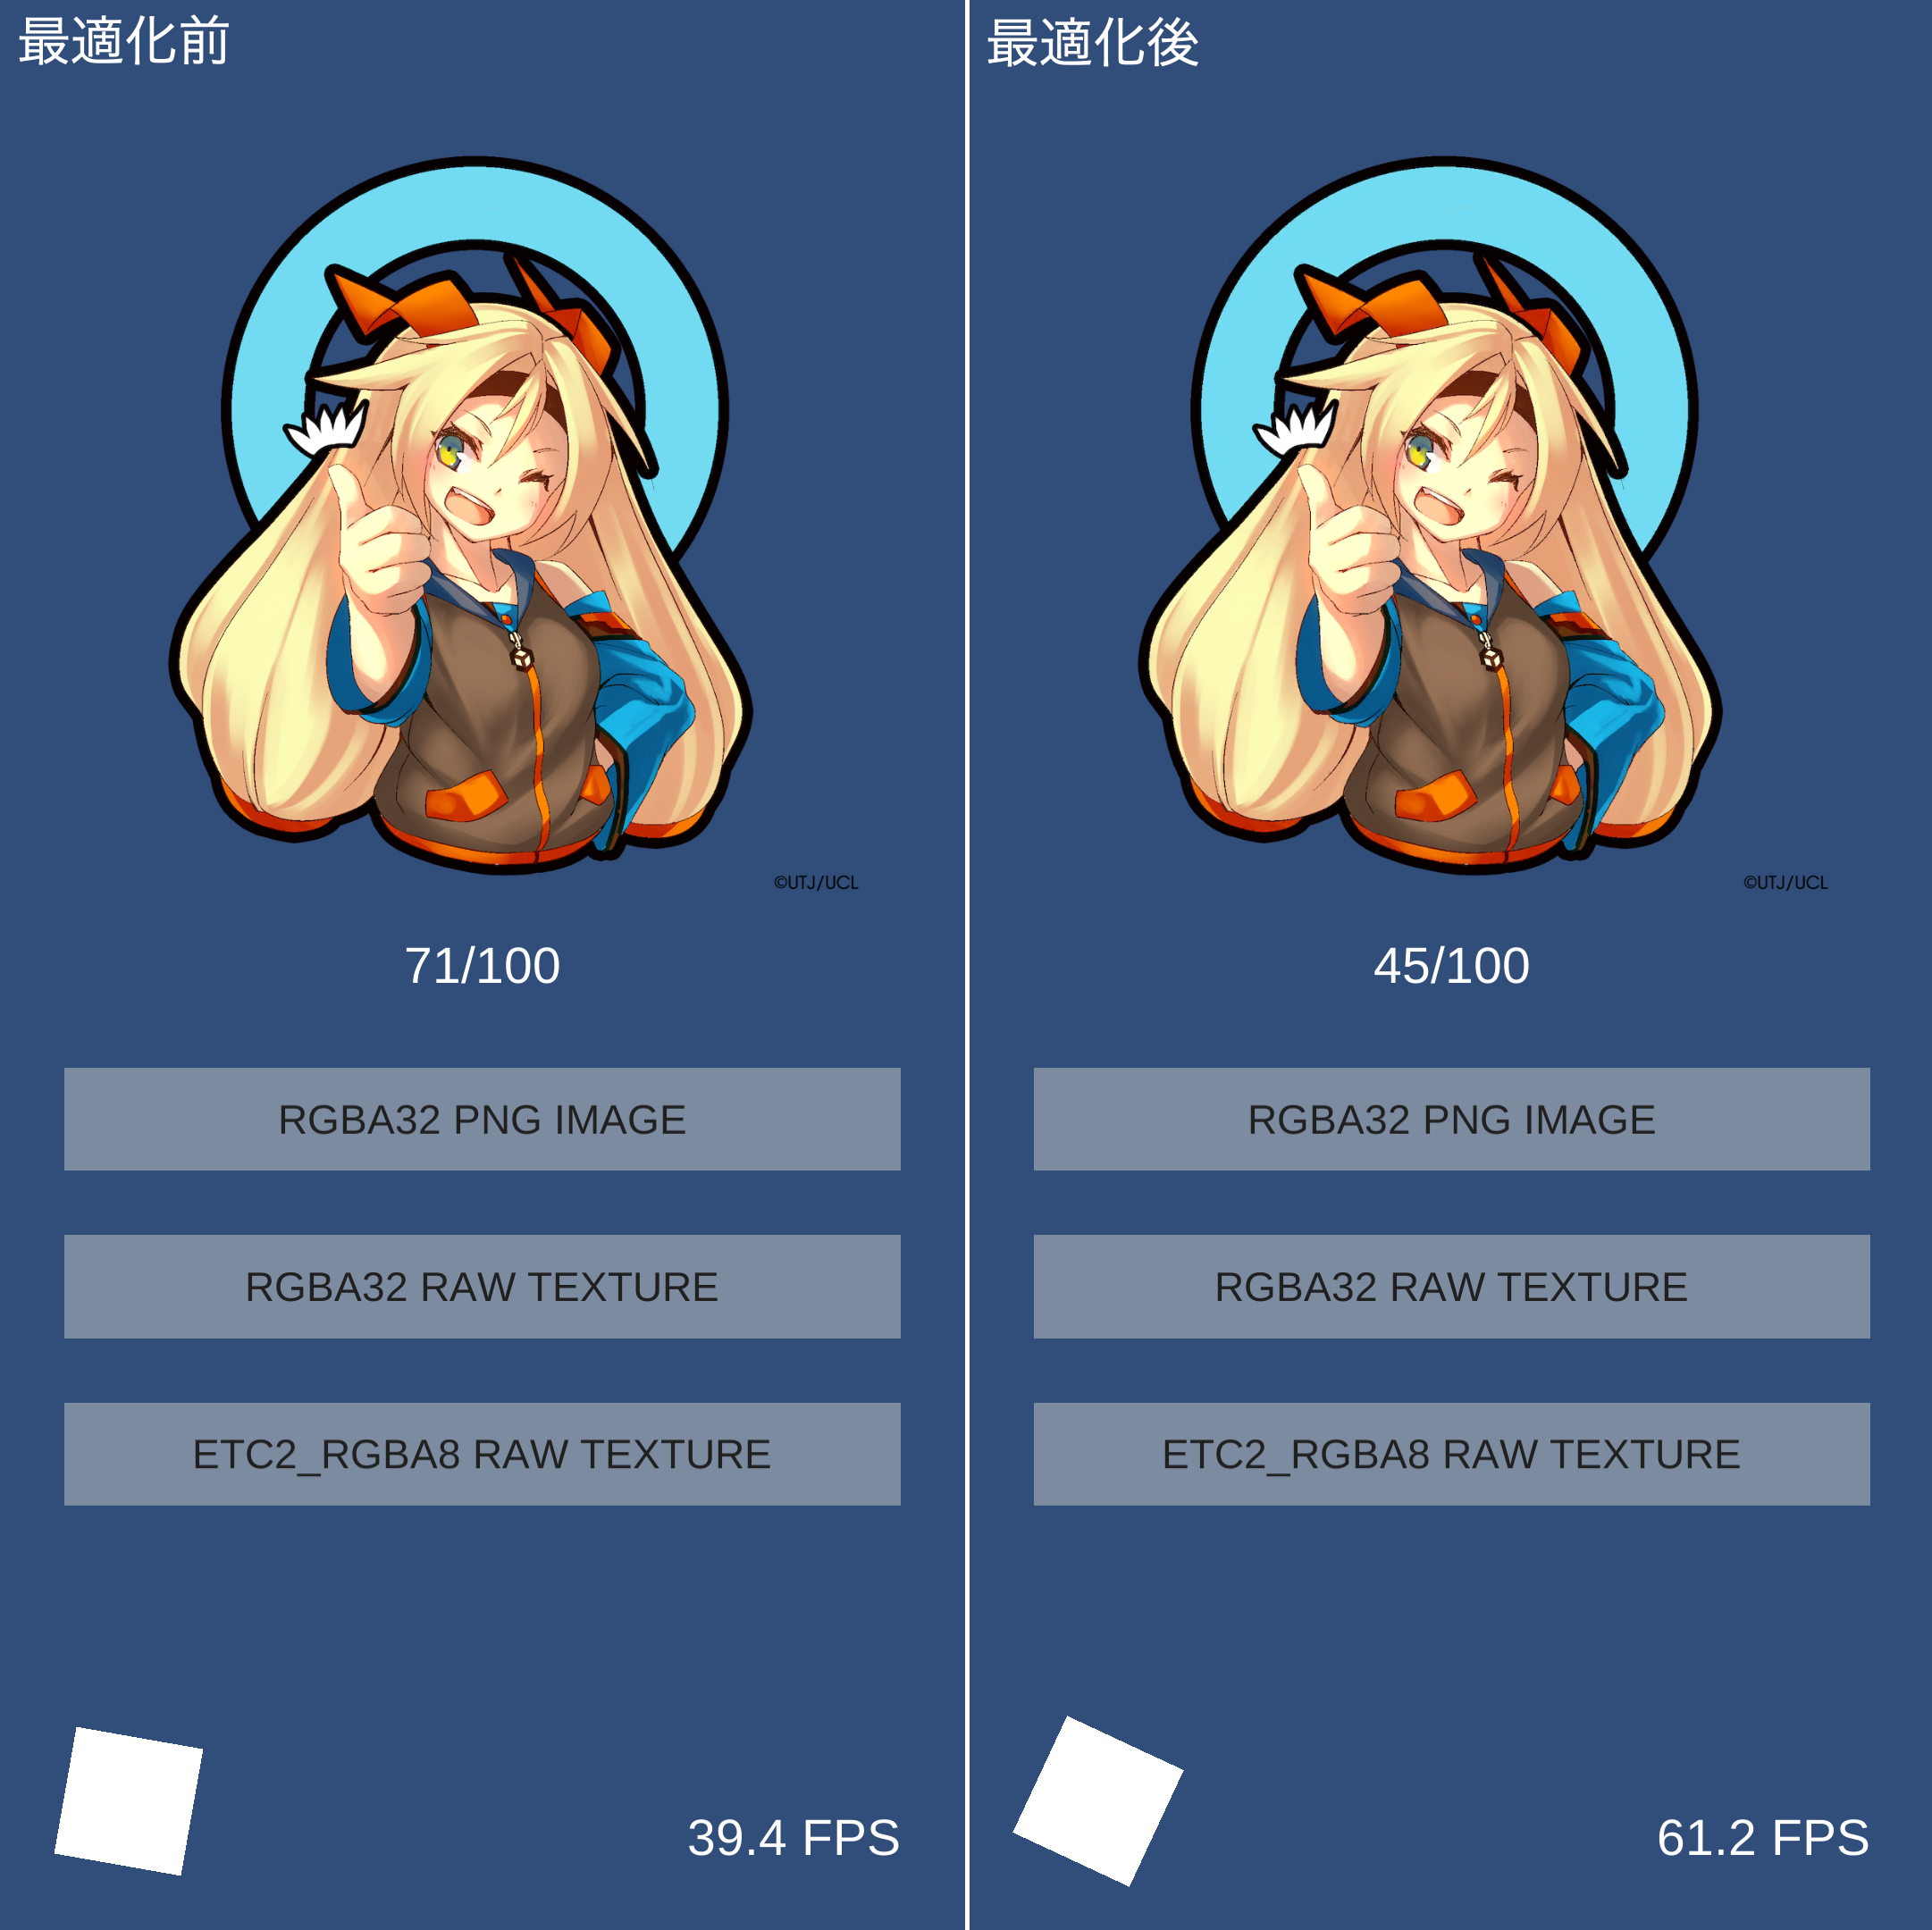
サンプルをAndroid端末(Pixel3)で実行してみます。
最適化前と後とで1000x1000の画像を100回読み込んで表示を繰り返し、負荷やかかった時間を見ます。
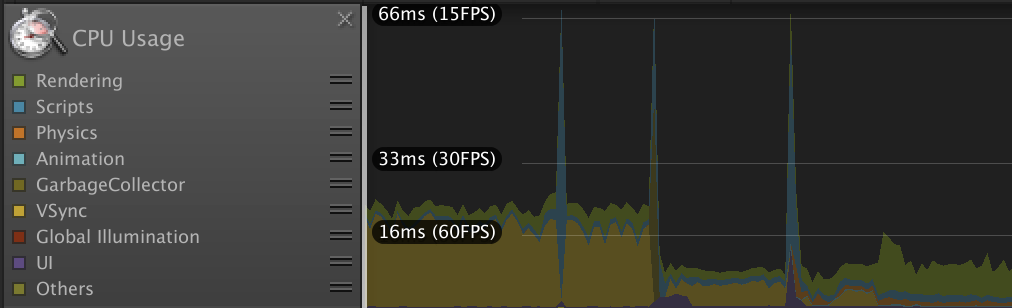
静止画だと分かりませんが、画面左下の白い四角は処理落ちを視覚的に確認するため、くるくると回っています。続いてプロファイラです。
レンダリングなどのノイズを除くため「Scripts」の項目のみを表示していますが、最適化後では負荷がしっかりと分散されていることが分かります。
ざっくりまとめると以下になります。
FPS 1フレームあたりの負荷 全体の処理時間 最適化前 40 16ms以上 2.6秒 最適化後 60 1ms 〜 2ms 3.3秒 最適化後は読み込みを非同期にしたためか、処理時間は少し伸びてしまっています。しかし、嬉しいことに処理中でも60fpsを余裕で維持できました。
ちなみに、更に大きい画像で試してみたところ、最適化後の方が短い時間で処理できる結果になりました。解説
AsyncTextureReader.Readメソッドで画像を読み込みます。
AsyncTextureReader.Read(
    new AsyncTextureReader.TextureData {
        filePath = Application.persistentDataPath + "/image/hoge.png",
        format = TextureFormat.ETC2_RGBA8,
        width = 1000,
        height = 1000
    },
    texture => {
        this.rawImage.texture = texture;
        this.rawImage.SetNativeSize();
    }
);
第一引数はパスなどの画像情報、第二引数には読み込んだテクスチャを受け取るコールバックを指定して使用します。連続でコールした場合は順番に処理されます。
画像情報にはパス以外にフォーマットやテクスチャサイズが必要で、AsyncTextureReader.TextureData構造体でまとめて渡すようにしています。これらの情報が必要なのはTexture2Dクラスの仕様によるものですが、アンマネージドメモリを活かそうとすると通常の形式の画像が扱えなかったためです。
どういうことかというと、AsyncReadManagerでファイルを読み込むとバッファへのポインタを取得できるのですが、Texture2Dの生成に使用していたLoadImageメソッドはbyte配列のデータでしか使用できません。
ポインタからbyte配列に直すことも可能ですが、byte配列を生成してしまうとそれはマネージドヒープに載ってしまい、せっかくアンマネージドメモリで処理している意味がなくなります。そこで、Texture2D.LoadImageメソッドの代わりにTexture2D.LoadRawTextureDataメソッドを使用しており、このメソッドにはポインタが渡せます。
しかし、このメソッドは扱える画像の形式が異なっており、LoadImageメソッドがpngやjpgの画像をそのまま読み込むのに対して、LoadRawTextureDataメソッドは圧縮された画像のバイナリデータを読み込みます。そのため、フォーマットやテクスチャサイズの情報も必要となります。
- 圧縮したテクスチャのバイナリデータが必要(PVRTC、ETC2、ASTC、など)
- 圧縮したテクスチャのフォーマットとサイズの情報が必要
圧縮したテクスチャのバイナリデータを用意する
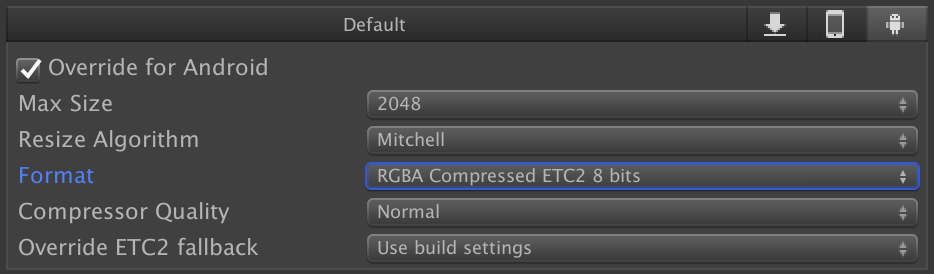
Unityに画像をインポートして、インポーター設定で圧縮設定を行います。
その後、スクリプトからTexture2D.GetRawTextureDataメソッドでバイナリデータを取得し、File.WriteAllBytesメソッドで書き出します。
サンプルプロジェクトでは初期化の時、この方法でビルドインアセットからバイナリデータの作成を行なっています。メモリ効率
Texture2D.LoadImageメソッドはRGBA32のフルカラーでテクスチャを読み込むため、メモリに優しくありません。そこが圧縮したテクスチャであれば改善されます。
以下は、1000x1000のテクスチャをRGBA32とETC2_RGBA8で読み込んだ時の比較です。
課題
プロファイラから分かるように負荷が減り、画像を多く読み込んでも画面がカクつかなくなりました。また、テクスチャが圧縮されることでメモリ効率も良くなり、改善が見られる結果が得られました。
しかし、課題もあります。
- 圧縮したバイナリデータを用意する必要があるため、画像を変換する一手間が必要となる。
- もともと減色処理などして容量削減をしていた場合、おそらくそれよりも容量が大きくなる。
- 圧縮形式がプラットフォームごとに違う場合、OSごとにリソースを用意する必要がある。
- 圧縮した画像はOSデフォルトのビューワーで確認できないため、ビューワーを用意した方が効率的。
- 画像を暗号化していた場合、復号化でマネージドヒープを使用してしまうとパフォーマンスが低下する。良い解決法がないか検討の必要があるが、OSデフォルトのビューワーで開けなくなるため、暗号化するかはプロジェクトの方針次第。
導入や運用のコストは上がりますが、とはいえ自動化やツールの作成でカバーできる範囲かと思います。何より画像を多く読み込むシーンで効果が発揮されるかと思います。
アセットバンドル
ここまでやるのであればアセットバンドルで良いのでは?となるので試してみます。下記コードはローカルからアセットバンドルを読み込んで画像を取り出すサンプルです。
アセットバンドルが暗号化されることを想定して、バイナリデータをbyte配列で読み込み、そこからLoadFromMemoryAsyncで読み込みます。private IEnumerator LoadAssetBundle() { string filePath = Application.persistentDataPath + "/AssetBundle/android/test.unity3d"; byte[] byteData = File.ReadAllBytes(filePath); // decryption AssetBundleCreateRequest createRequest = AssetBundle.LoadFromMemoryAsync(byteData); yield return createRequest; AssetBundle assetBundle = createRequest.assetBundle; AssetBundleRequest request = assetBundle.LoadAssetAsync<Texture2D>("hoge"); yield return request; Texture2D texture = request.asset as Texture2D; assetBundle.Unload(false); }一時的なbyte配列の保持はできれば避けたいので、そこを工夫した復号化の方法があればそちらが良いです。暗号化しないのであれば、LoadFromFileAsyncで読み込んだほうが軽くて良いかと思います。
これを同じ条件(1000x1000の画像)で100回繰り返して試してみます。
FPS 1フレームあたりの負荷 全体の処理時間 アセットバンドル 60 1ms 〜 2ms 4.8秒 比較すると負荷はAsyncTextureReaderとあまり変わらず、処理時間が少し伸びる結果となりました。とはいえ十分に軽いです。
また、リソースがアセットバンドルで更に圧縮されるため、ファイルサイズの削減が期待できます。まとめ
テクスチャフォーマット FPS 1フレームあたりの負荷 全体の処理時間 ファイルサイズ メモリサイズ Texture2D.LoadImage RGBA32 40 16ms以上 2.6秒 692KB 7.6MB AsyncTextureReader ETC2_RGBA8 60 1ms 〜 2ms 3.3秒 977KB 1.9MB AssetBundle ETC2_RGBA8 60 1ms 〜 2ms 4.8秒 175KB 1.9MB まず、Texture2D.LoadImageが重いことはよく分かりました。小さな画像であれば気にならないかもしれませんが、どうしても負荷が気になるシーンが出てきそうです。
アセットバンドルはファイルサイズが小さく負荷も軽かったです。また、Unityアセットであれば等しく扱えるため、画像以外も含めてリソースの管理方法を一本化できるのが利点です。
しかし、リソースが頻繁に増えるような場合で全部アセットバンドルにしていると、手間やビルド時間が気になってくるかもしれません。そういった場合に、AsyncTextureReaderのような仕組みが検討できるのかなと思います。また、Unityのメモリ管理のことも少し知れて良かったです。今後は、今まで以上にメモリに優しいコーディングを意識できそうです。
ちなみに、結局今回どのような対応にしたのかですが、フレームワークの改修が容易ではなかったため、効果が出やすい大きな画像をアセットバンドルにすることで対応を行いました。
参考