- 投稿日:2020-03-24T22:55:27+09:00
デフォルトTableViewサンプル集 【操作編】(swift)
はじめに
デフォルトTableViewサンプル集(swift)これのセル選択や編集などの操作編です。
複数選択 複数選択 2 一部選択不可 セル編集
メニュー インデックスバー スワイプ 複数選択
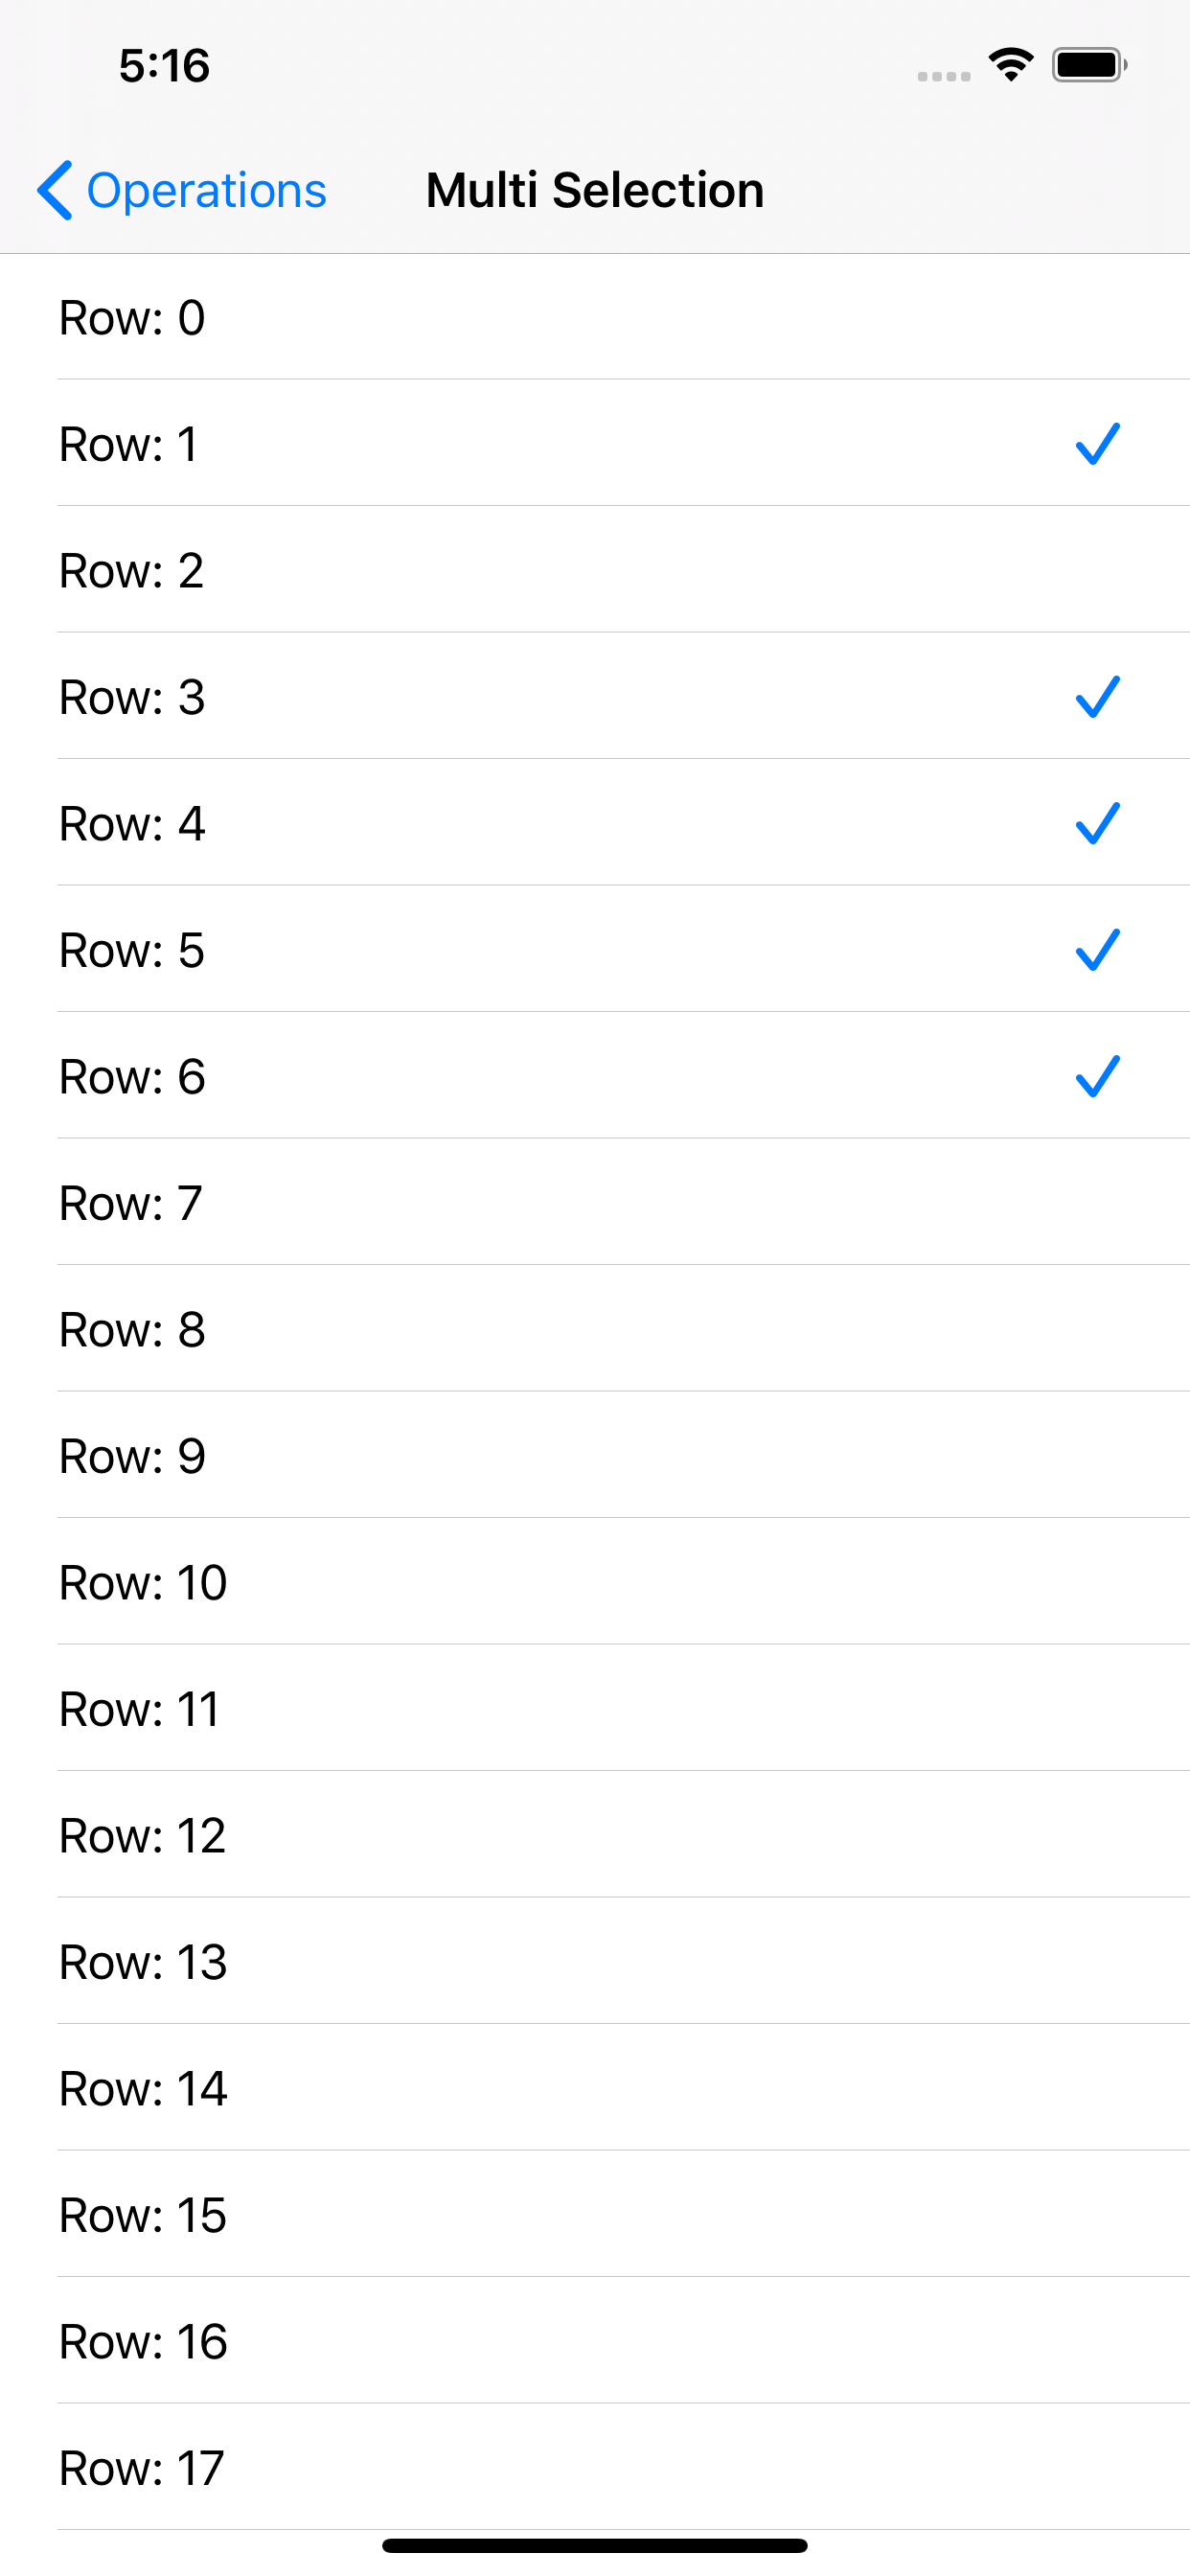
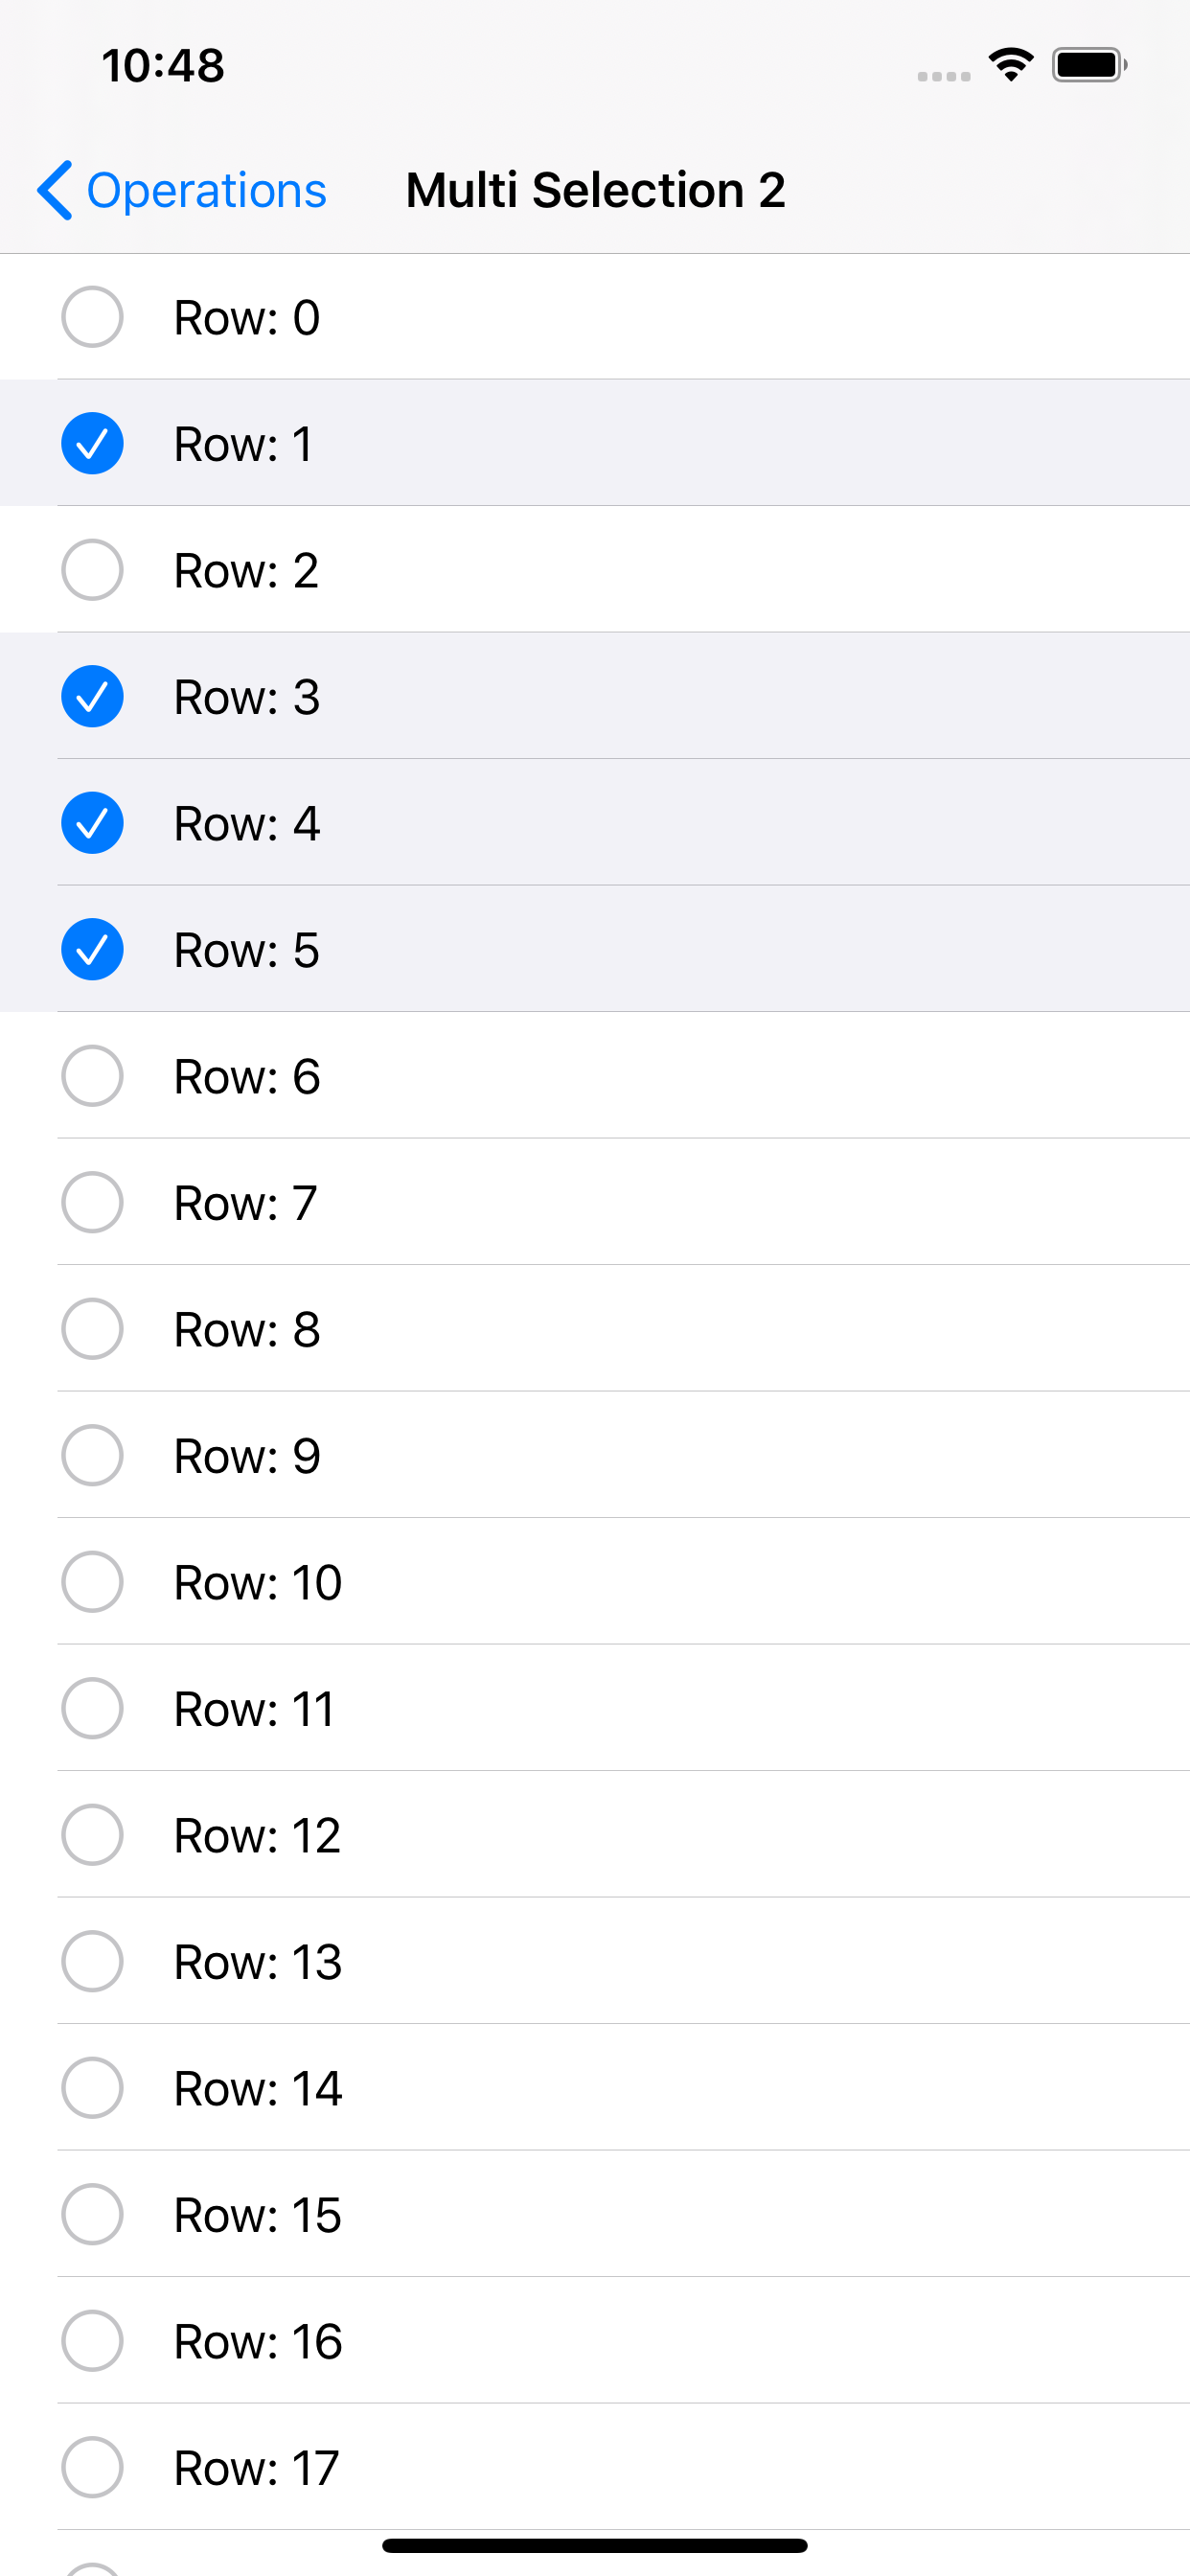
セルの複数選択処理です。
こんな感じ。
下記のように設定
tableView.allowsMultipleSelection = true処理としては上記のようにフラグを
trueにするだけでできる。選択したものにチェックマークをつけたい場合は下記も実装。
func tableView(_ tableView: UITableView, cellForRowAt indexPath: IndexPath) -> UITableViewCell {
  let cell = tableView.dequeueReusableCell(withIdentifier: "Cell", for: indexPath)

  // ここ
  cell.accessoryType = tableView.indexPathsForSelectedRows?.contains(indexPath) == true ?  .checkmark : .none
  cell.selectionStyle = .none // 選択時に背景色を変えないため
  return cell
}

func tableView(_ tableView: UITableView, didSelectRowAt indexPath: IndexPath) {
  if let cell = tableView.cellForRow(at: indexPath) {
    cell.accessoryType = .checkmark // チェックつける
  }
}

func tableView(_ tableView: UITableView, didDeselectRowAt indexPath: IndexPath) {
  if let cell = tableView.cellForRow(at: indexPath) {
    cell.accessoryType = .none // チェックはずす
  }
}
パターン2(20200325追記)
そういえば左側にチェックマーク置くのも簡単にできたので追記です。
こんな感じ。
実装は下記3行を追加するだけ!
tableView.isEditing = true
tableView.allowsMultipleSelection = true
tableView.allowsMultipleSelectionDuringEditing = true
一部のセル選択不可
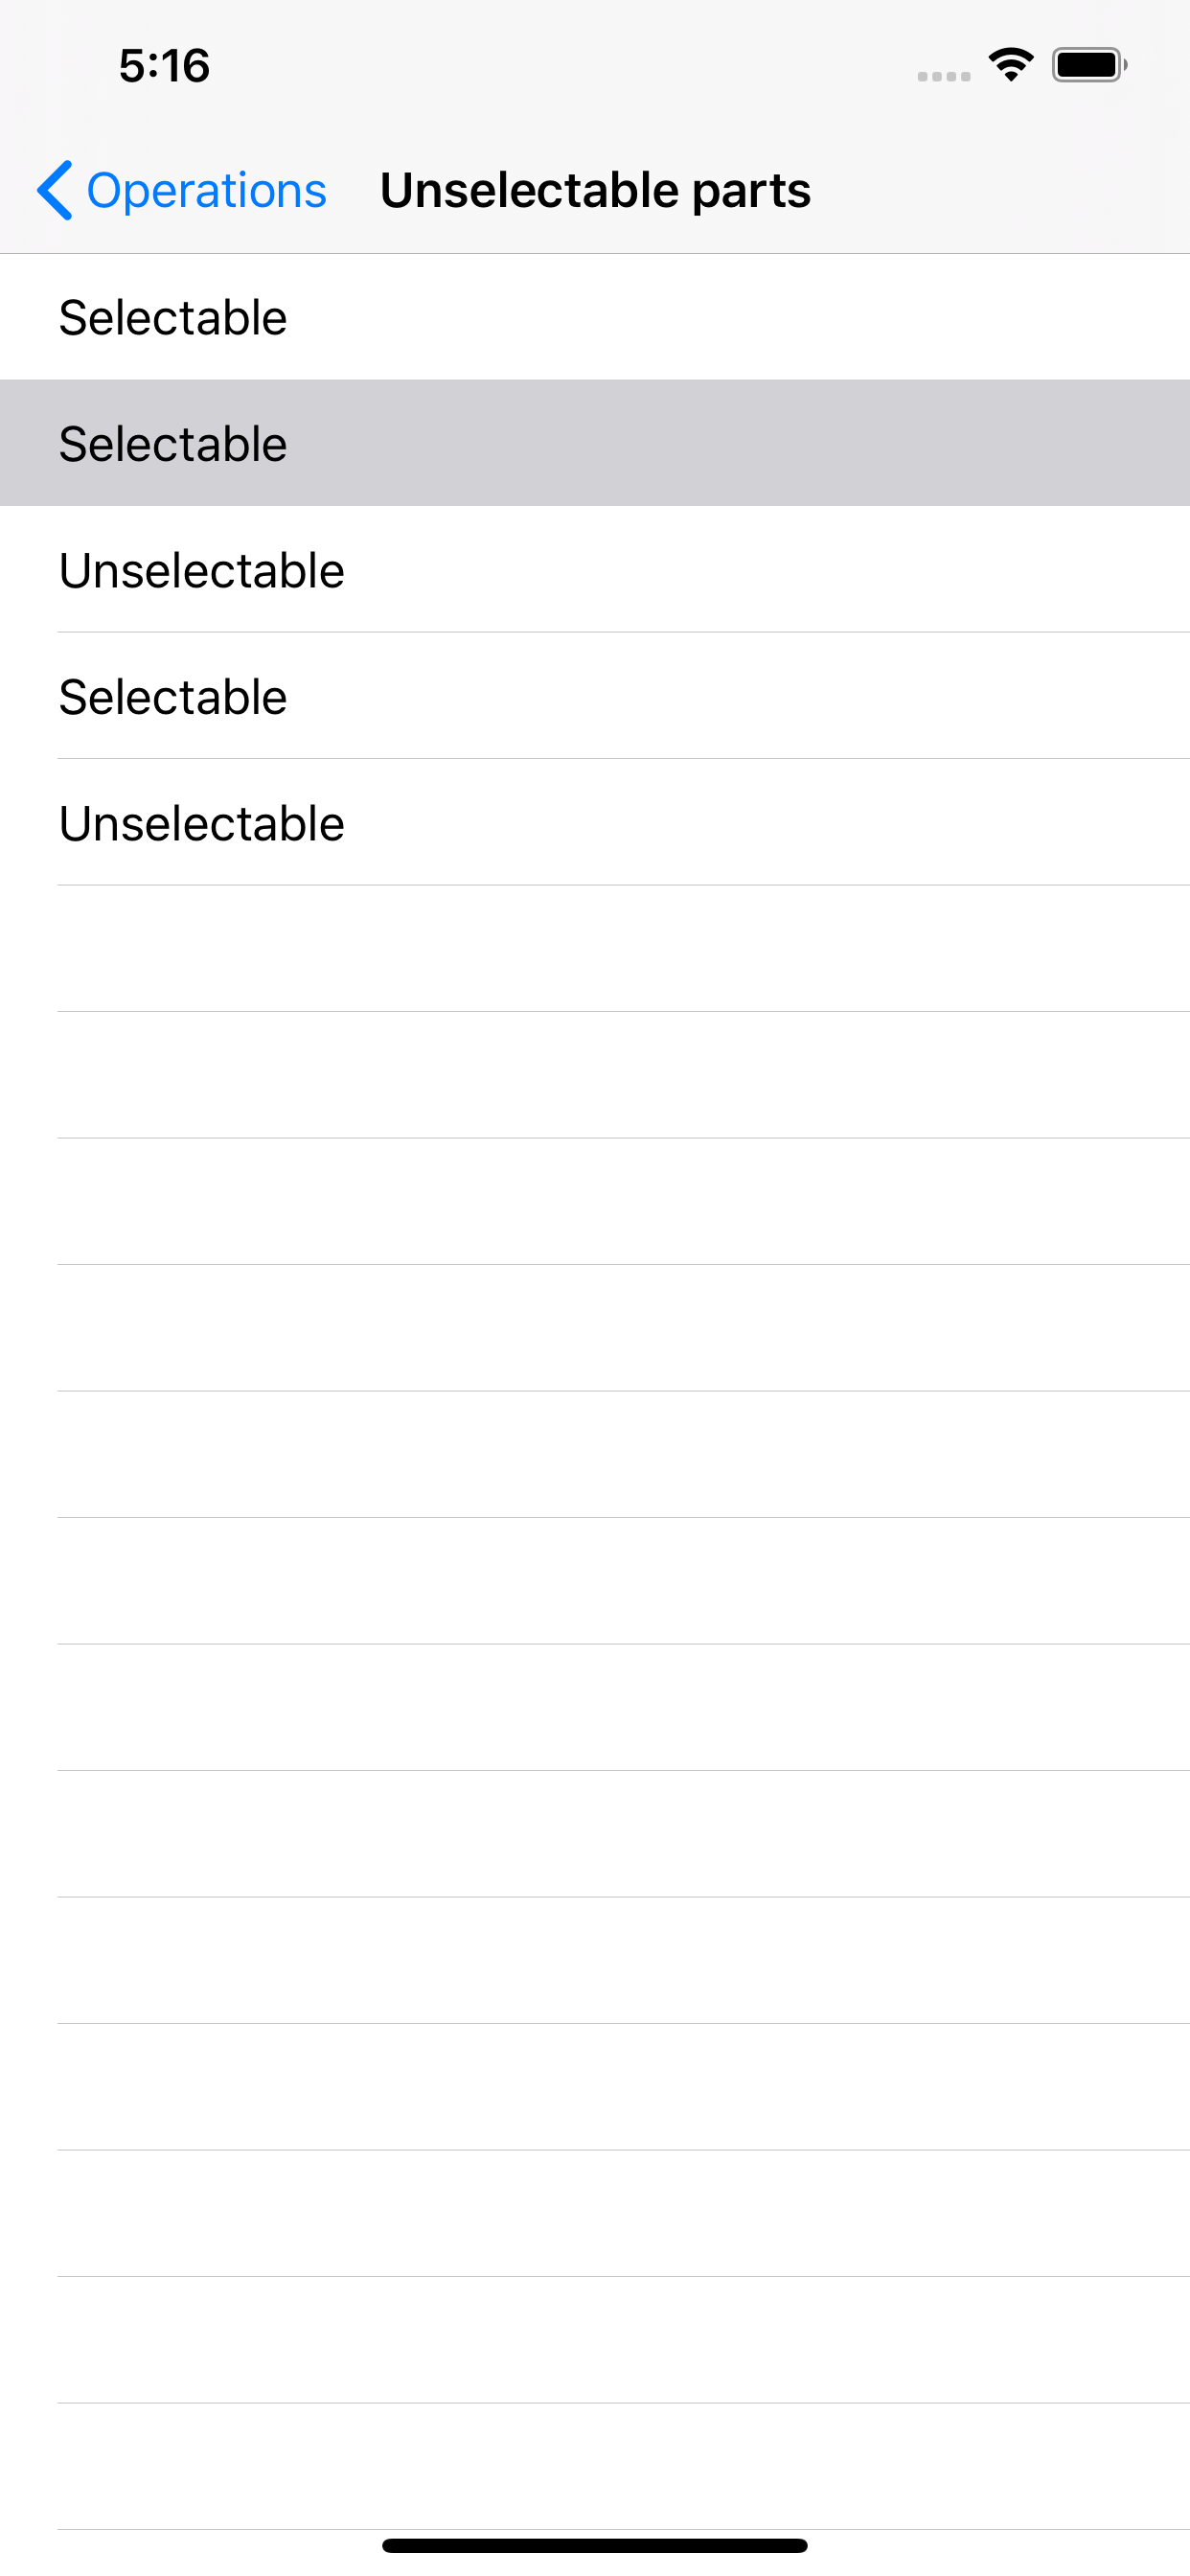
一部のセル選択不可にしたい場合は下記のように設定します。
func tableView(_ tableView: UITableView, cellForRowAt indexPath: IndexPath) -> UITableViewCell {
  let cell = tableView.dequeueReusableCell(withIdentifier: "Cell", for: indexPath)

  // 選択不可にしたい場合にnone設定
  cell.selectionStyle = selectable ? .default : .none
  return cell
}

func tableView(_ tableView: UITableView, willSelectRowAt indexPath: IndexPath) -> IndexPath? {
  // cell.selectionStyle = .noneだけだとselect自体はできる
   // 選択不可の場合にnilを設定する
  return selectable ? indexPath : nil
}
cell.selectionStyle = .noneだけだとセルタップ時にtableView(_:didSelectRowAt:)は呼ばれるしindexPathForSelectedRowにも値が設定されてしまうのでtableView(_:willSelectRowAt:)も設定する。セルの編集
初期表示で編集モードにしたい場合は
tableView.isEditing = trueを設定する。編集ボタンを表示したい場合は
navigationItem.rightBarButtonItem = editButtonItemでいける!編集モードの場合は完了ボタンに自動で変わってくれる
UITableViewControllerの場合は編集ボタン押下で自動で編集モードに変わってくれるUIViewControllerの場合はsetEditing(_ editing: Bool, animated: Bool)を実装してtableView.isEditing = trueで設定してやる必要がある)編集モードの場合もセル選択を有効にしたい場合は
tableView.allowsSelectionDuringEditing = trueを設定する。こんな感じ
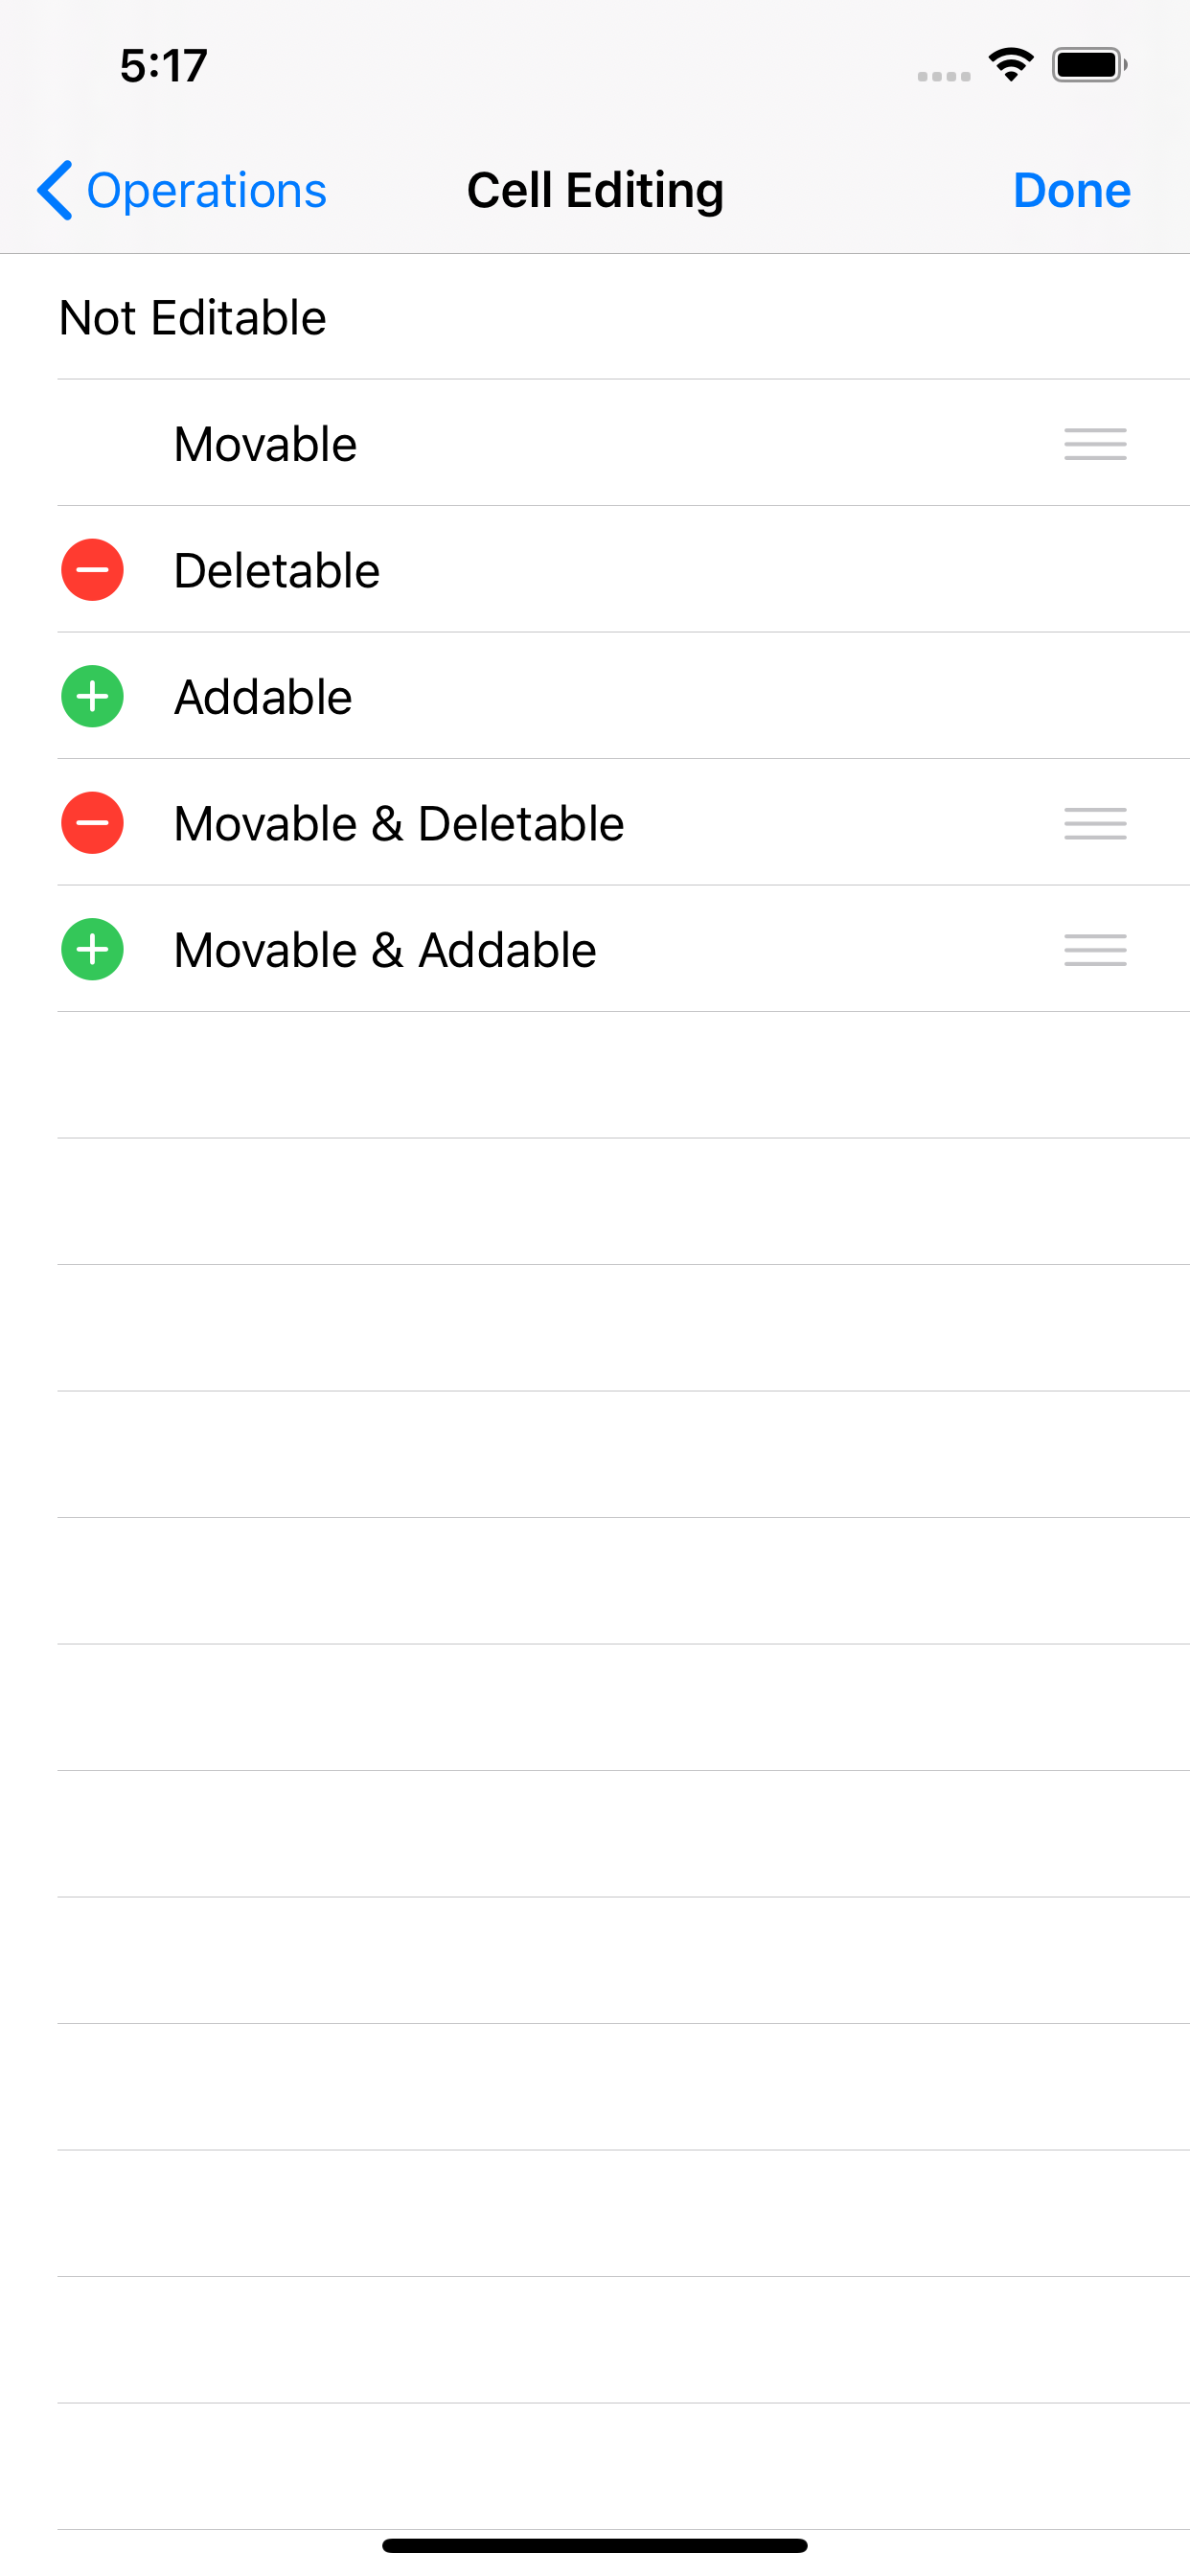
削除
削除ボタンを表示する。
下記を設定する。
override func tableView(_ tableView: UITableView, commit editingStyle: UITableViewCell.EditingStyle, forRowAt indexPath: IndexPath) {
  if editingStyle == .delete {
    tableDataList.remove(at: indexPath.row) // 先にリストから削除する
    // テーブルの高さが変わるのでこれで囲む
    tableView.beginUpdates()
    tableView.deleteRows(at: [indexPath], with: .automatic)
    tableView.endUpdates()
  }
}
これで削除ボタンタップ時と左にスワイプした時に削除処理がはしる。
追加
追加ボタンを表示する。
下記を設定する。
override func tableView(_ tableView: UITableView, commit editingStyle: UITableViewCell.EditingStyle, forRowAt indexPath: IndexPath) {
  if editingStyle == .insert {
    // 対象セルの下に追加(先にリストに追加する)
    tableDataList.insert(0, at: indexPath.row + 1)
    tableView.beginUpdates()
    tableView.insertRows(at: [IndexPath(row: indexPath.row + 1, section: 0)], with: .automatic)
    tableView.endUpdates()
  }
}

override func tableView(_ tableView: UITableView, editingStyleForRowAt indexPath: IndexPath) -> UITableViewCell.EditingStyle {
  return .insert // これを設定しないと削除モードになる
}
移動
セルを移動させる。
下記を設定する。
override func tableView(_ tableView: UITableView, canMoveRowAt indexPath: IndexPath) -> Bool {
  return true
}

override func tableView(_ tableView: UITableView, moveRowAt sourceIndexPath: IndexPath, to destinationIndexPath: IndexPath) {
  // 移動処理
  let element = tableDataList[sourceIndexPath.row]
  tableDataList.remove(at: sourceIndexPath.row)
  tableDataList.insert(element, at: destinationIndexPath.row)
}
削除ボタンを表示したくない場合
override func tableView(_ tableView: UITableView, editingStyleForRowAt indexPath: IndexPath) -> UITableViewCell.EditingStyle {
  return .none
}
編集モード時にインデントを変更したくない場合(削除or追加ボタンがある場合は変わらない)
override func tableView(_ tableView: UITableView, shouldIndentWhileEditingRowAt indexPath: IndexPath) -> Bool {
  return false
}
移動不可
override func tableView(_ tableView: UITableView, canMoveRowAt indexPath: IndexPath) -> Bool {
  return indexPath.row != 0 // 一番上のセルを移動不可に設定
}
上記の設定で一番上のセル(row=0)は移動不可になりましたが他のセルを一番上に移動させることは可能です
移動先としても不可にしたい場合は下記も設定する。
override func tableView(_ tableView: UITableView, targetIndexPathForMoveFromRowAt sourceIndexPath: IndexPath, toProposedIndexPath proposedDestinationIndexPath: IndexPath) -> IndexPath {
        return indexPath.row != 0 ? sourceIndexPath : proposedDestinationIndexPath
    }
ロングタップでメニュー表示
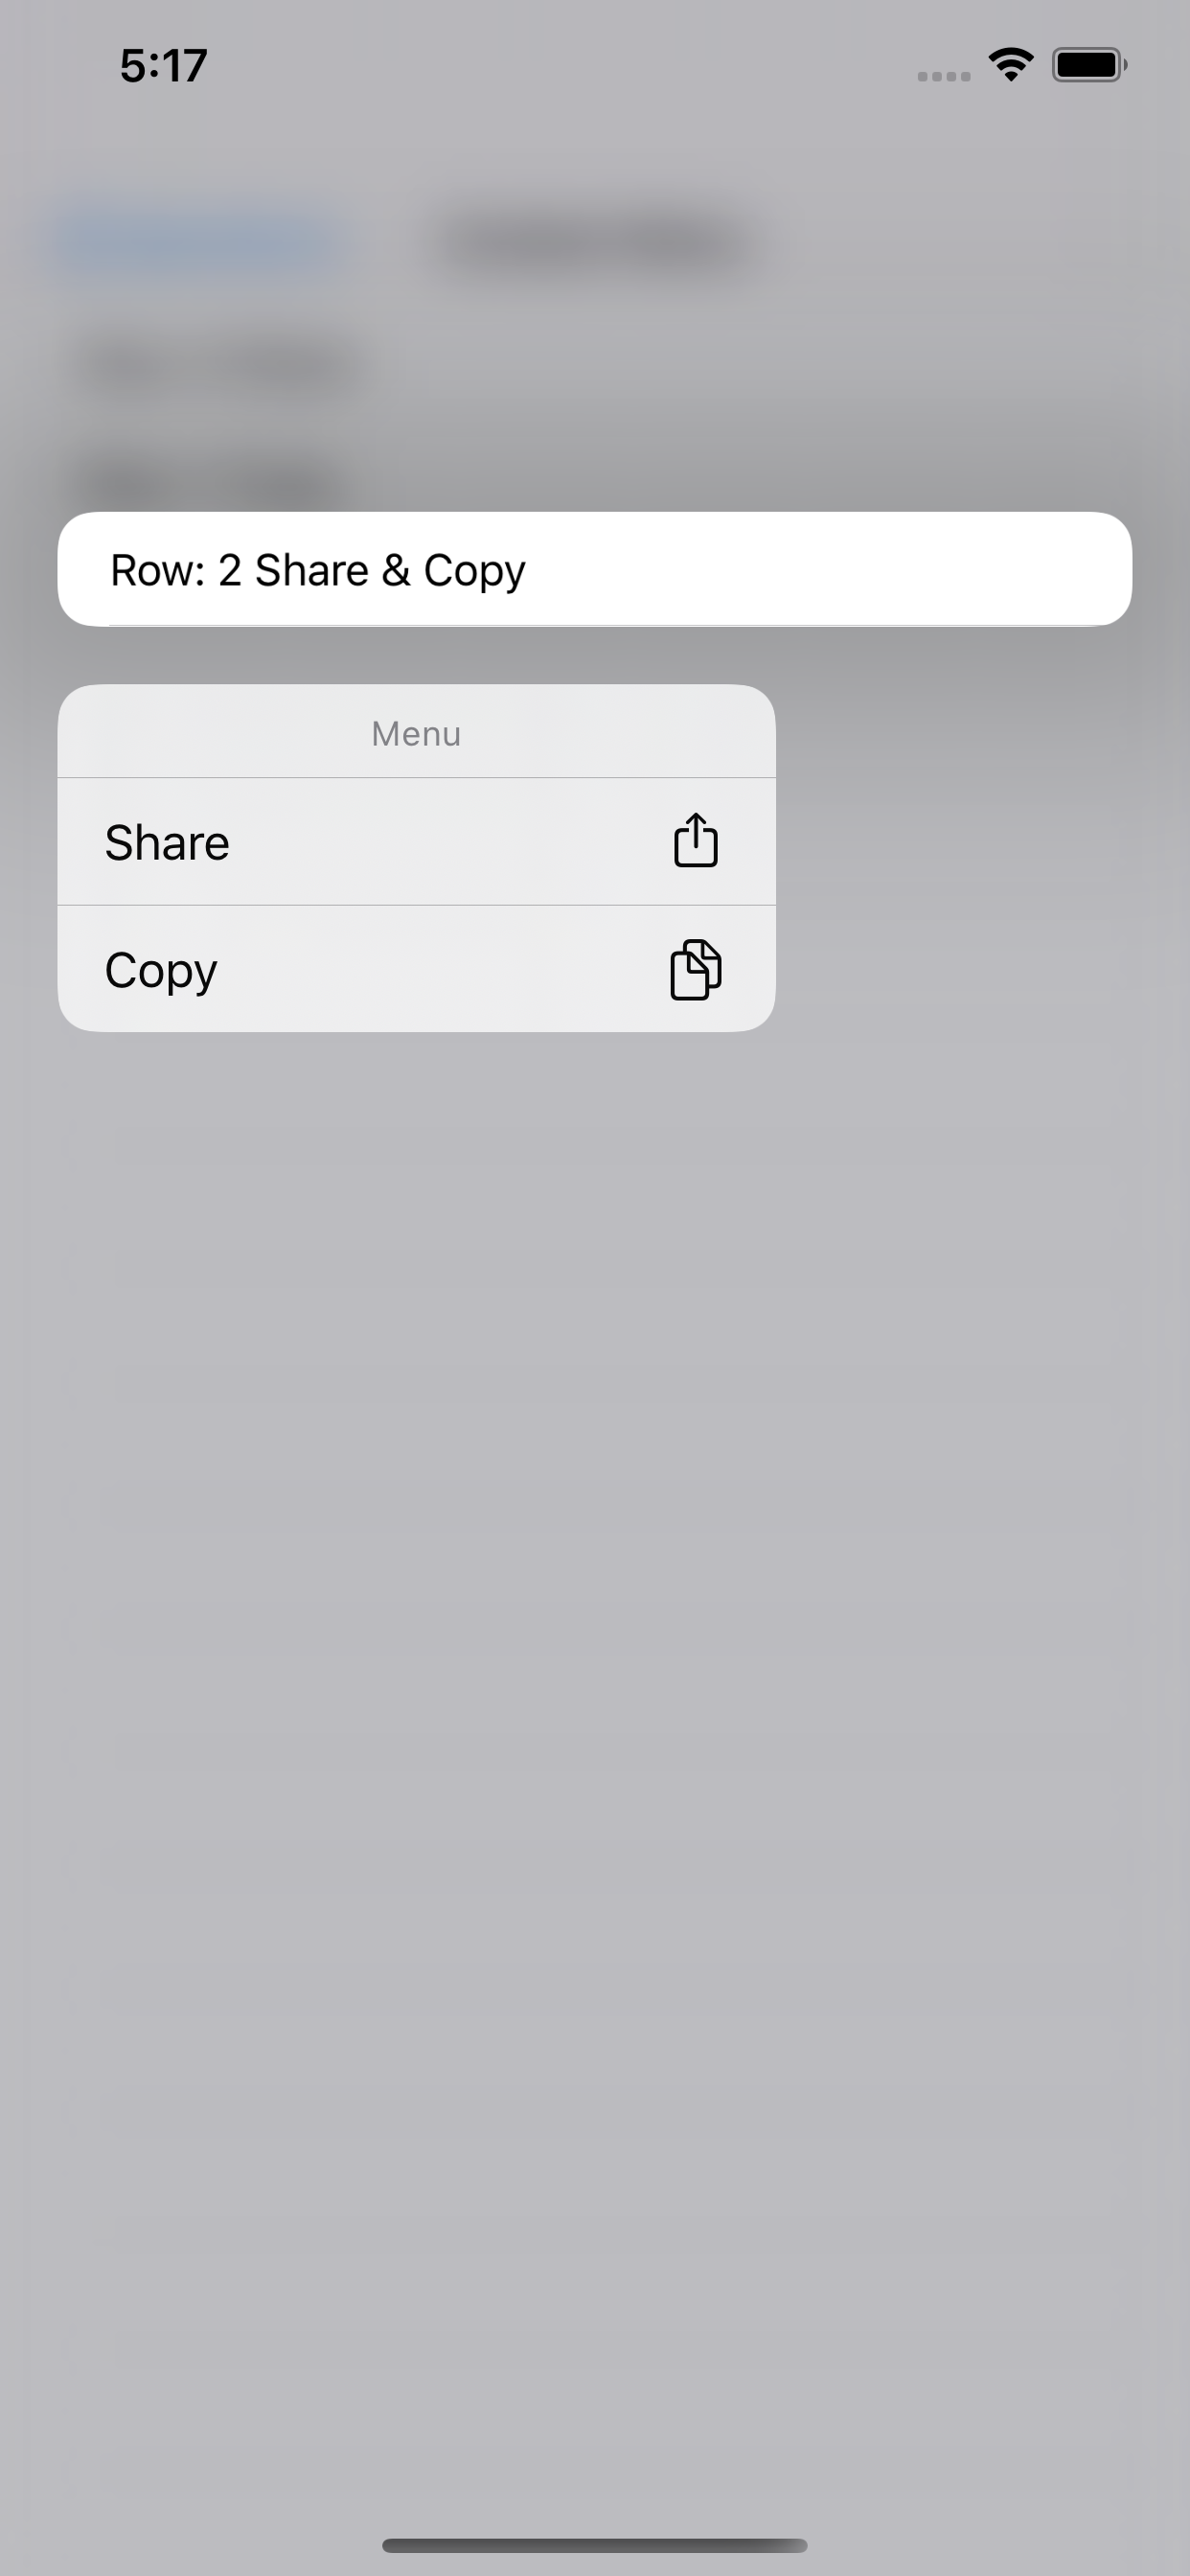
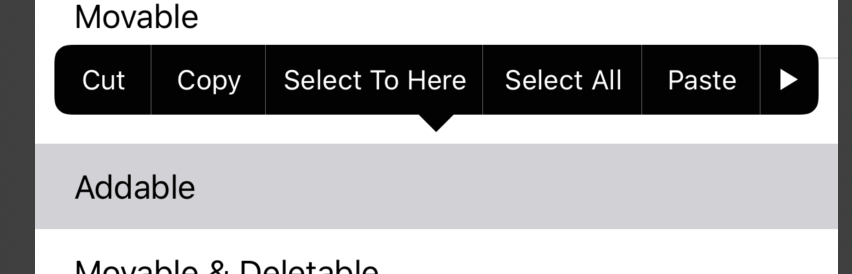
こんな感じのやつすぐ実装できんねや!知らんかった!と思ったら全部 iOS13 で Deprecated だった...
func tableView(_ tableView: UITableView, shouldShowMenuForRowAt indexPath: IndexPath) -> Bool
func tableView(_ tableView: UITableView, canPerformAction action: Selector, forRowAt indexPath: IndexPath, withSender sender: Any?) -> Bool
func tableView(_ tableView: UITableView, performAction action: Selector, forRowAt indexPath: IndexPath, withSender sender: Any?)
代わりにこれを使うらしい
tableView(_:contextMenuConfigurationForRowAt:point:)こんな感じ
override func tableView(_ tableView: UITableView, contextMenuConfigurationForRowAt indexPath: IndexPath, point: CGPoint) -> UIContextMenuConfiguration? {
  let configuration = UIContextMenuConfiguration(identifier: nil, previewProvider: nil) { actions -> UIMenu? in
    let copy = UIAction(title: "Copy", image: UIImage(systemName: "doc.on.doc"),
                                identifier: nil)
            { action in
                if let cell = tableView.cellForRow(at: indexPath) {
                  UIPasteboard.general.string = cell.textLabel?.text
                }
            }
            return UIMenu(__title: "Menu", image: nil, identifier: nil, children: [copy])
  }
  return configuration
}
インデックスバー
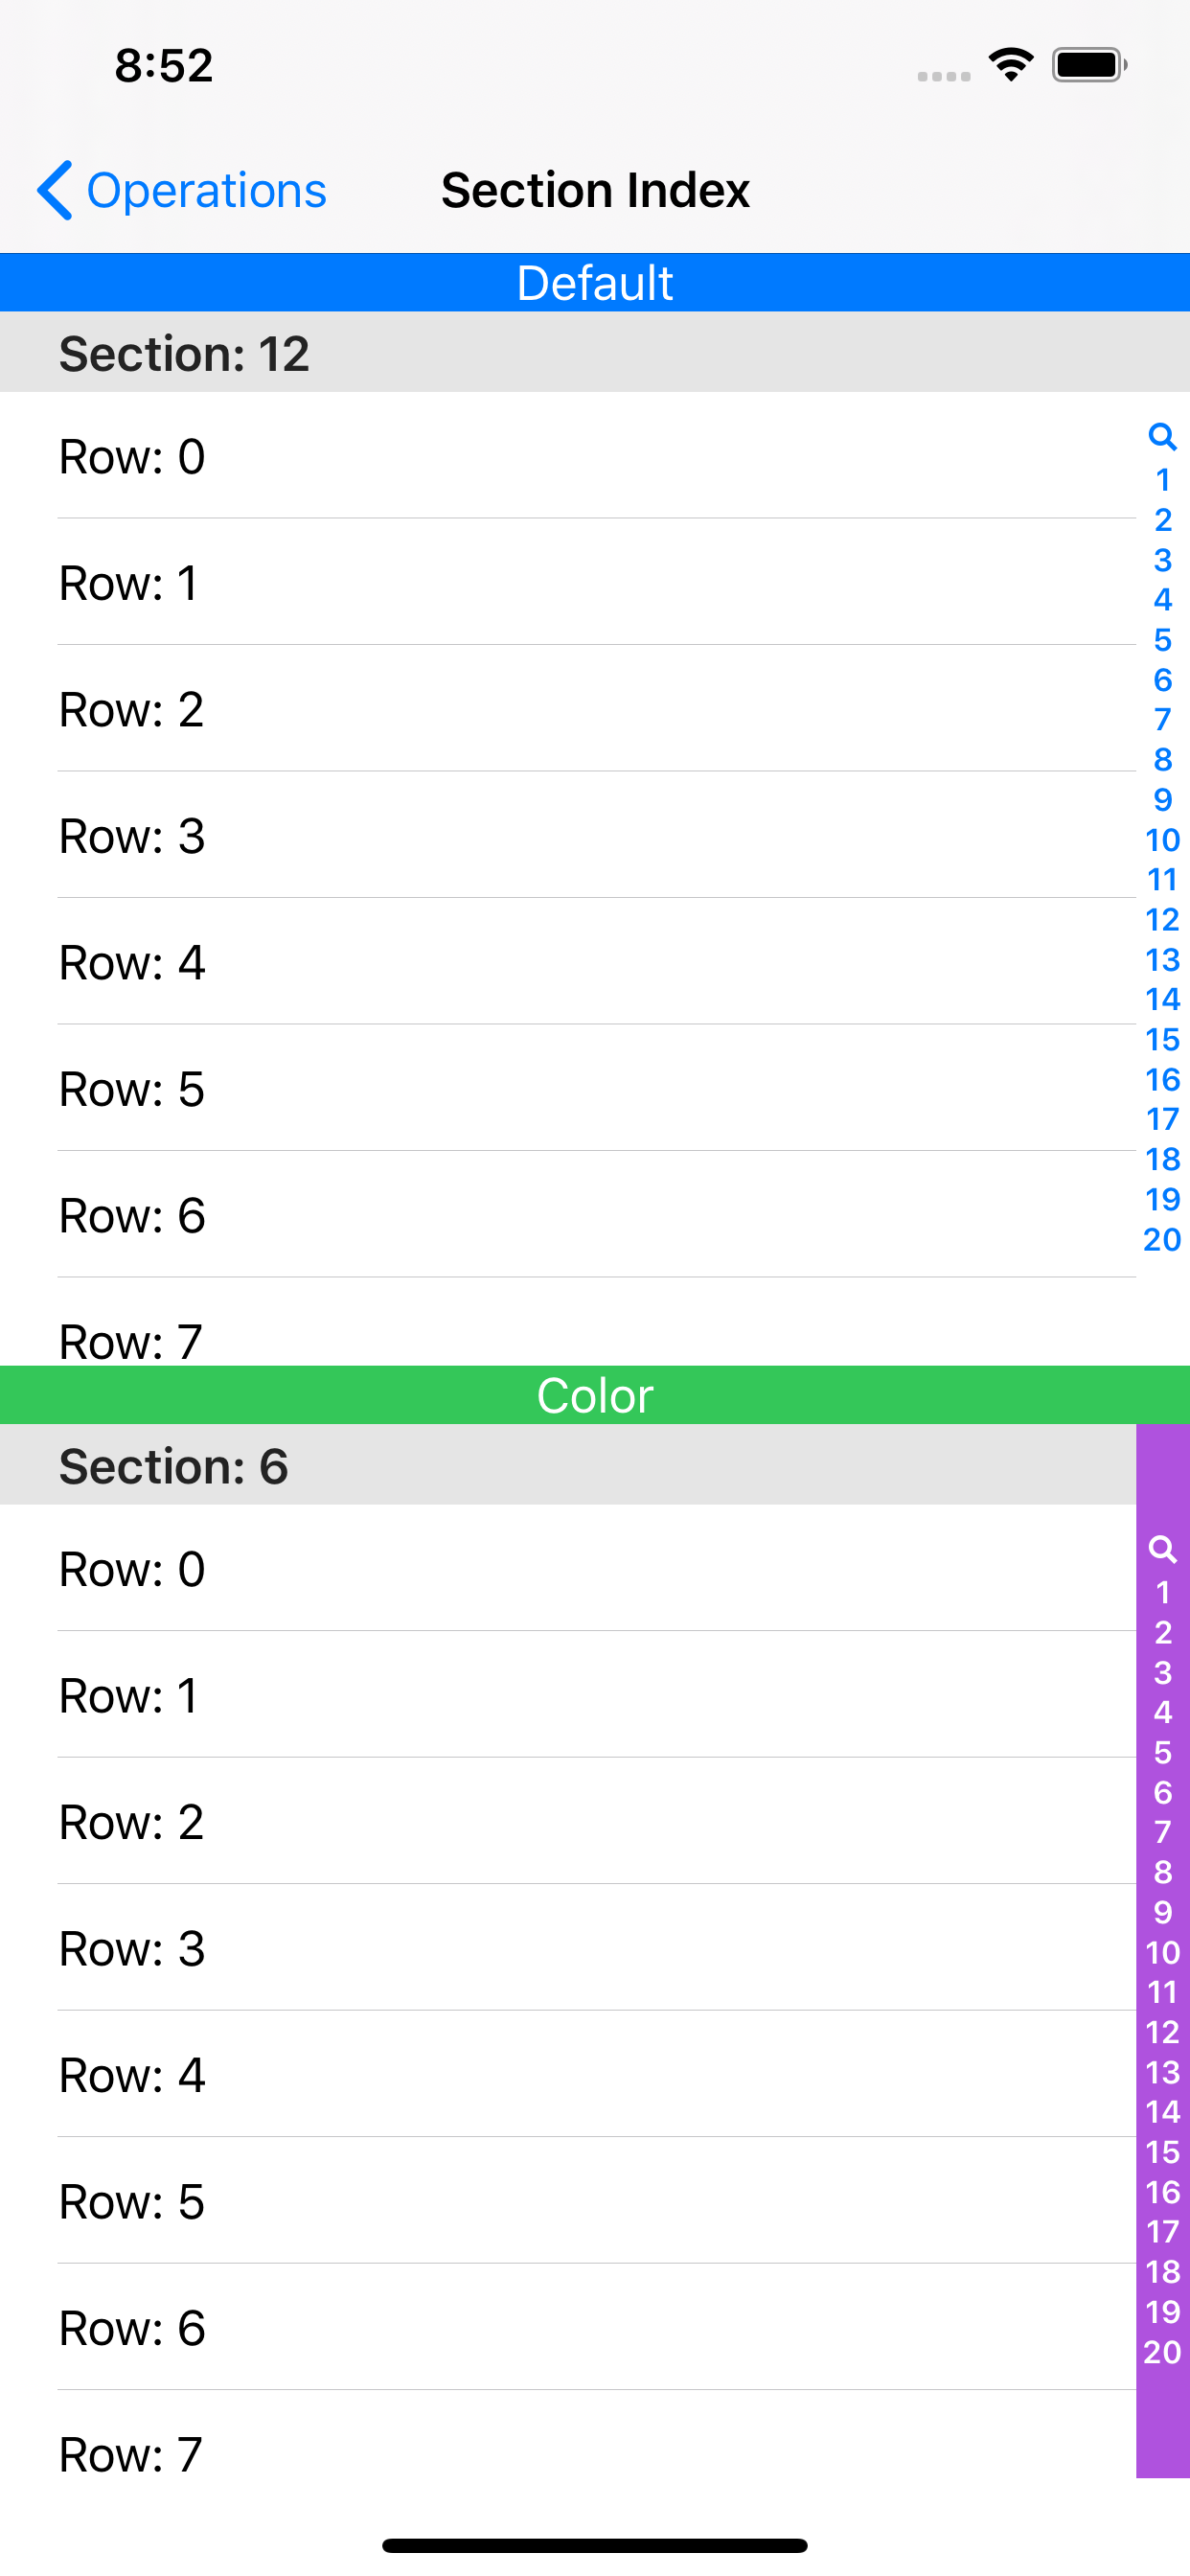
標準の電話帳アプリとかにあるやつ。
こんな感じ
テーブルの style が
.groupedでも表示されるがドキュメントには.plainのみみたいなことが書いてあるので.plainにしましょう。The table view must be in the plain style (UITableViewStylePlain).
参考:ドキュメント
func sectionIndexTitles(for tableView: UITableView) -> [String]? {
  return ["A", "B", "C"] // インデックスバーの文字設定
}

// 特殊なことをしないのであれば特に実装しなくても対象のセクションが表示される
func tableView(_ tableView: UITableView, sectionForSectionIndexTitle title: String, at index: Int) -> Int {
  return index
}
虫眼鏡アイコン下記のようにすると一番上に虫眼鏡アイコンが表示される。
func sectionIndexTitles(for tableView: UITableView) -> [String]? {
  return [UITableView.indexSearch, "A", "B", "C"]
}
使うなら一番上に置けみたいなことが書いてある。
This location should generally be the first title in the index.
参考:ドキュメント
これの使い道はよくわかりません。。。
カスタム
下記のように色が設定できる。
tableView.sectionIndexColor = .white // 文字色
tableView.sectionIndexBackgroundColor = .systemPurple // バーの背景色
tableView.sectionIndexTrackingBackgroundColor = .systemRed // ハイライト時の背景色
スワイプ
なんか昔ライブラリ入れてやった気がしますが標準でスワイプアクションがあるそうです。
こんな感じ。
(めっちゃアクションを追加できるけどたぶんそんな使い方をすることはない)
下記のように実装する。
// 右へスワイプ
func tableView(_ tableView: UITableView, leadingSwipeActionsConfigurationForRowAt indexPath: IndexPath) -> UISwipeActionsConfiguration? {
  let action = UIContextualAction(style: .normal, title: "Action") { (action, view, completionHandler) in
           // なんか処理
           completionHandler(true) // 処理成功時はtrue/失敗時はfalseを設定する
           }
           let configuration = UISwipeActionsConfiguration(actions: [action])
        return configuration
}

// 左へスワイプ
func tableView(_ tableView: UITableView, trailingSwipeActionsConfigurationForRowAt indexPath: IndexPath) -> UISwipeActionsConfiguration? {
let action = UIContextualAction(style: .destructive, title: "Action") { (action, view, completionHandler) in
           // なんか処理
           completionHandler(true) // 処理成功時はtrue/失敗時はfalseを設定する
           }
           let configuration = UISwipeActionsConfiguration(actions: [action])
        return configuration
}
Action の
styleにはnormalとdestructive(削除系)の2種類があります。スワイプを引っ張り切ると
UISwipeActionsConfiguration(actions: [action])の最初のactionが実行されます。これを無効にした場合は
configuration.performsFirstActionWithFullSwipe = falseを設定する。カスタム
action.backgroundColor = .systemBlue // 背景色設定
action.image = UIImage(systemName: "pencil.circle.fill") // 画像設定(タイトルは非表示になる)
さいごに
Table関連は頻繁に処理が追加されてるのでたまにチェックした方がいい。追加されたときは見るけど古いバージョンも動作保証してると使えないのでよく忘れます...たまにチェックしよう!
ドラッグドロップは色々できそうなのでまた時間があれば追加します...
プルリクくれてもええんやで
- 投稿日:2020-03-24T20:25:34+09:00
swiftでキーボードの扱いが面倒なので「IQKeyboardManager」を使ったら神だった
swiftでテキストを入力したりするときにキーボードの操作もしなければいけないのがすごく面倒くさい。
何てったって
・キーボードを表示
・doneをクリックしたらキーボードを隠すなのですが、これがよく忘れたりきちんと動かなかったり(俺が悪い)、ビルドしてから気づく。なんてことがあったので探してみたら速攻見つかりました。
使用感
簡単に使ってみましたがすごくいい。
https://www.youtube.com/watch?time_continue=4&v=iS1v7tSPUbc&feature=emb_title
参考
https://qiita.com/k-yamada-github/items/d4c791424ead414e3142
- 投稿日:2020-03-24T18:44:20+09:00
SwiftUIのPreview実装をそのまま使って、Screenshot撮影を自動化する
はじめに
SwiftUIのPreview機能を活用して、実装したPreview用のコードをそのままScreenshot撮影自動化に利用できる方法の紹介です。
わざわざテスト用のコードを実装することなく、既存の記述をほぼそのままCIとして組み込めるので、かなり簡単に対応できると思います。
これを使って、画像diffから意図しないUI変更を検知したり、簡単なUIカタログのようなものを作ることもできます。完成形
先に完成形を記載しておきます
Previewの実装
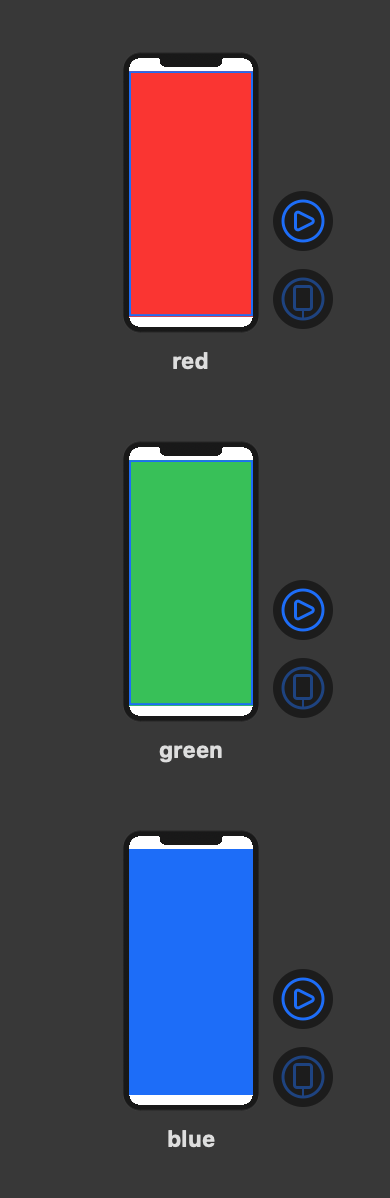
struct ContentView_Previews: PreviewProvider {
    // Previewableに適合したenumを定義して、previewプロパティで状態に応じたViewを返すだけです
    enum Context: String, Previewable {
        case red
        case green
        case blue

        var preview: some View {
            switch self {
            case .red:
                return ContentView()
                    .foregroundColor(.red)
            case .green:
                return ContentView()
                    .foregroundColor(.green)
            case .blue:
                return ContentView()
                    .foregroundColor(.blue)
            }
        }
    }

    static var previews: some View {
        // Previewableに定義してある便利関数で、各caseごとのViewをGroupで括った上で返却します
        Context.groupedAllContext
    }
}
Preview画面での実際の表示はこんな感じ
テストコードの実装
テスト用の実装はこれだけでOKです
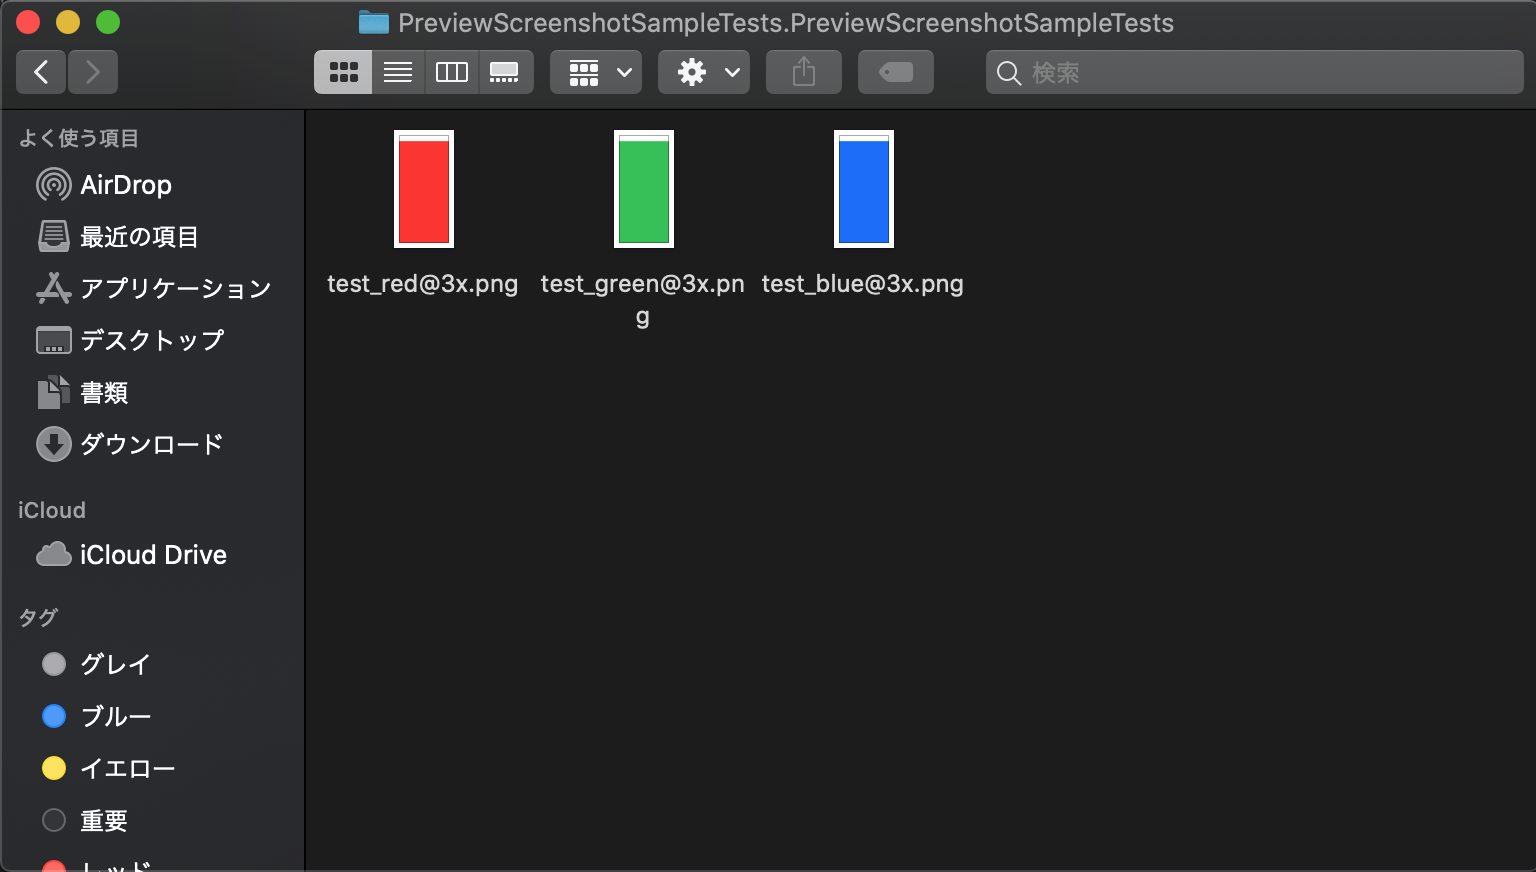
class PreviewScreenshotSampleTests: FBSnapshotTestCase {
    override func setUp() {
        super.setUp()
        // ここは、今回利用したFBSnapshotTestCaseのための実装です
        self.recordMode = true
    }

    func test() {
        // Previewableに適合した型の、screenshotメソッドを呼び出すだけです。
        ContentView_Previews.Context.screenshot(self)
    }
}
画像はこんな感じで出力されます
Previewで表示されていたものと同じ画面が撮影できているのがわかると思います。
上記の通り、
Previewableに適合した型のpreviewプロパティから、スクリーンショットを撮影したい状態のViewを返してあげるだけで、SwiftUIのPreviewとUnitTest両方から同じ状態の画面を参照することができました。以下では仕組みの方の解説をします。
ライブラリの準備
今回は ios-snapshot-test-case を利用してスクリーンショットを撮影しました。
特にライブラリに依存した実装はないので、お好みのライブラリでスクリーンショットを撮影できるはずです。ios-snapshot-test-case用の設定としてSchemeに以下の環境変数を設定します。
これにより、指定したディレクトリに画像が保存されます。
Preiewableの定義
実装はこれだけです。詳細はコメントに記述しています。
protocol Previewable: CaseIterable, Hashable, RawRepresentable {
    associatedtype Preview: View
    var preview: Preview { get }
}

// Groupを使ってPreiewを分けたり、Stackを使って縦に並べるための便利関数です。
// 無くても問題ありません
extension Previewable where Self.AllCases: RandomAccessCollection, Self.RawValue == String {
    static var groupedAllContext: some View {
        Group {
            ForEach(Self.allCases, id: \.self) {
                // Stringのenumで定義しておけば、case名がそのままPreiew内に表示されるようにしています
                $0.preview.previewDisplayName($0.rawValue)
            }
        }
    }

    static var stackedAllContext: some View {
        VStack {
            ForEach(Self.allCases, id: \.self) {
                $0.preview.previewDisplayName($0.rawValue)
            }
        }
    }
}
extension Previewable where Self.AllCases: RandomAccessCollection, Self.RawValue == String { static func screenshot(_ testCase: FBSnapshotTestCase) { // 定義されてある全てのケースを1つずつ撮影していく Self.allCases.forEach { (ctx) in ctx.screenshot(for: testCase) } } func screenshot(_ testCase: FBSnapshotTestCase) { let window = UIWindow(frame: UIScreen.main.bounds) // previewプロパティから対象の状態のViewを生成します window.rootViewController = UIHostingController(rootView: self.preview) window.makeKeyAndVisible() let expectation = testCase.expectation(description: "") DispatchQueue.main.asyncAfter(deadline: .now() + 3.0) { // ここで任意のスクリーンショット撮影処理を実行します。 // 今回はFBSnapshotTestCaseのメソッドを使うため、画面に表示されたぐらいのタイミングで、UIViewの型でSwiftUIの画面を取り出して受け渡します // identifierにrawValueを渡すことで、出力されるファイルの名前を定義したcaseの名前になるようにしています testCase.FBSnapshotVerifyView(window.rootViewController!.view, identifier: self.rawValue) expectation.fulfill() } testCase.wait(for: [expectation], timeout: 5.0) } }以上で必要な実装は終わりです。
サンプルコード

- 投稿日:2020-03-24T16:56:17+09:00
AuthKeyを利用してコマンド(curl)でPushテストする
メモ書き
簡単にPushテストできる方法をメモしておきます。
下記のスクリプト叩くだけ
/bin/bash push_test.shdeviceTokenはこんな感じで事前に取っておく。
AppDelegate.swiftfunc application(_ application: UIApplication, didRegisterForRemoteNotificationsWithDeviceToken deviceToken: Data) { var token: String = "" for i in 0..<deviceToken.count { token += String(format: "%02.2hhx", deviceToken[i] as CVarArg) } print("push token :\(token)") } }deviceTokenとAuthKey(デベロッパーページで作成)は事前に用意する。
push_test.sh#!/bin/bash deviceToken=dbfacf621430827771306fadb878304e9fd956f509527fc55bfd216915dxxx authKey="./AuthKey_XXXX43J85J.p8" authKeyId=XXXX43J85J teamId=XXXX798F94 # distribution # bundleId=jp.co.archive-asia.demo # endpoint=https://api.push.apple.com # development bundleId=jp.co.archive-asia.demo endpoint=https://api.development.push.apple.com #テスト read -r -d '' payload <<-'EOF' { "aps": { "badge": 2, "category": "あああ", "alert": { "title": "タイトル", "subtitle": "サブタイトル", "body": "ホゲホゲ" } }, "custom": { "mykey": "カスタムデータ" } } EOF base64() { openssl base64 -e -A | tr -- '+/' '-_' | tr -d = } sign() { printf "$1"| openssl dgst -binary -sha256 -sign "$authKey" | base64 } time=$(date +%s) header=$(printf '{ "alg": "ES256", "kid": "%s" }' "$authKeyId" | base64) claims=$(printf '{ "iss": "%s", "iat": %d }' "$teamId" "$time" | base64) jwt="$header.$claims.$(sign $header.$claims)" curl --verbose \ --header "content-type: application/json" \ --header "authorization: bearer $jwt" \ --header "apns-topic: $bundleId" \ --data "$payload" \ $endpoint/3/device/$deviceToken
- 投稿日:2020-03-24T16:56:17+09:00
コマンド(curl)でPushテストする方法(iOS)
メモ書き
AuthKeyを利用して簡単にPushテストできるのが分かったのでメモしておきます。
事前作業
- deviceTokenはこんな感じで事前に取っておく。
AppDelegate.swiftfunc application(_ application: UIApplication, didRegisterForRemoteNotificationsWithDeviceToken deviceToken: Data) { var token: String = "" for i in 0..<deviceToken.count { token += String(format: "%02.2hhx", deviceToken[i] as CVarArg) } print("push token :\(token)") } }
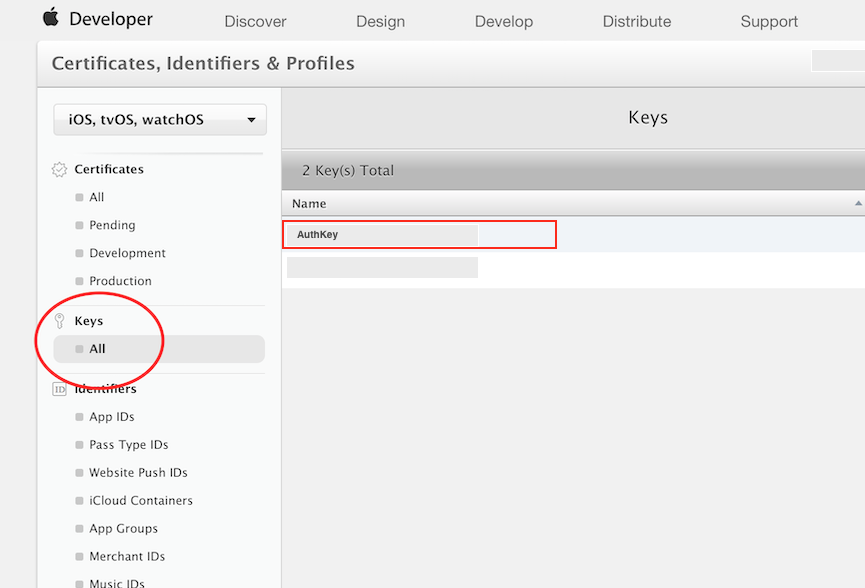
- AuthKey(デベロッパーページで作成)を取得
スクリプト
push_test.sh#!/bin/bash deviceToken=dbfacf621430827771306fadb878304e9fd956f509527fc55bfd216915dxxx authKey="./AuthKey_XXXX43J85J.p8" authKeyId=XXXX43J85J teamId=XXXX798F94 # distribution # bundleId=jp.co.archive-asia.demo # endpoint=https://api.push.apple.com # development bundleId=jp.co.archive-asia.demo endpoint=https://api.development.push.apple.com #テスト read -r -d '' payload <<-'EOF' { "aps": { "badge": 2, "category": "あああ", "alert": { "title": "タイトル", "subtitle": "サブタイトル", "body": "ホゲホゲ" } }, "custom": { "mykey": "カスタムデータ" } } EOF base64() { openssl base64 -e -A | tr -- '+/' '-_' | tr -d = } sign() { printf "$1"| openssl dgst -binary -sha256 -sign "$authKey" | base64 } time=$(date +%s) header=$(printf '{ "alg": "ES256", "kid": "%s" }' "$authKeyId" | base64) claims=$(printf '{ "iss": "%s", "iat": %d }' "$teamId" "$time" | base64) jwt="$header.$claims.$(sign $header.$claims)" curl --verbose \ --header "content-type: application/json" \ --header "authorization: bearer $jwt" \ --header "apns-topic: $bundleId" \ --data "$payload" \ $endpoint/3/device/$deviceToken実行
スクリプト叩くだけ
/bin/bash push_test.sh
- 投稿日:2020-03-24T15:17:01+09:00
iOSのiPhone端末別サポート状況(〜2020/3 & 〜iOS13)
頻繁にわからなくなるので、まとめました。
間違えありましたら、指摘or修正リクエストお願いします。表
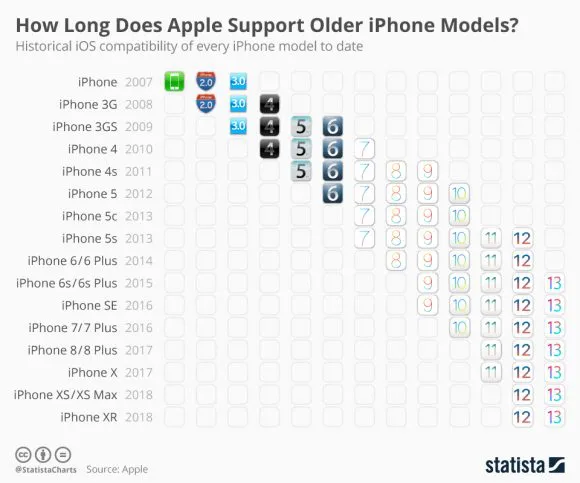
端末名 iOS ver
(工場出荷状態)iOS ver
(最終サポート)iPhone 1.0 3.0 iPhone 3G 2.0 4.0 iPhone 3GS 3.0 6.0 iPhone 4 4.0 7.0 iPhone 4S 5.0 9.0 iPhone 5 6.0 10.0 iPhone 5c 7.0 10.0 iPhone 5s 7.0 12.0 iPhone 6 / 6 Plus 8.0 12.0 iPhone 6s / 6s Plus 9.0 - iPhone SE 9.0 - iPhone 7 / 7 Plus 10.0 - iPhone 8 / 8 Plus 11.0 - iPhone X 11.0 - iPhone XR 12.0 - iPhone XS / XS Max 12.0 - iPhone 11 13.0 - iPhone 11 Pro/11 Pro Max 13.0 - 表つくってて思いましたが、iPhone 5sがやたらサポート長かったですね。
iOS 13からはiPhone 6S / iPhone SE以降となります。
iOS 14でiPhone SEが切られたら、4インチ端末は全滅ですかね。ソースはこちらです
- 投稿日:2020-03-24T11:46:28+09:00
Xcode11以降でfastlane matchで証明書を更新してはまったこと
Xcode11でfastlane matchで証明書を更新してから以下のようなエラーがでてビルドできなくなりました。
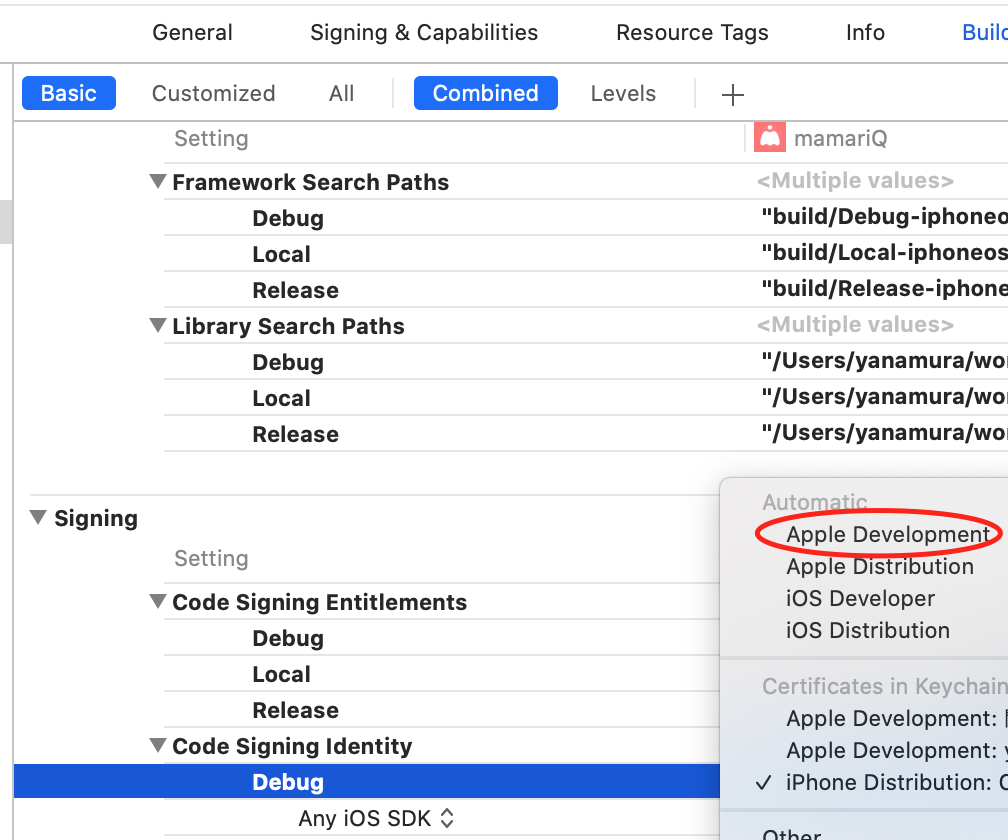
Provisioning profile xxxx doesn't include signing certificate yyyy原因
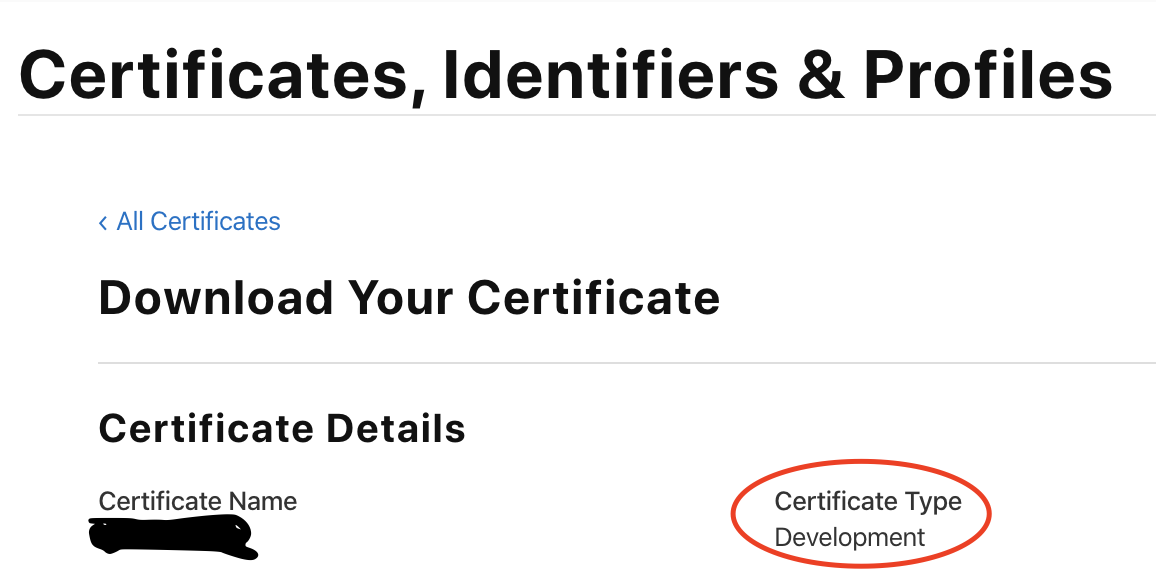
生成された証明書を確認してみるとCertificate Typeが以前は
iOS DevelopmentだったものがDevelopmentに変わっていました。
違いが何なのか調べてみると、これまでは
iOS DeveloperやiOS Distributionだったものが、Xcode11以降でApple Development,Apple Distributionに変わっていました。(document)修正方法
Code Signing Identityを
Apple DevelopmentやApple Distributionにしておけばよいです。(automaticの場合はiOS Developer/Distribution`にしていても大丈夫なようでした。直接keychainのcertificateを指定すると今回のようなビルドエラー起こってしまうのでよくないですね)
参考
- 投稿日:2020-03-24T01:43:09+09:00
iOS13のautomaticモーダルからfullScreenに横遷移する
こーゆう遷移をする方法を紹介します。
前置き
macOS 10.15.x
Xcode 11.2.x
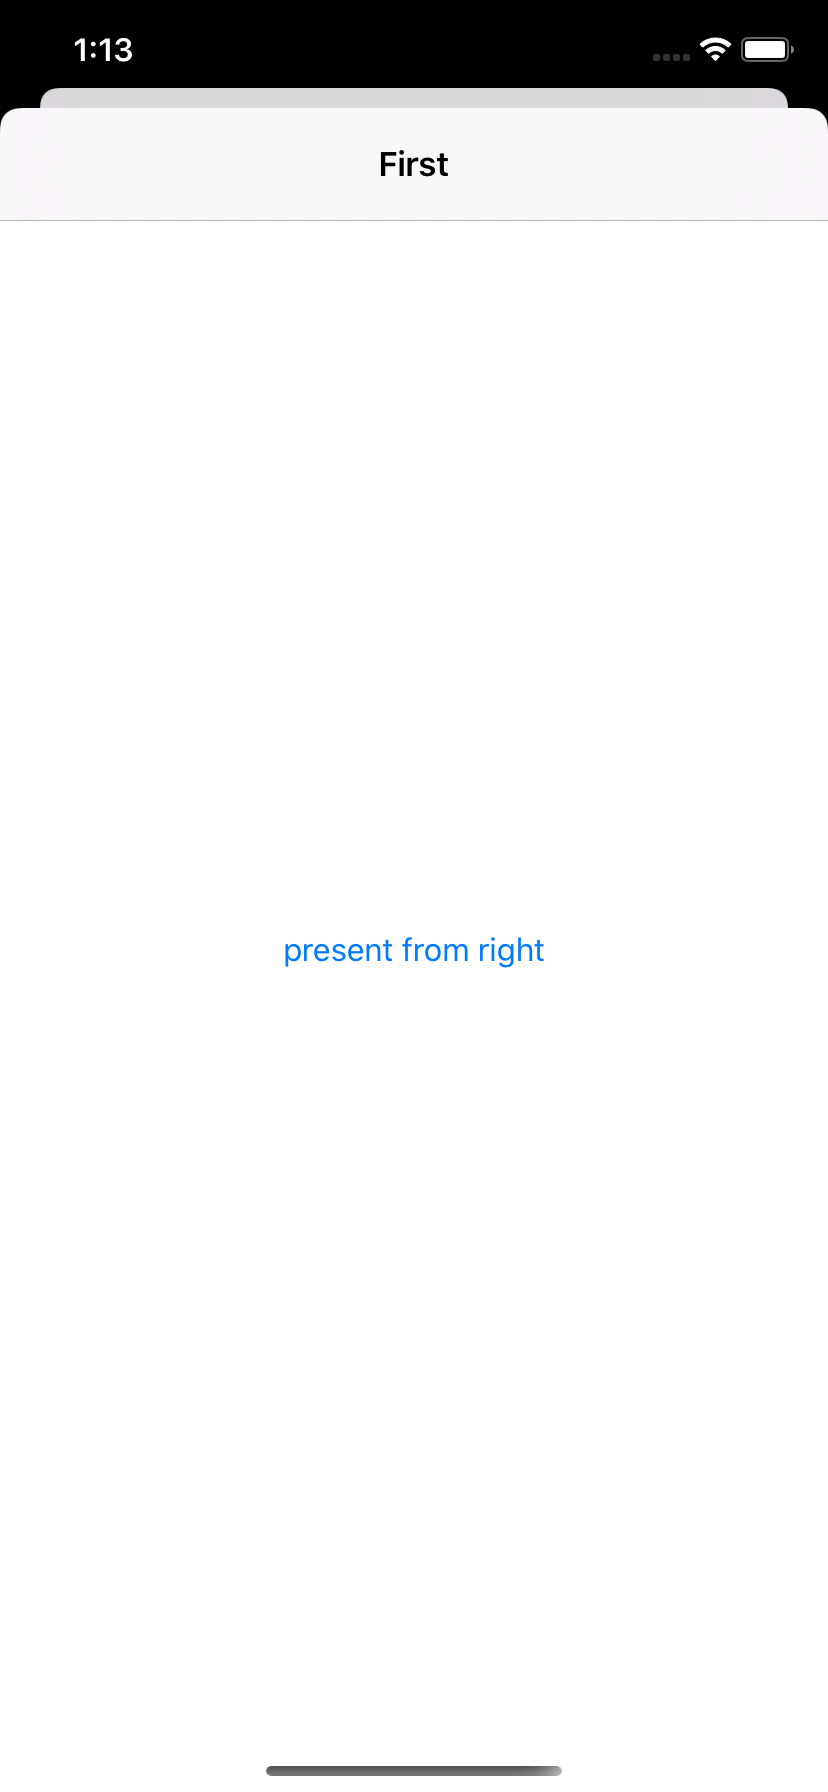
iOS 13.x画面遷移について、iOS13から通常のモーダル表示(下から表示)が、
ちょっと立体的な.automatic表示になりました。
.automatic .fullScreen iOS12以前は通常が.fullScreenでしたね。
.fullScreenで表示したい場合は、
ちゃんと指定するようにしなければならなくなりました。let viewController = xxx let navigationController = UINavigationController(rootViewController: viewController) navigationController.modalPresentationStyle = .fullScreen present(navigationController, animated: true, completion: nil)この記事は.automaticの状態から、.fullScreenの状態に、
pushViewController遷移のように横表示する方法を記載します。方法1(?): pushViewController遷移
-> 現状わかりませんでした
色々調べましたが、同じnavigationControllerで、
modalPresentationStyleを変更する方法は現状見つけられませんでした。もし方法が存在し、やり方を知っている方がいましたら教えてくださいm(_ _)m
方法2: present遷移の横バージョン
present(viewController, animated: true, completion: nil)
の遷移って下からですよね。コレを横から遷移に変更する方法が、方法2です。
横から遷移サンプルコード:
import UIKit

final class TestFirstViewController: UIViewController {

    @IBAction private func clickButton(_ sender: Any) {
        let storyBoard = UIStoryboard(name: "TestSecond", bundle: nil)
        let viewController = storyBoard.instantiateViewController(withIdentifier: "TestSecondViewController")
        let navigationController = UINavigationController(rootViewController: viewController)
        navigationController.modalPresentationStyle = .fullScreen
        let transition = CATransition()
        transition.duration = 0.4
        transition.type = .push
        transition.subtype = .fromRight
        view.window!.layer.add(transition, forKey: kCATransition)
        present(navigationController, animated: false, completion: nil)
    }

    override func viewDidLoad() {
        super.viewDidLoad()
    }
}
ポイントは、
- CATransitionを利用して、presentのanimationを定義していること
- presentのanimatedはfalseにすること
です。ちなみに
transition.typeとtransition.subtypeを
変更すれば、他にも様々な画面遷移アニメーションを実現できます。また、せっかく.automatic状態から横表示を実現しても、
何も設定していなければ、画面を閉じるアニメーションは下方向になってしまいます。
画面を閉じる動作も、横に設定してあげましょう。横へ画面閉じるサンプルコード:
import UIKit

final class TestSecondViewController: UIViewController {

    @objc private func clickBackBarButtonItem() {
        let transition = CATransition()
        transition.duration = 0.4
        transition.type = .push
        transition.subtype = .fromLeft
        view.window!.layer.add(transition, forKey: kCATransition)
        dismiss(animated: false, completion: nil)
    }

    override func viewDidLoad() {
        super.viewDidLoad()
        setupViews()
    }

    private func setupViews() {
        let backBarButtonItem = UIBarButtonItem(title: "戻る", style: .plain, target: self, action: #selector(clickBackBarButtonItem))
        navigationItem.setLeftBarButton(backBarButtonItem, animated: true)
    }
}
表示時と同じく、dismissのanimatedがfalseなことに注意しましょう。
ちなみに
safariViewControllerを用いた場合は、特に何も指定なく横遷移にできるようです。
let safariViewController = SFSafariViewController(url: URL(string: "https://google.com")!)
present(safariViewController, animated: true, completion: nil)
まとめ
本当は方法1の方で実現できれば楽なのですが。
今後のアップデートに期待です。参考
https://swallow-incubate.com/archives/blog/20200226/
https://zonneveld.dev/ios-13-viewcontroller-presentation-style-modalpresentationstyle/