- 投稿日:2020-03-23T20:35:44+09:00
TensorFlowを動かしてみた
Google先生が出している機械学習ライブラリ、TensorFlowを動かしてみました。
Pythonで触れるとのこと。
インストールはAnacondaからpipコマンドで入れてみます。
以下のサイトなどを参考にしてみます。TensorFlowをWindowsにインストール Python初心者でも簡単だった件
最初は上手く動かなかったのですが、TensorFlowのVersionをちょっと古いのに指定すると何とか動いてくれました。
というわけで、早速チュートリアル???のコードを動かしてみる。
GetStartでゲットできるコード、簡単な線形回帰分析で試してみます。
以下のサイトを参考にしてみました。多分もっともわかりやすいTensorFlow 入門 (Introduction)
y=0.1x+0.3
のプロット上の点を100点ほどサンプル取得して、0.1とか0.3という方程式のパラメタを推定するという問題。
import tensorflow as tf
import numpy as np

# Create 100 phony x, y data points in NumPy, y = x * 0.1 + 0.3
x_data = np.random.rand(100).astype(np.float32)
y_data = x_data * 0.1 + 0.3

# Try to find values for W and b that compute y_data = W * x_data + b
# (We know that W should be 0.1 and b 0.3, but Tensorflow will
# figure that out for us.)
W = tf.Variable(tf.random_uniform([1], -1.0, 1.0))
b = tf.Variable(tf.zeros([1]))
y = W * x_data + b

# Minimize the mean squared errors.
loss = tf.reduce_mean(tf.square(y - y_data))
optimizer = tf.train.GradientDescentOptimizer(0.5)
train = optimizer.minimize(loss)

# Before starting, initialize the variables.  We will 'run' this first.
init = tf.initialize_all_variables()

# Launch the graph.
sess = tf.Session()
sess.run(init)

# Fit the line.
for step in range(201):
    if step % 20 == 0:
        print((step, sess.run(W), sess.run(b)))
    sess.run(train)

# Learns best fit is W: [0.1], b: [0.3]
TensorFlowの使い方という意味ではとても良いサンプルなんだろうけど、どうしてもAPIがブラックボックス化していてよくわからない。
自分なりに、色々考えて何をやっているかを分析してみました。
どうやら、w,bというパラメタを初期値を適当に決めて、最小二乗のコスト関数に対して最急勾配法を用いて収束演算をしているようです。アルゴリズム自体は大したことは無く、評価関数に対してパラメタの1回偏微分を更新量としてアップデートすればOK。
具体的には・・・サンプルを以下のように定義する。(今回の例ではN=100っぽい)\left\{ \left( x_n,y_n \right) \right\}_{n=1}^Nこのとき、x_nとy_nの関係は以下のようになるように構成しています。
(今回の例では、w=0.1,b=0.3が真値)y_n=wx_n+bそして、コスト関数はというと、残差の二乗和なので、以下のようになります。
w、bは初期パラメータと考えればOKです。L(w,b)=\sum_{n=1}^N \left(y_n - (wx_n+b) \right)^2もちろん、w,bが正しい値のときには、めでたく
L(w,b)=0となるので、Lを最小化するw,bを探せばよいわけですね。
最急勾配法では、初期パラメタの更新を1回偏微分で実施するので、それぞれ求めておきます。
\frac{\partial}{\partial w}L(w,b)=-2\sum_{n=1}^N
\left( y_n - (wx_n+b)\right)x_n
\frac{\partial}{\partial b}L(w,b)=-2\sum_{n=1}^N \left( y_n - (wx_n+b)\right)これを利用すると、あるパラメタ初期値、w^(k),b^(k)を更新するには以下のようにしていくようです。
\left(
\begin{matrix}
w^{(k+1)} \\
b^{(k+1)}
\end{matrix}
\right)
=
\left(
\begin{matrix}
w^{(k)} \\
b^{(k)}
\end{matrix}
\right)
- \alpha
\left(
\begin{matrix}
\frac{\partial L}{\partial w} \\
\frac{\partial L}{\partial b}
\end{matrix}
\right)
\\
=
\left(
\begin{matrix}
w^{(k)} \\
b^{(k)}
\end{matrix}
\right)
+ 2\alpha
\left(
\begin{matrix}
\sum (y_n - (wx_n+b))x_n \\
\sum (y_n - (wx_n+b))
\end{matrix}
\right)
大変申し訳ないのですが、天下り的に、係数αを以下のように決めます。これはTensorFlowのライブラリに渡す係数の特徴から決めています。
\alpha = \frac{1}{N} \betaβ・・・なんか名前があるんだろうか?ここを収束の設定パラメタとして最初に決めるようです。今回のサンプルだとβ=0.5とします。
というわけで、自前のClassを作って検証してみます。
以下の感じでどうでしょうか?
class calcWB:
  def __init__(self,x,y,w,b):
    self.x = x
    self.y = y
    self.w = w
    self.b = b
    # get length of sample data
    self.N = len(x)

  def run(self,beta):
    # calculate current redisual
    residual = self.y - (self.w*self.x + self.b)
    # calc dL/dw
    dw = -2*np.dot(residual,self.x)
    # calc dL/db
    db = -2*sum(residual)
    # calc alpha
    alpha = beta/self.N
    # update param(w,b)
    self.w = self.w - alpha*dw
    self.b = self.b - alpha*db
    return self.w,self.b
初期化用のメソッドと、学習用のrunというメソッドの2つのみ。
これを使って、最初のサンプルを変更すると、以下のようになりそうです。# setting param init data w_init = np.random.rand()-.5 b_init = np.random.rand()-.5 # GradientDescentOptimizer parameter beta = 0.5 # Create 100 phony x, y data points in NumPy, y = x * 0.1 + 0.3 x_data = np.random.rand(100).astype(np.float32) y_data = x_data * 0.1 + 0.3 # Try to find values for W and b that compute y_data = W * x_data + b # (We know that W should be 0.1 and b 0.3, but TensorFlow will # figure that out for us.) #W = tf.Variable(tf.random_uniform([1], -10, 10)) W = tf.Variable(w_init) #b = tf.Variable(tf.zeros([1])) b = tf.Variable(b_init) y = W * x_data + b # Minimize the mean squared errors. loss = tf.reduce_mean(tf.square(y - y_data)) optimizer = tf.train.GradientDescentOptimizer(beta) train = optimizer.minimize(loss) # Before starting, initialize the variables. We will 'run' this first. init = tf.global_variables_initializer() # Launch the graph. sess = tf.Session() sess.run(init) # create calcWB object objCalcWB = calcWB(x_data,y_data,w_init,b_init) # Fit the line. for step in range(201): sess.run(train) w_tmp,b_tmp = objCalcWB.run(beta) if step % 20 == 0: #print(step, sess.run(W), sess.run(b)) print('[from TensorFlow] k=%d w=%.10f b=%.10f' % (step, sess.run(W), sess.run(b))) print('[from calcWB] k=%d w=%.10f b=%.10f' % (step,w_tmp,b_tmp)) # Learns best fit is W: [0.1], b: [0.3]実行結果を見てみると・・・
[from TensorFlow] k=0 w=0.4332985282 b=0.2284004837
[from calcWB]     k=0 w=0.4332985584 b=0.2284004998
[from TensorFlow] k=20 w=0.1567724198 b=0.2680215836
[from calcWB]     k=20 w=0.1567724287 b=0.2680215712
[from TensorFlow] k=40 w=0.1113634855 b=0.2935992479
[from calcWB]     k=40 w=0.1113634986 b=0.2935992433
[from TensorFlow] k=60 w=0.1022744998 b=0.2987188399
[from calcWB]     k=60 w=0.1022745020 b=0.2987188350
[from TensorFlow] k=80 w=0.1004552618 b=0.2997435629
[from calcWB]     k=80 w=0.1004552578 b=0.2997435619
[from TensorFlow] k=100 w=0.1000911444 b=0.2999486625
[from calcWB]     k=100 w=0.1000911188 b=0.2999486686
[from TensorFlow] k=120 w=0.1000182480 b=0.2999897301
[from calcWB]     k=120 w=0.1000182499 b=0.2999897517
[from TensorFlow] k=140 w=0.1000036523 b=0.2999979556
[from calcWB]     k=140 w=0.1000036551 b=0.2999979575
[from TensorFlow] k=160 w=0.1000007242 b=0.2999995947
[from calcWB]     k=160 w=0.1000007308 b=0.2999995937
[from TensorFlow] k=180 w=0.1000001431 b=0.2999999225
[from calcWB]     k=180 w=0.1000001444 b=0.2999999224
[from TensorFlow] k=200 w=0.1000000909 b=0.2999999523
[from calcWB]     k=200 w=0.1000000255 b=0.2999999832
となり、大体小数点以下7桁ぐらいまであっているので、考え方としてはよさそうです。
なるほど、TensorFlowのGradientDescentOptimizerがやっていることを少し理解できた気がします。
- 投稿日:2020-03-23T19:08:24+09:00
お勧めのtf.kerasのカスタムレイヤーの書き方と変数名の挙動
はじめに
tf.kerasのカスタムレイヤーでの名前の挙動についてドキュメントにない挙動を見つけたので、そのお知らせです。
ここで言っている"変数名"とはPythonの文法での変数名ではなく、Tensorflowの変数(tf.Variable)に付ける名前(引数として要求される)のことです。お勧めの書き方の前に変数名についてちょっと説明。
変数名の具体例
下のサンプルコードのself.v1やself.v2のことではなく、my_variable1やmy_variable2のことです。
import tensorflow as tf

# カスタムレイヤーのサンプルコード
# 自作の全結合層
class MyLayer(tf.keras.layers.Layer):
    def __init__(self, output_dim):
        super().__init__()
        self.output_dim = output_dim

        # バイアス項
        # 入力データのサイズには依存していない
        self.v1 = self.add_weight(name='my_variable1', shape=[output_dim])

    def build(self, input_shape):
        # affine行列
        # 入力データのサイズに依存している
        self.v2 = self.add_weight(name='my_variable2', shape=[input_shape[1], self.output_dim])
        self.built = True

    def call(self, inputs, **kwargs):
        return tf.matmul(inputs, self.v2) + self.v1
このあたりの内容は公式のチュートリアルにある内容です。
何か問題があるのか?
とりあえず実行
実際に実行して確認してみます。
model = MyLayer(output_dim=3)
# buildメソッドは初めてデータを入力したときに実行されるので、適当なデータを入れる
x = tf.random.normal(shape=(3, 5))
y = model(x)

print(model.trainable_variables)
↓これが名前 [<tf.Variable 'my_variable1:0' shape=(3,) dtype=float32, numpy=array([-0.56484747, 0.00200152, 0.42238712], dtype=float32)>, ↓これが名前 <tf.Variable 'my_layer/my_variable2:0' shape=(5, 3) dtype=float32, numpy= array([[ 0.47857696, -0.04394728, 0.31904382], [ 0.37552172, 0.22522384, 0.07408607], [-0.74956644, -0.61549807, -0.41261673], [ 0.4850598 , -0.45188528, 0.56900233], [-0.39462167, 0.40858668, -0.5422235 ]], dtype=float32)>]
my_variable1:0とmy_layer/my_variable2:0。
何か余計なものがついているけど、変数の名前はそれぞれmy_variable1とmy_variable2であると確認できたので、OK。本当にそうでしょうか?
レイヤーを重ねた場合
さっきの例に続けて実行してみます。
# 自作のレイヤーを重ねた場合
model = tf.keras.Sequential([
    MyLayer(3),
    MyLayer(3),
    MyLayer(3)
])
↓
[<tf.Variable 'my_variable1:0' shape=(3,) dtype=float32, (略)>,
 <tf.Variable 'sequential/my_layer_1/my_variable2:0' shape=(5, 3) dtype=float32, (略))>,
 <tf.Variable 'my_variable1:0' shape=(3,) dtype=float32, (略)>,
 <tf.Variable 'sequential/my_layer_2/my_variable2:0' shape=(3, 3) dtype=float32, (略)>,
 <tf.Variable 'my_variable1:0' shape=(3,) dtype=float32, (略)>,
 <tf.Variable 'sequential/my_layer_3/my_variable2:0' shape=(3, 3) dtype=float32, (略)]
my_variable1がいっぱいですね(泣)。
区別できません。Tensorboardで変数のヒストグラムを描いても名前が衝突しまくりで訳がわかりませんでした。
お勧めのカスタムレイヤーの書き方
class MyLayer(tf.keras.layers.Layer):
    def __init__(self, output_dim):
        super().__init__()
        self.output_dim = output_dim

    def build(self, input_shape):
        # バイアス項
        # 入力データのサイズには依存していない
        self.v1 = self.add_weight(name='my_variable1', shape=[output_dim])

        # affine行列
        # 入力データのサイズに依存している
        self.v2 = self.add_weight(name='my_variable2', shape=[input_shape[1], self.output_dim])
        self.built = True

    def call(self, inputs, **kwargs):
        return tf.matmul(inputs, self.v2) + self.v1
単純に全ての変数をbuildメソッド内で宣言するだけです。
Tensorflowもバージョン2になってからは、define by runなので、モデルやレイヤーの順序を最初に実行するまで解決できないのだと思います。
そのせいで、__init__メソッドとbiuldメソッドでは大きな違いになっているのだと思います。ちなみにtf.keras.layers.Denseなどはすべてbuildメソッド内で宣言しているので、安心して使えます。
まとめ
カスタムレイヤーで変数を宣言するときはbuildメソッド内で必ず宣言する。
__init__メソッドでは宣言しない。余談
名前の処理の挙動の解説
末尾の:0って何?
Tensorflowの仕様で自動で追加されます。
マルチGPUなどで実行する場合は、GPUごとに変数のコピーが作られるので、それぞれに0, 1, 2, ...と順に番号が振られます。
このあたりの仕様はバージョン1の頃も同じです。バージョン2ではtf.distribute.MirroredStrategyなどを利用してマルチGPUで上と同様のことをすると確認できます。
先頭のmy_layerは何?
my_layerはMyLayerに明示的に名前を設定しなかったときのデフォルトの名前です。
クラス名を自動でスネークケースに変換しています。また、2個目の例でtf.keras.Sequentialを使った場合はmy_layer_1, my_layer_2, my_layer_3となっています。
これは名前の衝突を避けるために末尾に自動的に追加されます。
1個目の例でmy_layerがある状態で、2個目の例を続けて実行しているので、このようになっています。これもバージョン1の頃と同じ挙動だと思います。
少なくともTensorflowのラッパーライブラリdm-sonnetでは同様の処理がされます。
- 投稿日:2020-03-23T00:32:46+09:00
Python × Flask × Tensorflow.Keras 猫の品種を予測するWebアプリ
はじめに
Webアプリ作成初挑戦、Qiita初投稿ですm(_ _)m
参考にした投稿
- 【AI×ねこ】猫の品種を当ててみる
- Python × Flask × PyTorch 数字認識Webアプリのお手軽構築環境
- Mac
- Visual Code
- Python3.7.5
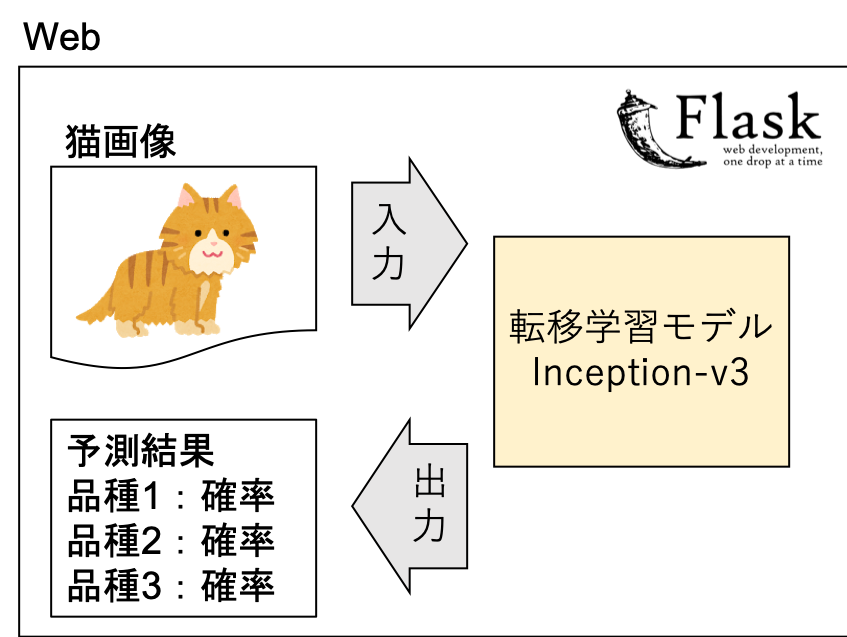
作りたいもの
猫画像を送信したら品種を予測してくれるWebアプリ
(Tensolflowの転移学習モデルInception-v3を用いて猫の品種を予測して
近い品種上位3位を確率を添えて教えてくれるやつ)
環境構築
ファイル構成
 ├── path/to/cat/image
 │   └── (学習データ 猫画像)
 ├── cat_list.txt(猫の品種リスト)
 ├── image_process.py
 ├── model.h5(save_model.pyの出力)
 ├── save_model.py(転移モデルを再学習する関数)
 ├── sever.py
 ├── static
 │   └── (入力した画像が保存される)
 └── templates
     └── index.html
importしたモジュールとバージョン
- Flask 1.1.1
- numpy 1.18.1
- pandas 1.0.1
- tensorflow 2.1.0
- scikit-learn 0.22.2.post1
- opencv-python 4.2.0.32
- Pillow 7.0.0
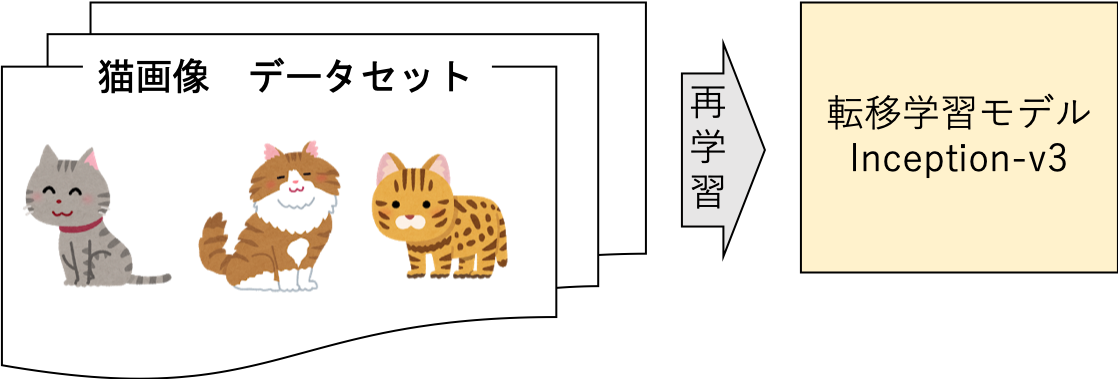
機械学習モデル構築
モデル構築のイメージ
猫画像データセットを用意
The Oxford-IIIT Pet DatasetのDownloadsのDatasetから得ました
犬の画像も含まれていますモデル構築
Inception-v3を再学習させてmodel.h5を作ります
学習データは200枚/クラス
クラスは以下の12個
- Abyssinian
- Bengal
- Birman
- Bombay
- British_Shorthair
- Egyptian_Mau
- Maine_Coon
- Persian
- Ragdoll
- Russian_Blue
- Siamese
- Sphynx事前にモデル構築をします
save_model.pyimport glob import numpy as np import pandas as pd #kerasのload_imgには手動でpillowのinstall必要 from tensorflow.keras.preprocessing.image import load_img, img_to_array from tensorflow.keras.applications.inception_v3 import InceptionV3, preprocess_input from tensorflow.keras.models import Model from tensorflow.keras.layers import Dense from sklearn.model_selection import train_test_split x_size = 299 y_size = 299 kind_label = [] cat_img = [] # 識別する品種のリスト cat_list = ['Abyssinian','Bengal','Birman','Bombay','British_Shorthair','Egyptian_Mau','Maine_Coon','Persian' ,'Ragdoll','Russian_Blue','Siamese','Sphynx'] f = open('cat_list.txt', 'w') for x in cat_list: f.write(str(x) + "\n") f.close() #データセットのロード for cat_kind in cat_list: file_list = glob.glob(f'path/to/cat/images/{cat_kind}*.jpg') #print(f"kind: {cat_kind}, num of images: {len(file_list)}") for cat_file in file_list: # img_path = file img = load_img(cat_file, target_size=(x_size, y_size)) x = img_to_array(img) x = preprocess_input(x) cat_img.append(x) kind_label.append(cat_kind) #品種ラベルをダミー化 Y_dummy = pd.get_dummies(kind_label) X_train, X_test, y_train, y_test = train_test_split( cat_img, Y_dummy, test_size=0.2, random_state=42) # model読み込み model = InceptionV3(weights='imagenet') # 中間層を出力するモデル intermediate_layer_model = Model(inputs=model.input, outputs=model.layers[311].output) # Denseレイヤーを接続 x = intermediate_layer_model.output x = Dense(1024, activation='relu')(x) predictions = Dense(len(cat_list), activation='softmax')(x) # 転移学習モデル transfer_model = Model(inputs=intermediate_layer_model.input, outputs=predictions) # 一旦全レイヤーをフリーズ for layer in transfer_model.layers: layer.trainable = False # 最終段のDenseだけ再学習する transfer_model.layers[312].trainable = True transfer_model.layers[313].trainable = True transfer_model.compile(loss='categorical_crossentropy', optimizer='adam', metrics=['accuracy']) #転移学習 transfer_model.fit(np.array(X_train), np.array(y_train), epochs=10, validation_data=(np.array(X_test), np.array(y_test))) #精度確認用に出力(必要に応じて) loss, acc = transfer_model.evaluate(np.array(X_test), np.array(y_test)) print('Loss {}, Accuracy {}'.format(loss, acc)) transfer_model.save("./model.h5")Webアプリ
①saver.py
- モデル読み込み
- 入力データ読み込み
- 品種予測(②image_process.py)
- 入力データと予測結果表示(③index.html)sever.pyfrom flask import Flask, render_template, request from tensorflow.keras.preprocessing.image import load_img from tensorflow.keras.models import load_model import numpy as np from image_process import examine_cat_breeds from datetime import datetime import os import cv2 import pandas as pd app = Flask(__name__) # モデル(model.h5)とクラスのリスト(cat_list)を読み込み model = load_model('model.h5') cat_list = [] with open('cat_list.txt') as f: cat_list = [s.strip() for s in f.readlines()] print('= = cat_list = =') print(cat_list) @app.route("/", methods=["GET","POST"]) def upload_file(): if request.method == "GET": return render_template("index.html") if request.method == "POST": # アプロードされたファイルをいったん保存する f = request.files["file"] filepath = "./static/" + datetime.now().strftime("%Y%m%d%H%M%S") + ".png" f.save(filepath) # 画像ファイルを読み込む # 画像ファイルをリサイズ input_img = load_img(filepath, target_size=(299, 299)) # 猫の種別を調べる関数の実行 result = examine_cat_breeds(input_img, model, cat_list) print("result") print(result) no1_cat = result[0,0] no2_cat = result[1,0] no3_cat = result[2,0] no1_cat_pred = result[0,1] no2_cat_pred = result[1,1] no3_cat_pred = result[2,1] return render_template("index.html", filepath=filepath, no1_cat=no1_cat, no2_cat=no2_cat, no3_cat=no3_cat, no1_cat_pred=no1_cat_pred, no2_cat_pred=no2_cat_pred, no3_cat_pred=no3_cat_pred) if __name__ == '__main__': app.debug = True app.run(host='localhost', port=5000)②image_process.py
引数は
- 入力データ(予測したい猫画像)
- モデル(猫モデル)
- クラスリスト(猫の品種リスト)
返り値は予測された品種上位3位と確率が格納された行列image_process.pyfrom tensorflow.keras.preprocessing.image import img_to_array import numpy as np from tensorflow.keras.applications.inception_v3 import preprocess_input def examine_cat_breeds(image, model, cat_list): # 行列に変換 img_array = img_to_array(image) # 3dim->4dim img_dims = np.expand_dims(img_array, axis=0) # Predict class(preds:クラスごとの確率が格納された12×1行列) preds = model.predict(preprocess_input(img_dims)) preds_reshape = preds.reshape(-1,preds.shape[0]) # cat_list(リスト)を12×1行列に変換 cat_array = np.array(cat_list).reshape(len(cat_list),-1) # 確率高い順にソートする preds_sort = preds_reshape[np.argsort(preds_reshape[:, 0])[::-1]] # 確率の降順に合わせて猫の順番も変える cat_sort = cat_array[np.argsort(preds_reshape[:, 0])[::-1]] # preds_reshape と cat_arrayを結合 set_result = np.concatenate([cat_sort, preds_sort], 1) return set_result[0:3, :]③index.html
綺麗に実装できませんでした(^_^;)index.html<!DOCTYPE html> <html> <body> {% if no1_cat %} <img src="{{filepath}} " border="1"> <br> 予測結果<br> {{no1_cat}}:{{no1_cat_pred}}<br> {{no2_cat}}:{{no2_cat_pred}}<br> {{no3_cat}}:{{no3_cat_pred}}<br> <hr> {% endif %} ファイルを選択して送信してください<br> <form action = "./" method = "POST" enctype = "multipart/form-data"> <input type = "file" name = "file" /> <input type = "submit"/> </form> </body> </html>実行
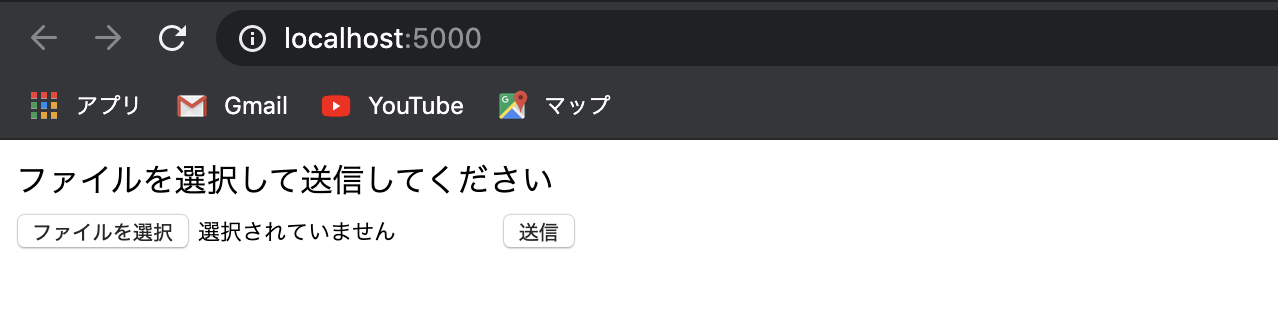
python sever.py+Enterで実行して
http://localhost:5000/にアクセスするすると以下が表示される
かわいい猫画像を送信すると品種予測結果が表示されます
まとめ
そういえばめちゃくちゃかわいい地域猫はキジ白っぽいんですよね
今回学習したクラスにいない…(^_^;)キジ白など日本に多い品種の学習データを集める手法を探してみようかな
スクレイピングというやつ?スマホアプリ化したいなぁ