- 投稿日:2020-03-23T09:48:14+09:00
Golangで、デザインパターン「Singleton」を学ぶ
GoFのデザインパターンを学習する素材として、書籍「増補改訂版Java言語で学ぶデザインパターン入門」が参考になるみたいですね。
取り上げられている実例は、JAVAベースのため、Pythonで同等のプラクティスに挑んだことがありました。
Qiita記事: "Pythonで、デザインパターン「Singleton」を学ぶ"今回は、Pythonで実装した”Singleton”のサンプルアプリをGolangで実装し直してみました。
■ Singleton(シングルトン)
Singletonパターン(シングルトン・パターン)とは、オブジェクト指向のコンピュータプログラムにおける、デザインパターンの1つである。GoF (Gang of Four; 4人のギャングたち) によって定義された。Singleton パターンとは、そのクラスのインスタンスが1つしか生成されないことを保証するデザインパターンのことである。ロケールやルック・アンド・フィールなど、絶対にアプリケーション全体で統一しなければならない仕組みの実装に使用される
(以上、ウィキペディア(Wikipedia)より引用)■ "Singleton"のサンプルプログラム
■ サンプルプログラムの詳細
Gitリポジトリにも、同様のコードをアップしています。
https://github.com/ttsubo/study_of_design_pattern_with_golang/tree/master/Singleton
- ディレクトリ構成
.
├── step1
│   └── Main.go
└── step2
    └── Main.go
インスタンスが一つしか作成できないようなクラスを定義してみます。
step1/Main.gopackage main import "fmt" // Singleton is struct type Singleton struct { } // MyClass is struct type MyClass struct { Singleton input int } var instance *MyClass func getInstance(input int) *MyClass { if instance == nil { instance = &MyClass{input: input} } else { instance.input = input } return instance } func main() { one := getInstance(1) fmt.Printf("one.input=%d\n", one.input) two := getInstance(2) fmt.Printf("one.input=%d, twe.input=%d\n", one.input, two.input) one.input = 0 fmt.Printf("one.input=%d, twe.input=%d\n", one.input, two.input) }動かしてみる
$ go run step1/Main.go
one.input=1
one.input=2, twe.input=2
one.input=0, twe.input=0
なるほど、まるでグローバル変数のように振る舞いますねぇー
あと、こちらのWeb記事"Go 言語における Singleton Pattern"を参考に、少し、実装を修正してみます。
step2/Main.gopackage main import "fmt" // Singleton is struct type Singleton struct { input int } func (s *Singleton) getInstance(input int) *Singleton { s.input = input return s } // MyClass is struct type MyClass struct { Singleton } var myclass = &MyClass{} func main() { one := myclass.getInstance(1) fmt.Printf("one.input=%d\n", one.input) two := myclass.getInstance(2) fmt.Printf("one.input=%d, twe.input=%d\n", one.input, two.input) one.input = 0 fmt.Printf("one.input=%d, twe.input=%d\n", one.input, two.input) }動かしてみる
$ go run step2/Main.go
one.input=1
one.input=2, twe.input=2
one.input=0, twe.input=0
同じ結果になりました
個人的に、こちらの書き方の方が、しっくりくる感じです■ 参考URL

- 投稿日:2020-03-23T09:23:16+09:00
Golangで、デザインパターン「Prototype」を学ぶ
GoFのデザインパターンを学習する素材として、書籍「増補改訂版Java言語で学ぶデザインパターン入門」が参考になるみたいですね。
取り上げられている実例は、JAVAベースのため、Pythonで同等のプラクティスに挑んだことがありました。
Qiita記事: "Pythonで、デザインパターン「Prototype」を学ぶ"今回は、Pythonで実装した”Prototype”のサンプルアプリをGolangで実装し直してみました。
■ Prototype(プロトタイプ・パターン)
Prototypeパターン(プロトタイプ・パターン)とは、ソフトウェア開発で用いられる、生成に関するデザインパターンの1つである。生成されるオブジェクトの種別がプロトタイプ(典型)的なインスタンスであるときに使用され、このプロトタイプを複製して新しいオブジェクトを生成する。
このパターンは、以下の目的で用いられる。
- Abstract Factory パターンでなされるように、クライアント・アプリケーションにおいてオブジェクトの生成者をサブクラスにすることを回避する
- 標準的な方法(例えば'new')で新しいオブジェクトを作ることによる固有のコストが所与のアプリケーションにとって高すぎる時にそれを回避する
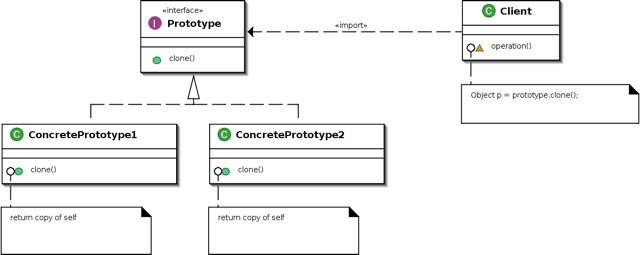
このパターンを実装するには、純粋仮想 (pure virtual method) の clone()メソッドを指定する抽象的(abstract)な基底クラスを宣言する。「多態性を持つコンストラクタ」の能力を必要とする全てのクラスは抽象的な基底クラスから自身を派生させ、clone()の操作を実装する。
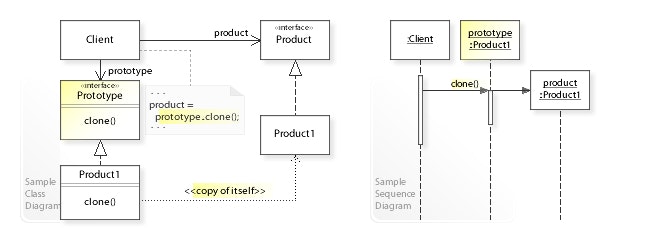
UML class and sequence diagram
UML class diagram
□ 備忘録
Prototypeパターンは、クラスからインスタンスをつくるのではなく、インスタンスをコピーすることで、インスタンスから別のインスタンスをつくるというものです。
Prototypeパターンを活用するメリットについては、書籍「増補改訂版Java言語で学ぶデザインパターン入門」P.66に以下の記述があります。
(1) 種類が多すぎてクラスにまとめられない場合
(2) クラスからインスタンス作成が難しい場合
(3) フレームワークと生成するインスタンスを分けたい場合まあ、大量に、インスタンスを生成するようなユースケースがあるならば、インスタンス生成に関わるオーバヘッド処理の削減につながるんですかねぇー
■ "Prototype"のサンプルプログラム
実際に、Prototypeパターンを活用したサンプルプログラムを動かしてみて、次のような動作の様子を確認したいと思います。
- 文字列を、下線を引いて表示する
- 文字列を、枠線で囲って表示する
$ go run Main.go
"Hello World"
-------------

***************
* Hello World *
***************

///////////////
/ Hello World /
///////////////
■ サンプルプログラムの詳細
Gitリポジトリにも、同様のコードをアップしています。
https://github.com/ttsubo/study_of_design_pattern_with_golang/tree/master/Prototype
- ディレクトリ構成
.
├── Main.go
└── framework
    ├── manager.go
    ├── message_box_prototype.go
    ├── prototype.go
    └── underline_pen_prototype.go
(1) Prototype(原型)の役
Prototype役は、インスタンスをコピー(複製)して新しいインスタンスを作るためのインタフェースを定めます。
サンプルプログラムでは、Prototypeインタフェースが、この役を努めます。framework/prototype.gopackage prototype // Prototype is interface type Prototype interface { Use(s string) createClone() Prototype }(2) ConcretePrototype(具体的な原型)の役
ConcretePrototype役は、インスタンスをコピーして新しいインスタンスを作るメソッドを実際に実装します。
サンプルプログラムでは、UnderlinePen構造体やMessageBox構造体が、この役を努めます。framework/underline_pen_prototype.gopackage prototype import ( "fmt" "strings" ) // UnderlinePen is struct type UnderlinePen struct { ulchar string } // NewUnderlinePen func for initializing UnderlinePen func NewUnderlinePen(ulchar string) *UnderlinePen { return &UnderlinePen{ ulchar: ulchar, } } // Use func for confirming name func (u *UnderlinePen) Use(s string) { length := len(s) line := strings.Repeat(u.ulchar, (length + 2)) fmt.Printf("\"%s\"\n", s) fmt.Println(line) fmt.Println("") } func (u *UnderlinePen) createClone() Prototype { return NewUnderlinePen(u.ulchar) }framework/message_box_prototype.gopackage prototype import ( "fmt" "strings" ) // MessageBox is struct type MessageBox struct { decochar string } // NewMessageBox func for initializing MessageBox func NewMessageBox(decochar string) *MessageBox { return &MessageBox{ decochar: decochar, } } // Use func for confirming name func (m *MessageBox) Use(s string) { length := len(s) line := strings.Repeat(m.decochar, (length + 4)) fmt.Println(line) fmt.Printf("%s %s %s\n", m.decochar, s, m.decochar) fmt.Println(line) fmt.Println("") } func (m *MessageBox) createClone() Prototype { return NewMessageBox(m.decochar) }(3) Client(利用者)の役
Client役は、インスタンスをコピーするメソッドを利用して、新しいインスタンスを作成します。
サンプルプログラムでは、Manager構造体やstartMainメソッドが、この役を努めます。framework/manager.gopackage prototype // ManagerInterface is interface type ManagerInterface interface { Register(name string, producter Prototype) Create(protoname string) Prototype } // Manager is struct type Manager struct { showcase map[string]Prototype } // NewManager func for initializing Manager func NewManager() *Manager { return &Manager{ showcase: make(map[string]Prototype), } } // Register func for registering proto func (m *Manager) Register(name string, proto Prototype) { m.showcase[name] = proto } // Create func for creating proto func (m *Manager) Create(protoname string) Prototype { p := m.showcase[protoname] return p.createClone() }Main.gopackage main import ( prototype "./framework" ) func startMain(managerObject prototype.ManagerInterface) { upen := prototype.NewUnderlinePen("-") mbox := prototype.NewMessageBox("*") sbox := prototype.NewMessageBox("/") managerObject.Register("strong message", upen) managerObject.Register("warning box", mbox) managerObject.Register("slash box", sbox) p1 := managerObject.Create("strong message") p2 := managerObject.Create("warning box") p3 := managerObject.Create("slash box") p1.Use("Hello World") p2.Use("Hello World") p3.Use("Hello World") } func main() { startMain(prototype.NewManager()) }■ 参考URL
- 投稿日:2020-03-23T08:10:59+09:00
Golangで、デザインパターン「Factory Method」を学ぶ
GoFのデザインパターンを学習する素材として、書籍「増補改訂版Java言語で学ぶデザインパターン入門」が参考になるみたいですね。
取り上げられている実例は、JAVAベースのため、Pythonで同等のプラクティスに挑んだことがありました。
Qiita記事: "Pythonで、デザインパターン「Factory Method」を学ぶ"今回は、Pythonで実装した” Factory Method”のサンプルアプリをGolangで実装し直してみました。
■ Factory Method(ファクトリメソッド)
Factory Method パターン(ファクトリメソッド・パターン)とは、GoF (Gang of Four; 四人組)によって定義されたデザインパターンの1つである。 Factory Method パターンは、他のクラスのコンストラクタをサブクラスで上書き可能な自分のメソッドに置き換えることで、 アプリケーションに特化したオブジェクトの生成をサブクラスに追い出し、クラスの再利用性を高めることを目的とする。
Virtual Constructor パターンとも呼ばれる。UML class diagram
□ 備忘録
振る舞いに関する
Template Methodパターンは、スーパークラスで処理の大枠を作って、サブクラスで具体的処理を決定するというもの。このTemplate Methodパターンを、インスタンスをつくる場面に適用したものが、Factory Methodパターンらしい。■ "Factory Method"のサンプルプログラム
Factory Methodパターンは、以下の特徴があるようです。
- インスタンスの作り方をスーパークラス側で定める
- 具体的なクラス名までは定めない
- 具体的な肉付けは、全てサブクラス側で行う
これによって、インスタンス作成のための枠組み(フレームワーク)と実際のインスタンス作成のクラスを分けて考えることができるようになるそうです。
実際に、Factory Methodパターンを使って、「身分証明書カード(IDカード)を作る工場」を題材としたサンプルプログラムを動かしてみて、次のような動作の様子を確認したいと思います。
Hiroshi Yuki",Tomura,Hanako Satoの3名の身分証明書カードを作成するHiroshi Yuki",Tomura,Hanako Satoの3名の身分証明書カードを使用する$ go run Main.go I'll create Hiroshi Yuki's card I'll create Tomura's card I'll create Hanako Sato's card I'll use Hiroshi Yuki's card I'll use Tomura's card I'll use Hanako Sato's cardサンプルプログラムを動かしただけだと、いまいち、何がしたいのかよく分かりませんね
つづいて、サンプルプログラムの詳細を確認していきます。■ サンプルプログラムの詳細
Gitリポジトリにも、同様のコードをアップしています。
https://github.com/ttsubo/study_of_design_pattern_with_golang/tree/master/FactoryMethod
- ディレクトリ構成
.
├── Main.go
└── framework
    ├── factory.go
    └── id_card_factory.go
(1) Product(製品)の役
Product役では、インスタンスが持つべきインタフェースを定めます。
サンプルプログラムでは、Productインタフェースが、この役を努めます。framework/factory.gopackage factoryMethod ... (snip) // Product is interface type Product interface { Use() getOwner() string }(2) Creator(作成者)の役
Creator役では、Productを生成する役割を担います。実際に生成するConcreteProduct役については何も知りません。
さらに、Creator役には、インスタンスの各部分を作るためのメソッドが用意されます。
サンプルプログラムでは、Factory構造体が、この役を努めます。framework/factory.gopackage factoryMethod // FactoryInterface is interface type FactoryInterface interface { createProduct(owner string) Product registerProduct(Product) Create(owner string) Product } // Factory is struct type Factory struct { factory FactoryInterface } // Create func for creating product func (f *Factory) Create(owner string) Product { p := f.factory.createProduct(owner) f.factory.registerProduct(p) return p } ... (snip)(3) ConcreteProduct(具体的製品)の役
ConcreteProduct役は、Product役のインタフェースを実装しているクラスです。実際のインスタンス作成後に呼び出されるメソッドが、ここで定義されます。
サンプルプログラムでは、iDCardProduct構造体が、この役を努めます。framework/id_card_factory.gopackage factoryMethod ... (snip) type iDCardProduct struct { owner string } func newIDCardProduct(owner string) *iDCardProduct { fmt.Printf("I'll create %s's card\n", owner) return &iDCardProduct{owner} } // Use func for using card func (i *iDCardProduct) Use() { fmt.Printf("I'll use %s's card\n", i.owner) } func (i *iDCardProduct) getOwner() string { return i.owner }(4) ConcreteCreator(具体的作成者)の役
ConcreteCreator役は、Creator役のインタフェースを実装しているクラスです。具体的な製品を作るクラスを定めます。
サンプルプログラムでは、IDCardFactory構造体が、この役を努めます。framework/id_card_factory.gopackage factoryMethod import "fmt" // IDCardFactory is struct type IDCardFactory struct { *Factory owners []string } // NewIDCardFactory func for initializing IDCardFactory func NewIDCardFactory() *IDCardFactory { idCardFactory := &IDCardFactory{ Factory: &Factory{}, } idCardFactory.factory = idCardFactory return idCardFactory } func (i *IDCardFactory) createProduct(owner string) Product { return newIDCardProduct(owner) } func (i *IDCardFactory) registerProduct(product Product) { i.owners = append(i.owners, product.getOwner()) } ... (snip)(5) Client(依頼人)の役
サンプルプログラムでは、
startMainメソッドが、この役を努めます。Main.gopackage main import ( factoryMethod "./framework" ) func startMain(factoryObject factoryMethod.FactoryInterface) { card1 := factoryObject.Create("Hiroshi Yuki") card2 := factoryObject.Create("Tomura") card3 := factoryObject.Create("Hanako Sato") card1.Use() card2.Use() card3.Use() } func main() { startMain(factoryMethod.NewIDCardFactory()) }■ 参考URL

