- 投稿日:2020-03-18T23:56:30+09:00
「ViewControllerをたくさん重ねると、いかにもメモリに悪そう」ということをXcodeを使って視覚的に表現してみた
1 はじめに
この記事は技術的な内容というよりは、実験系の内容になります。
ViewControllerを重ね合わせると、メモリに悪いというのは周知の事実ですが、視覚的に「いかにも悪そうだ〜」という記事は、私が探した限りでは見つけられなかったので掲載します。
2 試したこと
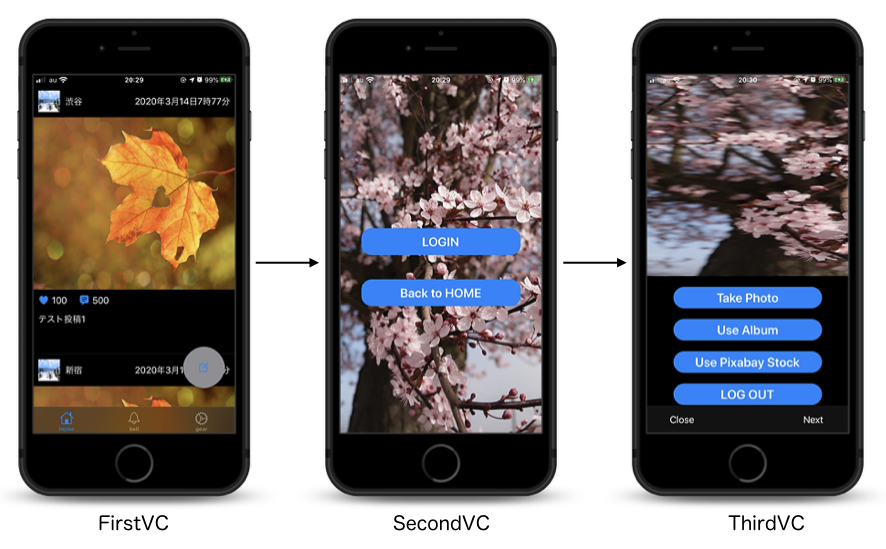
まず、最初に3つのViewControllerを用意します。
次にUIBUttonを用意して、下記のようなコードを書きます。
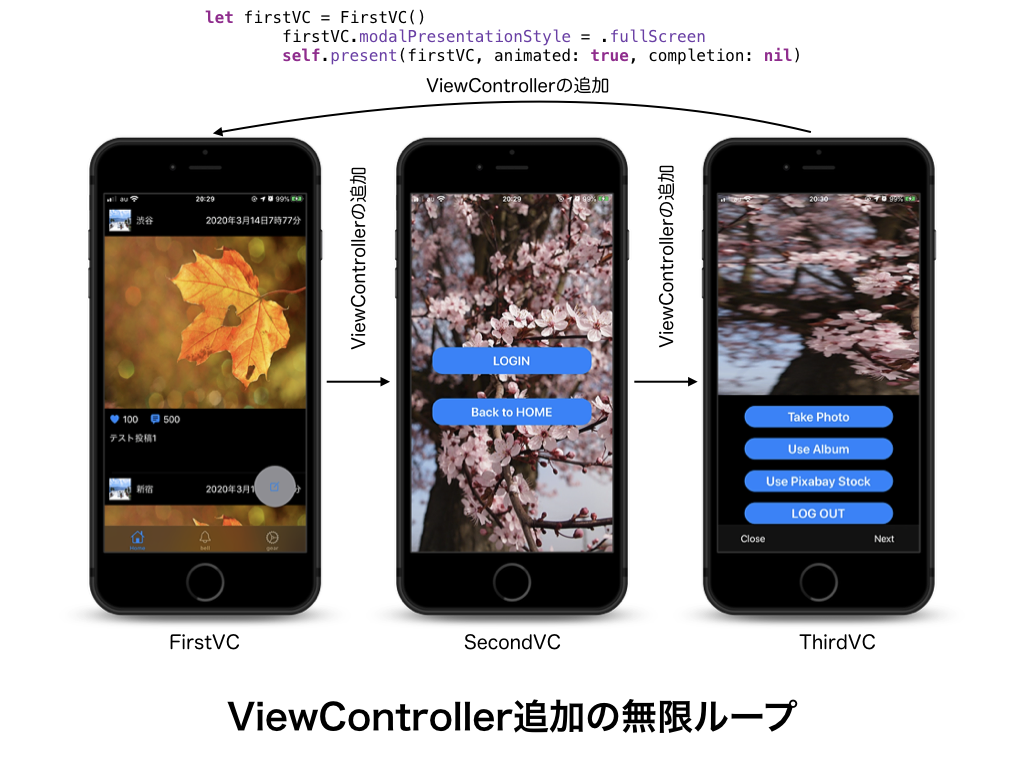
(UIButtonは省略します)ViewCotrollerを一つ用意して、画面遷移する(firstVC→secondVC)@objc func goSecondVC() { //secondVCを実体化させる let secondVC = SecondVC() //用意したVCへ画面遷移 self.present(secondVC, animated: true, completion: nil) }ViewControllerを一つ用意して、画面遷移する(secondVC→thirdVC)@objc func goThirdVC() { //thirdVCを実体化させる let thirdVC = ThridVC() //用意したVCへ画面遷移 self.present(thirdVC, animated: true, completion: nil) }ViewControllerを1つ用意して画面遷移する(thirdVC→firstVC)@objc func goFirstVC() { //firstVCを実体化させる let firstVC = FirstVC() //用意したVCへ画面遷移 self.present(firstVC, animated: true, completion: nil) }このコードでXcodeのシミュレターを立ち上げて、次々と画面遷移していきます。
動画だとこんな感じになります。
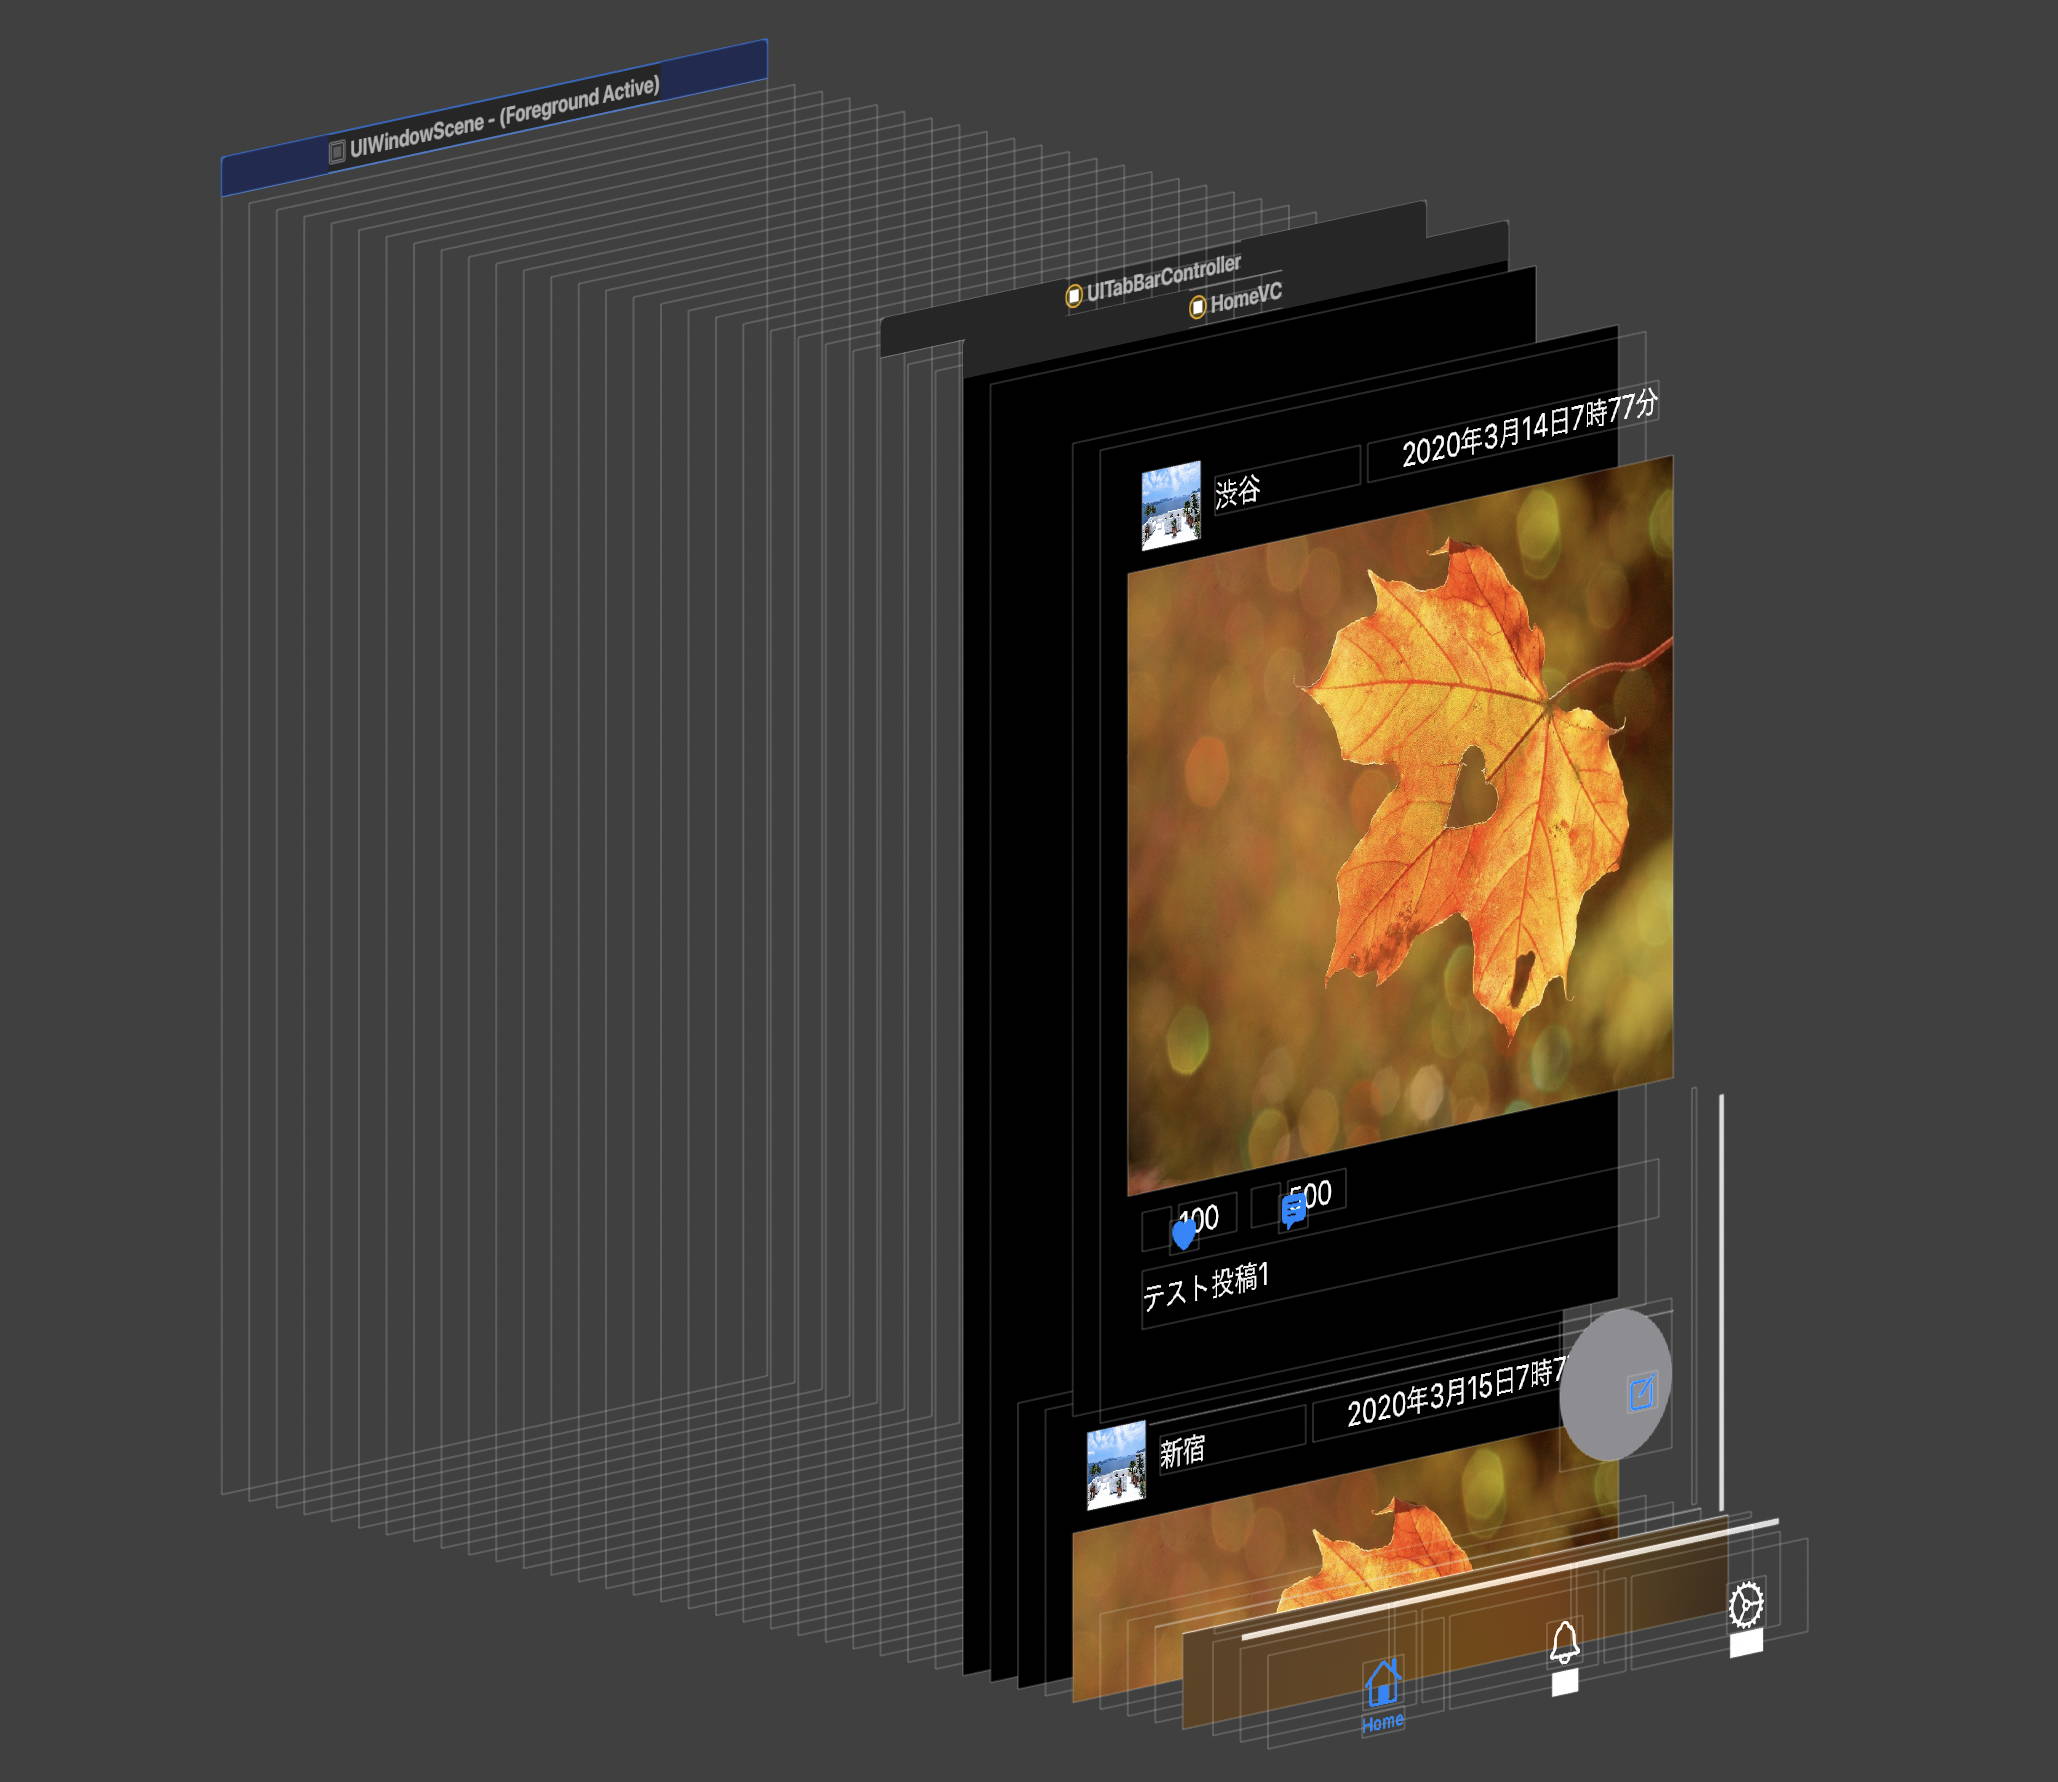
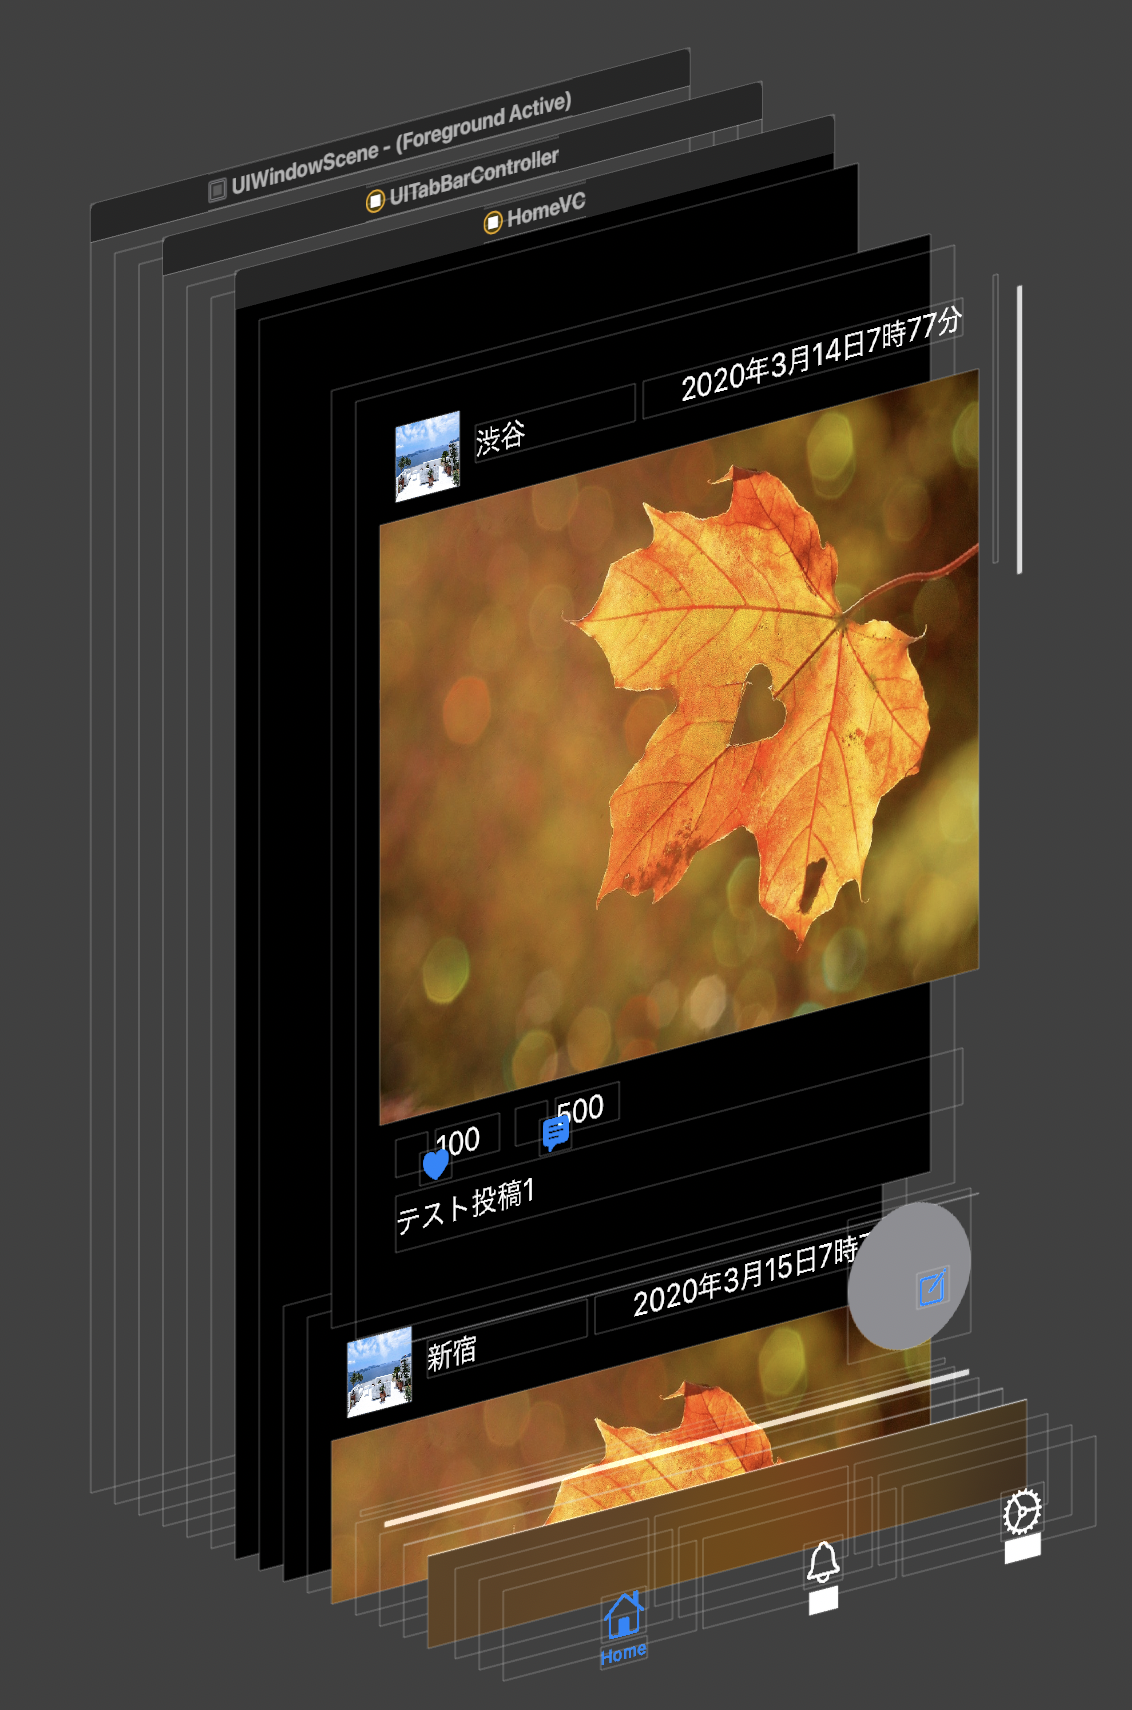
これを7回繰り返すと、こんな感じにViewが現れます。
これだけでも、
メモリをたくさん使っているように見えますね。さらに画面遷移を重ねていきます。
ここまでくると、明らかにメモリを使ってそうだというのがわかります。
ちなみに下記サイトがメモリに関してわかりやすく説明されていました。
https://wa3.i-3-i.info/word16066.html3. メモリを圧迫しないためには
ViewControllerを消す必要があります。
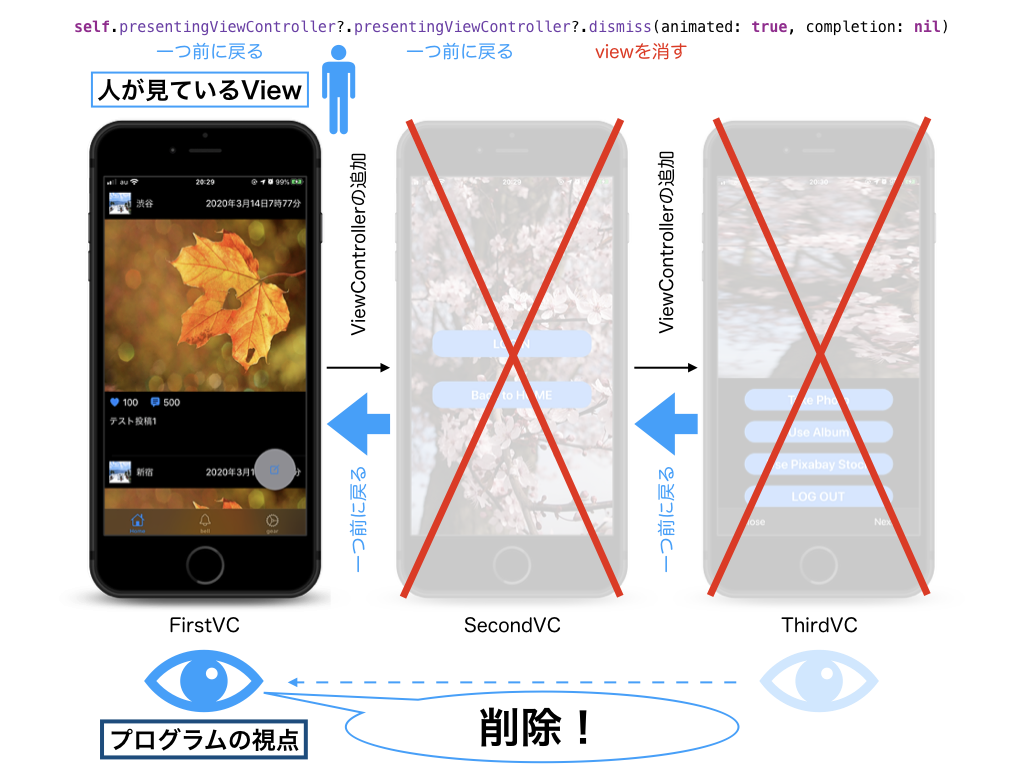
例えば、thirdVCからfirstVCへ画面遷移するときに、このようなコードを書くことでViewControllerが破棄出来ます。
Swift 二つ前の画面に戻る方法を参考にさせていただきました。2つ前の画面に戻って、ViewControllerを破棄する(thirdVC→firstVC)@objc func dismissTwoVC() { //2つ前のVCへ戻り、子VC(secondVC,thirdVCを削除) self.presentingViewController?.presentingViewController?.dismiss(animated: true, completion: nil) }イメージはこのようになります。
(間違っていた場合は、ご教授いただけますと幸いです)
こうすることで視覚的にも「メモリに良さそう」な実装になります。


- 投稿日:2020-03-18T22:56:21+09:00
Swift Vapor + Herokuで登録しているデータベースにmigrateやrevertを行う
Swiftのvaporを利用し始め、herokuにデプロイしてアプリを動かせるようになりました!
今日は、HerokuでDBのrevertとmigrateをしたのでそれのメモを書きます。
(3分で書いて、2秒で読み終わる代物になっており、オチもありません)参考文献
What is Heroku
How to REVERT a migration in Vapor 3 with fluent基本
以下のような感じでコマンドを打つのが基本スタイル。
~~ の部分にvaporのコマンドが入ります。heroku run Run ~~Run がローカルで実行するvaporのrunコマンドに相当するみたいです。
ちなみに、~~の部分ではvaporのcommand機能で実装した自作のコマンドも指定&実行させれます事前に・・・
configure.swiftにはFluentのコマンドが実行できるように設定しておきましょう。
これを忘れるとFluent系のコマンドはvaporのアプリで利用できません。configure.swiftvar commands = CommandConfig.default() commands.useFluentCommands() services.register(commands)Herokuでのvaporサンプルのデータベースmigrate
heroku run Run migrateHerokuでのvaporサンプルのデータベースrevert
--allのオプションでこれまでの全てをrevertできます。heroku run Run revertおまけ
ちなみに、ステージング環境と本番環境をHerokuのアプリで分けてる方は、--remoteや--appのコマンドで環境別にコマンド実行させれます。
--remoteにstagingとproductionが登録されており、stagingにのみmigrateしたい場合
heroku run Run migrate --remote staging同一のソースをHerokuのhello-worldとnew-worldというアプリにそれぞれ登録されており、new-worldにのみrevertしたい場合
heroku run Run revert --app new-world
- 投稿日:2020-03-18T17:45:15+09:00
JTAppleCalendar(v8.0.3)を簡単にさわってみる
はじめに
JTAppleCalendarを触る機会がたまたまあり、記事を執筆当時に公式チュートリアルにバージョン7系は記されていましたが、バージョン8.0.0のページでは具体的な使い方は記述されていませんでした。
そこで、バージョン8系での簡単な処理についてまとめてみました。これからの流れは、こちらの記事をベースに進めています。
手順
前準備
適当なプロジェクトを作成します。今回は、
JTAppleCalendarSampleで作成しました。今回JTAppleCalendarはcocoapodsでインストールします。
この記事ではバージョンは8.0.3をインストールしています。
インストールの方法はベースの記事を参照してください。インストール後は
.xcworkspaceを開いてください。実装
パーツ
プロジェクトを開いて、まずはパーツを設置しましょう。
Main.storyboardではUIView(オレンジ背景)の上にUICollectionViewを設置します。
曜日の部分は適当にUILabelを並べています。
CollectionViewのCustom ClassはClassを
JTACMonthView、moduleをJTAppleCalendarにしてください。
セルの境界をわかるようにするため、Min Spacingを設定しておきます。
カスタムセル
カレンダーの日付部分のセルのファイルを生成します。
MainCalendarViewCellというクラス名にし、親クラスはJTACDayCellを入力して下さい。(バージョン7系ではJTAppleCellでした)
XIBファイルも同時に作成しておきます。
MainCalendarCell.xibでは、Labelは縦横中心に設置しております。
セルとセルの境界をわかるようにするため、背景に色を付けています。
セルのCustom Classは
MyCalendarViewCellにして、同様にIdentifierにも同様にもMyCalendarViewCellを設定します。
実装ですることは3つ
1. JTAppleCalendarをimport
2. MainCalendarViewCell.xibで置いたLabelをOutlet接続
3. configureメソッドを作成(カレンダークラスで使用)まとめたものが以下です。
MainCalendarViewCell.swiftimport UIKit import JTAppleCalendar // 1 class MyCalendarViewCell: JTACDayCell { @IBOutlet weak var titleLabel: UILabel! // 2 /// 3 セルの表示の設定をする /// ex.ラベルに日にちを入れる func configure(view: JTACDayCell?, cellState: CellState) { guard let cell = view as? MyCalendarViewCell else { return } cell.titleLabel.text = cellState.text } }カレンダービュー
次にカレンダービューの実装をします。
UIViewクラスを継承したMyCalendarView.swiftを作成します。ここでやることは、
1. JTAppleCalendarをimport
2. Main.storyboadで設置したカレンダービューをOutlet接続する
3. delegateとdatasourceを定義する
4. cellの登録をする
です。MyCalendarView.swiftimport UIKit import JTAppleCalendar // 1 class MyCalendarView: UIView { @IBOutlet var calendarView: JTACMonthView! // 2 override func awakeFromNib() { // 3 delegateとdetasourceの定義 calendarView.calendarDelegate = self calendarView.calendarDataSource = self // 4 MainCalendarCellの登録 let nibName = UINib(nibName: "MyCalendarViewCell", bundle:nil) calendarView.register(nibName, forCellWithReuseIdentifier: "MyCalendarViewCell") } }Delegate
上のメソッドは空の記述でも動きますが、下のメソッドと同様のコードを書く必要があるようです。
理由はこちらのProblem 1を参照してください。MainCalendarView.swiftextension MyCalendarView: JTACMonthViewDelegate { func calendar(_ calendar: JTACMonthView, willDisplay cell: JTACDayCell, forItemAt date: Date, cellState: CellState, indexPath: IndexPath) { let cell = cell as! MyCalendarViewCell cell.configure(view: cell, cellState: cellState) } // cellの設定 func calendar(_ calendar: JTACMonthView, cellForItemAt date: Date, cellState: CellState, indexPath: IndexPath) -> JTACDayCell { let cell = calendar.dequeueReusableCell(withReuseIdentifier: "MyCalendarViewCell", for: indexPath) as! MyCalendarViewCell cell.configure(view: cell, cellState: cellState) return cell } }Datasoure
MainCalendarView.swiftextension MyCalendarView: JTACMonthViewDataSource { // カレンダー作成に必要なパラメータの設定 func configureCalendar(_ calendar: JTACMonthView) -> ConfigurationParameters { var current = Calendar.current current.locale = Locale(identifier: "ja_JP") current.timeZone = TimeZone(identifier: "Asia/Tokyo")! let date = Date() let startDate = date // 現在 let endDate = current.date(byAdding: .month, value: +1, to: current.startOfDay(for: date)) //1月後 let parameters = ConfigurationParameters(startDate: startDate, endDate: endDate!, numberOfRows: 5, calendar: current, firstDayOfWeek: .sunday) return parameters } }結果
これを実行すると、下記のような画面でカレンダーが表示されます。
おわりに
基本的にはバージョン7系のときと使い方は変わりませんでした。
オブジェクト名が変わっているので、そこは注意が必要なようですね。参照


- 投稿日:2020-03-18T15:51:52+09:00
GitHub ActionsでOpenAPI Generatorを動かす
TL;DR
API定義ファイルが更新されたらGitHub ActionsでOpenAPI Generatorを動かしてPRを作る
用意するもの
- OpenAPI-Specification v3に準拠したAPI定義ファイル
- API定義ファイルを管理するリポジトリ
- 生成したクライアントを管理するリポジトリ
GitHub Actionsで動かすOpenAPI Generator
本編です
1. sample-openapiの用意
- GitHub Actionsを作成
generate.yaml# This is a basic workflow to help you get started with Actions name: generate # Controls when the action will run. Triggers the workflow on push or pull request # events but only for the master branch and petstore.yaml on: push: branches: [ master ] paths: petstore.yaml # A workflow run is made up of one or more jobs that can run sequentially or in parallel jobs: # This workflow contains a single job called "build" build: # The type of runner that the job will run on runs-on: ubuntu-latest # Steps represent a sequence of tasks that will be executed as part of the job steps: # Checks-out your repository under $GITHUB_WORKSPACE, so your job can access it - uses: actions/checkout@v2 # clientをcheckout - uses: actions/checkout@v2 with: token: ${{ secrets.GITHUB_TOKEN }} repository: yumemi-nkomiya/github-actions-client-openapi path: client # openapi generate - uses: docker://openapitools/openapi-generator-cli with: args: generate -i ./petstore.yaml -g swift5 -o ./client/ # Create pull request - uses: peter-evans/create-pull-request@v2 with: token: ${{ secrets.REPO_ACCESS_TOKEN }} path: client commit-message: update client title: update client body: update client branch: feature/update_client branch-suffix: short-commit-hash # 同じプルリクは作らない解説
- trigger
ブランチとファイルを条件指定
- clientをcheckout
client-openapiをチェックアウトします。
client-openapiがprivateならPersonal access tokenを作ってsample-openapiのsecretsに登録して使います
- openapi generate
mavenビルドしてとか、jarをリポジトリに入れてとかあったんだけど公式にDockerが提供されているので利用する
パラメータはargsに指定します
- Create pull request
client-openapiの権限がある
Personal access tokenが必要2. GitHub Actionsの実行
sample-openapiにpetstore.yamlをpush
- GitHub Actionsの実行結果
https://github.com/yumemi-nkomiya/github-actions-sample-openapi/actions/runs/57991712)
- 作成されたPR
https://github.com/yumemi-nkomiya/github-actions-client-openapi/pull/1
参考記事
- 投稿日:2020-03-18T15:51:52+09:00
GitHub ActionsでOpenAPI Generatorを動かす [Docker版]
TL;DR
API定義ファイルが更新されたらGitHub ActionsでOpenAPI Generatorを動かしてPRを作る
用意するもの
- OpenAPI-Specification v3に準拠したAPI定義ファイル
- API定義ファイルを管理するリポジトリ
- 生成したクライアントを管理するリポジトリ
GitHub Actionsで動かすOpenAPI Generator
本編です
1. sample-openapiの用意
- GitHub Actionsを作成
generate.yaml# This is a basic workflow to help you get started with Actions name: generate # Controls when the action will run. Triggers the workflow on push or pull request # events but only for the master branch and petstore.yaml on: push: branches: [ master ] paths: petstore.yaml # A workflow run is made up of one or more jobs that can run sequentially or in parallel jobs: # This workflow contains a single job called "build" build: # The type of runner that the job will run on runs-on: ubuntu-latest # Steps represent a sequence of tasks that will be executed as part of the job steps: # Checks-out your repository under $GITHUB_WORKSPACE, so your job can access it - uses: actions/checkout@v2 # clientをcheckout - uses: actions/checkout@v2 with: token: ${{ secrets.GITHUB_TOKEN }} repository: yumemi-nkomiya/github-actions-client-openapi path: client # openapi generate - uses: docker://openapitools/openapi-generator-cli with: args: generate -i ./petstore.yaml -g swift5 -o ./client/ # Create pull request - uses: peter-evans/create-pull-request@v2 with: token: ${{ secrets.REPO_ACCESS_TOKEN }} path: client commit-message: update client title: update client body: update client branch: feature/update_client branch-suffix: short-commit-hash # 同じプルリクは作らない解説
- trigger
ブランチとファイルを条件指定
- clientをcheckout
client-openapiをチェックアウトします。
client-openapiがprivateならPersonal access tokenを作ってsample-openapiのsecretsに登録して使います
- openapi generate
mavenビルドしてとか、jarをリポジトリに入れてとかあったんだけど公式にDockerが提供されているので利用する
パラメータはargsに指定します
- Create pull request
client-openapiの権限がある
Personal access tokenが必要2. GitHub Actionsの実行
sample-openapiにpetstore.yamlをpush
- GitHub Actionsの実行結果
https://github.com/yumemi-nkomiya/github-actions-sample-openapi/actions/runs/57991712)
- 作成されたPR
https://github.com/yumemi-nkomiya/github-actions-client-openapi/pull/1
おまけ
generatorがpodspecやPackage.swiftを生成してくれるのでCocoaPodsや、tag打つだけでSwiftPMやCarthageも対応できます
参考記事
- 投稿日:2020-03-18T12:54:28+09:00
Swiftでiksm_sessionを取得するコード
iksm_sessionとは
SplatNet2からリザルトを取得するために必要なセッションキーのこと。
splatnet2statinkなどがiksm_sessionの自動生成に対応しているが、それをSwift向けに移植したものです。
必要なもの
- Xcode
- Swiftを扱うために必須
- Carthage
- 便利なパッケージマネージャ
- Alamofire
- 非同期で通信を行うフレームワーク
- SwiftyJSON
- JSONを簡単に扱えるフレームワーク
使用許可が必要なもの
動作確認に必要だが、事前に許可を取らなければいけないものが以下のもの。
- s2s API
- flapg APIに渡すハッシュを返す外部API
- flapg API
- ログインに必要なパラメータfを返す外部API
- Salmonia APIモドキ
- ログインのためのページの情報を返す外部API
- これに関しては過度なアクセスしなければ自由に使ってもらって結構
iksm.swift
このクラスは全部で8つのメンバ関数で構成されています。
Alamofireが非同期でデータ通信を行って、しかも完了ハンドラ内でエラーを吐けない(throwできない)のでsemaphoreとqueueを使って同期処理っぽくして実装しています。
この辺は自分で書いていてもダサいなあって思っているので、いい案があればぜひ教えて下さい。import Foundation import Alamofire import SwiftyJSON let semaphore = DispatchSemaphore(value: 0) let queue = DispatchQueue.global(qos: .utility) let ver: String = String(Bundle.main.object(forInfoDictionaryKey: "CFBundleShortVersionString") as! String) class Iksm { class func get_session_token(session_token_code: String, verifier: String) throws -> String { let url = "https://accounts.nintendo.com/connect/1.0.0/api/session_token" let app_head: HTTPHeaders = [ "User-Agent" : "com.nintendo.znca/1.6.1.2 Android", "Accept-Language" : "en-US", "Accept" : "application/json", "Host" : "accounts.nintendo.com", "Connecton" : "Keep-Alive", "Accept-Encoding" : "gzip", ] let body = [ "client_id" : "71b963c1b7b6d119", "session_token_code" : session_token_code, "session_token_code_verifier" : verifier ] var json: JSON? = nil AF.request(url, method: .post, parameters: body, encoding: JSONEncoding.default, headers: app_head) .validate(contentType: ["application/json"]) .responseJSON(queue: queue) { response in switch response.result { case .success(let value): json = JSON(value) case .failure: break } semaphore.signal() } semaphore.wait() if json == nil { throw APIError.Response(1000, "Login Step(session_token).") } return json!["session_token"].stringValue } class func get_access_token(session_token: String, userLang: String) throws -> JSON { let url = "https://accounts.nintendo.com/connect/1.0.0/api/token" let app_head: HTTPHeaders = [ "Host" : "accounts.nintendo.com", "Accept-Encoding" : "gzip", "Content-Type" : "application/json; charset=utf-8", "Accept-Language" : userLang, "Content-Length" : "439", "Accept" : "application/json", "Connecton" : "Keep-Alive", "User-Agent" : "com.nintendo.znca/1.6.1.2 Android" ] let body = [ "client_id" : "71b963c1b7b6d119", "session_token" : session_token, "grant_type" : "urn:ietf:params:oauth:grant-type:jwt-bearer-session-token" ] var json: JSON? = nil AF.request(url, method: .post, parameters: body, encoding: JSONEncoding.default, headers: app_head) .validate(contentType: ["application/json"]) .responseJSON(queue: queue) { response in switch response.result { case .success(let value): json = JSON(value) case .failure: break } semaphore.signal() } semaphore.wait() if json == nil { throw APIError.Response(1001, "Login Step(access_token).") // Error Handler } return json! } class func get_userinfo(access_token: String, userLang: String) throws -> JSON { let url = "https://api.accounts.nintendo.com/2.0.0/users/me" let app_head: HTTPHeaders = [ "User-Agent" : "OnlineLounge/1.6.1.2 NASDKAPI Android", "Accept-Language" : userLang, "Accept" : "application/json", "Authorization" : "Bearer " + access_token, "Host" : "api.accounts.nintendo.com", "Connection" : "Keep-Alive", "Accept-Encoding" : "gzip" ] var json: JSON? = nil AF.request(url, method: .get, headers: app_head) .validate(contentType: ["application/json"]) .responseJSON(queue: queue) { response in switch response.result { case .success(let value): json = JSON(value) case .failure: break } semaphore.signal() } semaphore.wait() if json == nil { throw APIError.Response(1002, "Account Step(user_info).") // Error Handler } return json! } class func get_splatoon_token(userLang: String, user_info: JSON, flapg_nso: JSON) throws -> String { let url = "https://api-lp1.znc.srv.nintendo.net/v1/Account/Login" let app_head: HTTPHeaders = [ "Host" : "api-lp1.znc.srv.nintendo.net", "Accept-Language" : userLang, "User-Agent" : "com.nintendo.znca/1.6.1.2 (Android/7.1.2)", "Accept" : "application/json", "X-ProductVersion" : "1.6.1.2", "Content-Type" : "application/json; charset=utf-8", "Connection" : "Keep-Alive", "Authorization" : "Bearer", "X-Platform" : "Android", "Accept-Encoding" : "gzip" ] let body: JSON = [ "f" : flapg_nso["f"], "naIdToken" : flapg_nso["p1"], "timestamp" : flapg_nso["p2"], "requestId" : flapg_nso["p3"], "naCountry" : user_info["country"], "naBirthday" : user_info["birthday"], "language" : user_info["language"] ] let app_body: Dictionary = ["parameter" : body.dictionaryObject!] var json: JSON = JSON() AF.request(url, method: .post, parameters: app_body, encoding: JSONEncoding.default, headers: app_head) .validate(contentType: ["application/json"]) .responseJSON(queue: queue) { response in switch response.result { case .success(let value): json = JSON(value) case .failure: break } semaphore.signal() } semaphore.wait() // Error Checking switch json["status"].intValue { case 9403: throw APIError.Response(9403, "Invalid Token.") case 9406: throw APIError.Response(9406, "Unauthorized.") case 9427: throw APIError.Response(9427, "Upgrade Required.") default: return json["result"]["webApiServerCredential"]["accessToken"].stringValue } } class func get_splatoon_access_token(splatoon_token: String, flapg_app: JSON) throws -> String { let url = "https://api-lp1.znc.srv.nintendo.net/v2/Game/GetWebServiceToken" let app_head: HTTPHeaders = [ "Host" : "api-lp1.znc.srv.nintendo.net", "User-Agent" : "com.nintendo.znca/1.6.1.2 Android", "Accept" : "application/json", "X-ProductVersion" : "1.6.1.2", "Content-Type" : "application/json; charset=utf-8", "Connection" : "Keep-Alive", "Authorization" : "Bearer " + splatoon_token, "X-Platform" : "Android", "Accept-Encoding" : "gzip" ] let body: JSON = [ "id" : 5741031244955648, "f" : flapg_app["f"], "registrationToken" : flapg_app["p1"], "timestamp" : flapg_app["p2"], "requestId" : flapg_app["p3"], ] let app_body = ["parameter" : body.dictionaryObject!] var json: JSON? = nil AF.request(url, method: .post, parameters: app_body, encoding: JSONEncoding.default, headers: app_head) .validate(contentType: ["application/json"]) .responseJSON(queue: queue) { response in switch response.result { case .success(let value): json = JSON(value) case .failure: break } semaphore.signal() } semaphore.wait() if json == nil { throw APIError.Response(1003, "Login Step(Splatoon2).") // Error Handler } return json!["result"]["accessToken"].stringValue } class func get_cookie(session_token: String, userLang: String) throws -> String { let timestamp: Int = Int(NSDate().timeIntervalSince1970) let guid: String = String(CFUUIDCreateString(nil, CFUUIDCreate(nil))) // Get Access Token let id_response = try get_access_token(session_token: session_token, userLang: userLang) let access_token = id_response["access_token"].stringValue // Get User information let user_info = try get_userinfo(access_token: access_token, userLang: userLang) // Get flapg parameters let flapg_nso = try call_flapg_api(id_token: access_token, guid: guid, timestamp: timestamp, type: "nso") // Get Splatoon token let splatoon_token = try get_splatoon_token(userLang: userLang, user_info: user_info, flapg_nso: flapg_nso) let flapg_app = try call_flapg_api(id_token: splatoon_token, guid: guid, timestamp: timestamp, type: "app") // Get Splatoon access token let splatoon_access_token = try get_splatoon_access_token(splatoon_token: splatoon_token, flapg_app: flapg_app) // Get cookie let url = "https://app.splatoon2.nintendo.net/?lang=" + userLang let app_head: HTTPHeaders = [ "Host" : "app.splatoon2.nintendo.net", "X-IsAppAnalyticsOptedIn" : "false", "Accept" : "text/html,application/xhtml+xml,application/xml;q=0.9,*/*;q=0.8", "Accept-Encoding" : "gzip,deflate", "X-GameWebToken" : splatoon_access_token, "Accept-Language" : userLang, "X-IsAnalyticsOptedIn" : "false", "Connection" : "keep-alive", "DNT" : "0", "User-Agent" : "Salmonia for iOS/" + ver, "X-Requested-With" : "com.nintendo.znca" ] var iksm_session: String? = nil AF.request(url, method: .get, headers: app_head) .response(queue: queue) { response in let cookie = HTTPCookie.cookies(withResponseHeaderFields: response.response?.allHeaderFields as! [String: String], for: (response.response?.url!)!) iksm_session = cookie.first!.value semaphore.signal() } semaphore.wait() if iksm_session == nil { throw APIError.Response(1004, "Auth Step(iksm_session)") } return iksm_session! } class func call_flapg_api(id_token: String, guid: String, timestamp: Int, type: String) throws -> JSON { var json: JSON? = nil let url = "https://flapg.com/ika2/api/login?public" let api_app_head: HTTPHeaders = [ "x-token" : id_token, "x-time" : String(timestamp), "x-guid" : guid, "x-hash" : try get_hash_from_s2s_api(id_token: id_token, timestamp: timestamp), "x-ver" : "3", "x-iid" : type, "User-Agent" : "Salmonia for iOS/" + ver ] AF.request(url, method: .get, headers: api_app_head) .validate(contentType: ["application/json"]) .responseJSON(queue: queue) { response in switch response.result { case .success(let value): json = JSON(value) case .failure(let value): debugPrint(value) break } semaphore.signal() } semaphore.wait() if json == nil { throw APIError.Response(2001, "Auth Step(flapg API).") // Error Handler } return json!["result"] } class func get_hash_from_s2s_api(id_token: String, timestamp: Int) throws -> String { let url = "https://elifessler.com/s2s/api/gen2" let api_app_head: HTTPHeaders = [ "User-Agent" : "Salmonia for iOS/" + ver ] let api_body = [ "naIdToken" : id_token, "timestamp" : String(timestamp) ] var json: JSON? = nil AF.request(url, method: .post, parameters: api_body, headers: api_app_head) .validate(contentType: ["application/json"]) .responseJSON(queue: queue) { response in switch response.result { case .success(let value): json = JSON(value) case .failure: break } semaphore.signal() } semaphore.wait() if json == nil { throw APIError.Response(2000, "Auth Step(s2s API).") // Error Handler } return json!["hash"].stringValue } }get_session_token()
get_session_token()はセッショントークンコードからセッショントークンを取得する関数です。この関数を呼ぶ前に、Salmonia APIが返すURL情報からログイン後に「この人を選ぶ」のURLからセッショントークンコードを取得しなければいけません。
get_access_token()
get_access_token()はセッショントークンからアクセストークンを取得する関数です。
id_responseはaccess_tokenとid_tokenの二つを返しますが、ニンテンドーAPI 1.6.1.2でid_tokenは使われなくなってしまいました。アクセストークンはその名の通り、ニンテンドーサーバにアクセスして情報を取得する権限があるトークンです。
このトークンを使ってユーザ情報を取得するのが次の関数です。get_userinfo()
get_userinfo()はアクセストークンを使ってニンテンドーサーバからニンテンドースイッチアカウントの情報を取得する関数です。ここで取得するのは生年月日、言語、国の三つの情報ですが、実はこれらの情報はログインに際して全く検証されていないので適当な値を使っても問題ありません。
例えば、ikaWidget2では全てのユーザのログイン時に生年月日として
1990-01-01が使用されています。get_splatoon_token
get_splatoon_token()はイカリング2へのアクセストークンを生成するためのセッショントークンを取得する関数です。
flapg APIが返すfという値が必要になります。get_splatoon_access_token
get_splatoon_access_token()はイカリング2にへのアクセストークン(splatoon_access_token)を取得するための関数です。
flapg APIが返すfという値が必要になります。get_cookie
get_cookie()はsplatoon_access_tokenを使ってイカリング2にアクセスし、Cookieからiksm_sessionを取り出す関数です。call_flapg_api
call_flapg_api()はflapg APIを叩いてスプラトゥーンの認証に必要な四つのパラメータを取得する関数です。get_hash_from_s2s_api
get_hash_from_s2s_api()はs2s APIを叩いてcall_flapg_api()内で使われるハッシュの値を計算する関数です。まとめ
誰かリファクタしてくれないかなあ(´・ω・`)
- 投稿日:2020-03-18T12:37:13+09:00
iOSでデバイスの回転ロック時に、回転情報を取得する
背景
デバイスを回転させた時の情報を取得する際、通常であれば、
NotificationCenterやviewWillTransitionを使用すれば簡単に出来るのですが、デバイスの設定で回転をロックしている場合、これらの方法では回転の情報を取得することが出来ませんでした。
そこで、色々と調べた結果、CoreMotionを使用することで回転情報の取得が出来ることが分かったので、メモしておきたいと思います。CoreMotionを使用した取得方法
import CoreMotion

var motionManager: CMMotionManager!

class ViewController: UIViewController {
    override func viewDidAppear(_ animated: Bool) {
        super.viewDidAppear(animated)
        motionManager = CMMotionManager()
        motionManager.accelerometerUpdateInterval = 0.2
        motionManager.startAccelerometerUpdates( to: OperationQueue() ) { p, _ in
            if p != nil {
                if let acceleration = p?.acceleration {
                    let d =
                        fabs( acceleration.y ) < fabs( acceleration.x )
                            ?   acceleration.x > 0 ? "Right"  :   "Left"
                            :   acceleration.y > 0 ? "Down"   :   "Up"
                    print(d)
                }
            }
        }
    }

    override func viewDidDisappear(_ animated: Bool) {
        super.viewDidDisappear(animated)
        motionManager.stopAccelerometerUpdates()
    }
}
CMMotionManagerを使用し、一定時間毎にAccelerometerを更新することで、ロックしていても無事回転をチェックすることが出来ました。
- 投稿日:2020-03-18T07:41:51+09:00
【Swift】Sing in with AppleのボタンをStoryboardで設定する
Sing in with Appleでは
ASAuthorizationAppleIDButtonを使用する必要がありますが
このクラスはStoryboardでサポートされておらず
コード上で追加する必要があります。そこで
今回はCustom Classを作成することで
StoryboardでもSign in with Appleのボタンを設定する方法について
整理してみました。コードでの追加方法は以前↓に書かせていただきました。
https://qiita.com/shiz/items/5e094910f742c2ad72a4実装方法
UIButtonクラスのサブクラスを定義する
UIButtonクラスのサブクラスを定義します
(名前は任意です)class SignInWithAppleIDButton: UIButton { override init(frame: CGRect) { super.init(frame: frame) } required init?(coder: NSCoder) { super.init(coder: coder) } }
ASAuthorizationAppleIDButtonをプロパティに保持する実際にSign in with Appleを実行するための
ASAuthorizationAppleIDButtonをプロパティに保持します。class SignInWithAppleIDButton: UIButton { private var appleIDButton: ASAuthorizationAppleIDButton! ... }暗黙的にOptionalをUnwrapしていますが
次に定義するdraw(_:)メソッドで必ず初期化をするため
問題はありません。
draw(_:)メソッドをoverrideする
draw(_:)メソッドの中で
ボタンを描画します。class SignInWithAppleIDButton: UIButton { super.draw(rect) appleIDButton = ASAuthorizationAppleIDButton(authorizationButtonType: .default, authorizationButtonStyle: .black) addSubview(appleIDButton) appleIDButton.translatesAutoresizingMaskIntoConstraints = false NSLayoutConstraint.activate([ appleIDButton.topAnchor.constraint(equalTo: self.topAnchor), appleIDButton.leadingAnchor.constraint(equalTo: self.leadingAnchor), appleIDButton.bottomAnchor.constraint(equalTo: self.bottomAnchor), appleIDButton.trailingAnchor.constraint(equalTo: self.trailingAnchor), ]) }ここでは
authorizationButtonTypeと
authorizationButtonStyleに
固定値を設定していますが
後ほどカスタム可能にします。Storyboardで設定可能にする
次にStoryboardで表示できるように
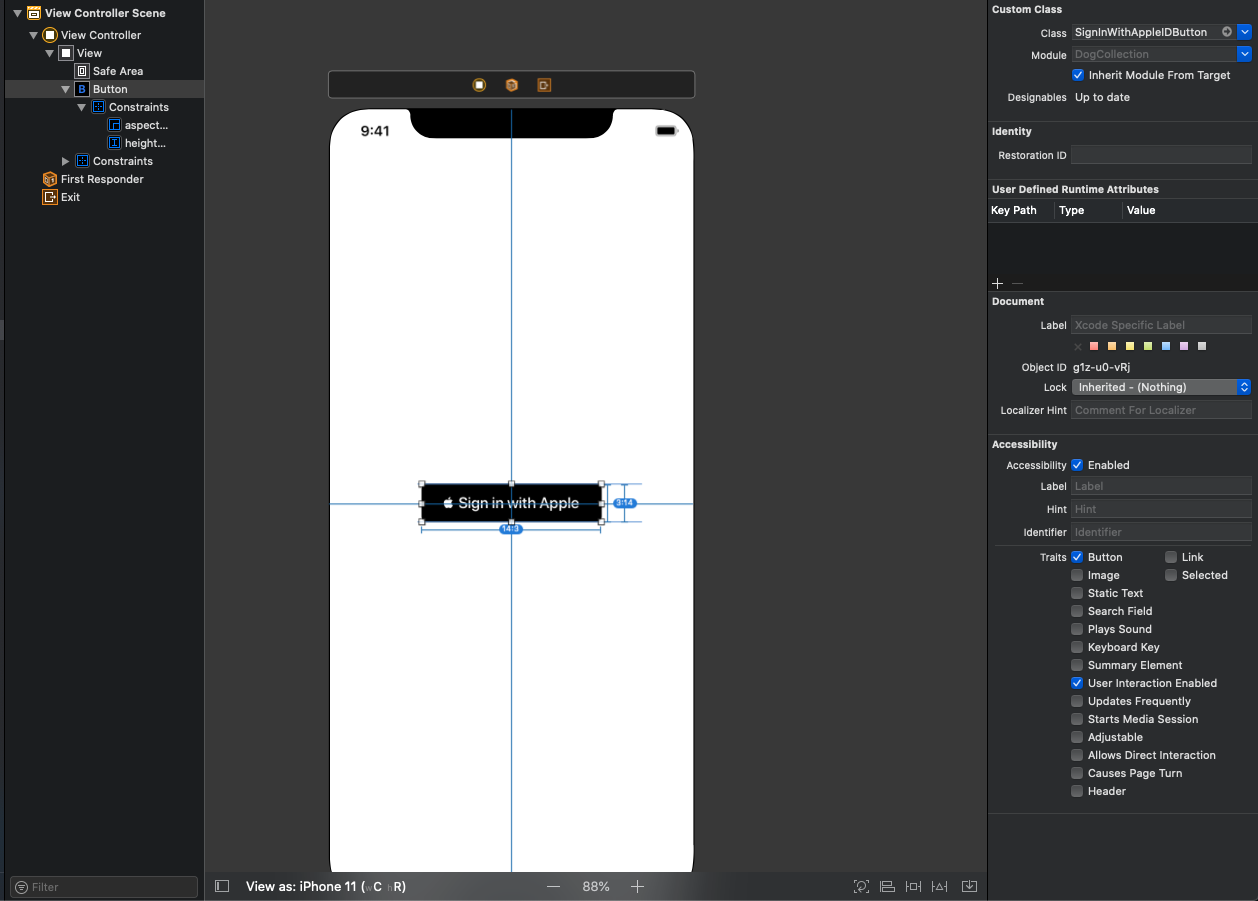
@IBDesignableをクラスに設定します。@IBDesignable class SignInWithAppleIDButton: UIButton { super.draw(rect) appleIDButton = ASAuthorizationAppleIDButton(authorizationButtonType: .default, authorizationButtonStyle: .black) addSubview(appleIDButton) appleIDButton.translatesAutoresizingMaskIntoConstraints = false NSLayoutConstraint.activate([ appleIDButton.topAnchor.constraint(equalTo: self.topAnchor), appleIDButton.leadingAnchor.constraint(equalTo: self.leadingAnchor), appleIDButton.bottomAnchor.constraint(equalTo: self.bottomAnchor), appleIDButton.trailingAnchor.constraint(equalTo: self.trailingAnchor), ]) }ここまででStoryboardに
UIButtonを設置してCustom Classに
SignInWithAppleIDButtonを指定すると
下記のようにStoryboard上で表示させることができます。
※ 制約などについてはAppleのHuman Interface Guidelinesに沿っています。
こちらについては後ほど記載します。ボタンをカスタマイズする
ここからはさらに
@IBInspectableを使って
Storyboard上でボタンをカスタマイズ可能にしたいと思います。
ASAuthorizationAppleIDButtonの定義を見てみると
ASAuthorizationAppleIDButton.ButtonType
ASAuthorizationAppleIDButton.Style
cornerRadiusの設定が可能です。
extension ASAuthorizationAppleIDButton {


    @available(iOS 13.0, *)
    public enum ButtonType : Int {


        case signIn = 0

        case `continue` = 1


        @available(iOS 13.2, *)
        case signUp = 2


        public static var `default`: ASAuthorizationAppleIDButton.ButtonType { get }
    }


    @available(iOS 13.0, *)
    public enum Style : Int {


        case white = 0

        case whiteOutline = 1

        case black = 2
    }
}

@available(iOS 13.0, *)
open class ASAuthorizationAppleIDButton : UIControl {


    public convenience init(type: ASAuthorizationAppleIDButton.ButtonType, style: ASAuthorizationAppleIDButton.Style)


    public init(authorizationButtonType type: ASAuthorizationAppleIDButton.ButtonType, authorizationButtonStyle style: ASAuthorizationAppleIDButton.Style)


    /** @abstract Set a custom corner radius to be used by this button.
     */
    open var cornerRadius: CGFloat
}
そこでこの3つのプロパティをカスタマイズできるようにします。
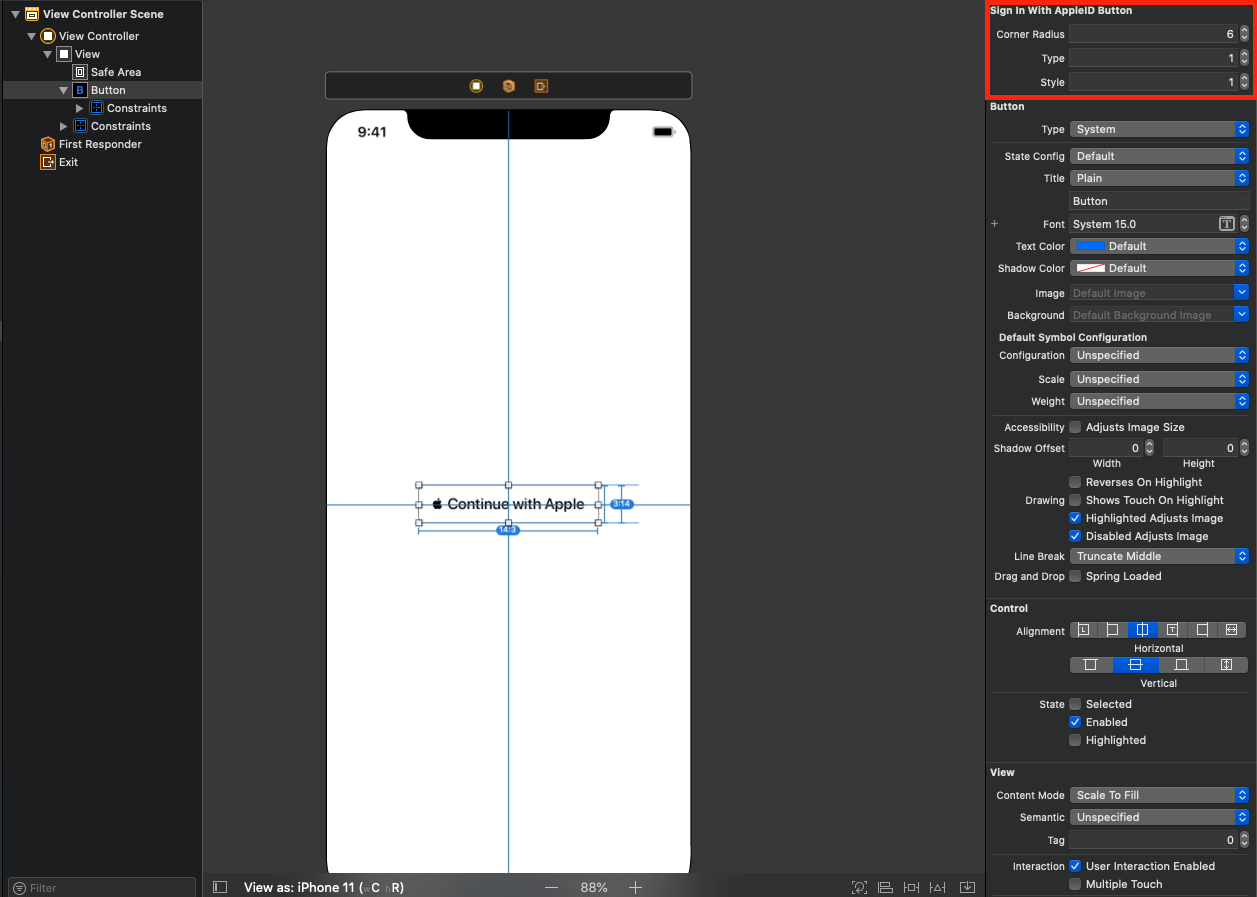
@IBDesignable
class SignInWithAppleIDButton: UIButton {

    ...

    @IBInspectable
    var cornerRadius: CGFloat = 6.0

    @IBInspectable
    var type: Int = ASAuthorizationAppleIDButton.ButtonType.default.rawValue

    @IBInspectable
    var style: Int = ASAuthorizationAppleIDButton.Style.black.rawValue

    ...

    override func draw(_ rect: CGRect) {
        super.draw(rect)

        let type = ASAuthorizationAppleIDButton.ButtonType.init(rawValue: self.type) ?? .default
        let style = ASAuthorizationAppleIDButton.Style.init(rawValue: self.style) ?? .black
        appleIDButton = ASAuthorizationAppleIDButton(authorizationButtonType: type, authorizationButtonStyle: style)
        appleIDButton.cornerRadius = cornerRadius

        addSubview(appleIDButton)

        appleIDButton.translatesAutoresizingMaskIntoConstraints = false
        NSLayoutConstraint.activate([
            appleIDButton.topAnchor.constraint(equalTo: self.topAnchor),
            appleIDButton.leadingAnchor.constraint(equalTo: self.leadingAnchor),
            appleIDButton.bottomAnchor.constraint(equalTo: self.bottomAnchor),
            appleIDButton.trailingAnchor.constraint(equalTo: self.trailingAnchor),
        ])
    }
}
こうするとStoryboard上で設定が変更可能になります。
IBInspectableではenumが指定できないため
RawValueのIntを設定し
enumのcaseに存在しない値に関してはデフォルトの値を設定しています。
cornerRadiusの値はAppleがデフォルトで提供している値のようです。ボタンをタップ可能にする
ここまででデザインはできましたが
ボタンをタップしても動作しません。そこでボタンがタップされたことを
プロパティで保持しているASAuthorizationAppleIDButtonへ
伝えるようにします。@IBDesignable class SignInWithAppleIDButton: UIButton { private var appleIDButton: ASAuthorizationAppleIDButton! ... override func draw(_ rect: CGRect) { super.draw(rect) ... appleIDButton.addTarget(self, action: #selector(appleIDButtonTapped), for: .touchUpInside) ... } @objc func appleIDButtonTapped(_ sender: Any) { sendActions(for: .touchUpInside) } }
sendActions(for:)はUIControlのメソッドで
関連しているUIControl(今回はUIButtonのsubViewのASAuthorizationAppleIDButton)へ
イベントを伝播させることができます。https://developer.apple.com/documentation/uikit/uicontrol/1618211-sendactions
Human Interface Guidelines
上記のようにStoryboardで設定はできるようになるものの
ASAuthorizationAppleIDButtonはデザインに関して
多くのガイドラインが存在します。そこでそれらが記載されている
Human Interface Guidelines
を見ていきたいと思います。
https://developer.apple.com/design/human-interface-guidelines/sign-in-with-apple/overview/buttons/全てに共通のルール
- 目立つように表示すること
- 他のサインインボタン(Facebook, Googleなど)よりも小さくしないこと
- スクロールしなくてもボタンは見えるようにすること
スクロールしなくてもボタンは見えるようにすることに関しては
iPhoneSEなどの小さい端末での表示に注意する必要がありそうですね。システムが提供するボタンを使用する場合
3つのスタイルの注意点
White
全プラットフォーム※で利用可能
※iOS, macOS, iPadOS, watchOS
- 暗い背景や十分にコントラストが与えられる色のついた背景で使用すること
参照元:https://developer.apple.com/design/human-interface-guidelines/sign-in-with-apple/overview/buttons/White with Outline
iOS, macOS, webで利用可能
- 白い背景やWhiteで使うと十分にコントラストが与えられない背景色で使用すること
- 黒のアウトラインが見辛いので暗かったり飽和した背景とは一緒に使わないこと
参照元:https://developer.apple.com/design/human-interface-guidelines/sign-in-with-apple/overview/buttons/
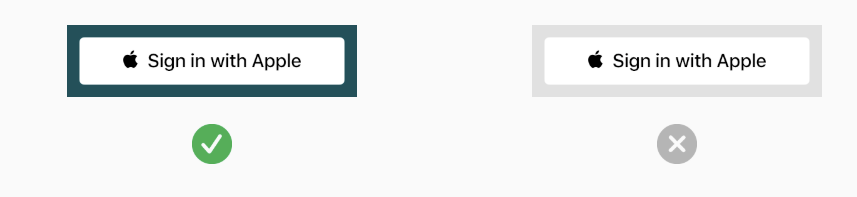
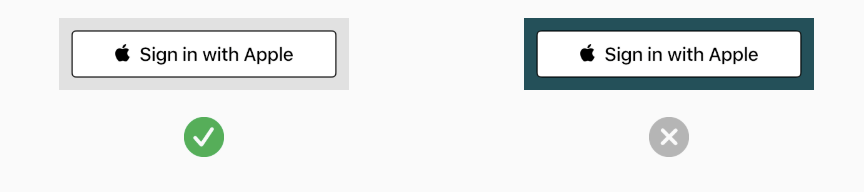
Black
全プラットフォームで利用可能
- 白や明るい背景と一緒に使用すること
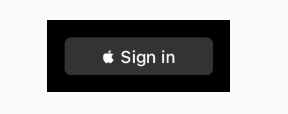
参照元:https://developer.apple.com/design/human-interface-guidelines/sign-in-with-apple/overview/buttons/※ WatchOSの場合、純粋な黒の背景に対応するために
グレーのボタンが用意されている
参照元:https://developer.apple.com/design/human-interface-guidelines/sign-in-with-apple/overview/buttons/Button Size and Corner Radius
アプリの他のボタンに合わせて調整が可能ですが
その中でも下記のようなガイドラインがあります。
https://developer.apple.com/design/human-interface-guidelines/sign-in-with-apple/overview/buttons/
- iOS, macOS, webではボタンの最小サイズと最小マージンを維持すること
ロケールでボタンタイトルの長さが変わるので注意が必要
参照元:https://developer.apple.com/design/human-interface-guidelines/sign-in-with-apple/overview/buttons/カスタムボタンを作成する場合
iOS, macOS, Webで利用可能
Apple Design Resourcesからロゴのダウンロードが可能
https://developer.apple.com/design/resources/ロゴを使用する場合のガイドライン
- ロゴ自体をボタンとして使用しないこと
- ロゴファイルの高さをボタンの高さに合わせること
- 切り取らないこと
- 垂直方向(vertical)のpaddingを追加しないこと
- 独自のカラーを使用しないこと
左寄せロゴボタンを作成する場合
ボタンの高さを基にロゴファイルのフォーマットを選択する
SVGとPDFはベクター形式のなのでどの高さでも利用できるが、PNGは44ptの高さのみで使用すること
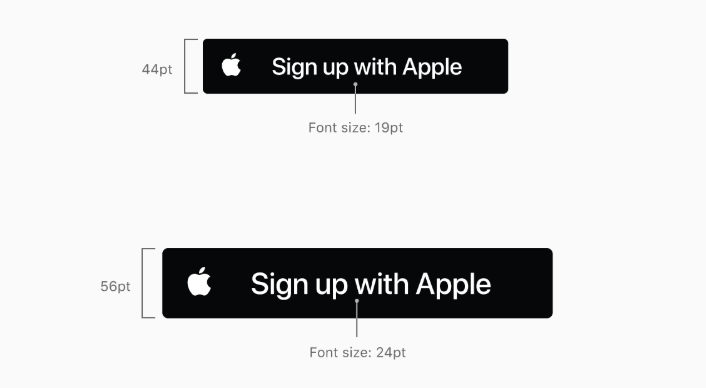
44ptはiOSでのデフォルトの高さで推奨される高さタイトル※にはシステムのフォントを利用すること
※ Sign in with Apple, Sign up with Apple, or Continue with Apple
タイトルのフォントサイズはボタンの高さの43%
逆を言えばボタンの高さはフォントサイズの233%
サイズの例
参照元:https://developer.apple.com/design/human-interface-guidelines/sign-in-with-apple/overview/buttons/タイトルの大文字、小文字を変えない
- 最初の一文字を大文字にすること
具体的にはSign, Continue, Appleは最初が大文字
それ以外は全て小文字にするタイトルとボタンの右端の間のマージンをボタンの幅を最低8%以上にする
ボタンのサイズと周りのマージンを最小以上にする
システムで提供されているものと同様のガイドラインです。

参照元:https://developer.apple.com/design/human-interface-guidelines/sign-in-with-apple/overview/buttons/ロゴのみのボタンを作成する場合
ボタンのサイズを基にロゴファイルのフォーマットを選択する
- ボタンの高さを基にロゴファイルのフォーマットを選択する
- SVGとPDFはベクター形式のなのでどの高さでも利用できるが、PNGは44ptx44ptでのサイズでのみ使用すること
右側に平行方向のpaddingを入れない
- ロゴのみの画像はすでに適切なpaddingが全てのサイドに入っているので変更はしないこと
- アスペクト比は1:1を維持すること
デフォルトの四角い形を変更したい場合はMaskを利用すること
- 元の画像を切り取ったりPaddingを追加してはいけない
ボタンの周りのマージンは最低ボタンの高さの1/10以上にする
まとめ
Sign in with Appleで使用するボタンについて
Storyboardでの設定方法について見てみました。画面に関してStoryboardを使用している場合には
他のパーツと一緒にデザインできるので
役に立つのかと思っています。一方でしっかりと使用する際のガイドラインも存在し
そこを守らないとアプリの審査でリジェクトされる可能性もあるため
しっかりとチェックする必要がありますね。もし何か間違いなどございましたらご指摘ください??♂️
参照記事
https://developer.apple.com/documentation/authenticationservices/implementing_user_authentication_with_sign_in_with_apple
https://developer.apple.com/design/human-interface-guidelines/sign-in-with-apple/overview/buttons/
https://developer.apple.com/library/archive/referencelibrary/GettingStarted/DevelopiOSAppsSwift/ImplementingACustomControl.html
https://medium.com/swlh/how-to-use-asauthorizationappleidbutton-in-storyboard-653f9cd94817


- 投稿日:2020-03-18T07:41:51+09:00
【Swift】Sign in with AppleのボタンをStoryboardで設定する
Sign in with Appleでは
ASAuthorizationAppleIDButtonを使用する必要がありますが
このクラスはStoryboardでサポートされておらず
コード上で追加する必要があります。そこで
今回はCustom Classを作成することで
StoryboardでもSign in with Appleのボタンを設定する方法について
整理してみました。コードでの追加方法は以前↓に書かせていただきました。
https://qiita.com/shiz/items/5e094910f742c2ad72a4実装方法
UIButtonクラスのサブクラスを定義する
UIButtonクラスのサブクラスを定義します
(名前は任意です)class SignInWithAppleIDButton: UIButton { override init(frame: CGRect) { super.init(frame: frame) } required init?(coder: NSCoder) { super.init(coder: coder) } }
ASAuthorizationAppleIDButtonをプロパティに保持する実際にSign in with Appleを実行するための
ASAuthorizationAppleIDButtonをプロパティに保持します。class SignInWithAppleIDButton: UIButton { private var appleIDButton: ASAuthorizationAppleIDButton! ... }暗黙的にOptionalをUnwrapしていますが
次に定義するdraw(_:)メソッドで必ず初期化をするため
問題はありません。
draw(_:)メソッドをoverrideする
draw(_:)メソッドの中で
ボタンを描画します。class SignInWithAppleIDButton: UIButton { super.draw(rect) appleIDButton = ASAuthorizationAppleIDButton(authorizationButtonType: .default, authorizationButtonStyle: .black) addSubview(appleIDButton) appleIDButton.translatesAutoresizingMaskIntoConstraints = false NSLayoutConstraint.activate([ appleIDButton.topAnchor.constraint(equalTo: self.topAnchor), appleIDButton.leadingAnchor.constraint(equalTo: self.leadingAnchor), appleIDButton.bottomAnchor.constraint(equalTo: self.bottomAnchor), appleIDButton.trailingAnchor.constraint(equalTo: self.trailingAnchor), ]) }ここでは
authorizationButtonTypeと
authorizationButtonStyleに
固定値を設定していますが
後ほどカスタム可能にします。Storyboardで設定可能にする
次にStoryboardで表示できるように
@IBDesignableをクラスに設定します。@IBDesignable class SignInWithAppleIDButton: UIButton { super.draw(rect) appleIDButton = ASAuthorizationAppleIDButton(authorizationButtonType: .default, authorizationButtonStyle: .black) addSubview(appleIDButton) appleIDButton.translatesAutoresizingMaskIntoConstraints = false NSLayoutConstraint.activate([ appleIDButton.topAnchor.constraint(equalTo: self.topAnchor), appleIDButton.leadingAnchor.constraint(equalTo: self.leadingAnchor), appleIDButton.bottomAnchor.constraint(equalTo: self.bottomAnchor), appleIDButton.trailingAnchor.constraint(equalTo: self.trailingAnchor), ]) }ここまででStoryboardに
UIButtonを設置してCustom Classに
SignInWithAppleIDButtonを指定すると
下記のようにStoryboard上で表示させることができます。
※ 制約などについてはAppleのHuman Interface Guidelinesに沿っています。
こちらについては後ほど記載します。ボタンをカスタマイズする
ここからはさらに
@IBInspectableを使って
Storyboard上でボタンをカスタマイズ可能にしたいと思います。
ASAuthorizationAppleIDButtonの定義を見てみると
ASAuthorizationAppleIDButton.ButtonType
ASAuthorizationAppleIDButton.Style
cornerRadiusの設定が可能です。
extension ASAuthorizationAppleIDButton {


    @available(iOS 13.0, *)
    public enum ButtonType : Int {


        case signIn = 0

        case `continue` = 1


        @available(iOS 13.2, *)
        case signUp = 2


        public static var `default`: ASAuthorizationAppleIDButton.ButtonType { get }
    }


    @available(iOS 13.0, *)
    public enum Style : Int {


        case white = 0

        case whiteOutline = 1

        case black = 2
    }
}

@available(iOS 13.0, *)
open class ASAuthorizationAppleIDButton : UIControl {


    public convenience init(type: ASAuthorizationAppleIDButton.ButtonType, style: ASAuthorizationAppleIDButton.Style)


    public init(authorizationButtonType type: ASAuthorizationAppleIDButton.ButtonType, authorizationButtonStyle style: ASAuthorizationAppleIDButton.Style)


    /** @abstract Set a custom corner radius to be used by this button.
     */
    open var cornerRadius: CGFloat
}
そこでこの3つのプロパティをカスタマイズできるようにします。
@IBDesignable
class SignInWithAppleIDButton: UIButton {

    ...

    @IBInspectable
    var cornerRadius: CGFloat = 6.0

    @IBInspectable
    var type: Int = ASAuthorizationAppleIDButton.ButtonType.default.rawValue

    @IBInspectable
    var style: Int = ASAuthorizationAppleIDButton.Style.black.rawValue

    ...

    override func draw(_ rect: CGRect) {
        super.draw(rect)

        let type = ASAuthorizationAppleIDButton.ButtonType.init(rawValue: self.type) ?? .default
        let style = ASAuthorizationAppleIDButton.Style.init(rawValue: self.style) ?? .black
        appleIDButton = ASAuthorizationAppleIDButton(authorizationButtonType: type, authorizationButtonStyle: style)
        appleIDButton.cornerRadius = cornerRadius

        addSubview(appleIDButton)

        appleIDButton.translatesAutoresizingMaskIntoConstraints = false
        NSLayoutConstraint.activate([
            appleIDButton.topAnchor.constraint(equalTo: self.topAnchor),
            appleIDButton.leadingAnchor.constraint(equalTo: self.leadingAnchor),
            appleIDButton.bottomAnchor.constraint(equalTo: self.bottomAnchor),
            appleIDButton.trailingAnchor.constraint(equalTo: self.trailingAnchor),
        ])
    }
}
こうするとStoryboard上で設定が変更可能になります。
IBInspectableではenumが指定できないため
RawValueのIntを設定し
enumのcaseに存在しない値に関してはデフォルトの値を設定しています。
cornerRadiusの値はAppleがデフォルトで提供している値のようです。ボタンをタップ可能にする
ここまででデザインはできましたが
ボタンをタップしても動作しません。そこでボタンがタップされたことを
プロパティで保持しているASAuthorizationAppleIDButtonへ
伝えるようにします。@IBDesignable class SignInWithAppleIDButton: UIButton { private var appleIDButton: ASAuthorizationAppleIDButton! ... override func draw(_ rect: CGRect) { super.draw(rect) ... appleIDButton.addTarget(self, action: #selector(appleIDButtonTapped), for: .touchUpInside) ... } @objc func appleIDButtonTapped(_ sender: Any) { sendActions(for: .touchUpInside) } }
sendActions(for:)はUIControlのメソッドで
関連しているUIControl(今回はUIButtonのsubViewのASAuthorizationAppleIDButton)へ
イベントを伝播させることができます。https://developer.apple.com/documentation/uikit/uicontrol/1618211-sendactions
Human Interface Guidelines
上記のようにStoryboardで設定はできるようになるものの
ASAuthorizationAppleIDButtonはデザインに関して
多くのガイドラインが存在します。そこでそれらが記載されている
Human Interface Guidelines
を見ていきたいと思います。
https://developer.apple.com/design/human-interface-guidelines/sign-in-with-apple/overview/buttons/全てに共通のルール
- 目立つように表示すること
- 他のサインインボタン(Facebook, Googleなど)よりも小さくしないこと
- スクロールしなくてもボタンは見えるようにすること
スクロールしなくてもボタンは見えるようにすることに関しては
iPhoneSEなどの小さい端末での表示に注意する必要がありそうですね。システムが提供するボタンを使用する場合
3つのスタイルの注意点
White
全プラットフォーム※で利用可能
※iOS, macOS, iPadOS, watchOS
- 暗い背景や十分にコントラストが与えられる色のついた背景で使用すること
参照元:https://developer.apple.com/design/human-interface-guidelines/sign-in-with-apple/overview/buttons/White with Outline
iOS, macOS, webで利用可能
- 白い背景やWhiteで使うと十分にコントラストが与えられない背景色で使用すること
- 黒のアウトラインが見辛いので暗かったり飽和した背景とは一緒に使わないこと
参照元:https://developer.apple.com/design/human-interface-guidelines/sign-in-with-apple/overview/buttons/
Black
全プラットフォームで利用可能
- 白や明るい背景と一緒に使用すること
参照元:https://developer.apple.com/design/human-interface-guidelines/sign-in-with-apple/overview/buttons/※ WatchOSの場合、純粋な黒の背景に対応するために
グレーのボタンが用意されている
参照元:https://developer.apple.com/design/human-interface-guidelines/sign-in-with-apple/overview/buttons/Button Size and Corner Radius
アプリの他のボタンに合わせて調整が可能ですが
その中でも下記のようなガイドラインがあります。
https://developer.apple.com/design/human-interface-guidelines/sign-in-with-apple/overview/buttons/
- iOS, macOS, webではボタンの最小サイズと最小マージンを維持すること
ロケールでボタンタイトルの長さが変わるので注意が必要
参照元:https://developer.apple.com/design/human-interface-guidelines/sign-in-with-apple/overview/buttons/カスタムボタンを作成する場合
iOS, macOS, Webで利用可能
Apple Design Resourcesからロゴのダウンロードが可能
https://developer.apple.com/design/resources/ロゴを使用する場合のガイドライン
- ロゴ自体をボタンとして使用しないこと
- ロゴファイルの高さをボタンの高さに合わせること
- 切り取らないこと
- 垂直方向(vertical)のpaddingを追加しないこと
- 独自のカラーを使用しないこと
左寄せロゴボタンを作成する場合
ボタンの高さを基にロゴファイルのフォーマットを選択する
SVGとPDFはベクター形式のなのでどの高さでも利用できるが、PNGは44ptの高さのみで使用すること
44ptはiOSでのデフォルトの高さで推奨される高さタイトル※にはシステムのフォントを利用すること
※ Sign in with Apple, Sign up with Apple, or Continue with Apple
タイトルのフォントサイズはボタンの高さの43%
逆を言えばボタンの高さはフォントサイズの233%
サイズの例
参照元:https://developer.apple.com/design/human-interface-guidelines/sign-in-with-apple/overview/buttons/タイトルの大文字、小文字を変えない
- 最初の一文字を大文字にすること
具体的にはSign, Continue, Appleは最初が大文字
それ以外は全て小文字にするタイトルとボタンの右端の間のマージンをボタンの幅を最低8%以上にする
ボタンのサイズと周りのマージンを最小以上にする
システムで提供されているものと同様のガイドラインです。

参照元:https://developer.apple.com/design/human-interface-guidelines/sign-in-with-apple/overview/buttons/ロゴのみのボタンを作成する場合
ボタンのサイズを基にロゴファイルのフォーマットを選択する
- ボタンの高さを基にロゴファイルのフォーマットを選択する
- SVGとPDFはベクター形式のなのでどの高さでも利用できるが、PNGは44ptx44ptでのサイズでのみ使用すること
右側に平行方向のpaddingを入れない
- ロゴのみの画像はすでに適切なpaddingが全てのサイドに入っているので変更はしないこと
- アスペクト比は1:1を維持すること
デフォルトの四角い形を変更したい場合はMaskを利用すること
- 元の画像を切り取ったりPaddingを追加してはいけない
ボタンの周りのマージンは最低ボタンの高さの1/10以上にする
まとめ
Sign in with Appleで使用するボタンについて
Storyboardでの設定方法について見てみました。画面に関してStoryboardを使用している場合には
他のパーツと一緒にデザインできるので
役に立つのかと思っています。一方でしっかりと使用する際のガイドラインも存在し
そこを守らないとアプリの審査でリジェクトされる可能性もあるため
しっかりとチェックする必要がありますね。もし何か間違いなどございましたらご指摘ください??♂️
参照記事
https://developer.apple.com/documentation/authenticationservices/implementing_user_authentication_with_sign_in_with_apple
https://developer.apple.com/design/human-interface-guidelines/sign-in-with-apple/overview/buttons/
https://developer.apple.com/library/archive/referencelibrary/GettingStarted/DevelopiOSAppsSwift/ImplementingACustomControl.html
https://medium.com/swlh/how-to-use-asauthorizationappleidbutton-in-storyboard-653f9cd94817
- 投稿日:2020-03-18T00:41:00+09:00
Swift で map (closure) のこんな書き方
Swift の map などで使用する closure には書き方が色々ありますね。
下記のような書き方は知っていました。let numbers = [0, 1, 2, 3] // 下記すべて[String]型 ["0", "1", "2", "3"] numbers.map({ (number: Int) -> String in return String(number) }) numbers.map({ (number: Int) -> String in String(number) }) // 暗黙的な戻り値 numbers.map({ number -> String in String(number) }) // 引数の型省略 numbers.map({ number in String(number) }) // 戻り値の型推論 numbers.map({ String($0) }) // 引数名の省略 numbers.map { String($0) } // 括弧の省略こんな書き方を発見しました。勉強不足でした。
numbers.map(String.init)結果は上記の例と同じですが、
単純にnumbers.map{ String($0) }と全く一緒というわけではなさそうです。
http://swiftlife.hatenablog.jp/entry/2015/12/27/213058 こちらで解説されていましたのでご参照ください。現に、Playgrounds で試すと結果の表示のされ方が異なります。右半分の表示です。
実験
イニシャライザ以外にも使えるのか
いけた。
// いけた
func f(_ number: Int) -> String {
    return String(number)
}
numbers.map(f)

// 引数ラベルをアンダースコアで省略できるようにしとかなくてもいい
func ff(number: Int) -> String {
    return String(number)
}
numbers.map(ff)

// クラス関数とかでも問題なく使用可
class C {
    class func f(_ number: Int) -> String {
        return String(number)
    }
}
numbers.map(C.f)
関数の引数の数
closure の引数の数と、関数の引数の数があってないと エラー です。
引数2つ目以降無視されるとかはないです。// エラー!! func f(a: Int, b: Int) -> String { return String(a) } numbers.map(f) // これは OK (sorted のクロージャの引数は2つのため) func ff(a: Int, b: Int) -> Bool { return true } numbers.sorted(by: ff)参考

- 投稿日:2020-03-18T00:21:04+09:00
Swift vapor + Heroku で 本番環境やステージング環境を分けて用意できるようになる
概要
Swiftのvaporを利用し始め、herokuにデプロイしてアプリを動かせるようになりました!
そこで、本番環境とかステージング環境とかどうやって分けて運用するんだろうと思い、調べたら意外とさくっといけたのでメモ書きを記事にしてみました。オチもなければ、説明も雑ですがメモベースということで許していただけると幸いです。。。
前提
- vaporで作成したプログラムがある or vaporの概要は知ってる or vaporの話も調べながら進められる
- homebrew がインストール済み
- herokuの概要はあらかた知ってる or herokuの話も調べながら進めれる
参考文献
- vapor Deploy Heroku
- Managing Multiple Environments for an App
- Herokuに本番環境とステージング環境を構築する(Rails5、MySQL5.7)
手順(基本は上記の「参考文献」参照)
1. homebrewのインストール
brew install heroku/brew/heroku2. vaporのディレクトリに移動(helloというアプリを作っていた場合)
cd hello3. herokuのログイン
heroku login
heroku auth:whoami
4. gitのリポジトリ初期化
とりあえず初期化して、masterブランチ用意してコミットを終わらせときましょう
git checkout master
git add .
git commit -m "first commit"
5. 各環境向けHerokuアプリの作成(ステージング:staging、本番環境:production)
Heroku上で作成するアプリの名前はそれぞれ、vapor-staging(ステージング環境)・vapor-production(本番環境)とします。
5.1 ステージング環境用のHerokuアプリ作成
heroku create vapor-staging --remote staging5.2 本番環境用のHerokuアプリ作成
heroku create vapor-production --remote productionここから先、各環境ごとに設定を変えたい場合はherokuコマンドの末尾に
--remote stagingや--remote productionをつけます。6. Buildpackの設定
Herokuのサーバ上でSwiftのvaporを起動させるための設定をします。
6.1 ステージング環境に設定
heroku buildpacks:set vapor/vapor --remote staging6.2 本番環境に設定
heroku buildpacks:set vapor/vapor --remote production7. Swiftバージョンを設定
.swift-versionファイルがあればOK。
以下のコマンドを打ちましょう(5.1.3の部分は利用したいSwiftのバージョンにする)echo "5.1.3" > .swift-version8. Procfileの用意
起動するためのコマンドを
Procfileに定義しときます。
以下のコマンドを打ちましょう。echo "web: Run serve --env production" \ "--hostname 0.0.0.0 --port \$PORT" > Procfile9. Herokuへのデプロイ
Herokuのアプリが指定するリモートリポジトリにプッシュしたら、
デプロイまで自動で動いてくれます(便利!)9.1 ステージング環境にデプロイ
git push staging master6.2 本番環境にデプロイ
git push production masterエラーが出てなければ、OK
10. プロセス数の指定
各環境で実際に稼働するプロセス数(≒インスタンス数)を指定する。
デプロイが終わっても、この設定をしないと実際に稼働しません。10.1 ステージング環境に設定
heroku ps:scale web=1 --remote staging10.2 本番環境に設定
heroku ps:scale web=1 --remote productionHerokuアプリで定められたURLにアクセス、Webページが表示されたらOKです!
- 投稿日:2020-03-18T00:21:04+09:00
Swift Vapor + Heroku で 本番環境やステージング環境を分けて用意できるようになる
概要
Swiftのvaporを利用し始め、herokuにデプロイしてアプリを動かせるようになりました!
そこで、本番環境とかステージング環境とかどうやって分けて運用するんだろうと思い、調べたら意外とさくっといけたのでメモ書きを記事にしてみました。オチもなければ、説明も雑ですがメモベースということで許していただけると幸いです。。。
前提
- vaporで作成したプログラムがある or vaporの概要は知ってる or vaporの話も調べながら進められる
- homebrew がインストール済み
- herokuの概要はあらかた知ってる or herokuの話も調べながら進めれる
参考文献
- vapor Deploy Heroku
- Managing Multiple Environments for an App
- Herokuに本番環境とステージング環境を構築する(Rails5、MySQL5.7)
手順(基本は上記の「参考文献」参照)
1. homebrewのインストール
brew install heroku/brew/heroku2. vaporのディレクトリに移動(helloというアプリを作っていた場合)
cd hello3. herokuのログイン
heroku login
heroku auth:whoami
4. gitのリポジトリ初期化
とりあえず初期化して、masterブランチ用意してコミットを終わらせときましょう
git checkout master
git add .
git commit -m "first commit"
5. 各環境向けHerokuアプリの作成(ステージング:staging、本番環境:production)
Heroku上で作成するアプリの名前はそれぞれ、vapor-staging(ステージング環境)・vapor-production(本番環境)とします。
5.1 ステージング環境用のHerokuアプリ作成
heroku create vapor-staging --remote staging5.2 本番環境用のHerokuアプリ作成
heroku create vapor-production --remote productionここから先、各環境ごとに設定を変えたい場合はherokuコマンドの末尾に
--remote stagingや--remote productionをつけます。6. Buildpackの設定
Herokuのサーバ上でSwiftのvaporを起動させるための設定をします。
6.1 ステージング環境に設定
heroku buildpacks:set vapor/vapor --remote staging6.2 本番環境に設定
heroku buildpacks:set vapor/vapor --remote production7. Swiftバージョンを設定
.swift-versionファイルがあればOK。
以下のコマンドを打ちましょう(5.1.3の部分は利用したいSwiftのバージョンにする)echo "5.1.3" > .swift-version8. Procfileの用意
起動するためのコマンドを
Procfileに定義しときます。
以下のコマンドを打ちましょう。echo "web: Run serve --env production" \ "--hostname 0.0.0.0 --port \$PORT" > Procfile9. Herokuへのデプロイ
Herokuのアプリが指定するリモートリポジトリにプッシュしたら、
デプロイまで自動で動いてくれます(便利!)9.1 ステージング環境にデプロイ
git push staging master6.2 本番環境にデプロイ
git push production masterエラーが出てなければ、OK
10. プロセス数の指定
各環境で実際に稼働するプロセス数(≒インスタンス数)を指定する。
デプロイが終わっても、この設定をしないと実際に稼働しません。10.1 ステージング環境に設定
heroku ps:scale web=1 --remote staging10.2 本番環境に設定
heroku ps:scale web=1 --remote productionHerokuアプリで定められたURLにアクセス、Webページが表示されたらOKです!