- 投稿日:2020-03-18T16:41:24+09:00
React公式チュートリアル『改良のアイディア』を実装してみた
前書き
SPAやってみたいなあと思っていたので、以下の記事を読んでReactを初めてみました。
ReactとVueのどちらを選ぶか - Qiita
https://qiita.com/teradonburi/items/fb91e5feacab5071cfef - Qiita
◆ Spring Bootで作成したAPIをReactからGETする - Qiita最初にやってみるのはやはり公式ということで、チュートリアル:React の導入にチャレンジ。
基本的なpropsやstateの考え方が分かりやすく、リファクタリング手順も載っているのでかなり見返すことになりそうです。チュートリアルの最後に以下のような記載がありましたので、こちらにもチャレンジ。
時間がある場合や、今回身につけた新しいスキルを練習してみたい場合に、あなたが挑戦できる改良のアイデアを以下にリストアップしています。
見返した自分の役に立つようチャレンジ時に考えていたことも書いているので、
参考になれば幸いです。実装
コードは最終手順からのステップアップ形式でやっていきます。
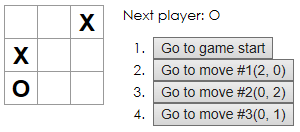
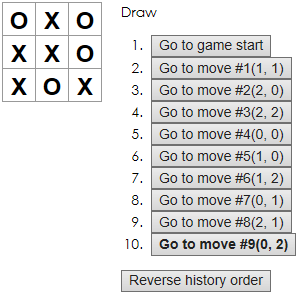
1. 履歴内のそれぞれの着手の位置を (col, row) というフォーマットで表示する。
イメージはこんな感じ。
まず、変更したいのは以下の部分です。
js// 省略 class Game extends React.Component { constructor(props) { // 省略 } handleClick(i) { // 省略 } jumpTo(step) { // 省略 } render() { const history = this.state.history; const current = history[this.state.stepNumber]; const winner = calculateWinner(current.squares); const moves = history.map((step, move) => { const desc = move ? 'Go to move #' + move : // ←ここ 'Go to game start'; return ( // 省略 ); }); // 省略 } } // 省略この部分で以下のように表示できれば。。。
      const desc = move ?
        'Go to move #' + move + '(' + col + ', ' + row + ')' :
        'Go to game start';
では、
colとrowはどのように求めるか。
1マスを表すSquareコンポーネントで、自身の座標を持つのが良さそうかな?と最初は考えました。
しかし、State のリフトアップで行ったように、Board が各 Square に、現時点の state がどうなっているか問い合わせればよいだけでは、と思うかもしれません。
React でそれをすることも可能ですが、コードが分かりにくく、より壊れやすく、リファクタリングしづらいものになるのでお勧めしません。とあります。
実際にSquareコンポーネント(とその親のBoardコンポーネント)はステートレスの状態になっているので、
Gameコンポーネントで管理することになりそうです。ではまず、
Squareコンポーネントを生成している部分を見ていきます。
このプログラム内でクリックした場所を表すのは、以下の部分です。js// 省略 class Board extends React.Component { renderSquare(i) { // ← 2. ここの引数として渡され return ( <Square value={this.props.squares[i]} onClick={() => this.props.onClick(i)} // ← 3. ここでGameコンポーネントから受け取った関数に渡される /> ); } render() { return ( <div> <div className="board-row"> {this.renderSquare(0)} // ← 1. ここでべた書きされているセル番号が {this.renderSquare(1)} {this.renderSquare(2)} </div> <div className="board-row"> {this.renderSquare(3)} {this.renderSquare(4)} {this.renderSquare(5)} </div> <div className="board-row"> {this.renderSquare(6)} {this.renderSquare(7)} {this.renderSquare(8)} </div> </div> ); } } // 省略つまり、最終的に
Gameコンポーネントから渡す関数オブジェクトに渡されるわけですね。
この関数オブジェクトは以下のように定義されています。js// 省略 class Game extends React.Component { // 省略 handleClick(i) { // ← この関数が const history = this.state.history.slice(0, this.state.stepNumber + 1); const current = history[history.length - 1]; const squares = current.squares.slice(); if (calculateWinner(squares) || squares[i]) { return; } squares[i] = this.state.xIsNext ? "X" : "O"; this.setState({ history: history.concat([ { squares: squares } ]), stepNumber: history.length, xIsNext: !this.state.xIsNext }); } // 省略 render() { // 省略 return ( <div className="game"> <div className="game-board"> <Board squares={current.squares} onClick={i => this.handleClick(i)} // ← ここでpropsとして渡されている /> </div> <div className="game-info"> <div>{status}</div> <ol>{moves}</ol> </div> </div> ); } }ですので、
handleClickメソッド内部でstateとして保持してあげれば良さそうです。
現状stateとして保持されている情報は以下の3つです。
- history:
squaresをプロパティとして持つObjectの配列- stepNumber: いま何手目の状態を見ているのかを表す数字
- xIsNext: 次が
Xの手番であるかどうかを表す真偽値保持したい情報は
各手番で押されたセルの座標ですので、historyと1対1の関係ですね。
ここで、historyが「Objectの配列」であるということが大切になります。
実際、私がチュートリアルをやっていたときは「historyってオブジェクトでラップせずに配列の配列でよくね」と考えていましたが、
ここまで手を進めて拡張性のためにわざわざしていたのだと気付きました。(違ったらすみません。。。)
ということで、historyの配列内オブジェクトにプロパティを追加します。js// 省略 class Game extends React.Component { constructor(props) { super(props); this.state = { history: [ { - squares: Array(9).fill(null) + squares: Array(9).fill(null), + location: { + col: null, + row: null, + }, } ], stepNumber: 0, xIsNext: true }; } // 省略 }初期値は
nullですが、handleClickメソッド内で値を設定します。
colは0~8のセル番号を3で割った余りにすればよいでしょう。
コードで表すと、i % 3となります。
rowは0~8のセル番号を3で割った商にすればよいでしょう。
コードで表すと、Math.trunc(i / 3)となります。
※Math.floorでも良いという記事もあります。
今回はiが0を含む自然数ですので問題にはなりませんが、Math.truncの方が定義としては正しいでしょう。
Math.trunc(-6.5 / 3) -> -2とMath.floor(-6.5 / 3) -> -3という違いがあります。js// 省略 class Game extends React.Component { // 省略 handleClick(i) { const history = this.state.history.slice(0, this.state.stepNumber + 1); const current = history[history.length - 1]; const squares = current.squares.slice(); if (calculateWinner(squares) || squares[i]) { return; } squares[i] = this.state.xIsNext ? "X" : "O"; this.setState({ history: history.concat([ { - squares: squares + squares: squares, + location: { + col: i % 3, + row: Math.trunc(i / 3), + }, } ]), stepNumber: history.length, xIsNext: !this.state.xIsNext }); } // 省略 }座標を保持できたので、ボタンに表示します。
js// 省略 class Game extends React.Component { // 省略 render() { const history = this.state.history; const current = history[this.state.stepNumber]; const winner = calculateWinner(current.squares); const moves = history.map((step, move) => { const desc = move ? - 'Go to move #' + move : + 'Go to move #' + move + '(' + step.location.col + ', ' + step.location.row + ')' : 'Go to game start'; return ( <li key={move}> <button onClick={() => this.jumpTo(move)}>{desc}</button> </li> ); }); // 省略 } } // 省略これで完成です。
【クリックで展開】ここまでのコードは以下になります。(CodePenはこちら)
html(変更なし)<div id="errors" style=" background: #c00; color: #fff; display: none; margin: -20px -20px 20px; padding: 20px; white-space: pre-wrap; "></div> <div id="root"></div> <script> window.addEventListener('mousedown', function(e) { document.body.classList.add('mouse-navigation'); document.body.classList.remove('kbd-navigation'); }); window.addEventListener('keydown', function(e) { if (e.keyCode === 9) { document.body.classList.add('kbd-navigation'); document.body.classList.remove('mouse-navigation'); } }); window.addEventListener('click', function(e) { if (e.target.tagName === 'A' && e.target.getAttribute('href') === '#') { e.preventDefault(); } }); window.onerror = function(message, source, line, col, error) { var text = error ? error.stack || error : message + ' (at ' + source + ':' + line + ':' + col + ')'; errors.textContent += text + '\n'; errors.style.display = ''; }; console.error = (function(old) { return function error() { errors.textContent += Array.prototype.slice.call(arguments).join(' ') + '\n'; errors.style.display = ''; old.apply(this, arguments); } })(console.error); </script>css(変更なし)body { font: 14px "Century Gothic", Futura, sans-serif; margin: 20px; } ol, ul { padding-left: 30px; } .board-row:after { clear: both; content: ""; display: table; } .status { margin-bottom: 10px; } .square { background: #fff; border: 1px solid #999; float: left; font-size: 24px; font-weight: bold; line-height: 34px; height: 34px; margin-right: -1px; margin-top: -1px; padding: 0; text-align: center; width: 34px; } .square:focus { outline: none; } .kbd-navigation .square:focus { background: #ddd; } .game { display: flex; flex-direction: row; } .game-info { margin-left: 20px; }jsfunction Square(props) { return ( <button className="square" onClick={props.onClick}> {props.value} </button> ); } class Board extends React.Component { renderSquare(i) { return ( <Square value={this.props.squares[i]} onClick={() => this.props.onClick(i)} /> ); } render() { return ( <div> <div className="board-row"> {this.renderSquare(0)} {this.renderSquare(1)} {this.renderSquare(2)} </div> <div className="board-row"> {this.renderSquare(3)} {this.renderSquare(4)} {this.renderSquare(5)} </div> <div className="board-row"> {this.renderSquare(6)} {this.renderSquare(7)} {this.renderSquare(8)} </div> </div> ); } } class Game extends React.Component { constructor(props) { super(props); this.state = { history: [ { squares: Array(9).fill(null), location: { col: null, row: null, }, } ], stepNumber: 0, xIsNext: true }; } handleClick(i) { const history = this.state.history.slice(0, this.state.stepNumber + 1); const current = history[history.length - 1]; const squares = current.squares.slice(); if (calculateWinner(squares) || squares[i]) { return; } squares[i] = this.state.xIsNext ? "X" : "O"; this.setState({ history: history.concat([ { squares: squares, location: { col: i % 3, row: Math.trunc(i / 3), }, } ]), stepNumber: history.length, xIsNext: !this.state.xIsNext }); } jumpTo(step) { this.setState({ stepNumber: step, xIsNext: (step % 2) === 0 }); } render() { const history = this.state.history; const current = history[this.state.stepNumber]; const winner = calculateWinner(current.squares); const moves = history.map((step, move) => { const desc = move ? 'Go to move #' + move + '(' + step.location.col + ', ' + step.location.row + ')' : 'Go to game start'; return ( <li key={move}> <button onClick={() => this.jumpTo(move)}>{desc}</button> </li> ); }); let status; if (winner) { status = "Winner: " + winner; } else { status = "Next player: " + (this.state.xIsNext ? "X" : "O"); } return ( <div className="game"> <div className="game-board"> <Board squares={current.squares} onClick={i => this.handleClick(i)} /> </div> <div className="game-info"> <div>{status}</div> <ol>{moves}</ol> </div> </div> ); } } // ======================================== ReactDOM.render(<Game />, document.getElementById("root")); function calculateWinner(squares) { const lines = [ [0, 1, 2], [3, 4, 5], [6, 7, 8], [0, 3, 6], [1, 4, 7], [2, 5, 8], [0, 4, 8], [2, 4, 6] ]; for (let i = 0; i < lines.length; i++) { const [a, b, c] = lines[i]; if (squares[a] && squares[a] === squares[b] && squares[a] === squares[c]) { return squares[a]; } } return null; }2. 着手履歴のリスト中で現在選択されているアイテムをボールドにする。
ボタンのテキストを
font-weight: boldにします。
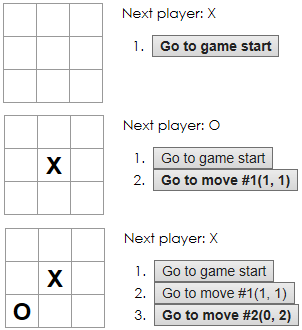
イメージはこんな感じ。
なんか1.より2.の方が簡単な気もしますが。。。
まずCSSにboldのスタイルを作成します。css/* 省略 */ .text-bold { font-weight: bold; }このスタイルをどのように当てるかですが、チュートリアル内で紹介されている一段階ずつ学べるガイドの項目の中に2. JSX の導入というものがあります。
これによると、あらゆる有効な JavaScript の式を JSX 内で中括弧に囲んで使用できます。
ということなので、
classNameの右辺で中括弧を使用した分岐ができれば良さそう。js// 省略 class Game extends React.Component { // 省略 render() { const history = this.state.history; const current = history[this.state.stepNumber]; const winner = calculateWinner(current.squares); const moves = history.map((step, move) => { const desc = move ? 'Go to move #' + move + '(' + step.location.col + ', ' + step.location.row + ')' : 'Go to game start'; return ( <li key={move}> - <button onClick={() => this.jumpTo(move)}>{desc}</button> + <button + onClick={() => this.jumpTo(move)} + className={move === this.state.stepNumber ? 'text-bold' : ''} + > + {desc} + </button> </li> ); }); // 省略 } } // 省略※読みやすくするため、
onClickとclassNameの両プロパティをそれぞれ独立した行に配置
【クリックで展開】ここまでのコードは以下になります。(CodePenはこちら)
html(変更なし)<div id="errors" style=" background: #c00; color: #fff; display: none; margin: -20px -20px 20px; padding: 20px; white-space: pre-wrap; "></div> <div id="root"></div> <script> window.addEventListener('mousedown', function(e) { document.body.classList.add('mouse-navigation'); document.body.classList.remove('kbd-navigation'); }); window.addEventListener('keydown', function(e) { if (e.keyCode === 9) { document.body.classList.add('kbd-navigation'); document.body.classList.remove('mouse-navigation'); } }); window.addEventListener('click', function(e) { if (e.target.tagName === 'A' && e.target.getAttribute('href') === '#') { e.preventDefault(); } }); window.onerror = function(message, source, line, col, error) { var text = error ? error.stack || error : message + ' (at ' + source + ':' + line + ':' + col + ')'; errors.textContent += text + '\n'; errors.style.display = ''; }; console.error = (function(old) { return function error() { errors.textContent += Array.prototype.slice.call(arguments).join(' ') + '\n'; errors.style.display = ''; old.apply(this, arguments); } })(console.error); </script>cssbody { font: 14px "Century Gothic", Futura, sans-serif; margin: 20px; } ol, ul { padding-left: 30px; } .board-row:after { clear: both; content: ""; display: table; } .status { margin-bottom: 10px; } .square { background: #fff; border: 1px solid #999; float: left; font-size: 24px; font-weight: bold; line-height: 34px; height: 34px; margin-right: -1px; margin-top: -1px; padding: 0; text-align: center; width: 34px; } .square:focus { outline: none; } .kbd-navigation .square:focus { background: #ddd; } .game { display: flex; flex-direction: row; } .game-info { margin-left: 20px; } .text-bold { font-weight: bold; }jsfunction Square(props) { return ( <button className="square" onClick={props.onClick}> {props.value} </button> ); } class Board extends React.Component { renderSquare(i) { return ( <Square value={this.props.squares[i]} onClick={() => this.props.onClick(i)} /> ); } render() { return ( <div> <div className="board-row"> {this.renderSquare(0)} {this.renderSquare(1)} {this.renderSquare(2)} </div> <div className="board-row"> {this.renderSquare(3)} {this.renderSquare(4)} {this.renderSquare(5)} </div> <div className="board-row"> {this.renderSquare(6)} {this.renderSquare(7)} {this.renderSquare(8)} </div> </div> ); } } class Game extends React.Component { constructor(props) { super(props); this.state = { history: [ { squares: Array(9).fill(null), location: { col: null, row: null, }, } ], stepNumber: 0, xIsNext: true }; } handleClick(i) { const history = this.state.history.slice(0, this.state.stepNumber + 1); const current = history[history.length - 1]; const squares = current.squares.slice(); if (calculateWinner(squares) || squares[i]) { return; } squares[i] = this.state.xIsNext ? "X" : "O"; this.setState({ history: history.concat([ { squares: squares, location: { col: i % 3, row: Math.trunc(i / 3), }, } ]), stepNumber: history.length, xIsNext: !this.state.xIsNext }); } jumpTo(step) { this.setState({ stepNumber: step, xIsNext: (step % 2) === 0 }); } render() { const history = this.state.history; const current = history[this.state.stepNumber]; const winner = calculateWinner(current.squares); const moves = history.map((step, move) => { const desc = move ? 'Go to move #' + move + '(' + step.location.col + ', ' + step.location.row + ')' : 'Go to game start'; return ( <li key={move}> <button onClick={() => this.jumpTo(move)} className={move === this.state.stepNumber ? 'text-bold' : ''} > {desc} </button> </li> ); }); let status; if (winner) { status = "Winner: " + winner; } else { status = "Next player: " + (this.state.xIsNext ? "X" : "O"); } return ( <div className="game"> <div className="game-board"> <Board squares={current.squares} onClick={i => this.handleClick(i)} /> </div> <div className="game-info"> <div>{status}</div> <ol>{moves}</ol> </div> </div> ); } } // ======================================== ReactDOM.render(<Game />, document.getElementById("root")); function calculateWinner(squares) { const lines = [ [0, 1, 2], [3, 4, 5], [6, 7, 8], [0, 3, 6], [1, 4, 7], [2, 5, 8], [0, 4, 8], [2, 4, 6] ]; for (let i = 0; i < lines.length; i++) { const [a, b, c] = lines[i]; if (squares[a] && squares[a] === squares[b] && squares[a] === squares[c]) { return squares[a]; } } return null; }3. Board でマス目を並べる部分を、ハードコーディングではなく 2 つのループを使用するように書き換える。
見た目に変更はありません。
こちらもとっかかりやすいですね。
対象は以下の部分です。js// 省略 class Board extends React.Component { // 省略 render() { const cols = [0, 1, 2]; return ( <div> <div className="board-row"> // ┐ {this.renderSquare(0)} // ┐ │ {this.renderSquare(1)} // │ここがループ(1) │ {this.renderSquare(2)} // ┘ │ </div> // │ <div className="board-row"> // │ {this.renderSquare(3)} // │ {this.renderSquare(4)} // │ ここがループ(2) {this.renderSquare(5)} // │ </div> // │ <div className="board-row"> // │ {this.renderSquare(6)} // │ {this.renderSquare(7)} // │ {this.renderSquare(8)} // │ </div> // ┘ </div> ); } } // 省略まずループ(1)からやっていきます。
JSXでは中括弧で囲まれた部分でJavascriptを使用できるので、以下のようにループします。js// 省略 class Board extends React.Component { // 省略 render() { + const cols = [0, 1, 2]; return ( <div> <div className="board-row"> - {this.renderSquare(0)} - {this.renderSquare(1)} - {this.renderSquare(2)} + {cols.map(col => this.renderSquare(col))} </div> <div className="board-row"> {this.renderSquare(3)} {this.renderSquare(4)} {this.renderSquare(5)} </div> <div className="board-row"> {this.renderSquare(6)} {this.renderSquare(7)} {this.renderSquare(8)} </div> </div> ); } } // 省略このままではチュートリアルの「過去の着手の表示」項目でも起きたように、
以下の警告も出力されているはずです。Warning: Each child in an array or iterator should have a unique "key" prop. Check the render method of "Board".
そのため、
renderSquareメソッド内で呼び出しているSquareコンポーネントにkeyプロパティを追加します。js// 省略 class Board extends React.Component { renderSquare(i) { return ( <Square value={this.props.squares[i]} onClick={() => this.props.onClick(i)} + key={i} /> ); } // 省略 } // 省略これでエラーが表示されなくなったので、他の
<div className="board-row">にもループを適用します。js// 省略 class Board extends React.Component { // 省略 render() { const cols = [0, 1, 2]; return ( <div> <div className="board-row"> {cols.map(col => this.renderSquare(col))} </div> <div className="board-row"> - {this.renderSquare(3)} - {this.renderSquare(4)} - {this.renderSquare(5)} + {cols.map(col => this.renderSquare(col + 3))} </div> <div className="board-row"> - {this.renderSquare(6)} - {this.renderSquare(7)} - {this.renderSquare(8)} + {cols.map(col => this.renderSquare(col + 6))} </div> </div> ); } } // 省略そして、ループ(2)を実装します。
js// 省略 class Board extends React.Component { // 省略 render() { + const rows = [0, 1, 2]; const cols = [0, 1, 2]; return ( <div> - <div className="board-row"> - {cols.map(col => this.renderSquare(col))} - </div> - <div className="board-row"> - {cols.map(col => this.renderSquare(col + 3))} - </div> - <div className="board-row"> - {cols.map(col => this.renderSquare(col + 6))} - </div> + {rows.map(row => { + return ( + <div className="board-row"> + {cols.map(col => this.renderSquare(row * 3 + col))} + </div> + ); + })} </div> ); } } // 省略2重ループは実装できましたが、また同じエラーが出ているので、
rowでループしている<div className="board-row">にもkeyプロパティを追加します。js// 省略 class Board extends React.Component { // 省略 render() { const rows = [0, 1, 2]; const cols = [0, 1, 2]; return ( <div> {rows.map(row => { return ( - <div className="board-row"> + <div + className="board-row" + key={row} + > {cols.map(col => this.renderSquare(row * 3 + col))} </div> ); })} </div> ); } } // 省略※読みやすくするため、
classNameとkeyの両プロパティをそれぞれ独立した行に配置
【クリックで展開】ここまでのコードは以下になります。(CodePenはこちら)
html(変更なし)<div id="errors" style=" background: #c00; color: #fff; display: none; margin: -20px -20px 20px; padding: 20px; white-space: pre-wrap; "></div> <div id="root"></div> <script> window.addEventListener('mousedown', function(e) { document.body.classList.add('mouse-navigation'); document.body.classList.remove('kbd-navigation'); }); window.addEventListener('keydown', function(e) { if (e.keyCode === 9) { document.body.classList.add('kbd-navigation'); document.body.classList.remove('mouse-navigation'); } }); window.addEventListener('click', function(e) { if (e.target.tagName === 'A' && e.target.getAttribute('href') === '#') { e.preventDefault(); } }); window.onerror = function(message, source, line, col, error) { var text = error ? error.stack || error : message + ' (at ' + source + ':' + line + ':' + col + ')'; errors.textContent += text + '\n'; errors.style.display = ''; }; console.error = (function(old) { return function error() { errors.textContent += Array.prototype.slice.call(arguments).join(' ') + '\n'; errors.style.display = ''; old.apply(this, arguments); } })(console.error); </script>css(変更なし)body { font: 14px "Century Gothic", Futura, sans-serif; margin: 20px; } ol, ul { padding-left: 30px; } .board-row:after { clear: both; content: ""; display: table; } .status { margin-bottom: 10px; } .square { background: #fff; border: 1px solid #999; float: left; font-size: 24px; font-weight: bold; line-height: 34px; height: 34px; margin-right: -1px; margin-top: -1px; padding: 0; text-align: center; width: 34px; } .square:focus { outline: none; } .kbd-navigation .square:focus { background: #ddd; } .game { display: flex; flex-direction: row; } .game-info { margin-left: 20px; } .text-bold { font-weight: bold; }jsfunction Square(props) { return ( <button className="square" onClick={props.onClick}> {props.value} </button> ); } class Board extends React.Component { renderSquare(i) { return ( <Square value={this.props.squares[i]} onClick={() => this.props.onClick(i)} key={i} /> ); } render() { const rows = [0, 1, 2]; const cols = [0, 1, 2]; return ( <div> {rows.map(row => { return ( <div className="board-row" key={row} > {cols.map(col => this.renderSquare(row * 3 + col))} </div> ); })} </div> ); } } class Game extends React.Component { constructor(props) { super(props); this.state = { history: [ { squares: Array(9).fill(null), location: { col: null, row: null, }, } ], stepNumber: 0, xIsNext: true }; } handleClick(i) { const history = this.state.history.slice(0, this.state.stepNumber + 1); const current = history[history.length - 1]; const squares = current.squares.slice(); if (calculateWinner(squares) || squares[i]) { return; } squares[i] = this.state.xIsNext ? "X" : "O"; this.setState({ history: history.concat([ { squares: squares, location: { col: i % 3, row: Math.trunc(i / 3), }, } ]), stepNumber: history.length, xIsNext: !this.state.xIsNext }); } jumpTo(step) { this.setState({ stepNumber: step, xIsNext: (step % 2) === 0 }); } render() { const history = this.state.history; const current = history[this.state.stepNumber]; const winner = calculateWinner(current.squares); const moves = history.map((step, move) => { const desc = move ? 'Go to move #' + move + '(' + step.location.col + ', ' + step.location.row + ')' : 'Go to game start'; return ( <li key={move}> <button onClick={() => this.jumpTo(move)} className={move === this.state.stepNumber ? 'text-bold' : ''} > {desc} </button> </li> ); }); let status; if (winner) { status = "Winner: " + winner; } else { status = "Next player: " + (this.state.xIsNext ? "X" : "O"); } return ( <div className="game"> <div className="game-board"> <Board squares={current.squares} onClick={i => this.handleClick(i)} /> </div> <div className="game-info"> <div>{status}</div> <ol>{moves}</ol> </div> </div> ); } } // ======================================== ReactDOM.render(<Game />, document.getElementById("root")); function calculateWinner(squares) { const lines = [ [0, 1, 2], [3, 4, 5], [6, 7, 8], [0, 3, 6], [1, 4, 7], [2, 5, 8], [0, 4, 8], [2, 4, 6] ]; for (let i = 0; i < lines.length; i++) { const [a, b, c] = lines[i]; if (squares[a] && squares[a] === squares[b] && squares[a] === squares[c]) { return squares[a]; } } return null; }4. 着手履歴のリストを昇順・降順いずれでも並べかえられるよう、トグルボタンを追加する。
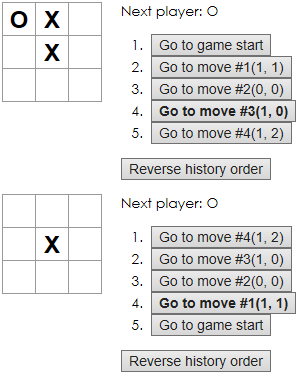
イメージはこんな感じ。
こちらは一見簡単そうに見えます。
具体的には、「Reverse history order」のボタンを用意し、クリックした際にhistoryプロパティを逆順にするreverseHistoryOrderメソッドを追加します。js// 省略 class Game extends React.Component { // 省略 + reverseHistoryOrder() { + this.setState({ + history: this.state.history.slice().reverse(), + }); + } render() { // 省略 return ( <div className="game"> <div className="game-board"> <Board squares={current.squares} onClick={i => this.handleClick(i)} /> </div> <div className="game-info"> <div>{status}</div> <ol>{moves}</ol> + <button onClick={() => this.reverseHistoryOrder()}>Reverse history order</button> </div> </div> ); } }ですが、この方法では以下の点で不具合が生じています。(他にもあるが割愛)
- 「Go to game start」ボタンが常に最初に表示されている
- 「Go to move」の番号が逆転しない
- 逆順にした際にゲームデータがリセットされる
- ゲームを続けた際、
historyの最後にmoveが追加されるこれらの不具合は、
Go to ~ボタンの表示がhistory.mapのインデックス(変数名はmove)に基づいて行われているためです。
解消するには、Gameコンポーネントで現状「昇順」と「降順」のどちらで表示されているかを管理する必要があります。まず、
GameコンポーネントのstateにisAscendingOrderの真偽値を追加します。js// 省略 class Game extends React.Component { constructor(props) { super(props); this.state = { history: [ { squares: Array(9).fill(null), location: { col: null, row: null, }, } ], stepNumber: 0, + isAscendingOrder: true, xIsNext: true }; } // 省略 }次に、
reverseHistoryOrderメソッド内ではisAscendingOrderを反転させます。js// 省略 class Game extends React.Component { // 省略 reverseHistoryOrder() { this.setState({ - history: this.state.history.slice().reverse(), + isAscendingOrder: !this.state.isAscendingOrder, }); } // 省略 }これで
historyの並び順を管理できるようになりましたが、このままでは表示が変わりません。
Gameコンポーネントのrenderメソッドを修正します。js// 省略 class Game extends React.Component { // 省略 render() { - const history = this.state.history; // 逆順の場合はthis.state.history配列のコピーを反転させる // これにより、this.state.historyはつねに昇順のデータを保持し続ける + const history = this.state.isAscendingOrder ? this.state.history : this.state.history.slice().reverse(); const current = history[this.state.stepNumber]; const winner = calculateWinner(current.squares); const moves = history.map((step, move) => { // 逆順の場合はインデックスを反転させる + const moveIndex = this.state.isAscendingOrder ? move : history.length - 1 - move; - const desc = move ? + const desc = moveIndex ? - 'Go to move #' + move + '(' + step.location.col + ', ' + step.location.row + ')' : + 'Go to move #' + moveIndex + '(' + step.location.col + ', ' + step.location.row + ')' : 'Go to game start'; return ( - <li key={move}> + <li key={moveIndex}> <button - onClick={() => this.jumpTo(move)} + onClick={() => this.jumpTo(moveIndex)} className={move === currentStepNumber ? 'text-bold' : ''} > {desc} </button> </li> ); }); // 省略 } } // 省略ポイントは(コメントにも書いていますが)
this.state.history配列のコピーを反転させることです。
チュートリアルの「イミュータビリティは何故重要なのか」項目にも記載されていますが、
this.state.historyはつねに昇順のデータを保持し、あくまで表示のタイミングのみ反転した履歴を扱うことで、
GameコンポーネントのhandleClickメソッドなどが修正不要となります。ただし、このままでは画像のように、順序を入れ替えた場合に「現在選択されているアイテム」がずれてしまうバグがあります。
#3を選択していたのに、反転後に#1が選択されてしまっているですので、「現在選択されているアイテム」は降順の場合に反転させる必要があります。
js// 省略 class Game extends React.Component { // 省略 render() { // 逆順の場合はthis.state.history配列のコピーを反転させる // これにより、this.state.historyはつねに昇順のデータを保持し続ける const history = this.state.isAscendingOrder ? this.state.history : this.state.history.slice().reverse(); // 現在選択されているアイテムのインデックスを逆順の場合に反転させる + const currentStepNumber = this.state.isAscendingOrder ? this.state.stepNumber : history.length - 1 - this.state.stepNumber; - const current = history[this.state.stepNumber]; + const current = history[currentStepNumber]; const winner = calculateWinner(current.squares); const moves = history.map((step, move) => { // 逆順の場合はインデックスを反転させる const moveIndex = this.state.isAscendingOrder ? move : history.length - 1 - move; const desc = moveIndex ? 'Go to move #' + moveIndex + '(' + step.location.col + ', ' + step.location.row + ')' : 'Go to game start'; return ( <li key={moveIndex}> <button onClick={() => this.jumpTo(moveIndex)} - className={move === this.state.stepNumber ? 'text-bold' : ''} + className={move === currentStepNumber ? 'text-bold' : ''} > {desc} </button> </li> ); }); // 省略 } } // 省略これで完成です。
【クリックで展開】ここまでのコードは以下になります。(CodePenはこちら)
html(変更なし)<div id="errors" style=" background: #c00; color: #fff; display: none; margin: -20px -20px 20px; padding: 20px; white-space: pre-wrap; "></div> <div id="root"></div> <script> window.addEventListener('mousedown', function(e) { document.body.classList.add('mouse-navigation'); document.body.classList.remove('kbd-navigation'); }); window.addEventListener('keydown', function(e) { if (e.keyCode === 9) { document.body.classList.add('kbd-navigation'); document.body.classList.remove('mouse-navigation'); } }); window.addEventListener('click', function(e) { if (e.target.tagName === 'A' && e.target.getAttribute('href') === '#') { e.preventDefault(); } }); window.onerror = function(message, source, line, col, error) { var text = error ? error.stack || error : message + ' (at ' + source + ':' + line + ':' + col + ')'; errors.textContent += text + '\n'; errors.style.display = ''; }; console.error = (function(old) { return function error() { errors.textContent += Array.prototype.slice.call(arguments).join(' ') + '\n'; errors.style.display = ''; old.apply(this, arguments); } })(console.error); </script>css(変更なし)body { font: 14px "Century Gothic", Futura, sans-serif; margin: 20px; } ol, ul { padding-left: 30px; } .board-row:after { clear: both; content: ""; display: table; } .status { margin-bottom: 10px; } .square { background: #fff; border: 1px solid #999; float: left; font-size: 24px; font-weight: bold; line-height: 34px; height: 34px; margin-right: -1px; margin-top: -1px; padding: 0; text-align: center; width: 34px; } .square:focus { outline: none; } .kbd-navigation .square:focus { background: #ddd; } .game { display: flex; flex-direction: row; } .game-info { margin-left: 20px; } .text-bold { font-weight: bold; }jsfunction Square(props) { return ( <button className="square" onClick={props.onClick}> {props.value} </button> ); } class Board extends React.Component { renderSquare(i) { return ( <Square value={this.props.squares[i]} onClick={() => this.props.onClick(i)} key={i} /> ); } render() { const rows = [0, 1, 2]; const cols = [0, 1, 2]; return ( <div> {rows.map(row => { return ( <div className="board-row" key={row} > {cols.map(col => this.renderSquare(row * 3 + col))} </div> ); })} </div> ); } } class Game extends React.Component { constructor(props) { super(props); this.state = { history: [ { squares: Array(9).fill(null), location: { col: null, row: null, }, } ], stepNumber: 0, isAscendingOrder: true, xIsNext: true }; } handleClick(i) { const history = this.state.history.slice(0, this.state.stepNumber + 1); const current = history[history.length - 1]; const squares = current.squares.slice(); if (calculateWinner(squares) || squares[i]) { return; } squares[i] = this.state.xIsNext ? "X" : "O"; this.setState({ history: history.concat([ { squares: squares, location: { col: i % 3, row: Math.trunc(i / 3), }, } ]), stepNumber: history.length, xIsNext: !this.state.xIsNext }); } jumpTo(step) { this.setState({ stepNumber: step, xIsNext: (step % 2) === 0 }); } reverseHistoryOrder() { this.setState({ isAscendingOrder: !this.state.isAscendingOrder, }); } render() { // 逆順の場合はthis.state.history配列のコピーを反転させる // これにより、this.state.historyはつねに昇順のデータを保持し続ける const history = this.state.isAscendingOrder ? this.state.history : this.state.history.slice().reverse(); const currentStepNumber = this.state.isAscendingOrder ? this.state.stepNumber : history.length - 1 - this.state.stepNumber; const current = history[currentStepNumber]; const winner = calculateWinner(current.squares); const moves = history.map((step, move) => { // 逆順の場合はインデックスを反転させる const moveIndex = this.state.isAscendingOrder ? move : history.length - 1 - move; const desc = moveIndex ? 'Go to move #' + moveIndex + '(' + step.location.col + ', ' + step.location.row + ')' : 'Go to game start'; return ( <li key={moveIndex}> <button onClick={() => this.jumpTo(moveIndex)} className={move === currentStepNumber ? 'text-bold' : ''} > {desc} </button> </li> ); }); let status; if (winner) { status = "Winner: " + winner; } else { status = "Next player: " + (this.state.xIsNext ? "X" : "O"); } return ( <div className="game"> <div className="game-board"> <Board squares={current.squares} onClick={i => this.handleClick(i)} /> </div> <div className="game-info"> <div>{status}</div> <ol>{moves}</ol> <button onClick={() => this.reverseHistoryOrder()}>Reverse history order</button> </div> </div> ); } } // ======================================== ReactDOM.render(<Game />, document.getElementById("root")); function calculateWinner(squares) { const lines = [ [0, 1, 2], [3, 4, 5], [6, 7, 8], [0, 3, 6], [1, 4, 7], [2, 5, 8], [0, 4, 8], [2, 4, 6] ]; for (let i = 0; i < lines.length; i++) { const [a, b, c] = lines[i]; if (squares[a] && squares[a] === squares[b] && squares[a] === squares[c]) { return squares[a]; } } return null; }5. どちらかが勝利した際に、勝利につながった3つのマス目をハイライトする。
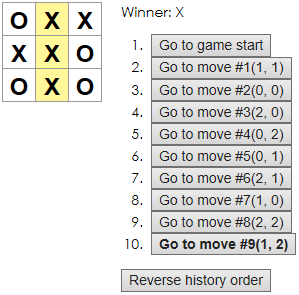
イメージはこんな感じ。
こちらはまず
calculateWinner関数を修正する必要がありそうです。
現状のcalculateWinner関数は勝者(XorOornull)を返却していますが、
勝者がいる場合はそのパターンも一緒にしたオブジェクトを返却するようにしましょう。js// 省略 function calculateWinner(squares) { const lines = [ [0, 1, 2], [3, 4, 5], [6, 7, 8], [0, 3, 6], [1, 4, 7], [2, 5, 8], [0, 4, 8], [2, 4, 6] ]; for (let i = 0; i < lines.length; i++) { const [a, b, c] = lines[i]; if (squares[a] && squares[a] === squares[b] && squares[a] === squares[c]) { - return squares[a]; + return { + winner: squares[a], + causedWinCells: lines[i], + }; } } - return null; + return { + winner: null, + causedWinCells: [], + }; }さらに、
calculateWinner関数の呼び出し元も修正します。js// 省略 class Game extends React.Component { // 省略 handleClick(i) { const history = this.state.history.slice(0, this.state.stepNumber + 1); const current = history[history.length - 1]; const squares = current.squares.slice(); + const winInfo = calculateWinner(squares); - if (calculateWinner(squares) || squares[i]) { + if (winInfo.winner || squares[i]) { return; } squares[i] = this.state.xIsNext ? "X" : "O"; // 省略 } // 省略 render() { // 逆順の場合はthis.state.history配列のコピーを反転させる // これにより、this.state.historyはつねに昇順のデータを保持し続ける const history = this.state.isAscendingOrder ? this.state.history : this.state.history.slice().reverse(); // 現在選択されているアイテムのインデックスを逆順の場合に反転させる const currentStepNumber = this.state.isAscendingOrder ? this.state.stepNumber : history.length - 1 - this.state.stepNumber; const current = history[currentStepNumber]; - const winner = calculateWinner(current.squares); + const winInfo = calculateWinner(current.squares); // 省略 let status; - if (winner) { + if (winInfo.winner) { - status = "Winner: " + winner; + status = "Winner: " + winInfo.winner; } else { status = "Next player: " + (this.state.xIsNext ? "X" : "O"); } // 省略 } } // 省略これで今まで通りの表示ができるようになりました。
次はハイライト部分を作成します。
まず、ハイライトされた際に適用されるCSSを記述します。色は適当css/* 省略 */ .square.caused-win { background: #fff799; }最終的に
<button class="square caused-win"></button>を生成するのはSquareコンポーネントですので、
真偽値が渡される前提で修正します。jsfunction Square(props) { return ( - <button className="square" onClick={props.onClick}> + <button + className={'square' + (props.causedWin ? ' caused-win' : '')} + onClick={props.onClick} + > {props.value} </button> ); } // 省略※読みやすくするため、
classNameとonClickの両プロパティをそれぞれ独立した行に配置
' caused-win'の部分で、最初にスペースが入ることに気を付けてください。
Squareコンポーネントの呼び出し元であるBoardコンポーネントのrenderSquareメソッドも修正します。js// 省略 class Board extends React.Component { - renderSquare(i) { + renderSquare(i, causedWin) { return ( <Square value={this.props.squares[i]} onClick={() => this.props.onClick(i)} key={i} + causedWin={causedWin} /> ); } // 省略 } // 省略
BoardコンポーネントのrenderSquareメソッドはBoardコンポーネントのrenderメソッドから呼び出されており、
ここで初めてセル番号(Squareコンポーネントのkey)を生成しています。
ですので、同時にそのセルが勝利につながったかどうかを判定します。js// 省略 class Board extends React.Component { // 省略 render() { const rows = [0, 1, 2]; const cols = [0, 1, 2]; return ( <div> {rows.map(row => { return ( <div className="board-row" key={row} > - {cols.map(col => this.renderSquare(row * 3 + col))} + {cols.map(col => { + const cell = row * 3 + col; + const causedWin = this.props.causedWinCells.includes(cell); + return this.renderSquare(cell, causedWin); })} </div> ); })} </div> ); } } // 省略あとは
GameコンポーネントからBoardコンポーネントにcausedWinCellsをpropsで渡せば完成です。js// 省略 class Game extends React.Component { // 省略 render() { // 省略 return ( <div className="game"> <div className="game-board"> <Board squares={current.squares} onClick={i => this.handleClick(i)} + causedWinCells={winInfo.causedWinCells} /> </div> <div className="game-info"> <div>{status}</div> <ol>{moves}</ol> <button onClick={() => this.reverseHistoryOrder()}>Reverse history order</button> </div> </div> ); } } // 省略
【クリックで展開】ここまでのコードは以下になります。(CodePenはこちら)
html(変更なし)<div id="errors" style=" background: #c00; color: #fff; display: none; margin: -20px -20px 20px; padding: 20px; white-space: pre-wrap; "></div> <div id="root"></div> <script> window.addEventListener('mousedown', function(e) { document.body.classList.add('mouse-navigation'); document.body.classList.remove('kbd-navigation'); }); window.addEventListener('keydown', function(e) { if (e.keyCode === 9) { document.body.classList.add('kbd-navigation'); document.body.classList.remove('mouse-navigation'); } }); window.addEventListener('click', function(e) { if (e.target.tagName === 'A' && e.target.getAttribute('href') === '#') { e.preventDefault(); } }); window.onerror = function(message, source, line, col, error) { var text = error ? error.stack || error : message + ' (at ' + source + ':' + line + ':' + col + ')'; errors.textContent += text + '\n'; errors.style.display = ''; }; console.error = (function(old) { return function error() { errors.textContent += Array.prototype.slice.call(arguments).join(' ') + '\n'; errors.style.display = ''; old.apply(this, arguments); } })(console.error); </script>cssbody { font: 14px "Century Gothic", Futura, sans-serif; margin: 20px; } ol, ul { padding-left: 30px; } .board-row:after { clear: both; content: ""; display: table; } .status { margin-bottom: 10px; } .square { background: #fff; border: 1px solid #999; float: left; font-size: 24px; font-weight: bold; line-height: 34px; height: 34px; margin-right: -1px; margin-top: -1px; padding: 0; text-align: center; width: 34px; } .square:focus { outline: none; } .kbd-navigation .square:focus { background: #ddd; } .game { display: flex; flex-direction: row; } .game-info { margin-left: 20px; } .text-bold { font-weight: bold; } .square.caused-win { background: #fff799; }jsfunction Square(props) { return ( <button className={'square' + (props.causedWin ? ' caused-win' : '')} onClick={props.onClick} > {props.value} </button> ); } class Board extends React.Component { renderSquare(i, causedWin) { return ( <Square value={this.props.squares[i]} onClick={() => this.props.onClick(i)} key={i} causedWin={causedWin} /> ); } render() { const rows = [0, 1, 2]; const cols = [0, 1, 2]; return ( <div> {rows.map(row => { return ( <div className="board-row" key={row} > {cols.map(col => { const cell = row * 3 + col; const causedWin = this.props.causedWinCells.includes(cell); return this.renderSquare(cell, causedWin); })} </div> ); })} </div> ); } } class Game extends React.Component { constructor(props) { super(props); this.state = { history: [ { squares: Array(9).fill(null), location: { col: null, row: null, }, } ], stepNumber: 0, isAscendingOrder: true, xIsNext: true }; } handleClick(i) { const history = this.state.history.slice(0, this.state.stepNumber + 1); const current = history[history.length - 1]; const squares = current.squares.slice(); const winInfo = calculateWinner(squares); if (winInfo.winner || squares[i]) { return; } squares[i] = this.state.xIsNext ? "X" : "O"; this.setState({ history: history.concat([ { squares: squares, location: { col: i % 3, row: Math.trunc(i / 3), }, } ]), stepNumber: history.length, xIsNext: !this.state.xIsNext }); } jumpTo(step) { this.setState({ stepNumber: step, xIsNext: (step % 2) === 0 }); } reverseHistoryOrder() { this.setState({ isAscendingOrder: !this.state.isAscendingOrder, }); } render() { // 逆順の場合はthis.state.history配列のコピーを反転させる // これにより、this.state.historyはつねに昇順のデータを保持し続ける const history = this.state.isAscendingOrder ? this.state.history : this.state.history.slice().reverse(); // 現在選択されているアイテムのインデックスを逆順の場合に反転させる const currentStepNumber = this.state.isAscendingOrder ? this.state.stepNumber : history.length - 1 - this.state.stepNumber; const current = history[currentStepNumber]; const winInfo = calculateWinner(current.squares); const moves = history.map((step, move) => { // 逆順の場合はインデックスを反転させる const moveIndex = this.state.isAscendingOrder ? move : history.length - 1 - move; const desc = moveIndex ? 'Go to move #' + moveIndex + '(' + step.location.col + ', ' + step.location.row + ')' : 'Go to game start'; return ( <li key={moveIndex}> <button onClick={() => this.jumpTo(moveIndex)} className={move === currentStepNumber ? 'text-bold' : ''} > {desc} </button> </li> ); }); let status; if (winInfo.winner) { status = "Winner: " + winInfo.winner; } else { status = "Next player: " + (this.state.xIsNext ? "X" : "O"); } return ( <div className="game"> <div className="game-board"> <Board squares={current.squares} onClick={i => this.handleClick(i)} causedWinCells={winInfo.causedWinCells} /> </div> <div className="game-info"> <div>{status}</div> <ol>{moves}</ol> <button onClick={() => this.reverseHistoryOrder()}>Reverse history order</button> </div> </div> ); } } // ======================================== ReactDOM.render(<Game />, document.getElementById("root")); function calculateWinner(squares) { const lines = [ [0, 1, 2], [3, 4, 5], [6, 7, 8], [0, 3, 6], [1, 4, 7], [2, 5, 8], [0, 4, 8], [2, 4, 6] ]; for (let i = 0; i < lines.length; i++) { const [a, b, c] = lines[i]; if (squares[a] && squares[a] === squares[b] && squares[a] === squares[c]) { return { winner: squares[a], causedWinCells: lines[i], }; } } return { winner: null, causedWinCells: [], }; }6. どちらも勝利しなかった場合、結果が引き分けになったというメッセージを表示する。
イメージはこんな感じ。
これ一番簡単なんじゃないか?
この部分に表示しているテキストは
Gameコンポーネントのrenderメソッド内にてstatusという変数で管理されています。js// 省略 class Game extends React.Component { // 省略 render() { // 省略 let status; if (winInfo.winner) { status = "Winner: " + winInfo.winner; } else { status = "Next player: " + (this.state.xIsNext ? "X" : "O"); } return ( <div className="game"> <div className="game-board"> <Board squares={current.squares} onClick={i => this.handleClick(i)} causedWinCells={winInfo.causedWinCells} /> </div> <div className="game-info"> <div>{status}</div> <ol>{moves}</ol> <button onClick={() => this.reverseHistoryOrder()}>Reverse history order</button> </div> </div> ); } } // 省略ここに新しい条件を追加します。
引き分けというステータスは、「勝者がいないかつすべてのセルがnullではない("X"か"O"である)」です。js// 省略 class Game extends React.Component { // 省略 render() { // 省略 let status; if (winInfo.winner) { status = "Winner: " + winInfo.winner; + } else if (!current.squares.includes(null)) { + status = "Draw"; } else { status = "Next player: " + (this.state.xIsNext ? "X" : "O"); } // 省略 } } // 省略これで完成です。
【クリックで展開】ここまでのコードは以下になります。(CodePenはこちら)
html(変更なし)<div id="errors" style=" background: #c00; color: #fff; display: none; margin: -20px -20px 20px; padding: 20px; white-space: pre-wrap; "></div> <div id="root"></div> <script> window.addEventListener('mousedown', function(e) { document.body.classList.add('mouse-navigation'); document.body.classList.remove('kbd-navigation'); }); window.addEventListener('keydown', function(e) { if (e.keyCode === 9) { document.body.classList.add('kbd-navigation'); document.body.classList.remove('mouse-navigation'); } }); window.addEventListener('click', function(e) { if (e.target.tagName === 'A' && e.target.getAttribute('href') === '#') { e.preventDefault(); } }); window.onerror = function(message, source, line, col, error) { var text = error ? error.stack || error : message + ' (at ' + source + ':' + line + ':' + col + ')'; errors.textContent += text + '\n'; errors.style.display = ''; }; console.error = (function(old) { return function error() { errors.textContent += Array.prototype.slice.call(arguments).join(' ') + '\n'; errors.style.display = ''; old.apply(this, arguments); } })(console.error); </script>css(変更なし)body { font: 14px "Century Gothic", Futura, sans-serif; margin: 20px; } ol, ul { padding-left: 30px; } .board-row:after { clear: both; content: ""; display: table; } .status { margin-bottom: 10px; } .square { background: #fff; border: 1px solid #999; float: left; font-size: 24px; font-weight: bold; line-height: 34px; height: 34px; margin-right: -1px; margin-top: -1px; padding: 0; text-align: center; width: 34px; } .square:focus { outline: none; } .kbd-navigation .square:focus { background: #ddd; } .game { display: flex; flex-direction: row; } .game-info { margin-left: 20px; } .text-bold { font-weight: bold; } .square.caused-win { background: #fff799; }jsfunction Square(props) { return ( <button className={'square' + (props.causedWin ? ' caused-win' : '')} onClick={props.onClick} > {props.value} </button> ); } class Board extends React.Component { renderSquare(i, causedWin) { return ( <Square value={this.props.squares[i]} onClick={() => this.props.onClick(i)} key={i} causedWin={causedWin} /> ); } render() { const rows = [0, 1, 2]; const cols = [0, 1, 2]; return ( <div> {rows.map(row => { return ( <div className="board-row" key={row} > {cols.map(col => { const cell = row * 3 + col; const causedWin = this.props.causedWinCells.includes(cell); return this.renderSquare(cell, causedWin); })} </div> ); })} </div> ); } } class Game extends React.Component { constructor(props) { super(props); this.state = { history: [ { squares: Array(9).fill(null), location: { col: null, row: null, }, } ], stepNumber: 0, isAscendingOrder: true, xIsNext: true }; } handleClick(i) { const history = this.state.history.slice(0, this.state.stepNumber + 1); const current = history[history.length - 1]; const squares = current.squares.slice(); const winInfo = calculateWinner(squares); if (winInfo.winner || squares[i]) { return; } squares[i] = this.state.xIsNext ? "X" : "O"; this.setState({ history: history.concat([ { squares: squares, location: { col: i % 3, row: Math.trunc(i / 3), }, } ]), stepNumber: history.length, xIsNext: !this.state.xIsNext }); } jumpTo(step) { this.setState({ stepNumber: step, xIsNext: (step % 2) === 0 }); } reverseHistoryOrder() { this.setState({ isAscendingOrder: !this.state.isAscendingOrder, }); } render() { // 逆順の場合はthis.state.history配列のコピーを反転させる // これにより、this.state.historyはつねに昇順のデータを保持し続ける const history = this.state.isAscendingOrder ? this.state.history : this.state.history.slice().reverse(); // 現在選択されているアイテムのインデックスを逆順の場合に反転させる const currentStepNumber = this.state.isAscendingOrder ? this.state.stepNumber : history.length - 1 - this.state.stepNumber; const current = history[currentStepNumber]; const winInfo = calculateWinner(current.squares); const moves = history.map((step, move) => { // 逆順の場合はインデックスを反転させる const moveIndex = this.state.isAscendingOrder ? move : history.length - 1 - move; const desc = moveIndex ? 'Go to move #' + moveIndex + '(' + step.location.col + ', ' + step.location.row + ')' : 'Go to game start'; return ( <li key={moveIndex}> <button onClick={() => this.jumpTo(moveIndex)} className={move === currentStepNumber ? 'text-bold' : ''} > {desc} </button> </li> ); }); let status; if (winInfo.winner) { status = "Winner: " + winInfo.winner; } else if (!current.squares.includes(null)) { status = "Draw"; } else { status = "Next player: " + (this.state.xIsNext ? "X" : "O"); } return ( <div className="game"> <div className="game-board"> <Board squares={current.squares} onClick={i => this.handleClick(i)} causedWinCells={winInfo.causedWinCells} /> </div> <div className="game-info"> <div>{status}</div> <ol>{moves}</ol> <button onClick={() => this.reverseHistoryOrder()}>Reverse history order</button> </div> </div> ); } } // ======================================== ReactDOM.render(<Game />, document.getElementById("root")); function calculateWinner(squares) { const lines = [ [0, 1, 2], [3, 4, 5], [6, 7, 8], [0, 3, 6], [1, 4, 7], [2, 5, 8], [0, 4, 8], [2, 4, 6] ]; for (let i = 0; i < lines.length; i++) { const [a, b, c] = lines[i]; if (squares[a] && squares[a] === squares[b] && squares[a] === squares[c]) { return { winner: squares[a], causedWinCells: lines[i], }; } } return { winner: null, causedWinCells: [], }; }後書き
できるだけチュートリアルの構文に則った書き方をしてみました。
最後の問題だけどうしても簡単すぎて、何か見落としているのではないかと思ってしまいます。
バグや、「ここはこうしたほうがいいんじゃない?」というようなポイントがあればコメントいただければ嬉しいです。あと、この記事ではコードブロックのシンタックスハイライトを
jsにしているのですが、QiitaではJSX構文で赤くエラーの表示がされてしまいます。
こちらについても解決策をご存じの方がいらっしゃいましたらコメントお待ちしています。次はこれをTypeScriptで書いてみたい。
参考
React公式チュートリアル
React公式ガイド
React.js 実戦投入への道 - Qiita
React における State と Props の違い - Qiita
Reactのstate,props,componentの使い方を自分なりにまとめてみた - Qiita
React.jsでループするには。 - Qiita

- 投稿日:2020-03-18T16:37:05+09:00
第6回 2020年版 React+Firebaseで画像のアップロード(その1)
1. 概要
ReactでFirebaseを利用して、画像ファイルをアップロードする方法について説明します。
FirebaseのCloud Storageに画像をアップロード可能とし、その後、Cloud Functionsでリサイズするアプリを開発するまでの手順を3回に分けて説明します。2. 前提条件
作業日時
- 2020/3/18
環境
- MacBook Pro (15-inch, 2018)
- macOS Catalina 10.15.2(19C57)
ソフトウェアのバージョン
分類 ソフトウェア バージョン フレームワーク React 16.13.0 フレームワーク React-dom 16.13.0 静的型付け TypeScript 3.7.5 ライブラリ create-react-app v3.4.0 ライブラリ Material UI v4.9.4 @material-ui/core 4.9.4 @material-ui/icons 4.9.1 Firebase CLI firebase-tools 7.14.0 3. Firebaseのプロジェクト作成
3.1. プロジェクトの作成
まずは、 FirebaseのWebサイト でプロジェクトを作ります。
- Firebaseにサインアップします。Googleアカウントがあればすぐ登録できます。
- プロジェクトを新規作成します。
3.2. リージョンを選択する。
なるべく多くの機能がある方が良いので、東京リージョン(
asia-northeast1)を選択する。
*リージョンは後から変更することができないので、注意。
なお、Realtime Databaseのイベントトリガーを利用する場合の推奨リージョンはus-central1となる。3.3. Webアプリを追加する
「プロジェクトの概要」 > 「全般」 > 「アプリを追加する」でWebアプリを追加します。
3.4 Database
Databaseがネイティブモードになっていない場合、移行の初期化時にエラーとなるので、ネイティブモードに変更する。
FirebaseのコンソールからGoogle cloud platformに遷移し、ネイティブモードに変更する。4. Firebase CLIのセットアップ
次に、ローカル環境にFirebase CLIをインストールします。
$ yarn global add firebase-toolsFirebase CLIでFirebaseへログインすることで、認証されます。
ブラウザが起動して、ログイン画面が表示されるのでログインします。firebase login5. Reactアプリの作成
Firebaseのサンプル用のReactのアプリを作成します。
$ npx create-react-app firebase-storage-sample --template typescript
$ cd firebase-sample/
6. Firebaseの初期設定
6.1. Firebaseの初期設定を行う
Firebaseの初期化を行います。
$ firebase init

     ######## #### ########  ######## ########     ###     ######  ########
     ##        ##  ##     ## ##       ##     ##  ##   ##  ##       ##
     ######    ##  ########  ######   ########  #########  ######  ######
     ##        ##  ##    ##  ##       ##     ## ##     ##       ## ##
     ##       #### ##     ## ######## ########  ##     ##  ######  ########

You're about to initialize a Firebase project in this directory:

  /Users/hoge/Documents/00_mygit/hoshimado/firebase-sample
色々質問をされるので、次のように選択します。
? Which Firebase CLI features do you want to set up for this folder? Press Space to select features, then Enter to confirm your choices. (Press <space> to select, <a> to toggle all, <i>
 to invert selection)
❯◉ Database: Deploy Firebase Realtime Database Rules
 ◉ Firestore: Deploy rules and create indexes for Firestore
 ◉ Functions: Configure and deploy Cloud Functions
 ◉ Hosting: Configure and deploy Firebase Hosting sites
 ◉ Storage: Deploy Cloud Storage security rules
 ◉ Emulators: Set up local emulators for Firebase features
→
aで全て選択します。First, let's associate this project directory with a Firebase project. You can create multiple project aliases by running firebase use --add, but for now we'll just set up a default project. ? Please select an option: Use an existing project ? Select a default Firebase project for this directory: ❯ sample-9f36d (sample)→
Use an existing projectを選択肢、その後、先程作成したプロジェクトを選択する。Database Setup
Firebase Realtime Database Rules allow you to define how your data should be
structured and when your data can be read from and written to.

? What file should be used for Database Rules? (database.rules.json)
→
database.rules.jsonを利用するので、そのままエンター。Firestore Setup
Firestore Security Rules allow you to define how and when to allow
requests. You can keep these rules in your project directory
and publish them with firebase deploy.

? What file should be used for Firestore Rules? (firestore.rules)
→
firestore.rulesを利用するので、そのままエンター。? What file should be used for Firestore indexes? (firestore.indexes.json)→
firestore.indexes.jsonを利用するので、そのままエンター。
なお、Databaseがネイティブモードになっていない場合、エラーとなる。
*冒頭に説明した通り、Firebaseの管理画面でネイティブモードに変更する。Functions Setup
A functions directory will be created in your project with a Node.js
package pre-configured. Functions can be deployed with firebase deploy.

? What language would you like to use to write Cloud Functions?
  JavaScript
❯ TypeScript
→
Typescriptを選択する。? Do you want to use TSLint to catch probable bugs and enforce style? (Y/n)→
Yを選択する。? Do you want to install dependencies with npm now? (Y/n)→
Nを選択する。
create react appでインストールしたライブラリが消えて、動作しなくなるため。Hosting Setup
Your public directory is the folder (relative to your project directory) that
will contain Hosting assets to be uploaded with firebase deploy. If you
have a build process for your assets, use your build's output directory.

? What do you want to use as your public directory? (public)
→
Enter(publicを利用する)を押下する。? Configure as a single-page app (rewrite all urls to /index.html)? (y/N)→SPA用の設定にするため、
yを入力し、Enterを押下する。? File public/index.html already exists. Overwrite? (y/N)→
create-react-appが生成したものを利用するため、Nを入力し、Enterを押下する。Storage Setup
Firebase Storage Security Rules allow you to define how and when to allow
uploads and downloads. You can keep these rules in your project directory
and publish them with firebase deploy.

? What file should be used for Storage Rules? (storage.rules)
→
Enter(storage.rulesを利用する)を押下する。Emulators Setup
? Which Firebase emulators do you want to set up? Press Space to select emulators, then Enter to confirm your choices. (Press <space> to select, <a> to toggle all, <i
> to invert selection)
❯◯ Functions
 ◯ Firestore
 ◯ Database
 ◯ Hosting
 ◯ Pubsub
→
aで全て選択する。? Which port do you want to use for the functions emulator? 5001 ? Which port do you want to use for the firestore emulator? 8080 ? Which port do you want to use for the database emulator? 9000 ? Which port do you want to use for the hosting emulator? 5000 ? Which port do you want to use for the pubsub emulator? 8085 ? Would you like to download the emulators now? No→ポートは全てデフォルト値とする。
ただし、Would you like to download the emulators now?はNoにする。
なぜかfirebase.jsonと.firebasercが作られなかったため。最後に
最後に以下のようなメッセージが出れば、成功です。
i  Skipping write of public/index.html

i  Writing configuration info to firebase.json...
i  Writing project information to .firebaserc...

✔  Firebase initialization complete!
6.2. インストール後の作業
インストール完了後のフォルダ構成は以下の通り。
$ ls -1
README.md
database.rules.json
firebase.json
firestore.indexes.json
firestore.rules
functions
node_modules
package.json
public
src
storage.rules
tsconfig.json
yarn.lock
firebaseホスティングの設定変更
firebaseの設定を修正する。
ローカルのbuildディレクトリをリモートのpublicにアップロードするように修正する。firebase.json{ "hosting": { "public": "build", /* publicからbuildに修正する。*/ "ignore": [ "firebase.json", "**/.*", "**/node_modules/**" ], "rewrites": [ { "source": "**", "destination": "/index.html" } ] } }firestore, database, storageの設定変更
firestore.rules、database.rules.json、storage.rulesを修正する。firestore.rulesrules_version = '2'; service cloud.firestore { match /databases/{database}/documents { match /{document=**} { allow read, write: if request.auth.uid != null; } } }database.rules.json{ "rules": { ".read": true, ".write": true } }storage.rulesrules_version = '2'; service firebase.storage { match /b/{bucket}/o { match /{allPaths=**} { allow read, write: if request.auth!=null; } } }7. 追加のライブラリのインストール
firebase initでインストールしなかった、以下のライブラリをインストールする。$ yarn add firebase-admin firebase-functions $ yarn add -D @types/firebase8. デプロイする
ここまでで一旦、Firebase Hostingにデプロイするので、アプリをビルドします。
$ yarn run buildその後、以下のコマンドでFirebase Hostingにデプロイします。
$ firebase deploy9. 動作確認
デプロイ後に表示される
Hosting URLをブラウザで開くとReactの画面が確認できます。=== Deploying to '*****'... 略 ✔ Deploy complete! Project Console: https://console.firebase.google.com/project/*****/overview Hosting URL: https://*****.firebaseapp.com
10. 最後に
次回は画像をアップロードするプログラムについて説明します。
11. 関連記事
Reactに関する記事です。

- 投稿日:2020-03-18T11:33:21+09:00
なんとなく、簡単に入門できそうなReact
タイトルが強弁すぎますね、ごめんなさい?
すすさんの記事のリリースツイートを見て「おっこれはワイもReact記事書くムーブかな???」となったので書いてみます。
本項のゴール
- Reactのコンポーネントの作り方を理解する
- propsを渡して動的にUIを作ってみる(Stateは気力があれば別記事で書こうと思います)
諸注意
間違ってる箇所とかバッドプラクティスがあるかもしれません
コメントで指摘していただければと思います。そもそもReactってなに?
フロントのUIライブラリの話になるとVueと比較される事が多いので高機能なのを想像しがちですが
React自体、及びReact-DOMは HTMLのレンダリングをするだけのライブラリです。そもそもReact自体はHTML周りの機能すら持ってません。その辺りは色々あってReact-DOMに分割されました。
この話についてはGoogleで検索するといくらでも出てくるので本稿では省略します。
HTMLをそのまま書いていくのとどう違う?
HTMLを直書きして
document.querySelector('div#hoge').~~~のようにJSでターゲットを指定して操作するの(いわゆるDOM操作)も悪くはないですが、UI部品が増えると似たようなコードが増え、非常にメンテナンスのしづらい煩雑なコードになっていきます。またUIを小分けにせずHTMLに全てベタ書きすると
どこからがNavの部分でどこからがメインビューなのかわかりづらくなります。これを解決するのがReactです。
Reactだと何が良いのか
Reactを使うことによって何がどう変わるのか、という話ですが結論的には以下のようになります。
- JSの中にHTMLを混ぜたような文が書ける(ビューに出す要素とJSで操作する部分を纏めて書ける)
- UIパーツをコンポーネントという単位で小分けしながら作れる
あんまり話が長くなっても面白くないので実際に作りましょう。
実際に作る-環境を建てる
注意事項です。
nodeとnpmはインストール済みである前提で解説します。
まだされていない方はnodenv等でインストールをしておいてください。
nodeのバージョンは偶数系が無難です。(Firebaseに興味があるとかでなければv10以降がおすすめ)ES6の構文については先に理解をしておいてください。
主に
constlet()=>import, exportが多用されます。これらが何なのか知らない方はMDNドキュメントを先に参照していただくか、Googleで検索していただくことをおすすめします。
$ npx create-react-app sampleこのコマンドを叩くと
./sample/の中にReactのアプリの開発に必要なものがすべてインストールされます。あるオプションを入れるとTypeScriptを使うようにすることもできますが今回は省略します。$ cd sample/ $ npm start
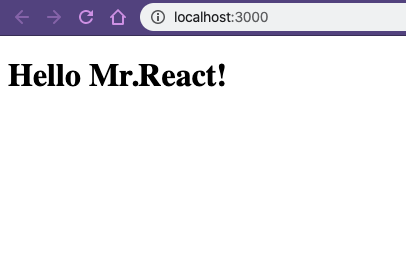
package.jsonのあるディレクトリでnpm startを叩くことで開発サーバが立ちあがり、自動的にブラウザにlocalhostのビューが出てきます。こんなの。
とりあえずこれで問題なく動くことは確認できました。
このテンプレートをそのまま加工してもいいですが、とりあえず今回はネイティブな状態に戻すためsrc/にあるものを全て消して、index.jsを新規作成してください。
おそらくエラーが出ますが一旦無視で構いません。実際に作る-HTMLをレンダリングしてみる
先程作った
index.jsに追記してみてください。index.jsimport React from 'react'; import ReactDOM from 'react-dom'; const App = () => { return ( <div> <h1>Hello Mr.React!</h1> </div> ); }; ReactDOM.render(<App />, document.querySelector('div#root'));順を追って説明します。
まず2行目まででReact、そしてReact-DOMを呼び出して使えるようにします。
ちなみに2行目のReact-DOMは使わない限りはimportしなくて大丈夫です。const App = () => { return ( <div> <h1>Hello Mr.React!</h1> </div> ); };Reactではコンポーネントを作る際に 大文字から始まる関数オブジェクト を用いてオブジェクトの体型を表現します。
大文字からという一文は絶対守ってください。小文字だと蹴られます。また、Reactアプリケーションの開発においてはよくHTML(XML)をそのまま書けるようにJSXという特殊なフォーマットを使います。
これはbabelという変換器を使ってブラウザも理解できるJSの構文に変換をしています。
(一般的にJSXを使う場合は拡張子を.jsxにして明示します。index.jsは例外)そしてこのJSXにも制限があり、復数の要素をルートに横並びさせることができません。
必ず1つの要素の下に居る必要があります。回避する方法もありますがこちらは後述しますので一旦忘れてください。このAppというコンポーネントは、単純に
<div>の中に<h1>~~~</h1>を包んだものを返しているだけです。
変化したりとかもさせていません。ちなみにクラスの構文でも表現できますが個人的には関数オブジェクトでの宣言がおすすめです。(理由とかはまた機会があれば)
ReactDOM.render(<App />, document.querySelector('div#root'));そして、そのAppのコンポーネントを
ReactDOM.renderに渡すことで指定したターゲット(public/index.htmlにある)にレンダリングされる、という流れになっています。実際に追記されるとこのように出ます。
これだけしか出ませんが、正常です。次に進みましょう。
ここまでで覚えておくこと
- コンポーネントは関数もしくはクラスで宣言して作る
- コンポーネント命名は頭文字が大文字である必要あり(小文字だとHTMLと解釈される)
- コンポーネントを使うときは
<ComponentName />のようにタグっぽい文法で書く- HTML(XML)を記述して
returnすることでレンダリングされる実際に作る-表を作ってみる(+コンポーネントを分ける)
多分ネイティブなReactを触る上で一番恩恵デカイのが表の生成だと思うのでそれで試してみようと思います。
まずは表を表現するためのコンポーネントを新しいファイルに分けて生成します。
今回はtable.jsxというファイル名で作ります。table.jsxconst Head = () => { // theadの構成を作る }; const Body = () => { // tbodyの構成を作る }; export default function Table(){ return( <table> <Head /> <Body /> </table> ) };
index.jsでコンポーネントを受け取れないと困るので、テーブル本体を返すコンポーネントのみexport修飾子で渡せるようにしておきます。defaultは気にすんなそして
index.jsで受け取りをして、レンダリングをさせます。index.jsimport React from 'react'; import ReactDOM from 'react-dom'; // `table.jsx` からTableをimportする import Table from './table'; const App = () => { return ( <div> <h1>Hello Mr.React!</h1> <Table /> </div> ); }; ReactDOM.render(<App />, document.querySelector('div#root'));受け取り側のコードが書けたので、表の実装に入ります。
しかし、Tableコンポーネントの中に全ての構成を突っ込むとコードがかなり長くなってしまうので、Reactの得意分野を活かしてHeadとBodyの2つのコンポーネントに分けてそれぞれ別々にレンダリングしようと思います。Headを作る
それでは
Headから作っていこう、と言いたいところですがストップです。
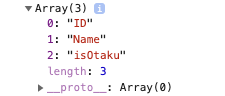
Tableコンポーネントのところでヘッダー行の名前や数量を配列で表現することで動的に変更できる、といった構造に出来ればかなり改変がしやすくなるような気がします。長年の勘がそう言っています。そのためには、先程作った
Tableコンポーネントに少しだけ変更を加えます。export default function Table(){ // 配列を入れた変数を追加 const headList = ['ID', 'Name', 'isOtaku']; // `<Head>` の横に`list={headList}` と追記 return( <table> <Head list={headList}/> <Body /> </table> ) };追記した
<Head list={}>ですが、これはpropsと呼ばれており、コンポーネントに対してデータを渡すことができる仕組みです。
今回の場合listというpropsの中にheadListという配列を渡しています。
これをHeadのコンポーネントの中で取得する際は以下のコードのようになります。// 引数に `props` が入ってくる必要がある const Head = (props) => { // `props.~~~` でpropsの中身を参照できる const array = props.headList; };試しに
console.log(array);と書いて保存してみてください。
こんな感じでコンポーネント側に配列が渡されていることが確認できます。
あとはArray.mapで回しながら<th></th>の中に内包してやればheadは完成です。
Headの完成形としてはこんな感じになりました。const Head = (props) => { // `props.~~~` でpropsの中身を参照できる console.log(props.list); return ( <thead> <tr> { props.list.map((item) => { return ( <th> { item } </th> ); }) } </tr> </thead> ); };少し難解ですが
()の中の{}で括った部分はJSのコードとして評価されるので、これを利用してmapで回しながら<th>を生成し、その中に配列の要素を挿入することでヘッダー行が出来上がりです。Bodyを作る
続いて
Bodyコンポーネントも作っていきます。
こちらも同様に変数を渡すことで動的に生成させようと思います。そのためには配列の中にオブジェクトを入れるのが最適かなあという感じなので、Tableの中身をこうしてみます。export default function Table(props){ const headList = ['ID', 'Name', 'isOtaku']; // tbodyを構成するためのオブジェクトの集まりを作る const bodyElements = [ { id: 1, name: 'Sister Cleaire', isOtaku: false }, { id: 2, name: 'Yashiro Kidsuku', isOtaku: true }, { id: 3, name: 'Otogibara Era', isOtaku: true } ]; return( <table> <Head list={headList}/> <Body list={bodyElements} /> </table> ) };ここでやっていることも同じで、オブジェクトの入った配列をprops経由で渡しているだけです。
あとはBodyコンポーネント内でループなどの実装をすればOKです。const Body = (props) => { // `<tr>`を纏めて生成するための // ローカル内のコンポーネント const Tds = (props) => { return( <> <td> {props.object.id} </td> <td> {props.object.name} </td> <td> {props.object.isOtaku.toString()} </td> </> ); }; return( <tbody> { props.list.map((item) => { return( <tr> <Tds object={item} /> </tr> ); }) } </tbody> ) };少しややこしいですが落ち着いて、まずは
return内部から入りましょう。return( <tbody> { props.list.map((item) => { return( <tr> <Tds object={item} /> </tr> ); }) } </tbody> )
<tbody>の中で配列をmapを使ってループさせ、<Tds>をレンダリングしています。
このときに配列の中に入っていたオブジェクトが一つずつprops.objectとして入ります。
このことを抑えてTdsを見てみましょう。const Tds = (props) => { return( <> <td> {props.object.id} </td> <td> {props.object.name} </td> <td> {props.object.isOtaku.toString()} </td> </> ); };
Tdsは複数の<td>タグを返すことから命名しています。
復数の<td>タグの中でprops.objectで渡されたオブジェクトの値を参照しています。
また、isOtakuだけ真理値型なので文字列に明示的に変換しています。ここで「おい待てや」ってなった方は優秀です。最初のあたりで説明したことを思い出してください。
そしてこのJSXにも制限があり、復数の要素をルートに横並びさせることができません。
そう、横並びした
<td>は通常だと返せません。そう。通常は。
ここで登場するのが<></>というカオナシのようなやつです。
これはReact.Fragmentと呼ばれるコンポーネントの糖衣構文で、これに包むとレンダリングの際に横並びした状態でレンダリングしてくれます。
今回はこれを利用することで横並びする要素をそのまま分離しています。これでレンダリングするものが完成です。
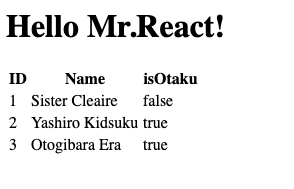
保存していただいて、表がきちんと出来ていればOKです。
また、配列を減らしたり増やしたりして行が増減するのを確認してみてください。
ここまでで覚えておくこと
- コンポーネントを小分けにしつつ、propsで値をバケツリレーして作ると煩雑化が防げる
- propsを使う際はコンポーネントの引数を入れることを忘れないようにする(必要なければ入れなくてOK)
おわりに
今回はReactのさわりのさわりだけ解説してみましたがいかがでしょうか。
Reactは自分でコンポーネントを作るだけでなく、npmからパッケージを引っ張ってimportすることでそのまま利用することもできます。
その時の話はここで纏めてありますので、そちらもよかったらぜひご覧いただければと思います。ちなみに今回のサンプルで作ったソースコードは以下に全て放り込んでおいたので、上手く行かなかった場合は見比べてみてください。
https://github.com/huequica/qiita_react_sampleそれでは今回はこの辺で。
- 投稿日:2020-03-18T07:18:47+09:00
React + Redux + TypeScript で Ducks パターン
Typescriptでreact/reduxの ducksパターンをやるとき。modules
modules/counter.module.tsexport type CounterState = { count: number; }; type IncrementCountAction = { type: 'INCREMENT_COUNT', } type DecrementCountAction = { type: 'DECREMENT_COUNT', } type SetCountAction = { type: 'SET_COUNT', count: number, } export type CounterActions = IncrementCountAction | DecrementCountAction | SetCountAction; export default ( state: CounterState = { count: 0 }, action: CounterActions ): CounterState => { switch (action.type) { case 'INCREMENT_COUNT': return { ...state, count: state.count + 1 }; case 'DECREMENT_COUNT': return { ...state, count: state.count - 1 }; case 'SET_COUNT': return { ...state, count: action.count }; default: return state; } };store
store.tsimport { combineReducers, createStore, Dispatch } from 'redux'; import counter, { CounterState, CounterActions } from './modules/counter.moudle'; import user, { UserState, UserActions } from './modules/user.moudle'; export type RootState = { counter: CounterState, user: UserState, }; export type RootDispatch = Dispatch<CounterActions | UserActions>; export const rootReducer = combineReducers({ counter, user });how to use
component.tsxconst dispatch = useDispatch<RootDispatch>(); const count = useSelector<RootState, number>(s => s.counter.count); dispatch({ type: 'INCREMENT_COUNT' });
- 投稿日:2020-03-18T07:00:29+09:00
Reactでマークダウンエディタ作成とマークダウンからHTMLに変換(ハイライト付き)
Reactでマークダウンエディタの作成と、マークダウン表記をHTMLに変換(ハイライト付き)してみました。
ライブラリを組み合わせることで、楽に実装することができます。環境
- OS : macOS Catalina 10.15.3
- node.js : 12.13.1
- React : 16.12.0
Reactのライブラリは以下を使用します。
- react-simplemde-editor(EasyMDE) : 4.1.0
- marked : 0.8.0
- highitjs : 9.16.2
参考までに、紹介するコードはGitHubにあります。
https://github.com/txkxyx/react-mde
マークダウンエディタを作成する
Webの画面にマークダウンエディタを埋め込む場合、元々
SimpleMDEというライブラリが使用されていましたが、今はEasyMDEというSimpleMDEをフォークして作られたライブラリが使用されています。↓EasyMDE
https://github.com/Ionaru/easy-markdown-editor
今回は
EasyMDEのReactラッパーコンポーネントであるreact-simplemde-editorを使用してマークダウンエディタを作成します。↓react-simplemde-editor
https://www.npmjs.com/package/react-simplemde-editor
まずは使用するパッケージをインストールします。
$ npm install react-simplemde-editorコンポーネントを作成します。
実装はとてもシンプルです。SimpleMDEのコンポーネントとEasyMDEのcssファイルをインポートします。
SimpleMDEコンポーネントにはonChangeイベントで起動する関数を渡す必要があります。この関数は合成イベントを受け取り、その値がエディターで入力したマークダウンになります。import React, { useState } from "react"; import SimpleMDE from 'react-simplemde-editor'; import 'easymde/dist/easymde.min.css'; const MarkDownEditor = () => { const [markdown, setMarkdown] = useState(''); return( <SimpleMDE onChange={(e) => setMarkdown(e)}/> ) } export default MarkDownEditor;
ツールバーにメニューが表示されています。デフォルトでは以下のメニューが表示されます。
メニュー 説明 表記 bold 強調 ****italic 強勢 **heading 見出し #quote 引用 >unordered-list 箇条書き *ordered-list 番号付きリスト 1.link リンク挿入 [](https://)image 画像挿入 preview プレビューモード なし side-by-side 入力とプレビューで画面分割 なし fullscreen 全画面でプレビューモード なし guide マークダウン記法ガイド なし メニューの一覧は以下を確認してください。
https://github.com/Ionaru/easy-markdown-editor#toolbar-icons
メニューを追加する場合は以下のように実装します。
メニューを追加するとデフォルトのメニューが消えてしまうので、デフォルトのメニューを追加したい場合は別途追加します。import React, { useState } from "react"; import SimpleMDE from 'react-simplemde-editor'; import 'easymde/dist/easymde.min.css'; const toolbar = [ { name: "save", action: function customFunction(editor) { alert(editor.value()) // save action }, className: "fa fa-save", title: "Save" }, '|', 'bold', 'italic', 'heading', '|', 'quote', 'unordered-list', 'ordered-list', '|', 'link', 'image', '|', 'preview', 'side-by-side', 'fullscreen', '|', 'guide', ] const MarkDownEditor = () => { const [markdown, setMarkdown] = useState(''); return( <SimpleMDE onChange={(e) => setMarkdown(e)} options={{toolbar:toolbar}}/> ) } export default MarkDownEditor;
マークダウンエディタを拡張する
EasyMDEは機能を拡張することができます。その一つのCodeMirrorのイベント処理を利用して、JavaScriptのイベントをハンドリングしてみます。
CodeMirrorのイベントは以下から確認してください。https://codemirror.net/doc/manual.html#events
画像などのファイルをマークダウンエディタにドロップして、そのデータを取得してみます。
import React, { useState } from "react";
import SimpleMDE from 'react-simplemde-editor';
import 'easymde/dist/easymde.min.css';

const MarkDownEditor = () => {

    const [markdown, setMarkdown] = useState('');

    function handleDrop(data, e){
        let files = e.dataTransfer.files;
        if(files.length > 0){
            let file = files[0];
            alert('FileName : ' + file.name );
            // any action
        }
    }

    return(
        <SimpleMDE onChange={(e) => setMarkdown(e)} events={{'drop':handleDrop}}/>
    )
}
export default MarkDownEditor;
SimpleMDEのコンポーネントのeventsのpropsにドロップ時に起動する関数を指定します。
この関数内でファイルオブジェクトを取得することができます。この関数内で画像アップロードをすると、画像アップロード込みのマークダウンエディタを実装することができます。マークダウン表記をHTMLに変換する
マークダウン形式の文字列をHTMLに変換するために、
markedライブラリを使用します。$ npm install marked先ほど作成したエディタで入力されたマークダウンを
markedでHTMLに変換し画面に表示します。
インポートしたmarkedの引数に、マークダウン形式の文字列を渡すだけです。import React, { useState } from "react"; import SimpleMDE from 'react-simplemde-editor'; import 'easymde/dist/easymde.min.css'; import marked from "marked"; const MarkDownEditor = () => { const [markdown, setMarkdown] = useState(''); return( <div> <SimpleMDE onChange={(e) => setMarkdown(e)}/> <div id="body" > <span dangerouslySetInnerHTML={{ __html: marked(markdown)}}/> </div> </div> ) } export default MarkDownEditor;
これで、エディタで入力したマークダウンをHTMLに変換して表示することができます。
ではコードを挿入している部分にハイライトを追加していきます。
ハイライトをつける
コードを挿入している部分にハイライトを付けるために、
highlightjsを導入します。
JavaScriptのハイライトのライブラリの中でも対応言語が多く、パレットの種類も豊富です。(185言語、91スタイル)https://highlightjs.org/static/demo/
ライブラリをインストールします。
$ npm install highlightjs実装は以下のようになります。
import React, { useState } from "react";
import SimpleMDE from 'react-simplemde-editor';
import 'easymde/dist/easymde.min.css';
import marked from "marked";
import highlight from 'highlightjs';
import 'highlightjs/styles/docco.css';

const MarkDownEditor = () => {

    const [markdown, setMarkdown] = useState('');

    return(
        <div>
            <SimpleMDE onChange={(e) => setMarkdown(e)}/>
            <div id="body" >
                <span dangerouslySetInnerHTML={{ __html: marked(markdown)}}/>
            </div>
        </div>

    )
}
export default MarkDownEditor;
highlightjsと適用したいスタイルのCSSファイルをインポートします。今回はdoccoというスタイルを使用したので、docco.cssをインポートしています。
CSSファイルはhighlightjs/styles/スタイル名.cssで指定できます。たまに違う場合もありますので、その時はハイフンを付けたりしてみてください。
highlightjsは表示する<code>タグのclass属性に指定されている言語名に応じてスタイルを適用します。例えば、マークダウンで記載したPythonのコードは以下のような流れで表示されます。
- マークダウン形式
```python
コード
```
- markedでHTMLに変換
<span><code class="language-python">コード</code></span>
マークダウンで言語を
Pythonに指定しているので、markedでHTMLに変換したい際にcodeタグのclass属性にlanguage-pythonが指定され、highlightjsのスタイルが適用されます。
```python:test.pyのように言語名の後にファイル名を記載している場合、class属性にファイル名まで適用されてしまうため、markedのオプションを使用しレンダリング前にファイル名を除去することもできます。実装は以下のようになります。
import React, { useState } from "react";
import SimpleMDE from 'react-simplemde-editor';
import 'easymde/dist/easymde.min.css';
import marked from "marked";
import highlight from 'highlightjs';
import 'highlightjs/styles/docco.css';

// delete file name
marked.setOptions({
    highlight: function (code, lang) {
        return highlight.highlightAuto(code, [lang.split(':')[0]]).value;
    }
});

const MarkDownEditor = () => {

    const [markdown, setMarkdown] = useState('');

    return(
        <div>
            <SimpleMDE onChange={(e) => setMarkdown(e)}/>
            <div id="body" >
                <span dangerouslySetInnerHTML={{ __html: marked(markdown)}}/>
            </div>
        </div>

    )
}
export default MarkDownEditor;
スタイルは豊富に用意されているので、サイトに合わせたハイライトを選択してみてください。
まとめ
Reactでライブラリを使用して、マークダウンエディタとマークダウンをHTMLに変換してみました。
コンポーネント一つ追加するだけで、簡単にマークダウンエディタを導入できます。拡張もできるので自由度はかなり高いかなと思っています。
他にもreact-mdeなどのエディタがありますが、デザインなどの面からreact-simplemde-editorの方が個人的には好みです。
もし使用する機会があれば検討してみてください。

- 投稿日:2020-03-18T05:50:00+09:00
React × Typescript × ESLint × Prettier × VSCodeなSetup
はじめに
create react app with tsなプロジェクトにeslintとprettierを入れる記事です。
やりたいこと
- react × typescript なLint設定
- Lintエラーの解消
- VScode保存時に自動整形
3は別記事がたくさんありますが一応
注意書きみたいなの
- node, yarnがinstallされてる前提で話進めます
- yarn 使います
- Create React App 使います
- style guide はAirbnb
- ルールは各プラグインの推奨設定 + α
各種version
Tools & packages Version yarn 1.22.4 react 16.13.0 react-scripts 3.4.0 eslint 6.8.0 1. プロジェクト作成

プロジェクト作る。
yarn create react-app react-app react-app --template typescript
eslint --initここでairbnbを選択します。yarn run eslint --init回答内容? How would you like to use ESLint? To check syntax, find problems, and enforce code style ? What type of modules does your project use? JavaScript modules (import/export) ? Which framework does your project use? React ? Does your project use TypeScript? Yes ? Where does your code run? Browser ? How would you like to define a style for your project? Use a popular style guide ? Which style guide do you want to follow? Airbnb: https://github.com/airbnb/javascript ? What format do you want your config file to be in? JSON2. package入れてく

eslint --initの質問で npm でインストールしないって選択したので、手動インストールする必要がある。
また prettier関連のパッケージもインストールします。airbnb
$ yarn add -D eslint-config-airbnbtypescript-eslint
$ yarn add -D @typescript-eslint/eslint-plugin @typescript-eslint/parserprettier
公式 に従う。
prettier入れないと eslint 実行時怒られる。$ yarn add -D prettier eslint-config-prettier eslint-plugin-prettier3. 設定

.eslintrcを編集
各pluginの推奨(Recommendedな)設定を使います。 prettierの記述は必ず最後に書く。
@typescript-eslint/eslint-plugin
Prettier.eslintrc.json"extends": [ "airbnb", + "eslint:recommended", + "plugin:@typescript-eslint/eslint-recommended", + "plugin:@typescript-eslint/recommended", "plugin:react/recommended", + "plugin:prettier/recommended", + "prettier/@typescript-eslint", + "prettier/react" ],
.prettirerc作成
Options一覧
prettier では デフォで ダブルクォートになってるのでしょうか。
eslint で シングルクォート推してる理由が知りたい。arrowParens: alwaysはわたしの好み。prettirerc{ "trailingComma": "es5", "tabWidth": 2, "arrowParens": "always" }
package.jsonに script 追記。 eslintConfigを除去。package.json"scripts": { "start": "react-scripts start", "build": "react-scripts build", "test": "react-scripts test", "eject": "react-scripts eject", + "lint": "eslint --ext .ts,.tsx ./src" }, - "eslintConfig": { - "extends": "react-app" - },4. Lintエラー対応

この時点で
yarn lintしてみる。まぁエラーでる。
ソース修正、ルールを追記していく。prettier/prettier
フォーマットエラー。ソースを修正します。後述する vscode の自動整形でなおしたが早いかも。
import/resolver , import/extensions
拡張子が
tsortsxなファイルのインポートが解釈されない。
settingsおよびrulesに追記する。.eslintrc.json+ "settings": { + "import/resolver": { + "node": { + "paths": ["src"], + "extensions": [".js", ".jsx", ".ts", ".tsx"] + } + } + },.eslintrc.json"rules": { + "import/extensions": [ + "error", + { + "js": "never", + "jsx": "never", + "ts": "never", + "tsx": "never" + } + ] }react/jsx-filename-extension
JSXを含むファイルの拡張子を制限するルール。
.tsxなんぞ知らんぞと言われてるのでルール追記。.eslintrc.json+ "react/jsx-filename-extension": [ + "error", + { + "extensions": [ + ".jsx", + ".tsx" + ] + } + ]spaced-comment
react-app-env.d.tsで Triple-slash directives してる(詳細わかりません)
例外としてルール追記。.eslintrc.json+ "spaced-comment": [ + "error", + "always", + { + "markers": [ + "/ <reference" + ] + } + ]@typescript-eslint/no-use-before-define
変数と関数は使用する前に宣言しなさいルール。
今回は 下位スコープで使用される関数と変数を無視する設定に。.eslintrc.json+ "@typescript-eslint/no-use-before-define": [ + "error", + { + "variables": false, + "functions": false + } + ],no-console
ルールでoffに。 ファイル単位でoffったほうがいいのかも。
.eslintrc.json+ "no-console": "off",no-param-reassign
引数の上書き禁止。 これは同意である。
serviceWorker.tsではline単位で off指定serviceWorker.ts+ // eslint-disable-next-line no-param-reassign registration.onupdatefound = (): void => {@typescript-eslint/explicit-function-return-type
return type書きましょうルール。書きましょう。
実務ではオフってました
App.tsxは FC をつけてあげる。App.tsx- function App() { + const App: React.FC = () => {
serviceWorker.tsは void型を記述VSCode

ファイル保存時に自動整形したい。
ESLint拡張機能いれる。この子の仕様コロコロ変わる気がする。
執筆時ver2.1.1下記設定で行けました。eslint.validateがいらなくなってた。settings.json{ "eslint.nodePath": "./node_modules/eslint", "eslint.packageManager": "yarn", "editor.codeActionsOnSave": { "source.fixAll.eslint": true }, "eslint.alwaysShowStatus": true }不明点

cra では 生成時に eslint関連のpackageが予めインストールされてる ※
eslint-plugin-react等。2で改めてインストールしたほうがいいのだろうか。
"extends"における列挙順。 airbnbを先頭にもってきたけど 他 plugin等の設定で上書きされてどれが残っているのかわかってない。参考
