- 投稿日:2020-01-24T20:23:19+09:00
CSS,SCSSで画像を背景にする方法
SCSSで作成
.クラス名 {
background: url(/フォルダ名/ファイル名) no-repeat top / 横px 縦px;
height: 要素の高さ;
wight: 要素の幅;
}backgroundで背景にする
urlで画像を指定する
no-repeatで画像が何枚も投稿されるのを防ぐ
(これがないと勝手に何枚も表示される)topで上に詰める?
画像の縦横を指定してあげる
間違いがあれば指摘をお願いします。
- 投稿日:2020-01-24T19:30:20+09:00
Action Cableの設定でつまずいたこと
行っていること
以下の記事や動画を参考にチャット機能を作成しています。
Rails 5 + ActionCableで作る!シンプルなチャットアプリ(DHH氏のデモ動画より)
0から手を動かして作るRailsチャットアプリ【チュートリアル】リアルタイムでのチャット機能を作成する際につまずいたことを、記録も兼ねて共有します。
やりたいこと
自分(current_user)と他の人で表示方法を変える
チャンネルの作成
$ rails g channel chatroom speak
    create  app/channels/chatroom_channel.rb
    create  app/assets/javascripts/channels/chatroom.coffee
つまずいたこと
・
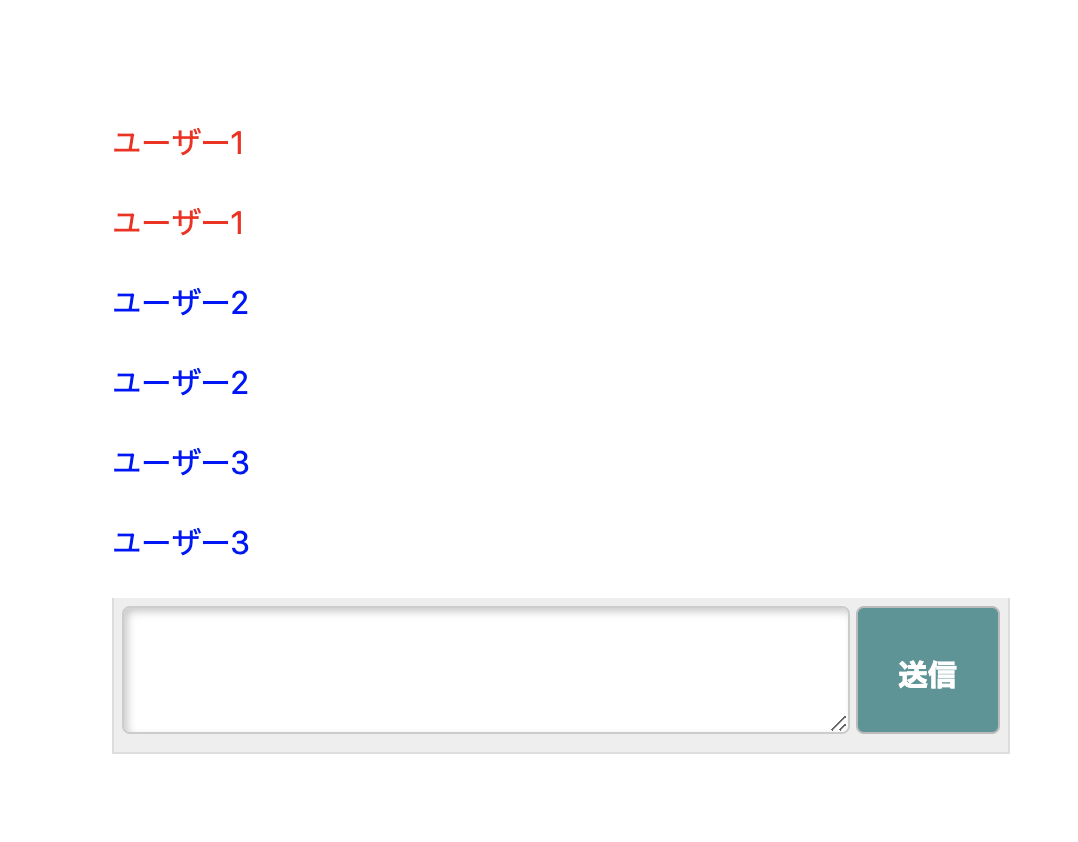
chatroom_channel.rbから_post.html.erbをrenderで呼び出そうとすると、[ActionView::Template::Error - undefined method 'id' for nil:NilClass]と言われる。→channelからrenderした際にcurrent_userの値を取れていないためコード一覧
routes.rbRails.application.routes.draw do root to: 'toppages#index' # (省略) resources :chatrooms do member do get :users end end mount ActionCable.server => '/cable' endposts/_post.html.erb<% unless post.user_id == current_user.id %> <p style="color:blue;"><%= post.content %></p> <% else %> <p style="color:red;"><%= post.content %></p> <% end %>chatroom_channel.rbclass ChatroomChannel < ApplicationCable::Channel def subscribed stream_from "chatroom_channel" end def unsubscribed # Any cleanup needed when channel is unsubscribed end def speak(data) message = Post.create! content: data['message'], user_id: data['user_id'], chatroom_id: data['room_id'] templete = ApplicationController.renderer.render(partial: 'posts/post', locals: { post: message }) ActionCable.server.broadcast 'chatroom_channel', message: templete end endchatroom.coffee# クライアントサイドの処理を受け持つチャンネ App.chatroom = App.cable.subscriptions.create "ChatroomChannel", connected: -> # Called when the subscription is ready for use on the server disconnected: -> # Called when the subscription has been terminated by the server received: (data) -> $('#posts').append data['message'] # Called when there's incoming data on the websocket for this channel speak: (content, data_user, data_room) -> @perform 'speak', message: content, user_id: data_user, room_id: data_room document.addEventListener 'DOMContentLoaded', -> input = document.getElementById('chat_input') data_user = input.getAttribute("data_user") data_room = input.getAttribute("data_room") button = document.getElementById('chat_button') button.addEventListener 'click', -> content = input.value App.chatroom.speak(content, data_user, data_room) input.value = '' return return原因
channelからは sessionを使うことが出来ないそうです。
(sessions_helperでcurrent_userを定義している。)解決方法
channelからcookieは使うことができるそうなので、cookieからユーザー情報を取ってきて、current_user変数に代入。
主にこちらの記事を参考にしました。cookieの情報からcurrent_userの作成
channels/application_cable/connection.rbmodule ApplicationCable class Connection < ActionCable::Connection::Base identified_by :current_user def connect self.current_user = find_verified_user end protected def find_verified_user if verified_user = User.find_by(id: session['user_id']) verified_user else reject_unauthorized_connection end end def session cookies.encrypted[Rails.application.config.session_options[:key]] end end endchatroom_channel.rb# (省略) def speak(data) message = Post.create! content: data['message'], user_id: data['user_id'], chatroom_id: data['room_id'] templete = ApplicationController.renderer.render(partial: 'posts/post', locals: { post: message, current_user: current_user }) # current_user変数にconnection.rbで取得したcurrent_userを設定 ActionCable.server.broadcast 'chatroom_channel', message: templete end参考リンク
- 投稿日:2020-01-24T19:21:40+09:00
初学者によるプログラミングMemo #19 正規表現(基本編)
はじめに
今回は正規表現(基本編)のお話です
正規表現を初めに見たときは、"/\d+\/\/"みたいなのを見てなんだこれは、謎の記号の羅列やんと思ったものです
ですが、私もプログラミング学習を進めていくうちに、少しずつわかってくるようになったので、このタイミングで書きたいと思います
なお、本記述はMacにおいて、Railsでの開発を前提としています
また、まだまだひよっこですので、不備等ございましたらご指摘いただけると幸いです目次
- 正規表現の各パーツについて
- 正規表現でなんか取ってこよう
正規表現の各パーツについて
まずは謎の記号の羅列が、各パーツに分解できるところから知りましょう(今回は解説含むので、理解できているものを紹介します)
[abc]    #aかbかcのどれか1文字
[^abc]   #a,b,c以外の1文字
[a-z]    #a~zのうちのどれか1文字
[a-zA-Z] #a~zかA~Zのうちのどれか1文字
.        #任意の1文字
\d       #任意の数字
\w       #任意(文字、数字、アンダースコアのうちの)の1文字
(a|b)    #aかbどちらか
a?       #a("?"の直前の文字)が0回か1回か
a+       #a("+"の直前の文字)が1回以上
a{3}     #aが3回
\/       #\の使い方、"/"を文字として扱う
基本的なところはこんなところでしょうか
これを組み合わせることで正規表現が成り立っています
最初に述べた"\d+"は"\d"と"+"の組み合わせですね
つまるところ、任意の数字が1回以上、ということになります正規表現でなんか取ってこよう
以前記事で書いた"scan"メソッドでも使って、文字列の中から任意の文字列を取り出してきましょうか
URLを取り出してみる
URLを取り出してみましょう
例えばこんな文章があるとします私のQiitaのMYPageはhttps://qiita.com/Ikuy_hですこれからURLを取り出したいと思います
ただし、この一文にしかヒットしないのは汎用性が全くないので、汎用性のあるコードにしたいと思いますまず、URLの頭ですが、"http:"か"https:"のどちらかから始まっている(それしか知りません、間違ってたら教えてください)ので、まずはそこにマッチするかを記述してみましょう
https?:できました
次に"/"です
前述したように、"/"を文字として考えなくてはいけませんので、こうなりますhttps?:\/\/できました
次は何かしらの文字が来るはずです
その記述を行います
まずは文字が入っているかどうかと、文字が一回以上でるということを考えて記述してみますhttps?:\/\/[\w]+できました
前述した基本パーツの組み合わせです
[]はどれか[]内のどれか1文字でしたよね
\wは任意(文字、数字、アンダースコアのうちの)の1文字でしたよね
+はそれが1回以上出現するかどうかですね
しかし、これではまだ不十分です
だって…"."があるじゃないか!!
そうです、\wでは"."は補完されません
あと記号としては"-","?","%","&","=","/"が考えられそうですね
なので…https?:\/\/[\w\.\-?%&=\/]+できました
()を使ったグループ化をする方がもっと綺麗にかけそうですが、まだ使いこなせていないので、今はこれでご勘弁を
ちゃんと理解したら、その時また記事書きますさあ、では実際に、プログラミングしてみましょう
hp = "私のQiitaのMYPageはhttps://qiita.com/Ikuy_hです"

p hp.scan(/https?:\/\/[\w\.\-?%&=\/]+/)

# => ["https://qiita.com/Ikuy_h"]
取り出せましたね
さいごに
プログラミングというか、ものづくりあるあると言いますか、出来上がりを無知な状態で見ると「うわぁ…こんなん…」って思いがちですが、一つずつ理解していくとほとんどのケースで分解ができます
分解して考えるとより理解しやすくなりますね
- 投稿日:2020-01-24T19:00:31+09:00
【Rails】掲示板に禁止ワードを設定する
掲示板にクローラー的なやつがリンクやスクリプトを書き込み始めたので、暫定的な対応をしました。
comments_controller.rbdef create #以下の4行で対応 prohibited_words = ['a href=', '<script'] if prohibited_words.any? { |p| comment_params[:content].include?(p) } redirect_to(comments_url) && return end @comment = Comment.new(comment_params) if @comment.save . .説明不要かもですが、まず
prohibited_words = ['a href=', '<script']で禁止ワードを設定して、prohibited_words.any? { |p| <検証したい文字列>.include?(p) }で検証したい文字列に禁止ワードが含まれているかをチェックしています。p.s.
掲示板荒らし対策に詳しい方、ご連絡ください。
- 投稿日:2020-01-24T16:17:58+09:00
のエラー解決例
1.エラーの様子
まず、自動デプロイを設定し、実行コマンドを行いました。すると下記のようになりました。
Neverland:chat-space-kai kontatomoya$ bundle exec cap production deploy
#自動deployのコマンドを打ちました
#ここまでまでエラーなし(省略)

00:51 unicorn:start
      unicorn is running...
      unicorn restarting...
      01 kill -s USR2 `cat /var/www/chat-space-kai/shared/tmp/pids/unicorn.pid`
    ✔ 01 ec2-user@13.112.68.204 0.609s
Skipping task `unicorn:restart'.
Capistrano tasks may only be invoked once. Since task `unicorn:restart' was previously invoked, invoke("unicorn:restart") at config/deploy.rb:43 will be skipped.
If you really meant to run this task again, use invoke!("unicorn:restart")
THIS BEHAVIOR MAY CHANGE IN A FUTURE VERSION OF CAPISTRANO. Please join the conversation here if this affects you.
https://github.com/capistrano/capistrano/issues/1686
#↑エラーの全文

#以下エラーなし(省略)
黄色い文章(筆者の環境では赤文字でした)を読むとバージョン違うんじゃない?と書いてあって心当たりがなかったので
THIS BEHAVIOR MAY CHANGE IN A FUTURE VERSION OF CAPISTRANO. Please join the conversation here if this affects you.の部分で検索をかけたところ下記の記事を見つけました。
https://github.com/capistrano/capistrano/issues/1686
https://obel.hatenablog.jp/entry/20181030/1540880580
この中ではunicornのrestartができないのをどうにかすれば良い。とありましたが、restartコマンドは挿入した記憶があるため分からない。そしてgithubの更新を反映できないという状況になってました。2.原因と解決策
結論から言いますと下記のファイルにrestartの実行を2回重複して記載していたためエラーを起こしており、その部分を取り除けば解決しました。
app/config/deploy.rblock '3.11.2' set :application, 'chat-space-kai' set :repo_url, 'git@github.com:KONTA2019/chat-space-kai.git' set :linked_dirs, fetch(:linked_dirs, []).push('log', 'tmp/pids', 'tmp/cache', 'tmp/sockets', 'vendor/bundle', 'public/system', 'public/uploads') set :rbenv_type, :user set :rbenv_ruby, '2.5.1' set :ssh_options, auth_methods: ['publickey'], keys: ['~/.ssh/ChatSpace.pem'] set :unicorn_pid, -> { "#{shared_path}/tmp/pids/unicorn.pid" } set :unicorn_config_path, -> { "#{current_path}/config/unicorn.rb" } set :keep_releases, 5 after 'deploy:publishing', 'deploy:restart' namespace :deploy do task :restart do invoke 'unicorn:restart' end end #↑この部分が不要です set :linked_files, %w{ config/secrets.yml } after 'deploy:publishing', 'deploy:restart' namespace :deploy do task :restart do invoke 'unicorn:restart' end desc 'upload secrets.yml' task :upload do on roles(:app) do |host| if test "[ ! -d #{shared_path}/config ]" execute "mkdir -p #{shared_path}/config" end upload!('config/secrets.yml', "#{shared_path}/config/secrets.yml") end end before :starting, 'deploy:upload' after :finishing, 'deploy:cleanup' end3.この記事で伝えたかったこと
あまり親しみのない自動deployの設定のエラーでも、もしかしたら筆者のように簡単なことで止まってるかもしれないので、'app/config/deploy.rb'を見直してみるとエラーが発見できるかもしれませんよ!ということを伝えたいと思ってこの記事を書きました。
何かのご参考になればと思います。
- 投稿日:2020-01-24T16:17:58+09:00
THIS BEHAVIOR MAY CHANGE IN A FUTURE VERSION OF CAPISTRANO. Please join the conversation here if this affects you. https://github.com/capistrano/capistrano/issues/1686のエラー解決例
1.エラーの様子
まず、自動デプロイを設定し、実行コマンドを行いました。すると下記のようになりました。
Neverland:chat-space-kai kontatomoya$ bundle exec cap production deploy
#自動deployのコマンドを打ちました
#ここまでまでエラーなし(省略)

00:51 unicorn:start
      unicorn is running...
      unicorn restarting...
      01 kill -s USR2 `cat /var/www/chat-space-kai/shared/tmp/pids/unicorn.pid`
    ✔ 01 ec2-user@13.112.68.204 0.609s
Skipping task `unicorn:restart'.
Capistrano tasks may only be invoked once. Since task `unicorn:restart' was previously invoked, invoke("unicorn:restart") at config/deploy.rb:43 will be skipped.
If you really meant to run this task again, use invoke!("unicorn:restart")
THIS BEHAVIOR MAY CHANGE IN A FUTURE VERSION OF CAPISTRANO. Please join the conversation here if this affects you.
https://github.com/capistrano/capistrano/issues/1686
#↑エラーの全文

#以下エラーなし(省略)
黄色い文章(筆者の環境では赤文字でした)を読むとバージョン違うんじゃない?と書いてあって心当たりがなかったので
THIS BEHAVIOR MAY CHANGE IN A FUTURE VERSION OF CAPISTRANO. Please join the conversation here if this affects you.の部分で検索をかけたところ下記の記事を見つけました。
https://github.com/capistrano/capistrano/issues/1686
https://obel.hatenablog.jp/entry/20181030/1540880580
この中ではunicornのrestartができないのをどうにかすれば良い。とありましたが、restartコマンドは挿入した記憶があるため分からない。そしてgithubの更新を反映できないという状況になってました。2.原因と解決策
結論から言いますと下記のファイルにrestartの実行を2回重複して記載していたためエラーを起こしており、その部分を取り除けば解決しました。
app/config/deploy.rblock '3.11.2' set :application, 'chat-space-kai' set :repo_url, 'git@github.com:KONTA2019/chat-space-kai.git' set :linked_dirs, fetch(:linked_dirs, []).push('log', 'tmp/pids', 'tmp/cache', 'tmp/sockets', 'vendor/bundle', 'public/system', 'public/uploads') set :rbenv_type, :user set :rbenv_ruby, '2.5.1' set :ssh_options, auth_methods: ['publickey'], keys: ['~/.ssh/ChatSpace.pem'] set :unicorn_pid, -> { "#{shared_path}/tmp/pids/unicorn.pid" } set :unicorn_config_path, -> { "#{current_path}/config/unicorn.rb" } set :keep_releases, 5 after 'deploy:publishing', 'deploy:restart' namespace :deploy do task :restart do invoke 'unicorn:restart' end end #↑この部分が不要です set :linked_files, %w{ config/secrets.yml } after 'deploy:publishing', 'deploy:restart' namespace :deploy do task :restart do invoke 'unicorn:restart' end desc 'upload secrets.yml' task :upload do on roles(:app) do |host| if test "[ ! -d #{shared_path}/config ]" execute "mkdir -p #{shared_path}/config" end upload!('config/secrets.yml', "#{shared_path}/config/secrets.yml") end end before :starting, 'deploy:upload' after :finishing, 'deploy:cleanup' end3.この記事で伝えたかったこと
題名のエラーが目立つため、バージョンの間違いによる「互換性の問題に違いない」とドツボにはまってしまうことがあるかもしれませんが、もしかしたら筆者のように簡単なことで止まってるかもしれないので、'app/config/deploy.rb'を見直してみるとエラーが発見できるかもしれませんよ!ということを伝えたいと思ってこの記事を書きました。
何かのご参考になればと思います。
- 投稿日:2020-01-24T16:13:56+09:00
Railsチュートリアル 第5章
ヘルパーメソッド
link_to
リンクを生成するためのヘルパーメソッド
<%= link_to "sample app", '#', id: "logo" %>第1引数:リンクテキスト
第2引数:URL
第3引数:オプションハッシュ(必須ではない)image_tag
画像を表示するためのimgタグを作成するヘルパーメソッド。
image_tag("rails.png", alt: "Rails logo")第1引数:画像ファイル名
ファイルの置き場所は「app/assets/images」フォルダと「public」フォルダの2つが用意されている。
上記の様に指定すると、「app/assets/images」が参照される。
「public」フォルダを参照したい場合は、ファイル名の前に「/」を入れる。
第2引数:オプション
alt:画像がない場合に代わりに表示される文字列
size:'100×200' 幅と高さを指定<%= link_to image_tag("rails.png", alt: "Rails logo"), 'http://rubyonrails.org/' %>上記の様に組み合わせて使うことができ、画像リンクが作れる
第1引数:image_tag("rails.png", alt: "Rails logo") ⇨画像
第2引数:'http://rubyonrails.org/' ⇨URLBootstrap
Bootstrapとは
Twitter社が開発したCSSのフレームワークです。(HTML/CSS/JavaScriptから構成される)
よく使うスタイルなどがあらかじめ定義されている。
また、レスポンシブWebデザインに対応しているので、スマートフォンやタブレットなど個別に対応するスタイルを作らなくても柔軟に調整してくれる。BootstrapではLESS CSS言語を使っているが、RailsのAsset PipelineはデフォルではSass言語をサポートしているので、bootstrap-sassは、LESSをSassへ変換し、Bootstrapファイルを現在のアプリケーションで全て利用できるようにする。
Sass
CSSを拡張した言語、元々のCSSに次の機能を追加
・ネスト
スタイルシート内に共通のパターンがある場合、要素をネストさせることができる
・変数
冗長なコードを削除し、より自由な表現を可能に
・ミックスイン
CSSルールのパッケージ化して、複数の箇所で再利用することができる (例:@include)Bootstrap導入
Gemfile.rbsource 'https://rubygems.org' gem 'rails', '5.1.6' gem 'bootstrap-sass', '3.3.7' ⇦追加 . .Bootstrapをインストール
$ bundle installカスタムCSSを作成
$ touch app/assets/stylesheets/custom.scsscustome.scss@import "bootstrap-sprockets"; @import "bootstrap";パーシャル
一箇所にまとめた方が良いHTMLや重複しているHTMLをパーシャルという機能を使って1つにまとめることができる。
パーシャルのファイル名の先頭にはアンダースコアをつける。
またrenderメソッドで使用する。アセットパイプライン
CSS/JavaScript/Imageなどを管理する機能
アセットディレクトリ
静的ファイルを目的別に分類
- app/assets:現在のアプリケーション固有のアセット
- lib/assets: あなたの開発チームによって作成されたライブラリ用のアセット
- vendor/assets: サードパーティのアセット
マニフェストファイル
1つのファイルにまとめる方法をRailsに指示
app/assets/stylesheets/application.css/* * This is a manifest file that'll be compiled into application.css, which * will include all the files listed below. * * Any CSS and SCSS file within this directory, lib/assets/stylesheets, * vendor/assets/stylesheets, or vendor/assets/stylesheets of plugins, if any, * can be referenced here using a relative path. * * You're free to add application-wide styles to this file and they'll appear * at the bottom of the compiled file so the styles you add here take * precedence over styles defined in any styles defined in the other CSS/SCSS * files in this directory. It is generally better to create a new file per * style scope. * *= require_tree . *= require_self */require_tree:app/assets/stylesheetsディレクトリ内の全てのCSSファイルがアプリケーションCSSに含まれるようにしている。
require_self:CSSの読み込みシーケンスの中で、application.css自身もその対象に含めている。プリプロセッサエンジン
指示に従ってブラウザに配信できるように結合
なぜアセットパイプライン?
開発する側としては複数のファイルに分割して効率的に開発できる
ただ、コンピューターに取っては1つにまとまっていた方が高速になるので、それをしてくれるのがアセットパイプライン名前付きルート
このようなルートは
get 'static_pages/help'このように変更する
get '/help', to: 'static_pages#help'GETリクエストが/helpに送信されたときにStaticPagesコントローラーのhelpアクションを呼び出してくれるようになる。
また、ルートURLの時と同様に、help_pathやhelp_urlといった名前付きルートも使えるようになる。asオプション
:asオプションを使うと、ルーティングの名前を指定できる。
get '/help', to: 'static_pages#help', as: :helfhelf_pathとして使用できる
リンクのテスト
require 'test_helper'

class SiteLayoutTest < ActionDispatch::IntegrationTest

  test "layout links" do
    get root_path                     ⇨ルートURL(Homeページ)にGETリクエストを送る
    assert_template 'static_pages/home'        ⇨正しいテンプレートが表示されている事を確認
    assert_select "a[href=?]", root_path, count: 2 ⇨Homeページへのリンクが2つ存在する事を確認
    assert_select "a[href=?]", help_path       ⇨Helpページへのリンクが存在する事を確認
    assert_select "a[href=?]", about_path       ⇨Aboutページへのリンクが存在する事を確認
    assert_select "a[href=?]", contact_path     ⇨Contactページへのリンクが存在する事を確認
  end
end
assert_selectにはいくつもの指定の方法があるが、今回はリンクのテストをする。
コード マッチするHTML assert_select "div" <div>foobar</div> assert_select "div", "foobar" <div>foobar</div> assert_select "div.nav" <div class="nav">foobar</div> assert_select "div#profile" <div id="profile">foobar</div> assert_select "div[name=yo]" <div name="yo">hey</div> assert_select "a[href=?]", ’/’, count: 1 <a href="/">foo</a> assert_select "a[href=?]", ’/’, text: "foo" <a href="/">foo</a>
- 投稿日:2020-01-24T11:40:15+09:00
[Ruby] Array#find_index の複数の index を返すバージョンがほしい
バージョン情報
$ ruby -v
ruby 2.7.0p0 (2019-12-25 revision 647ee6f091) [x86_64-darwin18]
やりたいこと
Array#find_index は引数に一致する最初の要素のインデックスを返す。
%w(? ? ? ? ?).find_index('?') #=> 2でも一致するすべてのインデックスを返してほしいな。
%w(? ? ? ? ?).some_method('?') #=> [2, 4]方法
module ArrayExtension
  refine Array do
    def find_indexes(val)
      filter_map.with_index { |element, i| i if element == val }

      # Ruby 2.7 未満の場合は Enumerable#filter_map がないので他の書き方で。
      # map.with_index { |element, i| i if element == val }.compact
    end
  end
end

using(ArrayExtension) # irb --context-mode=1 で起動すると irb でも using が使えるぞ。

%w(? ? ? ? ?).find_indexes('?') #=> [2, 4]
%w(? ? ? ? ?).find_indexes('?') #=> [1]
%w(? ? ? ? ?).find_indexes('?') #=> []
- 投稿日:2020-01-24T10:17:20+09:00
#Ruby で Shift JIS と UTF-8 を相互変換できないので Windows-31j(CP932) でエンコード・デコードする ( Encoding::UndefinedConversionError )
現象
特殊文字 ㈱ が相互変換できない
'㈱'.encode("Shift_jis").encode('UTF-8')
# Encoding::UndefinedConversionError: U+3231 from UTF-8 to Shift_JIS

'㈱'.encode("cp932").encode('UTF-8')
# => "㈱"
Ref
RubyでShift JISやCP932などのCSVをUTF-8に変換して読み込む - Qiita
https://qiita.com/daichi87gi/items/9097adfd47d9725097f1RubyでShift JISやCP932などのCSVをUTF-8に変換して読み込む - Qiita
https://qiita.com/daichi87gi/items/9097adfd47d9725097f1Original by Github issue
- 投稿日:2020-01-24T08:42:14+09:00
小規模チームが簡単に管理できるテスト管理アプリを個人開発しました
開発者とテスト担当者がわかれていないようなチームがテスト仕様書を作成できて、共有、レポート作成と
簡単に管理できるツールが作れないかと考えTESTBASE(https://www.test-base.tech/)というテスト管理ツールを個人開発しました。
現状はベータ版としてパイロット運用をして、本番稼働に移行していけたらなと考えています。対象読者
次のような方の参考になるような内容をまとめています。
- 個人開発を始めようとしている方
- テスト管理ツールを探している方
なぜ作ろうとおもったか
理由は次の3点があります。
- 無料で使えるテスト管理ツールがなかった
- 海外製品はIEEEなどの基準に準拠しているのか日本のExcelっぽいGUIではなかった。
- 海外製品は単純に機能が多すぎて、使いづらかった。
オープンソースのテスト管理ツールだとTestLinkというものがありますが、UIがかなり古く、実際に使用するには難しい印象を受けます。その他では、基本的には有償のツールでした。代表的なものを上げると国産だとqangaroo(https://qangaroo.jp/)、海外製品だとTestRail(https://www.gurock.com/testrail)などがあります。
海外製品はIEEEが作成した標準的なテストテンプレートに準拠しているのか、日本で多くのエンジニアが作成していると思われるExcelベースの表形式のテストテンプレートではありませんでした。テスト管理の点から考えるとIEEEのようなテンプレートのほうが認識間違いなどが少なくなるようですが、実務上は運用は厳しいという印象を受けます。(特に小規模な開発チームでは)
また、海外製品はテストシートをテストスイートという単位で管理するようで(詳細には調べていません)これもまた高機能ですが、使いこなせないなと印象を受けました。
そこで開発者がマニュアルテストを簡単に作成できて、管理できる。さらにテスト結果の集計を簡単にできるようなツールを作成しようと考えました。
構成技術
- bootstrap
- jQuery
- handsontable
- Chart.js
- Ruby On Rails
- PostgreSQL
- heroku
SPAのようなうな要件はなく、単純に入力項目を埋めていくような画面構成が多いため、フロントサイドはオーソドックスな技術を使用しています。テストシートのスプレッドシート部分はスプレッドシートのライブラリで無料で使用できて動きの安定しているhandsontableを利用しました。(一定の過去バージョンのみOSSで、それ以降は有償となっています。)
サーバーサイドは実務経験のあるSpringBoot(Java),Laravel(PHP)、RubyOnRails(Ruby)と検討しました。
実務経験があるのでSpringBootは学習工数がなく、開発作業に移れましたが、Ruby on Railsと比較すると作成しなければならないクラス数が多いのと(例:Form、Modelなど)、Ruby on Railsは優れたマイグレーション機能があるので、Ruby on Railsを採用しました。
結果として、体感ですが、SpringBootとと比較して4割減くらいの工数で開発できたと思います。実行環境については、VPSやAWS当のIaaSも検討しましたが、一人で開発とサーバー構築するのは不可能だったのでHeorkuを採用しました。SaaSということでマルチテナントを実現する必要がありましたが、Heorkuで対応ができました。
アプリケーション構成
TESTBASEはSaaSのためマルチテナント構成にする必要がありました。複数のテナントにたいして、テナント事にサブドメインを分割して、それによりアプリケーションにアクセス可能となっています。
次のような実現方法をとっています。
- テナント単位にサブドメインを分割
- サブドメイン部分によりテナントを特定
- データアクセス時にそのテナントによりデータアクセスし、テナントごとのデータ分離を実現
重要なデータ分離についてはテナントIDにて管理しており、Apartmentなどのマルチテナント用のGemは使用せず、モデルのdefault scopeとCurrentにより実現しています。defaultscopeを利用することで、CRUD操作すべてでテナントIDが条件に付与され、処理ごとにテナントIDを付与しなくてもいいようにして、保守性を実現しています。
マルチテナントはスキーマ分離方式もありますが,Heroku自体が使用を非推奨にしており、テナント数の増大によりテーブル定義等の変更が大きな負荷となってしまうため、採用しませんでした。

- 投稿日:2020-01-24T03:07:49+09:00
Ruby初級(計算、each文、ハッシュ、メソッド、既存メソッド、条件分岐、繰り返し文、おみくじ)をざっと書いてみた。
最初の頃に学んだRubyの基礎的な部分を書いてみました。
投稿慣れするために簡単に書いてみました。説明不足すみません。
環境構築で悩まれている方はAWScloud9
最初に私も環境設定ですごく進みが悪く時間を浪費しました。
最初はなんでもいいのでとりあえず動かしてみましょう。以下のコードは作ったfileにコピペした後に、ターミナルを開いて $ ruby qiita.rbとすると結果が表示されます。
- ファイル名はご自身の好きな名前で大丈夫です。
- 最後の.rbがRubyのファイルという意味になります。
- ターミナル開いたらcdコマンドでご自身で作った作業しているfileへ移動後に$ ruby ファイル名.rb しないとエラーになります
- #はコメントアウトなので一緒にコピペして大丈夫です。
いろんな計算
小数点とかいじってみてください。
qiita.rb#計算 puts 1+1 puts 2-1 puts 3*2 puts 10/3 puts 10.0/3 puts 10%3each文
- scoresに数字を入れ、sum=0と定義してあげます。
- each分でscoresの中から1つずつ取り出してあげてscoreに入ります。
- 1つずつeach文のdo〜endの中にある式が実行され、なくなるまで繰り返します。
- each文が終了後、endの下が実行されて合計のsumの数値が出ます。
qiita.rb# each文 足し算 # scores = (1..10).to_a # ↑↓同じ意味。コメントアウトを変えて試してみよう。 scores = [1,2,3,4,5,6,7,8,9,10] sum = 0 scores.each do |score| sum = sum + score puts "現在のスコア" puts sum end puts "合計" puts sumハッシュ
- ハッシュの利点は名前=>金額のように、各要素を関連つける事ができるという点にあります。
- 下の例では名前がキー(key)、金額がバリュー(value)と言います。
- コピペ後、数字や文字を変えてアレンジしてみましょう。例えばテストの成績や、お野菜の値段
qiita.rbmoney={"rafael"=>"5億","tokaionair"=>"8億","hikakin"=>"10億"} puts money["rafael"]メソッド
- 簡単にいうとメソッドとは処理の塊のことです(意味をしっかり知りたい方は調べましよう)
- プログラムを書いていると何度か繰り返すものが出てきます。なので同じ処理をまとめておく事で見やすくもなります。
qiita.rbputs "おはよう" puts "お疲れ様" puts "また明日" puts "おはよう" puts "お疲れ様" puts "また明日"これではめんどくさいし見にくい。
greetという塊を作ってあげる。greetと呼んであげたら処理の塊が出てくる。
実行して確認してみましょう。qiita.rbdef greet puts "おはよう" puts "お疲れ様" puts "また明日" end greet greet引数, 戻り値(返り値)
- 平均を求めるメソッドaverageを作る。実行してみる。
qiita.rbdef average (10+15+20)/3 end puts averageしかしこれだと、数値を変えたい時に面倒になります。何度averageを呼んでも同じ数字しか返ってきません。そこで好きな数字を指定して平均を求めます。
これで拡張も簡単になりました。qiita.rbdef average(a,b,c) #abcを戻り値 (a+b+c)/3 end #渡してあげる数値を、引数という puts average(10,15,20) puts average(25,5,50)いろんな既存のメソッドを使おう
sample, length, push
- コピペして試してみてください。コメントに簡単な説明あります。
qiita.rbomikuji = ["大吉","中吉","小吉"] # ランダム表示。簡易的なおみくじができます。 puts omikuji.sample #中の個数表示 puts omikuji.length #最後に追加する。omikuji.pushの前後にomikuji.lengthを置くと実行した時に追加されてるかわかりやすいです。 omikuji.push("末吉") puts omikuji.lengthfloor(切り捨て), ceil(繰り上げ), round(四捨五入)
qiita.rba= 78.5 ##切り捨て puts a.floor ##繰り上げ puts a.ceil ##四捨五入 puts a.rounddowncase, upcase, !(破壊的メソッド)
全部コピペして実行すると文字の変化がわかりやすいです。
qiita.rbuser = "Suzuki" puts user #小文字にする puts user.downcase #大文字にする puts user.upcase puts user #破壊的メソッド puts user.upcase! # #破壊的メソッドによりuserの中身を大文字に書き換えてしまう。 puts user条件分岐 if文
- if〜endまでが一括りです。aとbに数値を入れてあげます。
- 条件を満たしてないので,a > bは実行されません。
- 次はelseで条件分岐され、bは?️よりお大きいので実行されます。
- しかし、今の条件だと同じ数値の時でも2番目がputsされますので、最後に条件を増やしています。
qiita.rba = 10 b = 11 if a > b puts"aはbより大きい" end if a > b puts "aはbより大きい" else puts "bはaより大きい" end #もし数字が同じ場合、上記だとおかしくなる。条件を増やす。 if a > b puts "aはbより大きい" elsif a < b puts "bはaより大きい" else puts "aとbは等しい" end #等しい時は、a == b 違う時は、a != b を使う。繰り返し文 (timesメソッド, while文)
qiita.rb# 繰り返し文(timesメソッド) 10.times do puts "helo" enddoの後の||で囲われているのはブロック変数と言います。提示されているdo〜endの中で使う事ができます。試しにendの下に同じくputsするとエラーになります。
この機会にエラー文を読んでみましょう。
qiita.rb#3回繰り返し取り出してputsします。 omikuji = ["大吉","中吉","小吉"] 3.times do |i| puts omikuji[i] end↓こうすると取り出した回数が表示されます。
ブロック変数の中はご自身でわかりやすく変えれます。qiita.rbomikuji = ["大吉","中吉","小吉"] 3.times do |num| puts num end繰り返し文(while文)
- 条件式を満たさなくなるまで繰り返します
- aは最初0で、10ずつ足されます。100になると終わる。
qiita.rb#繰り返し文(while文) a=0 while(a <= 100) puts a a = a+10 end puts a #while文を抜けた後にputsすると110while文を使って大吉が出るまでおみくじ引こう
- 上での紹介した.sampleメソッドを使いランダム表示させる。
- ランダムに引いたおみくじをresult(結果)に入れてあげる。
- while文に条件を書いてあげる。(!=は上でやりました)慣れたら好きに変えてみてください。
qiita.rbomikuji = ["大吉","中吉","小吉"] result = omikuji.sample while(result != "大吉") #while〜endの中の条件を大吉が出るまで繰り返し引き直す処理 puts result result = omikuji.sample end puts result # わかりやすくする為、whileを抜けたらputsで大吉を表示する。誤字脱字あったらごめんなさい。
今回書いてみて、振り返りになりとても良かったので自分なりにまとめてみるのは凄くいいと思いました。
どなたかのお役に立てば幸いです。
- 投稿日:2020-01-24T02:17:55+09:00
ミニQ & Aサービスの開発
Udemyの教材でミニQ&Aサービスの開発について学んだので、備忘録として記録します。
教材:https://www.udemy.com/course/the-ultimate-ruby-on-rails-bootcamp/Rubyのバージョン管理
今回はバージョン2.5.1で進めました。
ターミナル$ rvm -v #rvmのバージョンを調べる $ rvm 1.29.8 (1.29.8) by Michal Papis, Piotr Kuczynski, Wayne E. Seguin [https://rvm.io] $ rvm list =* ruby-2.5.1 [ x86_64 ] ruby-2.6.3 [ x86_64 ] # => - current # =* - current && default # * - default $ rvm install 2.5.1 #バージョンを指定してインストールしたい場合 $ rvm use 2.5.1 #currentになる $ rvm --default use 2.5.1 #current && defaultになるRailsのインストール
バージョンを指定する場合の書き方。-Nはドキュメントをインストールしないという意味で時間短縮になる。
ターミナル$ gem install rails -v 5.2.1 -N
BundlerRubyGemsを管理するツール
RubyGemsRubyで書かれたサードパーティ製のライブラリ(プログラムのまとまり)
ex) ユーザー認証機能、画像の管理機能、管理画面の機能、など
http://rubygems.org/ミニQ and Aアプリ作成
ターミナル$ rails _5.2.1_ new qandaGemfile#エラー回避 #変更前 gem 'sqlite3' #変更後 gem 'sqlite3', '~> 1.3.6'ターミナル$ bundle updateデータベースを作成する
ターミナルrails db:createBootstrapの導入
Gemfilegem 'bootstrap', '~> 4.1.1' gem 'jquery-rails', '~> 4.3.1' #bootstrapはjQueryに依存しているターミナル$ bundle installstylesheetのファイル形式変更(CSS→Sass)
ターミナル$ mv app/assets/stylesheets/application.css app/assets/stylesheets/application.scssapplication.scss@import "bootstrap";application.js// This is a manifest file that'll be compiled into application.js, which will include all the files // listed below. // // Any JavaScript/Coffee file within this directory, lib/assets/javascripts, or any plugin's // vendor/assets/javascripts directory can be referenced here using a relative path. // // It's not advisable to add code directly here, but if you do, it'll appear at the bottom of the // compiled file. JavaScript code in this file should be added after the last require_* statement. // // Read Sprockets README (https://github.com/rails/sprockets#sprockets-directives) for details // about supported directives. // //= require rails-ujs //= require activestorage //= require turbolinks //= require jquery3 #ここを追記 //= require popper #ここを追記 //= require bootstrap-sprockets #ここを追記 //= require_tree .route
ルーティングの設定
ターミナル$ rails routes Prefix Verb URI Pattern Controller#Action root GET / questions#index question_answers GET /questions/:question_id/answers(.:format) answers#index POST /questions/:question_id/answers(.:format) answers#create new_question_answer GET /questions/:question_id/answers/new(.:format) answers#new edit_question_answer GET /questions/:question_id/answers/:id/edit(.:format) answers#edit question_answer GET /questions/:question_id/answers/:id(.:format) answers#show PATCH /questions/:question_id/answers/:id(.:format) answers#update PUT /questions/:question_id/answers/:id(.:format) answers#update DELETE /questions/:question_id/answers/:id(.:format) answers#destroy questions GET /questions(.:format) questions#index POST /questions(.:format) questions#create new_question GET /questions/new(.:format) questions#new edit_question GET /questions/:id/edit(.:format) questions#edit question GET /questions/:id(.:format) questions#show PATCH /questions/:id(.:format) questions#update PUT /questions/:id(.:format) questions#update DELETE /questions/:id(.:format) questions#destroy rails_service_blob GET /rails/active_storage/blobs/:signed_id/*filename(.:format) active_storage/blobs#show rails_blob_representation GET /rails/active_storage/representations/:signed_blob_id/:variation_key/*filename(.:format) active_storage/representations#show rails_disk_service GET /rails/active_storage/disk/:encoded_key/*filename(.:format) active_storage/disk#show update_rails_disk_service PUT /rails/active_storage/disk/:encoded_token(.:format) active_storage/disk#update rails_direct_uploads POST /rails/active_storage/direct_uploads(.:format) active_storage/direct_uploads#createconfig/routes.rbRails.application.routes.draw do root 'questions#index' #indexアクションのビューをrootに設定されるようする resources :questions do #questionsコントローラーに関係するルーティングを自動で用意してくれる resources :answers end endmodel
Questionモデルの作成
ターミナル$ rails g model Question name:string title:string content:text $ rails db:migrateAnswerモデルの作成
ターミナル$ rails g model Answer question:references name:string content:text #question:references→1対多の関係を定義出来る $ rails db:migrateデータベース構造の確認
ターミナル$ rails dbconsole SQLite version 3.7.17 2013-05-20 00:56:22 Enter ".help" for instructions Enter SQL statements terminated with a ";" sqlite> .schema #.schemaと入力 CREATE TABLE "schema_migrations" ("version" varchar NOT NULL PRIMARY KEY); CREATE TABLE "ar_internal_metadata" ("key" varchar NOT NULL PRIMARY KEY, "value" varchar, "created_at" datetime NOT NULL, "updated_at" datetime NOT NULL); CREATE TABLE "questions" ("id" integer PRIMARY KEY AUTOINCREMENT NOT NULL, "name" varchar, "title" varchar, "content" text, "created_at" datetime NOT NULL, "updated_at" datetime NOT NULL); CREATE TABLE "answers" ("id" integer PRIMARY KEY AUTOINCREMENT NOT NULL, "question_id" integer, "name" varchar, "content" text, "created_at" datetime NOT NULL, "updated_at" datetime NOT NULL, CONSTRAINT "fk_rails_3d5ed4418f" FOREIGN KEY ("question_id") REFERENCES "questions" ("id") ); CREATE INDEX "index_answers_on_question_id" ON "answers" ("question_id"); sqlite> .q #.qと入力question.rbclass Question < ApplicationRecord has_many :answers, dependent: :destroy #questionは複数のanswerを持っているという意味 #dependent: :destroy→親のquestionが削除されたら、それに紐づくanswersも全て削除される validates :name, presence: true #データが未入力の時に保存しないようにする validates :title, presence: true validates :content, presence: true endanswer.rbclass Answer < ApplicationRecord belongs_to :question #answerはquestionによって所有されていると言う関係 validates :content, presence: true validates :name, presence: true endcontroller
ターミナル$ rails g controller questions index show new edit #questionsコントローラーのindex,show,new,editアクションを作成question_controller.rbclass QuestionsController < ApplicationController #コントローラーの各アクションが実行される前にset_questionを実行する before_action :set_question, only: [:show, :edit, :update, :destroy] #一覧を表示する def index #Questionの全データの配列を取得して、@questionsインスタンス変数へ代入する @questions = Question.all end #詳細を表示する def show # @question = Question.find(params[:id]) #リファクタリング @answer = Answer.new #Answerクラスのインスタンスを作り、@answerインスタンス変数へ代入 end #新規作成 def new @question = Question.new #Questionモデルの空のインスタンスを作り、@questionインスタンス変数へ代入 end #保存 def create @question = Question.new(question_params) #name, title, contentを@questionに代入 if @question.save #保存されたら redirect_to root_path, notice: 'Success!' #「Success!」と表示してルートパスにリダイレクトする else #保存できない場合は flash[:alert] = "Save error!" #「Save error!」と表示して render :new #新規ページに戻る end end #編集 def edit # @question = Question.find(params[:id]) #リファクタリング end #アップデート def update # @question = Question.find(params[:id]) #リファクタリング if @question.update(question_params) #name, title, contentをアップデートできたら redirect_to root_path, notice: 'Success!' #「Success!」と表示してルートパスにリダイレクトする else #アップデートできない場合は flash[:alert] = "Save error!" #「Save error!」と表示して render :edit #編集ページに戻る end end def destroy # @question = Question.find(params[:id]) #リファクタリング @question.destroy #削除する redirect_to root_path, notice: 'Success!' #「Success!」と表示してルートパスにリダイレクトする end private def set_question #@question = Question.find(params[:id])が重複しているので共通化する! @question = Question.find(params[:id]) #(params[:id])を取得して@questionに代入 end #ストロングパラメーター private #クラスの内部だけで使用する def question_params params.require(:question).permit(:name, :title, :content) #name,title,contentのみの値を@questionに渡す end end★paramsに入るデータをデバッグツールbyebugで確認する
formに値を入れて、ターミナルでparamsを入力するとフォームから送られてきた値を確認することができる
終了するには、quitを実行するquestion_controller.rbprivate def question_params byebug #byebugを入力 params.require(:question).permit(:name, :title, :content) #paramsにはフォームから送られてきたデータが入る endターミナル$ rails g controller answers edit #answersコントローラーのeditアクションを作成answers_controller.rbclass AnswersController < ApplicationController #保存 def create #question_idを元にデータベースから該当のquestionを取得して変数に代入する @question = Question.find(params[:question_id]) #Answerモデルの空のインスタンスを作り、@answerインスタンス変数へ代入 @answer = Answer.new #content,name,question_idを保存できたら if @answer.update(answer_params) #「Success!」と表示して詳細ページににリダイレクトする redirect_to question_path(@question), notice: 'Success!' #アップデートできない場合は else #「Invalid!」と表示して詳細ページににリダイレクトする redirect_to question_path(@question), alert: 'Invalid!' end end def edit #question_idを元にデータベースから該当のquestionを取得して変数に代入する @question = Question.find(params[:question_id]) #取得した@questionから編集したいanswerのidを取得して@answerに代入する @answer = @question.answers.find(params[:id]) end def update #question_idを元にデータベースから該当のquestionを取得して変数に代入する @question = Question.find(params[:question_id]) #取得した@questionからアップデートしたいanswerのidを取得して@answerに代入する @answer = @question.answers.find(params[:id]) #アップデートできたら if @answer.update(answer_params) #「Success!」と表示して詳細ページににリダイレクトする redirect_to question_path(@question), notice: 'Success!' #アップデートできない場合は else #「Invalid!」と表示して flash[:alert] = 'Invalid!' #編集ページに戻る render :edit end end def destroy #question_idを元にデータベースから該当のquestionを取得して変数に代入する @question = Question.find(params[:question_id]) #取得した@questionから編集したいanswerのidを取得して@answerに代入する @answer = @question.answers.find(params[:id]) #削除する @answer.destroy #「Deleted!」と表示して詳細ページににリダイレクトする redirect_to question_path(@question), notice: 'Deleted!' end #ストロングパラメーター private def answer_params #content,name,question_idのみの値を@answerに渡す params.require(:answer).permit(:content, :name, :question_id) end endview
questions/application.html.erb<!DOCTYPE html> <html> <head> <title>Qanda</title> <%= csrf_meta_tags %> <%= csp_meta_tag %> <%= stylesheet_link_tag 'application', media: 'all', 'data-turbolinks-track': 'reload' %> <%= javascript_include_tag 'application', 'data-turbolinks-track': 'reload' %> </head> <body> <div class="container"> <% if flash[:notice] %> <p class="text-success"><%= flash[:notice] %></p> <% end %> <% if flash[:alert] %> <p class="text-danger"><%= flash[:alert] %></p> <% end %> <%= yield %> </div> </body> </html>質問一覧ページの作成
questions/index.html.erb<h2>Questions</h2> <div class="row"> <div class="col-md-12"> <table class="table table-striped"> <thead class="thead-light"> <tr> <th>ID</th> <th>Title</th> <th>Menu</th> </tr> </thead> <tbody> <% @questions.each do |question| %> <tr> <td><%= question.id %></td> <!-- 質問詳細画面へのリンク --> <!-- prefixに_pathをつけている --> <!-- (question)→:idとして読み込まれる --> <!-- question GET /questions/:id(.:format) questions#show --> <td><%= link_to question.title, question_path(question) %></td> <!-- edit_question GET /questions/:id/edit(.:format) questions#edit --> <td>[<%= link_to 'Edit', edit_question_path(question) %>] <!-- question DELETE /questions/:id(.:format) questions#destroy --> [<%= link_to 'Delete', question_path(question), method: :delete, data:{ confirm: 'Are you sure?' } %>]</td> </tr> <% end %> </tbody> </table> <div> <!-- new_question GET /questions/new(.:format) questions#new --> <%= link_to 'New question', new_question_path %> </div> </div> </div>シードファイルを使った初期データの投入
db/seeds.rbQuestion.create(id: 1, name: 'Test name 1', title: 'Test question 1', content: 'Test content 1') Question.create(id: 2, name: 'Test name 2', title: 'Test question 2', content: 'Test content 2') Question.create(id: 3, name: 'Test name 3', title: 'Test question 3', content: 'Test content 3')rails db:seed新規質問投稿ページの作成
questions/new.html.erb<div> <div class="col-md-4 offset-md-4"> <h2 class="text-center">New question</h2> <%= render 'form' %> <!--_form.html.erbを読み込む --> </div> </div>質問編集ページの作成
questions/edit.html.erb<div> <div class="col-md-4 offset-md-4"> <h2 class="text-center">Edit question</h2> <%= render 'form' %> <!--_form.html.erbを読み込む --> </div> </div>共通部分の作成
リファクタリング:プログラムを外部から見た時に動作を変えずに、ソースコードを整理すること
new.html.erbとedit.html.erbはほぼ同じ内容になっている
共通部分を_form.html.erbで作成し、new.html.erbとedit.html.erbで読み込むquestions/_form.html.erb<%= form_with model: @question, local: true do |f| %> <div class="form-group"> <label>Name</label> <%= f.text_field :name, class: "form-control" %> </div> <div class="form-group"> <label>Title</label> <%= f.text_field :title, class: "form-control" %> </div> <div class="form-group"> <label>Content</label> <%= f.text_area :content, class: "form-control" %> </div> <div class="text-center"> <%= f.submit "Save", class: "btn btn-primary" %> </div> <% end %>質問詳細ページの作成
questions/show.html.erb<div class="row"> <div class="col-md-12"> <h2><%= @question.title %></h2> <!-- 質問のタイトル --> <div> Content: <%= @question.content %> <!-- 質問の内容 --> </div> <div> Name: <%= @question.name %> <!-- 名前 --> </div> <hr> <div> <h3>Answers</h3> <table class="table table-striped"> <% if @question.answers.any? %> <!-- 質問の答えがある場合は下記を表示する --> <thead class="thead-light"> <tr> <td>Answer</td> <td>Name</td> <td>Menu</td> </tr> </thead> <tbody> <% @question.answers.each do |answer| %> <tr> <td> <%= answer.content %> <!-- 答えの内容 --> </td> <td> <%= answer.name %> <!-- 名前 --> </td> <td> <!-- edit_question_answer GET /questions/:question_id/answers/:id/edit(.:format)answers#edit --> [<%= link_to 'Edit', edit_question_answer_path(@question, answer) %>] <!-- question_answer DELETE /questions/:question_id/answers/:id(.:format) answers#destroy --> [<%= link_to 'Delete', question_answer_path(@question, answer), method: :delete, data: {confirm: 'Are you sure?'} %> ] </td> </tr> <% end %> </tbody> <% else %> <p>No answer yet.</p> <!-- 質問の答えがない場合に表示する --> <% end %> </table> </div> <h3>Post new answer</h3> <%= form_with model: [@question, @answer], local: true do |f| %> <%= f.hidden_field :question_id, { value: @question.id} %> <div class="form-group"> <label>Name</label> <%= f.text_field :name, class: 'form-control' %> </div> <div class="form-group"> <label>Content</label> <%= f.text_area :content, class: 'form-control' %> </div> <div class="text-center"> <%= f.submit "Post", class: 'btn btn-primary' %> </div> <% end %> <div> <%= link_to '> Home', root_path %> <!-- ルートパスに飛ぶ --> </div> </div> </div> <% end %>回答編集ページの作成
answers/edit.html.erb<div> <h2>Updates answer</h2> <%= form_with model:[@question, @answer], local: true do |f| %> <div class="form-group"> <div class="form-group"> <label>Name</label> <%= f.text_field :name, class: "form-control" %> </div> <div class="form-group"> <label>Content</label> <%= f.text_area :content, class: "form-control" %> </div> <div class="text-center"> <%= f.submit "Update", class: "btn btn-primary" %> </div> </div> <% end %> </div>

- 投稿日:2020-01-24T01:23:02+09:00
(Ruby2.7.0 )Ruby on Railsをうまくインストール出来ないとき(Windows)
WindowsでRuby2.7.0を使っているとRailsのインスールが出来ない(2020.1.24)
Progateが一通り終わって、Ruby on Railsの環境構築をしようとしたらエラーが表示されてインストールがうまくいかない。
それはなぜか。
Ruby2.7.0にnokogiriのバージョンが追いついていないから!!!
エラーメッセージ(コピペし忘れた)を読んでみると、
「お前のバージョンだとRuby2.3までしか対応してねーよ。nokogiriのバージョンを1.8.5にあげやがれ(確か1.8.5。細かい数字はうろおぼえ)。」
みたいなことが書かれていた。ということでまずnokogiriのバージョンを上げた。
gem install nokogiri -V '1.8.5'よし、これでRailsをインストールできる!!!!
gem install rails...またエラー出た。
今度は
「お前のnokogiriのバージョンだとRuby2.6までしか対応してねーよ」
みたいなことが書いてある。。。エラーメッセージを見てみると(コピペするの忘れてた)、
「nokogiriの最新バージョンがRuby2.6までしか対応していないよ」と、いうようなメッセージが表示された。
よし、じゃあRubyのバージョンを2.6に下げよう。
ということで色々調べた結果、uluというサービス?アプリ?を入れるとバージョンが簡単に変更できるらしい。
(他にもあるけどこれが一番簡単)ということで、
WindowsのRubyのバージョンをuruで切り替える方法【初心者向け】
を見ながらuluをインストール。↑↑
uru admin add C:\Ruby21-x64\bin --tag Ruby21
uru admin add C:\Ruby22-x64\bin --tag Ruby22
ここの記述を
uru admin add C:\Ruby26-x64\bin --tag Ruby26Ruby26に書き換える
そしてバージョン変更したいと書く。
ulu ruby26変更完了!!!
あとはgem install railsいっけーーーーーーー
Fetching thread_safe-0.3.6.gem
Fetching zeitwerk-2.2.2.gem
Fetching rack-2.1.1.gem
Fetching activesupport-6.0.2.1.gem
Fetching concurrent-ruby-1.1.5.gem
Fetching tzinfo-1.2.6.gem
Fetching rack-test-1.1.0.gem
Fetching i18n-1.8.2.gem
Fetching mini_portile2-2.4.0.gem
Fetching nokogiri-1.10.7-x64-mingw32.gem
Fetching crass-1.0.6.gem
Fetching loofah-2.4.0.gem
Fetching rails-html-sanitizer-1.3.0.gem
Fetching rails-dom-testing-2.0.3.gem.......................
できてるっぽい!!!!
最後に確認のため、
rails -vそうすると
Rails 6.0.2.1うおおおおおおおおおお
できたーーーーーーーーーー環境 = Windows + Ruby2.7.0 で使っている人で困っていたら参考にしてみてください!!!!!
- 投稿日:2020-01-24T01:10:55+09:00
【解決策】formにカラムが設定されない!?
Webアプリを開発していて、routesとcontroller、viewを何度も見直したのにformを検証で見てみると何故かカラムが設定されない時に以下の方法で解決しました。
before
  = form_with model: @message, url: job_messages_path(@job), local: true do |f|
    = f.text_field :text
after
  = form_with model: @message, url: job_messages_path(@job), local: true do |f|
    = f.text_field :text, name: "message[text]"
下の行に、name:"テーブル名[カラム名]"を書き足せばカラムが設定され、値を入れることができました!!
- 投稿日:2020-01-24T00:42:23+09:00
Active Storage + S3を使うときに気をつけること
備忘録なので無視してください
file_fieldで写真をアップする時にdirect_uploadを設定しないとNo route matchesになる時がある。= f.file_field :image, direct_upload: true