- 投稿日:2020-01-24T22:12:29+09:00
【MySQL】エラー:Warning: A partial dump from...
Warning: A partial dump from ...
mysqldumpしようとすると発生。
Warning: A partial dump from a server that has GTIDs will by default include the GTIDs of all transactions, even those that changed suppressed parts of the database. If you don't want to restore GTIDs, pass --set-gtid-purged=OFF. To make a complete dump, pass --all-databases --triggers --routines --events.エラーメッセージをちゃんとみていなかったのですが、
--set-gtid-purged=OFFをオプションにつけて再度mysqldumpコマンドを叩けばOK.
https://saba.omnioo.com/note/50/mysql%E3%82%A8%E3%83%A9%E3%83%BC%E9%9B%86/
こちらの記事を参考。
- 投稿日:2020-01-24T18:59:36+09:00
[mariaDB] ストアドファンクション内のDECLARE文でシンタックスエラーが出る
はじめに
mariaDBでストアドファンクションを定義している最中、絶対に間違っていないDECLARE文でエラーが出ました。
定義したかったFunctionCREATE OR REPLACE FUNCTION test (arg INT) RETURNS INT DETERMINISTIC BEGIN DECLARE numA INT DEFAULT 0; SET numA = arg; DECLARE numB INT DEFAULT 0; SET numB = numA; RETURN numB; END;受け取った引数を変数
numAに入れて、
numAを変数numBに入れて、
numBをreturnするだけ。結果ERROR 1064 (42000) at line 3 in file: '(ファイル名)': You have an error in your SQL syntax; check the manual that corresponds to your MariaDB server version for the right syntax to use near 'DECLARE numB INT DEFAULT 0; SET numB = numA; RETURN numB; END' at line 8
DECLARE numB INT DEFAULT 0;の辺りがおかしいよと。
え~?numAはよくてnumBはダメなの?変数宣言は先頭だけだった
定義できたFunctionCREATE OR REPLACE FUNCTION test (arg INT) RETURNS INT DETERMINISTIC BEGIN DECLARE numA INT DEFAULT 0; DECLARE numB INT DEFAULT 0; SET numA = arg; SET numB = numA; RETURN numB; END;結果Query OK, 0 rows affected (0.00 sec)
DECLAREをファンクションの先頭にまとめて書いたらできた。
そういう感じなんだ、勉強になった。。。参考
https://www.atmarkit.co.jp/ait/articles/0209/12/news001.html
- 投稿日:2020-01-24T16:55:04+09:00
【MySQL】起動の仕方
状況
MySQLが起動できない。
データベースの中身を全部消しても問題ない。
失敗1~3 => 成功 の順番で実行した。成功
実行コマンド
sudo rm -rf /usr/local/var/mysql
brew uninstall mysql
brew install mysql
mysql.server startStarting MySQL . SUCCESS!失敗1
参考
MySQLクライアントに Can't read dir of '/usr/local/etc/my.cnf.d' と言われた。実行コマンド
mkdir my.cnf.dエラー
ERROR 2002 (HY000): Can't connect to local MySQL server through socket '/tmp/mysql.sock' (2)失敗2
参考
mysqlが起動できない実行コマンド
sudo touch /tmp/mysql.sock
sudo chown mysql:mysql /tmp
mysql.server restartエラー
 ERROR! MySQL server PID file could not be found!
Starting MySQL
. ERROR! The server quit without updating PID file (/usr/local/var/mysql/MBP-3.local.pid).
失敗3
参考
MySQL起動できなくなった The server quit without updating PID file実行コマンド
touch MBP-3.local.pidエラー
なぜか作っても消えてしまう。。。
ERROR! MySQL server PID file could not be found!

Starting MySQL

. ERROR! The server quit without updating PID file (/usr/local/var/mysql/MBP-3.local.pid).
- 投稿日:2020-01-24T15:54:18+09:00
Laravelでトランザクションをネストせずに新しいトランザクションを切る
毎度同じことをやろうと思った時にどうやればいいか忘れてしまうので備忘も兼ねて
はじめに
Laravelでは以下のコードのようにするとトランザクションをネストしてSAVEPOINTを作成するため、やんごとなき事情で新しいトランザクションを切りたいなーと思ってもうまくいきません。
(ID発番が連番ではない場合に別テーブルでID発番を管理しトランザクションを分けることでロックする時間を短くするとか)DB::beginTransaction(); { DB::beginTransaction(); Animal::create(['name' => 'ぺんぎんさん']); DB::commit(); } DB::rollBack(); // ぺんぎんさんの挿入もロールバックされる!SAVEPOINTってなんだ!って方は以下の記事が非常にわかりやすかったです。
●トランザクションのネストの使い方まとめた(初心者向け)
https://qiita.com/_natsu_no_yuki_/items/e1db2a132cbff740896d実装方法
トランザクションを乱立させることはそう多くないと思うので、簡単にできる別コネクションを作成する方法を記載します。
準備
config/database.phpにデフォルトで利用している接続情報をまるっとコピーします。database.php// 既存の接続情報 'mysql' => [ 'driver' => 'mysql', 'url' => env('DATABASE_URL'), 'host' => env('DB_HOST', '127.0.0.1'), 'port' => env('DB_PORT', '3306'), 'database' => env('DB_DATABASE', 'forge'), 'username' => env('DB_USERNAME', 'forge'), 'password' => env('DB_PASSWORD', ''), 'unix_socket' => env('DB_SOCKET', ''), 'charset' => 'utf8mb4', 'collation' => 'utf8mb4_unicode_ci', 'prefix' => '', 'prefix_indexes' => true, 'strict' => true, 'engine' => null, 'options' => extension_loaded('pdo_mysql') ? array_filter([ PDO::MYSQL_ATTR_SSL_CA => env('MYSQL_ATTR_SSL_CA'), ]) : [], ], // ★mysqlの項目を丸コピした接続情報 'mysql_2' => [ 'driver' => 'mysql', 'url' => env('DATABASE_URL'), 'host' => env('DB_HOST', '127.0.0.1'), 'port' => env('DB_PORT', '3306'), 'database' => env('DB_DATABASE', 'forge'), 'username' => env('DB_USERNAME', 'forge'), 'password' => env('DB_PASSWORD', ''), 'unix_socket' => env('DB_SOCKET', ''), 'charset' => 'utf8mb4', 'collation' => 'utf8mb4_unicode_ci', 'prefix' => '', 'prefix_indexes' => true, 'strict' => true, 'engine' => null, 'options' => extension_loaded('pdo_mysql') ? array_filter([ PDO::MYSQL_ATTR_SSL_CA => env('MYSQL_ATTR_SSL_CA'), ]) : [], ],実装
新しいトランザクションを切りたい場合は、DBファサードの
connectionで追加した接続情報のキーを設定します。
Eloquentを利用する場合は、その中でModelのインスタンスを作成し、setConnectionで追加した接続情報のキーを設定します。
- 手動トランザクションの場合
    // デフォルトのコネクションでトランザクションの開始
    DB::beginTransaction();
    {
        // 追加した接続情報をセットして、トランザクションの開始
        $mysql2 = \DB::connection('mysql_2');
        $mysql2->beginTransaction();

        // Modelのインスタンスを作成し、追加した接続情報をセットする
        $animal = new Animal();
        $animal->setConnection('mysql_2');
        $animal->create(['name' => 'ぺんぎんさん']);

        // mysql_2のコネクションをコミットする
        $mysql2->commit();
    }
    // デフォルトのコネクションをロールバックする
    DB::rollBack(); // ぺんぎんさんのデータもコミットされている!
- トランザクションメソッドの場合
    DB::transaction(function () {
        DB::connection('mysql_2')->transaction(function () {
            $animal = new Animal();
            $animal->setConnection('mysql_2');
            $animal->create(['name' => 'ぺんぎんさん']);
        });
        throw new Exception(); // ぺんぎんさんのデータもコミットされている!
    });
おわりに
なんだかんだネストではなく、別トランザクションを切りたくなることはあるので、
newTransactionとかできると嬉しいんだろうなというお気持ちでした。
- 投稿日:2020-01-24T15:13:44+09:00
Python-peewee使用连接方式
方法1
To connect to a MySQL database, we will use MySQLDatabase. After the database name, you can specify arbitrary connection parameters that will be passed back to the driver (either MySQLdb or pymysql).
# http://docs.peewee-orm.com/en/latest/peewee/database.html#using-mysql
from peewee import (
    MySQLDatabase,
    Model,
    DateTimeField,
)
# MySQL连接
db = MySQLDatabase('my_database')

class BaseModel(Model):
    """
    DB-Base
    """
    class Meta:
        database = db

    created_at = DateTimeField(default=datetime.datetime.now)
    updated_at = DateTimeField(default=datetime.datetime.now)

    def save(self, *args, **kwargs):
        self.updated_at = datetime.datetime.now()
        return super(BaseModel, self).save(*args, **kwargs)
参照
http://docs.peewee-orm.com/en/latest/index.html
方法2
Connection pooling is provided by the pool module, included in the playhouse extensions library.
The pool supports:
- Timeout after which connections will be recycled.
- Upper bound on the number of open connections.#http://docs.peewee-orm.com/en/latest/peewee/database.html#connection-pooling from playhouse.pool import PooledMySQLDatabase from peewee import ( Model, UUIDField, CharField, ) # MySQL连接 db = PooledMySQLDatabase('my_database', max_connections=my['max_connections'])参照
https://stackoverflow.com/questions/34764266/peewee-pooledmysqldatabase-has-cache-or-buffer
Q:peewee PooledMySQLDatabase has cache or buffer?
A:
No cache, no buffer. It has to do with transaction management. Just be sure that you're running your statements in transactions and you should be fine.Multi-threaded apps DO NOT REQUIRE A POOL with peewee. Peewee correctly manages per-thread connections even without a pool.
方法3
peewee-async is a library providing asynchronous interface powered by asyncio for peewee ORM.
#https://peewee-async.readthedocs.io/en/latest/
import peewee_async

from peewee import (
    Model,
    UUIDField,
    CharField,
)

# 自定义连接类
class AsyncMySQLConnection(peewee_async.AsyncMySQLConnection):
    """
    Asynchronous database connection pool.
    """

    def __init__(self, *, database=None, loop=None, timeout=None, **kwargs):
        self.pool = None
        self.loop = loop
        self.database = database
        self.timeout = timeout
        kwargs.setdefault('pool_recycle', 3600)
        self.connect_params = kwargs

# MySQL连接
db = peewee_async.PooledMySQLDatabase('my_database'
    max_connections=my['max_connections'],
    async_conn=AsyncMySQLConnection)
参照
https://www.w3cschool.cn/hack_tutorial/hack_tutorial-qay32dz7.html
- 投稿日:2020-01-24T14:40:56+09:00
【mysql】UPDATEで連番を振り直す
はじめに
- テストとかしてカラムごにゃった時に番号がずれてしまったりしたので、連番をきれいに振り直したいと思ったしだい。
- 忘れがちなので、書いておくことにした
mysql のバージョン
mysql> select version();
+-----------+
| version() |
+-----------+
| 5.7.28    |
+-----------+
やってみる
- 例えば、この↓
select文のnoが1から始まって欲しいのに2から始まってる。mysql> select id, no from tests; +----+----+ | id | no | +----+----+ | 1 | 2 | | 2 | 3 | | 3 | 4 | | 4 | 5 | +----+----+ 4 rows in set (0.00 sec)
- 振り直す!!
mysql> set @cnt_i:=0; update tests set no = (@cnt_i := @cnt_i + 1 );

Query OK, 0 rows affected (0.00 sec)
Query OK, 4 rows affected (0.00 sec)
Rows matched: 4  Changed: 4  Warnings: 0
- 確認してみる。無事に
noが 1 からの連番になっている。やったーmysql> select id, no from tests; +----+----+ | id | no | +----+----+ | 1 | 1 | | 2 | 2 | | 3 | 3 | | 4 | 4 | +----+----+ 4 rows in set (0.01 sec)
- 投稿日:2020-01-24T12:32:21+09:00
MySQLデータベースのパフォーマンスチューニング
はじめに
1/10に日本oracle社主催のMySQL 8.0入門セミナー講演資料 (チューニング基礎編、SQLチューニング編)に行ってきました。
本記事では上記イベントのレポートをしていきます。※こちらのイベントではタイトルにもある通りMySQL8.0を対象としており、上記リンクからダウンロード可能な資料や本記事で解説するコマンド等はMySQL5.7以前のものではサポートされていない場合がございます。
データベースにおけるパフォーマンスとは
実際にパフォーマンスの向上方法を解説する前にデータベースにおけるパフォーマンスとは一体何を指し示しているかを整理する必要がある。
下記が主にデータベースのパフォーマンスを測定するための指標となっている。・スループット
単位時間あたりの処理能力
並列処理が出来る件数が増えるほどこのスループットの値が向上する・レスポンスタイム(レイテンシー)
処理を実行してからの結果が帰ってくるまでの時間
1処理自体にどのくらい時間がかかるか・スケーラビリティ
データベースをはじめとするサービスのパフォーマンスは必ずハードウェアのスペックに依存するため、メモリやCPUの追加、ディスクのSSD化などに柔軟に対応できる必要がある。
※単にハードウェアを良いものにすればパフォーマンスが上がりますが本記事の趣旨と異なるので以降では解説しないキューイング
パフォーマンス測定の指標ではないが、パフォーマンスチューニングに当たって非常に重要な仕組みなので解説していく。
キューイングとは複数のリクエストが発生したときに順番通り処理が実行されるように管理される待ち行列のことである。レスポンスタイムはこの待ち時間+実行時間で計算される。
実処理が実行される前のプロセスの準備時間にもキューに含まれるが、大量ののリクエストが発生した場合など現環境のスループットでは一度に処理できない際に待ち時間として増加される。当然、レスポンスタイムも増加する。このキューイングの仕組みを理解した上で、どの指標が低いのか、そしてネットワーク、処理、I/O、テーブルロックなどどこにボトルネックがあるかによって効果的な方法が異なるので、これらを知ることがパフォーマンスチューニングの第一歩になる。
またパフォーマンスチューニングはどのようなものであってもコストがかかるため、そのパフォーマンス向上の必要性や費用対効果などもしっかり検討したうえで実施をしていく必要がある。
パフォーマンスチューニングにおいて大事なこと
以上のことをまとめるとパフォーマンスチューニングには実対応の前に下記のことを検討実施していく必要がある。
1.パフォーマンスの測定(パフォーマンス状況の確認)
2.パフォーマンス低下のボトルネックの洗い出し(スループット?レスポンスタイム? I/O?)
3.上記に対するチューニングは必要か、コストに見合ったビジネスメリットがあるかの検討これらを踏まえた上で実際にどのようなことを確認していく必要があるのか見ていく。
パフォーマンス測定方法
例えばwebサイトなどの場合であれば、サーバ,DBサーバとの通信速度(ネットワーク)やリクエストの混雑状況、ファイル出力、データ加工処理などアプリケーションによる処理の差など様々な要素があるため、ここではMySQLデータベースの処理単体でのパフォーマンス測定について解説する、
一番単純な方法は開発環境などで実際に利用するSQLを実行して各種指標を監視する方法である。
tcpdumpコマンドでパケットの通信を計測する方法や、MySQL Proxyで監視する方法がある。
後半のSQLチューニング章で紹介するEXPLAINコマンドやSHOW FULL PROCESSLISTコマンドを利用することでクエリ自体のステータスや対象テーブルの状況なども確認できるので併せて利用すると効率的。その他ツールを利用する場合、下記などがある。
・mysqlslap
・SysBenchチューニングのアプローチ
では実際にパフォーマンスチューニングを行っていく。
DBのパフォーマンスチューニングでは大きく分けて2種類のアプローチがある。・DBチューニング(全体最適化)
主にスループットを向上させる
MySQLの設定ファイルのパラメータ等を環境に適した形に操作する
・SQLチューニング(個別最適化)
主にレスポンスタイムを向上させる
テーブルの構成やクエリの最適化によってクエリ実行速度の向上を目指すそれぞれ解説していく。
DBチューニング(全体最適化)
MySQLサーバの設定はシステム変数で定義されている。
まずはどのような設定がされているのか確認が必要。
システム変数はmy.cnfやmy.iniにて参照・編集可能になっている
また下記コマンドにても参照・編集が可能。/*全システム変数を表示*/ SHOW VARIABLES ; /*システム変数を設定*/ SET [GLOBAL] @variable = @value ;各種システム変数の詳細についてはこちらに記載されている。
今回はパフォーマンスに焦点を置いているため、性能統計情報分析のために用意されているパフォーマンススキーマ/sysスキーマにフォーカスする。
・パフォーマンス・スキーマ
性能統計情報の仕組み
MySQLサーバ内の「イベント」ごとの処理時間を記録
・処理時間
・処理データ量
・ソースコードでの位置
・各種メタデータ・sysスキーマ
パフォーマンススキーマをより便利に使うためのビュー、プロシージャ、ファンクションのセット
・I/O量の多いファイルや処理、コストの高いSQL文、ロック情報
・テーブル、インデックス、スキーマの統計、レイテンシ、待ち時間performance_schema/sys_schemaで実行できるクエリサンプル
/* performance_schemaからグローバル変数を参照する */
SELECT * FROM performance_schema.global_variables ;


/* sys_schemaからテーブル統計の要約を参照する */
SELECT * FROM sys.schema_table_statics limit 1 ;
重要確認パラメータ
上記にあげた確認方法の中でもDBサーバ設定にボトルネックがある場合、下記の値を参照・編集することで解決につながる可能性が高い。
max_connections
・サーバが許容可能なコネクションの数
・スループットが低い場合にはここを増やすことでパフォーマンス改善につながる
・増やしすぎるとサーバメモリを多く消費するためハードウェアのスペックと相談
・デフォルト(設定なし)の場合は151となっているthread_cache_size
・スレッドをキャッシュする数
・レスポンスタイムが長い場合にもこちらを増やすことで改善につながる可能性がある
・こちらもメモリを利用するため増やしすぎ注意
・デフォルトは9query_cache_size
・クエリ結果のキャッシュ
・直近に似た内容のクエリが叩かれた場合などはこのキャッシュから返されるためDBの処理としては非常に効率的
・近い内容のクエリを頻繁にたたく場合はこのキャッシュを利用することでパフォーマンス改善につながるsort_buffer_size
・ソート処理用のメモリサイズ
・ここで設定されているサイズを超えるものはディスクによって行われる
・ディスクI/Oは処理に時間がかかるため、大量データのソート処理が入る場合はこの値を上げることでパフォーマンス改善につながる可能性がある
・MySQL5.6でデフォルトが2MB⇒256KBに縮小されたらしい※Tips スキーマデザイン
テーブル定義においてもパフォーマンスを考える上で非常に大切になってくる。
【データ型】
・桁数の多くない数値型に対してはtinyint,smallint,mediumintなどを利用する
・joinで利用する列は同じデータ型にする
・charではなくvarcharを利用する
・可能なところはNOT NULLを宣言【インデックス】
・複数列貼ることで参照速度を改善することができる
※参照速度は上がるが更新速度は下がるため貼りすぎも注意DBチューニングまとめ
★スループットが低い、待機が多いことによるレスポンスタイムの低下はDB設定を見直す
★自身の環境のメモリサイズを鑑みて有効に使えているか確認する
⇒全然使っていない・・・スレッド/クエリキャッシュを使用してみる
⇒カツカツ・・・・・・・メモリを使い切ると処理コスト高のディスクを使用するのでキャッシュなどを減らす
★テーブルで利用する列の型は、インプットを想定して適切な型にする
★インデックスを利用するSQLチューニング(個別最適化)
大半の場合SQLをチューニングすることでパフォーマンス改善がなされる場合が多い。
まずは実行に時間がかかっているクエリの特定が必要。遅いクエリの参照方法手順(slow_query_log)
slow_query_logの設定確認
OFFになっているのでONにする必要がある。mysql > show variables like 'slow%' ; +---------------------+----------------+ | Variable_name | Value | +---------------------+----------------+ | slow_launch_time | 2 | | slow_query_log | OFF | | slow_query_log_file | mysql-slow.log | +---------------------+----------------+SET slow_query_log = ON ;これで
slow_query_log_fileから実行時間の遅いクエリを確認することができる。
また、「実行時間の遅い」定義はlong_query_timeという変数で設定されている。SHOW FULL PROCESSLIST
SHOW FULL PROCESSLISTコマンドを使えば現在実行中のクエリの実行時間やデータ量、ステータスなどが参照できる。実行計画
実行計画とはSQLを処理する際の処理の手順となっている。
主なプロセスとしては下記などがある。
・インデックススキャン
・テーブルスキャン
・JOINの順番
・サブクエリの処理実行計画によってパフォーマンスが大きく変わる可能性もあるので、対象のクエリが適切な実行計画を持っているか確認をする。
EXPLAINコマンド
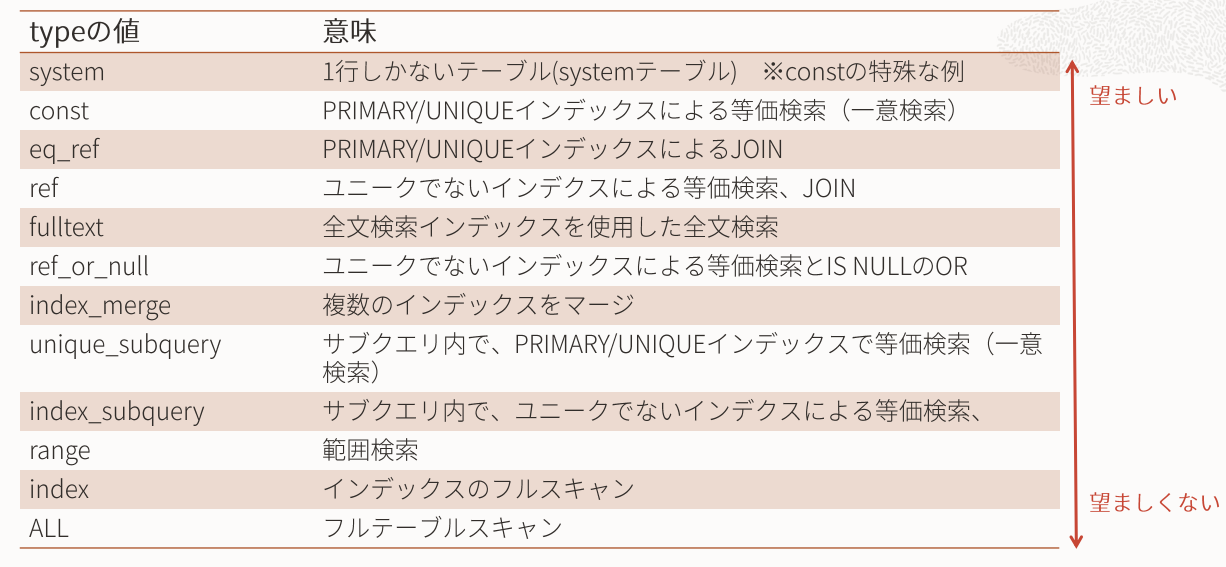
対象のクエリの実行計画を参照するクエリである。mysql > EXPLAIN select * from sampledb.sampletable ; +----+-------------+-------+------+---------------+------+---------+------+------+-------+ | id | select_type | table | type | possible_keys | key | key_len | ref | rows | Extra | +----+-------------+-------+------+---------------+------+---------+------+------+-------+ | 1 | SIMPLE | table | ALL | sample_id | NULL | NULL | NULL | 10 | NULL | +----+-------------+-------+------+---------------+------+---------+------+------+-------+ここで非常に重要なカラムはtypeとpossible_keys になる。
type
typeには下記の種類があり、そのクエリの意味を説明してくれる。
上にいくほど処理が軽く、下に行くほど高コストとなっている。
上記の例ではselect *で指定をしているためALLになっている。
意味の欄に頻出するようにインデックスをいかに適切に使用するかがカギになる。
possible_keys
テーブルのアクセスに利用可能なインデックスの候補として挙げられるキーを表示してくれる
SHOW INDEX FROM table_nameにてインデックスが参照できるのでそこにないキーを指定された場合はインデックス検討の余地があると言える。key
実際にインデックスとして参照されたカラムになる。
テーブルにインデックスが貼られていたとしてもこの値に含まれなければ使用できていないということになる。SQLチューニングまとめ
1.インデックスが使えていないクエリはインデックスがないか検討
※更新処理はインデックスがある方が時間がかかる
2.JOINの工夫
・取得される行数が少ないテーブルから順番にjoinするのが基本
・3テーブル以上のjoinは結果セットが少量になるテーブルからjoin終わりに
今回このセミナーに参加して、インデックスやjoinについては知っていたもののEXPLAINコマンドの便利さや、サーバ側のパラメータ設定などについては目からうろこだったので非常に勉強になりました。
最近遊びでテーブル作成をしたりしていたのでこの辺りの情報をしっかり自分でも触ってパフォーマンスの改善を自身で感じられるようになっていきたいです。
- 投稿日:2020-01-24T11:34:41+09:00
【Django】Django+MySQL+Vue.jsな環境を作るメモ【Python】
システム構成
・Django
・Vue.js
・MySQLdjango-admin startproject config . python manage.py startapp accounts最初の設定
APPSに追加
config/setting.pyINSTALLED_APPS = [ 'django.contrib.admin', 'django.contrib.auth', 'django.contrib.contenttypes', 'django.contrib.sessions', 'django.contrib.messages', 'django.contrib.staticfiles', "accounts.apps.AccountsConfig", ]言語とタイムゾーンを日本仕様にする
config/setting.pyLANGUAGE_CODE = 'ja' TIME_ZONE = 'Asia/Tokyo'DjangoのデータベースにMySQLを設定する
pip install pymysql
pip install python-dotenv
manage.pyの編集(MySQLの追加)
manage.pyimport pymysql pymysql.install_as_MySQLdb()configの中に.envファイルの作成
config/.envDB_NAME = XXXXX DB_PWD = XXXXX DB_USER = XXXXX DB_HOST = XXXXXsetting.pyの編集
config/setting.pyfrom os.path import join, dirname from dotenv import load_dotenvconfig/setting.pydotenv_path = join(dirname(__file__), '.env') load_dotenv(dotenv_path) DB_NAME = os.environ.get("DB_NAME") DB_PWD = os.environ.get("DB_PWD") DB_USER = os.environ.get("DB_USER") DB_HOST = os.environ.get("DB_HOST") DATABASES = { 'default': { 'ENGINE': 'django.db.backends.mysql', 'NAME': DB_NAME,#データベース名 'USER': DB_USER,#ユーザー名 'PASSWORD': DB_PWD,#パスワード 'HOST': DB_HOST,#ローカルホスト等 'PORT': '3306',#接続ポート } }ロガーの設定をする
config/settings.py#ロギング設定 LOGGING = { "version": 1, "disavle_existing_loggers": False, #ロガーの設定 "logger":{ "django": { "handlers": ["console"], "lebel": "INFO", } }, #accountsのアプリ利用するロガー "diary": { "handlers": ["console"], "level": "DEBUG", }, #ハンドラの設定 "handlers": { "console": { "level": "DEBUG", "class": "logging.StreamHandler", "formatter": "dev" }, }, #フォーマッターの設定 "formatters": { "dev": { "format": "\t".join([ "%(asctime)s", "[%(levelname)s]", "%(pathname)s(Line:%(lineno)d)", "%(message)s" ]) }, }, }ルーティングの設定し、index.htmlへアクセスさせる
config/urls.pyfrom django.contrib import admin from django.urls import path, include urlpatterns = [ path('admin/', admin.site.urls), path("", include("accounts.urls")) ]新規ファイル作成:accounts/urls.py
accounts/urls.pyfrom django.urls import path from . import views app_name = "accounts" urlpatterns = [ path("", views.IndexView.as_view(), name="index") ]新しいディレクトリ『templates』を作成
accounts/templatesに作成新規ファイルindex.htmlを作成
accouts/templates/index.html<!DOCTYPE html> <html lang="ja"> <head> <meta charset="UTF-8"> <title>トップページ</title> </head> <body> <h1>Hello World</h1> </body> </html>確認
python manage.py runserverBootstrapテンプレートを反映させる
staticフォルダの追加
Bootstrapをダウンロード
(https://startbootstrap.com/themes/one-page-wonder)プロジェクト直下にstaticフォルダを新規作成
ダウンロードしたBootStrapをstaticフォルダに入れる
├── accounts
├── config
├── static
|       ├── css
|       ├── img
|       └── vender
├── manage.py
静的フォルダが配置されている場所を設定する
config/settings.pySTATICFILES_DIRS = ( os.path.join(BASE_DIR, "static"), )各ページで共通するbase.htmlを作る
accounts/templates/base.html{% load static %} <html lang="ja"> <head> <meta charset="utf-8"> <meta name="viewport" content="width=device-width, initial-scale=1, shrink-to-fit=no"> <meta name="description" content=""> <meta name="author" content=""> <title>{% block title %}{% endblock %}</title> <!-- Bootstrap core CSS --> <link href="{% static 'vendor/bootstrap/css/bootstrap.min.css' %}" rel="stylesheet"> <!-- Custom fonts for this template --> <link href="https://fonts.googleapis.com/css?family=Catamaran:100,200,300,400,500,600,700,800,900" rel="stylesheet"> <link href="https://fonts.googleapis.com/css?family=Lato:100,100i,300,300i,400,400i,700,700i,900,900i" rel="stylesheet"> <!-- Custom styles for this template --> <link href="{% static 'css/one-page-wonder.min.css' %}" rel="stylesheet"> <!-- My style --> <link rel="stylesheet" type="text/css" href="{% static 'css/mystyle.css' %}"> <script src="https://cdn.jsdelivr.net/npm/vue"></script> <script src="https://unpkg.com/vue"></script> {% block head %}{% endblock %} </head> <body> <div id="wrapper"> <!-- ナビヘッダー --> <nav class="navbar navbar-expand-lg navbar-dark navbar-custom fixed-top"> <div class="container"> <a class="navbar-brand" href="{% url 'accounts:index' %}">TITLE</a> <button class="navbar-toggler" type="button" data-toggle="collapse" data-target="#navbarResponsive" aria-controls="navbarResponsive" aria-expanded="false" aria-label="Toggle navigation"> <span class="navbar-toggler-icon"></span> </button> <div class="collapse navbar-collapse" id="navbarResponsive"> <ul class="navbar-nav mr-auto"> <li class="nav-item {% block active_inquiry %}{% endblock %}"> <a class="nav-link" href="#">INQUIRY</a> </li> </ul> <ul class="navbar-nav ml-auto"> <li class="nav-item"> <a class="nav-link" href="#">Sign Up</a> </li> <li class="nav-item"> <a class="nav-link" href="#">Log In</a> </li> </ul> </div> </div> </nav> {% block contents%}{% endblock %} <!-- Footer --> <footer class="py-5 bg-black"> <div class="container"> <p class="m-0 text-center text-white small">©Foa TemplatesCode 2020</p> </div> <!-- /.container --> </footer> <!-- Vue.js JavaScript --> {% block scripts%}{% endblock %} <!-- Bootstrap core JavaScript --> <script src="{% static 'vendor/jquery/jquery.min.js' %}"></script> <script src="{% static 'vendor/bootstrap/js/bootstrap.bundle.min.js' %}"></script> </div> </body> </html>合わせてindex.htmlもそれっぽく編集する
accounts/templates/index.html{% extends 'base.html' %} {% load static %} {% block title %}TITLE --Subtitle{% endblock %} {% block contents %} <div id="indexapp"> <header class="masthead text-center text-white"> <div class="masthead-content"> <div class="container"> <h1 class="masthead-heading mb-0">[[ title ]]</h1> <h2 class="masthead-subheading mb-0">SubTitle</h2> <a href="#" class="btn btn-primary btn-xl rounded-pill mt-5">LOG IN</a> </div> </div> <div class="bg-circle-1 bg-circle"></div> <div class="bg-circle-2 bg-circle"></div> <div class="bg-circle-3 bg-circle"></div> <div class="bg-circle-4 bg-circle"></div> </header> <div class="py-5 text-white" style="background-image: linear-gradient(to bottom, rgba(0, 0, 0, .75), rgba(0, 0, 0, .75)), url(https://static.pingendo.com/cover-bubble-dark.svg); background-position: center center, center center; background-size: cover, cover; background-repeat: repeat, repeat;"> <div class="container"> <div class="row"> <div class="p-3 col-md-8 col-lg-6 ml-auto text-right text-white"> <p class="lead">"I throw myself down among the tall grass by the trickling stream; and, as I lie close to the earth, a thousand unknown plants are noticed by me: when I hear the buzz of the little world among the stalks."</p> <p><b>Johann Goethe</b><br><small>CEO and founder</small></p> </div> </div> </div> </div> <div class="py-5" style="background-image: linear-gradient(to left bottom, rgba(189, 195, 199, .75), rgba(44, 62, 80, .75)); background-size: 100%;"> <div class="container"> <div class="row"> <div class="text-center mx-auto col-md-12"> <h1 class="text-white mb-4">Testimonials</h1> </div> </div> <div class="row"> <div class="col-lg-4 col-md-6 p-3"> <div class="card"> <div class="card-body p-4"> <div class="row"> <div class="col-md-4 col-3"> <img class="img-fluid d-block rounded-circle" src="https://static.pingendo.com/img-placeholder-2.svg"> </div> <div class="d-flex col-md-8 flex-column justify-content-center align-items-start col-9"> <p class="mb-0 lead"> <b>J. W. Goethe</b> </p> <p class="mb-0">Co-founder</p> </div> </div> <p class="mt-3 mb-0">I throw myself down among the tall grass by the trickling stream; and, as I lie close to the earth, a thousand unknown plants are noticed by me: when I hear the buzz of the little world.</p> </div> </div> </div> <div class="col-lg-4 col-md-6 p-3"> <div class="card"> <div class="card-body p-4"> <div class="row"> <div class="col-md-4 col-3"> <img class="img-fluid d-block rounded-circle" src="https://static.pingendo.com/img-placeholder-1.svg"> </div> <div class="d-flex col-md-8 flex-column justify-content-center align-items-start col-9"> <p class="mb-0 lead"> <b>G. W. John</b> </p> <p class="mb-0">CEO & founder</p> </div> </div> <p class="mt-3 mb-0" >I lie close to the earth, a thousand unknown plants are noticed by me: when I hear the buzz of the little world among the stalks, and grow familiar with the countless indescribable forms of the insects and flies.</p> </div> </div> </div> <div class="col-lg-4 p-3"> <div class="card"> <div class="card-body p-4"> <div class="row"> <div class="col-md-4 col-3"> <img class="img-fluid d-block rounded-circle" src="https://static.pingendo.com/img-placeholder-3.svg"> </div> <div class="d-flex col-md-8 flex-column justify-content-center align-items-start col-9"> <p class="mb-0 lead"> <b>J. G. Wolf</b> </p> <p class="mb-0">CFO</p> </div> </div> <p class="mt-3 mb-0">Oh, would I could describe these conceptions, could impress upon paper all that is living so full and warm within me, that it might be the mirror of my soul, as my soul is the mirror of the infinite God!</p> </div> </div> </div> </div> </div> </div> <div class="py-5 text-center"> <div class="container"> <div class="row"> <div class="mx-auto col-md-8"> <h1>{{ this.title }}</h1> <p class="mb-4"> Oh, would I could describe these conceptions, could impress upon paper all that is living so full and warm within me, that it might be the mirror of my soul, as my soul is the mirror of the infinite God! O my friend -- but it is too much for my strength -- I sink under the weight of the splendour of these visions!</p> <div class="row text-muted"> <div class="col-md-2 col-4 p-2"> <i class="d-block fa fa-angellist fa-3x"></i> </div> <div class="col-md-2 col-4 p-2"> <i class="d-block fa fa-cc-visa fa-3x"></i> </div> <div class="col-md-2 col-4 p-2"> <i class="d-block fa fa-empire fa-3x"></i> </div> <div class="col-md-2 col-4 p-2"> <i class="d-block fa fa-paypal fa-3x"></i> </div> <div class="col-md-2 col-4 p-2"> <i class="d-block fa fa-rebel fa-3x"></i> </div> <div class="col-md-2 col-4 p-2"> <i class="d-block fa fa-first-order fa-3x"></i> </div> </div> </div> </div> </div> </div> </div> {% endblock %} {% block scripts %} <script src="{% static 'js/index_vue.js' %}"></script> {% endblock %}Vue.jsを組み込む
ファイルを作成し、Titleを動的に変化させる
static内に新規フォルダ『js』に作成
js内にindex.jsを作成
Djangoのシステムと混同させないため、
delimiters: ['[[', ']]']が大事static/js/index.jsvar app = new Vue({ delimiters: ['[[', ']]'], el: '#indexapp', data: { title: "TestTitle" }, })実行
python manage.py runserver