- 投稿日:2020-01-22T21:26:45+09:00
Googleの事前学習済みモデルを利用した一般物体検出(TensorFlow Hub経由)
概要
TensorFlow Hub を使って、一般物体認識の事前学習済みモデル(Google謹製)を持ってきて、それを使って任意の画像に対しての一般物体認識(一般物体検出)をしてみようという内容です。
基本的には、https://github.com/tensorflow/hub/blob/master/examples/colab/object_detection.ipynb を参考にしています。
実行環境は、Google Colab.で、TensorFlow 2.x 対応です。
準備
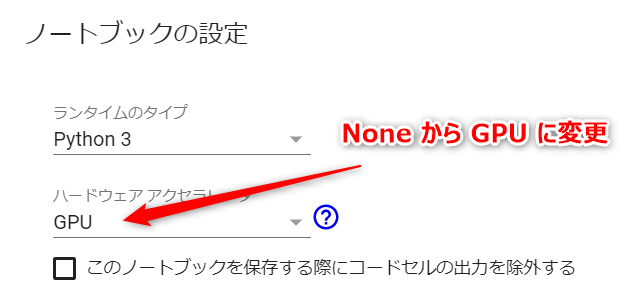
計算にGPUを利用するように変更します。上部のメニューから「ランタイム」-「ランタイムのタイプを変更」を選択して、ハードウェアアクセラレータを「GPU」に変更します。
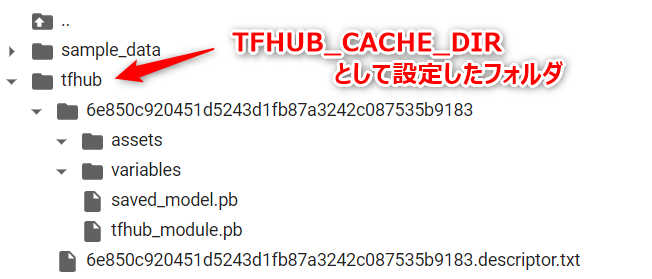
次に、TensorFlow Hub から持ってくるモジュール(学習済みモデル)を一時保存するディレクトリを指定する環境変数を追加します。なお、このプロセスは「モジュールとしてどんなものがダウンロードされるのか?」を確認したい場合のみ必要なもので省略可能です。
環境変数を追加import os os.environ['TFHUB_CACHE_DIR'] ='/content/tfhub'環境変数を確認!printenv TFHUB_CACHE_DIRTensorFlow 2.x を使うように切り替えます。
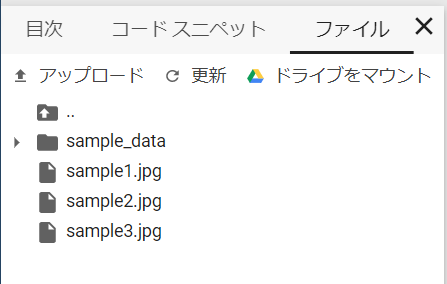
TensorFlow2.xに切り替え%tensorflow_version 2.xまた、物体認識させたい画像を、Google Colab. にアップロードしておきます(サイドバーを展開して、ファイルタブをアクティブにしてファイルをドラッグアンドドロップすればアップできます)。ここでは、jpg形式のファイルを使っていますが、png形式でもOKです。
ハブから一般物体検出のモジュール(学習済みモデル)を取得する
TensorFlow Hub から一般物体検出のモジュール(学習済みモデル)を取得します。
検出器のロードimport tensorflow as tf import tensorflow_hub as hub module_handle = 'https://tfhub.dev/google/openimages_v4/ssd/mobilenet_v2/1' #module_handle = 'https://tfhub.dev/google/faster_rcnn/openimages_v4/inception_resnet_v2/1' detector = hub.load(module_handle).signatures['default']上記のモジュールは「SSD-based object detection model trained on Open Images V4 with ImageNet pre-trained MobileNet V2 as image feature extractor.」とのこと。これ以外にも「image object detection」に対しての様々なモジュールがハブに揃っています。
環境変数
TFHUB_CACHE_DIRが設定されていれば、そこに取得したモジュールが格納されます(未指定の場合は、どこか適当なところ/tmp? に格納されるのだと思います)。
物体検出を実行する
上記でロードした「検出器」と「画像ファイルパス」を引数として受け取り、物体検出を実行して、その結果をテキスト出力する関数
run_detector(...)を記述します。なお、最終行で呼び出してる関数
showImage(...)は、後ほど作成するので、ここでは一旦、コメントアウトしておきます。要点は、次のようになります。
- 入力する画像ファイルは、$227\times 227$ ピクセルで、チャンネルは RGB の順であたえます。
- 縮小アルゴリズムの選択(入力データの生成)が、検出にも影響します。ここでは、
Image.LANCZOSを使用していますが、これをImage.NEARESTに変えると検出のスコアが変化します。物体検出を実行する関数定義import time import numpy as np import PIL.Image as Image def run_detector(detector, path): # 画像を読み込んで detector に入力できる形式に変換 img = Image.open(path) # Pillow(PIL) if img.mode == 'RGBA' : img = img.convert('RGB') converted_img = img.copy() converted_img = converted_img.resize((227,227),Image.LANCZOS) # 入力サイズに縮小 converted_img = np.array(converted_img, dtype=np.float32) # np.arrayに変換 converted_img = converted_img / 255. # 0.0 ~ 1.0 に正規化 converted_img = converted_img.reshape([1,227,227,3]) converted_img = tf.constant(converted_img) t1 = time.time() result = detector(converted_img) # 一般物体検出(本体) t2 = time.time() print(f'検出時間 : {t2-t1:.3f} 秒' ) # 結果をテキスト出力するための準備 r = {key:value.numpy() for key,value in result.items()} boxes = r['detection_boxes'] scores = r['detection_scores'] decode = np.frompyfunc( lambda p : p.decode('ascii'), 1, 1) class_names = decode( r['detection_class_entities'] ) # スコアが 0.25 以上の結果(n件)についてテキスト出力 print(f'検出オブジェクト' ) n = np.count_nonzero(scores >= 0.25 ) for i in range(n): y1, x1, y2, x2 = tuple(boxes[i]) x1, x2 = int(x1*img.width), int(x2*img.width) y1, y2 = int(y1*img.height),int(y2*img.height) t = f'{class_names[i]:10} {100*scores[i]:3.0f}% ' t += f'({x1:>4},{y1:>4}) - ({x2:>4},{y2:>4})' print(t) # showImage(np.array(img), r, min_score=0.25) # 検出結果を画像にオーバーレイ上記の
run_detector(...)は、次のように呼び出します。画像パスを指定して実行img_path = '/content/sample1.jpg' run_detector(detector, img_path)ここでは、
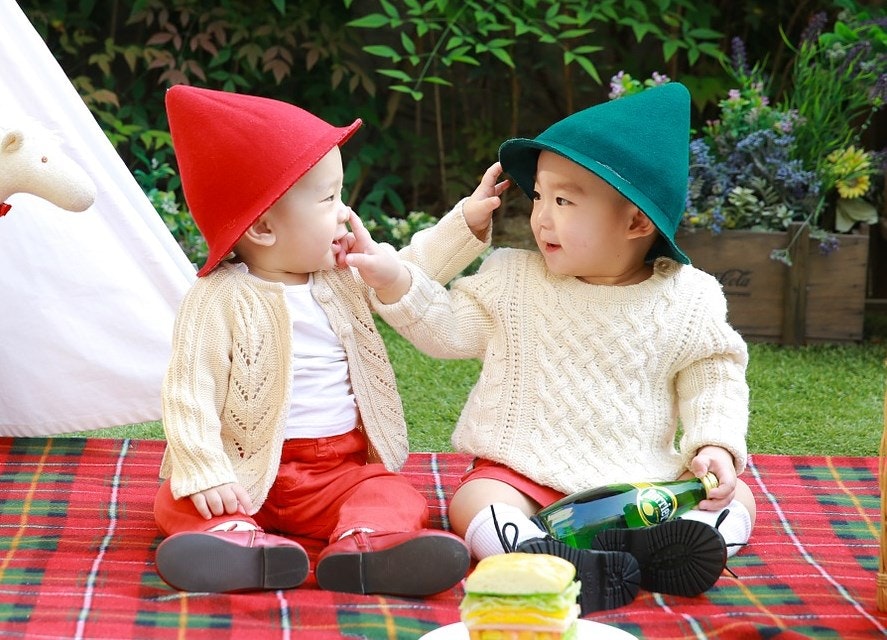
sample1.jpgに次のような写真(フリー素材)を使いました。
実行結果は、次のようになります。
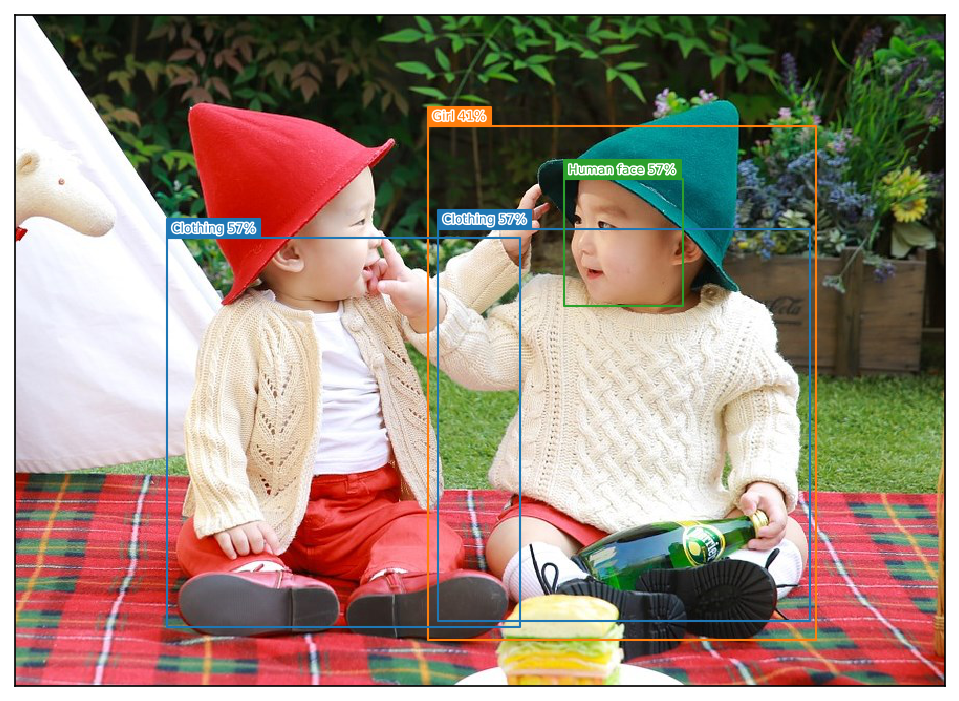
括弧の数値は、当該物体を囲むような矩形の左上と右下の座標になります。検出時間 : 0.251 秒 検出オブジェクト Human face 57% ( 522, 156) - ( 636, 276) Clothing 57% ( 403, 203) - ( 757, 577) Clothing 57% ( 144, 211) - ( 481, 583) Girl 41% ( 393, 104) - ( 763, 595) Girl 34% ( 214, 81) - ( 619, 614)このようなテキストでは、結果が分かりづらいので画像に重ねてみます。
検出結果を画像にオーバーレイ表示する
検出結果を画像にオーバーレイ表示するための関数
showImage(...)を記述します。検出結果を画像にオーバーレイ表示import matplotlib.pyplot as plt import matplotlib.patheffects as pe def showImage(img, r, min_score=0.1): fig = plt.figure(dpi=150,figsize=(8,8)) ax = plt.gca() ax.tick_params(axis='both', which='both', left=False, labelleft=False, bottom=False, labelbottom=False) ax.imshow(img) decode = np.frompyfunc( lambda p : p.decode("ascii"), 1, 1) boxes = r['detection_boxes'] scores = r['detection_scores'] class_names = decode( r['detection_class_entities'] ) n = np.count_nonzero(scores >= min_score) # class_names に対応した 色の準備 class_set = np.unique(class_names[:n]) colors = dict() cmap = plt.get_cmap('tab10') for i, v in enumerate(class_set): colors[v] =cmap(i) # 矩形を描画 スコアが低いものから描画 img_w = img.shape[1] img_h = img.shape[0] for i in reversed(range(n)): text = f'{class_names[i]} {100*scores[i]:.0f}%' color = colors[class_names[i]] y1, x1, y2, x2 = tuple(boxes[i]) y1, y2 = y1*img_h, y2*img_h x1, x2 = x1*img_w, x2*img_w # 枠 r = plt.Rectangle(xy=(x1, y1), width=(x2-x1), height=(y2-y1), fill=False, edgecolor=color, joinstyle='round', clip_on=False, zorder=8+(n-i) ) ax.add_patch( r ) # タグ:テキスト t = ax.text(x1+img_w/200, y1-img_h/300, text, va='bottom', fontsize=6, color=color,zorder=8+(n-i)) t.set_path_effects([pe.Stroke(linewidth=1.5,foreground='white'), pe.Normal()]) fig.canvas.draw() r = fig.canvas.get_renderer() coords = ax.transData.inverted().transform(t.get_window_extent(renderer=r)) tag_w = abs(coords[0,0]-coords[1,0])+img_w/100 tag_h = abs(coords[0,1]-coords[1,1])+img_h/120 # タグ:背景 r = plt.Rectangle(xy=(x1, y1-tag_h), width=tag_w, height=tag_h, edgecolor=color, facecolor=color, joinstyle='round', clip_on=False, zorder=8+(n-i)) ax.add_patch( r )そして、さきほどの
run_detector(...)の定義の最終行でコメントアウトしていたものを外して、再度、run_detector(detector, img_path)を実行します。次のような実行結果(画像)が得られます。
おまけ
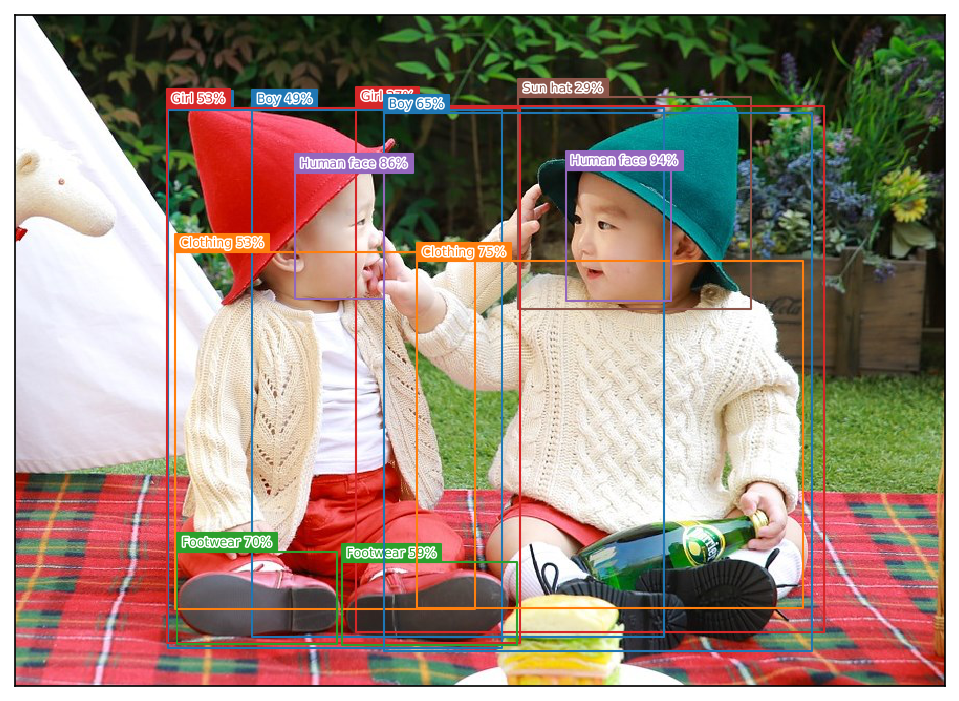
別のモジュール(検出器)に切り替えて、同じ画像に対して物体認識をしてみます(結構、時間がかかります)。
import tensorflow as tf
import tensorflow_hub as hub

#module_handle = 'https://tfhub.dev/google/openimages_v4/ssd/mobilenet_v2/1'
module_handle = 'https://tfhub.dev/google/faster_rcnn/openimages_v4/inception_resnet_v2/1'

detector = hub.load(module_handle).signatures['default']
実行結果は、次のようになりました。
先ほどの何倍も時間がかかっていますが、より多くのものを検出できています。
検出時間 : 1.379 秒
検出オブジェクト
Human face  94%  ( 524, 147) - ( 625, 272)
Human face  86%  ( 266, 149) - ( 351, 270)
Clothing    75%  ( 383, 234) - ( 750, 565)
Footwear    70%  ( 154, 511) - ( 306, 598)
Boy         65%  ( 351,  93) - ( 759, 606)
Footwear    59%  ( 311, 521) - ( 477, 600)
Clothing    53%  ( 152, 225) - ( 438, 565)
Girl        53%  ( 144,  88) - ( 481, 598)
Boy         49%  ( 225,  88) - ( 618, 592)
Boy         45%  ( 145,  90) - ( 464, 603)
Girl        37%  ( 324,  85) - ( 771, 587)
Sun hat     29%  ( 479,  78) - ( 701, 279)