- 投稿日:2020-01-22T23:54:34+09:00
Macのlocalhost上で動作しているサービスへDocker内部から接続する方法
Docker Container内部で動作している環境からMac上で動作しているサービスへ接続することが出来ずハマったので、その解決方法をメモしておきます。
よくあるMacからDocker上のサービスへ接続するのとは接続方向が逆になりますのでご注意ください。背景
VirtualBox上にNAT network interface1つを接続した状態で仮想Ubuntuサーバを立ち上げ、
そこへPostgreSQL(ポート番号:5432)を立ち上げました。
その後、VirtualBoxのPort Forwarding機能でHost:5432 Guest:5432 でForwardする設定をしました。
この状態であれば、MacへPostgreSQLクライアントをインストールして、localhost:5432へ接続することで仮想マシンで動作しているPostgreSQLへ接続可能です。
ところが、Mac環境をなるべく汚したくない私はpsqlコマンドをローカルにインストールすることを嫌い、PostgreSQLのDockerイメージを使って確認することにしました。
その際に接続できなくてハマりました。解決方法
docker run -it --rm postgres psql -U root -h host.docker.internalはい、結論から書くとこれが答えになります。
ポイントは、接続先をlocalhost:5432にするのではなく、host.docker.internal:5432にすることです。
どうやら、Docker Container上から見てローカル環境(Mac)のIPアドレスは、localhostと指定するのでは接続できず(おそらくDocker Containerそのものを指定してしまう?)、host.docker.internalを指定する必要があるようです。
DockerはMac上の1プロセスとして動作するという理解をしているので、psqlコマンドを単体で実行するのと同じようなイメージでlocalhostを指定していたのでハマってしまいました。参考情報など
公式: https://docs.docker.com/docker-for-mac/networking/#use-cases-and-workarounds
I WANT TO CONNECT FROM A CONTAINER TO A SERVICE ON THE HOSTStackOverFlow: https://stackoverflow.com/questions/24319662/from-inside-of-a-docker-container-how-do-i-connect-to-the-localhost-of-the-mach
Edit: If you are using Docker-for-mac or Docker-for-Windows 18.03+, just connect to your mysql service using the host host.docker.internal.
- 投稿日:2020-01-22T22:51:15+09:00
AWS Amplify Android を試してみる(Mac)
はじめに
AWS Amplify Android をGetting StartedにしたがってMacで試してみる。
以降の各章はGetting Startedに合わせている。Prerequisites
以下の通り、Getting Started に記載されている手順は Mac でしか動作しない。Windows の場合、下の説明にあるリンク先の手順を実施する必要がある。
https://aws-amplify.github.io/docs/android/start#prerequisitesThese steps currently only work on Mac. If you have a Windows machine, follow the steps on one of our categories such as API here.node.js のインストール
バージョン 12.14.0をインストールした。
Android Studio のインストール
以下からインストール。バージョン 3.1 以上である必要がある。
現在最新のやつをインストールすれば問題なし。https://developer.android.com/studio/index.html#downloads
プロジェクトの作成
以下にしたがってプロジェクトを作成する。
https://developer.android.com/training/basics/firstapp/creating-projectMinimum API levelは15(Ice Cream Sandwich)以上を選択する必要がある。
Android SDK のインストール
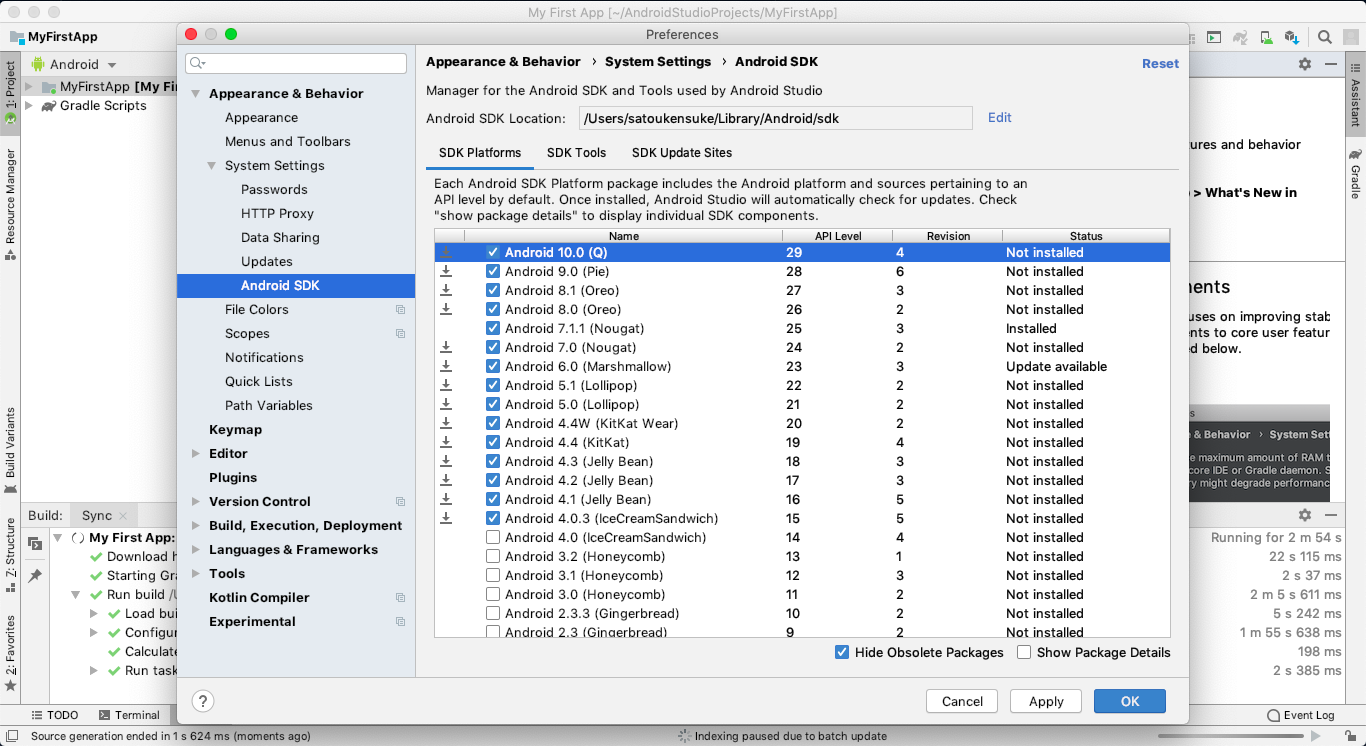
上で選択したAPI levelのSDKをイントールする。
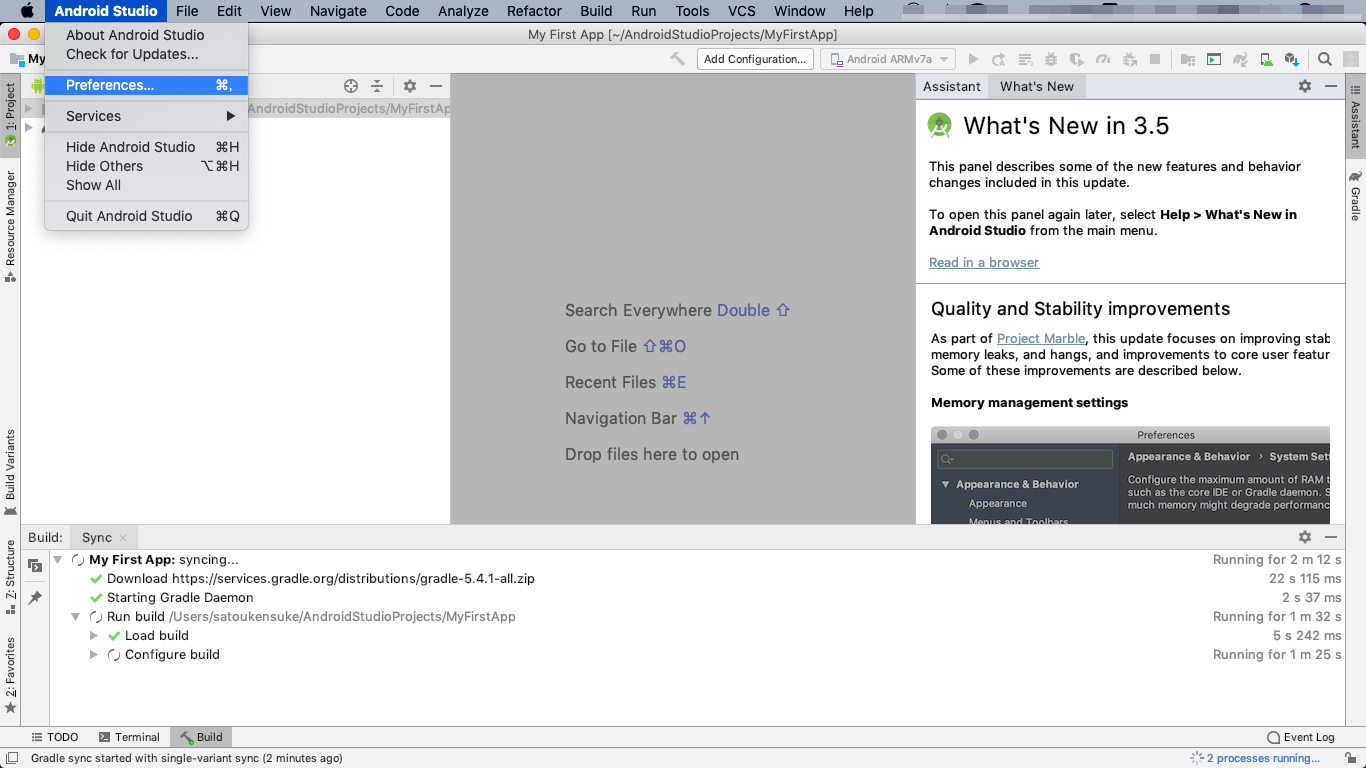
Android Studio -> Preference をクリック
Appearance & Behavior -> System Settings -> Android SDK をクリックし、必要なSDKがインストールされていなければインストールする。
Amplify CLI のインストール
npm install -g @aws-amplify/cliStep 1: Configure your app
プロジェクト用build.gradleの修正
build.gradle(Project:My First App)を開き、いろいろ追加する。追加した箇所にコメントをした。build.gradle// Top-level build file where you can add configuration options common to all sub-projects/modules. buildscript { repositories { // mavenCentral()を追加 mavenCentral() google() jcenter() } dependencies { classpath 'com.android.tools.build:gradle:3.5.3' // amplify-tools-gradle-pluginを追加 classpath 'com.amplifyframework:amplify-tools-gradle-plugin:0.2.0' } } // amplifytoolsを追加 apply plugin: 'com.amplifyframework.amplifytools' allprojects { repositories { google() jcenter() } } task clean(type: Delete) { delete rootProject.buildDir }アプリ用のbuild.gradleの修正
build.gradle(Module:App)を開き、いろいろ追加する。追加した箇所にコメントをした。build.gradleapply plugin: 'com.android.application' android { // compileOptionsを追加 compileOptions { sourceCompatibility 1.8 targetCompatibility 1.8 } compileSdkVersion 28 buildToolsVersion "29.0.2" defaultConfig { applicationId "com.example.myfirstapp" minSdkVersion 15 targetSdkVersion 28 versionCode 1 versionName "1.0" testInstrumentationRunner "androidx.test.runner.AndroidJUnitRunner" } buildTypes { release { minifyEnabled false proguardFiles getDefaultProguardFile('proguard-android-optimize.txt'), 'proguard-rules.pro' } } } dependencies { implementation fileTree(dir: 'libs', include: ['*.jar']) implementation 'androidx.appcompat:appcompat:1.0.2' implementation 'androidx.constraintlayout:constraintlayout:1.1.3' testImplementation 'junit:junit:4.12' androidTestImplementation 'androidx.test.ext:junit:1.1.0' androidTestImplementation 'androidx.test.espresso:espresso-core:3.1.1' // amplifyframeworkを追加 implementation 'com.amplifyframework:core:0.9.0' implementation 'com.amplifyframework:aws-api:0.9.0' }Make Projectの実行
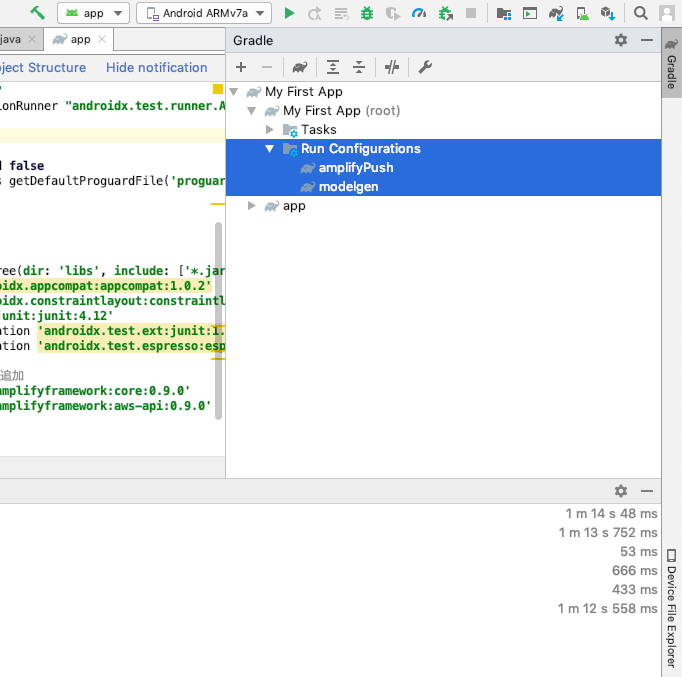
Build メニュー -> Make Project をクリック
Make Project に成功すると Gradle Task として
modelgenとamplifyPushが追加されます。
Step 2: Generate your Model files
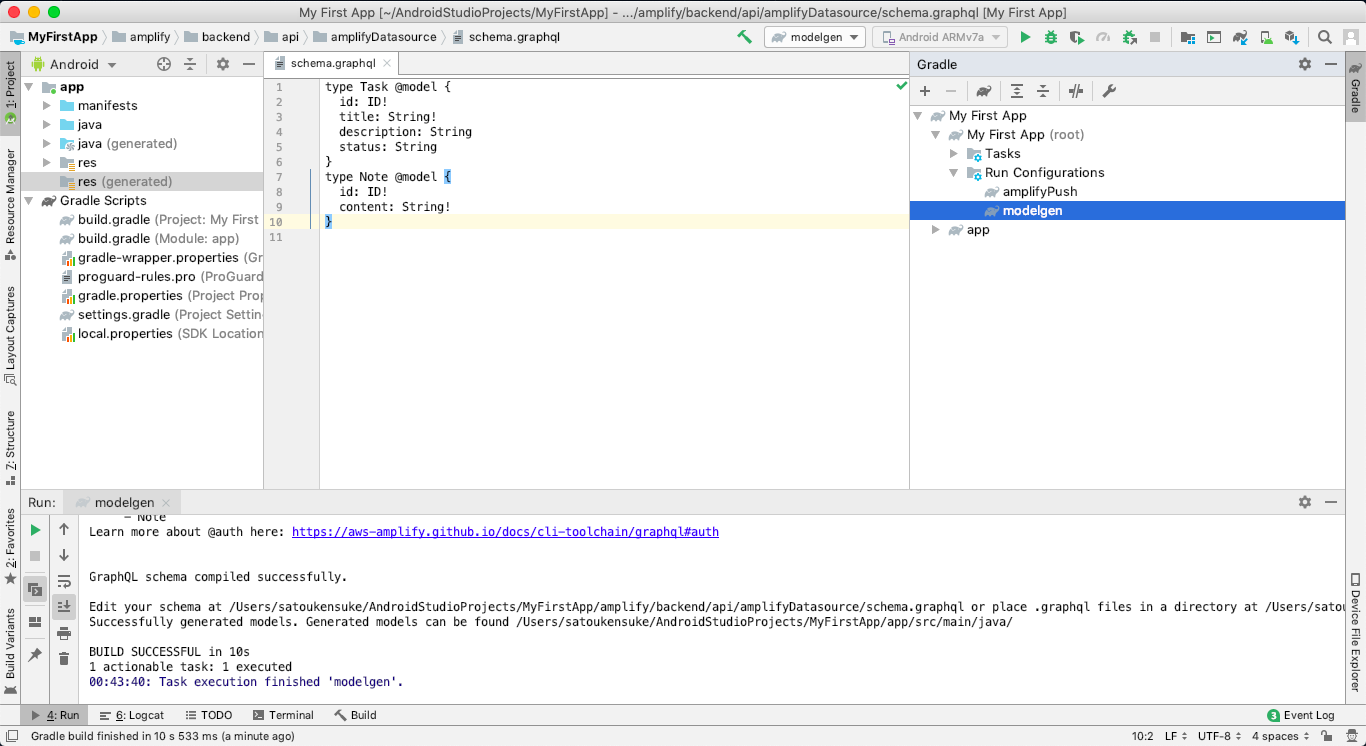
amplify/backend/api/amplifyDatasource/schema.graphqlを確認するamplify/backend/api/amplifyDatasource/schema.graphqltype Task @model { id: ID! title: String! description: String status: String } type Note @model { id: ID! content: String! }Gradle Task
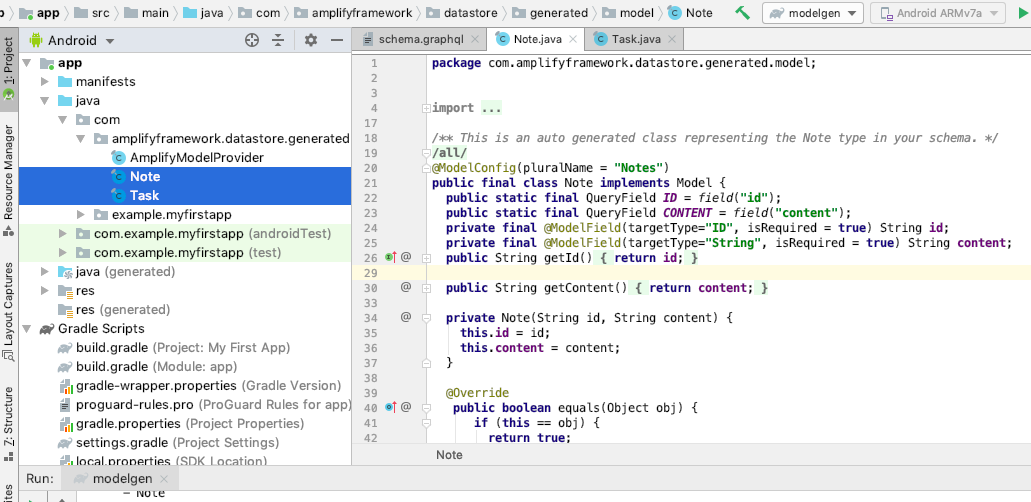
modelgenを実行する
app/src/main/java/com/amplifyframework.datastore.generated.modelの下にschema.graphqlに記述したmodelクラスが生成されたことを確認する。
Step 3: Add API and Database
amplify configureの実行
コマンドプロンプトでプロジェクトのルートディレクトリに移動し、以下を実行する。
amplify configureAWSログイン画面が出るため、ログインしておく。
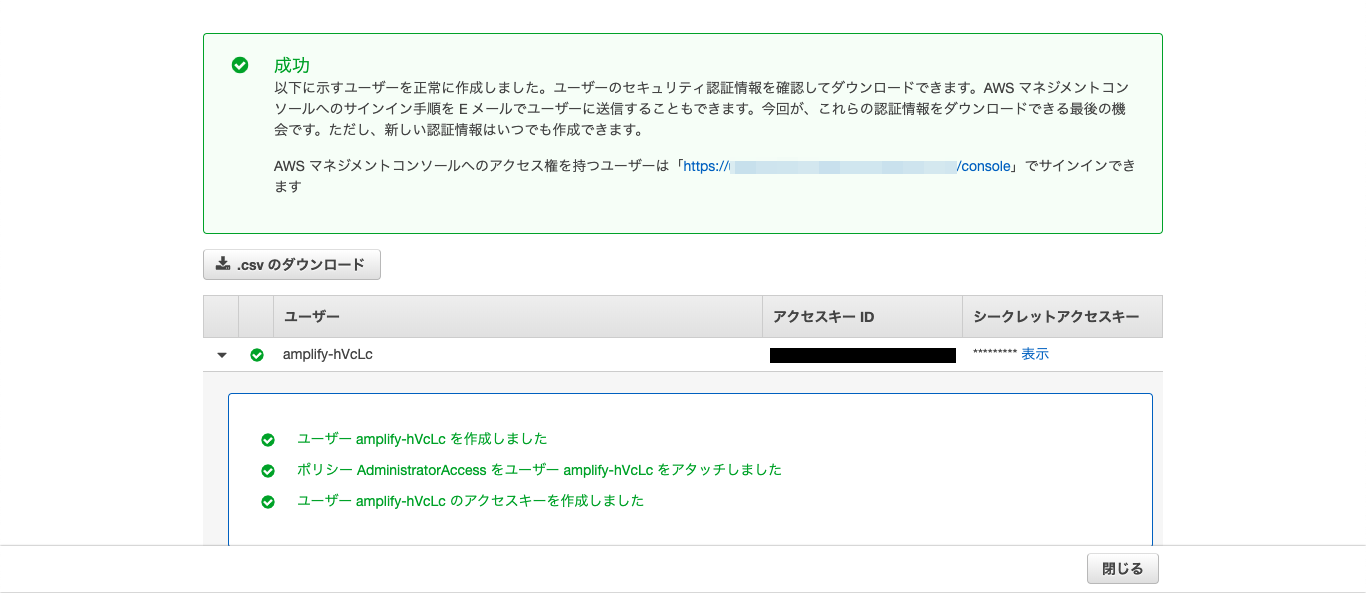
コマンドプロンプトに戻り、リージョンやら新規ユーザ名やらを入力すると、ブラウザにIAMユーザ登録画面が出るため、新規ユーザを登録する。
新規ユーザ登録後、アクセスキーIDとシークレットアクセスキーが発行される。
コマンドプロンプトでそれを聞かれるため、入力する。
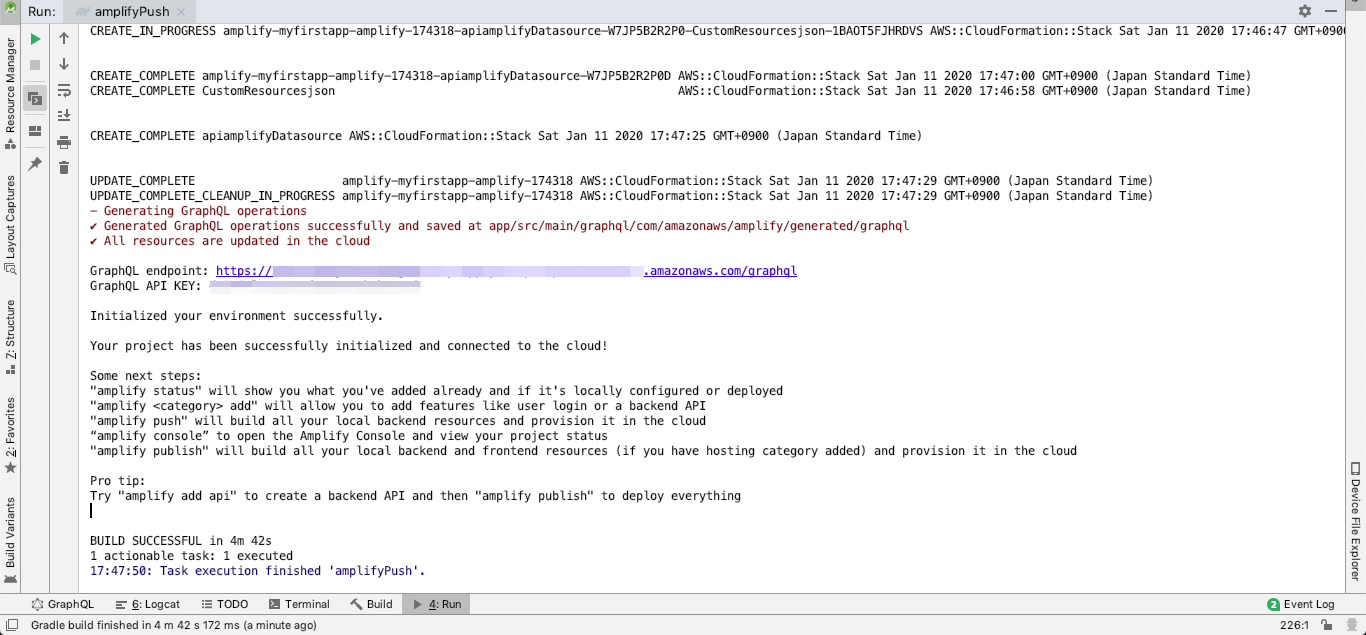
amplifyPushの実行
AndroidStudioに戻り、Gradle Task
amplifyPushを実行する
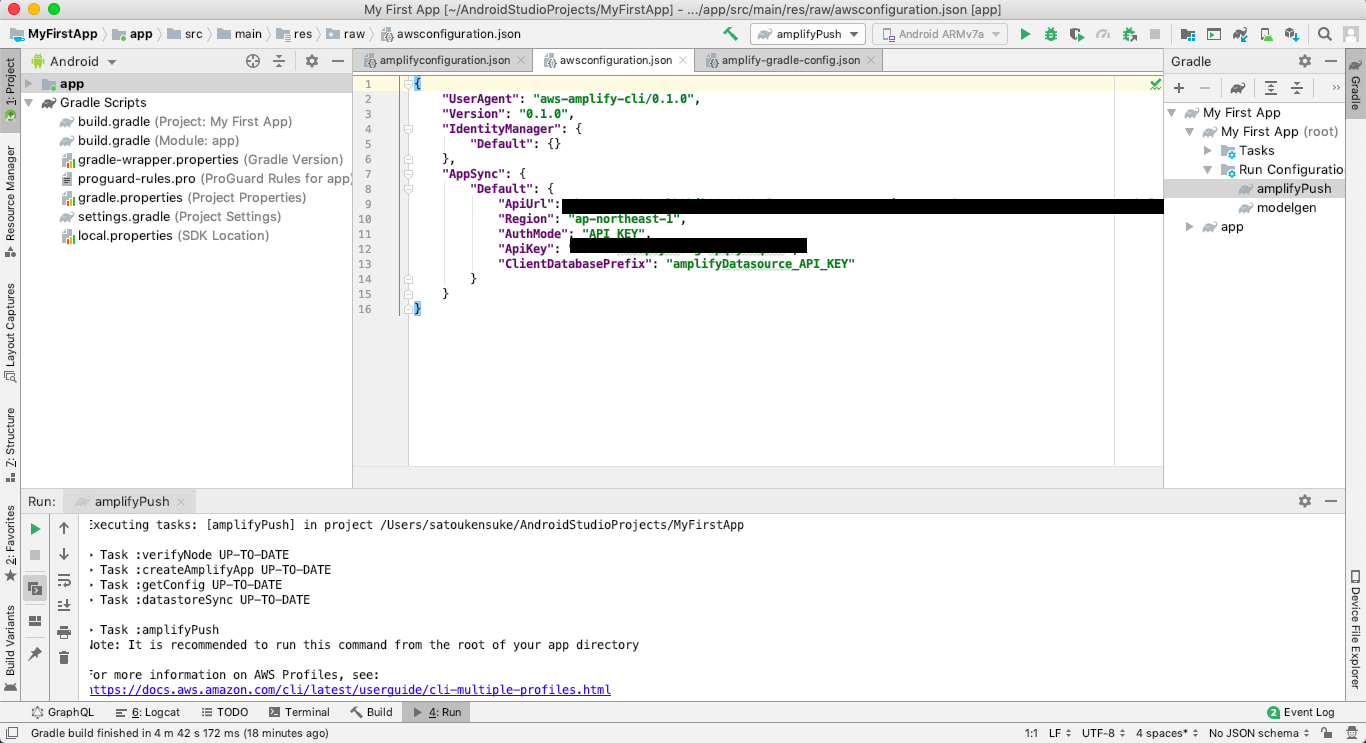
Task完了後、以下の2ファイルが生成されていることを確認する
src/main/res/raw/amplifyconfiguration.json
各サービスにアクセスするための情報を記載したファイル
src/main/res/raw/awsconfiguration.json
通信対象の全てのリージョンとエンドポイントを記載したファイル
Step 4: Integrate into your app
Amplifyの準備ができたので、Androidアプリに組み込んでいく、
com.example.myfirstapp.MainActivity#onCreateを以下の通り修正するMainActivity.javapackage com.example.myfirstapp; import android.os.Bundle; import android.util.Log; import androidx.appcompat.app.AppCompatActivity; import com.amplifyframework.AmplifyException; import com.amplifyframework.api.aws.AWSApiPlugin; import com.amplifyframework.api.graphql.GraphQLResponse; import com.amplifyframework.api.graphql.MutationType; import com.amplifyframework.api.graphql.SubscriptionType; import com.amplifyframework.core.Amplify; import com.amplifyframework.core.ResultListener; import com.amplifyframework.core.StreamListener; import com.amplifyframework.datastore.generated.model.Task; public class MainActivity extends AppCompatActivity { @Override protected void onCreate(Bundle savedInstanceState) { super.onCreate(savedInstanceState); try { // Amplifyの初期化処理 Amplify.addPlugin(new AWSApiPlugin()); Amplify.configure(getApplicationContext()); Log.i("AmplifyGetStarted", "Amplify is all setup and ready to go!"); // テスト用Taskを生成し、mutate APIを実行。DynamoDBに登録 Task task = Task.builder().title("My first task").description("Get started with Amplify").build(); Amplify.API.mutate(task, MutationType.CREATE, new ResultListener<GraphQLResponse<Task>>() { @Override public void onResult(GraphQLResponse<Task> taskGraphQLResponse) { Log.i("AmplifyGetStarted", "Added task with id: " + taskGraphQLResponse.getData().getId()); } @Override public void onError(Throwable throwable) { Log.e("AmplifyGetStarted", throwable.toString()); } }); // 登録したTaskの取得。Dynamoはデフォルトでは「結果的に整合性のある読み込み」のため、 // 上記で登録したばかりのデータは取得できない場合がある。 Amplify.API.query(Task.class, new ResultListener<GraphQLResponse<Iterable<Task>>>() { @Override public void onResult(GraphQLResponse<Iterable<Task>> iterableGraphQLResponse) { for(Task task : iterableGraphQLResponse.getData()) { Log.i("AmplifyGetStarted", "Task : " + task.getTitle()); } } @Override public void onError(Throwable throwable) { Log.e("AmplifyGetStarted", throwable.toString()); } }); // Taskが登録された時に実行するメソッドをsubscribe Amplify.API.subscribe( Task.class, SubscriptionType.ON_CREATE, new StreamListener<GraphQLResponse<Task>>() { @Override public void onNext(GraphQLResponse<Task> taskGraphQLResponse) { Log.i("AmplifyGetStarted", "Subscription detected a create: " + taskGraphQLResponse.getData().getTitle()); } @Override public void onComplete() { // Whatever you want it to do on completing } @Override public void onError(Throwable throwable) { Log.e("AmplifyGetStarted", throwable.toString()); } } ); } catch (AmplifyException exception) { Log.e("AmplifyGetStarted", exception.getMessage()); } setContentView(R.layout.activity_main); } }AWS AppSync
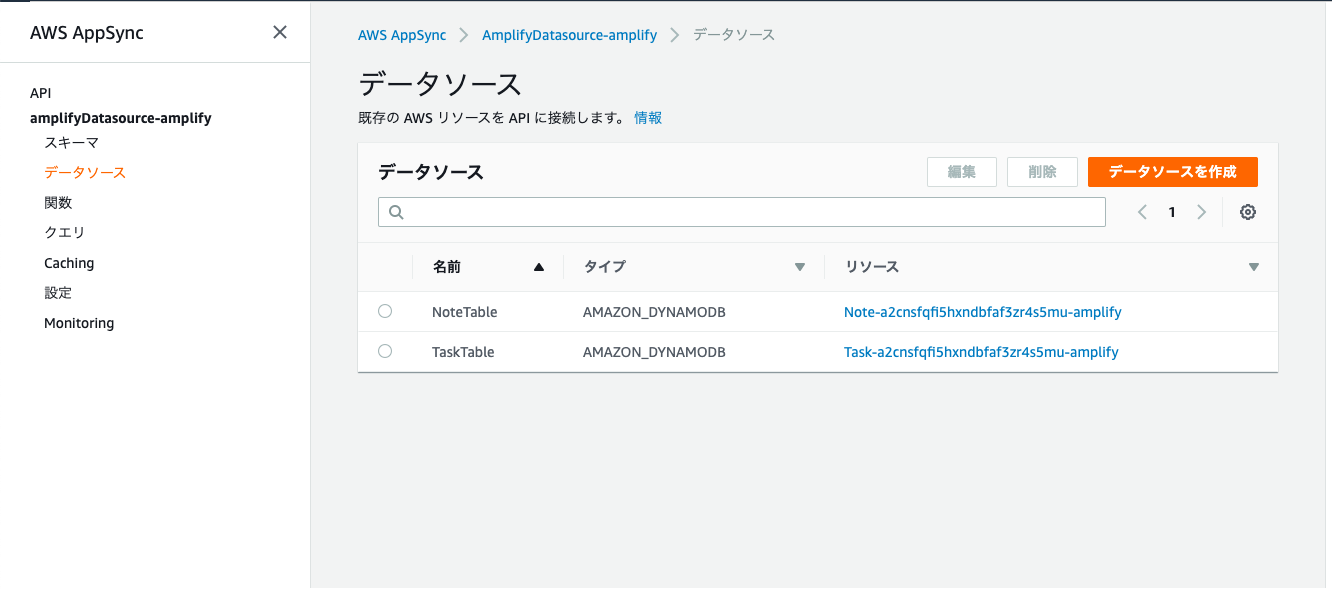
以下のコマンドを実行し、
GraphQLを選択すると、ブラウザにAWS AppSyncが表示されるamplify console apiこの画面からこれまで生成したデータソースを確認したり、GraphQLクエリを発行して、APIのテストができる
クエリ画面で作成されたAPIの仕様が確認できる。
Java に記載されているソースが実行されると、GraphQL クエリが発行されるイメージ
アプリを起動してみる
作成したAndroidアプリをシミュレーターやら実機で起動してみる。
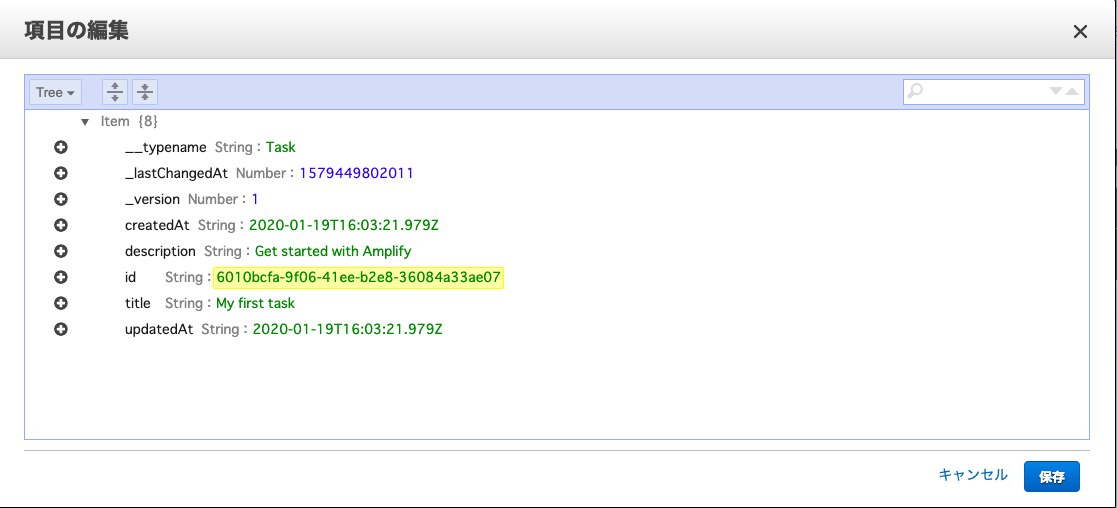
mutateの確認
Amplify.API.mutateでDynamoDBにtitleがMy first taskのレコードが登録されたことを確認できた。
queryの確認
登録後、
Amplify.API.queryで上記レコードを取得したいが、DynamoDBはデフォルトでは結果的に整合性のある読み込みのため、取得できない場合がある。
アプリを2回起動して、1回目のレコードを取得できるか確認する。
1回目
2回目
ログから1回目に登録したレコードの取得を確認できた。
subscribeの確認
Amplify.API.subscribeで指定したテーブルへの登録やレコードの削除などをトリガーにして、リスナーのメソッドを実行することができる。
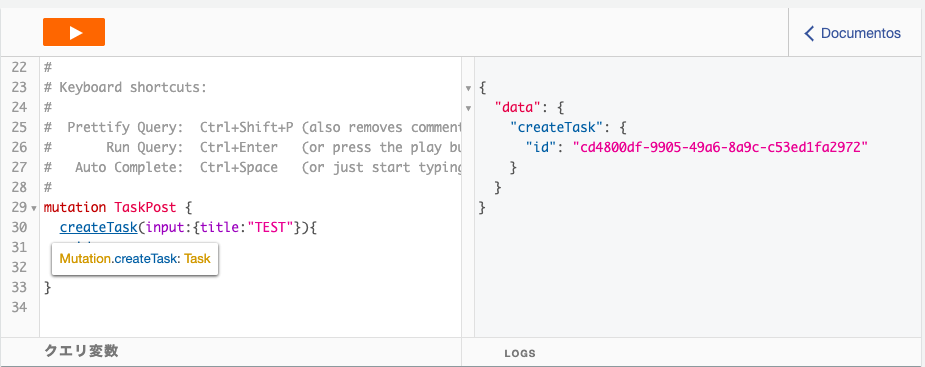
試しに、アプリを実行した状態で、AWS AppSyncからTaskを登録してみる。
Taskの登録は成功しているが、
onError()が実行され、エラーログが出力されてしまった。
問題なくonNext()のログが表示された方がいたら教えていただきたい。
終わりに
最後の方、少し消化不良となってしまったが、チュートリアルにしたがって Amplify SDKを使用してAndroidアプリを作成することができた。
次はiosアプリの方を試してみたい。iosの場合、Prediction(予測機能)が使えるようだ。参考
https://aws-amplify.github.io/docs/android/start#step-1-configure-your-app
https://dev.classmethod.jp/cloud/aws/amplify-ios-identify-celebrities/
https://qiita.com/uenohara/items/44d2334c597dc631bc60


- 投稿日:2020-01-22T20:24:15+09:00
MacOS Catalina(10.15.2) で、旧OSからアップデートした環境でpython pipがOpenSSLのエラーになる問題の解決法
TL;DR
/Library/Developer/CommandLineToolsをCommandLineTools.bakとかにmvして、xcode-select --installする。なぜそうするのか
Catalinaにupgradeする前から入れてあったCommandLineToolsがどうも古いのに新しいものと誤認識されているらしい。
なのでxcode-select --installしてもalready installedって言われてしまう。
それを強制的に入れ直すため。いろいろ修正方法が書いてあるけどどれも関係なかった
以下は無関係だった。
- brewを入れ直す
- OpenSSLをbrewで入れ直す
- MacOS10.14.pkgを入れる → そもそもファイルが無いのでできない。
問題のエラー文字列
$ pip install --upgrade pip
pip is configured with locations that require TLS/SSL, however the ssl module in Python is not available.
Retrying (Retry(total=4, connect=None, read=None, redirect=None, status=None)) after connection broken by 'SSLError("Can't connect to HTTPS URL because the SSL module is not avai
lable.")': /simple/pip/
Retrying (Retry(total=3, connect=None, read=None, redirect=None, status=None)) after connection broken by 'SSLError("Can't connect to HTTPS URL because the SSL module is not avai
lable.")': /simple/pip/
Retrying (Retry(total=2, connect=None, read=None, redirect=None, status=None)) after connection broken by 'SSLError("Can't connect to HTTPS URL because the SSL module is not avai
lable.")': /simple/pip/
Retrying (Retry(total=1, connect=None, read=None, redirect=None, status=None)) after connection broken by 'SSLError("Can't connect to HTTPS URL because the SSL module is not avai
lable.")': /simple/pip/
Retrying (Retry(total=0, connect=None, read=None, redirect=None, status=None)) after connection broken by 'SSLError("Can't connect to HTTPS URL because the SSL module is not avai
lable.")': /simple/pip/
Could not fetch URL https://pypi.org/simple/pip/: There was a problem confirming the ssl certificate: HTTPSConnectionPool(host='pypi.org', port=443): Max retries exceeded with ur
l: /simple/pip/ (Caused by SSLError("Can't connect to HTTPS URL because the SSL module is not available.")) - skipping
Requirement already up-to-date: pip in /usr/local/lib/python3.7/site-packages (18.1)
pip is configured with locations that require TLS/SSL, however the ssl module in Python is not available.
Could not fetch URL https://pypi.org/simple/pip/: There was a problem confirming the ssl certificate: HTTPSConnectionPool(host='pypi.org', port=443): Max retries exceeded with ur
l: /simple/pip/ (Caused by SSLError("Can't connect to HTTPS URL because the SSL module is not available.")) - skipping
brewが悪いのか、MacOSが悪いのか…。
もうCloud Shell(GCP)上でやったほうが楽そう。泣ける。
- 投稿日:2020-01-22T17:09:30+09:00
MySQLをMacのターミナルで操作するときのメモ
毎度てんやわんやするので整理メモを残します。
随時更新します。ご指摘・代替案等ありましたらコメントいただけますと幸いです。
環境状況
- Mac OSCatalina 10.15.2
- MySQL 8.0.19(Homebrewで
brew install mysqlして入れたもの)- ターミナルでの作業
懸念点
・/usr/local/opt配下に"mysql"と"mysql@8.0"がある
(バージョンはどちらも同じ)
→ 以前ポート番号が0になって接続できなかったことがあり、そのときの原因はこの見る先の問題かも?と想定(mysqladmin shutdownにて解決)・何回もインストールし直している
どこかでなにやらやばいことになってないか不安知識
個人的に覚えておきたいこと
- MySQLの設定は/etc/my.cnf(参考 - Qiita)
- MySQL 8.0では、ホストサーバーにログインしないでも設定値の変更から再起動で反映までコマンドでできるようになった(参考 - スマートスタイル TECH BLOG)
- 基本的にSQLは大文字でも小文字でも大丈夫
- 小文字だとダメだったときがあるけど、それはそもそも文を間違えてた可能性もある
- Macのターミナルでコマンドが実行できない&改行しまくれちゃう地獄に陥ったときは
control + c
/Cでも\cでもcommand + cでもなくcontrol + c- MySQL 8.0からユーザ作成と権限付与は別々でちゃんと行わないといけなくなった
- rootは元々パスワードがついていないので付けた方がいい(参考 - CodeCampus)
- MySQL内で設定を変えたら、基本的には一回出る
☆ MySQLの状態を調べる
(MySQL内から状態を見るパターンは後述)
・情報を見たいとき
$ brew info mysql
・バージョン確認
$ mysql --version
(参考 - Qiita)コマンド実行
☆ 文頭の違い
$:通常のターミナルでの操作
mysql>:MySQLにログインしてからの操作 → 文末に;がないと実行されない基本操作
MySQLの起動
$ mysql.server start
$ mysql.server start --skip-grant-tables
→ パスワードなしでログインできるMySQLにログイン(実行、接続とも)
$ mysql -u root -p「「ユーザ名:root」で接続します、パスワードは後で聞いて」という意味
らしい(抜粋元 - プロエンジニア)
このコマンドの後、パスワードが聞かれるので入力する(打ったパスワードは画面に表示されない)MySQLからログアウト
mysql> exit
quitでも\qでも可MySQLの停止(終了とも)
$ mysql.server stopバッテリーを消耗しやすいため、使わないときは停止させておいた方がいいらしい
MySQLの再起動
$ mysql.server restartMySQLの自動起動
$ brew services start mysqlHomebrewの機能(多分)
重複起動させたりしてわけわからんことになるので、
調べながらやってるビギナーなうちはやらない方がいい
事故る☆ 止めたいときは
$ brew services stop mysqlMySQL関連
どうなってるか見る
mysql> show variables like 'version'; #バージョン確認 mysql> show status; #セッション統計情報の表示 mysql> show status like "Threads_connected"; #現在の同時接続数を表示ユーザ関連
前述のログインするユーザに関連
rootだとなんでもできてしまってこわいので、
必要に応じて別途DBを利用するユーザを作っておいた方がいい現在のユーザ確認
mysql> SELECT user(); # ログイン中のユーザ表示
mysql> SHOW GRANTS; # 現在ログイン中ユーザの権限確認
ユーザ一覧の表示
mysql> SELECT user, host FROM mysql.user;mysqlというデータベースにあるuserテーブルにアクセス
他にもいろんなカラムがあるユーザの作成
mysql> CREATE USER '[作成したいユーザ名]'@'[ホスト名]' IDENTIFIED BY '[指定したいパスワード]';ホスト名には、MySQLへ接続するホストを指定する
ホスト名の代わりにIPアドレスやlocalhostを指定することも可(参考 - プロエンジニア)ユーザの削除
mysql> DROP USER '[削除したいユーザ名]'@'[ホスト名]';ユーザの権限付与
mysql> GRANT [権限] ON [適用対象のデータベース].[適用対象のテーブル] TO '[権限付与するユーザ名]'@'[ホスト名]';
mysql> FLUSH PRIVILEGES; # 権限の変更をデータベースに反映
<Point 1>
検索すると以下のような書き方がよく出てくるGRANT [権限] ON [適用対象のデータベース].[適用対象のテーブル] TO '[権限付与するユーザ名]'@'[ホスト名]' IDENTIFIED BY '[パスワード]';
が、MySQL 8.0の場合ユーザ作成と権限付与は別で行わないといけないので、文末に
IDENTIFIED BY '[パスワード]'を書いて実行すると構文エラーになる1<Point 2>
権限の書き方、種類、権限付与により操作を許可するDBやテーブルの書き方は、以下参考URLの該当項目を参照
MySQLでユーザを作成し、権限を設定する方法 | プロエンジニア対象ユーザの権限を確認
mysql> SHOW GRANTS FOR '[ユーザ名]'@'[ホスト名]';対象ユーザのパスワード変更
mysql> UPDATE mysql.user SET password=password('[新パスワード]') WHERE user='[対象ユーザ]';
mysql> FLUSH PRIVILEGES; # 権限変更を反映
対象ユーザの権限を削除
mysql> REVOKE [権限] ON [適用対象のデータベース].[適用対象のテーブル] FROM '[権限を削除するユーザ名]'@'[ホスト名]';
mysql> FLUSH PRIVILEGES; # 権限変更を反映
データベース関連
ほぼ抜粋
Macでmysqlを扱う方法 | Qiita
※自分の実行結果に修正・追記予定データベース確認
mysql> SHOW databases; #データベース一覧を表示
mysql> USE [データベース名] #使用するデータベースを選択(セミコロン不要)
mysql> CREATE database [データベース名]; #データベースの作成
mysql> DROP database [データベース名]; #データベースの削除
テーブル確認
mysql> SHOW tables; # テーブル一覧を表示
mysql> SHOW tables status; # テーブル一覧のステータス情報を表示
mysql> DESC [テーブル名]; # カラム一覧を表示
mysql> SHOW full columns FROM [テーブル名]; # カラム一覧を表示、Collation付き。
※Collation:照合順序。MySQLでは文字コードとソート順を持っており、ソート順の部分がCollationと呼ばれている。DB単位、テーブル単位、カラム単位で設定可能である。
インデックス確認
mysql> SHOW index FROM [テーブル名]; # 特定のテーブル mysql> USE information_schema; mysql> SELECT * FROM statistics WHERE TABLE_SCHEMA = [データベース名]; # 特定のデータベースmysqladminコマンド
管理操作を実行するためのクライアント
MySQL サーバの稼動状況を確認したり、MySQL サーバを停止したりできる
(参考 - MySQL 逆引きリファレンス)MySQLにログインしていない状態で使う
→$ mysqladmin ~このひとがいつ使うなんなのかわからなくてしっちゃかめっちゃかになったりした
mysql> ~の処理とごちゃまぜに書いてあるサイトが多いので、
しっかり区別して使うようにする☆ パスワード送信オプション
-u [ユーザー名] -p← これのこと
後述のmysqladminコマンドを実行する際、
パスワードを設定しているユーザが対象である場合は文末に記述する
そうしないと権限エラーになります
(例)$ mysqladmin ping -u root -pパスワードを設定していないユーザであれば書かなくてもいける
MySQL サーバが起動中であるかを確認
$ mysqladmin pingMySQLサーバを起動していない場合は、
パスワードを設定していても$ mysqladmin pingでわかる(エラー内容から)MySQL サーバの状態を表示
$ mysqladmin status
$ mysqladmin extended-status #詳細情報
ユーザーのパスワードを変更
$ mysqladmin password [新パスワード] -u [ユーザー名] -p<Point 1>
[新パスワード]の部分はそのままパスワードを書く
いつもみたいに'pass12345'とか書くと、パスワードがpass12345ではなく'pass12345'になる
(シングルクォーテーションもパスワードになっちゃう)<Point 2>
コマンドの履歴を記載するログファイルに
パスワードが残ってしまうらしいので、セキュリティ的にはよろしくない
(参考 - CodeCampus)mysqladmin コマンドのヘルプを表示
$ mysqladmin -?※パスワード送信オプション不要
実行中のプロセスの一覧を表示
$ mysqladmin processlistプロセス(処理中の接続)を強制的に停止
$ mysqladmin kill [プロセスID]<Point 1>
プロセスID の一覧はmysqladmin processlistで調べられる<Point 2>
強制的に終了するプロセスを,(カンマ)区切りで複数指定できるが、
その際1, 2, 3, ...のようにカンマの後ろに半角スペースを含めるとコマンドが正しく実行されなくなる気を付けたいポイント
・「同じ処理内容に見えるけど、書き方が全然違う」ときはなんらかの違う理由があるので、適当にやらずにちゃんと違いを理解する
→ 適当にやると余計なもの同士ががっちゃんこしたりする・ターミナル系でコケるとき、基本的に「何をするコマンドなのか」をわかっていないのが原因なので、わからないことを分解して調べる
・エラーメッセージは丸々ググる前に英文を理解してから
・書いてある通りにやってできなかったらバージョンの違いを確認する
つまり、この書き方はユーザ作成と権限付与をまとめてやってるやつ ↩
- 投稿日:2020-01-22T07:58:45+09:00
AtCoder用にPythonの環境構築
はじめに
最近、AtCoderを始めました。
AtCoderは競技プログラミングサイトで、毎週リアルタイムのコンテストが開催されていて、AtCoderで評価されたレーティングを利用して、転職活動ができるAtCoderJobsというサービスが話題になっているそうです。
最初、シェルがfishでHomebrewなどが入っている状態で色々試していましたが、うまくいかなかったので、Mac環境をきれいにして環境構築をしました。環境
macOS Catalina 10.15.2
Homebrew 2.1.15
bash 3.2.57シェルをbashに戻す
ターミナルで以下コマンドを叩いて、ターミナルの再起動をするとシェルがbashに戻ります。
$ chsh -s /bin/bashHomebrewをアンインストールする
以下コマンドを叩いてパスワードを入力すると、Homebrewをアンインストールできます。
$ ruby -e "$(curl -fsSL https://raw.githubusercontent.com/Homebrew/install/master/uninstall)"Homebrewの公式サイトに記載されています。
Homebrewインストールする
以下コマンドを叩く。
$ usr/bin/ruby -e "$(curl -fsSL https://raw.githubusercontent.com/Homebrew/install/master/install)"インストールできたか確認するために、以下コマンドを叩きます。
$ brew doctorすると、
Warningが大量に出たので、brew doctorでWarningが出たので解決方法まとめました。(for Mac)を参考に解決しました。
Warning: Unbrewed dylibs were found in /usr/local/include.のログに関しては残すことを忘れてしまっていたので、上記記事を引用しています。Please note that these warnings are just used to help the Homebrew maintainers with debugging if you file an issue. If everything you use Homebrew for is working fine: please don't worry or file an issue; just ignore this. Thanks! Warning: Unbrewed header files were found in /usr/local/include. If you didn't put them there on purpose they could cause problems when building Homebrew formulae, and may need to be deleted. Unexpected header files: /usr/local/include/arith.h /usr/local/include/binary_log_types.h /usr/local/include/cdt.h /usr/local/include/cgraph.h /usr/local/include/color.h /usr/local/include/decode.h /usr/local/include/demux.h /usr/local/include/encode.h /usr/local/include/errmsg.h /usr/local/include/fcfreetype.h /usr/local/include/fcprivate.h /usr/local/include/fontconfig.h /usr/local/include/freetype/config/ftconfig.h /usr/local/include/freetype/config/ftheader.h /usr/local/include/freetype/config/ftmodule.h /usr/local/include/freetype/config/ftoption.h /usr/local/include/freetype/config/ftstdlib.h /usr/local/include/freetype/freetype.h /usr/local/include/freetype/ftadvanc.h /usr/local/include/freetype/ftbbox.h /usr/local/include/freetype/ftbdf.h /usr/local/include/freetype/ftbitmap.h /usr/local/include/freetype/ftbzip2.h /usr/local/include/freetype/ftcache.h /usr/local/include/freetype/ftchapters.h /usr/local/include/freetype/ftcid.h /usr/local/include/freetype/ftdriver.h /usr/local/include/freetype/fterrdef.h /usr/local/include/freetype/fterrors.h /usr/local/include/freetype/ftfntfmt.h /usr/local/include/freetype/ftgasp.h /usr/local/include/freetype/ftglyph.h /usr/local/include/freetype/ftgxval.h /usr/local/include/freetype/ftgzip.h /usr/local/include/freetype/ftimage.h /usr/local/include/freetype/ftincrem.h /usr/local/include/freetype/ftlcdfil.h /usr/local/include/freetype/ftlist.h /usr/local/include/freetype/ftlzw.h /usr/local/include/freetype/ftmac.h /usr/local/include/freetype/ftmm.h /usr/local/include/freetype/ftmodapi.h /usr/local/include/freetype/ftmoderr.h /usr/local/include/freetype/ftotval.h /usr/local/include/freetype/ftoutln.h /usr/local/include/freetype/ftparams.h /usr/local/include/freetype/ftpfr.h /usr/local/include/freetype/ftrender.h /usr/local/include/freetype/ftsizes.h /usr/local/include/freetype/ftsnames.h /usr/local/include/freetype/ftstroke.h /usr/local/include/freetype/ftsynth.h /usr/local/include/freetype/ftsystem.h /usr/local/include/freetype/fttrigon.h /usr/local/include/freetype/fttypes.h /usr/local/include/freetype/ftwinfnt.h /usr/local/include/freetype/t1tables.h /usr/local/include/freetype/ttnameid.h /usr/local/include/freetype/tttables.h /usr/local/include/freetype/tttags.h /usr/local/include/ft2build.h /usr/local/include/geom.h /usr/local/include/graphviz_version.h /usr/local/include/gvc.h /usr/local/include/gvcext.h /usr/local/include/gvcjob.h /usr/local/include/gvcommon.h /usr/local/include/gvconfig.h /usr/local/include/gvplugin.h /usr/local/include/gvplugin_device.h /usr/local/include/gvplugin_layout.h /usr/local/include/gvplugin_loadimage.h /usr/local/include/gvplugin_render.h /usr/local/include/gvplugin_textlayout.h /usr/local/include/gvpr.h /usr/local/include/lt_dlloader.h /usr/local/include/lt_error.h /usr/local/include/lt_system.h /usr/local/include/mux.h /usr/local/include/mux_types.h /usr/local/include/my_command.h /usr/local/include/my_list.h /usr/local/include/mysql.h /usr/local/include/mysql/client_plugin.h /usr/local/include/mysql/plugin_auth_common.h /usr/local/include/mysql/udf_registration_types.h /usr/local/include/mysql_com.h /usr/local/include/mysql_time.h /usr/local/include/mysql_version.h /usr/local/include/mysqld_error.h /usr/local/include/mysqlx_ername.h /usr/local/include/mysqlx_error.h /usr/local/include/mysqlx_version.h /usr/local/include/pack.h /usr/local/include/pathgeom.h /usr/local/include/pathplan.h /usr/local/include/png.h /usr/local/include/pngconf.h /usr/local/include/textspan.h /usr/local/include/types.h /usr/local/include/usershape.h /usr/local/include/xdot.h Warning: Your Xcode (10.3) is outdated. Please update to Xcode 11.3 (or delete it). Xcode can be updated from the App Store. Warning: Broken symlinks were found. Remove them with `brew cleanup`: /usr/local/lib/node_modules/expo-cli/node_modules/.bin/detect-libc /usr/local/lib/node_modules/expo-cli/node_modules/.bin/prebuild-installまずは、
Warning: Unbrewed header files were found in /usr/local/include.の解決をします。Warning: Unbrewed header files were found in /usr/local/include. If you didn't put them there on purpose they could cause problems when building Homebrew formulae, and may need to be deleted. Unexpected header files: /usr/local/include/arith.h /usr/local/include/binary_log_types.h /usr/local/include/cdt.h /usr/local/include/cgraph.h ... ← 長いので省略ターミナルで以下を叩きます。
$ vim ~/.del_files.sh作成したファイルに2行目以降に
Unexpected header files:に記載されているファイルをコピペします。#!/bin/bash /usr/local/include/arith.h /usr/local/include/binary_log_types.h /usr/local/include/cdt.h /usr/local/include/cgraph.h ...以下の部分は参考にした記事からまるっと引用しています。
カーソルを一番上のファイル(2行目)の頭におき、
ctrl + vで矩形選択のビジュアルモード(VISUAL BLOCK)に移行。↓カーソルで一番下のファイルの頭まで選択し、:を押します。すると、下のラインに既に
:'<,'>が入力された状態でコマンドラインが表示されるので、続けてs/^/rm -f /と入力します。(rmは、ファイルやディレクトリを削除してあげるコマンドで、-fは、「削除しますか?」的なメッセージを都度出さないようにするオプションです。)
Enterを押して、全ての行(一番上以外)の先頭にs/^/rm -f /が追加されているのを確認したら、もう一度:を押します。一番下の行に入力欄が出てくるので、wq!と入力し、Enterを押します。$ bash ~/.del_files.shこれで対象ファイルの削除ができました。
次に、
Warning: Your Xcode (10.3) is outdated.を解決します。Warning: Your Xcode (10.3) is outdated. Please update to Xcode 11.3 (or delete it). Xcode can be updated from the App Store.App StoreでXcodeをアップデートします。
アップデートできたら、再度$ brew doctorを叩きます。
そうすると、Error: You have not agreed to the Xcode license. Please resolve this by running: sudo xcodebuild -license acceptが表示されたので、
$ sudo xcodebuild -license acceptを叩くと、Xcodeは解決できました。
次に、
Warning: Broken symlinks were found. Remove them with "brew cleanup"を解決をします。Warning: Broken symlinks were found. Remove them with `brew cleanup`: /usr/local/lib/node_modules/expo-cli/node_modules/.bin/detect-libc /usr/local/lib/node_modules/expo-cli/node_modules/.bin/prebuild-install以前、会社のReact Nativeの勉強会に参加していた時の残骸が残っていたので、これも削除します。
$ sudo rm -f /usr/local/lib/node_modules/expo-cli/node_modules/.bin/detect-libc
$ sudo rm -f /usr/local/lib/node_modules/expo-cli/node_modules/.bin/prebuild-install
すると、
$ brew doctor
Your system is ready to brew.
が表示されて、Homebrewのインストールは完了しました。
pyenvをインストールする
複数のPython環境を扱えるように、pyenvをインストールします。
MacOSとHomebrewとpyenvで快適python環境を。を参考にしました。$ brew install pyenv ==> Installing dependencies for pyenv: autoconf, openssl@1.1, pkg-config and readline ==> Installing pyenv dependency: autoconf ==> Downloading https://homebrew.bintray.com/bottles/autoconf-2.69.catalina.bott ==> Downloading from https://akamai.bintray.com/ca/ca510b350e941fb9395522a03f9d2 ######################################################################## 100.0% ==> Pouring autoconf-2.69.catalina.bottle.4.tar.gz ? /usr/local/Cellar/autoconf/2.69: 67 files, 3.0MB ==> Installing pyenv dependency: openssl@1.1 ==> Downloading https://homebrew.bintray.com/bottles/openssl@1.1-1.1.1d.catalina ==> Downloading from https://akamai.bintray.com/d7/d7f992ebfd78f80828051f6dc6a1a ######################################################################## 100.0% ==> Pouring openssl@1.1-1.1.1d.catalina.bottle.tar.gz ==> Caveats A CA file has been bootstrapped using certificates from the system keychain. To add additional certificates, place .pem files in /usr/local/etc/openssl@1.1/certs and run /usr/local/opt/openssl@1.1/bin/c_rehash openssl@1.1 is keg-only, which means it was not symlinked into /usr/local, because openssl/libressl is provided by macOS so don't link an incompatible version. If you need to have openssl@1.1 first in your PATH run: echo 'export PATH="/usr/local/opt/openssl@1.1/bin:$PATH"' >> ~/.bash_profile For compilers to find openssl@1.1 you may need to set: export LDFLAGS="-L/usr/local/opt/openssl@1.1/lib" export CPPFLAGS="-I/usr/local/opt/openssl@1.1/include" ==> Summary ? /usr/local/Cellar/openssl@1.1/1.1.1d: 7,983 files, 17.9MB ==> Installing pyenv dependency: pkg-config ==> Downloading https://homebrew.bintray.com/bottles/pkg-config-0.29.2.catalina. ==> Downloading from https://akamai.bintray.com/c0/c0a6927c8e404f6db8b14d6644a21 ######################################################################## 100.0% ==> Pouring pkg-config-0.29.2.catalina.bottle.1.tar.gz ? /usr/local/Cellar/pkg-config/0.29.2: 11 files, 623KB ==> Installing pyenv dependency: readline ==> Downloading https://homebrew.bintray.com/bottles/readline-8.0.1.catalina.bot ==> Downloading from https://akamai.bintray.com/ab/ab3c966f4cae7d0f3ecc5688bb989 ######################################################################## 100.0% ==> Pouring readline-8.0.1.catalina.bottle.tar.gz ==> Caveats readline is keg-only, which means it was not symlinked into /usr/local, because macOS provides the BSD libedit library, which shadows libreadline. In order to prevent conflicts when programs look for libreadline we are defaulting this GNU Readline installation to keg-only. For compilers to find readline you may need to set: export LDFLAGS="-L/usr/local/opt/readline/lib" export CPPFLAGS="-I/usr/local/opt/readline/include" For pkg-config to find readline you may need to set: export PKG_CONFIG_PATH="/usr/local/opt/readline/lib/pkgconfig" ==> Summary ? /usr/local/Cellar/readline/8.0.1: 48 files, 1.5MB ==> Installing pyenv ==> Downloading https://homebrew.bintray.com/bottles/pyenv-1.2.16.catalina.bottl ==> Downloading from https://akamai.bintray.com/1d/1da51fb67d5aac04bda57820d4bf9 ######################################################################## 100.0% ==> Pouring pyenv-1.2.16.catalina.bottle.tar.gz ? /usr/local/Cellar/pyenv/1.2.16: 671 files, 2.5MB ==> Caveats ==> openssl@1.1 A CA file has been bootstrapped using certificates from the system keychain. To add additional certificates, place .pem files in /usr/local/etc/openssl@1.1/certs and run /usr/local/opt/openssl@1.1/bin/c_rehash openssl@1.1 is keg-only, which means it was not symlinked into /usr/local, because openssl/libressl is provided by macOS so don't link an incompatible version. If you need to have openssl@1.1 first in your PATH run: echo 'export PATH="/usr/local/opt/openssl@1.1/bin:$PATH"' >> ~/.bash_profile For compilers to find openssl@1.1 you may need to set: export LDFLAGS="-L/usr/local/opt/openssl@1.1/lib" export CPPFLAGS="-I/usr/local/opt/openssl@1.1/include" For pkg-config to find openssl@1.1 you may need to set: export PKG_CONFIG_PATH="/usr/local/opt/openssl@1.1/lib/pkgconfig" ==> readline readline is keg-only, which means it was not symlinked into /usr/local, because macOS provides the BSD libedit library, which shadows libreadline. In order to prevent conflicts when programs look for libreadline we are defaulting this GNU Readline installation to keg-only. For compilers to find readline you may need to set: export LDFLAGS="-L/usr/local/opt/readline/lib" export CPPFLAGS="-I/usr/local/opt/readline/include" For pkg-config to find readline you may need to set: export PKG_CONFIG_PATH="/usr/local/opt/readline/lib/pkgconfig"インストールできました。
pyenv用にprofileを調整
この部分はMacOSとHomebrewとpyenvで快適python環境を。から引用しています。
pyenvのインストールの最後の所に細かいヒント(Caveats)が書いてあったので、従っておきます。具体的には2点
- pyenvはデフォルトでは~/.pyenvにファイルを置きたがるので、/usr/loca/var/pyenvを使う様にお願いする
- pyenvには自動補完機能があるので、それを提供してもらう。$ vim ~/.bash_profileを叩いて、
.bash_profileに以下内容を記載します。# pyenvさんに~/.pyenvではなく、/usr/loca/var/pyenvを使うようにお願いする export PYENV_ROOT=/usr/local/var/pyenv # pyenvさんに自動補完機能を提供してもらう if which pyenv > /dev/null; then eval "$(pyenv init -)"; fiインストールしたpyenvの確認
以下のように表示されたら、問題なしです。
$ pyenv --version
pyenv 1.2.16
Pythonをインストールする
pyenvでインストールできるPythonを確認します。
$ pyenv install --list

Available versions:
  2.1.3
  2.2.3
  2.3.7
  2.4.0
  2.4.1
  2.4.2
  2.4.3
  ...
インストールできるバージョンが多数表示されます。
次に、
Python 3.4.3をインストールします。$ pyenv install 3.4.3 ERROR: The Python ssl extension was not compiled. Missing the OpenSSL lib? Please consult to the Wiki page to fix the problem. https://github.com/pyenv/pyenv/wiki/Common-build-problems BUILD FAILED (OS X 10.15.2 using python-build 20180424) Inspect or clean up the working tree at /var/folders/kd/l6xnjrd50bjcb6p8vc9hq6n40000gn/T/python-build.20200121234254.85780 Results logged to /var/folders/kd/l6xnjrd50bjcb6p8vc9hq6n40000gn/T/python-build.20200121234254.85780.log Last 10 log lines: (cd /Users/ユーザー名/.pyenv/versions/3.4.3/share/man/man1; ln -s python3.4.1 python3.1) if test "xupgrade" != "xno" ; then \ case upgrade in \ upgrade) ensurepip="--upgrade" ;; \ install|*) ensurepip="" ;; \ esac; \ ./python.exe -E -m ensurepip \ $ensurepip --root=/ ; \ fi Ignoring ensurepip failure: pip 6.0.8 requires SSL/TLSのようなエラーが発生します。
これがよく分からなく、色々と試しましたが、pyenvでinstallできないが原因だったようです。。
Python 3.4.3入れられないのか。。上記記事を参考に
$ pyenv install 3.5.3

python-build: use openssl@1.1 from homebrew
python-build: use readline from homebrew
Downloading Python-3.5.3.tar.xz...
-> https://www.python.org/ftp/python/3.5.3/Python-3.5.3.tar.xz
Installing Python-3.5.3...
python-build: use readline from homebrew
python-build: use zlib from xcode sdk
Installed Python-3.5.3 to /Users/ユーザー名/.pyenv/versions/3.5.3
を叩くと、うまくインストールされました!!
AtCoderで使用するPython設定
AtCoder用フォルダで実行するPythonを設定します。
まず、AtCoder用フォルダを作成して、移動します。$ cd AtCoder/ ←今回はこのようなフォルダを作成しました。 $ pyenv local 3.5.3そして、確認をすると
$ python --version
Python 2.7.16
あれ、、デフォルトのPythonのままかわっていない。。
ググってみると、pyenvでPythonのバージョンを切り替えられない場合の対処法+を発見しました。記事の内容通りに、
$ pyenv init
# Load pyenv automatically by appending
# the following to ~/.bash_profile:

eval "$(pyenv init -)" ←この部分を ~/.bash_profileに記載します。
そして、
source ~/.bash_profileを叩くと、
python --version
Python 3.5.3
このフォルダで
Python 3.5.3が使えるようになりました!!まとめ
公式ドキュメントはしっかり読まないとやっぱりダメですね。。
今回はPython 3.5.3をインストールしましたが、AtCoderはPython 3.4.3が対象で、
もしコンテスト中に使い勝手が悪いとなったら、Python 3.4.3のインストールを検討します。
にしても、今回は遠回りしすぎたなぁ。