- 投稿日:2020-01-22T22:33:43+09:00
【UnityEditor拡張】毎フレームRepaintされるPropertyDrawer
TL;DR
Unityのユーザ定義PropertyDrawerの描画を毎フレーム自動更新する方法。
EditorWindowを継承していればUpdateがあるし、Editorを継承していればRequiresConstantRepaintがあります。
でもPropertyDrawerにはなくて不便なので頑張ってどうにかしました。記事の下の方に基底クラスとして汎用化したものを置いてあります。
一部Reflectionを使用、Unity2019.3.0f3にて動作確認済。
モチベーション
タイムラインと再生機能つきのPropertyDrawerを作りたかったのです。
現在位置を表示したいわけですが、マウスを動かしたりクリックしたりしないとRepaintが呼ばれないので、常に適切に表示するには別途Inspectorを拡張してoverride RequiresConstantRepaint() => true;する必要があります。
何もしなくても、あるいはAttributeをつけるだけで手軽に拡張できるのがPropertyDrawerの良さだというのに、これではあんまりです。実現までの道のり
過程はいいからモノを出せという方は飛ばしてどうぞ。
PropertyDrawer内部から自身をRepaintする
PropertyDrawerそのものにはRepaintという概念がないので、Repaintするためには親であるEditorのRepaintを呼ぶ必要があります。
アクティブなEditorはActiveEditorTracker.sharedTracker.activeEditorsでアクセスできるので、以下のように定義してRepaint()すればよいですね。SerializedObject parentSerializedObject; public override void OnGUI(Rect position, SerializedProperty property, GUIContent label) { parentSerializedObject = property.serializedObject; /*EditorGUI.BeginProperty(position, label, prop); ... (いつもの部分。以降のコードでは省略されます) EditorGUI.EndProperty();*/ } void Repaint() { foreach (var editor in ActiveEditorTracker.sharedTracker.activeEditors) { if (editor.serializedObject == parentSerializedObject) { editor.Repaint(); return; } } }ではこれをどこから呼ぶかですが、EditorWindowと違ってPropertyDrawerにはUpdateがありません。
EditorApplication.updateそこで出てくるのが、EditorのUpdateをフックするためのこのevent。
EditorApplication.update += Repaint;とすれば、毎UpdateごとにRepaint()が実行されるようになります。これを使っていきましょう。eventのadd/removeは大抵の場合OnEnabled/OnDisabled的な部分に書きますが、PropertyDrawerにはその類の「最初と最後に一度だけ呼ばれる」イベント、virtualメソッドが存在しません。
仕方がないのでOnGUI内に書きます。OnGUIは何度も呼ばれるので、addの前にremoveするのを忘れずに。SerializedObject parentSerializedObject; public override void OnGUI(Rect position, SerializedProperty property, GUIContent label) { parentSerializedObject = property.serializedObject; EditorApplication.update -= Repaint; //増殖を防ぐ EditorApplication.update += Repaint; } void Repaint(){/*略*/}これで、とりあえず毎フレームRepaintはされるようになりました。
event購読を解除する
addの前にremoveを挟むことで同一PropertyDrawer内での増殖は防いでいますが、開き直したPropertyDrawerは別のインスタンスになるようで、このままでは「選択しているGameObjectを変えて再び元のGameObjectを選択し直す」を繰り返すことでリークします。
これを防ぐため、選択項目が変わったらRepaintをremoveするようにしましょう。
Selection.selectionChangedを使う選択中のObjectの変化をフックするためのeventです。
SerializedObject parentSerializedObject;
public override void OnGUI(Rect position, SerializedProperty property, GUIContent label)
{
    parentSerializedObject = property.serializedObject;
    EditorApplication.update -= Repaint;
    EditorApplication.update += Repaint;
    Selection.selectionChanged -= OnSelectionChanged;
    Selection.selectionChanged += OnSelectionChanged;
}
void Repaint(){/*略*/}
void OnSelectionChanged()
{
    if (parentSerializedObject == null
        || parentSerializedObject.targetObject != Selection.activeObject)
    {
        EditorApplication.update -= Repaint;
        Selection.selectionChanged -= OnSelectionChanged;
    }
}
これで大丈夫な気がしますね。nullチェックもバッチリです。
早速PropertyDrawerを表示した状態で、別のGameObjectを選択してみましょう。
ダメみたいですね……
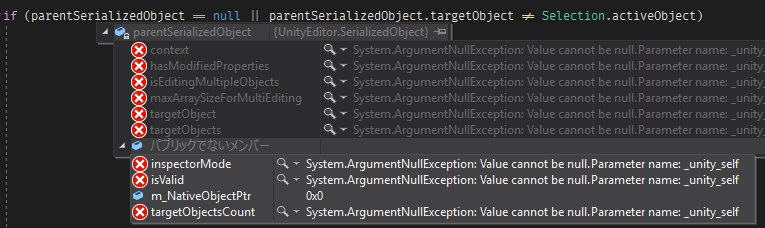
_unity_selfなるものがnullだそうです。知らんがな。VisualStudioでエラー箇所を確認してみると、
なんとparentSerializedObjectにまだ実体があり、しかしそのプロパティにアクセスできない状態。
targetObjectのget内でエラーが出てるみたいですね。
これは……Unityのバグかなあ。気が向いたらバグレポートでも出しますかね。
m_NativeObjectPtrで判断上のスクショを見ると、parentSerializedObjectのうち、ただ一つだけ正常にアクセスできているメンバがあります。
m_NativeObjectPtr、型はSystem.IntPtr。publicでないフィールド。選択解除時の値は0。
targetObjectのアドレスを保有するための内部フィールドだと考えられますね。
この値が0ならnullだと見なせばよさそうです。Reflectionしましょう。また、同スクリプトを載せた他のObjectを選択するときや選択解除するときも同様に
m_NativeObjectPtrは0だったので、選択中オブジェクトの比較は不要そうです。
nullチェックもいらなさそうですが、ちょっと怖いのでこっちは一応入れておきます。SerializedObject parentSerializedObject; public override void OnGUI(Rect position, SerializedProperty property, GUIContent label){/*略*/} void Repaint(){/*略*/} //キャッシュ static readonly FieldInfo fi_m_NativeObjectPtr = typeof(SerializedObject) .GetField("m_NativeObjectPtr", BindingFlags.NonPublic | BindingFlags.Instance); void OnSelectionChanged() { if (parentSerializedObject == null || (IntPtr)fi_m_NativeObjectPtr.GetValue(parentSerializedObject) == IntPtr.Zero) { EditorApplication.update -= Repaint; Selection.selectionChanged -= OnSelectionChanged; } }これでエラーは出なくなりました。
本当にリークしていないかどうかは、OnGUI()あたりにDebug.Log($"UpdateEvent Count = {EditorApplication.update.GetInvocationList().Length}");とでも書いておけばConsoleで確認できます。いくら選択し直しても数字が増えていかなければOK。
できたもの
コンパイルやUndo/Redoのフック、Updateフレームレートの変更、その他諸々追加して基底クラス化したものがこちら。
カスタムインスペクタ上で表示する場合はカスタムインスペクタ側でRequiresConstantRepaintするはずなので、二重にRepaintが走らないようフィルタリングしています。常識的な範囲でご自由に使ってどうぞ。リーク確認漏れとかバグとかあったらぜひ教えてくださいませ。
ConstantRepaintPropertyDrawer.csusing UnityEditor; using UnityEngine; using System; using System.Reflection; using UnityEditor.Compilation; public abstract class ConstantRepaintPropertyDrawer : PropertyDrawer { SerializedObject parentSerializedObject; static readonly FieldInfo fi_m_NativeObjectPtr = typeof(SerializedObject) .GetField("m_NativeObjectPtr", BindingFlags.NonPublic | BindingFlags.Instance); static double lastUpdateTime = 0; void Repaint() { if(Framerate <= 0 || EditorApplication.timeSinceStartup > lastUpdateTime + 1 / Framerate) { lastUpdateTime = EditorApplication.timeSinceStartup; foreach (var editor in ActiveEditorTracker.sharedTracker.activeEditors) { if (editor.serializedObject == parentSerializedObject) { editor.Repaint(); OnRepaint(); return; } } } } void _OnSelectionChanged() { OnSelectionChanged(); if (parentSerializedObject == null || (IntPtr)fi_m_NativeObjectPtr.GetValue(parentSerializedObject) == IntPtr.Zero) { EditorApplication.update -= Repaint; Selection.selectionChanged -= _OnSelectionChanged; CompilationPipeline.compilationStarted -= OnCompilationStarted; CompilationPipeline.compilationFinished -= OnCompilationFinished; Undo.undoRedoPerformed -= OnUndoRedoPerformed; } } /// <summary> /// Repaintの目標フレームレート。0以下で無制限(EditorApplication.updateごと)。既定値は60。 /// </summary> protected virtual float Framerate => 60; /// <summary> /// Repaint終了時に毎回呼ばれる。 /// </summary> protected virtual void OnRepaint() { } /// <summary> /// Selection変化時に呼ばれる。 /// </summary> protected virtual void OnSelectionChanged() { } /// <summary> /// コンパイル開始時に呼ばれる。 /// </summary> protected virtual void OnCompilationStarted(object obj) { } /// <summary> /// コンパイル終了時に呼ばれる。 /// </summary> protected virtual void OnCompilationFinished(object obj) { } /// <summary> /// Undo/Redoが行われた後に呼ばれる。 /// </summary> protected virtual void OnUndoRedoPerformed() { } /// <summary> /// sealed. OnGUIの代わりにOnGUIMainをoverrideしてください。 /// </summary> public sealed override void OnGUI(Rect position, SerializedProperty property, GUIContent label) { if (!ActiveEditorTracker.HasCustomEditor(property.serializedObject.targetObject)) { parentSerializedObject = property.serializedObject; EditorApplication.update -= Repaint; EditorApplication.update += Repaint; } Selection.selectionChanged -= _OnSelectionChanged; Selection.selectionChanged += _OnSelectionChanged; CompilationPipeline.compilationStarted -= OnCompilationStarted; CompilationPipeline.compilationStarted += OnCompilationStarted; CompilationPipeline.compilationFinished -= OnCompilationFinished; CompilationPipeline.compilationFinished += OnCompilationFinished; Undo.undoRedoPerformed -= OnUndoRedoPerformed; Undo.undoRedoPerformed += OnUndoRedoPerformed; OnGUIMain(position, property, label); } /// <summary> /// Override this method to make your own IMGUI based GUI for the property. /// </summary> protected virtual void OnGUIMain(Rect position, SerializedProperty property, GUIContent label) { base.OnGUI(position, property, label); } }要改善点
同じGameObject上でこのPropertyDrawerが複数回表示されている場合、その回数分Repaintが無駄に走ります。
PropertyDrawerが載ってるserializedObjectをどこかに保持しておけば比較でどうにかなりそうな気がしますが、めんどい。
あと複数選択時の挙動は未確認です。おわりに
デフォルトEditorもRequiresConstantRepaintをtrueにできればもうちょっと単純にできるのになぁと思いました。
あれは基底クラス(Editor)のvirtualメソッドの中身がreturn false;なのでReflectionじゃどうにもならないやつ。
メソッドの中身を動的に書き換える手段とか、実はどこかにあったりするんだろうか。

- 投稿日:2020-01-22T22:00:23+09:00
C# 年齢を算出してみた
C# 年齢算出してみた
自分の年齢を算出したいと思い、その時に調べて書いたプログラム。備忘録。
年齢算出プログラム
using System;

class Program
{
  static void Main()
  {
    var birthday = new DateTime(1994, 1, 23);
    var today = DateTime.Today;
    int age = getMyAge(birthday, today);
    Console.WriteLine("自分の年齢 : {0}歳", age);
  }
  public static int getMyAge (DateTime birthday, DateTime day)
  {
    var age = day.Year - birthday.Year;
    if (day < birthday.AddYears(age))
    {
      age--;
    }
    return age;
  }
}
- 投稿日:2020-01-22T18:20:33+09:00
Unity非同期処理を理解しようとしてみた
Unity非同期処理を理解しようとしてみた
Unityにおける非同期処理を理解するために、Simpleなコードから一歩づつ結果を見ていきます。
環境
- Windows10
- Unity 2019.2.11f1
- Visual Studio 2017
概要
- Unityで重い処理を実行してみる
- 重い処理を非同期実行してみる
- 重い処理の結果を待ってみる
- スレッドを追ってみる
- 後処理を正しい位置に修正
- (参考)Unity用のTaskパッケージ「UniTask」
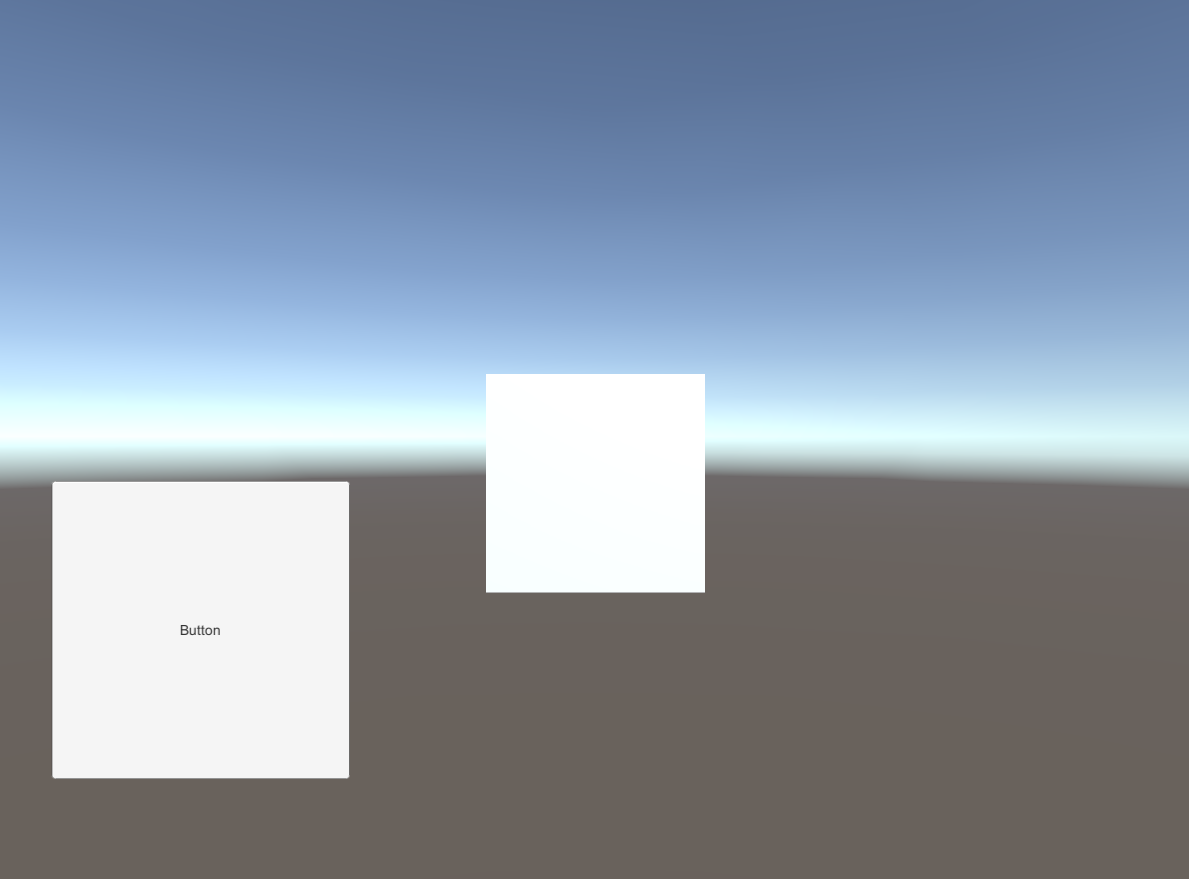
シーン構成
シーン上にはUpdateMethodで上下に移動するだけのCubeと重い処理が実行されるボタン、そのただ2つだけがあります。
やりたいこと
- 重い処理をバックグラウンドで動かしつつ、Cubeの往復を止めない。
- 重い処理が終わったことを検知して、Cubeを消す。
Unityで重い処理を実行してみる
ここからボタンの処理を書いていきます。
最もシンプルなコードから始めます。
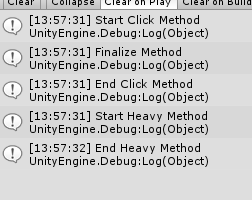
ボタンを押すとHeavyMethodとFinalizeMethodが順番に実行されます。
HeavyMethodは1秒Sleepするだけの単純な処理ですが、このコードを実行するとどうなるでしょうか?AsyncTest.csusing System.Collections; using System.Collections.Generic; using UnityEngine; using System.Threading; using System.Threading.Tasks; public class AsyncTest : MonoBehaviour { public void ButtonClick() { Debug.Log("Start Click Method"); HeavyMethod(); FinalizeMethod(); Debug.Log("End Click Method"); } void HeavyMethod() { Debug.Log("Start Heavy Method"); Thread.Sleep(1000); Debug.Log("End Heavy Method"); } void FinalizeMethod() { Debug.Log("Finalize Method"); } }結果はこちらです。
そしてHeavyMethodの実行中は、Cubeの動きは止まります。
重い処理を非同期で実行してみる
やっぱり重い処理の実行中は、シーンの処理(この場合はCubeの動き)を止めて欲しくないわけです。
ということで、重い処理を非同期実行にしてみます。AsyncTest.csusing System.Collections; using System.Collections.Generic; using UnityEngine; using System.Threading; using System.Threading.Tasks; public class AsyncTest : MonoBehaviour { public void ButtonClick() { Debug.Log("Start Click Method"); Task.Run(HeavyMethod); FinalizeMethod(); Debug.Log("End Click Method"); } void HeavyMethod() { Debug.Log("Start Heavy Method"); Thread.Sleep(1000); Debug.Log("End Heavy Method"); } void FinalizeMethod() { Debug.Log("Finalize Method"); } }
HeavyMethod();をTask.Run(HeavyMethod);に書き換えただけです。
これで結果がこのようになりました。
先ほどとは順番が変わっていますね。ButtonClickの中には
HeavyMethodFinilizeMethodとなっているのに、順番が入れ替わって、
FinilizeMethodHeavyMethodの順番になっているわけです。
さらに言えば、Heavy Methodが終わる前に、Click Methodを抜けているのがわかります。
この実装であれば、画面のCubeの動きも止まりません。重い処理の結果を待ってみる
さてここでまた新たな需要です。
「画面の動きは止めたくないけど、Finilize MethodはHeavy Methodが終わってから実行したい。」
わがままですね。
この需要を満たすように、処理を書き換えます。AsyncTest.csusing System.Collections; using System.Collections.Generic; using UnityEngine; using System.Threading; using System.Threading.Tasks; public class AsyncTest : MonoBehaviour { public void ButtonClick() { Debug.Log("Start Click Method"); Task.Run(HeavyMethod); // FinalizeMethod(); Debug.Log("End Click Method"); } void HeavyMethod() { Debug.Log("Start Heavy Method"); Thread.Sleep(1000); Debug.Log("End Heavy Method"); FinalizeMethod(); } void FinalizeMethod() { Debug.Log("Finalize Method"); } }
FinalizeMethodの場所を移動しただけです。
実行結果はこちら。
この方法もまた、Cubeの移動は止まりません。
でもちょっと待ってください。
FinalizeMethodでもし、GameObjectの操作などをしたらどうでしょう?
試してみましょう。AsyncTest.csusing System.Collections; using System.Collections.Generic; using UnityEngine; using System.Threading; using System.Threading.Tasks; public class AsyncTest : MonoBehaviour { public void ButtonClick() { Debug.Log("Start Click Method : " + Thread.CurrentThread.ManagedThreadId); Task.Run(HeavyMethod); // FinalizeMethod(); Debug.Log("End Click Method : " + Thread.CurrentThread.ManagedThreadId); } void HeavyMethod() { Debug.Log("Start Heavy Method : " + Thread.CurrentThread.ManagedThreadId); Thread.Sleep(1000); Debug.Log("End Heavy Method : " + Thread.CurrentThread.ManagedThreadId); FinalizeMethod(); } void FinalizeMethod() { Debug.Log("Start Finalize Method : " + Thread.CurrentThread.ManagedThreadId); Destroy(GameObject.Find("Cube")); Debug.Log("Start Finalize Method : " + Thread.CurrentThread.ManagedThreadId); } }
FinalizeMethodにCubeを破壊する処理と、おもむろにThreadのIdを出力する処理を追加しました。
結果はこちら。
あれ?
FinalizeMethodが途中で終了していますね。
Cubeも破壊されていないし、例外も宇宙の彼方に消えてしまいました。
Task.Run()で実行したHeavyMethodから以降の処理のThreadのIdが切り替わってますね。非同期にした処理が、マルチスレッドで動いているのがわかります。
Unityのシーン上のオブジェクトは、メインスレッド(番号1のThread)からしか、触れることができないので、このようになってしまいました。スレッドを追ってみる
- Cubeが消えない
- 例外が消える
という問題が発生していますが、一旦「Cubeが消えない」にフォーカスして、考えましょう。
DestroyCubeをメインスレッドから実行できればいいわけです。
というわけで修正していきます。AsyncTest.csusing System.Collections; using System.Collections.Generic; using UnityEngine; using System.Threading; using System.Threading.Tasks; public class AsyncTest : MonoBehaviour { private SynchronizationContext context; public void ButtonClick() { context = SynchronizationContext.Current; Debug.Log("Start Click Method : " + Thread.CurrentThread.ManagedThreadId); Task.Run(HeavyMethod); // FinalizeMethod(); Debug.Log("End Click Method : " + Thread.CurrentThread.ManagedThreadId); } void HeavyMethod() { Debug.Log("Start Heavy Method : " + Thread.CurrentThread.ManagedThreadId); Thread.Sleep(1000); Debug.Log("End Heavy Method : " + Thread.CurrentThread.ManagedThreadId); FinalizeMethod(); } void FinalizeMethod() { Debug.Log("Start Finalize Method : " + Thread.CurrentThread.ManagedThreadId); context.Post(state => DestroyCube(), null); // Destroy(GameObject.Find("Cube")); Debug.Log("End Finalize Method : " + Thread.CurrentThread.ManagedThreadId); } void DestroyCube() { Debug.Log("DestroyCube : " + Thread.CurrentThread.ManagedThreadId); Destroy(GameObject.Find("Cube")); } }いきなり
context = SynchronizationContext.Currentというものが出てきました。
これは、異なるThread間で状態をやりとりするためのオブジェクトです。
このcontextを経由して、FinalizeMethod内でcontext.Post()とすることで、メインスレッドに処理を戻すことができます。
また、本筋とは関係ありませんが、Cubeの破壊とLogの出力をまとめたMethodDestroyCubeを作成しました。結果はこちら。
ちゃんとDestoryCubeがメインスレッドで実行され、シーン内のCubeが破壊されました。
ちなみにThreadIdが先程と異なっているのは、Unityが空いてるThreadを適当にPoolからPickUpして使うからです。自分で指定しているわけではありませんよ。後処理を正しい位置に修正
さて、一応「やりたいこと」は実現できたように思いますね。
ただ、「重い処理の結果を待ってみる」でやったような、FinalizeMethod()をHeavyMethod内に書くのはよくない気がします。
HeavyMethodの本来の責務ではないし、構造がネストして複雑になります。
というわけで、FinalizeMethod()を本来あるべきButtonClick内に戻します。AsyncTest.csusing System.Collections; using System.Collections.Generic; using UnityEngine; using System.Threading; using System.Threading.Tasks; public class AsyncTest : MonoBehaviour { // private SynchronizationContext context; async void ButtonClick() { // context = SynchronizationContext.Current; Debug.Log("Start Click Method : " + Thread.CurrentThread.ManagedThreadId); await Task.Run(HeavyMethod); FinalizeMethod(); Debug.Log("End Click Method : " + Thread.CurrentThread.ManagedThreadId); } void HeavyMethod() { Debug.Log("Start Heavy Method : " + Thread.CurrentThread.ManagedThreadId); Thread.Sleep(1000); Debug.Log("End Heavy Method : " + Thread.CurrentThread.ManagedThreadId); // FinalizeMethod(); } void FinalizeMethod() { Debug.Log("Start Finalize Method : " + Thread.CurrentThread.ManagedThreadId); // context.Post(state => DestroyCube(), null); DestroyCube(); Debug.Log("End Finalize Method : " + Thread.CurrentThread.ManagedThreadId); } void DestroyCube() { Debug.Log("DestroyCube : " + Thread.CurrentThread.ManagedThreadId); Destroy(GameObject.Find("Cube")); } }ただ戻すだけでは、検証したように
Task.Run()の結果をまたずにFinalizeMethod()が動いてしまいます。
今回はTask.Run()の前にawaitというものがありますね。これは、Task.Run()が完了するまで次の処理を待てよ、という意味です。
これを付けると、VisualStudio2017様に「呼び出し元にasyncをつけろよ」と言われます。言われた通りにasyncをつけました。結果はこちら。
いいですね。正しい順番で動いてます。先ほどと違うのは、End Click Methodの位置でしょうか。
Task.Run()で実行した処理の中から、メインスレッドで処理をしたいという需要意外では、SynchronizationContextを使う必要はないってことなんですね。
これならDestroyCubeで発生した例外もcatchできます。Unity用のTask(UniTask)
今までは使ってきたTaskという仕組みは、C#に備わっている仕組みです。Unityの仕組みではありません。
これはusing System.Threading.Tasks;をimportしていることからもわかりますね。
実は、UnityにはTaskをもっとUnityに特化させたUniTaskというものがあるようです。
これを使うと、処理が速くなるだけではなく後々いろいろメリットがありそうです。
合わせて、今回は自作メソッドごとTask.Run()で呼び出しましたが、今回言及しなかった、別スレッドでの処理の例外をメインスレッドで受けるためにも「UniTaskCompletionSource」などを使って直接awaitできるように修正したら、よりいいのではないでしょうか。使い方
UniTaskをGitHubから拾ってきて、UnityPackageをimportしたら、using UniRx.Async;を書く。それでは。


- 投稿日:2020-01-22T17:27:15+09:00
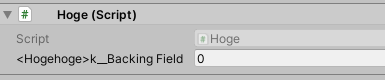
Unityエディタ上で表示される自動実装プロパティの名前がいい感じに

- 投稿日:2020-01-22T15:27:00+09:00
.NET Core3.1でCORSの設定をする
サーバーサイドとフロントサイド(今回はAngular)を別サーバーで実装する場合、Hostされるポート番号が異なるため、CORSの設定をする必要がある。
環境
Angular 8.2.14
.NET Core 3.1サーバーサイド:
https://localhost:44342フロントサイド:
http://localhost:4200※
localhost:4200はAngularのデフォルトのポート番号問題
何も設定しないと、フロントサイドからサーバーサイドにhttpリクエストした場合、下記のエラーによりレスポンスが返されない。
Access to XMLHttpRequest at 'https://localhost:44342/api/weatherforecast/getweatherforecast' from origin 'http://localhost:4200' has been blocked by CORS policy: Response to preflight request doesn't pass access control check: No 'Access-Control-Allow-Origin' header is present on the requested resource.
Startup.csにCORSの設定を行う
CORSの設定は、Startup.csで行う。
ポイントは
app.UseCors();をapp.UseEndpoints();の後に呼び出す- 複数のOriginを許可するには
.WithOrigins()に配列でURLを指定するusing Microsoft.AspNetCore.Builder; using Microsoft.AspNetCore.Hosting; using Microsoft.Extensions.Configuration; using Microsoft.Extensions.DependencyInjection; using Microsoft.Extensions.Hosting; using Microsoft.AspNetCore.Authentication.AzureAD.UI; using Microsoft.AspNetCore.Authentication; using Microsoft.AspNetCore.Mvc; namespace SampleWebApi { public class Startup { public Startup(IHostEnvironment env) { Configuration = builder.Build(); } public IConfiguration Configuration { get; } // This method gets called by the runtime. Use this method to add services to the container. public void ConfigureServices(IServiceCollection services) { // ~省略~ // ↓追加↓ services.AddCors(options => { options.AddDefaultPolicy( builder => builder .AllowAnyMethod() .AllowAnyHeader() .WithOrigins(new string[] { "http://localhost:4200" }) ); options.AddPolicy("CorsPolicyName", builder => builder .AllowAnyMethod() .AllowAnyHeader() .WithOrigins(new string[] { "http://localhost:8080" }) ); }); // This method gets called by the runtime. Use this method to configure the HTTP request pipeline. public void Configure(IApplicationBuilder app, IWebHostEnvironment env) { // ~省略~ app.UseEndpoints(endpoints => { endpoints.MapControllerRoute( name: "default", pattern: "{controller}/{action=Index}/{id?}"); }); // ↓追加↓ app.UseCors(); } } }APIごとにCORSを設定するには
Controllerの属性に
[EnableCore("CorsPolicyName")]を指定するとAPIごとにCORSを設定できます。[HttpGet] [Route("GetWeatherForecast")] [Authorize] [EnableCors("CorsPolicyName")] public IEnumerable<WeatherForecast> Get() { var rng = new Random(); return Enumerable.Range(1, 5).Select(index => new WeatherForecast { Date = DateTime.Now.AddDays(index), TemperatureC = rng.Next(-20, 55), Summary = Summaries[rng.Next(Summaries.Length)] }) .ToArray(); }参考ページ
ASP.NET Core でのクロスオリジン要求 (CORS) を有効にする | Microsoft Docs
.NET CORE 2.0 Angular 5: Allowing Cors - Stack Overflow
ASP.NET Core 3.0 への移行時に悩んだ点と新しくなった Endpoint Routing について - しばやん雑記
- 投稿日:2020-01-22T13:16:14+09:00
【C#】Project euler 62問目
C#を用いてProjectEulerに挑戦している人の記録です。VisualStudio2017で、1つのフォームアプリの中に問題番号のボタンを作成し、そのボタンをクリックすると結果をラベルに表示するという形式でやっています。
62問目
立方数
41063625 (345^3)は, 桁の順番を入れ替えると2つの立方数になる:
56623104 (384^3) , 66430125 (405^3)である. 41063625は, 立方数になるような桁の置換をちょうど3つもつ最小の立方数である.
立方数になるような桁の置換をちょうど5つもつ最小の立方数を求めよ.
private void button62_Click(object sender, EventArgs e)
        {
            const int Max = 10000;
            const int MaxCount = 5;

            long[] CubeArray = Enumerable.Range(1, Max).Select(X => (long)X * X * X).ToArray();

            for (int i = 0; i <= CubeArray.GetUpperBound(0); i++)
            {
                var sb1 = new StringBuilder();
                foreach (char Each in CubeArray[i].ToString().OrderBy(X => X))
                    sb1.Append(Each);

                var AnswerList = new List<int>() { i };
                int Cnt = 1;
                for (int j = i + 1; j <= CubeArray.GetUpperBound(0); j++)
                {
                    if (sb1.ToString().Length > CubeArray[j].ToString().Length) continue;
                    if (sb1.ToString().Length < CubeArray[j].ToString().Length) break;

                    var sb2 = new StringBuilder();

                    foreach (char Each in CubeArray[j].ToString().OrderBy(X => X))
                        sb2.Append(Each);

                    if (sb1.ToString().Equals(sb2.ToString()))
                    {
                        AnswerList.Add(j);
                        if (++Cnt > MaxCount) break;
                    }
                }
                if (Cnt == MaxCount)
                {
                    AnswerList.ForEach(X => textBox1.AppendText((X + 1) + "の立方" + (long)(X + 1) * (X + 1) * (X + 1) + " "));
                    label1.Text = "Answer =" + CubeArray[i].ToString();
                    return;
                }
            }
        }
2つの立方数を計算するループで、桁の順番を入れ替えて他の立方数になるということは、昇順で並べ替えたときに同じなので、昇順で並び替えて5つ等しいものが見つかると終了という仕組みです。
感想
かなり調べたので、自分の力で解けるように努力します
- 投稿日:2020-01-22T11:39:31+09:00
Windows版QuickLookのプラグインの読み込み・インストールのロジックを読む
OSXにある便利機能のQuickLook。それのwindows版のフリーソフトQuickLookのプラグイン部分のロジックを読んでみた。
調査したレポジトリのコミットはこちらgithub.com/QL-Win/QuickLook。2019年11月12日 22:32 JST時点のコミット。まとめ
- Namespaceプロパティが重要で、バージョンは関係なかった。UIに表示するだけで、値の大小比較はしていない
- プラグインのインストール先はユーザーがインストールするもの、システムにプリインストールされているものの2つある。
- インストール先は2つに別れているが、読み込み後に同じ配列に追加されてPriorityプロパティだけでソートしている。システムにプリインストールされているプラグインが優先される事も無いし、Priorityが同じ時にどうなるかは未定義。
QuickLookとは
OSXはファイルを選択してスペースキーを押すとプレビューが表示される機能がある。プレビューが表示されてもフォーカスは元のファイラー側にあり、表示中にカーソルキーで選択状態のファイルを変更するとプレビューの内容も更新される。
これをwindowsで再現したソフトがQuickLook。OSXの機能と同じ名前でちょっと紛らわしい。OS標準の機能ではないのでサクサク感は少し劣る。プラグインをインストールするロジック
QuickLook.Plugin.PluginInstallerプロジェクトがプラグインインストーラー。
最初に実行されるのはPlugin.csのinitメソッド。この中でApp.UserPluginPathの中の"*.to_be_deleted"ファイルを削除している。
QuickLookのプラグインはインストール時に同じ名前のプラグインがあると、そのプラグインのファイルを削除するのではなく、xxx.to_be_deleted というファイルにリネームする処理がある。public void Init() { CleanupOldPlugins(App.UserPluginPath); } private static void CleanupOldPlugins(string folder) { if (!Directory.Exists(folder)) return; Directory.GetFiles(folder, "*.to_be_deleted", SearchOption.AllDirectories).ForEach(file => { try { File.Delete(file); } catch (Exception) { // ignored } }); }次はPluginInfoPanel.xaml.csのReadInfoメソッド。_path変数にはプラグインファイルのパスが入っている。
プラグインファイルを解凍し、"QuickLook.Plugin.Metadata.config"という名前固定のxmlファイルを読み込み。xmlの名前空間、説明文、バージョン情報を読み込む。
名前空間は"QuickLook.Plugin."から始まらない場合はエラーとなる。バージョン情報や説明文はUIに表示するだけ。private void ReadInfo() { filename.Text = Path.GetFileNameWithoutExtension(_path); var xml = LoadXml(GetFileFromZip(_path, "QuickLook.Plugin.Metadata.config")); _namespace = GetString(xml, @"/Metadata/Namespace"); var okay = _namespace != null && _namespace.StartsWith("QuickLook.Plugin."); filename.Text = okay ? _namespace : "Invalid plugin."; version.Text = "Version " + GetString(xml, @"/Metadata/Version", "not defined"); description.Text = GetString(xml, @"/Metadata/Description", string.Empty); btnInstall.Visibility = okay ? Visibility.Visible : Visibility.Collapsed; }プラグインをインストールボタンが押されたら同ファイルのDoInstallが実行。CleanUp()は既存のプラグインを.to_be_deletedファイルにリネームする。その後、インストールファイルを名前空間のディレクトリに解凍する。この後再起動を促すメッセージを表示してインストールは終了。
private Task DoInstall()
{
    var targetFolder = Path.Combine(App.UserPluginPath, _namespace);
    return new Task(() =>
    {
        CleanUp();

        try
        {
            ZipFile.ExtractToDirectory(_path, targetFolder);
        }
        catch (Exception ex)
        {
            Dispatcher.BeginInvoke(new Action(() => description.Text = ex.Message));
            Dispatcher.BeginInvoke(new Action(() => btnInstall.Content = "Installation failed."));
            CleanUp();
        }
    });

    void CleanUp()
    {
        if (!Directory.Exists(targetFolder))
        {
            Directory.CreateDirectory(targetFolder);
            return;
        }

        try
        {
            Directory.GetFiles(targetFolder, "*", SearchOption.AllDirectories)
                .ForEach(file => File.Move(file,
                    Path.Combine(Path.GetDirectoryName(file), Guid.NewGuid() + ".to_be_deleted")));
        }
        catch (Exception ex)
        {
            Dispatcher.BeginInvoke(new Action(() => description.Text = ex.Message));
            Dispatcher.BeginInvoke(new Action(() => btnInstall.Content = "Installation failed."));
        }
    }
}
プラグインをロードするロジック
PluginManager.cs のコンストラクタでユーザが追加したプラグイン・システムデフォルトのプラグインを読み込んで初期化する。
App.UserPluginPathはC:\Users\UserName\AppData\Roaming\pooi.moe\QuickLook\QuickLook.Plugin\。App.AppPathはexeファイルの位置。private PluginManager() { LoadPlugins(App.UserPluginPath); LoadPlugins(Path.Combine(App.AppPath, "QuickLook.Plugin\\")); InitLoadedPlugins(); }LoadPluginsの中身。フォルダに対して"QuickLook.Plugin.*.dll"のファイルを全てリストアップ。dllファイルを読み込んで、Priorityプロパティでソート。
private void LoadPlugins(string folder)
{
    if (!Directory.Exists(folder))
        return;

    Directory.GetFiles(folder, "QuickLook.Plugin.*.dll",
            SearchOption.AllDirectories)
        .ToList()
        .ForEach(
            lib =>
            {
                (from t in Assembly.LoadFrom(lib).GetExportedTypes()
                        where !t.IsInterface && !t.IsAbstract
                        where typeof(IViewer).IsAssignableFrom(t)
                        select t).ToList()
                    .ForEach(type => LoadedPlugins.Add(type.CreateInstance<IViewer>()));
            });

    LoadedPlugins = LoadedPlugins.OrderByDescending(i => i.Priority).ToList();
}
その後各プラグインのinitメソッドを呼ぶ。
private void InitLoadedPlugins()
{
    LoadedPlugins.ForEach(i =>
    {
        try
        {
            i.Init();
        }
        catch (Exception e)
        {
            ProcessHelper.WriteLog(e.ToString());
        }
    });
}

- 投稿日:2020-01-22T09:28:23+09:00
WPF コードによる UIControlとのバインディング
はじめに
「WPFで、XAMLでないところでユーザーコントロールをnewして、データとバインディングしておいて、
そのnewしてあるユーザーコントロールを、公開したい」
という都合がありまして、そのためのテストプログラムを書きました。
まずは、テストプログラムなので、UIのコントロールはxaml側に書いています。ググると、いくつもサンプルは見つかるのですが、自分のイメージに近いものを書きました。
テストプログラムの内容
ラベル一つと、ボタン一つ
ボタンを押すと、ラベルの数値が1ずつ増えますコード
MainWindow.xaml.csusing System.ComponentModel; using System.Windows; using System.Windows.Controls; using System.Windows.Data; namespace WpfApp14 { /// <summary> /// MainWindow.xaml の相互作用ロジック /// </summary> public partial class MainWindow : Window { // バインディングさせたいデータソース Class1 obj = new Class1(1); public MainWindow() { InitializeComponent(); // 実質的なバインディングのコードは、ここの2行 label1.DataContext = (object)obj; //label1.SetBinding(Label.ContentProperty, new Binding("val1")); // どちらでもできた label1.SetBinding(Label.ContentProperty, nameof(Class1.val1)); // どちらでもできた } private void Button_Click(object sender, RoutedEventArgs e) { // バインディングさせたデータソース内のプロパティを更新 obj.val1 += 1; } } class Class1 : INotifyPropertyChanged // バインディングさせるソースは、INotifyPropertyChangedが必要 { private int _val1; public int val1 { get { return _val1; } set { _val1 = value; OnPropertyChanged(nameof(val1)); } } public event PropertyChangedEventHandler PropertyChanged; private void OnPropertyChanged(string name) { if (PropertyChanged != null) { PropertyChanged(this, new PropertyChangedEventArgs(name)); } } public Class1(int x) { val1 = x; } } }MainWindow.xaml<Window x:Class="WpfApp14.MainWindow" xmlns="http://schemas.microsoft.com/winfx/2006/xaml/presentation" xmlns:x="http://schemas.microsoft.com/winfx/2006/xaml" xmlns:d="http://schemas.microsoft.com/expression/blend/2008" xmlns:mc="http://schemas.openxmlformats.org/markup-compatibility/2006" xmlns:local="clr-namespace:WpfApp14" mc:Ignorable="d" Title="MainWindow" Height="450" Width="800"> <StackPanel> <Label x:Name="label1" Height="40" /> <Button Click="Button_Click" Content="Push" /> </StackPanel> </Window>参考にした記事
方法 : コードでバインディングを作成する
https://docs.microsoft.com/ja-jp/dotnet/framework/wpf/data/how-to-create-a-binding-in-code
WPFでコードだけどバインドするときの例
https://mohmongar.net/?p=951
C#(MVVM):ソースコードにてバインディング設定する方法
https://www.kakistamp.com/entry/2018/06/22/204440
