- 投稿日:2019-11-30T23:55:36+09:00
言語処理100本ノックの解答と感想-前編
advent calendar初日だが特別感なく書きやすいものを書く
これは
言語処理100本ノックを解いたので解答と感想を1問ずつ書いていくもの(現在11/30 PM20:30なので書けるところまでが前編)
前提条件
- 環境
- Dockerfileのリンク(関係ないのも入ってる)
- 実力
- mecab, gensimくらいはなにもわからず触ったことがある
- 解き方
- とりあえず自力で解き、10問ごとに不安だったところをググって確認した
- ので、2通りの答えを載せる部分もある
- 言い訳
- まとめている途中で気づいた誤答の訂正が間に合っていない
- 感謝
- こういった教材を公開していただけるのは独学で闇の中を進む者としてはとてもありがたいです
反省
この記事を描くために自分でコードを読み直していたので、擬似コードレビューとなり
"と'が混在- rowのrと、lineのlが混在
などなど多くの改善点が判明した
本編
第1章: 準備運動
00 文字列の逆順
文字列"stressed"の文字を逆に(末尾から先頭に向かって)並べた文字列を得よ.
## 00
smt = "stressed"
ans = ""
for i in range(len(smt)):
    ans += smt[-i - 1]
print(ans)
知らなかった書き方が↓
## 00
smt = "stressed"
smt[::-1]
つまり
list[start:stop:step]ということでした01 「パタトクカシーー」
「パタトクカシーー」という文字列の1,3,5,7文字目を取り出して連結した文字列を得よ.
## 1
smt = "パタトクカシーー"
''.join([smt[i] for i in range(len(smt)) if i % 2==0])
この時点では知らなかったのでこれも書き直す↓
## 1
smt = "パタトクカシーー"
smt[::2]
02 「パトカー」+「タクシー」=「パタトクカシーー」
「パトカー」+「タクシー」の文字を先頭から交互に連結して文字列「パタトクカシーー」を得よ.
## 2
smt1 = "パトカー"
smt2 = "タクシー"
''.join([p + t for p, t in zip(smt1, smt2)])
なんかゴリゴリ感がある
03 円周率
"Now I need a drink, alcoholic of course, after the heavy lectures involving quantum mechanics."という文を単語に分解し,各単語の(アルファベットの)文字数を先頭から出現順に並べたリストを作成せよ.
## 3
smt = "Now I need a drink, alcoholic of course, after the heavy lectures involving quantum mechanics."
[len(w) - w.count(',') - w.count('.') for w in smt.split(' ')]
isalpha()を使ってうまく書きたかったが内包表記での二重ループをうまくできなくて一時的にこれを解答とした04 元素記号
"Hi He Lied Because Boron Could Not Oxidize Fluorine. New Nations Might Also Sign Peace Security Clause. Arthur King Can."という文を単語に分解し,1, 5, 6, 7, 8, 9, 15, 16, 19番目の単語は先頭の1文字,それ以外の単語は先頭に2文字を取り出し,取り出した文字列から単語の位置(先頭から何番目の単語か)への連想配列(辞書型もしくはマップ型)を作成せよ.
## 4
smt = "Hi He Lied Because Boron Could Not Oxidize Fluorine. New Nations Might Also Sign Peace Security Clause. Arthur King Can."
dic = {}
target_index = [1, 5, 6, 7, 8, 9, 15, 16, 19]
for i, w in enumerate(smt.split(' ')):
    if i + 1 in target_index:
        dic[i + 1] = w[0]
    else:
        dic[i + 1] = w[:2]
dic
targetとか決め打ちでいいのか?とかifで分けていいのか?とか疑心暗鬼がやばすぎるがこのまま進む
05 n-gram
与えられたシーケンス(文字列やリストなど)からn-gramを作る関数を作成せよ.この関数を用い,"I am an NLPer"という文から単語bi-gram,文字bi-gramを得よ.
## 5
def get_n_gram(n, smt):
    words = smt.split(' ')
    return  [smt[i:i+n] for i in range(len(smt) - n + 1)], [' '.join(words[i:i+n]) for i in range(len(words) -n + 1)]

get_n_gram(3, "I am an NLPer")
スライスで上手く書けたな〜と思ったのと文字と単語分けたほうがいいかも
06 集合
"paraparaparadise"と"paragraph"に含まれる文字bi-gramの集合を,それぞれ, XとYとして求め,XとYの和集合,積集合,差集合を求めよ.さらに,'se'というbi-gramがXおよびYに含まれるかどうかを調べよ.
## 6
smt1 = "paraparaparadise"
smt2 = "paragraph"
X = set()
for i in range(len(smt1) - 2 + 1):
    X.add(smt1[i:i+2])
Y = set()
for i in range(len(smt2) - 2 + 1):
    Y.add(smt2[i:i+2])

print(X | Y)
print(X & Y)
print(X - Y)
print('se' in (X and Y))
print('se' in (X or Y))
内包表記でかけそう、、
Setが重複を消せるのを再確認したのと、listからuniqueなものが欲しい時って一旦Setにするとかアリかも07 テンプレートによる文生成
引数x, y, zを受け取り「x時のyはz」という文字列を返す関数を実装せよ.さらに,x=12, y="気温", z=22.4として,実行結果を確認せよ.
## 7
def get_template(x, y, z):
    return "{}時の{}は{}".format(x, y, z)

get_template(12, '気温', 22.4)
これは普段から使うのでできたが、{0}などで位置指定する方法をよく忘れる
08 暗号文
与えられた文字列の各文字を,以下の仕様で変換する関数cipherを実装せよ.
英小文字ならば(219 - 文字コード)の文字に置換
その他の文字はそのまま出力
この関数を用い,英語のメッセージを暗号化・復号化せよ.## 8 class Coder: def __init__(): pass def encode(smt): code = "" for i in range(len(smt)): if smt[i] .isalpha() and smt[i].islower(): code += chr(219 - ord(smt[i])) else: code += smt[i] return code def decode(code): stm = "" for i in range(len(code)): if code[i] .isalpha() and code[i].islower(): smt += chr(219 - ord(code[i])) else: smt += code[i] return smt coder = Coder smt = "I couldn't believe that" code = coder.encode(smt) desmt = coder.encode(code) print(smt) print(code) print(desmt)目が悪くてcipherをこの瞬間までcoderだと見間違えていた、しかもclassではなく関数でした
そして、文字コードは何度調べても忘れるので今度まとめたい09 Typoglycemia
スペースで区切られた単語列に対して,各単語の先頭と末尾の文字は残し,それ以外の文字の順序をランダムに並び替えるプログラムを作成せよ.ただし,長さが4以下の単語は並び替えないこととする.適当な英語の文(例えば"I couldn't believe that I could actually understand what I was reading : the phenomenal power of the human mind .")を与え,その実行結果を確認せよ.
## 9
import random
def feel_typoglycemia(smt):
    typogly = []
    for w in smt.split(' '):
        if len(w) <= 4:
            typogly.append(w)
        else:
            mid = list(w)[1:-1]
            random.shuffle(mid)
            typogly.append(w[0] + ''.join(mid) + w[-1])
    return ' '.join(typogly)

smt = "I couldn't believe that I could actually understand what I was reading : the phenomenal power of the human mind ."
feel_typoglycemia(smt)
スライスで先頭末尾だけ外して、混ぜて、装着する処理にした
当時の記憶がないので関数名の由来がわからないが、公開する予定がなくその時の感情でつけたと思われる第2章: UNIXコマンドの基礎
タイトル的にコマンドの確認かと思い込んでいたが、UNIXコマンドとはあくまでプログラムの実行結果の確認用だった
hightemp.txtは,日本の最高気温の記録を「都道府県」「地点」「℃」「日」のタブ区切り形式で格納したファイルである.以下の処理を行うプログラムを作成し,hightemp.txtを入力ファイルとして実行せよ.さらに,同様の処理をUNIXコマンドでも実行し,プログラムの実行結果を確認せよ.
10 行数のカウント
行数をカウントせよ.確認にはwcコマンドを用いよ.
## 10
with open('./hightemp.txt',) as f:
    print(len([r for r in f.read().split('\n') if r is not '']))
## 10 cat hightemp.txt | wc -lrはrowからだと思うがこのあとlineのlと混合していく
11 タブをスペースに置換
タブ1文字につきスペース1文字に置換せよ.確認にはsedコマンド,trコマンド,もしくはexpandコマンドを用いよ.
## 11
with open('./hightemp.txt',) as f:
    print([r.replace('\t', ' ') for r in f.read().split('\n') if r is not ''])
## 11 cat hightemp.txt | sed "s/\t/\ /g" ## 11 cat hightemp.txt | tr "\t" "\ " ## 11 expand -t 1 hightemp.txtsedはvimでよくつかうやつなのでわかった、tr, expandは学びだった
12 1列目をcol1.txtに,2列目をcol2.txtに保存
各行の1列目だけを抜き出したものをcol1.txtに,2列目だけを抜き出したものをcol2.txtとしてファイルに保存せよ.確認にはcutコマンドを用いよ.
## 12
with open('./hightemp.txt',) as f:
    table = [r for r in f.read().split('\n') if r is not '']

with open('col1.txt', mode='w') as f:
    for t in table:
        f.write(t.split('\t')[0] + '\n')
with open('col2.txt', mode='w') as f:
    for t in table:
        f.write(t.split('\t')[1] + '\n')
## 12 cat hightemp.txt | sed "s/\t/\ /g" | cut -f 1 -d " " > col1.txt cat hightemp.txt | sed "s/\t/\ /g" | cut -f 2 -d " " > col2.txt縦の操作のイメージが分かずに愚直にやった
13 col1.txtとcol2.txtをマージ
12で作ったcol1.txtとcol2.txtを結合し,元のファイルの1列目と2列目をタブ区切りで並べたテキストファイルを作成せよ.確認にはpasteコマンドを用いよ.
## 13
with open('cols.txt', mode='w') as c:
    with open('col1.txt') as f:
        with open('col2.txt') as ff:
            r1 = f.readline()
            r2 = ff.readline()
            c.write(r1.replace('\n', '') + '\t' + r2)
            while r1:
                while r2:
                    r1 = f.readline()
                    r2 = ff.readline()
                    c.write(r1.replace('\n', '') + '\t' + r2)
## 13 paste col1.txt col2.txt > cols.txt cat cols.txtf, ffから滲み出るダメ感
pasteは学びだった14 先頭からN行を出力
自然数Nをコマンドライン引数などの手段で受け取り,入力のうち先頭のN行だけを表示せよ.確認にはheadコマンドを用いよ.
## 14
n = 5
with open('./hightemp.txt') as f:
    lines = f.read()
for l in lines.split('\n')[:n]:
    print(l)
head -n 5 hightemp.txtコマンドライン引数の部分を失念していたので明確な誤答です、
sys.argvを用いたものを追記する予定です15 末尾のN行を出力
自然数Nをコマンドライン引数などの手段で受け取り,入力のうち末尾のN行だけを表示せよ.確認にはtailコマンドを用いよ.
## 15
n = 5
with open('./hightemp.txt') as f:
    lines = f.read()
for l in lines.split('\n')[-n:]:
    print(l)
## 15 tail -n 5 hightemp.txt同じく、コマンドライン引数の部分を失念していたので明確な誤答です、
sys.argvを用いたものを追記する予定です16 ファイルをN分割する
自然数Nをコマンドライン引数などの手段で受け取り,入力のファイルを行単位でN分割せよ.同様の処理をsplitコマンドで実現せよ.
## 16
import math
with open('./hightemp.txt') as f:
    obj = f.read()
lines = [ l for l in obj.split('\n')]
n = 3
ni = math.ceil(len(lines) / n)
for i in range(0, len(lines), ni):
    j = i + ni
    print(len(lines[i:j]))
## 16 split -n 5 hightemp.txt同じく、コマンドライン引数の部分を失念していたので明確な誤答です、
sys.argvを用いたものを追記する予定です17 1列目の文字列の異なり
1列目の文字列の種類(異なる文字列の集合)を求めよ.確認にはsort, uniqコマンドを用いよ.
## 17
with open('./hightemp.txt') as f:
    obj = f.read()
set(row.split('\t')[0] for row in obj.split('\n') if not row =='')
## 17 cat hightemp.txt | sed "s/\t/\ /g" | cut -f 1 -d " " | sort | uniqこんなにパイプでつなげたのは初めてなのでワンライナの悦びを識った
18 各行を3コラム目の数値の降順にソート
各行を3コラム目の数値の逆順で整列せよ(注意: 各行の内容は変更せずに並び替えよ).確認にはsortコマンドを用いよ(この問題はコマンドで実行した時の結果と合わなくてもよい).
## 18
with open('./hightemp.txt') as f:
    obj = f.read()
rows = [row for row in obj.split('\n') if not row =='']
sorted(rows, key=lambda x:  -1 * float(x.split('\t')[2]))
## 18 cat hightemp.txt | sed "s/\t/\ /g" | sort -r -k 3 -t " "floatにキャストが必要だった
19 各行の1コラム目の文字列の出現頻度を求め,出現頻度の高い順に並べる
各行の1列目の文字列の出現頻度を求め,その高い順に並べて表示せよ.確認にはcut, uniq, sortコマンドを用いよ.
## 19
with open('./hightemp.txt') as f:
    obj = f.read()

rows =[row.split('\t')[0] for row in obj.split('\n') if not row =='']
c_dic= {}
for k in set(rows):
    c_dic[k] = rows.count(k)
sorted(c_dic.items(), key=lambda x: -x[1])
## 19 cat hightemp.txt | sed "s/\t/\ /g" | cut -f 1 -d " " | sort | uniq -c | sort -rn -k 3 -t " "rだったりrowだったりするのは反省点
第3章: 正規表現
Wikipediaの記事を以下のフォーマットで書き出したファイルjawiki-country.json.gzがある.
1行に1記事の情報がJSON形式で格納される
各行には記事名が"title"キーに,記事本文が"text"キーの辞書オブジェクトに格納され,そのオブジェクトがJSON形式で書き出される
ファイル全体はgzipで圧縮される
以下の処理を行うプログラムを作成せよ.あまり正規表現を使わないですり抜けてしまった感がある
wget http://www.cl.ecei.tohoku.ac.jp/nlp100/data/jawiki-country.json.gzjuypter notebook上で実行していたので先頭に!をつけて実行
20 JSONデータの読み込み
Wikipedia記事のJSONファイルを読み込み,「イギリス」に関する記事本文を表示せよ.問題21-29では,ここで抽出した記事本文に対して実行せよ.
## 20
import json, gzip
with gzip.open('jawiki-country.json.gz', 'rt') as f:
    obj = json.loads(f.readline())
    while(obj):
        try:
            obj = json.loads(f.readline())
            if obj['title'] == "イギリス":
                break
        except:
            obj = f.readline()
gzipは完全に知らなかったので学び
21 カテゴリ名を含む行を抽出
記事中でカテゴリ名を宣言している行を抽出せよ.
## 21
for l in obj['text'].split('\n'):
    if 'Category' in l:
        print(l)
もっと厳密な条件の方がいいのかもしれない
22 カテゴリ名の抽出
記事のカテゴリ名を(行単位ではなく名前で)抽出せよ.
## 22
import re
head_pattern = r'\[\[Category:'
tail_pattern = r'\|?\*?\]\]'
for l in obj['text'].split('\n'):
    if 'Category' in l:
        l = re.sub(head_pattern, '', l)
        print(re.sub(tail_pattern, '', l))
ゴリゴリに書いてしまった
23 セクション構造
記事中に含まれるセクション名とそのレベル(例えば"== セクション名 =="なら1)を表示せよ.
## 23
pattern = '=='
for l in obj['text'].split('\n'):
    if pattern in l:
        pat_by_sec = ''.join([r'=' for i in range(int(l.count('=') / 2 ))])
        sec = len(pat_by_sec) - 1
        tab = ''.join(['\t' for i in range(sec - 1)])
        print('{}{}. {}'.format(tab, sec, l.replace('=', '')))
表示するときにタブでインデントしたかったがために少し遠回りしている
24 ファイル参照の抽出
記事から参照されているメディアファイルをすべて抜き出せ.
## 24
for l in obj['text'].split('\n'):
    if 'ファイル' in l:
        print(l.split(':')[1].split('|')[0])
ここもより厳密なif文がいいかも
25 テンプレートの抽出
記事中に含まれる「基礎情報」テンプレートのフィールド名と値を抽出し,辞書オブジェクトとして格納せよ.
## 25
import re
pattern = r' = '
basic_info = {}
for l in obj['text'].split('\n'):
    if pattern in l:
        basic_info[l.split(' = ')[0].replace('|', '')] = l.split(' = ')[1]
basic_info
テキスト処理のときによくメソッドをつなげまくってしまうのはよくなさそう
26 強調マークアップの除去
25の処理時に,テンプレートの値からMediaWikiの強調マークアップ(弱い強調,強調,強い強調のすべて)を除去してテキストに変換せよ(参考: マークアップ早見表).
## 26
import re
pattern = r' = '
basic_info = {}
for l in obj['text'].split('\n'):
    if pattern in l:
        basic_info[l.split(' = ')[0].replace('|', '')] = l.split(' = ')[1].replace('\'', '')
basic_info
テキスト処理には汎用性を求めずに、ゴリゴリハードコーディングを進めていいと思い始めた
27 内部リンクの除去
26の処理に加えて,テンプレートの値からMediaWikiの内部リンクマークアップを除去し,テキストに変換せよ(参考: マークアップ早見表).
## 27
import re
pattern = r' = '
med_link = r'\[|\]'

basic_info = {}
for l in obj['text'].split('\n'):
    if pattern in l:
        val =  l.split(' = ')[1].replace('\'', '')
        val =  re.sub(med_link, '', val)
        basic_info[l.split(' = ')[0].replace('|', '')] = val
basic_info
出力見ながら場当たり的に修正を重ねていた
28 MediaWikiマークアップの除去
27の処理に加えて,テンプレートの値からMediaWikiマークアップを可能な限り除去し,国の基本情報を整形せよ.
## 28
import re
pattern = r' = '
med_link = r'\[|\]'
strong = r'\{|\}'
tag = r'\<+.*\>'

basic_info = {}
for l in obj['text'].split('\n'):
    if pattern in l:
        val =  l.split(' = ')[1].replace('\'', '')
        val =  re.sub(med_link, '', val)
        val =  re.sub(strong, '', val)
        val =  re.sub(tag, '', val)
        basic_info[l.split(' = ')[0].replace('|', '')] = val
basic_info
「可能な限り」なのでギブアップが早かった
29 国旗画像のURLを取得する
テンプレートの内容を利用し,国旗画像のURLを取得せよ.(ヒント: MediaWiki APIのimageinfoを呼び出して,ファイル参照をURLに変換すればよい)
## 29
import requests
S = requests.Session()
URL = "https://en.wikipedia.org/w/api.php"
PARAMS = {
    "action": "query",
    "format": "json",
    "prop": "imageinfo",
    "iiprop": "url",
    "titles": "File:" + basic_info['国旗画像']
}

R = S.get(url=URL, params=PARAMS)
DATA = R.json()
PAGES = DATA["query"]["pages"]
for k, v in PAGES.items():
    for kk, vv in v.items():
        if kk == 'imageinfo':
            print(vv[0]['url'])
リファレンスのコードを参考にしてapiを叩いた
第4章: 形態素解析
夏目漱石の小説『吾輩は猫である』の文章(neko.txt)をMeCabを使って形態素解析し,その結果をneko.txt.mecabというファイルに保存せよ.このファイルを用いて,以下の問に対応するプログラムを実装せよ.
なお,問題37, 38, 39はmatplotlibもしくはGnuplotを用いるとよい.wget http://www.cl.ecei.tohoku.ac.jp/nlp100/data/neko.txtimport MeCab t = MeCab.Tagger() with open('./neko.txt') as f: text = f.read() with open('./neko.txt.mecab', mode='w') as f: f.write(t.parse(text))今までは解析結果を保存せずに、一連の処理のなかで解析をかけていた
この運用の方が良さそうなので学び30 形態素解析結果の読み込み
形態素解析結果(neko.txt.mecab)を読み込むプログラムを実装せよ.ただし,各形態素は表層形(surface),基本形(base),品詞(pos),品詞細分類1(pos1)をキーとするマッピング型に格納し,1文を形態素(マッピング型)のリストとして表現せよ.第4章の残りの問題では,ここで作ったプログラムを活用せよ.
## 30
doc = []
with open('./neko.txt.mecab') as f:
    token_list = []
    token = f.readline()
    while('EOS' not in token):
        dic = {}
        dic['surface'] = token.split('\t')[0]
        dic['base'] = token.split('\t')[1].split(',')[-3]
        dic['pos'] = token.split('\t')[1].split(',')[0]
        dic['pos1'] = token.split('\t')[1].split(',')[1]
        token = f.readline()
        if dic['surface'] == '。':
            doc.append(token_list)
            token_list = []
            continue
        token_list.
token.split('\t')の返り値を一回格納した方がいいかも31 動詞
動詞の表層形をすべて抽出せよ.
## 31
for s in doc:
    for t in s:
        if t['pos'] == '動詞':
            print(t['surface'])
今だったら絶対に
[t['surface'] for t in s if t['pos'] == '動詞']と書きます32 動詞の原形
動詞の原形をすべて抽出せよ.
## 32
for s in doc:
    for t in s:
        if t['pos'] == '動詞':
            print(t['base'])
同じく
[t['base'] for t in s if t['pos'] == '動詞']33 サ変名詞
サ変接続の名詞をすべて抽出せよ.
## 33
for s in doc:
    for t in s:
        if t['pos1'] == 'サ変接続':
            print(t['base'])
同じく
[t['base'] for t in s if t['pos1'] == 'サ変名詞']34 「AのB」
2つの名詞が「の」で連結されている名詞句を抽出せよ.
## 34
for s in doc:
    for i, t in enumerate(s):
        if t['surface'] == 'の' and i + 1 != len(s):
            if s[i -1]['pos'] == '名詞' and s[i +1]['pos'] == '名詞':
                print(s[i -1]['surface'] + t['base'] + s[i +1]['surface'])
形態素「の」から始まる文がないとして、indexが後ろに飛び出さないように気をつけている
形態素「の」から始まる文がないとして
たぶんよくない
35 名詞の連接
名詞の連接(連続して出現する名詞)を最長一致で抽出せよ.
## 35
## 35
max_list = []
tmp = ""
max_len = len(tmp)
for s in doc:
    for i, t in enumerate(s):
        if t['pos'] == '名詞' :
                tmp += t['surface']
        else:
            if len(tmp) == max_len:
                max_list.append(tmp)
            elif len(tmp) > max_len:
                max_list = []
                max_list.append(tmp)
                max_len = len(tmp)
            tmp = ''
print(len(max_list[0]))
print(max_list)
英単語で30文字でした
36 単語の出現頻度
文章中に出現する単語とその出現頻度を求め,出現頻度の高い順に並べよ.
## 36
base_list = []
count_dic = {}
for s in doc:
    for t in s:
        base_list.append(t['base'])
for word in set(base_list):
    count_dic[word] = base_list.count(word)
sorted(count_dic.items(), key=lambda x: -x[1])
base_list = [t['base'] for s in doc for t in s]でいけそう37 頻度上位10語
出現頻度が高い10語とその出現頻度をグラフ(例えば棒グラフなど)で表示せよ.
## 37
import matplotlib.pyplot as plt
import japanize_matplotlib
%matplotlib inline
n = 10
labels = [i[0] for i in sorted(count_dic.items(), key=lambda x: -x[1])[:n]]
score = [i[1] for i in sorted(count_dic.items(), key=lambda x: -x[1])[:n]]

plt.bar(labels, score)
plt.show()
matplotlibでの日本語表示のためにフォントを設定したりしてハマって心折れていたらjapanize-matplotlibという良いものに出会えました
38 ヒストグラム
単語の出現頻度のヒストグラム(横軸に出現頻度,縦軸に出現頻度をとる単語の種類数を棒グラフで表したもの)を描け.
## 38
import matplotlib.pyplot as plt
import japanize_matplotlib
%matplotlib inline
all_score = [i[1] for i in sorted(count_dic.items(), key=lambda x: -x[1])]
plt.hist(all_score, range(10, 100));
この辺りから辞書のリストのソートに慣れた顔をしだす
39 Zipfの法則
単語の出現頻度順位を横軸,その出現頻度を縦軸として,両対数グラフをプロットせよ.
## 39
import math
log_idx = [math.log(i + 1) for i in range(len(count_dic.values()))]
log_all_score = [math.log(i[1]) for i in sorted(count_dic.items(), key=lambda x: -x[1])]
plt.scatter(log_idx, log_all_score, range(10, 100));
知らなかったので出力見てすげ〜となった
numpyではなくmathをつかったおわり
こういうのって問題を掲載して良いのだろうか、だめであればすぐ消します
ゼミなどのコミュニティがあれば、毎週10問とか決めて全体でレビューし合えば良さそう
アドベントカレンダー中にラストまでまとめたいですね〜
- 投稿日:2019-11-30T23:33:47+09:00
[TensorFlow]勾配降下法(最急降下法)による最小2乗線形回帰
TensorFlow:最初のステップ
TensorFlowとは機械学習のアルゴリズムを実装して実行するための、スケーラブルなマルチプラットフォームのプログラミングインターフェースである........
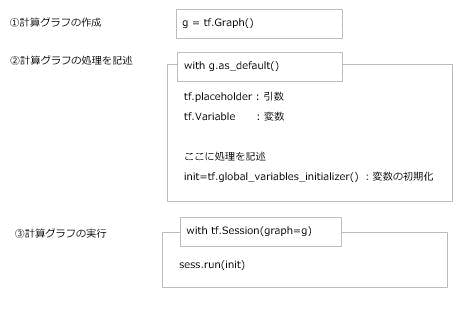
簡単にまとめると計算グラフと呼ばれる処理フローを作成して、実行するPackageらしい。
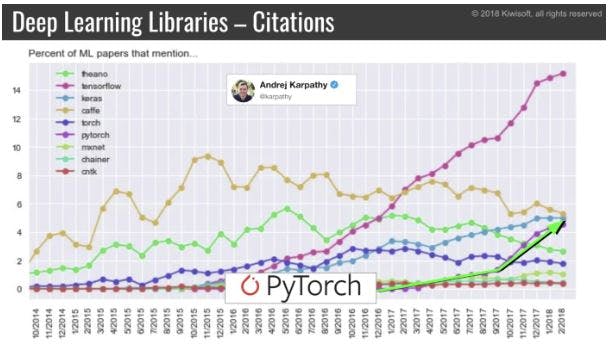
PyTorchとかKerasとかも追いついてきてるけど、依然としてTensorFlowの人気が高い。
Kerasに比べるとデバッグしずらいし、分かりずらい。
実際上記の指摘も多くあってか、シンプルにかけるTensorFlow2.0をリリースした模様。この記事では初期のTensorFlowの文法を使って記載していく。
TensorFlow2.0入れちゃったよという場合でも安心。以下のコードでコンバートできる....!import tensorflow.compat.v1 as tf tf.disable_v2_behavior()書き方はざっくり以下の構成になっている。
とりあえず実行してみよう。
なおTensorFlowのパッケージはインストールしていざ実行しようとすると意味不明なエラーが良く出てくるので、容赦なくアンインストール→インストールしよう。import os import numpy as np import tensorflow as tf g = tf.Graph() with g.as_default(): x = tf.placeholder(dtype=tf.float32, shape=(None), name='x') # 引数 w = tf.Variable(2.0, name='weight') # 変数① b = tf.Variable(0.7, name='bias') # 変数② z=w*x + b init=tf.global_variables_initializer() # 変数の初期化(tf.Session中で定義しても良いがここの方が扱いやすい) with tf.Session(graph=g) as sess: sess.run(init) # 変数の初期化の実行 for number in [1.0, 0.6, -1.8]: z = sess.run(z, feed_dict={x:number}) # z= w * x + bの実行 print(z) # 処理結果をprintz = sess.run(z, feed_dict={x:number})
ここの箇所だけ簡単に解説。
sess.run(アクセスしたい変数名, feed_dict={引数: 引数に渡したい値となる})どんどん行こう。次は配列(テンソル)を操作する。
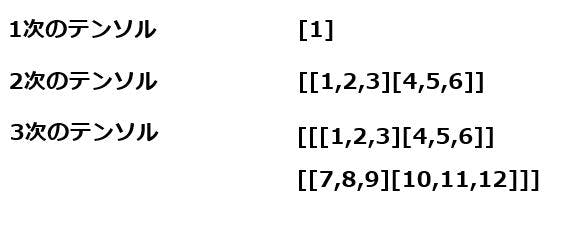
TensorFlowでは計算グラフではエッジを流れる値をテンソルと呼ぶ。まさにテンソル流れだ。
テンソルはスカラ・ベクトル・行列として解釈できる。例えば以下の要領だ。
それでは早速TensorFlowでテンソルを操作してみよう。g = tf.Graph() with g.as_default(): x = tf.placeholder(dtype=tf.float32, shape=(None,2,3), name='input_x') # テンソルを受け取る引数 x2 = tf.reshape(x,shape=(-1,6),name='x2') # 受け取った引数xをreshapeメソッドで変形 print(x2) # 変数の定義を出力 xsum=tf.reduce_sum(x2,axis=0,name='col_sum') # 各列の合計 xmean=tf.reduce_mean(x2,axis=0,name='col_mean') # 各列の平均 with tf.Session(graph=g) as sess: x_array = np.arange(18).reshape(3,2,3) # 配列を作成 print('Column Sums:\n', sess.run(xsum, feed_dict={x:x_array})) # 各列の合計を出力 print('Column Means:\n', sess.run(xmean, feed_dict={x:x_array})) # 各列の平均を出力tf.reshape(x,shape=(-1,6),name='x2')
ここでのポイントはshapeに-1が指定されていること。これは型定義が未定でよしなに入力された配列にあわせて変換してくださいな、という意味。
TensorFlow:最小2乗線形回帰の実装
まずは最小2乗線形回帰ってなによってとこから。
①y = w * x + b の式を使って予測値を算出する
②(正解ラベル - 予測値)^2を求める
③②の平均値を求める
④③を使ってwとbを求める
⑤これをエポック数分繰り返す結果、コスト値が大局的最小値に落ち着けば収束したといえる。
以下エクセルで手動で計算してみた様子。
そしてよくある図。
これはコスト値(エクセルの黄色い部分)をプロットして収束していく様子を表したもの。
線形関数のコスト関数は微分可能な凸関数になる。
それでは実際コードを見てみよう!!
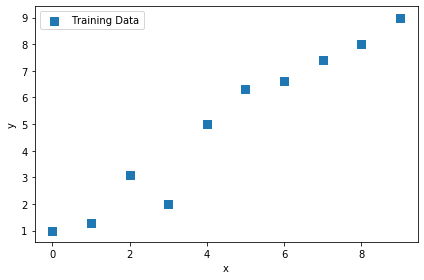
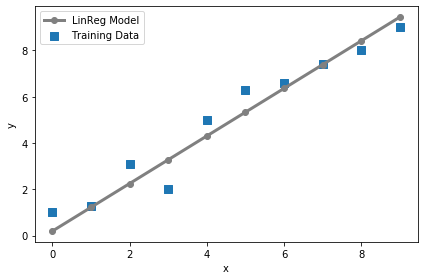
まずは訓練用のデータを用意する# 訓練データ X_train = np.arange(10).reshape((10, 1)) y_train = np.array([1.0, 1.3, 3.1,2.0, 5.0, 6.3, 6.6, 7.4, 8.0, 9.0]) # 線形回帰モデルのプロット plt.scatter(X_train, y_train, marker='s', s=50,label='Training Data') plt.xlabel('x') plt.ylabel('y') plt.legend() plt.tight_layout() plt.show()はい、matplotlibでプロットしてみましたー!
次にTfLinregクラスを用意する。
class TfLinreg(object):

    # コンストラクタ
    def __init__(self, x_dim, learning_rate=0.01, random_seed=None):
        self.x_dim = x_dim
        self.learning_rate = learning_rate
        self.g = tf.Graph()

        with self.g.as_default():
            tf.set_random_seed(random_seed)
            self.build()

            # 変数のイニシャライザ
            self.init_op = tf.global_variables_initializer()

    def build(self):

        # プレースホルダ―を定義
        self.X = tf.placeholder(dtype=tf.float32, shape=(None,self.x_dim), name='x_input')
        self.y = tf.placeholder(dtype=tf.float32, shape=(None), name='y_input')

        # tf.zeros:要素が全て0の行列
        # 1×1のテンソル
        w = tf.Variable(tf.zeros(shape=(1)), name='weight')
        b = tf.Variable(tf.zeros(shape=(1)), name='bias')

        self.w = w
        self.b = b

        # 予測値を算出
        # tf.squeeze:1の次元を削除し、テンソルを1つ下げる関数
        self.test = w * self.X + b
        self.z_net = tf.squeeze(w * self.X + b, name='z_net')

        # 実績値-予測値
        # tf.square:要素ごとに2乗をとる
        sqr_errors = tf.square(self.y - self.z_net, name='sqr_errors')
        self.sqr_errors = sqr_errors

        # コスト関数
        # tf.reduce_mean:与えたリストに入っている数値の平均値を求める関数
        self.mean_cost = tf.reduce_mean(sqr_errors, name='mean_cost')

        ## オプティマイザを作成
        # GradientDescentOptimizer:最急降下法
        optimizer = tf.train.GradientDescentOptimizer(
            learning_rate=self.learning_rate,
            name='GradientDescent'
        )

        # 損失関数の勾配(重みと傾き)を計算
        self.optimizer = optimizer.minimize(self.mean_cost)
この時点ではクラスを定義しただけなので、何も具体的な数値は設定されていません。
ここでワンポイント。勾配降下法の中にはいくつか種類があります。・最急降下法(Gradient Descent)
・確率的勾配降下法(Stochastic Gradient Descent - SDG)
・ミニバッチ確率的勾配降下法(Minibatch SGD - MSGD)最急降下法は全ての誤差の合計をとってからパラメタ更新するのに対して
確率的勾配降下法はデータ1つごとに重みを更新していきます。
ミニバッチは2つの中間的な存在で膨大なデータをバッチ数ごとにぶった切って実行していくようなイメージ。それじゃあ続き。
まずはコンストラクタを呼んでインスタンスを作成します。# モデルのインスタンス化 lrmodel = TfLinreg(x_dim=X_train.shape[1], learning_rate=0.01)続いて学習を実施
### 学習
# self.optimizer
def train_linreg(sess, model, X_train, y_train, num_epochs=10):
    # 変数の初期化
    sess.run(model.init_op)
    training_costs=[]

    # 同じX_trainを10回繰り返す
    for i in range(num_epochs):
        """
        model.optimizer:急速降下法を適用する
        model.X:学習データ(階数2)
        model.y:正解データ(階数1)
        model.z_net:予測値(w * self.X + bから計算)
        model.sqr_errors:実績値-予測値の2乗
        model.mean_cost:2乗誤差の平均値
        model.w:更新後の重み
        model.b:更新後のバイアス
        """
        _,X,y,z_net,sql_errors,cost,w,b= sess.run([
            model.optimizer,
            model.X,
            model.y,
            model.z_net,
            model.sqr_errors,
            model.mean_cost,
            model.w,
            model.b,
        ],feed_dict={model.X:X_train, model.y:y_train}) # 同じのを10回繰り返す

        print('  ')
        print(X)
        print(y)
        print(z_net)
        print(sql_errors)
        print(cost)
        print(w)
        print(b)

        training_costs.append(cost)

    return training_costs
model.optimizer
で最急降下法が実行されます。結構迷ったとこがwとbには更新後の重みが設定されていること。
だから出力は、[0.60279995]
[0.09940001]
みたいになるけど初回の予測は[0][0]で実施されています。早速動かしてみる。
sess = tf.Session(graph=lrmodel.g)
training_costs = train_linreg(sess, lrmodel, X_train, y_train)
ほんでコスト値をプロットしてみる。
plt.plot(range(1,len(training_costs) + 1), training_costs)
plt.tight_layout()
plt.xlabel('Epoch')
plt.ylabel('Training Cost')
#plt.savefig('images/13_01.png', dpi=300)
plt.show()
・・・!
やったね、収束したよ!!続いては予測をしよう。
予測は予測値(z_net)を呼び出すだけなので難しくない。
引数のx_testに2階数のテンソルをぶち込めば実行される。### 予測 # model.z_net def predict_linreg(sess, model, X_test): y_pred = sess.run(model.z_net, feed_dict={model.X:X_test}) return y_pred最後に訓練データで作成したモデルを可視化してみよう。
### 線形回帰モデルのプロット
# 訓練データ
plt.scatter(X_train, y_train, marker='s', s=50,label='Training Data')

# 訓練データを使って出力した線形回帰モデル
plt.plot(range(X_train.shape[0]), predict_linreg(sess, lrmodel, X_train),color='gray'
         , marker='o', markersize=6, linewidth=3,label='LinReg Model')

plt.xlabel('x')
plt.ylabel('y')
plt.legend()
plt.tight_layout()
plt.show()
いい感じに線形が引かれている...........!
ということで今回はここまで。


- 投稿日:2019-11-30T23:26:15+09:00
ROSユーザーのためのconda環境構築
最近流行りの機械学習なんかをやりたいとき、Pythonで環境構築って大変ですよね。
ローカルの環境も汚れますし...。
コードを動かしながら機械学習を学べる教材などではAnacondaやMinicondaを使っているものをよく見ます。
そしてこれらの環境を作るとき、ROSユーザーは割と困ることが多いんですが、意外と記事が少なかったりするのでここに残すことにしました。環境は以下のとおりです。
- Ubuntu18.04
- Python3.6
- Miniconda
Minicondaのインストール
ここからPython3.7の64bit版をダウンロード
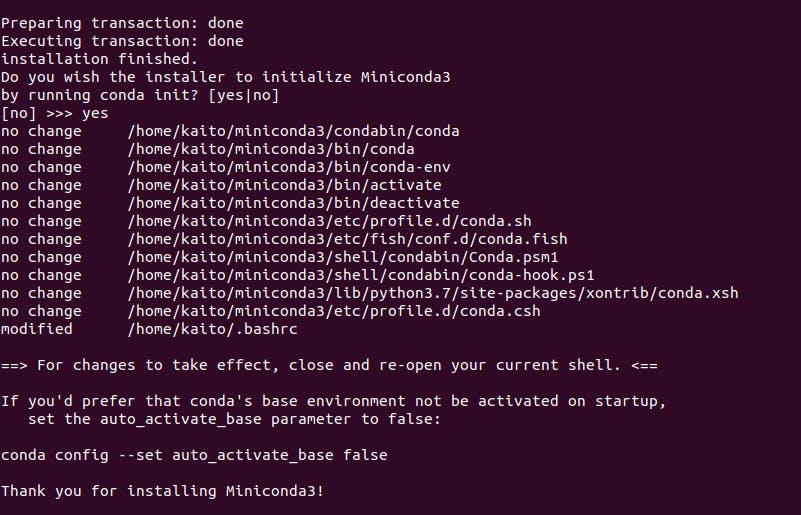
$ cd ~/Downloads
$ bash Miniconda3-latest-Linux-x86_64.sh
上のコマンドを実行し、端末の指示にしたがってインストールを進めます。
最後にconda initを実行するか聞かれるので、yesと答えれば環境構築は終了となります。正常にインストールできた場合、
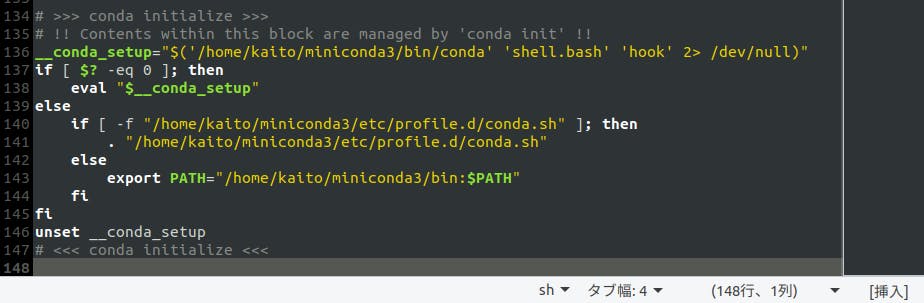
conda initの実行で何が起きるのかは以下をご覧ください。
.bashrcが編集されるようなので、中身を一応確認してきましょう。
追記されたのは以下の部分です。
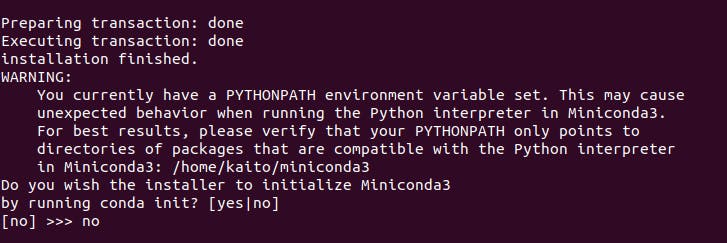
ここで注意!
.bashrcでROSの読み込みを行っている場合、
conda initのときに以下のようなワーニングが出ます。
ROSの環境を読み込んでいると、PYTHONPATHが/opt/ros/melodic/lib/python2.7/dist-packagesを指すようになっているからですね。
なので、インストール前にはROSの読み込みを無効にしておきましょう。condaを用いてROSの環境構築
以下のコマンドを打つだけ
$ conda create --name ros --channel conda-forge ros-core ros-actionlib ros-dynamic-reconfigure python=2.7
$ conda activate ros
これだけで、condaの仮想環境上にROSの環境ができるのって便利ですね。
roscoreやrosrun、roslaunchなどの基本コマンドは使えます。自作パッケージ
condaを使った仮想環境上でROSを動かす上で気になるのは自作パッケージです。
今回はROS1を使っているのでC++でパッケージなどを作成すると、catkin_makeが必要になります。https://github.com/nakano16180/roscpp_practice
上記リンクのパッケージを今回使用しました。はまった点
本来ならば、githubのパッケージをcloneしてcatkin_makeすればrosrunで起動することができます。
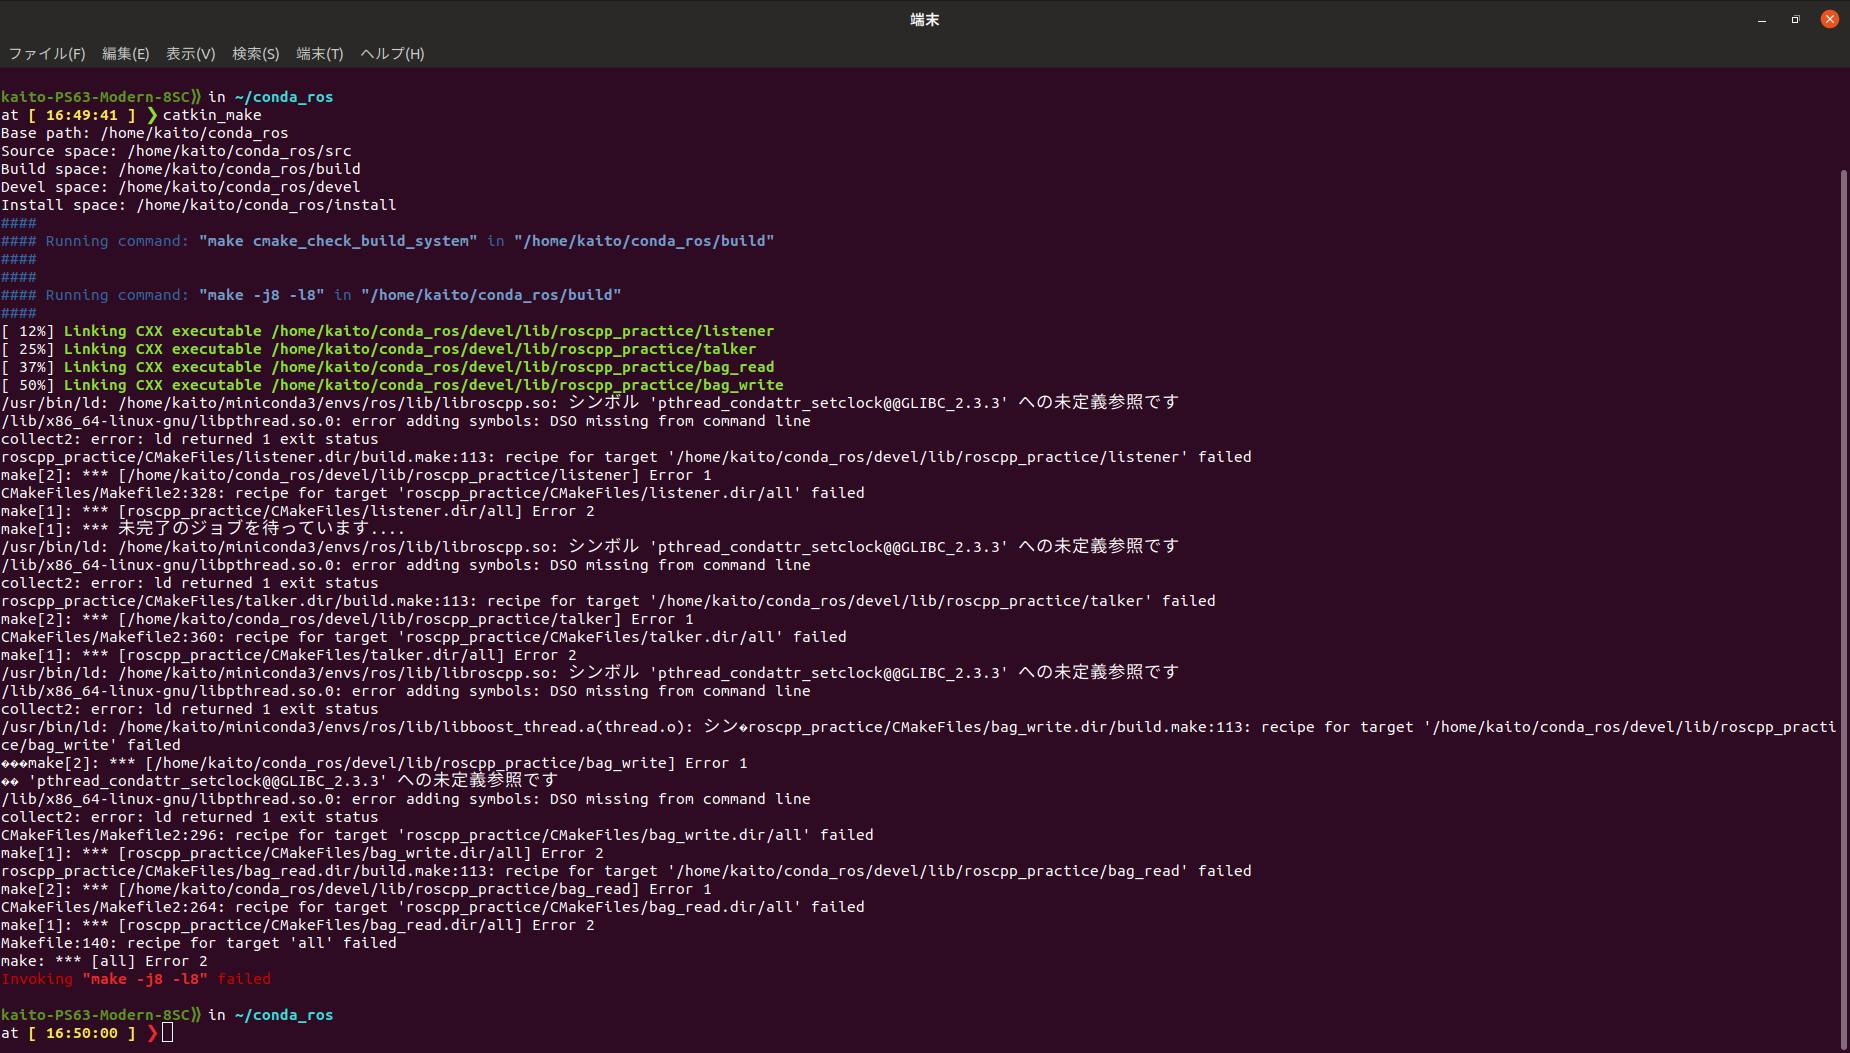
しかし今回はまったのはこちら。pthreadへのパスが通っていない模様?
これを解決するために、CMakeLists.txtを以下のように編集しました。
CMakeLists.txt
CMakeLists.txtcmake_minimum_required(VERSION 2.8.3) project(roscpp_practice) ## Compile as C++11, supported in ROS Kinetic and newer # add_compile_options(-std=c++11) ## Find catkin macros and libraries ## if COMPONENTS list like find_package(catkin REQUIRED COMPONENTS xyz) ## is used, also find other catkin packages find_package(catkin REQUIRED COMPONENTS roscpp std_msgs rosbag ) ## System dependencies are found with CMake's conventions find_package(Boost REQUIRED COMPONENTS system) find_package(Threads REQUIRED) # ここ追記 ## Uncomment this if the package has a setup.py. This macro ensures ## modules and global scripts declared therein get installed ## See http://ros.org/doc/api/catkin/html/user_guide/setup_dot_py.html # catkin_python_setup() ########### ## Build ## ########### ## Specify additional locations of header files ## Your package locations should be listed before other locations include_directories( # include ${catkin_INCLUDE_DIRS} ) ## Declare a C++ library # add_library(${PROJECT_NAME} # src/${PROJECT_NAME}/roscpp_practice.cpp # ) ## Add cmake target dependencies of the library ## as an example, code may need to be generated before libraries ## either from message generation or dynamic reconfigure # add_dependencies(${PROJECT_NAME} ${${PROJECT_NAME}_EXPORTED_TARGETS} ${catkin_EXPORTED_TARGETS}) ## Declare a C++ executable ## With catkin_make all packages are built within a single CMake context ## The recommended prefix ensures that target names across packages don't collide # add_executable(${PROJECT_NAME}_node src/roscpp_practice_node.cpp) add_executable(talker src/talker.cpp) add_executable(listener src/listener.cpp) add_executable(bag_write src/bag_write.cpp) add_executable(bag_read src/bag_read.cpp) ## Rename C++ executable without prefix ## The above recommended prefix causes long target names, the following renames the ## target back to the shorter version for ease of user use ## e.g. "rosrun someones_pkg node" instead of "rosrun someones_pkg someones_pkg_node" # set_target_properties(${PROJECT_NAME}_node PROPERTIES OUTPUT_NAME node PREFIX "") ## Add cmake target dependencies of the executable ## same as for the library above # add_dependencies(${PROJECT_NAME}_node ${${PROJECT_NAME}_EXPORTED_TARGETS} ${catkin_EXPORTED_TARGETS}) ## Specify libraries to link a library or executable target against # target_link_libraries(${PROJECT_NAME}_node # ${catkin_LIBRARIES} # ) target_link_libraries(talker ${catkin_LIBRARIES} Threads::Threads ##追記 ) target_link_libraries(listener ${catkin_LIBRARIES} Threads::Threads ##追記 ) target_link_libraries(bag_write ${catkin_LIBRARIES} Threads::Threads ##追記 ) target_link_libraries(bag_read ${catkin_LIBRARIES} Threads::Threads ##追記 )以上のように編集してやることで無事、buildして実行することができました。
最後に
ここまで書いといてなんですが、Python3系が使えるROS2に早く移行しましょう!

- 投稿日:2019-11-30T23:14:55+09:00
DjangoでLaravelライクなORM/クエリビルダのOratorを使う方法
この投稿は 「Django Advent Calendar 2019 - Qiita」 の0日目の記事です。(勝手に)(怒られそう)(怒られたら消します)
さてみなさん、Pythonでウェブアプリを作った時に、DBアクセスはどのようなライブラリを使っていますか?最もポピュラーなものはDjangoORMだと思います。FlaskやPyramidを使っている人はSQLAlchemyという選択肢が多いしょう。データサイエンス畑の人はPandasのDataFrameを使っているかもしれません。しかし私が最も推しているライブラリは、表題にある「Orator」です。ここQiitaでもOratorについて書かれた記事が既にいくつかあります。
「Orator」を触ってみたのでメモ
Scrapy でスクレイピングしたデータを ORM で RDB に保存するOratorはLaravelのORMの文法にとても強い影響を受けたORM/クエリビルダです。
公式サイト
開発を初めたのはsdispater氏。Pythonに深くハマっている人なら気づくかもしれません。最近はPoetryの開発に取り組んでいらっしゃる彼です。
LaravelのORMに強く影響を受けたというだけあって、マイグレーションはLaravelやRailsのようにマイグレーションファイルを自分で作らなければなりません。ここはテーブルの変更を自動で感知してマイグレーションファイルを作ってくれるDjangoに軍配が上がるでしょう。しかしOratorのその素晴らしさは、クエリの書きやすさにあるのです。students = Student \ .select('id', 'name', 'email') \ .join('class', 'class.num', '=', 'students.class_num') \ .where('class.id', 3) \ .get()ねっ?SQLライクで直感的でしょ?joinやwhereをメソッドチェーンでいくらでも繋げることができます。どんな複雑なクエリでもドンと来い!
ではこいつをDjangoに取り入れるにはどうすればいいのか?ここから本題に入っていきます。
アプリケーションの中にorator.pyを作ろう
Django公式チュートリアルで作るディレクトリ構造を元にして、models.pyと同じ階層にorator.pyというファイルを作ります。
├── mysite
│   ├── polls
│   │   ├── __init__.py
│   │   ├── admin.py
│   │   ├── apps.py
│   │   ├── migrations
│   │   │   └── __init__.py
│   │   ├── models.py
│   │   ├── orator.py ←←←←←←←NEW!!!
│   │   ├── tests.py
│   │   ├── urls.py
│   │   └── views.py
│   ├── manage.py
│   ├── mysite
│   │   ├── __init__.py
│   │   ├── settings.py
│   │   ├── urls.py
│   │   └── wsgi.py
│   └── templates
次にorator.pyの中で、oratorのライブラリにDBへの接続情報を知らせるための情報を設定します。
別にここで固定値を入れても良いのですが、DBへの接続情報は既にsettings.pyで定義されているので、ここから呼んできた方が良いでしょう。mysite/polls/orator.pyimport logging from orator import DatabaseManager from orator import Model from django.conf import settings config = { 'mysql': { 'driver': 'mysql', 'database': settings.DATABASES['default']['NAME'], 'host': settings.DATABASES['default']['HOST'], 'user': settings.DATABASES['default']['USER'], 'password': settings.DATABASES['default']['PASSWORD'], 'prefix': '' 'log_queries': True, } } db = DatabaseManager(config) Model.set_connection_resolver(db) logger = logging.getLogger('orator.connection.queries') logger.setLevel(logging.DEBUG) formatter = logging.Formatter( 'It took %(elapsed_time)sms to execute the query %(query)s' ) handler = logging.StreamHandler() handler.setFormatter(formatter) logger.addHandler(handler)
driverには「sqlite」「mysql」「postgres」の3種類が使えます。完全にこの通りに記述しないと動かないので、Typoに注意。
from django.conf import settingsでsettings.pyの内容を引っ張ってこれます。あとはDictを辿っていけば望みの値が得られます。モデルクラスを定義しよう
OratorのモデルクラスはDjangoやSQL Alchemyとは違い、テーブルのSchemaではありません。純粋に「このクラスはこのテーブルに紐付いているんですよ」というのを定義するだけです。
例として、Django公式チュートリアルのpollsアプリで使われている
QuestionクラスとChoiceクラスを定義してみましょう。mysite/polls/orator.pyclass Question(Model): __table__ = 'polls_questions' class Choice(Model): __table__ = 'polls_choices'Djangoが作るテーブル名には、先頭にアプリケーション名のプレフィックスが付くので、それを考慮した上で明示的にテーブル名を書いてあげましょう。
ただ私が普段開発するやり方では、Djangoでテーブルを作る時に、アプリケーション名のプレフィックスが付かないようにしています。mysite/polls/models.pyclass Question(models.Model): question_text = models.CharField(max_length=200) pub_date = models.DateTimeField('date published') class Meta: # db_tableを定義するとそれが実際に作られるテーブル名になる db_table = 'questions'mysite/polls/orator.pyclass Question(Model): __table__ = 'questions'Viewの中でOratorを呼び出してみよう
Django公式チュートリアルのこのコードのDBアクセスしている部分をOratorで書き換えるとどうなるでしょうか?以下のようになります。
mysite/polls/views.pyfrom django.shortcuts import render - from .models import Question + from .orator import Question def index(request): - latest_question_list = Question.objects.order_by('-pub_date')[:5] + latest_question_list = Question.order_by('pub_date', 'asc').limit(5) context = {'latest_question_list': latest_question_list} return render(request, 'polls/index.html', context)なんで簡単!ブラボー!
おわりに
DjangoでOratorを取り入れて、テーブル作成・マイグレーションはDjangoモデル、クエリ発行はOratorと役割分担をさせよう!特にウェブアプリ開発では複雑なクエリを発行することが多いので、Oratorは大いに力になってくれるはずです。もっと広まれー!
- 投稿日:2019-11-30T23:07:49+09:00
OneHotEndoderで冗長なダミー変数を減らす
はじめに
scikit-learnのOneHotEncoderをそのまま使うと、カテゴリ変数の水準数分だけダミー変数が作られる。この場合、線形回帰手法などでは多重共線性が生じるため、ダミー変数を水準数-1に減らしたい。その方法を調べたのでメモっておく。
環境
- scikit-learn 0.21.2
方法
OneHotEncoderのdropオプションを"first"にすると、最初のダミー変数を除去してくれる
やってみよう
ここでは以下のようなカテゴリ変数が格納された列を抽出してカテゴリ変数にしてみよう。
[['D']
 ['D']
 ['D']
 ['T']
 ['T']
 ['T']
 ['N']
 ['N']
 ['N']]
ソースは以下のとおりである。dropオプションを"first"にした場合、合わせてhandle_unknown='error'も設定しないと怒られる。
from sklearn.linear_model import LinearRegression
from sklearn.preprocessing import OneHotEncoder
import numpy as np

def main():

    X = np.array([
        [1, "D"],
        [3, "D"],
        [5, "D"],
        [2, "T"],
        [4, "T"],
        [6, "T"],
        [1, "N"],
        [8, "N"],
        [2, "N"],
        ])
    y = np.array([2, 6, 10, 6, 12, 18, 1, 8, 2])

    # 2列目を取り出し
    category = X[:, [1]]
    print(category)
    encoder = OneHotEncoder(handle_unknown='error', drop='first')
    encoder.fit(category)
    result = encoder.transform(category)
    print(result.toarray())


if __name__ == "__main__":
    main()
結果
drop='first'をつけない場合。
[[1. 0. 0.]
 [1. 0. 0.]
 [1. 0. 0.]
 [0. 0. 1.]
 [0. 0. 1.]
 [0. 0. 1.]
 [0. 1. 0.]
 [0. 1. 0.]
 [0. 1. 0.]]
drop='fist'をつけた場合
[[0. 0.]
 [0. 0.]
 [0. 0.]
 [0. 1.]
 [0. 1.]
 [0. 1.]
 [1. 0.]
 [1. 0.]
 [1. 0.]]
確かに最初の列が消えている。これでこころおきなくfitメソッドを呼び出すことができる。
- 投稿日:2019-11-30T22:44:46+09:00
Pythonのtkinterを8.6にアップデートする方法
概要
Pythonでtkinterモジュールを使用していると、ボタンの文字が表示されないという現象が発生した。調べてみたところ、それはどうやらtkinter8.5のバグらしい。
このバグはtkinterをアップデートすることで治るが、現状だとtkinterを公式にアップデートする方法はない。
いくつかのサイトがtkinterのアップデート方法を紹介しており、その方法はPythonを再インストールするというものだった。だが、私の環境ではそれでもtkinterをアップデートすることはできなかった。しかし、海外の有志の人間が作成したプログラムを使うことでtkinterを8.6にアップデートすることができたのでここで紹介する。
1. Pythonとtkinterをアンインストールする
homebrew、pyenvなど、インストールしているパッケージからPythonとtkinterを全てアンインストールする。
Pythonのアンインストール
$ brew uninstall python
$ pyenv uninstall x.x.xtkinterのアンインストール
$ brew uninstall tcl-tk2. プログラムをダウンロードする
MacOS homebrew python 3.7.4 with tcl-tk (properly)
上記サイトから、「python-with-tcl.rb」をダウンロードする。
3. ファイルを置き換える
/usr/local/Homebrew/Library/Taps/homebrew/homebrew-core/Formula/python.rb
を削除、または別の場所に置く。ダウンロードした「python-with-tcl.rb」の名前を「python.rb」に変更し、
/usr/local/Homebrew/Library/Taps/homebrew/homebrew-core/Formula/
に置く。4. Pythonをインストール
下記のコマンドを使用し、Pythonをインストールする。
$ HOMEBREW_NO_AUTO_UPDATE=1 brew install --build-from-source python5. tkinterのバージョンを確認
$ python -c "import tkinter;print(tkinter.TkVersion)"
8.6になっているはずだ。参考URL
MacOS homebrew python 3.7.4 with tcl-tk (properly)
Macのtkinter8.5でpngをまともに表示できない→PyenvのPython再インストールでtcl-tkをバージョンアップした
- 投稿日:2019-11-30T22:12:53+09:00
Django Tutorialを始める 1
何をやったか
公式のDjango Tutorialの通りにアプリを作る
https://docs.djangoproject.com/ja/2.2/intro/tutorial01/環境
- Windows 10 Pro
- Python 3.7.5
- Django 2.2.5
- conda 4.7.12
Djangoのインストール
Anacondaで仮想環境にDjangoをインストールした。
> conda install django

> python -m django --version
2.2.5
プロジェクトの作成
Django公式によると
初めて Django を使うのなら、最初のセットアップを行う必要があります。通常は、 Django の プロジェクト (project) を構成するコードを自動生成します。プロジェクトとは、データベースの設定や Django 固有のオプション、アプリケーション固有の設定などといった、個々の Django インスタンスの設定を集めたものです。
早速プロジェクトを作る。
> django-admin startproject mysite作ったプロジェクトを起動する。
> cd mysite
> python manage.py runserver
この状態で http://localhost:8000 にアクセスする。
とりあえずDjangoがちゃんと今の環境で使えそうということは分かった。

- 投稿日:2019-11-30T21:53:48+09:00
東京大学大学院情報理工学系研究科 創造情報学専攻 2012年度夏 プログラミング試験
2012年度夏の院試の解答例です
※記載の内容は筆者が個人的に解いたものであり、正答を保証するものではなく、また東京大学及び本試験内容の提供に関わる組織とは無関係です。出題テーマ
- ゲーム作成
問題文
※ 東京大学側から指摘があった場合は問題文を削除いたします。
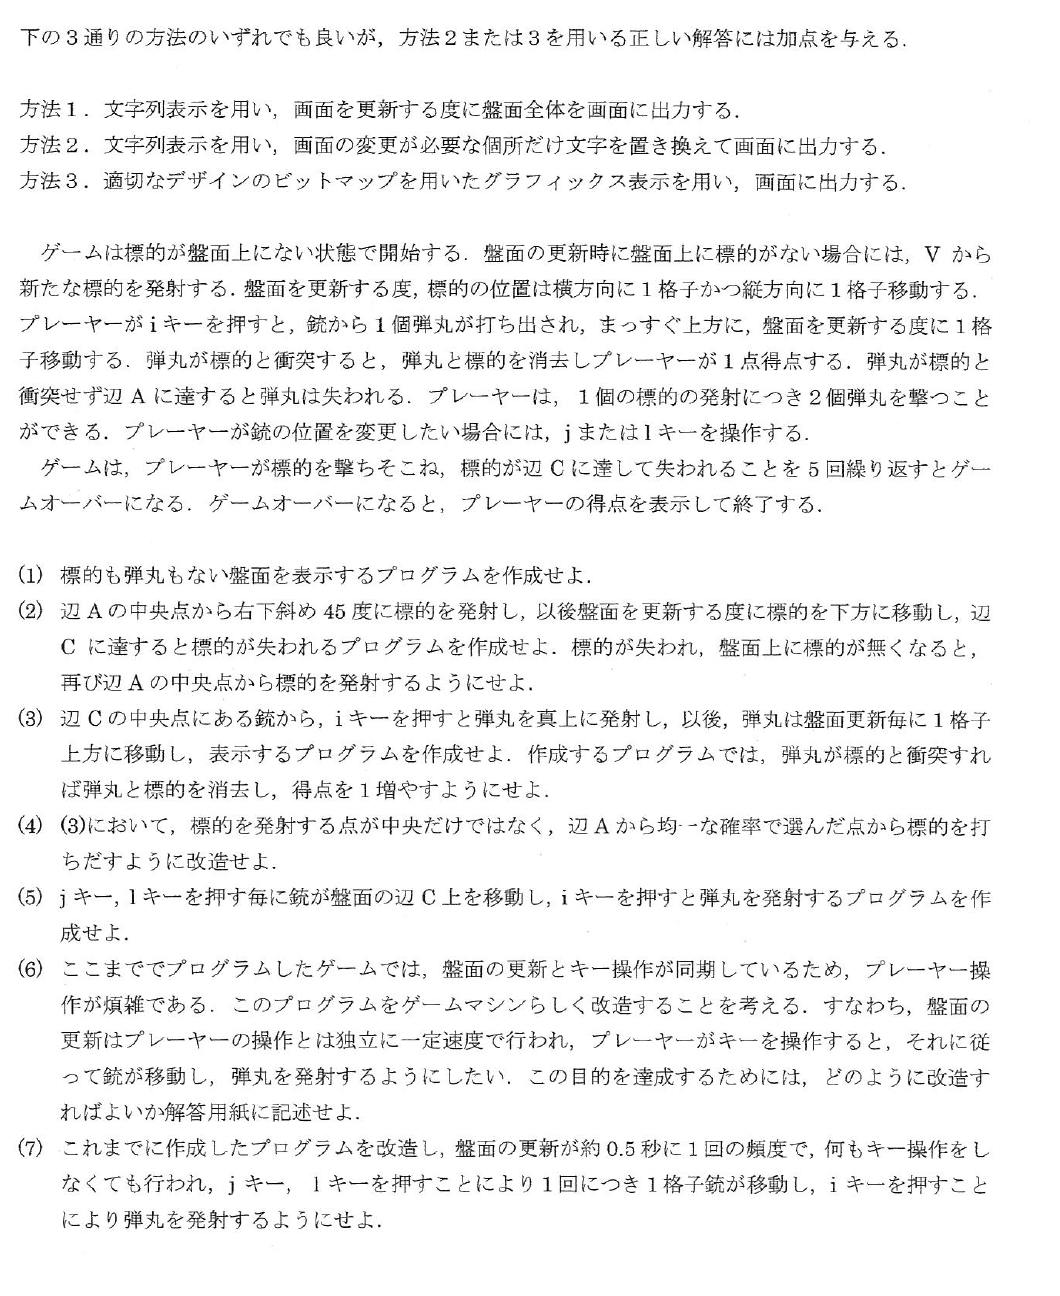
(1)
class Game(object):
    def __init__(self):
        self.board = [
            ['|', '-', '-', '-', 'V', '-', '-', '-', '|'],
            ['|', ' ', ' ', ' ', ' ', ' ', ' ', ' ', '|'],
            ['|', ' ', ' ', ' ', ' ', ' ', ' ', ' ', '|'],
            ['|', ' ', ' ', ' ', ' ', ' ', ' ', ' ', '|'],
            ['|', ' ', ' ', ' ', ' ', ' ', ' ', ' ', '|'],
            ['|', ' ', ' ', ' ', ' ', ' ', ' ', ' ', '|'],
            ['|', ' ', ' ', ' ', ' ', ' ', ' ', ' ', '|'],
            ['|', ' ', ' ', ' ', ' ', ' ', ' ', ' ', '|'],
            ['|', ' ', ' ', ' ', ' ', ' ', ' ', ' ', '|'],
            ['|', ' ', ' ', ' ', ' ', ' ', ' ', ' ', '|'],
            ['|', ' ', ' ', ' ', ' ', ' ', ' ', ' ', '|'],
            ['|', ' ', ' ', ' ', ' ', ' ', ' ', ' ', '|'],
            ['|', ' ', ' ', ' ', ' ', ' ', ' ', ' ', '|'],
            ['|', ' ', ' ', ' ', ' ', ' ', ' ', ' ', '|'],
            ['|', '-', '-', '-', 'X', '-', '-', '-', '|'],
        ]
    def print_board(self):
        row = len(self.board)
        col = len(self.board[0])
        for i in range(0, row):
            row_str = ''
            for j in range(0, col):
                row_str += self.board[i][j]
            print(row_str)

game = Game()
game.print_board()
(2)
import copy as cp
class Enemy(object):
    def __init__(self):
        self.x = int(4)
        self.y = int(0)
        self.mark = 'O'
        self.vector = [1, 1]

    def __repr__(self):
        return 'x: {0}, y: {1}, vec: {2}'.format(self.x, self.y, self.vector)

    def move(self):
        self.x += self.vector[0]
        self.y += self.vector[1]
        if (self.y > 14):
            self.x = int(4)
            self.y = int(0)
            self.vector = [1, 1]
        elif (self.x == 0):
            self.vector[0] = 1
        elif (self.x == 8):
            self.vector[0] = -1

class Game(object):
    def __init__(self):
        self.default_board = [
            ['|', '-', '-', '-', 'V', '-', '-', '-', '|'],
            ['|', ' ', ' ', ' ', ' ', ' ', ' ', ' ', '|'],
            ['|', ' ', ' ', ' ', ' ', ' ', ' ', ' ', '|'],
            ['|', ' ', ' ', ' ', ' ', ' ', ' ', ' ', '|'],
            ['|', ' ', ' ', ' ', ' ', ' ', ' ', ' ', '|'],
            ['|', ' ', ' ', ' ', ' ', ' ', ' ', ' ', '|'],
            ['|', ' ', ' ', ' ', ' ', ' ', ' ', ' ', '|'],
            ['|', ' ', ' ', ' ', ' ', ' ', ' ', ' ', '|'],
            ['|', ' ', ' ', ' ', ' ', ' ', ' ', ' ', '|'],
            ['|', ' ', ' ', ' ', ' ', ' ', ' ', ' ', '|'],
            ['|', ' ', ' ', ' ', ' ', ' ', ' ', ' ', '|'],
            ['|', ' ', ' ', ' ', ' ', ' ', ' ', ' ', '|'],
            ['|', ' ', ' ', ' ', ' ', ' ', ' ', ' ', '|'],
            ['|', ' ', ' ', ' ', ' ', ' ', ' ', ' ', '|'],
            ['|', '-', '-', '-', 'X', '-', '-', '-', '|'],
        ]
        self.board = [
            ['|', '-', '-', '-', 'V', '-', '-', '-', '|'],
            ['|', ' ', ' ', ' ', ' ', ' ', ' ', ' ', '|'],
            ['|', ' ', ' ', ' ', ' ', ' ', ' ', ' ', '|'],
            ['|', ' ', ' ', ' ', ' ', ' ', ' ', ' ', '|'],
            ['|', ' ', ' ', ' ', ' ', ' ', ' ', ' ', '|'],
            ['|', ' ', ' ', ' ', ' ', ' ', ' ', ' ', '|'],
            ['|', ' ', ' ', ' ', ' ', ' ', ' ', ' ', '|'],
            ['|', ' ', ' ', ' ', ' ', ' ', ' ', ' ', '|'],
            ['|', ' ', ' ', ' ', ' ', ' ', ' ', ' ', '|'],
            ['|', ' ', ' ', ' ', ' ', ' ', ' ', ' ', '|'],
            ['|', ' ', ' ', ' ', ' ', ' ', ' ', ' ', '|'],
            ['|', ' ', ' ', ' ', ' ', ' ', ' ', ' ', '|'],
            ['|', ' ', ' ', ' ', ' ', ' ', ' ', ' ', '|'],
            ['|', ' ', ' ', ' ', ' ', ' ', ' ', ' ', '|'],
            ['|', '-', '-', '-', 'X', '-', '-', '-', '|'],
        ]
        self.enemy = Enemy()
        # 初期段階
        self.phase = 0

    def print_board(self):
        row = len(self.board)
        col = len(self.board[0])
        for i in range(0, row):
            row_str = ''
            for j in range(0, col):
                row_str += self.board[i][j]
            print(row_str)

    def move_enemy(self):
        # 移動
        self.enemy.move()

    def update_board(self):
        tmp_board = cp.deepcopy(self.default_board)
        # enemyの移動後を更新
        tmp_board[self.enemy.y][self.enemy.x] = 'O'
        self.board = tmp_board
        # enemyがresetした時にVに戻す
        self.board[0][4] = 'V'

    def update_phase(self):
        self.phase += 1
        self.move_enemy()
        self.update_board()

    def play_game_debug(self):
        print('phase: {0}'.format(game.phase))
        game.print_board()
        print('=' * 20)
        for i in range(0, 20):
            self.update_phase()
            print('phase: {0}'.format(game.phase))
            game.print_board()
            print('=' * 20)

    def play_game(self):
        print('phase: {0}'.format(game.phase))
        game.print_board()
        print('=' * 20)
        for i in range(0, 20):
            self.update_phase()
            print('phase: {0}'.format(game.phase))
            game.print_board()
            print('=' * 20)

game = Game()
game.play_game()
(3)
import copy as cp

class Enemy(object):
    def __init__(self):
        self.x = int(4)
        self.y = int(0)
        self.mark = 'O'
        self.vector = [1, 1]

    def __repr__(self):
        return 'x: {0}, y: {1}, vec: {2}'.format(self.x, self.y, self.vector)

    def move(self):
        self.x += self.vector[0]
        self.y += self.vector[1]
        if (self.y > 14):
            self.x = int(4)
            self.y = int(0)
            self.vector = [1, 1]
        elif (self.x == 0):
            self.vector[0] = 1
        elif (self.x == 8):
            self.vector[0] = -1

class Bullet(object):
    def __init__(self, x:int):
        self.x = int(x)
        self.y = int(14)
        self.mark = 'e'
    def __repr__(self):
        return 'x: {0}, y: {1}'.format(self.x, self.y)
    def move(self):
        self.y -= 1

class Gun(object):
    def __init__(self):
        self.x = int(4)
        self.mark = 'X'
        # 残弾数
        self.remain_bullet = 2
    def __repr__(self):
        return 'x: {0}, 残弾数: {1}'.format(self.x, self.remain_bullet)

class Game(object):
    def __init__(self):
        self.board = [
            ['|', '-', '-', '-', 'V', '-', '-', '-', '|'],
            ['|', ' ', ' ', ' ', ' ', ' ', ' ', ' ', '|'],
            ['|', ' ', ' ', ' ', ' ', ' ', ' ', ' ', '|'],
            ['|', ' ', ' ', ' ', ' ', ' ', ' ', ' ', '|'],
            ['|', ' ', ' ', ' ', ' ', ' ', ' ', ' ', '|'],
            ['|', ' ', ' ', ' ', ' ', ' ', ' ', ' ', '|'],
            ['|', ' ', ' ', ' ', ' ', ' ', ' ', ' ', '|'],
            ['|', ' ', ' ', ' ', ' ', ' ', ' ', ' ', '|'],
            ['|', ' ', ' ', ' ', ' ', ' ', ' ', ' ', '|'],
            ['|', ' ', ' ', ' ', ' ', ' ', ' ', ' ', '|'],
            ['|', ' ', ' ', ' ', ' ', ' ', ' ', ' ', '|'],
            ['|', ' ', ' ', ' ', ' ', ' ', ' ', ' ', '|'],
            ['|', ' ', ' ', ' ', ' ', ' ', ' ', ' ', '|'],
            ['|', ' ', ' ', ' ', ' ', ' ', ' ', ' ', '|'],
            ['|', '-', '-', '-', 'X', '-', '-', '-', '|'],
        ]
        self.default_board = [
            ['|', '-', '-', '-', 'V', '-', '-', '-', '|'],
            ['|', ' ', ' ', ' ', ' ', ' ', ' ', ' ', '|'],
            ['|', ' ', ' ', ' ', ' ', ' ', ' ', ' ', '|'],
            ['|', ' ', ' ', ' ', ' ', ' ', ' ', ' ', '|'],
            ['|', ' ', ' ', ' ', ' ', ' ', ' ', ' ', '|'],
            ['|', ' ', ' ', ' ', ' ', ' ', ' ', ' ', '|'],
            ['|', ' ', ' ', ' ', ' ', ' ', ' ', ' ', '|'],
            ['|', ' ', ' ', ' ', ' ', ' ', ' ', ' ', '|'],
            ['|', ' ', ' ', ' ', ' ', ' ', ' ', ' ', '|'],
            ['|', ' ', ' ', ' ', ' ', ' ', ' ', ' ', '|'],
            ['|', ' ', ' ', ' ', ' ', ' ', ' ', ' ', '|'],
            ['|', ' ', ' ', ' ', ' ', ' ', ' ', ' ', '|'],
            ['|', ' ', ' ', ' ', ' ', ' ', ' ', ' ', '|'],
            ['|', ' ', ' ', ' ', ' ', ' ', ' ', ' ', '|'],
            ['|', '-', '-', '-', 'X', '-', '-', '-', '|'],
        ]
        self.enemy = Enemy()
        self.bullets = []
        self.gun = Gun()
        self.point = 0
        self.fail = 0
        # 初期段階
        self.phase = 0

    def print_board(self):
        row = len(self.board)
        print()
        col = len(self.board[0])
        for i in range(0, row):
            row_str = ''
            for j in range(0, col):
                row_str += self.board[i][j]
            print(row_str)

    def fire_gun(self, key):
        if (self.gun.remain_bullet > 0 and key == 'i'):
            self.bullets.append(Bullet(self.gun.x))
            self.gun.remain_bullet -= 1

    def move_enemy(self):
        # 移動
        self.enemy.move()
        if (self.enemy.y == 14):
            self.fail += 1
        # 初期位置にreset
        elif (self.enemy.y == 0):
            self.gun.remain_bullet = 2

    def move_bullets(self):
        for index, bullet in enumerate(self.bullets):
            if (bullet.y >= 0):
                bullet.move()

    def get_default_board_cell(self, x, y):
        if (x == 4 and y == 0):
            return 'V'
        elif (x == 0 or x == 8):
            return '|'
        elif (y == 0 or y == 14):
            return '-'
        else:
            return ' '

    def update_board(self):
        tmp_board = cp.deepcopy(self.default_board)
        # enemyの移動後を更新
        tmp_board[self.enemy.y][self.enemy.x] = 'O'
        # enemyがresetした時にVに戻す
        tmp_board[0][4] = 'V'
        # bulletの移動を更新
        for index, bullet in enumerate(self.bullets):
            if (bullet.y > 0 and bullet.y < 14):
                # enemyに当たった
                if (tmp_board[bullet.y][bullet.x] == 'O'):
                    tmp_board[bullet.y][bullet.x] = self.get_default_board_cell(bullet.x, bullet.y)
                    self.point += 1
                    self.gun.remain_bullet = 2
                    # reset enemy
                    self.enemy = Enemy()
                    # disable bullet
                    bullet.y = -1
                else:
                    tmp_board[bullet.y][bullet.x] = 'e'
        self.board = tmp_board

    def update_phase(self, key):
        self.phase += 1
        self.fire_gun(key)
        self.move_enemy()
        self.move_bullets()
        self.update_board()

    def play_game_debug(self):
        print('phase: {0}, point: {1}, fail: {2}, 残弾数: {3}'.format(game.phase, game.point, game.fail, game.gun.remain_bullet))
        game.print_board()
        print('=' * 20)
        for i in range(0, 20):
            key = 'x'
            if (i %2 == 0):
                key = 'i'
            self.update_phase(key)
            print('phase: {0}, point: {1}, fail: {2}, 残弾数: {3}'.format(game.phase, game.point, game.fail, game.gun.remain_bullet))
            game.print_board()
            print('=' * 20)

    def play_game(self):
        print('phase: {0}, point: {1}, fail: {2}, 残弾数: {3}'.format(game.phase, game.point, game.fail, game.gun.remain_bullet))
        game.print_board()
        print('=' * 20)
        while (game.fail < 5):
            key = input()
            self.update_phase(key)
            print('phase: {0}, point: {1}, fail: {2}, 残弾数: {3}'.format(game.phase, game.point, game.fail, game.gun.remain_bullet))
            game.print_board()
            print('=' * 20)

game = Game()
game.play_game()
(4)
import random

import copy as cp

class Enemy(object):
    def __init__(self):
        self.x = int(4)
        self.y = int(0)
        self.mark = 'O'
        self.vector = [1, 1]

    def __repr__(self):
        return 'x: {0}, y: {1}, vec: {2}'.format(self.x, self.y, self.vector)

    def move(self):
        self.x += self.vector[0]
        self.y += self.vector[1]
        if (self.y > 14):
            self.x = int(4)
            self.y = int(0)
            self.vector = [1, 1]
        elif (self.x == 0):
            self.vector[0] = 1
        elif (self.x == 8):
            self.vector[0] = -1

class Bullet(object):
    def __init__(self, x:int):
        self.x = int(x)
        self.y = int(14)
        self.mark = 'e'
    def __repr__(self):
        return 'x: {0}, y: {1}'.format(self.x, self.y)
    def move(self):
        self.y -= 1

class Gun(object):
    def __init__(self):
        self.x = int(4)
        self.mark = 'X'
        # 残弾数
        self.remain_bullet = 2
    def __repr__(self):
        return 'x: {0}, 残弾数: {1}'.format(self.x, self.remain_bullet)

class Game(object):
    def __init__(self):
        self.board = [
            ['|', '-', '-', '-', 'V', '-', '-', '-', '|'],
            ['|', ' ', ' ', ' ', ' ', ' ', ' ', ' ', '|'],
            ['|', ' ', ' ', ' ', ' ', ' ', ' ', ' ', '|'],
            ['|', ' ', ' ', ' ', ' ', ' ', ' ', ' ', '|'],
            ['|', ' ', ' ', ' ', ' ', ' ', ' ', ' ', '|'],
            ['|', ' ', ' ', ' ', ' ', ' ', ' ', ' ', '|'],
            ['|', ' ', ' ', ' ', ' ', ' ', ' ', ' ', '|'],
            ['|', ' ', ' ', ' ', ' ', ' ', ' ', ' ', '|'],
            ['|', ' ', ' ', ' ', ' ', ' ', ' ', ' ', '|'],
            ['|', ' ', ' ', ' ', ' ', ' ', ' ', ' ', '|'],
            ['|', ' ', ' ', ' ', ' ', ' ', ' ', ' ', '|'],
            ['|', ' ', ' ', ' ', ' ', ' ', ' ', ' ', '|'],
            ['|', ' ', ' ', ' ', ' ', ' ', ' ', ' ', '|'],
            ['|', ' ', ' ', ' ', ' ', ' ', ' ', ' ', '|'],
            ['|', '-', '-', '-', 'X', '-', '-', '-', '|'],
        ]
        self.default_board = [
            ['|', '-', '-', '-', 'V', '-', '-', '-', '|'],
            ['|', ' ', ' ', ' ', ' ', ' ', ' ', ' ', '|'],
            ['|', ' ', ' ', ' ', ' ', ' ', ' ', ' ', '|'],
            ['|', ' ', ' ', ' ', ' ', ' ', ' ', ' ', '|'],
            ['|', ' ', ' ', ' ', ' ', ' ', ' ', ' ', '|'],
            ['|', ' ', ' ', ' ', ' ', ' ', ' ', ' ', '|'],
            ['|', ' ', ' ', ' ', ' ', ' ', ' ', ' ', '|'],
            ['|', ' ', ' ', ' ', ' ', ' ', ' ', ' ', '|'],
            ['|', ' ', ' ', ' ', ' ', ' ', ' ', ' ', '|'],
            ['|', ' ', ' ', ' ', ' ', ' ', ' ', ' ', '|'],
            ['|', ' ', ' ', ' ', ' ', ' ', ' ', ' ', '|'],
            ['|', ' ', ' ', ' ', ' ', ' ', ' ', ' ', '|'],
            ['|', ' ', ' ', ' ', ' ', ' ', ' ', ' ', '|'],
            ['|', ' ', ' ', ' ', ' ', ' ', ' ', ' ', '|'],
            ['|', '-', '-', '-', '-', '-', '-', '-', '|'],
        ]
        self.enemy = Enemy()
        self.bullets = []
        self.gun = Gun()
        self.point = 0
        self.fail = 0
        # 初期段階
        self.phase = 0

    def print_board(self):
        row = len(self.board)
        print()
        col = len(self.board[0])
        for i in range(0, row):
            row_str = ''
            for j in range(0, col):
                row_str += self.board[i][j]
            print(row_str)

    def fire_gun(self, key):
        if (self.gun.remain_bullet > 0 and key == 'i'):
            self.bullets.append(Bullet(self.gun.x))
            self.gun.remain_bullet -= 1

    def move_enemy(self):
        # 移動
        self.enemy.move()
        if (self.enemy.y == 14):
            self.fail += 1
        # 初期位置にreset
        elif (self.enemy.y == 0):
            self.gun.remain_bullet = 2

    def move_bullets(self):
        for index, bullet in enumerate(self.bullets):
            if (bullet.y >= 0):
                bullet.move()

    def get_default_board_cell(self, x, y):
        if (x == 4 and y == 0):
            return 'V'
        elif (x == 0 or x == 8):
            return '|'
        elif (y == 0 or y == 14):
            return '-'
        else:
            return ' '
    def move_gun(self, x):
        self.gun.x = x

    def update_board(self):
        tmp_board = cp.deepcopy(self.default_board)
        # enemyの移動後を更新
        tmp_board[self.enemy.y][self.enemy.x] = 'O'
        # enemyがresetした時にVに戻す
        tmp_board[0][4] = 'V'
        # gunの移動を更新
        tmp_board[14][self.gun.x] = 'X'
        # bulletの移動を更新
        for index, bullet in enumerate(self.bullets):
            if (bullet.y > 0 and bullet.y < 14):
                # enemyに当たった
                if (tmp_board[bullet.y][bullet.x] == 'O'):
                    tmp_board[bullet.y][bullet.x] = self.get_default_board_cell(bullet.x, bullet.y)
                    self.point += 1
                    self.gun.remain_bullet = 2
                    # reset enemy
                    self.enemy = Enemy()
                    # disable bullet
                    bullet.y = -1
                else:
                    tmp_board[bullet.y][bullet.x] = 'e'
        self.board = tmp_board

    def update_phase(self, key):
        self.phase += 1
        rand_num = random.randrange(9)
        self.move_gun(rand_num)
        self.fire_gun(key)
        self.move_enemy()
        self.move_bullets()
        self.update_board()

    def play_game_debug(self):
        print('phase: {0}, point: {1}, fail: {2}, 残弾数: {3}'.format(game.phase, game.point, game.fail, game.gun.remain_bullet))
        game.print_board()
        print('=' * 20)
        for i in range(0, 20):
            key = 'x'
            if (i %2 == 0):
                key = 'i'
            self.update_phase(key)
            print('phase: {0}, point: {1}, fail: {2}, 残弾数: {3}'.format(game.phase, game.point, game.fail, game.gun.remain_bullet))
            game.print_board()
            print('=' * 20)

    def play_game(self):
        print('phase: {0}, point: {1}, fail: {2}, 残弾数: {3}'.format(game.phase, game.point, game.fail, game.gun.remain_bullet))
        game.print_board()
        print('=' * 20)
        while (game.fail < 5):
            key = input()
            self.update_phase(key)
            print('phase: {0}, point: {1}, fail: {2}, 残弾数: {3}'.format(game.phase, game.point, game.fail, game.gun.remain_bullet))
            game.print_board()
            print('=' * 20)

game = Game()
game.play_game()
(5)
import copy as cp

class Enemy(object):
    def __init__(self):
        self.x = int(4)
        self.y = int(0)
        self.mark = 'O'
        self.vector = [1, 1]

    def __repr__(self):
        return 'x: {0}, y: {1}, vec: {2}'.format(self.x, self.y, self.vector)

    def move(self):
        self.x += self.vector[0]
        self.y += self.vector[1]
        if (self.y > 14):
            self.x = int(4)
            self.y = int(0)
            self.vector = [1, 1]
        elif (self.x == 0):
            self.vector[0] = 1
        elif (self.x == 8):
            self.vector[0] = -1

class Bullet(object):
    def __init__(self, x:int):
        self.x = int(x)
        self.y = int(14)
        self.mark = 'e'
    def __repr__(self):
        return 'x: {0}, y: {1}'.format(self.x, self.y)
    def move(self):
        self.y -= 1

class Gun(object):
    def __init__(self):
        self.x = int(4)
        self.mark = 'X'
        # 残弾数
        self.remain_bullet = 2
    def __repr__(self):
        return 'x: {0}, 残弾数: {1}'.format(self.x, self.remain_bullet)

class Game(object):
    def __init__(self):
        self.board = [
            ['|', '-', '-', '-', 'V', '-', '-', '-', '|'],
            ['|', ' ', ' ', ' ', ' ', ' ', ' ', ' ', '|'],
            ['|', ' ', ' ', ' ', ' ', ' ', ' ', ' ', '|'],
            ['|', ' ', ' ', ' ', ' ', ' ', ' ', ' ', '|'],
            ['|', ' ', ' ', ' ', ' ', ' ', ' ', ' ', '|'],
            ['|', ' ', ' ', ' ', ' ', ' ', ' ', ' ', '|'],
            ['|', ' ', ' ', ' ', ' ', ' ', ' ', ' ', '|'],
            ['|', ' ', ' ', ' ', ' ', ' ', ' ', ' ', '|'],
            ['|', ' ', ' ', ' ', ' ', ' ', ' ', ' ', '|'],
            ['|', ' ', ' ', ' ', ' ', ' ', ' ', ' ', '|'],
            ['|', ' ', ' ', ' ', ' ', ' ', ' ', ' ', '|'],
            ['|', ' ', ' ', ' ', ' ', ' ', ' ', ' ', '|'],
            ['|', ' ', ' ', ' ', ' ', ' ', ' ', ' ', '|'],
            ['|', ' ', ' ', ' ', ' ', ' ', ' ', ' ', '|'],
            ['|', '-', '-', '-', 'X', '-', '-', '-', '|'],
        ]
        self.default_board = [
            ['|', '-', '-', '-', 'V', '-', '-', '-', '|'],
            ['|', ' ', ' ', ' ', ' ', ' ', ' ', ' ', '|'],
            ['|', ' ', ' ', ' ', ' ', ' ', ' ', ' ', '|'],
            ['|', ' ', ' ', ' ', ' ', ' ', ' ', ' ', '|'],
            ['|', ' ', ' ', ' ', ' ', ' ', ' ', ' ', '|'],
            ['|', ' ', ' ', ' ', ' ', ' ', ' ', ' ', '|'],
            ['|', ' ', ' ', ' ', ' ', ' ', ' ', ' ', '|'],
            ['|', ' ', ' ', ' ', ' ', ' ', ' ', ' ', '|'],
            ['|', ' ', ' ', ' ', ' ', ' ', ' ', ' ', '|'],
            ['|', ' ', ' ', ' ', ' ', ' ', ' ', ' ', '|'],
            ['|', ' ', ' ', ' ', ' ', ' ', ' ', ' ', '|'],
            ['|', ' ', ' ', ' ', ' ', ' ', ' ', ' ', '|'],
            ['|', ' ', ' ', ' ', ' ', ' ', ' ', ' ', '|'],
            ['|', ' ', ' ', ' ', ' ', ' ', ' ', ' ', '|'],
            ['|', '-', '-', '-', '-', '-', '-', '-', '|'],
        ]
        self.enemy = Enemy()
        self.bullets = []
        self.gun = Gun()
        self.point = 0
        self.fail = 0
        # 初期段階
        self.phase = 0

    def print_board(self):
        row = len(self.board)
        print()
        col = len(self.board[0])
        for i in range(0, row):
            row_str = ''
            for j in range(0, col):
                row_str += self.board[i][j]
            print(row_str)

    def fire_gun(self, key):
        if (self.gun.remain_bullet > 0 and key == 'i'):
            self.bullets.append(Bullet(self.gun.x))
            self.gun.remain_bullet -= 1

    def move_enemy(self):
        # 移動
        self.enemy.move()
        if (self.enemy.y == 14):
            self.fail += 1
        # 初期位置にreset
        elif (self.enemy.y == 0):
            self.gun.remain_bullet = 2

    def move_bullets(self):
        for index, bullet in enumerate(self.bullets):
            if (bullet.y >= 0):
                bullet.move()

    def get_default_board_cell(self, x, y):
        if (x == 4 and y == 0):
            return 'V'
        elif (x == 0 or x == 8):
            return '|'
        elif (y == 0 or y == 14):
            return '-'
        else:
            return ' '
    def move_gun(self, key):
        if (key == 'j'):
            self.gun.x -= 1
            if (self.gun.x < 0):
                self.gun.x = 0
        if (key == 'l'):
            self.gun.x += 1
            if (self.gun.x > 8):
                self.gun.x = 8

    def update_board(self):
        tmp_board = cp.deepcopy(self.default_board)
        # enemyの移動後を更新
        tmp_board[self.enemy.y][self.enemy.x] = 'O'
        # enemyがresetした時にVに戻す
        tmp_board[0][4] = 'V'
        # gunの移動を更新
        tmp_board[14][self.gun.x] = 'X'
        # bulletの移動を更新
        for index, bullet in enumerate(self.bullets):
            if (bullet.y > 0 and bullet.y < 14):
                # enemyに当たった
                if (tmp_board[bullet.y][bullet.x] == 'O'):
                    tmp_board[bullet.y][bullet.x] = self.get_default_board_cell(bullet.x, bullet.y)
                    self.point += 1
                    self.gun.remain_bullet = 2
                    # reset enemy
                    self.enemy = Enemy()
                    # disable bullet
                    bullet.y = -1
                else:
                    tmp_board[bullet.y][bullet.x] = 'e'
        self.board = tmp_board

    def update_phase(self, key):
        if (key == 'i' or key == 'j' or key == 'k' or key == 'l'):
            self.phase += 1
            self.move_gun(key)
            self.fire_gun(key)
            self.move_enemy()
            self.move_bullets()
            self.update_board()

    def play_game_debug(self):
        print('phase: {0}, point: {1}, fail: {2}, 残弾数: {3}'.format(game.phase, game.point, game.fail, game.gun.remain_bullet))
        game.print_board()
        print('=' * 20)
        for i in range(0, 40):
            randn = random.randrange(4)
            key = 'k'
            if (randn == 0):
                key = 'i'
            if (randn == 1):
                key ='j'
            if (randn == 2):
                key = 'k'
            if (randn == 3):
                key = 'l'
            print('key: ', key)
            self.update_phase(key)
            print('phase: {0}, point: {1}, fail: {2}, 残弾数: {3}'.format(game.phase, game.point, game.fail, game.gun.remain_bullet))
            game.print_board()
            print('=' * 20)

    def play_game(self):
        print('phase: {0}, point: {1}, fail: {2}, 残弾数: {3}'.format(game.phase, game.point, game.fail, game.gun.remain_bullet))
        game.print_board()
        print('=' * 20)
        while (game.fail < 5):
            key = input()
            self.update_phase(key)
            print('phase: {0}, point: {1}, fail: {2}, 残弾数: {3}'.format(game.phase, game.point, game.fail, game.gun.remain_bullet))
            game.print_board()
            print('=' * 20)

game = Game()
game.play_game()
(6)
更新するフレームの単位時間を微小な時間にし、フレーム毎にプレイヤーからのキーボード割り込みをbusy wait(while(true))によって擬似的に常に受け付ける形にし、割り込みが起きたらその値を使って次のフレームにその入力内容を反映させる
(7)
import copy as cp
import time

import fcntl
import termios
import sys
import os

def getkey():
    fno = sys.stdin.fileno()

    #stdinの端末属性を取得
    attr_old = termios.tcgetattr(fno)

    # stdinのエコー無効、カノニカルモード無効
    attr = termios.tcgetattr(fno)
    attr[3] = attr[3] & ~termios.ECHO & ~termios.ICANON # & ~termios.ISIG
    termios.tcsetattr(fno, termios.TCSADRAIN, attr)

    # stdinをNONBLOCKに設定
    fcntl_old = fcntl.fcntl(fno, fcntl.F_GETFL)
    fcntl.fcntl(fno, fcntl.F_SETFL, fcntl_old | os.O_NONBLOCK)

    chr = 0

    try:
        # キーを取得
        c = sys.stdin.read(1)
        if len(c):
            while len(c):
                chr = (chr << 8) + ord(c)
                c = sys.stdin.read(1)
    finally:
        # stdinを元に戻す
        fcntl.fcntl(fno, fcntl.F_SETFL, fcntl_old)
        termios.tcsetattr(fno, termios.TCSANOW, attr_old)

    return chr


class Enemy(object):
    def __init__(self):
        self.x = int(4)
        self.y = int(0)
        self.mark = 'O'
        self.vector = [1, 1]

    def __repr__(self):
        return 'x: {0}, y: {1}, vec: {2}'.format(self.x, self.y, self.vector)

    def move(self):
        self.x += self.vector[0]
        self.y += self.vector[1]
        if (self.y > 14):
            self.x = int(4)
            self.y = int(0)
            self.vector = [1, 1]
        elif (self.x == 0):
            self.vector[0] = 1
        elif (self.x == 8):
            self.vector[0] = -1

class Bullet(object):
    def __init__(self, x:int):
        self.x = int(x)
        self.y = int(14)
        self.mark = 'e'
    def __repr__(self):
        return 'x: {0}, y: {1}'.format(self.x, self.y)
    def move(self):
        self.y -= 1

class Gun(object):
    def __init__(self):
        self.x = int(4)
        self.mark = 'X'
        # 残弾数
        self.remain_bullet = 2
    def __repr__(self):
        return 'x: {0}, 残弾数: {1}'.format(self.x, self.remain_bullet)

class Game(object):
    def __init__(self):
        self.board = [
            ['|', '-', '-', '-', 'V', '-', '-', '-', '|'],
            ['|', ' ', ' ', ' ', ' ', ' ', ' ', ' ', '|'],
            ['|', ' ', ' ', ' ', ' ', ' ', ' ', ' ', '|'],
            ['|', ' ', ' ', ' ', ' ', ' ', ' ', ' ', '|'],
            ['|', ' ', ' ', ' ', ' ', ' ', ' ', ' ', '|'],
            ['|', ' ', ' ', ' ', ' ', ' ', ' ', ' ', '|'],
            ['|', ' ', ' ', ' ', ' ', ' ', ' ', ' ', '|'],
            ['|', ' ', ' ', ' ', ' ', ' ', ' ', ' ', '|'],
            ['|', ' ', ' ', ' ', ' ', ' ', ' ', ' ', '|'],
            ['|', ' ', ' ', ' ', ' ', ' ', ' ', ' ', '|'],
            ['|', ' ', ' ', ' ', ' ', ' ', ' ', ' ', '|'],
            ['|', ' ', ' ', ' ', ' ', ' ', ' ', ' ', '|'],
            ['|', ' ', ' ', ' ', ' ', ' ', ' ', ' ', '|'],
            ['|', ' ', ' ', ' ', ' ', ' ', ' ', ' ', '|'],
            ['|', '-', '-', '-', 'X', '-', '-', '-', '|'],
        ]
        self.default_board = [
            ['|', '-', '-', '-', 'V', '-', '-', '-', '|'],
            ['|', ' ', ' ', ' ', ' ', ' ', ' ', ' ', '|'],
            ['|', ' ', ' ', ' ', ' ', ' ', ' ', ' ', '|'],
            ['|', ' ', ' ', ' ', ' ', ' ', ' ', ' ', '|'],
            ['|', ' ', ' ', ' ', ' ', ' ', ' ', ' ', '|'],
            ['|', ' ', ' ', ' ', ' ', ' ', ' ', ' ', '|'],
            ['|', ' ', ' ', ' ', ' ', ' ', ' ', ' ', '|'],
            ['|', ' ', ' ', ' ', ' ', ' ', ' ', ' ', '|'],
            ['|', ' ', ' ', ' ', ' ', ' ', ' ', ' ', '|'],
            ['|', ' ', ' ', ' ', ' ', ' ', ' ', ' ', '|'],
            ['|', ' ', ' ', ' ', ' ', ' ', ' ', ' ', '|'],
            ['|', ' ', ' ', ' ', ' ', ' ', ' ', ' ', '|'],
            ['|', ' ', ' ', ' ', ' ', ' ', ' ', ' ', '|'],
            ['|', ' ', ' ', ' ', ' ', ' ', ' ', ' ', '|'],
            ['|', '-', '-', '-', '-', '-', '-', '-', '|'],
        ]
        self.enemy = Enemy()
        self.bullets = []
        self.gun = Gun()
        self.point = 0
        self.fail = 0
        # 初期段階
        self.phase = 0

    def print_board(self):
        row = len(self.board)
        print()
        col = len(self.board[0])
        for i in range(0, row):
            row_str = ''
            for j in range(0, col):
                row_str += self.board[i][j]
            print(row_str)

    def fire_gun(self, key):
        if (self.gun.remain_bullet > 0 and key == 'i'):
            self.bullets.append(Bullet(self.gun.x))
            self.gun.remain_bullet -= 1

    def move_enemy(self):
        # 移動
        self.enemy.move()
        if (self.enemy.y == 14):
            self.fail += 1
        # 初期位置にreset
        elif (self.enemy.y == 0):
            self.gun.remain_bullet = 2

    def move_bullets(self):
        for index, bullet in enumerate(self.bullets):
            if (bullet.y >= 0):
                bullet.move()

    def get_default_board_cell(self, x, y):
        if (x == 4 and y == 0):
            return 'V'
        elif (x == 0 or x == 8):
            return '|'
        elif (y == 0 or y == 14):
            return '-'
        else:
            return ' '
    def move_gun(self, key):
        if (key == 'j'):
            self.gun.x -= 1
            if (self.gun.x < 0):
                self.gun.x = 0
        if (key == 'l'):
            self.gun.x += 1
            if (self.gun.x > 8):
                self.gun.x = 8

    def update_board(self):
        tmp_board = cp.deepcopy(self.default_board)
        # enemyの移動後を更新
        tmp_board[self.enemy.y][self.enemy.x] = 'O'
        # enemyがresetした時にVに戻す
        tmp_board[0][4] = 'V'
        # gunの移動を更新
        tmp_board[14][self.gun.x] = 'X'
        # bulletの移動を更新
        for index, bullet in enumerate(self.bullets):
            if (bullet.y > 0 and bullet.y < 14):
                # enemyに当たった
                if (tmp_board[bullet.y][bullet.x] == 'O'):
                    tmp_board[bullet.y][bullet.x] = self.get_default_board_cell(bullet.x, bullet.y)
                    self.point += 1
                    self.gun.remain_bullet = 2
                    # reset enemy
                    self.enemy = Enemy()
                    # disable bullet
                    bullet.y = -1
                else:
                    tmp_board[bullet.y][bullet.x] = 'e'
        self.board = tmp_board

    def update_phase(self, key):
        if (key == 'i' or key == 'j' or key == 'k' or key == 'l'):
            self.phase += 1
            self.move_gun(key)
            self.fire_gun(key)
            self.move_enemy()
            self.move_bullets()
            self.update_board()

    def play_game_debug(self):
        print('phase: {0}, point: {1}, fail: {2}, 残弾数: {3}'.format(game.phase, game.point, game.fail, game.gun.remain_bullet))
        game.print_board()
        print('=' * 20)
        while (game.fail < 5 and game.phase < 40):
            start = time.time()
            key = 'k'
            randn = random.randrange(9)
            if (randn == 0):
                key = 'i'
            if (randn == 1):
                key ='j'
            if (randn == 2):
                key = 'k'
            if (randn == 3):
                key = 'l'
            # 0.5 秒いない
            while (time.time() - start < 0.5):
                key = key
            self.update_phase(key)
            print('phase: {0}, point: {1}, fail: {2}, 残弾数: {3}'.format(game.phase, game.point, game.fail, game.gun.remain_bullet))
            game.print_board()
            print('=' * 20)

    def play_game(self):
        print('phase: {0}, point: {1}, fail: {2}, 残弾数: {3}'.format(game.phase, game.point, game.fail, game.gun.remain_bullet))
        game.print_board()
        print('=' * 20)
        while (game.fail < 5):
            start = time.time()
            key = 'k'
            while (time.time() - start < 0.5):
                input_key = chr(getkey())
                if (input_key == 'i' or input_key == 'j' or input_key == 'l'):
                    key = input_key
            self.update_phase(key)
            print('phase: {0}, point: {1}, fail: {2}, 残弾数: {3}'.format(game.phase, game.point, game.fail, game.gun.remain_bullet))
            game.print_board()
            print('=' * 20)

game = Game()
game.play_game()
感想
- ゲームは作ったことがなかったので大変だったけど内容としては実装していて楽しかったです。
- 作り方は一番楽な1にしました。3はゲームそのものを作れるプロ向けですかね笑。一応2でもできそうでしたが本番で加点は狙いにいかないかなぁと思ってやめました(問題文にも正しく実装できた場合と書いてあるので、そもそも正しくできていない時のリスクが高いと思いました)。
- (7)は(6)で書いたようにbusy waitのやり方はすぐ思いついたのですが、キーボードからのIRQをどうpythonのプログラム側に渡せばいいのか分からなかったので調べちゃいました。
- (7)は実際に遊べるのでterminalで試してみてください(busy waitしているのでcpuへの負担がすごく、あまり長時間遊ぶのはオススメしません笑)。

- 投稿日:2019-11-30T21:52:47+09:00
GoogleスライドとOpen JTalkで動画作成
なぜ作ろうと思ったか
- バイト先の一つであるプログラミング教室で,学習用に使う動画を作りたかったから.
- 動画を作りたいけど,顔出しや声出しは恥ずかしいと言う人はざらにいるはず.そう言う人が手軽に動画を作れたら便利ではないかと思ったから.
何をしたのか
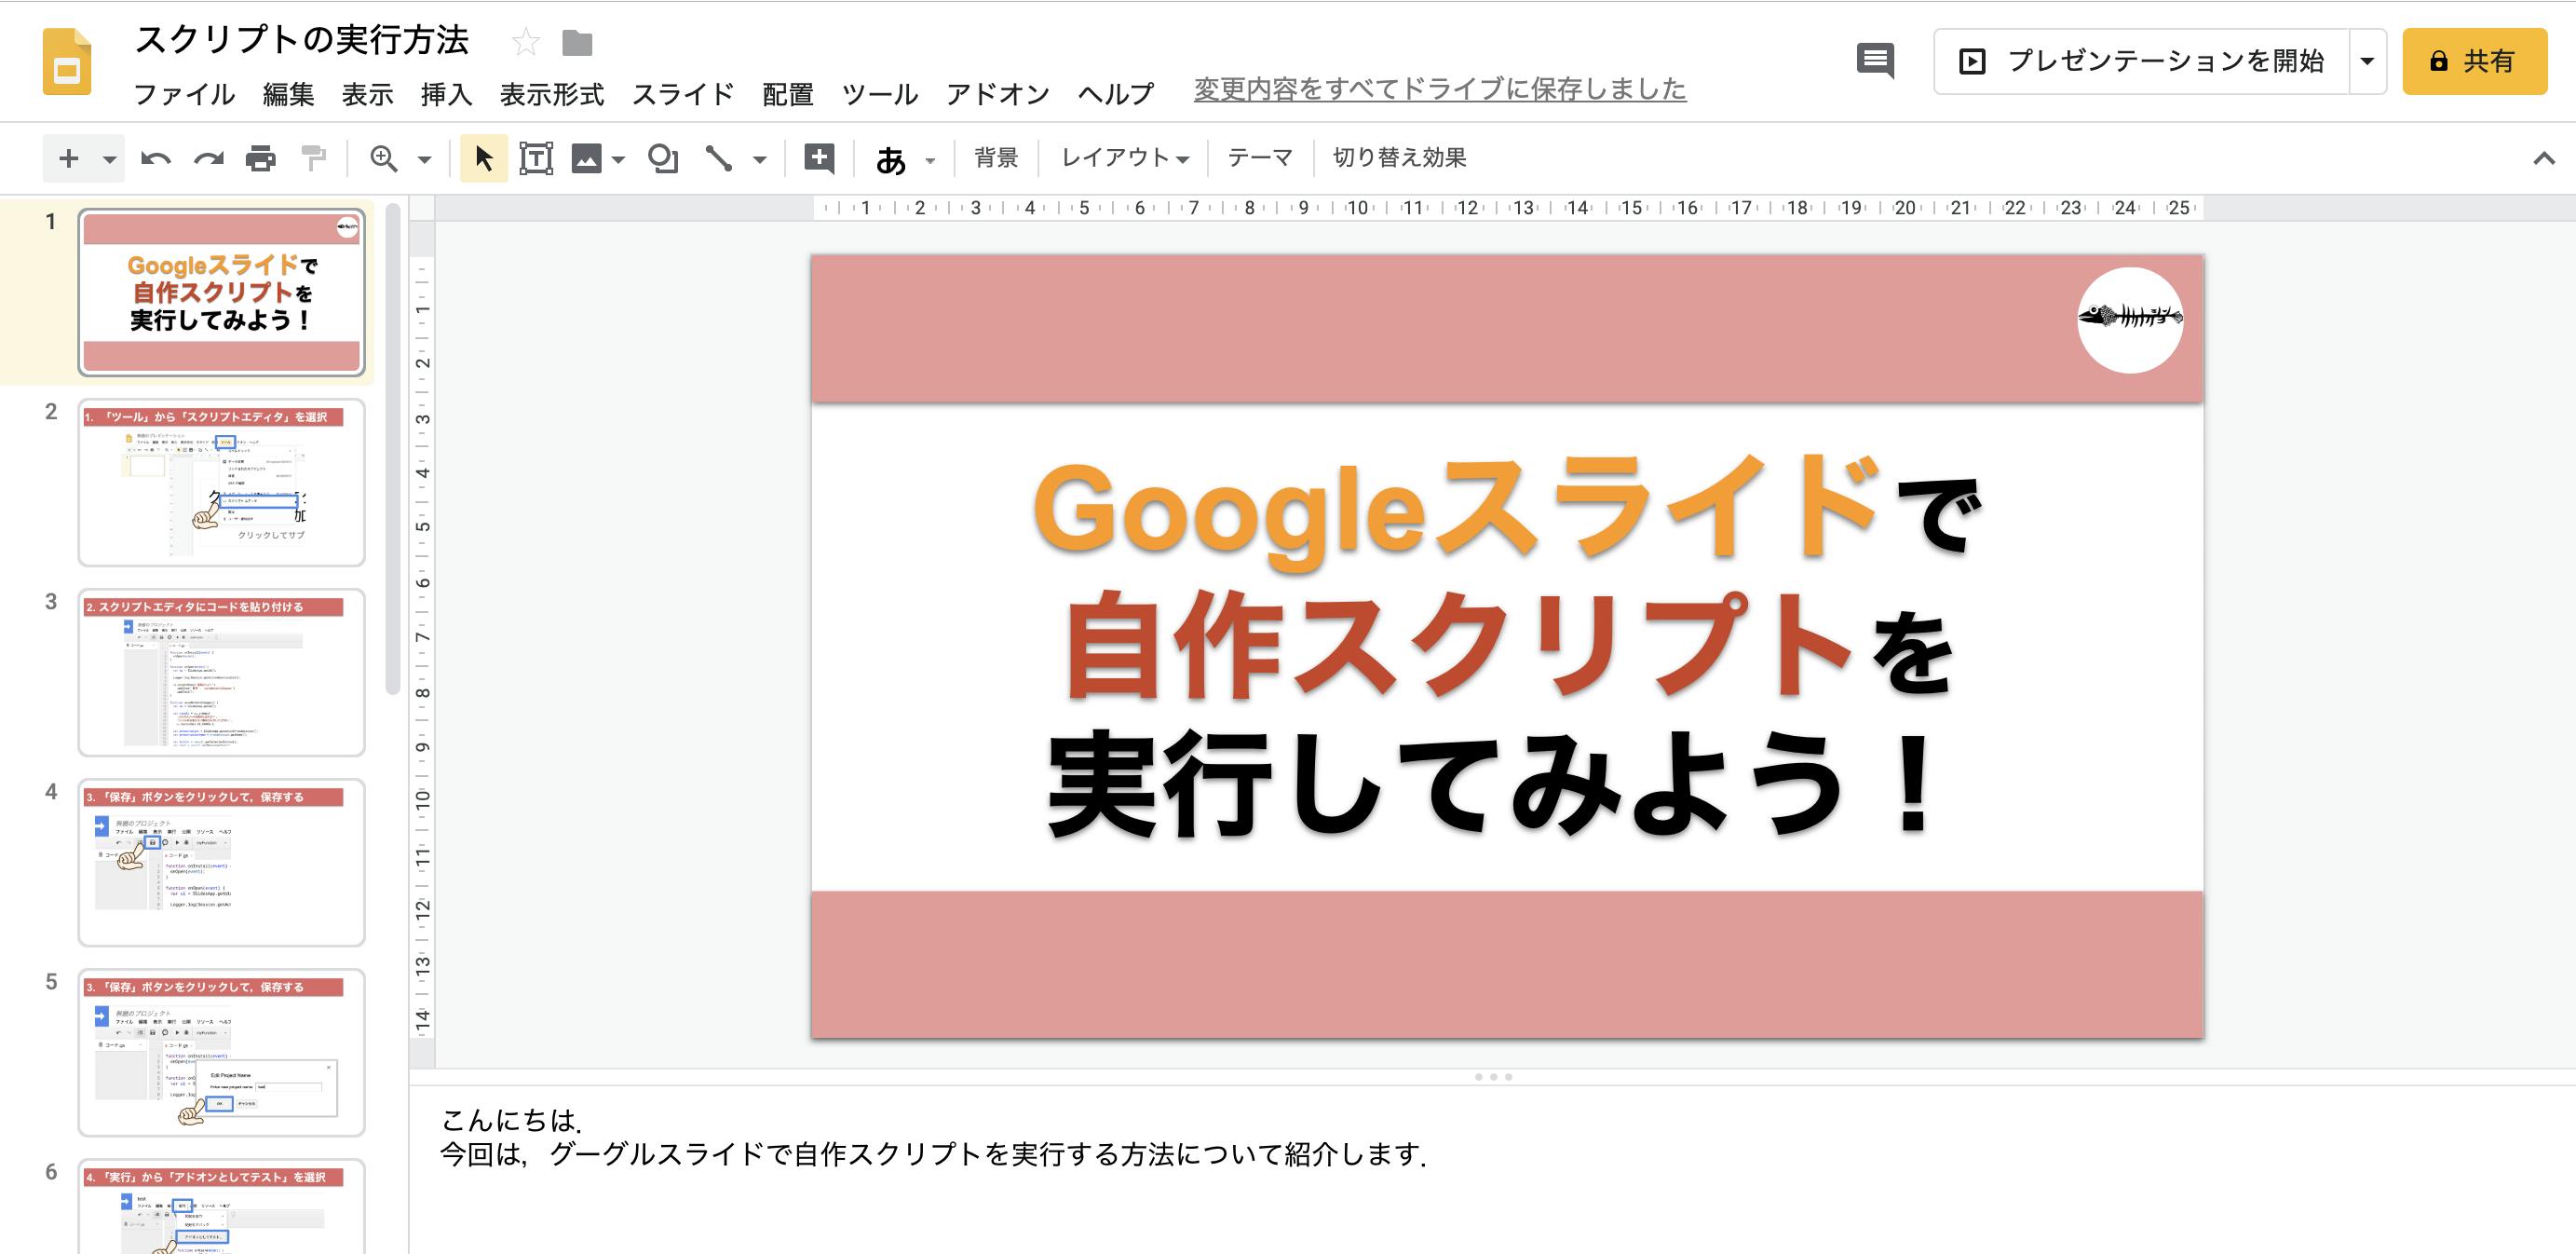
Googleスライドとは,Googleが作成したプレゼンテーションソフトです.ブラウザとGoogleアカウントがあれば,誰でもプレゼンテーションを作成することができます.今回,このGoogleスライドを用いてスライド動画を作成します.
Googleスライドでは,下図のようにスライドとその下にノート(話す内容などをメモするところ)があります.このスライドとノートを用いて,スライドに合わせて合成音声(Open JTalk)が話すスライドショーのような動画を作成します.
実際に作成した動画はこちら.
GoogleスライドとOpen JTalkで動画を作ってみた
— manaco (@mamamana26) November 30, 2019
(↓サンプル) pic.twitter.com/qvN9no65kSやったこと
- Googleスライドから,スライド画像とノートを保存するGoogle Apps Scriptの作成
- Pythonで,動画生成プログラムの作成
- 詳しいコードはgithubにあります
1. Google Apps Scriptの作成と実行
以下のコードをアドオンとして実行しました.実行方法は,サンプル動画にある通りなので見てみてください.
test.gsfunction onInstall(event) { onOpen(event); } function onOpen(event) { var ui = SlidesApp.getUi(); Logger.log(Session.getActiveUserLocale()); ui.createMenu('追加メニュー') .addItem('保存', 'saveNoteAndImages') .addToUi(); } function saveNoteAndImages() { var ui = SlidesApp.getUi(); var result = ui.prompt( 'スライドとノートを保存しますか?', 'ファイル名を変えたい場合は入力してください.', ui.ButtonSet.OK_CANCEL); var presentation = SlidesApp.getActivePresentation(); var presentationName = presentation.getName(); var button = result.getSelectedButton(); var text = result.getResponseText(); if (button == ui.Button.OK) { saveScenarioSlideImages(text ? text : presentationName); } else if (button == ui.Button.CANCEL) { } else if (button == ui.Button.CLOSE) { } } function downloadSlide(folder, name, presentationId, slideId) { var url = 'https://docs.google.com/presentation/d/' + presentationId + '/export/jpeg?id=' + presentationId + '&pageid=' + slideId; var options = { headers: { Authorization: 'Bearer ' + ScriptApp.getOAuthToken() } }; var response = UrlFetchApp.fetch(url, options); var image = response.getAs(MimeType.JPEG); image.setName(name); folder.createFile(image); } function saveScenarioSlideImages(presentationName) { var presentation = SlidesApp.getActivePresentation(); var scenario = []; var folder = DriveApp.createFolder(presentationName); presentation.getSlides().forEach(function(slide, i) { var pageName = Utilities.formatString('%03d', i+1)+'.jpeg'; var txt = ''; slide.getNotesPage().getShapes().forEach(function(shape, i) { txt += shape.getText().asString(); }); var note = []; txt.split('\n').map( function(t) { return t.trim() } ).forEach( function(v) { if (v == '') { //note.push(v); } else { note.push(v); } }); scenario = scenario.concat(note); scenario.push(':newpage'); downloadSlide(folder, pageName, presentation.getId(), slide.getObjectId()); }); folder.createFile('text.txt',scenario.join('\n')); }アドオンを実行すると,自分のドライブのホームにフォルダが作成されます.フォルダの中身は,スライド画像とノートの内容をまとめたテキストファイルです.これらのファイルを自分のPC上にダウンロードしてください.
text.txtの中身はこのようになっています.
:newpageで次のスライドへ進めます.:1は処理を停止する時間を表し,この例では1秒待ちます.話すときに間を作りたい時などに使用できます.text.txtこんにちは. :1 今回は,グーグルスライドで自作スクリプトを実行する方法について紹介します. :newpage はじめに,グーグルスライドを開き,ツールからスクリプトエディタを選択します. :newpage2.動画生成プログラム
スライドをめくるタイミングと音声のタイミングを合わせるために,1スライドごとに無音動画と音声を作成し,それを連結して各スライドの音あり動画を作成した後に,さらにそれらを連結することで1本の動画にします.
流れ:
各フレーズの音声生成→連結して1スライド分の音声作成→音声の長さと同じ長さの無音動画を生成→音声と無音動画を結合して音あり動画を生成→これを繰り返して全スライド分音あり動画を生成→全ての音あり動画を連結コードのリンクは上に載せたので,使用したいくつかの関数の機能を,軽く紹介だけします.
対応オプションは以下のようになってます.
def get_args():
    parser = argparse.ArgumentParser()
    parser.add_argument('input', type=str, help='input folder path')
    parser.add_argument('-o','--output', type=str, default='out.mp4', help='output file name')
    parser.add_argument('-f','--framerate', type=int, default=46000, help='sound frame rate')
    parser.add_argument('-s','--speed', type=float, default=1.0, help='sound speed')
    args = parser.parse_args()
    return args
get_NoteList()はテキストファイルからテキストを取り出し,スライド番号に対応するようにリストに格納します.def get_NoteList(fpath): f = open(fpath) text = f.read() f.close() text = text.split('\n') note_list = [] note = [] for line in text: if line==':newpage': note_list += [note] note = [] else: note += [line] return note_list
make_Sound()は,Open JTalkを用いて音声を作成します.サイレント音声部分はpydubのAudioSegmentで作成しました.def make_Sound(args, text, fname): if line[0]==':': # silent sound_len = float(line[1:]) * 1000 sound = AudioSegment.silent(duration=sound_len, frame_rate=args.framerate) sound.export(fname, format="wav") else: # talk open_jtalk = ['open_jtalk'] mech = ['-x', '/usr/local/Cellar/open-jtalk/1.11/dic'] htsvoice = ['-m', '/usr/local/Cellar/open-jtalk/1.11/voice/mei/mei_normal.htsvoice'] speed = ['-r', str(args.speed)] sampling = ['-s', str(args.framerate)] outwav = ['-ow', fname] cmd = open_jtalk + mech + htsvoice + speed + sampling + outwav c = subprocess.Popen(cmd, stdin=subprocess.PIPE) c.stdin.write(text.encode('utf-8')) c.stdin.close() c.wait()
join_Sound()はffmpegを使用して音声を生成します.def join_Sound(i, fname): sound_path_fname = './sound/tmp{:03}/sound_path.txt'.format(i) sound_list = sorted(glob.glob(os.path.join('./sound/tmp{:03}'.format(i), '*.wav'))) sound_path = '' for line in sound_list: sound_path += 'file ' + os.path.split(line)[-1] + '\n' with open(sound_path_fname, mode='w') as f: f.write(sound_path) cmd = ['ffmpeg', '-y', '-f', 'concat', '-safe', '0', '-i', sound_path_fname, '-loglevel', 'quiet', '-c', 'copy', fname] c = subprocess.call(cmd)
make_SilentVideo()はそのスライドの音声ファイルと同じ長さの無音動画を作成します.def make_SilentVideo(slide, sound_len, fname): img = cv2.imread(slide) h, w = img.shape[:2] fourcc = cv2.VideoWriter_fourcc('m','p','4', 'v') video = cv2.VideoWriter(fname, fourcc, 20.0, (w,h)) framecount = sound_len * 20 for _ in range(int(framecount)): video.write(img) video.release()
join_SilentVideo_Sound()は無音動画と音声を結合して1スライド分の音声あり動画を作成します.join_Video()は,作成した各スライドの音あり動画を連結して1本の動画にします.どちらもffmpegを使用しました.def join_SilentVideo_Sound(silent_video, sound, fname): cmd = ['ffmpeg', '-y', '-i', silent_video, '-i', sound, '-loglevel', 'quiet', './video/{:03}.mp4'.format(fname)] c = subprocess.call(cmd)def join_Video(args): video_path_fname = './video/video_path.txt' video_list = sorted(glob.glob(os.path.join('./video', '*.mp4'))) video_path = '' for line in video_list: video_path += 'file ' + os.path.split(line)[-1] + '\n' with open(video_path_fname, mode='w') as f: f.write(video_path) cmd = ['ffmpeg', '-y', '-f', 'concat', '-safe', '0', '-i', video_path_fname, '-loglevel', 'quiet', '-c', 'copy', args.output] c = subprocess.call(cmd)実行
main.pyに入力ファイル名./testを渡して実行します../testの中には,Googleドライブからダウンロードしたスライド画像と,ノートの内容が記録されたテキストファイルがあります.$ python main.py ./test実行すると,
out.mp4と言う出力ファイルがカレントディレクトリに作られます.
- 投稿日:2019-11-30T21:45:24+09:00
PyQ機械学習に関するメモ pythonの文法
目的
pyqで学んだことを忘れないために、メモを残す
pandas
描画について
・ヒストグラムを描画するときは
plt.hist
plt.hist(df[df["y"] == 1]["x"], label="men 16years old", bins=100,(dfはcsvのデータ)
range=(140, 187), alpha=0.3, color="green")
1. df[df["y"] == 1]["x"]
dfにおいて、列が y==1 の時の行の値
2. label="men 16years old"
ラベルの説明
3. bins=100
階級の幅 1階級 = range / bins
4. alpha=0.3
グラフの透明度
plt.xlabel("height [cm]"): x軸のタイトル
plt.legend();:データの説明を表示・散布図を描画するときは
plt.scatter
plt.scatter(men["height"], men["weight"], color="green")
第一引数に、データの中の横軸の値 第二引数に、データの中の縦軸の値・散布図行列を描画するときは
pd.plotting.scatter_matrix(df)DataFrame
・列の値を抽出する
df[["アルコール度数", "密度"]]のようにカラムの名前を指定
df.iloc(取り出す行, 取り出す列)df.ilocを使う・データをトレーニング用、評価(テスト)用に分割
train_test_splitを使う
from sklearn.model_selection import train_test_split

(X_train, X_test,

 y_train, y_test) = train_test_split(

    X, y, test_size=0.3, random_state=0

)
test_size=0.3 はデータの何割をテスト用にするか
random_state=0 データを分割する際の乱数のシード値 (普段は使わない)決定木
決定木は、「自動で条件を学習するif文の連続」
Numpy
要素が同じ多次元配列の作成方法
zeros(サイズ) : 全ての要素が0の多次元配列
ones(サイズ) : 全ての要素が1の多次元配列
full(サイズ, 値) : 全ての要素が値の多次元配列
zeros_like(多次元配列) : 要素が全て0の多次元配列
ones_like(多次元配列) : 要素が全て1の多次元配列
full_like(多次元配列, 値) : 要素が全て値の多次元配列連続データ
arange([start,] stop[, step,], dtype=None) :rangeと同じように連続データ作成
linspace(start, stop, num=50, endpoint=True, retstep=False, dtype=None) :作成する範囲と個数numが決まっている場合の連続データ作成単位行列と対角行列
numpy.eye:対角線が全て1の単位行列
numpy.diag:任意の対角行列評価規準
評価規準は、物差しの種類である
評価基準は、物差しの目盛りである
- 投稿日:2019-11-30T20:08:09+09:00
【Python スクレイピング】Qiitaのトレンド(ランキング)を取得してSlackに送信する
・Qiitaって勉強になるけど、わざわざ自分でWebページ行くの面倒やな。。
・Qiitaの今日のランキングを1ヶ月分集計して、タイトルや記事の中身を分析したい
・単純にPythonのスクレイピングしたいとかとか思ってQiitaのトレンド(以下のページ)をスクレイピングで取得してSlackかなんかに飛ばせ
ばいんでね。とか思い、朝にちょこまか作りました!!
よくよく見たら毎朝5時と17時に更新がかかっているようなので、バッチ化してあげれば良いかも(今回はしないけど)
とりあえずサクッと作っちゃいましょうー!!このプログラムを作るまでのわい。
『QiitaってAPIを無料で公開してるし、ランキング形式を返却してくれるAPIもあるやろ!よっしゃ早速調べてみよ!!!............????
あれ見当たらないな。。。
QiitaのAPI
≫ Qiita Developer調べたら昔はあったらしいけど、廃止になったらしい。。。(まじか)
自分の最初の根底が覆された。(どないしよ)QiitaのAPIが使えないと悟ったわい
『しゃーない!API使えないんだったらスクレイピングで取得したろ!!!Qiitaさん許してや!!!そんなサーバーに負荷かけない(1日2回くらいしかアクセスしないから!!』
スクレイピングの動作環境
- Python 3.6.5
- Mac OS Mojave
上記の環境で動かしています。Pythonの環境構築は以下の記事でメモ書き程度ですが書いています。もし興味あれば是非。
≫ MacでPython3系の環境構築その他ライブラリとして
requests,json,bs4を使用しています。
pip install requestsとかでインストールできるので、別途おこなってください。環境構築すらめんどいわ
って人には「Colaboratory」がオススメ。環境構築なしでPythonを実行できます。
≫ ColaboratoryQiitaのトレンド(ランキング)を取得する
よっしゃ!!早速QiitaのDOM構造のチェックや!!
ほほん。。。?親要素にクラスが付いてへんけど、
tr-itemの部分をループで回せば全部楽勝で取得できそうやな!やってみよ!asahaka.pyimport requests; from bs4 import BeautifulSoup; url = "https://qiita.com/" headers = { "User-Agent" : "Mozilla/5.0 (iPhone; CPU iPhone OS 11_0 like Mac OS X) AppleWebKit/604.1.38 (KHTML, like Gecko) Version/11.0 Mobile/15A372 Safari/604.1" } res = requests.get(url, headers=headers) # htmlをBeautifulSoupで扱う soup = BeautifulSoup(res.text, "html.parser") print(soup)--実行結果
<!DOCTYPE html> <html><head><meta charset="utf-8"/><title>Qiita</title><meta content="Qiitaは、プログラマのための技術情報共有サービスです。 プログラミングに関するTips、ノウハウ、メモを簡単に記録 &amp; 公開することができます。" name="description"/><meta content="width=device-width,initial-scale=1,shrink-to-fit=no" name="viewport"/><meta content="#55c500" name="theme-color"/><meta content="XWpkTG32-_C4joZoJ_UsmDUi-zaH-hcrjF6ZC_FoFbk" name="google-site-verification"/><link href="/manifest.json" rel="manifest"/><link href="/opensearch.xml" rel="search" title="Qiita" type="application/opensearchdescription+xml"/><meta content="authenticity_token" name="csrf-param"/> <meta content="6mrcOYXIEeUhyG/gJ61dUdg/NsvpuwfCgOeEZkJatjtuJk1l/rO1UgSUnZmwzrjNTEW8vzalQnv4/B57bHRB7w==" name="csrf-token"/><link href="https://cdn.qiita.com/assets/favicons/public/production-4ff10c1e1e2b5fcb353ff9cafdd56c70.ico" rel="shortcut icon" type="image/x-icon"/><link href="https://cdn.qiita.com/assets/favicons/public/apple-touch-icon-f9a6afad761ec2306e10db2736187c8b.png" rel="apple-touch-icon" type="image/png"/><link href="https://cdn.qiita.com/assets/public/style-fa51031b7b2e4068805b19f3b5b0ab40.min.css" media="all" rel="stylesheet"/><script defer="" src="https://cdn.polyfill.io/v2/polyfill.min.js"></script><script defer="defer" src="https://cdn.qiita.com/assets/public/bundle-16b878edbdebd67b417fa861cc743c7f.min.js"></script><meta content="summary" name="twitter:card"/><meta content="@Qiita" name="twitter:site"/><meta content="website" property="og:type"/><meta content="プログラマの技術情報共有サービス - Qiita" property="og:title"/><meta content="https://cdn.qiita.com/assets/qiita-fb-2887e7b4aad86fd8c25cea84846f2236.png" property="og:image"/><meta content="Qiitaは、プログラマのための技術情報共有サービスです。 プログラミングに関するTips、ノウハウ、メモを簡単に記録 &amp; 公開することができます。" property="og:description"/><meta content="https://qiita.com/" property="og:url"><meta content="Qiita" property="og:site_name"><meta content="564524038" property="fb:admins"/></meta></meta></head><body><div class="allWrapper"><div data-hyperapp-app="GlobalHeader" data-hyperapp-props='{"unreadNotificationsCount":null,"realms":[{"humanName":"Qiita","isCurrentRealm":true,"isQiita":true,"isQiitaTeam":false,"loggedInUser":null,"teamId":null,"url":"https://qiita.com/"}],"teamFindUrl":"https://teams-center.qiita.com/find_team","isTeamOnlyUser":null,"currentUser":null}'><div class="st-Header" id="globalHeader"><div class="st-Header_container"><div class="st-Header_start"><a class="st-Header_logo mr-1" href="/"><svg viewbox="0 0 75 25" xmlns="http://www.w3.org/2000/svg"><title>Qiita</title><path d="M24.6 12.2C24.6 6.2 20 0 12.2 0 6.2 0 0 4.6 0 12.4c0 6 4.6 12.2 12.4 12.2 2.5 0 5-.8 7.1-2.3l3.6 3.6 1.6-1.6-3.4-3.4c2.1-2.3 3.3-5.3 3.3-8.7zm-12.4-10c5.7 0 10.2 4.4 10.2 10.1 0 4.9-3.8 10.1-10.1 10.1s-10.1-5.1-10.1-10c0-6.4 5.1-10.2 10-10.2zM30.5 7.1h2.1v17h-2.1zM31.5 4.8c-1 0-1.8-.8-1.8-1.8s.8-1.8 1.8-1.8 1.8.8 1.8 1.8-.8 1.8-1.8 1.8zM40 4.8c-1 0-1.8-.8-1.8-1.8S39 1.2 40 1.2s1.8.8 1.8 1.8S41 4.8 40 4.8zM39 7.1h2.1v17H39zM53.7 24.4c-3.9 0-6.2-3-6.2-6v-16h2.1v4.7H57v2.1h-7.4v9.3c0 1.9 1.5 3.9 4.1 3.9.7 0 1.4-.2 2-.6l.2-.1 1 1.8-.2.1c-.9.5-2 .8-3 .8zM67.6 24.5c-5.7 0-9.1-4.5-9.1-8.9 0-5.7 4.5-9.1 8.9-9.1 2.3 0 4.1.8 5.4 2.3V7.1h2.1v17h-2.1v-1.9c-1.2 1.5-3 2.3-5.2 2.3zm-.2-15.9c-3.4 0-6.8 2.6-6.8 7 0 3.4 2.6 6.8 7 6.8 2 0 4-.9 5.3-2.5v-8.8c-1.4-1.6-3.3-2.5-5.5-2.5z"></path></svg></a><div><div class="st-Header_realmSelector"><span class="fa fa-fw fa-caret-down"></span></div></div><div><div class="st-Header_community">Community<span class="fa fa-fw fa-caret-down ml-1of2"></span></div></div><form class="st-Header_search"><span class="fa fa-search"></span><input class="st-Header_searchInput" placeholder="Search" type="search"/></form><div class="st-Header_searchButton"><span class="fa fa-serach"></span></div></div><div class="st-Header_end"><a class="st-Header_signupButton" href="/signup">Signup</a><a class="st-Header_loginLink" href="/login">Login</a></div></div></div></div><div class="st-HeaderAlert st-HeaderAlert-warning"><div class="st-HeaderAlert_body"></div></div><div class="p-home is-anonymous"><div class="nl-Hero"><div class="nl-Hero_inner"><div class="nl-Hero_start"><h1 class="mb-3 nl-Hero_title">Hello hackers !</h1><p class="nl-Hero_lead">Qiita is a social knowledge sharing for software engineers. Let's share your knowledge or ideas to the world.</p></div><div class="nl-Hero_end"><div class="nl-SocialSignupWrapper"><a class="nl-SocialSignup nl-SocialSignup-github" href="https://oauth.qiita.com/auth/github?callback_action=login_or_signup&realm=qiita"><span class="fa fa-github"></span>GitHub</a><a class="nl-SocialSignup nl-SocialSignup-twitter" href="https://oauth.qiita.com/auth/twitter?callback_action=login_or_signup&realm=qiita"><span class="fa fa-twitter"></span>Twitter</a><a class="nl-SocialSignup nl-SocialSignup-google" href="https://oauth.qiita.com/auth/google?callback_action=login_or_signup&realm=qiita"><span class="fa fa-google"></span>Google</a></div><div class="nl-Hero_separator">OR</div><form accept-charset="UTF-8" action="/registration" class="nl-SignupForm" method="post"><input name="utf8" type="hidden" value="✓"/><input name="authenticity_token" type="hidden" value="9UwzTIrFtVIw/ymQaZaGufy+FkyblFkRrtGo4SHB6BqDdUCzO5R5+TYRPwbB8ANzp40A0dtI2qBwMMU9rHM94g=="/><div class="mb-2 nl-SignupForm_group"><label class="nl-SignupForm_label" for="url_name">user name</label><input class="nl-SignupForm_input" id="url_name" name="user[url_name]" placeholder="qiitan" type="text"/></div><div class="mb-2 nl-SignupForm_group"><label class="nl-SignupForm_label" for="email">mail</label><input class="nl-SignupForm_input" id="email" name="user[email]" placeholder="qiitan@qiita.com" type="email"/></div><div class="mb-1 nl-SignupForm_group"><label class="nl-SignupForm_label" for="password">password</label><input class="nl-SignupForm_input" id="password" name="user[password]" placeholder="********" type="password"/></div><span class="mb-2 nl-SignupForm_helpText">Use at least 8 letters</span><script async="async" defer="defer" src="https://www.google.com/recaptcha/api.js"></script><div class="nl-SignupForm_recaptcha"><script async="" defer="" src="https://www.google.com/recaptcha/api.js"></script> <div class="g-recaptcha " data-sitekey="6LfNkiQTAAAAAM3UGnSquBy2akTITGNMO_QDxMw6"></div> <noscript> <div> <div style="width: 302px; height: 422px; position: relative;"> <div style="width: 302px; height: 422px; position: absolute;"> <iframe frameborder="0" scrolling="no" src="https://www.google.com/recaptcha/api/fallback?k=6LfNkiQTAAAAAM3UGnSquBy2akTITGNMO_QDxMw6" style="width: 302px; height:422px; border-style: none;"> </iframe> </div> </div> <div style="width: 300px; height: 60px; border-style: none; bottom: 12px; left: 25px; margin: 0px; padding: 0px; right: 25px; background: #f9f9f9; border: 1px solid #c1c1c1; border-radius: 3px;"> <textarea class="g-recaptcha-response" id="g-recaptcha-response" name="g-recaptcha-response" style="width: 250px; height: 40px; border: 1px solid #c1c1c1; margin: 10px 25px; padding: 0px; resize: none;" value=""> </textarea> </div> </div> </noscript> </div><div class="nl-SignupForm_buttonArea"><div class="nl-SignupForm_button"><button>Signup</button></div><div class="nl-SignupForm_attention">By clicking 'Signup', you agree to our <a href="/terms">terms of service</a>.</div></div></form></div></div></div><div class="px-2 px-1@s pt-4 pt-1@s"><div class="p-home_container"><div class="p-home_menu pt-1"><a class="p-home_menuItem p-1 pl-2 pl-1@s mb-1 p-home_menuItem-active" href="/"><span class="fa fa-fw fa-line-chart mr-1of2"></span>Trends</a><a class="p-home_menuItem p-1 pl-2 pl-1@s mb-1" href="/milestones"><span class="fa fa-fw fa-flag-checkered mr-1of2"></span>Milestones</a><div class="p-home_mobileMenu"><select class="p-home_mobileMenuDropdown pl-2 pt-1 pb-1 mb-1" onchange="location.href=value;"><option class="p-home_mobileMenuItem" selected="selected" value="/">Trends</option><option class="p-home_mobileMenuItem" value="/milestones">Milestones</option></select></div></div><div class="p-home_main mb-3 mr-0@s"><div data-hyperapp-app="Trend" data-hyperapp-props="{"trend":{"edges":[{"followingLikers":[],"isLikedByViewer":false,"isNewArrival":false,"hasCodeBlock":false,"node":{"createdAt":"2019-11-27T10:15:47Z","likesCount":891,"title":"エンジニアが活用したい情報リソースまとめ","uuid":"eb8f28223c9c2926b44f","author":{"profileImageUrl":"https://qiita-user-profile-images.imgix.net/https%3A%2F%2Fqiita-image-store.s3.amazonaws.com%2F0%2F198150%2Fprofile-images%2F1537780652?ixlib=rb-1.2.2\u0026auto=compress%2Cformat\u0026lossless=0\u0026w=48\u0026s=f53cb74c00741a3d965e27fce11ebe37","urlName":"EaE"}}},{"followingLikers":[],"isLikedByViewer":false,"isNewArrival":false,"hasCodeBlock":false,"node":{"createdAt":"2019-11-27T15:07:07Z","likesCount":245,"title":"「何がわからないのかわからない」は何がわからないのか","uuid":"745ecc0b604fd71177df","author":{"profileImageUrl":"https://qiita-user-profile-images.imgix.net/https%3A%2F%2Fpbs.twimg.com%2Fprofile_images%2F1146632882812665856%2Fu7UHkJSd_bigger.jpg?ixlib=rb-1.2.2\u0026auto=compress%2Cformat\u0026lossless=0\u0026w=48\u0026s=96374b0112d55fb38deacd8b3febc9eb","urlName":"K_Noko_224"}}},{"followingLikers":[],"isLikedByViewer":false,"isNewArrival":false,"hasCodeBlock":true,"node":{"createdAt":"2019-11-27T09:50:11Z","likesCount":311,"title":"「ループ・再帰・gotoを使わず1から100までの数値を印字する」Conner Davis 氏の回答の考察","uuid":"19d07c629852876da401","author":{"profileImageUrl":"https://qiita-user-profile-images.imgix.net/https%3A%2F%2Fqiita-image-store.s3.amazonaws.com%2F0%2F8760%2Fprofile-images%2F1473681145?ixlib=rb-1.2.2\u0026auto=compress%2Cformat\u0026lossless=0\u0026w=48\u0026s=a1f08746f7f3cc1783acd6d04d4cf1cf","urlName":"xtetsuji"}}},{"followingLikers":[],"isLikedByViewer":false,"isNewArrival":false,"hasCodeBlock":true,"node":{"createdAt":"2019-11-27T04:29:59Z","likesCount":257,"title":"開発者なら知っておくべき 11 のコンソールコマンド","uuid":"abe4adb81750e13362e2","author":{"profileImageUrl":"https://qiita-user-profile-images.imgix.net/https%3A%2F%2Fqiita-image-store.s3.ap-northeast-1.amazonaws.com%2F0%2F407975%2Fprofile-images%2F1566911067?ixlib=rb-1.2.2\u0026auto=compress%2Cformat\u0026lossless=0\u0026w=48\u0026s=c3aaa453f55f6123f0602e4da9ac8f8e","urlName":"baby-degu"}}},{"followingLikers":[],"isLikedByViewer":false,"isNewArrival":false,"hasCodeBlock":false,"node":{"createdAt":"2019-11-27T02:35:23Z","likesCount":234,"title":"【SES】ドナドナされる時の面談時に地雷案件をなるべく避けるための確認ポイント7選(iOS/Androidアプリ開発)","uuid":"1623879a0d3c87d23960","author":{"profileImageUrl":"https://qiita-user-profile-images.imgix.net/https%3A%2F%2Fs3-ap-northeast-1.amazonaws.com%2Fqiita-image-store%2F0%2F68288%2F94d8616b7db54a471885d89b9bd4938f1bee1f83%2Flarge.png%3F1475021009?ixlib=rb-1.2.2\u0026auto=compress%2Cformat\u0026lossless=0\u0026w=48\u0026s=26f41dcc659c0bef8a80be2fe95a08b4","urlName":"homunuz"}}},{"followingLikers":[],"isLikedByViewer":false,"isNewArrival":false,"hasCodeBlock":true,"node":{"createdAt":"2019-11-27T16:04:24Z","likesCount":129,"title":"Terraformアンチパターン(2019年版)","uuid":"7d80d149e3fb3494c1d4","author":{"profileImageUrl":"https://qiita-user-profile-images.imgix.net/https%3A%2F%2Favatars2.githubusercontent.com%2Fu%2F24871281%3Fv%3D4?ixlib=rb-1.2.2\u0026auto=compress%2Cformat\u0026lossless=0\u0026w=48\u0026s=3a78e3e2effe8f8b493f4fb77d4d5726","urlName":"m22r"}}},{"followingLikers":[],"isLikedByViewer":false,"isNewArrival":false,"hasCodeBlock":true,"node":{"createdAt":"2019-11-28T09:49:01Z","likesCount":64,"title":"【データサイエンス向け】Jupyterチートシート(随時更新)【Jupyter Notebook/Lab】","uuid":"0f5dd484fc5438a3bafc","author":{"profileImageUrl":"https://qiita-user-profile-images.imgix.net/https%3A%2F%2Favatars0.githubusercontent.com%2Fu%2F17490886%3Fv%3D3?ixlib=rb-1.2.2\u0026auto=compress%2Cformat\u0026lossless=0\u0026w=48\u0026s=b7ac22509468739f1391e59d9ce18d72","urlName":"syunyo"}}},{"followingLikers":[],"isLikedByViewer":false,"isNewArrival":false,"hasCodeBlock":true,"node":{"createdAt":"2019-11-28T16:42:17Z","likesCount":41,"title":"【忘年会に向け】オールスター感謝祭的な四択クイズウェブシステムをNuxt.js+Socket.IOで実装してみた","uuid":"50277f527f6e6dbc6d4b","author":{"profileImageUrl":"https://qiita-user-profile-images.imgix.net/https%3A%2F%2Fqiita-image-store.s3.amazonaws.com%2F0%2F136889%2Fprofile-images%2F1550885068?ixlib=rb-1.2.2\u0026auto=compress%2Cformat\u0026lossless=0\u0026w=48\u0026s=13605858e1943cce04277056334125a3","urlName":"majirou"}}},{"followingLikers":[],"isLikedByViewer":false,"isNewArrival":false,"hasCodeBlock":false,"node":{"createdAt":"2019-11-28T08:05:35Z","likesCount":44,"title":"データ抽出=作業、と扱われないためにするべき3つのこと","uuid":"bca79b456d37a6f1b573","author":{"profileImageUrl":"https://qiita-user-profile-images.imgix.net/https%3A%2F%2Fqiita-image-store.s3.amazonaws.com%2F0%2F311026%2Fprofile-images%2F1543494526?ixlib=rb-1.2.2\u0026auto=compress%2Cformat\u0026lossless=0\u0026w=48\u0026s=af0d9cbd5621428e0f2138b9a1c4e537","urlName":"k_0120"}}},{"followingLikers":[],"isLikedByViewer":false,"isNewArrival":false,"hasCodeBlock":false,"node":{"createdAt":"2019-11-28T09:41:18Z","likesCount":38,"title":"Flutterをプロダクション導入しました。","uuid":"21a6111b36b98cac3100","author":{"profileImageUrl":"https://qiita-user-profile-images.imgix.net/https%3A%2F%2Fqiita-image-store.s3.amazonaws.com%2F0%2F315364%2Fprofile-images%2F1542871594?ixlib=rb-1.2.2\u0026auto=compress%2Cformat\u0026lossless=0\u0026w=48\u0026s=a662619fdc247eb7660f992d05ca9257","urlName":"navitime_tech"}}},{"followingLikers":[],"isLikedByViewer":false,"isNewArrival":false,"hasCodeBlock":true,"node":{"createdAt":"2019-11-28T04:24:00Z","likesCount":34,"title":"年末まで毎日webサイトを作り続ける大学生 〜41日目 要素が画面内に入るとふわっとフェードインさせる〜","uuid":"358466eaa6fbd6c0e01e","author":{"profileImageUrl":"https://qiita-user-profile-images.imgix.net/https%3A%2F%2Fs3-ap-northeast-1.amazonaws.com%2Fqiita-image-store%2F0%2F516248%2Fb568bea39c5fdebbd20e1bda8e4037cde9bc11e8%2Flarge.png%3F1571436251?ixlib=rb-1.2.2\u0026auto=compress%2Cformat\u0026lossless=0\u0026w=48\u0026s=d085cced4d8c9da25ac800616116c8c5","urlName":"70days_js"}}},{"followingLikers":[],"isLikedByViewer":false,"isNewArrival":false,"hasCodeBlock":true,"node":{"createdAt":"2019-11-27T23:21:00Z","likesCount":32,"title":"ZEIT Nowで静的サイトの速度を15倍改善した話","uuid":"846b9d5c02a387756d3e","author":{"profileImageUrl":"https://qiita-user-profile-images.imgix.net/https%3A%2F%2Fqiita-image-store.s3.amazonaws.com%2F0%2F14275%2Fprofile-images%2F1527596243?ixlib=rb-1.2.2\u0026auto=compress%2Cformat\u0026lossless=0\u0026w=48\u0026s=649fbc8587e6b00e07792a0473b91410","urlName":"tomoyamachi"}}},{"followingLikers":[],"isLikedByViewer":false,"isNewArrival":false,"hasCodeBlock":true,"node":{"createdAt":"2019-11-26T23:56:45Z","likesCount":73,"title":"AWS LambdaのDestinationsを試してみる","uuid":"efcb2ac3d5cc176534ba","author":{"profileImageUrl":"https://qiita-user-profile-images.imgix.net/https%3A%2F%2Fqiita-image-store.s3.amazonaws.com%2F0%2F102769%2Fprofile-images%2F1482147140?ixlib=rb-1.2.2\u0026auto=compress%2Cformat\u0026lossless=0\u0026w=48\u0026s=70d352cc429d29280d1bb539e7427a84","urlName":"kojiisd"}}},{"followingLikers":[],"isLikedByViewer":false,"isNewArrival":false,"hasCodeBlock":false,"node":{"createdAt":"2019-11-28T14:06:34Z","likesCount":26,"title":"CloudNative Days Kansai 2019 発表資料一覧","uuid":"19683ab673868364b129","author":{"profileImageUrl":"https://qiita-user-profile-images.imgix.net/https%3A%2F%2Fqiita-image-store.s3.amazonaws.com%2F0%2F61641%2Fprofile-images%2F1531494058?ixlib=rb-1.2.2\u0026auto=compress%2Cformat\u0026lossless=0\u0026w=48\u0026s=58770c1bffefd357eea9dcb7f14604b2","urlName":"shibataka000"}}},{"followingLikers":[],"isLikedByViewer":false,"isNewArrival":false,"hasCodeBlock":true,"node":{"createdAt":"2019-11-28T09:43:51Z","likesCount":31,"title":"Swift未経験者が1日でアプリを作った話","uuid":"69503027d69ab02c131c","author":{"profileImageUrl":"https://qiita-user-profile-images.imgix.net/https%3A%2F%2Fqiita-image-store.s3.ap-northeast-1.amazonaws.com%2F0%2F172491%2Fprofile-images%2F1560220056?ixlib=rb-1.2.2\u0026auto=compress%2Cformat\u0026lossless=0\u0026w=48\u0026s=cb9864a556d1dc95d7b063308755aace","urlName":"Close_the_World"}}},{"followingLikers":[],"isLikedByViewer":false,"isNewArrival":false,"hasCodeBlock":false,"node":{"createdAt":"2019-11-28T00:59:22Z","likesCount":24,"title":"【随時更新】理論研究者に役立つ記事まとめ","uuid":"8b551ebb1738bc9c290e","author":{"profileImageUrl":"https://qiita-user-profile-images.imgix.net/https%3A%2F%2Fqiita-image-store.s3.ap-northeast-1.amazonaws.com%2F0%2F403437%2Fprofile-images%2F1575075110?ixlib=rb-1.2.2\u0026auto=compress%2Cformat\u0026lossless=0\u0026w=48\u0026s=8a6042f857ab22ff31034430888a9afe","urlName":"kumamupooh"}}},{"followingLikers":[],"isLikedByViewer":false,"isNewArrival":false,"hasCodeBlock":true,"node":{"createdAt":"2019-11-26T20:35:59Z","likesCount":70,"title":"C#でAES暗号化アルゴリズムを外部ライブラリに一切頼らず完全実装してみた","uuid":"ab0792aa1e8948b57490","author":{"profileImageUrl":"https://qiita-user-profile-images.imgix.net/https%3A%2F%2Fs3-ap-northeast-1.amazonaws.com%2Fqiita-image-store%2F0%2F535270%2F3e59522dfca791fd0ce7f98d863a9a796ca95a16%2Flarge.png%3F1574159780?ixlib=rb-1.2.2\u0026auto=compress%2Cformat\u0026lossless=0\u0026w=48\u0026s=de7812005bb01c1b7a282eb82a340c9f","urlName":"kkent030315"}}},{"followingLikers":[],"isLikedByViewer":false,"isNewArrival":false,"hasCodeBlock":true,"node":{"createdAt":"2019-11-27T13:03:40Z","likesCount":40,"title":"jqコマンドでAtCoder Beginners Selectionを解いてみた","uuid":"015459bc96f11626f99b","author":{"profileImageUrl":"https://qiita-user-profile-images.imgix.net/https%3A%2F%2Fqiita-image-store.s3.amazonaws.com%2F0%2F211640%2Fprofile-images%2F1546179543?ixlib=rb-1.2.2\u0026auto=compress%2Cformat\u0026lossless=0\u0026w=48\u0026s=1e6741d59740681be4ee2892d0dc6691","urlName":"yuchiki1000yen"}}},{"followingLikers":[],"isLikedByViewer":false,"isNewArrival":false,"hasCodeBlock":true,"node":{"createdAt":"2019-11-27T10:13:24Z","likesCount":23,"title":"Kotlin+Realm+RecyclerViewを使ってTodoアプリを作る","uuid":"5ab92ebce46c9479876b","author":{"profileImageUrl":"https://qiita-user-profile-images.imgix.net/https%3A%2F%2Fqiita-image-store.s3.amazonaws.com%2F0%2F152658%2Fprofile-images%2F1541210732?ixlib=rb-1.2.2\u0026auto=compress%2Cformat\u0026lossless=0\u0026w=48\u0026s=1c295d407e2575d6535fce63825b56e8","urlName":"konatsu_p"}}},{"followingLikers":[],"isLikedByViewer":false,"isNewArrival":false,"hasCodeBlock":true,"node":{"createdAt":"2019-11-28T10:44:01Z","likesCount":17,"title":"【Laravel5.8】PHP7.4でTrying to access array offset on valueが山盛り出るようになった","uuid":"eef7c214b8bf692a5eeb","author":{"profileImageUrl":"https://qiita-user-profile-images.imgix.net/https%3A%2F%2Fqiita-image-store.s3.ap-northeast-1.amazonaws.com%2F0%2F26088%2Fprofile-images%2F1565015744?ixlib=rb-1.2.2\u0026auto=compress%2Cformat\u0026lossless=0\u0026w=48\u0026s=293b9d61eea9649daf72d23b4edff2cd","urlName":"rana_kualu"}}},{"followingLikers":[],"isLikedByViewer":false,"isNewArrival":false,"hasCodeBlock":true,"node":{"createdAt":"2019-11-26T11:39:59Z","likesCount":41,"title":"Pythonで一般相対性理論:導入編","uuid":"2c815aed66647c46bcc5","author":{"profileImageUrl":"https://qiita-user-profile-images.imgix.net/https%3A%2F%2Fs3-ap-northeast-1.amazonaws.com%2Fqiita-image-store%2F0%2F151286%2F4c26758c5a6639adbef970d8e747869ddb8bece5%2Flarge.png%3F1574926292?ixlib=rb-1.2.2\u0026auto=compress%2Cformat\u0026lossless=0\u0026w=48\u0026s=e20a7a7b7525fb083c3135cfedc65ecc","urlName":"Takk_physics"}}},{"followingLikers":[],"isLikedByViewer":false,"isNewArrival":false,"hasCodeBlock":true,"node":{"createdAt":"2019-11-27T14:48:18Z","likesCount":28,"title":"Nuxt.js+Herokuを使って布団の温度をLINE LIFFで見る #SleepTech","uuid":"1044e4ee96e6868ae17e","author":{"profileImageUrl":"https://qiita-user-profile-images.imgix.net/https%3A%2F%2Fqiita-image-store.s3.ap-northeast-1.amazonaws.com%2F0%2F90087%2Fprofile-images%2F1574684737?ixlib=rb-1.2.2\u0026auto=compress%2Cformat\u0026lossless=0\u0026w=48\u0026s=f99d163871baa6464884cbeabbcfa384","urlName":"tmisuo0423"}}},{"followingLikers":[],"isLikedByViewer":false,"isNewArrival":false,"hasCodeBlock":true,"node":{"createdAt":"2019-11-27T03:53:29Z","likesCount":39,"title":"Amazon CloudWatch Synthetics を試してみた","uuid":"4c8562b51e1fb9d66e6a","author":{"profileImageUrl":"https://qiita-user-profile-images.imgix.net/https%3A%2F%2Fqiita-image-store.s3.amazonaws.com%2F0%2F16369%2Fprofile-images%2F1500426774?ixlib=rb-1.2.2\u0026auto=compress%2Cformat\u0026lossless=0\u0026w=48\u0026s=b67017475a97e25ed19e64fb04995b17","urlName":"hoto17296"}}},{"followingLikers":[],"isLikedByViewer":false,"isNewArrival":false,"hasCodeBlock":true,"node":{"createdAt":"2019-11-28T06:58:39Z","likesCount":13,"title":"【Rails】もっと早く知りたかったデバッグ用gem 'better_errors','binding_of_caller'","uuid":"a6f9a939dce25b2d9a3e","author":{"profileImageUrl":"https://qiita-user-profile-images.imgix.net/https%3A%2F%2Fqiita-image-store.s3.ap-northeast-1.amazonaws.com%2F0%2F483292%2Fprofile-images%2F1572131069?ixlib=rb-1.2.2\u0026auto=compress%2Cformat\u0026lossless=0\u0026w=48\u0026s=35b84c6b19d5e26a6a89dfadc9d55538","urlName":"terufumi1122"}}},{"followingLikers":[],"isLikedByViewer":false,"isNewArrival":true,"hasCodeBlock":false,"node":{"createdAt":"2019-11-29T07:09:11Z","likesCount":9,"title":"【Cloud Native Days Kansai 2019】参加記録","uuid":"9a657766221edeae7965","author":{"profileImageUrl":"https://qiita-user-profile-images.imgix.net/https%3A%2F%2Fqiita-image-store.s3.amazonaws.com%2F0%2F54853%2Fprofile-images%2F1540951561?ixlib=rb-1.2.2\u0026auto=compress%2Cformat\u0026lossless=0\u0026w=48\u0026s=8247c305c92716b9cc7c4782499f0284","urlName":"tzkoba"}}},{"followingLikers":[],"isLikedByViewer":false,"isNewArrival":true,"hasCodeBlock":true,"node":{"createdAt":"2019-11-29T09:42:28Z","likesCount":8,"title":"VHDLユーザがSystemVerilogでハマったところの記録","uuid":"2e175edfb0759b86f82f","author":{"profileImageUrl":"https://qiita-user-profile-images.imgix.net/https%3A%2F%2Fqiita-image-store.s3.amazonaws.com%2F0%2F313464%2Fprofile-images%2F1550668423?ixlib=rb-1.2.2\u0026auto=compress%2Cformat\u0026lossless=0\u0026w=48\u0026s=10a8e6c0d9e542d241d92fa0da65a9bc","urlName":"ryo_i6"}}},{"followingLikers":[],"isLikedByViewer":false,"isNewArrival":false,"hasCodeBlock":false,"node":{"createdAt":"2019-11-27T06:24:49Z","likesCount":16,"title":"一人でVIPERアーキテクチャーでiOSスマホアプリ開発した感想 まとめ","uuid":"30e44e4f4c9cf733d843","author":{"profileImageUrl":"https://qiita-user-profile-images.imgix.net/https%3A%2F%2Fs3-ap-northeast-1.amazonaws.com%2Fqiita-image-store%2F0%2F68288%2F94d8616b7db54a471885d89b9bd4938f1bee1f83%2Flarge.png%3F1475021009?ixlib=rb-1.2.2\u0026auto=compress%2Cformat\u0026lossless=0\u0026w=48\u0026s=26f41dcc659c0bef8a80be2fe95a08b4","urlName":"homunuz"}}},{"followingLikers":[],"isLikedByViewer":false,"isNewArrival":true,"hasCodeBlock":false,"node":{"createdAt":"2019-11-29T08:15:59Z","likesCount":17,"title":"こんな人は伸びない!プログラミング初学者がやりがちなダメ勉強法について","uuid":"dcd90203422dd7185bdb","author":{"profileImageUrl":"https://qiita-user-profile-images.imgix.net/https%3A%2F%2Fs3-ap-northeast-1.amazonaws.com%2Fqiita-image-store%2F0%2F392337%2Fe5877917f11508cc010237dcdb449a830282b52a%2Fx_large.png%3F1574745216?ixlib=rb-1.2.2\u0026auto=compress%2Cformat\u0026lossless=0\u0026w=48\u0026s=cb3d9641140d210a1a5fcac69832bc37","urlName":"shimajiri"}}},{"followingLikers":[],"isLikedByViewer":false,"isNewArrival":false,"hasCodeBlock":true,"node":{"createdAt":"2019-11-28T23:56:05Z","likesCount":7,"title":"Spring MVCのRestControllerのRequestParamで任意のEnumをコードなどの別の値で受け取る方法","uuid":"ff3338c34ce59c20bd5f","author":{"profileImageUrl":"https://qiita-user-profile-images.imgix.net/https%3A%2F%2Fqiita-image-store.s3.amazonaws.com%2F0%2F306730%2Fprofile-images%2F1540460519?ixlib=rb-1.2.2\u0026auto=compress%2Cformat\u0026lossless=0\u0026w=48\u0026s=81f9a05bf1e2d5120521713f627be4b7","urlName":"yushi_koga"}}},{"followingLikers":[],"isLikedByViewer":false,"isNewArrival":true,"hasCodeBlock":false,"node":{"createdAt":"2019-11-28T16:24:19Z","likesCount":16,"title":"エンジニアにオススメしたいyoutuber","uuid":"c2f8bd9a8ab14692bb32","author":{"profileImageUrl":"https://qiita-user-profile-images.imgix.net/https%3A%2F%2Fs3-ap-northeast-1.amazonaws.com%2Fqiita-image-store%2F0%2F264684%2Fdbb248c95cac38e52bd8e52b919976ba3c5871b1%2Flarge.png%3F1574611261?ixlib=rb-1.2.2\u0026auto=compress%2Cformat\u0026lossless=0\u0026w=48\u0026s=07ba0f52714099e4240edb1513d721af","urlName":"seiyatakahashi"}}}]},"scope":"daily"}"></div></div><div class="p-home_aside"><div class="p-home_ad"><div data-hyperapp-app="GPTSlot" data-hyperapp-props='{"id":"home-side-ad","adUnitPath":"/383564218/p_qiita_300x250_anonymous_feed_sidebar-top","size":[300,250]}'></div></div><div data-hyperapp-app="Announcement" data-hyperapp-props='{"announcement":{"id":"QW5ub3VuY2VtZW50LTEz","title":"Qiita利用規約改訂のお知らせ","body":"\u003cp\u003eユーザー体験の向上のため、Qiita利用規約第11条の内容に追加を行います。\u003cbr\u003e(2019年11月27日 改定)\u003cbr\u003e\u003cbr\u003e\nどの部分をなぜ改定するのか、詳細はこちらの記事をご覧ください。\u003c/p\u003e\n","detailUrl":"https://blog.qiita.com/revision-of-terms-article11/?utm_source=qiita\u0026utm_medium=announce","isStaffOnly":false,"isReadByViewer":false}}'></div><div data-hyperapp-app="QiitaZineFeed" data-hyperapp-props="{}"></div><div data-hyperapp-app="UserRanking" data-hyperapp-props='{"userRanking":{"edges":[{"score":1215,"node":{"name":"baby degu","profileImageUrl":"https://qiita-user-profile-images.imgix.net/https%3A%2F%2Fqiita-image-store.s3.ap-northeast-1.amazonaws.com%2F0%2F407975%2Fprofile-images%2F1566911067?ixlib=rb-1.2.2\u0026auto=compress%2Cformat\u0026lossless=0\u0026w=48\u0026s=c3aaa453f55f6123f0602e4da9ac8f8e","urlName":"baby-degu"}},{"score":850,"node":{"name":"@EaE","profileImageUrl":"https://qiita-user-profile-images.imgix.net/https%3A%2F%2Fqiita-image-store.s3.amazonaws.com%2F0%2F198150%2Fprofile-images%2F1537780652?ixlib=rb-1.2.2\u0026auto=compress%2Cformat\u0026lossless=0\u0026w=48\u0026s=f53cb74c00741a3d965e27fce11ebe37","urlName":"EaE"}},{"score":653,"node":{"name":"Sasaki","profileImageUrl":"https://qiita-user-profile-images.imgix.net/https%3A%2F%2Favatars1.githubusercontent.com%2Fu%2F18733090%3Fv%3D4?ixlib=rb-1.2.2\u0026auto=compress%2Cformat\u0026lossless=0\u0026w=48\u0026s=ea49ad0b7924ae284b846aa5f558e61f","urlName":"goemp"}},{"score":462,"node":{"name":"Junichi Fujinuma","profileImageUrl":"https://qiita-user-profile-images.imgix.net/https%3A%2F%2Fs3-ap-northeast-1.amazonaws.com%2Fqiita-image-store%2F0%2F430294%2F5178a5b94eda54f10ff8c5cf7a5e8e7c444bf42c%2Fx_large.png%3F1569383329?ixlib=rb-1.2.2\u0026auto=compress%2Cformat\u0026lossless=0\u0026w=48\u0026s=62bfed81f4ee1de1dc276d154c0fa922","urlName":"fujinumagic"}},{"score":455,"node":{"name":"ゴリラ","profileImageUrl":"https://qiita-user-profile-images.imgix.net/https%3A%2F%2Fqiita-image-store.s3.ap-northeast-1.amazonaws.com%2F0%2F66178%2Fprofile-images%2F1561294746?ixlib=rb-1.2.2\u0026auto=compress%2Cformat\u0026lossless=0\u0026w=48\u0026s=fe78a57e19406fc65ebb43cfe736e8fb","urlName":"gorilla0513"}},{"score":440,"node":{"name":"","profileImageUrl":"https://qiita-user-profile-images.imgix.net/https%3A%2F%2Fqiita-image-store.s3.ap-northeast-1.amazonaws.com%2F0%2F26088%2Fprofile-images%2F1565015744?ixlib=rb-1.2.2\u0026auto=compress%2Cformat\u0026lossless=0\u0026w=48\u0026s=293b9d61eea9649daf72d23b4edff2cd","urlName":"rana_kualu"}},{"score":411,"node":{"name":"","profileImageUrl":"https://qiita-user-profile-images.imgix.net/https%3A%2F%2Fqiita-image-store.s3.amazonaws.com%2F0%2F55077%2Fprofile-images%2F1526397030?ixlib=rb-1.2.2\u0026auto=compress%2Cformat\u0026lossless=0\u0026w=48\u0026s=11c47c0764213b2cf951fea74dc63f8b","urlName":"teradonburi"}},{"score":392,"node":{"name":"","profileImageUrl":"https://qiita-user-profile-images.imgix.net/https%3A%2F%2Fqiita-image-store.s3.ap-northeast-1.amazonaws.com%2F0%2F309745%2Fprofile-images%2F1566716125?ixlib=rb-1.2.2\u0026auto=compress%2Cformat\u0026lossless=0\u0026w=48\u0026s=75acb3d6da3fc226da05fa3f37150b73","urlName":"keeey999"}},{"score":358,"node":{"name":"","profileImageUrl":"https://qiita-user-profile-images.imgix.net/https%3A%2F%2Favatars1.githubusercontent.com%2Fu%2F19924936%3Fv%3D4?ixlib=rb-1.2.2\u0026auto=compress%2Cformat\u0026lossless=0\u0026w=48\u0026s=81724a31e83f0b9fa0bed01d9bc6a5a8","urlName":"ufield"}},{"score":350,"node":{"name":"Koto Furumiya","profileImageUrl":"https://qiita-user-profile-images.imgix.net/https%3A%2F%2Fqiita-image-store.s3.ap-northeast-1.amazonaws.com%2F0%2F64859%2Fprofile-images%2F1574522863?ixlib=rb-1.2.2\u0026auto=compress%2Cformat\u0026lossless=0\u0026w=48\u0026s=3bc0a583a635be5d0d60438740f1bfe2","urlName":"kfurumiya"}}]},"scope":"WEEKLY"}'></div><div data-hyperapp-app="TagRanking" data-hyperapp-props='{"tagRanking":{"edges":[{"score":256,"node":{"mediumIconUrl":"https://s3-ap-northeast-1.amazonaws.com/qiita-tag-image/ceafd5ce024e312de9e893ce876ec89995ec3a7f/medium.jpg?1559694099","name":"Python","urlName":"python"}},{"score":163,"node":{"mediumIconUrl":"https://s3-ap-northeast-1.amazonaws.com/qiita-tag-image/353fa0bbbfd79c4e8837b9c0b13232d80c32c6e8/medium.jpg?1554029821","name":"Rails","urlName":"rails"}},{"score":163,"node":{"mediumIconUrl":"https://s3-ap-northeast-1.amazonaws.com/qiita-tag-image/7e67c6a2d1e2fc39283fe28cfd5f065b93bbb15a/medium.jpg?1554725663","name":"JavaScript","urlName":"javascript"}},{"score":127,"node":{"mediumIconUrl":"https://s3-ap-northeast-1.amazonaws.com/qiita-tag-image/f9384932787d996b6e1ed26d7d0b2bc2a9e36441/medium.jpg?1443704516","name":"初心者","urlName":"%e5%88%9d%e5%bf%83%e8%80%85"}},{"score":116,"node":{"mediumIconUrl":"https://s3-ap-northeast-1.amazonaws.com/qiita-tag-image/6ce673b37ed24f77635fd6ec1b2664160c82b1c9/medium.jpg?1544599978","name":"Ruby","urlName":"ruby"}},{"score":104,"node":{"mediumIconUrl":"https://s3-ap-northeast-1.amazonaws.com/qiita-tag-image/b871970ded17b8af635a100cd45b4d701419a122/medium.jpg?1574663257","name":"PHP","urlName":"php"}},{"score":96,"node":{"mediumIconUrl":"https://s3-ap-northeast-1.amazonaws.com/qiita-tag-image/00f6ce83b6ee54dc44dd953fccd436d467de2766/medium.jpg?1558892430","name":"AWS","urlName":"aws"}},{"score":86,"node":{"mediumIconUrl":"https://s3-ap-northeast-1.amazonaws.com/qiita-tag-image/30af4a22607c5936f3ac647331e94978f6feb20a/medium.jpg?1462785908","name":"Python3","urlName":"python3"}},{"score":75,"node":{"mediumIconUrl":"https://s3-ap-northeast-1.amazonaws.com/qiita-tag-image/86890d8441752d26572afd242a19907002ce877e/medium.jpg?1559872881","name":"Docker","urlName":"docker"}},{"score":75,"node":{"mediumIconUrl":"https://s3-ap-northeast-1.amazonaws.com/qiita-tag-image/1bfaf60121121d7dec866c83d4c4453347ec93e2/medium.jpg?1436171387","name":"Java","urlName":"java"}}]},"scope":"WEEKLY"}'></div><div data-hyperapp-app="OrganizationRanking" data-hyperapp-props='{"organizationRanking":{"edges":[{"score":14,"node":{"name":"IoTLT","logoUrl":"https://s3-ap-northeast-1.amazonaws.com/qiita-organization-image/67955531570736d618f59dd5e615b01285b22217/original.jpg?1485315227","urlName":"iotlt"}},{"score":11,"node":{"name":"株式会社ゆめみ","logoUrl":"https://s3-ap-northeast-1.amazonaws.com/qiita-organization-image/0190460b4c89699a7fb39ef12ae29108a8be6a5c/original.jpg?1392785329","urlName":"yumemi"}},{"score":11,"node":{"name":"アイレット株式会社(cloudpack)","logoUrl":"https://s3-ap-northeast-1.amazonaws.com/qiita-organization-image/b96f2cf7abab99053ed76cc32c0b34ff96d7018a/original.jpg?1405472933","urlName":"cloudpack"}},{"score":10,"node":{"name":"株式会社エクストランス","logoUrl":"https://s3-ap-northeast-1.amazonaws.com/qiita-organization-image/e041a3dcf46ed72645ed53f727b25f4ca3d9ae8b/original.jpg?1574242500","urlName":"x-trans"}},{"score":10,"node":{"name":"株式会社トップゲート","logoUrl":"https://s3-ap-northeast-1.amazonaws.com/qiita-organization-image/f34a0a3e5aaaa516181ffc04f22486cd8abfd9b8/original.jpg?1390363920","urlName":"topgate"}},{"score":9,"node":{"name":"運営者ギルド","logoUrl":"https://s3-ap-northeast-1.amazonaws.com/qiita-organization-image/3fd54146cf16402656ade1852e0d1bcbe8b30ad8/original.jpg?1570259460","urlName":"admin-guild"}},{"score":8,"node":{"name":"株式会社ガイアックス","logoUrl":"https://s3-ap-northeast-1.amazonaws.com/qiita-organization-image/646b13eb1e51a484163f320913d23a40d3f40fe1/original.jpg?1468893400","urlName":"gaiax"}},{"score":8,"node":{"name":"fukuoka.ex (福岡Elixirコミュ)","logoUrl":"https://s3-ap-northeast-1.amazonaws.com/qiita-organization-image/8897385058d4d3d723b2eda49c1e0b784f07f6cb/original.jpg?1532652872","urlName":"fukuokaex"}},{"score":7,"node":{"name":"プロトアウトスタジオ","logoUrl":"https://s3-ap-northeast-1.amazonaws.com/qiita-organization-image/7c7925faf150fc608840d63309ee2c9e933c9827/original.jpg?1561535995","urlName":"protoout-studio"}},{"score":7,"node":{"name":"株式会社Wiz","logoUrl":"https://s3-ap-northeast-1.amazonaws.com/qiita-organization-image/70cd487d8a14a94b657b4590d8c683cabc590d74/original.jpg?1565075253","urlName":"wiz_inc"}}]},"scope":"WEEKLY"}'></div><div data-hyperapp-app="CommunitySponserList" data-hyperapp-props='{"sponsers":[{"alt":"転職ドラフト","src":"//cdn.qiita.com/assets/public/community-sponsers/001_job-draft-95d1738aa7b1e2977654db64e6137362.png","link":"https://job-draft.jp/?utm_source=qiita\u0026utm_medium=tg\u0026utm_term=sponsor\u0026utm_campaign=attention\u0026utm_content=top"},{"alt":"Amazon Web Services","src":"//cdn.qiita.com/assets/public/community-sponsers/007_aws-c0c529d8a8a6ac63a2f5a09c8b4d2e7d.png","link":"https://awsproservjapan.splashthat.com/"},{"alt":"ブロックチェーンハブ","src":"//cdn.qiita.com/assets/public/community-sponsers/013_blockchain_hub-64a0e063bf807ae0a70816b134ae5a87.png","link":"https://www.blockchainhub.co.jp/"},{"alt":"SIGNATE","src":"//cdn.qiita.com/assets/public/community-sponsers/015_signate-9bd16e5f3c9829e92f513cee4903a1fe.jpg","link":"https://signate.jp/"}]}'></div></div></div></div></div><footer class="st-Footer px-2 px-1@s pt-1 pt-3@s pb-2" id="globalFooter"><div class="st-Footer_container"><ul class="st-Footer_start"><li class="st-Footer_link"><a class="st-Footer_copyright" href="https://increments.co.jp">© 2011-2019 Increments Inc.</a></li><li class="st-Footer_link"><a href="/terms">Terms</a></li><li class="st-Footer_link"><a href="http://help.qiita.com/ja/articles/qiita-community-guideline" target="_blank">Guideline</a></li><li class="st-Footer_link"><a href="/privacy">Privacy</a></li><li class="st-Footer_link"><a href="https://help.qiita.com">Help</a></li></ul><ul class="st-Footer_end"><li class="st-Footer_link"><a href="/about">About</a></li><li class="st-Footer_link"><a href="/users">Users</a></li><li class="st-Footer_link"><a href="/tags">Tags</a></li><li class="st-Footer_link"><a href="/items">Items</a></li><li class="st-Footer_link"><a href="https://blog.qiita.com">Blog</a></li><li class="st-Footer_link"><a href="/api/v2/docs">API</a></li><li class="st-Footer_link"><a href="https://jobs.qiita.com?utm_source=qiita&utm_medium=referral&utm_content=footer">Qiita Jobs</a></li><li class="st-Footer_link"><a href="https://teams.qiita.com">Qiita:Team</a></li><li class="st-Footer_link"><a href="https://zine.qiita.com?utm_source=qiita&utm_medium=referral&utm_content=footer" target="_blank">Qiita:Zine</a></li><li class="st-Footer_link"><a href="https://qiita.com/ads?utm_source=qiita&utm_medium=referral&utm_content=footer" target="_blank">Advertisement</a></li><li class="st-Footer_link"><a href="/feedback/new">ご意見</a></li></ul></div></footer></div><div class="p-messages"><div data-hyperapp-app="Message" data-hyperapp-props='{"messages":[]}'></div></div><div data-config='{"actionPath":"public/home#index","settings":{"analyticsTrackingId":"UA-24675221-12","mixpanelToken":"17d24b448ca579c365d2d1057f3a1791","assetsMap":{},"csrfToken":"X4QvqrjRUFB9XQ9vYa6ieXzDDIjWZYvFMEQJ4ORJ053byL72w6r051gB/Rb2zUfl6LmG/Al7znxIX5P9ymckSQ==","locale":"en"},"currentUser":null}' id="dataContainer" style="display: none;"></div></body></html>あ。。。あれ????欲しい
tr-itemの部分が存在せえへんぞ!!!どういうこっちゃ!!!!割とWebサイトをスクレピングしようとするとQiitaのように、アクセスしてもHTMLが描写されるタイミングがズレている場合があります。単純にそういう対策を取っているサイトは少なくありません。
このままでは何も出来へん。。。なんかヒントないか探し中------
うーん。。。。。なんかヒントないかなあ。
....あれ???カスタムデータ属性に記事と同じ内容にJSONが詰め込まれている。。。
consoleでちょいと試し。。。
取れているやん!!!!ちゃんとJSON形式で埋め込まれているんやん!!!
実際に取れている値はこんな感じ{ "trend": { "edges": [ { "followingLikers": [], "isLikedByViewer": false, "isNewArrival": false, "hasCodeBlock": true, "node": { "createdAt": "2019-11-23T00:47:30Z", "likesCount": 298, "title": "OpenCV をビジュアルプログラミングできるアプリを Electron + Vue.js で作成", "uuid": "f3dc7d9a4174a2bad007", "author": { "profileImageUrl": "https://qiita-user-profile-images.imgix.net/https%3A%2F%2Favatars1.githubusercontent.com%2Fu%2F19924936%3Fv%3D4?ixlib=rb-1.2.2&auto=compress%2Cformat&lossless=0&w=48&s=81724a31e83f0b9fa0bed01d9bc6a5a8", "urlName": "ufield" } } }, { "followingLikers": [], "isLikedByViewer": false, "isNewArrival": false, "hasCodeBlock": false, "node": { "createdAt": "2019-11-23T15:33:52Z", "likesCount": 207, "title": "グラブルのコミュニティが抱える課題をウェブアプリで解決して1日で6万PVを叩き出したときの話", "uuid": "f0ff43cb7b9d41448a95", "author": { "profileImageUrl": "https://qiita-user-profile-images.imgix.net/https%3A%2F%2Fqiita-image-store.s3.ap-northeast-1.amazonaws.com%2F0%2F64859%2Fprofile-images%2F1574522863?ixlib=rb-1.2.2&auto=compress%2Cformat&lossless=0&w=48&s=3bc0a583a635be5d0d60438740f1bfe2", "urlName": "kfurumiya" } } } ] }, "scope": "daily" }光が見えてきたー!!!!!!
URLの構造の部品や、記事のタイトルはtrend.edges.nodeの中にあるみたい。"node": { "createdAt": "2019-11-23T00:47:30Z", "likesCount": 298, "title": "OpenCV をビジュアルプログラミングできるアプリを Electron + Vue.js で作成", "uuid": "f3dc7d9a4174a2bad007", "author": { "profileImageUrl": "https://qiita-user-profile-images.imgix.net/https%3A%2F%2Favatars1.githubusercontent.com%2Fu%2F19924936%3Fv%3D4?ixlib=rb-1.2.2&auto=compress%2Cformat&lossless=0&w=48&s=81724a31e83f0b9fa0bed01d9bc6a5a8", "urlName": "ufield" } }このJSONを取得すれば余裕で処理書けるわー!!ほんじゃ早速書いていこう!!!
qiita.pyimport requests; from bs4 import BeautifulSoup; url = "https://qiita.com/" headers = { "User-Agent" : "Mozilla/5.0 (iPhone; CPU iPhone OS 11_0 like Mac OS X) AppleWebKit/604.1.38 (KHTML, like Gecko) Version/11.0 Mobile/15A372 Safari/604.1" } # 空で置いておく item_json = [] result = [] res = requests.get(url, headers=headers) # htmlをBeautifulSoupで扱う soup = BeautifulSoup(res.text, "html.parser") # JSONがある部分を取得する items = soup.find(class_="p-home_main") # JSONがあるデータ属性があったら取得する for items in soup.find_all(): if "data-hyperapp-props" in items.attrs: item_json.append(items["data-hyperapp-props"]) # jsonをlist化(PHPでいうjson_decode的なやつ) items = json.loads(item_json[1]) # 欲しいのはnodeというkeyの部分だけなのでこれだけ取得する for edges in items['trend']['edges']: result.append(edges['node']) for v in result: text = 'タイトル:' + v['title'] + '\n' text += 'いいね数:' + str(v['likesCount']) + '\n' text += 'URL:' + url + v['author']['urlName'] + '/items/' + v['uuid'] + '\n' text += '###############################' # ログ用に出力 print(text)----実行結果
タイトル:エンジニアが活用したい情報リソースまとめ
いいね数:896
URL:https://qiita.com/EaE/items/eb8f28223c9c2926b44f
###############################
タイトル:「何がわからないのかわからない」は何がわからないのか
いいね数:252
URL:https://qiita.com/K_Noko_224/items/745ecc0b604fd71177df
###############################
タイトル:「ループ・再帰・gotoを使わず1から100までの数値を印字する」Conner Davis 氏の回答の考察
いいね数:317
URL:https://qiita.com/xtetsuji/items/19d07c629852876da401
###############################
タイトル:開発者なら知っておくべき 11 のコンソールコマンド
いいね数:258
URL:https://qiita.com/baby-degu/items/abe4adb81750e13362e2
###############################
タイトル:【SES】ドナドナされる時の面談時に地雷案件をなるべく避けるための確認ポイント7選(iOS/Androidアプリ開発)
いいね数:238
URL:https://qiita.com/homunuz/items/1623879a0d3c87d23960
###############################
タイトル:Terraformアンチパターン(2019年版)
いいね数:130
URL:https://qiita.com/m22r/items/7d80d149e3fb3494c1d4
おけい!!!取れたわ!!!!
これをSlackとかに送信しよ!!!!スクレイピングした結果をSlackに送信する
slackにはWebhookのURLが用意されていて、そのURLを指定すればチャットに簡単に送信することが出来ます。
slackのWebhookのURLの仕方や登録の仕方はブログに書いてるので、もし良ければ見てね!!上記でスクレイピングで取得した結果をslackに送信するためには、post送信で指定のURLに送ってあげれば良いだけ!!
post.pyweb_hook_url = 'https://hooks.slack.com/services/hogehoge/****/*****' requests.post(web_hook_url, data = json.dumps({ 'text': text, # 送りたい内容 'username': 'Qiita-Bot', # botの名前 }));この内容を上記のプログラムに当て込むと.....
qiita.pyimport requests; from bs4 import BeautifulSoup; url = 'https://qiita.com/' web_hook_url = 'slackで取得したhookのURL' headers = { "User-Agent" : "Mozilla/5.0 (iPhone; CPU iPhone OS 11_0 like Mac OS X) AppleWebKit/604.1.38 (KHTML, like Gecko) Version/11.0 Mobile/15A372 Safari/604.1" } # 空で置いておく item_json = [] result = [] res = requests.get(url, headers=headers) # htmlをBeautifulSoupで扱う soup = BeautifulSoup(res.text, "html.parser") # JSONがある部分を取得する items = soup.find(class_="p-home_main") # JSONがあるデータ属性があったら取得する for items in soup.find_all(): if "data-hyperapp-props" in items.attrs: item_json.append(items["data-hyperapp-props"]) # jsonをlist化(PHPでいうjson_decode的なやつ) items = json.loads(item_json[1]) # 欲しいのはnodeというkeyの部分だけなのでこれだけ取得する for edges in items['trend']['edges']: result.append(edges['node']) for v in result: text = 'タイトル:' + v['title'] + '\n' text += 'いいね数:' + str(v['likesCount']) + '\n' text += 'URL:' + url + v['author']['urlName'] + '/items/' + v['uuid'] + '\n' text += '###############################' # ログ用に出力 print(text) requests.post(web_hook_url, data = json.dumps({ 'text': text, 'username': 'Qiita-Bot', }));プログラムちょっと汚いけどまあええやろ!!!!
これを実際に実行すると以下のような感じで無事に送信されます。
やった!!!!!!!でけたわ!!!!
pandasとかのライブラリを使用すればcsv出力も出来るし、データ収集できそう。
これでわいもQiitaマスター。

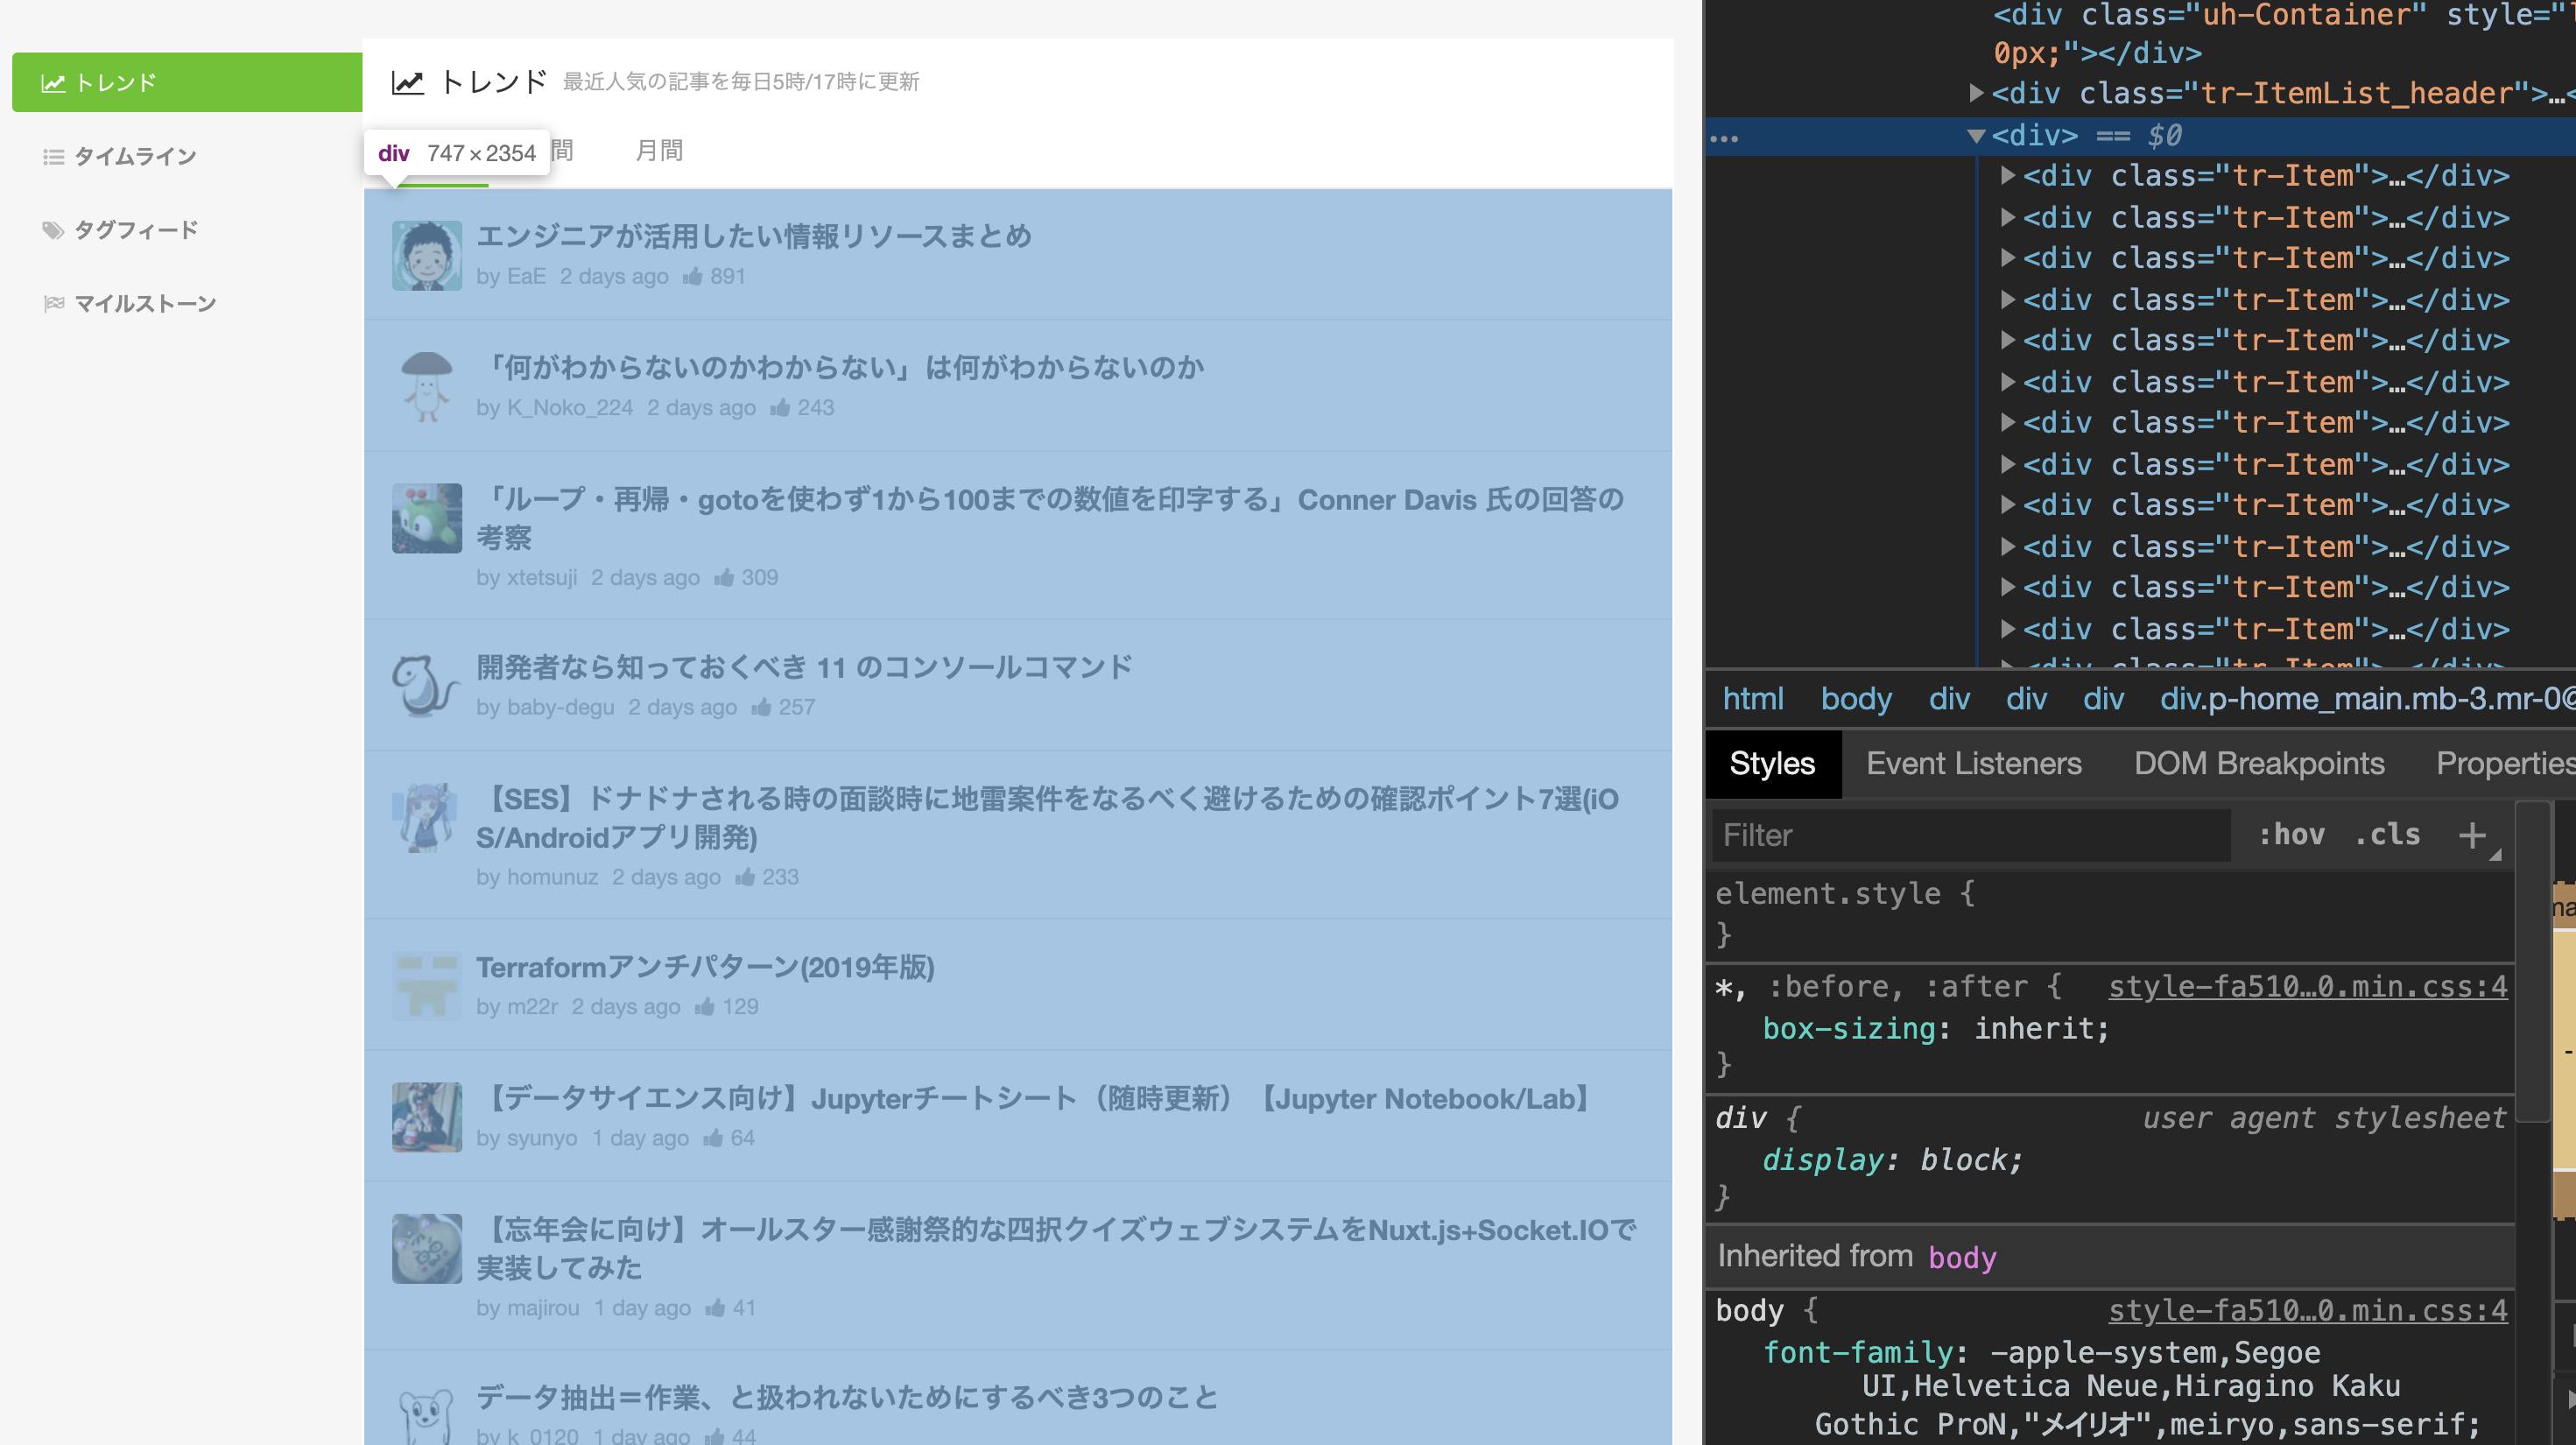

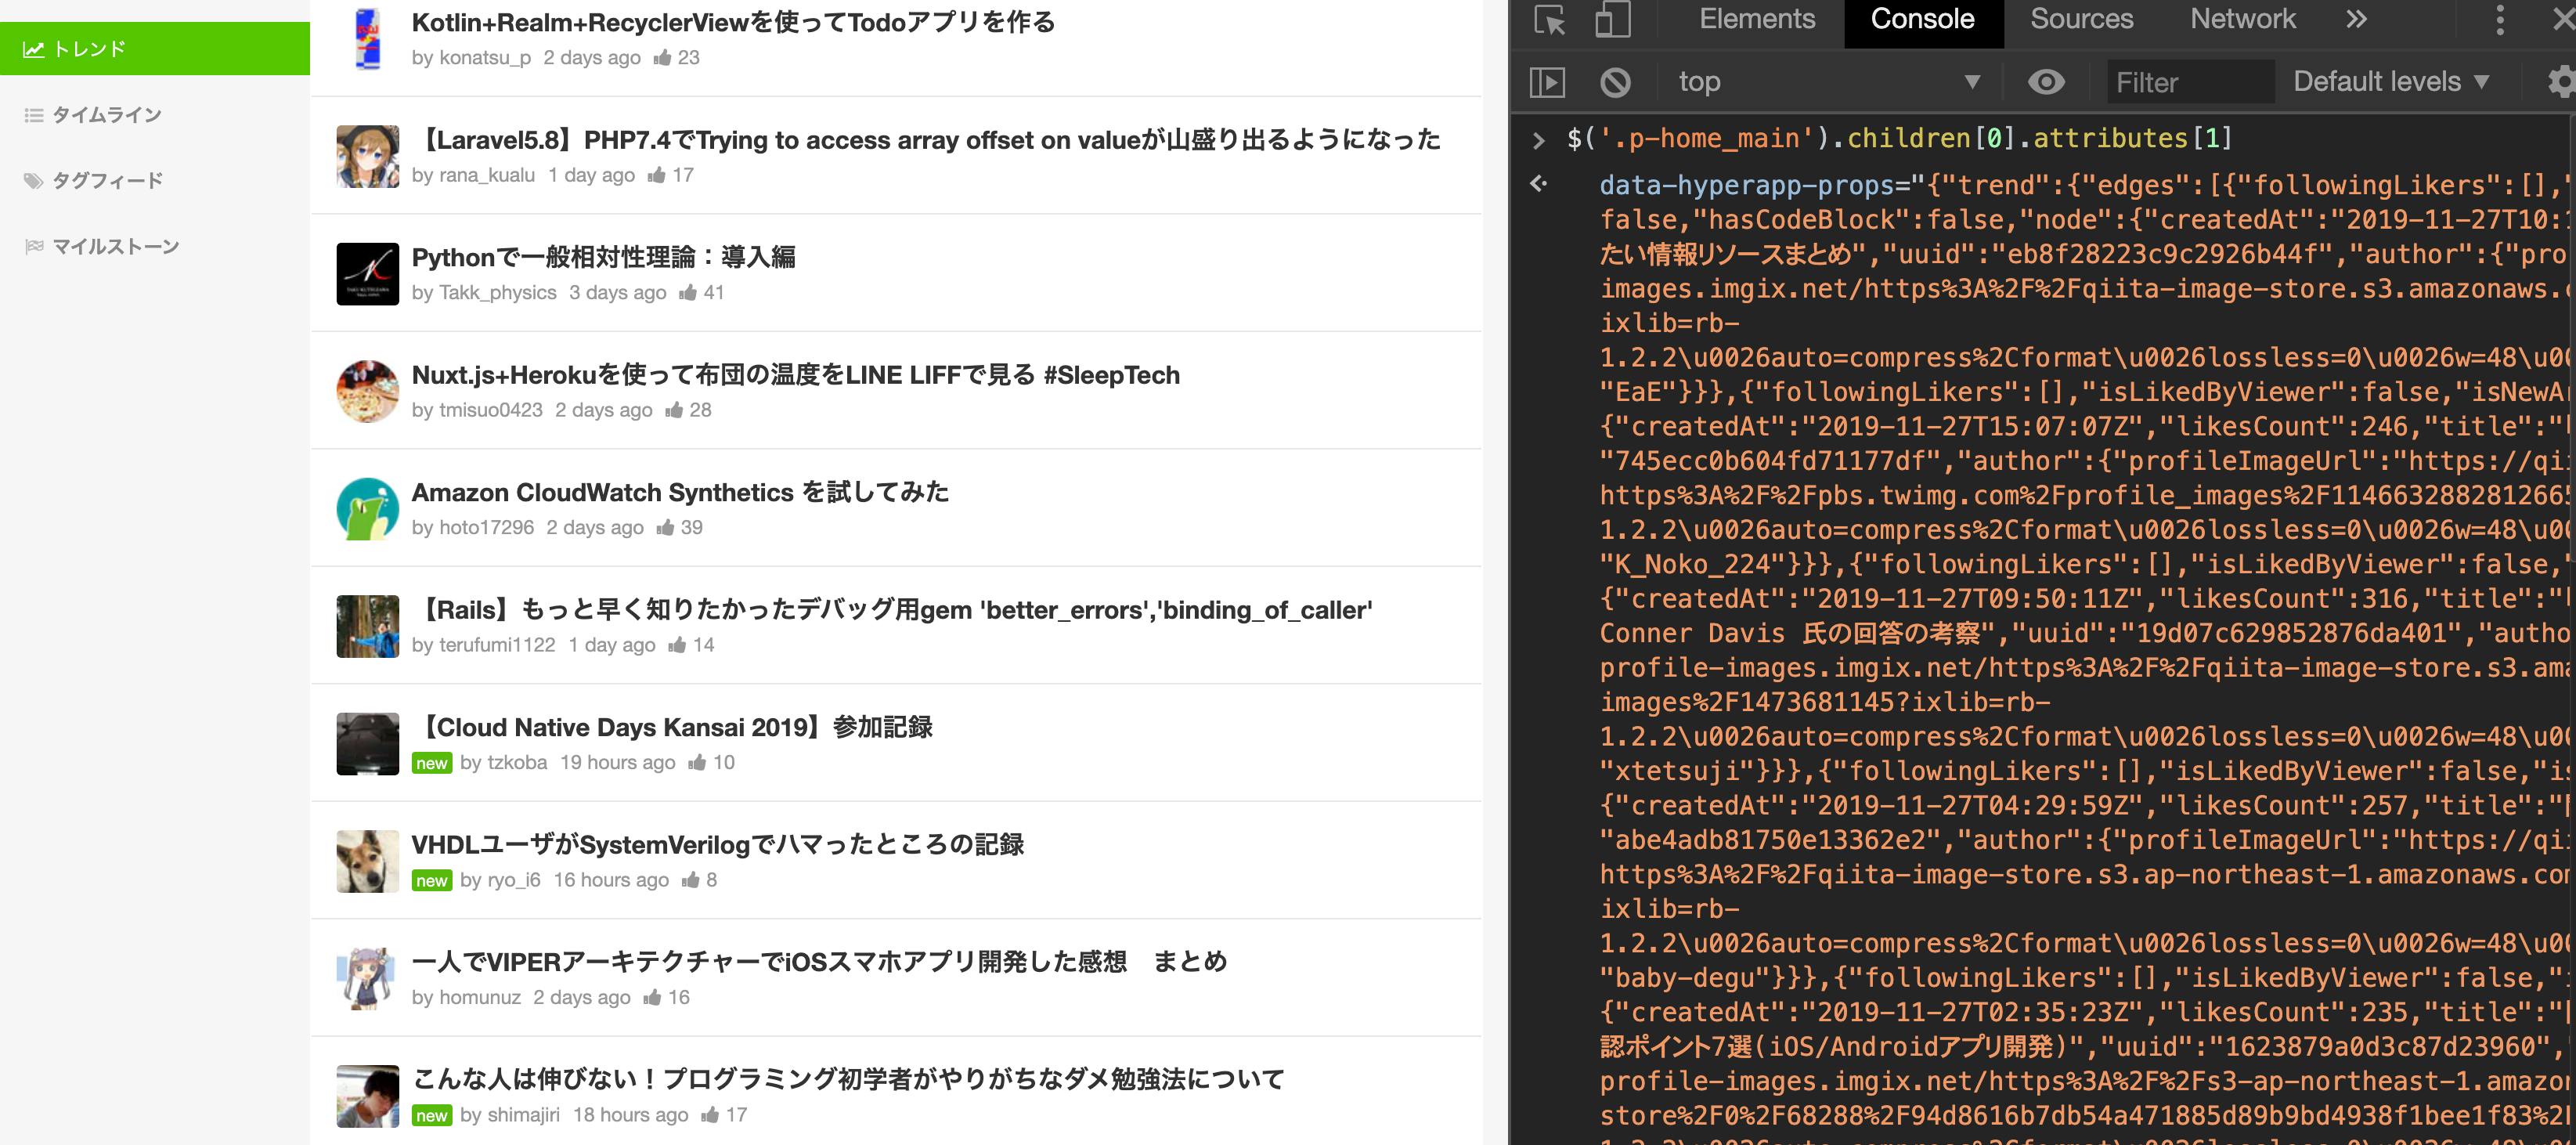
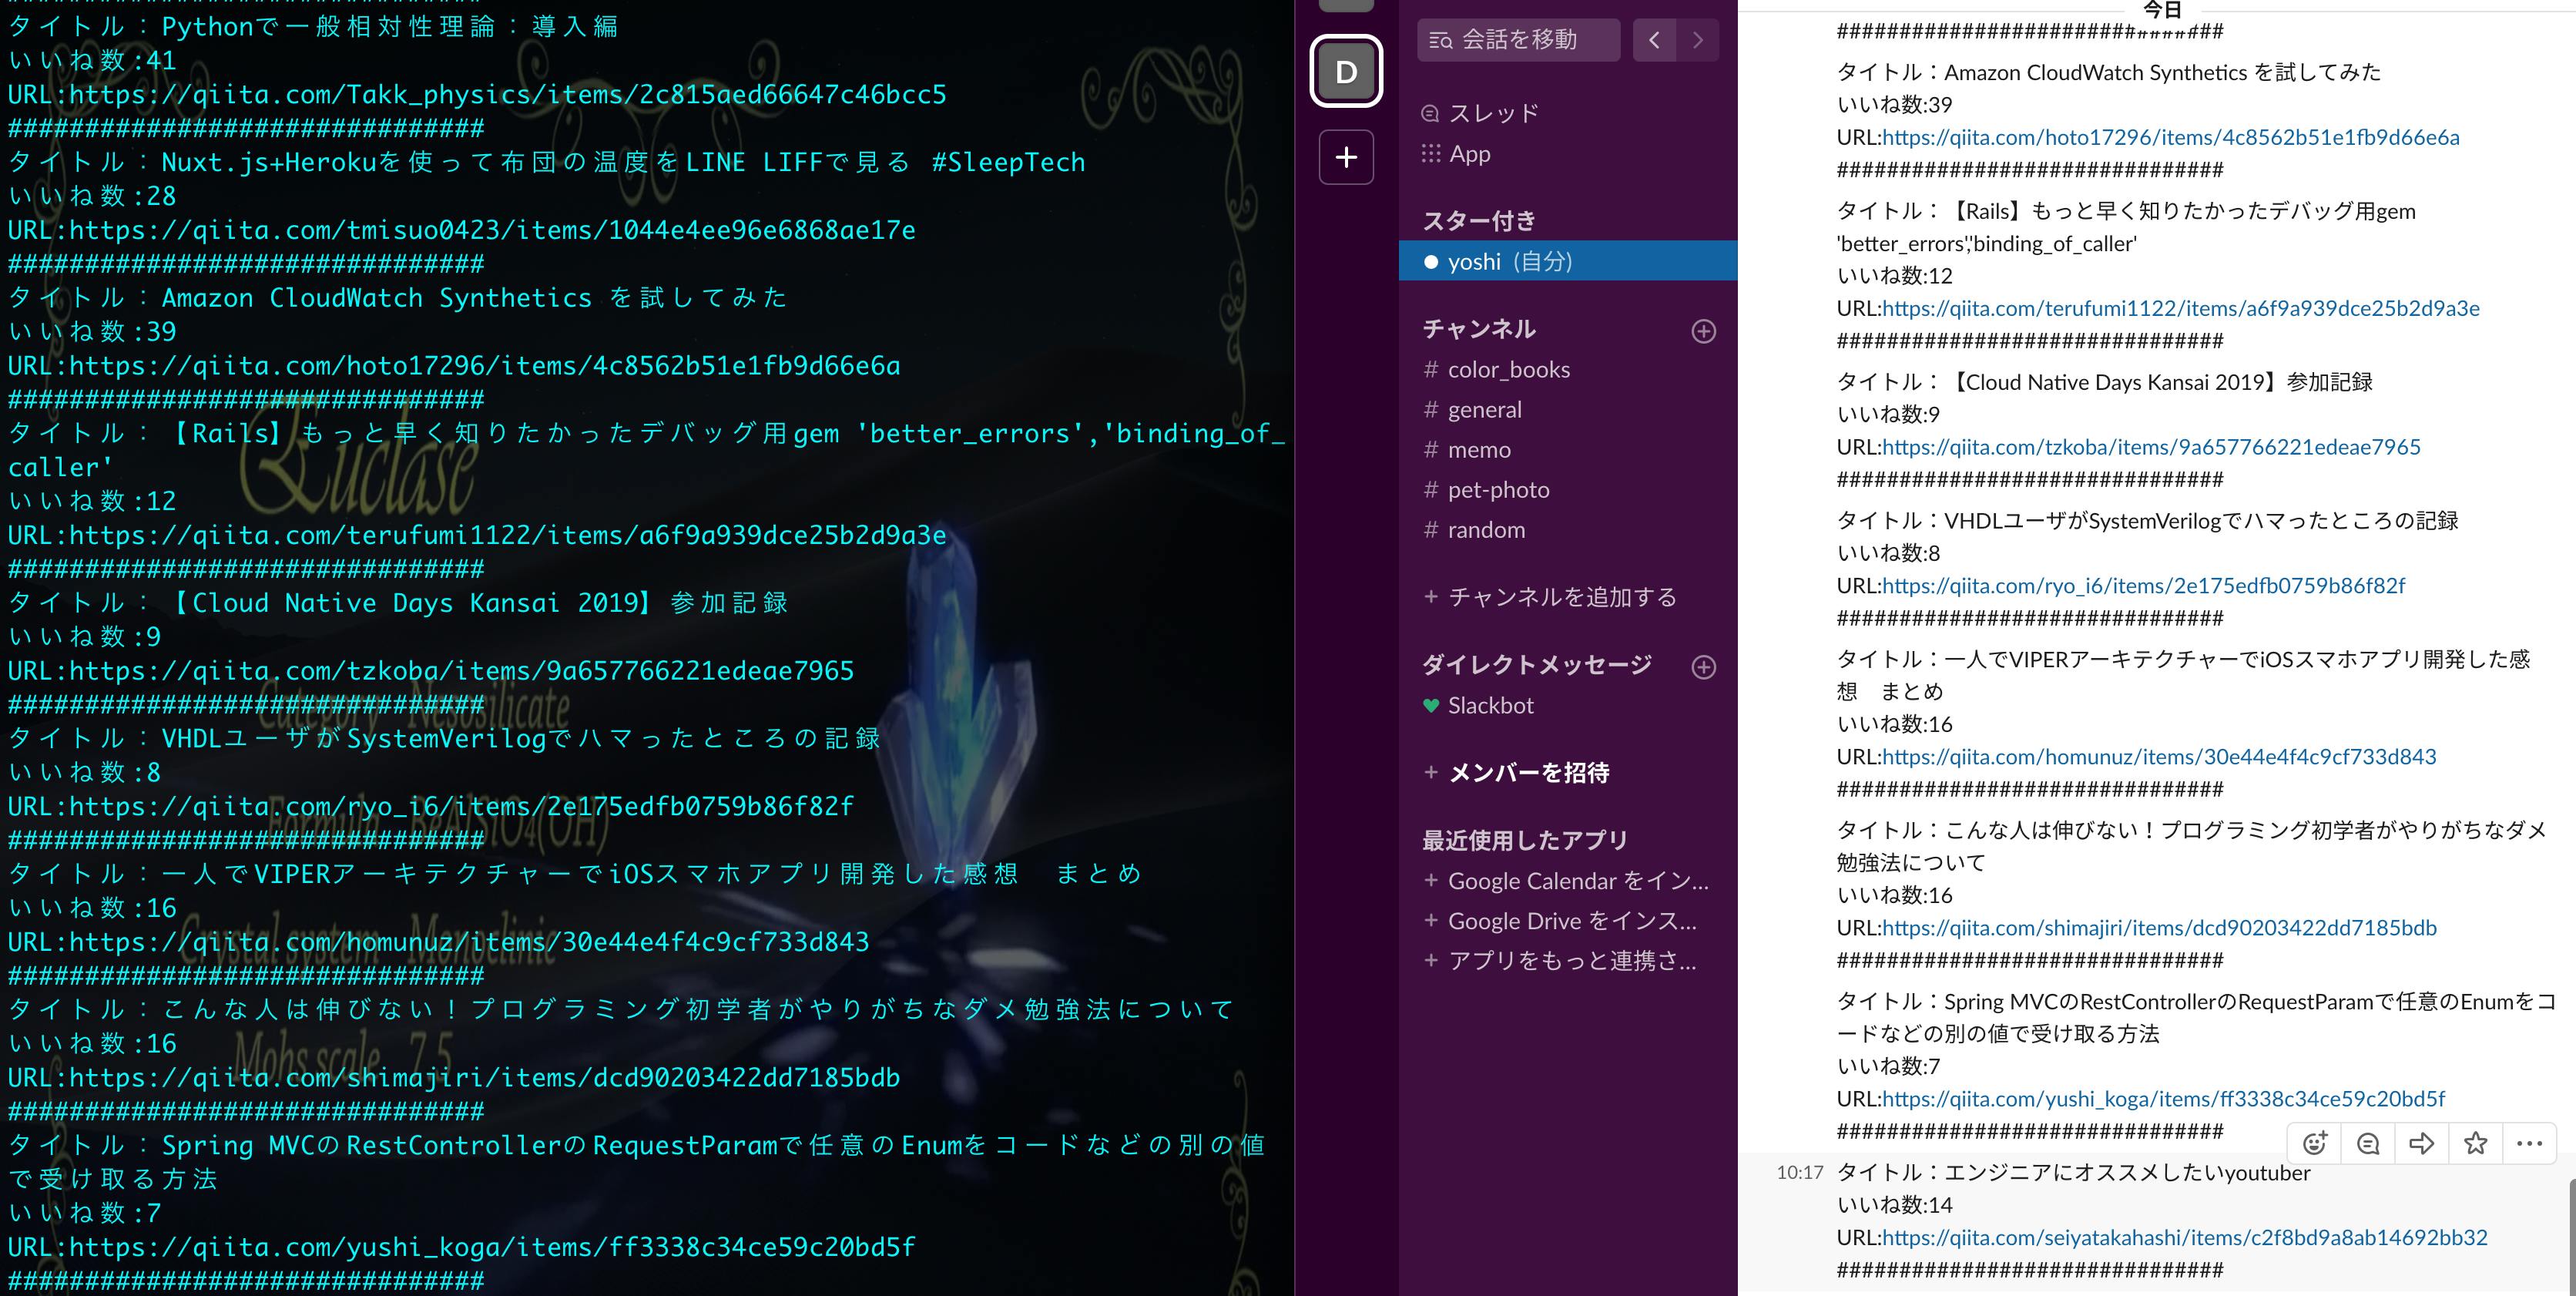
- 投稿日:2019-11-30T20:01:45+09:00
Django でデータをプロジェクト的単位に分ける (2)
前置き
この記事のつづきです。
「プロジェクト的単位」というのはタスク管理ツールなどで言う "プロジェクト" の事で、ここでは演劇の管理をするので「公演」がそれに当たります。
- -> GitHub のリポジトリ (Python 3.6.9, Django 2.2.6)
記事の内容
前回は「公演」と「公演のユーザ」を作り、アクセス制御をしました。
また、「公演のユーザ」がその公演に属するデータ (役者) を追加できるようにしました。今回は、公演に属するデータを追加・編集する際のインターフェイスについて考えてみたいと思います。
具体的な目標
たとえば、「登場人物」というデータに「配役」という
ForeignKeyフィールドを作って「役者」を参照する場合に、その公演の役者だけを選択可能にしたいです。
ところが、下のようなModelとViewを作るだけでは、castとして全ての役者 (他の公演に属する役者も) が選べるようになってしまいます。models.pyfrom django.db import models class Character(models.Model): '''登場人物 ''' production = models.ForeignKey(Production, verbose_name='公演', on_delete=models.CASCADE) name = models.CharField('役名', max_length=50) cast = models.ForeignKey(Actor, verbose_name='配役', on_delete=models.SET_NULL, blank=True, null=True)views.pyfrom django.contrib.auth.mixins import LoginRequiredMixin from django.views.generic.edit import CreateView from .models import Character class ChrCreate(LoginRequiredMixin, CreateView): '''Character の追加ビュー ''' model = Character fields = ('name', 'cast')
▲ 他の公演の役者が選べてしまう。
やりたい事の整理
ある "公演" に "登場人物" を追加することを考えます。
"登場人物" には "配役" というフィールドがあり、「その公演に属している "役者のデータ" を参照する」とします。配役を選択する UI
上記の図版は「他の公演の役者が選べてしまう例」ですが、その問題を除けば UI はこれで良いです。
バリデーション
Web ブラウザから送られてくるリクエストが改ざんされている可能性を考えて、UI の選択肢だけでなく「受け入れる値」についても、「その公演の役者だけ」に限る必要があります。
あとで編集する時のこと
追加した "登場人物" をあとで編集する時のことを考えます。
せっかく「その公演の役者」を配役した登場人物の、所属先 (公演) を変更できてしまっては元のもくあみです。
一度作った "登場人物" の所属先は、変更できないようにしてしまうのが良さそうです。UI の変更
このアプリではクラスベースのビュー (
CreateView) を使っていますので、フォームが自動的に生成され、テンプレートを以下のように書くことができます。modelname_form.html<form method="post"> {% csrf_token %} <table> {{ form }} </table> {% if object %} <input type="submit" value="更新"> {% else %} <input type="submit" value="追加"> {% endif %} </form>この
{{ form }}という部分にオブジェクトの各フィールドの入力 UI が展開されるので、ここを書き換えるという方法もあります。
その場合はcastの選択肢をcontextとして渡し、テンプレート内でのフォームの書き方もフィールドごとにバラす必要があります。ここではそれはやめて、
{{ form }}部分に展開されるフォームの内容を、あらかじめ改変するという方法をとります。フォームの内容を改変する
フォームの内容を改変するには、フォームのサブクラスを作るというやり方もありますが、それをしなくても改変はできます。
ここではビューのメソッドの中で改変してみます。
フォームのサブクラス化については後で説明します。フォームはビューからテンプレートに渡される
contextの一種なので、get_context_data()をオーバーライドして、以下のように改変することが可能です。
以下のコードでビューが継承しているProdBaseCreateViewは、公演 ID を受け取ってアクセス制御をする抽象クラスです (詳しくは前回の記事を御覧ください。今はあまり気にしなくて良いです)。rehearsal/views/views.pyclass ChrCreate(ProdBaseCreateView): '''Character の追加ビュー ''' model = Character fields = ('name', 'cast') def get_context_data(self, **kwargs): '''テンプレートに渡すパラメタを改変する ''' context = super().get_context_data(**kwargs) # その公演の役者のみ表示するようにする actors = Actor.objects.filter(production=self.production) # 選択肢を作成 choices = [('', '---------')] choices.extend([(a.id, str(a)) for a in actors]) # Form にセット context['form'].fields['cast'].choices = choices return context詳しい解説
context['form']で、ビューがテンプレートに渡そうとしているフォームを参照できます。- フォームが持っているフィールドに
choicesを設定すると、それを選択肢として表示します。choicesの各要素は、"値" と "表示文字列" のタプルになっています。- このアプリでは
castに空をセットする事を許すので、一個目の選択肢の値を空にしてあります。
▲ 登場人物が属す公演の役者だけが表示された。
バリデーション
フォームのフィールドに
choicesを設定すると自動的にそれ以外の値をはじいてくれる、という情報を見かけますが、実際にやってみると弾いてくれませんでした。
choicesを設定したフィールドがForeignKeyだった事が原因かも知れません。
▲ ブラウザで選択肢を改ざんしてみる。
▲改ざんした値が追加できてしまった。
バリデーションの結果を改変する
ビューのメソッドをオーバーライドして、バリデーションの結果を改変する事ができます。
最終的にはフォームのサブクラスを作ってしまった方がすっきりしますが、まずはビューだけでやってみます。rehearsal/views/views.pyclass ChrCreate(ProdBaseCreateView): # (中略) def form_valid(self, form): '''バリデーションを通った時 ''' # cast が同じ公演の役者でなければ、バリデーション失敗 instance = form.save(commit=False) if instance.cast.production != self.production: return self.form_invalid(form) return super().form_valid(form)
form_valid()は、フォーム側でバリデーションを通った時に呼ばれる、ビュー側の処理のメソッドです。
ここで強引に、バリデーションを通らなかった時に呼ばれるメソッド (form_invalid()) を呼んでしまえば、保存を阻止することが出来ます。詳しい解説
form.save(commit=False)は、フォームが保存しようとしているオブジェクトを取得します。commit=Trueにすると保存してから取得することになります。
- 他にも
self.objectやform.instanceでもオブジェクトを取得できますが、違いが良く分かりません。ご存知の方がいましたら教えて頂けると嬉しいです。if文の中のself.productionは、このビューのスーパークラスProdBaseCreateViewが持っている属性で、保存しようとするオブジェクトの所属先の "公演" を持っています (詳しくは前回の記事を御覧ください)。これの気持ち悪いところ
上のような
form_valid()からform_invalid()を呼ぶ方法を気持ち悪いと思う方もいるかと思います。
form_valid()の意味を「バリデーションを通った時に呼ばれて、続きの処理をするところ」と考えれば、そこでもバリデーションをするのは越権行為のような違和感があるからです。
結果としてform_invalid()が呼ばれるなど、そんなちゃぶ台返しが許されるのか、という感じです。最悪のシナリオとしては、
form_invalid()からもform_valid()を呼ぶことを許して、循環呼び出しが起こってしまう事も考えられます。
もちろん、そこは一方通行にする等ルールを決めておけば、上のやり方でも問題はありません。もうひとつの方法 (フォームのサブクラス化)
フォームをサブクラス化するのであれば、「UI の変更」のところでやった
get_context_data()のオーバーライドも必要ありません。
代わりに、ビューではget_form_kwargs()というメソッドをオーバーライドします。
「テンプレートに渡すフォーム」を改変するのでなく、生成するフォーム自体をカスタマイズするイメージです。フォームにデータを渡す
get_form_kwargs()で取れる返り値は、フォームのコンストラクタに渡されるキーワード引数を辞書にしたものです。
なのでこれにエントリを追加すれば、フォーム側で使うことができます。以下は、
ChrFormというクラスが定義されている前提での、get_form_kwargs()のオーバーライドの例です。
ビューでform_classを設定する場合は、fieldsは設定しません (たしか設定するとエラーになったと思います)。rehearsal/views/views.pyfrom rehearsal.forms import ChrForm class ChrCreate(ProdBaseCreateView): '''Character の追加ビュー ''' model = Character form_class = ChrForm def get_form_kwargs(self): '''フォームに渡す情報を改変する ''' kwargs = super().get_form_kwargs() # フォーム側でバリデーションに使うので production を渡す kwargs['production'] = self.production return kwargsフォーム側の実装
rehearsal/forms.pyfrom django import forms from production.models import Production from .models Character class ChrForm(forms.ModelForm): '''登場人物の追加・更新フォーム ''' class Meta: model = Character fields = ('name', 'cast') def __init__(self, *args, **kwargs): # view で追加したパラメタを抜き取る production = kwargs.pop('production') super().__init__(*args, **kwargs) # 配役は、同じ公演の役者のみ選択可能 queryset = Actor.objects.filter(production=production) self.fields['cast'].queryset = queryset
castフィールドのchoicesではなくquerysetを設定しています。
こうすることで、設定したクエリセットに基づいて、選択肢の生成とバリデーションをするようになります。このフォームを作っておけば、追加用のビューだけでなく、更新用のビューでも使えます。
これで、「バリデーション」のところでやった選択肢の改ざんをしてみます。
あとで編集する時のこと
"登場人物" や "役者" の所属先の "公演" を変えられないように、これらの追加/更新ビューで、
productionの変更を禁止します。編集可能フィールドの変更
Django で普通に
modelを指定してフォームを作ると、すべてのフィールドが編集可能になってしまうので、編集できるフィールドを指定する必要があります。
- 「フォームのサブクラス化」でやったみたいに、ビューで
form_classを指定する場合は、フォームのMetaでfieldsを指定します。form_classを指定しない場合は、ビューでfieldsを指定します。編集はしないが参照はしたい
編集しないフィールドも、フォームやテンプレートから参照したい場合があります。
いずれの場合も、これまでも触れてきたように、ビューのget_context_data()やget_form_kwargs()を使えば可能です。まとめ
- 共に
production(公演) というForeignKeyフィールドを持つ2種類のデータ ("登場人物" と "役者") を関連付ける時に、productionが同じになるようにする方法を考えました。- ビューの方で UI とバリデーションの両方を改変することも出来ましたが、フォームをサブクラス化した方がすっきりとした実装になりました。
- ビューからテンプレートにデータを渡す場合は
get_context_data()メソッドをオーバーライドしました。- ビューからフォームにデータを渡す場合は
get_form_kwargs()メソッドをオーバーライドしました。- フォーム側で入力値の選択肢を指定するには、フィールドの
querysetを設定すれば、UI とバリデーションの両方がそれに従いました。
- 投稿日:2019-11-30T19:53:41+09:00
ゼロから始めるcodewars kata[day3]数独、ナンプレ
codewars kataではプログラミングと実用英語が同時に学べます。天才的サイトです。
githubアカウントがあれば30秒で始められます
興味が沸いたら今すぐここから始めようちなみにpython以外でも多くの言語でチャレンジ出来ます
今日のコード
Sudoku数独といいkata型といいkyu級といいこのサイトは日本が好きみたい
Kumite組手とかいうサービスもあるみたいです1.数独Did I Finish my Sudoku?[5kyu]
Q 入力の盤面において数独が終わったかどうか判定せよ
数独のルール置いときます
縦、横、3*3エリアにおいて1~9を並べるやつですね例1
入力:盤面
[[1, 3, 2, 5, 7, 9, 4, 6, 8]
,[4, 9, 8, 2, 6, 1, 3, 7, 5]
,[7, 5, 6, 3, 8, 4, 2, 1, 9]
,[6, 4, 3, 1, 5, 8, 7, 9, 2]
,[5, 2, 1, 7, 9, 3, 8, 4, 6]
,[9, 8, 7, 4, 2, 6, 5, 3, 1]
,[2, 1, 4, 9, 3, 5, 6, 8, 7]
,[3, 6, 5, 8, 1, 7, 9, 2, 4]
,[8, 7, 9, 6, 4, 2, 1, 5, 3]]
出力:'Finished!'
例2
入力:盤面
[[1, 3, 2, 5, 7, 9, 4, 6, 8]
,[4, 9, 8, 2, 6, 1, 3, 7, 5]
,[7, 5, 6, 3, 8, 4, 2, 1, 9]
,[6, 4, 3, 1, 5, 8, 7, 9, 2]
,[5, 2, 1, 7, 9, 3, 8, 4, 6]
,[9, 8, 7, 4, 2, 6, 5, 3, 1]
,[2, 1, 4, 9, 3, 5, 6, 8, 7]
,[3, 6, 5, 8, 1, 7, 9, 2, 4]
,[8, 7, 9, 6, 4, 2, 1, 3, 5]]
             #5 #3  #縦に見たとき5,3がそれぞれ足りない
出力:'Try again!'
My Answer
import numpy as np
def done_or_not(board):
    sets = set([i for i in range(1,10)])
    board = np.array(board)
    if not [1  for j in range(9) if not set(board[j]) == sets or not set(board[:,j]) == sets] ==[]:
        return 'Try again!'
    if not [1 for i in range(9) if not set(board[i//3*3:i//3*3+3,i%3*3:(i%3*3)+3].flatten()) == sets ] ==[]:
        return 'Try again!'
    return 'Finished!'
sets = {1~9の集合}として
縦横列がこの集合になっているか
各エリアがこの集合になっているか
をそれぞれチェックしてる感じですね
Codewarsっぽいコードになってきた気がする…
可読性が低いのでいいのか悪いのか分からんBest Answer
import numpy as np
def done_or_not(aboard): #board[i][j]
  board = np.array(aboard)

  rows = [board[i,:] for i in range(9)]
  cols = [board[:,j] for j in range(9)]
  sqrs = [board[i:i+3,j:j+3].flatten() for i in [0,3,6] for j in [0,3,6]]

  for view in np.vstack((rows,cols,sqrs)):
      if len(np.unique(view)) != 9:
          return 'Try again!'

  return 'Finished!'
これはなんていうか…めっちゃ見やすいですね
np.vstack()で縦横四角を2次元配列に並べて
np.unique()で何種類の要素があるかを見ているんですね
len(set())で同じことをしようとしてたことがあったけどこんな便利な機能があるとは
内包表記カコイイじゃなくてちゃんと端的で見やすいコードを書けるよう精進します。あとがき
CSSとHTMLの勉強を始めました
- 投稿日:2019-11-30T19:25:57+09:00
PCAとNMFを用いてアニメ顔の特徴量を検出しようと思ったらホラーになった
機械学習といえば画像処理です。PCA(主成分分析)やNMF(非負値行列因子分析)といった古典的な解析手法によって、多数の顔画像から主要な特徴量を抽出できるということで、さっそくアニメ顔を対象にやってみました。対象となるのは以下のような21,551通りの顔データです。https://www.kaggle.com/soumikrakshit/anime-faces からお借りしました。ありがとうございます。
解析によって、輪郭を決定づける成分、髪を決定づける成分などが視覚的に分解できたら面白いですね。
PCA
import cv2
import numpy as np
import matplotlib.pyplot as plt
from sklearn.decomposition import PCA

sample = 20000

X = []

for i in range(sample):
    file_name = str(i+1) + '.png'
    img = cv2.imread(file_name)
    img = img.reshape(12288)/255
    X.append(img)

pca = PCA(n_components=9, whiten=True)
pca.fit(X)
X_pca = pca.transform(X)

fig, axes = plt.subplots(3,3,figsize=(10,10))
for i,(component, ax) in enumerate(zip(pca.components_,axes.ravel())):
    ax.imshow(0.5-component.reshape((64,64,3))*10)
    ax.set_title('PC'+str(i+1))

print(pca.explained_variance_ratio_)

plt.show()
解析結果がこちら。
ホラーだ! 壁に滲んだ怨念の顔みたいになっとる!
PC1から順に画像の主要な部分を説明するように変数(ここでいうと座標とピクセル)を束ねたものになっているはずですが……
- PC1 全体の明るさ
- PC2 髪の全体的なボリューム?
- PC3 左を向いているかどうか?
みたいな傾向を無理すれば読めなくもないですが、明確な特徴量とはとても言えないですね。PCによる説明率を見ても、それほど集約できているとは言えなさそうです。残念。
print(pca.explained_variance_ratio_)Output[0.21259875 0.06924239 0.03746094 0.03456278 0.02741101 0.01864574 0.01643447 0.01489064 0.0133781 ]NMF
import cv2
import numpy as np
import matplotlib.pyplot as plt
from sklearn.decomposition import NMF

sample = 20000

X = []

for i in range(sample):
    file_name = str(i+1) + '.png'
    img = cv2.imread(file_name)
    img = img.reshape(12288)/255
    X.append(img)

nmf = NMF(n_components=9)
nmf.fit(X)
#X_nmf = nmf.transform(X)

fig, axes = plt.subplots(3,3,figsize=(10,10))
for i,(component, ax) in enumerate(zip(nmf.components_,axes.ravel())):
    ax.imshow(component.reshape((64,64,3)))
    ax.set_title('component'+str(i+1))

plt.show()
解析結果がこちら。
ホラーだ! フィルムに映り込んだ亡霊のネガになっとる! もはや解釈する気も起きない。
キルミーベイベー
先人に倣ってキルミーベイベーでも解析を試みていきます。
PCA
NMF
南無。
結論
やはり線形的な手法だけで(それも教師なしで)画像の特徴量を抽出することは難しいようです。GANなどの発展的な手法を用いてさらなる解析を進めることが望まれるので勉強します、ハイ。
コードの解説
なんか短くなってしまったのでコードの解説。画像の読み込みと展開について。実行するpythonファイルと同じ場所に画像ファイルを置いておけば、ファイル名を指定するだけでアクセスできます。
1.jpg、2.jpgというように名付けていけば単純なイテレーションでファイル名を指定できます。より一般的なコードだと、os.listdirでファイル名を取得しますが、今回はラクをしました。読み込んだファイルは
cv2モジュールにあるimreadという関数を使って配列化します。しかしこの配列は縦×横×RGBという3次元配列になっているので、後の解析に使うため、reshapeで1行の長いベクトルにします。今回は縦64、横64、RGBなので64*64*3=12288となります。また、配列の値が生データだとRGBの値が0~255なっているので、255で割ることにより0~1の間に収めます。file_name = str(i+1) + '.png' img = cv2.imread(file_name) img = img.reshape(12288)/255以上の内容をコードにしたものが上です。
解析によって得られた成分は、PCAでもNMFでも
components_に格納されています。リファレンスはhttps://scikit-learn.org/stable/modules/generated/sklearn.decomposition.PCA.html とhttps://scikit-learn.org/stable/modules/generated/sklearn.decomposition.NMF.html のAttributes:を参照。これをpyplotモジュールにあるimshowという関数でグラフに表示します。これは先ほどとは逆に、解析結果(1行の長いベクトル)をまた縦×横×RGBに整形しなおす必要があるのでまたreshapeしていきます。fig, axes = plt.subplots(3,3,figsize=(10,10)) for i,(component, ax) in enumerate(zip(pca.components_,axes.ravel())): ax.imshow(0.5-component.reshape((64,64,3))*10) ax.set_title('PC'+str(i+1))以上の内容をコードにしたものが上です。
axesは多数のグラフの中でどのグラフの位置にあるかとういことを示していますが、axes.ravelではそれを一連の配列として取得することができます。これも一種のreshapeのようなものですね。


- 投稿日:2019-11-30T18:27:06+09:00
matplotlibを書いてみた
matplotlibでよく書くグラフをまとめてみた
片対数グラフ
# 目盛線の描画
import matplotlib.pyplot as plt
import matplotlib

# Figureを設定
fig = plt.figure()

#日本語設定
font = {'family' : ' IPAexGothic'}
matplotlib.rc('font', **font)


# Axesを追加
ax = fig.add_subplot(111)

#軸の表示設定
plt.xlabel("周波数")
plt.ylabel("電圧")

# 軸の範囲を設定
ax.set_xlim(0.1, 1000)
ax.set_ylim(0, 1.04)

#x値y値の設定
x = [0.1,0.2,0.4,0.7,1.0,2.0,4.0,7.0,10,20,40,70,100,200,400,700,1000]
y1 = [1, 1, 1, 0.980, 0.980, 0.980, 0.960, 0.920, 0.840, 0.680, 0.420, 0.280, 0.2, 0.120, 0.1, 0.080, 0.072]
y2 = [0.060, 0.060, 0.080, 0.100, 0.100, 0.180, 0.300, 0.460, 0.580, 0.800, 0.940, 0.980, 1.0, 1.02, 1.02, 1.02, 1.02]

plt.scatter(x, y1, s=30, c="r",label = "まるまる")
plt.scatter(x, y2, s=30, c="b", label = "これこれ",marker = "s")
#片対数グラフの設定
ax.set_xscale('log')


#グラフの書式設定

plt.plot(x, y1, linestyle = "None", linewidth = 0)

 #x軸に補助目盛線を設定
ax.grid(which = "major", axis = "x", color = "black", alpha = 0.8,linestyle = "--", linewidth = 1)

# y軸に目盛線を設定
ax.grid(which = "major", axis = "y", color = "black", alpha = 0.8,linestyle = "--", linewidth = 1)
plt.legend(loc='center right', borderaxespad=1)
plt.show()
点を打って、直線を書く
# 目盛線の描画
import matplotlib.pyplot as plt
import matplotlib

# Figureを設定
fig = plt.figure()

#日本語設定
font = {'family' : ' IPAexGothic'}
matplotlib.rc('font', **font)


# Axesを追加
ax = fig.add_subplot(111)

#軸の表示設定
plt.xlabel("電圧")
plt.ylabel("電流")


# 軸の範囲を設定
ax.set_xlim(0,10.1)
ax.set_ylim(0, 4.3 )

#x値y値の設定
x = [0,1,2,3,4,5,6,7,8,9,10]
y1 = [0,0.18, 0.35, 0.53, 0.71, 0.89, 1.07, 1.25, 1.43, 1.61, 1.78]
y2 = [0, 0.41, 0.83, 1.25, 1.67, 2.09, 2.51, 2.93, 3.35, 3.77, 4.19]

plt.scatter(x, y1, s=30, c="r",label = "まるまる")
plt.scatter(x, y2, s=30, c="b", label = "これこれ",marker = "s")


#グラフの書式設定
#plt.plot(x, y1, marker="o", color = "red", linestyle = "-")
plt.plot(x, y1, marker = "o", color = "red", linestyle = "-")
plt.plot(x,y2, marker = "o", color = "blue", linestyle = "-")

 #x軸に補助目盛線を設定
ax.grid(which = "major", axis = "x", color = "black", alpha = 0.8,linestyle = "--", linewidth = 1)

# y軸に目盛線を設定
ax.grid(which = "major", axis = "y", color = "black", alpha = 0.8,linestyle = "--", linewidth = 1)

plt.legend(loc='upper left', borderaxespad=1)
plt.show()
点を打って放物線を書く
# 目盛線の描画
import matplotlib.pyplot as plt
import matplotlib

# Figureを設定
fig = plt.figure()

#日本語設定
font = {'family' : ' IPAexGothic'}
matplotlib.rc('font', **font)


# Axesを追加
ax = fig.add_subplot(111)

#軸の表示設定
plt.xlabel("電圧")
plt.ylabel("電流")
plt.title("タイトルはここです。")

# 軸の範囲を設定
#ax.set_xlim(0, 1.0)
#ax.set_ylim(0, 30)

#x値y値の設定
x = [0,0.1,0.2,0.3,0.4,0.5,0.60,0.65,0.68,0.7,0.72,0.74,0.75,0.76,0.78,0.8]
y1 = [0,0,0,0,0,0,0.02,0.10,0.28,0.54,1.42,3.21,4.7,4.98,10.87,30.15]

len_x = len(x)
print(len_x)
len_y1 = len(y1)
print(len_y1)
#グラフの書式設定
plt.plot(x, y1, marker="o", color = "red", linestyle = "-")

# x軸に補助目盛線を設定
ax.grid(which = "major", axis = "x", color = "blue", alpha = 0.8,
        linestyle = "--", linewidth = 1)

# y軸に目盛線を設定
ax.grid(which = "major", axis = "y", color = "green", alpha = 0.8,
        linestyle = "--", linewidth = 1)
plt.show()
参照
https://techacademy.jp/magazine/19316
https://qiita.com/sci_Haru/items/68bd9a05d99598d445b0
https://paper.hatenadiary.jp/entry/2017/05/02/152223最後まで読んでいただいてありがとうございました。


- 投稿日:2019-11-30T18:04:59+09:00
PandasのSql Upsertを試してみた
はじめに
estie CTOの宮野(@estie_mynfire)です。
estieでは多様なリソースから不動産データを構築しているため,データ成形にpandasを用いています.そのため
pandasで作ったデータ -> DataBase
というフローをスムーズに行うことが肝になります.いままではreplaceとappendしかなかったため,pandas側で頑張って成形してから更新するしかありませんでした.(これがすごくめんどくさい)
そんな中,先日pandasに待望のSql Upsert機能追加のプルリクがあったので,動かしてみました.これによって作業効率を爆上がりさせてくれるはずです・・!!
そもそもUpsertとは
InsertとUpdateをやるという意味です.
SqlにおけるUpsertの機能は大きく2つあります.
- Primary Keyベースで,存在するものはなにもせず,存在しないものはInsert(upsert_keep)
- Primary Keyベースで,存在するものはUpdateして存在しないものはInsert(upsert_overwrite)
なぜpandasでできるとうれしいか
- Sqlの欠損値の扱いが難しい
- NULL文字列のみ欠損値と判断してくれる
- PythonのnanやNone -> そのまま文字列としてテーブルに入ってしまう
- 空白文字列 -> 0と認識される
- csv吐き出しがめんどくさい
- せっかくPythonで書いてるのに,一旦csvに吐き出してから別のラッパーに突っ込むのは効率悪い
そのため,Pythonエンジニアにとってはpandasから直接,安心してテーブル更新したいという欲望があります.
結論
- Sql操作をほぼpandasのみでできるようになって便利.そしてシンプルで使いやすい
- upsert_keepが思うような挙動していないみたいなので原因調査する
'''
Attributes:
    df (pd.DataFrame): any DataFrame
    tablename (str): テーブル名
'''
import pandas as pd
from sqlalchemy import create_engine

con = create_engine('mysql+mysqlconnector://[user]:[pass]@[host]:[port]/[schema]')

# upsert_keep -> 基本なにもしない(?) バグの可能性もあるので今後みていく.
df.to_sql(tablename, con, if_exist='upsert_keep', index=False)

# upsert_overwrite -> 存在するものはUpdateして存在しないものはInsert.意図通り
df.to_sql(tablename, con, if_exist='upsert_overwrite', index=False)
Env
ここからは具体的な話を書いていきます.
環境は以下です.
- macOS Mojave
- 10.14.5
- Python -V
- 3.6.8
- package version
- SQLAlchemy 1.3.11
Setting
環境構築
git clone https://github.com/V0RT3X4/pandas.git
cd pandas
git checkout -b sql-upsert
git pull origin  sql-upsert

git rev-parse HEAD # 現在のcommit hash値
# d0eb251075883902280cba6cd0dd9a1a1c4a69a4
Installation from sources
pip install cython
# Successfully installed cython-0.29.14
python setup.py build_ext --inplace --force #結構時間かかります.気長に待ちましょう.
Mysql server
localでのテスト用に,mysqlサーバを立てて,usersテーブルを作っておきます.
usersテーブル(idカラムをprimary keyとする)
id name age 0 taro 20 1 jiro 17 2 saburo 18 mysql.server start --skip-grant-tables # パスワード無しでログイン可能なmysqlサーバの起動 mysql #ログイン mysql> CREATE DATABASE testdb; mysql> USE testdb; mysql> CREATE TABLE users ( id INT NOT NULL, name VARCHAR(256), age INT ); mysql> ALTER TABLE users ADD PRIMARY KEY (id); mysql> INSERT INTO users (id, name, age) VALUES (0, 'taro', 20), (1, 'jiro', 19), (2, 'saburo', 18);本題
ここからはpandasとsqlalchemyを用いてSql Upsertを試していきます
Db connect
まずはDBとの繋ぎこみから.sqlalchemyが必要になるので入っていない方は
pip install sqlalchemyしてくださいfrom sqlalchemy import create_engine import pandas as pd con = create_engine('mysql+mysqlconnector://@localhost/testdb') # format: 'mysql+mysqlconnector://[user]:[pass]@[host]:[port]/[schema]' users = pd.read_sql('SELECT * FROM users;', con) users # id name age #0 0 taro 20 #1 1 jiro 19 #2 2 saburo 18Upsert
まずDataFrameを書き換えておく
users.loc[users.id==0, 'name'] = 'syo'
users = pd.concat([users, pd.DataFrame({'id': [3], 'name': ['shiro'], 'age': [28]})])
#   id    name  age
#0   0     syo   20
#1   1    jiro   19
#2   2  saburo   18
#0   3   shiro   28
to_sqlメソッドの基本構文は,
df.to_sql(tablename, con, if_exist, index=False) # df: pd.DataFrame # tablename: テーブル名 # if_exist: {'fail', 'replace', 'append', 'upsert_overwrite', 'upsert_keep'} # * fail: Raise a ValueError. # * replace: Drop the table before inserting new values. # * append: Insert new values to the existing table. # * upsert_overwrite: Overwrite matches in database with incoming data. # * upsert_keep: Keep matches in database instead of incoming data.(その他引数はpandas/core/generic.pyを確認!)
upsert_keep
- なにもしない(?) -> 後述
3 shiro 28をInsertしてくれると思ったけどされていないusers.to_sql('users', con, if_exists='upsert_keep', index=False) pd.read_sql('SELECT * FROM users;', con) #確認 # id name age #0 0 taro 20 #1 1 jiro 19 #2 2 saburo 18upsert_overwrite
- primary key(ここではid)かぶっていなければInsert, かぶっているレコードは更新する
- 意図通り
users.to_sql('users', con, if_exists='upsert_overwrite', index=False)
pd.read_sql('SELECT * FROM users;', con) #確認
#   id    name  age
#0   0     syo   20
#1   1    jiro   19
#2   2  saburo   18
#3   3   shiro   28
おわりに
upsert_keepが意図する挙動にならない問題
pandas/io/sql.pyの_upsert_keep_processingメソッドあたりをちゃんとみていく必要がありそう.原因わかり次第,プルリクand記事更新していきます.
estieについて
estieでは,新しい技術にアンテナを張っているエンジニア,フルスタックのエンジニアを常に募集しています!
https://www.wantedly.com/companies/company_6314859/projectsestie -> https://www.estie.jp
estiepro -> https://pro.estie.jp
会社サイト -> https://www.estie.co.jp
- 投稿日:2019-11-30T18:00:32+09:00
VSCodeでの競プロ向けPython環境をWindowsで作る
下記を前提とします。記事作成時の手元のバージョンも一応書いておきます。
- Windows10
- VSCodeインストール済み(1.40.1)
- Windows版のPythonインストール済み(3.8.0)
- Python導入後のWindowsに右記もインストール済み⇒online-judge-tools
ゴール
Ctrl+Shift+Bでサンプルケースでのテスト実行できて、
Ctrl+Shift+Tで手入力でのテスト実行できる環境を作ります。フォルダー構成
以下のようにしました。1問ごとに1ファイルとして、全部src以下に放り込みます。
work
│  cptest.bat
│  input.txt
│
├─.vscode
│      launch.json
│      settings.json
│      tasks.json
│
├─src
│      abc114_a.py
│
└─test
cptest.bat
cptest.bat@echo off set problemname=%1 set testdir=test\%problemname% set baseurl=%problemname:~0,-2% set baseurlreplaced=%baseurl:_=-% rem # log in oj login -u username -p password "https://atcoder.jp/" oj login --check "https://atcoder.jp/" rem # make test directory if not exist %testdir% ( oj dl -d test/%problemname%/ https://atcoder.jp/contests/%baseurlreplaced%/tasks/%problemname% ) oj test -c "python src/%problemname%.py" -d test/%problemname%/説明
cptest.bat abc114_aのように引数を一つ与えて動かすバッチファイルです。
なお、cptest.bat ddcc2020_qual_aでも動くように無理やり変換処理を入れています。
oj login -uの行にあるusernameやpasswordは適切に変更してから使います。
最後の行ではpythonコマンドにパスが通っていることを前提に、ゴリゴリと実行して結果を標準出力に吐き出します。input.txt
input.txt(標準入力として渡したい内容を書く)説明
python xxxxx.py < input.txtのように使うテキストファイルです。
自前でテストしたい入力を気合で書きます。launch.json
launch.json{ // IntelliSense を使用して利用可能な属性を学べます。 // 既存の属性の説明をホバーして表示します。 // 詳細情報は次を確認してください: https://go.microsoft.com/fwlink/?linkid=830387 "version": "0.2.0", "configurations": [ { "name": "Python: Current File", "type": "python", "request": "launch", "program": "${file}", "console": "integratedTerminal", "args": [ "<", "input.txt" ] } ] }説明
F5でデバッガを走らせるための設定ファイルです。
以下は作り方:
.pyファイルを開いてから唐突にF5を押せばデバッグを開けます。
下記のような画面の「構成の追加」を押すとlaunch.jsonひな形が用意できます。
用意されたひな形にargsのあたりを記載してあげれば完成です。tasks.json
tasks.json{ // See https://go.microsoft.com/fwlink/?LinkId=733558 // for the documentation about the tasks.json format "version": "2.0.0", "tasks": [ { "label": "test_atcorder_sample", "group": { "kind": "build", "isDefault": true }, "type": "shell", "command": "${workspaceFolder}/cptest.bat", "args": [ "${fileBasenameNoExtension}" ], "problemMatcher": [ "$gcc" ] }, { "label": "test_manual_input", "group": { "kind": "test", "isDefault": true }, "type": "shell", "command": "python", "args": [ "${file}", "<", "input.txt" ] } ] }説明
Ctrl+Shift+B(ビルドタスク)やCtrl+Shift+T(テストタスク)を書いておく設定ファイルです。
以下は作り方:
.pyファイルを開いてから唐突にCtrl+Shift+Bを押せば下記のような画面が出てきてtasks.jsonのひな形が用意できます。
用意されたひな形をゴリゴリと編集しまくって完成です。abc114_a.py
abc114_a.pydef main(): x = int(input()) ans = "NO" if (x == 7 or x == 5 or x == 3): ans = "YES" print(ans) if __name__ == '__main__': main()説明
[コンテスト名]_[問題名].pyとなるようにファイル名を気を付けます。
上記の場合、ABC114のA問題を解くコードを書きます。運用
コンテストに合わせて、適切なファイル名の.pyファイルをsrc以下に作ります。
回答を作ったら、Ctrl+Shift+Bでサンプルケースの動作確認をして、よかったらそのまま提出します。
怪しい箇所に気が付いたらinput.txtを適宜変えつつ、F5やCtrl+Shift+Tでの動作確認しつつ修正して提出します。参考


- 投稿日:2019-11-30T17:59:07+09:00
動的モード分解(Dynamic Mode Decomposition)のご紹介
はじめに
時間変化を調べる方法といえばフーリエ変換かウェーブレット変換くらいしか思い浮かびませんでしたが、時間方向と空間方向双方のモードを抽出できる動的モード分解(DMD)という良い手法があることを知りました。自身の理解を深めるためにもここに記録しようと思います。
内容はほぼ参考にしたサイトそのままで、Google翻訳したものを少し直して書いていきます。グラフ描画に関するコードは参考元にはないので追記しておきました。DMDの実行からグラフの描画までそのまま実行できるはずです。
参考
簡単のために3次元ベクトル場のDMDは省略して、単純な1次元のスカラー関数のみを考えます。
Dynamic Mode Decomposition in PythonSVDもなんだか知らなかったのでこちらを参考にしました。
PCAとSVDの関連について動的モード分解
動的モード分解(DMD)は、比較的最近の数学的革新であり、とりわけ、時間内に成長、減衰、および/または振動するコヒーレント構造に関して動的システムを解決または近似することができます。コヒーレント構造をDMDモードと呼びます。各DMDモードには、単一の固有値に関して定義された対応する時間ダイナミクスがあります。
言い換えれば、DMDは動的システムを固有値によってダイナミクスが支配されるモードの重ね合わせに変換します。
驚くべきことに、DMDモードと固有値を識別するための数学的手順は純粋に線形ですが、システム自体は非線形でも構いません。ここでは取り上げませんが、非線形システムはモードと固有値のペアのセットで記述できるという主張には、健全な理論的根拠があります。詳細については、Koopman演算子とDMDの連携に関する論文を読んでください123。
DMDは、システムの内部動作を分析するための便利な診断ツールであるだけでなく、システムの将来の状態を予測するためにも使用できます。必要なのは、モードと固有値だけです。僅かな労力で、モードと固有値を組み合わせて、いつでもシステム状態を近似する関数を生成できます。
公式の定義
n個のデータセットを考えます。
$${(x_0,y_0),(x_1,y_1),\dots (x_n,y_n)}$$ここで、$x_i$と$y_i$はそれぞれ大きさ$m$の列ベクトルです。2つの$m\times n$行列を定義します。
$$X=[x_0\ x_1\ \dots\ x_n],\quad Y=[y_0\ y_1\ \dots\ y_n]$$演算子$A$を次のように定義すると
$$A=YX^\dagger$$ここで、$X^\dagger$は$X$の疑似逆行列であり、$(X,Y)$の動的モード分解は$A$の固有値分解によって与えられます。つまりDMDモードと固有値は$A$の固有ベクトルと固有値です。
上記のTu et al.2による定義はexact DMDとして知られています。これは現在最も一般的な定義であり、特定の要件を満たす任意のデータセットに適用できます。この記事では、$A$がすべての$i$について式$y_i=Ax_i$を(おそらくおおよそ)満たす場合に最も興味があります。または、より正確には:
$$Y=AX$$明らかに、$X$は入力ベクトルのセットであり、$Y$は対応する出力ベクトルのセットです。このDMDの特定の解釈は、支配方程式が不明な動的すステムを分析(および予測)するための便利な方法を提供するため、非常に強力です。動的システムについては後ほど説明します。
このDMD2の定義に沿った定理がいくつかあります。より有用な定理の1つは、$X$と$Y$が線形に一貫している場合(換言すれば、ベクトル$v$に対して$Xv=0$であるとき、常に$Yv=0$も満たす場合)に限り、$Y=AX$を完全に満たします。後で説明するように、線形一貫性のテストは比較的簡単です。つまり、線形一貫性はDMDを使用するための必須の前提条件ではありません。$A$のDMD分解が式$Y=AX$を完全に満たさない場合でも、最小二乗法であり、$L^2$ノルムの誤差を最小にします。
DMDアルゴリズム
一見すると、$A=YX^\dagger$の固有値分解はそれほど大きな問題ではないように思えます。実際、$X$と$Y$のサイズが適切な場合、NumpyまたはMATLABからpinvメソッドとeigメソッドを2、3回呼び出すとうまくいきます。問題は$A$が本当に大きいときに発生します。$A$は$m\times m$であるため、$m$(各時間サンプル内の信号の数)が非常に大きい場合、固有値分解が扱いにくくなります。
幸いなことに、exact DMDのアルゴリズムの助けを借りて、問題を小さな断片に分割することができます。
1. $X$のSVD(singular value decomposition:特異値分解)を計算し、同時に必要に応じて低位の切り捨てを実行します:
$$X=U\Sigma V^*$$
行列$A$を$U$へ射影して$\tilde A$を計算します:
$$\tilde A=U^* AU=U^*YV\Sigma^{-1}$$$\tilde A$の固有値$\lambda_i$と固有ベクトル$w_i$を計算します:
$$\tilde AW=W\Lambda$$$W$と$\Lambda$から$A$の固有値分解を再構成します。$A$の固有値は、$\tilde A$の固有値と同等です。$A$の固有ベクトルは、$\Phi$の列で与えられます。
$$A\Phi=\Phi\Lambda,\quad \Phi=YV\Sigma^{-1}W$$アルゴリズムの導出のより詳細な説明は、参考文献12にあります。また、$\Phi=UW$は、projected DMDモードと呼ばれる$\Phi$の代替の導出であることに注意することも理論的に興味深いかもしれません。この記事では、exact DMDモードのみを使用します。
Pythonでアルゴリズムをステップごとに見ていきましょう。 必要なすべてのパッケージをインストールしてインポートすることから始めます。
import numpy as np
import matplotlib as mpl
import matplotlib.pyplot as plt
from mpl_toolkits.mplot3d import Axes3D
from numpy import dot, multiply, diag, power
from numpy import pi, exp, sin, cos, cosh, tanh, real, imag
from numpy.linalg import inv, eig, pinv
from scipy.linalg import svd, svdvals
from scipy.integrate import odeint, ode, complex_ode
from warnings import warn

#これは私の好み
plt.rcParams["font.family"] = "Times New Roman"      #全体のフォントを設定
plt.rcParams["xtick.direction"] = "in"               #x軸の目盛線を内向きへ
plt.rcParams["ytick.direction"] = "in"               #y軸の目盛線を内向きへ
plt.rcParams["xtick.minor.visible"] = True           #x軸補助目盛りの追加
plt.rcParams["ytick.minor.visible"] = True           #y軸補助目盛りの追加
plt.rcParams["xtick.major.width"] = 1.5              #x軸主目盛り線の線幅
plt.rcParams["ytick.major.width"] = 1.5              #y軸主目盛り線の線幅
plt.rcParams["xtick.minor.width"] = 1.0              #x軸補助目盛り線の線幅
plt.rcParams["ytick.minor.width"] = 1.0              #y軸補助目盛り線の線幅
plt.rcParams["xtick.major.size"] = 10                #x軸主目盛り線の長さ
plt.rcParams["ytick.major.size"] = 10                #y軸主目盛り線の長さ
plt.rcParams["xtick.minor.size"] = 5                 #x軸補助目盛り線の長さ
plt.rcParams["ytick.minor.size"] = 5                 #y軸補助目盛り線の長さ
plt.rcParams["font.size"] = 14                       #フォントの大きさ
plt.rcParams["axes.linewidth"] = 1.5                 #囲みの太さ
いくつかのプレイデータを生成しましょう。 実際には、必ずしもデータの支配方程式を知っているわけではないことに注意してください。 ここでは、データセットを作成するための方程式をいくつか作成しています。 データが生成されたら、それらが存在することを忘れてください。
# 時間領域と空間領域を定義する
x = np.linspace(-10, 10, 100)
t = np.linspace(0, 6*pi, 80)
dt = t[2] - t[1]
Xm,Tm = np.meshgrid(x, t)

# 3つの時間と空間上のパターンを作成する
f1 = multiply(20-0.2*power(Xm, 2), exp((2.3j)*Tm))
f2 = multiply(Xm, exp(0.6j*Tm))
f3 = multiply(5*multiply(1/cosh(Xm/2), tanh(Xm/2)), 2*exp((0.1+2.8j)*Tm))

# 信号を組み合わせてデータ行列を作成する
D = (f1 + f2 + f3).T

# DMD入出力行列を作成する
X = D[:,:-1]
Y = D[:,1:]
fig = plt.figure(figsize=(10,6)) ax = fig.add_subplot(111, projection="3d") surf = ax.plot_surface(Xm, Tm, np.real(D.T), cmap="gray", linewidth=0) ax.set_xlabel("x") ax.set_ylabel("t") fig.colorbar(surf)
ここで、$X$のSVDを計算します。主な関心のある最初の変数は、$X$の特異値である$\Sigma$です。$X$のSVDを取得すると、「高エネルギー」モードを抽出し、システムの次元を適切な直交分解で削減できます (Proper Orthogonal Decomposition, POD:固有直交分解)。 特異値を見ると、切り捨てるモードの数が決まります。
# 入力行列のSVD U2,Sig2,Vh2 = svd(X, False)fig, ax = plt.subplots() ax.scatter(range(len(Sig2)), Sig2, label="singular values") ax.legend()
上記の特異値を考えると、データには重要な3つのモードがあると結論付けられます。 したがって、これらのモードのみを含めるようにSVDを切り捨てます。 次に、$\tilde A$を構築し、その固有値分解を見つけます。
# ランク3切り捨て
r = 3
U = U2[:,:r]
Sig = diag(Sig2)[:r,:r]
V = Vh2.conj().T[:,:r]

# A~を構築する
Atil = dot(dot(dot(U.conj().T, Y), V), inv(Sig))
mu,W = eig(Atil)
def circle(r=1): x,y = [],[] for _x in np.linspace(-180,180,360): x.append(np.sin(np.radians(_x))) y.append(np.cos(np.radians(_x))) return x,y c_x,c_y = circle(r=1) fig, ax = plt.subplots(figsize=(8,8)) ax.plot(c_x, c_y, c="k", linestyle="dashed") ax.scatter(np.real(mu[0]), np.imag(mu[0]), label="1st") ax.scatter(np.real(mu[1]), np.imag(mu[1]), label="2nd") ax.scatter(np.real(mu[2]), np.imag(mu[2]), label="3rd") ax.set_aspect("equal") ax.set_xlabel(r"$\it{Re}\,\mu$") ax.set_ylabel(r"$\it{Im}\,\mu$") ax.legend()
$\Lambda$の各固有値は、対応するDMDモードの動的な振る舞いについて教えてくれます。 その正確な解釈は、$X$と$Y$の関係の性質に依存します。差分方程式の場合、多くの結論を出すことができます。 固有値にゼロ以外の虚数部がある場合、対応するDMDモードに振動があります。 固有値が単位円内にある場合、モードは減衰しています。 固有値が外側にある場合、モードは成長しています。 固有値が単位円に正確に当てはまる場合、モードは成長も減衰もしません。
次に、exact DMDモードを構築します。
# DMDモードを構築する Phi = dot(dot(dot(Y, V), inv(Sig)), W)fig, ax = plt.subplots() ax.plot(x, np.real(Phi[:,0]), label="1st mode") ax.plot(x, np.real(Phi[:,1]), label="2nd mode") ax.plot(x, np.real(Phi[:,2]), label="3rd mode") ax.set_xlabel("x") ax.legend()
$\Phi$の列は、上にプロットされたDMDモードです。 それらは、異なる時間ダイナミクスに従ってシステム内で成長/減衰/振動する一貫した構造です。 上記のプロットの曲線を、元の3D表面プロットに見られる回転、進化する形状と比較します。 類似点に気付くはずです。
ここがDMDアルゴリズムの技術的な終着点です。 $A$の固有値分解とシステム$Y=AX$の性質の基本的な理解を備えているため、システムの時間発展に対応する行列$\Psi$を構築できます。 以下のコードを完全に理解するには、次のセクションで差分方程式の関数$x(t)$を見てください。
# 時間発展の計算
b = dot(pinv(Phi), X[:,0])
Psi = np.zeros([r, len(t)], dtype='complex')
for i,_t in enumerate(t):
    Psi[:,i] = multiply(power(mu, _t/dt), b)
fig = plt.figure(figsize=(10,10)) ax1,ax2,ax3 = fig.add_subplot(311), fig.add_subplot(312), fig.add_subplot(313) plt.subplots_adjust(wspace=0.5, hspace=0.5) ax1.set_title("1st mode"), ax2.set_title("2nd mode"), ax3.set_title("3rd mode") ax1.plot(t, np.real(Psi[0]), label=r"$\it{Re}\,\Psi$") ax1.plot(t, np.imag(Psi[0]), label=r"$\it{Re}\,\Psi$") ax2.plot(t, np.real(Psi[1])), ax2.plot(t, np.imag(Psi[1])) ax3.plot(t, np.real(Psi[2])), ax3.plot(t, np.imag(Psi[2])) ax3.set_xlabel("t") fig.legend()
上記の3つのプロットは、3つのDMDモードの時間ダイナミクスです。 3つすべてが振動していることに注目してください。 さらに、2番目のモードは指数関数的に成長するように見えます。これは固有値プロットによって確認されます。
元のデータ行列の近似を作成する場合は、単純に$\Phi$と$\Psi$を乗算します。 この特定のケースでは、オリジナルと近似が正確に一致します。
# DMD再構成の計算
D2 = dot(Phi, Psi)
np.allclose(D, D2) # True
動的システム
この記事では、式$Y=AX$の2つの解釈のみを検討します。 最初の解釈は、$A$が差分方程式を定義する場所で
$$x_{i+1}=Ax_i$$この場合、演算子$A$は動的システム状態$x_i$を時間的に1ステップ進めます。 時系列$D$があるとしましょう。
$$D=[x_0\ x_1\ \dots\ x_{n+1}]$$ここで、$x_i$はタイムステップ$i$でのシステムの$m$次元状態を定義する列ベクトルです。すると、以下のように$X$と$Y$を定義できます。
$$X=[x_0\ x_1\ \dots\ x_{n}],\quad Y=[x_1\ x_2\ \dots\ x_{n+1}]$$このようにして、$X$および$Y$の列ベクトルの各組は、差分方程式の1回の反復に対応し、一般に次のようになります。
$$Y=AX$$DMDを使用して、$A\Phi=\Phi\Lambda$の固有分解を見つけます。 DMDモードと固有値を使用すると、$Y=AX$を時間ステップ$\Delta t$の離散時間反復$k$で定義された関数に簡単に変換できます。
$$x_k=\Phi\Lambda^k\Phi^\dagger x_0$$連続時間$t$の対応する関数は
$$x(t)=\Phi\Lambda^{t/\Delta t}\Phi^\dagger x(0)$$本当に驚くべきことは、データのみを使用して時間内に明示的な関数を定義したところです。これは、方程式のないモデリングの良い例です。
この記事で考慮される$Y=AX$の2番目の解釈は、$A$が微分方程式系を定義する場所で
$$\dot x=Ax$$この場合、演算子$A$は、ベクトル$x_i$の時間に関する1次導関数を計算します。 行列$X$と$Y$は、ベクトル場の$n$個のサンプルで構成されます。$X$の$i$番目の列は位置ベクトル$x_i$です。 $Y$の$i$番目の列は、速度ベクトル$\dot x_i$です。
DMDの計算後、時間の関数は先程と非常によく似ています(つまり、差分方程式)。 $x(0)$が任意の初期条件であり、$t$が連続時間である場合、
$$x(t)=\Phi\text{exp}(\Lambda t)\Phi^\dagger x(0)$$ヘルパーメソッド
便宜上、DMDコードを1つのメソッドにまとめて、いくつかのヘルパーメソッドを定義して線形整合性をチェックし、解を確認します。
def nullspace(A, atol=1e-13, rtol=0):
    # from http://scipy-cookbook.readthedocs.io/items/RankNullspace.html
    A = np.atleast_2d(A)
    u, s, vh = svd(A)
    tol = max(atol, rtol * s[0])
    nnz = (s >= tol).sum()
    ns = vh[nnz:].conj().T
    return ns

def check_linear_consistency(X, Y, show_warning=True):
    # tests linear consistency of two matrices (i.e., whenever Xc=0, then Yc=0)
    A = dot(Y, nullspace(X))
    total = A.shape[1]
    z = np.zeros([total, 1])
    fails = 0
    for i in range(total):
        if not np.allclose(z, A[:,i]):
            fails += 1
    if fails > 0 and show_warning:
        warn('linear consistency check failed {} out of {}'.format(fails, total))
    return fails, total

def dmd(X, Y, truncate=None):
    U2,Sig2,Vh2 = svd(X, False) # SVD of input matrix
    r = len(Sig2) if truncate is None else truncate # rank truncation
    U = U2[:,:r]
    Sig = diag(Sig2)[:r,:r]
    V = Vh2.conj().T[:,:r]
    Atil = dot(dot(dot(U.conj().T, Y), V), inv(Sig)) # build A tilde
    mu,W = eig(Atil)
    Phi = dot(dot(dot(Y, V), inv(Sig)), W) # build DMD modes
    return mu, Phi

def check_dmd_result(X, Y, mu, Phi, show_warning=True):
    b = np.allclose(Y, dot(dot(dot(Phi, diag(mu)), pinv(Phi)), X))
    if not b and show_warning:
        warn('dmd result does not satisfy Y=AX')
制限事項
DMDにはいくつかの既知の制限があります。 まず第一に、並進および回転の不変性を特にうまく処理できません。 第二に、一時的な時間動作が存在する場合、完全に失敗する可能性があります。 次の例は、これらの問題を示しています。
1. 並進不変性
次のデータセットは非常に単純です。 これは、システムの進化に応じて空間ドメインに沿って並進する単一モード(ガウス)で構成されます。 DMDはこれをきれいに処理すると思うかもしれませんが、逆のことが起こります。 SVDは、明確に定義された単一の特異値を取得する代わりに、多くの値を取得します。
# 時間領域と空間領域を定義する
x = np.linspace(-10, 10, 50)
t = np.linspace(0, 10, 100)
dt = t[2] - t[1]
Xm,Tm = np.meshgrid(x, t)

# 空間的にも時間的にも移動する単一モードでデータを作成する
D = exp(-power((Xm-Tm+5)/2, 2))
D = D.T

# 入出力行列を抽出する
X = D[:,:-1]
Y = D[:,1:]
check_linear_consistency(X, Y)

U2,Sig2,Vh2 = svd(X, False)
fig = plt.figure(figsize=(10,5)) ax1,ax2 = fig.add_subplot(121), fig.add_subplot(122) ax1.set_xlabel("x"), ax1.set_ylabel("t") ax1.imshow(D.T, aspect=0.5) ax2.scatter(range(len(Sig2)), Sig2)
左側のプロットは、システムの時間変化を示しています。 右側のプロットは特異値を示しています。 システムを正確に近似するには、10近いDMDモードが必要であることがわかりました。次のプロットを考えてみましょう。真のダイナミクスと、重ね合わせるモードの数を変化させたものを比較します。
def build_dmd_modes(t, X, Y, r):
    """
    DMD再構成
    """
    mu, Phi = dmd(X, Y, truncate=r)
    b = dot(pinv(Phi), X[:,0])
    Psi = np.zeros([r, len(t)], dtype='complex')
    for i,_t in enumerate(t):
        Psi[:,i] = multiply(power(mu, _t/dt), b)
    return dot(Phi, Psi)

fig = plt.figure(figsize=(10,10))
axes = []
for i in range(9):
    axes.append(fig.add_subplot(331+i))
plt.subplots_adjust(wspace=0.5, hspace=0.5)

for i,ax in enumerate(axes):
    ax.set_title("{} modes".format(i+1))
    ax.imshow(np.real(build_dmd_modes(t, X, Y, r=i+1).T), aspect=0.5)
過渡時間の挙動
この最後の例では、一時的な時間のダイナミクスを含むデータセットを調べます。 具体的には、データにガウスが存在する場合と存在しない場合を示しています。 残念ながら、DMDはこのデータを正確に分解できません。
# 時間領域と空間領域を定義する
x = np.linspace(-10, 10, 50)
t = np.linspace(0, 10, 100)
dt = t[2] - t[1]
Xm,Tm = np.meshgrid(x, t)

# 単一の一時モードでデータを作成する
D = exp(-power((Xm)/4, 2)) * exp(-power((Tm-5)/2, 2))
D = D.astype('complex').T

# 入出力行列を抽出する
X = D[:,:-1]
Y = D[:,1:]
check_linear_consistency(X, Y)

# DMD分解
r = 1
mu,Phi = dmd(X, Y, r)
check_dmd_result(X, Y, mu, Phi)

# 時間発展
b = dot(pinv(Phi), X[:,0])
Psi = np.zeros([r, len(t)], dtype='complex')
for i,_t in enumerate(t):
    Psi[:,i] = multiply(power(mu, _t/dt), b)
fig = plt.figure(figsize=(10,10)) ax1,ax2 = fig.add_subplot(221),fig.add_subplot(222) ax3,ax4 = fig.add_subplot(223),fig.add_subplot(224) ax1.imshow(np.real(D), aspect=2.0), ax1.set_title("True") ax2.imshow(np.real(dot(Phi, Psi).T), aspect=0.5), ax2.set_title("1-mode approx.") ax3.plot(x, np.real(Phi)), ax3.set_xlabel("x"), ax3.set_title("mode1") ax4.plot(t, np.real(Psi[0])), ax3.set_xlabel("t"), ax4.set_title("time evol. of mode 1")
DMDはモードを正しく識別しますが、時間の振る舞いを完全に識別することはできません。 これは、DMD時系列の時間挙動が固有値に依存していることを考慮すると理解できます。固有値は、指数関数的成長(固有値の実数部)と振動(虚数部)の組み合わせのみを特徴付けることができます。
このシステムの興味深い点は、理想的な分解がさまざまな固有値を持つ単一モード(図に示すように)の重ね合わせで構成される可能性があることです。 単一のモードに、真の時間ダイナミクスを近似する多くの直交サインとコサインの線形結合(フーリエ級数)が掛けられていると想像してください。 残念ながら、SVDベースのDMDの単一のアプリケーションでは、異なる固有値で同じDMDモードを何度も生成することはできません。
さらに、時間の振る舞いを多数の固有値として正しく抽出できたとしても、過渡的な振る舞い自体を完全に理解しないと、解の予測機能は信頼できないことに注意することが重要です。 一時的な動作は、その性質上、永続的ではありません。
多重解像度DMD(mrDMD)は、DMDを再帰的に適用することにより、一時的な時間動作の問題を軽減しようとしています。
結言
その制限にもかかわらず、DMDは動的システムを分析および予測するための非常に強力なツールです。 すべてのバックグラウンドのすべてのデータサイエンティストは、DMDとその適用方法について十分に理解している必要があります。 この記事の目的は、DMDの背後にある理論を提供し、実際のデータで使用できる実用的なPythonのコード例を提供することです。 DMDの正式な定義を検討し、アルゴリズムを段階的に説明し、失敗した例を含むいくつかの簡単な使用例を試してみました。これにより、DMDが研究プロジェクトまたはエンジニアリングプロジェクトにどのように適用されるかについて、より明確な理解が得られることを願っています。
DMDには多くの拡張機能があります。 将来の作業では、多解像度DMD(mrDMD)やスパースDMD(sDMD)など、これらの拡張機能の一部に関する投稿が行われる可能性があります。
まとめ
ハイスピードカメラの映像のような2次元配列の時間発展をDMDしようと思ったときは、2次元配列を1次元配列に平らにすれば上記のコードでうまくいきます。CFDでカルマン渦のシミュレーションをしたものをDMDした例もそのうち追加しようと思います。
"Kutz, J. Nathan. Data-driven modeling & scientific computation: methods for complex systems & big data. OUP Oxford, 2013" ↩
"Tu, Jonathan H., et al. “On dynamic mode decomposition: theory and applications.” arXiv preprint arXiv:1312.0041 (2013)." ↩
"Wikipedia contributors. “Composition operator.” Wikipedia, The Free Encyclopedia. Wikipedia, The Free Encyclopedia, 28 Dec. 2015. Web. 24 Jul. 2016." ↩


- 投稿日:2019-11-30T17:52:03+09:00
IBM Cloud Functionsで外部ライブラリを使いたい
IBM Cloud Functionsで標準対応している言語には、デフォルトで様々なライブラリが提供されています。ただ、デフォルトにはないライブラリを使って開発をするにはコマンドラインでの開発が必須になります。また、JavaはGUIの開発環境がないのでコマンドラインでの開発が必須になります。というわけで今回はPythonを例にコマンドラインでCloud Functionsの開発をしたときに詰まったことをまとめます。なお、今回は予めdockerをインストールしている前提で話を進めます。(他の言語で開発する場合も適宣読み替えていただくと開発できるかと思います。)
まずはドキュメント通りに作ってみる
今回はpythonのLINE bot SDKを入れていきたいと思います。こちらのドキュメントを参考にして,
requirements.txtの中身を以下の通り作成します。# Requirements.txt contains a list of dependencies for the Python Application # # Setup modules gevent == 1.4.0 flask == 1.0.2 # default available packages for python3action beautifulsoup4 == 4.8.0 httplib2 == 0.13.0 kafka_python == 1.4.6 lxml == 4.3.4 python-dateutil == 2.8.0 requests == 2.22.0 scrapy == 1.6.0 simplejson == 3.16.0 virtualenv == 16.7.1 twisted == 19.7.0 PyJWT == 1.7.1 # packages for numerics numpy == 1.16.4 scikit-learn == 0.20.3 scipy == 1.2.1 pandas == 0.24.2 # packages for image processing Pillow == 6.2.1 # IBM specific python modules ibm_db == 3.0.1 cloudant == 2.12.0 watson-developer-cloud == 2.8.1 ibm-cos-sdk == 2.5.1 ibmcloudsql == 0.2.23 # Compose Libs psycopg2 == 2.8.2 pymongo == 3.8.0 redis == 3.2.1 pika == 1.0.1 elasticsearch == 6.3.1 cassandra-driver == 3.18.0 etcd3 == 0.10.0 #Additional modules line-bot-sdkテキストファイルを作成したところでdockerコマンドでFunctionsの動作環境を取得し、Pythonの仮想環境のパッケージを作成します。
$ docker pull ibmfunctions/action-python-v3.7
$ docker run --rm -v "$PWD:/tmp" ibmfunctions/action-python-v3.7 bash -c "cd /tmp && virtualenv virtualenv && source virtualenv/bin/activate && pip install -r requirements.txt"
デプロイしたときに動かすコード(
__main__.py)を以下に掲載します。__main__.pydef main(args): return {"result":"OK!"}先ほど作成したパッケージとコードをzipに圧縮して、コマンドラインからアクションを作成します。なお、IBM Cloudコマンドでログインをしている状態で続けます。
$ zip -r hellobot.zip virtualenv __main__.py
$ ibmcloud fn action create hellobot hellobot.zip --kind python:3.7
すると、実行結果が以下に出力されました。
error: Unable to create action 'my-action-name': The connection failed, or timed out. (HTTP status code 413)おや?タイポはしてないのにどうしてこんなエラーが出るのでしょう?
原因を調べてみた
このエラーの原因を調べてみたらStackoverflowでこんな記事を見つけました。
IBM Cloud functions - Unable to create an action
IBM Cloud Functionsの責任者らしき人の回答によると、これはコマンドライン側のバグのようで、このやり方ではアクションを作成できないようです。(それ、ドキュメントに書いてよー)Docker Hubを使ってアクションを作成する(忙しい方はここから読んでください)
先程のStackoverflowの中にはバグだから使えないよってことを言っているだけではなく、代替の解決策も提示してくれたので、今度はそっちで試して行きたいと思います。こちらを参考にして自前で仮想環境を構築してDocker Hubにアップしてからアクションを作成します。この方法はDockerの操作に慣れている方なら簡単な操作ですが、触ったことない方には分かりにくいかもしれません。
実行環境を作成する
まずはアクションの実行環境のDockerfileを用意します。
FROM openwhisk/actionloop-python-v3.7:36721d6

COPY requirements.txt requirements.txt

RUN pip install --upgrade pip setuptools six && pip install --no-cache-dir -r requirements.txt
Dockerfileからお分かりいただけるかと思いますがこの中に出てくる
requirements.txtは先程作成したものをそのまま使うので中身は省略します。ここまで必要なファイルが揃ったので、以下のコマンドを実行し、イメージを作成します。完成に結構時間がかかります。$ docker build -t linebot_function .作成したイメージをDocker Hubにアップロードをします。Docker Hubに登録してない方は、こちらから登録します。登録したら、DockerのGUI画面を開きDockerにサインインをします。サインインできたら以下のコマンドを使用してアップロードをします。
$ docker push YOUR_USER_NAME/linebot_functionアクションを作成する
それでは実行環境を用意できたので、今度は動かすためのコードを用意します。今回は外部ライブラリとして、LINE botのPythonSDKを入れたのでそれがちゃんと入っているかを確認します。そこで以下のコードを用意します。
first-linebot.pyimport linebot def main(args): return {"LINEbot":linebot.__version__}コードを用意できたので、以下のコマンドでアクションを作成します。
$ ibmcloud fn action create first-linebot --docker YOUR_USER_NAME/linebot_function first-linebot.pyエラーなく結果が返ってきたら成功です。
動作確認
これで作成したアクションの動作確認を行います。ですが、Dockerの実行環境で作成したアクションは、GUIから動作確認をできないのでこれもコマンドラインで操作をして行います。以下のコマンドを実行します。
ibmcloud fn action invoke first-linebot --result実行後にLINE bot SDKのバージョンが結果として出力されたら、自前の環境でアクションが問題なく動作しています。
{
    "LINEbot": "1.15.0"
}
これで作成できるアクションの幅が広がると思います。今回構築した環境を使ってサーバーレスのLINE botを作成してみようと思います。
- 投稿日:2019-11-30T16:45:43+09:00
flaskでHello world
目標
ブラウザに"Hello, world!"と表示するだけ。
環境
- Windows 10 Pro
- Python 3.7.5
- flask 1.1.1
ディレクトリ構成
これだけ。
ソースコード
index.htmlはVSCode上でEmmetで!と打ってtabで展開したものに<h1>Hello, world!</h1>を書いただけ。<!DOCTYPE html> <html lang="ja"> <head> <meta charset="UTF-8"> <meta name="viewport" content="width=device-width, initial-scale=1.0"> <meta http-equiv="X-UA-Compatible" content="ie=edge"> <title>Document</title> </head> <body> <h1>Hello, world!</h1> </body> </html>
sample.pyでport='5555'としてるのに特に理由はない。from flask import Flask, render_template # インスタンス化 app = Flask(__name__) @app.route('/') def index(): return render_template('index.html'); if __name__ == '__main__': app.run(host='0.0.0.0', port='5555', debug=True)起動
>python sample.py

- 投稿日:2019-11-30T16:34:36+09:00
Pythonのthreading使ったらプログラムが止まらなかったパターンがある
プログラム「俺は止まんねえからよ…」
ぼく「止まってください」この記事は、N高等学校 Advent Calendar 2019 7日目の記事です。
私は現在2年生2回目(転校するときにいろいろあった)で、通学コースに通っています。
N高は必須課題さえ終わらせれば、プログラミングの時間に自分のプロジェクトができて、非常にありがたいです。この記事では、PythonでDiscordとTwitterのbotを作っていたら直面した問題について書きます。
何か間違いがあったら指摘してください。概要
Pythonのthreadingを使ったプログラムをKeyboardInterrupt(Ctrl+C)で止めようとしたら、なぜか一回で止まらなかった。
さらに調べたらsys.exit()でも止まらなかった。環境
OS: Windows 10 Home
Runtime: Python 3.8.0実践
とりあえず、検証のためにthreadingを使ったコードを書いてみることにした。
import threading
import time

# 関数定義
def a():
    for i in range(5):
        time.sleep(1)
        print("A" + str(i))

def b():
    time.sleep(0.5)
    for j in range(5):
        time.sleep(1)
        print("B" + str(j))

# スレッドオブジェクト生成
t1 = threading.Thread(target=a)
t2 = threading.Thread(target=b)

# 実行
t1.start()
t2.start()

# 終わるまで待機
t1.join()
t2.join()

print("Finish")
出力は期待通り、以下のようになった。
B4が表示されると同時にFinishが表示された。A0 B0 A1 B1 A2 B2 A3 B3 A4 B4 Finishさて、これを無限ループに改造してみる。
import threading
import time

# 関数定義
def a():
    c=1
    while True:
        time.sleep(1)
        print("A" + str(c))
        c+=1

def b():
    k=1
    time.sleep(0.5)
    while True:
        time.sleep(1)
        print("B" + str(k))
        k+=1

# スレッドオブジェクト生成
t1 = threading.Thread(target=a)
t2 = threading.Thread(target=b)

# 実行
t1.start()
t2.start()

# 終わるまで待機
t1.join()
t2.join()
出力は以下の通りになった。
A1
B1
A2
B2
A3
B3
^CTraceback (most recent call last):
  File "***********.py", line 28, in <module>
    t1.join()
  File "/Library/Frameworks/Python.framework/Versions/3.8/lib/python3.8/threading.py", line 1011, in join
    self._wait_for_tstate_lock()
  File "/Library/Frameworks/Python.framework/Versions/3.8/lib/python3.8/threading.py", line 1027, in _wait_for_tstate_lock
    elif lock.acquire(block, timeout):
KeyboardInterrupt
A4
B4
A5
B5
A6
B6
^CException ignored in: <module 'threading' from '/Library/Frameworks/Python.framework/Versions/3.8/lib/python3.8/threading.py'>
Traceback (most recent call last):
  File "/Library/Frameworks/Python.framework/Versions/3.8/lib/python3.8/threading.py", line 1388, in _shutdown
    lock.acquire()
KeyboardInterrupt:
なぜか1回目のKeyboardInterruptで止まっていない。
今回は2回やったら止まったからいいが、できれば避けたい。解決策?
「終わるまで待機」させなければ良い。つまり
**.join()を消せばいい。
実際にt1.join()とt2.join()を消して実行してみると、こうなる。A1 B1 A2 B2 ^CException ignored in: <module 'threading' from '/Library/Frameworks/Python.framework/Versions/3.8/lib/python3.8/threading.py'> Traceback (most recent call last): File "/Library/Frameworks/Python.framework/Versions/3.8/lib/python3.8/threading.py", line 1388, in _shutdown lock.acquire() KeyboardInterrupt:「While Trueを使うような処理ならどうせ途中で終わらせないだろうしCtrl+Cで止まればええやろ」とか思っていた時期が僕にもありました。
でも止めたいシーンって意外とある。botをコマンドでシャットダウンさせたいときとか。
そんなときに発覚したのが以下の内容だ。
sys.exit()も効かないimport threading import time import sys # 関数定義 def a(): c=1 while True: time.sleep(1) print("A" + str(c)) c+=1 def b(): k=1 time.sleep(0.5) while True: time.sleep(1) print("B" + str(k)) k+=1 # スレッドオブジェクト生成 t1 = threading.Thread(target=a) t2 = threading.Thread(target=b) # 実行 t1.start() t2.start() # 強制終了 print("Terminate") sys.exit() print("Terminated")期待される出力は
Terminate1行だ。sys.exit()以降はプログラムが実行されないはずだからだ(後述するがこれは厳密には間違いである)。
しかしこれを実際に動作させると、以下のような出力が得られる。Terminate A1 B1 A2 B2 A3 B3 A4 B4
Terminateの後にsys.exit()が走り、Terminatedは表示されないようになっているが、上にある2つの関数は普通に実行されてしまっている。原因
sys.exit()についての認識に間違いがあった。これはプログラム全部を止めてくれるものではなく、スレッドを停止するものだ。
上記のプログラムで止まるスレッドはprint("Terminate")を実行しているスレッドだけで、無限ループしているスレッド2つにはsys.exit()が届いていない。
止める方法の一つとして、sys.exit()をスレッドオブジェクト内で実行するというものがある。
だが私がやりたいことは「全てのスレッドを一気に止める」ことだ。解決策
メインスレッド以外のスレッドをデーモン化する。
import threading
import time
import sys

# 関数定義
def a():
    c=1
    while True:
        time.sleep(1)
        print("A" + str(c))
        c+=1

def b():
    k=1
    time.sleep(0.5)
    while True:
        time.sleep(1)
        print("B" + str(k))
        k+=1

def c():
    while True:
        n = input()
        if n == "e":
            print("Terminate")
            sys.exit()

# スレッドオブジェクト生成
t1 = threading.Thread(target=a)
t2 = threading.Thread(target=b)

# デーモン化
t1.setDaemon(True)
t2.setDaemon(True)

# 実行
t1.start()
t2.start()
c() # c()のみメインスレッドで実行
入力
eを受け取ったらsys.exit()が走るようにした。
出力結果は以下のようになる。A1 B1 A2 e Terminateeを押してEnter(Return)すれば、そこで実行が止まる。
デーモンスレッドはデーモンスレッド以外のスレッドが動いていない場合に自動的に消えるという挙動をする。
sys.exit()が含まれる処理が1つであるならばメインスレッドで、すなわちthreading.Thread()をしないで一番外側で動かすといいかもしれない。まとめ
正直、原因も調べてみたけれどわからない。シグナルがどうとか、いくつかそれっぽいものはあったが、自分の技量では正しく書けないので載せるのはやめておく。
この記事を書く過程でthreadingについていろいろと調べたが、まだまだ様々な機能があるらしく、上に載せたもの以外にもやりたいことを実現する方法があるのかもしれない。
ただ、とりあえず自分の理解が及ぶ範囲でやろうとすると上記のようになる。これで詰まったときは、また別の方法を探そうと思う。
- 投稿日:2019-11-30T16:33:56+09:00
Seleniumを使ってCentOS上でTwitterのbookmarkを取得する
Twitterがbookmark周りのAPIを提供していないため、Seleniumを使用して全ブックマークを取得してみた。
環境CentOS Linux release 7.7.1908 Python 3.6.8準備編
必要なもののinstall
google-chrome
この記事を参考にinstallをする。
ChromeDriver
installするversionに注意が必要。
不用意に入れると正常に動作しない。
ChromeDriverのサイトを確認し、version指定付きでpip install。例# google-chrome --version Google Chrome 78.0.3904.108 # pip install chromedriver-binary==78.0.3904.105 # pip show chromedriver-binary Name: chromedriver-binary Version: 78.0.3904.105.0 # chromedriver-path /usr/lib/python3.6/site-packages/chromedriver_binary (後に必要)Selenium
# pip install selenium動作確認
大量にoptionを追加しているが、
--headlessや--no-sandboxくらいで十分かも。
自分の環境では--headlessなしでは例外が発生した。
executable_pathは上記のchromedriver-pathの結果を指定。
確認用としてscreenshotを保存している。test.pyimport time from selenium import webdriver from selenium.webdriver.chrome.options import Options from selenium.webdriver.common.keys import Keys options = Options() options.add_argument('--no-sandbox') options.add_argument('--disable-dev-shm-usage') options.add_argument('--disable-infobars') options.add_argument('--disable-extensions') options.add_argument('--disable-gpu') options.add_argument('--headless') driver = webdriver.Chrome(chrome_options=options, executable_path='/usr/lib/python3.6/site-packages/chromedriver_binary/chromedriver') driver.get('https://www.google.com/') time.sleep(3.0) driver.save_screenshot('screenshot.png') driver.close() driver.quit()bookmark取得編
ログイン処理
option.add_argument('--user-data-dir='+os.path.abspath('profile'))上記optionにより使用profileを指定するとcookieがそこに保存されるため、プログラムの実行毎にログインしなくて良くなる。
その状態で、この記事のtwitterloginを一度だけ実行しておく。
ログインに成功したと思ってもメールアドレスの確認ページで止まっていることもあるので、interactive modeを使用してスクショやURLを確認しながら実行すると良い気がする。取得処理
Twitterのタイムラインやブックマークなどは、スクロールに応じて動的にツイートの要素が追加・削除されている。
以下のプログラムでは
読み込まれているツイートのurl取得→一番下のツイートがページ上部に来るようスクロール→ページがツイートを読み込むのを待機
をひたすら繰り返すことで全ツイートのurlを取得している。def get_list(): driver.get('https://twitter.com/i/bookmarks') time.sleep(10.0) status_urls = [] container_xpath = '//*[@id="react-root"]/div/div/div/main/div/div/div/div[1]/div/div[2]/section/div/div/div' container = driver.find_element_by_xpath(container_xpath) # 複数のツイートが含まれる縦長の要素 end_count = 0 while True: divs = container.find_elements_by_xpath('./div') for div in divs: if len(div.find_elements_by_tag_name('img')) == 0: end_count += 1 break status_url = div.find_element_by_xpath('./div/article/div/div[2]/div[2]/div[1]/div[1]/a').get_attribute('href') status_urls.append(status_url) if end_count > 8: break driver.execute_script('arguments[0].scrollIntoView();', divs[-1]) # must check length print(len(status_urls)) time.sleep(15.0) return list(set(status_urls)) # 取得方法上重複が生じるので、一度setにすることでuniqueにしているブックマークを限界まで遡った時、一番下の要素にはツイートが格納されていないため、
div.find_elements_by_tag_name('img')によって終端までスクロールしたかを判定可。
時間はいくらかかってもいいので全取得したい、というノリで書いているのでやたらとsleepしたり回数指定したりで冗長なコードになっている。まとめ
- ChromeDriverのinstall時にはしっかりversionチェックしとかないと沼にハマる
- Seleniumを使ってページを読み込めば、普段ブラウザでやっているように値を入力したりクリックしたりできて非常に便利。
- HTMLのDOM構造が変わって要素にアクセスできなくなる事があるので注意が必要。
間違ってるとこなど見つけましたらコメント下さると嬉しいです。
参考にさせていただいたサイト
CentOS7でSelenium+Pythonを動かすまで - Qiita
Seleniumで次の実行時にもサイトのログイン状態を維持したい場合
Python Seleniumでtwitterのログインからリプライするbot - Qiita
- 投稿日:2019-11-30T16:22:12+09:00
Pandas使いが手軽にSQLを練習するために
背景
Pandasの方が慣れており、仕事でSQLにつまづく
⇨手軽に練習する環境が欲しい(ローカル、Python)
⇨pandasql備考
- SQLiteです。職場の環境とは違いますが、一般的なSQL練習として良しとしました
- pandasqlを紹介するページは他にありますが、「sqlをpandasでどう書けばいいの?」という主旨のページが多く、私と同じ背景の人は少ない印象だったので、ページを残すことにしました
パッケージをインストール
pip install pandasqlコード例
データフレームの変数名をテーブル名のところに入れて、SQLを書くだけ
いつもPandasで触ってるデータフレームに対して、SQLを発行できますimport pandas as pd from pandasql import sqldf, load_meat, load_births # get data df_meat = load_meat() #df_births = load_births() # check data (if you want) if False: # just check df_meat.shape df_meat.head(2).T df_meat.dtypes df_meat.duplicated().sum() df_meat.isnull().sum() df_meat.nunique() desc = df_meat.describe().T desc[['min','25%','50%','75%','max']] desc[['mean','std']] # sql scripts 1 sql = ''' SELECT * FROM df_meat LIMIT 10; ''' # execute sql 1 res = sqldf(sql, locals()) res # sql scripts 2 sql = ''' SELECT other_chicken, avg(beef) as avg_beef FROM df_meat GROUP BY other_chicken ORDER BY avg_beef DESC LIMIT 10 ; ''' # execute sql 2 res = sqldf(sql, locals()) res参考リンク
- 投稿日:2019-11-30T15:56:58+09:00
欠損値の可視化
初めに
データ分析をする上で大事になるのが、データの可視化です。非エンジニアでもできる、Pythondの小手先の技術を紹介します。
データセットの読み込み
pandasをimportしてデータセットを読み込みます。今回は、kaggleのHouse Prices: Advanced Regression Techniquesのtrain.csvのデータを使用します。
House Prices: Advanced Regression Techniques
https://www.kaggle.com/c/house-prices-advanced-regression-techniquesimport pandas as pd data = pd.read_csv('../train.csv')欠損値が多い項目から表示
dfに確認したいデータをセットします。今回の場合は上記でセットしたtrain.csvを見ていきます。
#欠損値の確認方法
df=data #dfにデータセットを登録
total = df.isnull().sum()
percent = round(df.isnull().sum()/df.isnull().count()*100,2)

missing_data = pd.concat([total,percent],axis =1, keys=['Total','Ratio_of_NA(%)'])
type=pd.DataFrame(df[missing_data.index].dtypes, columns=['Types'])
missing_data=pd.concat([missing_data,type],axis=1)
missing_data=missing_data.sort_values('Total',ascending=False)
missing_data.head(20)

print(missing_data.head(20))
print()
print(set(missing_data['Types']))
print()
print("---Categorical col---")
print(missing_data[missing_data['Types']=="object"].index)
print()
print("---Numerical col---")
print(missing_data[missing_data['Types'] !="object"].index)
欠損値の可視化
上のコードを使えば、欠損値の割合がわかります。しかし時系列のデータセットなど、どこに欠損値があるか
を知りたい時があります。そのような場合は、heatmapを使います。import matplotlib.pyplot as plt import seaborn as sns sns.set_style('whitegrid') %matplotlib inline df = data plt.figure(figsize=(16,16)) #サイズ調整 plt.title("Missing Value") #タイトル sns.heatmap(df.isnull(), cbar=False) #ヒートマップ表示
まとめ
各コードのdfに様々なデータセットを登録すると、自動的に、各列がテキスト型か、数値型かの判定と、欠損値可視化ができます。
- 投稿日:2019-11-30T15:56:58+09:00
欠損値の確認方法
初めに
データ分析をする上で大事になるのが、データの可視化です。今回は非エンジニアでもできる、欠損値の確認方法について紹介します。
データセットの読み込み
pandasをimportしてデータセットを読み込みます。今回は、kaggleのHouse Prices: Advanced Regression Techniquesのtrain.csvのデータを使用します。
House Prices: Advanced Regression Techniques
https://www.kaggle.com/c/house-prices-advanced-regression-techniquesimport pandas as pd data = pd.read_csv('../train.csv')欠損値が多い項目から表示
dfに確認したいデータをセットします。今回の場合は上記でセットしたtrain.csvを見ていきます。
#欠損値の確認方法
df=data #dfにデータセットを登録
total = df.isnull().sum()
percent = round(df.isnull().sum()/df.isnull().count()*100,2)

missing_data = pd.concat([total,percent],axis =1, keys=['Total','Ratio_of_NA(%)'])
type=pd.DataFrame(df[missing_data.index].dtypes, columns=['Types'])
missing_data=pd.concat([missing_data,type],axis=1)
missing_data=missing_data.sort_values('Total',ascending=False)
missing_data.head(20)

print(missing_data.head(20))
print()
print(set(missing_data['Types']))
print()
print("---Categorical col---")
print(missing_data[missing_data['Types']=="object"].index)
print()
print("---Numerical col---")
print(missing_data[missing_data['Types'] !="object"].index)
欠損値の可視化
上のコードを使えば、欠損値の割合がわかります。しかし時系列のデータセットなど、どこに欠損値があるか
を知りたい時があります。そのような場合は、heatmapを使います。import matplotlib.pyplot as plt import seaborn as sns sns.set_style('whitegrid') %matplotlib inline df = data plt.figure(figsize=(16,16)) #サイズ調整 plt.title("Missing Value") #タイトル sns.heatmap(df.isnull(), cbar=False) #ヒートマップ表示
まとめ
各コードのdfに様々なデータセットを登録すると、自動的に、各列がテキスト型か、数値型かの判定と、欠損値可視化ができます。

- 投稿日:2019-11-30T15:56:58+09:00
欠損値の確認方法(Kaggle:House Prices)
初めに
データ分析をする上で大切なことの1つが、データの内容の確認です。今回は、非エンジニアでもできる、欠損値の確認方法について紹介します。
データセットの読み込み
pandasをimportしてデータセットを読み込みます。今回は、kaggleのHouse Prices: Advanced Regression Techniquesのtrain.csvのデータを使用します。
House Prices: Advanced Regression Techniques
https://www.kaggle.com/c/house-prices-advanced-regression-techniquesimport pandas as pd data = pd.read_csv('../train.csv')欠損値が多い項目から表示
dfに確認したいデータをセットします。今回の場合は上記でセットしたtrain.csvを見ていきます。
#欠損値の確認方法
df=data #dfにデータセットを登録
total = df.isnull().sum()
percent = round(df.isnull().sum()/df.isnull().count()*100,2)

missing_data = pd.concat([total,percent],axis =1, keys=['Total','Ratio_of_NA(%)'])
type=pd.DataFrame(df[missing_data.index].dtypes, columns=['Types'])
missing_data=pd.concat([missing_data,type],axis=1)
missing_data=missing_data.sort_values('Total',ascending=False)
missing_data.head(20)

print(missing_data.head(20))
print()
print(set(missing_data['Types']))
print()
print("---Categorical col---")
print(missing_data[missing_data['Types']=="object"].index)
print()
print("---Numerical col---")
print(missing_data[missing_data['Types'] !="object"].index)
欠損値の可視化
上のコードを使えば、欠損値の割合がわかります。しかし時系列のデータセットなど、どこに欠損値があるか
を知りたい時があります。そのような場合は、heatmapを使います。import matplotlib.pyplot as plt import seaborn as sns sns.set_style('whitegrid') %matplotlib inline df = data plt.figure(figsize=(16,16)) #サイズ調整 plt.title("Missing Value") #タイトル sns.heatmap(df.isnull(), cbar=False) #ヒートマップ表示
まとめ
各コードのdfに様々なデータセットを登録すると、自動的に、各列がテキスト型か、数値型かの判定と、欠損値可視化ができます。
- 投稿日:2019-11-30T15:17:29+09:00
ゼロから始めるcodewars kata[day2]おなかすいた
codewars kataではプログラミングと実用英語が同時に学べます。天才的サイトです。
githubアカウントがあれば30秒で始められます
興味が沸いたら今すぐここから始めようちなみにpython以外でも多くの言語でチャレンジ出来ます
今日のコード
Q1 初めての辞書型 Pete, the baker[5kyu]
ケーキが何個作れるかの関数
def cakes(recipe, available):を作れ例1
入力:レシピと材料
cakes({flour: 500, sugar: 200, eggs: 1}, {flour: 1200, sugar: 1200, eggs: 5, milk: 200})
出力:作れる数
2
例2
入力:レシピと材料
{apples: 3, flour: 300, sugar: 150, milk: 100, oil: 100}, {sugar: 500, flour: 2000, milk: 2000})
出力:作れる数
0
MyAnswer
    list = []
    for key,value in recipe.items():
        if key in available:
            list.append(available[key]//value)
        else:
            list.append(0)
    return min(list)
初めての辞書型でggったらitems()で内容取れるらしいのでforで取ってきて
各材料(key)において 材料//レシピ をlistに保存
なお材料がなかったら 0 保存
listの最小値を変える素直なコード
BestAnswers
def cakes(recipe, available):
  return min(available.get(k, 0)/recipe[k] for k in recipe)
for k in dictでkeyを取得出来るみたいです
dict.get(k, 0)でvalueを取得、もしkeyがない場合は第二引数を取得
min(available.get(k, 0) // v for k,v in recipe.items())でもほぼ同じ
dict.getを使わないと
return min([available[i]//recipe[i] if i in available else 0 for i in recipe])とifを内包してもOKQ2 OXゲーム Tic-Tac-Toe Checker[5kyu]
チックタックゲームってなんやねんと思ったらOXゲームの事らしい
盤面を渡されて結果を分類すればOK
-1:未完了
1:Xの勝ち
2:Oの勝ち
0:引き分け(it's a cat's gameっていうらしい)
難しそう・・・例1
入力:盤面
[[0, 0, 1],
[0, 1, 2],
[2, 1, 0]]
※0:空欄 1:X 2:O出力:結果
-1
MyAnswer
def ox(board):
    lines = []
    for i in range(3):
        lines.append(board[i])
        lines.append([board[j][i] for j in range(3)])
    lines.append([board[0][0],board[1][1],board[2][2]])
    lines.append([board[0][2],board[1][1],board[2][0]])

    yetfin = 0
    for k in range(8):
        if lines[k] == [1,1,1] or lines[k] == [2,2,2]:
            return lines[k][0]

        if set(lines[k]) == {0,1} or set(lines[k]) == {0,2} :
            yetfin = 1

    if yetfin:
        return -1
    else:
        return 0
linesに縦横ナナメ8列それぞれの数値を保存してからそれが以下のどれなのか探すプログラムです
勝ち:[111][222]
未完了:{0,1}{0,2}
引き分け:それ以外BestAnswers
def ox2(board):
  for i in range(0,3):
    if board[i][0] == board[i][1] == board[i][2] != 0:
      return board[i][0]
    elif board[0][i] == board[1][i] == board[2][i] != 0:
      return board[0][i]

  if board[0][0] == board[1][1] == board[2][2] != 0:
    return board[0][0]
  elif board[0][2] == board[1][1] == board[2][0] != 0:
    return board[0][0]

  elif 0 not in board[0] and 0 not in board[1] and 0 not in board[2]:
    return 0
  else:
    return -1
やってることは勝ち判定まではlinesを作ってない以外はほぼ同じ
(メモリ的に助かるのでこっちのが賢い)
だけど引き分け判定でこっちは0を探しているだけですね・・・
つまり
XXO
OOX
XO_
のような0のある積みゲーで挙動が変わってきてboard = [[1,1,2], [2,2,1], [1,2,0]] print('MyAnswer:',ox(board)) print('BestPractice:',ox2(board))MyAnswer: 0 BestPractice: -1となります。
あれ?と思って問題文をよく見たら
-1 if the board is not yet finished (there are empty spots),
つまりemptyが1つでもあったら未完了なので後者がBestPracticeが正しいみたいですね
あとがき
土曜はごろごろ昼過ぎ前家を出る気もしないので何も食べれずハラペコ
自分用テンプレ
今日のコード
Q
例1
入力:
出力:
例2
入力:
出力:
MyAnswer
BestAnswers
- 投稿日:2019-11-30T15:06:29+09:00
久しぶりに機械学習用の環境を0から構築した(windows10 + Anaconda + VSCode + Tensorflow + GPU版)
少し間が開いてOSも再インストールしていたので、再度環境構築しました。
その時の備忘録です。概要
- ほぼ0から機械学習(強化学習)の環境を構築した(GPU対応)
- 環境
- windows10
- NVIDIA GeForce GTX 1060
- 構築環境
- Anaconda
- VSCode
- Tensorflow GPU対応の設定
- AnacondaとVSCodeの連携
- ChainerRL
Tensorflow GPU版 を使うための準備
※ CPU版を使う場合は不要です。
項目は以下です。
- 対応したグラボの購入およびドライバの更新
- CUDA(v10.0)のインストール
- CuDNN(v7.6.5 for CUDA 10.0)のダウンロード(無料の会員登録が必要)
バージョンが結構重要です。
対応していないバージョンを使うと別途設定が必要だったり動かなかったりします。・参考
- windows10にTensorFlow GPUを入れる
- TensorFlow-GPUのインストールで詰まったときのメモ
- Windows10にTensorFlow GPUとKerasをインストールする
- TensorFlow 2.0 Alpha0(GPU版)の環境をWindowsで作る方法
グラボの Compute Capability の確認とドライバの更新
Tensorflow は Compute Capability が 3.5 以上のものが対応しているそうです。
対応表はここにあります。
このPCのグラボはNVIDIA GeForce GTX 1060なので 6.1 ですね。確認出来たらドライバも最新にしておきます。
ドライバのページ:https://www.nvidia.co.jp/Download/index.aspx?lang=jpCUDA v10.0 のインストール
CUDA v10.0 のダウンロードページ:https://developer.nvidia.com/cuda-10.0-download-archive
インストーラーの選択では「高速(推奨)」を選択してデフォルトでインストールしています。ちなみに執筆時(2019/11)では v10.2 が最新です。
ただ v10.2 を入れると、Tensorflow が v10.0 のパスを参照しているようで後に以下のようなエラーがでます。> python -c "import tensorflow as tf; print(tf.__version__)" 2019-11-28 19:22:20.012829: W tensorflow/stream_executor/platform/default/dso_loader.cc:55] Could not load dynamic library 'cudart64_100.dll'; dlerror: cudart64_100.dll not found 2.0.0一応回避方法はあるらしいですが…、とりあえず動作優先で試していません。
回避方法:CUDA 10.1で利用したい場合の追加手順CuDNN のインストール
CuDNN のダウンロードページ:https://developer.nvidia.com/rdp/cudnn-download
無料ですが、会員登録が必要です。
ログインしたら CUDA に対応した以下のバージョンをダウンロードします。Download cuDNN v7.6.5 (November 5th, 2019), for CUDA 10.0CuDNN は zip ファイルなので解凍して CUDA フォルダに突っ込みます。
デフォルトだと CUDA フォルダは以下です。C:\Program Files\NVIDIA GPU Computing Toolkit\CUDA\v10.0\Anaconda のインストール
CPU と GPU で環境を分けたかったので Anaconda を入れています。
DLページ:https://www.anaconda.com/distribution/インストールした Anaconda は以下です。(バージョンは気にしなくてもよさげ)
Anaconda 2019.10 for Windows Installer
Python 3.7 version
インストールする時に環境変数も追加しておきます。(デフォルトだとチェックが外れています)
Advanced OptionsのAdd Anaconda to my PATH environment variableにチェックをいれます。環境変数を追加しているのでインストール後に再起動したほうがいいかも。
実行環境の作成(python3.7)
Anaconda Navigater を起動します。
プログラム一覧 → Anaconda3 (64-bit) → Anaconda Navigater (Anaconda3)起動したら左のメニューから Environments を選択し、Create を押します。
ここで実際に動作させる時の環境を構築します。
- 設定値
- Name: 自由に (ここでは py37-gpu としています)
- Package は python 3.7 を選びます。
(半年ほど前は Tensorflow が 3.7 で動かなかったのですが対応したようですね)Create を押すと環境ができます。
環境ができたらクリック(py37-gpu)し、その後 ▶ をクリック →
Open Terminalを選びます。
すると、Terminal が起動します。今後 pip 等でパッケージを追加する場合はこの手順で実施します。
(もっと簡単なやり方がありそうですが…)Tensorflow のインストール
・CPUを使う場合
> pip install tensorflow・GPUを使う場合
> pip install tensorflow-gpu確認
Tensorflow の確認
Terminal で以下コマンドをうちます。(ワンライナー)
> python -c "import tensorflow as tf; print(tf.__version__)"・CPU版表示結果
>python -c "import tensorflow as tf; print(tf.__version__)"
2.0.0
・GPU版表示結果(dllがSuccessfullyになっていること)
> python -c "import tensorflow as tf; print(tf.__version__)"
2019-11-28 19:59:12.696817: I tensorflow/stream_executor/platform/default/dso_loader.cc:44] Successfully opened dynamic library cudart64_100.dll
2.0.0
GPUデバイスの確認(GPU版のみ)
Terminal で以下コマンドをうちます。
> python
>>> from tensorflow.python.client import device_lib
>>> device_lib.list_local_devices()
実行結果です。
(py37-gpu) C:\Users\poco> python
Python 3.7.5 (default, Oct 31 2019, 15:18:51) [MSC v.1916 64 bit (AMD64)] :: Anaconda, Inc. on win32
Type "help", "copyright", "credits" or "license" for more information.
>>>
>>>
>>> from tensorflow.python.client import device_lib
2019-11-28 21:33:00.714942: I tensorflow/stream_executor/platform/default/dso_loader.cc:44] Successfully opened dynamic library cudart64_100.dll
>>>
>>>
>>> device_lib.list_local_devices()
2019-11-28 21:33:05.777537: I tensorflow/core/platform/cpu_feature_guard.cc:142] Your CPU supports instructions that this TensorFlow binary was not compiled to use: AVX2
2019-11-28 21:33:05.790386: I tensorflow/stream_executor/platform/default/dso_loader.cc:44] Successfully opened dynamic library nvcuda.dll
2019-11-28 21:33:05.813090: I tensorflow/core/common_runtime/gpu/gpu_device.cc:1618] Found device 0 with properties:
name: GeForce GTX 1060 3GB major: 6 minor: 1 memoryClockRate(GHz): 1.7085
pciBusID: 0000:01:00.0
2019-11-28 21:33:05.818802: I tensorflow/stream_executor/platform/default/dlopen_checker_stub.cc:25] GPU libraries are statically linked, skip dlopen check.
2019-11-28 21:33:05.823869: I tensorflow/core/common_runtime/gpu/gpu_device.cc:1746] Adding visible gpu devices: 0
2019-11-28 21:33:06.275014: I tensorflow/core/common_runtime/gpu/gpu_device.cc:1159] Device interconnect StreamExecutor with strength 1 edge matrix:
2019-11-28 21:33:06.279606: I tensorflow/core/common_runtime/gpu/gpu_device.cc:1165]      0
2019-11-28 21:33:06.282091: I tensorflow/core/common_runtime/gpu/gpu_device.cc:1178] 0:   N
2019-11-28 21:33:06.285366: I tensorflow/core/common_runtime/gpu/gpu_device.cc:1304] Created TensorFlow device (/device:GPU:0 with 2108 MB memory) -> physical GPU (device: 0, name: GeForce GTX 1060 3GB, pci bus id: 0000:01:00.0, compute capability: 6.1)
[name: "/device:CPU:0"
device_type: "CPU"
memory_limit: 268435456
locality {
}
incarnation: 15688037898080382701
, name: "/device:GPU:0"
device_type: "GPU"          # GPUが表示されていればおk
memory_limit: 2210712780
locality {
  bus_id: 1
  links {
  }
}
incarnation: 506641733629436041
physical_device_desc: "device: 0, name: GeForce GTX 1060 3GB, pci bus id: 0000:01:00.0, compute capability: 6.1"
]
VSCode のインストールと設定
IDE として VSCode を使っています。
DLページ:https://code.visualstudio.com/Extentions
VSCode を起動したら左メニューの Extensions から各名前を検索することで追加できます。
名前 備考 Japanese Language Pack for Visual Studio Code 日本人なので Python Python用 これ以外のは好みでどうぞ。
Anaconda と VSCode の連携
やり方はいろいろあるので一例です。
1. フォルダ作成
作業用のフォルダを作成します。
VSCode で「ファイル → フォルダーを開く」で作業用フォルダを指定します。2. テストファイルを作成
次に作業用フォルダの配下に適当な python ファイルを作成します。
テストファイルとして hello world を記載しておきます。hello.pyimport tensorflow as tf msg = tf.constant('TensorFlow 2.0 Hello World') tf.print(msg)そしたらこのファイルを VSCode で開きます。
3. 設定ファイルの記載
「メニュー → デバッグ → 構成の追加 → Python File」を実行します。
するとlaunch.jsonが開きますのでこれを編集します。が、編集する前に python のパスを確認する必要があるので Anaconda で確認します。
Anaconda の Terminal を開いてconda info -eコマンドを実行します。(py37-gpu) C:\Users\poco> conda info -e # conda environments: # base C:\Users\poco\Anaconda3 py37-cpu C:\Users\poco\Anaconda3\envs\py37-cpu py37-gpu * C:\Users\poco\Anaconda3\envs\py37-gpuここで指定したパスの環境で python を実行するようにしたいので、
確認した後、launch.jsonに以下のように"pythonPath"を追加します。launch.json{ // IntelliSense を使用して利用可能な属性を学べます。 // 既存の属性の説明をホバーして表示します。 // 詳細情報は次を確認してください: https://go.microsoft.com/fwlink/?linkid=830387 "version": "0.2.0", "configurations": [ { "name": "Python: Current File", "type": "python", "request": "launch", "program": "${file}", "console": "integratedTerminal", // ↓ python.exe を追加して追加 "pythonPath": "C:\\Users\\poco\\Anaconda3\\envs\\py37-gpu\\python.exe" } ] }追加出来たら保存して、F5 または「デバッグ→デバッグの開始」を押し、hello world が実行できるか確認します。
ChainerRL
今回は Keras-RL ではなく、ChainerRL を使ってみます。
強化学習のライブラリがこっちのほうが充実していそうだったので。pip インストール
Anaconda の Terminal から必要なパッケージを落としていきます。
以前(【強化学習】OpenAI Gym×Keras-rlで強化学習アルゴリズムを実装していくぞ(準備編))に書いたパッケージなどです。# ChainerRL > pip install chainerrl > pip install cupy-cuda100 // GPU用、100はバージョンなのでCUDEのバージョンに合わせてください。 # gym > pip install gym > pip install --no-index -f https://github.com/Kojoley/atari-py/releases atari_py # 画像系 > pip install matplotlib > pip install pillow > pip install opencv-python # 統計 > pip install pandasあとがき
とりあえず環境構築が終わりました。
次回は ChainerRL のチュートリアルをやりたいと思います。
- 投稿日:2019-11-30T15:00:56+09:00
リッジ回帰(L2正則化)を理解して実装する
はじめに
重回帰分析の発展として正則化について勉強しました。
今回はリッジ回帰(L2正則化)についてまとめています。参考
リッジ回帰(L2正則化)の理解に当たって下記を参考にさせていただきました。
- 機械学習のエッセンス 加藤公一(著) 出版社; SBクリエイティブ株式会社
- 正則化の種類と目的 L1正則化 L2正則化について
- リッジ回帰とラッソ回帰の理論と実装を初めから丁寧に
リッジ回帰(L2正則化)概要
重回帰分析の復習
リッジ回帰は重回帰分析を行う際の損失関数に対して正則化項を付与したものになります。
重回帰分析は下記のような損失関数を最小化する重みを見つけることで、最適な回帰式を導きだします。$$L = \sum_{n=1}^{n} (y_{n} -\hat{y}_{n} )^2$$
- $y_{n}$は実測値
- $\hat{y}_{n}$の予測値
ベクトルの形式で表現するとこのような感じになります。
$$L = (\boldsymbol{y}-X\boldsymbol{w})^T(\boldsymbol{y}-X\boldsymbol{w})$$
- $\boldsymbol{y}$は目的変数の実測値をベクトル化したもの
- $\boldsymbol{w}$は重回帰式を作成した際の回帰係数をベクトル化したもの
- $X$はサンプル数$n$個、変数の数$m$個の説明変数の実測値を行列化したもの
上記$L$を最小化するような重み$\boldsymbol{w}$が求められればOKです。
上記$L$を$\boldsymbol{w}$で微分して$0$と置くと下記のようになります。$$-2X^T\boldsymbol{y}+2\boldsymbol{w}X^TX = 0$$
こちらを解くことで重み$\boldsymbol{w}$を求めることができます。
リッジ回帰(L2正則化)
$$L = (\boldsymbol{y} - X\boldsymbol{w})^T (\boldsymbol{y} - X\boldsymbol{w}) + \lambda|| \boldsymbol{w} ||_{2}$$
上記がリッジ回帰(L2正則化)の損失関数の式になります。重回帰分析の損失関数に正則化項 $\lambda|| \boldsymbol{w} ||_{2} $を付け足した形になっています。
リッジ回帰(L2正則化)では上記のように重み$\boldsymbol{w}$のL2ノルムの2乗を加えることで正則化行います。L2ノルムとは何か
ベクトル成分の差の2乗和の平方根(いわゆる"普通の距離"、ユークリッド距離と呼ばれる)がL2ノルムです。ノルムは「大きさ」を表す指標で他にL1ノルムやL∞ノルムなどが使われます。
L2正則化の効果
正則化項を損失関数に加えることで重み$\boldsymbol{w}$の値の大きさを抑える効果があります。
通常の重回帰分析の場合、最小化する項は下記のみです。
$$(\boldsymbol{y} - X\boldsymbol{w})^T (\boldsymbol{y} - X\boldsymbol{w})$$
こちらに正則化を加えると、下記項も含めて最小化を行う必要があります。
$$\lambda|| \boldsymbol{w} ||_{2}$$
重み$\boldsymbol{w}$が損失関数に与える影響が強くなるため、より重み$\boldsymbol{w}$の値の大きさを下げる方向に進んでいくことになります。また$\lambda$の大きさによってその度合いをコントロールしています。リッジ回帰(L2正則化)の説明として下記のような図がよく用いられます。
そのままだとわかりにくいため図の中で説明を加えています。下記は重みのパラメーターが2種類だった時の損失関数の値の等高線を2次元上にプロットしたものになります。正則化項を加えることで重みの値が下がっている様子が図上でわかるかと思います。
リッジ回帰(L2正則化)の重みの導出
$$L = (\boldsymbol{y} - X\boldsymbol{w})^T (\boldsymbol{y} - X\boldsymbol{w}) + \lambda|| \boldsymbol{w} ||_{2}$$
上記損失関数を重み$\boldsymbol{w}$で微分して$0$と置いて計算します。
-2X^T\boldsymbol{y}+2\boldsymbol{w}X^TX+2\lambda\boldsymbol{w} = 0 \\ (X^TX+\lambda I)\boldsymbol{w} - X^T\boldsymbol{y} = 0 \\ (X^TX+\lambda I)\boldsymbol{w} = X^T\boldsymbol{y} \\ \boldsymbol{w} = (X^TX+\lambda I)^{-1}X^T\boldsymbol{y}こちらで重み$\boldsymbol{w}$を導き出すことができました。
リッジ回帰(L2正則化)を実装する
実装
下記がリッジ回帰(L2正則化)のモデルを自力実装した結果です。
import numpy as np class RidgeReg: def __init__(self, lambda_ = 1.0): self.lambda_ = lambda_ self.coef_ = None self.intercept_ = None def fit(self, X, y): #切片の計算を含めるために、説明変数の行列の1行目に全て値が1の列を追加 X = np.insert(X, 0, 1, axis=1) #単位行列を作成 i = np.eye(X.shape[1]) #重みを求める計算式 temp = np.linalg.inv(X.T @ X + self.lambda_ * i) @ X.T @ y #これは回帰係数の値 self.coef_ = temp[1:] #これは切片の値 self.intercept_ = temp[0] def predict(self, X): #リッジ回帰モデルによる予測値を返す return (X @ self.coef_ + self.intercept_)検証
上記の自力実装のモデルと、sklearnの結果が一致しているか検証します。
今回はボストン住宅価格のデータセットを用いて検証を行います。データセットの中身については重回帰分析の検証をした記事の方に詳細を記載しております。sklearnのモデル
from sklearn.datasets import load_boston import pandas as pd from sklearn.preprocessing import StandardScaler #データの読み込み boston = load_boston() #一旦、pandasのデータフレーム形式に変換 df = pd.DataFrame(boston.data, columns=boston.feature_names) #目的変数(予想したい値)を取得 target = boston.target df['target'] = target from sklearn.linear_model import Ridge X = df[['INDUS', 'CRIM']].values X = StandardScaler().fit_transform(X) y = df['target'].values clf = Ridge(alpha=1) clf.fit(X, y) print(clf.coef_) print(clf.intercept_)出力はこちら。上からモデルの回帰係数と切片です。
[-3.58037552 -2.1078602 ] 22.532806324110677自力実装のモデル
X = df[['INDUS', 'CRIM']].values X = StandardScaler().fit_transform(X) y = df['target'].values linear = RidgeReg(lambda_ = 1) linear.fit(X,y) print(linear.coef_) print(linear.intercept_)出力はこちら。上からモデルの回帰係数と切片です。
[-3.58037552 -2.1078602 ] 22.532806324110677回帰係数の方は完全に一致したのですが、なぜか切片で微妙な差が出てしまいました。
調査したのですが原因がわからなかったため、このまま載せさせていただきます。
わかる方いらっしゃればご指摘ください...Next
次はラッソ回帰(L1正則化)の理解と自力実装に挑戦します。
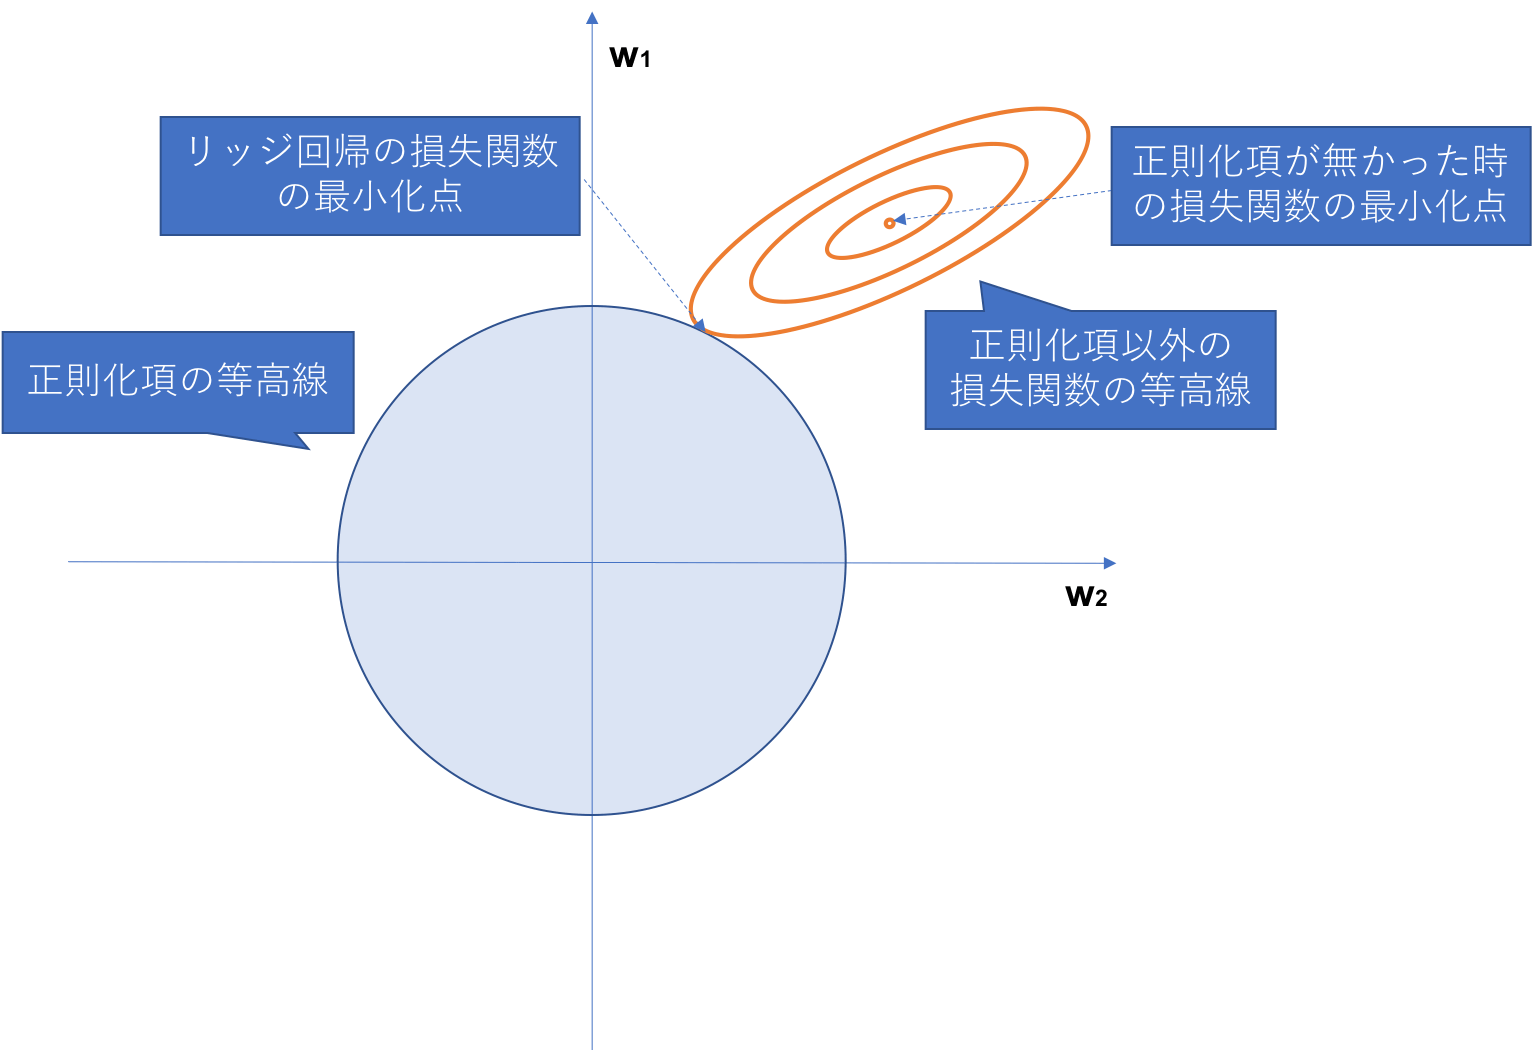
- 投稿日:2019-11-30T14:33:37+09:00
【AI初心者向け】mnist_mlp.pyを1行ずつ解説していく(KerasでMNISTを学習させる)
はじめに
皆さんはじめまして。
この記事はmnist_mlp.pyを1行ずつ解説していくだけの記事です。
AIに興味があるけどまだ触ったことはない人などが対象です。これを読めばディープラーニングの基本的な学習の流れが理解できるはず、と思って書いていきます。(もともとは社内で研修用に使おうと思って作成していた内容です)全3回予定です。
1. 【AI初心者向け】mnist_mlp.pyを1行ずつ解説していく(KerasでMNISTを学習させる)
2. 【AI初心者向け】mnist_cnn.pyを1行ずつ解説していく(KerasでMNISTを学習させる)
3. 【AI初心者向け】mnist_transfer_cnn.pyを1行ずつ解説していく(KerasでMNISTを学習させる)動作確認方法について
MNISTは画像なので、このコードを動かすにはGPUがあったほうがいいです(CPUだとちょっと辛いです)。
おすすめの方法はGoogle Colaboratoryを使う方法です。
やることは2つだけ。
・Python3の新しいノートブックを開く
・ランタイムからGPUを有効にする
これでGPUが使えるようになりました。
セルにコードを貼り付けて実行(ショートカットはCTRL+ENTER)するだけで動きます。mnistについて
手書き文字画像のデータセットで、機械学習のチュートリアルでよく使用されます。
内容:0~9の手書き文字
画像サイズ:28pix*28pix
カラー:白黒
データサイズ:7万枚(訓練データ6万、テストデータ1万の画像とラベルが用意されています)mlpとは
Multilayer perceptron、多層パーセプトロンのことです。
mnistは画像データですが、画像データの形を(28, 28)から(784,)に変更することでmlpとして学習させることができます。(精度は第2回でやるCNNのほうが上です。)mnist_mlp.pyについて
mnistの手書き文字の判定を行うモデルをKerasとTensorFlowを使って作成するコードです。
0~9の10種類の手書き文字を入力として受け取り、0~9のいずれであるか10種類に分類するモデルを作成します。コードの解説
準備
'''Trains a simple deep NN on the MNIST dataset. Gets to 98.40% test accuracy after 20 epochs (there is *a lot* of margin for parameter tuning). 2 seconds per epoch on a K520 GPU. ''' # 特に必要ないコードです(Pythonのバージョンが3だが、コードがPython2で書かれている場合に必要になる) from __future__ import print_function # 必要なライブラリをインポートしていく import keras from keras.datasets import mnist from keras.models import Sequential from keras.layers import Dense, Dropout from keras.optimizers import RMSprop # 定数を最初にまとめて指定する batch_size = 128 # バッチサイズ。1度に学習するデータサイズ num_classes = 10 # 分類するラベル数。今回は手書き画像を0~9の10種類に分類する epochs = 20 # エポック数。全データを何回学習するかデータの前処理
# mnistのデータを読み込み、訓練データ(6万件)とテストデータ(1万件)に分割する (x_train, y_train), (x_test, y_test) = mnist.load_data() '''mlpでインプットデータとして使用できるようにするため、reshapeしてデータの形式を合わせる x_train:(60000, 28, 28) ->(60000, 784) 28pix*28pixの画像を1列にする x_test:(10000, 28, 28) ->(10000, 784) 28pix*28pixの画像を1列にする''' x_train = x_train.reshape(60000, 784) x_test = x_test.reshape(10000, 784) # 画像データは0~255の値をとるので255で割ることでデータを標準化する # .astype('float32')でデータ型を変換する。(しないと割ったときにエラーが出るはず) x_train = x_train.astype('float32') x_test = x_test.astype('float32') x_train /= 255 x_test /= 255 # データの数を出力して確認 print(x_train.shape[0], 'train samples') print(x_test.shape[0], 'test samples') # ラベルデータをone-hot-vector化する '''one-hot-vectorのイメージはこんな感じ label 0 1 2 3 4 5 6 7 8 9 0: [1,0,0,0,0,0,0,0,0,0] 8: [0,0,0,0,0,,0,0,1,0]''' y_train = keras.utils.to_categorical(y_train, num_classes) y_test = keras.utils.to_categorical(y_test, num_classes)標準化について:画像の各ピクセルの値は0~255になっています。これを0~1に変換するイメージです。画像で機械学習するときは大体この255で割る処理をして、値を標準化します。
one-hot-vectorについて:今回、ラベルは0~9の10種類があり、それぞれ0~9の数字で表しています。しかし、10種類に分類したいだけなので、ラベルの数字自体には意味がありません。そこで、one-hot-vectorすることにより0と1のみでどのラベルなのかを表せるように変換します。
モデルの定義
# Sequentialクラスをインスタンス化 model = Sequential() # 中間層 # 全結合層(512ユニット、活性化関数:Relu、受け取る入力サイズ:784)を追加 model.add(Dense(512, activation='relu', input_shape=(784,))) # 0.2の確率でドロップアウト model.add(Dropout(0.2)) # 全結合層(512ユニット、活性化関数:Relu、受け取る入力サイズは自動で判断)を追加 model.add(Dense(512, activation='relu')) # 0.2の確率でドロップアウト model.add(Dropout(0.2)) # 出力層 # 全結合層(10ユニット、活性化関数:SoftMax、受け取る入力サイズは自動で判断)を追加 model.add(Dense(num_classes, activation='softmax')) # モデルの構造を可視化 model.summary()SequentialモデルはDNNの層を積み重ねて作るモデルです。一番最初の層にだけ、input_shapeを指定してやる必要があります。
出力層の活性化関数は、今回は多値分類するモデルなのでsoftmaxを使います。学習
# 学習プロセスを設定する model.compile( # 損失関数を設定。今回は分類なのでcategorical_crossentropy loss='categorical_crossentropy', # 最適化アルゴリズムを指定。学習率などをいじれる optimizer=RMSprop(), # 評価関数を指定 metrics=['accuracy']) # 学習させる history = model.fit( # 学習データ、ラベル x_train, y_train, # バッチサイズ(128) batch_size=batch_size, # エポック数(20) epochs=epochs, # 学習の進捗をリアルタムに棒グラフで表示(0で非表示) verbose=1, # テストデータ(エポックごとにテストを行い誤差を計算するため) validation_data=(x_test, y_test))モデルの定義が終わったら、損失関数や最適化アルゴリズムを指定してコンパイルします。その後、モデルにデータを渡して学習させます。より良いモデルを作るためには、最適化アルゴリズムやバッチサイズ、エポック数などをいろいろ変更して試してやる必要があります。
評価
# テストデータを渡す(verbose=0で進行状況メッセージを出さない) score = model.evaluate(x_test, y_test, verbose=0) # 汎化誤差を出力 print('Test loss:', score[0]) # 汎化性能を出力 print('Test accuracy:', score[1])学習が終わったら、テストデータを使ってどの程度の性能になったのかを評価します。lossが低く、accuracyが高いほど良いモデルといえます。
