- 投稿日:2019-11-30T23:55:08+09:00
【ハンズオン】UniNativeLinqで学ぶGitHub Actions【Mono.Cecil】
この記事はUnity Advent Calendar 2019の第1日目の記事です。
ハンズオンの目標
- Mono.Cecilの使い方に慣れる
- LINQの内部実装についての初歩の理解を得る
- マネージドプラグイン開発に慣れる
- GitHub Actionsに慣れる
- UniNativeLinqのファンになる
LINQについては結構資料がありますので、主にMono.CecilとGitHub Actionsについてこの記事で学んでいただければと思います。
筆者の開発環境
- Windows10 Home
- Intel Core i7-8750H
- RAM 16GB
- Unity
- 2018.4.9f1
- .NET Core 3.0
- 3.0.101
- Visual Studio 2019
- 16.4.0 Preview2.0
- Git
- 2.24.0.windows.2
- Rider 2019.3 EAP
前提知識
- C#
- 値型、参照型の違いとパフォーマンス特性への理解 参考文献:C# によるプログラミング入門 [メモリとリソース管理] 値型と参照型
- foreachとそのコンパイラによる展開、特にパターンベースであることの理解 参考文献:C# によるプログラミング入門 [データ列処理] foreach
- LINQのAPIに対する理解 参考文献:C# によるプログラミング入門 [データ列処理] LINQ
- IL
- C#のコードがIL(Intermediate Language)の集合にコンパイルされるということへの理解 参考文献:ILに関するWikipedia記事
- 各命令についてわからないことがあればMSDocsのOpCodesクラスの説明を読むのが良いでしょう
- Unity
- Unity2018でC#7.3の機能が使えるということの理解 参考文献:Unity公式ブログより「Unity 2018.3 リリース」
- Unity2018からUnity.Collections.NativeArray<T>というアンマネージドなヒープやスタック上の連続したメモリ領域を表す配列的構造体についての理解
- 参考文献1:UnityのScriptingリファレンスのNativeArrayに関するページ
- 参考文献2:【Unity】アセット読書会に行ってきたよ。NativeArrayってなんだろう?
- Unity.Collections.UnsafeUtilityというstatic classがNativeArrayの基礎であることへの理解 参考文献:【Unity】UnsafeUtilityについて纏めてみる
- UnsafeUtilityの詳細なAPIとその機能についての理解
- 参考文献1:【Unity】UnsafeUtility基礎論【入門者向け】
- 参考文献2:UnityのScriptingリファレンスのUnsafeUtilityに関するページ
- GitHub Actions
- GitHubに統合されたCI/CDサービスであることの理解 参考文献:GitHub Actionsについて
- UniNativeLinq
- NativeArray<T>向けのLINQライブラリであることの理解 参考文献:UniNativeLinqに関して
事前にハンズオンを行う人がインストールしておくべきもの
- Unity2018.4
- Unityのバージョンについては2018.4系列である限りなんでもよいです。適宜読み替えを行ってください。
- .NET Core 3.0
- Visual Studio2019またはRider2019.2以上
- Git
第0章 準備
パス通し
以後ターミナル操作はPowerShell上で行います。
まずUnity2018.4の実体のあるパスを追加します。
私は"コントロール パネル\システムとセキュリティ\システム\システムの詳細設定\環境変数\Path"に"C:\Users\conve\Documents\Unity\Editor"と追加していますが、環境変数を汚したくない方は都度下のように書いてパスを通すのが良いのではないでしょうか。powershell$Env:Path += ";C:\Program Files\Unity\Hub\Editor\2018.4.13f1\Editor"作業ディレクトリ
適当なディレクトリの下に新規に作業ディレクトリを作成します。
今回はUniNativeLinqHandsOnという名前にしましょう。powershellmkdir UniNativeLinqHandsOn前節で正常にパスが通っているならば次のシェルコマンドを実行してUnityエディタが起動するはずです。
powershellunity -createProject ./UniNativeLinqHandsOn/起動して図のようにエディタが正常に起動しましたか?
では、一旦エディタを閉じましょう。
Git初期化
GitHub Actionsを使う兼ね合いもあり、Gitのリポジトリを用意しましょう。
powershellcd UniNativeLinqHandsOn git init echo [Ll]ibrary/ [Ll]ogs/ [Oo]bj/ .idea/ .vs/ .vscode/ /*.csproj /*.sln /*.sln.user /TestResults-*.xml > .gitignoreマネージドプラグインの下拵え
これからUniNativeLinqの基礎となるNativeEnumerable<T> where T : unmanagedを実装します。
マネージドプラグインとしてUnity外でDLLをビルドしますので、フォルダを作りましょう。フォルダ名は"core~"とします。powershellmkdir core~ cd core~DLLを作るためにdotnet newコマンドでclasslib(ライブラリ作成)オプションを指定して初期化します。
Class1.csは特に要らないので削除します。
追加で.gitignoreをこのフォルダにも定義します。powershelldotnet new classlib del Class1.cs echo bin/ obj/ > .gitignore次にcore~.csprojを編集します。
初期状態では以下のように記述されているはずです。core~.csproj<Project Sdk="Microsoft.NET.Sdk"> <PropertyGroup> <TargetFramework>netstandard2.0</TargetFramework> <RootNamespace>core_</RootNamespace> </PropertyGroup> </Project>
csprojの各要素の軽い解説
Unity使いの方はcsprojファイルの中身をこれまで読んだ時に物凄く長くて冗長な記述を見てきたことでしょう。 そもそもcsprojの中身を読まない? アッ、ハイ
Visual Studio 2017の頃からcsprojの新しい形式としてSdk形式というものが登場しました。 参考文献:ufcppのブログ記事
全てを設定していた従来のものよりも、デフォルト値と異なる点のみ設定するSdk形式の方が非常に記述量が少なく可読性が高いですね。
<Project Sdk="Microsoft.NET.Sdk">というトップレベルのProject要素にSdk属性が定義されている場合Sdk形式となります。PropertyGroup要素以下に基本設定を記述します。
TargetFarmework要素にビルド対象のプラットフォーム/フレームワークを指定します。
Unity2018以上で使うことを考え、.NET Standard 2.0を意味するnetstandard2.0を指定しておきます。RootNamespace要素はVisual Studioで新規にcsファイルを作成する時に使用される名前空間を指定します。
上記csprojを編集して以下の通りにします。
core~.csproj<Project Sdk="Microsoft.NET.Sdk"> <PropertyGroup> <TargetFramework>netstandard2.0</TargetFramework> <RootNamespace>UniNativeLinq</RootNamespace> <AllowUnsafeBlocks>True</AllowUnsafeBlocks> <AssemblyName>UniNativeLinq</AssemblyName> <LangVersion>8</LangVersion> </PropertyGroup> <ItemGroup> <Reference Include="UnityEngine.CoreModule"> <HintPath>○Unityのインストールしてあるフォルダ○\Editor\Data\Managed\UnityEngine\UnityEngine.CoreModule.dll</HintPath> </Reference> </ItemGroup> </Project>AllowUnsafeBlocks要素をTrueにしてポインタを使用可能にします。
AssemblyName要素によりアセンブリ名と出力されたDllファイルの名前を指定します。
そして、LangVersion要素を8に指定してunmanaged型制約の判定を緩めます。 参考文献:アンマネージな総称型に関するunmanaged型制約最後に、ItemGroup/Reference要素でUnityEngine.CoreModule.dllを参照に追加しましょう。
Unityのランタイムで使用される基本的な機能はUnityEngine.CoreModule.dllを通じて提供されています。以上で最初の下拵えを終わります。
第1章 UniNativeLinq-Coreの最低限の実装(1)
現在の作業ディレクトリが"UniNativeLinqHandsOn/core~"であることを確認してください。
これから私達は以下のファイル群を作成し、UniNativeLinqのコア機能を最低限の形で実装していきます。
- NativeEnumerable.cs
- NativeEnumerable<T>構造体を定義します。
- NativeArray<T>に対してSpan<T>的な役割を果たす基本的な構造体です。
- IRefEnumerable<T>を実装します。
- IRefEnumerable.cs
- System.Collections.IEnumerable<T>を継承したIRefEnumerable<TEnumerator, T>インターフェイスを定義します。
- 通常のIEnumerable<T>の型引数が1つであるのに対して、IRefEnumerable<TEnumerator, T>の型引数が2つであるのは、構造体イテレータのボクシングを避ける目的があります。
- IRefEnumerator.cs
- System.Collections.IEnumerator<T>を継承したIRefEnumerator<T>インターフェイスを定義します。
- foreach(ref var item in collection)のような参照をイテレーションするための種々の操作を定義します。
- AsRefEnumerable.cs
- NativeEnumerable静的クラスを定義します。
- NativeEnumerable<T>構造体と名前がほぼ同じですが別物です。
- NativeArray<T>とT[]に対して拡張メソッドを定義します。
powershellmkdir Collection mkdir Interface mkdir Utility mkdir API New-Item Collection/NativeEnumerable.cs New-Item Interface/IRefEnumerator.cs New-Item Interface/IRefEnumerable.cs New-Item API/AsRefEnumerable.csNativeEnumerable<T>の最初の定義
最初のNativeEnumerable.cs
NativeEnumerable.csnamespace UniNativeLinq { public readonly unsafe struct NativeEnumerable<T> where T : unmanaged { public readonly T* Ptr; public readonly long Length; public NativeEnumerable(T* ptr, long length) { if (ptr == default || length <= 0) { Ptr = default; Length = default; return; } Ptr = ptr; Length = length; } public ref T this[long index] => ref Ptr[index]; } }unsafeでreadonlyな構造体UniNativeLinq.NativeEnumerable<T>を定義します。
これはジェネリックなTのポインタであるPtrと要素数であるLengthフィールドを露出させています。
nullポインタやダングリングポインタに対する安全性保証は一切ないので、その辺りはエンドユーザーに一切合切投げっぱなしになるC++スタイルです。これをビルドし、テストコードをUnityの方で実行してみましょう。
最低限のテスト
現在のワーキングディレクトリは"UniNativeLinqHandsOn/core~"のはずです。
以下のようにAssets以下Plugins/UNLフォルダを作成し、core~のビルド成果物であるUniNativeLinq.dllをコピーして配置します。powershellmkdir -p ../Assets/Plugins/UNL dotnet build -c Release cp -Force ./bin/Release/netstandard2.0/UniNativeLinq.dll ../Assets/Plugins/UNL/UniNativeLinq.dllビルドした後毎回"cp -Force ほげほげ"と入力するのも面倒ですので、core~.csprojにビルド後イベントを定義して自動化します。
ビルド後イベントでコピーを自動化したcsproj
core.csproj<Project Sdk="Microsoft.NET.Sdk"> <PropertyGroup> <TargetFramework>netstandard2.0</TargetFramework> <RootNamespace>UniNativeLinq</RootNamespace> <AllowUnsafeBlocks>True</AllowUnsafeBlocks> <LangVersion>8</LangVersion> <AssemblyName>UniNativeLinq</AssemblyName> </PropertyGroup> <ItemGroup> <Reference Include="UnityEngine.CoreModule"> <HintPath>○Unityのインストールしてあるフォルダ○\Editor\Data\Managed\UnityEngine\UnityEngine.CoreModule.dll</HintPath> </Reference> </ItemGroup> <Target Name="PostBuild" AfterTargets="PostBuildEvent"> <Exec Command="copy $(TargetPath) $(ProjectDir)..\Assets\Plugins\UNL\UniNativeLinq.dll"/> </Target> </Project>ビルド後イベントでローカルデプロイの自動化は結構重宝しますのでオススメです。
さて、Assets/Plugins/UNL以下にdllを配置しましたので、それを対象としたテストコードを書きましょう。
powershellcd .. unity -projectPath .エディタが起動しましたね?
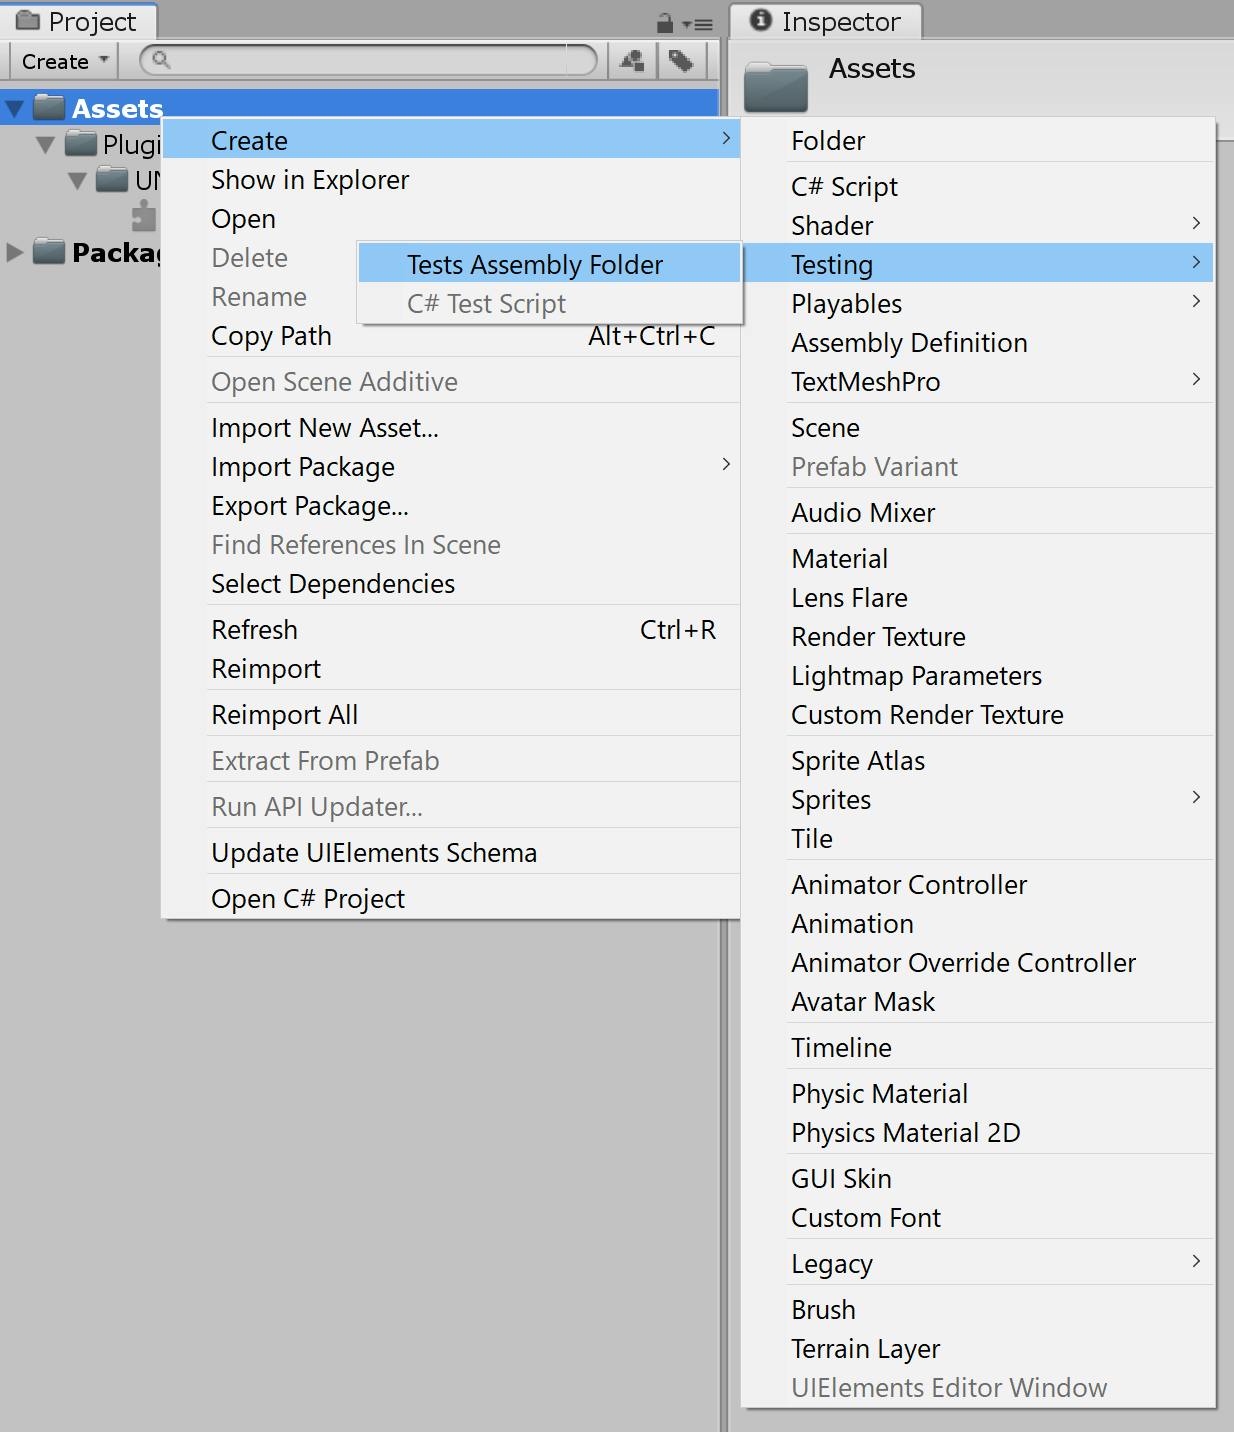
ProjectタブのAssetsを選択してコンテキストメニューから"Create/Testing/Tests Assembly Folder"を選択してTestsフォルダーを作成してください。
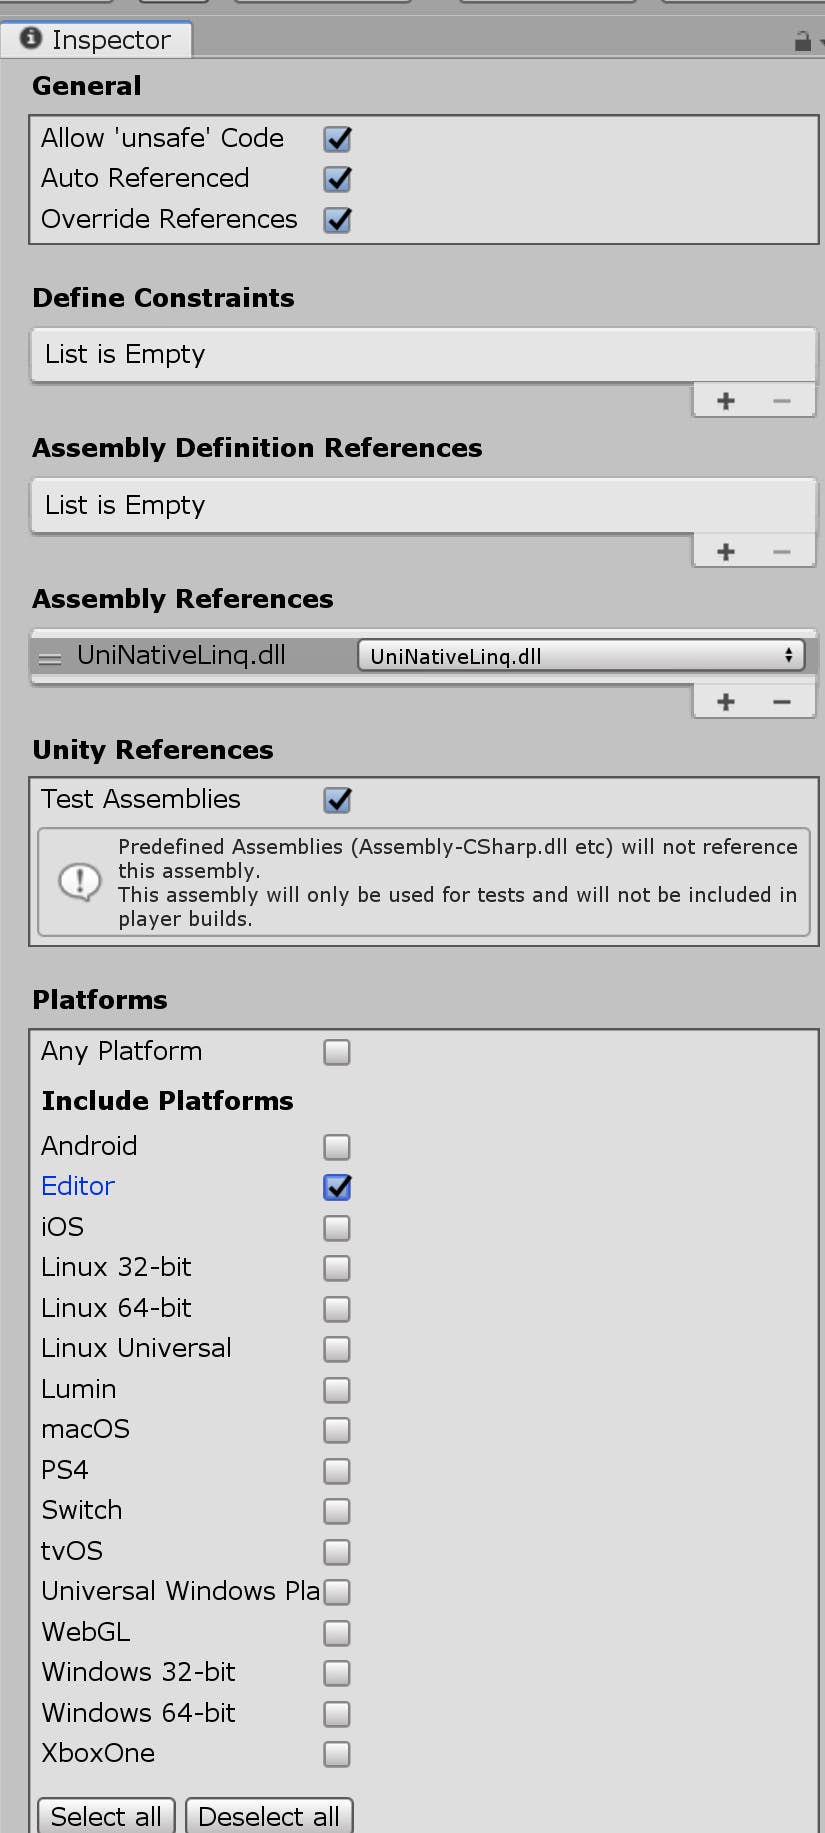
無事にTestsフォルダが作成されたならばそのフォルダ以下にTests.asmdefファイルがあるはずです。
それを選択し、Inspectorタブから設定を変更します。
"Allow 'unsafe' Code"と"Override References"にチェックを入れ、"Assembly References"に"UniNativeLinq.dll"を加えてください。
そしてPlatformsをEditorだけにしてください。
次の画像のようなInspectorになるはずです。正しく設定できたならば一番下のApplyボタンを押して設定を保存してください。
次にProjectタブでAssets/Testsフォルダを右クリックしてコンテキストメニューを呼び出し、"Create/Testing/C# Test Script"を押して新規にテスト用スクリプトを作成します。
ファイル名は"NativeEnumerableTestScript"としましょう。NativeEnumerableTestScriptをダブルクリックして編集を行います。
NativeEnumerableTestScript.csの中身
NativeEnumerableTestScript.csusing NUnit.Framework; using UniNativeLinq; using Unity.Collections; using Unity.Collections.LowLevel.Unsafe; namespace Tests { public sealed unsafe class NativeEnumerableTestScript { [Test] public void DefaultValuePass() { NativeEnumerable<int> nativeEnumerable = default; Assert.AreEqual(0L, nativeEnumerable.Length); Assert.IsTrue(nativeEnumerable.Ptr == null); } [TestCase(0L)] [TestCase(-10L)] [TestCase(-12241L)] [TestCase(long.MinValue)] public void ZeroOrNegativeCountTest(long count) { using (var array = new NativeArray<int>(1, Allocator.Persistent)) { Assert.IsFalse(array.GetUnsafePtr() == null); var nativeEnumerable = new NativeEnumerable<int>((int*) array.GetUnsafePtr(), count); Assert.AreEqual(0L, nativeEnumerable.Length); Assert.IsTrue(nativeEnumerable.Ptr == null); } } [TestCase(0, Allocator.Temp)] [TestCase(1, Allocator.Temp)] [TestCase(10, Allocator.Temp)] [TestCase(114, Allocator.Temp)] [TestCase(0, Allocator.TempJob)] [TestCase(1, Allocator.TempJob)] [TestCase(10, Allocator.TempJob)] [TestCase(114, Allocator.TempJob)] [TestCase(0, Allocator.Persistent)] [TestCase(1, Allocator.Persistent)] [TestCase(10, Allocator.Persistent)] [TestCase(114, Allocator.Persistent)] public void FromNativeArrayPass(int count, Allocator allocator) { using (var array = new NativeArray<int>(count, allocator)) { var nativeEnumerable = new NativeEnumerable<int>((int*) array.GetUnsafePtr(), array.Length); Assert.AreEqual((long)count, nativeEnumerable.Length); for (var i = 0; i < nativeEnumerable.Length; i++) { Assert.AreEqual(0, nativeEnumerable[i]); nativeEnumerable[i] = i; } for (var i = 0; i < count; i++) Assert.AreEqual(i, array[i]); } } } }
上記コードに従ってUnity Test Runnerの為のEditor Mode Testを複数個用意します。
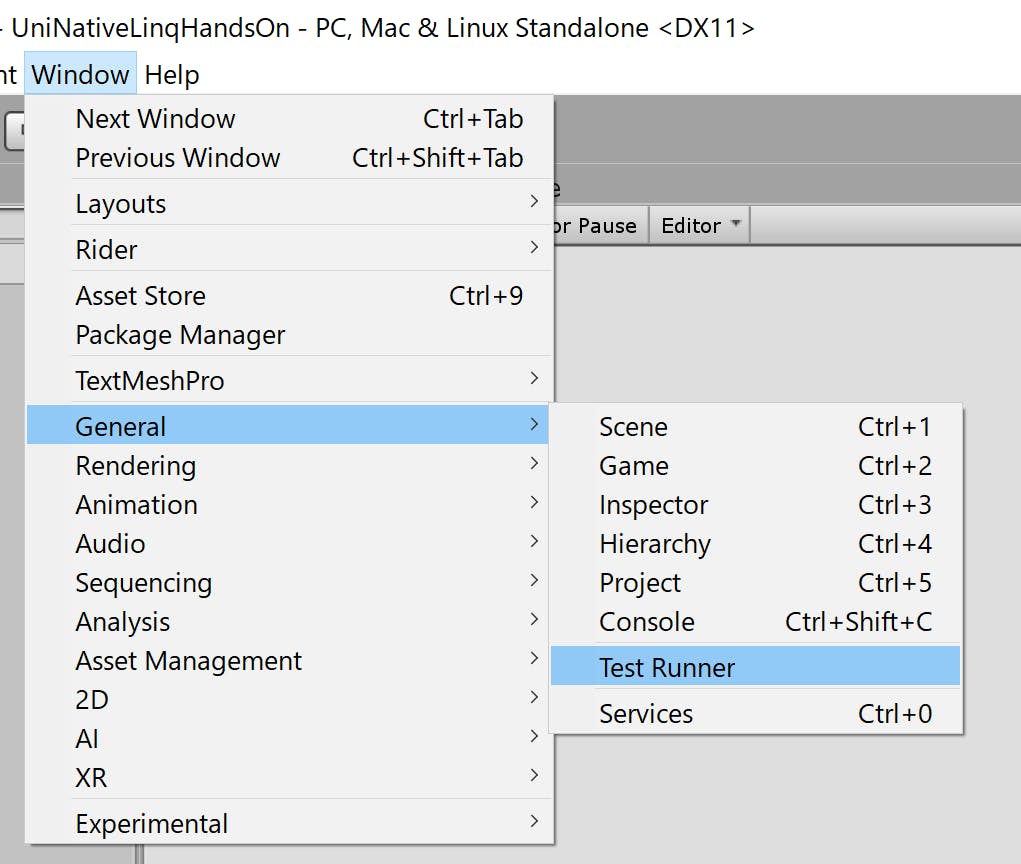
NUnit.Framework.TestCase属性はバリエーションを作り出すのにかなり便利な属性です。テストコードの記述後はエディタに戻り、Unity Test Runnerのウィンドウを呼び出しましょう。メニューの"Window/General/Test Runner"をクリックすると開きます。
出てきたウィンドウのRun Allを押すと全ての項目が緑になり、テスト全てをPassしたことがわかります。
GitHubにリポジトリを作って成果物を公開する
GitHubに適当なリポジトリ名で新規リポジトリを作成してください。そこにこのプロジェクトを公開します。
私は"HandsOn_CSharpAdventCalendar20191201"と命名しました。
現在のワーキングディレクトリはUniNativeLinqHandsOnのはずです。powershellgit switch -c develop git add . git commit -m "[init]" git remote add origin https://github.com/pCYSl5EDgo/HandsOn_CSharpAdventCalendar20191201.git git push -u origin develop
git remote add origin https://github.com/pCYSl5EDgo/HandsOn_CSharpAdventCalendar20191201.gitについては適切な読み替えを行ってください。
適切な.gitignore設定を行っているならば上記の操作で最初のコミットを過不足なくできます。基本的にローカルのワーキングブランチはdevelopとし、リモートリポジトリのdevelopブランチにpushすることとします。
この措置はリモートのmasterブランチをUPM用にする為のものです。Assetsを含む通常のUnityプロジェクトはUPMの構成と相性が悪いのです。GitHub Actions対応 CI/CDを行う
これからGitHub ReleasesでUniNativeLinq.dllをpush時に自動的に公開する仕組みを作ります。その際にテストも走らせ、テスト失敗時はリリースしないようにします。
GitHub ActionsでUnityを使うための下拵え 参考文献:GitHub ActionsでUnity開発
GitHub ActionsではLinux, Windows, MacOSXの3種類の環境でCI/CDを行うことができます。
CI/CDサービスからUnityを利用する場合にはLinux環境を利用する形になります。
なぜWindowsやMacではなくLinuxなのかについての補足
WindowsやMacOS環境でもpCYSl5EDgo/setup-unityというGitHub Actionを利用してUnityをインストール可能です。
WinやMacはVMインスタンスとして立ち上がるので、ジョブ毎にMachine IDが変化します。
困ったことに後述するalfファイルの項目にMachine IDがありまして、ここがulfにも受け継がれてしまい、不一致だと認証にコケるのです。
故にulfファイルを使用してオフライン認証を行う手法をWindowsとMacOS環境では取り得ません。Unityを利用するためには必ずメールアドレスとパスワードで認証する必要があります。
CUIで認証する場合にはオフライン/ 手動アクティベーションを行う方がパスワード漏洩対策として安全です。
これは事前にUnityを動かすPCの情報と、Unityのバージョン、ユーザーのパスワードとメールアドレス等全ての情報を含んだulfファイルを生成しておき、GitHub Actionsでの実行時にulfファイルを使用して認証を行うという手法です。詳細な手順は公式の参考文献を読んで理解していただくとして、次のような手順でulfファイルを作成してください。
- https://github.com/pCYSl5EDgo/CreateALF/releases から v1028.4.12f1.alfをダウンロード
- alfファイルを元にulfファイルにするためのUnityの提供するウェブページに行き、Unityにログインする(ログイン済の方はメールアドレスとパスワード入力不要)
- alfファイルをアップロード 1
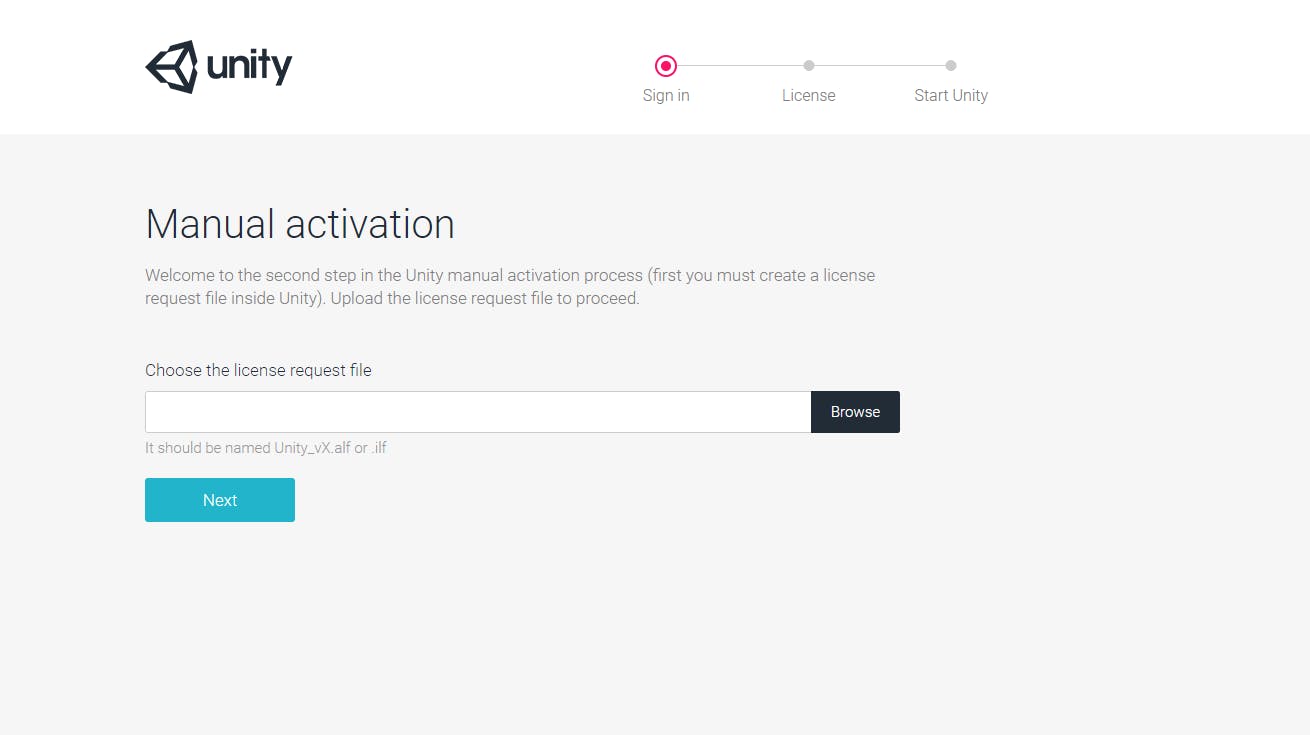
- 使用しているUnityがProまたはPersonalであるかを選択 1
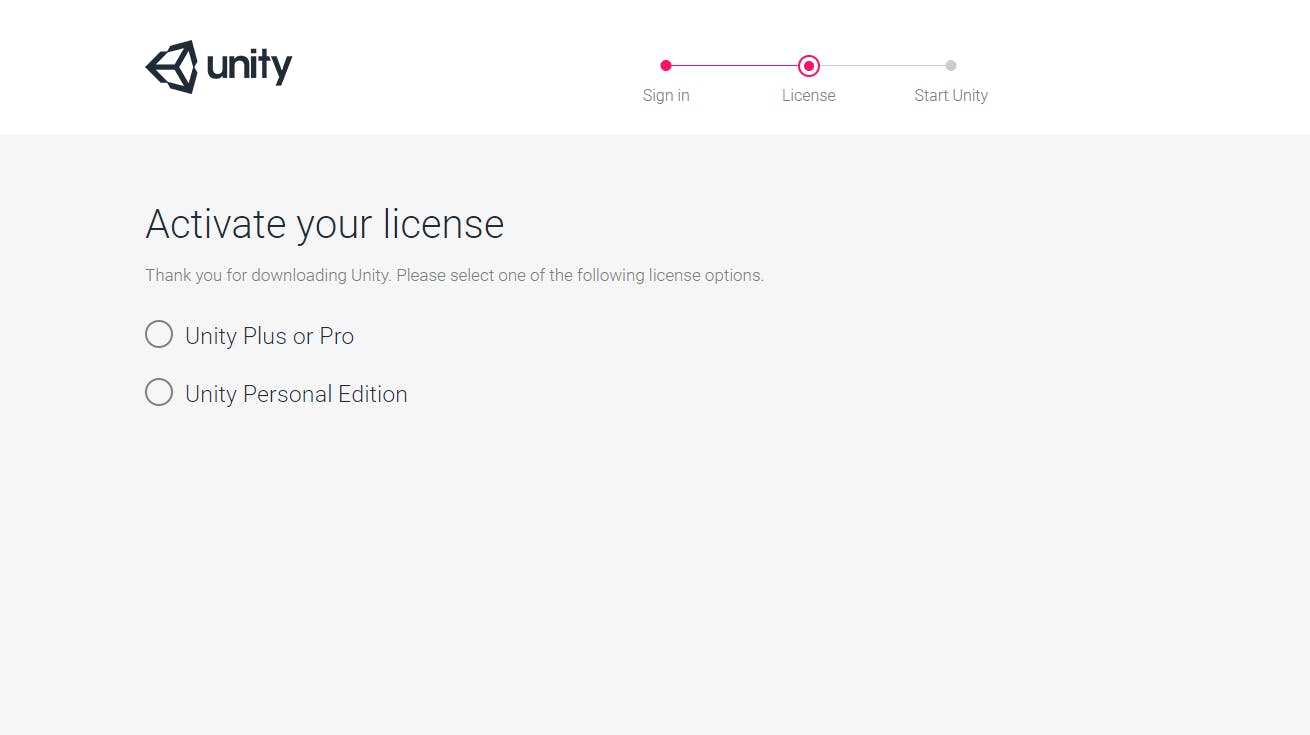
- "Download License File"をクリックしてulfファイルを入手 1

もしあなたがUnity2018.4.12f1以外でこのハンズオンを行う場合
そのバージョンのalfファイルを作成しなくてはいけません。
CreateALFというGitHubのリポジトリをForkし、".github/workflows/CreateLicenseALF.yml"を編集してください。CreateLicenseALF.ymlname: Create ALF File on: [push] jobs: build: runs-on: ubuntu-latest strategy: matrix: unity-version: - 2018.4.9f1 - 2018.4.10f1 - 2018.4.11f1 - 2018.4.12f1 - 2018.4.13f1 - 2019.3.0f1 - 2020.1.0a14 steps: - uses: pCYSl5EDgo/setup-unity@master with: unity-version: ${{ matrix.unity-version }} - name: Create Manual Activation File run: /opt/Unity/Editor/Unity -quit -batchmode -nographics -logfile -createManualActivationFile || exit 0 - name: Create Release id: create_release uses: actions/create-release@v1.0.0 env: GITHUB_TOKEN: ${{ secrets.GITHUB_TOKEN }} with: tag_name: setup-${{ matrix.unity-version }} release_name: Release setup-Unity ${{ matrix.unity-version }} draft: false prerelease: false - name: Upload Release Asset id: upload-release-asset uses: actions/upload-release-asset@v1.0.1 env: GITHUB_TOKEN: ${{ secrets.GITHUB_TOKEN }} with: upload_url: ${{ steps.create_release.outputs.upload_url }} # This pulls from the CREATE RELEASE step above, referencing it's ID to get its outputs object, which include a `upload_url`. See this blog post for more info: https://jasonet.co/posts/new-features-of-github-actions/#passing-data-to-future-steps asset_path: Unity_v${{ matrix.unity-version }}.alf asset_name: Unity_v${{ matrix.unity-version }}.alf asset_content_type: application/xmlmatrix.unity-versionにあなたの使うUnityのバージョンを指定してください。
masterブランチにpushするとGitHub Releaseにそのバージョンのalfファイルが登録されます。
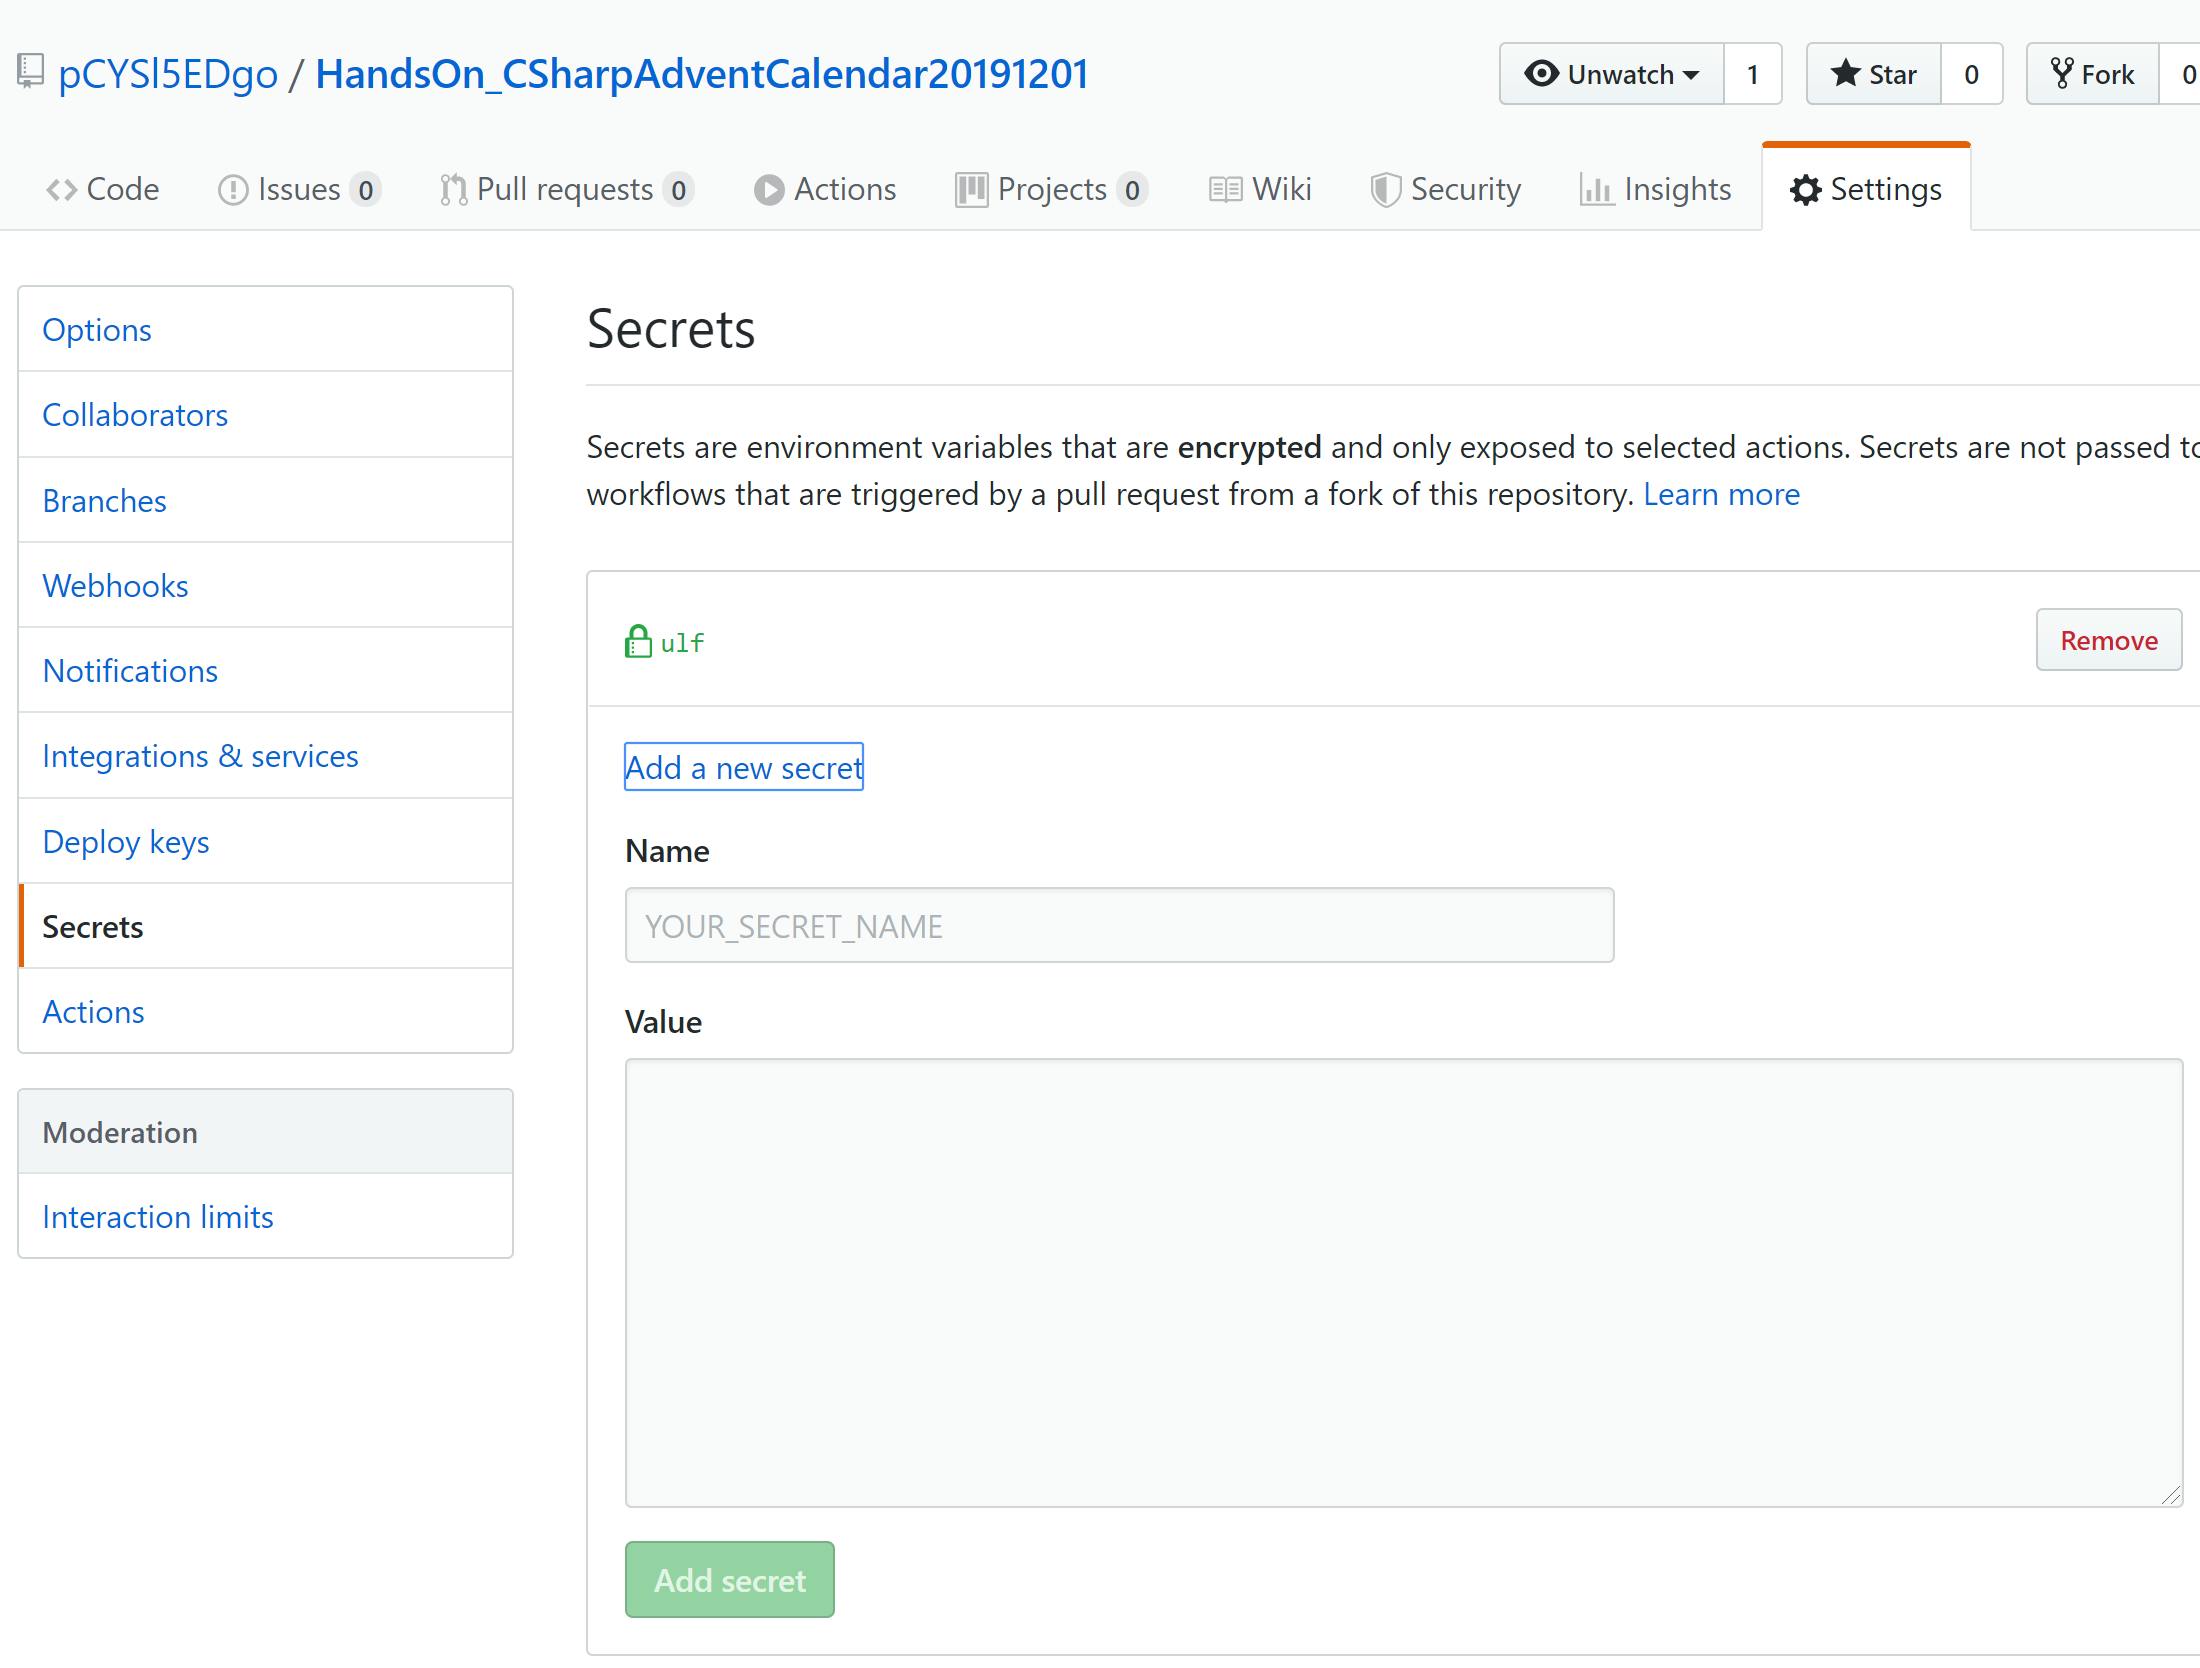
入手したulfファイルをリポジトリ"HandsOn_CSharpAdventCalendar20191201"で利用しますが、秘密にすべき情報であるため、GitHub Secretsという機能を使って暗号化しましょう。
GitHub SecretsはSettings/Secretsを選択し、そこにキーと値のペアを登録します。
今回はulfというキーでulfファイルの中身を登録しましょう。
以上でGitHub ActionsでUnityを扱う下拵えは完了です。現在のワーキングディレクトリはUniNativeLinqHandsOnのはずです。
powershellmkdir -p .github/workflows New-Item .github/workflows/CI.yaml".github/workflows"フォルダ以下にyamlファイルを作成し、そこに自動化する仕事を記述します。
更にcore~.csproje.txtを新規に作成します。core~.csprojはWindows向けの記述をしていて、そのままではLinuxのDockerコンテナ上では動作しません。
core~.csprojはこのように記述しなおしてください。
ほぼ元のcore~.csprojと変わりは無いですが、HintPathが変更され、かつビルド後イベントが削除されています。core~.csproj.txt<Project Sdk="Microsoft.NET.Sdk"> <PropertyGroup> <TargetFramework>netstandard2.0</TargetFramework> <RootNamespace>UniNativeLinq</RootNamespace> <AllowUnsafeBlocks>True</AllowUnsafeBlocks> <LangVersion>8</LangVersion> <AssemblyName>UniNativeLinq</AssemblyName> </PropertyGroup> <ItemGroup> <Reference Include="UnityEngine.CoreModule"> <HintPath Condition="Exists('C:\Users\conve')">C:\Users\conve\Documents\Unity\Editor\Data\Managed\UnityEngine\UnityEngine.CoreModule.dll</HintPath> <HintPath Condition="Exists('/opt/Unity/Editor/Unity')">/opt/Unity/Editor/Data/Managed/UnityEngine/UnityEngine.CoreModule.dll</HintPath> </Reference> </ItemGroup> </Project>
CI.yamlの内容
CI.yamlname: CreateRelease on: push: branches: - develop jobs: buildReleaseJob: runs-on: ubuntu-latest strategy: matrix: unity-version: [2018.4.9f1] user-name: [pCYSl5EDgo] repository-name: [HandsOn_CSharpAdventCalendar20191201] exe: ['/opt/Unity/Editor/Unity'] steps: - uses: pCYSl5EDgo/setup-unity@master with: unity-version: ${{ matrix.unity-version }} - name: License Activation run: | echo -n "$ULF" > unity.ulf ${{ matrix.exe }} -nographics -batchmode -quit -logFile -manualLicenseFile ./unity.ulf || exit 0 env: ULF: ${{ secrets.ulf }} - run: git clone https://github.com/${{ github.repository }} - uses: actions/setup-dotnet@v1.0.2 with: dotnet-version: '3.0.101' - name: Builds DLL run: | cd ${{ matrix.repository-name }}/core~ dotnet build -c Release - name: Post Process DLL run: | cd ${{ matrix.repository-name }} mv -f ./core~/bin/Release/netstandard2.0/UniNativeLinq.dll ./Assets/Plugins/UNL/UniNativeLinq.dll - name: Run Test run: ${{ matrix.exe }} -batchmode -nographics -projectPath ${{ matrix.repository-name }} -logFile ./log.log -runEditorTests -editorTestsResultFile ../result.xml || exit 0 - run: ls -l - run: cat log.log - run: cat result.xml - uses: pCYSl5EDgo/Unity-Test-Runner-Result-XML-interpreter@master id: interpret with: path: result.xml - if: steps.interpret.outputs.success != 'true' run: exit 1 - name: Get Version run: | cd ${{ matrix.repository-name }} git describe --tags 1> ../version 2> ../error || exit 0 - name: Cat Error uses: pCYSl5EDgo/cat@master id: error with: path: error - if: startsWith(steps.error.outputs.text, 'fatal') != 'true' run: | cat version cat version | awk '{ split($0, versions, "-"); split(versions[1], numbers, "."); numbers[3]=numbers[3]+1; variable=numbers[1]"."numbers[2]"."numbers[3]; print variable; }' > version_increment - if: startsWith(steps.error.outputs.text, 'fatal') run: echo -n "0.0.1" > version_increment - name: Cat uses: pCYSl5EDgo/cat@master id: version with: path: version_increment - name: Create Release id: create_release uses: actions/create-release@v1.0.0 env: GITHUB_TOKEN: ${{ secrets.GITHUB_TOKEN }} with: tag_name: ${{ steps.version.outputs.text }} release_name: Release Unity${{ matrix.unity-version }} - v${{ steps.version.outputs.text }} draft: false prerelease: false - name: Upload DLL uses: actions/upload-release-asset@v1.0.1 env: GITHUB_TOKEN: ${{ secrets.GITHUB_TOKEN }} with: upload_url: ${{ steps.create_release.outputs.upload_url }} asset_path: ${{ matrix.repository-name }}/Assets/Plugins/UNL/UniNativeLinq.dll asset_name: UniNativeLinq.dll asset_content_type: application/vnd.microsoft.portable-executablejobs.buildReleaseJob.startegy.matrix以下の3項目は適切に書き換えてください。
unity-tag: [2018.4.12f1]
user-name: [pCYSl5EDgo]
repository-name: [HandsOn_CSharpAdventCalendar20191201]
- unity-tag
- Unityのバージョン
- user-name
- あなたのGitHubアカウント名
- repository-name
- あなたのリポジトリ名
全体の流れとしては以下の通りになります。
- 作業リポジトリをクローン
- actions/checkoutだとcore~などの隠しフォルダを無視してしまうのでgit cloneするのが安牌
- GitHub Secretsに登録したulfファイルをトップレベルに
echo -n "${ULF}" > Unity_v2018.x.ulfで出力
- 環境変数に仕込んでいるので外部にバレずに利用可能
- ビルドに必要なdotnet core 3.0環境のセットアップ
- DLLをビルドしてそれをAssets/Plugins/UNL以下に配置
- Unityのライセンス認証
- Unity Test Runnerをコマンドラインから走らせる
- テストに失敗したなら全体を失敗させて終了
- 前回のビルド時のバージョンを取得
- 取得に失敗したならば今回のバージョンを0.0.1とする
- 取得成功時はawkでゴニョゴニョしてマイナーバージョンをインクリメントする
- GitHub Releasesに新規リリースを作成する
- リリースにファイルを追加する
powershellgit add . git commit -m "[update]Publish Release" git push現在のワーキングディレクトリはUniNativeLinqHandsOnのはずです。
全ての作業が終わったらGitHubにpushして最初のGitHub Releasesを公開しましょう。IEnumerable<T>の実装
NativeEnumerable<T>の中身として全てのフィールドとインデクサを定義しました。
これからIEnumerable<T>を実装します。記述が増えるのでpartial structにします。
IEnumerable<T>を実装したNativeEnumerable<T>
NativeEnumerable.csusing System.Collections; using System.Collections.Generic; namespace UniNativeLinq { public readonly unsafe partial struct NativeEnumerable<T> : IEnumerable<T> where T : unmanaged { public readonly T* Ptr; public readonly long Length; public NativeEnumerable(T* ptr, long length) { if (ptr == default || length <= 0) { Ptr = default; Length = default; return; } Ptr = ptr; Length = length; } public ref T this[long index] => ref Ptr[index]; public Enumerator GetEnumerator() => new Enumerator(this); IEnumerator<T> IEnumerable<T>.GetEnumerator() => GetEnumerator(); IEnumerator IEnumerable.GetEnumerator() => GetEnumerator(); } }
IEnumerator<T>を実装したNativeEnumerable<T>.Enumerator
NativeEnumerable.Enumerator.csusing System.Collections; using System.Collections.Generic; namespace UniNativeLinq { public readonly partial struct NativeEnumerable<T> { public unsafe struct Enumerator : IEnumerator<T> { private readonly T* ptr; private readonly long length; private long index; public Enumerator(NativeEnumerable<T> parent) { ptr = parent.Ptr; length = parent.Length; index = -1; } public bool MoveNext() => ++index < length; public void Reset() => index = -1; public ref T Current => ref ptr[index]; T IEnumerator<T>.Current => Current; object IEnumerator.Current => Current; public void Dispose() => this = default; } } }イテレータ構造体を内部型として定義するのはforeachの性能向上の常套手段です。
powershellcd core~ dotnet build -c Release cd .. unity -projectPath .ビルドをした後エディタを起動し、テストコードを書きましょう。
NativeEnumerableTestScriptクラスに追記する形で単一のクラスを肥大させましょう。
Unityのよくわからない仕様なのですが、1つのプロジェクトに2ファイル以上のテストスクリプトが存在するとコマンドラインからrunEditorTestsするとエラー吐きます。
このような事情もあり、簡易的な処置ですが神テストクラスを肥えさせます。本格的な処置についてはいずれまた別の記事で書くこともあるかも知れません。
NativeEnumerableTestScript.cs
NativeEnumerableTestScript.cs[TestCase(0, Allocator.Temp)] [TestCase(114, Allocator.Temp)] [TestCase(114514, Allocator.Temp)] [TestCase(0, Allocator.TempJob)] [TestCase(114, Allocator.TempJob)] [TestCase(114514, Allocator.TempJob)] [TestCase(0, Allocator.Persistent)] [TestCase(114, Allocator.Persistent)] [TestCase(114514, Allocator.Persistent)] public void IEnumerableTest(int count, Allocator allocator) { using (var array = new NativeArray<long>(count, allocator)) { var nativeEnumerable = new NativeEnumerable<long>((long*) array.GetUnsafePtr(), array.Length); Assert.AreEqual(count, nativeEnumerable.Length); for (var i = 0L; i < count; i++) nativeEnumerable[i] = i; var index = 0L; foreach (ref var i in nativeEnumerable) { Assert.AreEqual(index++, i); i = index; } index = 1L; foreach (var i in nativeEnumerable) Assert.AreEqual(index++, i); } }foreach文が正しく動いていることがこれで確認できます。
Unityエディターを閉じた後、GitHubにpushしてCI/CDを体感しましょう。powershellgit add . git commit -m "[update]Implement IEnumerable<T> & IEnumerator<T>" git pushAsEnumerable()に相当するAsRefEnumerable()の実装
NativeArray<T>からNativeEnumerable<T>を生成するのに一々
var nativeEnumerable = new NativeEnumerable<T>((T*) array.GetUnsafePtr(), array.Length);と記述するのも手間です。
var nativeEnumerable = array.AsRefEnumerable();だったら非常に楽ですので、拡張メソッドを定義します。AsRefEnumerable.csnamespace UniNativeLinq { public static unsafe class NativeEnumerable { public static NativeEnumerable<T> AsRefEnumerable<T>(this Unity.Collections.NativeArray<T> array) where T : unmanaged => new NativeEnumerable<T>(ptr: (T*)Unity.Collections.LowLevel.Unsafe.NativeArrayUnsafeUtility.GetUnsafeBufferPointerWithoutChecks(array), length: array.Length); } }IRefEnumerable/torの定義と実装
NativeEnumerable<T>とその内部型Enumeratorは
public Enumerator GetEnumetor();とpublic ref T Current{get;}が特徴的な要素です。
これをインターフェイスに抽出します。
IRefEnumerable.csとIRefEnumerator.csの定義
IRefEnumerable.csnamespace UniNativeLinq { public interface IRefEnumerable<TEnumerator, T> : System.Collections.Generic.IEnumerable<T> where TEnumerator : IRefEnumerator<T> { new TEnumerator GetEnumerator(); } }IRefEnumerator.csnamespace UniNativeLinq { public interface IRefEnumerator<T> : System.Collections.Generic.IEnumerator<T> { new ref T Current { get; } } }
上記インターフェイスをNativeEnumerableに実装します。
実際は各ファイルを一行書き換えるだけです。NativeEenumerable.cspublic readonly unsafe partial struct NativeEnumerable<T> : IRefEnumerable<NativeEnumerable<T>.Enumerator, T>NativeEenumerable.Enumerator.cspublic unsafe struct Enumerator : IRefEnumerator<T>テストコードには何も差は生じません。(既存の実装を元にインターフェイスを抽出しただけですので)
第2章 初めてのAPI - Select
LINQで一番使うAPIはSelectまたはWhereのはずです。
今回はUniNativeLinqの特異性を学ぶのに好適であるため、Selectを実装してみます。通常LINQのSelectについて
通常のSystem.Linq.Enumerableの提供するSelectメソッドのシグネチャを見てみましょう。
Select.cspublic static IEnumerable<TTo> Select<TFrom, TTo>(this IEunmerable<TFrom> collection, Func<TFrom, TTo> func);引数にIEnumerable<TFrom>なコレクションと、Func<TFrom, TTo>な写像を取ってマッピングを行います。
LINQの優れている点は拡張メソッドの型引数を(C#の貧弱な型推論でも)型推論完了できるという点にあります。標準にLINQに習ってAPIを定義してみましょう。
UniNativeLinq.Select.cspublic static IRefEnumerable<TToEnumerator, TTo> Select<TFromEnumerator, TFrom, TToEnumerator, TTo>(this IRefEunmerable<TFromEnumerator, TFrom> collection, Func<TFrom, TTo> func);このような感じでしょうか?
TToEnumeratorを引数から導出できず、センスが悪いですね。
実際のUniNativeLinqでは新たにSelectEnumerable<TPrevEnumerable, TPrevEnumerator, TPrev, T, TAction>型を定義します。
powershellNew-Item API/RefAction.cs New-Item Interface/IRefAction.cs New-Item Utility/DelegateRefActionToStructOperatorAction.cs New-Item Utility/Unsafe.cs New-Item Collection/SelectEnumerable.cs New-Item Collection/SelectEnumerable.Enumerator.cs細々と必要な型があるので他にもいくつか新規にファイルを作成します。
RefAction.csとIRefAction.cs
似たような内容なので同一ファイル内に記述するのも良いでしょう。RefAction.csnamespace UniNativeLinq { public delegate void RefAction<T0, T1>(ref T0 arg0, ref T1 arg1); public interface IRefAction<T0, T1> { void Execute(ref T0 arg0, ref T1 arg1); } }namespace UniNativeLinq { public readonly struct DelegateRefActionToStructOperatorAction<T0, T1> : IRefAction<T0, T1> { private readonly RefAction<T0, T1> action; public DelegateRefActionToStructOperatorAction(RefAction<T0, T1> action) => this.action = action; public void Execute(ref T0 arg0, ref T1 arg1) => action(ref arg0, ref arg1); } }
Unsafe.csは、System.Runtime.CompilerServices.Unsafeの一部抜粋です。
Unsafe.csnamespace UniNativeLinq { public static class Unsafe { // ref T AsRef<T>(in T value) => ref value; public static ref T AsRef<T>(in T value) => throw new System.NotImplementedException(); } }実際の所、NotImplementExceptionとして中身は空っぽなモックAPIです。
後にいい感じにこのモックAPIを処理します。Unsafe.AsRefはin引数をref戻り値に変換します。
引数にreadonlyフィールドの参照を与えたら、その戻り値が変更可能な参照になります。
SelectEnumerable.cs
SelectEnumerable.csnamespace UniNativeLinq { public readonly partial struct SelectEnumerable<TPrevEnumerable, TPrevEnumerator, TPrev, T, TAction> : IRefEnumerable<SelectEnumerable<TPrevEnumerable, TPrevEnumerator, TPrev, T, TAction>.Enumerator, T> where TPrevEnumerable : IRefEnumerable<TPrevEnumerator, TPrev> where TPrevEnumerator : IRefEnumerator<TPrev> where TAction : IRefAction<TPrev, T> { private readonly TPrevEnumerable enumerable; private readonly TAction action; public SelectEnumerable(in TPrevEnumerable enumerable) { this.enumerable = enumerable; action = default; } public SelectEnumerable(in TPrevEnumerable enumerable, in TAction action) { this.enumerable = enumerable; this.action = action; } public Enumerator GetEnumerator() => new Enumerator(ref Unsafe.AsRef(in enumerable), action); System.Collections.Generic.IEnumerator<T> System.Collections.Generic.IEnumerable<T>.GetEnumerator() => GetEnumerator(); System.Collections.IEnumerator System.Collections.IEnumerable.GetEnumerator() => GetEnumerator(); } }
GetEnumerator()においてUnsafe.AsRef(in enumerable)と記述されています。
Unsafe.AsRefはreadonly制約を無視する危険なメソッドですが、この場合において問題はありません。
UniNativeLinqの提供する範囲において、全てのGetEnumeratorメソッドがreadonlyなメソッドであるからです。
この辺りをC#の型制約で保証できればよいのですが、出来ないため今回のようにUnsafe.AsRefを利用する必要があるのです。
SelectEnumerable.Enumerator.cs
SelectEnumerable.Enumerator.csnamespace UniNativeLinq { public readonly partial struct SelectEnumerable<TPrevEnumerable, TPrevEnumerator, TPrev, T, TAction> { public struct Enumerator : IRefEnumerator<T> { private TPrevEnumerator enumerator; private TAction action; private T element; public Enumerator(ref TPrevEnumerable enumerable, in TAction action) { enumerator = enumerable.GetEnumerator(); this.action = action; element = default; } public bool MoveNext() { if (!enumerator.MoveNext()) return false; action.Execute(ref enumerator.Current, ref element); return true; } public void Reset() => throw new System.InvalidOperationException(); public ref T Current => throw new System.NotImplementedException(); T System.Collections.Generic.IEnumerator<T>.Current => Current; object System.Collections.IEnumerator.Current => Current; public void Dispose() { } } } }
SelectEnumerableの実装はそこまで変なものではありません。
コンストラクタで必要な情報をフィールドに初期化し、GetEnumerator()でEnumeratorを返すだけのシンプルな作りです。
EnumeratorではIRefAction<T0, T1>を実装した型引数TActionのインスタンスactionを使用してMoveNext()する度にT型フィールドであるelementを更新しています。このEnumeratorの最大の特徴は、
public ref T Current => throw new System.NotImplementedException();です。
そう、未実装のままなのです。これはバグではなく極めて意図的な仕様です。
これをこのままビルドしてテストコードを追加してもエラーを吐くだけです。本当は
public ref T Current => ref element;と記述したいのですが、C#の文法の制限として無理です。UniNativeLinq.dllのポストプロセス用dotnet core 3.0プロジェクト
現在のワーキングディレクトリはUniNativeLinqHandsOnのはずです。
Mono.Cecilを利用してUniNativeLinq.dllを編集してSelectEnumerable.Enumerator.CurrentからNotImplementedExceptionを消し飛ばしましょう。powershellmkdir post~ cd post~ dotnet new console echo bin/ obj/ post~.sln > .gitignore dotnet add package Mono.Cecil New-Item DllProcessor.cs New-Item InstructionUtility.cs New-Item ToDefinitionUtility.cs New-Item GenericInstanceUtility.cs
参考までにpost~.csprojの中身
<Project Sdk="Microsoft.NET.Sdk">
  <PropertyGroup>
    <OutputType>Exe</OutputType>
    <TargetFramework>netcoreapp3.0</TargetFramework>
    <RootNamespace>_post</RootNamespace>
  </PropertyGroup>
  <ItemGroup>
    <PackageReference Include="Mono.Cecil" Version="0.11.1" />
  </ItemGroup>
</Project>
PackageReferenceタグでMono.Cecilをインストール可能です。
Program.cs
Program.csusing System; using System.IO; public sealed class Program { static int Main(string[] args) { if (!ValidateArguments(args, out FileInfo inputUniNativeLinqDll, out FileInfo outputUniNativeLinqDllPath, out DirectoryInfo unityEngineFolder)) { return 1; } using (DllProcessor processor = new DllProcessor(inputUniNativeLinqDll, outputUniNativeLinqDllPath, unityEngineFolder)) { processor.Process(); } return 0; } private static bool ValidateArguments(string[] args, out FileInfo inputUniNativeLinqDll, out FileInfo outputNativeLinqDllPath, out DirectoryInfo unityEngineFolder) { if (args.Length != 3) { Console.Error.WriteLine("Invalid argument count."); inputUniNativeLinqDll = default; outputNativeLinqDllPath = default; unityEngineFolder = default; return false; } inputUniNativeLinqDll = new FileInfo(args[0]); if (!inputUniNativeLinqDll.Exists) { Console.Error.WriteLine("Empty Input UniNativeLinq.dll path"); outputNativeLinqDllPath = default; unityEngineFolder = default; return false; } string outputNativeLinqDllPathString = args[1]; if (string.IsNullOrWhiteSpace(outputNativeLinqDllPathString)) { Console.Error.WriteLine("Empty Output UniNativeLinq.dll path"); unityEngineFolder = default; outputNativeLinqDllPath = default; return false; } outputNativeLinqDllPath = new FileInfo(outputNativeLinqDllPathString); unityEngineFolder = new DirectoryInfo(args[2]); if (!unityEngineFolder.Exists) { Console.Error.WriteLine("Unity Engine Dll Folder does not exist"); return false; } return true; } }Main関数はコマンドライン引数を2つ要求します。
- 第1引数:core~で生成したDllのパス "core~/bin/Release/netstandard2.0/UniNativeLinq.dll"
- 第2引数:Mono.Cecilで編集した後、Dllを出力するパス "Assets/Plugins/UNL/UniNativeLinq.dll"
ValidateArgumentsで引数の妥当性を検証します。
IDisposableを実装したDllProcessorのインスタンスを生成し、Processメソッドを実行することで適切な処理を加えます。
DllProcessor.cs
DllProcessor.csusing System; using System.IO; using System.Linq; using Mono.Cecil; using Mono.Cecil.Cil; internal struct DllProcessor : IDisposable { private readonly ModuleDefinition mainModule; private readonly FileInfo outputDll; public DllProcessor(FileInfo input, FileInfo output) { mainModule = ModuleDefinition.ReadModule(input.FullName); outputDll = output; } public void Process() { ProcessEachMethod(RewriteUnsafeAsRef); mainModule.Types.Remove(mainModule.GetType("UniNativeLinq", "Unsafe")); ProcessEachMethod(RewriteThrowNotImplementedException, PredicateThrowNotImplementedException); } private void ProcessEachMethod(Action<MethodDefinition> action, Func<TypeDefinition, bool> predicate = default) { foreach (TypeDefinition typeDefinition in mainModule.Types) ProcessEachMethod(action, predicate, typeDefinition); } private void ProcessEachMethod(Action<MethodDefinition> action, Func<TypeDefinition, bool> predicate, TypeDefinition typeDefinition) { foreach (TypeDefinition nestedTypeDefinition in typeDefinition.NestedTypes) ProcessEachMethod(action, predicate, nestedTypeDefinition); if (predicate is null || predicate(typeDefinition)) foreach (MethodDefinition methodDefinition in typeDefinition.Methods) action(methodDefinition); } private void RewriteUnsafeAsRef(MethodDefinition methodDefinition) { Mono.Collections.Generic.Collection<Instruction> instructions; try { instructions = methodDefinition.Body.Instructions; } catch (NullReferenceException) { return; } catch { Console.WriteLine(methodDefinition.FullName); throw; } for (int i = instructions.Count - 1; i >= 0; i--) { Instruction instruction = instructions[i]; if (instruction.OpCode.Code != Code.Call) continue; MethodDefinition callMethodDefinition; try { callMethodDefinition = ((MethodReference)instruction.Operand).ToDefinition(); } catch { continue; } if (callMethodDefinition.Name != "AsRef" || callMethodDefinition.DeclaringType.Name != "Unsafe") continue; instructions.RemoveAt(i); } } private bool PredicateThrowNotImplementedException(TypeDefinition typeDefinition) { if (!typeDefinition.HasFields) return false; return typeDefinition.Fields.Any(field => !field.IsStatic && field.Name == "element"); } private void RewriteThrowNotImplementedException(MethodDefinition methodDefinition) { if (methodDefinition.IsStatic) return; FieldReference elementFieldReference = methodDefinition.DeclaringType.FindField("element").MakeHostInstanceGeneric(methodDefinition.DeclaringType.GenericParameters); ILProcessor processor = methodDefinition.Body.GetILProcessor(); Mono.Collections.Generic.Collection<Instruction> instructions = methodDefinition.Body.Instructions; for (int i = instructions.Count - 1; i >= 0; i--) { Instruction throwInstruction = instructions[i]; if (throwInstruction.OpCode.Code != Code.Throw) continue; Instruction newObjInstruction = instructions[i - 1]; if (newObjInstruction.OpCode.Code != Code.Newobj) continue; MethodDefinition newObjMethodDefinition; try { newObjMethodDefinition = ((MethodReference)newObjInstruction.Operand).ToDefinition(); } catch { continue; } if (newObjMethodDefinition.Name != ".ctor" || newObjMethodDefinition.DeclaringType.FullName != "System.NotImplementedException") continue; newObjInstruction.Replace(Instruction.Create(OpCodes.Ldarg_0)); throwInstruction.Replace(Instruction.Create(OpCodes.Ldflda, elementFieldReference)); processor.InsertAfter(throwInstruction, Instruction.Create(OpCodes.Ret)); } } public void Dispose() { using (Stream writer = new FileStream(outputDll.FullName, FileMode.Create, FileAccess.Write)) { mainModule.Assembly.Write(writer); } mainModule.Dispose(); } }
- Process
- 元となる不完全なDllに対して処理を加えて完全なDllにするメソッドです。
- ProcessEachMethod
- Dllに含まれる全ての型の全てのメソッドを走査して全てのメソッドに対して引数のactionを適用します。
- RewriteUnsafeAsRef
- Unsafe.AsRefはreadonlyな要素を非readonlyな状態に変換する極めて危険なAPIです。
- 使い所がGetEnumeratorに限定されているため特に問題はないです。
- PredicateThrowNotImplementedException
- インスタンスフィールドに"element"という名前のそれが存在する型のみを処理対象に選ぶメソッドです。
- RewriteThrowNotImplementedException
throw new NotImplementedException();をreturn ref this.element;に置換します。InstructionUtility.cs
InstructionUtility.csusing Mono.Cecil.Cil; internal static class InstructionUtility { public static void Replace(this Instruction instruction, Instruction replace) => (instruction.OpCode, instruction.Operand) = (replace.OpCode, replace.Operand); }RewriteThrowNotImplementedException内部で使用されます。
ILの命令を置換するための拡張メソッドです。
ILProcessorのReplaceメソッドはバグを誘発するわりと使い物にならないメソッドです。
gotoやif, switchなどのジャンプ系の命令の行き先にまつわる致命的なバグを生じます。
こうしてわざわざ拡張メソッドを用意する必要があるのです。
ToDefinitionUtility.cs
ToDefinitionUtility.csusing Mono.Cecil; internal static class ToDefinitionUtility { public static TypeDefinition ToDefinition(this TypeReference reference) => reference switch { TypeDefinition definition => definition, GenericInstanceType generic => generic.ElementType.ToDefinition(), _ => reference.Resolve(), }; public static MethodDefinition ToDefinition(this MethodReference reference) => reference switch { MethodDefinition definition => definition, GenericInstanceMethod generic => generic.ElementMethod.ToDefinition(), _ => reference.Resolve(), }; }特に気にする必要はない拡張メソッドです。
Resolve()が例外を投げる可能性が結構あります。
GenericInstanceUtility.cs
GenericInstanceUtility.csusing Mono.Cecil; using System.Linq; using System.Collections.Generic; internal static class GenericInstanceUtility { public static FieldReference FindField(this TypeReference type, string name) { if (type is TypeDefinition definition) return definition.FindField(name); if (type is GenericInstanceType genericInstanceType) return genericInstanceType.FindField(name); var typeDefinition = type.ToDefinition(); var fieldDefinition = typeDefinition.Fields.Single(x => x.Name == name); if (fieldDefinition.Module == type.Module) return fieldDefinition; return type.Module.ImportReference(fieldDefinition); } public static FieldReference FindField(this TypeDefinition type, string name) => type.Fields.Single(x => x.Name == name); public static FieldReference FindField(this GenericInstanceType type, string name) { var typeDefinition = type.ToDefinition(); var definition = typeDefinition.Fields.Single(x => x.Name == name); return definition.MakeHostInstanceGeneric(type.GenericArguments); } public static FieldReference MakeHostInstanceGeneric(this FieldReference self, IEnumerable<TypeReference> arguments) => new FieldReference(self.Name, self.FieldType, self.DeclaringType.MakeGenericInstanceType(arguments)); public static GenericInstanceType MakeGenericInstanceType(this TypeReference self, IEnumerable<TypeReference> arguments) { var instance = new GenericInstanceType(self); foreach (var argument in arguments) instance.GenericArguments.Add(argument); return instance; } }CI.yamlをアップデート
post~によりUniNativeLinq.dllにポストプロセスをする必要があり、CI.yamlを書き換えます。
CI.yaml全文
CI.yamlname: CreateRelease on: push: branches: - develop jobs: buildReleaseJob: runs-on: ubuntu-latest strategy: matrix: unity-version: [2018.4.9f1] user-name: [pCYSl5EDgo] repository-name: [HandsOn_CSharpAdventCalendar20191201] exe: ['/opt/Unity/Editor/Unity'] steps: - uses: pCYSl5EDgo/setup-unity@master with: unity-version: ${{ matrix.unity-version }} - name: License Activation run: | echo -n "$ULF" > unity.ulf ${{ matrix.exe }} -nographics -batchmode -quit -logFile -manualLicenseFile ./unity.ulf || exit 0 env: ULF: ${{ secrets.ulf }} - run: git clone https://github.com/${{ github.repository }} - uses: actions/setup-dotnet@v1.0.2 with: dotnet-version: '3.0.101' - name: Builds DLL run: | cd ${{ matrix.repository-name }}/core~ dotnet build -c Release - name: Post Process DLL run: | cd ${{ matrix.repository-name }}/post~ ls -l ../Assets/Plugins/UNL/ dotnet run ../core~/bin/Release/netstandard2.0/UniNativeLinq.dll ../Assets/Plugins/UNL/UniNativeLinq.dll ls -l ../Assets/Plugins/UNL/ - name: Run Test run: ${{ matrix.exe }} -batchmode -nographics -projectPath ${{ matrix.repository-name }} -logFile ./log.log -runEditorTests -editorTestsResultFile ../result.xml || exit 0 - run: ls -l - run: cat log.log - run: cat result.xml - uses: pCYSl5EDgo/Unity-Test-Runner-Result-XML-interpreter@master id: interpret with: path: result.xml - if: steps.interpret.outputs.success != 'true' run: exit 1 - name: Get Version run: | cd ${{ matrix.repository-name }} git describe --tags 1> ../version 2> ../error || exit 0 - name: Cat Error uses: pCYSl5EDgo/cat@master id: error with: path: error - if: startsWith(steps.error.outputs.text, 'fatal') != 'true' run: | cat version cat version | awk '{ split($0, versions, "-"); split(versions[1], numbers, "."); numbers[3]=numbers[3]+1; variable=numbers[1]"."numbers[2]"."numbers[3]; print variable; }' > version_increment - if: startsWith(steps.error.outputs.text, 'fatal') run: echo -n "0.0.1" > version_increment - name: Cat uses: pCYSl5EDgo/cat@master id: version with: path: version_increment - name: Create Release id: create_release uses: actions/create-release@v1.0.0 env: GITHUB_TOKEN: ${{ secrets.GITHUB_TOKEN }} with: tag_name: ${{ steps.version.outputs.text }} release_name: Release Unity${{ matrix.unity-tag }} - v${{ steps.version.outputs.text }} draft: false prerelease: false - name: Upload DLL uses: actions/upload-release-asset@v1.0.1 env: GITHUB_TOKEN: ${{ secrets.GITHUB_TOKEN }} with: upload_url: ${{ steps.create_release.outputs.upload_url }} asset_path: ${{ matrix.repository-name }}/core~/bin/Release/netstandard2.0/UniNativeLinq.dll asset_name: UniNativeLinq.dll asset_content_type: application/vnd.microsoft.portable-executable
変更箇所のみ抜粋
CI.yaml- name: Builds DLL run: | mkdir artifact cd ${{ matrix.repository-name }}/core~ dotnet build -c Release - name: Post Process DLL run: | cd ${{ matrix.repository-name }}/post~ dotnet run ../core~/bin/Release/netstandard2.0/UniNativeLinq.dll ../Assets/Plugins/UNL/UniNativeLinq.dll - name: License Activation
powershellgit add . git commit -m "[add]post~ prot-process project" git push第3章 補足
UnityPackage化
ライブラリをGitHubから提供するならば素のDLLを提供するだけというのも不親切です。
やはりunitypackageファイルをGitHub Releasesから提供したいものです。この節ではコマンドラインからUnityを操作してunitypackageを作成します。
Unityのコマンドラインの機能自体ではunitypackageを作成することは不可能ですが、プロジェクトのEditorフォルダ直下に存在するクラスのstaticメソッドを呼び出すことが可能です。
UnityEditor.AssetDatabase.ExportPackageメソッドをstaticメソッド内で呼び出してunitypackageを作成します。現在のワーキングディレクトリはUniNativeLinqHandsOnのはずです。
powershellmkdir -p Assets/Editor New-Item Assets/Editor/UnityPackageBuilder.cs
UnityPackageBuilder.cs
UnityPackageBuilder.csusing System; using UnityEditor; namespace HandsOn { public static class UnityPackageBuilder { public static void Build() { string[] args = Environment.GetCommandLineArgs(); string exportPath = args[args.Length - 1]; AssetDatabase.ExportPackage( new[]{ "Assets/Plugins/UNL/UniNativeLinq.dll" }, exportPath, ExportPackageOptions.Default ); } } }コマンドラインから呼び出すメソッドのシグネチャは必ずSystem.Actionである必要があります。
コマンドライン引数を扱いたい場合にはSystem.Environment.GetCommandLineArgsメソッドから適切に文節処理された文字列の配列を受け取りましょう。これは今回限りの約束事ですが、最後のコマンドライン引数がunitypackageの出力先のパスを示すようにします。
AssetDatabase.ExportPackageの第一引数にstring[]を渡してunitypackageを構築します。
ここで渡すファイルのパスはプロジェクトのルートに対する相対パスですね。
HandsOn.UnityPackageBuilder.BuildをGitHub Actionsから呼び出し、リリースに同梱します。
yamlファイルの最後に追記する部分(インデントには気を付けてください)
CI.yamlへの追記- name: Create UnityPackage run: ${{ matrix.exe }} -batchmode -nographics -quit -projectPath ${{ matrix.repository-name }} -logFile ./log.log -executeMethod HandsOn.UnityPackageBuilder.Build "../UniNativeLinq.unitypackage" - run: cat log.log - name: Upload Unity Package uses: actions/upload-release-asset@v1.0.1 env: GITHUB_TOKEN: ${{ secrets.GITHUB_TOKEN }} with: upload_url: ${{ steps.create_release.outputs.upload_url }} asset_path: UniNativeLinq.unitypackage asset_name: UniNativeLinq.unitypackage asset_content_type: application/x-gzip終わりに
UniNativeLinq本家ではエディタ拡張に関連して更にえげつない最適化やMono.Cecilテクニックが使用されています。
既存のLINQに比べて非常に高速に動作しますので是非使ってください。このハンズオンよりも更に深くMono.CecilやUniNativeLinqを学びたいという方は私のTwitterのDMなどでご相談いただければ嬉しいです。
画像はUnityのサイトより引用 ↩


- 投稿日:2019-11-30T20:35:01+09:00
UnityのGameView上に好きな画像載せれる拡張を作った
こんちにわ!
今回、ちょっとしたUnityの拡張機能を作ったのでご紹介します。作ったもの
UnityのGameWindowに好きな画像を重ねられる機能です。
上記の画像のようにドラッグ・アンド・ドロップで
GameViewの表示にぴったり合うようにして
手元の好きなイメージが重ねられて
透明度を変えてそれぞれの画像を見ることができます。
予めGameViewのサイズを画像のアスペクト比と合わせておく必要がありますなんで作ったの?
開発をする際にUIの仮配置を行うときに当たりになる物が欲しく
今までは、
1. UIデザイン画像をインポートする
2. 新しくImageオブジェクトを作る
3. サイズや位置、表示順など調整する
4. UI画像アタッチする
5. アルファ変えながら画像見て調整する
6. 他のアス比にしても大丈夫か3-4を繰り返す
7. 不要になった画像とGameObject削除
8. おわり!
とやっていたのですがこの方法では手数が多く
仮画像をうっかり入れそうになったり不要なGameObject残したり
してしまい不便でした。そのため今回の機能を作ってみました。
これにより
1. Windowを開く
2. 画像をドラッグ・アンド・ドロップする
3. アルファ変えながら画像見て調整する
4. 他のアス比にしても大丈夫か2-3を繰り返す
5. おわり!
な感じでそんなに手間を掛けずプロジェクトを汚さず
確認できるようになりました。使い方
- GameViewを表示します。表示してないと動かないです。理由は後述
- ImageOverlapWindowを開きます。
- Windowがでるので自分の好きな画像をドラッグ・アンド・ドロップでぺっちょんします。(大人の事情でPNGしか対応できてないです
- 下にスクロールすると怪しいスライダーが出るのでそれを動かすと透明度変わります。
- GameViewと同じサイズで追従するのでチェックボックスで切り替えられます。
- おわり!
*予めGameViewのサイズを画像のアスペクト比と合わせておく必要があります。
内部の実装について
    RenderTexture GetGameTexture()
    {
        var gameMainView = GetMainGameView();
        if (gameMainView == null)
        {
            return null;
        }

        var t = System.Type.GetType("UnityEditor.GameView,UnityEditor");
        if (t == null) return null;
        var renderTexture = t.GetField("m_TargetTexture",
            BindingFlags.NonPublic | BindingFlags.Instance | BindingFlags.GetField | BindingFlags.FlattenHierarchy |
            BindingFlags.SetField);
        if (renderTexture == null)
        {
            return null;
        }

        return (RenderTexture) renderTexture.GetValue(gameMainView);

    }

    public static EditorWindow GetMainGameView()
    {
        var t = System.Type.GetType("UnityEditor.GameView,UnityEditor");
        if (t == null) return null;
        var getMainGameView = t.GetMethod("GetMainGameView", BindingFlags.NonPublic | BindingFlags.Static);
        if (getMainGameView == null) return null;
        var res = getMainGameView.Invoke(null, null) ?? GetWindow(t);
        return (EditorWindow)res;

    }
上記のようにReflectionで取得してGameViewのRenderTextureを無理やり拾ってきて表示しています。
リフレクションでGameViewを出してるWindowを取得して
その中のRenderTextureを取得している感じになります。
そのためタブ切り替えとかでGameViewが隠れると表示が更新されなくなります。また、OSによってUVが反転したりしてしまったので
シェーダーでその辺り直して二枚合成して表示しています。
全体のコードはこちらからDLできます。反響
社内でデザイナーさんがUIの配置調整をやっているため
こちらのツールを利用してかなり楽に配置できているようです。
作ってよかった!思っております。
パッケージで欲しい人はこちら*画像を重ねる際に専用のシェーダーを利用してるのでそちらも必要になります

- 投稿日:2019-11-30T18:54:51+09:00
【備忘録】ファイルまたはアセンブリ,またはその依存関係の 1 つが読み込めませんでした。は .config ファイルを疑う
問題
自分で .NET Framework のアプリケーションをビルドして実行すると動作するファイルを,友人のコンピュータに転送し実行したところ次のような例外が投げられ正常動作しなかった。
System.IO.FileNotFoundException: ファイルまたはアセンブリ '***', またはその依存関係の 1 つが読み込めませんでした。指定されたファイルが見つかりません。
(Exception.ToString より抜粋)また,転送する際に含めたファイルを自身のコンピュータの別のディレクトリに展開し実行すると,次のような例外が投げられ正常動作しなかった。
System.IO.FileLoadException: ファイルまたはアセンブリ '***'、またはその依存関係の 1 つが読み込めませんでした。見つかったアセンブリのマニフェスト定義はアセンブリ参照に一致しません。 (HRESULT からの例外:0x80131040)
警告: アセンブリ バインドのログ記録がオフにされています。アセンブリ バインドのエラー ログを有効にするには、レジストリ値 HKLM\Software\Microsoft\Fusion!EnableLog を 1 に設定してください。
注意: アセンブリ バインドのエラー ログに関連するパフォーマンス ペナルティがあります。
この機能をオフにするには、レジストリ値 [HKLM\Software\Microsoft\Fusion!EnableLog] を削除します。
(Exception.ToString より抜粋)原因
.exe.config ファイルが実行ファイルと同じディレクトリに存在しない。
解決策
.exe.config を実行ファイルと同じディレクトリに配置する。(アーカイブに含める。)
- 投稿日:2019-11-30T17:35:08+09:00
Character Controllerで設定したプレイヤーが敵の上をジャンプすると乗ってしまう
Character Controllerで設定したプレイヤーが敵の上をジャンプすると乗ってしまいます。
敵の上へ乗っかからないで滑って地面に落ちるようにしたいです。
敵だけじゃなくterrainで設定した山などもジャンプすると引っかかって滑らないので
それも改善したいです!
回答くださると幸いです!
- 投稿日:2019-11-30T17:24:19+09:00
C#でJSONを扱うときはSystem.Text.Jsonを使う
はじめに
「C# JSON」とかで検索するとDataContractJsonSerializerかJson.NETを解説した記事がよくヒットします。
しかし、DataContractJsonSerializer クラスのページを見ると「JSON へのシリアル化と JSON からの逆シリアル化を含むほとんどのシナリオでは、system.string名前空間のツールを使用することをお勧めします。」と書いてるので、使えるならこっちを使った方がよいと思います。使用条件
.NET Core 3.0の場合はデフォルトで入ってます。
.NET Standard 2.0以降、.NET Framework 4.6.1以降、.NET Core 2.0以降はSystem.Text.Jsonのnugetパッケージを入れることで使えるようになります。使用方法
.NET で JSON をシリアル化および逆シリアル化する方法から抜粋。
シリアライズ
System.Text.Json名前空間をusingして次のようなコードでシリアライズできます。
SerializeToUtf8BytesというUTF8を高速で処理できるメソッドもあります。string jsonString = JsonSerializer.Serialize(serializeObj);デシリアライズ
デシリアライズは下記のコードで行えます。
ジェネリックなのでキャストの必要が無いところがいいですね。TestClass deserializeObj = JsonSerializer.Deserialize<TestClass>(jsonString);メリット
- 基本的にジェネリックメソッドなのでキャストやtypeofが必要ない。
[DataContract]みたいなアノテーションが不要。参考
文中でも取り上げましたが再度まとめ。
- 投稿日:2019-11-30T16:52:59+09:00
[C# 8.0] 整数の範囲とのパターンマッチ
C# 8.0から使用できるswitch式で、整数の範囲とマッチさせたい場合、破棄パターン+
when句で下記のようになります。var num = 100; var rsult = input switch { _ when 1 <= num && num < 13 => "special", _ => "", };これでも十分ですが、どうせならC# 8.0から導入された
System.Range構造体(1..13)を使用したいです。
しかし、System.Range構造体は配列内の範囲を表すことを想定されて設計されているため、特定の値が含まれるかどうかを判定するメソッドがありません。
Enumerable.Range()メソッドを使えばもう少し綺麗に書けますが、ヒープにオブジェクトが作成されるのが少し嫌なので拡張メソッドを用意します。拡張メソッド
static class RangeExtention
{
    public static bool Contains(this Range range, int value)
    {
        var start = range.Start.IsFromEnd ? (int.MaxValue - range.Start.Value) : range.Start.Value;
        var end = range.End.IsFromEnd ? (int.MaxValue - range.End.Value) : range.End.Value;
        if (start > end)
            throw new ArgumentOutOfRangeException(nameof(range));
        return start <= value && value < end;
    }
}
var num = 100; var rsult = num switch { _ when (1..13).Contains(num) => "special", _ => "", };注意点
System.Range構造体を使用するので、制約があります。
- 型は
intしか使用できない。- 値の範囲は0以上しか使用できない。(
Enumerable.Range()メソッドを使えば負値も可能)(2..0)のような、大小関係が逆転している範囲は例外を投げるようにしている。- 半閉区間しか使用できない。
(System.Range構造体の想定は半閉区間なのでそれに従っている。)
- 投稿日:2019-11-30T16:28:10+09:00
C# - タスクトレイアイコンでライフゲームやってみた
using System;
using System.ComponentModel; // CancelEventArgsを使用するため
using System.Drawing;
using System.Runtime.InteropServices;
using System.Windows.Forms;


static class MyIconUtil
{
    static class NativeMethods
    {
        [DllImport("user32.dll", CharSet = CharSet.Auto)]
        public extern static bool DestroyIcon(IntPtr handle);
    }

    public static Icon CreateIcon(byte[,] iconDot)
    {
        Bitmap bmp = new Bitmap(iconDot.GetLength(0),iconDot.GetLength(1));
        using ( Graphics g = Graphics.FromImage(bmp) ) {
            g.Clear(Color.White);
        }
        for ( int y=0 ; y<iconDot.GetLength(1) ; y++ ) {
            for ( int x=0 ; x<iconDot.GetLength(0) ; x++ ) {
                if ( iconDot[x,y] != 0 ) {
                    bmp.SetPixel(x,y,Color.Black);
                }
            }
        }

        IntPtr Hicon = bmp.GetHicon();
        return Icon.FromHandle(Hicon);
    }

    public static void DestroyIcon(Icon icon)
    {
        NativeMethods.DestroyIcon(icon.Handle);
    }
}


class TaskTrayTest
{
    static readonly int W = 16;
    static readonly int H = 16;

    NotifyIcon trayIcon;
    byte[,] iconDot; // each byte value is 0 or 1
    System.Windows.Forms.Timer timer;

    TaskTrayTest()
    {
        trayIcon = new NotifyIcon();
        iconDot = new byte[W,H];
        ResetBoardData();

        Icon tmpIcon = MyIconUtil.CreateIcon(iconDot);
        trayIcon.Icon = tmpIcon;
        trayIcon.Visible = true;

        trayIcon.Text = "LifeGame";
        var menu = new ContextMenuStrip();
        var menuItem = new ToolStripMenuItem();

        menu.Items.AddRange(new ToolStripMenuItem[]{
            new ToolStripMenuItem("E&xit", null, (s,e)=>{timer.Stop();Application.Exit();}, "Exit")
        });

        trayIcon.Click += (s,e)=>{ResetBoardData();};
        trayIcon.ContextMenuStrip = menu;

        timer = new System.Windows.Forms.Timer();
        timer.Interval = 200;//ms
        timer.Tick += (sender,e)=>{UpdateBoard();};
        timer.Start();
    }

    void ResetBoardData()
    {
        var rand = new System.Random((int)System.Environment.TickCount);

        for ( int y=0;y<H;y++) {
            for ( int x=0;x<W;x++) {
                iconDot[x,y] = (byte)(rand.Next()%2);
            }
        }
    }

    void UpdateBoard()
    {
        var a = iconDot; // old
        var b = new byte[W,H]; // new
        for ( int y=0;y<H;y++) {
            int ym = (y-1+H)%H;
            int yp = (y+1  )%H;
            for ( int x=0;x<W;x++) {
                int xm = (x-1+W)%W;
                int xp = (x+1  )%W;

                int c = a[xm,ym]+a[x ,ym]+a[xp,ym]
                       +a[xm,y ]         +a[xp,y ]
                       +a[xm,yp]+a[x ,yp]+a[xp,yp];

                if ( a[x,y] == 0 ) {
                    b[x,y] = (byte)((c==3)?1:0);
                }
                else {
                    b[x,y] = (byte)((c==2||c==3)?1:0);
                }
            }
        }
        iconDot = b;

        Icon oldIcon = trayIcon.Icon;
        trayIcon.Icon = MyIconUtil.CreateIcon(iconDot);
        MyIconUtil.DestroyIcon(oldIcon);
    }

    [STAThread]
    static void Main(string[] args)
    {
        Console.WriteLine("Main() Start.");
        new TaskTrayTest();
        Console.WriteLine("Instance is created.");
        Application.Run();
        Console.WriteLine("Main() End.");
    }
}
- 投稿日:2019-11-30T14:49:07+09:00
Delegate周りの機能について調べたメモ
自分用の学習メモです。
既に多くの人が書いている内容なので、僕の記事を読むよりも他の人の記事読んだ方がいいかも... (参考サイトに飛べばわかる)動機
現在、取り組んでいるドイツのHarz大学との合同ゲームプロジェクトにてゲームを作る上でせっかくなので設計を頑張ってみようと思いました。
ちゃんとした設計をするのは初めてだったので色々と調査をしました。
調査を進める中でUniRxというライブラリを使うと良いということを知りました。これを使ってみたいと思いました。が、その解説の中でDelegate、Eventという知らない概念があったので、それについて調べました。(ついでラムダ式、Action、匿名関数も勉強した)Delegateとは(概念部分)
C#入門者を苦しめるDelegate、Action、Event、ラムダ式、匿名関数は全てDelegateの派生形です。なのでまずDelegateをわかるようにするのが大切。
Delegateは関数型志向の考え方をプログラムとして実現するための機能です。
関数型志向とは「関数をまとめて変数として扱おうゼ!!」という発想のことです。delegateの書き方
delegateの使い方
よくあるのはコールバックで処理が終わった後に何かしらのメソッドを実行したいときにメソッドごと渡すというパターンです。
他にもメソッドの中身をごっそりと変えるということもできる(てことは、Strategyパターン?)
delegateの記法
1.まずCのプロトタイプ関数宣言のように書く
Delegate_test.cspublic delegate void DelVoid(); public delegate int DelInt(int a); public delegate string DelStr(string s);注)ここではあくまで型を作っただけ(structやenumのような新しい型を作るのがdelegate)
2.実際にdelegateを利用して処理する部分を書く
Delegate_test.csvoid Method1(DelVoid delvoid){ //処理 delvoid(); } void Method2(DelInt delint) { //処理 delint(); } void Method3(DelStr delstr) { //処理 delstr(); }ここまでで型の定義とその型を持つ変数の使い方が決まった
外部からの使い方
1.delegate変数の中身を代入
Delegate_user.csクラス名.DelVoid.delvoid = A; クラス名.DelInt.delint = B; クラス名.Delstr.delstr = C;とすることでMethod1,2,3のdelegete系変数の中身を宣言できる(A、B、Cはそれぞれの型と一致する引数と戻り値を持つ関数)
クラス名の部分にはDelVoidを型宣言したクラス名を書く
ついでにdelegateに対する処理の追加についても説明します。
以下のようにするとAの後に処理Bを追加できます。クラス名.DelVoid.delvoid = A; クラス名.DelVoid.delvoid += B;2.delegateを使う
Delegate_user.csクラス名.Method1(delvoid); クラス名.Method2(delint); クラス名.Method3(delstr);これで先ほど代入したA,B,Cの内容をMethod1,2,3内で宣言している箇所に貼り付けて使うことができます。
Action
Actionはdelegateの省略表現
Action<引数の型> action = Aのように書く。引数は<string,int>のように「,」で区切ることで複数渡せる
引数がない場合は
Action action = Aでおk
要はActionによって明示的な名前(DelVoidのようなやつ)をつけずに引数と戻り値だけで判断することができる
ただし、Actionは戻り値を返すことができないvoid関数しか作れない戻り値を返したい場合はFuncを使う
書き方は以下の通りFunc<引数の型(複数可),戻り値> func例えば
Func<int, string > funcは
string func(int num){
    //処理
  //最後にstringを返す
}
のような関数のdelegateとなる
引数がない場合は以下のように書く
Func<戻り値> func例えば、
Func<int> funcは
int func(){
   //処理
   //最後にintを返す
}
という関数のdelegateとなる
匿名関数
今までAction action = Aと書いていた
これは別にメソッドAを書かなければいけないのでめんどいし、場合によっては可読性が落ちる
これをAction<int,string> action = delegate(int x, string str){ //処理 }と書き換えることができる。それだけ
ラムダ式
1行だけの処理であれば、delegate、Actionをより簡単に書ける
以下のように書くAction<引数の型> = 引数の変数名 => 処理;他にも様々な記法があるが、一番簡潔なものを覚えておけば、とりあえずは使える。必要に応じて調べればおk
Event
ほぼdelegateと同じ
違いは外からの代入と実行ができないこと
Delegateとの使い分けは「その関数型変数を内部でしか使わないように限定するかどうか」ということ(カプセル化するかどうかってことか?)
カプセル化する場合はEvent
そうでない場合(interface的な時?)はDelegateと覚えておけばとりあえず丸い(多分他にも細かい違いがあると思うけど、今は無視!!)
宣言の仕方
例1
public event Action action = null;例2
public event Action<int> action = num =>{Debug.Log("入力されたのは" + num + "です")};外部クラスからのアクセス
エラーの例
クラス名.action();
クラス名.action = A
これは外部でdelegateを実行しようとしたり、代入しているのでNG
大丈夫な例
クラス名.action+=A外からdelegateに処理を付け加えるのはセーフ
まとめ
delegateだけわかってればとりあえずはこの辺の概念はふわっとわかるようになる!!
参考
1.http://kan-kikuchi.hatenablog.com/entry/Delegate
2.https://qiita.com/RyotaMurohoshi/items/740151bd772889cf07de
3.https://hk-ryukyu.club/hideto/archives/49#toc6
- 投稿日:2019-11-30T11:34:41+09:00
C# パネルをいくつか配置し、それぞれにコントロールやグラフィクス、イメージを表示する。
Formの上に、パネルをいくつか配置し、それぞれの上にコントロールやグラフィクス、イメージを表示したみた。
そもそもは、Dobon.netに記述されていたコード ”Panel1.Invalidate();” の意味が分からず、”Invalidate()”の前は、ふつう”this”じゃないの、、、と思いつつ、、、数日悩んだあげく、やっと ”Invalidate()” の前には、再描画させたいパネル(領域)を指定するということに気が付いた。
というわけで、このソースには Invalidate() が2つ、Panelが3つ含まれている。
また、おかげでPenelの上に、コントロール、グラフィクス、イメージの表示のさせ方がわかった。
// https://dobon.net/vb/dotnet/graphics/creategraphics.html
// 高橋麻奈著 やさしいC# p211,222 SBCreative

using System;
using System.Collections.Generic;
using System.Drawing;
using System.Windows.Forms;

namespace Project1
{
    class Class1 : Form
    {
        // 変数の宣言と代入
        //画像ファイルを読み込む
        Image[] images = new Image[] {
                                        Image.FromFile(@"C:\materials\picture\car100_50.bmp"),
                                        Image.FromFile(@"C:\materials\picture\racingcar100_50.bmp")
                                     };
        Image currentImage = null;
        Image backImage = Image.FromFile(@"C:\materials\picture\thankful640_640.jpg");

        // ラベルの宣言
        Label lb0, lb1, lb2, lb3;

        // フロアパネルの宣言
        Panel panel1, panel2, panel3;

        // ボタンの宣言
        Button button1;

        // パネル3の上でマウスクリックしたときに、その位置を記憶するリストの宣言
        private List<Point> ls;

        // メインメソッド
        public static void Main()
        {
            Application.Run(new Class1());
        }

        // コンストラクタ
        public Class1()
        {
            // ウインドウの定義
            Text = "Panelをいくつか配置し、グラフィックス、コントロール、イメージを表示する";
            Width = 640;
            Height = 640;

            //パネル3の上でマウスクリックしたときに、その位置を記憶するリスト
            ls = new List<Point>();


            // パネル1(領域1)の定義
            panel1 = new Panel();
            panel1.BorderStyle = BorderStyle.FixedSingle;   //境界線
            panel1.Location = new Point(300, 300);
            panel1.Size = new Size(100, 100);
            panel1.BackColor = Color.Gray;
            this.Controls.Add(panel1);

            // パネル2(領域3)の定義
            panel2 = new Panel();
            panel2.BorderStyle = BorderStyle.FixedSingle;   //境界線
            panel2.Location = new Point(100, 200);
            panel2.Size = new Size(200, 100);
            this.Controls.Add(panel2);

            // パネル3(領域3)の定義
            panel3 = new Panel();
            panel3.BorderStyle = BorderStyle.FixedSingle;   //境界線
            panel3.Location = new Point(0, 400);
            panel3.Size = new Size(300, 200);
            this.Controls.Add(panel3);

            // ボタン1の定義
            button1 = new Button();
            button1.Text = "ボディーカラー変更\nこの赤いボタンを押してください。";
            button1.AutoSize = true;
            button1.Dock = DockStyle.Bottom;
            button1.BackColor = Color.Red;
            panel2.Controls.Add(button1);

            // ラベル0の定義
            lb0 = new Label();
            lb0.ForeColor = Color.Blue;
            lb0.BackColor = Color.Yellow;
            lb0.Text = "thisの領域";
            this.Controls.Add(lb0);

            // ラベル1の定義
            lb1 = new Label();
            lb1.Text = "panel1の領域";
            panel1.Controls.Add(lb1);

            // ラベル2の定義
            lb2 = new Label();
            lb2.Text = "panel2の領域";
            panel2.Controls.Add(lb2);

            // ラベル2の定義
            lb3 = new Label();
            lb3.AutoSize = true;
            lb3.Text = "panel3の領域。\nこの領域でクリックしてください";
            panel3.Controls.Add(lb3);

            // 画像の初期化
            currentImage = images[0];

            //ボタン1のイベントハンドラの登録
            button1.Click += new EventHandler(Button1_Click);

            //Panel1_Paintで記述された内容を、Panel1に描画するためにイベントハンドラを登録する
            this.Paint += new PaintEventHandler(Back_Paint);

            //Panel1_Paintで記述された内容を、Panel1に描画するためにイベントハンドラを登録する
            panel1.Paint += new PaintEventHandler(Panel1_Paint);

            panel3.MouseDown += new MouseEventHandler(Panel3_MouseDown);
            panel3.Paint += new PaintEventHandler(Panel3_Paint);
        }

        // Panel1のPaintイベントハンドラ
        private void Panel1_Paint(Object sender, PaintEventArgs e)
        {
            if (currentImage != null)
            {
                // DrawImageメソッドで画像をpanel1の座標系の(0, 25)の位置に表示する
                Graphics g = e.Graphics;
                g.DrawImage(currentImage, 0, 25, currentImage.Width, currentImage.Height);
            }
        }

        // thisのPaintイベントハンドラ
        private void Back_Paint(Object sender, PaintEventArgs e)
        {
            if (backImage != null)
            {
                //DrawImageメソッドで画像を示する
                Graphics g = e.Graphics;
                g.DrawImage(backImage, 0, 0, backImage.Width, backImage.Height);
            }
        }

        //Button1のClickイベントハンドラ
        private void Button1_Click(object sender, EventArgs e)
        {
            //表示する画像を入れ替える
            if (currentImage != images[0])
            {
                currentImage = images[0];
            }
            else
            {
                currentImage = images[1];
            }
            //コントロールを再描画する。これがないと、新しい画像が表示されない。
            this.Invalidate();
            panel1.Invalidate();  //panel1に対してのみ、グラフィックスをInvalidate()する。
        }

        // Panel3でマウスをクリック(ダウン)したときのイベントハンドラ
        public void Panel3_MouseDown(Object sender, MouseEventArgs e)
        {
            Point p = new Point();
            p.X = e.X;
            p.Y = e.Y;
            ls.Add(p);
            panel3.Invalidate();
        }

        // Panel3で描画するためのイベントハンドラ
        public void Panel3_Paint(Object sender, PaintEventArgs e)
        {
            Graphics g = e.Graphics;
            Pen dp = new Pen(Color.Pink, 3);

            foreach (Point p in ls)
            {
                g.DrawEllipse(dp, p.X - 5, p.Y - 5, 10, 10);
            }
        }
    }
}


- 投稿日:2019-11-30T07:49:46+09:00
C# - .zi_ とか .ex_ とかの拡張子をリネームするツールつくった
メールの添付ファイルとして拡張子
.zipや.exeが禁止されている環境で、
ファイルをリネームして展開するのが地味に面倒なので、Drag&Dropでリネームするツールを作ってみた。
(※添付ファイルを開くときは慎重に!)機能
Drag&Dropしたファイルの拡張子をリネームする。
拡張子の変換規則はプログラム内で決め打ちにしてある。ソースコード
using System;
using System.Collections.Generic;
using System.Drawing;
using System.IO;
using System.Windows.Forms;

// Note: "."が2つ以上ある場合は、最後の"."以降を拡張子とみなす
//  例: "hoge.tar.gz" の拡張子は "gz" とみなす
class FileRenamer : Form
{
    static Dictionary<string,string> _defaultExtensionDict = new Dictionary<string,string>(){
        // Key:変換前拡張子(小文字), Value:変換後拡張子
        // "."は付けない
        {"zi",  "zip"},
        {"zi_", "zip"},
        {"ex",  "exe"},
        {"ex_", "exe"},
        //{"",    "zip"},
    };

    FileRenamer()
    {
        Text = "File Renamer";
        ClientSize = new Size(200,200);

        AllowDrop = true;
        DragEnter += (sender,e)=>{
            if (e.Data.GetDataPresent(DataFormats.FileDrop)){
                e.Effect = DragDropEffects.Copy;
            }
            else{
                e.Effect = DragDropEffects.None;
            }
        };
        DragDrop += (sender,e)=>{
            var fileNames = (string[]) e.Data.GetData(DataFormats.FileDrop, false);
            foreach(string s in fileNames) {
                RenameFile(_defaultExtensionDict, s);
            }
        };
    }

    static bool RenameFile(Dictionary<string,string> extentionConvertionDict, string partialFileName)
    {
        var fi = new FileInfo(partialFileName);
        if ( !fi.Exists ) {
            return false;
        }
        string newName = GetRenamedFullName(extentionConvertionDict, fi);
        if ( newName == null ) {
            return false;
        }

        Console.WriteLine(newName);

        try {
            File.Move(fi.FullName, newName);
        }
        catch (UnauthorizedAccessException e) {
            Console.WriteLine(e);
        }
        catch (PathTooLongException e) {
            Console.WriteLine(e);
        }
        catch (DirectoryNotFoundException e) {
            Console.WriteLine(e);
        }
        catch (IOException e) {
            Console.WriteLine(e);
        }

        return true;
    }

    // return null : 変更対象ではない or エラー
    static string GetRenamedFullName(Dictionary<string,string> extentionConvertionDict, FileInfo fi)
    {
        string oldExtension;

        int posDot = fi.Name.LastIndexOf(".");
        if ( posDot < 0 ) {       // 拡張子がない
            oldExtension = "";
        }
        else if ( posDot == 0 ) { // "."から始まっている(ファイル名部分がない)
            return null;
        }
        else if ( posDot == fi.Name.Length-1 ) { // "."で終わっている
            return null;
        }
        else { // posDot >= 1 (拡張子がある)
            oldExtension = fi.Name.Substring(posDot+1); // "."を含まない拡張子部分
        }

        oldExtension = oldExtension.ToLowerInvariant(); // 小文字に変換する

        string newExtension;
        if (extentionConvertionDict.TryGetValue(oldExtension, out newExtension)){
            return Path.ChangeExtension(fi.FullName, newExtension);
        }
        else {
            return null; // 置換対象ではない
        }
    }

    [STAThread]
    static void Main(string[] args)
    {
        if ( args.Length >= 1 ) {
            foreach ( string s in args ) {
                RenameFile(_defaultExtensionDict, s);
            }
        }
        else {
            Application.Run(new FileRenamer());
        }
    }
}
- 投稿日:2019-11-30T06:57:14+09:00
Blazorの初期読み込み画面(Loading)を変更する
概要
Blazorで起動時のローディング画面を変更するための方法のメモ。
背景
BlazorのデフォルトテンプレートからWEBサイトを作成すると、起動時のローディング画面は下図のような[Loading...]と表示されるだけの非常にシンプルな画面となっています。
少し味気ないので、今風のWEBサイトのようにアニメーションでローディング画面を表示できるようにしたいと思います。
実装方法
変更対象のファイル
wwwroot直下のindex.htmlが対象のファイルになります。
wwwroot
├ index.html
…(略)
中を見ると下記のようにLoading...と記載されたappタグがあります。
この部分を変更することで、ローディング画面をおしゃれにできます。index.html<!DOCTYPE html> <html> <head> …(略) </head> <body> <app>Loading...</app> …(略) </body>CSSの追加
該当の個所にスピナーを埋め込みます。
今回は下記のようなシンプルなCSSで実現しているものを埋め込みます。
https://projects.lukehaas.me/css-loaders/お好みの色の設定をして、ViewSourceを押せばCSSが出力されるので取得します。
loader.css.loader, .loader:before, .loader:after { border-radius: 50%; width: 2.5em; height: 2.5em; -webkit-animation-fill-mode: both; animation-fill-mode: both; -webkit-animation: load7 1.8s infinite ease-in-out; animation: load7 1.8s infinite ease-in-out; } .loader { color: #ff8000; font-size: 10px; margin: 80px auto; position: relative; text-indent: -9999em; -webkit-transform: translateZ(0); -ms-transform: translateZ(0); transform: translateZ(0); -webkit-animation-delay: -0.16s; animation-delay: -0.16s; } .loader:before, .loader:after { content: ''; position: absolute; top: 0; } .loader:before { left: -3.5em; -webkit-animation-delay: -0.32s; animation-delay: -0.32s; } .loader:after { left: 3.5em; } @-webkit-keyframes load7 { 0%, 80%, 100% { box-shadow: 0 2.5em 0 -1.3em; } 40% { box-shadow: 0 2.5em 0 0; } } @keyframes load7 { 0%, 80%, 100% { box-shadow: 0 2.5em 0 -1.3em; } 40% { box-shadow: 0 2.5em 0 0; } }画面の中央に配置するためのレイアウトのCSSを追加します。
loader.css.loading { position: fixed; left: 0px; top: 0px; width: 100%; height: 100%; z-index: 9999999999; overflow: hidden; }作成したCSSの参照を追加し、appタグ内にスピナーを配置すれば完了です。
index.html<!DOCTYPE html> <html> <head> …(略) <link href="css/loader.css" rel="stylesheet" /> </head> <body> <app> <div class="loading"> <div class="loader"> <div class="dot-loader"></div> <div class="dot-loader dot-loader--2"></div> <div class="dot-loader dot-loader--3"></div> </div> </div> </app> …(略) </body>以上で完了です。
CSSのスピナー等、いろいろなリソースがありますので、自分の好みに合わせて変えてみてください。
下記などもよさそうです。
https://github.com/jlong/css-spinners参考

