- 投稿日:2019-07-27T23:22:16+09:00
vue-codemirrorはproductionモードだと挙動が変わるようです
こんにちは、プログラミングスクールのレビューサイト「スクールレポート」を運営しているアカネヤ(@ToshioAkaneya)です。
vue-codemirrorはproductionモードだと挙動が変わるようです。
タイトルの通りです。バグなのかわかりませんが、productionの時のみcodemirrorタグが生成されたりと、生成されるDOMエレメントが微妙に違います。
スタイルが適用されないなどのトラブルがある場合は、DOMを確認してみるのが良さそうです。
この記事が参考になれば幸いです。終わりに
Ruby on RailsとVueで作成したプログラミングスクールのレビューサイトを運営しています。良ければご覧ください。https://school-report.com/
- 投稿日:2019-07-27T22:41:33+09:00
Vue + Quasarで環境を設定する
Quasar
https://quasar.dev/
Vue.jsベースのフレームワークです。
Vue.jsで色々試す際に、スタイルまで設定するのは時間がかかると思っていたところ、存在を教えていただいたので利用してみました。既にあるプロジェクトにQuasarを組み込む内容ではなく
新規にQuasar入りのプロジェクトを作成する内容となります。Quasar CLI Installation
Quasarの導入には、Quasar-Cliを利用するのが簡単だということなので、インストールを行います。(
node>=8.9.0npm>=5.6.0yarn>=1.6.0)が必要ですまた、quasar-cliの利用にはvue-cliが必要ということなので両方のインストールを行います。
$ yarn global add vue-cli
$ yarn global add quasar-cli
次に
quasar init <フォルダー名>でプロジェクトの作成を行います。対話式で色々聞かれるので、自分の作りたいものに合わせて設定を行います。? Project name (internal usage for dev) hoge ? Project product name (official name; must start with a letter if you will buil d mobile apps) Quasar App ? Project description A Quasar Framework app ? Author hoge <hoge@hoge.com> ? Check the features needed for your project: (Press <space> to select, <a> to t oggle all, <i> to invert selection)ESLint ? Pick an ESLint preset Standard ? Cordova id (disregard if not building mobile apps) org.cordova.quasar.app ? Should we run `npm install` for you after the project has been created? (recom mended) yarnプロジェクトが作成されるので、cdでディレクトリを移動した後に、
quasar devを行うとローカルの開発環境が起動し、自動的にブラウザに画面が表示されます。(と、書いてありますが、自分はこのままでは起動できなかったので下記の動作を行いました。同じく動かない状況の方は、同じことを試してみてください。)#To get started: $ cd hoge $ quasar dev
quasar devでローカル環境が起動しない
理由はわかりませんが上記の動作で起動しなかったため、生成されたファイルを少し修正してみました。何故動くのかまでは調査できていないため、わかる方がいたら教えてください、、mm
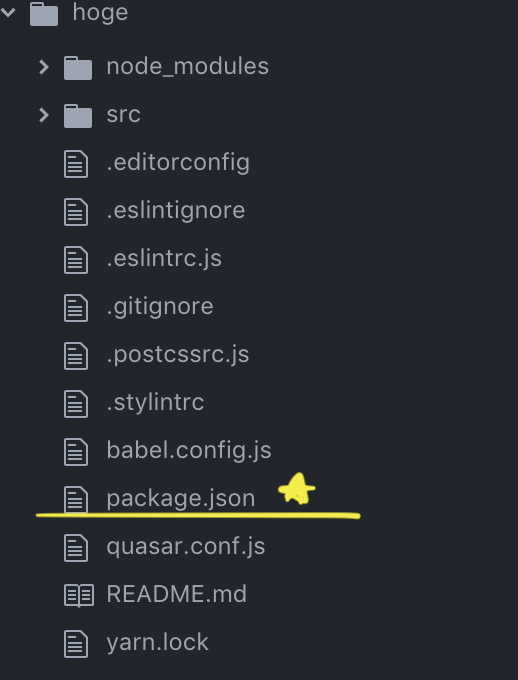
上記のようなディレクトリが生成されているので、package.jsonに変更を加えます。
9行目scriptsの中に、"dev": "quasar dev","build": "quasar build","build:pwa": "quasar build -m pwa",を追加します。とりあえずローカルを起動するだけなら1行で良いと思います。
↓
これを追加したら、プロジェクトの位置で
yarn devを行えば起動されます。$ yarn devさっそく色々試してみます。


- 投稿日:2019-07-27T19:54:24+09:00
2019 7月・令和元年・Nuxt .js・LIFF動向
はじめに
この記事は、WebBenchというプログラミングを「アクティブラーニング」形式で、
学ぶ勉強会を実施している筆者が分かりやすくプログラミングの技術を伝達するために作成しました。
過去に何回か、セミナーを都内で実施しております。
団体の説明などはこちら→Web Bench 公式 https://twitter.com/bench_web
note→https://note.mu/kaji_____/n/n50c684f7eb6bNuxt.jsとは、何ぞや
Nuxt.js(ナクストと読みます)とはユニバーサルなVue.jsアプリケーションを構築するためのフレームワーク
*UI構築のためのJSライブラリと思っていただければ大丈夫です。
*React.jsベースのSSR用フレームワークであるNext.jsに触発されて作成された、Vue.jsベースのフレームワークです。UIの描画サポート、SSRをはじめとした様々なサポートを行ってくれるものとなります。
*SSR(サーバサイドレンダリング)とは「(元々ブラウザ上でしか動かなかった)JavaScriptをサーバー内部で実行して、HTMLを生成すること」を指します。
引用・参考資料・Vue.js製フレームワークNuxt.jsではじめるUniversalアプリケーション開発
https://html5experts.jp/potato4d/24346/
環境セットアップ
Node.jsのインストール
自分のPCのターミナルで $ node –vでバージョン確認できます【Mac】 Homebrewを使う場合→brew –vでバージョン確認
$ brew update $ brew install node.js【Windows】http://nodejs.org/ja/から最新版をDL
vue-cliを利用
$ npm install -g vue-cli # 既にvue-cli を導入されているかたについて は不要です
$ vue init nuxt-community/starter-template nuxt_sample
サンプルプロジェクトのセットアップ
$ cd nuxt_sample
$ yarn
$ yarn dev
環境セットアップが難しいかた
Code sandboxというサービスを利用
ブラウザ上で動くエディタ
npm package対応している。こちらでも十分に演習することは可能です
以下・参考URL/記事
ルーティングの追加と非同期データの取得
Nuxt.js 上での開発における babel の対応文法のソース(設定プリ セット)https://github.com/vuejs/babel-preset-vue-app
参照URL https://html5experts.jp/potato4d/24346/
Laravel+NuxtでLIFFアプリを作ってみた
Laravel Vue.js LINE LIFFhttps://techblog.scouter.co.jp/entry/2019/03/14/120000
LIFFとは
LINEアプリ上で動くフロントエンドのフレームワーク。
こちらもNuxtと組み合わせて使用されることがユースケースとして増えている
- 投稿日:2019-07-27T19:40:46+09:00
Check! auth0-js の WebAuth.checkSession() でエラーが出てしまう場合の対処
こんにちは、 @dz_ こと大平かづみです。
Prologue
最近、 Auth0 をつかって認証機構を作ろうと試作しています。そこで躓いた点を共有します。
環境
フロントエンド(Vue.js)で Auth0 を使って認証をしようと試みています。基本的にはこのチュートリアル Auth0 Vue SDK Quickstarts: Login を参考にしています。
Vue.js に限らず、フロントエンドで Auth0 を使う場合は
auth0-jsを使うことが多いようです。今回は、この
auth0-jsを利用している際にみつけた事象について記載します。即タイムアウト?
タイムアウトするようなタイミングでもないのに下記のようなエラーが出た場合は、 Auth0 の管理画面から Applications の
Allowed Web Originsの設定を確認してみてください。こちらのドキュメント Error response - Silent Authentication | Auth0 にも記載があるように、Allowed Web Originsを正しく設定するとエラーが解消するかと思います。Timeout during executing web_message communication常に
Login requiredエラー上記エラーをクリアしたのに、今度は常に
Login required…調査してみたところ、 auth0.js/README.md at master · auth0/auth0.js の
checkSession()の説明を見ると、ソーシャルアカウントでログインしていて、開発環境(インターネット上でアクセス可能なドメインでない)場合は常にLogin requiredになるようです。
Important: If you're not using the hosted login page to do social logins, you have to use your own social connection keys. If you use Auth0's dev keys, you'll always get login_required as an error when calling checkSession.
ですので、ソーシャルアカウントではなくメールアドレスとパスワードでログインするようにすれば、このエラーは解消できることを確認できました。
なお、インターネットからアクセスできるドメインで運用すればこのエラーは解消されると見受けられますが、まだ試しておりませんのでご了承くださいませ。
Epilogue
これで常にタイムアウトする事象は避けられました!(笑)
どんどん開発するぞ~!(๑•̀ㅂ•́)و✧
- 投稿日:2019-07-27T17:51:53+09:00
Vue.js+Firebaseプロジェクト作成(Hosting、Authentication、Firestore、Storage、Functions)
書いてあること
- Vue.jsプロジェクトからFirebaseの下記機能を利用する
- Hosting
- Authentication
- Cloud Firestore
- Cloud Storage
- Cloud Functions
環境
- CentOS Linux release 7.6.1810 (Core)
- Node.js v10.16.0
- Npm 6.10.0
- Vue 3.9.1
- Firebase CLI 7.1.1
前提
下記で作成したVue.jsプロジェクト、Firebaseプロジェクトを利用する。
Vue.jsのプロジェクト作成
Firebaseプロジェクト作成方法作成したプロジェクト
↓に置いてあります。
vue-firebase-projectFirebase初期化
プラグインでFirebaseの初期化を行う。
src/plugins/firebase.jsimport firebase from 'firebase' const firebaseConfig = { apiKey: '<apiKey>', authDomain: '<authDomain>', databaseURL: '<databaseURL>', projectId: '<projectId>', storageBucket: '<storageBucket>', messagingSenderId: '<messagingSenderId> ', appId: '<appId>', } firebase.initializeApp(firebaseConfig) export default firebaseAuthenticationによるGoogleログイン認証
ルーティング設定
src/router.jsimport firebase from '@/plugins/firebase' import Login from './views/auth/login.vue' import Error from './views/auth/error.vue' import Home from './views/home.vue' (略) { path: '/auth/login', name: 'auth/login', component: Login, }, { path: '/auth/error', name: 'auth/error', component: Error, }, { path: '/', name: 'home', component: Home, }, (略) router.beforeResolve((to, from, next) => { const funcLoginAuthentication = firebase.functions().httpsCallable('funcLoginAuthentication') funcLoginAuthentication() .then(res => { const user = res.data // Googleログインしている場合 if (user.isLogin) { // xxxxx.comドメインの場合 if (to.name === 'auth/login') { next({ name: 'home' }) } else { next() } } else { // xxxxx.comドメイン以外の場合 if (to.name === 'auth/error') { next() } else { next({ name: 'auth/error' }) } } }) .catch(() => { // Googleログインしていない場合 if (to.name === 'auth/login') { next() } else { next({ name: 'auth/login' }) } }) }) export default routerログイン
src/views/auth/login.vue<template> <div class="login"> <h1>Login</h1> <img alt="Vue logo" src="../../assets/logo.png" /> <Login /> </div> </template> <script> import Login from '@/components/auth/Login.vue' export default { name: 'login', components: { Login, }, } </script>src/components/auth/Login.vue<template> <div class="login"> <button @click="doLogin()">Login</button> </div> </template> <script> import * as firebase from 'firebase' export default { name: 'Login', methods: { doLogin: () => { const provider = new firebase.auth.GoogleAuthProvider() // Googleアカウントの選択を強制 provider.setCustomParameters({ prompt: 'select_account consent' }) firebase .auth() .signInWithRedirect(provider) .then() }, }, } </script>ログアウト
src/components/auth/Logout.vue<template> <div class="footer" style="margin-top: 50px;"> <button @click="doLogout()">Logout</button> </div> </template> <script> import firebase from '@/plugins/firebase' export default { methods: { doLogout() { firebase .auth() .signOut() .then(() => { alert('ログアウトしました。') this.$router.push({ name: 'auth/login' }) }) .catch(error => { alert(error) }) }, }, } </script>ログインエラー
src/views/auth/error.vue<template> <div class="error"> <h1 style="color: tomato;">Error</h1> <p>指定したメールアドレスではログインできません。</p> <Logout /> </div> </template> <script> import Logout from '@/components/auth/Logout.vue' export default { name: 'error', components: { Logout, }, } </script>ホーム画面
src/views/home.vue<template> <div class="home"> <h1>Home</h1> <img alt="Vue logo" src="../assets/logo.png" /> <Home :lists="this.lists" /> <Logout /> </div> </template> <script> import Home from '@/components/Home.vue' import Logout from '@/components/auth/Logout.vue' export default { name: 'home', data() { return { lists: [ { id: 1, name: 'スタッフ一覧', url: '/staff' }, { id: 2, name: 'タスク一覧', url: '/task' }, { id: 3, name: 'ストレージ', url: '/storage' }, ], } }, components: { Home, Logout, }, } </script>src/components/Home.vue<template> <div class="home"> <div v-for="item in lists" :key="item.id" style="margin-top: 20px; margin-bottom: 20px;"> <router-link :to="item.url"> {{ item.name }} </router-link> </div> </div> </template> <script> export default { name: 'Home', props: ['lists'], } </script>ログイン状況確認(Functions)
functions/index.jsimport * as functions from 'firebase-functions' (略) export const funcLoginAuthentication = functions.https.onCall((data, context) => { const user = context.auth.token const isLogin = user.email.indexOf('@xxxxx.com') !== -1 return { isLogin: isLogin, uid: user.uid, name: user.name, email: user.email, picture: user.picture, } })コンポーネントからFirestore操作
コレクション・ドキュメントを準備
ルーティング設定
src/router.jsimport StaffIndex from './views/staff/index.vue' import StaffAdd from './views/staff/add.vue' import StaffUpdate from './views/staff/update.vue' (略) { path: '/staff', name: 'staff', component: StaffIndex, }, { path: '/staff/add', name: 'staff/add', component: StaffAdd, }, { path: '/staff/update/:id', name: 'staff/update', component: StaffUpdate, },スタッフ一覧
src/views/staff/index.vue<template> <div class="staff-index"> <h1>Staff</h1> <div style="margin-bottom: 30px;"> <router-link to="/">Home</router-link> </div> <StaffLists /> <Logout /> </div> </template> <script> import StaffLists from '@/components/staff/StaffLists.vue' import Logout from '@/components/auth/Logout.vue' export default { name: 'staff-index', components: { StaffLists, Logout, }, } </script>src/components/staff/StaffLists.vue<template> <div class="staff-lists"> <div> <button @click="doAdd()">Add</button> </div> <table style="border: solid #333 1px; margin: 30px auto 0;"> <thead> <tr> <th>Index</th> <th>id</th> <th>name</th> <th>mail</th> <th>age</th> <th>createdAt</th> <th></th> </tr> </thead> <tbody> <tr v-for="(item, index) in items" :key="item.id"> <td>{{ index }}</td> <td>{{ item.id }}</td> <td>{{ item.name }}</td> <td>{{ item.mail }}</td> <td>{{ item.age }}</td> <td>{{ item.createdAt | format }}</td> <td> <button @click="doUpdate(item.id)">Update</button> <button @click="doDelete(item.id)">delete</button> </td> </tr> </tbody> </table> </div> </template> <script> import firebase from '@/plugins/firebase' import moment from 'moment' export default { name: 'StaffLists', data() { return { db: null, items: [], } }, methods: { doAdd() { this.$router.push({ name: 'staff/add' }) }, doUpdate(modId) { this.$router.push({ name: 'staff/update', params: { id: modId } }) }, doDelete(delId) { if (!confirm('削除してよろしいですか?')) { return } this.db .collection('people') .doc(delId) .delete() }, }, created() { this.db = firebase.firestore() this.db .collection('people') // .orderBy('age') .orderBy('age', 'desc') .onSnapshot(querySnapshot => { this.items = [] // 取得結果を初期化 querySnapshot.forEach(doc => { // console.log(doc.id) // 自動ID // console.log(doc.data()) // 各フィールド // ドキュメントの自動ID、各フィールドを連結して配列へ追加 this.items.push(Object.assign({ id: doc.id }, doc.data())) }) }) }, filters: { // 日付書式指定 format: data => { return moment(data.toDate()).format('YYYY-MM-DD HH:mm:ss') }, }, } </script>スタッフ追加
src/views/staff/add.vue<template> <div class="staff-add"> <h1>Staff Add</h1> <StaffAddForm /> <Logout /> </div> </template> <script> import StaffAddForm from '@/components/staff/StaffAddForm.vue' import Logout from '@/components/auth/Logout.vue' export default { name: 'staff-add-form', components: { StaffAddForm, Logout, }, } </script>src/components/staff/StaffAddForm.vue<template> <div class="staff-add-form"> <table style="border: solid #333 1px; margin: 10px auto 0;"> <tbody> <tr> <th>Name</th> <td> <input type="text" v-model="formData.name" /> </td> </tr> <tr> <th>Mail</th> <td> <input type="text" v-model="formData.mail" /> </td> </tr> <tr> <th>Age</th> <td> <input type="number" v-model="formData.age" /> </td> </tr> <tr> <th></th> <td> <button @click="doAdd()">Add</button> <button @click="doCancel()">Cancel</button> </td> </tr> </tbody> </table> </div> </template> <script> import firebase from '@/plugins/firebase' export default { name: 'StaffAddForm', data() { return { db: null, people: null, formData: { name: null, mail: null, age: null, createdAt: null, }, } }, methods: { doAdd() { this.formData.createdAt = new Date() this.people .add(this.formData) .then(res => { alert(`Complete document add: ${res.id}`) }) .catch(error => { alert(`Error document add: ${error}`) }) this.$router.push({ name: 'staff' }) }, doCancel() { this.$router.push({ name: 'staff' }) }, }, created() { this.db = firebase.firestore() this.people = this.db.collection('people') }, } </script>スタッフ更新
src/views/staff/update.vue<template> <div class="staff-update"> <h1>Staff Update</h1> <StaffUpdateForm /> <Logout /> </div> </template> <script> import StaffUpdateForm from '@/components/staff/StaffUpdateForm.vue' import Logout from '@/components/auth/Logout.vue' export default { name: 'staff-update-form', components: { StaffUpdateForm, Logout, }, } </script>src/components/staff/StaffUpdateForm.vue<template> <div class="staff-add-form"> <table style="border: solid #333 1px; margin: 10px auto 0;"> <tbody> <tr> <th>Name</th> <td> <input type="text" v-model="formData.name" /> </td> </tr> <tr> <th>Mail</th> <td> <input type="text" v-model="formData.mail" /> </td> </tr> <tr> <th>Age</th> <td> <input type="number" v-model="formData.age" /> </td> </tr> <tr> <th></th> <td> <button @click="doUpdate()">Update</button> <button @click="doCancel()">Cancel</button> </td> </tr> </tbody> </table> </div> </template> <script> import firebase from '@/plugins/firebase' export default { name: 'StaffUpdateForm', data() { return { db: null, people: null, id: null, peopleData: null, formData: { name: null, mail: null, age: null, createdAt: null, }, } }, methods: { doUpdate() { this.formData.createdAt = new Date() this.people .doc(this.id) .set(this.formData) .then(() => { alert('Complete document Update') }) .catch(error => { alert(`Error document Update: ${error}`) }) this.$router.push({ name: 'staff' }) }, doCancel() { this.$router.push({ name: 'staff' }) }, }, created() { this.db = firebase.firestore() this.people = this.db.collection('people') // Firebaseからデータ取得 this.id = this.$route.params.id this.people .doc(this.id) .get() .then(doc => { if (doc.exists) { this.peopleData = doc.data() // 取得したデータをFormへ表示 this.formData.name = this.peopleData.name this.formData.mail = this.peopleData.mail this.formData.age = this.peopleData.age } else { alert('Not Found Document') this.$router.push({ name: 'staff' }) } }) .catch(error => { console.log(`Error: ${error}`) this.$router.push({ name: 'staff' }) }) }, } </script>FunctionsからFirestore操作
コレクション・ドキュメントを準備
ルーティング設定
src/router.jsimport TaskIndex from './views/task/index.vue' import TaskAdd from './views/task/add.vue' import TaskUpdate from './views/task/update.vue' (略) { path: '/task', name: 'task', component: TaskIndex, }, { path: '/task/add', name: 'task/add', component: TaskAdd, }, { path: '/task/update/:id', name: 'task/update', component: TaskUpdate, },タスク一覧
src/views/task/index.vue<template> <div class="task-index"> <h1>Task</h1> <div style="margin-bottom: 30px;"> <router-link to="/">Home</router-link> </div> <TaskLists /> <Logout /> </div> </template> <script> import TaskLists from '@/components/task/TaskLists.vue' import Logout from '@/components/auth/Logout.vue' export default { name: 'task-index', components: { TaskLists, Logout, }, } </script>src/components/task/TaskLists.vue<template> <div class="task-lists"> <button @click="doAdd()">Add</button> <table style="border: solid #333 1px; margin: 30px auto 0;"> <thead> <tr> <th>Index</th> <th>id</th> <th>name</th> <th>description</th> <th>done</th> <th></th> </tr> </thead> <tbody> <tr v-for="(item, index) in items" :key="item.id"> <td>{{ index }}</td> <td>{{ item.id }}</td> <td>{{ item.name }}</td> <td>{{ item.description }}</td> <td>{{ item.done }}</td> <td> <button @click="doUpdate(item.id)">Update</button> <button @click="doDelete(item.id)">delete</button> </td> </tr> </tbody> </table> </div> </template> <script> import firebase from '@/plugins/firebase' export default { name: 'TaskLists', data() { return { items: [], } }, methods: { doAdd() { this.$router.push({ name: 'task/add' }) }, doUpdate(modId) { this.$router.push({ name: 'task/update', params: { id: modId } }) }, async doDelete(delId) { if (!confirm('削除してよろしいですか?')) { return } const funcDeleteTask = firebase.functions().httpsCallable('funcDeleteTask') await funcDeleteTask({ id: delId, }) .then(res => { console.log(res) }) .catch(err => { console.log(err) }) // データ取得 const funcGetTaskLists = firebase.functions().httpsCallable('funcGetTaskLists') await funcGetTaskLists() .then(res => { this.items = res.data.items }) .catch(err => { console.log(err) }) }, }, created() { // データ取得 const funcGetTaskLists = firebase.functions().httpsCallable('funcGetTaskLists') funcGetTaskLists() .then(res => { this.items = res.data.items }) .catch(err => { console.log(err) }) }, } </script>タスク追加
src/views/task/add.vue<template> <div class="task-add"> <h1>Task Add</h1> <TaskAddForm /> <Logout /> </div> </template> <script> import TaskAddForm from '@/components/task/TaskAddForm.vue' import Logout from '@/components/auth/Logout.vue' export default { name: 'staff-add-form', components: { TaskAddForm, Logout, }, } </script>src/components/task/TaskAddForm.vue<template> <div class="staff-add-form"> <table style="border: solid #333 1px; margin: 10px auto 0;"> <tbody> <tr> <th>Name</th> <td> <input type="text" v-model="formData.name" /> </td> </tr> <tr> <th>Description</th> <td> <textarea rows="3" v-model="formData.description" /> </td> </tr> <tr> <th>Done</th> <td> <input type="radio" id="false" value="false" v-model="formData.done" /> <label for="false">False</label> <input type="radio" id="true" value="true" v-model="formData.done" /> <label for="true">True</label> </td> </tr> <tr> <th></th> <td> <button @click="doAdd()">Add</button> <button @click="doCancel()">Cancel</button> </td> </tr> </tbody> </table> </div> </template> <script> import firebase from '@/plugins/firebase' export default { name: 'TaskAddForm', data() { return { formData: { name: null, description: null, done: null, }, } }, methods: { doAdd() { const funcAddTask = firebase.functions().httpsCallable('funcAddTask') this.formData.done = this.formData.done === 'true' funcAddTask({ task: this.formData, }) .then(res => { alert(`Complete document add: ${res.id}`) console.log(res) }) .catch(error => { alert(`Error document add: ${error}`) }) this.$router.push({ name: 'task' }) }, doCancel() { this.$router.push({ name: 'task' }) }, }, created() { this.db = firebase.firestore() this.people = this.db.collection('people') }, } </script>タスク更新
src/views/task/update.vue<template> <div class="task-update"> <h1>Task Update</h1> <TaskUpdateForm /> <Logout /> </div> </template> <script> import TaskUpdateForm from '@/components/task/TaskUpdateForm.vue' import Logout from '@/components/auth/Logout.vue' export default { name: 'staff-update-form', components: { TaskUpdateForm, Logout, }, } </script>src/components/task/TaskUpdateForm.vue<template> <div class="task-update-form"> <table style="border: solid #333 1px; margin: 10px auto 0;"> <tbody> <tr> <th>Name</th> <td> <input type="text" v-model="formData.name" /> </td> </tr> <tr> <th>Description</th> <td> <textarea rows="3" v-model="formData.description" /> </td> </tr> <tr> <th>Done</th> <td> <input type="radio" id="false" value="false" v-model="formData.done" /> <label for="false">False</label> <input type="radio" id="true" value="true" v-model="formData.done" /> <label for="true">True</label> </td> </tr> <tr> <th></th> <td> <button @click="doUpdate()">Update</button> <button @click="doCancel()">Cancel</button> </td> </tr> </tbody> </table> </div> </template> <script> import firebase from '@/plugins/firebase' export default { name: 'TaskUpdateForm', data() { return { id: null, taskData: null, formData: { name: null, description: null, done: null, }, } }, methods: { doUpdate() { const funcUpdateTask = firebase.functions().httpsCallable('funcUpdateTask') this.formData.done = this.formData.done === 'true' funcUpdateTask({ id: this.id, task: this.formData, }) .then(res => { alert('Complete document Update') }) .catch(error => { alert(`Error document Update: ${error}`) }) this.$router.push({ name: 'task' }) }, doCancel() { this.$router.push({ name: 'task' }) }, }, created() { // Firebaseからデータ取得 this.id = this.$route.params.id const funcGetTask = firebase.functions().httpsCallable('funcGetTask') funcGetTask({ id: this.id, }) .then(res => { this.taskData = res.data if (this.taskData.status) { // 取得したデータをFormへ表示 this.formData.name = this.taskData.name this.formData.description = this.taskData.description this.formData.done = this.taskData.done } else { alert('Not Found Document') this.$router.push({ name: 'task' }) } }) .catch(error => { console.log(`Error: ${error}`) this.$router.push({ name: 'task' }) }) }, } </script>Firestore API(Functions)
functions/index.jsadmin.initializeApp() const db = admin.firestore() (略) export const funcGetTaskLists = functions.https.onCall(async (data, context) => { const response = { status: null, error: null, items: [], } await db .collection('task') .get() .then(snapshot => { response.status = true snapshot.forEach(doc => { response.items.push(Object.assign({ id: doc.id }, doc.data())) }) }) .catch(error => { response.status = false response.error = error }) return response }) export const funcGetTask = functions.https.onCall(async (data, context) => { const response = { status: null, error: null, } await db .collection('task') .doc(data.id) .get() .then(doc => { if (doc.exists) { const taskData = doc.data() response.status = true response.name = taskData.name response.description = taskData.description response.done = taskData.done response.createdAt = taskData.createdAt } else { response.status = false } }) .catch(error => { response.status = false response.error = error }) return response }) export const funcAddTask = functions.https.onCall(async (data, context) => { const response = {} const task = data.task task.createdAt = new Date() await db .collection('task') .add(task) .then(res => { response.status = true response.id = res.id }) .catch(error => { response.status = false response.error = error }) return response }) export const funcUpdateTask = functions.https.onCall(async (data, context) => { const response = {} const id = data.id const task = data.task task.createdAt = new Date() await db .collection('task') .doc(id) .set(task) .then(() => { response.status = true }) .catch(error => { response.status = false response.error = error }) return response }) export const funcDeleteTask = functions.https.onCall(async (data, context) => { const response = {} const id = data.id await db .collection('task') .doc(id) .delete() .then(() => { response.status = true }) .catch(error => { response.status = false response.error = error }) return response })コンポーネント・FunctionsからStorage操作
コレクションを準備
ルーティング設定
src/router.jsimport StorageIndex from './views/storage/index.vue' import Storage01 from './views/storage/storage01.vue' import Storage02 from './views/storage/storage02.vue' import Storage03 from './views/storage/storage03.vue' import Storage04 from './views/storage/storage04.vue' import Storage05 from './views/storage/storage05.vue' (略) { path: '/storage', name: 'storage', component: StorageIndex, }, { path: '/storage/01', name: 'storage/01', component: Storage01, }, { path: '/storage/02', name: 'storage/02', component: Storage02, }, { path: '/storage/03', name: 'storage/03', component: Storage03, }, { path: '/storage/04', name: 'storage/04', component: Storage04, }, { path: '/storage/05', name: 'storage/05', component: Storage05, },Storage動作確認用のメニュー画面
src/views/storage/index.vue<template> <div class="storage-index"> <h1>Storage</h1> <div style="margin-bottom: 30px;"> <div style="margin-bottom: 20px;"><router-link to="/">Home</router-link></div> <div style="margin-bottom: 20px;"><router-link to="/storage/01">Storage01</router-link></div> <div style="margin-bottom: 20px;"><router-link to="/storage/02">Storage02</router-link></div> <div style="margin-bottom: 20px;"><router-link to="/storage/03">Storage03</router-link></div> <div style="margin-bottom: 20px;"><router-link to="/storage/04">Storage04</router-link></div> <div style="margin-bottom: 20px;"><router-link to="/storage/05">Storage05</router-link></div> </div> <Logout /> </div> </template> <script> import Logout from '@/components/auth/Logout.vue' export default { name: 'storage-index', components: { Logout, }, } </script>アップロードしたテキストファイルの内容を表示
src/views/storage/storage01.vue<template> <div class="storage01"> <h1>Storage01</h1> <div style="margin-bottom: 30px;"> <router-link to="/">Home</router-link> </div> <Storage01 /> <Logout /> </div> </template> <script> import Storage01 from '@/components/storage/Storage01.vue' import Logout from '@/components/auth/Logout.vue' export default { name: 'storage01', components: { Logout, Storage01, }, } </script>src/components/storage/Storage01.vue<template> <div class="storage01"> <div v-for="(item, index) in items" :key="index" style="margin-bottom: 10px;"> {{ item }} </div> </div> </template> <script> import firebase from '@/plugins/firebase' export default { name: 'Storage01', data() { return { storage: null, txtRef: null, items: [], } }, created() { this.storage = firebase.storage() this.txtRef = this.storage.ref('upload/sample.txt') this.txtRef .getDownloadURL() .then(url => { console.log(url) const xhr = new XMLHttpRequest() xhr.responseType = 'text' xhr.onload = event => { const data = xhr.responseText const array = data.split('\r\n') for (const index in array) { this.items.push(array[index]) } console.log(this.items) } xhr.open('GET', url) xhr.send() }) .catch(error => { console.log(error) }) }, } </script>アップロードした画像ファイルを表示
src/views/storage/storage02.vue<template> <div class="storage02"> <h1>Storage02</h1> <div style="margin-bottom: 30px;"> <router-link to="/">Home</router-link> </div> <Storage02 /> <Logout /> </div> </template> <script> import Storage02 from '@/components/storage/Storage02.vue' import Logout from '@/components/auth/Logout.vue' export default { name: 'storage02', components: { Logout, Storage02, }, } </script>src/components/storage/Storage02.vue<template> <div class="storage02"> <img :src="img.url" :alt="img.alt" /> </div> </template> <script> import firebase from '@/plugins/firebase' export default { name: 'Storage02', data() { return { storage: null, imgRef: null, img: { url: null, alt: null, }, } }, created() { this.storage = firebase.storage() this.imgRef = this.storage.ref('image.jpg') this.imgRef .getDownloadURL() .then(url => { console.log(url) this.img.url = url }) .catch(error => { console.log(error) }) }, } </script>メタデータを取得
src/views/storage/storage04.vue<template> <div class="storage04"> <h1>Storage04</h1> <div style="margin-bottom: 30px;"> <router-link to="/">Home</router-link> </div> <Storage04 /> <Logout /> </div> </template> <script> import Storage04 from '@/components/storage/Storage04.vue' import Logout from '@/components/auth/Logout.vue' export default { name: 'storage04', components: { Logout, Storage04, }, } </script>src/components/storage/Storage04.vue<template> <div class="storage04"> <div style="margin-bottom: 20px;"> <input type="text" v-model="formData.fname" /> </div> <div> <button @click="getMetadata()">Metadata</button> </div> </div> </template> <script> import firebase from '@/plugins/firebase' export default { name: 'Storage04', data() { return { storage: null, ref: null, formData: { fname: null, }, } }, methods: { getMetadata() { this.ref = this.storage.ref(this.formData.fname) this.ref .getMetadata() .then(metadata => { console.log(metadata) alert('Get metadata') }) .catch(error => { console.log(error) }) }, }, created() { this.storage = firebase.storage() }, } </script>選択したファイルをストレージへアップロード、ファイル情報をFirestoreへ保存
src/views/storage/storage05.vue<template> <div class="storage05"> <h1>Storage05</h1> <div style="margin-bottom: 30px;"> <router-link to="/">Home</router-link> </div> <Storage05 /> <Logout /> </div> </template> <script> import Storage05 from '@/components/storage/Storage05.vue' import Logout from '@/components/auth/Logout.vue' export default { name: 'storage05', components: { Logout, Storage05, }, } </script>src/components/storage/Storage05.vue<template> <div class="storage05"> <div style="margin-bottom: 20px;"> <input type="text" v-model="formData.name" placeholder="名前" /> </div> <div style="margin-bottom: 20px;"> <textarea v-model="formData.description" cols="50" rows="5" /> </div> <div style="margin-bottom: 20px;"> <input type="file" name="file" ref="file" @change="selectedFile" /> </div> <div> <table style="border: solid #333 1px; margin: 30px auto 0;" v-if="formData.files.length"> <thead> <tr> <th>Index</th> <th>ファイル名</th> <th>タイプ</th> <th>サイズ</th> <th></th> </tr> </thead> <tbody> <tr v-for="(item, index) in formData.files" :key="index"> <td>{{ index }}</td> <td>{{ item.name }}</td> <td>{{ item.type }}</td> <td>{{ item.size }}</td> <td><button @click="doDelete(index)">X</button></td> </tr> </tbody> </table> </div> <div style="margin-top: 30px;"> <button @click="doUpload">Upload</button> </div> </div> </template> <script> import firebase from '@/plugins/firebase' import moment from 'moment' export default { name: 'Storage05', data() { return { storage: null, db: null, ref: null, formData: { name: null, description: null, files: [], }, files: [], } }, methods: { // 選択されたファイルの情報を保存 selectedFile(event) { event.preventDefault() this.formData.files.push({ file: event.target.files[0], name: event.target.files[0].name, type: event.target.files[0].type, size: event.target.files[0].size, }) // 選択したファイルをリセット this.$refs.file.type = 'text' this.$refs.file.type = 'file' }, doDelete(index) { if (!confirm(`${this.formData.files[index].name} を削除します。よろしいですか?`)) { return } this.formData.files.splice(index, 1) }, async doUpload(event) { const dir = moment().format('YYYYMMDDHHmmss') // Storageへファイルをアップロード await this.formData.files.forEach(async item => { // console.log(item.file) this.ref = this.storage.ref(`${dir}/${item.name}`) // ファイルをアップロード await this.ref .put(item.file) .then(snapshot => { console.log(snapshot) }) .catch(error => { console.log(error) }) }) // Firestoreへデータを保存 this.formData.files.forEach(item => { this.files.push({ name: item.name, downloadUrl: `https://firebasestorage.googleapis.com/v0/b/vue-firebase-project-xxxxx.appspot.com/o/${encodeURIComponent( dir + '/' + item.name )}?alt=media`, }) }) this.db.collection('storage').add({ user: firebase.auth().currentUser.displayName, name: this.formData.name, description: this.formData.description, files: this.files, }) alert('Upload complete') this.formData.name = null this.formData.description = null this.formData.files = [] }, }, created() { this.storage = firebase.storage() this.db = firebase.firestore() console.log(firebase.auth().currentUser) }, } </script>メタデータ設定、アップロードしたファイル情報を保存(Functions)
functions/index.jsconst storage = admin.storage() (略) export const setMetaData = functions.storage.object().onFinalize((object, context) => { const ref = storage.bucket().file(object.name) const metaData = { cacheControl: 'max-age=300', } ref .setMetadata(metaData) .then(res => { console.info(res) }) .catch(error => { console.error(error) }) db.collection('storage_func') .add({ bucket: object.bucket, contentType: object.contentType, id: object.id, md5Hash: object.md5Hash, mediaLink: object.mediaLink, name: object.name, selfLink: object.selfLink, size: object.size, storageClass: object.storageClass, timeCreated: object.timeCreated, downloadUrl: `https://firebasestorage.googleapis.com/v0/b/${object.bucket}/o/${encodeURIComponent( object.name )}?alt=media`, }) .then(res => { console.log(res) }) .catch(error => { console.log(error) }) })メモ
Firebaseの扱い方がそもそもこれでよいのか?わからないため、こう書いたほうが効率的などあればどなたか教えてください。
個人的に各機能の個人的な理解で終わっているため、どこかでVuetify、Elementなどで多少見た目も組み合わせて使ってみようかと。


- 投稿日:2019-07-27T17:49:09+09:00
Vue.jsでカレンダーコンポーネント作ってみた
前置き
カレンダーと一言で言っても、機能も様々なので、
ひとまず機能もシンプルで、あまりごちゃごちゃさせてないものを紹介します。
vueとmomentのみで作っています。下記が主な機能:
1.<>ボタンで月単位での移動ができる
2.選択状態の概念があること(表示時は現在日付)
3.日付ごとにその日のTodoを表示できる結構スタイルに依存するので、簡単なcssも記述します。
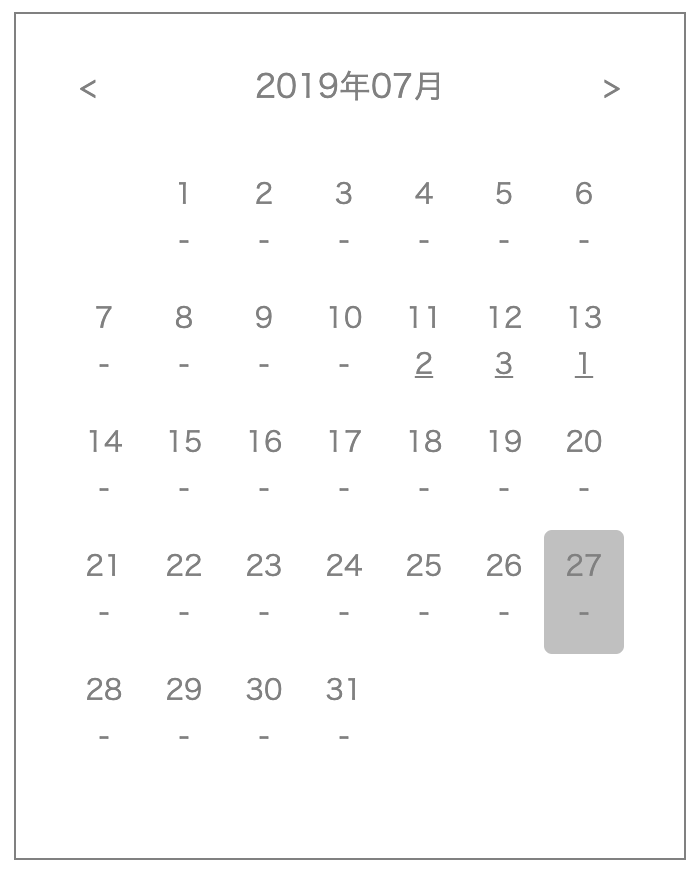
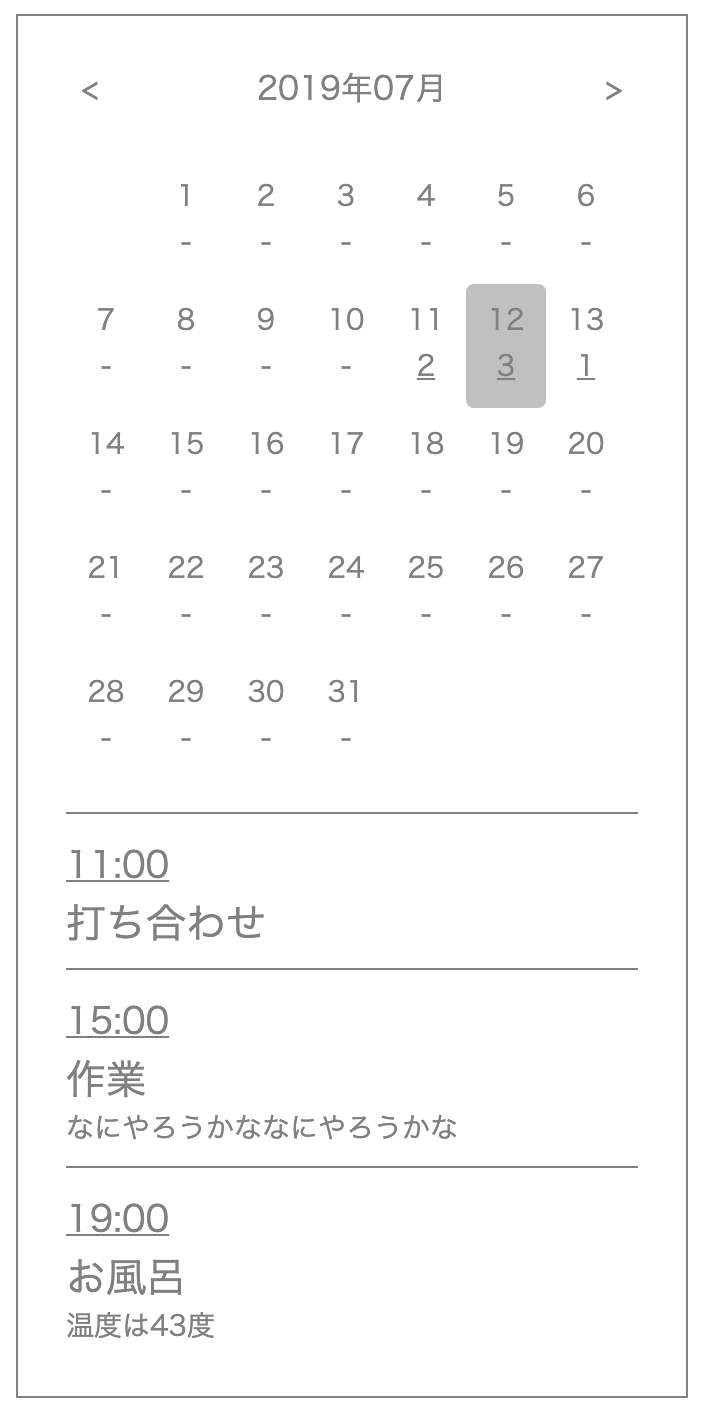
完成品
んで、todoがある日付を選択すると、
todoリストが出る仕組み。まずはじめに
todoリストを別ファイルで作ってみます。
実際こういうコンポーネントを使うアプリを作る場合は、
だいたいDBから取得するパターンが多いと思います。
今回は簡易的に定数ファイル的なノリで作成。todoList.jsconst TODO_LIST = [ { id: 1, title: "起床", description: "きっとねむい", date: "2019-07-11", time: "09:00", }, { id: 2, title: "出勤", description: "まだねむい", date: "2019-07-11", time: "10:00", }, { id: 3, title: "打ち合わせ", description: "", date: "2019-07-12", time: "11:00", }, { id: 4, title: "作業", description: "なにやろうかななにやろうかな", date: "2019-07-12", time: "15:00", }, { id: 5, title: "お風呂", description: "温度は43度", date: "2019-07-12", time: "19:00", }, { id: 6, title: "カレンダー作り", description: "つくるぞつくるぞ", date: "2019-07-13", time: "14:00", }, ]; export default TODO_LIST;続いて、カレンダーのカレンダーの部分。
Calender.vue<template> <div class="calender"> <div class="calender-component"> <div class="calender-header"> <div class="arrow-back" v-on:click="changeMonth(0)"><</div> <div class="current-date">{{ dateLabel }}</div> <div class="arrow-next" v-on:click="changeMonth(1)">></div> </div> <div class="calender-body"> <ul class="calender-panel-list"> <li class="calender-panel_space" v-for="space in spaces"></li> <li class="calender-panel" v-on:click="selectDate" v-for="date in dates" :id="date.date" v-bind:class="selectedDate === date.date ? 'selected' : ''" > <div class="calender-date"> {{ date.dateNumber }} </div> <div class="calender-todo" v-bind:class="date.todoNumber !== '-' ? 'number' : ''"" > {{ date.todoNumber }} </div> </li> </ul> </div> <div class="calender-footer"> <div class="calender-footer_todo" v-for="todo in todoList" v-show="todo.date === selectedDate" > <div class="calender-footer_todo-time"> {{ todo.time }} </div> <div class="calender-footer_todo-title"> {{ todo.title }} </div> <div class="calender-footer_todo-description"> {{ todo.description }} </div> </div> </div> </div> </div> </template> <script> import moment from 'moment'; import TODO_LIST from '../data/todoList'; export default { mixins: [TODO_LIST], data () { return { todoList: TODO_LIST, //todoリスト dates: [], //カレンダーの日付 spaces: [], //その月の最初日が始まる場所 dateLabel: "", //フォーマット="2019年7月" selectedMonth: null, //今選択している月 selectedDate: null, //今選択している日付 } }, methods: { selectDate(event) { //日付を選択する this.selectedDate = event.currentTarget.id }, changeMonth(num) { //月を変更 if(num === 0) { this.selectedMonth = moment(this.selectedMonth).subtract(1, 'months'); } else { this.selectedMonth = moment(this.selectedMonth).add(1, 'months'); } } }, created() { //画面表示時に今日の日付と月を設定。 this.selectedDate = moment().format('YYYY-MM-DD'); this.selectedMonth = moment(); }, watch: { selectedMonth: function() { //選択している月の変更時の処理、画面表示時も動きます this.dateLabel = moment(this.selectedMonth).format('YYYY年MM月'); //月ラベルを更新 this.spaces = []; //スペースを初期化 for(let i = 0; i < moment(this.selectedMonth).startOf('month').day(); i++) { //スペースを更新 this.spaces[i] = i; } this.dates = []; //カレンダーパネルを初期化 for(let i = 0; i < moment(this.selectedMonth).daysInMonth(); i++) { //カレンダーパネルを更新 let todoNumber = '-'; for(let k of Object.keys(this.todoList)) { //todoListの情報をカレンダーパネルに追加 if(this.todoList[k].date === this.dates[i].date) { todoNumber++; } } this.dates[i] = { date: moment(this.selectedMonth).startOf('month').add(i, 'day').format('YYYY-MM-DD'), dateNumber: i + 1, todoNumber: todoNumber } } } } } </script>ざっくりとした解説をしていきます。
createdにて、まずは今日の日付と、今月の値を取得。this.selectedDate = moment().format('YYYY-MM-DD'); this.selectedMonth = moment();methodsは二つ。
1.選択している日付を変更。selectDate(event) { //日付を選択する this.selectedDate = event.currentTarget.id },2.選択している月を変更。
changeMonth(num) { //月を変更
  if(num === 0) {
    this.selectedMonth = moment(this.selectedMonth).subtract(1, 'months');
  } else {
    this.selectedMonth = moment(this.selectedMonth).add(1, 'months');
}
"<"には0、">"では1を返しております。
watchではselectedMonthの状態を監視。
selectedMonth: function() { //選択している月の変更時の処理、画面表示時も動きます
  this.dateLabel = moment(this.selectedMonth).format('YYYY年MM月'); //月ラベルを更新

  this.spaces = []; //スペースを初期化
  for(let i = 0; i < moment(this.selectedMonth).startOf('month').day(); i++) { //スペースを更新
    this.spaces[i] = i;
  }

  this.dates = []; //カレンダーパネルを初期化
  for(let i = 0; i < moment(this.selectedMonth).daysInMonth(); i++) { //カレンダーパネルを更新
    let todoNumber = '-';
    for(let k of Object.keys(this.todoList)) { //todoListの情報をカレンダーパネルに追加
      if(this.todoList[k].date === this.dates[i].date) {
        todoNumber++;
      }
    }
    this.dates[i] = {
      date: moment(this.selectedMonth).startOf('month').add(i, 'day').format('YYYY-MM-DD'),
      dateNumber: i + 1,
      todoNumber: todoNumber
    }
  }
}
ここで、選択されてる月(selectedMonth)の日数と、最初の日が何曜日かの計算と、todoListの情報も各日付に入れてます。
spacesとdatesの更新を行なっております。this.spaces = [0]; //1日が火曜日の場合 this.spaces = [0, 1, 2, 3]; //1日が金曜日の場合selectedMonthが変更されるたびに、watchの処理が走るので、
それに合わせてカレンダーも更新されます。スタイルも乗せときます。
<style scoped>

.calender {
  width: 336px;
}

.calender-component {
  min-height: 320px;
  border: solid 1px gray;
  padding: 24px;
  box-sizing: border-box;
}

.calender-header {
  display: flex;
  justify-content: space-between;
}

.arrow-back {
  font-size: 16px;
  color: gray;
  user-select: none;
  cursor: pointer;
  text-align: center;
  width: 24px;
  height: 24px;
}

.arrow-back:hover {
  background-color: silver;
  border-radius: 4px;
}

.arrow-next {
  font-size: 16px;
  color: gray;
  user-select: none;
  cursor: pointer;
  text-align: center;
  width: 24px;
  height: 24px;
}

.arrow-next:hover {
  background-color: silver;
  border-radius: 4px;
}

.current-date {
  color: gray;
  user-select: none;
}

.calender-body {
  margin-top: 24px;
}

.calender-panel-list {
  display: flex;
  flex-wrap: wrap;
  padding: 0;
  justify-content: left;
}

.calender-panel {
  padding: 8px 0px;
  width: 40px;
  text-align: center;
  color: gray;
  font-size: 14px;
  user-select: none;
  list-style: none;
}

.calender-panel:hover {
  background-color: silver;
  border-radius: 4px;
}

.calender-date {
  cursor: pointer;
}

.selected {
  background-color: silver;
  border-radius: 4px;
}

.calender-todo {
  cursor: pointer;
  text-align:center;
  margin: 0px 8px;
  line-height: 25px;
}

.calender-panel_space {
  width: 40px;
  list-style: none;
}

.calender-footer_todo {
  border-top: 1px gray solid;
  padding-top: 12px;
  margin-top: 8px;
}

.calender-footer_todo-time {
  font-size: 18px;
  color: gray;
  word-break: break-word;
  text-decoration: underline;
}

.calender-footer_todo-title {
  font-size: 20px;
  color: gray;
  word-break: break-word;
}

.calender-footer_todo-description {
  font-size: 14px;
  color: gray;
  word-break: break-word;
}

.number {
  text-decoration: underline;
}

</style>
一行に日付が7日(曜日分)表示させるのは、スタイルで制御しちゃってます。
まとめと振り返り
実際にこれを使用したプロジェクトでは、1時間ぐらいで作ったので、
ところどころ直して、自分の備忘録として書いてみました。ほどよくライフサイクルとディレクティブを使ってたりするので、
Vue初心者の学習にちょうどいいかもしれないです。input type="date"コンポーネントの自作とかも、
これをベースに作れそうですよね。ただ、スタイル依存の部分が多いという点で、
汎用性に怪しさを感じました。あとqiitaに初めて投稿しましたが、
わかりやすく書くのってめちゃくちゃむずい。気づいたところがあれば、都度更新していきたいです。
- 投稿日:2019-07-27T17:00:46+09:00
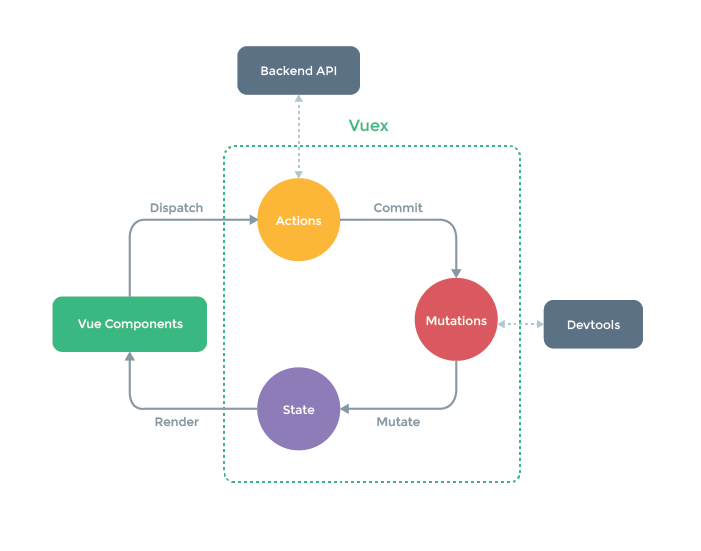
Fluxに学ぶvuex
最初に
この記事は自分なりにvuexを噛み砕こうと初心者がまとめたものです。
この解釈違うだろ等あるかもしれませんので、そのときはご指摘いただけると嬉しいです!
なお、今回はソースについては触れず、概念についての解釈をまとめています。この記事を書くことになった背景
現場でまずVue.jsの新規開発、続いてknockout.jsの(以下ko.js)保守開発に関わる機会がありました。
どっちにも触れた上での最初の感想、「えっko.js分かりにくいがすぎる!データの流れがよ、よめない。」という感じでした(笑)
ko.jsは一瞬流行ったフレームワークだそうで・・・不人気!?
それがまた大規模で複雑なシステムだったので、余計でした。
vuexの状態管理の恩恵を実感することができました。
実感しているうちに、自分で調べたことを含め、まとめておこうと思います。目次
1.Fluxについて(概念)
2.vuexについて(概念)1.Fluxについて
vuexはFluxというアーキテクトの概念から影響を大きく受けています。
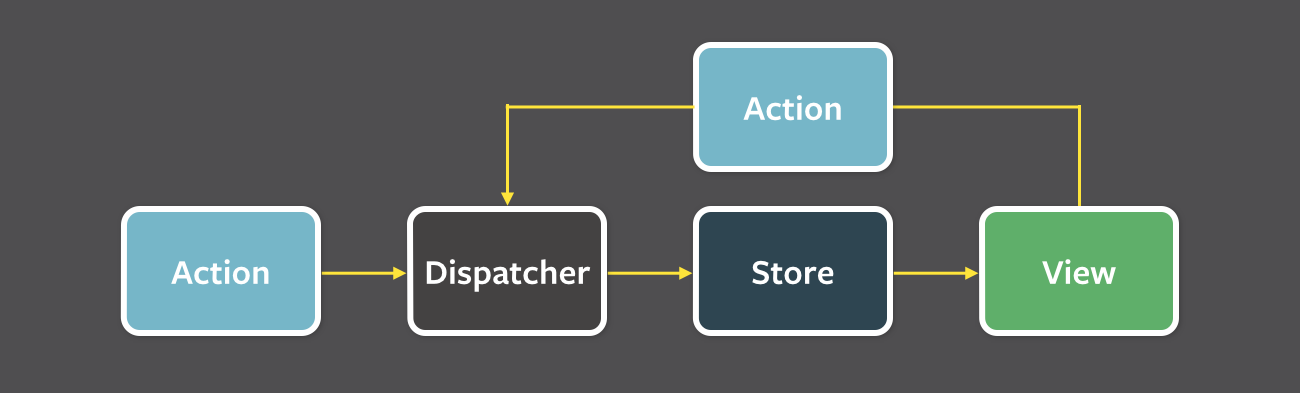
Fluxとは、一言で言うと、状態管理のための一方向のデータフローのアーキテクチャーです。
なんじゃそりゃ・・・
Fluxを勉強するのに
漫画で説明する Fluxが絵で説明されていてわかりやすかったです。Fluxが生まれた背景として・・・
・「漫画で説明する Flux」から引用
データを持ち、データを描画するために View 層にデータを渡す Model があります。
ユーザーの操作は View を介して起こっているので、View は時々ユーザーの入力に基づいて Model を更新する必要がありました。
加えて、ときにこれらのユーザーの操作は他の変更の連鎖を誘発します。非同期に自由にいろんな場所でデータの変更が行われることでデータの流れが追いにくくなり、デバックがしづらくなりました。
この問題に対して解決策として考え出されたのがFluxです!!
一方向のデータフローのアークテクチャーを設計することで、データの変更を追いやすくしたのです!
ReactJSの状態管理フレームワークreduxもこのFluxから影響を受けています。
2.vuexについて
まずVueの一つの特徴である単一ファイルコンポーネントの話から始めます。
単一ファイルコンポーネントにはHTML、JS、CSSをまとめることができ、画面ごとにファイルを管理できて大変便利です。
さらにHTMLの各要素(例えばBUTTONなど)を再利用可能なUIコンポーネントとして作成することもできます。
そして、画面ごとの単一ファイルコンポーネントを作成して、そのコンポーネント内にUIコンポーネントを配置していきます。
そのような構成になり、コンポーネント間でデータを共有することが必要になり、コンポーネント間でのデータの受け渡しをするようになりました。
ですが、そこには問題がありました・・・・公式サイトからの引用
しかし、単純さは、共通の状態を共有する複数のコンポーネントを持ったときに、すぐに破綻します:
複数のビューが同じ状態に依存することがあります。
異なるビューからのアクションで、同じ状態を変更する必要があります。
一つ目は、プロパティ (props) として深く入れ子になったコンポーネントに渡すのは面倒で、兄弟コンポーネントでは単純に機能しません。
二つ目は、親子のインスタンスを直接参照したり、イベントを介して複数の状態のコピーを変更、同期することを試みるソリューションに頼っていることがよくあります。これらのパターンは、いずれも脆く、すぐにメンテナンスが困難なコードに繋がります。vuexのstoreパターンはこの問題を解決します。
コンポーネントから共有している状態(データ)を抽出し、それをグローバルに管理するというものです。
これにより、コンポーネント間でデータを依存していたのが、どのコンポーネントも自立して管理された状態にアクセスできるようになりました。さらに、状態管理に関わる概念を定義、分離し、特定のルールを敷くことで、コードの構造と保守性を向上させることができます。
終わりに
ko.jsのソースを見たとき、いつ、どこでデータが変更されたかデータを追うのに苦労しました。
それにより、どこまでソースに手を加える必要があるか予測しづらかった。Fluxに基づいたvuexを使って状態管理することで、
・ViewとModelの双方向のデータの変更をmutationが取り持ち、stateを管理することでデータを変更する流れを単一方向にした
→データの流れが追いやすくなった
・データの変更の流れを「state」、「mutations」、「actions」、「getters」の4つの役割に分け、明確にした
→ソースの箇所を特定しやすい
→何をテストすればよいか明確になるコードの保守性がぐんとあがりそうですね!!
今はここまで。このFluxについては、まだまだ知見を深めていきたいです。

- 投稿日:2019-07-27T10:44:09+09:00
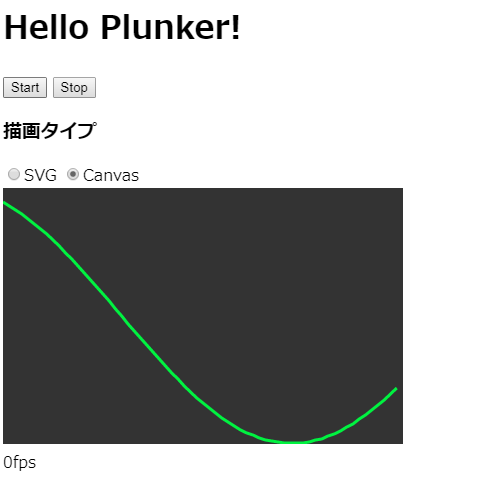
plunkerでvue その7
概要
plunkerでvueやってみた。
波形表示、やってみた。参考にしたページ
https://jsfiddle.net/bc_rikko/1b7vhkqp/
写真
成果物
https://embed.plnkr.co/oEPnmzyn8L3PU9e8ODvR/
以上。
- 投稿日:2019-07-27T09:20:17+09:00
Vue.js初学者が猫本の前半を読んだのでざっくり整理する
Vue.jsの入門書である基礎から学ぶVue.js(猫本)を前半の5章まで読みました。後半は今の自分には難しい&使わない部分も結構ありそうなので、前半部分の基本知識をざっくり整理します。
なお自分の知識としてはHTML,CSSが少しだけできる、生JavaScript、jQueryもまあ少しだけできるかなという程度です。jQueryしか知らないとマズイ時代なのかと感じ人気のある猫本を読み始めました。
Qiitaの投稿も初めて(若干コワイ)なのでお手柔らかにお願いします。間違っている部分や問題点があれば指摘お願いします。
1章
Vue.jsについて
Vue.jsはjavascriptのフレームワークです。
フレームワークとは、作成するアプリケーションの設計の骨組みのようなものです。この骨組みに沿って実装することで実装速度の上昇や設計をシンプルに保つことができる等のメリットが得られます。
Vue.jsはJavaScriptのフレームワークなので、普通のJavaScriptとは少し違う書き方を求められます。書き方を覚えてしまえばよりシンプルに実装することができます。
また、フレームワークと類似した言葉にライブラリがあります。
フレームワークが全体を構成するための骨組みだとすると、ライブラリは局所を埋める部品のようなものです。局所的な処理に対して既存のライブラリを用いたりコードをライブラリとして共通化することでやはり実装処理の上昇や処理の切り分けが期待できます。なぜVue.jsなのか
Vue.js以外にもJavaScriptのフレームワークは色々あります。
代表的なものとしては、
- React.js
- Angular.js
等です。
これらのフレームワークについて全ての長所短所を調べたわけではないですが、少なくともVue.jsの良さとしては、
- 学習コストが低い
- スケールの柔軟性
- 公式ドキュメント(日本語)の充実
が挙げられます。
Vue.jsでのHello world
- テキストバインディング
Vue.jsのhello world的なもの。
テンプレートにプロパティを記述するとその場所に値を入れて描画してくれます。html<div id="app"> <p>{{ message }} </p> </div>jsvar app = new Vue({ el: '#app', data: { message: 'Hello Vue.js' } })実際の描画<p>Hello Vue.js</p>2章
データバインディング
上記コードのように
dataオプションに文字列やオブジェクトなどのデータを定義することで、リアクティブデータを設定できます。
リアクティブデータというのは、Vue.js側でデータの取得時や更新時に自動的に反応してくれるデータのことです。
上記のコードではmessageをリアクティブデータとすることで、DOM更新時にHello Vue.jsというテキストに変換してくれたということです。
また、このようなテキストバインディングの場合は{{ message }}のように変換したい部分を中括弧で囲みます。この記法をMustache(マスタッシュ)と呼びます。色々なデータバインディング
ネストと配列
jsnew Vue({ el: '#app', data: { message: { value: 'Hello Vue.js' }, //配列にもできる list: ['りんご', 'ばなな', 'いちご'], //listから取り出す要素を動的にするためにセット num: 1 } })html<div id="app"> <p>{{ message.value }} </p> <p>{{ message.value.length }} </p> <p>{{ list[2]}} </p> <p>{{ list[num] }} </p> </div>実際の描画<p>Hello Vue.js</p> <p>13</p> <p>いちご</p> <p>ばなな</p>ifとshow
条件分岐によって対象の表示・非表示等を設定できます。
Vue.jsではv-ifとv-showがあります。
この際のv-ifやv-showをディレクティブと呼びます。
v-〇〇と書かれていれば、Vueで操作するために設定しているんだな、と思えばよいです。html<div id="app"> <div v-if="ok">v-if条件による描画</div> <div v-show="ok">v-show条件による描画</div> </div>jsnew Vue({ el: '#app', data: { ok: false } })実際の描画<!----> <div style="display: none;">v-show条件による表示</div>条件がfalseなので、
v-ifはコメント化され、v-showではdisplay: noneが設定されていることがわかります。for
v-forディレクティブを使いますhtml<div id="app"> <ul> <li v-for="item in list" v-bind:key="item.id"> ID. {{ item.id }} {{ item.name }} HP. {{ item.hp }} </li> </ul> </div>jsnew Vue({ el: '#app', data: { list:[ { id: 1, name: 'スライム', hp: 100 }, { id: 2, name: 'いっかくうさぎ', hp: 200 }, { id: 3, name: 'ゴーレム', hp: 500 } ] } })実際の描画<div id="app"> <ul> <li>ID.1 スライム HP.100</li> <li>ID.2 いっかくうさぎ HP.200</li> <li>ID.3 ゴーレム HP.500</li> </ul> </div>
v-forのポイントはv-vind:key="item.id"の部分です。繰り返し処理の場合はこのようにkey属性をつけるようにします。
key属性には不変かつユニークなものを設定するので、今回はitem.idをセットしています。3章
イベントハンドリング
「ボタンをクリックしたとき」というようにあるイベントに対しての処理を行うことをイベントハンドリングといいます。
JavascriptのaddEventListenerやjQueryの$(element).onに相当します。
Vue.jsでは、v-onディレクティブを使用します。html<button v-on:click="handleClick">クリック</button>jsnew Vue({ el: '#app', methods: { handleClick: function() { alert('クリックされました!') } } })ボタンをクリックすると、Vueインスタンスで設定したhandleClickが呼び出される、という流れです。
フォーム入力バインディング
フォームの入力値とデータと同期させることができます(双方向データバインディング)。
html<div id="app"> <input v-model="message"> <p>{{ message }}</p> </div>jsnew Vue ({ el: '#app', data: { message: 'Hello!' } })簡単に入力値と画面上の値を同期させることができます。
4章
算出プロパティ
算出プロパティはその名の通り計算等の処理を含めることのできるデータのことです。
Mustache記法をする際に、テンプレート側に式を書いてしまうと見にくくなるので、算出プロパティとして設定することで可読性を保持できます。
計算したデータをcomputedオプションに定義するかたちで実装します。html<p>{{ num }}の二倍は{{ doubleNum }}</p>jsnew Vue({ el: '#app', data: { num: 50 }, computed: { doubleNum: function(){ return this.num * 2 } } })フィルタ
フィルタとは文字列の操作処理に特化した機能です。
html<div id="app"> {{ price | localeNum }}円 </div>jsnew Vue({ el: '#app', data: { price: 59800 }, filters: { localeNum: function (val) { return val.toLocaleString() } } })実際の描画59,800円5章
コンポーネント
コンポーネントとは、WebサイトのヘッダーやフッターなどのUIの部分ごとにテンプレートとJavaScriptをセットで持つことで、他のUIと切り離して管理できる機能です。
html<div id="app"> <my-component></my-component> </div>jsVue.component('my-component',{ template: '<p>MyComponent</p>' }) new Vue({ el: '#app', })実際の描画<div id="app"> <p>MyComponent</p> </div>コンポーネント間の通信
テンプレートで他のコンポーネントを使用すると親子関係になります。
親子間のデータのやりとりとして、
- 親からデータを
属性として渡し、子はpropsで受け取る- 子からデータを
$emitで渡し、親はonで受け取るという構造になります。
まずは親から子の場合
html<comp-child val="子1"></comp-child> <comp-child val="子2"></comp-child>属性を
valとして設定してます。jsVue.component('comp-child', { template: '<p>{{ val }}</p>', //受けとる属性名をpropsで指定 props: ['val'] }) new Vue({ el: '#app' })実際の描画<p>子1</p> <p>子2</p>そして子から親の場合
html<div id="app"> <comp-child v-on:childs-event="parentsMethod"></comp-child> </div>jsVue.component('comp-child',{ template: '<button v-on:click="handleClick">押すとイベントが発火するボタン</button>', methods: { handleClick: function(){ this.$emit('childs-event') } } }) new Vue({ el: '#app', methods: { parentsMethod: function(){ alert('イベントをキャッチしました!') } } })おわりに
マスコットキャラの猫のかわいいページランキング
1位. ライフサイクルで夜なのでおやすみ猫 p.45
2位. デプロイのたびに変更は面倒なリボン猫 p.237
3位. アニメーション・消える時の猫 p.201