- 投稿日:2019-07-27T23:22:11+09:00
ブラウザで名前が定義されている140色をSwiftで定義する
アプリを作成する毎に、Swiftで色定義を毎回作成してはいませんか?
標準的な定義と色見本があれば、デザイナーさんやクライアントさんとの色に関するやりとりが少なくできるのではないかと考えて少しググってみました。
結果、軽く調べた感じではSwiftの定義は無くて(誰も作ってなくて)代わりに下記のような素敵なサイトを発見しました。コード書いてあるし、名前があるのが何より良いです。
色見本と言えば個人的にはPantone Colorとかかなと思っていましたが、今やブラウザーの色定義ですよ。やはり!
というわけで、出来上がったのが下記のコードです。
Appleがすでに定義しているものはコメントアウトしています。作っているうちに、あれ?これ
#colorLiteralの方が良くない?と思ったので、
次回作ってみます。Swiftimport UIKit public extension UIColor { //static let black = { UIColor(hex: 0x000000) }() static let aliceblue = { UIColor(hex: 0xf0f8ff) }() static let darkcyan = { UIColor(hex: 0x008b8b) }() static let lightyellow = { UIColor(hex: 0xffffe0) }() static let coral = { UIColor(hex: 0xff7f50) }() static let dimgray = { UIColor(hex: 0x696969) }() static let lavender = { UIColor(hex: 0xe6e6fa) }() static let teal = { UIColor(hex: 0x008080) }() static let lightgoldenrodyellow = { UIColor(hex: 0xfafad2) }() static let tomato = { UIColor(hex: 0xff6347) }() //static let gray = {UIColor(hex: 0x808080) }() static let lightsteelblue = { UIColor(hex: 0xb0c4de) }() static let darkslategray = { UIColor(hex: 0x2f4f4f) }() static let lemonchiffon = { UIColor(hex: 0xfffacd) }() static let orangered = { UIColor(hex: 0xff4500) }() //static let darkgray = { UIColor(hex: 0xa9a9a9) }() static let lightslategray = { UIColor(hex: 0x778899) }() static let darkgreen = { UIColor(hex: 0x006400) }() static let wheat = { UIColor(hex: 0xf5deb3) }() //static let red = {UIColor(hex: 0xff0000) }() static let silver = { UIColor(hex: 0xc0c0c0) }() static let slategray = { UIColor(hex: 0x708090) }() //static let green = { UIColor(hex: 0x008000) }() static let burlywood = { UIColor(hex: 0xdeb887) }() static let crimson = { UIColor(hex: 0xdc143c) }() //static let lightgray = { UIColor(hex: 0xd3d3d3) }() static let steelblue = { UIColor(hex: 0x4682b4) }() static let forestgreen = { UIColor(hex: 0x228b22) }() static let tan = { UIColor(hex: 0xd2b48c) }() static let mediumvioletred = { UIColor(hex: 0xc71585) }() static let gainsboro = { UIColor(hex: 0xdcdcdc) }() static let royalblue = { UIColor(hex: 0x4169e1) }() static let seagreen = { UIColor(hex: 0x2e8b57) }() static let khaki = { UIColor(hex: 0xf0e68c) }() static let deeppink = { UIColor(hex: 0xff1493) }() static let whitesmoke = { UIColor(hex: 0xf5f5f5) }() static let midnightblue = { UIColor(hex: 0x191970) }() static let mediumseagreen = { UIColor(hex: 0x3cb371) }() //static let yellow = { UIColor(hex: 0xffff00) }() static let hotpink = { UIColor(hex: 0xff69b4) }() //static let white = {UIColor(hex: 0xffffff) }() static let navy = { UIColor(hex: 0x000080) }() static let mediumaquamarine = { UIColor(hex: 0x66cdaa) }() static let gold = { UIColor(hex: 0xffd700) }() static let palevioletred = { UIColor(hex: 0xdb7093) }() static let snow = { UIColor(hex: 0xfffafa) }() static let darkblue = { UIColor(hex: 0x00008b) }() static let darkseagreen = { UIColor(hex: 0x8fbc8f) }() //static let orange = { UIColor(hex: 0xffa500) }() static let pink = { UIColor(hex: 0xffc0cb) }() static let ghostwhite = { UIColor(hex: 0xf8f8ff) }() static let mediumblue = { UIColor(hex: 0x0000cd) }() static let aquamarine = { UIColor(hex: 0x7fffd4) }() static let sandybrown = { UIColor(hex: 0xf4a460) }() static let lightpink = { UIColor(hex: 0xffb6c1) }() static let floralwhite = { UIColor(hex: 0xfffaf0) }() //static let blue = {UIColor(hex: 0x0000ff) }() static let palegreen = { UIColor(hex: 0x98fb98) }() static let darkorange = { UIColor(hex: 0xff8c00) }() static let thistle = { UIColor(hex: 0xd8bfd8) }() static let linen = { UIColor(hex: 0xfaf0e6) }() static let dodgerblue = { UIColor(hex: 0x1e90ff) }() static let lightgreen = { UIColor(hex: 0x90ee90) }() static let goldenrod = { UIColor(hex: 0xdaa520) }() //static let magenta = { UIColor(hex: 0xff00ff) }() static let antiquewhite = { UIColor(hex: 0xfaebd7) }() static let cornflowerblue = { UIColor(hex: 0x6495ed) }() static let springgreen = { UIColor(hex: 0x00ff7f) }() static let peru = { UIColor(hex: 0xcd853f) }() static let fuchsia = { UIColor(hex: 0xff00ff) }() static let papayawhip = { UIColor(hex: 0xffefd5) }() static let deepskyblue = { UIColor(hex: 0x00bfff) }() static let mediumspringgreen = { UIColor(hex: 0x00fa9a) }() static let darkgoldenrod = { UIColor(hex: 0xb8860b) }() static let violet = { UIColor(hex: 0xee82ee) }() static let blanchedalmond = { UIColor(hex: 0xffebcd) }() static let lightskyblue = { UIColor(hex: 0x87cefa) }() static let lawngreen = { UIColor(hex: 0x7cfc00) }() static let chocolate = { UIColor(hex: 0xd2691e) }() static let plum = { UIColor(hex: 0xdda0dd) }() static let bisque = { UIColor(hex: 0xffe4c4) }() static let skyblue = { UIColor(hex: 0x87ceeb) }() static let chartreuse = { UIColor(hex: 0x7fff00) }() static let sienna = { UIColor(hex: 0xa0522d) }() static let orchid = { UIColor(hex: 0xda70d6) }() static let moccasin = { UIColor(hex: 0xffe4b5) }() static let lightblue = { UIColor(hex: 0xadd8e6) }() static let greenyellow = { UIColor(hex: 0xadff2f) }() static let saddlebrown = { UIColor(hex: 0x8b4513) }() static let mediumorchid = { UIColor(hex: 0xba55d3) }() static let navajowhite = { UIColor(hex: 0xffdead) }() static let powderblue = { UIColor(hex: 0xb0e0e6) }() static let lime = { UIColor(hex: 0x00ff00) }() static let maroon = { UIColor(hex: 0x800000) }() static let darkorchid = { UIColor(hex: 0x9932cc) }() static let peachpuff = { UIColor(hex: 0xffdab9) }() static let paleturquoise = { UIColor(hex: 0xafeeee) }() static let limegreen = { UIColor(hex: 0x32cd32) }() static let darkred = { UIColor(hex: 0x8b0000) }() static let darkviolet = { UIColor(hex: 0x9400d3) }() static let mistyrose = { UIColor(hex: 0xffe4e1) }() static let lightcyan = { UIColor(hex: 0xe0ffff) }() static let yellowgreen = { UIColor(hex: 0x9acd32) }() //static let brown = { UIColor(hex: 0xa52a2a) }() static let darkmagenta = { UIColor(hex: 0x8b008b) }() static let lavenderblush = { UIColor(hex: 0xfff0f5) }() //static let cyan = { UIColor(hex: 0x00ffff) }() static let darkolivegreen = { UIColor(hex: 0x556b2f) }() static let firebrick = { UIColor(hex: 0xb22222) }() //static let purple = { UIColor(hex: 0x800080) }() static let seashell = { UIColor(hex: 0xfff5ee) }() static let aqua = { UIColor(hex: 0x00ffff) }() static let olivedrab = { UIColor(hex: 0x6b8e23) }() static let indianred = { UIColor(hex: 0xcd5c5c) }() static let indigo = { UIColor(hex: 0x4b0082) }() static let oldlace = { UIColor(hex: 0xfdf5e6) }() static let turquoise = { UIColor(hex: 0x40e0d0) }() static let olive = { UIColor(hex: 0x808000) }() static let rosybrown = { UIColor(hex: 0xbc8f8f) }() static let darkslateblue = { UIColor(hex: 0x483d8b) }() static let ivory = { UIColor(hex: 0xfffff0) }() static let mediumturquoise = { UIColor(hex: 0x48d1cc) }() static let darkkhaki = { UIColor(hex: 0xbdb76b) }() static let darksalmon = { UIColor(hex: 0xe9967a) }() static let blueviolet = { UIColor(hex: 0x8a2be2) }() static let honeydew = { UIColor(hex: 0xf0fff0) }() static let darkturquoise = { UIColor(hex: 0x00ced1) }() static let palegoldenrod = { UIColor(hex: 0xeee8aa) }() static let lightcoral = { UIColor(hex: 0xf08080) }() static let mediumpurple = { UIColor(hex: 0x9370db) }() static let mintcream = { UIColor(hex: 0xf5fffa) }() static let lightseagreen = { UIColor(hex: 0x20b2aa) }() static let cornsilk = { UIColor(hex: 0xfff8dc) }() static let salmon = { UIColor(hex: 0xfa8072) }() static let slateblue = { UIColor(hex: 0x6a5acd) }() static let azure = { UIColor(hex: 0xf0ffff) }() static let cadetblue = { UIColor(hex: 0x5f9ea0) }() static let beige = { UIColor(hex: 0xf5f5dc) }() static let lightsalmon = { UIColor(hex: 0xffa07a) }() static let mediumslateblue = { UIColor(hex: 0x7b68ee) }() }
- 投稿日:2019-07-27T22:07:20+09:00
[Swift] バックグラウンドで処理を継続させたい場合に、処理数が多いとダメな時があるっぽい
バックグラウンドでも動くタイマーアプリを作ろうとして
https://qiita.com/rc_code/items/f0d9d19e7844fbcf0260
↑この記事と
https://qiita.com/SatoTakeshiX/items/8e1489560444a63c21e7
↑この記事を参考に作っていた時にわかったこと動くパターン
timer = Timer.scheduledTimer(
            timeInterval: 0.1, //⇦ここ
            target: self,
            selector: #selector(handleTimer(_:)),
            userInfo: nil,
            repeats: true
        )
動かないパターン
timer = Timer.scheduledTimer(
            timeInterval: 0.01, //⇦ここ
            target: self,
            selector: #selector(handleTimer(_:)),
            userInfo: nil,
            repeats: true
        )
覚書。
- 投稿日:2019-07-27T22:03:53+09:00
【iOS】iOS開発初心者の個人的に参考になったswift記事まとめ
趣旨
swift関連でお世話になった、参考になった記事のまとめ。
個人的に詰まった時にために参考にするためにまとめます。
勉強初めて1月程度の初心者なのでswift関連のおすすめ記事などあれば教えていただけると助かります。
多くなってきたら分類します・・・たぶん
随時更新していくはず記事一覧
デリゲートの概要
デリゲートってそもそも何ってなった際に以下の記事を読んだ。
この記事を理解して初心者向けの記事読んだほうが個人的には良いと思った。
参考先iOSの設定画面への遷移方法
アプリ側からiOS本体側への設定画面への遷移方法。
参考先Slider
地図
基本的なとこ
参考先地図でのピンのたてかた
swift5では地味に違ってる気がする。
あとピンを複数立てる場合は配列で渡すようになってるみたい
参考先
- 投稿日:2019-07-27T17:51:26+09:00
Asset Catalogを使って色の管理 Swift
Asset Catalogを使って色の管理をしてみた
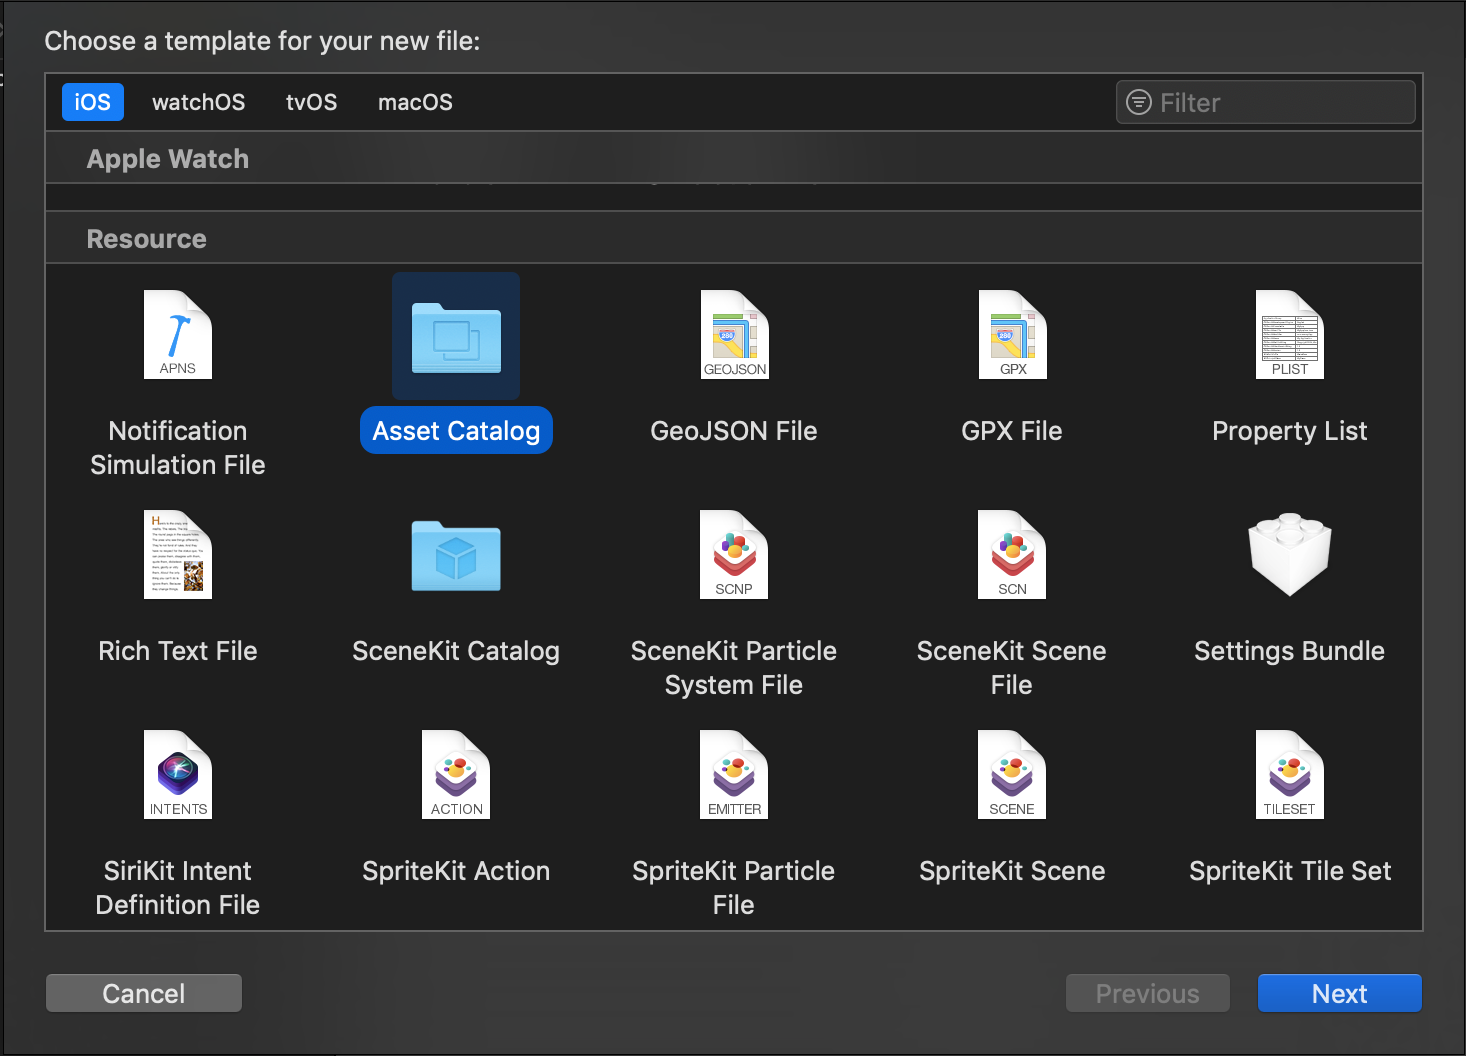
1. 新しくAsset Catalogを作成
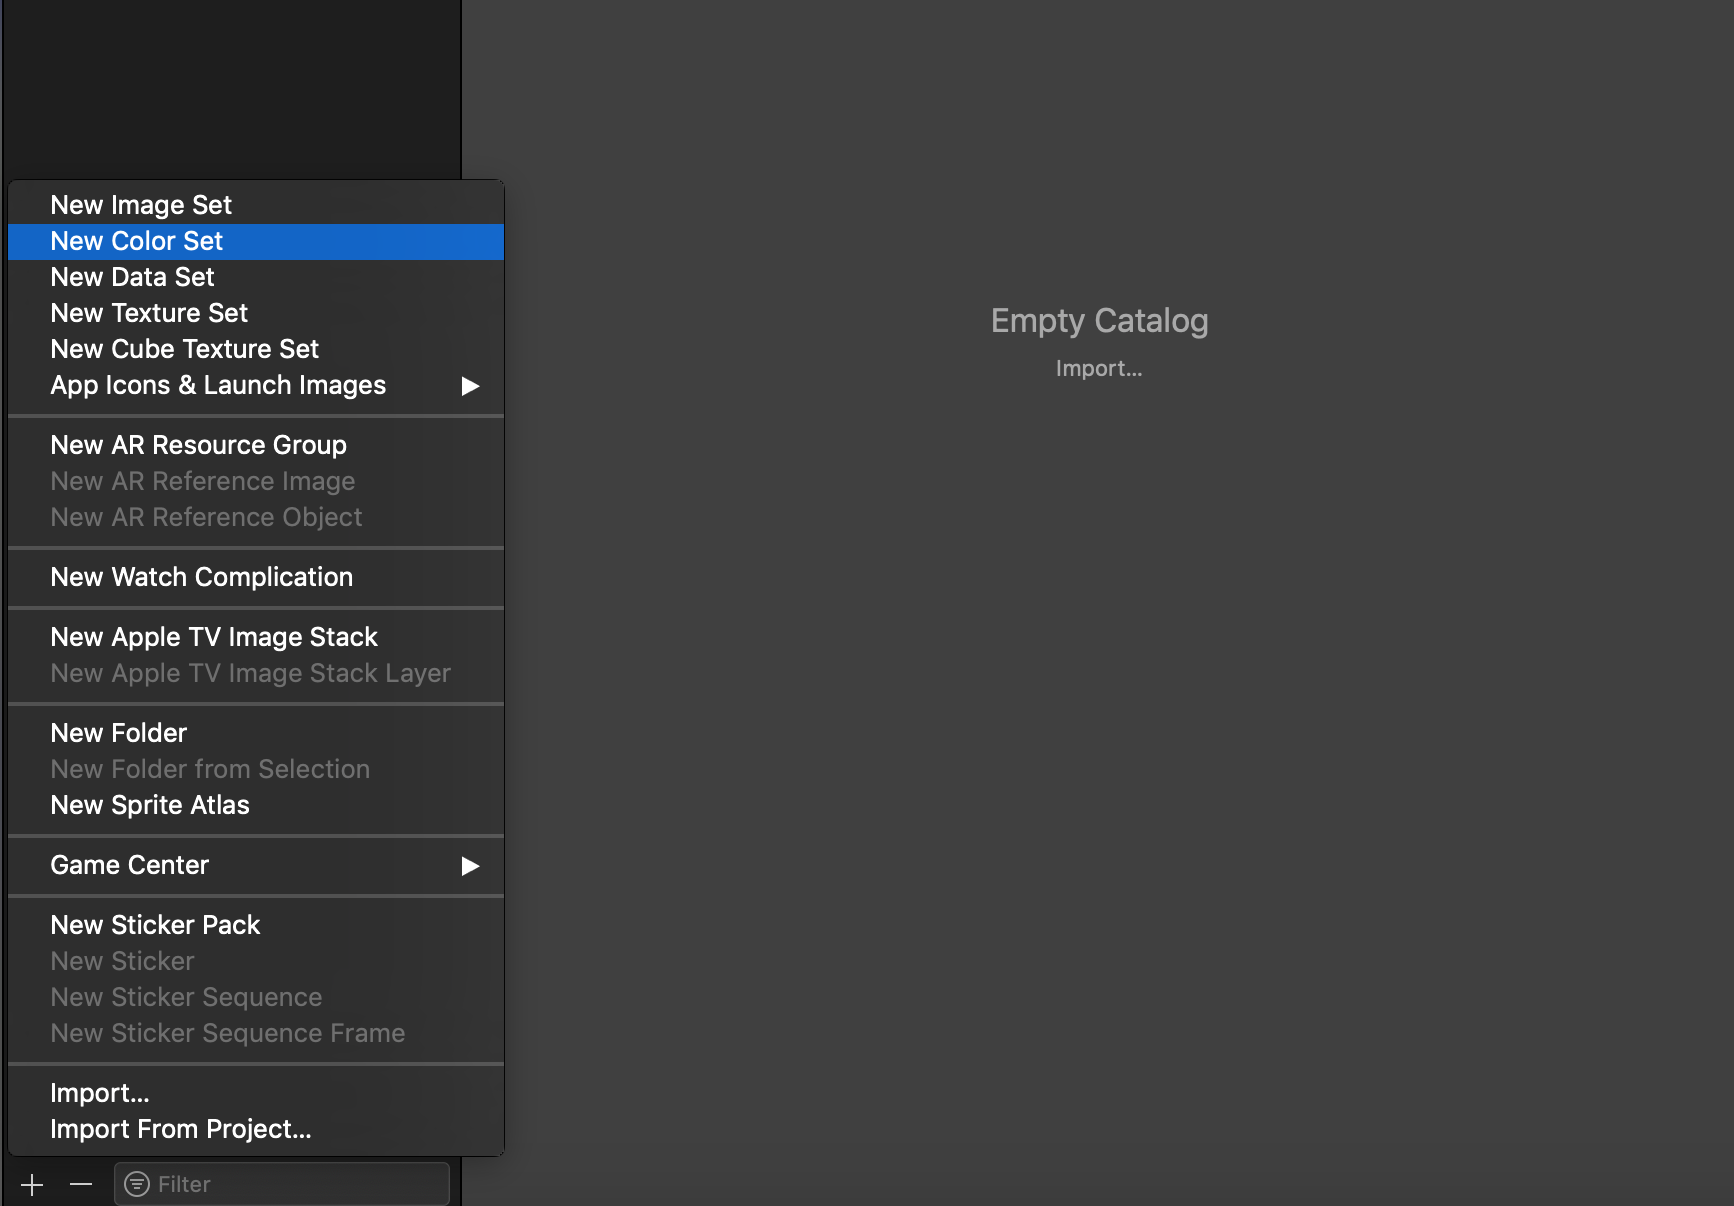
2. 作成したAsset Catalogで
New Color Setを選択
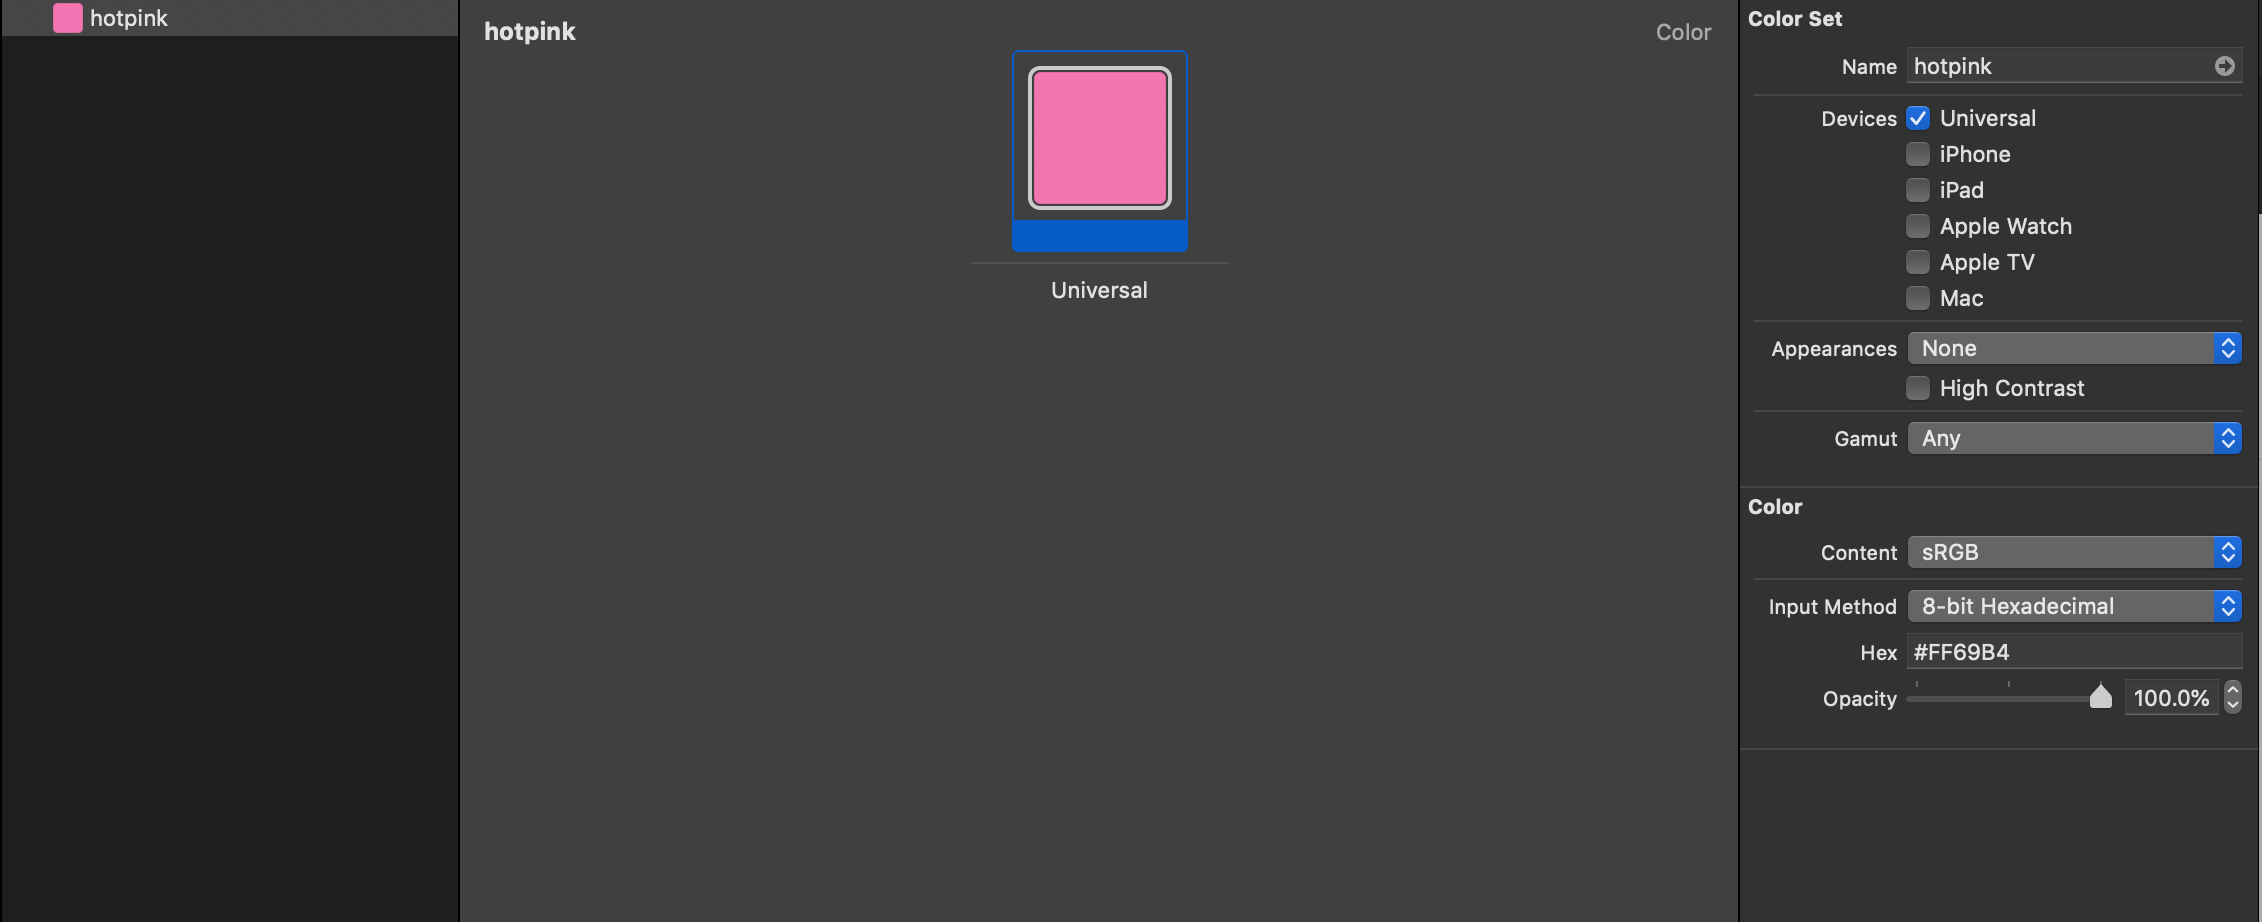
3. 色の名前、値を設定 (例 名前:
hotpink、RGB:#FF69B4)
Interface Builderで使用する
- 色を設定するときに
Named Colorsに作成したものが表示される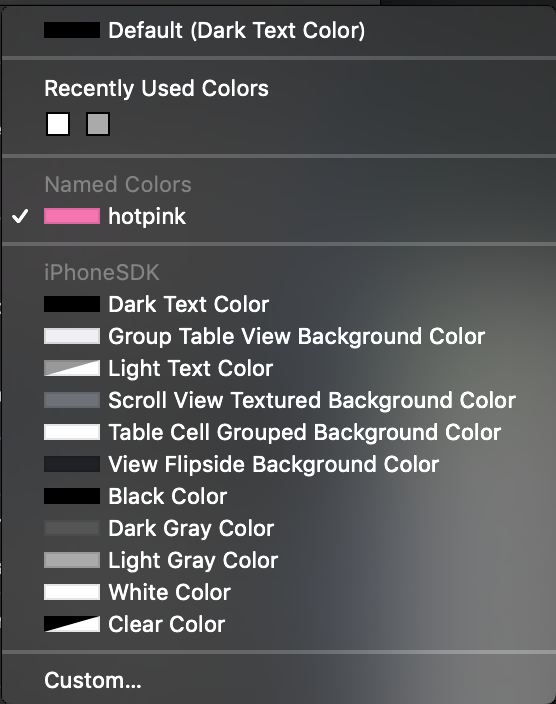
ソースコードで使用する
- UIColorを拡張する
UIColorextension UIColor { /// hotpink RGB:#FF69B4 class var hotpink: UIColor { return UIColor(named: "hotpink") } }
- 実際に使用する
ViewControllerclass ViewController: UIViewController { override func viewDidLoad() { super.viewDidLoad() self.view.backgroundColor = UIColor.hotpink } }まとめ
どの画面でも使用する色や各パーツの色をこのように管理することでデザインしやすくなった。
さらにいい方法があったら教えてください。

- 投稿日:2019-07-27T17:51:26+09:00
xcassetsを使って色の管理 Swift
Asset Catalogを使って色の管理をしてみた
1. 新しくAsset Catalogを作成
2. 作成したAsset Catalogで
New Color Setを選択
3. 色の名前、値を設定 (例 名前:
hotpink、RGB:#FF69B4)
Interface Builderで使用する
- 色を設定するときに
Named Colorsに作成したものが表示されるソースコードで使用する
- UIColorを拡張する
UIColorextension UIColor { /// hotpink RGB:#FF69B4 class var hotpink: UIColor { return UIColor(named: "hotpink") } }
- 実際に使用する
ViewControllerclass ViewController: UIViewController { override func viewDidLoad() { super.viewDidLoad() self.view.backgroundColor = UIColor.hotpink } }まとめ
どの画面でも使用する色や各パーツの色をこのように管理することでデザインしやすくなった。
さらにいい方法があったら教えてください。
- 投稿日:2019-07-27T16:54:02+09:00
UILabelのAttributedが反映されない Swift
問題
StoryBoardやxibなどでUILabelに対してAttributedを設定した状態で
Swiftlabel.text = "新しい文字"のように設定すると行間のスペースなど、Attributedで設定したものが反映されなくなってしまう。
解決策
UILabelを拡張してみる
extension UILabel {
    func setAttributedTextString(string: String) {
        self.attributedText = NSAttributedString(string: string,
                                                 attributes: self.attributedText?.attributes(at: 0, effectiveRange: nil))
    }
}
実際に作成した
setAttributedTextStringを呼び出す。label.setAttributedTextString(string: "新しい文字列")これで変更前のattributedを保持したまま文字列のみ変更することができる。
- 投稿日:2019-07-27T16:54:02+09:00
UILabelのtextに新しい文字を入力するAttributedが反映されなくなる Swift
問題
StoryBoardやxibなどでUILabelに対してAttributedを設定した状態で
Swiftlabel.text = "新しい文字"のように設定すると行間のスペースなど、Attributedで設定したものが反映されなくなってしまう。
解決策
UILabelを拡張してみる
extension UILabel {
    func setAttributedTextString(string: String) {
        self.attributedText = NSAttributedString(string: string,
                                                 attributes: self.attributedText?.attributes(at: 0, effectiveRange: nil))
    }
}
実際に作成した
setAttributedTextStringを呼び出す。label.setAttributedTextString(string: "新しい文字列")これで変更前のattributedを保持したまま文字列のみ変更することができる。
- 投稿日:2019-07-27T14:49:43+09:00
R.swift 追加したリソースが更新されない時~
- 投稿日:2019-07-27T12:24:36+09:00
画像の読み込み時に「Thread 1: EXC_BAD_INSTRUCTION 」エラーが出る
UIImageを読み込む際、
Buildは成功するが、画面描画の際に、下記エラーが出ていた。Thread 1: EXC_BAD_INSTRUCTION (code=EXC_I386_INVOP, subcode=0x0) image literalUIImageViewで直接読み込もうとした際も下記エラーが出ていた。
Thread 1: EXC_BAD_INSTRUCTION (code=EXC_I386_INVOP, subcode=0x0)解決法:
Assetsフォルダ内のContents.jsonで
「properties」
を丸ごと削除したら描画した。
- 投稿日:2019-07-27T11:20:59+09:00
【Swift】Swift5.1の新機能 Collection Diffing入門
Collection Diffingとは?
Swift5.1で導入される新しい機能です。
Forumスレッド一覧
https://forums.swift.org/search?q=SE-0240Original Pitch
https://forums.swift.org/t/se-0240-ordered-collection-diffing/19514/34Proposal
https://github.com/apple/swift-evolution/blob/master/proposals/0240-ordered-collection-diffing.mdReview
https://forums.swift.org/t/se-0240-ordered-collection-diffing/19514/42
https://forums.swift.org/t/amendment-se-0240-ordered-collection-diffing/26084これは
difference(from:)やdifference(from:by:)を呼び出すことで
2つのコレクションの差分を計算して
何がどう変わっているのかを教えてくれます。
difference(from:)
https://github.com/apple/swift/blob/a0421124f0de37d696e503c17c05afba19f74cf2/stdlib/public/core/Diffing.swift#L188またCollection Diffingは全てSwiftで書かれています。
今回はCollection Diffingがどういうものなのか
とても参考になる記事がありましたので
そちらを参考に実際の実装などを見ながら
理解をしていきたいと思います。参考記事
https://www.fivestars.blog/code/swift-5-1-collection-diffing.html最初に使用される要素を見ていき
その後にメソッドを見ていきたいと思います。CollectionDifference
Genericな
Collectionで
2つの整列されているコレクションの
差分(どの要素が削除され、どの要素が挿入されているのか)を
を保持しています。A collection of insertions and removals that describe the difference between two ordered collection states
CollectionDifference
https://github.com/apple/swift/blob/a0421124f0de37d696e503c17c05afba19f74cf2/stdlib/public/core/CollectionDifference.swift#L16ChangeElement
比較している要素の型でこれには何の制約も付いていません。
.insertと.removeという2つのケースを持った
CollectionDifference.Changeというenumになっており
個々の要素の変化を表します。(詳細は後ほど記載します)
CollectionDifference.Change
https://github.com/apple/swift/blob/a0421124f0de37d696e503c17c05afba19f74cf2/stdlib/public/core/CollectionDifference.swift#L19CollectionDifferenceの特徴
CollectionDifferenceには下記のような特徴があります。CollectionDifferenceが返す値の順番が決まっている
まず最初に削除された要素のコレクション
その次に追加された要素のコレクションという順番になっています。これは内部の
initで保証されており
必ず適切な順番になって返ってきます。CollectionDifferenceの要素はユニークである
initのコメントに下記のような記載があります。The collection of changes passed as `changes` must meet these requirements: - All insertion offsets are unique - All removal offsets are unique - All associations between insertions and removals are symmetricつまり
削除や挿入された要素のオフセットは全てユニークでなければなりません。
また削除と挿入のこ関係は対称でなければなりません。同じインデックスに対して削除の処理をしていたりした場合などはできません。
挿入に関しても同じです。移動した要素は削除と挿入に対になる要素が一つ存在している。
どちらか片方だけというようなものは存在できません。これは内部でバリデーションをしており
initで不適切なコレクションが渡ってきた場合はnilが返却されます。
_validateChanges
https://github.com/apple/swift/blob/a0421124f0de37d696e503c17c05afba19f74cf2/stdlib/public/core/CollectionDifference.swift#L89insertionsとremovalsプロパティ
これらの2つのプロパティを使用することで
元のコレクションの要素に直接アクセスすることができます。insertions
挿入された要素がオフセットが小さいものから順番に並んでいます。
removals
削除された要素がオフセットが小さいものから順番に並んでいます。
CollectionDifference.Change
2つのコレクションを比較した時に
変化としては下記の3つのパターンがあります。
- 新しい要素が追加された
- 要素が削除された
- 移動して位置が変わった(元の位置から削除され、新しい位置に挿入された)
そのため
CollectionDifference.Changeは
insertとremoveの2つのenumで表現できます。
CollectionDifference.Change
https://github.com/apple/swift/blob/a0421124f0de37d696e503c17c05afba19f74cf2/stdlib/public/core/CollectionDifference.swift#L19それぞれのcaseは
offsetelementassociatedWithという
3つのassociated valuesを持っています。
offset挿入または削除された位置です。
削除された場合
let oldArray = ["a", "b", "c", "d"]
let newArray = ["a", "b", "d"]

// "c"という要素がindex 2から削除されました

let difference = newArray.difference(from: oldArray)
// differenceは1つの要素を含んだ配列です。
// これは`.remove`で`offset`は2となります。
挿入された場合
let oldArray = ["a", "b", "c", "d"]
let newArray = ["a", "b", "c", "d", "e"]

// "e"という要素がindex 4に挿入されました

let difference = newArray.difference(from: oldArray)
// differenceは1つの要素を含んだ配列です。
// これは`.insert`で`offset`は4となります。
element
実際の要素です。
これがCollectionDifferenceがジェネリックになっている要因です。let oldArray = ["a", "b", "c", "d"]
let newArray = ["a", "b", "d", "e"]// "c"という要素をindex 2から削除
// "e"という要素をindex 3に追加let difference = newArray.difference(from: oldArray)
// differenceは2つの要素の配列
// 最初の要素は.removeでoffset 2、element "c"
// 次の要素は.insertでoffset 3、element "e"associatedWith
要素を移動した時にこの値が入ります。
insertの場合は移動後のオフセット
removeの場合は移動前のオフセット
が入ります。これは計算に時間がかかるため
デフォルトでは全てnilとなっており
inferringMoves()を呼び出す必要があります。
inferringMoves
https://github.com/apple/swift/blob/a0421124f0de37d696e503c17c05afba19f74cf2/stdlib/public/core/CollectionDifference.swift#L323let oldArray = ["a", "b", "d", "e", "c"] let newArray = ["a", "b", "c", "d", "e"] // "c"をindex 4から2へ移動 // - index 4から削除 // - index 2へ追加 let difference = newArray.difference(from: oldArray) // differenceは2つの要素の配列 // - 最初の要素は`.remove` offset 4 associatedWith nil // - 次の要素は`.insert` offset 2 associatedWith nil let differenceWithMoves = difference.inferringMoves() // differenceWithMovesは2つの要素の配列 // - 最初の要素は`.remove` offset 4 associatedWith 2 // - 次の要素は`.insert` offset 2 associatedWith 4InferringMoves
CollectionDifferenceインスタンスをスキャンして
削除と挿入のオフセットがマッチした(移動した)要素をコレクションに格納していきます。
もし存在しなければ元のコレクションと同じ要素が含まれたコレクションを返します。CollectionDifferenceの要素の並び順
initの中を見てみるとわかるのですが
要素の順番は削除が先 挿入があと
になります。
挿入された要素は
insertions配列に入り
削除された要素はremovals配列に入ります。しかし
subscriptを見てみると
また違った順番で要素を参照しています。
removalsは大きいオフセットから小さいオフセットへ
insertionsは小さいオフセットから大きいオフセットに向かっています。これは順番に取得した要素を元のコレクション(変化前のコレクション)に適用していくと
新しいコレクションになるようになっており
変化を再現することができます。let oldArray = ["a", "b", "c", "d"] let newArray = ["x", "a", "e", "c"] var anotherArray = oldArray let difference = newArray.difference(from: oldArray) // differenceは4つの要素の配列 // 1. `.remove` at offset 3 // 2. `.remove` at offset 1 // 3. `.insert` at offset 0 // 4. `.insert` at offset 2 for change in difference { switch change { case let .remove(offset, _, _): anotherArray.remove(at: offset) case let .insert(offset, newElement, _): anotherArray.insert(newElement, at: offset) } } // この時点で`anotherArray`は`newArray`と等しくなる遷移をたどると下記のようになります。
["a", "b", "c", "d"] // 初期状態
["a", "b", "c"] // "d"をindex 3から削除
["a", "c"] // "b"をindex 1から削除
["x", "a", "c"] // "x"をindex 0へ挿入
["x", "a", "e", "c"] // "e"をindex 2へ挿入
applying
上記では
difference(from:)で取得した要素をコレクションに順番に適用してきましたが
applying(_:)メソッドを使用することで変化を別のコレクションに適用できます。let oldArray = ["a", "b", "c", "d"] let newArray = ["x", "a", "e", "c"] var anotherArray = oldArray let difference = newArray.difference(from: oldArray) // ここでdifferenceをapplyingしている anotherArray = anotherArray.applying(difference)! // この時点で`anotherArray`は`newArray`と等しくなるこのメソッドは制約に適合している限りはどんなコレクションにも適用できます。
戻り値としてdifferenceを適用したOptionalなコレクションを返します。なぜ
Optionalなのかは
differenceの要素のオフセットが
適用対称のコレクションのオフセットを超えた時に
クラッシュを避けてnilを返すようにしています。difference(from:)
これまでも出てきましたCollection Diffingの中心となるメソッドです。
extension BidirectionalCollection where Element : Equatable {
  public func difference<C: BidirectionalCollection>(
    from other: C
  ) -> CollectionDifference<Element> where C.Element == Self.Element {
    return difference(from: other, by: ==)
  }
}
difference(from:)はdifference(from: by:)を呼び出しているだけで
要素がEquatableの時に使用できます。difference(from: by:)
byに等しくなる条件を指定することで
Equatableに適合していない要素にも
differenceを取得することができるようになります。public func difference<C: BidirectionalCollection>( from other: C, by areEquivalent: (Element, C.Element) -> Bool ) -> CollectionDifference<Element> where C.Element == Self.Element
difference(from:by:)
https://github.com/apple/swift/blob/a0421124f0de37d696e503c17c05afba19f74cf2/stdlib/public/core/Diffing.swift#L134シンタックスを見てみると2つのコレクションは
BidirectionalCollectionに適合している必要があります。つまり前から後からもコレクションの要素へ行ったり来たり参照できることが必要になります。
また2つのコレクションはassociated typeの型は同じである必要があります。byの条件によってdifferenceで取得できる要素が変わってきます。
例えば全てに対してfalseを返すようにすると
let oldArray = ["a", "b", "c"]
let newArray = ["a", "b", "c"] // 同じ要素

let difference = newArray.difference(from: oldArray,
                                     by: { _, _  in false })
// `difference`は6つの要素を持つ配列:
// - removalsに3要素
// - insertionsに3要素
これは全ての要素の比較がfalseになるので
要素を全部入れ替えたとみなされているからです。difference(from: by:) の戻り値
Optional*ではない*CollectionDifferenceを返します。
上記でCollectionDifferenceのinitは
nilを返す可能性があることを紹介しましたが
なぜ違うのか?これは内部でnilにならないinitを保持しており
そちらを使用しているからです。これは妥当だと証明されたコレクションを使用しているので
Swift的にもnon-optionalで問題ありません。difference(from: by:)の内部
まず
_CountingIndexCollectionのコレクションを2つ作成し
これを_CollectionChangesへの変換しなおしています。let source = _CountingIndexCollection(other) let target = _CountingIndexCollection(self) let result = _CollectionChanges(from: source, to: target, by: areEquivalent)
_CountingIndexCollectionは実際のコレクションを包んで
開始のindexからのoffsetへアクセスしやすくします。let originalCollection = ["a", "b", "c", "d"] let offsetCollection = _CountingIndexCollection(originalCollection) if let index = offsetCollection.index(of: "d") { print(index.offset) // 3 print(offsetCollection[index]) // d }
_CollectionChangesはCollectionDifference.Changeインスタンスの配列です。その後取得したChangeインスタンスの配列から
CollectionDifferenceのインスタンスを生成して返却しています。このメソッドないでは実際の差分計算はしておらず
_CollectionChangesの初期化の中で行っています。_CollectionChanges
2つのコレクションの要素を辿っていき、下記のようなことを行っています。
2つのコレクションの最長共通部分列を取得
https://ja.wikipedia.org/wiki/%E6%9C%80%E9%95%B7%E5%85%B1%E9%80%9A%E9%83%A8%E5%88%86%E5%88%97%E5%95%8F%E9%A1%8C削除と挿入の最短経路を探して最も少ない手順で
sourceコレクションからtargetコレクションへ遷移する方法を見つけます。
https://ja.wikipedia.org/wiki/%E6%9C%80%E7%9F%AD%E7%B5%8C%E8%B7%AF%E5%95%8F%E9%A1%8Cこの2つは表裏一体のような関係となっており
片方が見つかるともう片方も見つかるようになっています。挿入や削除は非常にコストの高い操作であるため
このプロセスで最も効率差分更新するための方法を導き出すことが
Collection Diffingの根幹になります。
_CollectionChanges
https://github.com/apple/swift/blob/a0421124f0de37d696e503c17c05afba19f74cf2/stdlib/public/core/Diffing.swift#L247ある状態からある状態への遷移方法は複数見つかる中で
もっとも効率の良いものを_CollectionChangesは導き出すことを保証します。Endpoint
_CollectionChangesの定義の冒頭にあるtypealiasです。
typealias Endpoint = (x: SourceIndex, y: TargetIndex)これは
sourceコレクションとtargetコレクションの関係を表します。
例えばsourceコレクションの最初の要素とtargetコレクションの2番目の要素を関連づけたい場合
Endpointは(1,2)と定義します。pathStorage
ここからは_CollectionChangesが
具体的にどういう計算をしているのかを見ていきます。下記のような2次元のチャートがあります。
x軸がsourceのコレクションを
y軸はtargetのコレクションを表します。| • | X | A | B | C | D | • | | | | | | | X | | | | | | | Y | | | | | | | C | | | | | | | D | | | | | | |左上を(0,0)として一番右下の(lastIndexOfTarget, lastIndexOfSource)を目指します。
下記のようなイメージです。
```
| • | X | A | B | C | D |
• | S | | | | | |
X | | | | | | | // S: 開始
Y | | | | | | | // T: 目的地
C | | | | | | |
D | | | | | | T |// 開始位置 S: (0,0)
// 目的位置 T: (4,5)
```ルール
- 左から右にしか移動できない
- 上から下にしか移動できない
- 左右と上下は同じ距離だけ同時に動かして良い(左に1、下に1など)
- 左右と上下を同時に動かして良いのはxとyが同じ時だけ((A,A)の時など)この中でもっとも少ない数で対角線の位置に移動する方法を探します。
これが最長共通部分列問題です。
_CollectionChangesに当てはめると
- 垂直への移動が挿入
- 平行への移動が削除
になります。
結果は下記になります。
  | • | X | A | B | C | D |
 • | S |   |   |   |   |   |
 X |   | x | x | x |   |   | // S: 開始
 Y |   |   |   | x |   |   | // T: 目的地
 C |   |   |   |   | x |   |
 D |   |   |   |   |   | T |

// 経路:
(0,0) → (1,1) → (1,2) → (1,3) → (2,3) → (3,4) → (4,5)
これを_CollectionChangesで考えると
- (1,1) → (1,2)、(1,2) → (1,3)は2つの削除
- (1,3) → (2,3)は1つの挿入
になります。
この一つ一つの地点が
Endpointであり
pathはEndpointの配列になります。これが
pathStorageプロパティになります。pathStartIndex
_CollectionChangesが持つもう一つのプロパティで
差分計算のパスを探す開始位置を表します。これは内部最適化のために使われ
例えばAEOSとAEFTという文字列があった場合
AEは共通なのでこの分の計算は無駄になります。
そこでpathStartIndexを見てこの無駄をスキップします。
pathStartIndex
https://github.com/apple/swift/blob/a0421124f0de37d696e503c17c05afba19f74cf2/stdlib/public/core/Diffing.swift#L279enum Element
internalな要素で上記の計算で見つけたパスを
CollectionDifference.Changeに変換するときに使用します。enum Element { case removed(Range<SourceIndex>) case inserted(Range<TargetIndex>) case matched(Range<SourceIndex>, Range<TargetIndex>) }
_CollectionChanges.Element
https://github.com/apple/swift/blob/a0421124f0de37d696e503c17c05afba19f74cf2/stdlib/public/core/Diffing.swift#L300※ なぜ
Rangeなのか?上記の問題の例では一つ一つ
Endpointを分けて考えましたが
(1,1) → (1,2) → (1,3)は連続した平行移動で
(1,1) → (1,3)と一緒にできます。
これを表現するためにRangeとなっています。
differenceメソッドでは
このElementを一つ一つ取り出してCollectionDifference.Changeへと変換していきます。_CollectionChangesの内部
まず中心となる
initの形です。fileprivate init<Source: BidirectionalCollection, Target: BidirectionalCollection>( from source: Source, to target: Target, by areEquivalent: (Source.Element, Target.Element) -> Bool ) where Source.Element == Target.Element, Source.Index == SourceIndex, Target.Index == TargetIndex { self.init() formChanges(from: source, to: target, by: areEquivalent) }空の
initは下記になります。private init() { self.pathStorage = [] self.pathStartIndex = 0 }
formChangesメソッドでpathStorageにEndpointを追加していきます。下記ような処理を行っています。
最初のチェック
最初のチェックとして下記の2つを行います。
- 両方のコレクションが空の場合
すぐに処理を中断し、
diffrenceの結果も空になります。
- 共通の接頭辞を見つけ、かつ1つのコレクションがもう1つのコレクションの全要素を網羅している場合
上記の最短経路問題で考えると
右か下にぶつかるまで斜めに移動することができ
その後平行か垂直移動して対角線にいきます。いくつかの例を見てイメージしてみます。
// source = ASDFO
// target = ASD
// targetはsourceの接頭辞になっています:

   | • | A | S | D | F | O |
 • | S |   |   |   |   |   |
 A |   | x |   |   |   |   | // S: 開始
 S |   |   | x |   |   |   | // T: 目的地
 D |   |   |   | x | x | T |
                 ↑
        ここで端にぶつかって平行移動している

// 最終経路:
(0,0) → (3,3) → (3,5)

// - 3つが一致 (0,0) → (3,3)
// - 2つ削除 (FとO), (3,3) → (3,5)

// source = ASD
// target = ASDFO
// sourceがtargetの接頭辞になっています:

   | • | A | S | D |
 • | S |   |   |   | // S: 開始
 A |   | x |   |   | // T: 目的地
 S |   |   | x |   |
 D |   |   |   | x | ← ここで端にぶつかって垂直移動している
 F |   |   |   | x |
 O |   |   |   | T |

// 最終経路:
(0,0) → (3,3) → (5,3)

// - 3つが一致 (0,0) → (3,3)
// - 2つ挿入 (FとO), (3,3) → (5,3)

// source = ASD
// target = ASD
// 両方同じ要素

   | • | A | S | D |
 • | S |   |   |   | // S: 開始
 A |   | x |   |   | // T: 目的地
 S |   |   | x |   |
 D |   |   |   | T | ← 端にぶつかる

// 最終経路:
(0,0) → (3,3)

// - 3つが一致 (0,0) → (3,3)
上記では2か3つの要素を持ったpathStorageができます。
formChangesCore
上記の条件に合わない場合は
下記のような状態になっています。
- 2つのコレクションの要素が等しくない(byで示した条件ですべてtrueにならない)
- 2つのコレクションが空ではない
- 共通の接頭辞がある可能性がある
この際には
formChangesCoreメソッドを呼び出します。
formChangesCore
https://github.com/apple/swift/blob/a0421124f0de37d696e503c17c05afba19f74cf2/stdlib/public/core/Diffing.swift#L411引数には2つのコレクションと等しいとみなすための条件に加えて
最初のロジックで見つけた共通の接頭辞のindexです。
これを渡すことで不要な計算をスキップします。このメソッド内では
Greedy LCS/SES Algorithmを実装しています。
http://www.xmailserver.org/diff2.pdf詳細は割愛しますが簡単に何をしているのかを示すと
- まずはもっとも時間がかかるように斜め移動なしでのDまでの移動手順を見つけます。
- この時点で目的地に到着したら計算を終了します。
- 到着していない場合、Dの値を一つずつ増やして再び最初から計算を開始します。
この際により最適化するために前のパスをロジックに従った形で保存しておくことで
できる限り計算の無駄をなくすようにされています。ご興味のある方は冒頭の参照記事をご覧ください。
まとめ
Collection Diffingについて見てきました。
使う側としては非常にシンプルに使えますが内部の複雑なアルゴリズムに支えられ
安全に効率良く差分計算を実現されていることもわかりました。参照記事の筆者も結論で述べていますが
これはCollectionViewやTableViewでは使用しない方が良く
代わりにDiffable Data Sourcesというより最適化されたAPIが
iOS13で用意されています。詳細は下記にまとめましたのでもしよろしければご参照ください
https://qiita.com/shiz/items/a6032543a237bf2e1d19Swiftはまだまだ発展途上で
たくさんのプロポーサルが出てきています。これからもどんな新しい機能が増えていくのか楽しみですね
もし間違いなどございましたら教えていただけると嬉しいです