- 投稿日:2020-04-26T23:55:53+09:00
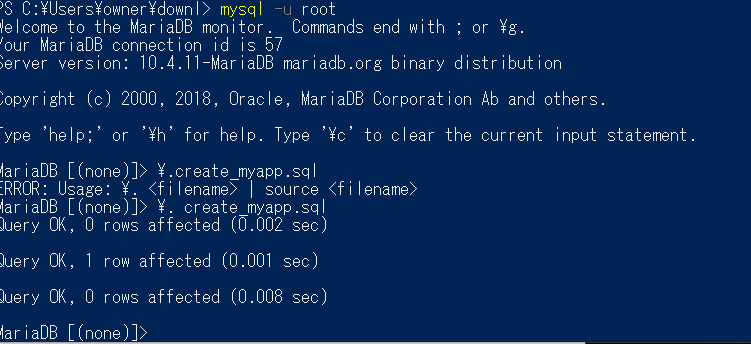
Mysqlで外部ファイルを実行する。
コマンドプロンプトで外部ファイルを実行したいフォルダに行く。
mysql -u root
でログインをする. 「create_myapp.sql」
またはsource 「create_myapp.sql」
「」は外部ファイル名
これで実行可能
- 投稿日:2020-04-26T20:21:20+09:00
MySQL 8.0.19 Install on CentOS
はじめに
CentOS 7 に、MySQL 8.0.19 をインストール手順を確認します。車輪の再発明ですが、自分の作業の備忘録用メモな意図が強いです。
バージョン情報
- CentOS 7
- MySQL 8.0.19
MySQL Install
Repository
https://dev.mysql.com/downloads/repo/yum/
sudo yum localinstall https://dev.mysql.com/get/mysql80-community-release-el7-3.noarch.rpmrepolist
[opc@mysql ~]$ yum repolist
Failed to set locale, defaulting to C
Loaded plugins: fastestmirror, langpacks
Loading mirror speeds from cached hostfile
 * base: ftp.iij.ad.jp
 * epel: nrt.edge.kernel.org
 * extras: ftp.iij.ad.jp
 * updates: ftp.iij.ad.jp
repo id                                                             repo name                                                                        statusbase/7/x86_64                                                       CentOS-7 - Base                                                                  10097
epel/x86_64                                                         Extra Packages for Enterprise Linux 7 - x86_64                                   13242
extras/7/x86_64                                                     CentOS-7 - Extras                                                                  341
mysql-connectors-community/x86_64                                   MySQL Connectors Community                                                         141
mysql-tools-community/x86_64                                        MySQL Tools Community                                                              105
mysql80-community/x86_64                                            MySQL 8.0 Community Server                                                         161
updates/7/x86_64                                                    CentOS-7 - Updates                                                                1787
repolist: 25874
[opc@mysql ~]$
Install
sudo yum -y install mysql-community-server依存関係
==============================================================================================================================================================
Package                                          Arch                        Version                            Repository                              Size
==============================================================================================================================================================
Installing:
 mysql-community-libs                             x86_64                      8.0.19-1.el7                       mysql80-community                      4.0 M
     replacing  mariadb-libs.x86_64 1:5.5.64-1.el7
 mysql-community-libs-compat                      x86_64                      8.0.19-1.el7                       mysql80-community                      1.3 M
     replacing  mariadb-libs.x86_64 1:5.5.64-1.el7
 mysql-community-server                           x86_64                      8.0.19-1.el7                       mysql80-community                      436 M
Installing for dependencies:
 mysql-community-client                           x86_64                      8.0.19-1.el7                       mysql80-community                       41 M
 mysql-community-common                           x86_64                      8.0.19-1.el7                       mysql80-community                      605 k

Transaction Summary
==============================================================================================================================================================
起動
sudo systemctl enable mysqld
sudo systemctl start mysqld
sudo systemctl status mysqld
Password の更新
MySQL root ユーザーでログインするために、初期パスワードを確認します
sudo cat /var/log/mysqld.log | grep root実行例
[opc@mysql ~]$ sudo cat /var/log/mysqld.log | grep root
2020-04-26T11:08:02.818912Z 5 [Note] [MY-010454] [Server] A temporary password is generated for root@localhost: #nan_jf3Tr>4
[opc@mysql ~]$
mysql_secure_installation
mysql_secure_installation実行例
- new password :
#nan_jf3Tr>41$ mysql_secure_installation Securing the MySQL server deployment. Enter password for user root: # ログファイルから取得した初期パスワードを入力します The existing password for the user account root has expired. Please set a new password. New password: # root ユーザの新規パスワードを入力します Re-enter new password: # 確認用にもう一度入力します The 'validate_password' plugin is installed on the server. The subsequent steps will run with the existing configuration of the plugin. Using existing password for root. Estimated strength of the password: 100 Change the password for root ? ((Press y|Y for Yes, any other key for No) : y By default, a MySQL installation has an anonymous user, allowing anyone to log into MySQL without having to have a user account created for them. This is intended only for testing, and to make the installation go a bit smoother. You should remove them before moving into a production environment. Remove anonymous users? (Press y|Y for Yes, any other key for No) : y # 匿名ユーザーアカウントを削除 Success. Normally, root should only be allowed to connect from 'localhost'. This ensures that someone cannot guess at the root password from the network. Disallow root login remotely? (Press y|Y for Yes, any other key for No) : y # ローカルホスト以外からアクセス可能な root アカウントを削除 Success. By default, MySQL comes with a database named 'test' that anyone can access. This is also intended only for testing, and should be removed before moving into a production environment. Remove test database and access to it? (Press y|Y for Yes, any other key for No) : y # test データベースの削除 - Dropping test database... Success. - Removing privileges on test database... Success. Reloading the privilege tables will ensure that all changes made so far will take effect immediately. Reload privilege tables now? (Press y|Y for Yes, any other key for No) : y Success. All done!ログイン確認
mysql -u root -p実行例
[opc@mysql ~]$ mysql -u root -p
Enter password:
Welcome to the MySQL monitor.  Commands end with ; or \g.
Your MySQL connection id is 14
Server version: 8.0.19 MySQL Community Server - GPL

Copyright (c) 2000, 2020, Oracle and/or its affiliates. All rights reserved.

Oracle is a registered trademark of Oracle Corporation and/or its
affiliates. Other names may be trademarks of their respective
owners.

Type 'help;' or '\h' for help. Type '\c' to clear the current input statement.

mysql>
パスワードの有効期限や文字コード設定などは、今回の手順では省略します。実際に本番に使うときには、色々なパラメータの検討が必要なのでご注意ください。
参考URL
- 投稿日:2020-04-26T18:25:57+09:00
mysqlの整数型カラムにデータを入れるときの補正
あまり役に立つ情報ではない気もしますが、mysqlの整数カラムについてタイトルの内容が気になったため、調べて&試してみました。
気になったのは、
1. 範囲外の数値を入れようとしたらどうなるか。
2. 小数点以下の値を持つ数値を入れようとしたらどうなるか。
の2点。結論から言えば、以下のような挙動でした。
1. sql_modeに何を指定しているかによって変わる。
(1)「厳密なSQLモード」で動作させている場合
エラー扱いとなる。
(2)「厳密なSQLモード」で動作させていない場合
・データ型の最大値超過なら、データ型の最大値を入れる。
・データ型の最小値未満なら、データ型の最小値を入れる。
2. 小数点以下第1位を四捨五入した後の値を入れようとする。
四捨五入した後の値が1.のような値になった場合は、さらに1.の判定が入る。実験に使ったのは下のようなテーブルです。
mysql> desc test;
+-------+---------------------+------+-----+---------+-------+
| Field | Type                | Null | Key | Default | Extra |
+-------+---------------------+------+-----+---------+-------+
| col1  | tinyint(3) unsigned | YES  |     | NULL    |       |
| col2  | tinyint(4)          | YES  |     | NULL    |       |
+-------+---------------------+------+-----+---------+-------+
「厳密なSQLモード」ではない場合
mysql> select @@SESSION.sql_mode;
+------------------------+
| @@SESSION.sql_mode     |
+------------------------+
| NO_ENGINE_SUBSTITUTION |
+------------------------+
まずは下限値未満。警告が出ますが、テーブル上にレコードは作成されます。
以下だと、作成されるレコードの中身は(0,-128)。mysql> insert into test values( -1, -129 ); Query OK, 1 row affected, 2 warnings (0.10 sec) mysql> show warnings; +---------+------+-----------------------------------------------+ | Level | Code | Message | +---------+------+-----------------------------------------------+ | Warning | 1264 | Out of range value for column 'col1' at row 1 | | Warning | 1264 | Out of range value for column 'col2' at row 1 | +---------+------+-----------------------------------------------+ 2 rows in set (0.00 sec)次は上限値超過。下限値未満の場合と同様、警告が出るもののテーブル上にレコードは作成されます。
以下だと、作成されるレコードの中身は(255,127)。mysql> insert into test values( 256, 128 ); Query OK, 1 row affected, 2 warnings (0.13 sec)小数点以下は四捨五入されます。警告も何も出ません。
mysql> insert into test values( 1.49, -1.49 );
Query OK, 1 row affected (0.38 sec)

mysql> insert into test values( 1.50, -1.50 );
Query OK, 1 row affected (0.13 sec)
小数点以下を処理してからデータ型に対する評価がされるようで、範囲外っぽい値を入れようとしても特に問題視されないことも(笑)。
mysql> insert into test values( 255.4, 127.4 );
Query OK, 1 row affected (0.36 sec)
小数点以下を処理した結果がデータ型の範囲外になれば、もちろん、それなりの扱いを受けます。
mysql> insert into test values( 255.5, 127.5 );
Query OK, 1 row affected, 2 warnings (0.11 sec)
これまでのinsertによる結果はこちら。
mysql> select * from test;
+------+------+
| col1 | col2 |
+------+------+
|    0 | -128 |
|  255 |  127 |
|    1 |   -1 |
|    2 |   -2 |
|  255 |  127 |
|  255 |  127 |
+------+------+
「厳密なSQLモード」の場合
「厳密なSQLモード」ではない場合には警告で済んだクエリが、悉くエラーとなります。
mysql> set session sql_mode = 'STRICT_ALL_TABLES';
Query OK, 0 rows affected (0.00 sec)

mysql> select @@SESSION.sql_mode;
+--------------------+
| @@SESSION.sql_mode |
+--------------------+
| STRICT_ALL_TABLES  |
+--------------------+
1 row in set (0.00 sec)

mysql> insert into test values( -1, -129 );
ERROR 1264 (22003): Out of range value for column 'col1' at row 1

mysql> insert into test values( 256, 128 );
ERROR 1264 (22003): Out of range value for column 'col1' at row 1

mysql> insert into test values( 255.5, 127.5 );
ERROR 1264 (22003): Out of range value for column 'col1' at row 1
参考情報
・厳密なSQLモードに関する説明
https://dev.mysql.com/doc/refman/5.6/ja/sql-mode.html
- 投稿日:2020-04-26T16:50:56+09:00
bundle installでAn error occurred while installing mysql2
$ rails _5.2.4.1_ new appname --database=mysql --skip-test --skip-turbolinks --skip-bundleでrailsアプリを新規作成した後、
$ bundle install
...
-----
Don't know how to set rpath on your system, if MySQL libraries are not in path mysql2 may not load
-----
-----
Setting libpath to /usr/local/Cellar/mysql/8.0.19/lib
-----
...
ld: library not found for -lssl
clang: error: linker command failed with exit code 1 (use -v to see invocation)
make: *** [mysql2.bundle] Error 1

make failed, exit code 2

Gem files will remain installed in /Users/machoair/.rbenv/versions/2.6.1/lib/ruby/gems/2.6.0/gems/mysql2-0.5.3 for inspection.
Results logged to
/Users/machoair/.rbenv/versions/2.6.1/lib/ruby/gems/2.6.0/extensions/x86_64-darwin-17/2.6.0/mysql2-0.5.3/gem_make.out

An error occurred while installing mysql2 (0.5.3), and Bundler cannot continue.
Make sure that `gem install mysql2 -v '0.5.3' --source 'https://rubygems.org/'` succeeds before bundling.
のエラーが発生
解決策
上記の通り、エラー内容は
Don't know how to set rpath on your system, if MySQL libraries are not in path mysql2 may not load
Setting libpath to /usr/local/Cellar/mysql/8.0.19/lib
ld: library not found for -lssl
私もよく理解していませんが、「libssl.dylib」を探そうとして、「/usr/local/Cellar/mysql/8.0.19/lib」を探したがありませんというエラーらしいです。
【Rails】MySQL2がbundle installできない時の対応方法
https://qiita.com/fukuda_fu/items/463a39406ce713396403の記事を参考に、
$ cd アプリ場所
$ brew info openssl
...
For compilers to find openssl@1.1 you may need to set:
  export LDFLAGS="-L/usr/local/opt/openssl@1.1/lib" #ここを参考に次のコマンドを書く
  export CPPFLAGS="-I/usr/local/opt/openssl@1.1/include"  #ここを参考に次のコマンドを書く
...
$ bundle config --local build.mysql2 "--with-cppflags=-I/usr/local/opt/openssl@1.1/include"
$ bundle config --local build.mysql2 "--with-ldflags=-L/usr/local/opt/openssl@1.1/lib"
You are replacing the current local value of build.mysql2, which is currently "--with-cppflags=-I/usr/local/opt/openssl@1.1/include"
$ bundle install
で解決しました!
- 投稿日:2020-04-26T14:44:42+09:00
brew doctorのエラー解決
新しいrailsアプリを作成しようとしたところ、bundle installでMySQL関係でエラーが発生
大事なデータもないので、いっそのことMySQLを再インストールすることにしましたどうしよう!困った時のMac上のMySQLのアンインストール&再インストール、動作確認手順
https://qiita.com/akiko-pusu/items/aef52b723da2cb5dc596を参考にしようと、
$ brew doctor
Please note that these warnings are just used to help the Homebrew maintainers
with debugging if you file an issue. If everything you use Homebrew for is
working fine: please don't worry or file an issue; just ignore this. Thanks!

Warning: Unbrewed header files were found in /usr/local/include.
If you didn't put them there on purpose they could cause problems when
building Homebrew formulae, and may need to be deleted.

Unexpected header files:
  /usr/local/include/node/js_native_api.h
  /usr/local/include/node/js_native_api_types.h
  ...

Warning: You have unlinked kegs in your Cellar.
Leaving kegs unlinked can lead to build-trouble and cause brews that depend on
those kegs to fail to run properly once built. Run `brew link` on these:
  node
のエラーが発生。言われた通り、
$ brew link node
Linking /usr/local/Cellar/node/13.11.0...
Error: Could not symlink bin/node
Target /usr/local/bin/node
already exists. You may want to remove it:
  rm '/usr/local/bin/node'

To force the link and overwrite all conflicting files:
  brew link --overwrite node

To list all files that would be deleted:
  brew link --overwrite --dry-run node
のエラーで治らない
解決策
brew doctor したらUnbrewed header files were found in /usr/local/include. と言われたから消そうとしたけど消せなかった話
https://qiita.com/rinimaruranran/items/2d8d930ad846fa41b9e6を参考に、
$ sudo rm -R /usr/local/include/node
$ brew doctor
Please note that these warnings are just used to help the Homebrew maintainers
with debugging if you file an issue. If everything you use Homebrew for is
working fine: please don't worry or file an issue; just ignore this. Thanks!

Warning: You have unlinked kegs in your Cellar.
Leaving kegs unlinked can lead to build-trouble and cause brews that depend on
those kegs to fail to run properly once built. Run `brew link` on these:
  node

$ npm uninstall npm -g
$ rm -rf /usr/local/lib/node_modules/npm
と入力しました。しかし、
$ brew link node
Linking /usr/local/Cellar/node/13.11.0...
Error: Could not symlink share/doc/node/gdbinit
Target /usr/local/share/doc/node/gdbinit
already exists. You may want to remove it:
  rm '/usr/local/share/doc/node/gdbinit'

To force the link and overwrite all conflicting files:
  brew link --overwrite node

To list all files that would be deleted:
  brew link --overwrite --dry-run node

$ brew link --overwrite node
Linking /usr/local/Cellar/node/13.11.0...
Error: Could not symlink share/doc/node/gdbinit
/usr/local/share/doc/node is not writable.

$ sudo brew link --overwrite --dry-run node
Would remove:
/usr/local/share/doc/node/gdbinit
/usr/local/share/doc/node/lldb_commands.py
/usr/local/share/man/man1/node.1
/usr/local/share/systemtap/tapset/node.stp
/usr/local/lib/dtrace/node.d
とエラーが発生したため、
$ rm -rf ファイル名でファイル名を削除しました。しかし、
$ brew link node
Linking /usr/local/Cellar/node/13.11.0...
Error: Could not symlink share/systemtap/tapset/node.stp
/usr/local/share/systemtap/tapset is not writable.
のエラーが出たので、
Homebrewインストールのlinkエラーを修正する方法
https://wtnvenga.hatenablog.com/entry/2017/11/15/125430
を参考に$ cd /usr/local/share/systemtap $ sudo chown -R $USER tapset $ brew link node Linking /usr/local/Cellar/node/13.11.0... 7 symlinks created $ brew doctor Your system is ready to brew.良かった解決です!
- 投稿日:2020-04-26T13:01:26+09:00
Heroku+Rails+MySQLでデプロイする方法
Heroku+Rails+MySQLでデプロイした際の備忘録として作成いたしました。
環境
MacOS 10.15.4
Ruby 2.5.1
Rails 5.2.3
Mysql2 0.5.3Heroku上にアプリを作成
※Herokuの新規登録とクレジットカードの登録がまだの方は登録を済ませてから行ってください。
$ heroku login上記のコマンドでブラウザにログインページが出てくるのでログインしてください。
$ heroku create <アプリ名>$ git remoteherokuのgit URLが表示されることを確認してください。
下記の様に出力されます。heroku https://git.heroku.com/<アプリの名前>.git (fetch) heroku https://git.heroku.com/<アプリの名前>.git (push) origin git@github.com:shou1012/<アプリの名前>.git (fetch) origin git@github.com:shou1012/<アプリの名前>.git (push)git remoteで表示されたherokuのgit URLをリモートリポジトリに追加します。
$ git remote add heroku https://git.heroku.com/xxxxx-xxxxx-xxxxx.git環境設定
データベースと環境変数の設定を行なっていきます。
今回は無料のigniteプランで作成致します。$ heroku addons:create cleardb:ignite$ heroku config下記の様にClearDBのURLが表示されますので、コピーしておきます。
CLEARDB_DATABASE_URL: mysql://<ユーザー名>:<パスワード>@<ホスト名>/<データベース名>?reconnect=true上記のURLを参考に下記を登録していきます。
$ heroku config:add DB_NAME='<データベース名>'
$ heroku config:add DB_USERNAME='<ユーザー名>'
$ heroku config:add DB_PASSWORD='<パスワード>'
$ heroku config:add DB_HOSTNAME='<ホスト名>'
$ heroku config:add DB_PORT='3306'
続いて、DATABASE URLを登録します。
※今回はmysql2で登録しますが、Gemfileを確認して'mysql'を使用している場合は、mysql://で始めてください。$ heroku config:add DATABASE_URL='mysql2://<ユーザー名>:<パスワード>@<ホスト名>/<データベース名>?reconnect=true'Railsの環境変数にcredentials.yml.encを使っている場合は下記で登録できます。
$ heroku config:set RAILS_MASTER_KEY='cat config/master.key'heroku configで登録内容が確認できます。
$ heroku config本番環境のcompileの設定
config/environments/production.rbに下記を追加します。
config/environments/production.rb
config.assets.compile = true #falseからtrueへ
config.assets.initialize_on_precompile=false
デプロイ
$ git add .$ git commit -m "コミットメッセージ"$ git push heroku masterこれでうまくいけばデプロイは完了です!!
エラーが出る場合はこちらをご確認ください。最後にdbマイグレーションをします。
$ heroku run rake db:migrateでは、アプリを開いてみましょう!
$ heroku open以上でHerokuによるデプロイが完了しました!
最後に
Herokuを使うことで非常に簡単にデプロイができました。
問題がなければこれからも使用していきたいです。参考
https://kurose.me/heroku-deploy/
https://qiita.com/rainbow___0/items/1789920cf797b5e80a5e
https://qiita.com/daigou26/items/64d87d987652c4108ae6
https://qiita.com/terufumi1122/items/27bf288414569e13e050