- 投稿日:2020-04-26T23:25:26+09:00
ソケット通信 possible SYN flooding on port 443. Sending cookies. がログに出てきた
はじめに
/var/log/messagesに
possible SYN flooding on port 443. Sending cookies.が出力されていたので、Linuxのソケット通信についてメモしてみました。環境
- CentOS6
- Apache
参考
https://qiita.com/smallpalace/items/14ea25ae07178f5ea6bd
https://qiita.com/sato4557/items/f1205bef8dbfe8022832
https://blog.cloudflare.com/jp/syn-packet-handling-in-the-wild-jp/
http://d.hatena.ne.jp/nyant/20111216/1324043063
http://triplesky.blogspot.jp/2014/07/centos6dmesgpossible-syn-flooding-on.html結論
原因
tcp_max_syn_backlog(ACKを受け取っていない状態のコネクションのキューの保持可能数)を上回るsyn通信があると、OSは SYN Flood攻撃として認識されて、SYNパケットを拒否することになり、/var/log/messageに
possible SYN flooding on port 443. Sending cookies.が出力された。tcp_max_syn_backlogはデフォルトだと128対応策
DDOSがあるわけでもなくpossible SYN flooding on port 443. Sending cookiesがログに出た場合、以下3つのカーネルパラメータを調整する必要がある。
https://note.com/ujisakura/n/n443807235887
net.ipv4.tcp_max_syn_backlog
SYN受信後のACK待ちキュー保持数( SYN flood 発生に影響あり)
※単位:キュー数
※Listen ポートでポート( =ソケット) 当たりのSYNを受け付けて、ACKを受け取っていない状態のコネクションのキューの保持可能数のことです。この値を超えたものに関しては、OSは SYN Flood攻撃として認識されて、SYNパケットを拒否することになります。例
net.ipv4.tcp_max_syn_backlog = 128→8192net.core.somaxconn
同時に受け入れるTCP接続のソケット上限
ListneポートでSYNからACK受信し、ESTABになる前の状態を一度に受け入れるTCPセッションのキュー数
※単位:キュー数
※netstat の Send-Q に表示されます。
※syn_backlog とsomaxconn の数字は合わせるのが推奨とされています。
例
net.core.somaxconn = 128→8192backlogのキュー長はlisten()時に指定されるbacklog引数の値に設定される。ただし、指定値がsysctlのnet.core.somaxconnより大きかった場合は、net.core.somaxconnの値に切り詰められる。
net.core.netdev_max_backlog
LISTENポート受信前のNICからOSへ渡すバッファリング領域
※単位:パケット数
例
net.core.netdev_max_backlog = 1000→5000ApacheのListenBacklog値
ListenBacklogで設定を行ってもOSによる制限の方が優先され、さらに、その制限はOSにより異なるので注意しなければならない。
制限はOSにより異なるのでここも大きくはしたほうがよさそうhttp://u-kipedia.hateblo.jp/entry/2015/01/01/001135
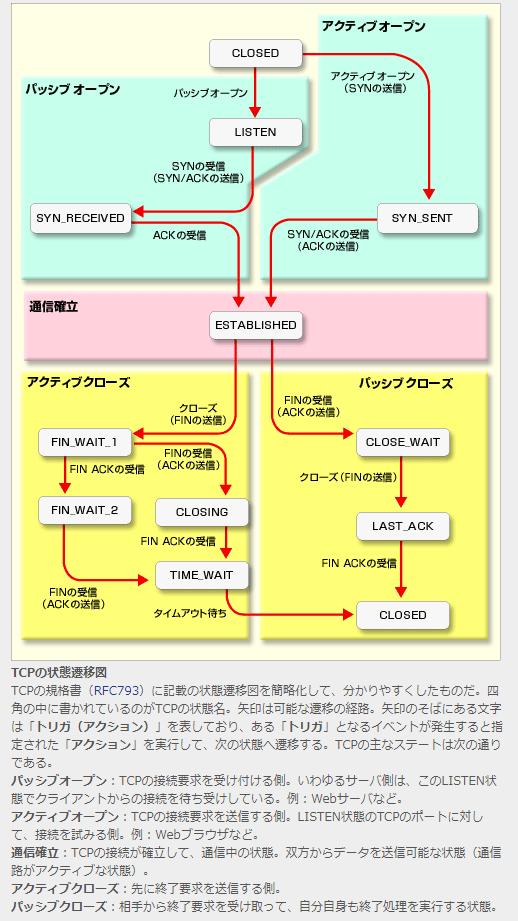
- ソケットキューの大きさがbacklog数
- ソケットキューは、サーバソケットごと(=port)ごとに作成される
- accept()システムコールが呼ばれると、確立済のTCPセッションはソケットキューから削除され、ファイルディスクリタに登録される(関連づけられる)
以下上記の理由など
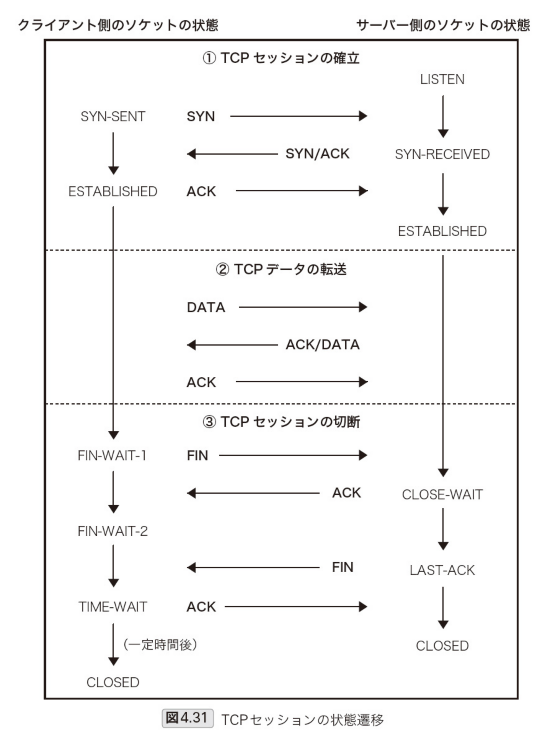
TCPセッションの状態遷移
netstatのステータス状態一覧
参照:[改訂新版]プロのためのLinuxシステム構築・運用技術
参照:https://www.atmarkit.co.jp/ait/articles/0207/20/news003.html
TIME_WAIT
「CLOSING」でACKを受けた状態。アクティブ・クローズ後のタイムアウト待ち状態。同じシーケンス番号やポート番号などを再利用しないように、しばらく待ってから(ネットワーク上で遅れていたパケットがこの時間内に到着する可能性があるので、それと衝突しないように待つ)、「CLOSED」へ遷移して終了する。
コネクションの終了待ち状態。しばらく待ったあと、CLOSEDへ遷移して終了する(netstatの表示から消える)LinuxカーネルのTCP/IPプロトコルスタック
https://blog.cloudflare.com/jp/syn-packet-handling-in-the-wild-jp/
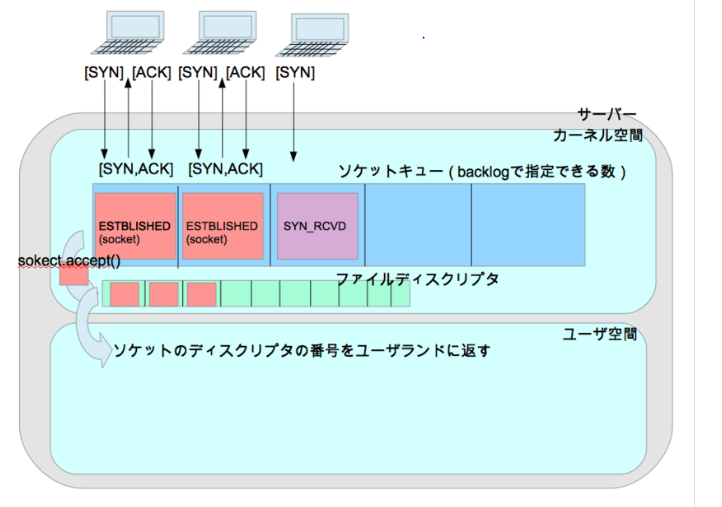
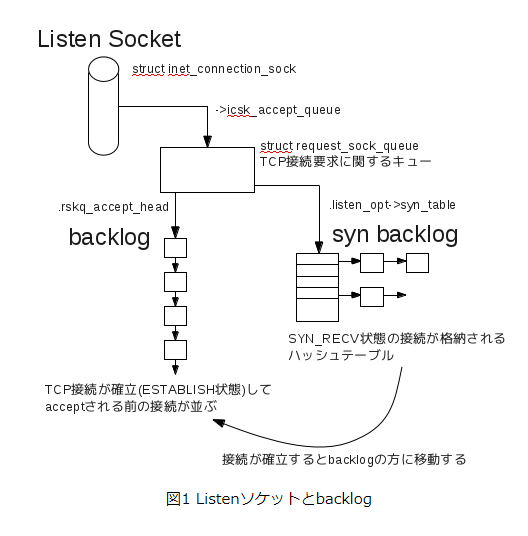
ファイルディスクリプタと、ソケットが入るキューが2つある
backlog
- Acceptキューには、完全に確立された接続が含まれていて、アプリケーションはいつでも利用できます。プロセスが accept() を呼び出すと、ソケットはキューから取り出され、アプリケーションに渡されます。 これはファイルディスクリプタを介してユーザープロセスにわたされて接続済みソケットが使えるようになるということ
参照:http://u-kipedia.hateblo.jp/entry/2015/01/01/001135
ファイルディスクリプタが入っている図
参照:https://wiki.bit-hive.com/linuxkernelmemo/pg/listen%20backlog%20%E3%80%903.6%E3%80%91
2つのキューが書かれている図なのでユーザープロセスがaccept()するとこの図のbacklogから、ファイルディスクリプタに関連付けれる
カーネルパラメータ
https://qiita.com/sion_cojp/items/c02b5b5586b48eaaa469
上記図のキューサイズを変更するのは下記パラメータになる
パラメーター 内容 default値 net.core.somaxconn = 65535 一度に受け入れられるTCPセッションのキューの数。
TCPのセッション数をbacklogで管理し、それを超えたものはキューに格納される。
このキューの数をここで設定する128 net.core.netdev_max_backlog = 65536 パケット受信時にキューに繋ぐことができるパケットの最大数 1000 net.ipv4.tcp_max_syn_backlog = 65536 ソケット当たりのSYNを受け付けてACKを受け取っていない状態のコネクションの保持可能数。
この値を超えたものに関してはOSはSYNパケットを拒否することになる。
溢れたパケットはnetstatで確認できる。
ただし、この値はnet.core.somaxconnより大きかった場合、net.core.somaxconnの値を優先する。1024 その他
パラメーター 内容 default値 net.ipv4.tcp_syncookies = 1 SYN flood攻撃対策 1 net.core.rmem_max = 16777216 TCPとUDPの受信バッファのデフォルトサイズと最大サイズ。 124928 net.core.wmem_max = 16777216 TCPとUDPの送信バッファのデフォルトサイズと最大サイズ。 124928 net.nf_conntrack_max = 1053616 ESTABLISHEDのリストの最大数(OS側の管理数) 可変 net.ipv4.conf.default.accept_source_route = 0 ソースルートが指定されたパケットを拒否。本来は経路のテストを行う目的であるのでoffにする 1 net.ipv4.tcp_rmem = 4096 349520 16777216 データ受信バッファ サイズ 可変 net.ipv4.tcp_timestamps = 0 NAT環境下で、複数ホストがクライアントのときに、WAN側のサーバに接続が切られる対策 1 net.ipv4.tcp_fin_timeout = 5 FINのタイムアウト時間 60 net.ipv4.tcp_syn_retries = 3 tcpのSYNを送信するリトライ回数。
この回数SYNを送ってもダメなら諦める5 net.ipv4.tcp_synack_retries = 3 接続を受付側としてオープンするとき、 カーネルは SYN に ACK を詰め込んで送り、先に受けとった SYN を確認する。 5 net.ipv4.ip_local_port_range = 10000 65535 TCP/IPの送信時に使用するポートの範囲
可能なら 1024-65535が良いが、iptablesやAWSだとNetworkACLとかで
同様に必要に応じて開放しておかないとパケットが途中で止まってハマるから注意。
$ cat /proc/sys/net/ipv4/ip_local_port_rangeで確認できる32768 61000 net.ipv4.tcp_tw_reuse = 1 自分からの接続を使い回す。tcp_tw_recycleは相手からの接続を使い回す。 0 net.ipv4.tcp_tw_recycle = 0 相手からの接続を使い回す。 0 net.ipv4.tcp_rfc1337 = 1 RFC1337に準拠させる。TIME_WAIT状態のときにRSTを受信した場合、TIME_WAIT期間の終了を待たずにそのソケットをクローズする 0 net.ipv4.tcp_fin_timeout = 5 タイムアウトはできる限り短いほうがいい 60 net.ipv4.tcp_max_tw_buckets = 65536 システムが同時に保持するtime-waitソケットの最大数。
DoS攻撃を防げるため、低くするのはやめたほうが良い。動的 net.ipv4.tcp_orphan_retries = 0 こちらからクローズしたTCPコネクションを終了する前の再送回数。
webサーバだとリソースを消費する可能性があるため、低くしたほうが良い0 net.ipv4.tcp_keepalive_probes = 5 TCP が keepalive プローブを送る数。この数に達すると、 その接続が壊れたとみなす。
9 net.ipv4.tcp_slow_start_after_idle = 0 keepaliveしててもしばらく通信がなかったらcongestion window sizeをresetする。
keepaliveを利用しており、かつ輻輳が少ない環境ではoffが良い。1 net.ipv4.conf.eth180.arp_ignore = 1 ぶら下がってるAPサーバ群にarpに応答させない(MACアドレスを覚えさせない)
IPとmacアドレスが関係ずけられると、送りたい機器に通信できなくなる。0 net.ipv4.conf.eth180.arp_announce = 2 ぶら下がってるAPサーバ群にarpに応答させない(MACアドレスを覚えさせない)
IPとmacアドレスが関係ずけられると、送りたい機器に通信できなくなる。0 vm.swappiness = 0 実メモリがある状態でスワップを使用しない 0 vm.overcommit_memory = 2 実メモリ以上にプロセスにメモリを割り当てない 0 vm.overcommit_ratio = 99 OOM killerで勝手にkillするくらいだったら、メモリ不足を検出してエラー処理をさせる。
vm.overcommit_memory = 2のときに設定する50 kernel.shmmax = メモリのByte数 共有メモリの最大サイズ。サーバーの搭載メモリ(1GB)に合わせて変更するので 動的? kernel.shmall = 68719476736 システム全体の共有メモリ・ページの最大数 68719476736 kernel.msgmnb = 65536 1つのメッセージキューに保持できるメッセージの最大値 65536 kernel.msgmax = 65536 メッセージキューIDの最大値 65536 kernel.sysrq = 0 SysRqとは、サーバでキーボード操作ができなくなったとき、カーネルが昨日してれば特定のキー(Alt + PrintScreen)で割り込める。使わないので0 0 kernel.core_uses_pid = 1 コアダンプ時、".PID"をコアファイル名に追加しない 0 Apacheのbacklog
https://thinkit.co.jp/article/118/2?page=0%2C1
ListenBackLogディレクティブ
MaxClients制限数を超えているときに接続してきたコネクションは、
棄却されるのではなく、「ListenBacklog」ディレクティブ(デフォルト値は511)で設定した数まで処理待ちとしてキューに格納され保留状態になる。キューに格納されたコネクションは、確立中のコネクションが解放されしだい順次リクエストに応答する仕組みになっている(図2)。ListenBacklogで設定を行ってもOSによる制限の方が優先され、さらに、その制限はOSにより異なるので注意しなければならない。
補足:ソケット通信の確認コマンド
netstatコマンド
https://network-beginners-handbook.com/netstat/
「プロトコル」には、「TCP」、「UDP」といったトランスポート層のプロトコル名が入ります。
- オプションなしで「netstat」を実行した場合UDPは表示されません。
- UDPが表示されない理由は、UDPはコネクションを確立しないためです。
- netstat -a でudpも表示
- 「状態」は、TCPの状態遷移を表しています。
- 投稿日:2020-04-26T23:23:32+09:00
CentOS Linux 8 でのセキュリティアップデート方法
概要
- CentOS Linux サーバの日々の定常作業として実施するべき dnf upgrade 作業手順をまとめる
- 通常のパッケージ更新と Linux カーネルのパッケージ更新の2パターン
セキュリティ更新の情報源
セキュリティ情報などの告知メーリングリスト。
CentOS announcements (security and general) will be posted to this list
Red Hat Enterprise Linux 等のセキュリティ勧告ページ。
Red Hat Product Advisories - Red Hat Customer Portal
通常のセキュリティアップデート
実施コマンド概要
新しいバージョンがあるパッケージを更新し、再起動が必要なプロセスを確認する。
$ sudo dnf check-update
$ sudo dnf upgrade
$ sudo needs-restarting
dnf check-update
更新可能なパッケージがあるか確認する。
DNF Command Reference — dnf latest documentation
dnf [options] check-update [--changelogs] [...]
Non-interactively checks if updates of the specified packages are available. If no is given, checks whether any updates at all are available for your system.
dnf upgrade
利用可能な最新のパッケージに更新する。
DNF Command Reference — dnf latest documentation
dnf [options] upgrade
Updates each package to the latest version that is both available and resolvable.dnf upgrade などにはセキュリティ修正があるパッケージのみを対象とする --security オプションが存在するが、このオプションは Red Hat Enterprise Linux では利用可能だが CentOS では使えない。CentOS ではセキュリティのメタデータを持っていないため使えないとのこと。
CentOS errata : bug and security fixes - CentOS
There is no security metadata in the CentOS yum repos which means that running yum --security update does nothing useful. However, just running yum update applies all outstanding patches including those released for security purposes.
So the answer is: just run yum update
needs-restarting コマンドで再起動が必要なプロセスを確認
needs-restarting を使うためには yum-utils パッケージをインストールする。
$ sudo dnf install yum-utilsneeds-restarting コマンドで再起動が必要なプロセスを確認できる。
$ sudo needs-restarting
1 : /usr/lib/systemd/systemd --system --deserialize 21
554 : /usr/sbin/httpd -DFOREGROUND
597 : /usr/lib/systemd/systemd-journald
766 : /usr/bin/dbus-daemon --system --address=systemd: --nofork --nopidfile --systemd-activation --syslog-only
767 : /usr/sbin/mcelog --ignorenodev --daemon --foreground
769 : /usr/bin/lsmd -d
770 : /sbin/rngd -f
777 : /usr/lib/polkit-1/polkitd --no-debug
779 : /usr/sbin/NetworkManager --no-daemon
789 : /usr/sbin/chronyd
Linux カーネルのアップデート
コマンド概要
パッケージを更新した後、OS を再起動する必要がある。
$ sudo dnf check-update
$ sudo dnf upgrade
$ sudo reboot
Linux カーネル更新例
$ sudo dnf upgrade
メタデータの期限切れの最終確認: 0:00:11 時間前の 2020年04月15日 08時39分31秒 に実施しました。
依存関係が解決しました。
====================================================================================================
 パッケージ                  Arch   バージョン                                      Repo      サイズ
====================================================================================================
インストール:
 kernel                      x86_64 4.18.0-147.8.1.el8_1                            BaseOS    1.5 M
 kernel-core                 x86_64 4.18.0-147.8.1.el8_1                            BaseOS     25 M
 kernel-devel                x86_64 4.18.0-147.8.1.el8_1                            BaseOS     13 M
 kernel-modules              x86_64 4.18.0-147.8.1.el8_1                            BaseOS     22 M
(中略)
トランザクションの概要
====================================================================================================
インストール     4 パッケージ
アップグレード  61 パッケージ

ダウンロードサイズの合計: 141 M
これでよろしいですか? [y/N]: y
パッケージのダウンロード:
(1/65): kernel-4.18.0-147.8.1.el8_1.x86_64.rpm                      3.0 MB/s | 1.5 MB     00:00
(2/65): kernel-devel-4.18.0-147.8.1.el8_1.x86_64.rpm                3.4 MB/s |  13 MB     00:04
(3/65): kernel-modules-4.18.0-147.8.1.el8_1.x86_64.rpm              3.8 MB/s |  22 MB     00:05
(中略)
インストール済み:
  kernel-4.18.0-147.8.1.el8_1.x86_64              kernel-core-4.18.0-147.8.1.el8_1.x86_64
  kernel-devel-4.18.0-147.8.1.el8_1.x86_64        kernel-modules-4.18.0-147.8.1.el8_1.x86_64

完了しました!
OS を再起動しないと Linux カーネルが更新されない。
$ uname -mrsv
Linux 4.18.0-147.5.1.el8_1.x86_64 #1 SMP Wed Feb 5 02:00:39 UTC 2020 x86_64
OSを再起動して、Linux カーネルを更新。
$ sudo rebootLinux カーネルのバージョンが更新されていることを確認できる。
$ uname -mrsv
Linux 4.18.0-147.8.1.el8_1.x86_64 #1 SMP Thu Apr 9 13:49:54 UTC 2020 x86_64
参考資料
- 投稿日:2020-04-26T23:19:54+09:00
CentOS では dnf コマンドで --security オプションが使えない
dnf コマンドの --security オプション
dnf コマンドには dnf upgrade などでパッケージを更新する際に、セキュリティ修正があるパッケージのみを対象とする --security オプションが存在する。
DNF Command Reference — dnf latest documentation
dnf [options] upgrade
Updates each package to the latest version that is both available and resolvable.DNF Command Reference — dnf latest documentation
--security
Includes packages that provide a fix for a security issue. Applicable for the upgrade command.ただし、このオプションは Red Hat Enterprise Linux では利用可能だが CentOS では使えない。CentOS ではセキュリティのメタデータを持っていないため使えないとのこと。
CentOS errata : bug and security fixes - CentOS
There is no security metadata in the CentOS yum repos which means that running yum --security update does nothing useful. However, just running yum update applies all outstanding patches including those released for security purposes.
So the answer is: just run yum update
yum list-security vs yum yum --security list updates - CentOS
I'm surprised that either of them work - security information is provided by Redhat only and there is no equivalent CentOS feed for it so the yum-security plugin is a no-op on CentOS.
No see packages informations - Page 2 - CentOS
We do not supply security metadata for ANY CentOS version. Not CentOS 8 or 7 or 6 or 5...
Reminder: CentOS automatic security updates DO NOT WORK | AWS Consulting | Casey Labs
Why doesn’t it work on CentOS? The updateinfo.xml in the CentOS repositories do not include classifications for security patches. So when you run yum upgrade –security on a CentOS box, CentOS can’t find any security-only updates, and hence thinks everything is up to date.
実例
実際に --security オプションを指定してみると、セキュリティ修正のあるパッケージ更新があっても「セキュリティー更新は必要ありませんが」と表示されてしまう。
$ sudo dnf check-update --security
メタデータの期限切れの最終確認: 0:35:24 時間前の 2020年04月26日 22時25分21秒 に実施しました。
セキュリティー更新は必要ありませんが、8 更新が利用可能です
$ sudo dnf --security upgrade メタデータの期限切れの最終確認: 0:35:31 時間前の 2020年04月26日 22時25分21秒 に実施しました。 セキュリティー更新は必要ありませんが、8 更新が利用可能です 依存関係が解決しました。 行うべきことはありません。 完了しました!実際にはセキュリティ修正のあるパッケージが更新されている可能性があるので --security オプションを指定せずに更新をする必要がある (状況によってはパッケージ全てではなく個別に更新をする必要があるかもしれない)。
$ sudo dnf check-update
メタデータの期限切れの最終確認: 0:35:46 時間前の 2020年04月26日 22時25分21秒 に実施しました。

git.x86_64                                                   2.18.2-2.el8_1                                    AppStream
git-core.x86_64                                              2.18.2-2.el8_1                                    AppStream
git-core-doc.noarch                                          2.18.2-2.el8_1                                    AppStream
java-1.8.0-openjdk.x86_64                                    1:1.8.0.252.b09-2.el8_1                           AppStream
java-1.8.0-openjdk-headless.x86_64                           1:1.8.0.252.b09-2.el8_1                           AppStream
java-11-openjdk.x86_64                                       1:11.0.7.10-1.el8_1                               AppStream
java-11-openjdk-headless.x86_64                              1:11.0.7.10-1.el8_1                               AppStream
perl-Git.noarch                                              2.18.2-2.el8_1                                    AppStream
$ sudo dnf upgrade メタデータの期限切れの最終確認: 0:35:56 時間前の 2020年04月26日 22時25分21秒 に実施しました。 依存関係が解決しました。 ======================================================================================================================== パッケージ アーキテクチャー バージョン リポジトリー サイズ ======================================================================================================================== アップグレード: git x86_64 2.18.2-2.el8_1 AppStream 186 k git-core x86_64 2.18.2-2.el8_1 AppStream 5.0 M git-core-doc noarch 2.18.2-2.el8_1 AppStream 2.3 M java-1.8.0-openjdk x86_64 1:1.8.0.252.b09-2.el8_1 AppStream 320 k java-1.8.0-openjdk-headless x86_64 1:1.8.0.252.b09-2.el8_1 AppStream 33 M java-11-openjdk x86_64 1:11.0.7.10-1.el8_1 AppStream 247 k java-11-openjdk-headless x86_64 1:11.0.7.10-1.el8_1 AppStream 40 M perl-Git noarch 2.18.2-2.el8_1 AppStream 77 k トランザクションの概要 ======================================================================================================================== アップグレード 8 パッケージ ダウンロードサイズの合計: 81 M これでよろしいですか? [y/N]: yこの例では java-1.8.0-openjdk パッケージの 1.8.0.252.b09-2.el8_1 バージョンがセキュリティ修正のパッケージ更新となっているのに --security オプションを付けても更新対象ではなくなってしまっている。
このパッケージがセキュリティ修正対象であるという情報は RedHat の Security Advisory サイトに載っている。
RHSA-2020:1515 - Security Advisory - Red Hat カスタマーポータル
Important: java-1.8.0-openjdk security update
java-1.8.0-openjdk-1.8.0.252.b09-2.el8_1.x86_64.rpm
今回の動作確認環境
$ cat /etc/centos-release
CentOS Linux release 8.1.1911 (Core)
- 投稿日:2020-04-26T23:19:54+09:00
CentOS Linux では dnf コマンドで --security オプションが使えない
dnf コマンドの --security オプション
dnf コマンドには dnf upgrade などでパッケージを更新する際に、セキュリティ修正があるパッケージのみを対象とする --security オプションが存在する。
DNF Command Reference — dnf latest documentation
dnf [options] upgrade
Updates each package to the latest version that is both available and resolvable.DNF Command Reference — dnf latest documentation
--security
Includes packages that provide a fix for a security issue. Applicable for the upgrade command.ただし、このオプションは Red Hat Enterprise Linux では利用可能だが CentOS では使えない。CentOS ではセキュリティのメタデータを持っていないため使えないとのこと。
CentOS errata : bug and security fixes - CentOS
There is no security metadata in the CentOS yum repos which means that running yum --security update does nothing useful. However, just running yum update applies all outstanding patches including those released for security purposes.
So the answer is: just run yum update
yum list-security vs yum yum --security list updates - CentOS
I'm surprised that either of them work - security information is provided by Redhat only and there is no equivalent CentOS feed for it so the yum-security plugin is a no-op on CentOS.
No see packages informations - Page 2 - CentOS
We do not supply security metadata for ANY CentOS version. Not CentOS 8 or 7 or 6 or 5...
Reminder: CentOS automatic security updates DO NOT WORK | AWS Consulting | Casey Labs
Why doesn’t it work on CentOS? The updateinfo.xml in the CentOS repositories do not include classifications for security patches. So when you run yum upgrade –security on a CentOS box, CentOS can’t find any security-only updates, and hence thinks everything is up to date.
実例
実際に --security オプションを指定してみると、セキュリティ修正のあるパッケージ更新があっても「セキュリティー更新は必要ありませんが」と表示されてしまう。
$ sudo dnf check-update --security
メタデータの期限切れの最終確認: 0:35:24 時間前の 2020年04月26日 22時25分21秒 に実施しました。
セキュリティー更新は必要ありませんが、8 更新が利用可能です
$ sudo dnf --security upgrade メタデータの期限切れの最終確認: 0:35:31 時間前の 2020年04月26日 22時25分21秒 に実施しました。 セキュリティー更新は必要ありませんが、8 更新が利用可能です 依存関係が解決しました。 行うべきことはありません。 完了しました!実際にはセキュリティ修正のあるパッケージが更新されている可能性があるので --security オプションを指定せずに更新をする必要がある (状況によってはパッケージ全てではなく個別に更新をする必要があるかもしれない)。
$ sudo dnf check-update
メタデータの期限切れの最終確認: 0:35:46 時間前の 2020年04月26日 22時25分21秒 に実施しました。

git.x86_64                                                   2.18.2-2.el8_1                                    AppStream
git-core.x86_64                                              2.18.2-2.el8_1                                    AppStream
git-core-doc.noarch                                          2.18.2-2.el8_1                                    AppStream
java-1.8.0-openjdk.x86_64                                    1:1.8.0.252.b09-2.el8_1                           AppStream
java-1.8.0-openjdk-headless.x86_64                           1:1.8.0.252.b09-2.el8_1                           AppStream
java-11-openjdk.x86_64                                       1:11.0.7.10-1.el8_1                               AppStream
java-11-openjdk-headless.x86_64                              1:11.0.7.10-1.el8_1                               AppStream
perl-Git.noarch                                              2.18.2-2.el8_1                                    AppStream
$ sudo dnf upgrade メタデータの期限切れの最終確認: 0:35:56 時間前の 2020年04月26日 22時25分21秒 に実施しました。 依存関係が解決しました。 ======================================================================================================================== パッケージ アーキテクチャー バージョン リポジトリー サイズ ======================================================================================================================== アップグレード: git x86_64 2.18.2-2.el8_1 AppStream 186 k git-core x86_64 2.18.2-2.el8_1 AppStream 5.0 M git-core-doc noarch 2.18.2-2.el8_1 AppStream 2.3 M java-1.8.0-openjdk x86_64 1:1.8.0.252.b09-2.el8_1 AppStream 320 k java-1.8.0-openjdk-headless x86_64 1:1.8.0.252.b09-2.el8_1 AppStream 33 M java-11-openjdk x86_64 1:11.0.7.10-1.el8_1 AppStream 247 k java-11-openjdk-headless x86_64 1:11.0.7.10-1.el8_1 AppStream 40 M perl-Git noarch 2.18.2-2.el8_1 AppStream 77 k トランザクションの概要 ======================================================================================================================== アップグレード 8 パッケージ ダウンロードサイズの合計: 81 M これでよろしいですか? [y/N]: yこの例では java-1.8.0-openjdk パッケージの 1.8.0.252.b09-2.el8_1 バージョンがセキュリティ修正のパッケージ更新となっているのに --security オプションを付けても更新対象ではなくなってしまっている。
このパッケージがセキュリティ修正対象であるという情報は RedHat の Security Advisory サイトに載っている。
RHSA-2020:1515 - Security Advisory - Red Hat カスタマーポータル
Important: java-1.8.0-openjdk security update
java-1.8.0-openjdk-1.8.0.252.b09-2.el8_1.x86_64.rpm
今回の動作確認環境
$ cat /etc/centos-release
CentOS Linux release 8.1.1911 (Core)
- 投稿日:2020-04-26T21:31:51+09:00
[systemd] rc.localでNvidiaのGPUのファン制御をする
ながれ
- rc.localを有効にする
- GPUファン制御用のシェルスクリプトを作成する
- rc.localにスクリプトの実行パスを記述する
1. rc.localを有効にする
https://techexpert.tips/ja/ubuntu-ja/enable-rc-local-ubuntu-linux/
# touch /etc/rc.local
# chmod 755 /etc/rc.local
# vi /etc/systemd/system/rc-local.service [Unit] Description=/etc/rc.local Compatibility ConditionPathExists=/etc/rc.local [Service] Type=forking ExecStart=/etc/rc.local start TimeoutSec=0 StandardOutput=tty RemainAfterExit=yes SysVStartPriority=99 [Install] WantedBy=multi-user.target# systemctl enable rc-localテスト# vi /etc/rc.local #!/bin/bash echo "TEST OK" > /tmp/rc.local.status再起動して確認# reboot # cat /tmp/rc.local.status2. GPUファン制御用のシェルスクリプトを作成する
https://www.techticity.com/howto/how-to-control-nvidia-graphics-card-fan-speed-in-linux/
/opt/fancontrol/fancntrol.sh#!/bin/sh prf() { printf %s\\n "$*" ; } z=$0; display=""; CDPATH=""; fname=""; num_gpus="0"; num_fans="0"; debug="0" max_t="0"; max_t2="0"; mnt="0"; mxt="0"; ot="0"; tdiff="0"; cur_t="0" new_spd="0"; cur_spd="0"; old_t="200"; check_diff1="0"; check_diff2="0" fcurve_len="0"; fcurve_len2="0"; num_gpus_loop="0"; num_fans_loop="0"; old_s="0" otl="-1"; sleep_override=""; gpu_cmd="nvidia-settings" usage="Usage: $(basename "$0") [OPTION]... where: -c [ARG] configuration file (default: $PWD/config) -d [ARG] display device string (e.g. \":0\", \"CRT-0\"), defaults to auto -D run in daemon mode (background process), using sh -h show this help text -l enable logging to stdout -s [ARG] set the sleep time (in seconds) -v show the current version of this script" { \unalias command; \unset -f command; } >/dev/null 2>&1 [ -n "$ZSH_VERSION" ] && options[POSIX_BUILTINS]=on while true; do [ -L "$z" ] || [ -e "$z" ] || { prf "'$z' is invalid" >&2; exit 1; } command cd "$(command dirname -- "$z")" fname=$(command basename -- "$z"); [ "$fname" = '/' ] && fname='' if [ -L "$fname" ]; then z=$(command ls -l "$fname"); z=${z#* -> }; continue fi; break done; conf_file=$(command pwd -P) if [ "$fname" = '.' ]; then conf_file=${conf_file%/} elif [ "$fname" = '..' ]; then conf_file=$(command dirname -- "${conf_file}") else conf_file=${conf_file%/}/$fname fi conf_file=$(dirname -- "$conf_file")"/config" while getopts ":c: :d: :D :h :l :s: :v :x" opt; do if [ "$opt" = "c" ]; then conf_file="$OPTARG" elif [ "$opt" = "d" ]; then display="-c $OPTARG" elif [ "$opt" = "D" ]; then nohup sh temp.sh >/dev/null 2>&1 & exit 1 elif [ "$opt" = "h" ]; then prf "$usage"; exit 0 elif [ "$opt" = "l" ]; then debug="1" elif [ "$opt" = "s" ]; then sleep_override="$OPTARG" elif [ "$opt" = "v" ]; then prf "Version 18"; exit 0 elif [ "$opt" = "x" ]; then gpu_cmd="../nssim/nssim nvidia-settings" elif [ "$opt" = ":" ]; then prf "Option -$OPTARG requires an argument" else prf "Invalid option: -$OPTARG"; exit 1 fi done prf " ################################################################################ # nan0s7's script for automatically managing GPU fan speed # ################################################################################ " # FUNCTIONS THAT REQUIRE CERTAIN DEPENDENCIES TO BE MET #~~~~~~~~~~~~~~~~~~~~~~~~~~~~~~~~~~~~~~~~~~~~~~~~~~~~~~~~~~~~~~~~~~~~~~~~~~~~~~~ # DEPENDS: PROCPS kill_already_running() { tmp="$(pgrep -c temp.sh)" if [ "$tmp" -gt "1" ]; then process_pid="$(pgrep -o temp.sh)" kill "$process_pid"; prf "Killed $process_pid" fi } # DEPENDS: NVIDIA-SETTINGS get_temp() { cur_t="$($gpu_cmd -q=[gpu:"$gpu"]/GPUCoreTemp -t $display)" } get_query() { prf "$($gpu_cmd -q "$1" $display)" } set_fan_control() { i=0 while [ "$i" -le "$1" ]; do $gpu_cmd -a [gpu:"$i"]/GPUFanControlState="$2" $display i=$((i+1)) done } set_speed() { $gpu_cmd -a [fan:"$fan"]/GPUTargetFanSpeed="$cur_spd" $display } finish() { set_fan_control "$num_gpus_loop" "0" prf "Fan control set back to auto mode"; exit 0 }; trap " finish" INT #~~~~~~~~~~~~~~~~~~~~~~~~~~~~~~~~~~~~~~~~~~~~~~~~~~~~~~~~~~~~~~~~~~~~~~~~~~~~~~~ echo_info() { e=" t=$cur_t ot=$ot td=$tdiff s=$sleep_time gpu=$gpu fan=$fan cd=$chd" e="$e nsp=$new_spd osp=$cur_spd maxt=$mxt mint=$mnt otl=$otl" prf "$e" } arr_size() { arr_len=0 for element in $arr; do arr_len=$((arr_len+1)) done } re_elem() { i=0 elem=0 for elem in $arr; do if [ "$i" -ne "$n" ]; then i=$((i+1)) else break fi done } loop_cmds() { get_temp if [ "$cur_t" -ne "$ot" ]; then # Calculate difference and make sure it's positive if [ "$cur_t" -le "$ot" ]; then tdiff="$((ot-cur_t))" else tdiff="$((cur_t-ot))" fi if [ "$tdiff" -ge "$chd" ]; then if [ "$cur_t" -lt "$mnt" ]; then new_spd="0"; otl="-1" elif [ "$cur_t" -lt "$mxt" ]; then tl=0 for arr_t in $tc; do if [ "$cur_t" -le "$arr_t" ]; then break else tl=$((tl+1)) fi done if [ "$tl" -ne "$otl" ]; then arr="$fc"; n="$tl"; re_elem new_spd="$elem"; otl="$tl" fi else new_spd="100" fi if [ "$new_spd" -ne "$cur_spd" ]; then cur_spd="$new_spd" set_speed i=0 tmp="$old_s"; old_s="" for elem in $tmp; do if [ "$i" -ne "$fan" ]; then old_s="$old_s $elem" else old_s="$old_s $cur_spd" fi i=$((i+1)) done fi i=0 tmp="$old_t"; old_t="" for elem in $tmp; do if [ "$i" -ne "$fan" ]; then old_t="$old_t $elem" else old_t="$old_t $cur_t" fi i=$((i+1)) done tdiff="0" fi fi if [ "$debug" -eq "1" ]; then echo_info fi } set_stuff() { arr="$fan2gpu"; n="$fan"; re_elem; gpu="$elem" arr="$which_curve"; n="$fan"; re_elem; tmp="$elem" if [ "$tmp" -eq "1" ]; then chd="$check_diff1" mnt="$min_t"; mxt="$max_t" tc="$tcurve"; fc="$fcurve" else chd="$check_diff2" mnt="$min_t2"; mxt="$max_t2" tc="$tcurve2"; fc="$fcurve2" fi } kill_already_running # Load the config file if ! [ -f "$conf_file" ]; then prf "Config file not found." >&2; exit 1 fi . "$conf_file"; prf "Configuration file: $conf_file" if [ -n "$sleep_override" ]; then sleep_time="$sleep_override"; fi # Check for any user errors in config file arr="$fcurve"; arr_size; size1="$arr_len" arr="$tcurve"; arr_size; size2="$arr_len" if ! [ "$size1" -eq "$size2" ]; then prf "fcurve and tcurve don't match up!"; exit 1 fi arr="$fcurve2"; arr_size; size1="$arr_len" arr="$tcurve2"; arr_size; size2="$arr_len" if ! [ "$size1" -eq "$size2" ]; then prf "fcurve2 and tcurve2 don't match up!"; exit 1 fi arr="$tcurve"; n="0"; re_elem if [ "$min_t" -ge "$elem" ]; then prf "min_t is greater than the first value in the tcurve!"; exit 1 fi arr="$tcurve2"; n="0"; re_elem if [ "$min_t2" -ge "$elem" ]; then prf "min_t2 is greater than the first value in the tcurve2!"; exit 1 fi # Calculate some more values arr="$tcurve"; arr_size; arr="$tcurve"; n="$arr_len"; re_elem; max_t="$elem" arr="$tcurve2"; arr_size; arr="$tcurve2"; n="$arr_len"; re_elem; max_t2="$elem" arr="$fcurve"; arr_size; fcurve_len="$((arr_len-1))" arr="$fcurve2"; arr_size; fcurve_len2="$((arr_len-1))" # Get the system's GPU configuration num_fans=$(get_query "fans"); num_fans="${num_fans%* Fan on*}" if [ -z "$num_fans" ]; then prf "No Fans detected"; exit 1 elif [ "${#num_fans}" -gt "2" ]; then num_fans="${num_fans%* Fans on*}" num_fans_loop="$((num_fans-1))" fi prf "Number of Fans detected: $num_fans" num_gpus=$(get_query "gpus"); num_gpus="${num_gpus%* GPU on*}" if [ -z "$num_gpus" ]; then prf "No GPUs detected"; exit 1 elif [ "${#num_gpus}" -gt "2" ]; then num_gpus="${num_gpus%* GPUs on*}" num_gpus_loop="$((num_gpus-1))" fi prf "Number of GPUs detected: $num_gpus" i=0 while [ "$i" -lt "$num_fans_loop" ]; do old_t="$old_t 0" old_s="$old_s 0" i=$((i+1)) done if [ "$force_check" -eq "0" ]; then j=0 while [ "$j" -le "$((fcurve_len-1))" ]; do arr="$tcurve"; n="$((j+1))"; re_elem; tmp1="$elem" arr="$tcurve"; n="$j"; re_elem; tmp2="$elem" check_diff1="$((check_diff1+tmp1-tmp2))" j=$((j+1)) done check_diff1="$(((check_diff1/(fcurve_len-1))-sleep_time))" j=0 while [ "$j" -le "$((fcurve_len2-1))" ]; do arr="$tcurve2"; n="$((j+1))"; re_elem; tmp1="$elem" arr="$tcurve2"; n="$j"; re_elem; tmp2="$elem" check_diff2="$((check_diff2+tmp1-tmp2))" j=$((j+1)) done check_diff2="$(((check_diff2/(fcurve_len2-1))-sleep_time))" else check_diff1="$force_check"; check_diff2="$force_check" fi set_fan_control "$num_gpus_loop" "1" if [ "$num_gpus" -eq "1" ] && [ "$num_fans" -eq "1" ]; then prf "Started process for 1 GPU and 1 Fan" fan="$default_fan" set_stuff while true; do arr="$old_t"; n="$fan"; re_elem; ot="$elem" arr="$old_s"; n="$fan"; re_elem; cur_spd="$elem" loop_cmds sleep "$sleep_time" done else prf "Started process for n-GPUs and n-Fans" while true; do fan=0 while [ "$fan" -le "$num_fans_loop" ]; do set_stuff arr="$old_t"; n="$fan"; re_elem; ot="$elem" arr="$old_s"; n="$fan"; re_elem; cur_spd="$elem" loop_cmds fan=$((fan+1)) done sleep "$sleep_time" done fi/opt/fancontrol/config# min_t is the temperature at which every temperature below it will cause # the fan speed to be set to 0%, and everything above will be whatever the # first speed in fcurve is (default of 25%) # min_t2 is only used with the second fan speed and temperature arrays, so # there is no need to change it unless you're using the second curve min_t="25" min_t2="25" # How many seconds the script should wait until checking for a change in temps sleep_time="7" # By default it's set up so that when the temp is less than or equal to 35 # degrees, the fan speed will be set to 25%. Next, if the temp is between 36 # and 45, the fan speed should be set to 40%, etc. # The last temperature value will be the maximum temperature before 100% fan # speed will be set # You can make the array as big or as small as you require, as long as they # both end up being the same size fcurve="25 40 55 70 85" # fan speeds tcurve="35 45 55 65 75" # temperatures # This value is used to determine the temperature difference needed to get # the script to check for a new speed to apply. The default of this value # is zero, which means the script will automatically calculate a value # based on the temperature curves supplied below force_check="0" # These two arrays are for GPU's that have a secondary fan that you may wish # to control seperately, especially if it is water-cooled. fcurve2="15 30 45 60 75" tcurve2="35 45 55 65 75" # First number in array is fan 0, second number is fan 1, etc. If the number # is 1, that indicates that the script should use the first curve for that # fan. The same goes for the number 2. which_curve="1 2 1 2" # Only used for single-fan operation. If you have more than one gpu/fan but # only want to control one of them, select which one here. Otherwise there # is no need to change this setting. default_fan="0" # Similar to which_curve, but instead lets the script know which of the GPU's # has which fan. i.e. element 0 in the array being set to 0 means that fan 0 # is assigned to GPU 0, element 1 is 0 too, meaning fan 1 is on GPU 0 as well fan2gpu="0 0 1 1"3. rc.localにスクリプトの実行パスを記述する
/etc/rc.localbash /opt/fancontrol/fancontrol.sh exit 0
- 投稿日:2020-04-26T21:13:04+09:00
[systemd] サービスを削除するときのコマンド
systemctl stop [servicename]
systemctl disable [servicename]
rm /etc/systemd/system/[servicename]
rm /etc/systemd/system/[servicename] symlinks that might be related
systemctl daemon-reload
systemctl reset-failed
- 投稿日:2020-04-26T18:54:39+09:00
Ubuntu 20.04でシリアルコンソールを使う
sudo cp -nv /etc/default/grub   /etc/default/grub.orig
sudo cp -nv /boot/grub/grub.cfg /boot/grub/grub.cfg.orig
sudo vim /etc/default/grub
/etc/default/grub:## remove (optional): # GRUB_TIMEOUT_STYLE=hidden ## change: # (optional) # GRUB_TIMEOUT=0 GRUB_TIMEOUT=2 ## add: GRUB_TERMINAL="console serial" GRUB_SERIAL_COMMAND="serial --speed=115200" ## change: # GRUB_CMDLINE_LINUX="" GRUB_CMDLINE_LINUX="console=tty1 console=ttyS0,115200"
説明
GRUB_TIMEOUT_STYLE=hiddenを消してGRUB_TIMEOUT=2にするとブート時にGRUBメニューが表示されるようになります。
GRUB_TIMEOUTが1以上(あるいは-1)であれば、GRUB_TIMEOUT_STYLE=hiddenであっても Escape キーを押すことでメニューは出せます (ref.)。
GRUB_TERMINAL="console serial"をつけることで、VGAコンソールとserialターミナルの両方にGRUBメニューが表示されます。
シリアルコンソールの出力が表示されない場合、マニュアルを参照して、ハードウェアに合わせて
GRUB_SERIAL_COMMAND="serial --speed=115200"を変えてみて下さい。
GRUB_CMDLINE_LINUX="console=tty1 console=ttyS0,115200"はLinux kernelのcommand-line parameterです。GRUB_TERMINAL="console serial"と同様、このオプションによりVGAコンソール (tty1) とシリアルコンソール (ttyS0) の両方でtty入力/出力が可能になります。
これはboot時にGRUB menuで変更することも可能です。
/etc/default/grubを編集したらsudo update-grubを実行して、boot時に実際に読み込まれる/boot/grub/grub.cfgを生成します。これは内部的にgrub-mkconfig -o /boot/grub/grub.cfgを実行しています。
/etc/default/grub のオリジナル、修正後、diff
オリジナル(環境によって変わります。これはQEMUのもの):
# If you change this file, run 'update-grub' afterwards to update
# /boot/grub/grub.cfg.
# For full documentation of the options in this file, see:
#   info -f grub -n 'Simple configuration'

GRUB_DEFAULT=0
GRUB_TIMEOUT_STYLE=hidden
GRUB_TIMEOUT=0
GRUB_DISTRIBUTOR=`lsb_release -i -s 2> /dev/null || echo Debian`
GRUB_CMDLINE_LINUX_DEFAULT=""
GRUB_CMDLINE_LINUX=""

# Uncomment to enable BadRAM filtering, modify to suit your needs
# This works with Linux (no patch required) and with any kernel that obtains
# the memory map information from GRUB (GNU Mach, kernel of FreeBSD ...)
#GRUB_BADRAM="0x01234567,0xfefefefe,0x89abcdef,0xefefefef"

# Uncomment to disable graphical terminal (grub-pc only)
#GRUB_TERMINAL=console

# The resolution used on graphical terminal
# note that you can use only modes which your graphic card supports via VBE
# you can see them in real GRUB with the command `vbeinfo'
#GRUB_GFXMODE=640x480

# Uncomment if you don't want GRUB to pass "root=UUID=xxx" parameter to Linux
#GRUB_DISABLE_LINUX_UUID=true

# Uncomment to disable generation of recovery mode menu entries
#GRUB_DISABLE_RECOVERY="true"

# Uncomment to get a beep at grub start
#GRUB_INIT_TUNE="480 440 1"
修正後:
# If you change this file, run 'update-grub' afterwards to update
# /boot/grub/grub.cfg.
# For full documentation of the options in this file, see:
#   info -f grub -n 'Simple configuration'

GRUB_DEFAULT=0
GRUB_TIMEOUT=2
GRUB_DISTRIBUTOR=`lsb_release -i -s 2> /dev/null || echo Debian`
GRUB_CMDLINE_LINUX_DEFAULT=""
GRUB_CMDLINE_LINUX="console=tty1 console=ttyS0,115200"

# Uncomment to enable BadRAM filtering, modify to suit your needs
# This works with Linux (no patch required) and with any kernel that obtains
# the memory map information from GRUB (GNU Mach, kernel of FreeBSD ...)
#GRUB_BADRAM="0x01234567,0xfefefefe,0x89abcdef,0xefefefef"

# Uncomment to disable graphical terminal (grub-pc only)
#GRUB_TERMINAL=console
#GRUB_TERMINAL="console serial"
GRUB_TERMINAL="console serial"
GRUB_SERIAL_COMMAND="serial --speed=115200"

# The resolution used on graphical terminal
# note that you can use only modes which your graphic card supports via VBE
# you can see them in real GRUB with the command `vbeinfo'
#GRUB_GFXMODE=640x480

# Uncomment if you don't want GRUB to pass "root=UUID=xxx" parameter to Linux
#GRUB_DISABLE_LINUX_UUID=true

# Uncomment to disable generation of recovery mode menu entries
#GRUB_DISABLE_RECOVERY="true"

# Uncomment to get a beep at grub start
#GRUB_INIT_TUNE="480 440 1"
diff:
sudo apt install python3-pip
pip3 install icdiff
~/.local/bin/icdiff /etc/default/grub.orig   /etc/default/grub
~/.local/bin/icdiff /boot/grub/grub.cfg.orig /boot/grub/grub.cfg
/boot/grub/grub.cfgのdiffは大きいので自分の目で確かめてみて下さい。
再起動するとシリアルコンソールにdmesgが流れ、ログインプロンプトが表示されるようになります。
この 作品 は クリエイティブ・コモンズ 表示 4.0 国際 ライセンスの下に提供されています。


- 投稿日:2020-04-26T17:20:53+09:00
[cron] シェルを自動実行してLinuxのGPUのファンをCurve Controlする
環境
Linux Ubuntu bionic xfce
はじめに
LinuxでNvidiaのグラボをカーブコントロール(グラボの温度に応じてファンを制御すること)をするためにWebを漁りなんとか解決にたどり着いた。
手順
- ファンコントロールをするシェルを用意する (https://github.com/FedoraTipper/Nvidia-Fan-Curve-Linux)
- crontabで起動時に自動実行するようにする
1.ファン制御するシェル
/path/to/script#!/bin/bash #Make sure to enable nvidia-xconfig --cool-bits=4 #This new script works with version 378.13 driver #Old script is not functional (on Arch, at least) #Changed up some options and flags for nvidia-settings #Added some comments for clarity, in case other people want to make improved forks #enable headless mode #request lightdm installed - apt install --no-install-recommends xorg lightdm for debian/ubuntu headless=true verbose=false if [ "$headless" = true ] ; then export DISPLAY=:0 XAUTHORITY=/var/run/lightdm/root/:0 fi #Enable user defined fancontrol for all gpu nvidia-settings -a "GPUFanControlState=1" while true do #gpu index i=0 #Get GPU temperature of all cards for gputemp in $(nvidia-smi --query-gpu=temperature.gpu --format=csv,noheader);do if [ "$verbose" = true ] ; then echo "gpu ${i} temp ${gputemp}"; fi #Note: you need to set the minimum fan speed to a non-zero value, or it won't work #This fan profile is being used in my GTX580 (Fermi). Change it as necessary #If temperature is between X to Y degrees, set fanspeed to Z value case "${gputemp}" in 0[0-9]) newfanspeed="10" ;; 1[0-9]) newfanspeed="15" ;; 2[0-9]) newfanspeed="20" ;; 3[0-9]) newfanspeed="20" ;; 4[0-9]) newfanspeed="30" ;; 5[0-4]) newfanspeed="35" ;; 5[5-6]) newfanspeed="40" ;; 5[7-9]) newfanspeed="50" ;; 6[0-5]) newfanspeed="60" ;; 6[6-9]) newfanspeed="65" ;; 7[0-5]) newfanspeed="70" ;; 7[6-9]) newfanspeed="85" ;; *) newfanspeed="100" ;; esac nvidia-settings -a "[fan-${i}]/GPUTargetFanSpeed=${newfanspeed}" 2>&1 >/dev/null if [ "$verbose" = true ] ; then echo "gpu ${i} new fanspeed ${newfanspeed}"; fi sleep 1s #increment gpu index i=$(($i+1)) done done2. crontab設定
設定
エディタで追記
エディタ起動crontab -e/tmp/crontab.xxxxx@reboot /path/to/scriptワンライナーで追記
echo '@reboot /path/to/script' | crontab設定内容を確認
crontab -l結果@reboot /path/to/script
- 投稿日:2020-04-26T14:55:49+09:00
意外と知らないLinuxの仕組みについて解説
こんにちは和己です。今回はLinuxの仕組みをサクッと解説したいと思います。
Linuxとは?
MacやWindowsと同じようにOS(Operating System)でスマートフォンからクラウドまで、幅広く利用されている。
OSの種類
Windows
macOs
Linux/UNIX
iOS
AndroidOSそんなLinuxを理解するまでに必要最低限の考え方が2つあるのでそれらから説明します。
ハードウェアとソフトウェアの違い
この違いについてはご存知の方が多いと思いますがハードウェアとはコンピュータの機械そのもののことを指します。一方でソフトウェアとはハードウェアで動いているプログラムを指します。
ゲーム機本体(=ハードウェア)とゲームソフト(=ソフトウェア)の関係をイメージするとわかりやすいと思います。
基本ソフトウェアと応用ソフトウェアの違い
先ほど説明したソフトウェアにも大きく分けて2種類あります。
それが基本ソフトウェアと応用ソフトウェアです。基本ソフトウェアはOSのことを指し、応用ソフトウェアはその上で動くアプリケーションを指します。
先ほど種類をあげたWindowsやLinux、macOsが基本ソフトウェア。WordやExcelなどは応用ソフトウェアになります。以上を踏まえた上でLinuxとは?を考えると理解しやすいです。
Linuxの特徴とは?
シェルとログイン
Linuxには対話型のコマンドで操作入力環境が用意されています。シェルは入力されたコマンドを理解し、実行します。それとLinuxでは利用開始時にユーザー名とパスワードを入力します。ユーザー名とパスワードの組み合わせをアカウントといい、アカウントを使ってLinuxを使い始めることをログインするといいます。
ではLinuxはどういう仕組で動いているのか?
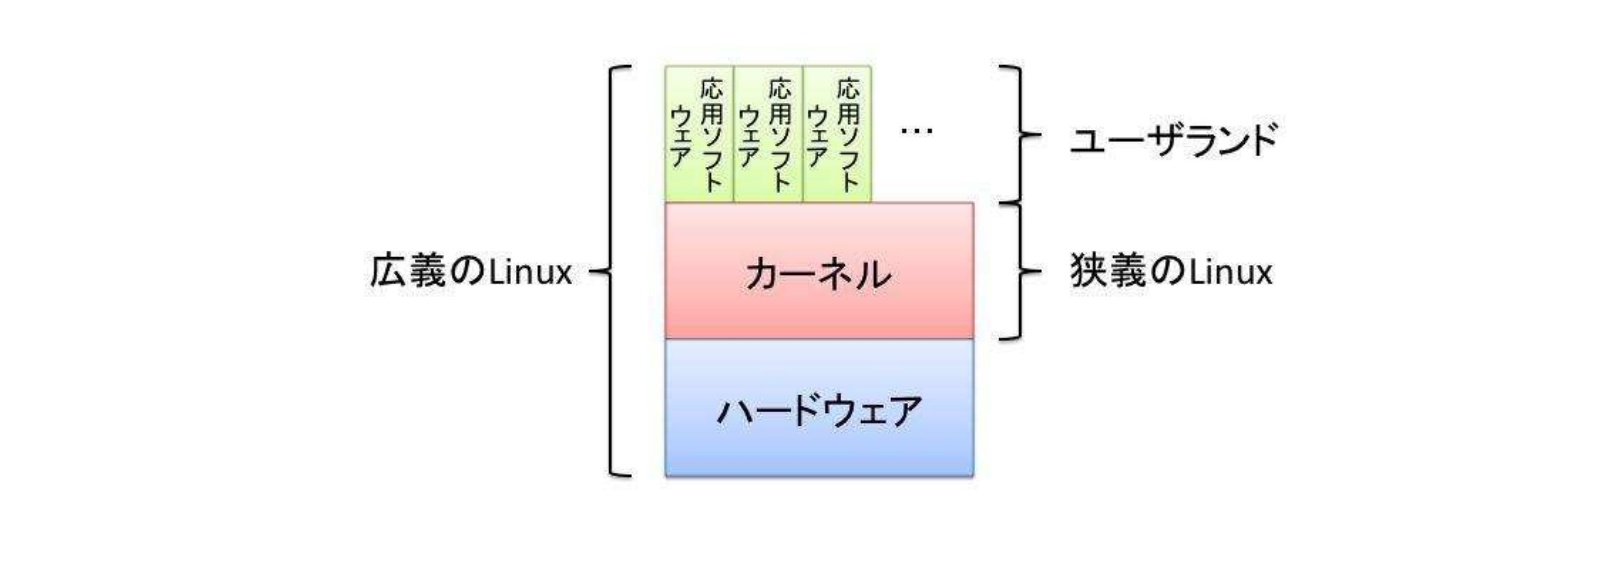
さきほど説明した基本ソフトウェアはさらに2つの領域に分かれます。それらをカーネルとユーザーラドと言います。
カーネル
カーネルはOSの中核となる部分でハードウェアと直接やり取りするなど最も中心的な機能を持つ部分です。カーネルはハードウェアの違いを吸収して、プログラムがどのようなハードウェア上でも動くようにする役割があります。
ユーザーランド
OSが動作するのに必要なカーネル以外の部分のことです。ファイルシステムやファイル操作コマンド、シェルなどの基本的なソフトウェア群を指します。
図はLinux標準教科書より
LinuxのプログラムにはGPLというライセンス形式が採用されている
以下の特徴を含むフリーソフトウェアライセンスの一つです。
プログラムを実行する自由
ソースの改変の自由
利用、再配布の自由
改良したプログラムをリリースする権利詳しいことはOSSのライセンスを理解する(「使用」と「利用」の違い、知っていますか?)を参考にしてください。
理解度テスト
ハードウェアとソフトウェアの違いとは?
基本ソフトウェアと応用ソフトウェアの違いとは?
Linuxの特徴とは?
余談
Twitterも毎日更新しているのでフォローしてくださると嬉しいです。
- 投稿日:2020-04-26T14:18:14+09:00
ansibleでkubernetes環境の構築 2
はじめに
前回の記事でansibleを使用してkubernetesを初期化することができた
いよいよk8s workerを追加して本確定なk8s環境を作っていく環境
MBP OS Sierra
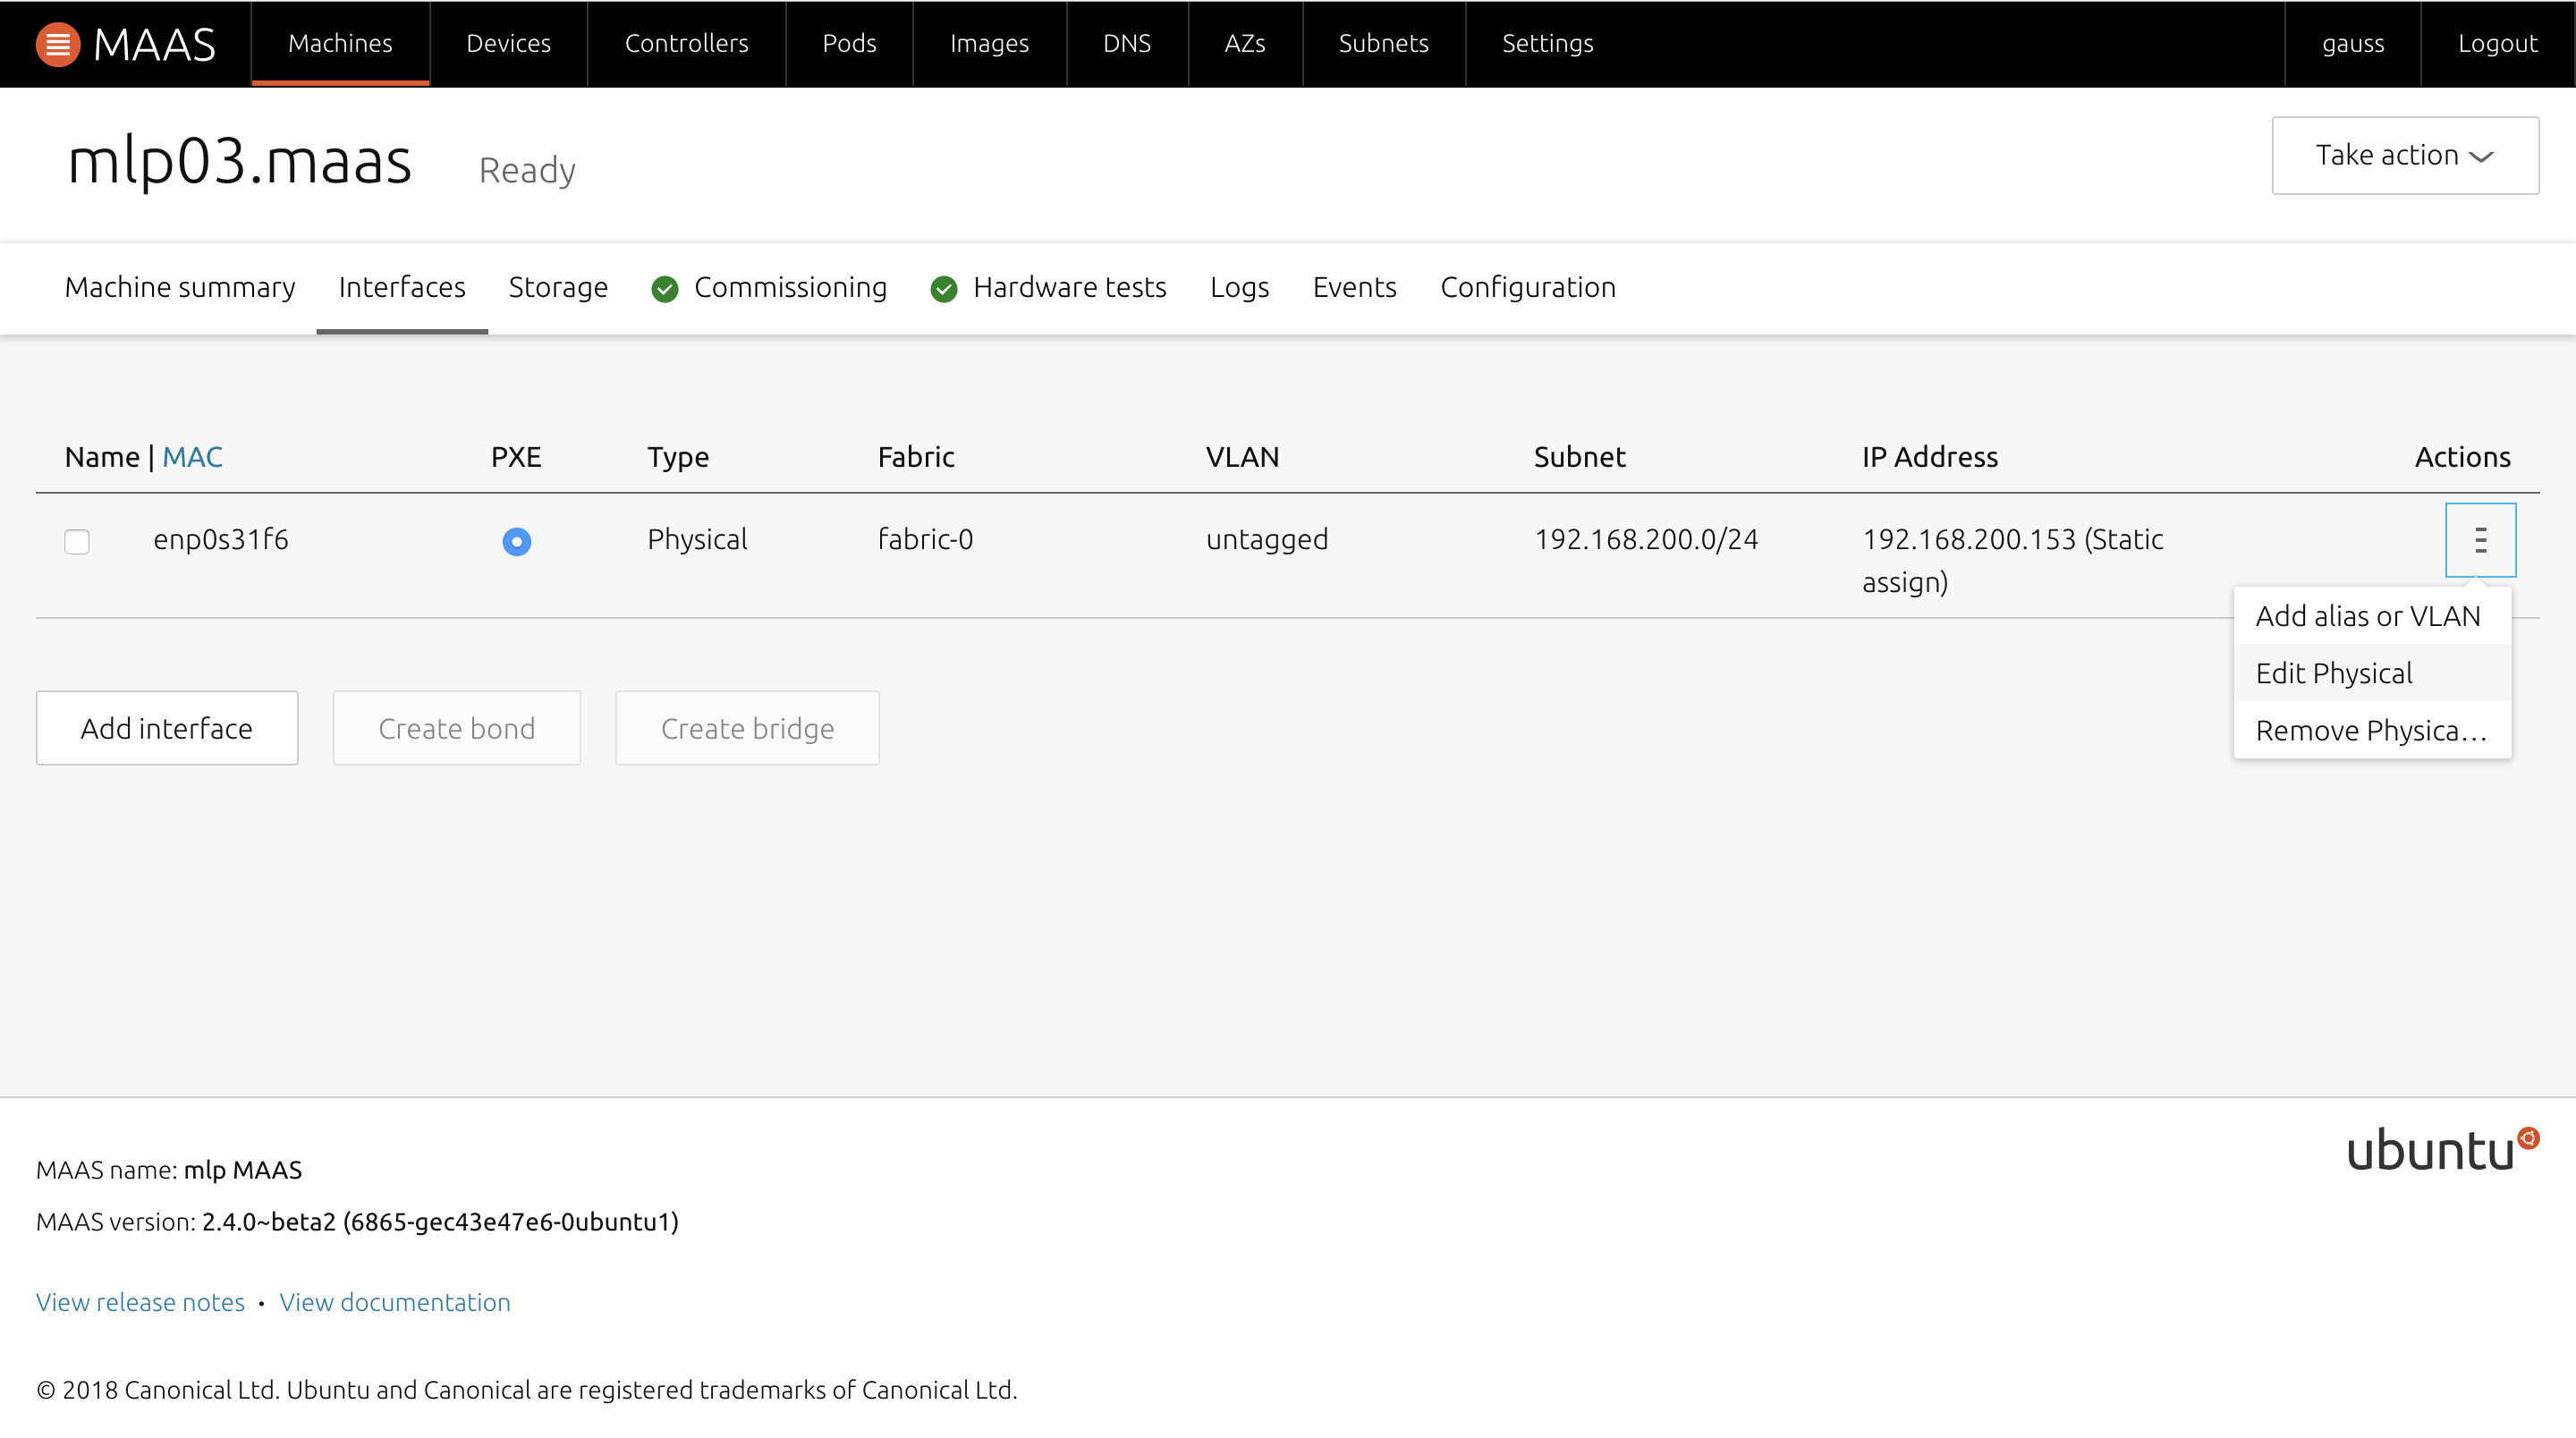
MAASサーバー(192.168.100.152 MAAS用ネットワーク:192.168.200.1)
k8s-masterサーバー(KVM:192.168.100.191)
ansibleサーバー(KVM:192.168.100.192)
k8s worker(192.168.200.151)
k8s worker(192.168.200.153)dash-board Ver.1.8
ゴール
k8sで作ったflannelネットワーク内に、MAASでOSをデプロイしたマシンをk8s-workerとして追加する
またk8sの使用状況をダッシュボードでも見ることができるようにするMAASサーバーのネットワーク設定
今回はMAASのDHCP問題の関係でk8s-masterとworkerは別のネットワークにしているため、MAASサーバーでブリッジ設定をする必要がある
ubuntu18は16までのものとネットワーク設定の仕方が変わっている
/etc/netplan/50-cloud-init.yaml_bkの記述だけでいけるはずだったが、ブリッジの設定がうまくいかなかったため今回は2種類のファイルに記述している$ sudo vi /etc/netplan/50-cloud-init.yaml_bk network: ethernets: enp0s31f6: addresses: - 192.168.100.152/24 gateway4: 192.168.100.1 nameservers: addresses: - 8.8.8.8 search: - 8.8.4.4 enp2s0: addresses: - 192.168.200.1/24 gateway4: 192.168.100.1 nameservers: addresses: - 8.8.8.8 search: - 8.8.4.4 version: 2 $ sudo vi /etc/network/interfaces auto lo iface lo inet loopback auto enp0s31f6 iface enp0s31f6 inet manual auto br0 iface br0 inet static address 192.168.100.152 netmask 255.255.255.0 gateway 192.168.100.1 dns-nameservers 8.8.8.8 bridge_ports enp0s31f6 bridge_maxwait 0 bridge_df 0 bridge_stp off auto enp2s0 iface enp2s0 inet static address 192.168.200.1 netmask 255.255.255.0 gateway 192.168.100.1 dns-nameservers 8.8.8.8 $ ifconfig br0: flags=4163<UP,BROADCAST,RUNNING,MULTICAST> mtu 1500 inet 192.168.100.152 netmask 255.255.255.0 broadcast 192.168.100.255 inet6 fe80::329c:23ff:feac:5570 prefixlen 64 scopeid 0x20<link> ether 30:9c:23:ac:55:70 txqueuelen 1000 (Ethernet) RX packets 9579059 bytes 16579553543 (16.5 GB) RX errors 0 dropped 657286 overruns 0 frame 0 TX packets 6047022 bytes 936298283 (936.2 MB) TX errors 0 dropped 0 overruns 0 carrier 0 collisions 0 enp0s31f6: flags=4163<UP,BROADCAST,RUNNING,MULTICAST> mtu 1500 inet6 fe80::329c:23ff:feac:5570 prefixlen 64 scopeid 0x20<link> ether 30:9c:23:ac:55:70 txqueuelen 1000 (Ethernet) RX packets 21689196 bytes 26237413396 (26.2 GB) RX errors 0 dropped 475 overruns 0 frame 0 TX packets 6555651 bytes 4057603928 (4.0 GB) TX errors 0 dropped 0 overruns 0 carrier 0 collisions 0 device interrupt 16 memory 0xdf100000-df120000 enp2s0: flags=4163<UP,BROADCAST,RUNNING,MULTICAST> mtu 1500 inet 192.168.200.1 netmask 255.255.255.0 broadcast 192.168.200.255 inet6 fe80::6a05:caff:fe66:a834 prefixlen 64 scopeid 0x20<link> ether 68:05:ca:66:a8:34 txqueuelen 1000 (Ethernet) RX packets 6867754 bytes 970026556 (970.0 MB) RX errors 0 dropped 0 overruns 0 frame 0 TX packets 13304857 bytes 15246678579 (15.2 GB) TX errors 0 dropped 0 overruns 0 carrier 0 collisions 0 device interrupt 17 memory 0xdf0c0000-df0e0000また2つのネットワークで通信できるようにNATの設定をする
sudo iptables -t nat -A POSTROUTING -s 192.168.200.0/24 -j SNAT --to 192.168.100.152workerの追加
k8sのworkerを追加するにはマスターの場合とほとんど変わらないがflannelネットワークに参加させる最後に起動させるコマンドが必要になる
そのコマンドはkubeadm initを行なった際の出力内容に表示されるが、下記コマンドでも確認することができる
(k8s-master)$ kubeadm token create --print-join-command出てきたコマンドを使ってworker参加用のplaybookを作成する
(ansible)$ sudo vi mlp.yml
---
- hosts: mlp01
  remote_user: ubuntu
  become: yes
  tasks:
    - name: Install prerequisites and Docker.io , nfs-common
      apt: name={{item}} update_cache=yes
      with_items:
        - nfs-common
        - apt-transport-https
        - ca-certificates
        - curl
        - software-properties-common
        - docker.io
    - name: user add to docker group
      user: name=ubuntu group=docker append=yes
    - name: Add K8S GPG key
      apt_key:
        url: https://packages.cloud.google.com/apt/doc/apt-key.gpg
    - name: Add K8S APT repository
      apt_repository:
        repo: deb http://apt.kubernetes.io/ kubernetes-xenial main
    - name: Install K8S
      apt: name={{item}} update_cache=yes
      with_items:
        - kubelet
        - kubeadm
        - kubectl
    - name: Remove swapfile from /etc/fstab
      mount:
        name: swap
        fstype: swap
        state: absent
    - name: Disable swap
      command: swapoff -a
      when: ansible_swaptotal_mb > 0
    - name: Set docker service to start on boot.
      service: name=docker enabled=yes
    - name: Set kubelet service to start on boot.
      service: name=kubelet enabled=yes
    - name: Join k8s-master
      become: yes
      shell: kubeadm join 192.168.100.191:6443 ~~ #上記のコマンドで出力したものを記述
マスターの時と同様にhostsの編集
$ sudo vi /etc/ansible/hosts
[master]
k8s-master

[mlp]
mlp01

$ sudo vi /etc/hosts
192.168.100.191 k8s-master 192.168.200.151 mlp01
ansibleのplaybook実行
python3をしようする場合は"-e"以降のオプションが必要~/ansible$ sudo ansible-playbook --private-key=id_rsa_common mlp.yml -e 'ansible_python_interpreter=/usr/bin/python3'playbookが成功した場合、以下の状態になる
(k8s-master)$ kubectl get node
NAME         STATUS    ROLES     AGE       VERSION
k8s-master   Ready     master    3d        v1.10.3
mlp01        Ready     <none>    3d        v1.10.2
nginxイメージの起動
nodeが追加された後は、ひとまずnginxのdockerイメージを走らせる
理由は後述する$ sudo vi nginx-pod.yaml apiVersion: v1 kind: Pod metadata: name: nginx-pod spec: containers: - name: nginx-container image: nginx ports: - containerPort: 80 $ kubectl apply -f nginx-pod.yaml create $ kubectl get pod NAME READY STATUS RESTARTS AGE nginx-pod 1/1 Running 0 3dnginxがRunningになれば問題ない
Dash-boardのインストール
Dash-boardはなくても、kubernetesを使う上ではなんとかなるがせっかくなら使いたい
というわけでインストールをしていく$ kubectl create -f https://raw.githubusercontent.com/kubernetes/dashboard/master/src/deploy/recommended/kubernetes-dashboard.yamlエラーが出ず、「created」と表示されればOK
動いているかを確認kubectl get pods --all-namespaces NAMESPACE NAME READY STATUS RESTARTS AGE default nginx-pod 1/1 Running 0 3d kube-system kubernetes-dashboard-7d5dcdb6d9-7hptz 1/1 Running 0 3dkubeのproxyを起動
$ kubectl proxy --address 0.0.0.0 --accept-hosts '.*'
Starting to serve on [::]:8001
この状態になったらブラウザでアクセスして見る
ログイン画面が出てくるhttp://localhost:8001/api/v1/namespaces/kube-system/services/https:kubernetes-dashboard:/proxy/#!/login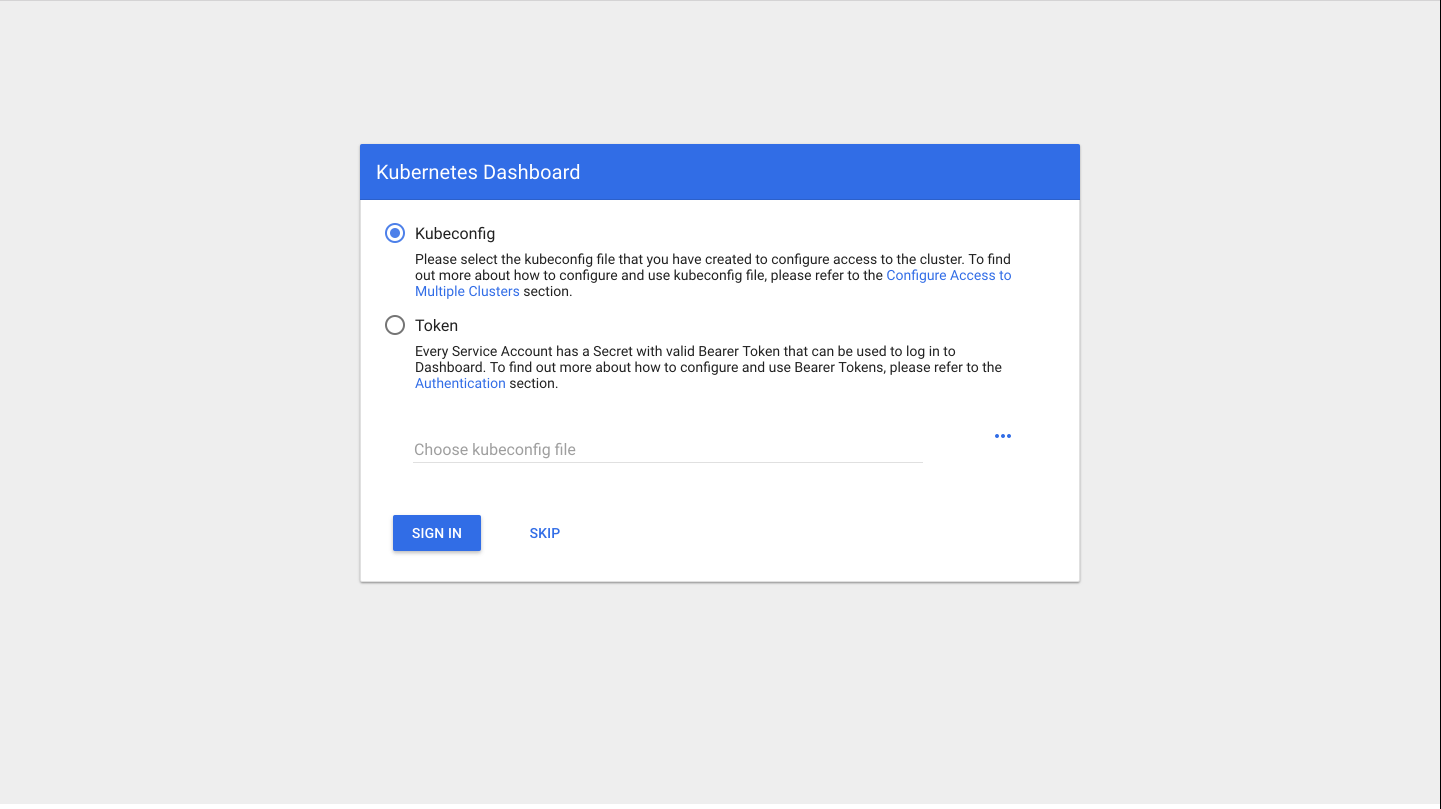
ログインするためのトークンを発行する
$ kubectl -n kube-system get secret発行されたトークンを使えば入れる
毎回トークンを発行するのが大変という人向けの設定は以下のもの
これを実行した後は、ログイン画面のSKIPで入れるようになる
ただしセキュリティ的にはガバガバなため、社内オンリーの環境など外部の人がいない条件での使用推奨$ cat <<EOF | kubectl create -f - apiVersion: rbac.authorization.k8s.io/v1beta1 kind: ClusterRoleBinding metadata: name: kubernetes-dashboard labels: k8s-app: kubernetes-dashboard roleRef: apiGroup: rbac.authorization.k8s.io kind: ClusterRole name: cluster-admin subjects: - kind: ServiceAccount name: kubernetes-dashboard namespace: kube-system EOFこれでkubernetesの環境構築は終了である
おわりに
この環境を作ることができたら、あとはk8s-masterからdockerイメージを起動させればnodeに自動配布することができる
nodeの新規追加もflannelネットワークに追加するコマンドさえあればすぐできるためとても便利つまづいたところ
ネットワーク通信
この記事の冒頭の方でネットワーク設定を載せているが、これに決まるまでは通信が通らないエラーがで続けていた
ubuntu18のバージョン変更に伴う設定方法の変更に振り回された印象kubeadm initが失敗する
原因としてはswapの消去を忘れていただけだが、存在を忘れがちである
dash-boardが表示されない
マスターにノードが追加され、dash-boardをインストール→proxyを起動としただけではブラウザにdash-boardは表示されず、ブラウザのページにはファイルのディレクトリツリーだけが出てくるのみだった
試しにページの中段にあるようにproxy-podを起動させてみて、その後手順通りに進めたらdash-boardが表示されるようになった
他の参考にしたページでは同様の症状はなかったようでdash-boardのバージョンの仕様なのか、自分だけだやっていない設定があるのか、原因は不明参考にしたページ
iptables で NAT 環境を構築してみた
kubernetes 公式ページ
access control
Kubernetes/Web UI (Dashboard)の追加
KubernetesにDashboardをインストールして、認証なしでアクセスする
- 投稿日:2020-04-26T14:17:03+09:00
ansibleでkubernetes環境の構築 1
はじめに
nodeに対してのk8sのインストールなどは極力ansibleで自動化していく
ansibleの実行機やk8sのマスターはMAASサーバーのKVMを使用するゴール
ansibleでk8sをインストールできる状態まで構築する
環境
MBP OS Sierra
MAASサーバー(192.168.100.152)
k8s-masterサーバー(KVM:192.168.100.191)
ansibleサーバー(KVM:192.168.100.192)ansible Ver.2.5.1
kubernetes Ver.1.10.3MAASサーバーにKVMをインストールする
ansibleサーバー、k8sサーバーを作るためのKVMを土台となるMAASサーバーにインストールする
インストール後はlibvirtグループに参加し、sudoなしでも実行できるようにする$ sudo apt install -y qemu-kvm libvirt0 libvirt-bin virt-manager bridge-utils $ sudo systemctl enable libvirt-bin $ sudo gpasswd libvirtd -a <username>KVMの作成はデスクトップ環境を使用した方が便利なため、MAASサーバーにデスクトップをインストールする
$ sudo apt -y install ubuntu-desktopデスクトップのインストールは時間がかかるためしばし待つ
インストールが完了して再起動すれば自動でデスクトップが表示されるデスクトップ上のターミナルでKVMを起動すれば作成用ウィンドウが起動される
$ virt-manager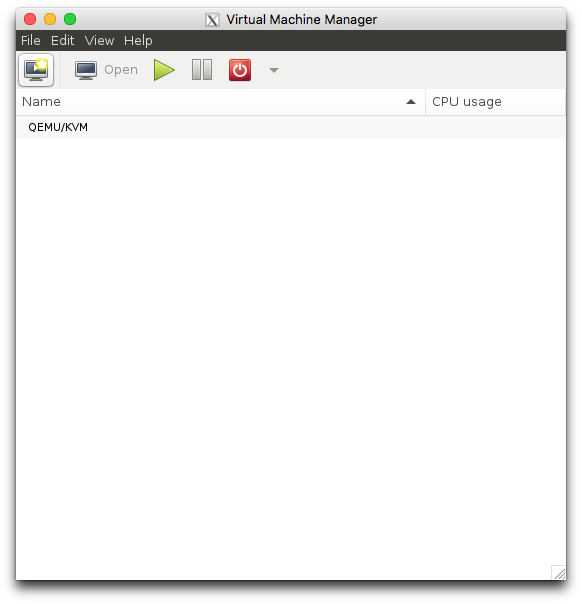
ここで下記スペックのKVMを新規作成する
ホスト名:ansible
メモリ:4GB
CPU:2
ストレージ:30GB

ホスト名:k8s-master
メモリ:8GB
CPU:4
ストレージ:40GB
ansibleの構築
KVMで作成したansibleサーバーに実際にansibleをインストールする
$ sudo apt-get update
$ sudo apt-get install software-properties-common
$ sudo apt-add-repository ppa:ansible/ansible
$ sudo apt-get update
$ sudo apt-get install ansible
今回はhome直下にansibleフォルダを作成し、各種ファイルを管理する
$ sudo mkdir ansiblek8s-masterにk8sをインストールするためのplaybookを作成する
$ sudo vi k8s-master.yaml

---
- hosts: k8s-master
  remote_user: $user名
  become: yes
  tasks:
    - name: Install prerequisites and Docker.io #dockerインストール
      become: yes
      apt: name={{item}} update_cache=yes
      with_items:
        - apt-transport-https
        - ca-certificates
        - curl
        - software-properties-common
        - docker.io
    - name: user add to docker group
      user: name=gauss group=docker append=yes
    - name: Add K8S GPG key #k8sインストール準備
      apt_key:
        url: https://packages.cloud.google.com/apt/doc/apt-key.gpg
    - name: Add K8S APT repository
      apt_repository:
        repo: deb http://apt.kubernetes.io/ kubernetes-xenial main
    - name: Install K8S
      apt: name={{item}} update_cache=yes
      with_items:
        - kubelet
        - kubeadm
        - kubectl
    - name: Remove swapfile from /etc/fstab #swapを消しておかないと失敗する
      mount:
        name: swap
        fstype: swap
        state: absent
    - name: Disable swap
      command: swapoff -a
      when: ansible_swaptotal_mb > 0
    - name: Set docker service to start on boot. #再起動後もdockerを自動起動させる
      service: name=docker enabled=yes
    - name: Set kubelet service to start on boot. #再起動後もk8sを自動起動させる
      service: name=kubelet enabled=yes
    - name: Init k8s-master #k8smの初期化
      become: yes
      shell: kubeadm init --pod-network-cidr=10.244.0.0/16 --apiserver-advertise-address=192.168.100.191
    - name: Make Directory .kube
      file:
        path: /.kube
        state: directory
        owner: $オーナー
        group: docker
        mode: 0755
    - name: Copy the .kube config
      become: yes
      file:
        src: /home/$ユーザ名/ansible/admin.conf
        dest: ~/.kube/config
        owner: $オーナー
        group: docker
        mode: 0600
    - name: Export Kubernetes
      lineinfile:
        path: /home/$ユーザ名/.kube/config
        state: absent
        regexp: '^%KUBECONFIG'
    - name: Apply Flannel $flannelのネットワークを作成
      sudo: yes
      shell: kubectl apply -f https://raw.githubusercontent.com/coreos/flannel/v0.10.0/Documentation/kube-flannel.yml
次はansibleのhostsを追加設定
[master]$ sudo vi /etc/ansible/hostsk8s-master $ sudo vi /etc/hosts 192.168.100.191 k8s-master
準備ができたらansibleのplaybook実行
python3をしようする場合は"-e"以降のオプションが必要~/ansible$ sudo ansible-playbook --private-key=id_rsa_common k8s-master.yml -e 'ansible_python_interpreter=/usr/bin/python3'エラーが出なければ完了
おわりに
k8sはバージョンの移り変わりが早く、ubuntuも18.04と新しいバージョンでエラーが多くどうなるかと思ったが初期化の成功にひとまず安心した
つまづいたところ
dockerのバージョン
k8sの初期化をする際、最新のdocker(18.03)を入れていると、対応しているバージョンは17.03までだからダウングレードしろとメッセージが出たため、17.03を入れ直した
しかし失敗するのは変わらなかったため、docker.ioをいれたところ成功したkube-dnsが機能しなかった
ansibleファイル内で実行しているkubeadm initのコマンドにおいて、--pod-network-cidrのネットワーク表記を当初「10.0.0.0」にしていたが、その設定だとパッケージに入っているkube-dnsが機能しなかった
各ページを確認したところこのネットワークは「10.244.0.0」が正しそうだということがわかり、そちらの設定でコマンドを実行したところ正常にkube-dnsは機能してくれた参考ページ
Ubuntu 16.04: KVMをインストールして仮想マシンを起動する
Ansible入門しました。【入門編】
kubernetes 公式ページ
kubernetesによるDockerコンテナ管理入門
kubeadm で kubernetes v1.8 + Flannel をインストール
- 投稿日:2020-04-26T14:15:45+09:00
0から始めるUbuntu18.04+MAAS2.4環境作成
はじめに
現在社内でMAAS+kubernetes環境を構築しようというプロジェクトがあり、
その中で行ったもの、つまづいたところを記述していく.ゴール
Ubuntuでサーバーを構築し、独立したネットワーク内でUbuntuOSのデプロイをPXEブート経由でできるようになる.
導入前注意事項
MAASサーバーが存在するネットワークにはDHCPが存在しないことを事前に確認する.
DHCPが既存のネットワークでMAASサーバーを構築すると、後の設定でMAASサーバーがDHCPサーバーになるため、既存DHCPと競合する.
DHCPが競合すると、ネットワーク内の端末がIPアドレスを再取得する際にMAASサーバーから取得した場合、ネットワークの外側と通信できなくなる.
また、MAASクライアントになるはずの端末も、MAASサーバーと安定的に通信できなくなる.
(様々な記事を確認したが現状未解決)構築用端末
MAASサーバー用端末(IP:192.168.200.1)
MAASクライアント用端末(IP:192.168.200.151)
macbookproUbuntuインストール
ubuntuダウンロード
以下のURLからUbuntu ServerのISOイメージをダウンロードする.
http://releases.ubuntu.com/18.04/
Ubuntuイメージの起動ディスク作成
手持ちのUSBメモリにUbuntuのISOイメージを焼き付けて、インストール用メディアを作成する.
USBメモリの確認
MACにUSBメモリを差した後、ターミナルを立ち上げディスクの場所を確認する.
diskutil list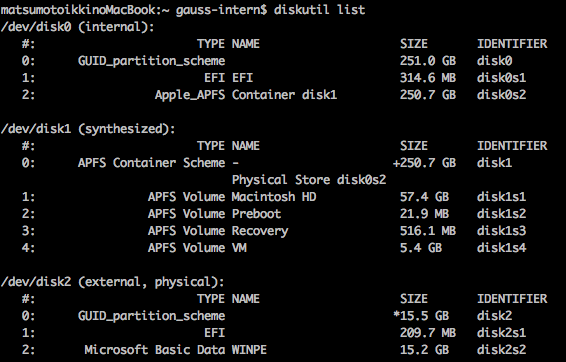
コマンド実行時はUSBメモリは/dev/disk2となっていたので、これを一度MS-DOS形式でフォーマットする.
diskutil eraseDisk MS-DOS UNTITLED /dev/disk2フォーマットされたUSBメモリをアンマウントしddコマンドで起動ディスクを作成する.
diskutil unmountDisk /dev/disk2
sudo dd if=./Downloads/ubuntu-18.04-live-server-amd64.iso of=/dev/disk2 bs=4028
多少時間がかかるため、コーヒータイム.
イメージ作成が完了したら、デバイスを取り外す.もし刺さったままなら、
diskutil eject /dev/disk2を実行してUSBメモリを抜く.
Ubuntuイメージのインストール
MAASサーバ用の端末に先ほど作成したUSBを差し、BOOT画面でUSB起動を指定しインストールを開始.
BOOTデバイスの指定はマシンによって異なるため省略.インストールのオプションは任意の設定で.
MAASインストール
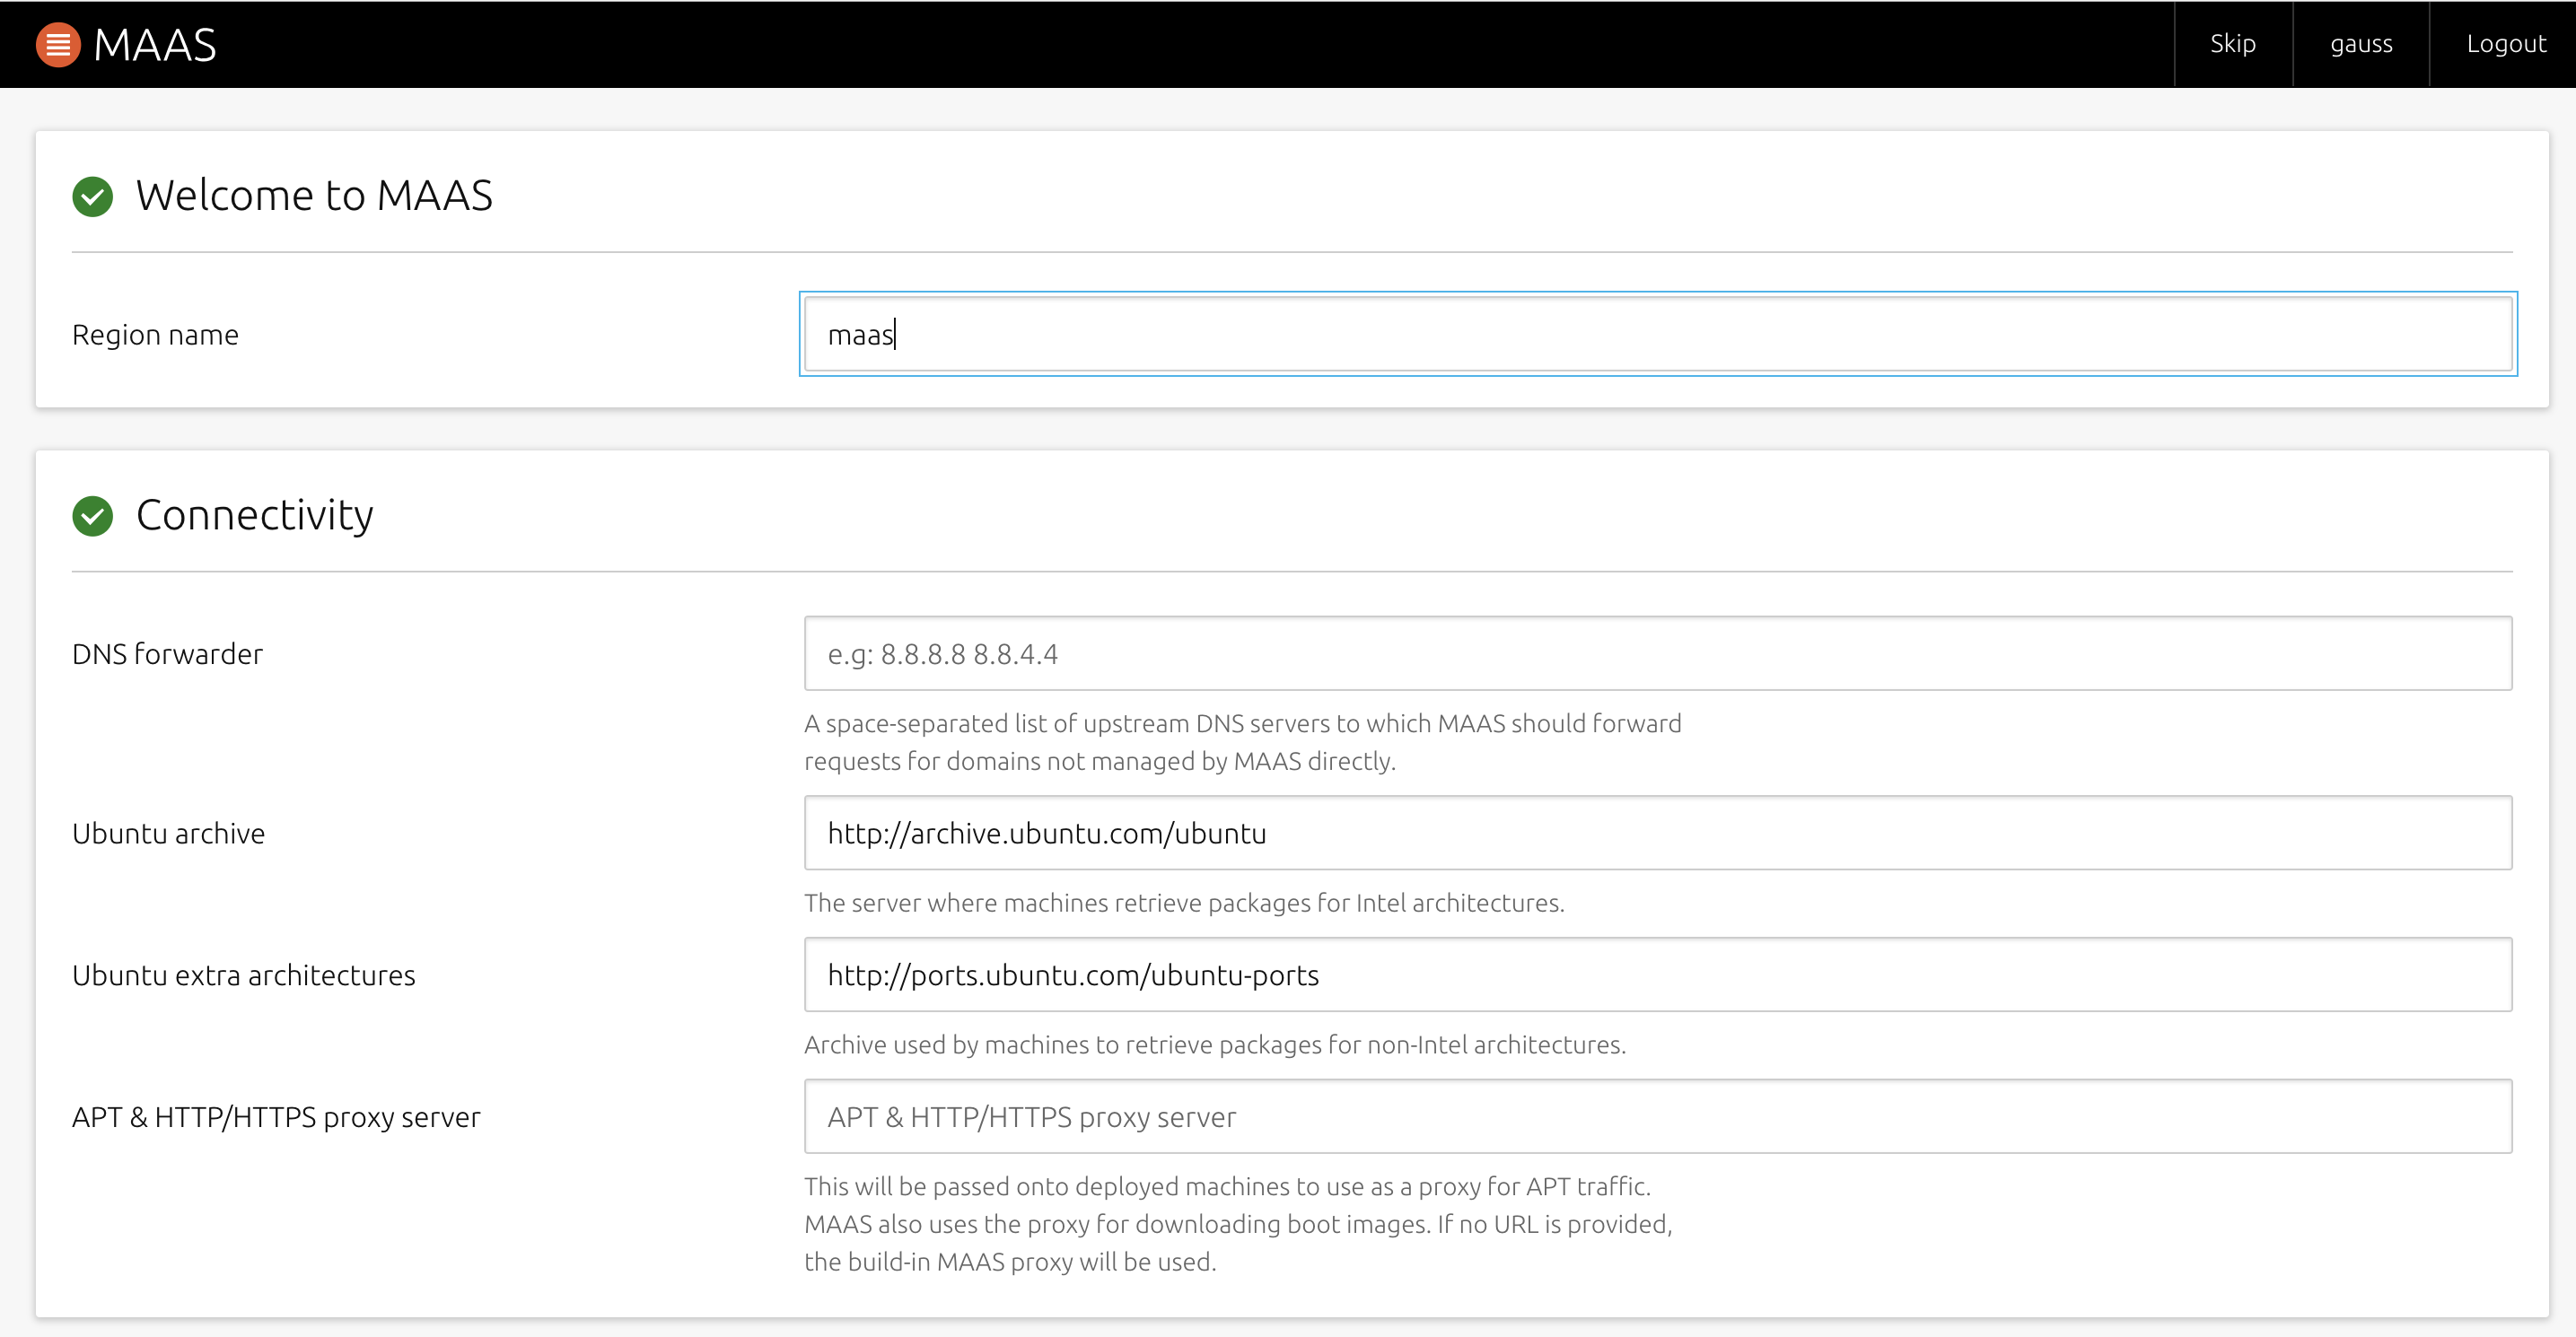
サーバーにMAASパッケージをインストールする.
$ sudo apt -y update
$ sudo apt -y upgrade
$ sudo apt -y install maas
インストールが完了したら管理者用ユーザの作成.
必要なユーザー名、パスワード、アドレスなどを設定.
SSHキーの登録は後で行うため、空欄のままエンターでスルー.$ sudo maas createadmin作成が完了したら「MAASサーバーのアドレス:5240/MAAS/」でログイン.
MAASの設定
ログイン画面が出てくるため、
作成したユーザーでログイン.
ログイン後、イントロページが出てくる.
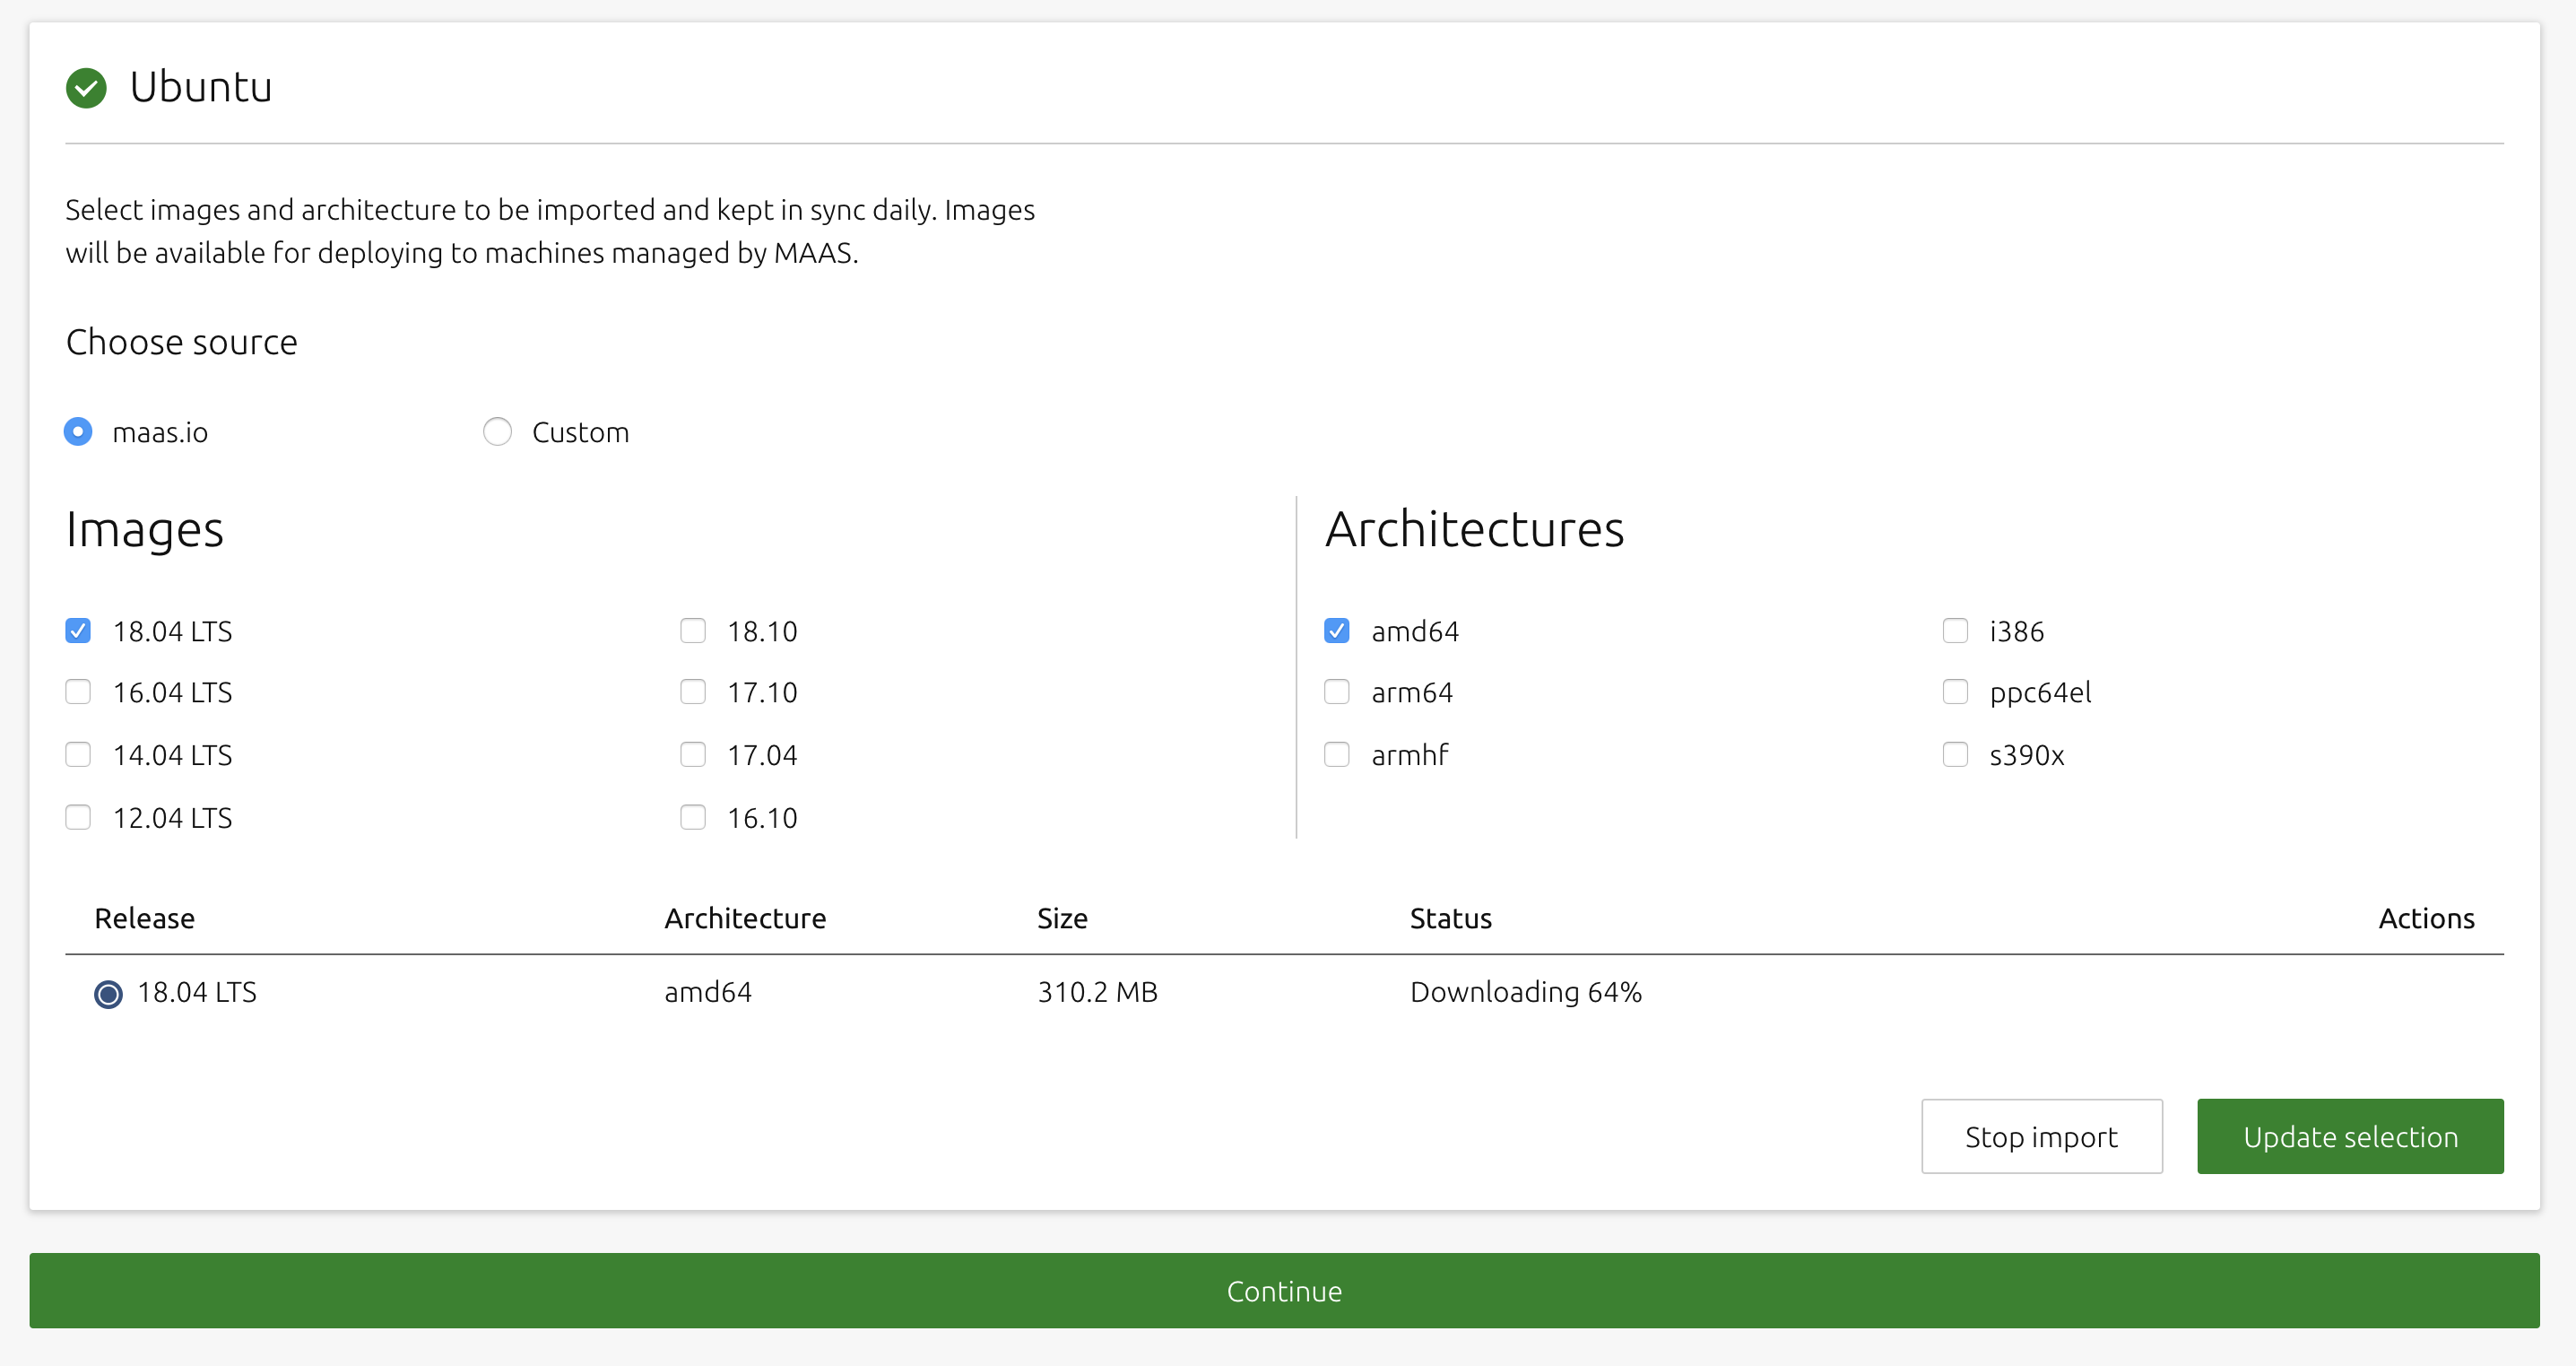
特に設定をいじる必要はない.後者の画像では、ダウンロードするUbuntuのOSイメージを選択する.
欲しいバージョンにチェックを入れたら、基本的に自動でダウンロードが始まるため、しばらく待つ.ダウンロードが完了し、「Status」が「Synced」になったらContinueをクリック
秘密鍵を入力する画面に移るため、Ubuntuサーバー側で鍵を生成する.
特に指定はせずに、空欄のままエンター連打.$ sudo ssh-keygen -t rsaサーバーの.sshフォルダに鍵が生成されるため、
そちらの公開鍵の中身をコピーする.cat .ssh/id_rsa.pubコピー後はMAASの管理サーバーに戻り、SourceをUploadに変え、隣の入力画面に先ほどコピーした鍵の中身をペーストし、Importをクリック.
問題がなければ「Go to dashboard」をクリック.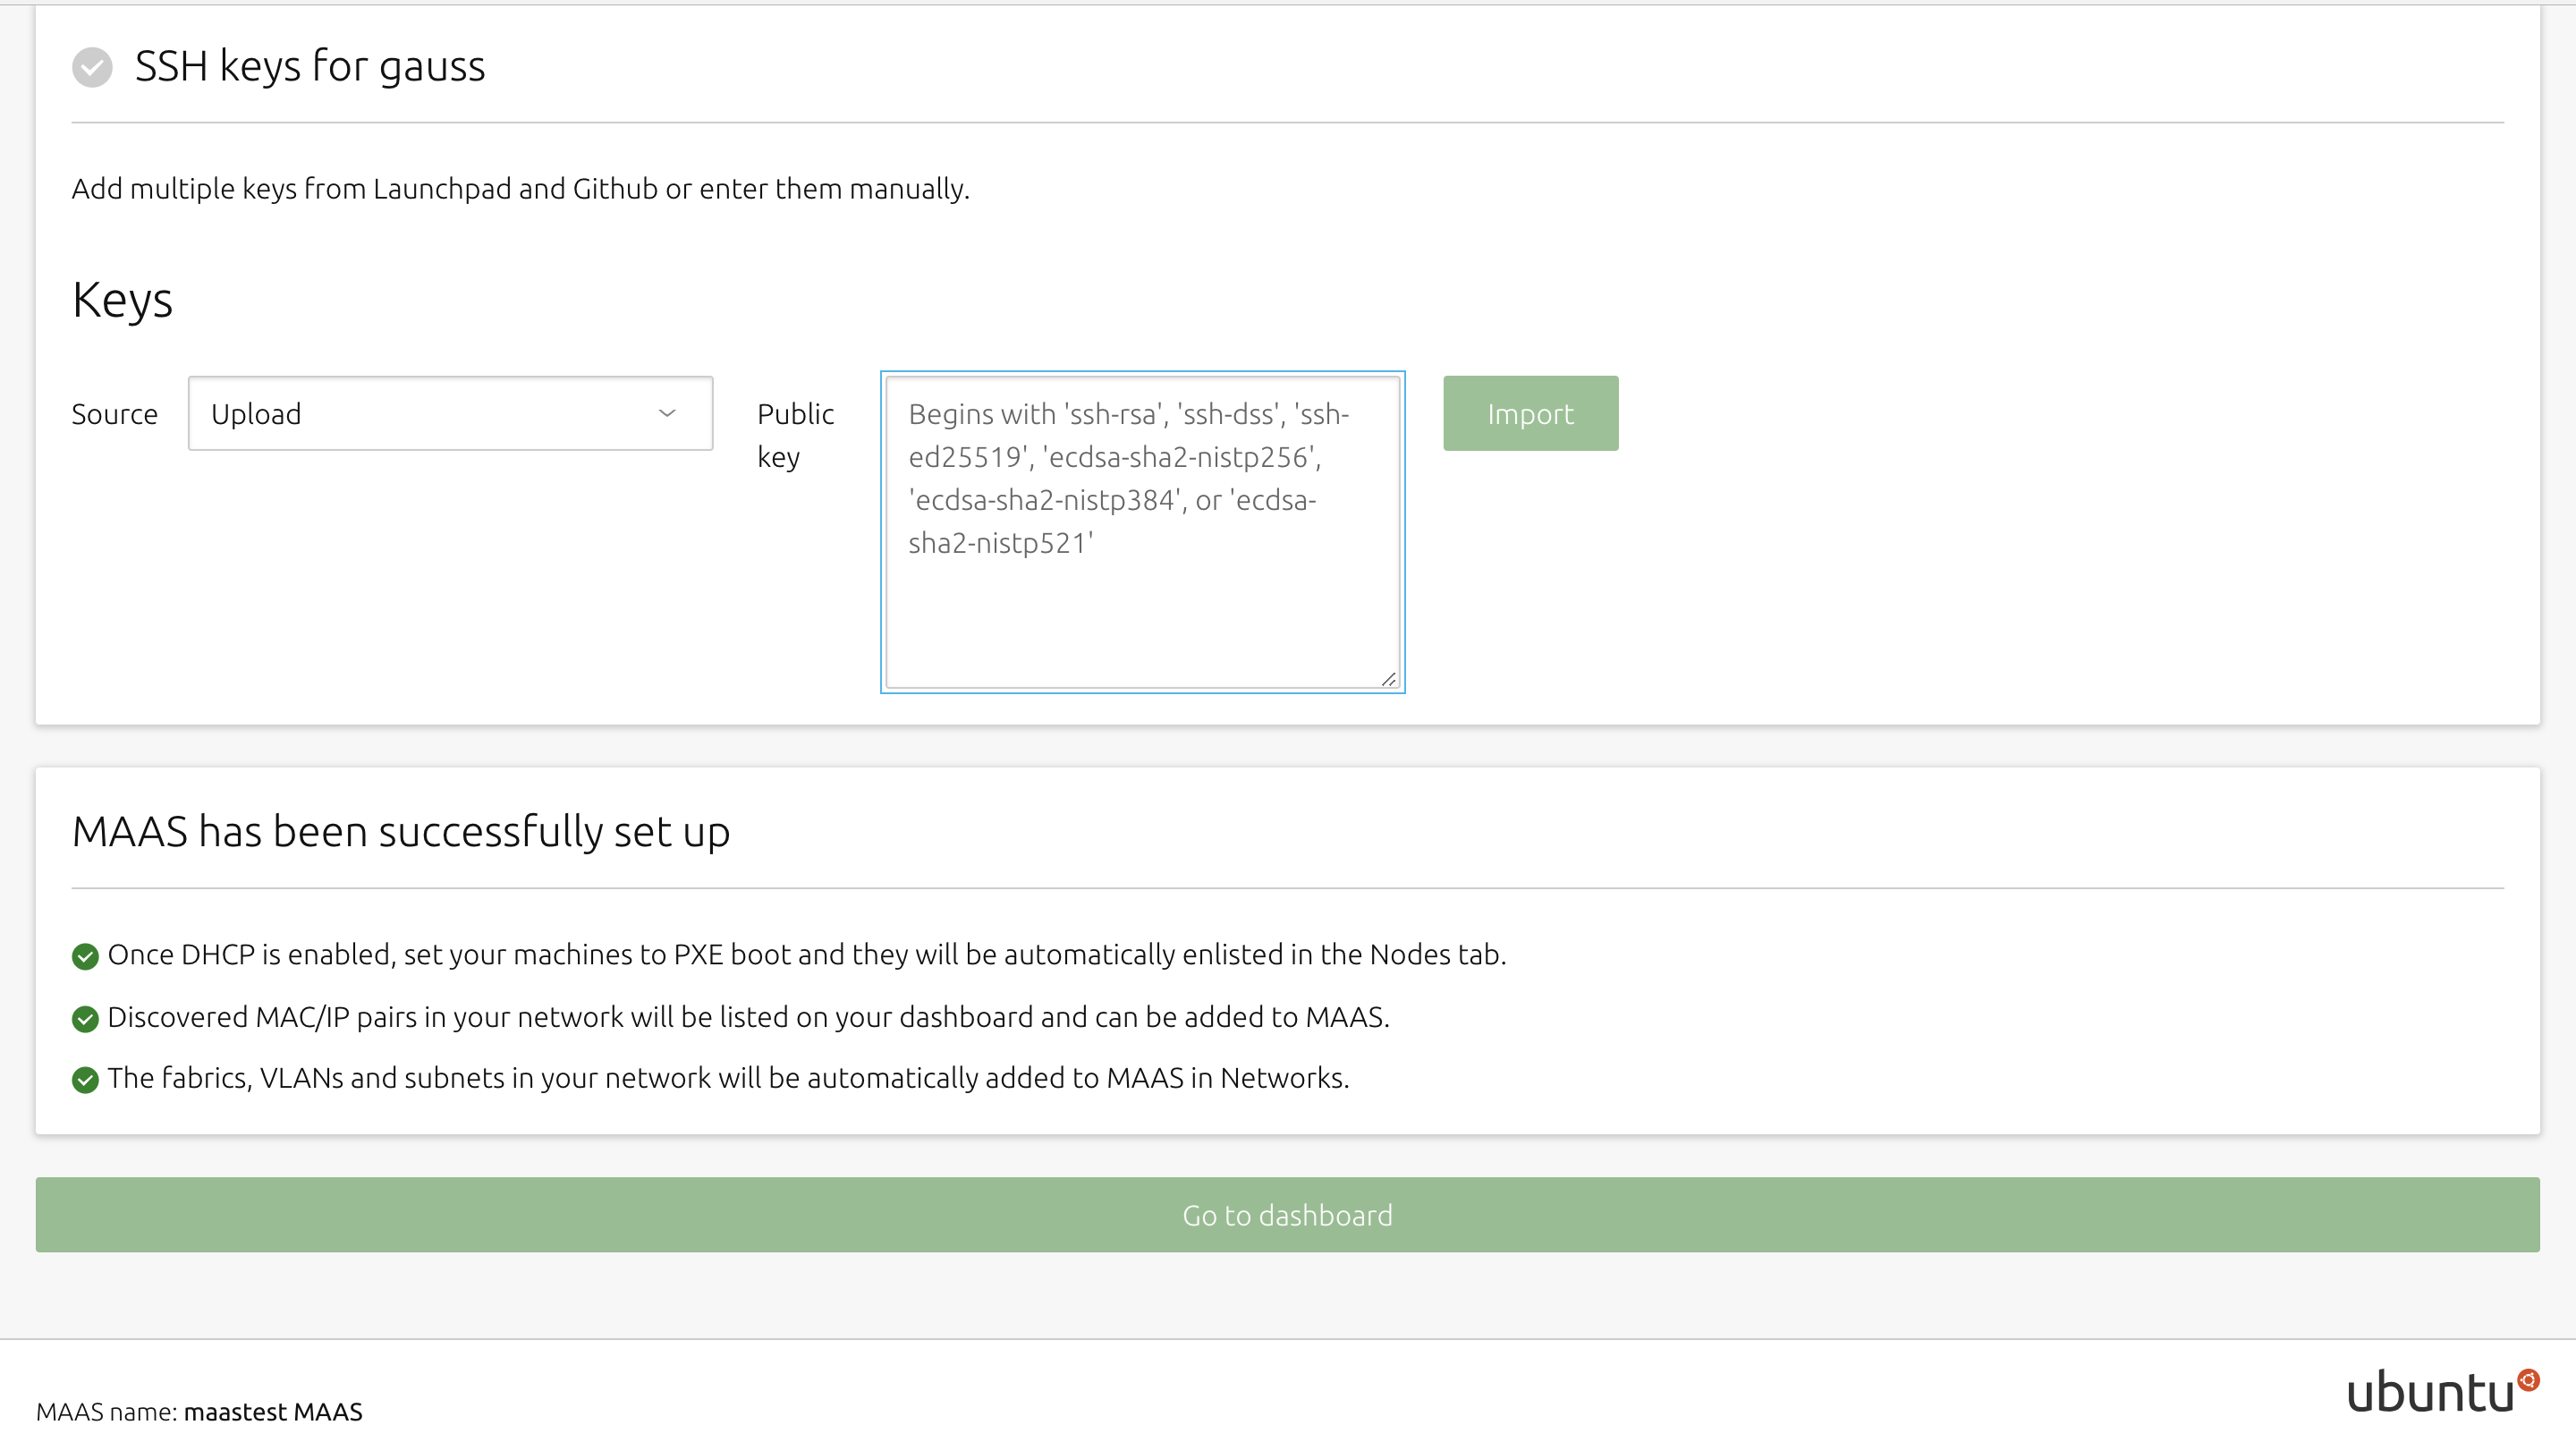
準備として、MAASトップページ上部の「Subnets」ページ内、展開したいネットワークVLANのuntaggedを選択.
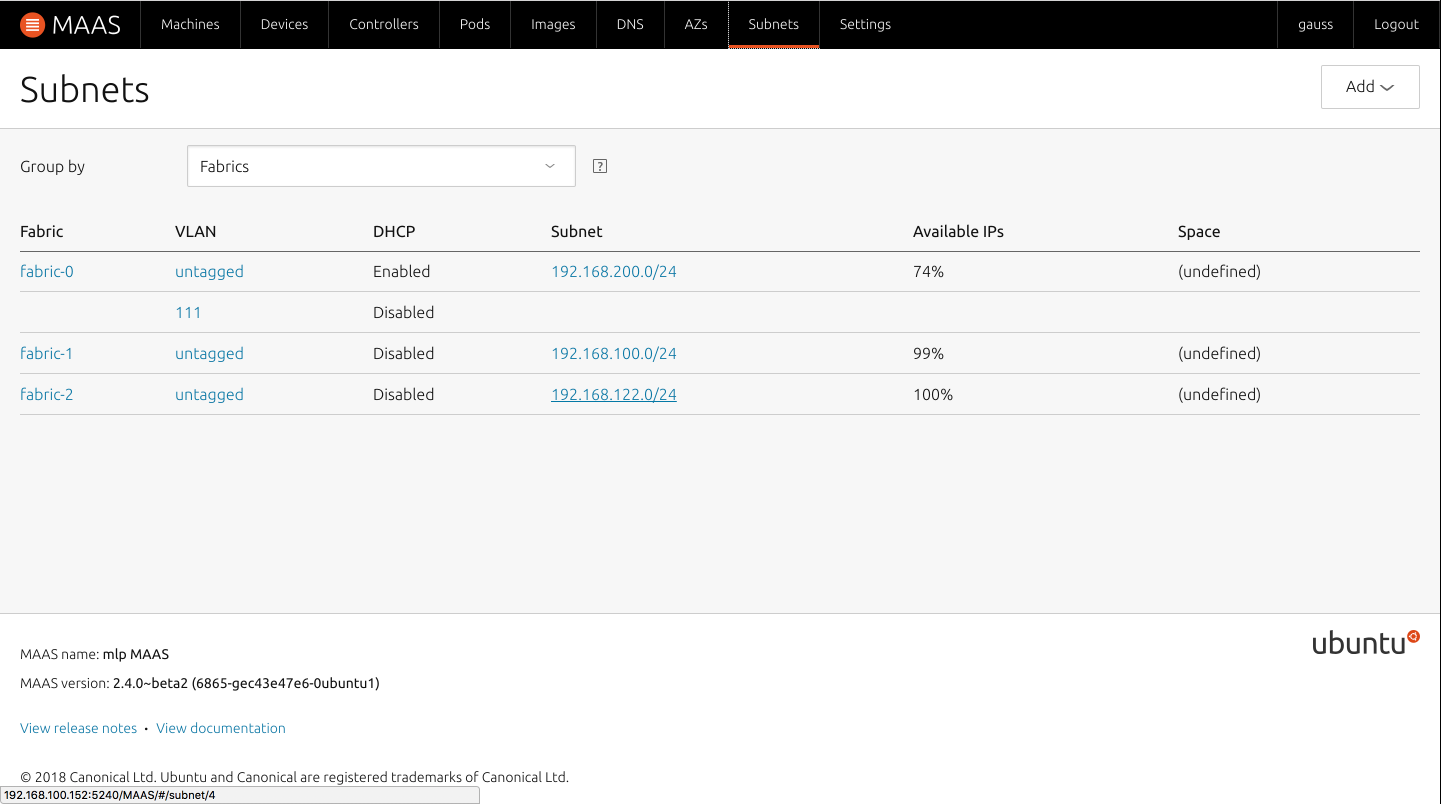
画面上部の「Take action」から「Provide DHCP」を選択.

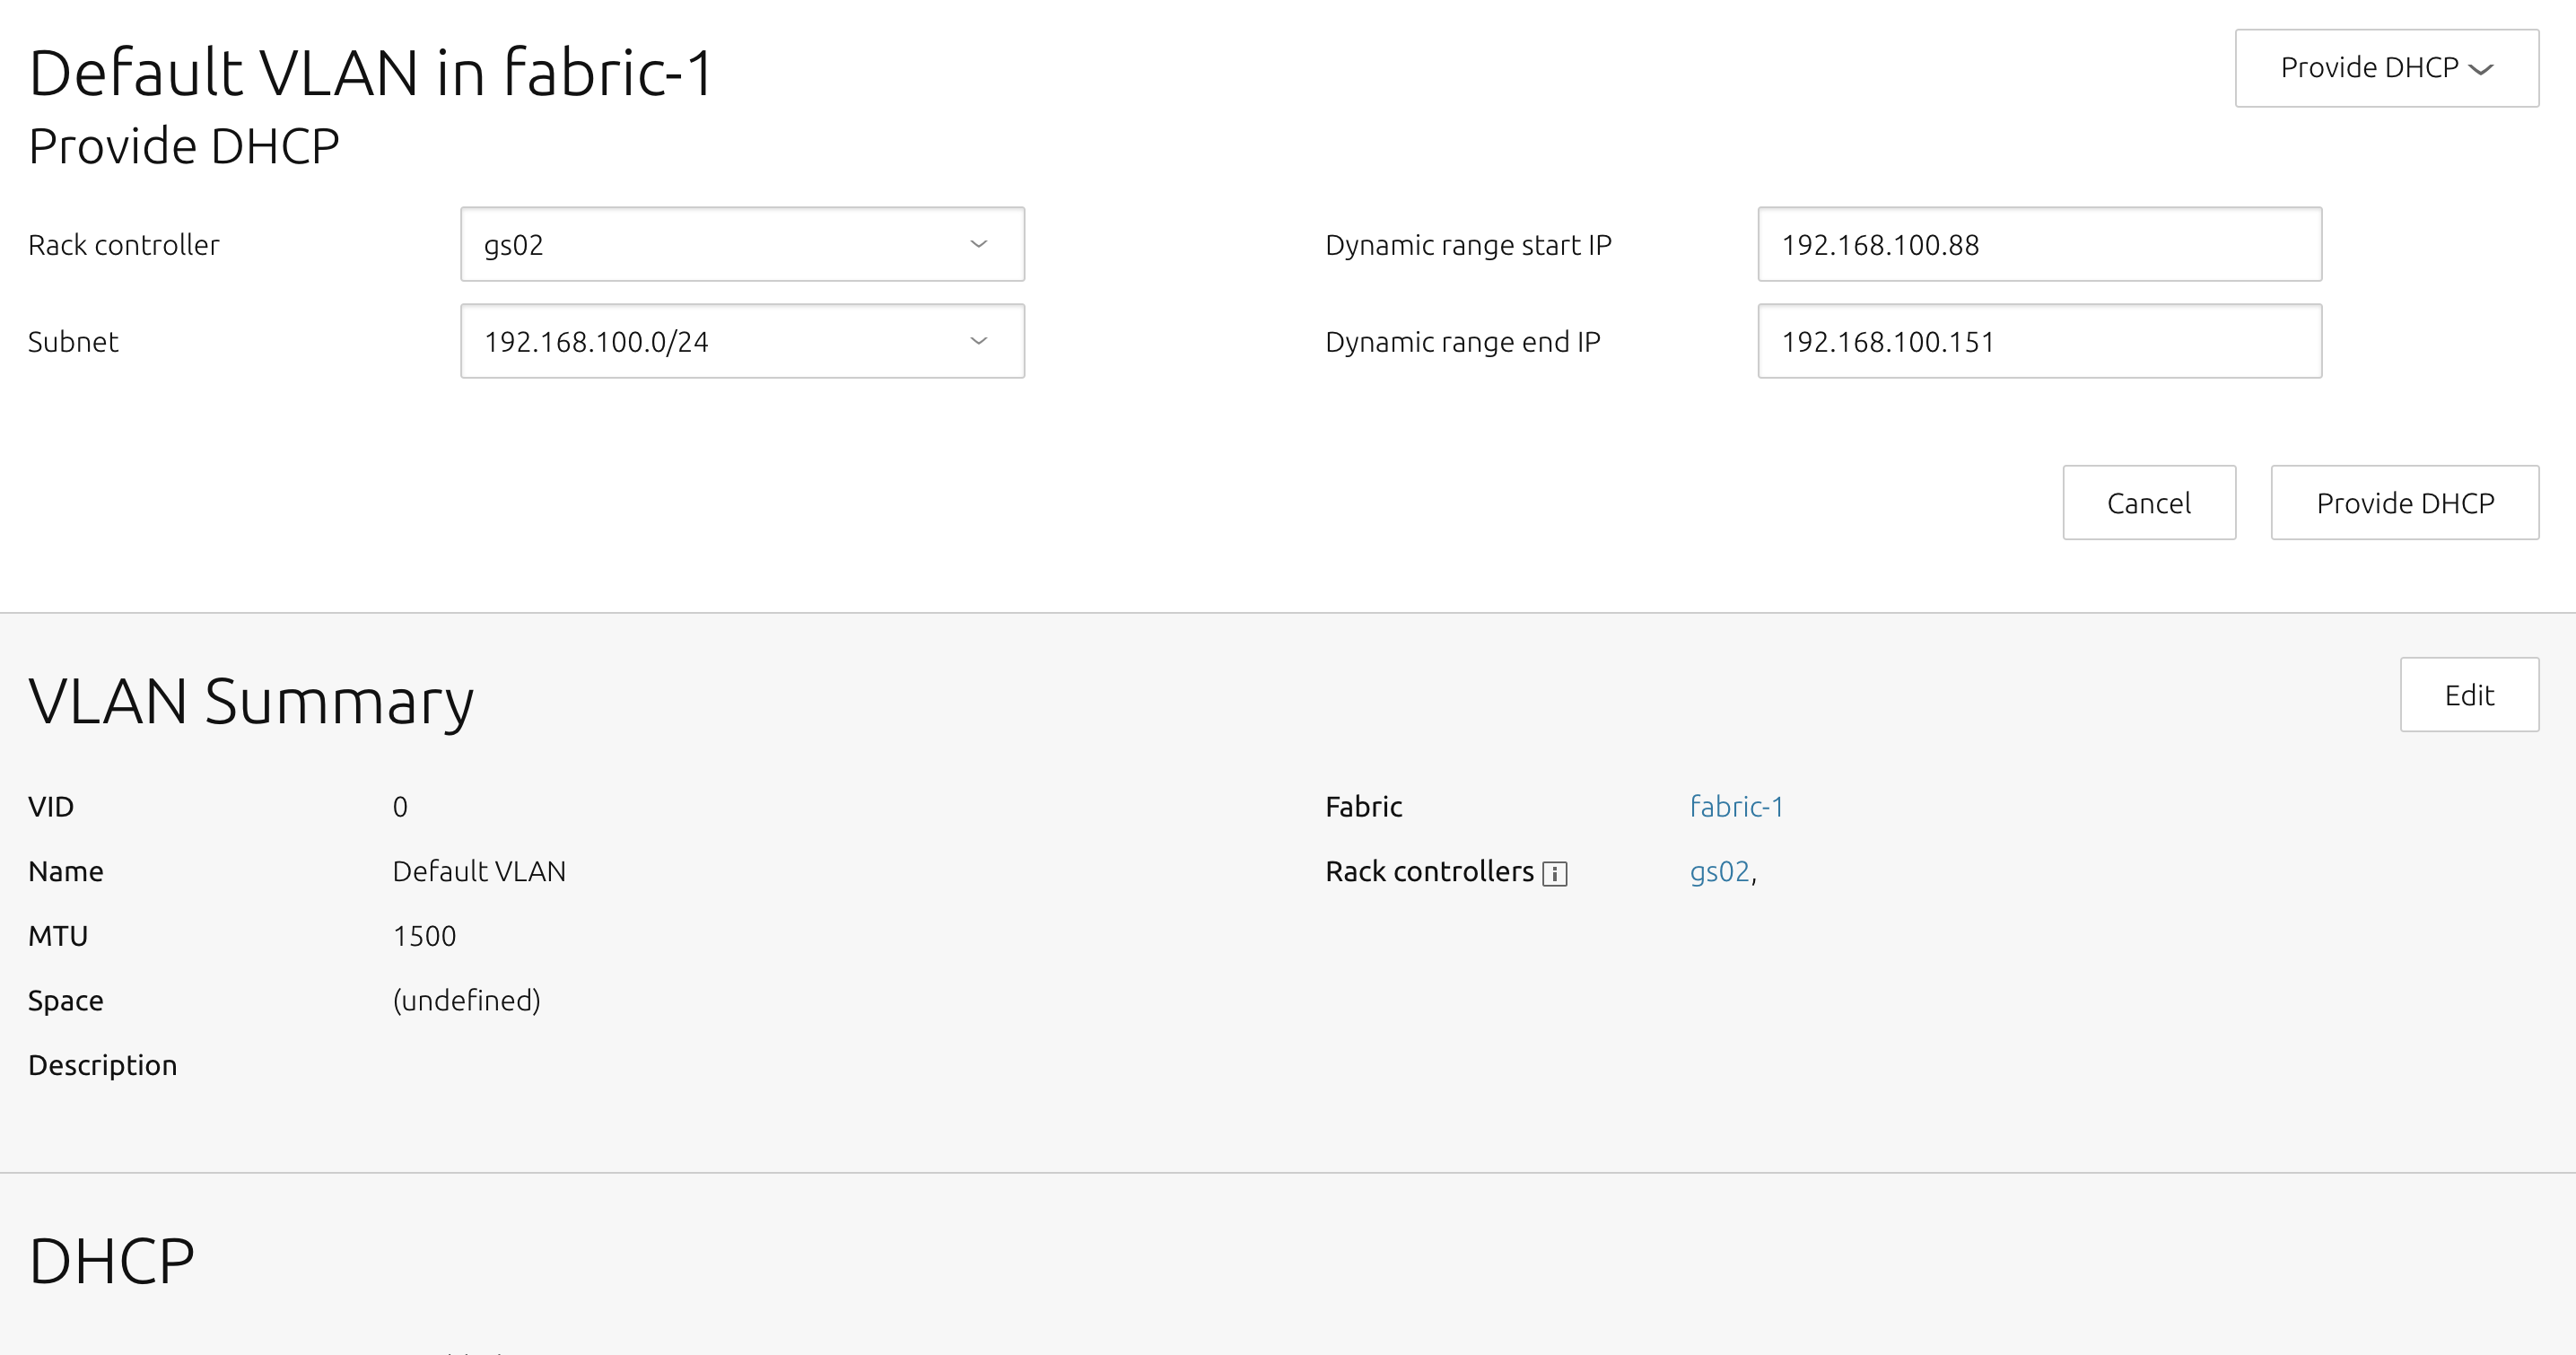
MAASサーバーのDHCPレンジが出てくるため、任意の数を指定し、「Provide DHCP」を選択すると、同じページ内のDHCP項目がEnableになり、「Reserved ranges」に追加したネットワーク範囲が表示される.
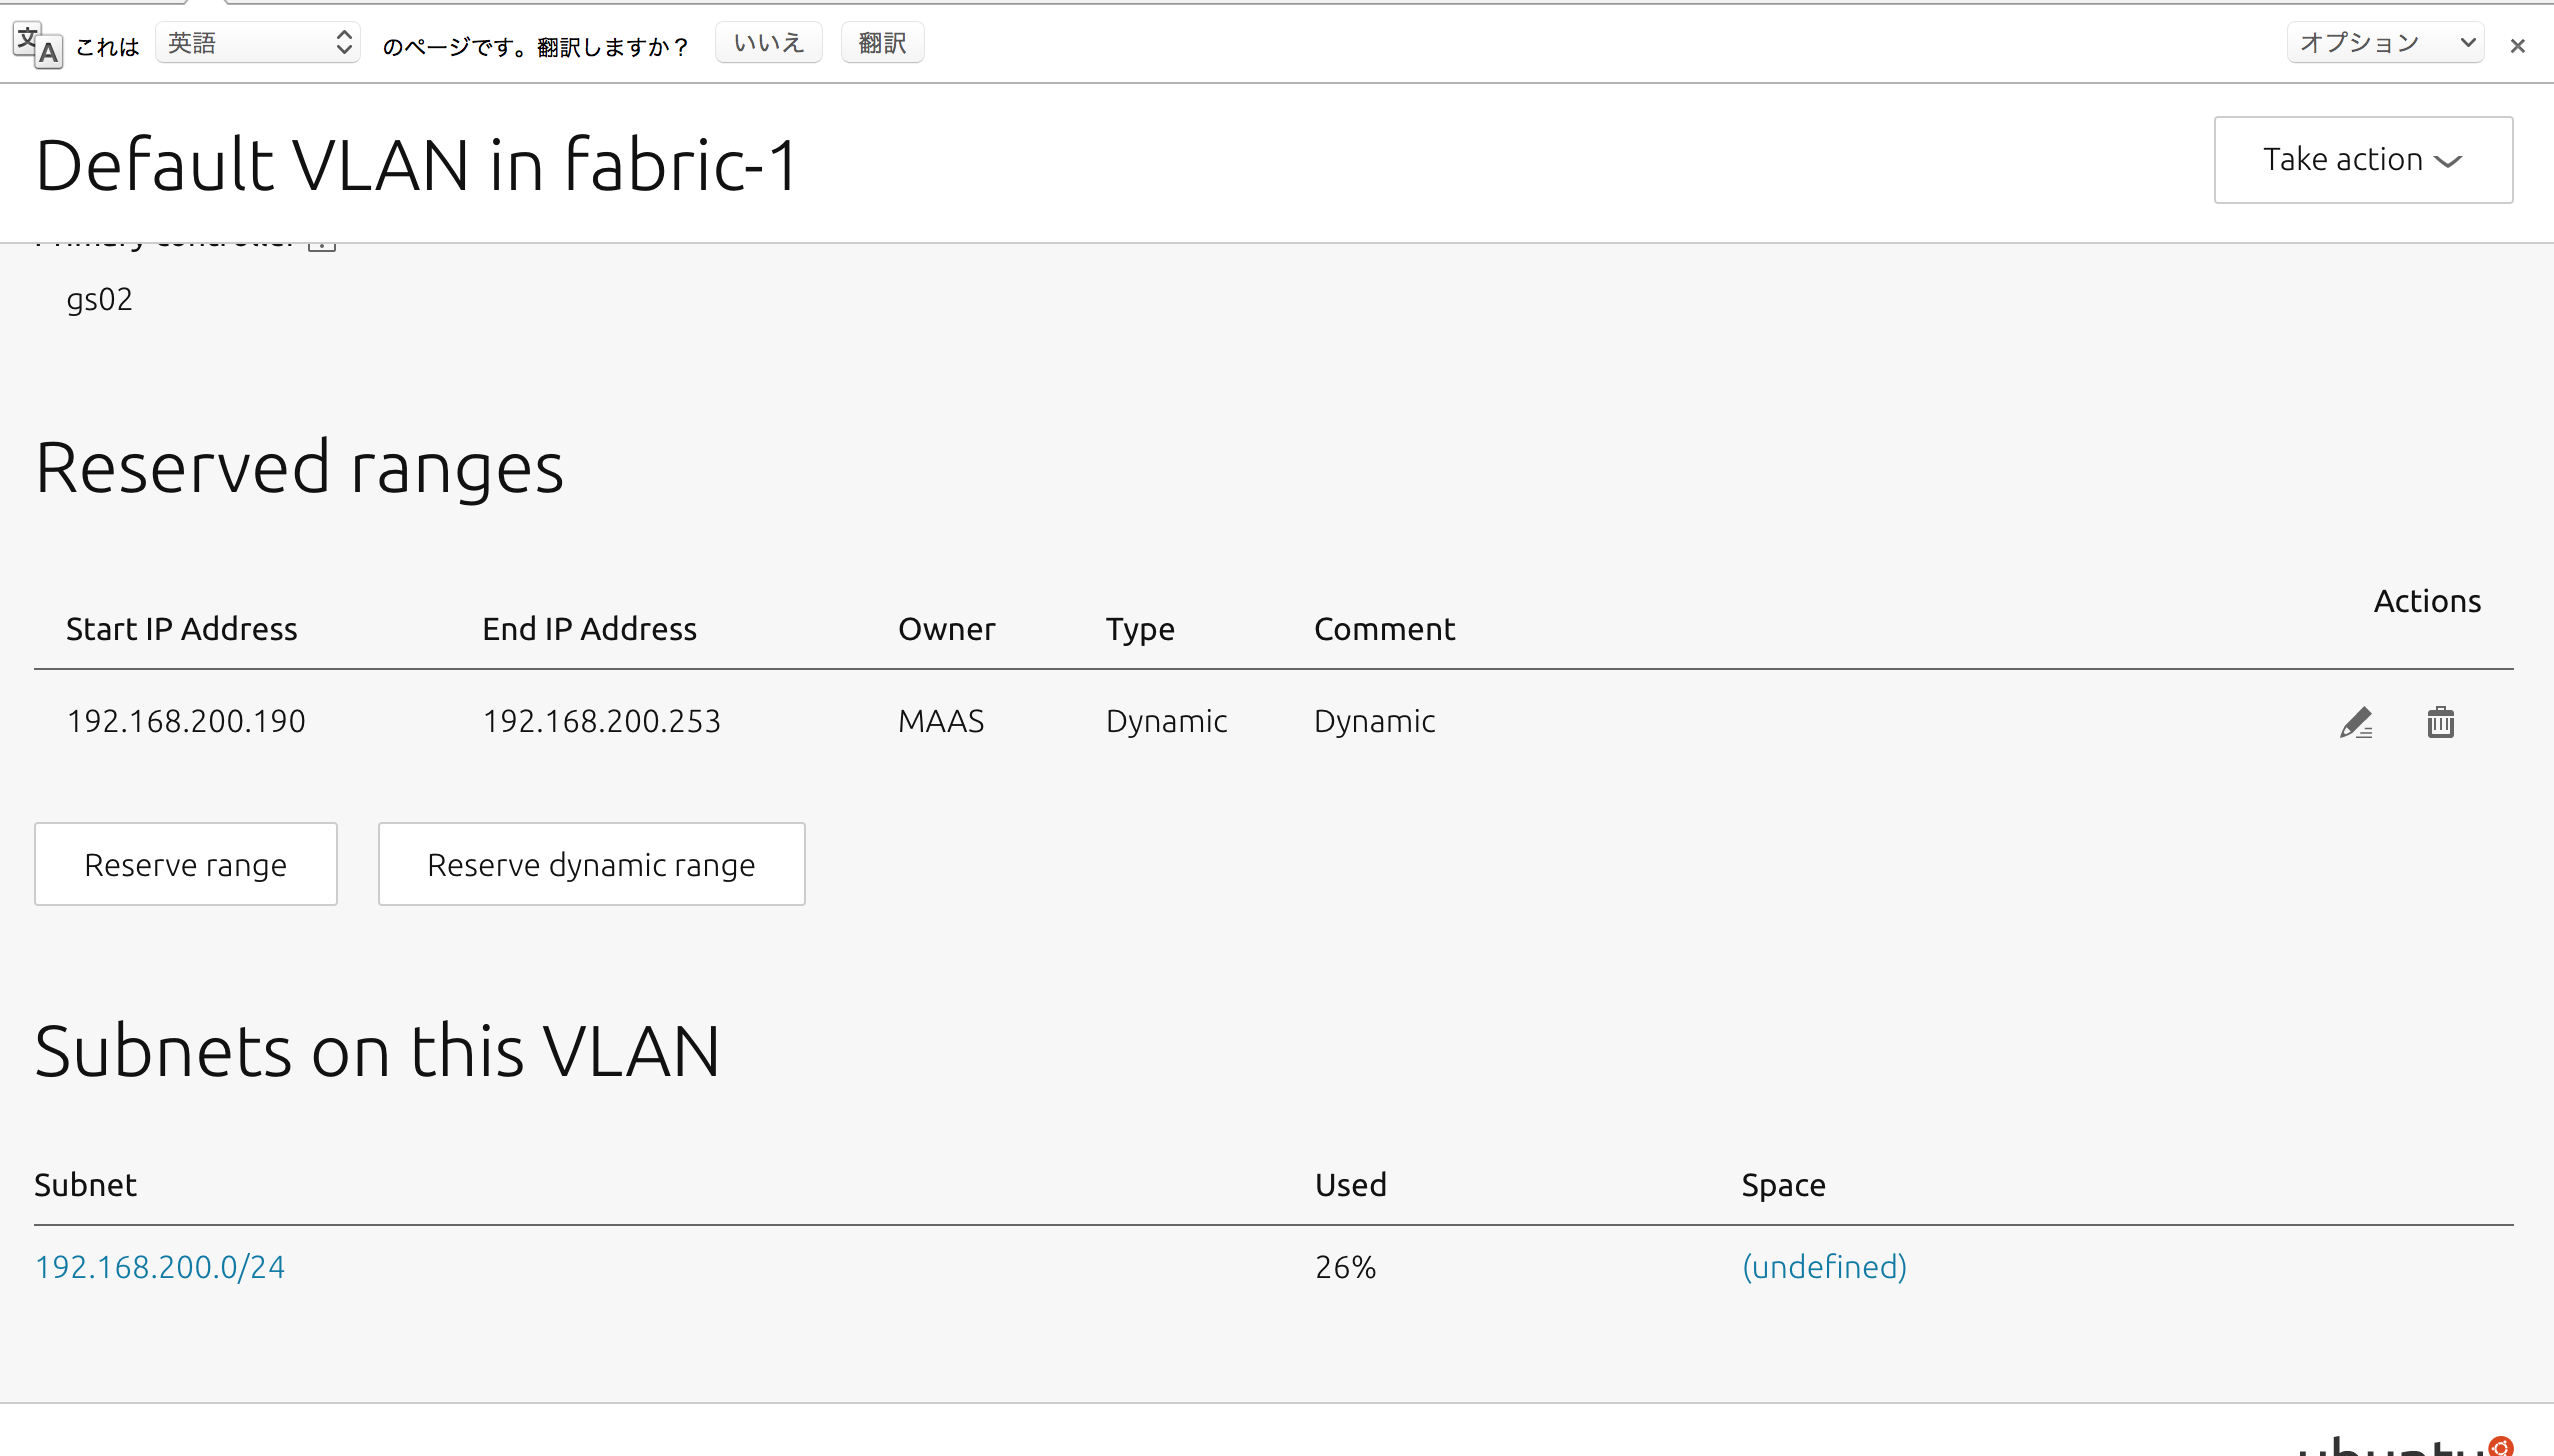
これで一通りの下準備が完了になる.
MAASクライアントのデプロイ
MAASクライアントとなる端末のBOOT順序でPXE bootの項目を起動順序の一位へする.
その後クライアントの電源を入れると自動でMAASサーバーと通信を開始し、電源が落ちる.
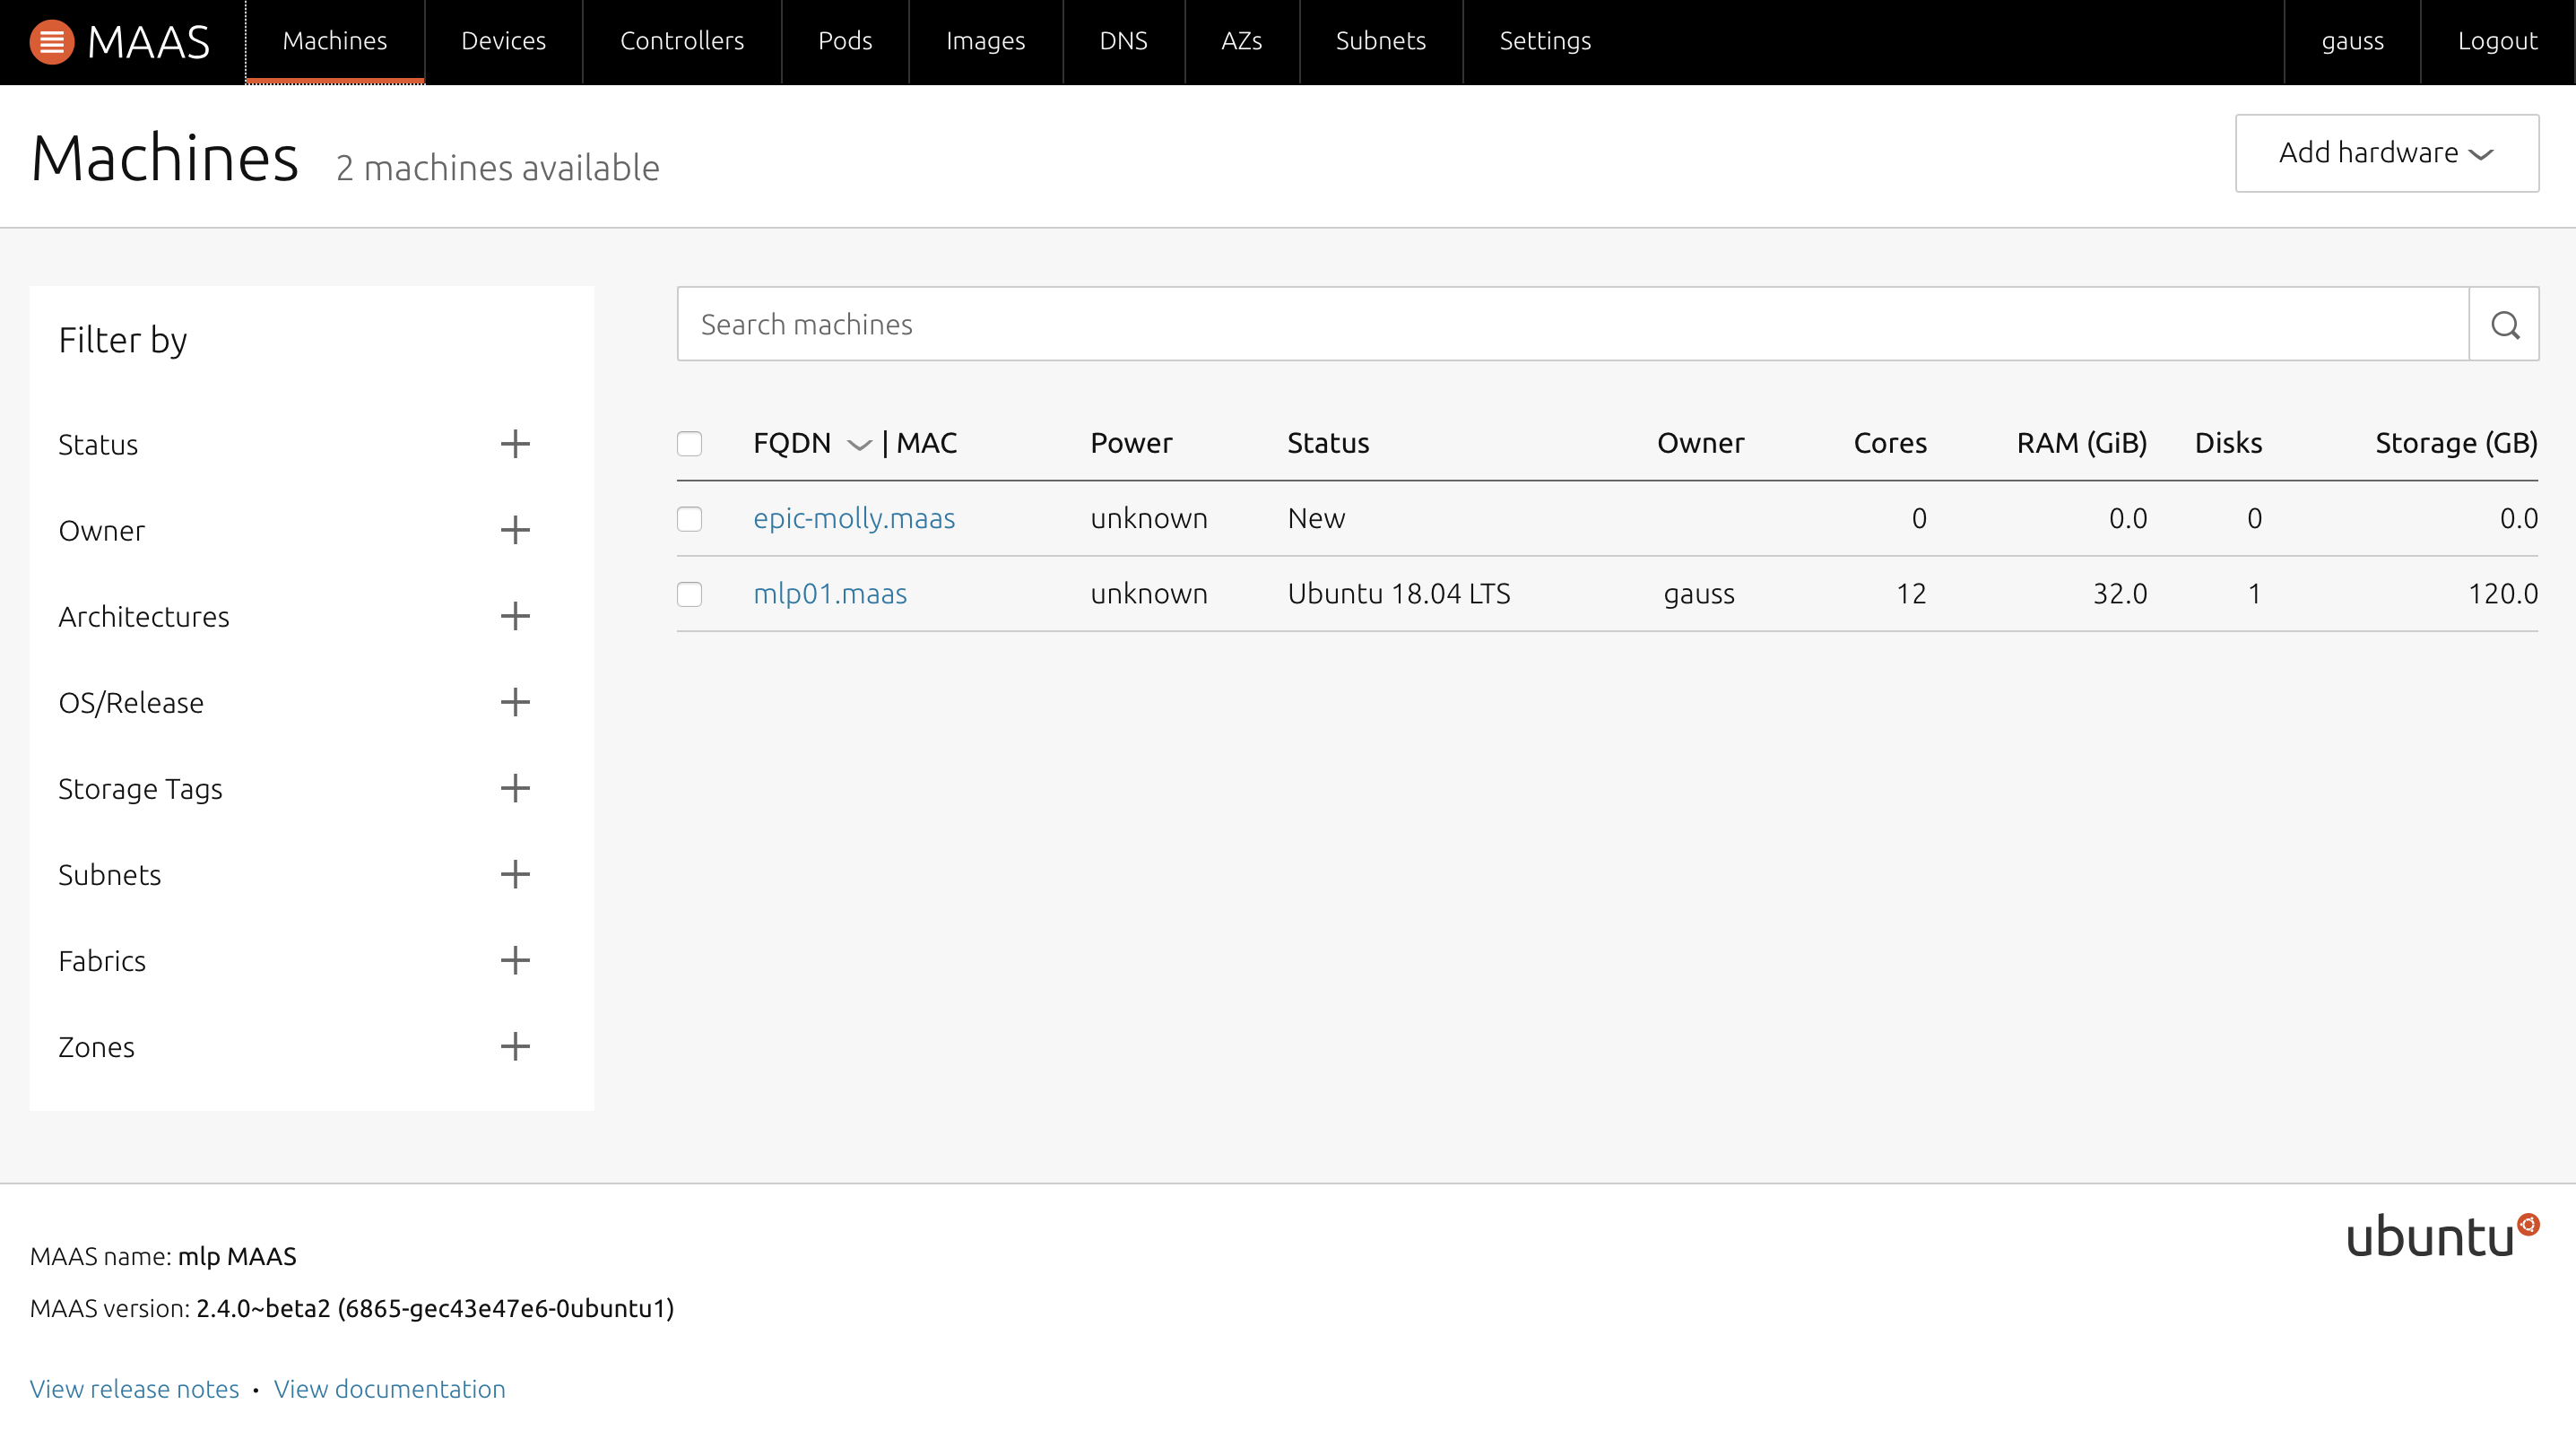
電源が落ちた後は、MAASの管理画面上の「Machines」に端末が追加される.
(端末の名前は仮で動物の名前が入る)
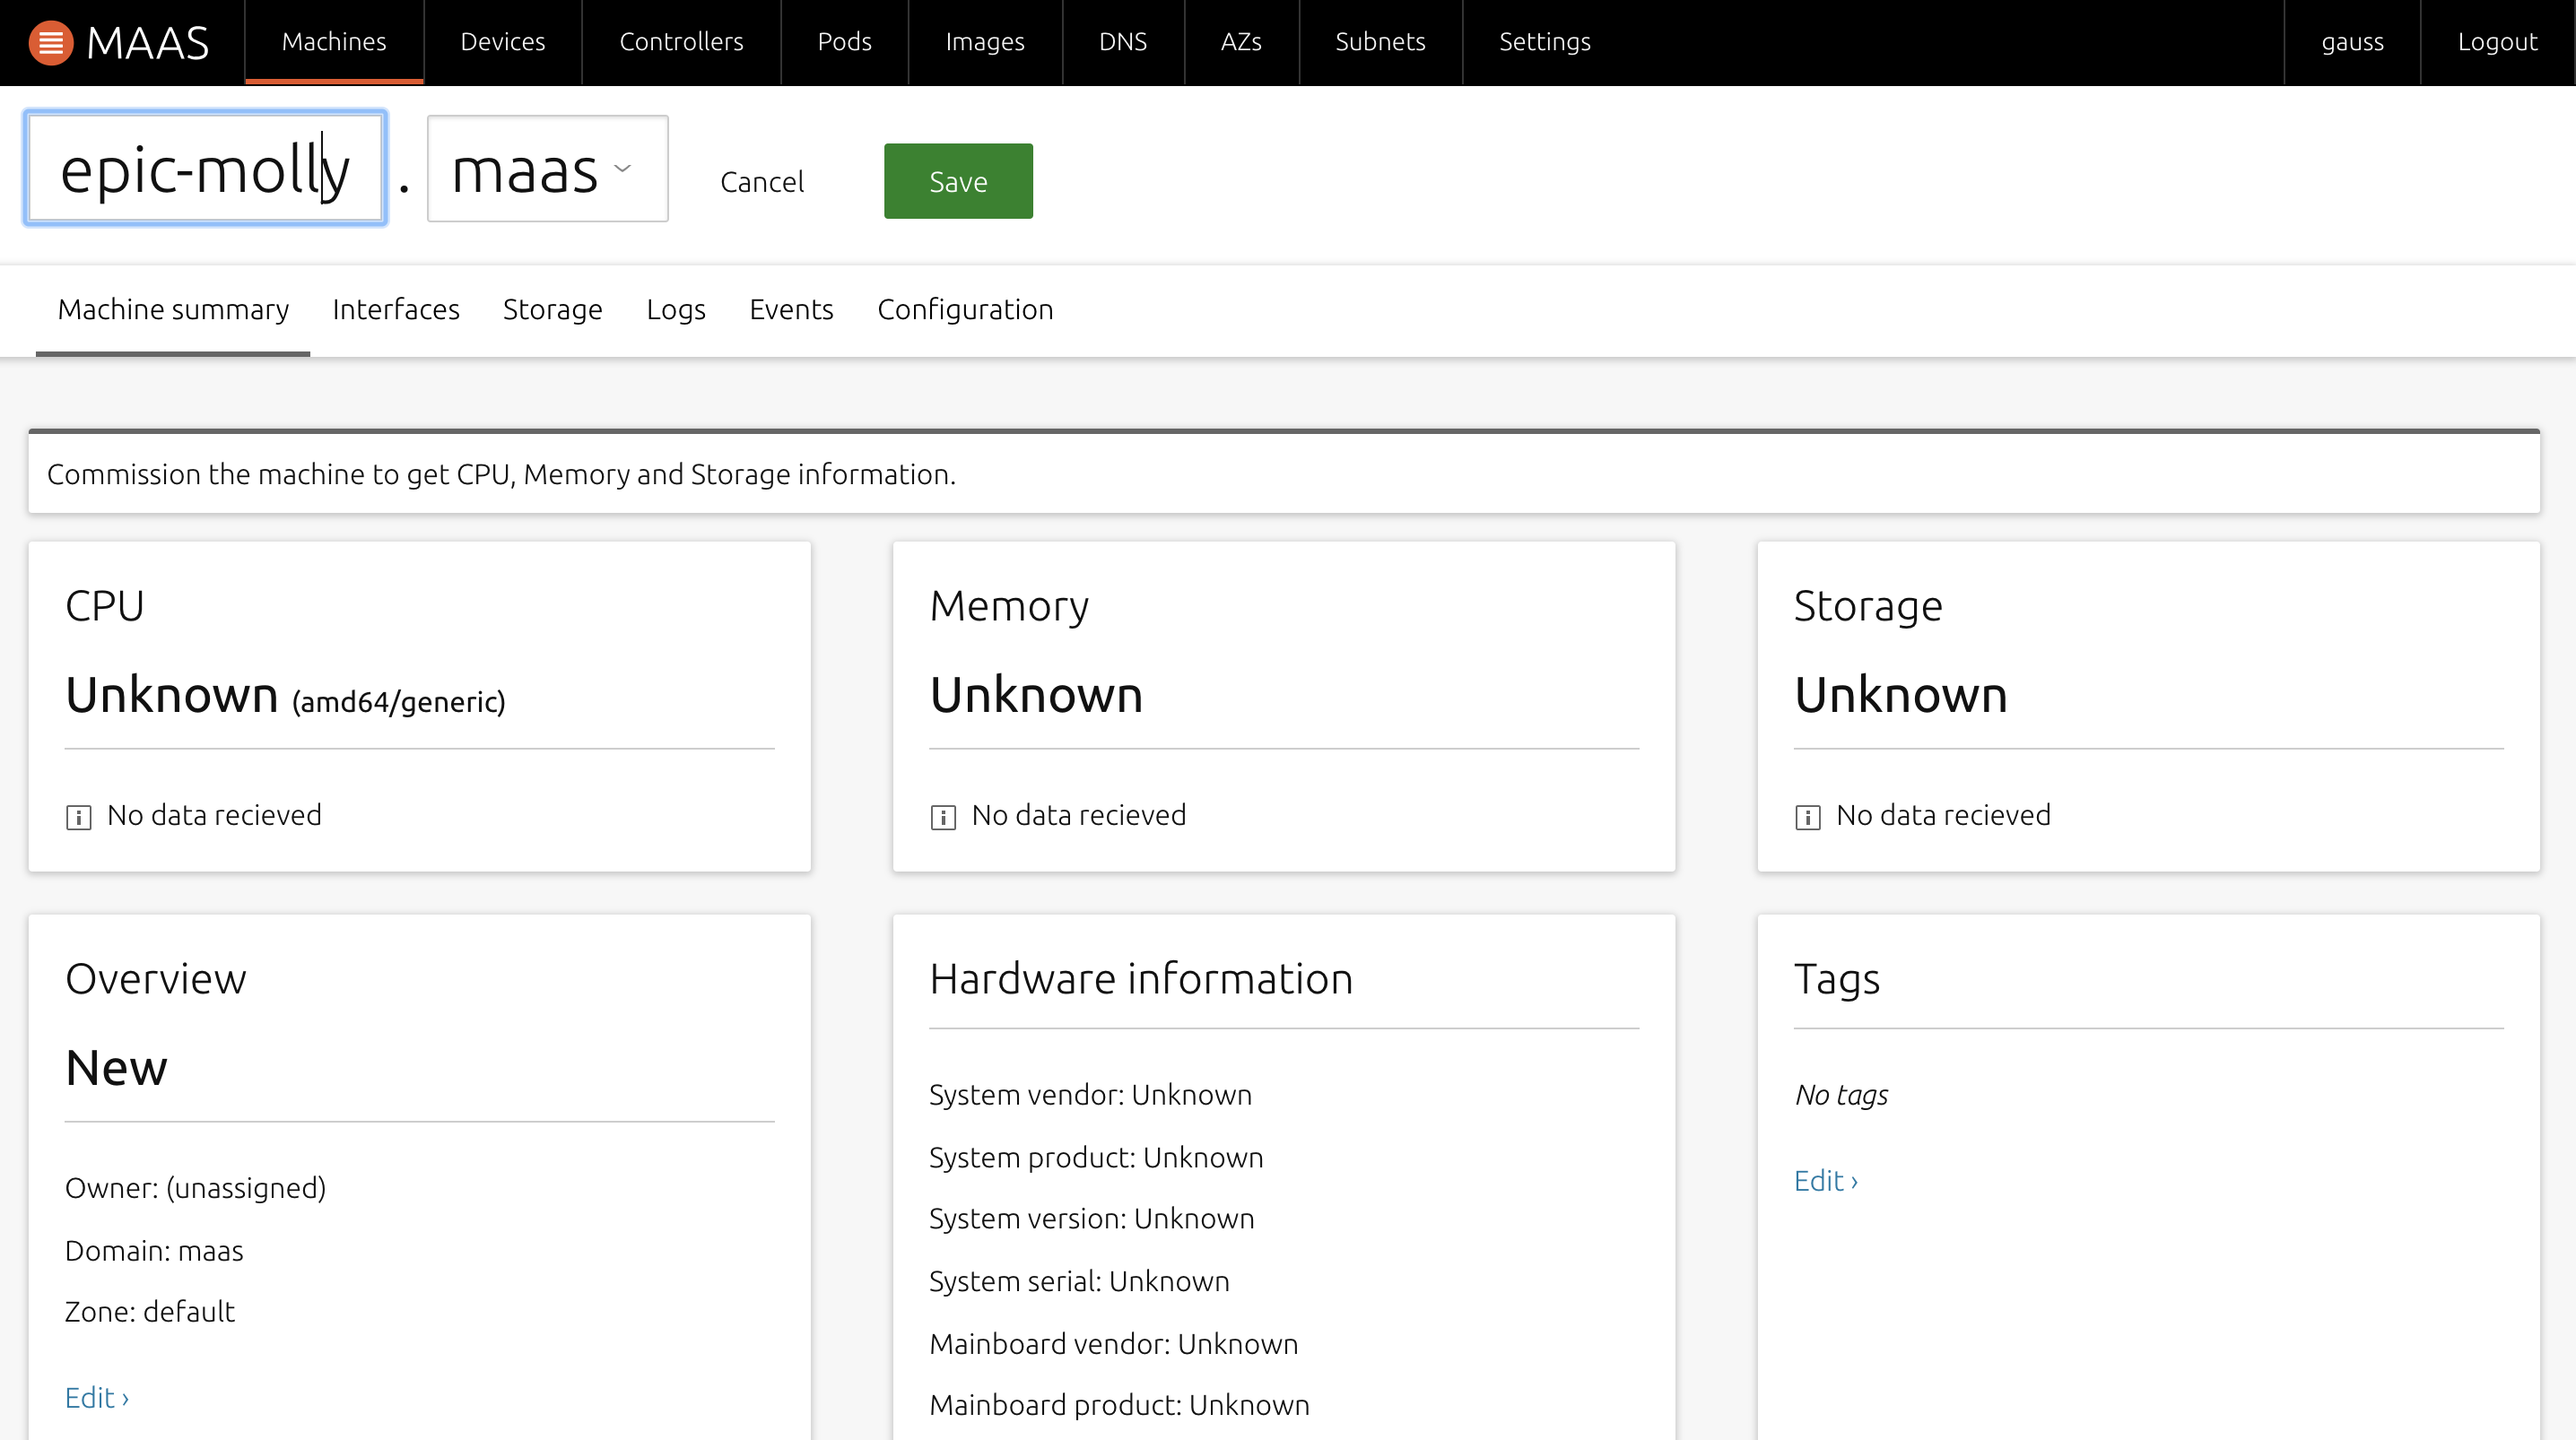
追加されたマシンを選択し、まずは名前の変更をする.
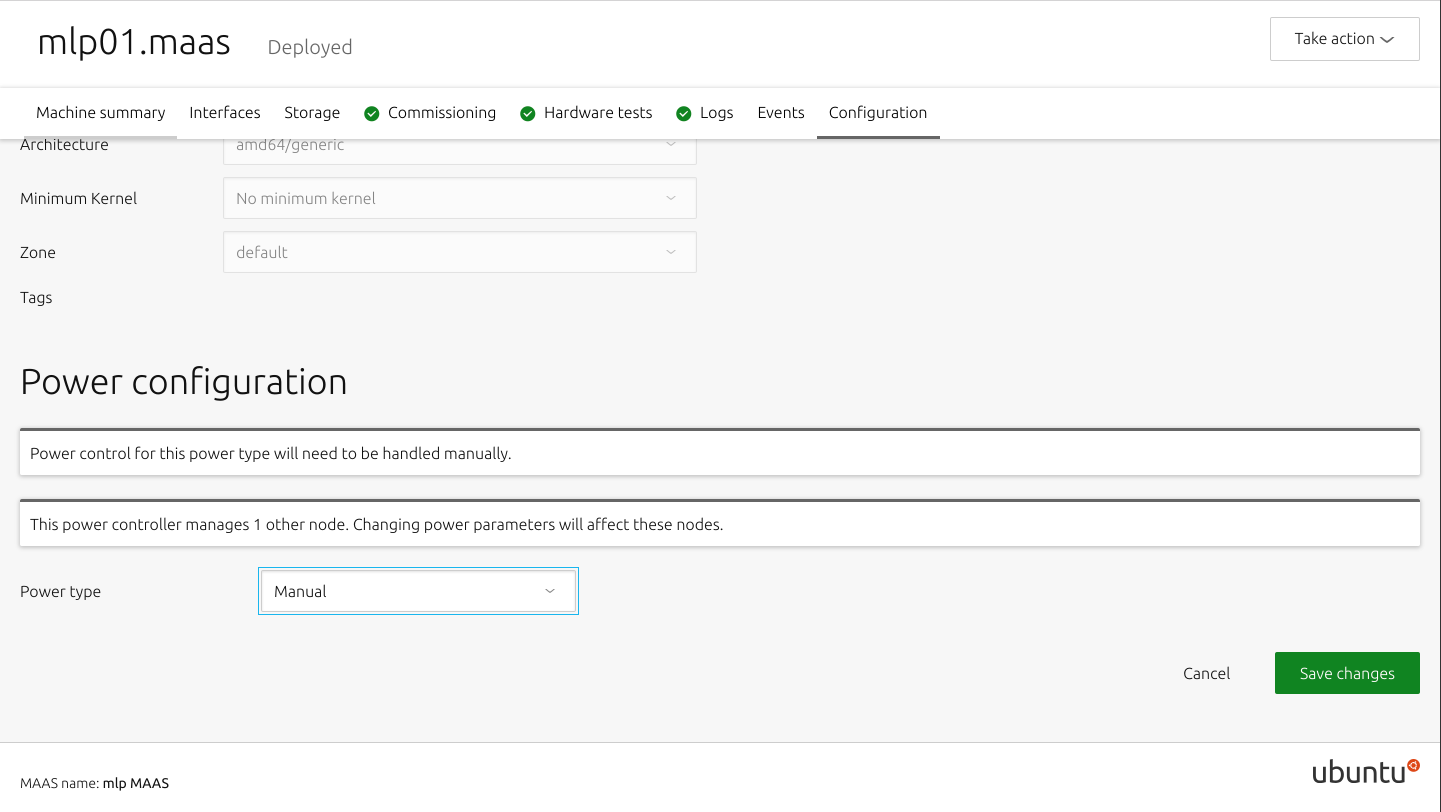
「Configration」内の「Power configuration」で電源オプションを選択.
今回は「Manual」を選択する.
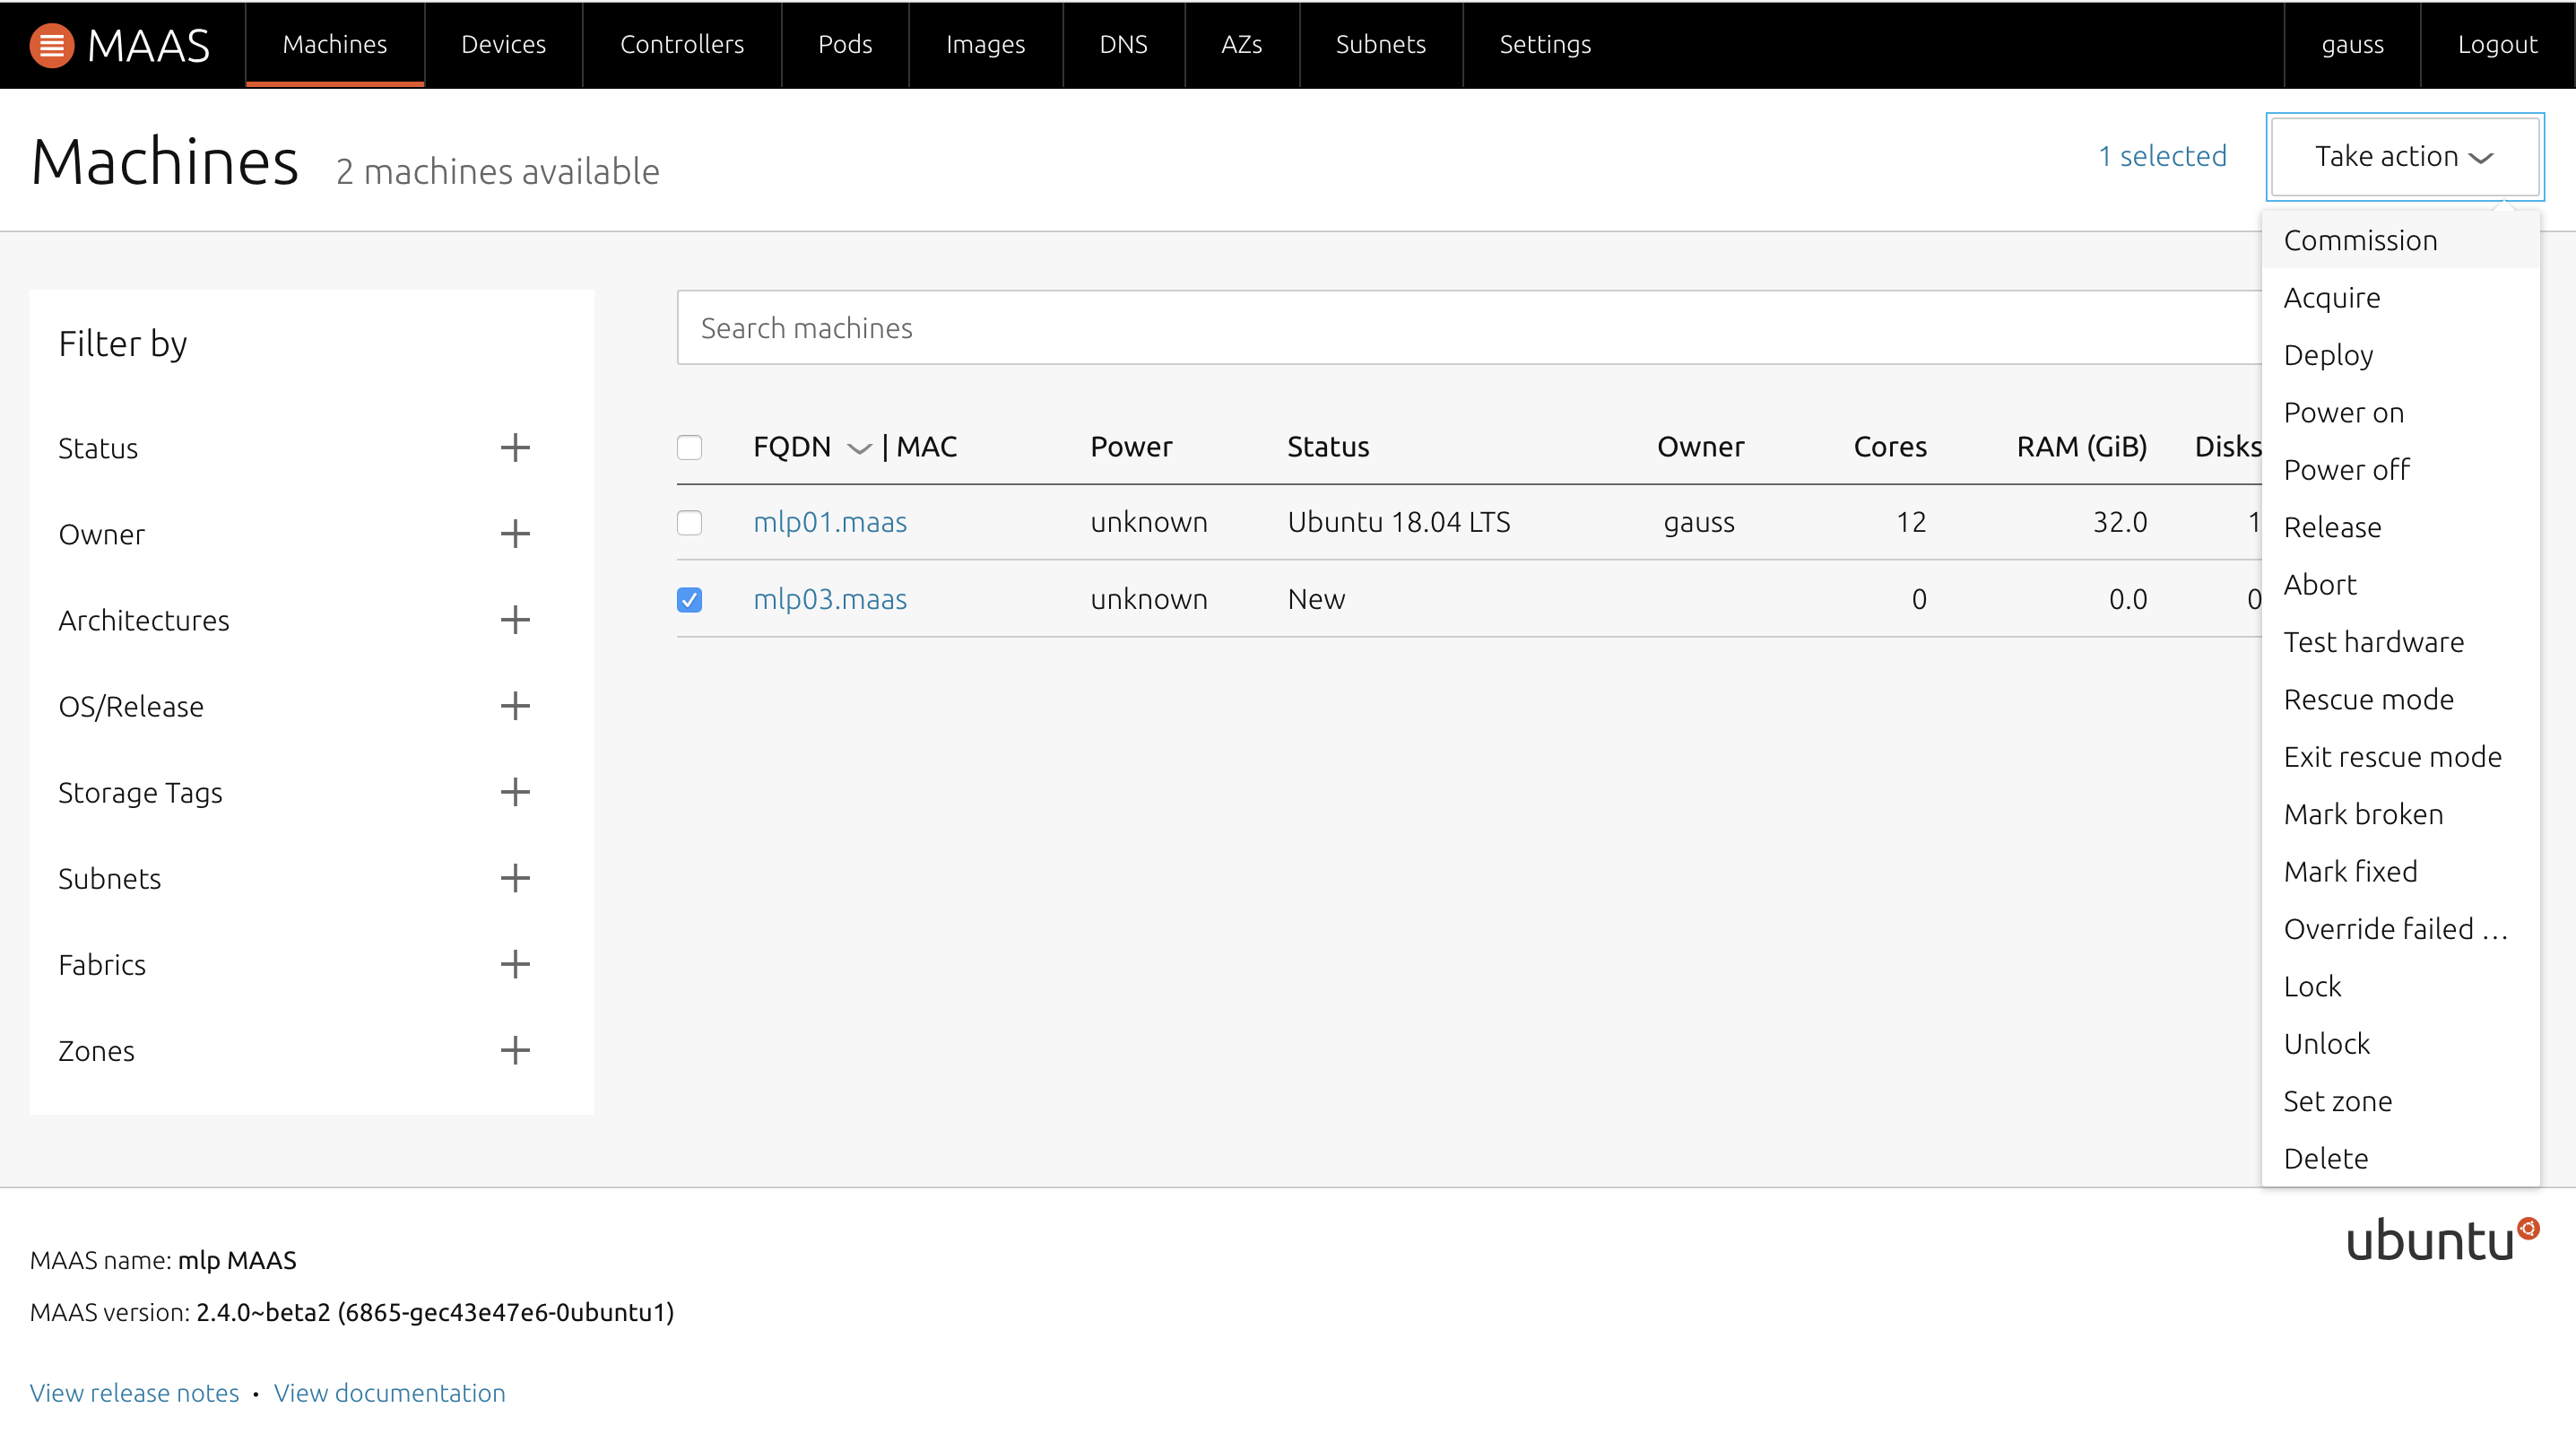
「Machines」ページで、端末のチェックボックスにチェックを入れ、「Take action」から「Commission」を選択した後、クライアント端末の電源を入れる.
再びサーバーとの通信を開始するので終了まで待つ.
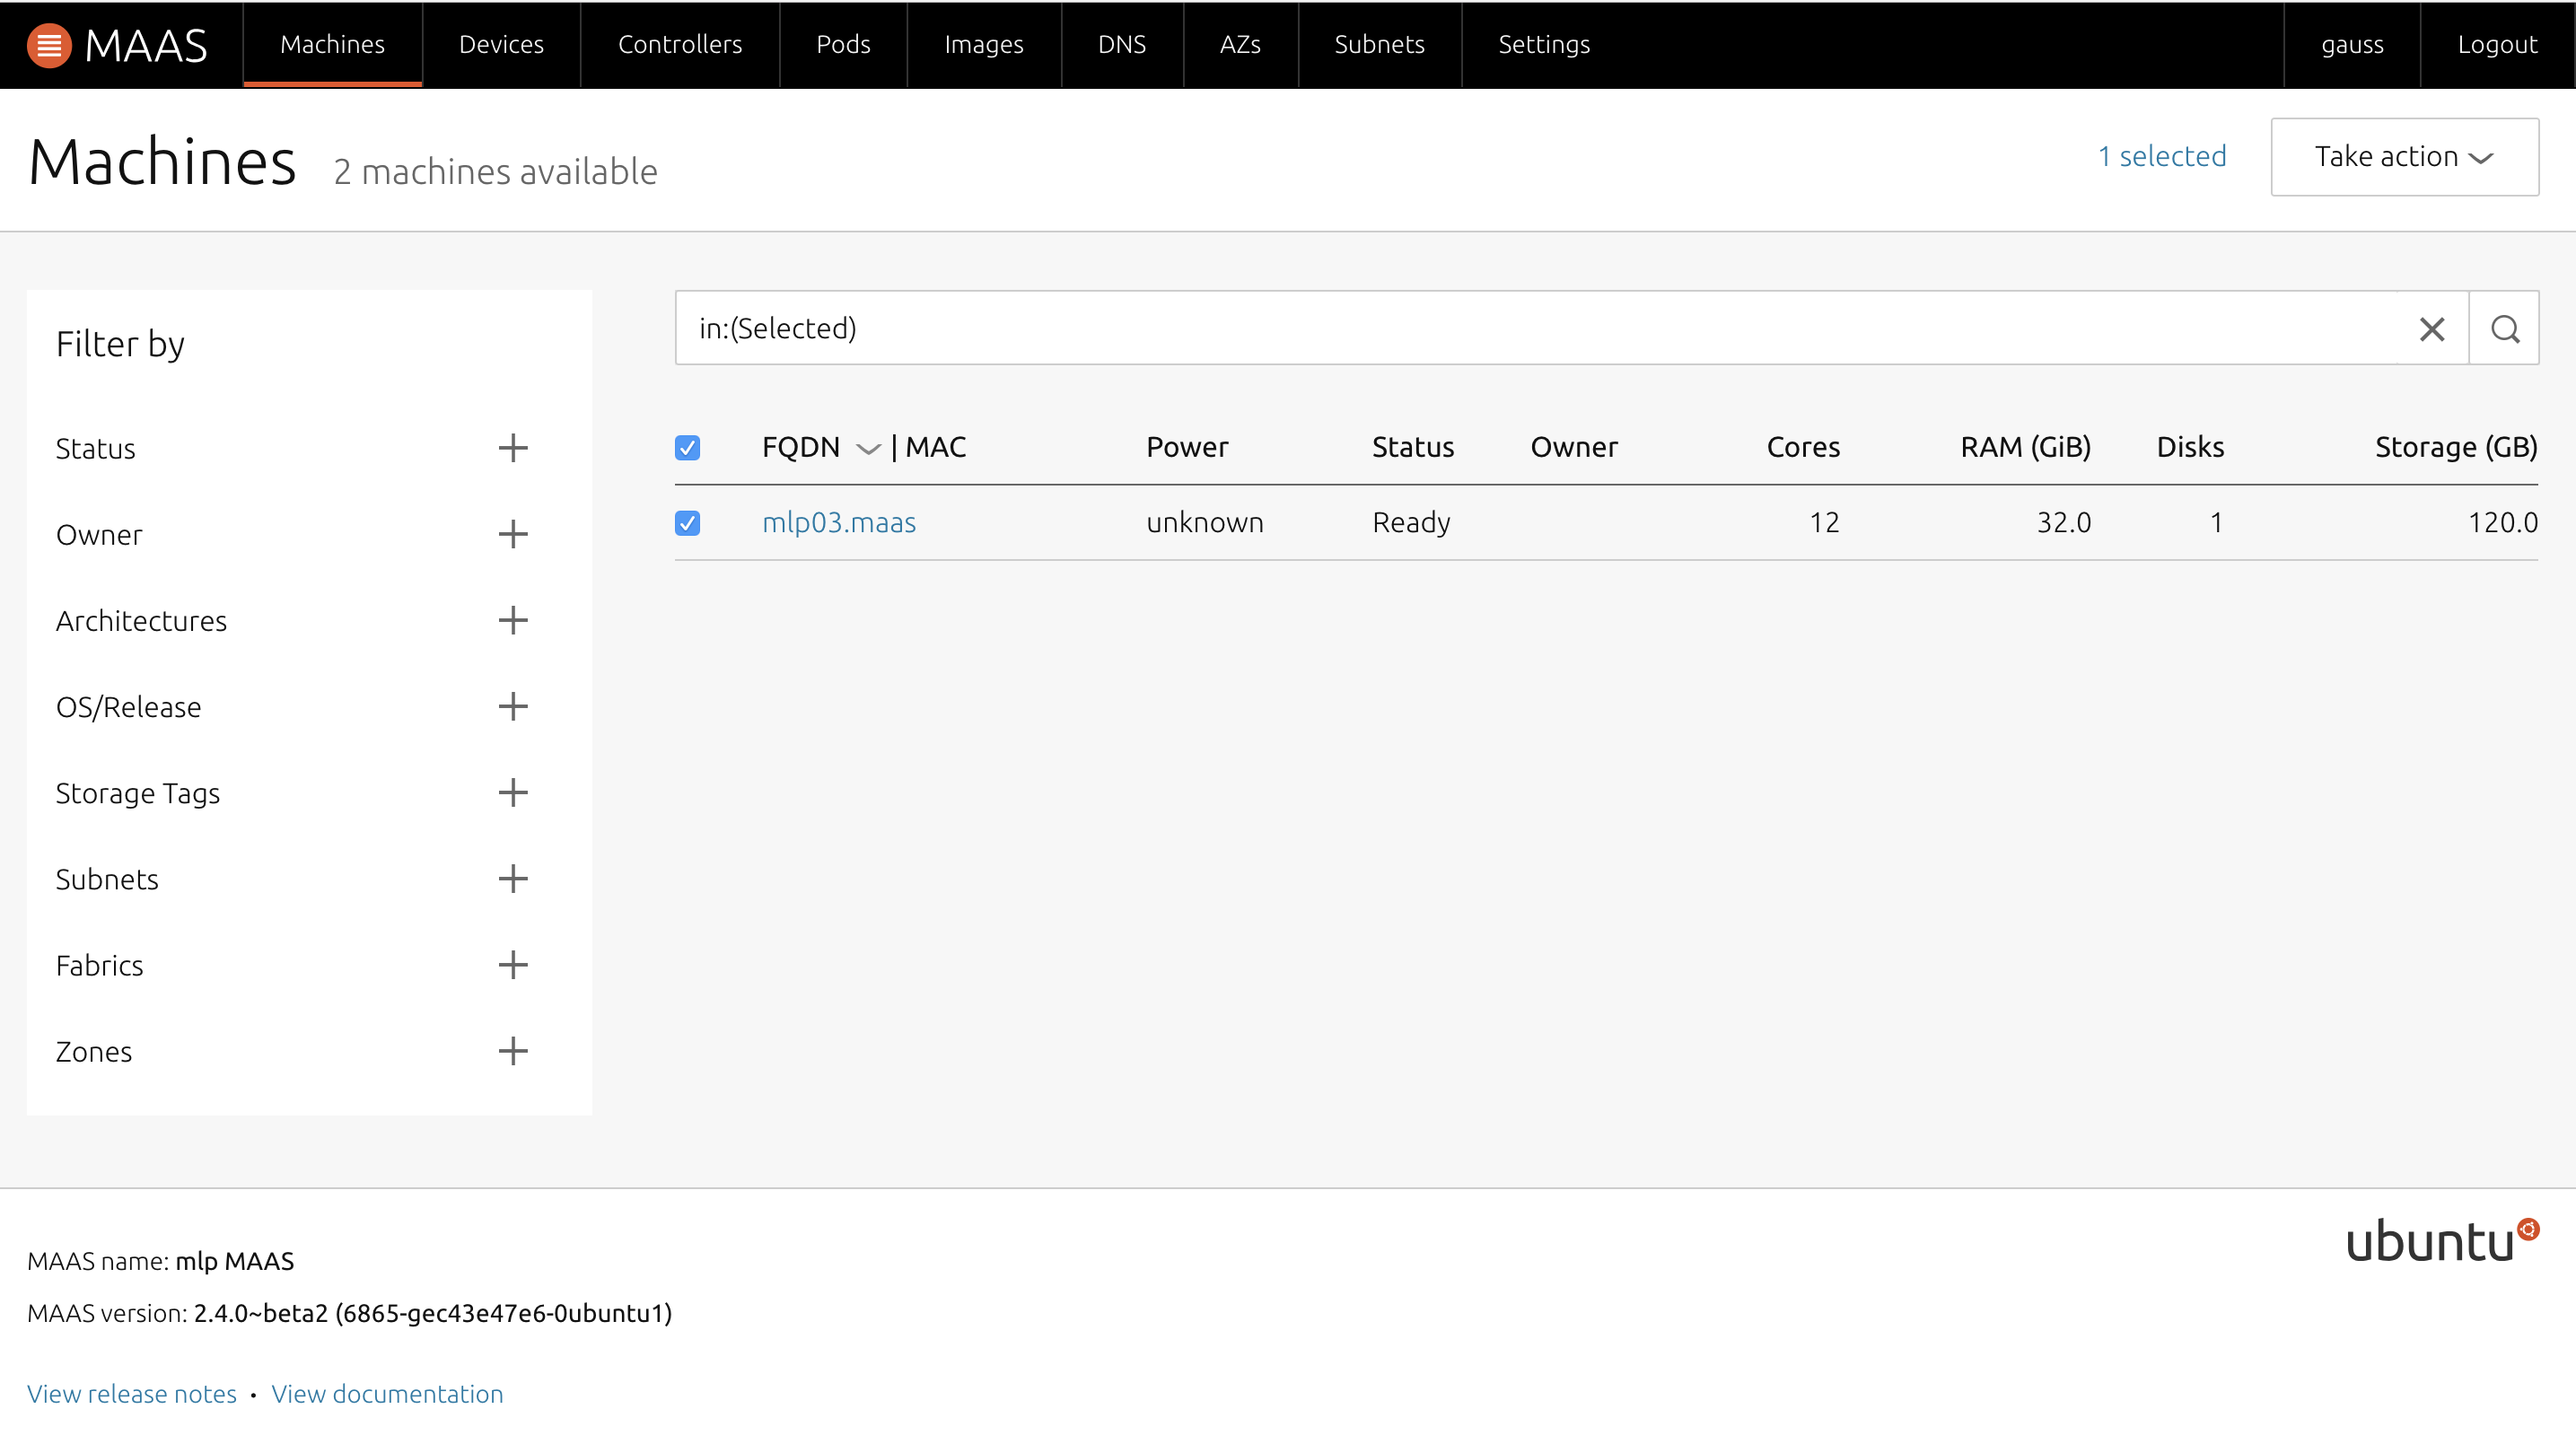
無事にCommissionが終了したら、サーバーの管理画面では「Status」が「Ready」になる.
「Take action」から「Deploy」を選択し任意のOSを選択し、デプロイを開始させ、クライアントの電源を入れる.
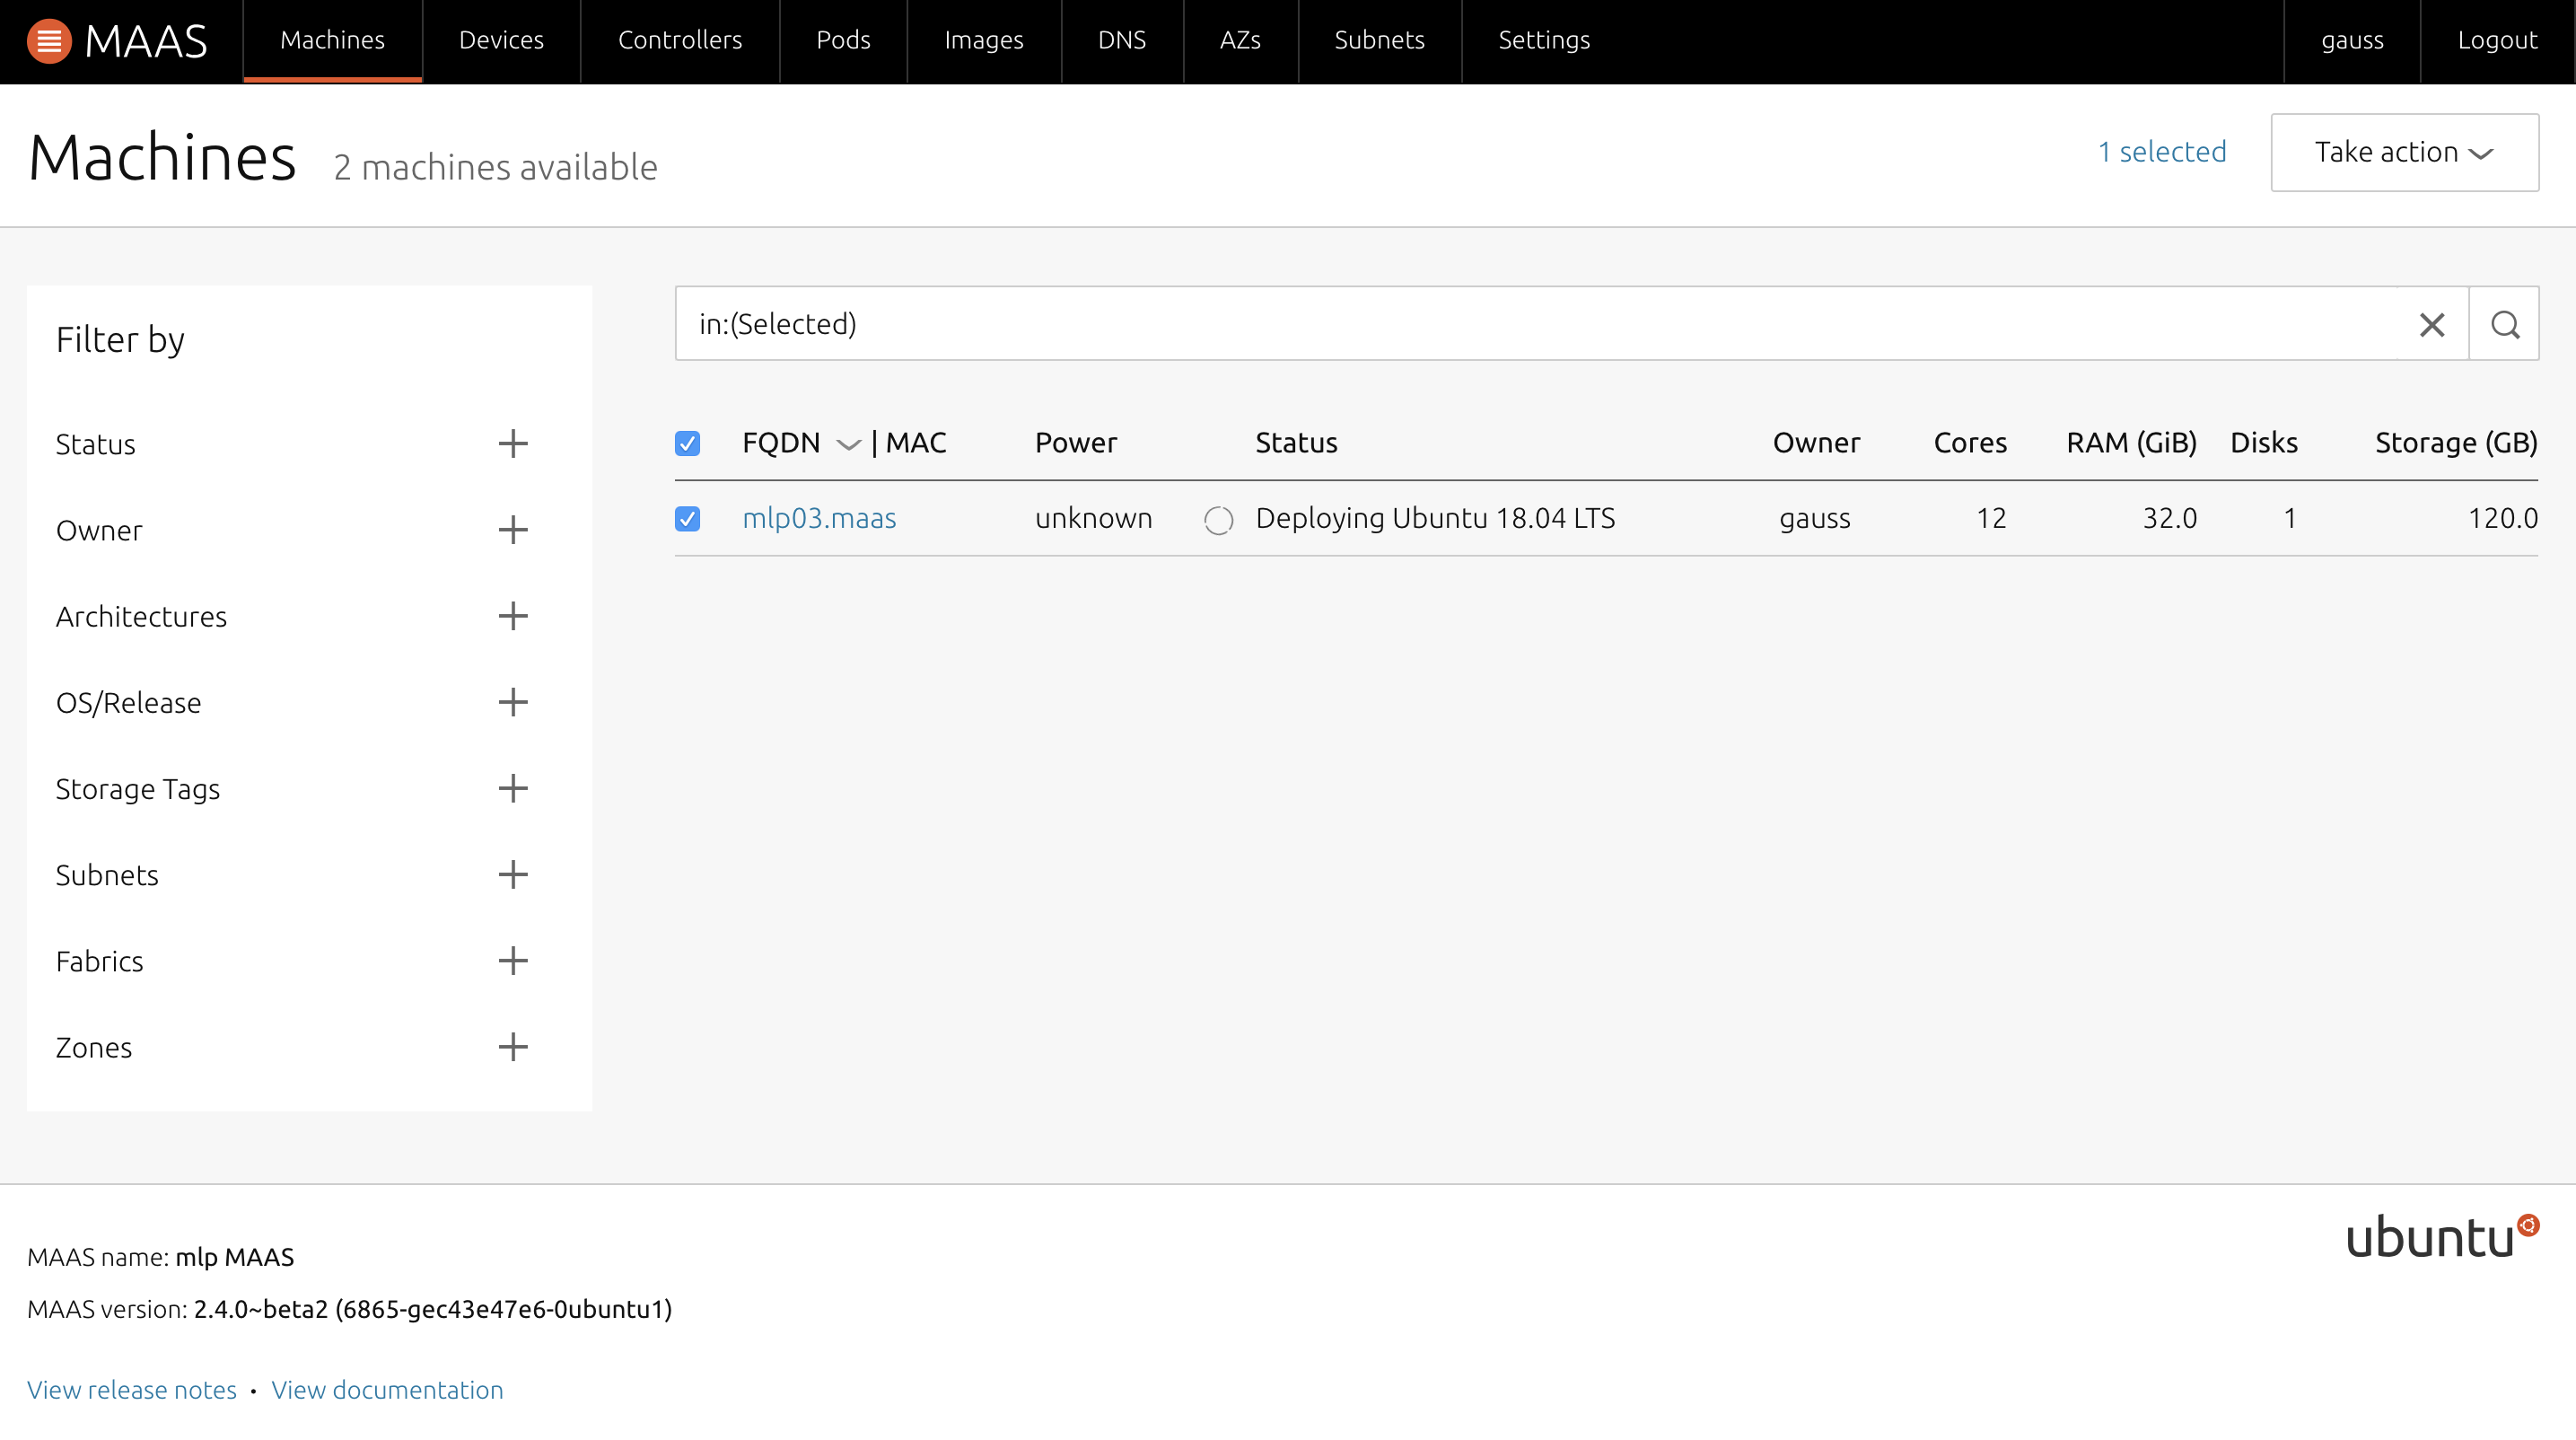
サーバーからOSがデプロイされるため、しばし待ち、管理画面上でStatus欄がOS名に変われば成功
.
クライアント端末のネットワーク設定について
MAASのクライアント端末は基本はDHCPだが、Staticに指定することも可能.
その場合はOSのデプロイ前に端末の情報ページ内「Interfaces」内の「Actions」-「Edit Physical」を選択し、「Auto assign」を「Static」に変更し、任意のアドレスを指定する.

つまづいたところ
MAASサーバーをインストールした後、設定画面上はDHCPはEnabledになっているが、クライアントに対してアドレスの配布が行われない.
解決方法
管理画面上部「Controllers」内の「Name」にあるマシンを選択(初期だと一つしかないはず)
移ったページ内のServices項目において「dhcpd」にグリーンマークが付いていない場合があるため、一度MAASを再起動するとグリーンマークが付くようになった.これでもダメな場合は、
sudo dpkg-reconfigure maas-rack-controller

sudo apt-get install maas-rack-controller

sudo maas-rack register --url http://MAASサーバーアドレス:5240/
で治ることもあった.
参考ページ
Mac OSX上でISOイメージからBootable USBを作成する - 1日ひとつだけ強くなる
MAASの環境構築とUbuntuのデプロイ - Qiita
公開鍵暗号を用いてのSSH接続(きほん) - Qiita
- 投稿日:2020-04-26T14:13:55+09:00
Cronなどでコマンドを書く際、変数を使いまわすための記載方法
はじめに
社内でRocket.Chatを使用しているが、ubuntuサーバーのcron処理の結果をチャットボットとして通知させたい。
Webhookの仕組みでRocket.Chatからcurlコマンドが発行されるが、cronで実行したシェル内で作成した変数をcurlコマンドでチャットに送信する方法につまづいたので、解決方法を残すゴール
curlコマンドで変数を受け取り、状況により違う結果を出せるようにする
curlの形
まずはRocket.ChatにWebhookで発行した基本のcurlコマンドを確認する
curl -X POST -H 'Content-Type: application/json' --data '{"text":"Example message","attachments":[{"title":"Rocket.Chat","title_link":"https://rocket.chat","text":"Rocket.Chat, the best open source chat","image_url":"https://rocket.chat/images/mockup.png","color":"#764FA5"}]}' https://〜〜テキストのみ飛ばす
プレーンテキストのみ飛ばしたい場合は以下のように記述する
curl -X POST -H 'Content-Type: application/json' --data '{"text":"hogehoge"}' https://〜〜変数を使う
変数を使う場合は以下のよう
結論は
['"+"']
で囲むcurl -X POST -H 'Content-Type: application/json' --data '{"text":"'"$fuga"'"}' https://〜〜テキスト+変数
固定文と変数を使いたい場合
curl -X POST -H 'Content-Type: application/json' --data '{"text":"hogehoge'"$fuga"'"}' https://〜〜こんな感じ
終わりに
見た目としては違和感が強いがこれで使えるようになる
いつか使う時があれば参考にしてください最初はこの方法はcurlで変数を使用するときだけだと思っていたが、
実際はshellscriptを書くときなどに変数を使いまわしたいときに使う方法だったよう
- 投稿日:2020-04-26T13:53:31+09:00
chmod 600 ←600ってなんやねん
近況報告
とりあえずデプロイは完了しました。readmeを書いて,投稿物を揃え,エラー対応すれば見世物としての体裁はできあがるのかな。某雑食系さんのツイートに,ポートフォリオはサーバーサイドの実力はもちろんのこと,コンテンツ力,そして見た目も評価の対象になりうるとありましたね(めっちゃ噛み砕いた)。自分のはサーバーサイドの記述,実力はまだまだですけど,見た目は手を抜かなければよくできるので,今の自分の最善を尽くした作品を作っていこうと思います。
今回の目的
chmodに続く数字を知る。
結論
ファイルへの権限の種類だよ
詳細
chmodは「change mode」の略で,桁数,数字の組み合わせによって編集の権限とかを設定しています。
これにより,第三者からの不正アクセスの予防に繋がります。
桁数 意味 1桁目(百の位) 所有者のアクセス権限の範囲 2桁目(十の位) グループのアクセス権限の範囲 3桁目(一の位) その他のユーザーのアクセス権限の範囲
数字 意味 4 読み出し許可 2 書き込み許可 1 実行許可 0 権限なし 数字の足し算で権限は増えていきます。例えば全ての権限なら
4+2+1+0で7に
読み出しと書き込みだけなら4+2で6になります。
このように編集できるユーザーを適宜設定できます。おわりに
Linuxのコマンドは他にもごっそりあるのでそれの一部と考えていただければ。
微量でも参考になったらLGTM,ご指導はコメント欄にお願いします!
- 投稿日:2020-04-26T08:56:14+09:00
The Common Clk Framework
もともと、Linux Kernelのソースコードの一部なので、GPLv2扱いになる(はずの認識)。
https://www.kernel.org/doc/html/latest/index.html
Licensing documentation
The following describes the license of the Linux kernel source code (GPLv2), how to properly mark the license of individual files in the source tree, as well as links to the full license text.
https://www.kernel.org/doc/html/latest/process/license-rules.html#kernel-licensing
https://www.kernel.org/doc/html/latest/driver-api/clk.html
The Common Clk Framework
Author: Mike Turquette mturquette@ti.com
This document endeavours to explain the common clk framework details, and how to port a platform over to this framework. It is not yet a detailed explanation of the clock api in
include/linux/clk.h, but perhaps someday it will include that information.このドキュメントでは、一般的なclk frameworkの詳細と、このframeworkをプラットフォームを越えて異色する方法を説明しています。
include/linux/clk.h内のclock apiの詳細説明はありませんが、おそらくいくつかは含まれるでしょう。Introduction and interface split
The common clk framework is an interface to control the clock nodes available on various devices today. This may come in the form of clock gating, rate adjustment, muxing or other operations. This framework is enabled with the CONFIG_COMMON_CLK option.
共通clk frameworkは、今日様々なデバイスで有効なクロックノードを制御するインターフェイスである。これは、clock gating、rate adjustment, muxing(多重化) あるいはほかの操作を実現する。このframworkは、CONFIG_COMMON_CLK optionによって有効化される。
The interface itself is divided into two halves, each shielded from the details of its counterpart.
このインタフェイス自身は大きく二つの部分に分けられる。それぞれが対応する部分の詳細から保護している。
First is the common definition of struct clk which unifies the framework-level accounting and infrastructure that has traditionally been duplicated across a variety of platforms.
第1は、clk構造体の共通定義である。clk構造体は、従来様々なプラットフォームで複製されてきたframework-level accountingとインフラストラクチャを統合するものである。
Second is a common implementation of the clk.h api, defined in
drivers/clk/clk.c.第2は、
drivers/clk/clk.cに定義された、clk.h apiの共通実装である。Finally there is struct clk_ops, whose operations are invoked by the clk api implementation.
最後に、clk_ops構造体があり、clk api 実装によって呼び出されます。
The second half of the interface is comprised of the hardware-specific callbacks registered with struct clk_ops and the corresponding hardware-specific structures needed to model a particular clock.
インターフェイスの後半は、clk_ops構造体に登録されたハードウェア固有のコールバックと、特定のクロックのモデル化に必要な、対応するハードウェア固有の構造で構成されています。
For the remainder of this document any reference to a callback in struct clk_ops, such as .enable or .set_rate, implies the hardware-specific implementation of that code.
このドキュメントの残りでは、clk_ops構造体に含まれるコールバックのいくつかを参照する。例えば、.enable や .set_rateなど、ハードウェア固有の実装を意味する。
Likewise, references to struct clk_foo serve as a convenient shorthand for the implementation of the hardware-specific bits for the hypothetical "foo" hardware.
同様に、clk_foo構造体は、架空の"foo"ハードウェアに対する、ハードウェア固有の実装に関して、便利な省略形として機能をする。
Tying the two halves of this interface together is struct clk_hw, which is defined in struct clk_foo and pointed to within struct clk_core.
このインターフェイスの、2つの半分を統合するのが、clk_hw構造体でです。これは、clk_foo構造体で定義され、clk_core構造体内でポインタされます。
This allows for easy navigation between the two discrete halves of the common clock interface.
これにより共通クロックインターフェイスの、2つの分かれている半分の間でのナビゲーションがやりやすくなります。
Common data structures and api
Below is the common struct clk_core definition from
drivers/clk/clk.c, modified for brevity::下記は、
drivers/clk/clk.cで定義されている、共通clk_core構造体である。簡潔化するために修正されている。struct clk_core { const char *name; const struct clk_ops *ops; struct clk_hw *hw; struct module *owner; struct clk_core *parent; const char **parent_names; struct clk_core **parents; u8 num_parents; u8 new_parent_index; ... };The members above make up the core of the clk tree topology. The clk api itself defines several driver-facing functions which operate on struct clk. That api is documented in
include/linux/clk.h.上記のメンバーは、clk tree topologyのコアを構成します。clk api自体は、clk構造体に対して制御を行うためのdriver界面のいくつかの関数を定義しています。このapiは、
include/linux/clk.hにてドキュメント化されています。Platforms and devices utilizing the common struct clk_core use the struct clk_ops pointer in struct clk_core to perform the hardware-specific parts of the operations defined in clk-provider.h::
共通clk_core構造体を利用するプラットフォームとデバイスドライバは、clk_core構造体内のclk_ops構造体へのポインタを用いて、clk-providor.hで定義された、ハードウェア固有の処理を実行します。
    struct clk_ops {
        int     (*prepare)(struct clk_hw *hw);
        void        (*unprepare)(struct clk_hw *hw);
        int     (*is_prepared)(struct clk_hw *hw);
        void        (*unprepare_unused)(struct clk_hw *hw);
        int     (*enable)(struct clk_hw *hw);
        void        (*disable)(struct clk_hw *hw);
        int     (*is_enabled)(struct clk_hw *hw);
        void        (*disable_unused)(struct clk_hw *hw);
        unsigned long   (*recalc_rate)(struct clk_hw *hw,
                        unsigned long parent_rate);
        long        (*round_rate)(struct clk_hw *hw,
                        unsigned long rate,
                        unsigned long *parent_rate);
        int     (*determine_rate)(struct clk_hw *hw,
                          struct clk_rate_request *req);
        int     (*set_parent)(struct clk_hw *hw, u8 index);
        u8      (*get_parent)(struct clk_hw *hw);
        int     (*set_rate)(struct clk_hw *hw,
                        unsigned long rate,
                        unsigned long parent_rate);
        int     (*set_rate_and_parent)(struct clk_hw *hw,
                        unsigned long rate,
                        unsigned long parent_rate,
                        u8 index);
        unsigned long   (*recalc_accuracy)(struct clk_hw *hw,
                        unsigned long parent_accuracy);
        int     (*get_phase)(struct clk_hw *hw);
        int     (*set_phase)(struct clk_hw *hw, int degrees);
        void        (*init)(struct clk_hw *hw);
        void        (*debug_init)(struct clk_hw *hw,
                          struct dentry *dentry);
    };
Hardware clk implementations
The strength of the common struct clk_core comes from its .ops and .hw pointers which abstract the details of struct clk from the hardware-specific bits, and vice versa.
共通clk_core構造体の強みは、それ自体が.opsと.hw pointerによって、ハードウェア固有のbitに対する抽象化ができていることである。逆も同様です。
To illustrate consider the simple gateable clk implementation in
drivers/clk/clk-gate.c::
drivers/clk/clk-gate.cで実装されるシンプルなクロックゲーティング可能を図示します。struct clk_gate { struct clk_hw hw; void __iomem *reg; u8 bit_idx; ... };struct clk_gate contains struct clk_hw hw as well as hardware-specific knowledge about which register and bit controls this clk's gating.
clk_gate構造体は、当該clockのgatingを制御するためのレジスタとbitに関するハードウェア固有の知識として、clk_hw構造体を含みます。
Nothing about clock topology or accounting, such as enable_count or notifier_count, is needed here. That is all handled by the common framework code and struct clk_core.
ここで、enable_countあるいはnotifier_count等のような、clock topologyやaccountingについては必要ありません。これはすべて共通のフレームワークコードとclk_core構造体によって処理されます。
Let's walk through enabling this clk from driver code::
ドライバコードから、このclk構造体を有効化する手順を確認しましょう。
    struct clk *clk;
    clk = clk_get(NULL, "my_gateable_clk");

    clk_prepare(clk);
    clk_enable(clk);
The call graph for clk_enable is very simple::
clk_enableのコールグラフはとても簡潔です。
    clk_enable(clk);
        clk->ops->enable(clk->hw);
        [resolves to...]
            clk_gate_enable(hw);
            [resolves struct clk gate with to_clk_gate(hw)]
                clk_gate_set_bit(gate);
And the definition of clk_gate_set_bit::
そして、clk_get_set_bitの定義は以下です。
    static void clk_gate_set_bit(struct clk_gate *gate)
    {
        u32 reg;

        reg = __raw_readl(gate->reg);
        reg |= BIT(gate->bit_idx);
        writel(reg, gate->reg);
    }
Note that to_clk_gate is defined as::
ここで、to_clk_gateは以下のように定義されます。
#define to_clk_gate(_hw) container_of(_hw, struct clk_gate, hw)This pattern of abstraction is used for every clock hardware representation.
この抽象化のパターンは、全てのclock hard ware表現で利用されます。
Supporting your own clk hardware
When implementing support for a new type of clock it is only necessary to include the following header::
新しいclock typeをサポートする実装をする時、下記のヘッダをincludeするだけでよい。
#include <linux/clk-provider.h>To construct a clk hardware structure for your platform you must define the following::
あなたのプラットフォームのclk hardware structureを構成するには、下記の定義が必要になります。
    struct clk_foo {
        struct clk_hw hw;
        ... hardware specific data goes here ...
    };
To take advantage of your data you'll need to support valid operations for your clk::
データを利用するメリットを活かすには、clkを正しい制御手段のサポートが必要です。
    struct clk_ops clk_foo_ops = {
        .enable     = &clk_foo_enable,
        .disable    = &clk_foo_disable,
    };
Implement the above functions using container_of::
container_ofを用いて、上記関数を実装します。
    #define to_clk_foo(_hw) container_of(_hw, struct clk_foo, hw)

    int clk_foo_enable(struct clk_hw *hw)
    {
        struct clk_foo *foo;

        foo = to_clk_foo(hw);

        ... perform magic on foo ...

        return 0;
    };
Below is a matrix detailing which clk_ops are mandatory based upon the hardware capabilities of that clock.
下記は、そのクロックにおいてハードウェア機能に基づいてclk_opsが必要となるかの詳細を示したマトリックスである。
A cell marked as "y" means mandatory, a cell marked as "n" implies that either including that callback is invalid or otherwise unnecessary.
"y"とマークされたセルが必須であり、"n"は当該コールバックが無効であるか必要ないかを意味している。
Empty cells are either optional or must be evaluated on a case-by-case basis.
空のセルは、オプションであるか、ケースバイベースによって評価する必要があります。
.. table:: clock hardware characteristics
   +----------------+------+-------------+---------------+-------------+------+
   |                | gate | change rate | single parent | multiplexer | root |
   +================+======+=============+===============+=============+======+
   |.prepare        |      |             |               |             |      |
   +----------------+------+-------------+---------------+-------------+------+
   |.unprepare      |      |             |               |             |      |
   +----------------+------+-------------+---------------+-------------+------+
   +----------------+------+-------------+---------------+-------------+------+
   |.enable         | y    |             |               |             |      |
   +----------------+------+-------------+---------------+-------------+------+
   |.disable        | y    |             |               |             |      |
   +----------------+------+-------------+---------------+-------------+------+
   |.is_enabled     | y    |             |               |             |      |
   +----------------+------+-------------+---------------+-------------+------+
   +----------------+------+-------------+---------------+-------------+------+
   |.recalc_rate    |      | y           |               |             |      |
   +----------------+------+-------------+---------------+-------------+------+
   |.round_rate     |      | y [1]_      |               |             |      |
   +----------------+------+-------------+---------------+-------------+------+
   |.determine_rate |      | y [1]_      |               |             |      |
   +----------------+------+-------------+---------------+-------------+------+
   |.set_rate       |      | y           |               |             |      |
   +----------------+------+-------------+---------------+-------------+------+
   +----------------+------+-------------+---------------+-------------+------+
   |.set_parent     |      |             | n             | y           | n    |
   +----------------+------+-------------+---------------+-------------+------+
   |.get_parent     |      |             | n             | y           | n    |
   +----------------+------+-------------+---------------+-------------+------+
   +----------------+------+-------------+---------------+-------------+------+
   |.recalc_accuracy|      |             |               |             |      |
   +----------------+------+-------------+---------------+-------------+------+
   +----------------+------+-------------+---------------+-------------+------+
   |.init           |      |             |               |             |      |
   +----------------+------+-------------+---------------+-------------+------+
[1] either one of round_rate or determine_rate is required.
[1] round_rate もしくは determine_rate のいずれかで必要となる
Finally, register your clock at run-time with a hardware-specific registration function.
This function simply populates struct clk_foo's data and then passes the common struct clk parameters to the framework with a call to::最後に、ハードウェア固有の登録関数を用いて、実行時にクロックを登録します。この関数は単純に、clk_foo構造体のデータを入力し、次の呼び出しで一般的なclk構造体パラメータをframworkに伝えます。
clk_register(...)See the basic clock types in
drivers/clk/clk-*.cfor examples.
drivers/clk/clk-*.c内の基本的なclock typeを参考としてみてください。Disabling clock gating of unused clocks
Sometimes during development it can be useful to be able to bypass the default disabling of unused clocks.
開発中においてはしばしば、デフォルトでクロックを無効化することで有効であることがある。
For example, if drivers aren't enabling clocks properly but rely on them being on from the bootloader, bypassing the disabling means that the driver will remain functional while the issues are sorted out.
例えば、ドライバーがクロックを適切に有効にしていないが、ブートローダーからの恩に依存している場合、無効化をbypassすることで問題が解決されるばでドライバーが機能し続ける。
To bypass this disabling, include "clk_ignore_unused" in the bootargs to the kernel.
この無効化をbypassするには、kernelのbootargsに"clk_ignore_unused"を含めてください。
Locking
The common clock framework uses two global locks, the prepare lock and the enable lock.
共通clock frameworkは2つのグローバルロックを利用しています。prepare lockと、enable lockです。
The enable lock is a spinlock and is held across calls to the .enable, .disable operations.
enable lockはspinlockであり、 .enableや.disable 処理を実行する間に保持されます。
Those operations are thus not allowed to sleep, and calls to the clk_enable(), clk_disable() API functions are allowed in atomic context.
したがってこれらの処理はsleepできず、clk_enable()とcld_disable() APIはatomic context内で呼び出すことが許容されます。
.
For clk_is_enabled() API, it is also designed to be allowed to be used in atomic context.
また、clk_is_enable() APIは、atomic context内で利用されることを許容された設計になっています。
However, it doesn't really make any sense to hold the enable lock in core, unless you want to do something else with the information of the enable state with that lock held.
しかし、コアがenable lockをholdしているときに、lock holdでの有効状態の情報を用いて別のことをしたい場合を除きます。
Otherwise, seeing if a clk is enabled is a one-shot read of the enabled state, which could just as easily change after the function returns because the lock is released.
それ以外の場合、クロックがenableであるかを確認する事は、enabled stateをワンショットで読み出す事であり、ロックが解放されるので、関数が戻った後にも簡単に変更できます。
Thus the user of this API needs to handle synchronizing the read of the state with whatever they're using it for to make sure that the enable state doesn't change during that time.
したがって、このAPIのユーザーは、除隊の読み取りを、それが使用しているものと同期して、enable stateがその間に変更されないようにする必要があります。
.
The prepare lock is a mutex and is held across calls to all other operations.
prepare lockはmutexであり、その他の処理を呼び出している間で保持されます。
All those operations are allowed to sleep, and calls to the corresponding API functions are not allowed in atomic context.
これらの操作はすべてスリープすることができ、対応するAPI関数の呼び出しは、atomic contextでは許容されていません。
This effectively divides operations in two groups from a locking perspective.
これにより、ロックの観点からすると、処理が2つのグループに効果的に分割されます。
.
Drivers don't need to manually protect resources shared between the operations of one group, regardless of whether those resources are shared by multiple clocks or not.
ドライバーは、リソースが複数のクロックで共有されているかどうかにかかわらず、1つのグループの捜査官で共有しているリソースを手動で保護する必要はありません。
However, access to resources that are shared between operations of the two groups needs to be protected by the drivers.
ただし、2つのグループの操作間で共有されるリソースへのアクセスは、ドライバーによって保護する必要があります。
An example of such a resource would be a register that controls both the clock rate and the clock enable/disable state.
このようなリソースの一例として、クロックレートとクロックの有効/無効状態の両方を制御するレジスタがあります。
.
The clock framework is reentrant, in that a driver is allowed to call clock framework functions from within its implementation of clock operations.
clock frameworkは、ドライバーがクロック操作の実装内から呼び出すことができるという点でリエントラントです。
This can for instance cause a .set_rate operation of one clock being called from within the .set_rate operation of another clock.
これにより、例えば、あるクロックの.set_rate操作が、別のクロックの.set_rate操作内から呼び出される可能性があります。
This case must be considered in the driver implementations, but the code flow is usually controlled by the driver in that case.
このケースは、ドライバーの実装で考慮する必要があります。しかし、コードフローは通常そのような場合、ドライバーによって制御されます。
.
Note that locking must also be considered when code outside of the common clock framework needs to access resources used by the clock operations.
共通clock frameworkの外部コードが、クロック操作で使用するリソースにアクセスする必要がる場合、ロックも考慮する必要がある事に注意してください。
This is considered out of scope of this document.
それは本ドキュメントのスコープ外になります。