- 投稿日:2020-03-15T21:43:51+09:00
[開発]Javaフレームワーク比較
個人メモ
【Javaフレームワーク】
No フレームワーク 開発 公開年 バージョン(確認日時) 概要 1 Play Framework Guillaume Bort 2 Spring Boot 3 Spring Framework Rod Johnson 2003年 環境に依存する機能を外部から提供可能とする方法が特徴的 4 Apache Struts 5 JSF(Java Server Faces) 2004年 6 Apache Wicket 2005年 7 Dropwizard yammerのWebサービス提供のために作られた、比較的新しいフレームワーク Play Framework Zenexity社のソフトウェア開発者であるGuillaume Bortにより作成
Ruby on RailsとDjangoから大きな影響を受けた、これらと似た同種のフレームワーク
Spring Boot
2.2.2
Spring Framework
Apache Struts
JSF (Java Server Faces)
Apache Wicket
Dropwizard
- 投稿日:2020-03-15T20:15:59+09:00
Spring SecurityでDB認証&BCryptでハッシュ化
概要
- Spring Securityで必要最低限のログイン機能を実装する。(権限周りは触れません。)
- ログインフォームなどはSpring Securityで用意されているものを使う。
- 仕組みはあまり理解できていないので、また別でまとめます。
- この投稿はとりあえず、動くようになったというところまで!
開発環境
- OS:Windows10
- IDE:eclipse 2019-12
- Java:13
- Spring boot:2.2.5(Gradle)
- DB:Oracle 12c
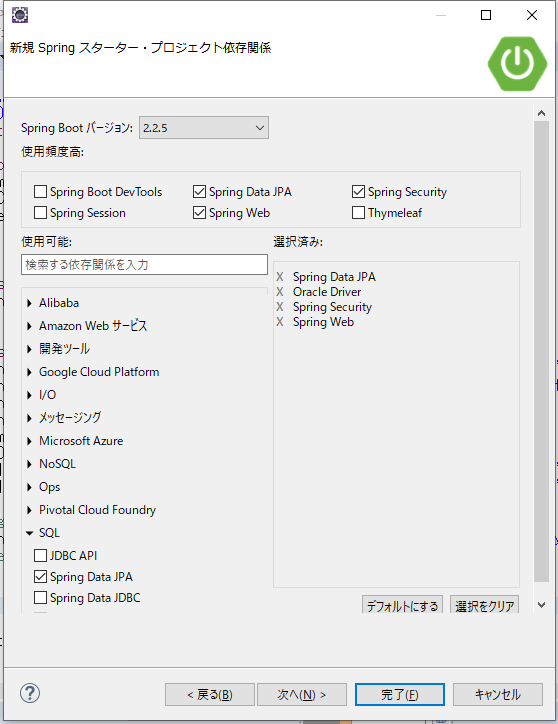
Spring Securityの導入
依存関係で下記の4つを選択
- Spring Security
- Spring Web
- Spring Data JPA
- Oracle Driver ←使用するDBのDriverを選択してください
DB接続情報をプロパティファイルに記述
- それぞれのDBに合った内容にしてください。
application.propertiesspring.datasource.url=jdbc:oracle:thin:@//localhost:1521/[データベース名] spring.datasource.username=[DBユーザー名] spring.datasource.password=[パスワード] spring.datasource.driver-class-name=oracle.jdbc.OracleDriver
ユーザー情報のテーブルを作成
create table USER_TABLE (
    USER_ID VARCHAR2(30 char)
  , FAMILY_NAME VARCHAR2(10 char) not null
  , FIRST_NAME VARCHAR2(10 char) not null
  , PASSWORD VARCHAR2(255) not null
  , constraint USER_TABLE_PKC primary key (USER_ID)
) ;
データ登録
下記のパスワードは「pass」をハッシュ化したものです。
この記事を参考にしました。INSERT INTO USER_TABLE VALUES( '0001' ,'テスト' ,'太郎' ,'$2a$10$w0C4tFU.SLFATC1Y6Y4uy.vMYsLXhlfvgnFP4dLbRjEa6/Ag1csKS' );
Entityクラスを作成
UserTable.javaimport javax.persistence.Column; import javax.persistence.Entity; import javax.persistence.GeneratedValue; import javax.persistence.GenerationType; import javax.persistence.Id; import javax.persistence.Table; @Entity @Table(name = "USER_TABLE") public class UserTable { @Id @GeneratedValue(strategy = GenerationType.AUTO) @Column(name = "USER_ID") private String userId; @Column(name = "FAMILY_NAME") private String familyName; @Column(name = "FIRST_NAME") private String firstName; @Column(name = "PASSWORD") private String password; // Getter,Setterは省略
リポジトリを作成
UserTableRepository.javaimport org.springframework.data.jpa.repository.JpaRepository; import org.springframework.stereotype.Repository; import com.azkz.entity.UserTable; @Repository public interface UserTableRepository extends JpaRepository<UserTable, String> { public UserTable findByUserId(String userId); }
SecurityConfigを作成
DemoSecurityConfig.javaimport org.springframework.context.annotation.Bean; import org.springframework.context.annotation.Configuration; import org.springframework.security.config.annotation.web.builders.HttpSecurity; import org.springframework.security.config.annotation.web.configuration.EnableWebSecurity; import org.springframework.security.config.annotation.web.configuration.WebSecurityConfigurerAdapter; import org.springframework.security.crypto.bcrypt.BCryptPasswordEncoder; import org.springframework.security.crypto.password.PasswordEncoder; @Configuration @EnableWebSecurity public class DemoSecurityConfig extends WebSecurityConfigurerAdapter { //アクセス可能なURLの制限とログイン成功時の遷移先の指定をするメソッド @Override protected void configure(HttpSecurity httpSecurity) throws Exception { httpSecurity.authorizeRequests() .mvcMatchers("/").permitAll() // 「/」は誰でもアクセスできる .anyRequest().authenticated() // それ以外はログインが必要 .and() .formLogin() .defaultSuccessUrl("/success"); // ログイン成功時には「/success」にGetリクエストをする } //入力されたパスワードをBCrypt方式でハッシュ化するメソッド @Bean protected PasswordEncoder passwordEncoder() { return new BCryptPasswordEncoder(); } }
UserDetailsServiceを作成
- DBからユーザ情報を取得し、DemoUserDetailsをインスタンス化する。
DemoUserDetailsService.java
import org.springframework.beans.factory.annotation.Autowired;
import org.springframework.security.core.userdetails.UserDetails;
import org.springframework.security.core.userdetails.UserDetailsService;
import org.springframework.security.core.userdetails.UsernameNotFoundException;
import org.springframework.stereotype.Service;

import com.azkz.entity.UserTable;
import com.azkz.repository.UserTableRepository;

@Service
public class DemoUserDetailsService implements UserDetailsService {

    @Autowired
    UserTableRepository userTableRepository;

    @Override
    public UserDetails loadUserByUsername(String userId) throws UsernameNotFoundException {

        //入力されたUserIDを条件にDBからデータを取得する
        UserTable userTable = userTableRepository.findByUserId(userId);

        // 入力値(ユーザーID、パスワード)とインスタンス化したDemoUserDetailsクラスを
        // SpringSecurityの内部で比較することで、ログインチェックを行っている。
        return new DemoUserDetails(userTable);

    }

}
UserDetailsを作成
- このクラスが入力情報(ユーザID、パスワード)と比較されることになる(?)
- ログイン後のセッション情報もこれ
DemoUserDetails.javaimport java.util.Collections; import org.springframework.beans.factory.annotation.Autowired; import org.springframework.security.core.userdetails.User; import com.azkz.entity.UserTable; public class DemoUserDetails extends User { @Autowired UserTable userTable; public DemoUserDetails(UserTable userTable) { // 「Collections.emptySet()」は本来は権限名のコレクションとなる。今回は空。 super(userTable.getUserId(), userTable.getPassword(),Collections.emptySet()); this.userTable = userTable; } // セッション情報から独自の項目を取得するためのGetter public String getFirstName() { return this.userTable.getFirstName(); } public String getFamilyName() { return this.userTable.getFamilyName(); } }
Controllerを作成
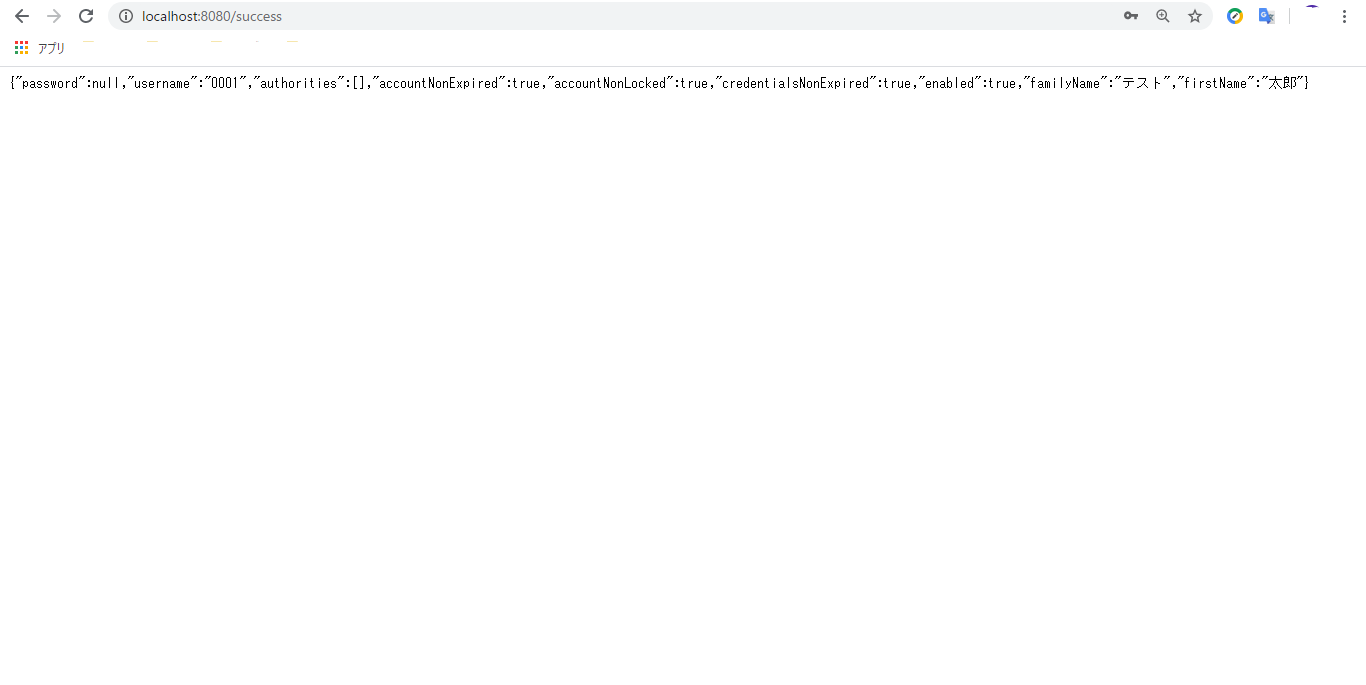
- 成功時にログインユーザの情報を表示する
DemoController.javaimport org.springframework.security.core.context.SecurityContextHolder; import org.springframework.web.bind.annotation.GetMapping; import org.springframework.web.bind.annotation.RestController; import com.azkz.security.DemoUserDetails; @RestController public class DemoController { @GetMapping("/success") public DemoUserDetails loginSuccess() { // ログイン中のユーザ情報を取得 DemoUserDetails demoUserDetails = (DemoUserDetails) SecurityContextHolder .getContext().getAuthentication().getPrincipal(); return demoUserDetails; } }
画面確認
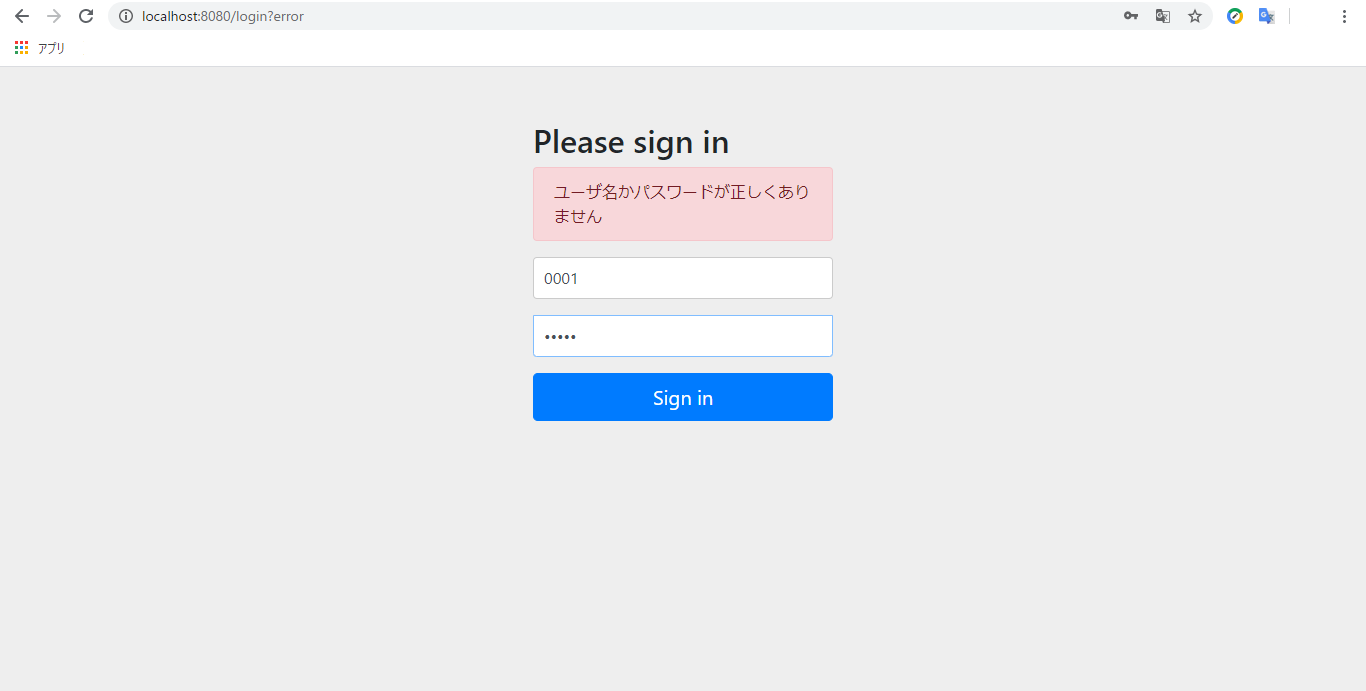
http://localhost:8080/login にアクセス
ログイン成功
ログイン失敗
終わりに
- 表面的なことしか書いておりませんが、間違い・不足点等がございましたら、ぜひご教示いただきたく存じます。何卒!

- 投稿日:2020-03-15T19:08:14+09:00
Summary of information about OpenJDK and JDK Distributions #minjava
Introduction
The original contents is written in Japanese "OpenJDKと各種JDKディストリビューションの情報源まとめ #minjava". If the translation is strange, please send edit requests to this article. Linked contents may be in Japanese.
This article is part of the Mar 13th, 2020 publication "Everyone's Java" ('Minna-no-Java/a.k.a minjava' in Japanese) tie-up campaign.
【新刊】2020年3月13日発売『みんなのJava OpenJDKから始まる大変革期!』本体2,280円+税、きしだ なおき、吉田 真也、山田 貴裕、蓮沼 賢志、阪田 浩一、前多 賢太郎 著 Javaの変化を一気にキャッチアップ! https://t.co/ec8tnNF3g7 pic.twitter.com/IMEhI3w989
— 技術評論社販売促進部 (@gihyo_hansoku) February 21, 2020Here's a quick blog post, and at the end of Section 2-4 "Most Recent JDK Distributions", which I am in charge of, I write some sources to keep track of.
I think you can follow the link in the case of the electronic version, but it will be difficult for those who purchased the paper version of the book, and the link may change in the future, so I will summarize it as this article.
In addition, I'll add some links to the JDK you should keep an eye on in Section 2-4, as well as some references and additional information.The basic sources for insight into the OpenJDK Project
Type and name URL Usage and Remarks Site Top https://openjdk.java.net/ The structure is a bit complex because this site is for OpenJDK developers. JDK Enhancement Proposal (JEP) https://openjdk.java.net/jeps/0 You can see which features are included in each JDK version. Introduced in 2011, it is leading JSR by JCP. JDK Project https://openjdk.java.net/projects/jdk/ JDK release schedule and the included JEP OCTLA Signatories List https://openjdk.java.net/groups/conformance/JckAccess/jck-access.html List of signers with access to a technology compatibility kit (TCK/JCK) that certifies formal implementation of Java @OpenJDK Mailing Lists (ML) https://mail.openjdk.java.net/ You can browse, subscribe to, and post topics of interest. Java Bug System (JBS) https://bugs.openjdk.java.net/ Issue Tracking by JIRA (Not only Bug but also enhancements, compatibility checks, etc.) Source Code Control https://hg.openjdk.java.net/ Managed by Mercurial. Also testing the move to GitHub by Project Skara. https://github.com/openjdk Major multi-platform JDKs
The information presented here is based on publicly available, and if commercial support is available, you may find more information on the dedicated site.
Oracle JDK
- Originally, Java SE Embedded has been free development, and the deployment required royalties, so it can be said that the same thing happened.
Oracle OpenJDK
General Information Description Development and Operation Same as Oracle JDK, but with a half-year lifecycle only (Until the next feature release) Trend Understanding Same as Oracle JDK, but with links from the download page Download https://jdk.java.net/ *JDK9~. No authentication required License GPLv2 + Classpath Exception (GNU General Public License, version 2, with the Classpath Exception)
- The license is the same as the OpenJDK source code. : https://openjdk.java.net/legal/gplv2+ce.html
- Reference material: "Let's talk anew about Oracle-supplied JDKs"
Red Hat OpenJDK
General Information Type and name Where to find Development and Operation Documents https://access.redhat.com/documentation/en-us/openjdk/ *For Windows. JBoss users can refer to the installation guide for RHEL. Release Notes (See above) Lifecycle https://access.redhat.com/articles/1299013 Certified platforms (See above) Trend Understanding @rhdevelopers (Check personal accounts as appropriate) Blog https://developers.redhat.com/blog/category/java/ Download For Developers https://developers.redhat.com/products/openjdk/download *For Windows and authentication required For commercial customers https://access.redhat.com/jbossnetwork/restricted/listSoftware.html?product=core.service.openjdk&downloadType=distributions *Subscription, such as the JBoss product, is required. There is also a yum repository for RHEL. License GPLv2 + Classpath Exception
- Reference material: "Red Hat OpenJDK"
Azul Zulu
General Information Type and name Where to find Development and Operation Documents https://docs.azul.com/zulu/zuludocs/ Release Notes https://docs.azul.com/zulu/zulurelnotes/ Lifecycle (Zulu Community) https://www.azul.com/products/zulu-community/ Certified platforms (Zulu Community) https://www.azul.com/products/zulu-system-specifications/ Lifecycle (Zulu Enterprise) https://www.azul.com/products/azul_support_roadmap/ Certified platforms (Zulu Enterprise) https://www.azul.com/products/zulu-enterprise/supported-platforms/ Trend Understanding @AzulSystems Blog https://www.azul.com/blog/ GitHub https://github.com/zulu-openjdk *Currently mostly for Dockerfile Download Zulu Community https://www.azul.com/downloads/zulu-community/ *No authentication required For Azure customers https://www.azul.com/downloads/azure-only/zulu/ License GPLv2 + Classpath Exception SapMachine
General Information Type and name Where to find Development and Operation Documents https://github.com/SAP/SapMachine/wiki Release Notes (I can't find it.) *It should be basically the same as Oracle OpenJDK and/or AdoptOpenJDK. Lifecycle https://github.com/SAP/SapMachine/wiki/Security-Updates,-Maintenance-and-Support Certified platforms https://github.com/SAP/SapMachine/wiki/Certification-and-Java-Compatibility Trend Understanding @SweetSapMachine GitHub https://github.com/SAP/SapMachine Download https://sap.github.io/SapMachine/ *No authentication required (Download from GitHub) License GPLv2 + Classpath Exception BellSoft Liberica JDK
General Information Type and name Where to find Development and Operation Documents See the "Installation Guide" on the download page for each release. Release Notes See the "Release Notes" on the download page for each release. Lifecycle https://bell-sw.com/support Certified platforms See Release Notes Trend Understanding @bellsoftware Blog https://bell-sw.com/blog/ GitHub https://github.com/bell-sw/Liberica Download https://bell-sw.com/ *No authentication required License GPLv2 + Classpath Exception AdoptOpenJDK with HotSpot
General Information Type and name Where to find Development and Operation Documents https://adoptopenjdk.net/installation.html Release Notes https://adoptopenjdk.net/release_notes.html Lifecycle https://adoptopenjdk.net/support.html Certified platforms https://adoptopenjdk.net/supported_platforms.html Trend Understanding @adoptopenjdk Blog https://blog.adoptopenjdk.net GitHub https://github.com/AdoptOpenJDK/openjdk-build Slack https://adoptopenjdk.net/slack Download https://adoptopenjdk.net/ *No authentication required (Download from GitHub) License GPLv2 + Classpath Exception
- Many of the JDK vendors mentioned in this article are Platinum Sponsors, and recently Microsoft also participated in OpenJDK development.
Amazon Corretto
General Information Type and name Where to find Development and Operation Documents https://docs.aws.amazon.com/corretto/ Release Notes (Corretto 8) https://docs.aws.amazon.com/corretto/latest/corretto-8-ug/doc-history.html Release Notes (Corretto 11) https://docs.aws.amazon.com/corretto/latest/corretto-11-ug/doc-history.html Lifecycle https://aws.amazon.com/corretto/faqs/#support Certified platforms https://aws.amazon.com/corretto/faqs/#Using_Amazon_Corretto Trend Understanding @AWSOpen Blog https://aws.amazon.com/blogs/opensource/category/devops/aws-java-development/ GitHub https://github.com/corretto/ Download https://aws.amazon.com/corretto/ *No authentication required License GPLv2 + Classpath Exception Other notable JDKs
The following are basic links only.
OpenJDK with HotSpot VM Base
OpenJDK in each Linux distribution
*Other links to OpenJDK packages for Linux distributions will be added as appropriate, so please point them out in the comments.
JDK of the Japanese vendor
- FJVM (For FUJITSU Software Interstage)
- Hitachi's own JavaVM (For Hitachi Cosminexus)
Other
- Alibaba Dragonwell
- Tencent Kona (It's not mentioned in the book.)
- ojdkbuild
- JetBrains Runtime
- Pivotal Spring Runtime
- Reference material: "Pivotal Spring Runtime"
OpenJDK with NOT HotSpot VM
- AdoptOpenJDK with OpenJ9
- Reference material: "OpenJ9 + OpenJDK"
- IBM SDK Java Technology Edition
- Reference material: "About OpenJ9 VM and IBM Java"
- Azul Zing
- GraalVM
- Technically HotSpot based, but with a different JIT compiler (See chapter 5 of the book for details)
- 投稿日:2020-03-15T17:49:03+09:00
Minecraft Modding 1.12.2
Minecraft Modding 1.12.2
MinecraftのMod開発は大きいバージョンだけではなく、小さいバージョンでも細かい差異があり、わかりにくい状況が続いています。
なので、この記事にたどり着いたユーザーの助けになるかはわかりませんが、少しでもヒントになればと思い書いております。ソースコードを直接確認したい方はGithubを参照ください。
下記の内容を随時作成していこうと思っています。
- Proxy機能
- アイテムの追加
- 食べ物の追加
- 魚の追加
- 作物の追加
- クリエイティブタブ追加
私自身、まだまだ勉強している最中ですので説明に間違いなどがありましたら、コメントをお願いします。
環境
- IntelliJ IDEA
- Minecraft 1.12.2
- Minecraft Forge 14.23.5.2838
開発環境はここを参考に構築してください。
src/main/javaディレクトリにjp/artan/tmディレクトリを作成し、そこに`TutorialMod.java‘を作成します。src/main/java/jp/artan/tm/TutorialMod.javapackage jp.artan.tm; import net.minecraftforge.fml.common.Mod; import net.minecraftforge.fml.common.event.FMLConstructionEvent; import net.minecraftforge.fml.common.event.FMLInitializationEvent; import net.minecraftforge.fml.common.event.FMLPostInitializationEvent; import net.minecraftforge.fml.common.event.FMLPreInitializationEvent; import org.apache.logging.log4j.Logger; @Mod(modid = TutorialMod.MODID, name = TutorialMod.NAME, version = TutorialMod.VERSION) public class TutorialMod { public static final String MODID = "tm"; public static final String NAME = "Tutorial Mod"; public static final String VERSION = "1.0"; public static Logger logger; @Mod.EventHandler public void construct(FMLConstructionEvent event) { } @Mod.EventHandler public void preInit(FMLPreInitializationEvent event) { logger = event.getModLog(); logger.info("TutorialMod.preInit"); } @Mod.EventHandler public void init(FMLInitializationEvent event) { logger.info("TutorialMod.init"); } @Mod.EventHandler public void postInit(FMLPostInitializationEvent event) { logger.info("TutorialMod.postInit"); } }これから作成するすべてのjavaファイルは
src/main/java/jp/artan/tmを基点にして説明します。
また、テクスチャなどのpngデータやjsonデータはsrc/main/assets/tmを基点にして説明します。
Proxy機能
ProxyとはModを呼び出したのが、クライアント/サーバーなのかを判断して、適切なイベントを自動で呼び出すための仕組みです。
なぜその仕組みが必要かというと、これ以降で説明するアイテムなどに必要なModel情報はサーバーで実行してはいけないことになっているためです。では、次のファイルを作成してください。
proxy/CommonProxy.javapackage jp.artan.tm.proxy; import jp.artan.tm.TutorialMod; import net.minecraftforge.fml.common.Mod; import net.minecraftforge.fml.common.event.FMLInitializationEvent; import net.minecraftforge.fml.common.event.FMLPostInitializationEvent; import net.minecraftforge.fml.common.event.FMLPreInitializationEvent; @Mod.EventBusSubscriber(modid = TutorialMod.MODID) public abstract class CommonProxy { public void preInit(FMLPreInitializationEvent event) { TutorialMod.logger.info("CommonProxy.preInit"); } public void init(FMLInitializationEvent event) { TutorialMod.logger.info("CommonProxy.init"); } public void postInit(FMLPostInitializationEvent event) { TutorialMod.logger.info("CommonProxy.postInit"); } }proxy/ClientProxy.javapackage jp.artan.tm.proxy; import jp.artan.tm.TutorialMod; import net.minecraftforge.fml.common.event.FMLPreInitializationEvent; public class ClientProxy extends CommonProxy { @Override public void preInit(FMLPreInitializationEvent event) { super.preInit(event); TutorialMod.logger.info("ClientProxy.preInit"); } }proxy/ServerProxy.javapackage jp.artan.tm.proxy; public class ServerProxy extends CommonProxy { // 今回はサーバーの説明はしないので、何も記述はしない // 必要に応じてpreinitなどを作成して利用してください。 }
CommonProxyにクライアント/サーバーで共通の処理を記述し、それぞれだけで行う処理に関してはClientProxyやServerProxyに記述する。では、
ClientProxyやServerProxy‘を自動で選択し、呼び出すための処理をTutorialMod.java`に記述していく。
コメントで追記と書かれているところが今回追記したものになる。TutorialMod.javapackage jp.artan.tm; import jp.artan.tm.proxy.CommonProxy; import net.minecraftforge.common.MinecraftForge; import net.minecraftforge.fml.common.Mod; import net.minecraftforge.fml.common.SidedProxy; import net.minecraftforge.fml.common.event.FMLConstructionEvent; import net.minecraftforge.fml.common.event.FMLInitializationEvent; import net.minecraftforge.fml.common.event.FMLPostInitializationEvent; import net.minecraftforge.fml.common.event.FMLPreInitializationEvent; import org.apache.logging.log4j.Logger; @Mod(modid = TutorialMod.MODID, name = TutorialMod.NAME, version = TutorialMod.VERSION) public class TutorialMod { public static final String MODID = "tm"; public static final String NAME = "Tutorial Mod"; public static final String VERSION = "1.0"; public static Logger logger; public static final String CLIENT_PROXY = "jp.artan." + MODID + ".proxy.ClientProxy"; // 追記 public static final String SERVER_PROXY = "jp.artan." + MODID + ".proxy.ServerProxy"; // 追記 @SidedProxy(clientSide = CLIENT_PROXY, serverSide = SERVER_PROXY) // 追記 public static CommonProxy proxy; // 追記 @Mod.EventHandler public void construct(FMLConstructionEvent event) { MinecraftForge.EVENT_BUS.register(proxy); // 追記 } @Mod.EventHandler public void preInit(FMLPreInitializationEvent event) { logger = event.getModLog(); logger.info("TutorialMod.preInit"); proxy.preInit(event); // 追記 } @Mod.EventHandler public void init(FMLInitializationEvent event) { logger.info("TutorialMod.init"); proxy.init(event); // 追記 } @Mod.EventHandler public void postInit(FMLPostInitializationEvent event) { logger.info("TutorialMod.postInit"); proxy.postInit(event); // 追記 } }一部を抜粋して説明をしていく。
public static final String CLIENT_PROXY = "jp.artan." + MODID + ".proxy.ClientProxy";
public static final String SERVER_PROXY = "jp.artan." + MODID + ".proxy.ServerProxy";

@SidedProxy(clientSide = CLIENT_PROXY, serverSide = SERVER_PROXY)
public static CommonProxy proxy;
変数の
proxyについているアノテーションSidedProxyが重要になる。
このアノテーションを指定することで、指定されたclientSideとserverSideのファイルディレクトリ情報を基にインスタンスを自動で生成して変数に格納してくれる。
※この時に指定するパスはsrc/main/javaを基点としたパスになるこの段階でクライアントとサーバーを起動するとそれぞれのインスタンスが自動で用意されていることが確認できるかと思う。
runClient.log[17:25:39] [Client thread/INFO] [tm]: TutorialMod.preInit [17:25:39] [Client thread/INFO] [tm]: CommonProxy.preInit [17:25:39] [Client thread/INFO] [tm]: ClientProxy.preInit [17:25:44] [Client thread/INFO] [tm]: TutorialMod.init [17:25:44] [Client thread/INFO] [tm]: CommonProxy.init [17:25:44] [Client thread/INFO] [tm]: TutorialMod.postInit [17:25:44] [Client thread/INFO] [tm]: CommonProxy.postInitrunServer.log[17:33:43] [Server thread/INFO] [tm]: TutorialMod.preInit [17:33:43] [Server thread/INFO] [tm]: CommonProxy.preInit [17:33:43] [Server thread/INFO] [tm]: TutorialMod.init [17:33:43] [Server thread/INFO] [tm]: CommonProxy.init [17:33:44] [Server thread/INFO] [tm]: TutorialMod.postInit [17:33:44] [Server thread/INFO] [tm]: CommonProxy.postInitアイテムの追加
一括登録処理
次に何の機能もないアイテムを実装してみたいと思います。
その前に、アイテムをgemeRegistryやModelLoderに一括で登録するための仕組みを作成します。event/IItemRegisterEvent.javapackage jp.artan.tm.event; import net.minecraft.item.Item; import net.minecraftforge.client.event.ModelRegistryEvent; import net.minecraftforge.event.RegistryEvent; public interface IItemRegisterEvent { /** * Register Item * * @param event */ void registerItem(RegistryEvent.Register<Item> event); /** * Register Model * * @param event */ void registerModel(ModelRegistryEvent event); }init/ItemInit.javapackage jp.artan.tm.init; import jp.artan.tm.event.IItemRegisterEvent; import java.util.ArrayList; import java.util.List; public class ItemInit { public static final List<IItemRegisterEvent> ITEMS = new ArrayList<IItemRegisterEvent>(); }proxy/CommonProxy.javapackage jp.artan.tm.proxy; import jp.artan.tm.TutorialMod; import jp.artan.tm.init.ItemInit; import net.minecraft.item.Item; import net.minecraftforge.event.RegistryEvent; import net.minecraftforge.fml.common.Mod; import net.minecraftforge.fml.common.event.FMLInitializationEvent; import net.minecraftforge.fml.common.event.FMLPostInitializationEvent; import net.minecraftforge.fml.common.event.FMLPreInitializationEvent; import net.minecraftforge.fml.common.eventhandler.SubscribeEvent; @Mod.EventBusSubscriber(modid = TutorialMod.MODID) public abstract class CommonProxy { public void preInit(FMLPreInitializationEvent event) { TutorialMod.logger.info("CommonProxy.preInit"); } public void init(FMLInitializationEvent event) { TutorialMod.logger.info("CommonProxy.init"); } public void postInit(FMLPostInitializationEvent event) { TutorialMod.logger.info("CommonProxy.postInit"); } // 以下追記 @SubscribeEvent public void registerItems(RegistryEvent.Register<Item> event) { TutorialMod.logger.info("CommonProxy.registerItems"); ItemInit.ITEMS.forEach(f -> f.registerItem(event)); } // 以上追記 }proxy/ClientProxy.javapackage jp.artan.tm.proxy; import jp.artan.tm.TutorialMod; import jp.artan.tm.init.ItemInit; import net.minecraftforge.client.event.ModelRegistryEvent; import net.minecraftforge.fml.common.event.FMLPreInitializationEvent; import net.minecraftforge.fml.common.eventhandler.SubscribeEvent; public class ClientProxy extends CommonProxy { @Override public void preInit(FMLPreInitializationEvent event) { super.preInit(event); TutorialMod.logger.info("ClientProxy.preInit"); } // 以下追記 @SubscribeEvent public void registerModels(ModelRegistryEvent event) { TutorialMod.logger.info("ClientProxy.registerModels"); ItemInit.ITEMS.forEach(f -> f.registerModel(event)); } // 以上追記 }IItemRegisterEventを継承しているオブジェクトをITEMSで一括管理し、1個ずつgemeRegistryやModelLoderに登録していく。
※registerModelsイベントはクライアントのみで実行すること。アイテム実装
では、本題のアイテム登録を行いたいと思います。
item/TutorialItem.javapackage jp.artan.tm.item; import jp.artan.tm.TutorialMod; import jp.artan.tm.event.IItemRegisterEvent; import jp.artan.tm.init.ItemInit; import net.minecraft.client.renderer.block.model.ModelResourceLocation; import net.minecraft.creativetab.CreativeTabs; import net.minecraft.item.Item; import net.minecraft.util.ResourceLocation; import net.minecraftforge.client.event.ModelRegistryEvent; import net.minecraftforge.client.model.ModelLoader; import net.minecraftforge.event.RegistryEvent; public class TutorialItem extends Item implements IItemRegisterEvent { private final String name; public TutorialItem(String name) { super(); this.name = name; this.setUnlocalizedName(this.name); this.setRegistryName(TutorialMod.MODID, this.name); this.setCreativeTab(CreativeTabs.MISC); ItemInit.ITEMS.add(this); } @Override public void registerItem(RegistryEvent.Register<Item> event) { event.getRegistry().register(this); } public void registerModel(ModelRegistryEvent event) { ModelLoader.setCustomModelResourceLocation(this, 0, new ModelResourceLocation(new ResourceLocation(TutorialMod.MODID, this.name), "inventory")); } }TutorialItemが作成できたら、ItemInitでインスタンスを作成します。
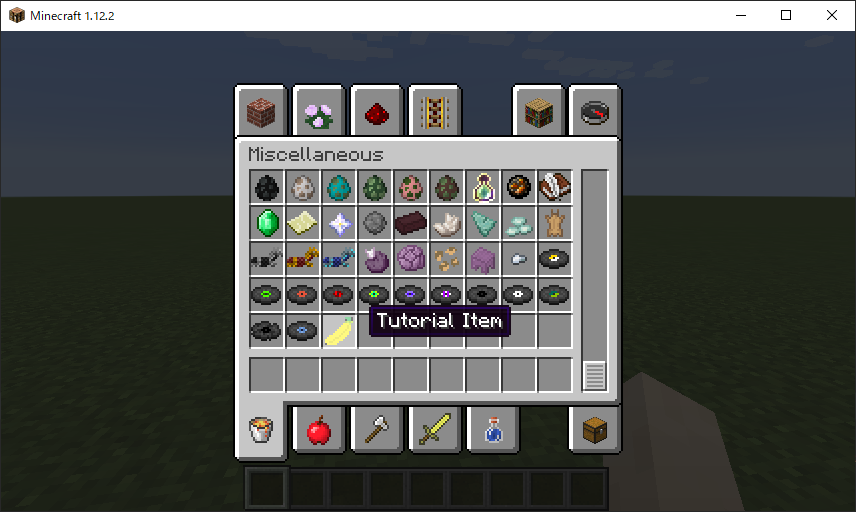
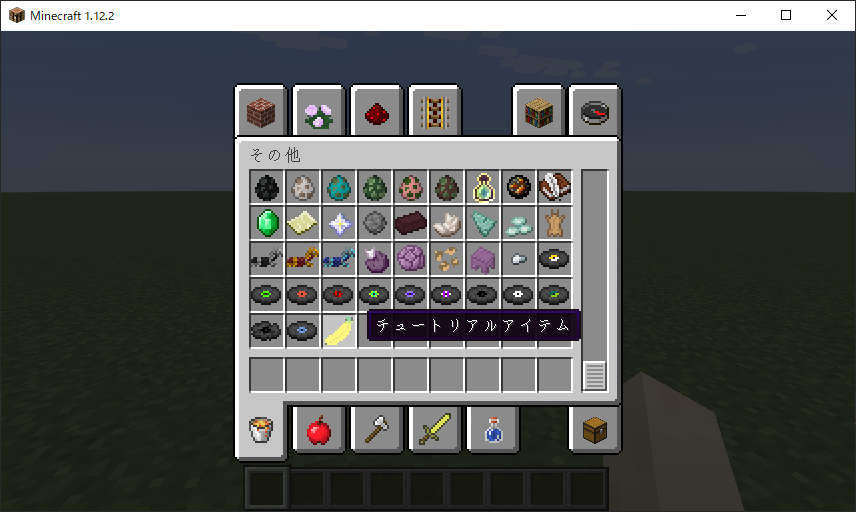
init/ItemInit.javapackage jp.artan.tm.init; import jp.artan.tm.event.IItemRegisterEvent; import jp.artan.tm.item.TutorialItem; import net.minecraft.item.Item; import java.util.ArrayList; import java.util.List; public class ItemInit { public static final List<IItemRegisterEvent> ITEMS = new ArrayList<IItemRegisterEvent>(); public static final Item TUTORIAL_ITEM = new TutorialItem("tutorial_item"); // 追記 }これで実行すると下記のように
その他のタブにアイテムが登録されるかと思います。
テクスチャと言語設定
このままでは、読みにくいうえにテクスチャを設定していない状態ですので、とても使える状況とは言えません。
なので、テクスチャと言語設定を行っていきます。今回は
new TutorialItem("tutorial_item")のようにインスタンスを生成していますので、アイテムの名前はtutorial_itemになっています。models/item/tutorial_item.json{ "parent": "item/generated", "textures": { "layer0": "tm:items/tutorial_item" } }textures/items/tutorial_item.png [
]
※画像の大きさが 16ピクセル × 16ピクセルでないと正しく読みだされないので気をつけてください。lang/en_us.lang# English Language File # Items item.tutorial_item.name=Tutorial Itemlang/ja_jp.lang# 日本語言語ファイル # Items item.tutorial_item.name=チュートリアルアイテム※Forgeのバージョンによって、
en_us.lang,ja_jp.langはen_US.lang,ja_JP.langと指定する必要があります。次の画像のようにデータがあっていれば問題ありません。
クリエイティブタブ追加
自身で作成したアイテムやブロックといったものは一定のまとまりで、クリエイティブタブに登録したいと思います。
今回はチュートリアルタブを作成したいと思います。クリエイティブタブのアイコンには前述で作成したアイテムを設定したいと思います。
tab/TutorialTab.javapackage jp.artan.tm.tab; import jp.artan.tm.init.ItemInit; import net.minecraft.creativetab.CreativeTabs; import net.minecraft.item.ItemStack; public class TutorialTab extends CreativeTabs { public TutorialTab() { super("tutorial_tab"); } @Override public ItemStack getTabIconItem() { return new ItemStack(ItemInit.TUTORIAL_ITEM); } }CreativeTabsのコンストラクタに渡した文字列は英小文字で渡すようにしてください。
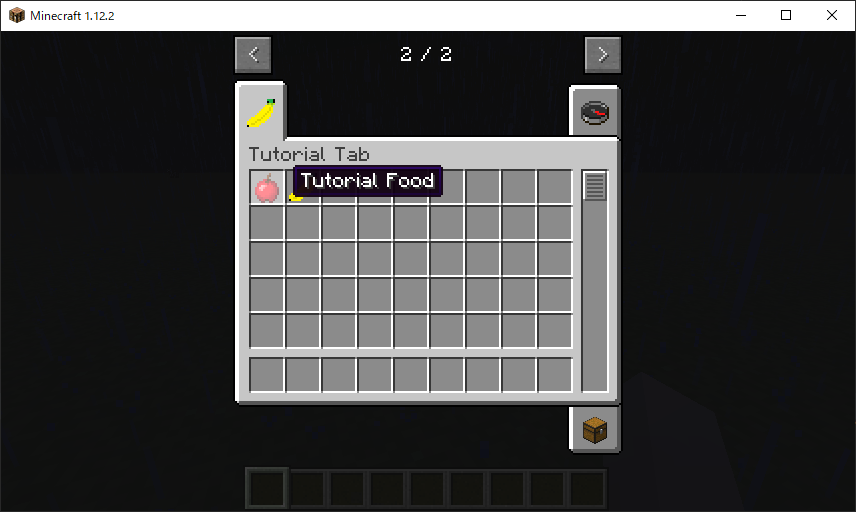
また、ここで指定した名前が書きの言語設定にで利用する文字列になります。lang/en_us.lang# English Language File # Tabs itemGroup.tutorial_tab=Tutorial Tab # Items item.tutorial_item.name=Tutorial Itemlang/ja_jp.lang# 日本語言語ファイル # Tabs itemGroup.tutorial_tab=チュートリアルタブ # Items item.tutorial_item.name=チュートリアルアイテムTutorialMod.javapackage jp.artan.tm; import jp.artan.tm.proxy.CommonProxy; import jp.artan.tm.tab.TutorialTab; import net.minecraft.creativetab.CreativeTabs; import net.minecraftforge.common.MinecraftForge; import net.minecraftforge.fml.common.Mod; import net.minecraftforge.fml.common.SidedProxy; import net.minecraftforge.fml.common.event.FMLConstructionEvent; import net.minecraftforge.fml.common.event.FMLInitializationEvent; import net.minecraftforge.fml.common.event.FMLPostInitializationEvent; import net.minecraftforge.fml.common.event.FMLPreInitializationEvent; import org.apache.logging.log4j.Logger; @Mod(modid = TutorialMod.MODID, name = TutorialMod.NAME, version = TutorialMod.VERSION) public class TutorialMod { public static final String MODID = "tm"; public static final String NAME = "Tutorial Mod"; public static final String VERSION = "1.0"; public static Logger logger; public static final String CLIENT_PROXY = "jp.artan." + MODID + ".proxy.ClientProxy"; public static final String SERVER_PROXY = "jp.artan." + MODID + ".proxy.ServerProxy"; @SidedProxy(clientSide = CLIENT_PROXY, serverSide = SERVER_PROXY) public static CommonProxy proxy; public static CreativeTabs creativeTabs = new TutorialTab(); // 追記 @Mod.EventHandler public void construct(FMLConstructionEvent event) { MinecraftForge.EVENT_BUS.register(proxy); } @Mod.EventHandler public void preInit(FMLPreInitializationEvent event) { logger = event.getModLog(); logger.info("TutorialMod.preInit"); proxy.preInit(event); } @Mod.EventHandler public void init(FMLInitializationEvent event) { logger.info("TutorialMod.init"); proxy.init(event); } @Mod.EventHandler public void postInit(FMLPostInitializationEvent event) { logger.info("TutorialMod.postInit"); proxy.postInit(event); } }クリエイティブタブの作成ができましたので、前述で作成したアイテムの登録先を
その他タブから作成したタブに変更します。item/TutorialItem.javapackage jp.artan.tm.item; import jp.artan.tm.TutorialMod; import jp.artan.tm.event.IItemRegisterEvent; import jp.artan.tm.init.ItemInit; import net.minecraft.client.renderer.block.model.ModelResourceLocation; import net.minecraft.creativetab.CreativeTabs; import net.minecraft.item.Item; import net.minecraft.util.ResourceLocation; import net.minecraftforge.client.event.ModelRegistryEvent; import net.minecraftforge.client.model.ModelLoader; import net.minecraftforge.event.RegistryEvent; public class TutorialItem extends Item implements IItemRegisterEvent { private final String name; public TutorialItem(String name) { super(); this.name = name; this.setUnlocalizedName(this.name); this.setRegistryName(TutorialMod.MODID, this.name); this.setCreativeTab(TutorialMod.creativeTabs); // 変更 ItemInit.ITEMS.add(this); } @Override public void registerItem(RegistryEvent.Register<Item> event) { event.getRegistry().register(this); } public void registerModel(ModelRegistryEvent event) { ModelLoader.setCustomModelResourceLocation(this, 0, new ModelResourceLocation(new ResourceLocation(TutorialMod.MODID, this.name), "inventory")); } }下記の画像のように表示されれば成功です。
食べ物の追加
バナナのアイコンをしていましたが、先ほど作ったのは無機能アイテムなので食べることができませんでした。
次は食べれるアイテムの追加を行いたいと思います。
また、今回のアイテムのテクスチャはバニラのリンゴのテクスチャを流用しようと思います。imte/TutorialFood.javapackage jp.artan.tm.item; import jp.artan.tm.TutorialMod; import jp.artan.tm.event.IItemRegisterEvent; import jp.artan.tm.init.ItemInit; import net.minecraft.client.renderer.block.model.ModelResourceLocation; import net.minecraft.item.Item; import net.minecraft.item.ItemFood; import net.minecraft.util.ResourceLocation; import net.minecraftforge.client.event.ModelRegistryEvent; import net.minecraftforge.client.model.ModelLoader; import net.minecraftforge.event.RegistryEvent; public class TutorialFood extends ItemFood implements IItemRegisterEvent { private final String name; public TutorialFood(String name, int amount, float saturation) { super(amount, saturation, false); this.name = name; this.setUnlocalizedName(this.name); this.setRegistryName(TutorialMod.MODID, this.name); this.setCreativeTab(TutorialMod.creativeTabs); ItemInit.ITEMS.add(this); } @Override public void registerItem(RegistryEvent.Register<Item> event) { event.getRegistry().register(this); } @Override public void registerModel(ModelRegistryEvent event) { ModelLoader.setCustomModelResourceLocation(this, 0, new ModelResourceLocation(new ResourceLocation(TutorialMod.MODID, this.name), "inventory")); } }ItemFoodのコンストラクタの引数は次のようになっている。
第1引数 amount 食べた時の回復量
第2引数 saturation 食べた時の隠し満腹度の回復量
第3引数 isWolfFood オオカミの食べ物にするかinit/ItemInit.javapackage jp.artan.tm.init; import jp.artan.tm.event.IItemRegisterEvent; import jp.artan.tm.item.TutorialFood; import jp.artan.tm.item.TutorialItem; import net.minecraft.item.Item; import java.util.ArrayList; import java.util.List; public class ItemInit { public static final List<IItemRegisterEvent> ITEMS = new ArrayList<IItemRegisterEvent>(); public static final Item TUTORIAL_ITEM = new TutorialItem("tutorial_item"); public static final Item TUTORIAL_FOOD = new TutorialFood("tutorial_food", 1, 1.0F); // 追記 }lang/en_us.lang# English Language File # Tabs itemGroup.tutorial_tab=Tutorial Tab # Items item.tutorial_item.name=Tutorial Item item.tutorial_food.name=Tutorial Foodlang/ja_jp.lang# 日本語言語ファイル # Tabs itemGroup.tutorial_tab=チュートリアルタブ # Items item.tutorial_item.name=チュートリアルアイテム item.tutorial_food.name=チュートリアル食べ物models/item/tutorial_food.json{ "parent": "item/generated", "textures": { "layer0": "minecraft:items/apple" } }これで実行すると次のようになるかと思います。
作物の追加
次は、畑の作物の追加を行いたいと思います。
作物を作成するために必要なものは、種アイテム・作物アイテム・作物ブロックの3つが必要になります。一括登録処理
まずは、アイテムの一括登録処理と同じようにブロックを一括登録できるように設定を行います。
event/IBlockRegisterEvent.javapackage jp.artan.tm.event; import net.minecraft.block.Block; import net.minecraftforge.client.event.ModelRegistryEvent; import net.minecraftforge.event.RegistryEvent; public interface IBlockRegisterEvent { /** * Register Block * * @param event */ void registerBlock(RegistryEvent.Register<Block> event); /** * Register Model * * @param event */ void registerModel(ModelRegistryEvent event); }init/BlockInit.javapackage jp.artan.tm.init; import jp.artan.tm.block.TutorialPlant; import jp.artan.tm.event.IBlockRegisterEvent; import net.minecraft.block.BlockCrops; import java.util.ArrayList; import java.util.List; public class BlockInit { public static final List<IBlockRegisterEvent> BLOCKS = new ArrayList<IBlockRegisterEvent>(); }proxy/CommonProxy.javapackage jp.artan.tm.proxy; import jp.artan.tm.TutorialMod; import jp.artan.tm.init.BlockInit; import jp.artan.tm.init.ItemInit; import net.minecraft.block.Block; import net.minecraft.item.Item; import net.minecraftforge.event.RegistryEvent; import net.minecraftforge.fml.common.Mod; import net.minecraftforge.fml.common.event.FMLInitializationEvent; import net.minecraftforge.fml.common.event.FMLPostInitializationEvent; import net.minecraftforge.fml.common.event.FMLPreInitializationEvent; import net.minecraftforge.fml.common.eventhandler.SubscribeEvent; @Mod.EventBusSubscriber(modid = TutorialMod.MODID) public abstract class CommonProxy { public void preInit(FMLPreInitializationEvent event) { TutorialMod.logger.info("CommonProxy.preInit"); } public void init(FMLInitializationEvent event) { TutorialMod.logger.info("CommonProxy.init"); } public void postInit(FMLPostInitializationEvent event) { TutorialMod.logger.info("CommonProxy.postInit"); } @SubscribeEvent public void registerItems(RegistryEvent.Register<Item> event) { TutorialMod.logger.info("CommonProxy.registerItems"); ItemInit.ITEMS.forEach(f -> f.registerItem(event)); } @SubscribeEvent public void registerBlocks(RegistryEvent.Register<Block> event) { // 追記 TutorialMod.logger.info("CommonProxy.registerBlocks"); BlockInit.BLOCKS.forEach(f -> f.registerBlock(event)); } }proxy/ClientProxy.javapackage jp.artan.tm.proxy; import jp.artan.tm.TutorialMod; import jp.artan.tm.init.BlockInit; import jp.artan.tm.init.ItemInit; import net.minecraftforge.client.event.ModelRegistryEvent; import net.minecraftforge.fml.common.event.FMLPreInitializationEvent; import net.minecraftforge.fml.common.eventhandler.SubscribeEvent; public class ClientProxy extends CommonProxy { @Override public void preInit(FMLPreInitializationEvent event) { super.preInit(event); TutorialMod.logger.info("ClientProxy.preInit"); } @SubscribeEvent public void registerModels(ModelRegistryEvent event) { TutorialMod.logger.info("ClientProxy.registerModels"); ItemInit.ITEMS.forEach(f -> f.registerModel(event)); BlockInit.BLOCKS.forEach(f -> f.registerModel(event)); // 追記 } }作物ブロックと種アイテムの作成
作物ブロックと種アイテムはそれぞれがインスタンス内で、相方のインスタンスを利用する仕組みになっている。
さらに、種アイテムのインスタンスを生成するときは作物ブロックのインスタンスを必要としている。まずは、それぞれのインスタンスをBlockInitとItemInitに配置する。
それぞれのクラス名はTutorialPlantとTutorialSeedとする。init/BlockInit.javapackage jp.artan.tm.init; import jp.artan.tm.block.TutorialPlant; import jp.artan.tm.event.IBlockRegisterEvent; import net.minecraft.block.BlockCrops; import java.util.ArrayList; import java.util.List; public class BlockInit { public static final List<IBlockRegisterEvent> BLOCKS = new ArrayList<IBlockRegisterEvent>(); public static final BlockCrops TUTORIAL_PLANT = new TutorialPlant("tutorial_plant"); }init/ItemInit.javapackage jp.artan.tm.init; import jp.artan.tm.event.IItemRegisterEvent; import jp.artan.tm.item.TutorialFood; import jp.artan.tm.item.TutorialItem; import jp.artan.tm.item.TutorialSeed; import net.minecraft.item.Item; import net.minecraft.item.ItemFood; import net.minecraft.item.ItemSeeds; import java.util.ArrayList; import java.util.List; public class ItemInit { public static final List<IItemRegisterEvent> ITEMS = new ArrayList<IItemRegisterEvent>(); public static final Item TUTORIAL_ITEM = new TutorialItem("tutorial_item"); public static final ItemFood TUTORIAL_FOOD = new TutorialFood("tutorial_food", 1, 1.0F); public static final ItemSeeds TUTORIAL_SEED = new TutorialSeed("tutorial_seed"); }それぞれのインスタンスを配置できたので、TutorialPlantとTutorialSeedを作成していく。
block/TutorialPlant.javapackage jp.artan.tm.block; import jp.artan.tm.TutorialMod; import jp.artan.tm.event.IBlockRegisterEvent; import jp.artan.tm.init.BlockInit; import jp.artan.tm.init.ItemInit; import net.minecraft.block.Block; import net.minecraft.block.BlockCrops; import net.minecraft.client.renderer.block.model.ModelResourceLocation; import net.minecraft.item.Item; import net.minecraft.util.ResourceLocation; import net.minecraftforge.client.event.ModelRegistryEvent; import net.minecraftforge.client.model.ModelLoader; import net.minecraftforge.event.RegistryEvent; public class TutorialPlant extends BlockCrops implements IBlockRegisterEvent { protected final String Name; public TutorialPlant(String name) { super(); this.Name = name; this.setUnlocalizedName(this.Name); this.setRegistryName(TutorialMod.MODID, this.Name); BlockInit.BLOCKS.add(this); } @Override public Item getSeed() { return ItemInit.TUTORIAL_SEED; } @Override public Item getCrop() { return ItemInit.TUTORIAL_FOOD; } @Override public void registerBlock(RegistryEvent.Register<Block> event) { event.getRegistry().register(this); } @Override public void registerModel(ModelRegistryEvent event) { ModelLoader.setCustomModelResourceLocation(Item.getItemFromBlock(this), 0, new ModelResourceLocation(new ResourceLocation(TutorialMod.MODID, this.Name), "inventory")); } }
getSeedで作物ブロックを破壊したときにドロップする種アイテムを指定すること
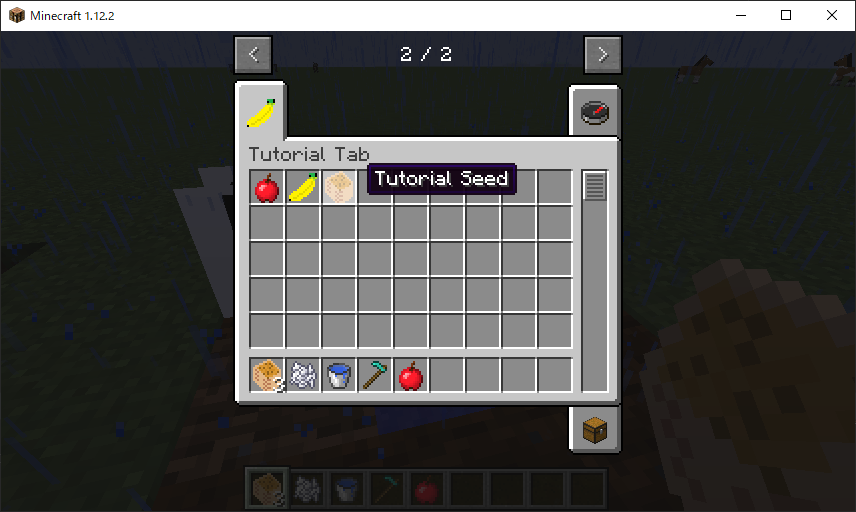
getCropで作物ブロックを破壊したときにドロップする作物アイテムを指定することitem/TutorialSeed.javapackage jp.artan.tm.item; import jp.artan.tm.TutorialMod; import jp.artan.tm.event.IItemRegisterEvent; import jp.artan.tm.init.BlockInit; import jp.artan.tm.init.ItemInit; import net.minecraft.block.state.IBlockState; import net.minecraft.client.renderer.block.model.ModelResourceLocation; import net.minecraft.entity.player.EntityPlayer; import net.minecraft.init.Blocks; import net.minecraft.item.Item; import net.minecraft.item.ItemSeeds; import net.minecraft.item.ItemStack; import net.minecraft.util.EnumActionResult; import net.minecraft.util.EnumFacing; import net.minecraft.util.EnumHand; import net.minecraft.util.ResourceLocation; import net.minecraft.util.math.BlockPos; import net.minecraft.world.IBlockAccess; import net.minecraft.world.World; import net.minecraftforge.client.event.ModelRegistryEvent; import net.minecraftforge.client.model.ModelLoader; import net.minecraftforge.common.EnumPlantType; import net.minecraftforge.event.RegistryEvent; public class TutorialSeed extends ItemSeeds implements IItemRegisterEvent { private final String name; public TutorialSeed(String name) { super(BlockInit.TUTORIAL_PLANT, Blocks.FARMLAND); this.name = name; this.setUnlocalizedName(this.name); this.setRegistryName(TutorialMod.MODID, this.name); this.setCreativeTab(TutorialMod.creativeTabs); ItemInit.ITEMS.add(this); } @Override public EnumActionResult onItemUse(EntityPlayer player, World worldIn, BlockPos pos, EnumHand hand, EnumFacing facing, float hitX, float hitY, float hitZ) { ItemStack stack = player.getHeldItem(hand); IBlockState state = worldIn.getBlockState(pos); if (facing == EnumFacing.UP && player.canPlayerEdit(pos.offset(facing), facing, stack) && state.getBlock().canSustainPlant(state, worldIn, pos, EnumFacing.UP, this) && worldIn.isAirBlock(pos.up())) { worldIn.setBlockState(pos.up(), BlockInit.TUTORIAL_PLANT.getDefaultState()); if (player.capabilities.isCreativeMode || !worldIn.isRemote) { stack.shrink(1); } return EnumActionResult.SUCCESS; } return EnumActionResult.FAIL; } @Override public EnumPlantType getPlantType(IBlockAccess world, BlockPos pos) { return EnumPlantType.Crop; } @Override public IBlockState getPlant(IBlockAccess world, BlockPos pos) { return BlockInit.TUTORIAL_PLANT.getDefaultState(); } @Override public void registerItem(RegistryEvent.Register<Item> event) { event.getRegistry().register(this); } @Override public void registerModel(ModelRegistryEvent event) { ModelLoader.setCustomModelResourceLocation(this, 0, new ModelResourceLocation(new ResourceLocation(TutorialMod.MODID, this.name), "inventory")); } }テクスチャと言語設定
次に言語設定とテクスチャの設定を行う
lang/en_us.lang# English Language File # Tabs itemGroup.tutorial_tab=Tutorial Tab # Items item.tutorial_item.name=Tutorial Item item.tutorial_food.name=Tutorial Food item.tutorial_seed.name=Tutorial Seedlang/ja_jp.lang# 日本語言語ファイル # Tabs itemGroup.tutorial_tab=チュートリアルタブ # Items item.tutorial_item.name=チュートリアルアイテム item.tutorial_food.name=チュートリアル食べ物 item.tutorial_seed.name=チュートリアル種models/item/tutorial_seed.json{ "parent": "item/generated", "textures": { "layer0": "tm:items/tutorial_seed" } }models/item/tutorial_plant.json{ "parent": "block/cube_all", "textures": { "all": "tm:blocks/tutorial_plant" } }blockstates/tutorial_plant.json{ "variants": { "age=0": { "model": "tm:tutorial_plant0" }, "age=1": { "model": "tm:tutorial_plant1" }, "age=2": { "model": "tm:tutorial_plant2" }, "age=3": { "model": "tm:tutorial_plant3" }, "age=4": { "model": "tm:tutorial_plant4" }, "age=5": { "model": "tm:tutorial_plant5" }, "age=6": { "model": "tm:tutorial_plant6" }, "age=7": { "model": "tm:tutorial_plant7" } } }上記のファイルで作物が成長する7段階に対応したテクスチャ情報が格納されているjsonファイルを指定できるようになる
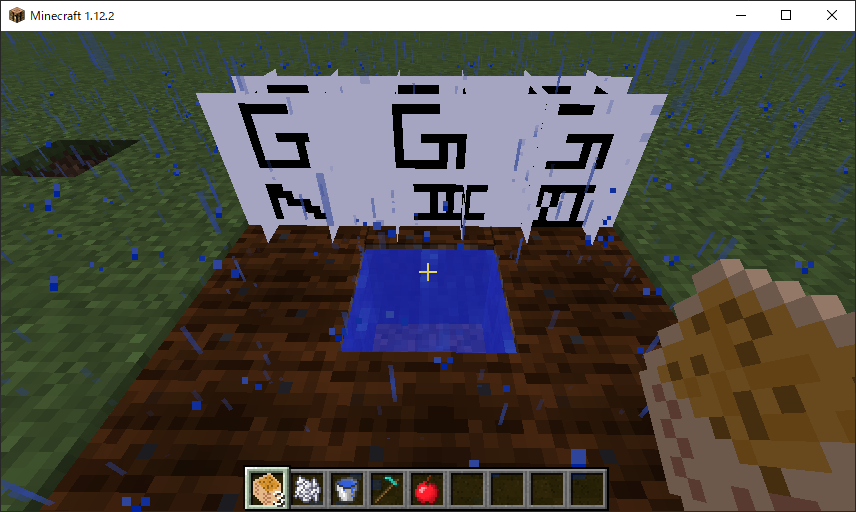
下記には成長していない最初の状態のデータだけを記載しておくので、0~7の8個のjsonデータを作成することmodels/block/tutorial_plant0.json{ "parent": "block/crop", "textures": { "crop": "tm:blocks/tutorial_plant0" } }最大成長したあとに破壊したときにTutorialPlantで指定した、作物アイテムと種アイテムがドロップすればよい。
左から成長が0段階目、成長が3段階目、成長が6段階目の時のブロックになっている。


- 投稿日:2020-03-15T16:50:12+09:00
初心者から始めるJava、インスタンス
はじめに
この記事は備忘録である。
参考書レベルの内容だが、本記事に掲載するコードについては、
間違えたものが中心となる。これは実際にコーディング中に間違えた部分を掲載し、自分で反省するために投稿するという目的によるもの。
また、後日にJavaSilver試験問題の勉強を兼ねて復習するため、深い部分の話はここでは触れない。環境
言語:Java11、JDK13.0.2
動作環境:Windows10インスタンス
以前、オブジェクトとインスタンスを混同して話していたように記憶しているが、改めて触れてみたい。
まずはいつもの通りCatクラスを用意する。Cat.javaclass Cat { public static int sumCats = 0; private int age; private double weight; public Cat() { age = 0; weight = 0.0; sumCats++; System.out.println("新しい猫ちゃんがやってきましたよ!"); } public void setCat(int a,double w) { age = a; weight = w; System.out.println("この猫、年齢は" + age + "歳、体重は" + weight + "kgです。"); } public static void showSumCats() { System.out.println("今は全部で" + sumCats + "匹の猫がいます。"); } }この
Catクラスを使って2匹の猫を用意した場合を考える。・2匹の猫は、同じ
Catクラス由来である別々のオブジェクトである。
・2匹の猫は、それぞれのage,weightフィールドを有している。以上のとき、2匹の猫はそれぞれのオブジェクトに関連付けられたフィールドであるインスタンス変数(instance variable)と、オブジェクトに関連付けられたメソッドであるインスタンスメソッド(instance method)を有する。
これらインスタンスな変数とメソッドは「オブジェクトが生成(new)されてからアクセス可能になる」。今まで持っていた誤解
・オブジェクト≒インスタンス⇒オブジェクト毎のフィールド・メソッド = インスタンス変数・メソッド new!!
クラス変数・クラスメソッド
しかし、オブジェクトが生成されるより前に扱いたいメンバ(フィールド・メソッド)もある。そのために、クラスそのものと関連付けがなされたメンバを
staticで宣言して使うことが出来る。
public static void showSumCats()は、
public static int sumCats = 0;と宣言されたクラス変数sumCatsを参照し、newするたびにコンストラクタCat()が呼び出され、自動でインクリメントされるようになっている。これにより、「何回Catオブジェクトを生成したか」と「猫の総数」をリンクさせている。
showSumCats()は、staticであるため、「一度もCatオブジェクトを生成していな」くても呼び出すことが出来るメソッドである。よって「猫0匹」を示すこともできる。this.ってなんだろう
インスタンスメソッド内でのみ、
this.ageやthis.weightと書いて、オブジェクトに関連付けられたフィールド値のみを示すように書くことが出来る。
ローカル変数の話は割愛。終わりに
これからmain関数内で扱おうとしている変数・メソッドがクラス関連かオブジェクト関連か、
staticで判別してよく理解していないと、ここを突かれる問題はかなり多い。参考
出来るだけ自分で変数や式を書いてコンパイルしているので、完全に引用する場合はその旨記述する。
- 投稿日:2020-03-15T16:18:32+09:00
[Scala]コンストラクター
オーグジリアリコンストラクター (this(), or .this) について公式リファレンス内をうろうろしていたのですが、見つからなかった代わりに二次情報としてコンストラクターの記事があったので、内容はおおよそ文献の翻訳です。
コンストラクターは、オブジェクトの状態を初期化する為に使用します。メソッド同様、ひとつのコンストラクターはオブジェクト作成時に実行される命令の集合も含んでいます。
Scala には二種類のコンストラクターがサポートされています。
- プライマリーコンストラクター
- オーグジリアリコンストラクター
プログラムに含まれるコンストラクターが一つしかない時、それをプライマリーコンストラクターと呼びます。プライマリーコンストラクターとクラスは同じ本体を共有する為、プログラマがコンストラクターの作成を明示的に宣言する必要はありません。
class Hello(name) {
  // Statements
}
- 上記の構文において、プライマリーコンストラクターはクラスと同じ本体を共有します。メソッドの宣言を除き、クラスの本体に定義されるもの全てはプライマリーコンストラクターの一部です。
// プライマリーコンストラクター作成
class Monster(name: String, attribute: String, attack: Int, defense: Int) {
  def status: String = {
    s"""
       |Name: $name
       |Attribute: $attribute
       |Attack: $attack
       |Defense: $defense
       |""".stripMargin
  }
}

object Main {
  def main(args: Array[String]): Unit = {
    // オブジェクトの生成と初期化
    val dmg = new Monster("Dark Magician Girl", "Dark", 2000, 1700)
    println(dmg.status)
  }
}
Name: Dark Magician Girl Attribute: Dark Attack: 2000 Defense: 1700
- プライマリーコンストラクターは 0 個以上のパラメータを持ちます。
- プログラム内にコンストラクターを作成しなかった場合、クラスからオブジェクトを作成した時に、コンパイラは自動でプライマリーコンストラクターを作成します。このコンストラクターはデフォルトのプライマリーコンストラクターと呼び、パラメータを受け取りません。
// プライマリーコンストラクター作成 class Nap { def zzz: String = { "Zzz.." } } object Main { def main(args: Array[String]): Unit = { // オブジェクトの生成と初期化 val nobita = new Nap println(nobita.nap) } }Zzz..
- コンストラクターのパラメータを
varで宣言すると、フィールドの値を変更することができ、フィールドにゲッターメソッドとセッターメソッドが生成されます。- コンストラクターのパラメータを
valで宣言すると、フィールドの値は変更できません。フィールドにはゲッターメソッドのみが生成されます。- コンストラクターのパラメータを
varやvalなしで宣言すると、フィールドの可視性は非常に制限されたものになります。フィールドにはゲッターメソッドもセッターメソッドも生成されません。- コンストラクターのパラメータを
private varやprivate valで宣言すると、フィールドのゲッターメソッドとセッターメソッドが生成されることを阻止します。フィールドにはそのクラスのメンバーだけがアクセスできます。- プライマリーコンストラクターだけは、スーパークラスのコンストラクターを起動できます。
- クラス名とパラメータの間に
privateキーワードを用いて、プライマリーコンストラクターをプライベートにできます。// パラメータあり class Secret private (n: Int) { // Statements } // パラメータなし class Privacy private { // Statements }
- コンストラクターの宣言時にパラメーターのデフォルト値を設定できます。
class User(val name: String = "Anonymous") {
  def show: String = s"Name: $name"
}

object Main {
  def main(args: Array[String]) = {
    val usr = new User
    println(usr.show)
  }
}
プライマリーコンストラクター以外のコンストラクターは オーグジリアリコンストラクターと呼ばれ、好きなだけ作成できます。ただし、プログラムが持つプライマリーコンストラクターはひとつだけです。
class Apple(product: String, model: String) {
  var color: String = ""

  def details: String = {
    s"""
      |Product name: $product
      |Model: $model
      |Color: $color
      |""".stripMargin
  }

  // オーグジリアリコンストラクター
  def this(name: String, model: String, color: String) = {
    // プライマリーコンストラクター起動
    this(name: String, model: String)
    this.color = color
  }
}

object Main {
  def main(args: Array[String]): Unit = {
    val device: Apple = new Apple("iPhone", "iPhone 11 Pro", "Gold")
    println(device.details)
  }
}
Product name: iPhone Model: iPhone 11 Pro Color: Gold文献
- 投稿日:2020-03-15T11:58:39+09:00
メソッドを呼び出して数をカウントしたいです
コンソールに出力したい結果は以下です
ブラックジャックへようこそ!
貴方の1枚目のカードはハートのQ
ディーラーの1枚目のカードはダイヤのA
貴方の2枚目のカードはハートのA
ディーラーの2枚めのカードは秘密だよ
あなたの現在のポイントは11です
カードを引きますか? Yes:y or No:nーーーーーーーーーーーーーーーーーーーーーーーー
プレイヤーの何枚目、という部分をメソッドを使い1、2、3・・・としたいです。現状は以下です
ブラックジャックへようこそ!
貴方の0枚目のカードはハートのQ
ディーラーの1枚目のカードはダイヤのA
貴方の0枚目のカードはハートのA
ディーラーの2枚めのカードは秘密だよ
あなたの現在のポイントは11です
カードを引きますか? Yes:y or No:nソースコードを載せます
package blackjack;

import java.util.ArrayList;
import java.util.List;
import java.util.Scanner;

public class MainGame {

    public static void main(String[] args) {
        System.out.println("ブラックジャックへようこそ!");

        List<Integer> deck = new ArrayList<Integer>(52);

        Deck.shuffleDeck(deck); // メソッドを呼び出す

        // シャッフルしたカードを表示。デバック用
        //      for(Integer i : deck) {
        //              System.out.println(i);
        //          }

        List<Integer> player = new ArrayList<>(); //プレイヤーの手札リストを作成
        List<Integer> dealer = new ArrayList<>(); //ディーラーの手札リストを作成

        //プレイヤー・ディーラーがカードを2枚引く
        player.add(deck.get(0));
        dealer.add(deck.get(1));
        player.add(deck.get(2));
        dealer.add(deck.get(3));

        //プレイヤー・ディーラーの手札のポイントを表示
        System.out.println("貴方の"
                + Player.getPlayerHands() + "枚目のカードは"
                + Deck.toDescription(player.get(0)));
        System.out.println("ディーラーの1枚目のカードは"
                + Deck.toDescription(dealer.get(0)));
        System.out.println("貴方の"
                + Player.getPlayerHands() + "枚目のカードは"
                + Deck.toDescription(player.get(1)));
        System.out.println("ディーラーの2枚めのカードは秘密だよ");

        //プレイヤー、ディーラーのポイントを集計
        int playerPoint = Deck.sumPoint(player);
        int dealerPoint = Deck.sumPoint(dealer);

        System.out.println("あなたの現在のポイントは"
                + playerPoint + "です");

        //プレイヤーがカードを引くフェーズ
        while (true) {
            System.out.println("カードを引きますか? Yes:y or No:n");
            //キーボードの入力を受け付けて、変数strに代入する

            Scanner scan = new Scanner(System.in);
            String str = scan.next();

            if ("n".equals(str)) {
                break;
            } else if ("y".equals(str)) {
                //手札に山札から1枚加える
                player.add(deck.get(Deck.deckCount));

                //山札と手札を一枚進める
                Deck.deckCount++;
                Player.setPlayerHands(Player.getPlayerHands() + 1);

                System.out.println("あなたの"
                        + Player.getPlayerHands() + "枚目のカードは"
                        + Deck.toDescription(player.get(Player.getPlayerHands() - 1)));
                playerPoint = Deck.sumPoint(player);
                System.out.println("現在の合計は" + playerPoint);
                //プレイヤーのバーストチェック
                if (Deck.isBusted(playerPoint)) {
                    System.out.println("残念、バーストしてしまいました。ディーラーの勝ちです。");
                    return;
                }
            } else {
                System.out.println("あなたの入力は"
                        + str + "です。y か n を入力してください。");
            }
        }

        //ディーラーが手札を17以上にするまでカードを引くフェーズ
        while (true) {
            //手札が17以上の場合ブレーク
            if (dealerPoint >= 17) {
                break;
            } else {
                //手札に山札から1枚加える
                dealer.add(deck.get(Deck.deckCount));
                //山札を1枚進める
                Deck.deckCount++;

                //ディーラーの合計ポイントを計算
                dealerPoint = Deck.sumPoint(dealer);
                //ディーラーのバーストチェック
                if (Deck.isBusted(dealerPoint)) {
                    System.out.println("ディーラーがバーストしました。あなたの勝ちです!");
                    return;

                }
            }
        }

        //ポイントを比較する
        System.out.println("あなたのポイントは" + playerPoint);
        System.out.println("ディーラーのポイントは" + dealerPoint);

        if (playerPoint == dealerPoint) {
            System.out.println("引き分けです。");
        } else if (playerPoint > dealerPoint) {
            System.out.println("勝ちました!");
        } else {
            System.out.println("負けました・・・");
        }

    }

}
package blackjack; import java.util.Collections; import java.util.List; public class Deck { static int deckCount; //山札の進行状況を記録する変数deckCountを定義 // 山札(deck)に値を入れ、シャッフルするメソッド public static void shuffleDeck(List<Integer> deck) { // リストに1-52の連番を代入 for (int i = 1; i <= 52; i++) { deck.add(i); } // 山札をシャッフル Collections.shuffle(deck); } //現在の合計ポイントを計算するメソッド public static int sumPoint(List<Integer> list) { int sum = 0; for (int i = 0; i < list.size(); i++) { sum = sum + toPoint(toNumber(list.get(i))); } return sum; } //山札の数をカードの数に置き換えるメソッド private static int toNumber(int cardNumber) { int number = cardNumber % 13; if (number == 0) { number = 13; } return number; } //山札の通し番号を得点計算用のポイントに変換するメソッド J/Q/Kは10とする public static int toPoint(int num) { if (num == 11 || num == 12 || num == 13) { num = 10; } return num; } //山札の数を(スート)の(ランク)の文字列に置き換えるメソッド public static String toDescription(int cardNumber) { String rank = toRank(toNumber(cardNumber)); String suit = toSuit(cardNumber); return suit + "の" + rank; } //カード番号をランクに変換するメソッド(A,J,Q,Kなど) private static String toRank(int number) { switch (number) { case 1: return "A"; case 11: return "J"; case 12: return "Q"; case 13: return "K"; default: String str = String.valueOf(number); return str; } } //山札の数をスートに置き換えるメソッド private static String toSuit(int cardNumber) { switch ((cardNumber - 1) / 13) { case 0: return "クラブ"; case 1: return "ダイヤ"; case 2: return "ハート"; case 3: return "スペード"; default: return "例外です"; } } //手札がバーストしているか判定するメソッド public static boolean isBusted(int point) { if (point <= 21) { return false; } else { return true; } } }package blackjack; public class Player extends Deck { private static int playerHands; //プレイヤーの手札枚数を記録する変数playerHandsを定義 public static int getPlayerHands() { return playerHands; } public static void setPlayerHands(int playerHands) { Player.playerHands = playerHands; } }ネットなどでも調べてみたのですが、限界を感じ。。。
よろしければご教授願います。
- 投稿日:2020-03-15T11:29:35+09:00
C言語のリンクリストをオブジェクト指向風に書いてみる(PythonとJavaとのコード比較あり)
はじめに
最近、「C言語でリンクリストを書いてみた」という投稿を2件みかけました。
いずれも、C言語らしい書き方をしておられましたので、オブジェクト指向風な書き方をコメントさせていただきました。オブジェクト指向風な書き方をすることで、オブジェクト指向の理解の助けになればと思い、本記事を書くことにしました。
難しいオブジェクト指向の考え方は抜きにして、構造体の拡張版=ユーザ定義型としてクラスを使います。リンクリスト
リンクリストについては、他の記事やサイトをご覧ください。
参考: https://ja.wikipedia.org/wiki/連結リストまず、リンクリストに使う構造体を2種類用意します。
struct node: リストの要素struct list:nodeをリンクリスト管理以下のルールでオブジェクト指向風な書き方にします。
- 構造体へのポインタ を クラス名 として
typedefする- クラス名 は 最初を大文字 にして ポインタ型=参照型 であることを明示する
- クラスの関数名 は クラス名とアンダースコア で始めて 名前衝突 を避ける
- メモリ獲得関数名は
newにする- 獲得した 個々のメモリ領域 のことを「インスタンス」と呼ぶ
- 各クラスの メモリ獲得&初期化関数 も
newにする、この関数を「コンストラクタ」と呼ぶ- コンストラクタ は インスタンス を返す
- コンストラクタ以外の クラスの関数 を「メソッド」と呼ぶ
- 各メソッドの 第一引数 を インスタンス にする
C言語での関数実装例
#include <stdio.h>
#include <stdlib.h>

typedef const char *String;

void *new(size_t size)
{
    void *memory = malloc(size);
    if (memory == NULL) {
        fprintf(stderr, "Out of memory\n");
        exit(8);
    }
    return memory;
}

/*
 * class Node {
 */
typedef struct node {
    int data;
    struct node *next;
} *Node;

Node Node_new(int data)
{
    Node node = new(sizeof(*node));
    node->data = data;
    node->next = NULL;
    return node;
}

void Node_output(Node node, String separator) {
    printf("%d%s", node->data, separator);
}

void Node_free(Node node)
{
    node->next = NULL;
    free(node);
}

/* } */

/*
 * class List {
 */
typedef struct list {
    Node head;
    Node tail;
} *List;

List List_new()
{
    List list = new(sizeof(*list));
    list->head = NULL;
    list->tail = NULL;
    return list;
}

void List_add(List list, int data)
{
    Node node = Node_new(data);
    if (list->head == NULL) {
        list->head = node;
        list->tail = node;
    } else {
        list->tail->next = node;
        list->tail = node;
    }
}

void List_input(List list)
{
    int size;
    if (scanf("%d", &size) != 1) {
        fprintf(stderr, "Invalid size\n");
        exit(1);
    }
    for (int i = 0; i < size; i++) {
        int data;
        if (scanf("%d", &data) != 1) {
            fprintf(stderr, "Invalid data\n");
            exit(2);
        }
        List_add(list, data);
    }
}

void List_output(List list)
{
    for (Node node = list->head; node != NULL; node = node->next) {
        Node_output(node, " ");
    }
    printf("\n");
}

void List_free(List list)
{
    Node node = list->head;
    while (node != NULL) {
        Node next = node->next;
        Node_free(node);  // cannot access node members after here
        node = next;
    }
    list->head = NULL;
    list->tail = NULL;
    free(list);
}

/* } */

int main(void)
{
    List list = List_new();
    List_input(list);
    List_output(list);
    List_free(list);
}
Pythonでの関数実装例
C言語とPythonの相違点を下表に示します。
C言語 Python 変数宣言 不要
変数代入すると変数辞書に{変数名: 値}の形で変数登録される。構造体定義 不要
インスタンスに自由に変数代入できる型定義 typedefクラス定義
整数の123は、自動的にint型の123インスタンスが作られる。ポインタのメンバアクセス演算子 ->インスタンスのメンバアクセス演算子 .NULL None 処理ブロックは {と}で囲む処理ブロックはインデントを下げる printf関数
ただし、自動的に改行される。
改行されないときはend引数で改行文字の代わりを指定。malloc関数クラス名()
class定義するとメモリ確保関数(コンストラクタ)が自動的に作られる
クラス名がメモリ確保関数名になる。free関数不要
使わなくなったメモリ領域は自動返却される。del文で強制返却もできる。scanf関数`input関数
1行分の文字列を読み込む。
整数化はint関数。
空白分割はsplitメソッド。比較のため、空のメモリ領域(インスタンス)を確保する
newクラス を定義してあります。class new: pass # # class Node { #/ def Node_new(data): node = new() node.data = data node.next = None return node def Node_output(node, separator): print(node.data, end=separator) # } # # class List { #/ def List_new(): list = new() list.head = None list.tail = None return list def List_add(list, data): node = Node_new(data) if list.head is None: list.head = node list.tail = node else: list.tail.next = node list.tail = node def List_input(list): size = int(input()) # Pythonでは使用しない for data in input().split(): List_add(list, int(data)) def List_output(list): node = list.head while node is not None: Node_output(node, " ") node = node.next print() # } def main(): list = List_new() List_input(list) List_output(list) del list if __name__ == '__main__': main()Pythonでのクラス実装例
Node と List をクラス定義することで、それぞれのクラスでメモリ確保されるようになるので、newクラスが不要になります。
初期化処理は、__init__メソッドに書きます。コンストラクタがメモリ確保したあと、自動的に呼び出してくれます。クラス定義することで名前空間が作られ、クラス内に定義した関数は他のクラスの関数と名前が衝突しても異なる関数としてそれぞれ使用できるので、「クラス名とアンダースコア」を取り除きます。
クラス名_メソッド名(インスタンス, その他引数)と書いていたのを
インスタンス.メソッド(その他引数)と書くと、
クラス名.メソッド名(インスタンス, その他引数)を呼び出してくれます。メソッドの第一引数のインスタンス変数名は、
selfにするのが慣習になっています。class Node: def __init__(self, data): self.data = data self.next = None def output(self, separator): print(self.data, end=separator) class List: def __init__(self): self.head = None self.tail = None def add(self, data): node = Node(data) if self.head is None: self.head = node self.tail = node else: self.tail.next = node self.tail = node def input(self): size = int(input()) # Pythonでは使用しない for data in input().split(): self.add(int(data)) def output(self): node = self.head while node is not None: node.output(" ") node = node.next print() def main(): list = List() list.input() list.output() del list if __name__ == '__main__': main()Javaでのクラス実装例
基本的な文法はC言語と同じです。
クラスは構造体の拡張版だと思えばいいです。
構造体の中に関数定義を書けて、他のクラスと名前衝突を気にせずに自由にメンバ定義やメソッド定義できます。
メソッドの第一引数のインスタンス引数は記述不要で、暗黙の第一引数thisが自動定義されてインスタンスが代入されます。
クラス名と同じメソッドがコンストラクタになります。インスタンスthisが暗黙定義されますので、復帰値型やreturnの記述は不要です。
scanfはScannerクラスで代用しています。LinkedList.javaimport java.util.Scanner; class Node { int data; Node next; Node(int data) { this.data = data; this.next = null; } void output(String separator) { System.out.print(this.data + separator); } } class List { Node head; Node tail; List() { this.head = null; this.tail = null; } void add(int data) { Node node = new Node(data); if (this.head == null) { this.head = node; this.tail = node; } else { this.tail.next = node; this.tail = node; } } void input() { Scanner scanner = new Scanner(System.in); int size = scanner.nextInt(); for (int i = 0; i < size; i++) { int data = scanner.nextInt(); add(data); } } void output() { for (Node node = this.head; node != null; node = node.next) { node.output(" "); } System.out.print("\n"); } } public class LinkedList { public static void main(String[] args) { List list = new List(); list.input(); list.output(); } }
- 投稿日:2020-03-15T07:27:46+09:00
Java 定数の設定の仕方
- 先頭に"final"を付けて、値を設定すると、その値を変えようとしてもエラーになる。
final double TAX = 1.10;
- 投稿日:2020-03-15T03:42:08+09:00
IntelliJでJavaをKotlinへ変換する 〜その2〜
はじめに
IntelliJでJavaをKotlinへ変換する 〜その1〜の続きです。
今回は変換をしていて「Kotlin便利だな」や「スマートに書けるな」と感じたところを紹介します。Source
こちらにコミットしてますので、合わせてご確認ください。
https://github.com/ken-araki/line_bot_kotlinjava to kotlin
Collection操作が楽
streamやListsを使わずスマートにかけます。
今回は、以下のように書き換えました。
java kotlin list.stream().limit(10) list.take(10) list.stream().skip(10) list.drop(10) List list = Lists.partition(list, 3) list.chunked(3) ちなみに、
KotlinのList操作はKotlin の Collection まとめ ~List編~がまとまっています。
他に便利なものないかな?、という時はこちらを参考にさせてもらうといいと思います。Listの検索はfirstをつかう
とある
Listから特定の要素を取得したいとき、
以下のどちらかで対応するかと思います。
1. ループして条件に一致している物を返す。
2. stream -> filter -> findFirst// java // 1. ループして条件に一致している物を返す。 for (ActionSelector action : values()) { if (action.getStartWord().equals(message)) { return action; } } return null; // 2. stream -> filter -> findFirst TrainDelayTime time = Arrays.stream(TrainDelayTime.values()) .filter(t -> t.getTime().equals(message)) .findFirst() .get();それを
fistOrNullを使ってこんな感じで書き換えれます。// kotlin // 1. をfirstOrNullで書き換えたパターン values().firstOrNull { it.startWord == message } // 2. をfirstで書き換えたパターン val time = TrainDelayTime.values().first { it.time == message }もし、一致するものがなければ例外としたい場合は、「エルビス演算子」を利用してこんな感じで書きます。
// kotlin (一致するものがなければ例外)
values().firstOrNull { it.startWord == message } ?: throw IllegalArgumentException()
Nullチェックが楽
とあるオブジェクトのプロパティのNullチェックをする時、
以下のように「そのオブジェクト自体がNullじゃない、かつ、そのプロパティがNullじゃない」という書き方をします。// java BotUserQiita user = botUserQiitaService.findByUserId(userId); if (user == null || StringUtils.isEmpty(user.getQiitaUserId())) { String replyMessage = "Qiita名を設定してください"; return Collections.singletonList( new TextMessage(replyMessage) ); } List<ItemSummary> list = qiitaService.getItemByUserId( user.getQiitaUserId(), QiitaRequestParameter.builder() .perPage(20) .page(1) .build() ); return Collections.singletonList( qiitaItemMessage.build(user.getQiitaUserId(), list) );それを
?.を使ってこんな感じで書き換えれます。
(Collectionsとか、letとか、エルビス演算子とかも使っているので、だいぶ変わりました)// kotlin return botUserQiitaService.findByUserId(userId)?.qiitaUserId ?.let { val list = qiitaService.getItemByUserId( it, QiitaRequestParameter(perPage = 20, page = 1) ) listOf(qiitaItemMessage.build(it, list)) } ?: listOf(TextMessage("Qiita名を設定してください"))スコープ関数が便利
スコープ関数とは、
let,run,apply,also,withなどのことです。let
基本的には、
Optionalと似たような使い方で、?.letとすることでNull出ないことが保証できます。// java if (value != null) { param.add(keyName, Objects.toString(value)); }このようにnullでなければ、特定の処理を行うときに便利です。
// kotlin
value?.let {
  param.add(keyName, Objects.toString(it))
}
run
今回使っていませんが、とある
Listを別のものに置き換えたいときに使うと良さそうです。
例えば、以下のようにログデータを集計して、Summaryオブジェクトを作りたいとかに便利だと思います。// kotlin val logSummary = trainDelayLogs.run { nameCountMap = this.groupingBy { it.name }.eachCount() yearMonthCountMap = this.groupingBy { it.yearMonth }.eachCount() // ... }apply
そのオブジェクト自身へ反映させる関数です。
いままでは、以下のようにインスタンス作って、それのsetterやらメソッドやらを呼び出しています。// java RedisTemplate<String, UserStatus> redisTemplate = new RedisTemplate<String, UserStatus>(); redisTemplate.setConnectionFactory(connectionFactory); redisTemplate.setKeySerializer(new StringRedisSerializer()); redisTemplate.setValueSerializer(new GenericJackson2JsonRedisSerializer("UserStatus")); redisTemplate.setHashKeySerializer(redisTemplate.getKeySerializer()); redisTemplate.setHashValueSerializer(redisTemplate.getValueSerializer()); return redisTemplate;これを
applyを使ってこんな感じに書き換えれます。// kotlin return RedisTemplate<String, UserStatus>() .apply { connectionFactory = connectionFactoryArg keySerializer = StringRedisSerializer() valueSerializer = GenericJackson2JsonRedisSerializer("UserStatus") hashKeySerializer = this.keySerializer hashValueSerializer = this.valueSerializer }also
ついでに処理したいことがあるときに便利です。
以下のように、Message送信をしたいだけですが、responseをログに出したいので一度変数におき、ログ出力後にreturnしてます。// java log.info("send broadcast. messages: {}", messages) return Utils.uncheck<BotApiResponse> { val response = lineMessagingClient.broadcast(Broadcast(messages, false)).get() log.info("broadcast result. {}", response) response }これを
alsoを使うとこんな感じに書き換えれます。// kotlin log.info("send broadcast. messages: {}", messages) return Utils.uncheck<BotApiResponse> { lineMessagingClient.broadcast(Broadcast(messages, false)).get() .also { log.info("broadcast result. {}", it) } }おわりに
kotlinを使うとだいぶスマートに書けた気がします。
特別な理由がなければ、今後はkotlinで書くのが良さそうな気がしています。次は、kotlin自体のフレームワークや、もっと便利なライブラリも使ってみたいなと思っています。