- 投稿日:2020-01-26T20:55:03+09:00
Swift(iOS)でイケてるトースト・バナー・ポップアップを導入する (SwiftEntryKit)
SwiftEntryKit
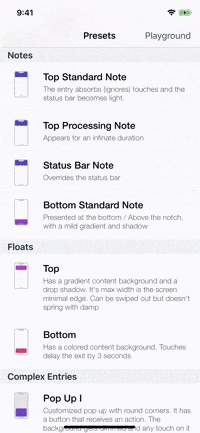
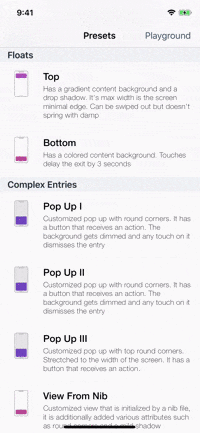
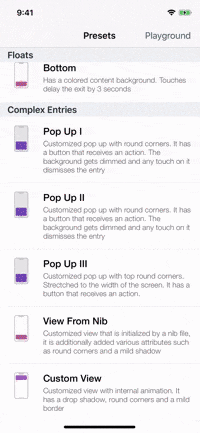
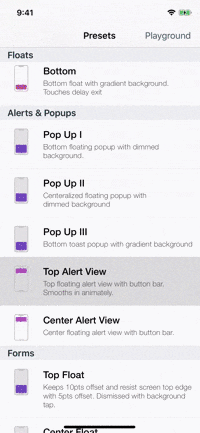
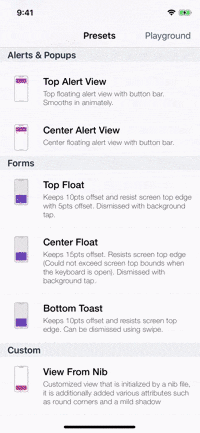
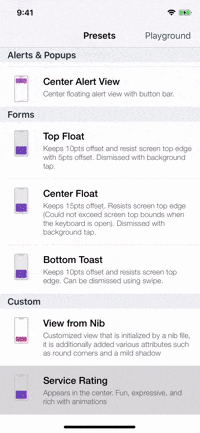
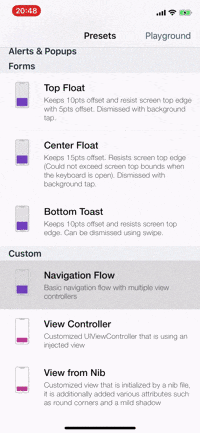
トーストやポップアップ、プッシュ通知のようなビューを簡単に導入できるすごいライブラリ SwiftEntryKit をこの記事で紹介する。いくつか同様のライブラリ(Toast-Swiftなど)を試したが、SwiftEntryKitが圧倒的にイケてるUIUXを作れると感じた。イメージは以下の通り。
Toasts Notes Floats Popups
Alerts Forms Rating More... インストール
https://github.com/huri000/SwiftEntryKit#installation
ここに丁寧に書いてあるのでここでは言及しない。CocoaPodsやCarthageで入れるだけ。
使い方のイメージ
import SwiftEntryKit

///

func test() {
    var attributes = EKAttributes.bottomFloat // bottomFloat以外に様々なタイプがある
    // プロパティを設定していく
    // attributes.xxx = xxx
    // たとえば以下の通り
    attributes.entryBackground = .gradient(gradient: .init(colors: [EKColor(UIColor.red), EKColor(UIColor.orange)], startPoint: .zero, endPoint: CGPoint(x: 1, y: 1)))
    attributes.popBehavior = .animated(animation: .init(translate: .init(duration: 0.3), scale: .init(from: 1, to: 0.7, duration: 0.7)))
    attributes.shadow = .active(with: .init(color: .black, opacity: 0.5, radius: 10, offset: .zero))
    attributes.statusBar = .light
    attributes.scroll = .enabled(swipeable: true, pullbackAnimation: .jolt)
    attributes.positionConstraints.maxSize = .init(width: .constant(value: UIScreen.main.bounds.width), height: .intrinsic)

    // EKNotificationMessageViewなど、EKxxxViewを作ってattributesとともにSwiftEntryKitに渡す
    let title = EKProperty.LabelContent(text: "Sample Notification", style: .init(font: UIFont(), color: .standardContent))
    let description = EKProperty.LabelContent(text: "Body message", style: .init(font: UIFont(), color: .standardContent))
    let image = EKProperty.ImageContent(image: UIImage(named: "some image"), size: CGSize(width: 35, height: 35))
    let simpleMessage = EKSimpleMessage(image: image, title: title, description: description)
    let notificationMessage = EKNotificationMessage(simpleMessage: simpleMessage)
    let contentView = EKNotificationMessageView(with: notificationMessage)

    // あとはSwiftEntryKit.displayを呼ぶだけ
    SwiftEntryKit.display(entry: contentView, using: attributes)
}
このライブラリでは、ビューのトップ、中央、ボトムの3つの位置(
top/center/bottom)を選択でき、ビューのタイプは以下のような感じで10個以上定義されている。位置とビューのタイプを組み合わせて使うことになる。
- EKAlertMessageView
- EKFormMessageView
- EKNotificationMessageView
- EKNoteMessageView
- EKPopUpMessageView
- EKRatingMessageView
iOSのプッシュ通知のようなバナーを表示する
struct NotificationBanner {
    static func show(title: String, body: String, image: UIImage) {
        var attributes = EKAttributes.topFloat
        attributes.entryBackground = .gradient(gradient: .init(colors: [EKColor(UIColor.red), EKColor(UIColor.orange)], startPoint: .zero, endPoint: CGPoint(x: 1, y: 1)))
        attributes.popBehavior = .animated(animation: .init(translate: .init(duration: 0.3), scale: .init(from: 1, to: 0.7, duration: 0.7)))
        attributes.shadow = .active(with: .init(color: .black, opacity: 0.5, radius: 10, offset: .zero))
        attributes.statusBar = .light
        attributes.scroll = .enabled(swipeable: true, pullbackAnimation: .jolt)
        attributes.positionConstraints.maxSize = .init(width: .constant(value: UIScreen.main.bounds.width), height: .intrinsic)

        let title = EKProperty.LabelContent(text: title, style: .init(font: UIFont(), color: .white))
        let description = EKProperty.LabelContent(text: body, style: .init(font: UIFont(), color: .white))
        let image = EKProperty.ImageContent(image: image, size: CGSize(width: 35, height: 35))
        let simpleMessage = EKSimpleMessage(image: image, title: title, description: description)
        let notificationMessage = EKNotificationMessage(simpleMessage: simpleMessage)

        let contentView = EKNotificationMessageView(with: notificationMessage)
        SwiftEntryKit.display(entry: contentView, using: attributes)
    }
}
利用するのはこんな感じ。
NotificationBanner.show(title: "Notification title", body: "Notification body", image: UIImage(named: "xxx"))お洒落なアラートを表示する
struct Alert {
    // ここではアクションが一つの場合
    static func show(title: String, body: String, image: UIImage, action: @escaping () -> Void) {
        var attributes = EKAttributes.topFloat
        attributes.displayDuration = .infinity
        attributes.entryBackground = .gradient(gradient: .init(colors: [EKColor(UIColor.purple), EKColor(UIColor.blue)], startPoint: .zero, endPoint: CGPoint(x: 1, y: 1)))
        attributes.screenBackground = .visualEffect(style: .prominent)
        attributes.popBehavior = .animated(animation: .init(translate: .init(duration: 0.3), scale: .init(from: 1, to: 0.7, duration: 0.7)))
        attributes.shadow = .active(with: .init(color: .black, opacity: 0.5, radius: 10, offset: .zero))
        attributes.scroll = .enabled(swipeable: true, pullbackAnimation: .jolt)
        attributes.positionConstraints.maxSize = .init(width: .constant(value: UIScreen.main.bounds.width), height: .intrinsic)
        // これがないとアクションが実行されない
        attributes.entryInteraction = .absorbTouches

        let title = EKProperty.LabelContent(text: title, style: .init(font: UIFont(), color: .white))
        let description = EKProperty.LabelContent(text: body, style: .init(font: UIFont(), color: .white))
        let image = EKProperty.ImageContent(image: image, size: CGSize(width: 35, height: 35))
        let simpleMessage = EKSimpleMessage(image: image, title: title, description: description)

        let label = EKProperty.LabelContent(text: "OK", style: .init(font: UIFont(), color: .black))
        let button = EKProperty.ButtonContent(label: label, backgroundColor: .white, highlightedBackgroundColor: .standardBackground) {
            // dismissを自分で呼ばないとビューが消えない
            SwiftEntryKit.dismiss()
            action()
        }
        let content = EKProperty.ButtonBarContent(with: [button], separatorColor: EKColor(UIColor.black), expandAnimatedly: true)

        let alertMessage = EKAlertMessage(simpleMessage: simpleMessage, buttonBarContent: content)
        let view = EKAlertMessageView(with: alertMessage)

        SwiftEntryKit.display(entry: view, using: attributes)
    }
}
利用するのはこんな感じ。
Alert.show(title: "Alert title", body: "Alert body") {
    print("tapped!!")
}
ポップアップを表示する
struct Popup {
    static func show(title: String, body: String, action: @escaping () -> Void) {
        var attributes = EKAttributes.centerFloat
        attributes.displayDuration = .infinity
        attributes.entryBackground = .gradient(gradient: .init(colors: [EKColor(UIColor.purple), EKColor(UIColor.blue)], startPoint: .zero, endPoint: CGPoint(x: 1, y: 1)))
        attributes.screenBackground = .visualEffect(style: .prominent)
        attributes.popBehavior = .animated(animation: .init(translate: .init(duration: 0.3), scale: .init(from: 1, to: 0.7, duration: 0.7)))
        attributes.shadow = .active(with: .init(color: .black, opacity: 0.5, radius: 10, offset: .zero))
        attributes.scroll = .enabled(swipeable: true, pullbackAnimation: .jolt)
        attributes.positionConstraints.maxSize = .init(width: .constant(value: UIScreen.main.bounds.width), height: .intrinsic)
        // これがないとアクションが実行されない
        attributes.entryInteraction = .absorbTouches

        let title = EKProperty.LabelContent(text: title, style: .init(font: UIFont(), color: .white))
        let description = EKProperty.LabelContent(text: body, style: .init(font: UIFont(), color: .white))

        let label = EKProperty.LabelContent(text: "OK", style: .init(font: UIFont(), color: .black))
        let button = EKProperty.ButtonContent(label: label, backgroundColor: .white, highlightedBackgroundColor: .standardBackground)
        let action: EKPopUpMessage.EKPopUpMessageAction = {
            SwiftEntryKit.dismiss()
            // ここにボタン押下時のアクションを入れることができる
            action()
        }
        let popupMessage = EKPopUpMessage(title: title, description: description, button: button, action: action)
        let view = EKPopUpMessageView(with: popupMessage)

        SwiftEntryKit.display(entry: view, using: attributes)
    }
}
利用するのはこんな感じ。
Popup.show(title: "Popup title", body: "Popup body") {
    print("tapped!!")
}
フォーム付きのポップアップを表示する
struct Form {
    // フォームが1つの場合
    static func show(title: String, placeholder: String = "", image: UIImage, action: @escaping (String) -> Void) {
        var attributes = EKAttributes.centerFloat
        attributes.displayDuration = .infinity
        attributes.entryBackground = .gradient(gradient: .init(colors: [EKColor(UIColor.purple), EKColor(UIColor.blue)], startPoint: .zero, endPoint: CGPoint(x: 1, y: 1)))
        attributes.screenBackground = .visualEffect(style: .prominent)
        attributes.popBehavior = .animated(animation: .init(translate: .init(duration: 0.3), scale: .init(from: 1, to: 0.7, duration: 0.7)))
        attributes.shadow = .active(with: .init(color: .black, opacity: 0.5, radius: 10, offset: .zero))
        attributes.scroll = .enabled(swipeable: true, pullbackAnimation: .jolt)
        attributes.positionConstraints.maxSize = .init(width: .constant(value: UIScreen.main.bounds.width), height: .intrinsic)
        // これがないとアクションが実行されない
        attributes.entryInteraction = .absorbTouches

        let white = EKColor(UIColor.white)
        let black = EKColor(UIColor.black)
        let gray = EKColor(UIColor.gray)

        let whiteStyle = EKProperty.LabelStyle(font: UIFont(), color: white)
        let blackStyle = EKProperty.LabelStyle(font: UIFont(), color: black)

        let title = EKProperty.LabelContent(text: title, style: whiteStyle)
        let ok = EKProperty.LabelContent(text: "OK", style: blackStyle)
        let placeholder = EKProperty.LabelContent(text: placeholder, style: whiteStyle)

        let content = EKProperty.TextFieldContent(keyboardType: .asciiCapable, placeholder: placeholder, tintColor: white, displayMode: .inferred, textStyle: whiteStyle, leadingImage: image, bottomBorderColor: white)

        let button = EKProperty.ButtonContent(label: ok, backgroundColor: .white, highlightedBackgroundColor: gtray) {
            SwiftEntryKit.dismiss()
            action(content.textContent)
        }

        let view = EKFormMessageView(with: title, textFieldsContent: [content], buttonContent: button)

        SwiftEntryKit.display(entry: view, using: attributes)
    }
}
利用するのはこんな感じ。
Form.show(title: "Form title", body: "Form body") { value in
    print("input value: \(value)")
}
まとめ
他にもToast、Note、Rating等のビューが用意されているが、同様の要領で利用できる。繰り返しになるが、
EKNotificationMessageViewなど、EKxxxViewを作ってattributesとともにSwiftEntryKitに渡せば良い。
- 投稿日:2020-01-26T09:10:55+09:00
【香川県】App Storeのガイドラインに抵触しない「ゲーム依存症対策条例案」対応を実装してみた【Unity】
はじめに
香川県議会による「ネット・ゲーム依存症対策条例案」が話題になっています。
これは18歳以下の子どもがネット・ゲーム依存状態になることを防ぐ目的で、ゲームのプレイ時間を平日は60分(休日は90分)までに制限する項目が盛り込まれています。
問題は、ゲームソフトを提供する事業者等に対しても上記の条例に対して協力する義務を課せられる可能性があります。可決されたら令和2年4月1日より施行されるため、開発者としては早急に今後必要な対策が気になるところです。
出典: 香川県の「ネット・ゲーム依存症対策条例案」【全文】 - ITmedia NEWSこの記事ではiOS向けのApp Storeに配布されるゲームアプリにおいてどういった対応ができるか検討し、Unityを使って実装してみました。
※ 専門的な法律の知見に基づくものではないので、情報の取り扱いは自己責任でお願いします。
条例により課せられる制限と対応
第18条2項より下記のような基準になります。(第2条(4)より、「子ども」とは18歳未満の者を指すようです)
- 総利用時間の制限
- 18歳未満
- 通常: 1日60分まで
- 休日: 1日90分まで (学校等の休業日)
- 利用時間帯の制限
- 15歳以下: 21:00まで (義務教育修了前)
- 18歳未満: 22:00まで
ただし、これらはあくまで基準で「子どもの年齢や各家庭の実情等を考慮し、話し合いの上で使用に関するルールづくりをする」という旨の記載があります。正確に準拠するのなら各家庭の状況に応じて規制の強化・緩和を行えるべきかもしれませんが、今回は考慮していません。
『あなたは香川県民ですか?』は実現可能か
法律的には「属地主義の原則」という考え方があるそうです。これは、法律は定められた領土内に対して適用されるというもので、例えば国内の法律は原則として海外にいる時に適用されません。今回の条例をこの考えに照らし合わせて考えると、適用される人は「香川県民」ではなく「今現在香川県内にいる人」となりそうです1。
この場合、実装としてはGPSなどを用いたリアルタイムの位置情報を利用することが好ましいかと思います。
年齢に関する情報の取得
条例案の対象になるのは18歳未満の子どもですが、その中でも段階的な利用時間帯の制限があるため、3段階の区別が必要になります。「義務教育修了前の子供については」という記載があるため、年齢よりも中学生以下かどうかで区別する方が好ましそうです。
質問形式による取得の場合、虚偽の情報を入力できてしまう可能性が考えられます。一部マッチングアプリやペイメント系サービスのように本人確認書類等を用いた年齢認証を行う方法もありますが、こちらの記事によると香川県議会の「自主的な対策を行って欲しい」という旨の説明をしているため、そこまで厳格な対応は必要ないように思います。
余談ですが、韓国のシャットダウン制では住民登録番号を用いた識別が義務付けられており、違反したメーカーは2年以下の懲役、又は1千万ウォン(約75万円)以下の罰金の処罰が下されるそうです。
参考: 韓国最新オンラインゲームレポート 「青少年夜間ゲームシャットダウン制」に揺れる韓国オンラインゲーム業界 - GAME Watch
プレイ時間の制限
単一のゲームでプレイ時間の制限を行うことは難しくないです。アプリの起動時間を計測し、規程の60分を経過した時点でプレイに制限をするような実装になるかと思います。時間帯についても、端末もしくはネットワークを介した現在時刻を取得すれば実現できます。
問題は「複数のゲームのプレイ時間を合算した制限をかける必要があるのか」という点です。例えば、一つのゲームを60分間遊んだ後に制限されてしまっても、別のゲームでは制限がかかっていない状態で遊べてしまうような状況が考えられます。
この対策には各事業者毎のゲームにおいてプレイ時間を記録し、ネットワークを介して共有するような仕組み作りが必要なので非常に困難です。少なくとも単一の事業者で対応できるようなことではないため今回は考慮しないものとします。
App Store Reviewガイドラインに抵触しそうなポイント
App Store Reviewガイドライン (日本語)
個人情報の収集に関する項目で抵触する可能性があり、最悪の場合アプリのリリース審査に通らない場合が考えられます。特に近年のAppleは個人情報の保護に非常に力を入れており、例えば2018年10月からは全てのアプリにプライバシーポリシーが必須となりました。
参考: 予定されているプライバシーポリシー要件の変更について。 - ニュース - App Store Connect - Apple Developer
抵触しないためには「何のために収集するのか」をユーザーにきちんと示すこと、不必要な情報を収集しないこと、また上記のプライバシーポリシーの提出が必要だと思います。
参考: 個人情報を送信するアプリには必然性がいる 〜 17.2対応 - Qiita
「子ども向け」カテゴリの場合
さらに、App Storeの「子ども向け」カテゴリでは、子ども達が安心して遊べるようより厳格な個人情報の保護が求められています (ここでいう「子ども」は11歳以下を指す(参考)))
「子ども向け」カテゴリのAppでは、個人を特定できる情報またはデバイス情報を第三者に送信することはできません。また、「子ども向け」カテゴリのAppには、他社製の分析機能や広告を組み込むことはできません。
参考: 1.3 「子ども向け」カテゴリ
これを見ると一切の個人情報の収集が認められていないように見えますが、法的事項/プレイバシーに関する章には下記のようにも記載されています。
多くの理由から、子どもの個人データを扱う場合は厳重な注意が求められます。児童オンラインプライバシー保護法(COPPA)やEU一般Data protection規則(GDPR)のような法律、およびその他の適用される規制または法律をすべて慎重に確認してください。
Appでは、これらの法律に準拠する目的でのみ生年月日や保護者の連絡先を要求することができます。参考: 5.1.4 「子ども向け」
今回の条例案は「その他の適用される規制または法律」に該当するように思うので、準拠する目的に限定していれば認められそうです。
余談: ペアレンタルコントロール
iOS 12以降のペアレンタルコントロールという機能では、保護者がアプリのカテゴリ毎に起動時間の制限をかけることができます。下記の画像のように、ゲームカテゴリに対して制限時間を設定すると、上限時間を超えた場合に該当アプリがグレーアウトする仕様になっています。
各ゲーム事業者の立場では対応に限界があるので、香川県にお住まいのお子さんにiPhoneを貸与している保護者の方は是非ご活用ください。
参考: お子様の iPhone、iPad、iPod touch でペアレンタルコントロールを使う - Apple サポート
条例に準拠したUnity製サンプル【Udon】
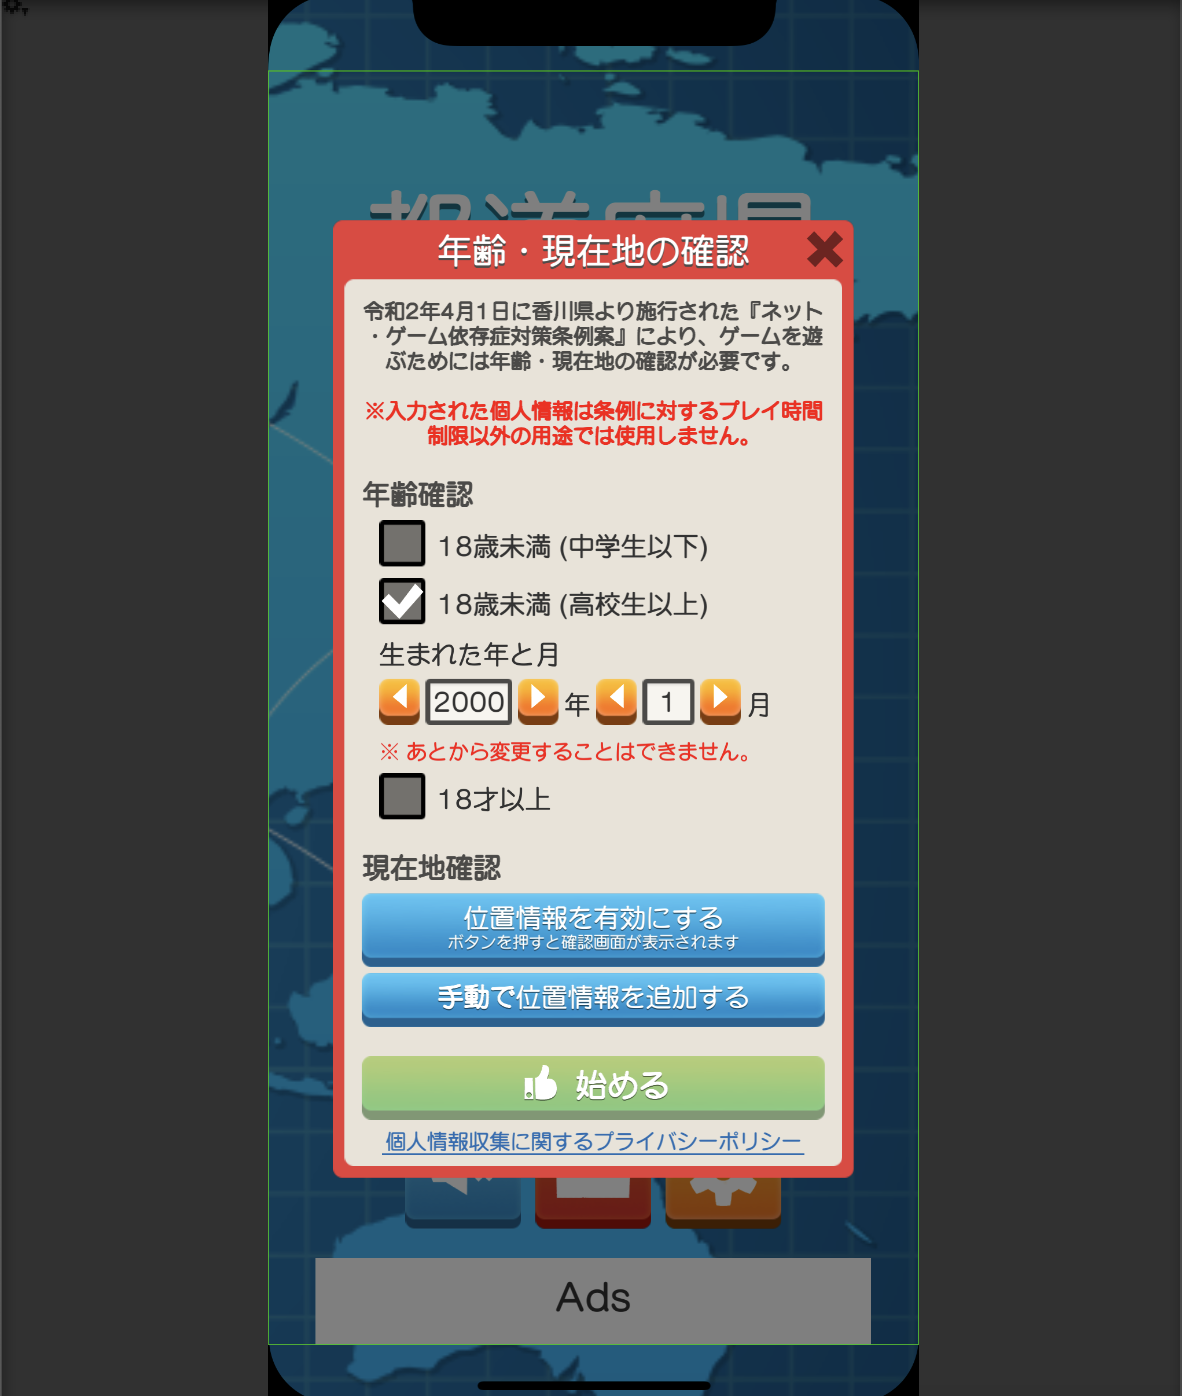
上記を踏まえ、以下のようなダイアログを実装してみました2。
GitHub: nkjzm/Udon
(Gif画像にはリポジトリには含まれていないフォント(URW MARU GOTHIC)と画像アセット(Simple UI)を使用しています)
サンプル(Udon)の使い方
リポジトリのReleasesから最新の
*.unitypackageをダウンロードし、Unityプロジェクトにインポートしてください。Google Geocoding APIを使用しているため、別途API Keyの取得が必要です。var popup = Instantiate(Prefab, Canvas.transform); popup.Open(onComplete: flg => { Debug.Log(flg ? "設定完了" : "未完了"); });表示の際には
Instantiateメソッドで生成し、Open()メソッドを呼んでください。ポイント①: 個人情報収集の目的を明記する
ダイアログ内では収集する目的や背景を説明した上で、これ以外の目的にしようしないことを明記しています。また、画面下部にはプライバシーポリシーのリンクも設置しています。
ポイント②: 年齢の確認
今回の用途では正確な生年月日は必要ないため、どの区分に該当するかどうかのみを質問する形式にしました。入力が容易であるというメリットもあります。
ただし時間の経過で区分が変わった場合に対応できないデメリットがあり、後から登録した区分を変更する機能は子どもが制限を解除するため悪用されるリスクが伴います。ゲームアプリにおいては課金上限額の設定のため年齢確認をすることがありますが、毎回未成年かどうかを質問する例(『どうぶつの森 ポケットキャンプ』)や、生まれた月までを登録して後から変更できない例(下記画像)、変更の際には運営への問い合わせが必要な例(『荒野行動』)などがあるようです。
出典: ブシロードとKLab、『ラブライブ!スクフェス』で年齢別課金上限を設定…未成年者保護のため | Social Game Info
ハイブリットな手法として、として、18歳未満の選択肢を答えた場合のみ「生まれた年と月」を入力してもらうような方法も良いかもしれません。
ポイント③: 二つの方法で位置情報を設定する
GPSを用いた位置情報取得では、iOSのシステムダイアログ上でユーザーに権限の許可をしてもらう必要があります。システムダイアログを表示する前に、きちんとユーザーに目的を伝えることが大切です。
↑ボタン内に確認画面が出る旨を表記しましたボタン押下後の画面は下記のようになっています。
↑左が取得が成功した場合、右が取得に失敗した場合
位置情報の取得が成功した場合、GPSの緯度経度からどの県にいるかを取得し表示しています。
取得に失敗した場合ですが、二通りの状況が考えられます。一つは端末自体で位置情報の使用が許可されていない場合で、「設定」アプリから位置情報を有効にしてもらう必要があります。もう一つはシステムダイアログで許可されなかった場合です。iOSの仕様ではシステムダイアログが表示されるのは「初めてそのアプリで位置情報を使おうとした時」のみで、一度許可されなかった場合は再度ダイアログを表示することはできません。許可してもらうためには先ほどと同様に「設定」アプリからの再設定が必要です。
GPSでの位置情報取得に加えて、「手動で位置情報を追加する」ボタンも設置しています。
これはガイドラインにある以下の記載に準拠するためのものです。
可能であれば、アクセスに同意しないユーザー向けに別の方法を用意してください。たとえば、位置情報の共有に同意しないユーザーには、住所を手動で入力できる機能を用意することができます。
位置情報の共有を必須にしてしまうとリジェクトされる可能性があるため、こういった対応をしておくとより安心かと思います。
ポイント④: プレイ制限の情報をユーザーに明示する
入力状況に応じてどんなプレイ制限が適用されるかを、リアルタイムに表示しています。18歳以上、もしくは香川県外にいる場合は、制限がかからない旨が表示されます。
こうした表示をすることで、制限が適用されるユーザーがきちんと内容を知ることができます。
また「ポイント①: 個人情報収集の目的を明記」を強化する意図もあり、入力された情報がどのように利用されているか示すことでユーザーより安心して使ってもらえるように思いました。
実装の解説
香川県かどうかの判定でいくつかのハマりポイントがあったので、簡単に解説したいと思います。
位置情報(座標)の取得
UnityでiOSの位置情報を取得する場合は
Input.locationを使います。まず端末自体の位置情報が有効かどうかを調べるため
Input.location.isEnabledByUserにアクセスします。ユーザーに位置情報取得の権限を許可してもらうシステムダイアログはInput.locationのいずれかの機能にアクセスした時点で表示されるため、このタイミングが該当します。// 端末自体の位置情報が有効か if (!Input.location.isEnabledByUser) { LocationSettingWarning.text = $"「設定」アプリから位置情報を有効にしてください"; LocationSettingWarning.color = Color.red; yield break; }ちなみにシステムダイアログが表示されるUnityアプリケーション自体はスリープ扱いになるため、入力待ちの非同期処理を書く必要なありません。
次に、
Input.location.statusの値に応じた処理を行います。メソッド全体を示します。IEnumerator GetLocation() { // 端末自体の位置情報が有効か if (!Input.location.isEnabledByUser) { LocationSettingWarning.text = $"「設定」アプリから位置情報を有効にしてください"; LocationSettingWarning.color = Color.red; yield break; } while (true) { var status = Input.location.status; switch (status) { case LocationServiceStatus.Stopped: Input.location.Start(); break; // 位置情報が有効になった場合 case LocationServiceStatus.Running: // Reverse Geocoding APIから件名を取得 var data = Input.location.lastData; StartCoroutine(GetAreaName(data.latitude, data.longitude)); yield break; // ユーザーが位置情報を許可しなかった場合 case LocationServiceStatus.Failed: LocationSettingWarning.text = $"「設定」アプリから位置情報を有効にしてください"; LocationSettingWarning.color = Color.red; yield break; default: break; } // 1秒毎に状態を再取得 yield return new WaitForSeconds(1f); } }はじめは
LocationServiceStatus.Stoppedが返ってくるためInput.location.Start()で開始を要求します。成功する場合はLocationServiceStatus.Initializingを経てLocationServiceStatus.Runningが返ってくるため、Input.location.lastDataから緯度経度の情報を取り出すことができます。ユーザーがパーミッションの許可をしなかったなどの理由で取得に失敗した場合はLocationServiceStatus.Failedが返ってくるため、再設定の旨を表示しています。難しいのが「位置情報の使用が許可されていないこと」を確認するためには、一度上記の処理を試みる必要がある点です。
Input.locationにアクセスした時点でシステムダイアログが表示されてしまうため、状態を確認する前にボタン押下のアクションを挟んでいます。二回目以降で許可されているかどうかを確認するためには初回のシステムダイアログが表示済みかどうかを判断する必要があるため、別途アプリ側で状態を保持する必要がありそうです。緯度経度から「県名」を取得
GoogleのGeocoding APIを使用しています。これは住所の文字列などから位置座標(緯度経度)を取得するためのAPIですが、Reverse geocodingと呼ばれる「緯度経度→住所」の機能も提供されています。
取得するためのURLはこのような形にになります。認証されたAPI Keyを発行する必要がある点に注意してください(無料枠の範囲内で利用可能)。
var url = $"https://maps.googleapis.com/maps/api/geocode/json?" +
$"latlng={lat},{lng}&result_type=administrative_area_level_1&key={API_KEY}&language=ja";
APIを叩くとこんなJSONが返ってきます。
{
   "plus_code" : {
      "compound_code" : "82RV+28 日本、香川県高松市",
      "global_code" : "8Q6P82RV+28"
   },
   "results" : [
      {
         "address_components" : [
            {
               "long_name" : "香川県",
               "short_name" : "香川県",
               "types" : [ "administrative_area_level_1", "political" ]
            },
            {
               "long_name" : "日本",
               "short_name" : "JP",
               "types" : [ "country", "political" ]
            }
         ],
         "formatted_address" : "日本、香川県",
         "geometry" : {
            "bounds" : {
               "northeast" : {
                  "lat" : 34.5646136,
                  "lng" : 134.4474078
               },
               "southwest" : {
                  "lat" : 34.0123081,
                  "lng" : 133.4465942
               }
            },
            "location" : {
               "lat" : 34.2225915,
               "lng" : 134.0199152
            },
            "location_type" : "APPROXIMATE",
            "viewport" : {
               "northeast" : {
                  "lat" : 34.5646136,
                  "lng" : 134.4474078
               },
               "southwest" : {
                  "lat" : 34.0123081,
                  "lng" : 133.4465942
               }
            }
         },
         "place_id" : "ChIJr363rNTcUzURsdqbibLWgS0",
         "types" : [ "administrative_area_level_1", "political" ]
      }
   ],
   "status" : "OK"
}
今回の実装では、
JsonUtilityを使って下記のように県名のみを取得しています。// 一部処理を抜き出して掲載 IEnumerator GetAreaName(float lat, float lng) { var url = $"https://maps.googleapis.com/maps/api/geocode/json?" + $"latlng={lat},{lng}&result_type=administrative_area_level_1&key={API_KEY}&language=ja"; var request = UnityWebRequest.Get(url); yield return request.SendWebRequest(); var response = JsonUtility.FromJson<Response>(request.downloadHandler.text); var prefecture = response.results?[0].address_components?[0].long_name; LocationProgress.text = $"あなたの現在地は<color=red>{prefecture}</color>です"; } [System.Serializable] class Response { public Result[] results; } [System.Serializable] class Result { public Adress[] address_components; } [System.Serializable] class Adress { public string long_name; }ちなみにテスト用にInspectorから
TestDummyLocationにチェックを入れると香川県庁の座標で試せるようになっています。if (TestDummyLocation) { // 香川県庁の座標に置き換える var lat = 34.340117f; var lng = 134.043312f; StartCoroutine(GetAreaName(lat, lng)); yield break; }参考: Get Started | Geocoding API | Google Developers
最後に
現在香川県では「ネット・ゲーム依存症対策条例」に対するパブリックコメントを募集しています。対象は香川県民もしくはゲーム事業者のみですが、意見のある方は是非公募してみてください。
香川県|香川県ネット・ゲーム依存症対策条例(仮称)素案についてパブリック・コメント(意見公募)を実施します
参考


- 投稿日:2020-01-26T00:26:01+09:00
iOS, Androidアプリの強制アップデート(サーバーレス)
はじめに
文字列→塩基配列の相互変換ツールをつくってみた(アプリ版)でつくったアプリ
これに強制アップデート機能(半強制で抜け道あり)をつけてみました。
特に必要なわけではないですがこの記事([iOS]アプリに強制アップデート機能を導入すべき理由と、簡単に実装する方法)をみてやりたいと思い実装してみました。
が!!サーバーを用意するのはめんどくさいと思いサーバーなしで強制アップデート機能のようなものをつけてみました。
iOS&Mac
方法
iTunes Search APIというのがあるらしくこれを使うとアプリの情報が取れるそうです。
下記のURLのアプリIDに指定のアプリを設定するとそのアプリ情報が取得できます。
https://itunes.apple.com/lookup?id=[アプリID]取得した情報からバージョンをみてBundleのバージョンと比較してアプリストアに遷移させるようにすれば強制アップデートのようなことができます。
ソース
AppStoreModel.swiftstruct AppStoreModel { private let version = Version(version: Bundle.main.version!) private var appId: String { #if targetEnvironment(macCatalyst) return "1494127578" #else return "1493994947" #endif } private var url: URL { return URL(string: "https://itunes.apple.com/lookup?id=\(appId)")! } var appStoreURL: URL { return URL(string: "itms-apps://itunes.apple.com/app/id\(appId)")! } func checkVersion(completion: @escaping ((Result<AppVersionState, AppVersionError>) -> ())) { let task = URLSession.shared.dataTask(with: url) { (data, response, error) in if let _ = error { completion(.failure(.network)) return } guard let data = data else { completion(.failure(.invalidData)) return } do { let appVersion = try JSONDecoder().decode(AppVersion.self, from: data) if let version = appVersion.version, Version(version: version) > self.version { completion(.success(.shouldUpdate)) } else { completion(.success(.noUpdate)) } } catch { completion(.failure(.invalidJSON)) } } task.resume() } } struct AppVersion: Decodable { struct Result: Codable { let version: String let trackName: String } let name: String? let version: String? private enum CodingKeys: String, CodingKey { case results = "results" } init(from decoder: Decoder) throws { let container = try decoder.container(keyedBy: CodingKeys.self) let results = try container.decodeIfPresent([Result].self, forKey: .results) name = results?.first?.trackName version = results?.first?.version } } struct Version { let major: Int let minor: Int let revision: Int } extension Version { init(version: String) { let versions = version.components(separatedBy: ".") self.major = versions[safe: 0].flatMap { Int($0) } ?? 0 self.minor = versions[safe: 1].flatMap { Int($0) } ?? 0 self.revision = versions[safe: 2].flatMap { Int($0) } ?? 0 } static func > (lhs: Version, rhs: Version) -> Bool { if lhs.major > rhs.major { return true } if lhs.major < rhs.major { return false } // lhs.major == rhs.major if lhs.minor > rhs.minor { return true } if lhs.minor < rhs.minor { return false } // lhs.major == rhs.major && lhs.minor == rhs.minor if lhs.revision > rhs.revision { return true } return false } } enum AppVersionError: Error { case network case invalidData case invalidJSON } enum AppVersionState { case shouldUpdate case noUpdate } extension Bundle { var version: String? { return Bundle.main.object(forInfoDictionaryKey: "CFBundleShortVersionString") as? String } }
SceneDelegateのfunc scene(_ scene: UIScene, willConnectTo...に下記を記載SceneDelegate.swiftguard let _ = (scene as? UIWindowScene) else { return } let appStoreModel = AppStoreModel() appStoreModel.checkVersion { [weak self] result in DispatchQueue.main.async { if case .success(.shouldUpdate) = result { let alertController = UIAlertController(title: "アップデート", message: "", preferredStyle: .alert) let action = UIAlertAction(title: "OK", style: .default, handler: { _ in UIApplication.shared.open(appStoreModel.appStoreURL) }) alertController.addAction(action) self?.window?.rootViewController?.present(alertController, animated: true) } } }なんかめっちゃ長くなった...
最初は
Version(version: version) > self.versionこのバージョン比較をversion != self.versionにしてたのですがこれだと審査のときに常にアラートが表示されリジェクトされましたこの方法はストアに遷移したあとにもう一回アプリを表示したら普通に使えるので強制アップデートとまではいえませんが、アップデートを促すことはできるのでまあいいかな。
Android
方法
in-app Updates APIというのがあるのでこれを使えばいい感じにやってくれるみたいです。
使えるのはAndroid 5.0 (API level 21) 以上です。
下記の参考サイトに丁寧に書いてくれています
- Android in-app Updates API 解説と雑感
- [Android] アプリ内アップデート AppUpdateManager / FakeUpdateManager ( in-app updates API ) のまとめ
ソース
ソースも参考サイトにあるのですが少しつまずきました...
manager.appUpdateInfo.addOnCompleteListener { task ->
            val info = task.result
            when (info.updateAvailability()) {
                UpdateAvailability.UPDATE_AVAILABLE -> {
                    manager.startUpdateFlowForResult(info, AppUpdateType.FLEXIBLE, activity, REQUEST_CODE)
                }
                else -> {
                }
            }
        }
上記のような実装をしているとエミュレータで実行すると下記のようなエラーが発生しました。
com.google.android.play.core.tasks.RuntimeExecutionException: com.google.android.play.core.internal.aa: Failed to bind to the service.
        at com.google.android.play.core.tasks.l.getResult(Unknown Source:18)
        at am10.dnaconverter.models.AppUpdateModel$checkAppVersion$1.onComplete(AppUpdateModel.kt:19)
        at com.google.android.play.core.tasks.a.run(Unknown Source:23)
        at android.os.Handler.handleCallback(Handler.java:883)
        at android.os.Handler.dispatchMessage(Handler.java:100)
        at android.os.Looper.loop(Looper.java:214)
        at android.app.ActivityThread.main(ActivityThread.java:7356)
        at java.lang.reflect.Method.invoke(Native Method)
        at com.android.internal.os.RuntimeInit$MethodAndArgsCaller.run(RuntimeInit.java:492)
        at com.android.internal.os.ZygoteInit.main(ZygoteInit.java:930)
     Caused by: com.google.android.play.core.internal.aa: Failed to bind to the service.
        at com.google.android.play.core.internal.t.b(Unknown Source:82)
        at com.google.android.play.core.internal.t.a(Unknown Source:0)
        at com.google.android.play.core.internal.v.a(Unknown Source:4)
        at com.google.android.play.core.internal.r.run(Unknown Source:0)
        at android.os.Handler.handleCallback(Handler.java:883)
        at android.os.Handler.dispatchMessage(Handler.java:100)
        at android.os.Looper.loop(Looper.java:214)
        at android.os.HandlerThread.run(HandlerThread.java:67)
これは一部の実機でも起こるようで
addOnCompleteListenerを使う場合はtaskが成功したかを下記のようにしっかりチェックしないといけないようですmanager.appUpdateInfo.addOnCompleteListener { task -> if (task.isSuccessful) { val info = task.result when (info.updateAvailability()) { UpdateAvailability.UPDATE_AVAILABLE -> { manager.startUpdateFlowForResult(info, AppUpdateType.FLEXIBLE, activity, REQUEST_CODE) } else -> { } } } else { task.exception.printStackTrace() } }参考サイトは
addOnSuccessListenerを使ってました全体としては下記のような実装になりました。
gradleに下記を追加
implementation 'com.google.android.play:core:1.6.4' implementation 'com.google.android.material:material:1.0.0' // Snackbar用AppUpdateModel.ktclass AppUpdateModel(context: Context) { val manager = AppUpdateManagerFactory.create(context) var listener: InstallStateUpdatedListener? = null val REQUEST_CODE = 100 fun checkAppVersion(activity: Activity, callback: (() -> (Unit))?) { listener = makeListener(callback) manager.registerListener(listener) manager.appUpdateInfo.addOnSuccessListener { info -> when (info.updateAvailability()) { UpdateAvailability.UPDATE_AVAILABLE -> { manager.startUpdateFlowForResult(info, AppUpdateType.FLEXIBLE, activity, REQUEST_CODE) } else -> { } } } } // ミス(20200126修正ここもCompleteじゃなくてSuccessじゃないと落ちる) fun addOnSuccessListener(callback: (() -> (Unit))?) { manager.appUpdateInfo.addOnSuccessListener { info -> if (info.installStatus() == InstallStatus.DOWNLOADED) { callback?.invoke() } } } fun completeUpdate() { manager.completeUpdate() } private fun makeListener(callback: (() -> (Unit))?) : InstallStateUpdatedListener { return InstallStateUpdatedListener { if (it.installStatus() == InstallStatus.DOWNLOADED) { callback?.invoke() manager.unregisterListener(listener) } } } }MainActivity.ktoverride fun onCreate(savedInstanceState: Bundle?) { super.onCreate(savedInstanceState) setContentView(R.layout.activity_main) appUpdateModel = AppUpdateModel(this) appUpdateModel.checkAppVersion(this) { popupSnackbarForCompleteUpdate() } } override fun onResume() { super.onResume() appUpdateModel.addOnSuccessListener { popupSnackbarForCompleteUpdate() } } private fun popupSnackbarForCompleteUpdate() { Snackbar.make(findViewById(R.id.root_layout), "ダウンロード完了", Snackbar.LENGTH_INDEFINITE) .setAction("更新") { appUpdateModel.completeUpdate() } .show() }Google Playストアのアプリが更新判定を行うらしいのでどの時点で更新情報が受け取れるのかはわかりません。
これも戻るボタンとかで回避できるらしいので強制アップデートとまではいえないかもしれません。(そもそもGoogle Playストアのアプリがないと取れない?)
20200127追記
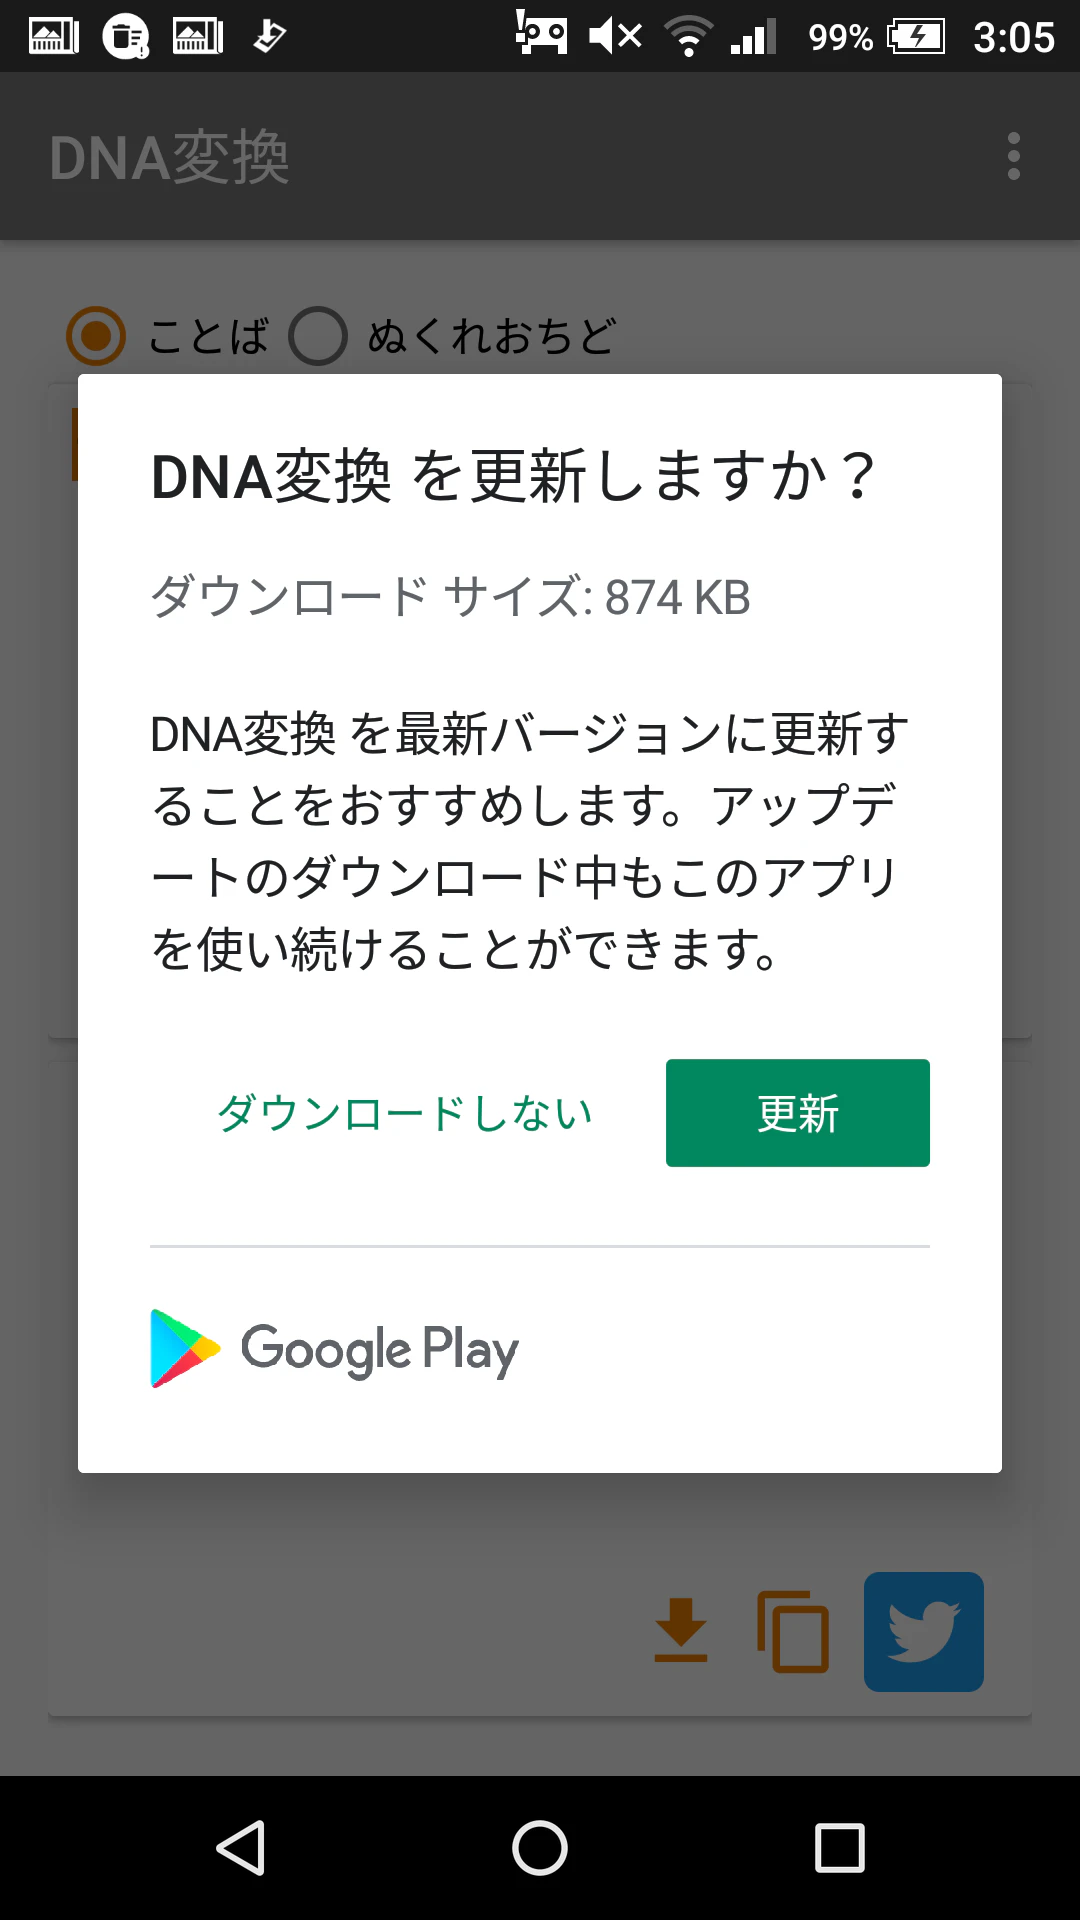
やっぱりストアに公開されてから即時反応というわけではなく、2端末(Android 6.0.1, 9.0)で確認したところ、公開されてから2~3時間後は特に反応はなく、10時間後に再度アプリを起動したところ無事下記の画面が表示されました
おまけ
サーバー用意してバージョン情報のJSONファイル置くのめんどくさいと思って今回の方法で実装しましたが、GitHubにJSONファイル置けばいいんじゃね?ふと思いました。(iOSアプリをリリースしてればもしかしたらプライバシーポリシー用にGitHub使ってるかもしれないですし)
試しにJSONファイル置いてるリポジトリでやってみたらJSON取れました
github.comのところをraw.githubusercontent.comするといけそうです!!さいごに
特にこのアプリに強制アップデート必要ないですが、試しに実装してみましたmm
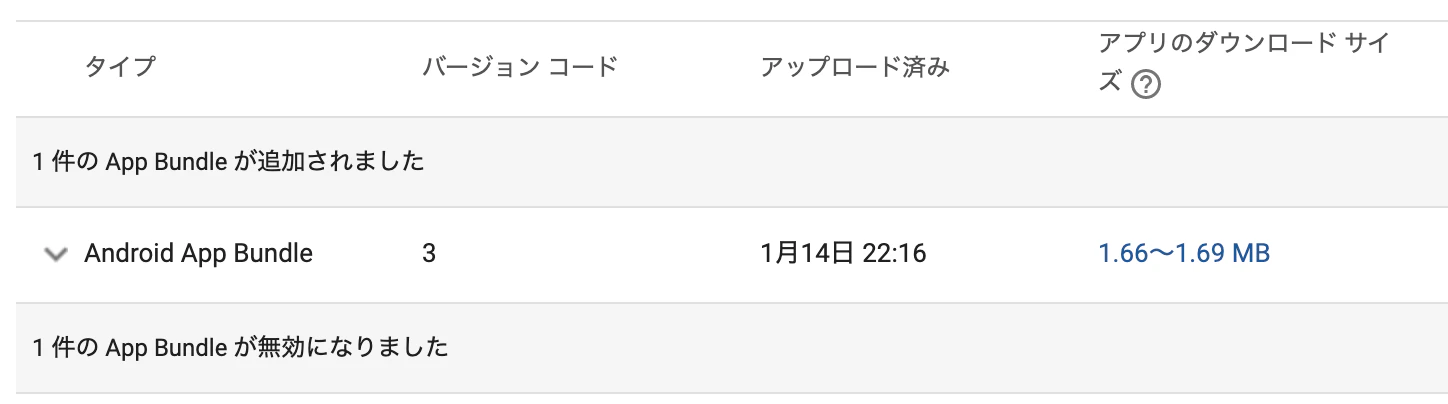
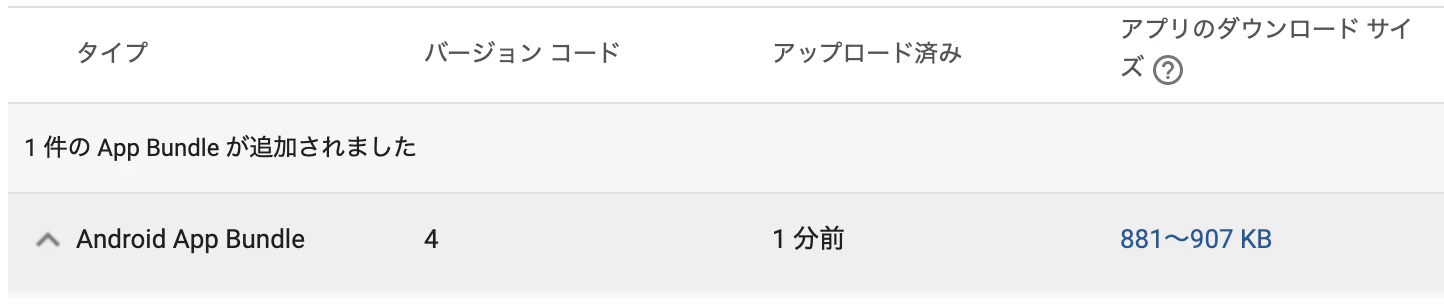
関係ないですがAndroidのアプリを最適化しようと思って下記をgradleに追加したらサイズがめっちゃ小さくなりました。
release {
    minifyEnabled true
    shrinkResources true
    proguardFiles getDefaultProguardFile('proguard-android-optimize.txt'), 'proguard-rules.pro'
}
before after アプリサイズ 50%OFF !!!