- 投稿日:2020-01-26T22:03:31+09:00
DockerでMysqlコンテナを作る
この記事について
dockerコマンドをよく忘れるのでメモしておきます
mysqlを例にしています。
ただの備忘録ですdocker pull Dockerイメージの取得
docker pull mysqldocker images -a Docker イメージの一覧を表示
docker images -a
REPOSITORY          TAG                 IMAGE ID            CREATED             SIZE
mysql               latest              3a5e53f63281        11 days ago         465MB
mysql               <none>              d5127813070b        2 years ago         407MB
docker run コンテナの作成
docker run --name mysql-for-test -e MYSQL_ROOT_PASSWORD=password -d -p 13307:3306 mysql:latest-dはコンテナをバックグラウンド実行するオプション
docker rundocker start [name] コンテナの起動
docker start mysql-for-test
mysql-for-test
docker ps -a 現在実行中のコンテナの確認
docker ps -a
CONTAINER ID        IMAGE               COMMAND                  CREATED             STATUS              PORTS                                NAMES
a0371102cea6        mysql:latest        "docker-entrypoint.s…"   4 minutes ago       Up 4 minutes        33060/tcp, 0.0.0.0:13307->3306/tcp   mysql-for-test
docker stop [name] コンテナの停止
docker stop mysql-for-test
mysql-for-test
docker rmi イメージ削除
docker rmi mysql:latest
Untagged: mysql:latest
Untagged: mysql@sha256:f1df505c4c6e8eae599a0482e3bde3e761cd700c00cbc371a8161648a26817c0
Deleted: sha256:3a5e53f6328162f8d8bc70131658a721e8e7dcf7495f2fae7cfe4febdbcfefbb
Deleted: sha256:f2533710d884b7eb9329d63844e1504c2d166cdb9139be622f9a5ed5dbd8044c
Deleted: sha256:573b1ee1cfefd4e3c18ade60576f03e275e28b73d985ce551ae78b1a93a81ace
Deleted: sha256:a7de8634d9c2f1188b74aceb18c048e37ea86eace1c4614996e76abc065e71fb
Deleted: sha256:96b788fd084094ed5b2b00b29865ec25bdba4aba633b8a86bb7e485df21e9dfb
Deleted: sha256:c1f124fbef5b35b53dadbd9caa1a272bde42490963ec68daa0a0e52a516cf5f9
Deleted: sha256:5f7c68324b959d2c806db18d02f153bc810f9842722415e077351bc834cc8578
Deleted: sha256:338fc0cd3fb4b87a2b83d274e8fbf475fbde19947c4ac5c5eb6e981a6fb0e8f0
Deleted: sha256:f7a4ccab931f1d1e861961eb951a7806d91ccb375e737fe1f84282f6bbafd2be
Deleted: sha256:f388e1092f8fb931a3cd07a7381bd9707d19526ff81f8b624e932f4919c27a3e
Deleted: sha256:e209b7a884b4d2e9d56bbac40ced48f2caa6a19e7ad6eb6dd20ff754f3af2c5d
Deleted: sha256:2401cf11c5455d505ef49657afcc709197ffcdfc9bd732508e9b62578a30b3a5
Deleted: sha256:814c70fdae62bc26c603bfae861f00fb1c77fc0b1ee8d565717846f4df24ae5d
コンテナ起動時はコンテナに使用しているイメージは削除できない
MySQL Workbenchで接続する設定
上記の例だと
IP 127.0.0.1
Port 13307
username root
Password password
で繋がるはずdocker volume ls Dockerボリュームを表示する
docker volume ls
DRIVER              VOLUME NAME
local               4af0b51aff028e66d409e273378cbae94384a5a19ad4d2b2e22020a050c2f1ab
docker volumeとはデータを永続化する場所とのこと
Mysqlのコンテナを作成するとVolumeも作成されています。
イメージやコンテナを削除してもVolumeは削除されない
Docker、ボリューム(Volume)について真面目に調べたdocker inspect [ボリューム名] Dockerボリュームの詳細を表示する
docker inspect 4af0b51aff028e66d409e273378cbae94384a5a19ad4d2b2e22020a050c2f1ab
[
    {
        "CreatedAt": "2020-01-26T11:30:51Z",
        "Driver": "local",
        "Labels": null,
        "Mountpoint": "/var/lib/docker/volumes/4af0b51aff028e66d409e273378cbae94384a5a19ad4d2b2e22020a050c2f1ab/_data",
        "Name": "4af0b51aff028e66d409e273378cbae94384a5a19ad4d2b2e22020a050c2f1ab",
        "Options": null,
        "Scope": "local"
    }
]
docker volume rm [ボリューム名] Dockerボリュームを削除する
docker volume rm e50120cd5bd6f95e469e056390285e62d4607cb171578ab965c404bd9cc6ac35
e50120cd5bd6f95e469e056390285e62d4607cb171578ab965c404bd9cc6ac35
使用中のボリュームを削除しようとした場合は以下のようにエラーが出て削除できません
docker volume rm e78cc14f113a5604b8ce19be097b9a293bf10e35ea17d0643ebfe8f1b875e416
Error response from daemon: remove e78cc14f113a5604b8ce19be097b9a293bf10e35ea17d0643ebfe8f1b875e416: volume is in use - [d78ae59aa2db6328999a0a02b552a72f5f8bf7ef047673778323fe1b4d276c7a]
docker volume prune 停止しているコンテナのDockerボリュームを一括削除する
docker volume prune
WARNING! This will remove all local volumes not used by at least one container.
Are you sure you want to continue? [y/N] y
Deleted Volumes:
9f2e7aece432721df0c486f424deaac4fd2ec599164f5dc942c68cb81cbed8b1
4af0b51aff028e66d409e273378cbae94384a5a19ad4d2b2e22020a050c2f1ab
d8158a2830563c99eb8907feacbe85da49f7186e9d4464d6e4ccc0666cd66b44
44e1f3a93792855219d361a11381fc5ce21eb7bac7f6940ef2617ebcb916c74e
d296e6bf49ecb4da2a84589ce1d7439621eedd1242fc979cfcff6636e175f568
e4a3ffc963c51b5d86e787344ee483215c354a8f72bbe6640a51d9c9760b8e5c

Total reclaimed space: 891.7MB
docker volume create [ボリューム名] Dockerボリュームを新規作成する
docker volume create mysql-test-volume
mysql-test-volume
Dockerボリュームを指定してコンテナを作成する
docker run --name mysql-for-test -v mysql-test-volume:/var/lib/mysql -e MYSQL_ROOT_PASSWORD=password -d -p 13307:3306 mysql:latest
eb61f634a9b04e86e81470096489938cac77682e20be551c961f7395d18fc836
これでデータが永続化される・・・はず。
今度書く
docker-compose使う方法
- 投稿日:2020-01-26T17:08:00+09:00
【Rails】MySQL2がbundle installした時エラーになったので対処法を調べてみた
スクールの課題で
Gitからアプリをクローンし、
自身のPCで環境構築する際にbundle installしたら、エラーを出したので、対処法を調べて見ました。
以下、エラー時の状況と対処手順です。エラー内容
gemのインストールをする為、bundle installを行ったところエラー発生Gem::Ext::BuildError: ERROR: Failed to build gem native extension. current directory: /Users/motoike/.rbenv/versions/2.5.1/lib/ruby/gems/2.5.0/gems/mysql2-0.4.10/ext/mysql2 /Users/motoike/.rbenv/versions/2.5.1/bin/ruby -r ./siteconf20200126-32549-89onao.rb extconf.rb checking for rb_absint_size()... yes checking for rb_absint_singlebit_p()... yes checking for ruby/thread.h... yes r ruby/thread.h... yes checking for rb_thread_call_without_gvl() in ruby/thread.h... yes checking for rb_thread_blocking_region()... no checking for rb_wait_for_single_fd()... yes checking for rb_hash_dup()... yes checking for rb_intern3()... yes checking for rb_big_cmp()... yes ----- Using mysql_config at /usr/local/opt/mysql@5.6/bin/mysql_config ----- checking for mysql.h... yes checking for errmsg.h... yes checking for SSL_MODE_DISABLED in mysql.h... no checking for MYSQL_OPT_SSL_ENFORCE in mysql.h... no checking for MYSQL.net.vio in mysql.h... yes checking for MYSQL.net.pvio in mysql.h... no checking for MYSQL_ENABLE_CLEARTEXT_PLUGIN in mysql.h... yes ----- Don't know how to set rpath on your system, if MySQL libraries are not in path mysql2 may not load ----- ----- Setting libpath to /usr/local/opt/mysql@5.6/lib ----- creating Makefile current directory: /Users/motoike/.rbenv/versions/2.5.1/lib/ruby/gems/2.5.0/gems/mysql2-0.4.10/ext/mysql2 make "DESTDIR=" clean current directory: /Users/motoike/.rbenv/versions/2.5.1/lib/ruby/gems/2.5.0/gems/mysql2-0.4.10/ext/mysql2 make "DESTDIR=" compiling client.c compiling infile.c compiling mysql2_ext.c compiling result.c result.c:326:40: warning: incompatible pointer types assigning to 'my_bool *' (aka 'char *') from 'bool *' [-Wincompatible-pointer-types] wrapper->result_buffers[i].is_null = &wrapper->is_null[i]; ^ ~~~~~~~~~~~~~~~~~~~~ result.c:328:40: warning: incompatible pointer types assigning to 'my_bool *' (aka 'char *') from 'bool *' [-Wincompatible-pointer-types] wrapper->result_buffers[i].error = &wrapper->error[i]; ^ ~~~~~~~~~~~~~~~~~~ 2 warnings generated. compiling statement.c linking shared-object mysql2/mysql2.bundle ld: library not found for -lssl clang: error: linker command failed with exit code 1 (use -v to see invocation) make: *** [mysql2.bundle] Error 1 make failed, exit code 2 Gem files will remain installed in /Users/motoike/.rbenv/versions/2.5.1/lib/ruby/gems/2.5.0/gems/mysql2-0.4.10 for inspection. Results logged to /Users/motoike/.rbenv/versions/2.5.1/lib/ruby/gems/2.5.0/extensions/x86_64-darwin-19/2.5.0/mysql2-0.4.10/gem_make.out An error occurred while installing mysql2 (0.4.10), and Bundler cannot continue. Make sure that `gem install mysql2 -v '0.4.10' --source 'https://rubygems.org/'` succeeds before bundling. In Gemfile: mysql2解決する為の手順
ターミナルで
brew info opensslを実行します。openssl@1.1 is keg-only, which means it was not symlinked into /usr/local, because openssl/libressl is provided by macOS so don't link an incompatible version. If you need to have openssl@1.1 first in your PATH run: echo 'export PATH="/usr/local/opt/openssl@1.1/bin:$PATH"' >> ~/.zshrc For compilers to find openssl@1.1 you may need to set: export LDFLAGS="-L/usr/local/opt/openssl@1.1/lib" export CPPFLAGS="-I/usr/local/opt/openssl@1.1/include" For pkg-config to find openssl@1.1 you may need to set: export PKG_CONFIG_PATH="/usr/local/opt/openssl@1.1/lib/pkgconfig"
export LDFLAGS、export CPPFLAGSに着目します。$ bundle config --local build.mysql2"--with-cppflags=-I/usr/local/opt/openssl@1.1/include" Settings for `build.mysql2--with-cppflags=-I/usr/local/opt/openssl@1.1/include` in order of priority. The top value will be usedと実行してから、
$ bundle config --local build.mysql2 "--with-ldflags=-L/usr/local/opt/openssl@1.1/lib"
You are replacing the current local value of build.mysql2, which is currently nil
と実行後、再度
bundle installする事で、インストールが出来ました。
- 投稿日:2020-01-26T13:43:43+09:00
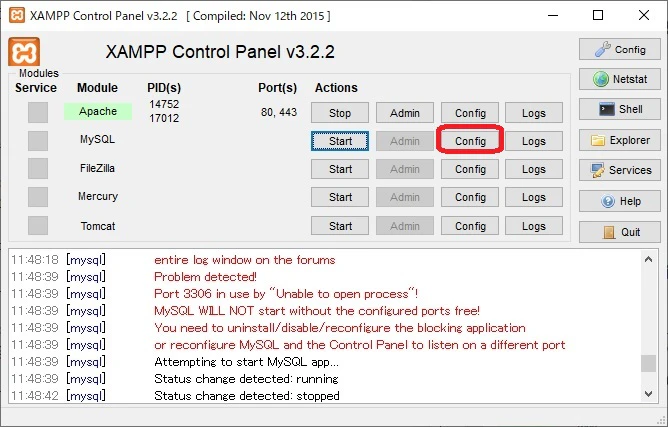
xamppでmysqlを使う設定(ポート番号変更~rootパスワード設定まで)
xampp(7.2.4)でmysqlを使うには
sqlite3ではなく、mysqlを使ってみたい。
と思ったのだが、数々の難問が降りかかってきた。
そのうちの幾つかを記録したい。1.xamppのコントロールパネルからmysqlが起動しない。
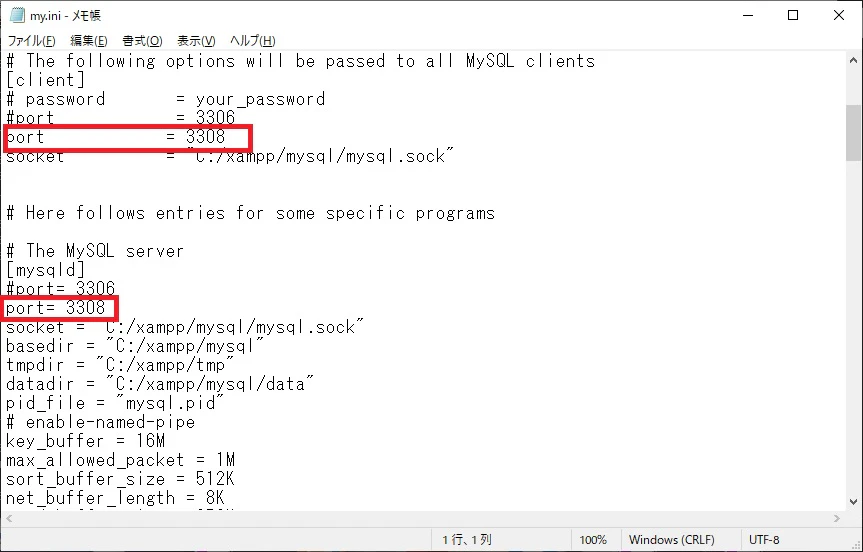
※イメージはポート番号変更後
configを右クリックでmy.iniを表示。
赤枠のようにポート番号を変更
3306がデフォルトらしいが、このままだと起動できないので「3308」に変更
無事にコンパネから、mysqlサービスが起動できた
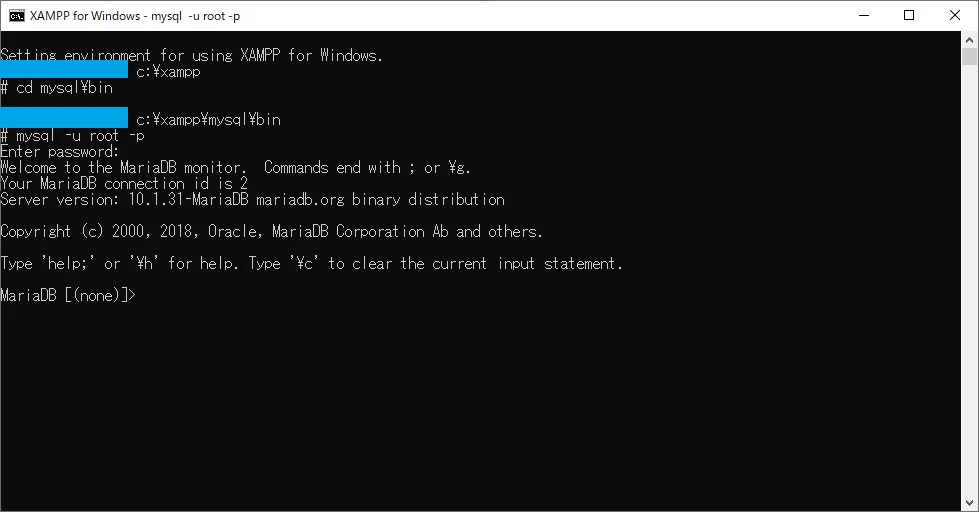
2.コンパネのshellから、mysqlのrootパスワードを設定
コンパネのshellを起動し、
「xamppのインストールディレクトリ\mysql\bin」まで移動。ディレクトリに移動後
「mysql -u root -p」を入力後
「Enter password」でエンターキーを押下。(ここは空パスワードでok)
接続できることが確認できた。
管理者パスワードを設定するために下記コマンドを入力する。
「mysqladmin -u root password」
を入力すると、「New password」が表示されたら、
自分で決めたパスワードを入力する。
とりあえず、rootパスワードの変更が完了。
※ここから先データベース作成等は、このshell(黒画面)から行うことになる。


- 投稿日:2020-01-26T11:57:01+09:00
mysql server(mysqld)の起動をn回リトライして待つshellコマンドとmakefileを書いた
この記事の対象読者
- mysql serverの起動を待つスクリプトが欲しい
docker-compose で mysqlを使っているが上手く初期化できない
- なぜか初期化処理がbuildプロセスだけ失敗する
以下のエラーでググってhostを直しても一向に直らない
ERROR 2013 (HY000): Lost connection to MySQL server at 'reading initial communication packet', system error: 0TL;DR
mysql server(mysqld) の起動を待つ処理を入れましょう。
通常であればこれでいいと思います

$ mysqladmin --wait --count 3 ping || exit 1
docker-composeだとちょっと癖があるので上記以外で対処します。
shellはこんな感じ
// 5回繰り返す
for i in 1 2 3 4 5; do mysqladmin ping &>/dev/null && break || sleep 1  && [ 5 -eq $i ] && exit 1; done

// 出来るまで繰り返す
until (mysqladmin ping &>/dev/null) do echo '.' && sleep 1; done
人によってはこっちでもいいかも: 処理が成功するまで実行しつづける@katzchang
makefile
mysql/lifecheck:
    until (mysqladmin ping &>/dev/null) do echo '.' && sleep 1; done

mysql/wait:
    which mysqladmin
    @echo "waiting boot mysql..."
    $(MAKE) mysql/lifecheck
mysql server(mysqld)の起動を待つshellコマンドとmakefileを書いた
mysql server(mysqld)で起動直後にサーバ接続ができないケースがあった。
困ったので接続できるまでn回リトライし続けるshellコマンドと makefileを書いた。
無限に待ちたいわけではない ので今回は
n回と言う制約を持たせる。僕はdocker-composeを使っているのでそれ前提で話をすすめる。
同じく困ってる人はいるんじゃないかな、と思ったのでメモる。
docker-compose で mysqlコンテナへ起動直後に接続できない!
今回は
docker-composeでmysqlのコンテナを立てるケースを考える。コンテナのbuild直後にmysqlに接続できないことがあった。
これでは、buildしたあとにエラーが起きDBの初期化処理が続けてできない。
マイグレーションもできないし、設定もできなくて困る。
コンテナ起動直後はmysql server(mysqld)が立ち上がっていない。
docker containerが立ち上がった直後はmysql server(mysqld)がまだ起動していない。
mysql client(mysqladmin)から接続を試みるとこのエラーが出る。ERROR 2013 (HY000): Lost connection to MySQL server at 'reading initial communication packet', system error: 0エラーメッセージでぐぐるとhostの設定が足りないとの記事が出てきてめちゃめちゃハマった。
そうじゃない。
sleep n秒が1番簡単な解決方法
マイグレーションなどの処理の前に sleep 60 する
mysql serverのデーモン起動(mysqld)まで待てばいいのでこれでok。起動までリトライしたい
60秒を超えてmysql serverが起動した場合、
sleep 60だと対応できない。
時間 or n回 リトライするような作りになっていればよい。How do I write a retry logic in script to keep retrying to run it upto 5 times? より拝借
for i in 1 2 3 4 5; do command && break || sleep 1; doneこれを使えば
5回, 1秒ごとに 成功するまでcmdを繰り返す状態を作り出せる。mysql serverのlifecheckは
mysqladmin pingで行える。for i in 1 2 3 4 5; do mysqladmin ping && break || sleep 1 ; doneこれだと mysql serverが起動してようとしてなろうと次の処理へ行ってしまう。
そこで最終ループのときに
exit 1で抜けるようにしたfor i in 1 2 3 4 5; do mysqladmin ping && break || sleep 1 && [ 5 -eq $i ] && exit 1; ; donemakefile で rangeを指定する
build中のタスクランナーとしてmakefileを使っている。
n回処理する記述は以下のように書ける。
RETRY_COUNT=30
RETRY_RANGE=$(shell seq 1 $(RETRY_COUNT) | xargs)

mysql/lifecheck:
    for i in $(RETRY_RANGE); do mysqladmin ping &>/dev/null && break || echo '.' && sleep 1  && [ $(RETRY_COUNT) -eq $$i ] && exit 1; done

mysql/wait:
    which mysqladmin
    @echo "waiting boot mysql..."
    $(MAKE) mysql/lifecheck
無限に続ける方はこっち。こっちの方が仕事が明確
mysql/lifecheck:
    until (mysqladmin ping &>/dev/null) do echo '.' && sleep 1; done

mysql/wait:
    which mysqladmin
    @echo "waiting boot mysql..."
    $(MAKE) mysql/lifecheck
- 投稿日:2020-01-26T03:14:02+09:00
CentOS 8とmysqlで WordPress 構築
環境
CentOS 8.0.1905(Conoha VPS)
WordPress
Nginx
mysql初めに
WordPressの環境を作りたく、作ってみた思ったより簡単にできたので
手順メモ。フロー
1.Nginxインストール
2.mysqlインストール
3.phpインストール
4.phpの拡張機能インストール
5.db作成
6.wordpressのインストール
7.Nginx設定
8.完了手順
LEMP環境を作成
LEMP…Linux,Nginx,Mysql,Phpの頭文字をとったもの。LAMPは知ってたけど。
遅れながら初耳。
という訳でVPSとかでOSまでのインストールまでは勝手にやってくれている前提でやってみる。まずはシステムのアップデートdnfupdatednf updatednfっていうのも初めて。調べてみるとyumの後継だとか。ほほう。ラズパイだとapt-getとかだよね(多分)
次、Nginxをインストール。install_Nginxdnf install nginx #再起動時に自動で起動するように設定 systemctl enable --now nginx #状態をチェック systemctl status nginxnginxのインストール
inginx_status#以下のように表示されていればOKそう。 ● nginx.service - The nginx HTTP and reverse proxy server Loaded: loaded (/usr/lib/systemd/system/nginx.service; enabled; vendor preset: disabled) Active: active (running) since Wed 2019-10-09 02:57:23 EDT; 10s ago #…(略) #うまくいってないと以下のような表示がある Active: failed (Result: exit-code)firewall#firewallのポート設定http (80) https(443)を許可しておく firewall-cmd --add-port = 80 / tcp --permanent firewall-cmd --reloadここまでで問題なければ
http://サーバーのIPアドレス
でブラウザを叩くとWelcome to Nginx なるページが表示されればOK。お次はmysqlのインストール
mysqlのインストール
install_mysql#これで一撃だった dnf install @mysql #インストール後はおなじみサービス起動と自動起動設定 systemctl start mysqld systemctl enable mysqld #mysqlの初期セキュリティ設定もついでにやっとく詳しい内容はググった。対話形式の設定なので躓く事はないかと。 mysql_secure_installation #動作確認(ログインできるか確認する) mysql -u root -pmysqlはいったん完了。次PHP
phpのインストール
install_php#これで一撃だった dnf install php-cli php-json php-opcache php-xml php-gd php-curl #phpも自動起動設定 systemctl enable --now php-fpm #動作確認 vi /usr/share/nginx/html/test.php #vimで開いたら以下のコードを書く <?php phpinfo(); ?>ファイルを保存してブラウザで「http://サーバーのIPアドレス/test.php」を叩いて
phpinfoが表示されればOK。ファイル削除#確認が完了したらテストファイルは削除 rm -rf /var/www/html/test.phpphpの拡張機能インストール
CentOS 8でWordPressを実行するために必要なphpの拡張機能のインストールをする。
PHPExtensionsdnf install php-cli php-json php-opcache php-xml php-gd php-curここからwordpress構築に向けてDBをいじる。
DB作成
login_mysql#rootユーザで乗り込む mysql -u root -p#db作成(名前は任意でOK) create database wordpressdb; #ユーザー作成と権限設定と設定反映 create user wpadmin@localhost identified by 'StrongP@432#'; grant all on wordpressdb.* to wpadmin@localhost; flush privileges; quitwordpressのインストール
install_wordpress#wordpress日本語版公式サイトからダウンロード wget https://ja.wordpress.org/latest-ja.tar.gz #wordpress用のフォルダー作成(フォルダー名は任意) mkdir /usr/share/nginx/wp.example.com #解凍 tar xzf wordpress-5.3.2-ja.tar.gz -C /usr/share/nginx/wp.example.com/ --strip-components=1 #設定ファイルをコピー cp /usr/share/nginx/wp.example.com/wp-config-sample.php /usr/share/nginx/wp.example.com/wp-config.php #設定ファイルを開く vi /usr/share/nginx/wp.example.com/wp-config.phpwp-config.php/** MySQL データベースのユーザー名 */ define( 'DB_USER', 'wpadmin' ); /** MySQL データベースのパスワード */ define( 'DB_PASSWORD', 'StrongP@432#' ); /** MySQL のホスト名 */ define( 'DB_HOST', 'localhost' ); /** データベースのテーブルを作成する際のデータベースの文字セット */ define( 'DB_CHARSET', 'utf8' ); /** データベースの照合順序 (ほとんどの場合変更する必要はありません) */ define( 'DB_COLLATE', '' );で、いったん保存。
認証ユニークキーを取得する。getkeycurl -s https://api.wordpress.org/secret-key/1.1/salt/ define('AUTH_KEY', 'hogehoge'); define('SECURE_AUTH_KEY', 'hogehogehogehoge'); define('LOGGED_IN_KEY', 'hgoehogheohgoehgoehoge'); define('NONCE_KEY', 'hogehoghoehgoehgoehoehgoehoge'); define('AUTH_SALT', 'hogehogehogehogehogehogheogehoge'); define('SECURE_AUTH_SALT', 'hogehogehogheogheohgoehgoehgoehogheogho'); define('LOGGED_IN_SALT', 'hogehogehogheogheohgoehgoehgoehoghe'); define('NONCE_SALT', 'hogehogehogheogheohgoehgoehoge');帰ってきた内容をwp-config.phpにコピペ
次はnginxの設定ファイル作成。Nginx設定
nginx_settingvi /etc/nginx/conf.d/example.confexample.confserver { listen 80 default_server; server_name example.com; root /usr/share/nginx/example.com; access_log /var/log/nginx/access_example.com.log; error_log /var/log/nginx/error_example.com.log; index index.php; location / { try_files $uri $uri/ /index.php?$args; } location ~ \.php$ { fastcgi_pass unix:/run/php-fpm/www.sock; fastcgi_param SCRIPT_FILENAME $document_root$fastcgi_script_name; include fastcgi_params; fastcgi_index index.php; } error_page 404 /404.html; location = /40x.html { } error_page 500 502 503 504 /50x.html; location = /50x.html { } }作り終わったら、ファイル所有者を変更。
chwonchown -R nginx:nginx /usr/share/nginx/example.com/Nginxを再起動。
restartsystemctl restart nginx問題なければサーバーのブラウザのIPアドレスを指定すると
wordpressの初期設定画面が表示されるので、あとは画面の表示に従って設定すればOK。
次はwordpressのセキュリティ周りの設定がないか気になるから調べよ。今回はここまで。
初めての記事を書いたけど、書きなれてないせいか時間がかかるなぁ。。参考サイト
https://kifarunix.com/install-lemp-stack-on-centos-8/
https://kifarunix.com/install-wordpress-with-nginx-and-mysql-8-on-centos-8/
- 投稿日:2020-01-26T00:20:25+09:00
Rails6 decimal型のカラムに格納されたデータの文字数を取得する
目的
- devimal型のカラムに格納されたデータの文字数を取得する方法をまとめる。
経緯
- Rails6のアプリでツイート用のテンプレートを作成したい。
- そのテンプレート内容は140文字以内に制限したい。
- そのテンプレート内容はデータベースの複数の特定カラムに格納されているもので構成される。
- 複数の特定カラムのデータ型はtext型とdecimal型が混在している。
結論
- decimal型のデータの文字数は
.to_sで一旦文字列に変更してから.lengthで文字数を抽出する。詰まったところ
- decimal型の値を
.lengthのみで文字数を抽出しようとした。- そもそも数値に
.lengthメソットは使用できない。解決方法
- decimal型の値の文字列は
.to_iで一旦文字列に変更してから.lengthで文字数を抽出した。下記に文字数の抽出方法を記載する。
decimal型の値.to_s.length今回の具体例
下記にテンプレートのビューファイルの内容を記載する。(下記に記載される内容を全て含めて140文字以内にしたい。説明のために空行を入れているため改行は考慮しない。)
<p>
<!-- postsテーブルのcontentカラムの内容(text型) -->
<%= @post.content %><br>

<!-- postsテーブルのtoday_study_timeの内容(decimal型) -->
today: <%= @post.today_study_time %> h<br>

<!-- postsテーブルのstudy_timeの内容(decimal型) -->
total: <%= @post.study_time %> h<br>

<!-- postsテーブルのfree_commentの内容(text型) -->
<%= @post.free_comment %><br>

<!-- postsテーブルのhash_tagの内容(text型) -->
#<%= @post.hash_tag %>
</p>
コントローラファイルで前述のデータベースから取得した値の文字列のトータルを140文字以下になっているかの処理を記載した。
下記に処理を記載する。(今回の件を説明することに最小限のコードを記載する)
#ビューから受け取った情報を@postに格納
@post = Post.new(content: params[:content],
                 study_time: params[:'study_time'],
                 today_study_time: params[:'study_time'],
                 hash_tag: params[:hash_tag],
                 user_id: @current_user.id,
                 free_comment: params[:free_comment]
)

#変数word_countに各値の文字数を格納する。
word_count = @post.content.length  + @post.hash_tag.length  + @post.free_comment.length  + @post.study_time.to_s.length + @post.today_study_time.to_s.length

#word_countが140よりも大きい時にエラーで特定のページにリダイレクトされるような処理などが連なって記載されている。