- 投稿日:2019-07-16T23:20:21+09:00
[Swift 5]ImageViewの画像の色を変更す流にはRenderingModeを変更しよう
ものすごく簡単なことですが、いつもつい忘れてしまうので…
通常、デフォルトではUIImageのレンダリングモードがオリジナルモードとなっているため、以下のように
tintColorを指定しても、元の画像の色から変更できない。iconView.image = UIImage(named: "imageName") iconView.tintColor = .gray色を変更するならレンダリングモードを変更する必要があります
UIImageを生成した時に
withRenderingMode()を繋げて指定し、レンダリングモードをテンプレートモードにすればOK!iconView.image = UIImage(named: "imageName")?.withRenderingMode(.alwaysTemplate) iconView.tintColor = .gray
alwaysTemplateは、Assetsの画像Inspectorで指定することもできます。参考:https://stackoverflow.com/questions/12872680/changing-uiimage-color
- 投稿日:2019-07-16T23:20:21+09:00
[Swift 5]ImageViewの画像の色を変更するにはRenderingModeを変更しよう
ものすごく簡単なことですが、いつもつい忘れてしまうので…
通常、デフォルトではUIImageのレンダリングモードがオリジナルモードとなっているため、以下のように
tintColorを指定しても、元の画像の色から変更できない。iconView.image = UIImage(named: "imageName") iconView.tintColor = .gray色を変更するならレンダリングモードを変更する必要があります
UIImageを生成した時に
withRenderingMode()を繋げて指定し、レンダリングモードをテンプレートモードにすればOK!iconView.image = UIImage(named: "imageName")?.withRenderingMode(.alwaysTemplate) iconView.tintColor = .gray
alwaysTemplateは、Assetsの画像Inspectorで指定することもできます。参考:https://stackoverflow.com/questions/12872680/changing-uiimage-color
- 投稿日:2019-07-16T21:44:08+09:00
【iOS, Swift】(備忘録)コーディング規約の大事なとこだけ
どうも!
Yoki(@enyyokii)と申します。
渋谷のIT企業でアプリエンジニアしている26才です。
仕事では iOS、Android、Webフロントエンドなど色々しており、週末は勉強を兼ねて個人開発したりしています。今回はSwiftのコーディング規約についていろいろ資料を見る時間があったので、規約で忘れがち、重要度が高そうなものを抜粋してまとめてみました。
(※ 個人差ありです)
基本的なもの、具体例は「参考」にあるものが詳しいです。(エウレカのものが分かりやすいと思います。)
では本題!!
目的
- プログラマー自身のエラーを減らして、さらにエラーを見つけやすくする
- コードの可読性と明快さを向上させる(他の人がコードをレビューもしくは書き換えると仮定して) => 冗長さがなく、誤解の可能性を少なくする
規約
- フォーマット
- 半角スペース4つ分(Text Editingで設定する)。
- 命名
- 出来る限り省略された名前を付けない。
- 副作用がない場合は、名詞を使用する。
- 副作用がある場合は、動詞を使用する
- 依存関係
- 必要最低限のものだけを
importする。(UIKitをインポートする必要がある場合は、Foundationをインポートしない。)
import文はOS固有のフレームワークと外部フレームワークとの間に空行を1行入れて、アルファベット順に並べる。- 宣言の順序
class、struct、enum、extension、protocolなどの全ての宣言は// MARK: - <宣言の名前>を付ける。 また、// MARK:タグは上に2行、下に1行の空行を入れる。- アクセス修飾子
- privateとして宣言することをデフォルトとして、必要なときだけinternalまたはpublicとして外部に公開する。
型
- できる限り常に
varではなくletを使う。シンタックスシュガーを使用し短く書く。
- 必要な場合を除いて、変数やプロパティの型は宣言文の左側か右側のいずれか片側から推測できるようにする。
- Forced Unwrappingは避ける
コメント
- コメントは「なぜ?」という問いに答えるものであり、それ以外のことはコード自体が説明すべきである。
Collections / SequenceTypes
isEmpty,first,lastを使用する(indexを使用しなくても良い場合は使用しない)countを使用する箇所はindicesを検討する- → Off-by-oneエラーを回避できる
Self
- selfは省略する
- クロージャ内では
[weak self]、guard let節を用いて循環参照のケアをする。 また、予期せぬクラッシュをケアする為に[unowned self]は使用しない。参考
数字は最終更新日
- raywenderlich 2019/04/28
- Swift API Design Guidelines
- エウレカ 2016/08/03
- クックパッド 2017/04/25
- リクルートライフスタイル 2017/07/11
- 投稿日:2019-07-16T15:35:29+09:00
アスペクト比で高さを指定した場合のトルツメ(Viewの非表示)の方法
今回は特殊なトルツメ(Viewを消して空白を詰めること)について紹介したいです。
androidでいうところのView.GONEがないようなので。ちょっとばかりコアなのですが、aspect ratioでwidthからheightを動的に設定している場合を想定してください。
通常、トルツメをする際は消したいViewのheightに関する制約をドラッグしてきて
hogeHeightConstraint.constant = 0これだけです。
調べたら大体この方法が出てくるかなと思います。
が、aspect ratioの場合はどうしたら。。。width:height = 1:0にしちゃえばいいのかなと、とりあえず制約をドラッグしてみますがうまくいじれませんでした。
これのいじり方を知ってる方は教えてください。というわけで別のちょっとテクニカルな方法をとりました。
priority
こんなものがあったなとふと脳裏をよぎりました。
プライオリティー
まんま、優先、ですね。優先席はプライオリティーシートなんて言いますが、それです。これの利用方法ですが
①height = 0 の制約をpriorityを低めに設定
②widthとheightのaspect ratioの制約のpriorityを中くらいに設定(①の制約が無視されるためまだ非表示にはならない)
③トルツメしたいタイミングでheight = 0の制約のpriorityを高めに設定し直す③のコードですが
hogeHeight.priority = UILayoutPriority(rawValue: 500)こんな感じです
これは優先度500です
ストーリーボードなどで①の制約のpriorityを100、②のアスペクト比を300などに設定しておいてください。ちょっとテクニカルですが参考にしてくれたら嬉しいです。
- 投稿日:2019-07-16T14:10:56+09:00
Swift Firebase 匿名ゲストログイン
Firebaseへ匿名ユーザーのログイン
Authenticationのログイン方法はmail/password, Anonymousを有効にする@IBAction func loginOutClicked(_ sender: Any) { guard let user = Auth.auth().currentUser else { return } if user.isAnonymous { presentLoginController() } else { do { try Auth.auth().signOut() Auth.auth().signInAnonymously { (result, error) in if let error = error { debugPrint(error) } self.presentLoginController() } } catch { debugPrint(error) } } }
- 投稿日:2019-07-16T08:36:18+09:00
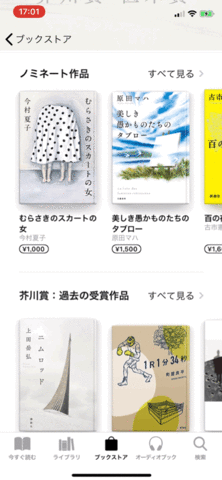
Apple製 BooksアプリのセミモーダルUIを再現する
はじめに
Apple製のBooksアプリ(以後Booksアプリ)ではタイル状に並んだ本をタップすると、特徴的なセミモーダル画面へ遷移します。
一般的なセミモーダルと違い、横スワイプで元画面で並んでいた本を切り替えることができ、縦スクロールすることで徐々に拡大し全画面モーダルへと変化します。
このUIの良いところは、詳細な情報を表示や、前後のコンテンツ切り替えをスムーズに行うことができるところだと思います。ちなみに、似たようなことは
UIPageViewControllerで以前より実現していましたが、前後のコンテンツの有無をユーザーへ知らせる機能が弱く(画面下へPageControlを設置など)、ユーザーに実際に気づいてもらえないことが多々あります。
ユーザーに気づいてもらうために、ガイドモーダルを表示したり、一時的に横スクロールアニメーションを行い、横スクロールを示唆したりと一工夫しているアプリを見かけます。また、
UIPageViewControllerの横スワイプによるViewController切り替えを行うため、各ViewControllerに横スワイプアクションを入れると競合してしまいます。Booksアプリのセミモーダルは前後コンテンツが見える状態のため、前後の存在が一目瞭然です。
更に、全画面に拡大中は各要素となるViewControllerの横スワイプ切り替えは出来ないため、横方向のジェスチャーに対応したコンテンツを配置することも可能です。良いとこばかりのBooksアプリのセミモーダルですが、
UIPageViewControllerのようにUIKitに存在しないため独自実装する必要があります。
複数の要素をうまく連携する必要があるため、導入の難易度が比較的高いUIだと思います。このエントリーでは完全ではないものの、BooksアプリのセミモーダルUIを再現しています。
デザイナーやプロダクトマネージャー等から実装の要望をされたアプリ開発者もそこそこいるのではないでしょうか?
今まで見送っていた方の導入する際の参考になれば幸いです。再現したもの
以下は今回実装したアプリのGifです。以降の調査にある特徴的な4つの要素が再現できていると思います。
Githubに再現したプロジェクトをおいてあります。実装の詳細や動作を確認する際に適宜参照してください。
https://github.com/iincho/CollectionViewSemiModalTransitioning構成する要素の調査
BooksアプリのセミモーダルUIを再現するために、どの機能を組み合わせる必要があるのか調べるため、まずはアプリの挙動を観察します。
1. タイル状に並んだ画像タップでセミモーダル状態に遷移
画像と背景のViewが拡大しながらセミモーダル状態に変化しています。似たような挙動として、Twitterアプリ等で写真リスト>写真詳細へ遷移する際のアニメーションによく見られる挙動です。2. セミモーダル状態で左右のViewをスワイプで切り替え
左右Viewの部分的な表示と横スクロール時の制御では、スワイプ終了時のスクロール方向や位置と速度により停止位置が制御されています。3. 上方向のスクロールで全画面モーダルへ遷移アニメーション
上方向へのスクロールでシームレスに全画面モーダルへと状態変化しますが、スワイプだけでなく、慣性スクロールでも遷移アニメーションが継続します。これは全画面モーダルから、セミモーダル状態への遷移でも同様です。
例)
セミモーダル表示中に勢いよく画面上部に向けてスクロール→慣性スクロールにより全画面モーダル状態まで到達し、更に全画面モーダルでもスクロールを継続4. 下方向へのスワイプでモーダルを閉じる
モーダルを閉じる処理はスワイプを中断する位置によってDismissをキャンセルすることができます。また、スワイプに合わせてインタラクティブにDismissアニメーションが行われます。
また、下方向へのスワイプ中アニメーションとスワイプ完了後のアニメーションが異なります。実装
クラス構成
クラス 概要 ViewController セミモーダル画面への遷移元画面 CollectionSemiModalViewController UICollectionViewを保持したUIViewControllerCollectionViewCell UITableViewを保持したUICollectionViewCellCollectionViewPresentAnimator セミモーダル画面のPresent, Dismissする際のアニメーションを制御する UIViewControllerAnimatedTransitioningに準拠したクラスModalPresentationController ViewControllerからのPresentアニメーションを制御する UIPresentationControllerを継承したクラスDismissalTransitioningInteractor ※ Dismissアニメーションの内、上下スクロール中のアニメーションを制御 DismissalTransitionable ※ セミモーダルのDismissの内、上下スクロールをインタラクティブに制御するためのProtocolExtensionを保持し、DismissalTransitioningInteractorのインスタンスメソッドによりインタラクションを制御する。 SemiModalTransitioningDelegate ※ UIViewControllerTransitioningDelegateに準拠したクラス。関連するDelegateメソッドをViewControllerから分離するため別クラスとして定義している 以降、実装のポイントとなる箇所を抜粋しています。全体の実装はGitHubを確認ください。
1. タイル状に並んだ画像タップでセミモーダル状態に遷移
カスタムした
UIPresentaitonControllerや、UIViewControllerAnimatedTransitioningによる実装で実現します。Present時、背景にグレーの透過Viewを差し込みます。Dismiss時には逆に透過Viewを取り除きます。そのためのUIPresentationControllerを継承したModalPresentationControllerを実装します。
ModalPresentationController.swiftfinal class ModalPresentationController: UIPresentationController { private let overlayView = UIView() override func presentationTransitionWillBegin() { super.presentationTransitionWillBegin() overlayView.frame = containerView!.bounds overlayView.backgroundColor = .black overlayView.alpha = 0.0 containerView!.insertSubview(overlayView, at: 0) presentedViewController.transitionCoordinator?.animate(alongsideTransition: { [unowned self] _ in self.overlayView.alpha = 0.5 }) } override func dismissalTransitionWillBegin() { super.dismissalTransitionWillBegin() presentedViewController.transitionCoordinator?.animate(alongsideTransition: { [unowned self] _ in self.overlayView.alpha = 0.0 }) } override func dismissalTransitionDidEnd(_ completed: Bool) { super.dismissalTransitionDidEnd(completed) if completed { overlayView.removeFromSuperview() } } override var frameOfPresentedViewInContainerView: CGRect { return containerView!.bounds } override func containerViewWillLayoutSubviews() { super.containerViewWillLayoutSubviews() overlayView.frame = containerView!.bounds presentedView!.frame = frameOfPresentedViewInContainerView } }
遷移元のカラーViewがセミモーダル内のカラーViewへアニメーションする処理を実装します。
UIViewControllerAnimatedTransitioningに準拠したCollectionViewPresentAnimatorを実装します。
なお、Dismiss時のアニメーションも同クラスへ実装するため、内部的に分岐処理を実装しています。CollectionViewPresentAnimator.swiftfinal class CollectionViewPresentAnimator: NSObject, UIViewControllerAnimatedTransitioning { let isPresent: Bool init(isPresent: Bool) { self.isPresent = isPresent super.init() } func transitionDuration(using transitionContext: UIViewControllerContextTransitioning?) -> TimeInterval { return 0.3 } func animateTransition(using transitionContext: UIViewControllerContextTransitioning) { if isPresent { // Present時のアニメーション処理を実行するメソッドをコール presentTransition(using: transitionContext) } else { // Dismiss時のアニメーション処理を実行するメソッド dismissalTransition(using: transitionContext) } }
func presentTransition(using transitionContext: UIViewControllerContextTransitioning)メソッドでは以下の処理を行っています。
- 遷移アニメーション開始時のView描画に必要な情報(CGRect, Index, UIColor)を用意
- 遷移アニメーション終了時のView描画に必要な情報(CGRect, Index)を用意
- 遷移アニメーション用のViewを1で生成した位置から、2で生成した位置へアニメーション実行
- 遷移完了後、遷移アニメーションViewを削除
遷移先CollectionViewCellに合わせて、1のアニメション開始位置の
CGRect, Index, UIColor生成します。
遷移先に表示されるCollectionViewCellの数に合わせてCellごとに必要な情報を生成しています。
この際、transitionContextから生成した、遷移先のViewControllertoVCから遷移先のCollectionViewCellを取得しますが、このタイミングでは遷移先の描画が終わっておらず、ほしいCellの情報を取得できません。
そこでsnapshotView(afterScreenUpdates: true)メソッドにより表示更新後のスナップショットを取ることで、以toVCから必要なCell情報を取得することが可能となります。また、再現アプリでは、遷移元のCollectionViewは改行を含みます。実装では遷移後の横並びCellに合わせ、遷移開始時、最大横3列のアニメーションViewを用意しています。(Booksアプリでも同様のアニメーションを行っています。)
2019/7/17追記
toVCから遷移先のCollectionViewCellが取得できない件について補足します。
アニメーションに必要なCellを参照するには描画されている必要がある→以下工程が完了している必要があります。
- 1.CollectionViewの描画
- 2.遷移元でタップされたCellを中央に表示
この内、2については
UICollectionView.scrollToItem(at indexPath: at scrollPosition: animated:)によりCellを初期描画の段階で移動させる必要があります。
この場合、viewDidLayoutSubviews()で一度呼び出すことで対応していますが、UIViewControllerAnimatedTransitioningの関連メソッド内部では、明示的に呼び出す方法がありません。
beginAppearanceTransition(_:animated:)ではviewWillAppear, viewDidAppearを呼び出せますことは可能ですが、Cell移動させるにはviewWillAppearでは早すぎ(移動しない)、viewDidAppearではおそすぎ(遷移アニメーション後にCellが移動する)、うまくいきません。
試行錯誤の上、snapshotView(afterScreenUpdates: true)メソッドでスナップショットを作成すると、それ以降CollectionViewCellがスクロールした状態でCellの参照ができる事がわかりました。CollectionViewPresentAnimator.presentTransitionメソッドprivate func presentTransition(using transitionContext: UIViewControllerContextTransitioning) { let fromVC = transitionContext.viewController(forKey: .from) as! ViewController let toNC = transitionContext.viewController(forKey: .to) as! UINavigationController let toVC = toNC.viewControllers.first as! CollectionSemiModalViewController let finalToVCFrame = toVC.view.frame let containerView = transitionContext.containerView let selectedIndexPath = fromVC.collectionView.indexPathsForSelectedItems!.first! // 通常、このタイミングで取得できる[遷移先]のvisibleCellsは先頭2つのCellとなる。本来はタップしたCell+前後のCellがほしい。 // snapshotView(afterScreenUpdates: true)によりスナップショットを取得することで、描画完了後のViewを生成するとともに目的のCellがvisibleCellsに格納されるようになる。 if toVC.view.snapshotView(afterScreenUpdates: true) != nil { // 遷移元Cell関連 // 遷移元Cellの座標をもとにアニメーション開始位置を決める。 // 今回のアニメーションでは、遷移後の横並びに合わせ、アニメーション開始位置はタップされたCellの両脇を開始位置とする。 // そのため、左右のセルが改行の関係で上下に位置する場合を考慮し、タップされたCellをもとにCGRectを生成する。 // なお、遷移元のCell位置関係の取得はCollectionViewが一つであることを想定した実装であるため、複数ある場合はそれを考慮した実装が必要になる。 // 遷移元Cellの生成 TargetCellの前後の存在有無を確認した上でCellを生成 // cellForItemでは取得出来ない場合(画面外にあるなど)はUICollectionViewCellを生成している。 // Frame指定する際、前後のCellはCollectionViewの改行を考慮し、TargetCellの左右に並ぶよう調整している let targetCell = fromVC.collectionView.cellForItem(at: selectedIndexPath)! let targetConvertFrame = targetCell.convert(targetCell.bounds, to: fromVC.view) // TODO: minimumLineSpacingはLayoutによって実際のCell間隔とズレが生じる。改行があるため、単純に前後のCell.originの比較では無いため今回は妥協している。 let cellSpacing = (fromVC.collectionView.collectionViewLayout as? UICollectionViewFlowLayout)?.minimumLineSpacing ?? 0 var fromCellDataList: [AnimationCellData] = [] // PrevCell let prevTag = targetCell.tag - 1 if 0 <= prevTag { let prevCell = fromVC.collectionView.cellForItem(at: IndexPath(row: prevTag, section: selectedIndexPath.section)) ?? UICollectionViewCell() prevCell.tag = prevTag fromCellDataList.append(AnimationCellData(cell: prevCell, targetConvertFrame: targetConvertFrame, targetType: .prev, cellSpacing: cellSpacing)) } // TargetCell fromCellDataList.append(AnimationCellData(cell: targetCell, targetConvertFrame: targetConvertFrame, targetType: .target, cellSpacing: cellSpacing)) // NextCell let nextTag = targetCell.tag + 1 if nextTag < fromVC.collectionView.numberOfItems(inSection: selectedIndexPath.section) { let nextCell = fromVC.collectionView.cellForItem(at: IndexPath(row: nextTag, section: selectedIndexPath.section)) ?? UICollectionViewCell() nextCell.tag = nextTag fromCellDataList.append(AnimationCellData(cell: nextCell, targetConvertFrame: targetConvertFrame, targetType: .next, cellSpacing: cellSpacing)) } // 遷移先View関連 let toCells = toVC.collectionView.visibleCells.compactMap { cell -> CollectionSemiModalViewCell? in guard let castCell = cell as? CollectionSemiModalViewCell else { return nil } castCell.switchTitleColorView(isClear: true) return castCell }.sorted(by:{ $0.tag < $1.tag }) let finalToCellsFramesWithTag = toCells.map { toCell -> (frame: CGRect, tag: Int) in let frame = toCell.convert(toCell.bounds, to: toVC.view) return (frame, toCell.tag) } let finalColorViewsFramesWithTag = toCells.map { toCell -> (frame: CGRect, tag: Int) in let frame = toCell.titleColorView?.convert(toCell.titleColorView?.bounds ?? .zero, to: toVC.view) ?? .zero return (frame, toCell.tag) } // AnimationView関連(toVCからSnapshotを作成) let animationToCells = toCells.map { toCell -> UIView in let snapshotCell = toCell.resizableSnapshotView(from: toCell.bounds, afterScreenUpdates: true, withCapInsets: .zero) ?? UIView() snapshotCell.tag = toCell.tag snapshotCell.frame = fromCellDataList.first(where: {$0.tag == toCell.tag})?.frame ?? .zero snapshotCell.alpha = 0 return snapshotCell } let animationColorViews = fromCellDataList.map { tuple -> UIView in let view = UIView(frame: tuple.frame) view.tag = tuple.tag view.backgroundColor = tuple.color return view } // アニメーションに関してtoVCを主に操作しているが、containerViewへ追加するのはあくまでUINavigationControllerのViewである必要がある。 // toVCでも遷移自体は完了するが、遷移後画面がちらついたり詳細への遷移がおかしくなることがある。 toNC.view.isHidden = true containerView.addSubview(toNC.view) animationToCells.forEach { containerView.addSubview($0) } animationColorViews.forEach { containerView.addSubview($0) } UIView.animate(withDuration: transitionDuration(using: transitionContext), delay: 0, options:[.curveEaseInOut], animations: { animationToCells.forEach { animationCell in animationCell.frame = finalToCellsFramesWithTag.first(where: { $0.tag == animationCell.tag })?.frame ?? .zero animationCell.alpha = 1 } animationColorViews.forEach { animationColorView in animationColorView.frame = finalColorViewsFramesWithTag.first(where: { $0.tag == animationColorView.tag })?.frame ?? .zero } }, completion: { _ in toNC.view.isHidden = false toCells.forEach { $0.switchTitleColorView(isClear: false) } animationToCells.forEach { $0.removeFromSuperview() } animationColorViews.forEach { $0.removeFromSuperview() } transitionContext.completeTransition(true) }) } else { // アニメーションさせる遷移先のSnapshotが取得出来なかった場合 containerView.addSubview(toVC.view) toVC.view.frame = CGRect(origin: CGPoint(x: 0, y: finalToVCFrame.size.height), size: finalToVCFrame.size) UIView.animate(withDuration: transitionDuration(using: transitionContext), delay: 0, options: [.curveEaseOut], animations: { toVC.view.frame = finalToVCFrame }, completion: { _ in transitionContext.completeTransition(true) }) } } struct AnimationCellData { enum TargetType { case prev case target case next } let frame: CGRect let tag: Int let color: UIColor? init(cell: UICollectionViewCell, targetConvertFrame: CGRect, targetType: TargetType, cellSpacing: CGFloat) { switch targetType { case .target: frame = targetConvertFrame case .prev: frame = targetConvertFrame.offsetBy(dx: -targetConvertFrame.width - cellSpacing, dy: 0) case .next: frame = targetConvertFrame.offsetBy(dx: targetConvertFrame.width + cellSpacing, dy: 0) } tag = cell.tag color = cell.contentView.backgroundColor } }2. セミモーダル状態で左右のViewをスワイプで切り替え
横スクロール時の停止位置制御は以下3パターンに分類できます。
- 横スクロール時、Viewの半分以上をスワイプ後に指を離す→次のViewにスクロール
- 横スクロール時、Viewの半分以下をスワイプ後に指を離す→元のView位置にスクロール
- すばやく横スワイプ→スワイプ終了位置にかかわらず次のViewへスクロール
UICollectionViewには上記アニメーションをデフォルトで表現することは出来ないため、独自実装を行います。
始め、UICollectionViewLayoutのtargetContentOffset(forProposedContentOffset proposedContentOffset: CGPoint, withScrollingVelocity velocity: CGPoint) -> CGPointメソッドをオーバーライドして対応する方針を検討しましたが、スワイプ完了後の慣性スクロールを自然な状態にできませんでした。
参考サイト: https://dev.classmethod.jp/smartphone/iphone/collection-view-layout-cell-snap/再現アプリではUIScrollViewDelegateメソッド
scrollViewWillEndDragging(_ scrollView: UIScrollView, withVelocity velocity: CGPoint, targetContentOffset: UnsafeMutablePointer<CGPoint>)でスワイプ完了時の状態により動きを制御しています。
参考サイト: https://github.com/hershalle/CollectionViewWithPaging-simplerExampleCollectionSemiModalViewController/// CollectionViewの横スクロールを必ず中央で止まるように制御している /// ドラッグ完了位置(Cell半分以上スクロール)、もしくは、スワイプ時の速度のどちらかが該当条件を満たしていた場合に、前後のCollectionViewCellの中央までスクロールするよう制御している func scrollViewWillEndDragging(_ scrollView: UIScrollView, withVelocity velocity: CGPoint, targetContentOffset: UnsafeMutablePointer<CGPoint>) { // 横スクロールの速度閾値 let swipeVelocityThreshold: CGFloat = 0.5 // 横スクロールを現在の位置で止め、現在の横スクロール位置から中央に表示されるCollectionViewCellのindexを取得 targetContentOffset.pointee = scrollView.contentOffset let indexOfMajorCell = self.indexOfMajorCell() let dataSourceCount = collectionView(collectionView!, numberOfItemsInSection: 0) // 横スクロールの速度が次のCellへスライドする閾値を超えているか(かつindexが範囲内) let hasEnoughVelocityToSlideToTheNextCell = indexOfCellBeforeDragging + 1 < dataSourceCount && velocity.x > swipeVelocityThreshold // 横スクロールの速度が前のCellへスライドする閾値を超えているか(かつindexが範囲内) let hasEnoughVelocityToSlideToThePrevCell = indexOfCellBeforeDragging - 1 >= 0 && velocity.x < -swipeVelocityThreshold // ドラッグ開始前のIndexと現在のIndexが一致しているか let majorCellIsTheCellBeforeDragging = indexOfMajorCell == indexOfCellBeforeDragging // スワイプ速度による前後Cellへのスクロールを行うか let didSwipeToSkipCell = majorCellIsTheCellBeforeDragging && (hasEnoughVelocityToSlideToTheNextCell || hasEnoughVelocityToSlideToThePrevCell) if didSwipeToSkipCell { // スワイプ速度による前後スクロール制御 let snapToIndex = indexOfCellBeforeDragging + (hasEnoughVelocityToSlideToTheNextCell ? 1 : -1) let toValue = layout.pageWidth * CGFloat(snapToIndex) // usingSpringWithDamping: 1 振動なし、initialSpringVelocity: アニメーション初速をCollectionViewの横スクロール速度に設定 UIView.animate(withDuration: 0.3, delay: 0, usingSpringWithDamping: 1, initialSpringVelocity: velocity.x, options: .allowUserInteraction, animations: { scrollView.contentOffset = CGPoint(x: toValue, y: 0) scrollView.layoutIfNeeded() }, completion: { _ in self.selectedIndex = snapToIndex }) } else { // indexによるスクロール位置の更新 let indexPath = IndexPath(row: indexOfMajorCell, section: 0) layout.collectionView!.scrollToItem(at: indexPath, at: .centeredHorizontally, animated: true) selectedIndex = indexOfMajorCell } } /// CollectionViewの水平方向の位置を元に、中央付近にあるCollectionViewCellのindexを返却 private func indexOfMajorCell() -> Int { let itemWidth = layout.pageWidth let proportionalOffset = layout.collectionView!.contentOffset.x / itemWidth let index = Int(round(proportionalOffset)) let numberOfItems = collectionView.numberOfItems(inSection: 0) let safeIndex = max(0, min(numberOfItems - 1, index)) return safeIndex }3. 上方向のスクロールで全画面モーダルへ遷移アニメーション
全画面モーダルへの遷移アニメーションを
UIViewControllerAnimatedTransitioningとUIPercentDrivenInteractiveTransitionにより実現しようとしましたが、Present, Dismiss完了後のアニメーションまで制御する必要があり、その煩雑さから現実的では無いと判断しました。回避策として、上方向のスクロールで全画面モーダル表示アニメーションを、
遷移ではなくスクロールアニメーションとすることで再現します。
UICollectionViewCellがUITableViewを保持し、スクロール量によってUICollectionViewCell.widthを変更するとともに、UICollectionViewの横スクロール可否を切り替えます。合わせてNavigationBarの表示制御もスクロール量により切り替えます。
※だいぶ力技な気がします。良い方法があればコメントいただければ幸いです。縦方向のスクロールで閾値を超えた際にナビゲーションバーの表示を切り替えでは、表示切り替えごとにcontentInsetが変動するため、そのままでは表示が崩れたりUICollectionViewのサイズがおかしくなってスクロールができなくなります。
対策として、contentInsetAdjustmentBehaviorの設定をUICollectionViewとCell内部のUITableViewで変動しないよう、.neverに設定。合わせて、UICollectionViewの上方向制約条件はSafeAreaに対してではなく、Superviewに対して行う必要があります。
例)
collectionView.contentInsetAdjustmentBehavior = .neverCollectionSemiModalViewController// MARK: - UICollectionViewDelegate, UICollectionViewDataSource, UICollectionViewDelegateFlowLayout Methods extension CollectionSemiModalViewController: UICollectionViewDelegate, UICollectionViewDataSource, UICollectionViewDelegateFlowLayout { func collectionView(_ collectionView: UICollectionView, numberOfItemsInSection section: Int) -> Int { return dataList.count } func collectionView(_ collectionView: UICollectionView, cellForItemAt indexPath: IndexPath) -> UICollectionViewCell { let cell = collectionView.dequeueReusableCell(with: CollectionSemiModalViewCell.self, for: indexPath) let baseRect = cell.frame let data = dataList[indexPath.row] cell.tag = indexPath.row cell.configure(headerHeight: cellHeaderHeight, data: data) cell.scrollViewDidScrollHandler = { [weak self] offsetY in // CollectionViewCellが保持するUITableViewからスクロールされるたびに呼ばれるハンドラー // UITableViewのスクロール位置を保持し、CollectionViewCell.frameを更新するメソッドを呼ぶ self?.tableViewContentOffsetY = offsetY self?.transformCell(cell, baseRect: baseRect) } cell.tableViewDidSelectHandler = { [weak self] row in // 詳細へ遷移 } cell.closeTapHandler = { [weak self] in // セミモーダルを閉じる } return cell } /// TableViewのスクロールに合わせて、画面内のCollectionViewCellのFrameを制御 /// /// - Parameters: /// - cell: TableViewをスクロールしているCollectionViewCell /// - baseRect: CollectionViewCell初期位置のframe private func transformCell(_ cell: CollectionSemiModalViewCell, baseRect: CGRect) { switchDisplayNavigationBar(data: cell.data) // Cellの拡大中は横スクロールできないよう、TableViewのスクロール位置により制御 collectionView.isScrollEnabled = tableViewContentOffsetY == 0 let targetHeight = cellHeaderHeight + visibleNaviBarOffsetY // CellWidthが画面幅まで拡大するのが完了する高さ let verticalMovement = tableViewContentOffsetY / targetHeight let upwardMovement = fmaxf(Float(verticalMovement), 0.0) let upwardMovementPercent = fminf(upwardMovement, 1.0) let transformX = Float(view.frame.width - baseRect.size.width) * upwardMovementPercent let newPosX = Float(baseRect.origin.x) - transformX / 2 let newWidth = baseRect.size.width + CGFloat(transformX) // 中央のCellを操作 cell.frame = CGRect(x: CGFloat(newPosX), y: baseRect.origin.y, width: newWidth, height: baseRect.size.height) // 前後のCollectionViewCellを動かす collectionView.visibleCells.forEach { vCell in if vCell.tag < cell.tag { vCell.frame.origin.x = (baseRect.origin.x - layout.pageWidth) - CGFloat(transformX / 2) } else if cell.tag < vCell.tag { vCell.frame.origin.x = (baseRect.origin.x + layout.pageWidth) + CGFloat(transformX / 2) } } } /// NavigationBarの表示制御 /// 一定以上TableViewがスクロールされている場合にナビバーを表示する private func switchDisplayNavigationBar(data: ViewData) { if let nv = navigationController { if cellHeaderHeight + visibleNaviBarOffsetY <= abs(tableViewContentOffsetY), nv.isNavigationBarHidden { title = data.title nv.navigationBar.barTintColor = data.color nv.setNavigationBarHidden(false, animated: true) } if abs(tableViewContentOffsetY) < cellHeaderHeight + visibleNaviBarOffsetY, !nv.isNavigationBarHidden { nv.setNavigationBarHidden(true, animated: true) } } }4. 下方向へのスワイプでセミモーダルを閉じる
セミモーダルを閉じる一連の動きは、以下アニメーションに分類できます。
- 下方向のスワイプ中アニメーション: Interactiveなアニメーション。スワイプ中断位置によりDismissキャンセル可能
- スワイプ完了後のアニメーション: 不可逆なDismissアニメーション
1はUICollectionViewに
UIPanGestureRecognizerを設定しViewのドラッグ操作時のtranslation.yにより、Interactiveなアニメーションを実現します。CollectionSemiModalViewControlleroverride fun viewDidRoad() { //.... 省略 let collectionViewGesture = UIPanGestureRecognizer(target: self, action: #selector(collectionViewDidDragging(_:))) collectionViewGesture.delegate = self // collectionViewへPanGestureを設定 collectionView.addGestureRecognizer(collectionViewGesture) //.... 省略 } /// CollectionViewの縦方向スクロールをハンドリング /// /// - Parameter sender: UIPanGestureRecognizer @objc private func collectionViewDidDragging(_ sender: UIPanGestureRecognizer) { // CollectionViewが横方向にスクロールしている間はInteraction開始処理しない。 if isScrollingCollectionView { return } // CollectionViewCell内のTableViewスクロール位置と、CollectionView PanGestureの縦方向移動量により、ハンドリング handleTransitionGesture(sender, tableViewContentOffsetY: tableViewContentOffsetY) }DismissalTransitionable/// DismissTransition制御関連プロトコル protocol DismissalTransitionable where Self: UIViewController { // Dismiss実行閾値(縦スクロール量の比率) var percentThreshold: CGFloat { get } // Dismiss実行速度閾値 var shouldFinishVerocityY: CGFloat { get } // DismissTransitionの状態を保持 var interactor: DismissalTransitioningInteractor { get } } extension DismissalTransitionable { /// Dismiss開始までの上下スワイプによるアニメーションと、Dismiss実行、中止を制御している /// /// - Parameters: /// - sender: CollectionViewのPanGestureRecognizer /// - tableViewContentOffsetY: CollectionViewCell内部のTableViewスクロール位置 func handleTransitionGesture(_ sender: UIPanGestureRecognizer, tableViewContentOffsetY: CGFloat) { let translation = sender.translation(in: view) // スクロール位置によりインタラクションの状態を更新するメソッドをコール interactor.updateStateWithTranslation(y: translation.y, tableViewContentOffsetY: tableViewContentOffsetY) if interactor.shouldStopInteraction { return } // 上下スクロール量の割合を計算 let dismisalOffsetY = translation.y - interactor.startInteractionTranslationY let verticalMovement = dismisalOffsetY / view.bounds.height let downwardMovement = fmaxf(Float(verticalMovement), 0.0) let downwardMovementPercent = fminf(downwardMovement, 1.0) let progress = CGFloat(downwardMovementPercent) // UIPanGestureRecognizer.state によるinteractor.stateの更新 switch sender.state { case .changed: interactor.changed(by: dismisalOffsetY) if progress > percentThreshold || sender.velocity(in: view).y > shouldFinishVerocityY { // スクロール量の割合が閾値を超えた、もしくは、スクロール速度がしきい値を超えた場合 interactor.state = .shouldFinish } else { interactor.state = .hasStarted } case .cancelled: interactor.reset() case .ended: // パンジェスチャー終了時のinteractor.stateによりDismiss実行有無を判定 switch interactor.state { case .shouldFinish: interactor.finish() case .hasStarted, .none: interactor.reset() } default: break } } }class DismissalTransitioningInteractor { enum State { case none case hasStarted case shouldFinish } var state: State = .none var startInteractionTranslationY: CGFloat = 0 var startHandler: (() -> Void)? var changedHandler: ((_ offsetY: CGFloat) -> Void)? var finishHandler: (() -> Void)? var resetHandler: (() -> Void)? var shouldStopInteraction: Bool { switch state { case .none: return true case .hasStarted, .shouldFinish: return false } } /// スクロール位置によるState更新 /// /// - Parameters: /// - translationY: CollectionViewGestrueTranslationY /// - tableViewContentOffsetY: TableViewのScrollContentOffsetY ドラッグによる更新されたOffsetY (慣性スクロールは含まない) func updateStateWithTranslation(y translationY: CGFloat, tableViewContentOffsetY: CGFloat) { switch state { case .none: if tableViewContentOffsetY <= 0 { // Interaction開始できる状態になったら、現在のCollectionViewGestureのtranslationYを記憶し、Interaction中のstateへ更新 // startInteractionTranslationYを記憶することで、TableViewスクロール中から連続的にDismissアニメーションにつなげることができる startInteractionTranslationY = translationY state = .hasStarted startHandler?() } case .hasStarted, .shouldFinish: // 初期位置よりも上へのスクロールの場合、インタラクション終了 if translationY - startInteractionTranslationY < 0 { state = .none reset() } } } func changed(by offsetY: CGFloat) { changedHandler?(offsetY) } func finish() { finishHandler?() } func reset() { state = .none startInteractionTranslationY = 0 resetHandler?() } }縦方向のスクロール量により状態を更新した結果をViewController側へハンドラ経由で伝えている。
CollectionSemiModalViewController/// OverCurrentTransitioningInteractorのセットアップ 各種ハンドラーのセット private func setupInteractor() { interactor.startHandler = { [weak self] in // CollectionViewCell内部のTableViewがバウンス出来ないように更新 // この処理がないと、縦方向のDismissアニメーション中にCollectionViewCell内部のTableViewが一緒にスクロールしてしまう。 self?.collectionView.visibleCells .compactMap { $0 as? CollectionSemiModalViewCell } .forEach { $0.updateBounces(false) } } interactor.changedHandler = { [weak self] offsetY in // 受け取ったOffsetYに合わせてcollectionViewを移動 self?.collectionView.frame.origin = CGPoint(x: 0, y: offsetY) } interactor.finishHandler = { [weak self] in // Dismissアニメーションを開始 self?.dismiss(isInteractive: true) } interactor.resetHandler = { [weak self] in // Dismissが中断された場合にCollectionViewを元の位置へ移動、CollectionViewCell内部のTableViewのバウンスを許可 UIView.animate(withDuration: 0.3, delay: 0, options: [.curveEaseInOut], animations: { self?.collectionView.frame.origin = CGPoint(x: 0, y: 0) self?.collectionView.visibleCells .compactMap { $0 as? CollectionSemiModalViewCell } .forEach { $0.updateBounces(true) } }, completion: nil) } }2はPresentと同様に
UIViewControllerAnimatedTransitioningによる不可逆なDismissアニメーションを実装していきます。
実装内容はPresentと逆方向へのアニメーションです。CollectionViewPresentAnimator// Dismissal Transition Animator private func dismissalTransition(using transitionContext: UIViewControllerContextTransitioning) { let fromNC = transitionContext.viewController(forKey: .from) as! UINavigationController let fromVC = fromNC.viewControllers.first as! CollectionSemiModalViewController let toVC = transitionContext.viewController(forKey: .to) as! ViewController let containerView = transitionContext.containerView // 遷移元Cell関連 let fromCells = fromVC.collectionView.visibleCells.compactMap { cell -> CollectionSemiModalViewCell? in guard let castCell = cell as? CollectionSemiModalViewCell else { return nil } castCell.switchTitleColorView(isClear: true) return castCell }.sorted(by:{ $0.tag < $1.tag }) // 遷移先Cell関連 let targetToIndexPath = IndexPath(row: fromVC.selectedIndex, section: 0) if toVC.collectionView.cellForItem(at: targetToIndexPath) == nil { // 遷移先対象Cellが画面外にいる場合、画面内にスクロールさせる。更にスナップショットをとることでcellForItemメソッドで参照可能な状態にしている。 toVC.collectionView.scrollToItem(at: targetToIndexPath, at: .centeredVertically, animated: false) toVC.view.snapshotView(afterScreenUpdates: true) } let targetToCell = toVC.collectionView.cellForItem(at: targetToIndexPath)! let targetConvertFrame = targetToCell.convert(targetToCell.bounds, to: toVC.view) // TODO: minimumLineSpacingはLayoutによって実際のCell間隔とズレが生じる。改行があるため、単純に前後のCell.originの比較では無いため今回は妥協している。 let cellSpacing = (fromVC.collectionView.collectionViewLayout as? UICollectionViewFlowLayout)?.minimumLineSpacing ?? 0 var toCellDataList: [AnimationCellData] = [] // PrevCell let prevTag = targetToCell.tag - 1 if 0 <= prevTag { let prevCell = toVC.collectionView.cellForItem(at: IndexPath(row: prevTag, section: targetToIndexPath.section)) ?? UICollectionViewCell() prevCell.tag = prevTag toCellDataList.append(AnimationCellData(cell: prevCell, targetConvertFrame: targetConvertFrame, targetType: .prev, cellSpacing: cellSpacing)) } // TargetCell toCellDataList.append(AnimationCellData(cell: targetToCell, targetConvertFrame: targetConvertFrame, targetType: .target, cellSpacing: cellSpacing)) // NextCell let nextTag = targetToCell.tag + 1 if nextTag < toVC.collectionView.numberOfItems(inSection: targetToIndexPath.section) { let nextCell = toVC.collectionView.cellForItem(at: IndexPath(row: nextTag, section: targetToIndexPath.section)) ?? UICollectionViewCell() nextCell.tag = nextTag toCellDataList.append(AnimationCellData(cell: nextCell, targetConvertFrame: targetConvertFrame, targetType: .next, cellSpacing: cellSpacing)) } // AnimationView関連(fromVCからSnapshotを作成) let animationColorViews = toCellDataList.map { toCellData -> UIView in let view = fromCells.first(where: {$0.tag == toCellData.tag})?.titleColorView ?? UIView() let snapshotView = view.snapshotView(afterScreenUpdates: true) ?? UIView() snapshotView.frame = view.convert(view.bounds, to: toVC.view) snapshotView.tag = toCellData.tag snapshotView.backgroundColor = toCellData.color return snapshotView } let animationFromCells = toCellDataList.map { toCellData -> UIView in let cell = fromCells.first(where: {$0.tag == toCellData.tag}) ?? UIView() let snapshotCell = cell.snapshotView(afterScreenUpdates: true) ?? UIView() snapshotCell.frame = cell.convert(cell.bounds, to: toVC.view) snapshotCell.tag = cell.tag return snapshotCell } fromVC.view.isHidden = true animationFromCells.forEach { containerView.addSubview($0) } animationColorViews.forEach { containerView.addSubview($0) } UIView.animate(withDuration: transitionDuration(using: transitionContext), delay: 0, options:[.curveEaseInOut], animations: { animationFromCells.forEach { animationCell in animationCell.frame = toCellDataList.first(where: { $0.tag == animationCell.tag })?.frame ?? .zero animationCell.alpha = 0 } animationColorViews.forEach { animationColorView in animationColorView.frame = toCellDataList.first(where: { $0.tag == animationColorView.tag })?.frame ?? .zero } }, completion: { _ in fromVC.view.isHidden = false fromCells.forEach { $0.switchTitleColorView(isClear: false) } animationFromCells.forEach { $0.removeFromSuperview() } animationColorViews.forEach { $0.removeFromSuperview() } transitionContext.completeTransition(!transitionContext.transitionWasCancelled) }) }最後に
再現アプリでは遷移元、遷移先でのページングや詳細へのトランジション等実装していませんが、そこそこのボリュームとなりました。
特にPresent, Dismissアニメーションを実装しているCollectionViewPresentAnimatorが重いです。
仮にプロダクトへ導入する際には、該当アニメーション部分を簡略化しても良い気がしています。(単純な上下のSemiModalアニメーション 参考)また、今回Booksアプリの完全なアニメーションを再現できていません。タイルタップ時のアニメーションや、セミモーダルのスクロール時のアニメーション等では細かなインタラクションが散りばめられていました。機会があれば別の機会に再現したいと思います。