- 投稿日:2019-07-04T23:07:58+09:00
Twitter風のログイン機能を実装してみた
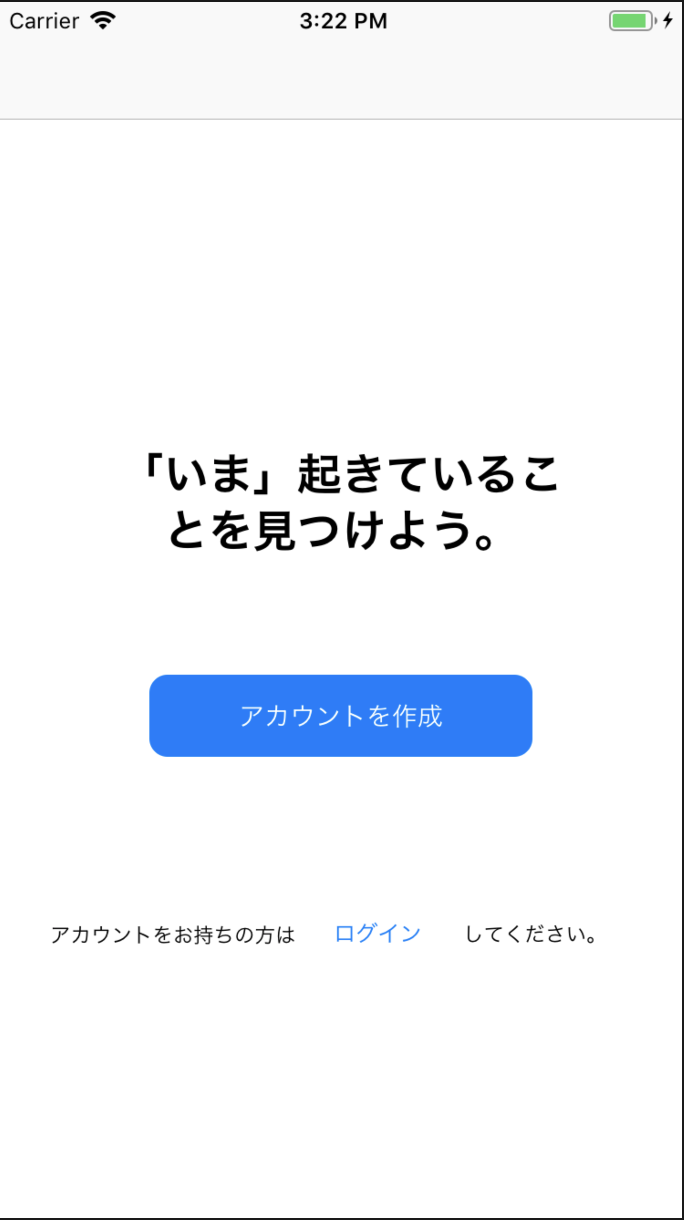
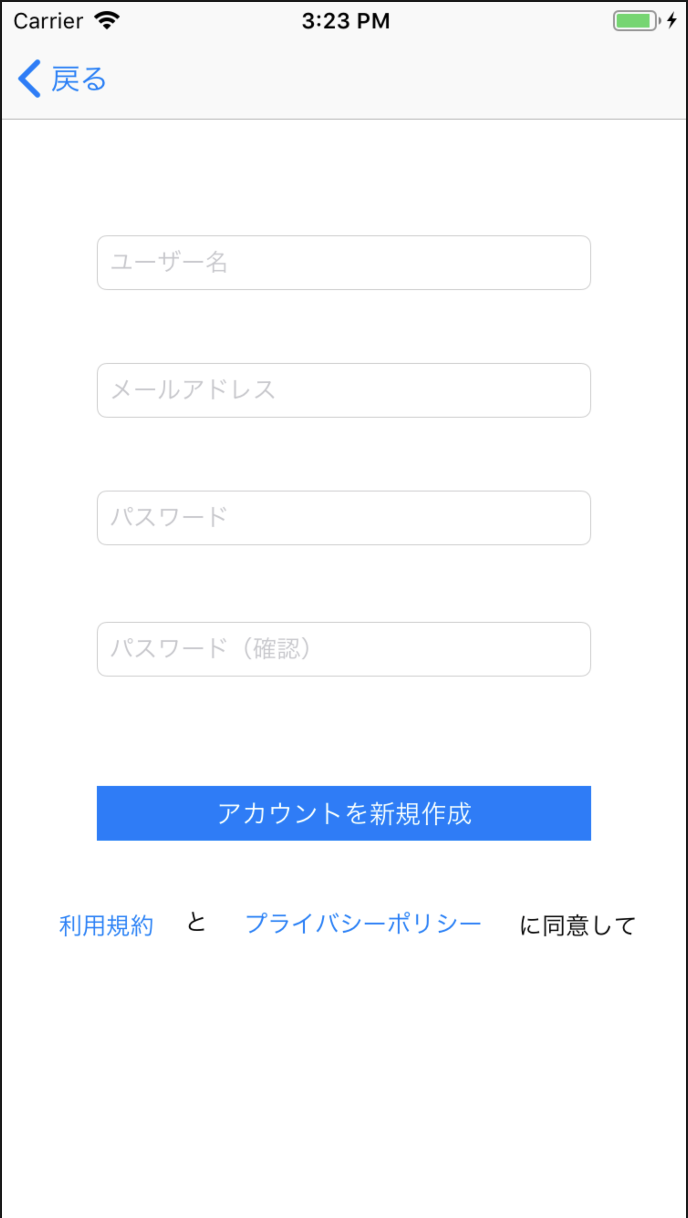
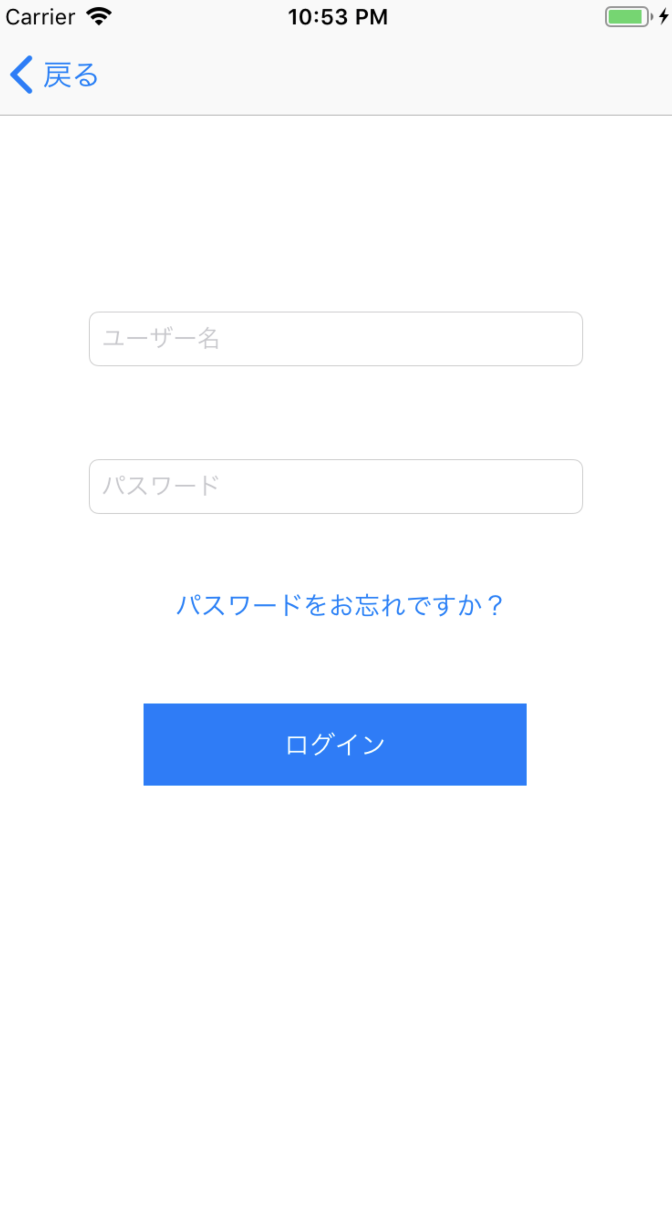
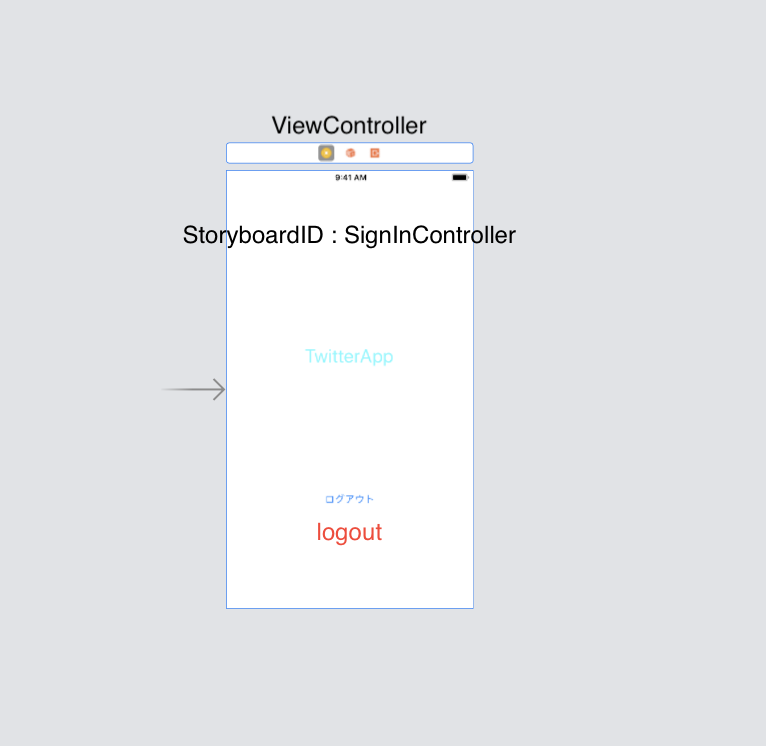
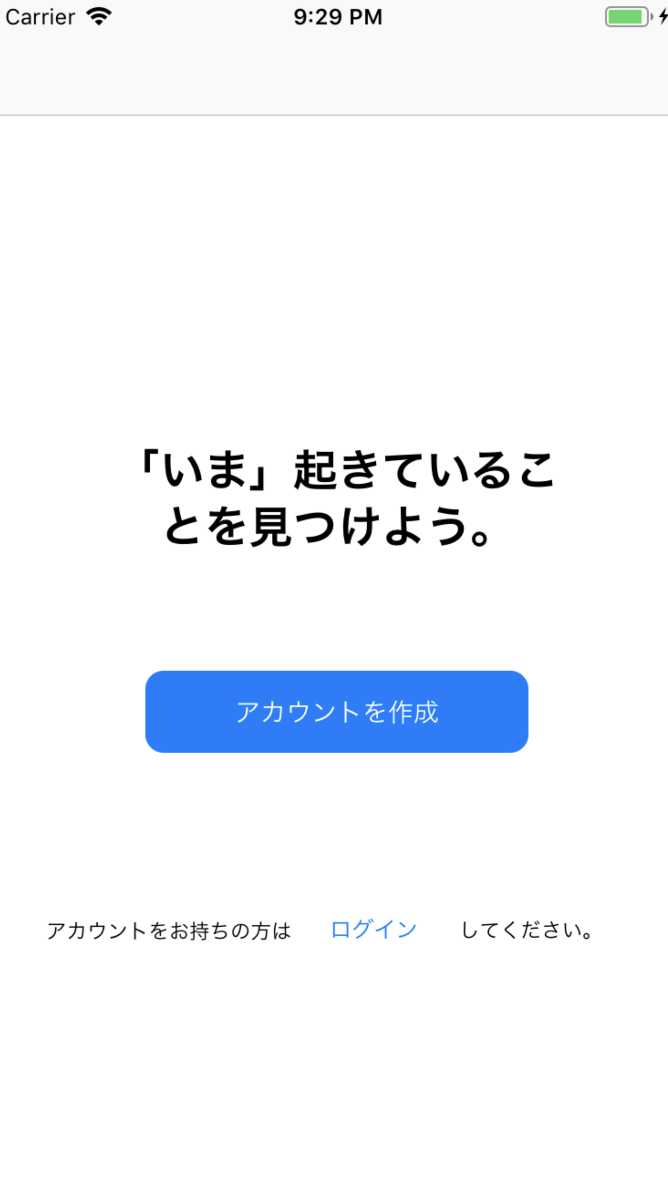
ログイン前
⇨
⇩
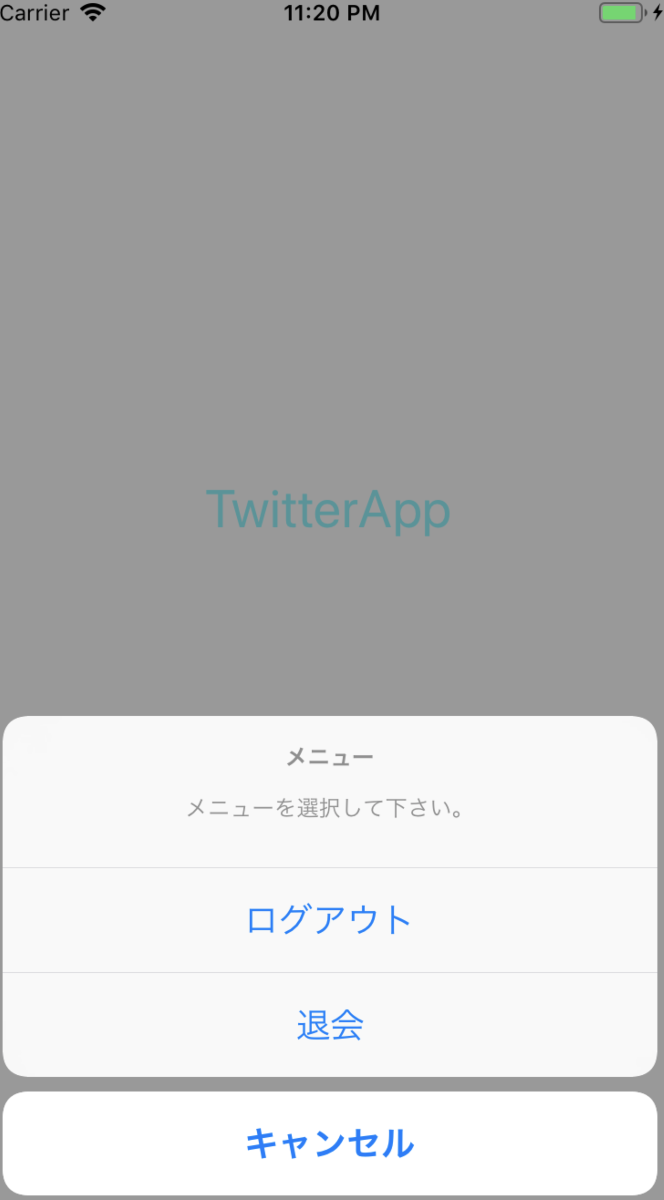
ログイン後
⇨⇨
事前準備
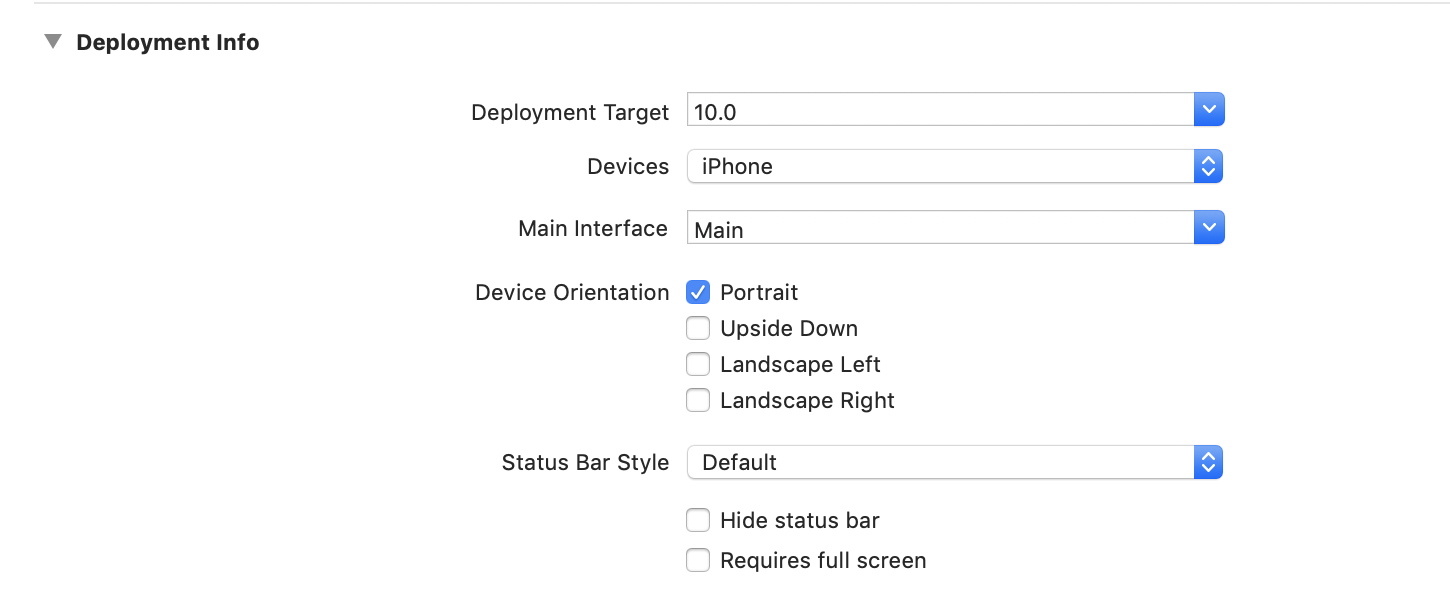
縦画面だけの対応にするため、GeneralのDeployment infoのLandscapeLandscapeLeftとLandscaperightのチェックを外す。
今回はNCMBを使うので、こちらのページのCocoaPodsを利用する方法を用いてNCMBを導入する。
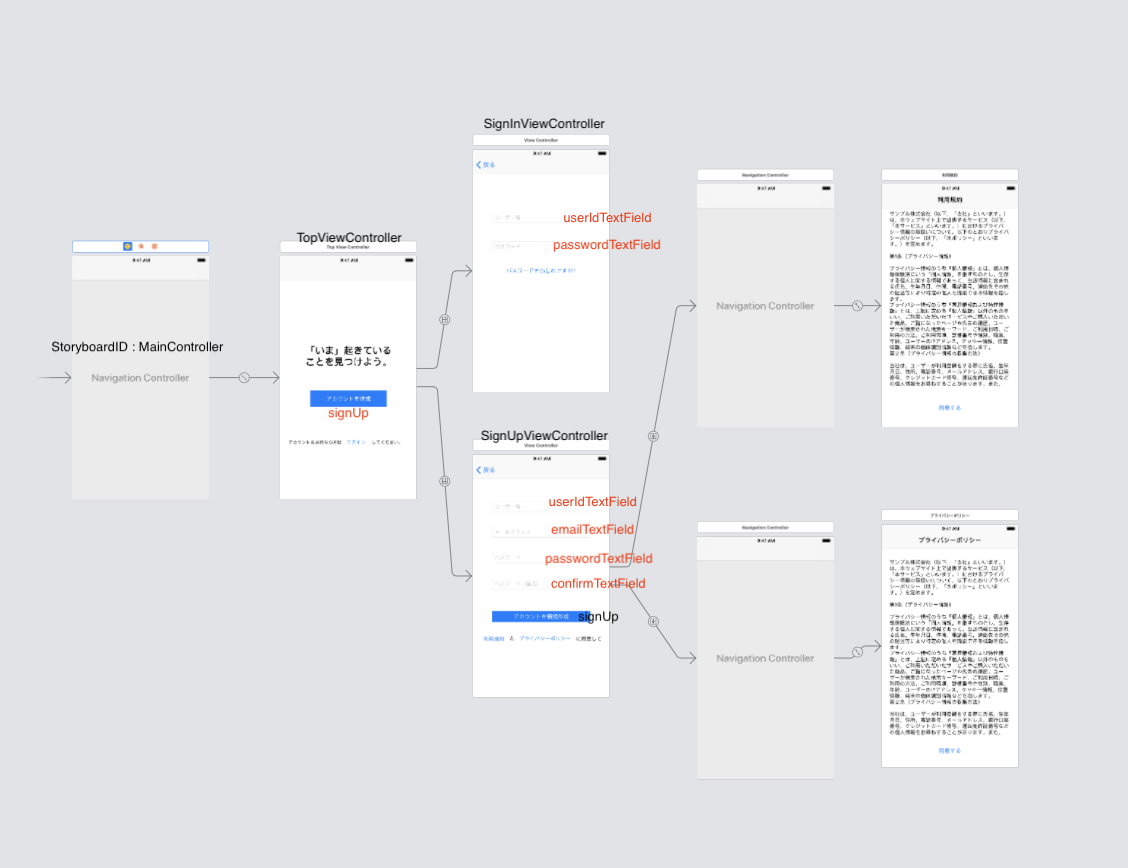
また、Storyboardを作成していきます。(赤:Outlet接続 黒:Action接続orclass)
SignIn.storyboard(自分で作る)
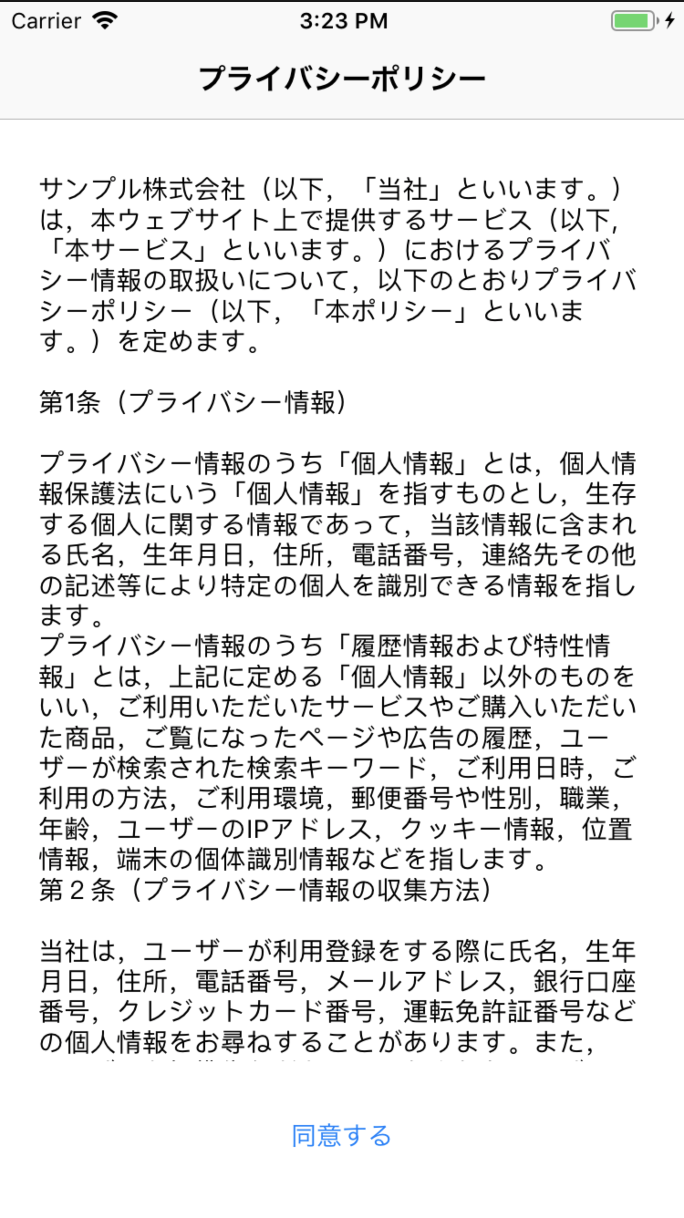
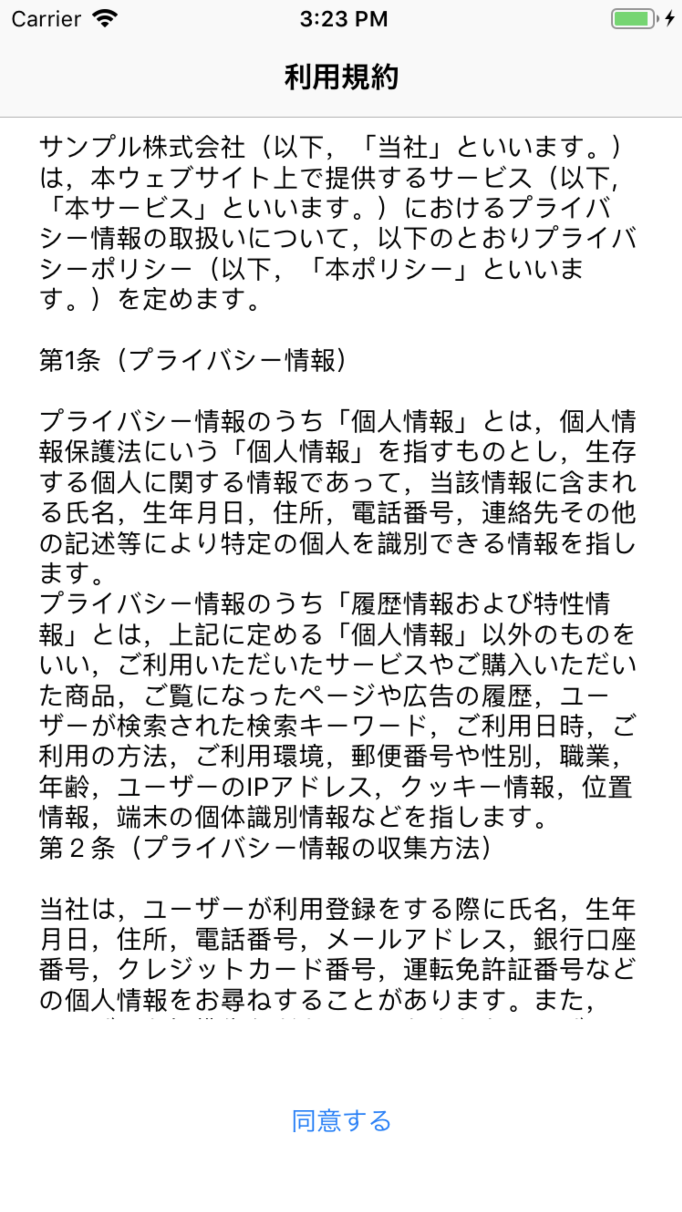
今回はパスワードを忘れたときと、利用規約、プライバシーポリシーの処理は省かせていただきます。
Main.storyboard
これから本題に入っていくのですが、
❶ユーザー登録
❷ログイン
❸ログアウト
➍ユーザー退会
の順番でやっていこうと思います。ユーザー登録
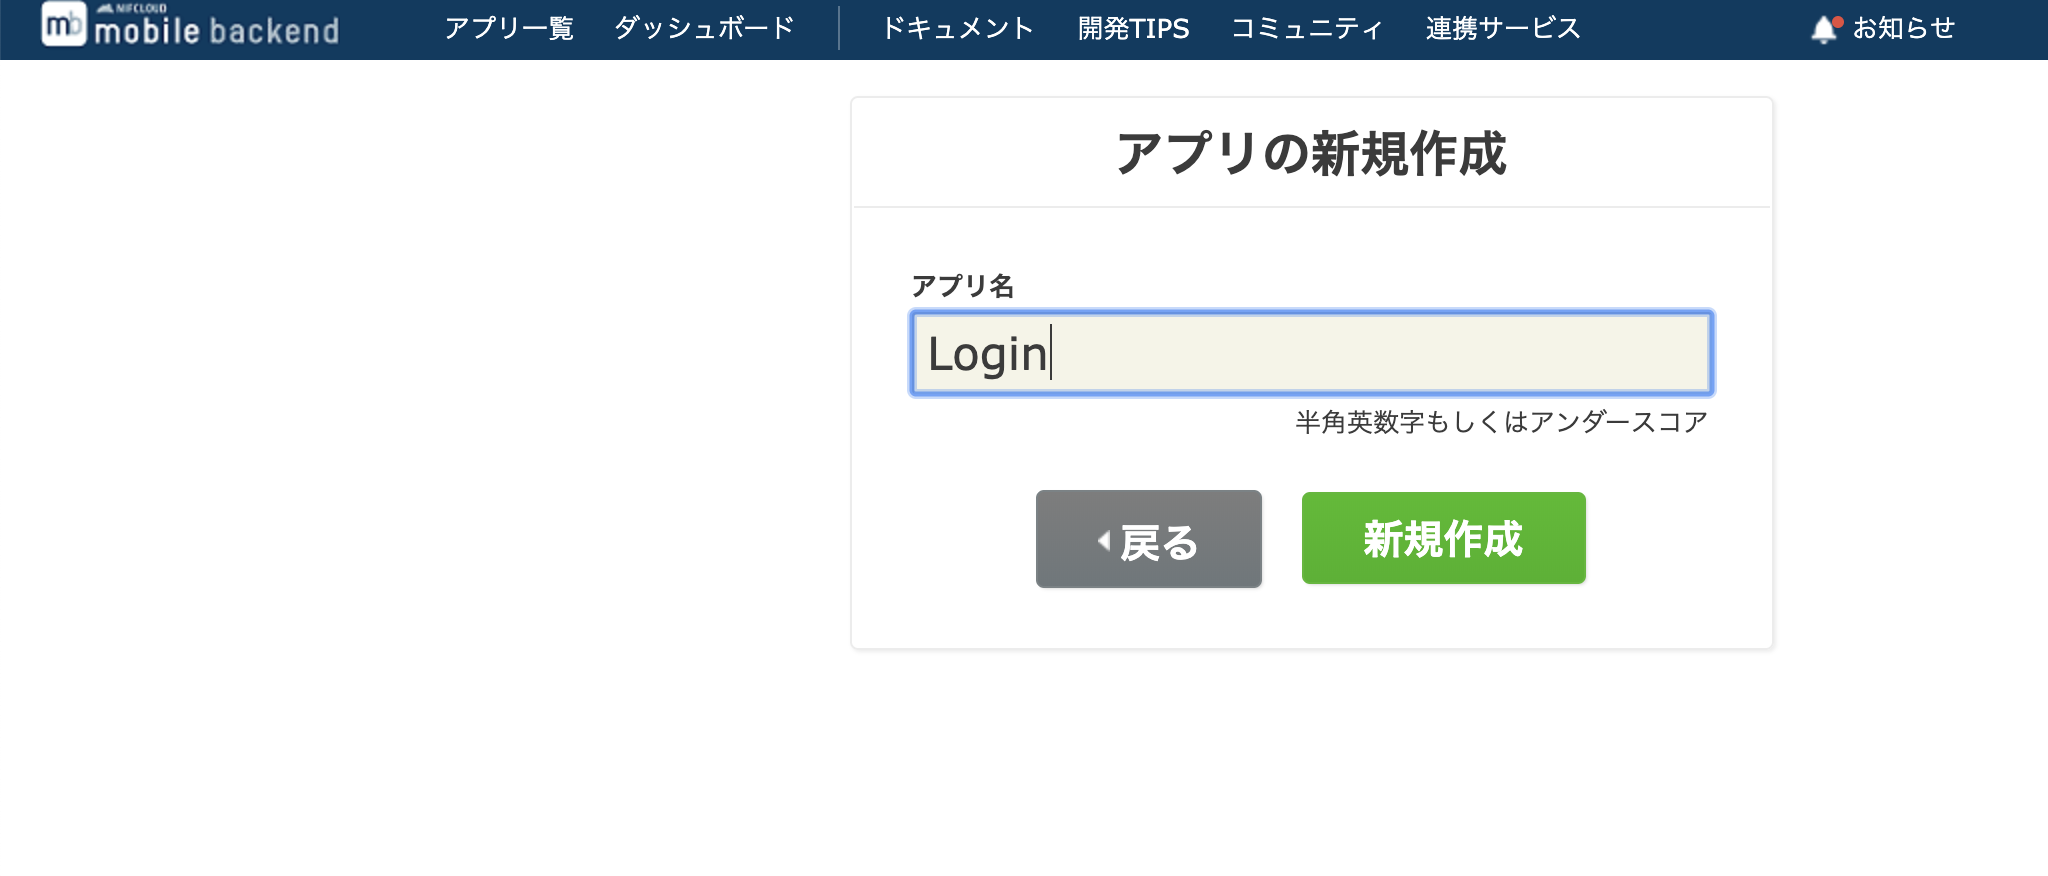
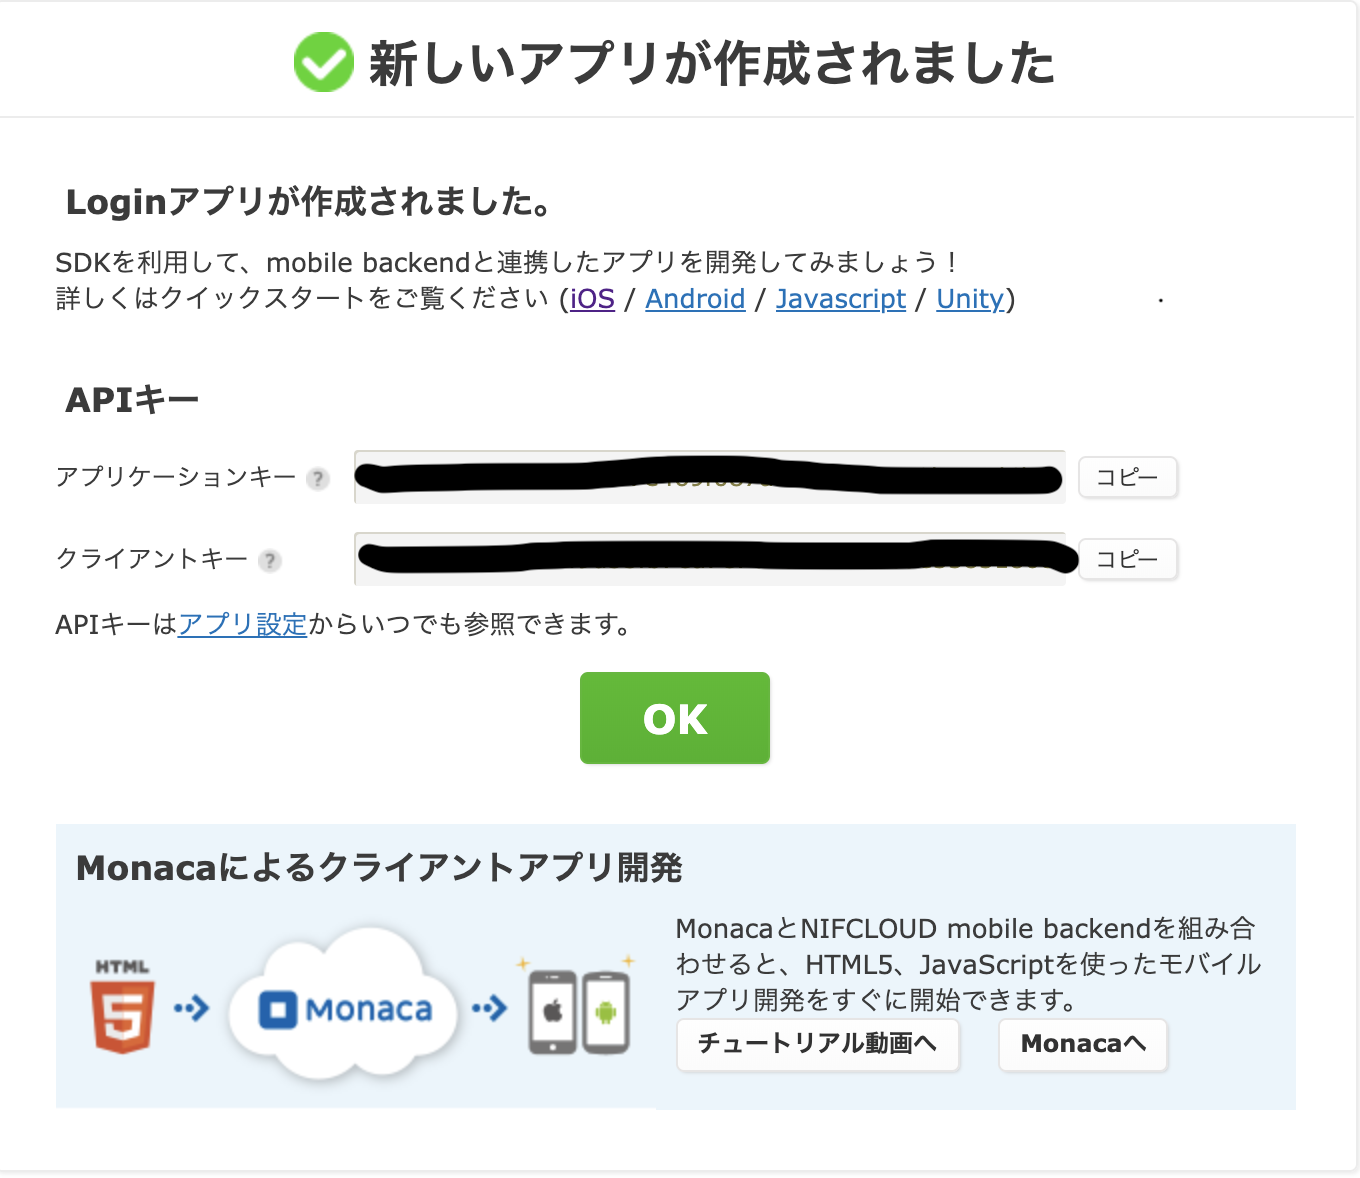
NCMBのページを開いて、アプリを作成します。
アプリケーションキーとクライアントキーはのちに使うのでコピーしておいて下さい。
AppDelegate.swiftに以下の記述を書いてください。
これでNCMBと接続が行えます。import UIKit import NCMB @UIApplicationMain class AppDelegate: UIResponder, UIApplicationDelegate { var window: UIWindow? func application(_ application: UIApplication, didFinishLaunchingWithOptions launchOptions: [UIApplication.LaunchOptionsKey: Any]?) -> Bool { //連携完了 NCMB.setApplicationKey("あなたのアプリケーションキー", clientKey: "あなたのクライアントキー") return true } ~~~省略~~~また、ログインしているか否かで最初の画面表示(Storyboard)が違うのでそのためのコードを書かなければなりません。
AppDelegate.swift

 func application(_ application: UIApplication, didFinishLaunchingWithOptions launchOptions: [UIApplication.LaunchOptionsKey: Any]?) -> Bool {

       ~~~省略~~~
        let ud = UserDefaults.standard
        let isLogin = ud.bool(forKey: "isLogin")

        if isLogin == true {
            // ログイン中だったら
            //画面の大きさ
            self.window = UIWindow(frame: UIScreen.main.bounds)
            let storyboard = UIStoryboard(name: "Main"
                , bundle: Bundle.main)
            //起動時の画面を設定
            let rootViewController = storyboard.instantiateViewController(withIdentifier: "MainController")
            self.window?.rootViewController = rootViewController
            self.window?.backgroundColor = UIColor.white
            //その画面を表示
            self.window?.makeKeyAndVisible()
        } else {
            // ログインしていなかったら
            self.window = UIWindow(frame: UIScreen.main.bounds)
            let storyboard = UIStoryboard(name: "SignIn", bundle: Bundle.main)
            let rootViewController = storyboard.instantiateViewController(withIdentifier: "SignInController")
            self.window?.rootViewController = rootViewController
            self.window?.backgroundColor = UIColor.white
            self.window?.makeKeyAndVisible()
        }
        return true
    }
これで起動時の画面が決定しました。
このような丸みを帯びたボタンにするために以下のコードを書いていきます。import UIKit class TopViewController: UIViewController { @IBOutlet weak var signUp: UIButton! override func viewDidLoad() { super.viewDidLoad() //角丸サイズ signUp.layer.cornerRadius = 10.0 } }次にアカウント作成ページを作っていきましょう。
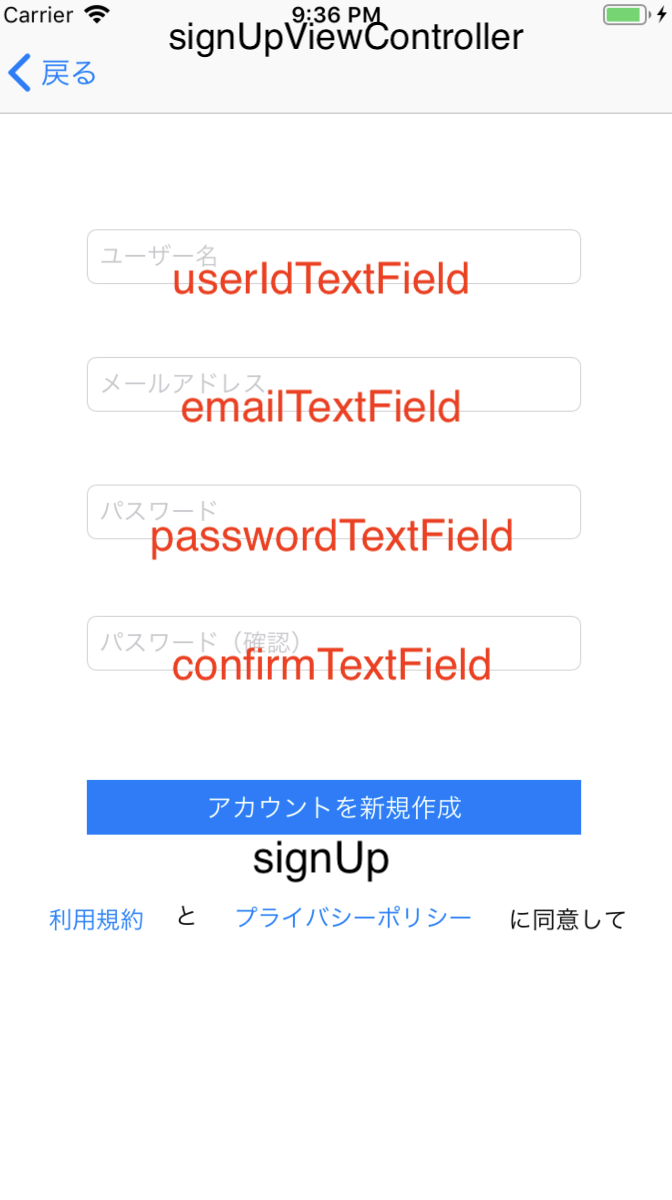
import UIKit
import NCMB

class SignUpViewController: UIViewController, UITextFieldDelegate {

    @IBOutlet var userIdTextField: UITextField!
    @IBOutlet var emailTextField: UITextField!
    @IBOutlet var passwordTextField: UITextField!
    @IBOutlet var confirmTextField: UITextField!

    override func viewDidLoad() {
        super.viewDidLoad()

        userIdTextField.delegate = self
        emailTextField.delegate = self
        passwordTextField.delegate = self
        confirmTextField.delegate = self
    }

    override func didReceiveMemoryWarning() {
        super.didReceiveMemoryWarning()
        // Dispose of any resources that can be recreated.
    }

    func textFieldShouldReturn(_ textField: UITextField) -> Bool {
        textField.resignFirstResponder()
        return true
    }

    @IBAction func signUp() {
        let user = NCMBUser()

        if (userIdTextField.text?.characters.count)! < 4 {
            print("文字数が足りません")
            return
        }

        user.userName = userIdTextField.text!
        user.mailAddress = emailTextField.text!

        if passwordTextField.text == confirmTextField.text {
            user.password = passwordTextField.text!
        } else {
            print("パスワードの不一致")
        }

        user.signUpInBackground { (error) in
            if error != nil {
                // エラーがあった場合
                print(error)
            } else {
                // 登録成功
                let storyboard = UIStoryboard(name: "Main", bundle: Bundle.main)
                let rootViewController = storyboard.instantiateViewController(withIdentifier: "MainController")<img width="338" alt="スクリーンショット 2019-07-04 22.35.52.png" src="https://qiita-image-store.s3.ap-northeast-1.amazonaws.com/0/325764/90f22961-fbfc-55fe-9181-67a7c1a8d19b.png">
<img width="338" alt="スクリーンショット 2019-07-04 22.35.52.png" src="https://qiita-image-store.s3.ap-northeast-1.amazonaws.com/0/325764/52410859-4046-e5f8-7f2c-1f18f8d501fe.png">

                UIApplication.shared.keyWindow?.rootViewController = rootViewController

                 // ログイン状態の保持
                 let ud = UserDefaults.standard
                 ud.set(true, forKey: "isLogin")
                 ud.synchronize()

                    }
                })
            }
        }

    }
以上で簡易ではありますが、ユーザー登録の処理は終わりました。
ログイン
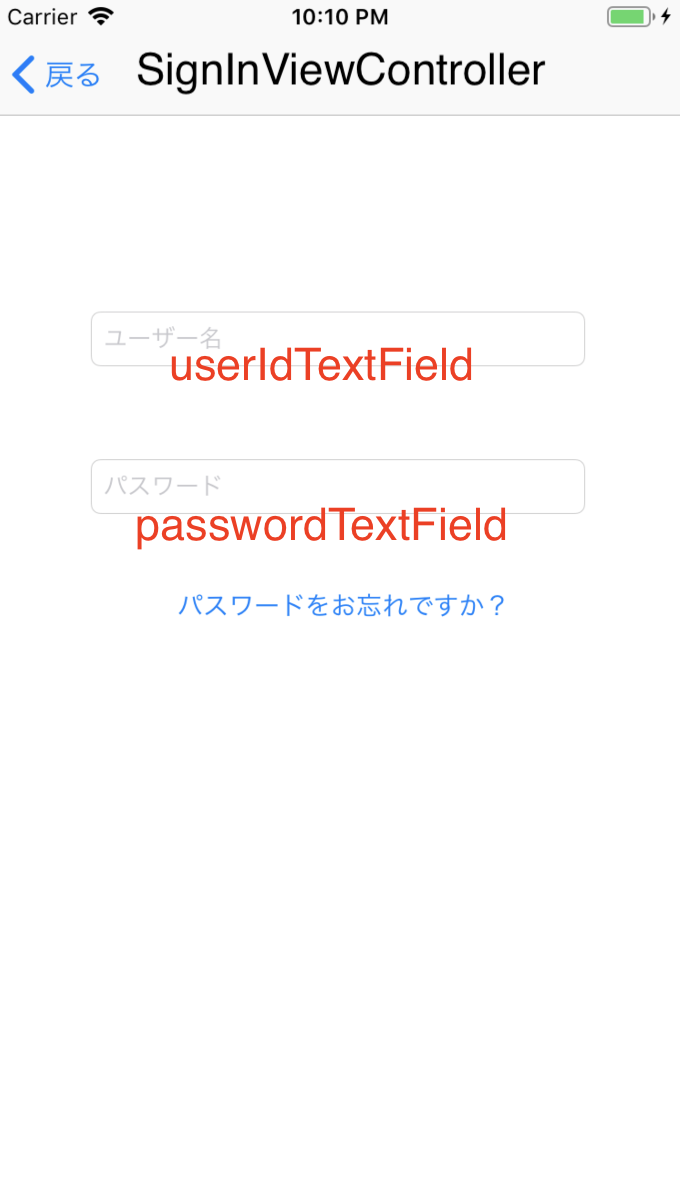
import UIKit
import NCMB

class SignInViewController: UIViewController, UITextFieldDelegate {

    @IBOutlet var userIdTextField: UITextField!
    @IBOutlet var passwordTextField: UITextField!

    override func viewDidLoad() {
        super.viewDidLoad()

        userIdTextField.delegate = self
        passwordTextField.delegate = self
    }

    func textFieldShouldReturn(_ textField: UITextField) -> Bool {
        textField.resignFirstResponder()
        return true
    }

    @IBAction func signIn() {

        if (userIdTextField.text?.characters.count)! > 0 && (passwordTextField.text?.characters.count)! > 0 {

            NCMBUser.logInWithUsername(inBackground: userIdTextField.text!, password: passwordTextField.text!) { (user, error) in
                if error != nil {
                    print(error)
                } else {
                    // ログイン成功
                    let storyboard = UIStoryboard(name: "Main", bundle: Bundle.main)
                    let rootViewController = storyboard.instantiateViewController(withIdentifier: "MainController")
                    UIApplication.shared.keyWindow?.rootViewController = rootViewController

                    // ログイン状態の保持
                    let ud = UserDefaults.standard
                    ud.set(true, forKey: "isLogin")
                    ud.synchronize()
                    }
                }
            }
        }
    }
ログアウト
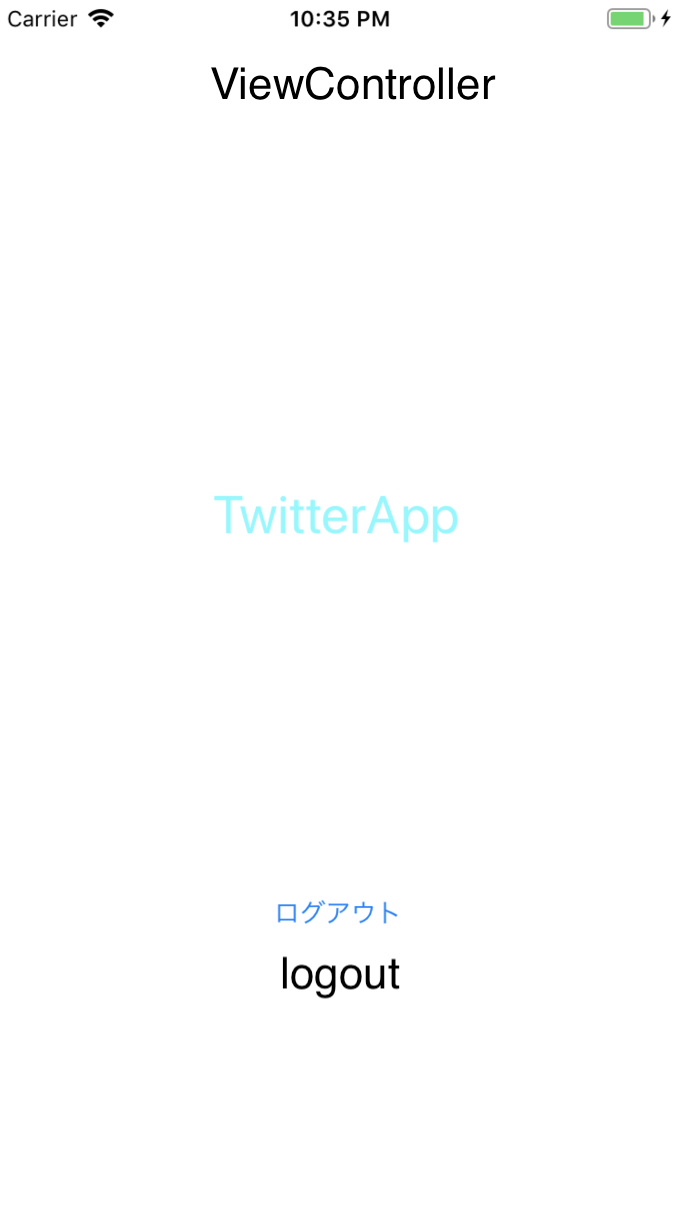
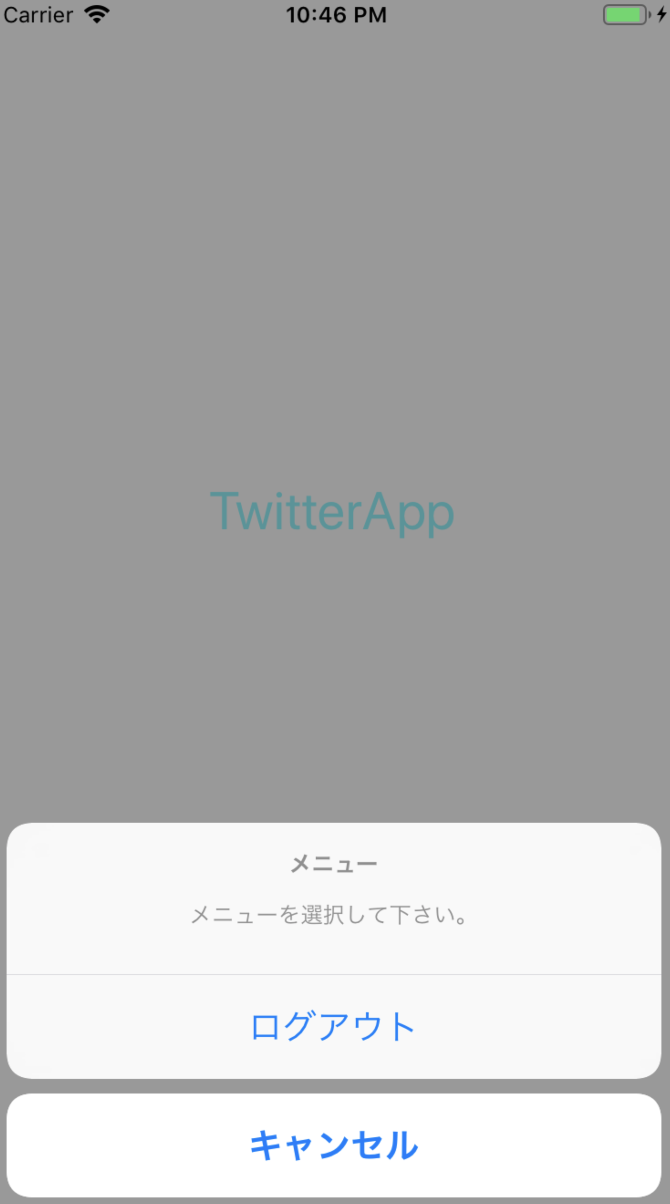
import UIKit
import NCMB

class ViewController: UIViewController {

    override func viewDidLoad() {
        super.viewDidLoad()
        // Do any additional setup after loading the view, typically from a nib.
    }

    @IBAction func logout(_ sender: Any) {
        let alertController = UIAlertController(title: "メニュー", message: "メニューを選択して下さい。", preferredStyle: .actionSheet)

        let signOutAction = UIAlertAction(title: "ログアウト", style: .default) { (action) in
            NCMBUser.logOutInBackground({ (error) in
                if error != nil {
                    print(error)
                } else {
                    // ログアウト成功
                    let storyboard = UIStoryboard(name: "SignIn", bundle: Bundle.main)
                    let rootViewController = storyboard.instantiateViewController(withIdentifier: "SignInController")
                    UIApplication.shared.keyWindow?.rootViewController = rootViewController

                    // ログイン状態の保持
                    let ud = UserDefaults.standard
                    ud.set(false, forKey: "isLogin")
                    ud.synchronize()
                }
            })
        }
        let cancelAction = UIAlertAction(title: "キャンセル", style: .cancel) { (action) in
            alertController.dismiss(animated: true, completion: nil)
        }

        alertController.addAction(signOutAction)
        alertController.addAction(cancelAction)

        self.present(alertController, animated: true, completion: nil)
    }
}
ここで少し小技。
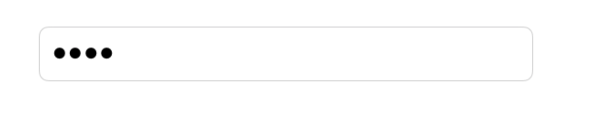
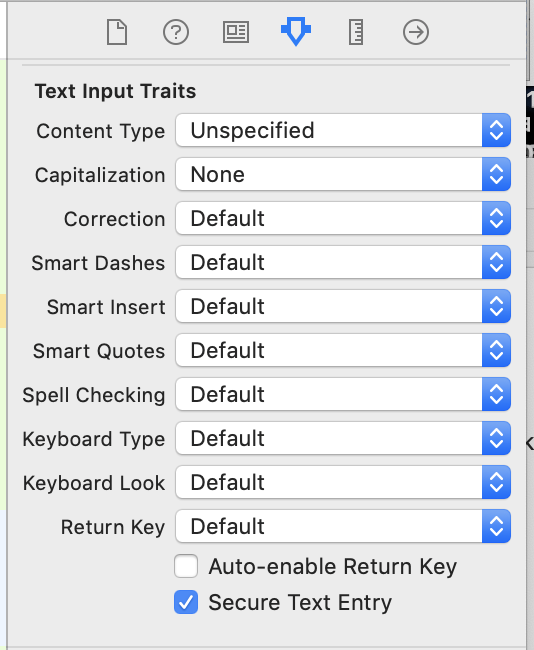
このようにパスワードを打つとき隠したい場合、
このようにSecure Text Entryにチェックを入れる。ユーザー退会
ユーザーの退会は重い処理なので、メールアドレスを入力させたりするのですが今回は簡単にやってみたいと思います。
⇨

ViewControllerに@IBAction func logout(_ sender: Any) { ~~~省略~~~ let deleteAction = UIAlertAction(title: "退会", style: .default) { (action) in let user = NCMBUser.current() user?.deleteInBackground({ (error) in if error != nil{ print(error) }else{ // ログアウト成功 let storyboard = UIStoryboard(name: "SignIn", bundle: Bundle.main) let rootViewController = storyboard.instantiateViewController(withIdentifier: "SignInController") UIApplication.shared.keyWindow?.rootViewController = rootViewController // ログイン状態の保持 let ud = UserDefaults.standard ud.set(false, forKey: "isLogin") ud.synchronize() } }) } ~~~省略~~~ alertController.addAction(deleteAction) self.present(alertController, animated: true, completion: nil) }これで簡易ではありますがログインからユーザー退会までの機能がすべて終わりました。
ぜひみなさん開発するときの参考にしてみてください。サンプルはこちらです。


- 投稿日:2019-07-04T16:24:44+09:00
Swift:Macのインカメラから取得した映像を鏡写し(左右反転)で保存する(プレビュー付き)
インカメラから映像を取得するのも録画するのも簡単だが,鏡写しで保存するのに意外と手こずったので備忘録.
CustomViewimport Cocoa import AVFoundation class CameraView: NSView { let output = AVCaptureMovieFileOutput() // ファイル出力用 let session = AVCaptureSession() var camera: AVCaptureDevice? = nil var previewLayer: AVCaptureVideoPreviewLayer? = nil // プレビュー用 required init?(coder decoder: NSCoder) { super.init(coder: decoder) wantsLayer = true let devices = AVCaptureDevice.devices(for: AVMediaType.video) if devices.count > 0 { camera = devices.first! } else { Swift.print("No Available Devices") return } do { let input = try AVCaptureDeviceInput(device: camera!) // プレビューの設定 if session.canAddInput(input) { session.addInput(input) session.sessionPreset = AVCaptureSession.Preset.medium previewLayer = AVCaptureVideoPreviewLayer(session: session) previewLayer!.frame = bounds previewLayer!.videoGravity = AVLayerVideoGravity.resizeAspectFill previewLayer!.setAffineTransform(CGAffineTransform(scaleX: -1, y: 1)) layer?.addSublayer(previewLayer!) } // ファイル出力の設定 if session.canAddOutput(output) { session.addOutput(output) // ここからが鏡写しのキモ session.beginConfiguration() if let connection = output.connection(with: AVMediaType.video) { if connection.isVideoMirroringSupported { connection.automaticallyAdjustsVideoMirroring = false connection.isVideoMirrored = true } } session.commitConfiguration() } } catch { Swift.print("No Available Devices") } } // 画面のリサイズ対応 public func resizeWindow() { previewLayer!.frame = bounds } }ViewControllerimport Cocoa import AVFoundation class CameraVC: NSViewController, NSWindowDelegate, AVCaptureFileOutputRecordingDelegate { @IBOutlet weak var cameraView: CameraView! override func viewDidLoad() { super.viewDidLoad() cameraView.session.startRunning() } override func viewWillAppear() { self.view.window?.delegate = self } override func viewWillDisappear() { cameraView.output.stopRecording() cameraView.session.stopRunning() } // 画面のリサイズに対応 func windowDidResize(_ notification: Notification) { cameraView.resizeWindow() } public func startRecording() { let fileName = "sample.mov" // とりあえず書類フォルダに保存する guard let docDir = FileManager.default.urls(for: .documentDirectory, in: .userDomainMask).first else { return } let url = docDir.appendingPathComponent(fileName) cameraView.output.startRecording(to: url, recordingDelegate: self) } public func stopRecording() { cameraView.output.stopRecording() } func fileOutput(_ output: AVCaptureFileOutput, didFinishRecordingTo outputFileURL: URL, from connections: [AVCaptureConnection], error: Error?) { Swift.print("Finish Recording.") } }
- 投稿日:2019-07-04T15:56:57+09:00
SwiftUI 時代の依存関係逆転のプラクティス [beta]
※注意:本記事は Xcode 11.0 beta 3 の環境で動作確認したものです。正式版では動作が変わる可能性もありますのでご参考まで。
本題に入る前の前提知識
依存関係逆転 #とは
詳しくは Wikipedia などで確認できますが、簡単にいうと:
- 上位レイヤーのモジュールが下位レイヤーのモジュールに1依存すべきではない、両方抽象に依存すべき
- 抽象が実装に依存してはならない、実装が抽象に依存すべき
の 2 点だけです。RxSwift を使って具体的にコードで書いてみるとこんな感じでしょう:
ViewController.swiftimport UIKit import RxSwift import RxCocoa protocol ModelObject: AnyObject { var count: Observable<Int> { get } func countUp() } class ViewController: UIViewController { let model: ModelObject let label: UILabel init(model: ModelObject) { self.model = model model.count .map({ "\($0)" }) .asDriver(...) .drive(label.rx.text) } override func touchesEnded(_ touches: Set<UITouch>, with event: UIEvent?) { model.countUp() } // 略 }Model.swiftimport Foundation import RxSwift final class Model { var _count: BehaviorSubject<Int> = .init(value: 0) func _countUp() { let newValue = try! _count.value + 1 _count.onNext(newValue) } } extension Model: ModelObject { var count: Observable<Int> { return _count.asObservable() } func countUp() { return _countUp() } }上記の例では、上位レイヤーである
ViewControllerは、直接下位レイヤーのオブジェクトModelに依存するのではなく、下位レイヤーに欲しい機能を抽象化したModelObjectに依存し、下位レイヤーのオブジェクトModelも同じくModelObjectである抽象に適合しています;また、実装に依存した抽象も一切なく、全ての実装は抽象に依存しています。それで何が嬉しいの?
一番嬉しい場面は、オブジェクトを入れ替えるときです。全ての依存は抽象への依存なので、依存注入するときに必要に応じて具体的な実装を簡単に入れ替えられます。例えば本番アプリでは実際のサーバと通信するオブジェクトを注入しますが、ローカルでロジックのテストをするときに実際のサーバと通信したくないので、通信オブジェクトを実際の通信をしないモックオブジェクトで差し替えればすぐにできます。この依存注入の手法を DI(Dependency Injection)と言います。
例えば上記の例ですと、桁数がとても長い数字の表示をテストしたいときに、本番オブジェクトのような
0から始まって1ずつ上がるオブジェクトではいつまで経ってもその欲しい桁数にたどり着かないので、countがいきなり100,000,000から始まったり、一回のcountUpで数値ではなく桁数を上げるロジックを入れたりしたオブジェクトを、テスト専用のモックオブジェクトとしてテストコードに注入すればいい訳です。もしViewControllerが依存してるのは抽象のModelObjectではなく、具体的な実装であるModelでしたら、その入れ替えがとても難しいです。また他にも、ソースコードが読みやすくなる(依存宣言で必要最小限のことしか書いてないため)、依存先の修正が依存元への影響が少ない(
protocolの適合だけ修正すればいい)などの利点もあります。抽象と実装 #とは
ここまでで何度も出てきた言葉ですが、もう一回これらの言葉を見てみましょう。
まず「実装」は簡単です、つまりは何かしらのロジックの実装です。「抽象」の対義語として「具象」とも言えるかと思いますがなんかわかりにくいので、「具体的な実装」と思えばいいでしょう(抽象的な実装は何なのかというツッコミはさておき)。例えば上記のサンプルですと、
ViewControllerのtouchesEndedメソッド内でmodel.countUp()を呼び出すのも、Modelの_countUpメソッド内で_count.onNext(newValue)を呼び出すのも、すべて具体的な実装です。これらは実際の動作が書かれてあるからです。逆に「抽象」は何かと言うと、
ModelObjectのprotocolで宣言したvar countやfunc countUp()は全て抽象です。これらはModelObjectに適合した部品は「これらのプロパティーやメソッドがあるよ」という宣言しかしていません、彼らは何を返すかとか、呼び出したらどうなるのかとかは一切言ってないからです。Swift では多くの場合、「抽象」は
protocol宣言で作りますが、classで作る方法もあります。その場合、具体的な動作を自分で定義せず、自分を継承したサブクラスで定義すればいいです。ただし Swift は C# のように明示的に「abstract class(抽象クラス)」の宣言が出来ないため、ビルド時の動作保証が出来ない2のが大きなデメリットとも言えます。ではそろそろ本題
アップルが示した実装アプローチはある
SwiftUI は
View自身に@Stateプロパティーを入れることによって、該当プロパティーの値変更がビューに自動的に反映されます。もう自分で監視処理を書かなくて済むのがとても嬉しいです;ところで外部オブジェクトと連携するとき、例えばモデルオブジェクトと連携するときは@Stateが使えず、@ObjectBinding等を使う必要があります。
@ObjectBindingを利用する前提条件として、該当オブジェクトはprotocol BindableObjectに適合する必要があります、このプロトコルが定めた条件は二つあって:
- Combine の
Publisherに適合したPublisherTypeを定義する必要があります;なおこのPublisherTypeのPublisher.FailureはNeverである必要がありますdidChangeというPublisherTypeのプロパティーを用意する必要があります;SwiftUI はこのプロパティーからreceiveを受け取ったときに、変更差分を検出してそれに合わせて画面レンダリングを更新しますですので、上記のサンプルコードをこのアプローチで作り直せば、このような感じになります:
View.swiftimport SwiftUI import Combine struct ContentView : View { @ObjectBinding var model: Model var body: some View { Button.init(action: { [unowned model] in model.reset() }, label: { Text("\(model.int)") }) } }Model.swiftimport SwiftUI import Combine final class Model: BindableObject { var int: Int = 0 { didSet { didChange.send() } } var didChange: PassthroughSubject<Void, Never> = .init() private var timer: Timer? init() { setupTimer() } private func resetTimer() { timer?.invalidate() int = 0 } private func setupTimer() { timer = Timer.scheduledTimer(withTimeInterval: 1, repeats: true, block: { [weak self] (_) in self?.int += 1 }) } func reset() { resetTimer() setupTimer() } }さて、ここで問題に気づいた人もいるのではないでしょうか。
アップルが示した実装アプローチは依存関係逆転できてない
Viewが依存するモデルオブジェクトであるModelは、抽象てはなく実装です。そもそもこのアプローチでは抽象がどこにもないのです。そして他にも、例えば本来 UI 層のことについて知らなくていい(というか知ってはいけない)はずのモデルオブジェクトは、UI 層にあるはずの SwiftUI に依存してしまっています。これは
BindableObjectは Combine ではなく SwiftUI で定義したプロトコルだからです。ではとりあえず最初のサンプルコードのように、試しに
ModelをプロトコルとしてModelObjectに抽象化してみましょうか?View.swiftprotocol ModelObject: BindableObject { var count: Int { get } func countUp() } struct ContentView: View { @ObjectBinding var model: ModelObject // 略 }って、あれ?なんかいきなりエラーが出てきますね。
@ObjectBinding var model: ModelObjectの行で、Property type 'ModelObject' does not match that of the 'wrappedValue' property of its wrapper type 'ObjectBinding'のエラーがいきなり出てきます。困った。解決法 1:class を利用する
一番愚直な方法は、アップルのアプローチと同じように、class で抽象したモデルオブジェクトをプロパティーの型として利用することです:
View.swiftimport SwiftUI import Combine class ModelObject: BindableObject { let didChange: PassthroughSubject<Void, Never> = .init() var count: Int = .max { didSet { didChange.send() } } func reset() { fatalError() } } struct ContentView: View { @ObjectBinding var model: ModelObject // 略 }こうすれば
ContentViewはちゃんとビルドが通るので、あとはモデルオブジェクトの実装だけです:Model.swiftimport Foundation import Combine final class Model: ModelObject { private var timer: Timer? override func reset() { resetTimer() setupTimer() } override init() { super.init() count = 0 setupTimer() } } extension Model { private func resetTimer() { timer?.invalidate() count = 0 } private func setupTimer() { timer = Timer.scheduledTimer(withTimeInterval: 1, repeats: true, block: { [weak self] (_) in self?.count += 1 }) } }この方法ではとりあえずビルドも通りますし、モデル層の実装で
import SwiftUIをする必要もありません。ただし抽象と実装の章でも述べたとおり、この方法でいくつかの欠点があります:
- 実装ファイルでどこを実装しなくてはならないか、というのがビルドタイムでは明確に特定できず、具体的なソースコードに依存してしまいます
- それらの実装において、大量の
overrideが発生してしまいます- 多重継承ができないので、複数の画面を同じモデルオブジェクトで対応するときは、全て同じ抽象化で定義する必要があり、それによりモックオブジェクトが作りにくく、また画面の責務も絞りにくい
などなどです。そのため、これは残念ながらいい対応法とは言い難いでしょう。
解決法 2:ジェネリクスを利用する
そもそもの話、
Property type 'ModelObject' does not match type 'ObjectBinding'エラーが発生する理由は、プロトコル自身は、プロトコルに適合していない3からであり、ここはジェネリクスの力を借りて実際の型に落とし込む必要があるからです。では具体的にどうするのかというとこの
Viewに<Model: ModelObject>のジェネリクスを入れてあげればいいです。View.swiftprotocol ModelObject: BindableObject { var count: Int { get } func reset() } struct ContentView<Model: ModelObject>: View { @ObjectBinding var model: Model init(model: Model) { self.model = model } // 略 }Model.swiftfinal class Model { private var _count: Int = 0 { didSet { didChange.send() } } private var timer: Timer? let didChange: PassthroughSubject<Void, Never> = .init() // 略 } extension Model: ModelObject { var count: Int { return _count } func reset() { resetTimer() setupTimer() } }この方法の最大のメリットは、抽象から実装に落とし込むときの暗黙なルール、つまりどのメソッドはオーバーライドすべきか等のルールはないので、コンパイラーが動作の成功を保証してくれます;また目障りな大量の
overrideキーワードもないので、コードがだいぶ綺麗になります。そしてもちろん、アップルが提示したアプローチから道を大きく踏み外していないのもポイント高いと思います。それはすなわち SwiftUI が用意してくれてる差分抽出などの資産を最大限に利用できることを意味します。
なお実は最初のサンプルコードと比べれば、もう一つ小さいメリットがあります:パフォーマンスの良さです。最初のサンプルでは
protocolをそのままプロパティーの型として宣言したため、実際の利用は存在型となり、メソッドディスパッチで微妙なオーバーヘッドが発生します4。実際のプロダクトではほぼほぼ無視できるオーバーヘッドかと思いますが。ただし筆者としてはあと 2 つほど違和感を覚える箇所があります:
- ModelObject が BindableObject を継承しているので分かりきってることとは言え、事前に
didChangeプロパティーを用意しなくてはいけない、拡張で対応できないという点についてはなんとなくちょっと気持ち悪いです- 値型なので
nonmutatingの動作が保証されるとは言え、@ObjectBindingを利用している Property Wrapper は宣言としてvarの利用が強要されるのもなんとなくちょっと気持ち悪いです、内包しているのは参照型なので何も変更されることがないはずなのにもちろん上記の違和感は全て筆者個人の気持ちですので一概に正しいとは言えませんが、そんな筆者の個人的なモヤモヤを解消したもう一つの解決法があります:
解決法 3:そもそも
BindableObjectを使わないこれはそもそも最初からモデルオブジェクトに対して SwiftUI への依存を完全に排除し、「ビジネスロジック」としての純粋さを最大限に保った方法です。ただその代わり、データバイディング処理を自分で書かないといけないので、UI 層のコードが多少膨らみます。まずは上のサンプルと同じように UI 層を書きます:
View.swiftprotocol ModelObject: AnyObject { var countPublisher: AnyPublisher<Int, Never> { get } func reset() } struct ContentView<Model: ModelObject>: View { let model: Model @State private var count: Int = .max init(model: Model) { self.model = model } var body: some View { Button.init(action: { [unowned model] in model.reset() }, label: { Text("\(count)") }).onReceive(model.countPublisher.receive(on: DispatchQueue.main)) { [self] count in self.count = count } } }モデルオブジェクトの抽象化は最初のサンプルと同じように、結果プロパティーをそのまま
Intとしてではなく、変更を通知してくれる型(RxSwift ではObservable<Int>、Combine ではAnyPublisher<Int>)にしています;そしてプロトコルの継承はBindableObjectではなく、ただの参照型を示すAnyObjectにすることによって、モデルオブジェクトの所持をそのままletで宣言できちゃいます。ただその代わり、SwiftUI のデータバイディングが一切使えないので、ContentViewの中には自分でバイディング用の@State var count: Intを実装し、そしてbodyの実装でそのバイディングメカニズムのonReceiveを実装しなくてはいけません。しかも更にここで注意しないといけないのは、モデルオブジェクトのcountPublisherが通知を送ってくるのはメインスレッドじゃない可能性もあるので、UI 変更に必要なメインスレッドにジャンプする処理receive(on:)も忘れてはいけません。ここまでできたら、あとはモデルオブジェクトの実装だけです、簡単です:
Model.swiftfinal class Model { private var count: CurrentValueSubject<Int, Never> = .init(0) private var timer: Timer? init() { setupTimer() } // 略 } extension Model: ModelObject { var countPublisher: AnyPublisher<Int, Never> { return count.eraseToAnyPublisher() } func reset() { resetTimer() setupTimer() } }これにより、
Modelが知る必要があることを最小限に留めておいて、ModelObjectへの適合が可能になり、上記の筆者のモヤモヤも全て解消されます。ただもちろん、View 側のコードが大変です。せっかく SwiftUI で宣言的な画面作りができたのに、結局こんな大量なバインディングコードを書かなくてはいけないのは確かに面倒です。今回はcountプロパティー一つだけのバインディングなのでまだマシですが、そのプロパティーが 10 個 20 個に膨らんできたら正気を保てないですね。でも、一番大きな問題はこの
onReceiveメソッドの煩わしさです。我々が本当にやりたいのはただ単にmodel.countPublisherの値を、自分自身のcountにバインドしたいだけです。そこでちょっと工夫をすることで、この手動バインディングの煩わしさがだいぶ軽減できるじゃないかと思います:View+.swiftextension View { func assign <P> (_ publisher: P, to state: Binding<P.Output>) -> SubscriptionView<Publishers.ReceiveOn<P, DispatchQueue>, Self> where P : Publisher, P.Failure == Never { return onReceive(publisher.receive(on: DispatchQueue.main)) { result in state.value = result } } }これは
Viewに対してassign(_: to:)メソッドを追加しています。具体的なバインディング作業、つまりスレッドの切り替えやデータが来た時の処理は全部メソッド内で自動でやってくれますので、これでContentViewの実装がこのようになります:View.swiftstruct ContentView<Model: ModelObject>: View { // 略 var body: some View { Button.init(action: { [unowned model] in model.reset() }, label: { Text("\(count)") }) .assign(model.countPublisher, to: $count) } }上記のコードで、
$countの$は今回の Swift 5.1 で追加したバインディング修飾子で、countというBindingの値を直接アクセスするためのものです。まとめ
SwiftUI 時代の依存関係逆転で使えるデータバインディングの手法をとりあえず 3 つ紹介してきましたが、他にもいろいろあるとは思いますのでぜひコメントで教えていただけたらと思います。ひとまずここではそれぞれのメリット/デメリットをまとめてみます:
classで SwiftUI を利用する方法ジェネリクスで SwiftUI を利用する方法 手動でデータバインディングする方法 習得のしやすさ ○ ○ △ ビルド時の動作保証 × ○ ○ UI 層のコード量 ◎ ◎ △ ロジック層のコード量 △ △ ○ ロジック層の純粋さ △ △ ○ モックオブジェクトの柔軟さ × ○ ◎
例えば画面とビジネスロジックで見れば、画面が上位レイヤーで、ビジネスロジックが下位レイヤーと見なせます。 ↩
Swift では「抽象クラス」というキーワードがなく、全てのクラスは平等に扱われるので、抽象クラスのインスタンス化を防いだり、継承したサブクラスが親の宣言したメソッドやプロパティーについて具体的な実装を強制することができない ↩
プロトコル自身を型として宣言したプロパティーは、そのプロトコルに適合した実際の型を隠蔽した「存在型(Existencial)」であり、存在型自身は該当プロトコルに適合しません。詳しくはこちらの記事などをご参考ください。 ↩
プロトコルの存在型のメソッドディスパッチは「Witness Table」を利用するが、ジェネリクスで落とし込まれた型は自分の「Direct Dispatch」もしくは「Vtable」が使えるので、どれもパフォーマンスが Witness Table より高いです。ただそれはせいぜい 120 fps のモバイルアプリからすると、例えば MacBook Pro が JIS 配列か US 配列かで発生する物理重量の差と同じくらいで、よほどシビアじゃないシチュエーションでは基本的に無視できます。 ↩
- 投稿日:2019-07-04T15:04:18+09:00
SwiftのArray.countはO(1)なのか?を実装で確認してみた。
Array.countはO(1)
Array.countはO(1)という話をTwitterで見かけました。
え???
— hori,masaki @ 南無自動最適化 (@masakihori) 2019年5月14日
もしかして SwiftのArrayのcountってO(1)なのでは???
O(n)だと思ってたんだけどhttps://t.co/rOcflehWR9確かに、リンクにあるCollection.countのドキュメントを読むとこうあります
To check whether a collection is empty, use its isEmpty property instead of comparing count to zero. Unless the collection guarantees random-access performance, calculating count can be an O(n) operation.
Complexity: O(1) if the collection conforms to RandomAccessCollection; otherwise, O(n), where n is the length of the collection.すなわち、(そのCollectionが)
RandomAccessCollectionに適合している場合はO(1)、そうでない場合はO(n)と書かれています。また、Arrayは
RandomAccessCollectionに適合しているので、O(1)ということになります。これを実装から確認してみます。
※以下の実装は2019/7/3時点のmasterの実装から抽出しています。また、アノテーションやコメントを割愛したり、改行位置を変えたりしています。最新の実際の実装はapple/swiftから確認をお願いします。
Arrayの実装
stdlibはOSSなので、ここから見ることができます → Array.swift
Arrayはstructで、中身は
_bufferだけで、あとはメソッドとかゲッターとかの定義です。Array.swift@frozen public struct Array<Element>: _DestructorSafeContainer { #if _runtime(_ObjC) @usableFromInline internal typealias _Buffer = _ArrayBuffer<Element> #else @usableFromInline internal typealias _Buffer = _ContiguousArrayBuffer<Element> #endif @usableFromInline internal var _buffer: _Buffer /// Initialization from an existing buffer does not have "array.init" /// semantics because the caller may retain an alias to buffer. @inlinable internal init(_buffer: _Buffer) { self._buffer = _buffer } } // https://github.com/apple/swift/blob/master/stdlib/public/core/Array.swift#L299-L318
Array.countを根っこまで辿る
.countの実装は以下のようになっていますArray.swiftpublic var count: Int { return _getCount() } // https://github.com/apple/swift/blob/master/stdlib/public/core/Array.swift#L763-L767Array.swiftinternal func _getCount() -> Int { return _buffer.count }つまり、
_buffer.countを返しているだけになります。_bufferは先程も示したとおり、以下のような定義です。#if _runtime(_ObjC) internal typealias _Buffer = _ArrayBuffer<Element> #else internal typealias _Buffer = _ContiguousArrayBuffer<Element> #endif internal var _buffer: _Buffer // https://github.com/apple/swift/blob/master/stdlib/public/core/Array.swift#L301-L310知識不足でどういう状況でどちらが選択されるのかわからないですが、他の実装を見る限りおそらく通常は
_ContiguousArrayBufferが使用されると思われるので、
こちらについてみていきます。7/4追記:Mac版では
_ArrayBufferの方らしい!!!ので以下はLinux版の実装ということになります(コメント参照)
※ reserveCapacityの実装を見ると、newBufferとして_ContiguousArrayBufferが生成されていますので、このときには必ず_ContiguousArrayBufferが使用されることになります。また、init(repeatedValue:count)を用いた場合も必ず_ContiguousArrayBufferが使われているのも確認しました。 ので、そう判断しました。
おそらく_ArrayBufferはObjCとのブリッジ用で、 こんなコメントとかあるので、Swiftだけを意識するなら無視して良いかなと。_ContiguousArrayBuffer
_buffer.countをgetしたときに実際に返される値は以下です。つまり、_storage.countAndCapacity.countですね。※ countにsetが存在するということはつまり、、、?という感じもしますね。setについては次の章で書きます
ContiguousArrayBuffer.swiftinternal var count: Int { get { return _storage.countAndCapacity.count } nonmutating set { ... } // https://github.com/apple/swift/blob/e9d4687e31a3ae8e90604d3b15bf8b241479c211/stdlib/public/core/ContiguousArrayBuffer.swift#L347-L353_storageの定義は以下のようになっています。
ContiguousArrayBuffer.swiftinternal var _storage: __ContiguousArrayStorageBase // https://github.com/apple/swift/blob/e9d4687e31a3ae8e90604d3b15bf8b241479c211/stdlib/public/core/ContiguousArrayBuffer.swift#L507__ContiguousArrayStorageBase
__ContiguousArrayStorageBaseは以下のような実装です。
大事なポイントとして、countAndCapacityは_ArrayBody型のプロパティとして保持されています。ただこれはベースクラスで、実際に
countAndCapacityに値を書き込む処理はありません。SwiftNativeNSArray.swiftinternal class __ContiguousArrayStorageBase: __SwiftNativeNSArrayWithContiguousStorage { final var countAndCapacity: _ArrayBody ... } // https://github.com/apple/swift/blob/e9d4687e31a3ae8e90604d3b15bf8b241479c211/stdlib/public/core/SwiftNativeNSArray.swift#L268実際に実装されているクラスは、以下の2つです。
internal final class _ContiguousArrayStorage<Element> : __ContiguousArrayStorageBase {

internal final class __EmptyArrayStorage: __ContiguousArrayStorageBase {
今はとにかく実際の値を辿るため、
_ArrayBodyの中身を見に行きます。_ArrayBody
ArrayBody.swiftinternal struct _ArrayBody { internal var _storage: _SwiftArrayBodyStorage ... internal var count: Int { get { return _assumeNonNegative(_storage.count) } set(newCount) { ... } // https://github.com/apple/swift/blob/e9d4687e31a3ae8e90604d3b15bf8b241479c211/stdlib/public/core/ArrayBody.swift#L22
.countをgetしたときは、_storage.countが返されます。
(_assumeNonNegativeは最後にちょっと説明しますが、値をそのまま返す関数です)_SwiftArrayBodyStorage
_SwiftArrayBodyStorage.countをみにいくと、やっとこさ実際の値に行き着きます。
つまり、countはprimitive型です!GlobalObjects.hstruct _SwiftArrayBodyStorage { __swift_intptr_t count; __swift_uintptr_t _capacityAndFlags; }; // https://github.com/apple/swift/blob/48d8ebd1b051fba09d09e3322afc9c48fabe0921/stdlib/public/SwiftShims/GlobalObjects.h#L30-L33※
__swift_intptr_tはIntです(MappedTypes.def)よって、結論として、
.countとして値を取得した場合、
Array._buffer._storage.countAndCapacity._storage.countというプリミティブな値が返される事がわかりましたね!
ということでO(1)ぽいですね!ここからは、どういう仕組でこうなっているのかを辿りたいと思います。
.countの初期値を辿るArrayの生成時に
init(repeating repeatedValue: Element, count: Int)を使ったとしましょう。Array.swiftpublic init(repeating repeatedValue: Element, count: Int) { var p: UnsafeMutablePointer<Element> (self, p) = Array._allocateUninitialized(count) for _ in 0..<count { p.initialize(to: repeatedValue) p += 1 } } // https://github.com/apple/swift/blob/e9d4687e31a3ae8e90604d3b15bf8b241479c211/stdlib/public/core/Array.swift#L866-L875まずはここが呼ばれます。
まずメモリをallocateして、for以下の処理はポインタを走査して値を書き込んでいるだけですね。
selfはArray._allocateUninitializedの返り値の1つ目の値みたいです。
Array._allocateUninitializedをみていきます。Array.swiftinternal static func _allocateUninitialized(_ count: Int) -> (Array, UnsafeMutablePointer<Element>) { let result = Array(_uninitializedCount: count) return (result, result._buffer.firstElementAddress) } // https://github.com/apple/swift/blob/e9d4687e31a3ae8e90604d3b15bf8b241479c211/stdlib/public/core/Array.swift#L905-L914ここではイニシャライザが呼ばれています。
返り値の2つ目の値はただの先頭アドレスみたい。
次はinit(_uninitializedCount:)をみます。@inlinable internal init(_uninitializedCount count: Int) { _precondition(count >= 0, "Can't construct Array with count < 0") // Note: Sinking this constructor into an else branch below causes an extra // Retain/Release. _buffer = _Buffer() if count > 0 { // Creating a buffer instead of calling reserveCapacity saves doing an // unnecessary uniqueness check. We disable inlining here to curb code // growth. _buffer = Array._allocateBufferUninitialized(minimumCapacity: count) _buffer.count = count } // Can't store count here because the buffer might be pointing to the // shared empty array. } // https://github.com/apple/swift/blob/e9d4687e31a3ae8e90604d3b15bf8b241479c211/stdlib/public/core/Array.swift#L887-L903
_preconditionはただのアサーションなので無視して良きです。
_buffer = _Buffer()で作っているに見えますが、count > 0のときは_buffer = Array._allocateBufferUninitialized(minimumCapacity: count)として上書きしています。
コメントを見る限り最適化のためっぽいですね。
というわけでifの中身だけをみます。Array.swiftinternal static func _allocateBufferUninitialized( minimumCapacity: Int ) -> _Buffer { let newBuffer = _ContiguousArrayBuffer<Element>( _uninitializedCount: 0, minimumCapacity: minimumCapacity) return _Buffer(_buffer: newBuffer, shiftedToStartIndex: 0) } // https://github.com/apple/swift/blob/e9d4687e31a3ae8e90604d3b15bf8b241479c211/stdlib/public/core/Array.swift#L877-L885きました。
_buffer.countに書き込んでいます。
ここで冒頭でちらっと紹介したsetterが呼ばれます。nonmutating set { _internalInvariant(newValue >= 0) _internalInvariant( newValue <= capacity, "Can't grow an array buffer past its capacity") _storage.countAndCapacity.count = newValue } // https://github.com/apple/swift/blob/e9d4687e31a3ae8e90604d3b15bf8b241479c211/stdlib/public/core/ContiguousArrayBuffer.swift#L353-L361ここで、
_internalInvariantもただのアサーションなので、無視してよきです(あとで書きます)
実際の中身は、_storage.countAndCapacity.countに値を書き込んでいるだけです。ここで
countAndCapacityは_ArrayBody型なので、また_ArrayBodyのセッターに戻ります。set(newCount) { _storage.count = newCount } // https://github.com/apple/swift/blob/e9d4687e31a3ae8e90604d3b15bf8b241479c211/stdlib/public/core/ArrayBody.swift#L55-L57と、やっぱり_storage.countに値を書き込んでいて、これが先程のプリミティブ値になります。
よって、最終的に正しくcountが格納されています。
.countの変化を辿るappendの場合どう変化しているのでしょうか。
public mutating func append(_ newElement: __owned Element) {
  _makeUniqueAndReserveCapacityIfNotUnique()
  let oldCount = _getCount()
  _reserveCapacityAssumingUniqueBuffer(oldCount: oldCount)
  _appendElementAssumeUniqueAndCapacity(oldCount, newElement: newElement)
}

// https://github.com/apple/swift/blob/e9d4687e31a3ae8e90604d3b15bf8b241479c211/stdlib/public/core/Array.swift#L1120-L1125
_makeUniqueAndReserveCapacityIfNotUnique()
まず一行目、
_makeUniqueAndReserveCapacityIfNotUnique()です。Array.swiftinternal mutating func _makeUniqueAndReserveCapacityIfNotUnique() { if _slowPath(!_buffer.isMutableAndUniquelyReferenced()) { _copyToNewBuffer(oldCount: _buffer.count) } }
isMutableAndUniquelyReferenced()はCopyOnWrite(見た目は値渡しでも、実際のコピーは必要になるまで行わない)を実現するための機能だと思います。
必要なときは、_copyToNewBufferが呼ばれます。Array.swiftinternal mutating func _copyToNewBuffer(oldCount: Int) { let newCount = oldCount + 1 var newBuffer = _buffer._forceCreateUniqueMutableBuffer( countForNewBuffer: oldCount, minNewCapacity: newCount) _buffer._arrayOutOfPlaceUpdate(&newBuffer, oldCount, 0) }newCountとして今の長さに一つ増やした長さが与えられえていますね。
それが_forceCreateUniqueMutableBufferのminNewCapacityとして与えられています。
countForBufferは現在のcountです。ArrayShared.swiftinternal func _forceCreateUniqueMutableBuffer( countForNewBuffer: Int, minNewCapacity: Int ) -> _ContiguousArrayBuffer<Element> { return _forceCreateUniqueMutableBufferImpl( countForBuffer: countForNewBuffer, minNewCapacity: minNewCapacity, requiredCapacity: minNewCapacity) } internal func _forceCreateUniqueMutableBufferImpl( countForBuffer: Int, minNewCapacity: Int, requiredCapacity: Int ) -> _ContiguousArrayBuffer<Element> { _internalInvariant(countForBuffer >= 0) _internalInvariant(requiredCapacity >= countForBuffer) _internalInvariant(minNewCapacity >= countForBuffer) let minimumCapacity = Swift.max(requiredCapacity, minNewCapacity > capacity ? _growArrayCapacity(capacity) : capacity) return _ContiguousArrayBuffer( _uninitializedCount: countForBuffer, minimumCapacity: minimumCapacity) } // https://github.com/apple/swift/blob/e9d4687e31a3ae8e90604d3b15bf8b241479c211/stdlib/public/core/ArrayShared.swift#L154-L193
let minimumCapacityの計算はcapacityが足りないときに、二倍にする処理です。
これはSwiftに限らず、一般的なArrayのcapacity確保の仕組みです。またいつかArrayのメモリ連続が担保されている話をしたいと思います。internal func _growArrayCapacity(_ capacity: Int) -> Int { return capacity * 2 }そのcapacityを用いて、新しいbufferが作られています。
このとき、countとcapacityを渡しています。
countは今の値の方でしたね。ContiguousArrayBuffer.swiftinternal init( _uninitializedCount uninitializedCount: Int, minimumCapacity: Int ) { let realMinimumCapacity = Swift.max(uninitializedCount, minimumCapacity) if realMinimumCapacity == 0 { self = _ContiguousArrayBuffer<Element>() } else { _storage = Builtin.allocWithTailElems_1( _ContiguousArrayStorage<Element>.self, realMinimumCapacity._builtinWordValue, Element.self) let storageAddr = UnsafeMutableRawPointer(Builtin.bridgeToRawPointer(_storage)) let endAddr = storageAddr + _swift_stdlib_malloc_size(storageAddr) let realCapacity = endAddr.assumingMemoryBound(to: Element.self) - firstElementAddress _initStorageHeader( count: uninitializedCount, capacity: realCapacity) } } // https://github.com/apple/swift/blob/e9d4687e31a3ae8e90604d3b15bf8b241479c211/stdlib/public/core/ContiguousArrayBuffer.swift#L177-L202minimumCapacityは必ず0より大きいので、elseブロックをみると、
一番下で_initStorageHeaderが呼ばれています。ContiguousArrayBuffer.swiftinternal func _initStorageHeader(count: Int, capacity: Int) { #if _runtime(_ObjC) let verbatim = _isBridgedVerbatimToObjectiveC(Element.self) #else let verbatim = false #endif // We can initialize by assignment because _ArrayBody is a trivial type, // i.e. contains no references. _storage.countAndCapacity = _ArrayBody( count: count, capacity: capacity, elementTypeIsBridgedVerbatim: verbatim) }というわけで、今の値がそのままcountとして渡されて、capacityが(必要に応じて)広がった
_ArrayBodyが作られます。で、
_copyToNewBufferのところに戻って、_buffer._arrayOutOfPlaceUpdate(&newBuffer, oldCount, 0)が実行されます。
(newBufferにはさきほど作られた新しい_ContiguousArrayBufferが入っています。)_arrayOutOfPlaceUpdate は長いので細かい実装は省略しますが、最後以下のようになっています。
...
self = Self(_buffer: dest, shiftedToStartIndex: startIndex)
destは上で作られた新しい
_ContiguousArrayBufferです。
selfをdestを使って置き換えているのがわかります。
それ以外は主に中身のcopyの処理です(そもそも_copyToNewBufferから呼ばれているので)よって、appendを実行可能な箱ができましたが、まだcountはそのままです。
_reserveCapacityAssumingUniqueBuffer(oldCount: oldCount)
append自体の実装に戻ります。
二行目でoldCountには現在のcountの値が代入され、
_reserveCapacityAssumingUniqueBuffer(oldCount: oldCount)に進みます。internal mutating func _reserveCapacityAssumingUniqueBuffer(oldCount: Int) { let capacity = _buffer.capacity == 0 _internalInvariant(capacity || _buffer.isMutableAndUniquelyReferenced()) if _slowPath(oldCount + 1 > _buffer.capacity) { _copyToNewBuffer(oldCount: oldCount) } } // https://github.com/apple/swift/blob/e9d4687e31a3ae8e90604d3b15bf8b241479c211/stdlib/public/core/Array.swift#L1055-L1082一行目のcapacityは
_internalInvariantにしか使われていませんが、これはコメントを見る限り最適化のためらしいです。
よって、if以下だけを見ますと、capacityが(oldCount + 1)に足りないなら_copyToNewBufferということになります。
さっきと同じですね。copyOnWriteのための複製の必要がなくても、capacityが足りなければ確保する必要があります。_appendElementAssumeUniqueAndCapacity(oldCount, newElement: newElement)
append関数の最後の行、やっとappendを実行しそうな感じの名前です。
internal mutating func _appendElementAssumeUniqueAndCapacity(
  _ oldCount: Int,
  newElement: __owned Element
) {
  _internalInvariant(_buffer.isMutableAndUniquelyReferenced())
  _internalInvariant(_buffer.capacity >= _buffer.count + 1)

  _buffer.count = oldCount + 1
  (_buffer.firstElementAddress + oldCount).initialize(to: newElement)
}

// https://github.com/apple/swift/blob/e9d4687e31a3ae8e90604d3b15bf8b241479c211/stdlib/public/core/Array.swift#L1086-L1095
やったー!てかココだけ見ればよかった〜!
buffer.countに1を足して、値を書き込んでいます。というわけで、append時にもこうやってcountが値として更新されていることがわかりました。
まとめ
Array.countは通常はO(1)なことが確認できました。
removeとか、他のイニシャライザ使った時とかまで追ってないですが、
とにかく.countはたどればprimitive値なので、O(1)になるはずです。おまけ:Assertion
上でたまにでてきてた
_assumeNonNegative,_internalInvariantなどはアサーション用の関数です。主にAssert.swiftに定義されています。
_assumeNonNegativeは0以上であることを確認して、値をそのまま返すメソッドです。@_transparent public func _assumeNonNegative(_ x: ${Self}) -> ${Self} { _internalInvariant(x >= (0 as ${Self})) return ${Self}(Builtin.assumeNonNegative_${BuiltinName}(x._value)) } // https://github.com/apple/swift/blob/e9d4687e31a3ae8e90604d3b15bf8b241479c211/stdlib/public/core/IntegerTypes.swift.gyb#L1701-L1710gyb(Pythonを混ぜてSwiftのコードを生成する仕組み)で書かれているのでちょっと読みづらいかもしれませんが、だいたいSwiftだと思って読んでください。
integer_typesのうち、signedのものにこの実装が生成されています。
https://github.com/apple/swift/blob/e9d4687e31a3ae8e90604d3b15bf8b241479c211/stdlib/public/core/IntegerTypes.swift.gyb#L1067-L1071中で使われている
_internalInvariantは、INTERNAL_CHECKS_ENABLEDのときだけconditionをチェックして、落とすものみたいです。internal func _internalInvariant( _ condition: @autoclosure () -> Bool, _ message: StaticString = StaticString(), file: StaticString = #file, line: UInt = #line ) { #if INTERNAL_CHECKS_ENABLED if !_fastPath(condition()) { _fatalErrorMessage("Fatal error", message, file: file, line: line, flags: _fatalErrorFlags()) } #endif } // https://github.com/apple/swift/blob/ba750305905e94173fbb6b6494477e7298fe0ba3/stdlib/public/core/Assert.swift#L287-L298
_fastPathの説明はmarkdownに見つかりました→Standard Library Programmers Manual_fastPath returns its argument, wrapped in a Builtin.expect
中身をそのまま返すだけで、最適化のためのものらしいです。
_precondition もconditionをチェックして落とすものですが、リリース時にも実行される点が
_internalInvariantとの違いです。
- 投稿日:2019-07-04T14:41:21+09:00
【Swift】Swift5.1からenumのAssociated Valuesにデフォルト値を設定できるようになった
Swiftのenum
Associated Valuesという付属の値をenumの要素に含めることができます。
Associated Valuesは初期化時に値を設定する必要がありましたが
Swift5.1よりデフォルト値を設定することができるようになりました。今回は公式のガイドに載っている例を使って見てみました。
https://docs.swift.org/swift-book/LanguageGuide/Enumerations.html検証環境: Xcode11 Beta3
これまで
下記ように全ての値を指定する必要があります。
enum Barcode {
    case upc(Int, Int, Int, Int)
    case qrCode(String)
}

var productBarcode = Barcode.upc(8, 85909, 51226, 3)

print(productBarcode) // upc(8, 85909, 51226, 3)
Swift5.1
enum Barcode {
    case upc(a: Int = 1, Int, Int, Int)
    case qrCode(String)
}

var productBarcode = Barcode.upc(85909, 51226, 3)

print(productBarcode) // upc(a: 1, 85909, 51226, 3)
とデフォルトの値を設定することができるようになります。
ただし
ラベル引数を設定しないとコンパイルエラーになりました。例えば下記のように間を抜かしても大丈夫なようです。
enum Barcode {
    case upc(a:Int = 1, Int, Int, d: Int = 4)
    case qrCode(String)
}

var productBarcode = Barcode.upc(85909, 51226)

print(productBarcode) // upc(a: 1, 85909, 51226, d: 4)
少しの変化かもしれませんが
これで冗長な記述が少し減ればうれしいですね
- 投稿日:2019-07-04T14:36:03+09:00
willTransition系のまとめ
取り上げるのは
・viewWillTransition(to newSize)
・viewWillTransition(to size, with coordinator)
・willTransition(to newCollection, with coordinator)※一旦和訳しただけ あとでまとめます
viewWillTransition(to newSize)
アプリケーション拡張機能の一部であるView Controllerの場合、そのビューのサイズが変更されようとしているときに呼び出されます。
newSize
View Controllerのビューの新しいサイズ。
使い方
サイズの変更に応じてレイアウトを変更したい場合、この方法をオーバーライドしてください(アニメーション化されている可能性があります)。
viewWillAppearみたいに考えればいいのかな
viewWillTransition(to size, with coordinator)
ビューのサイズが変更されようとしていることをコンテナに通知します。
size
コンテナのビューの新しいサイズ
coordinator
サイズ変更を管理する遷移コーディネータオブジェクト。
このオブジェクトを使用して、変更をアニメートしたり、進行中の移行に関する情報を取得したりできます。使い方
表示されている
View Controllerのビューのサイズを変更する前に、UIKitはこのメソッドを呼び出します。 このメソッドを自分のオブジェクトでオーバーライドして、サイズ変更に関連する追加のタスクを実行するために使用することができます。 たとえば、コンテナView Controllerはこのメソッドを使用して、埋め込まれた子View Controllerの特性をオーバーライドすることがあります。 行った変更をアニメートするには、提供されているコーディネータオブジェクトを使用します。カスタム
View Controllerでこのメソッドをオーバーライドする場合は、UIKitがサイズ変更メッセージを適切に転送できるように、実装のある時点で常にsuperを呼び出してください。View Controllerは、サイズ変更メッセージを自分のビューと子View Controllerに転送します。 プレゼンテーションコントローラは、サイズの変更を表示されているView Controllerに転送します。willTransition(to newCollection, with coordinator)
traitCollectionが変更されたことをコンテナに通知します。
newCollection
コンテナに適用される特性。
coordinator
特性変更を管理する遷移コーディネータオブジェクト。
このオブジェクトを使用して、変更をアニメートしたり、進行中の移行に関する情報を取得したりできます。使い方
UIKitは、現在のオブジェクトの特性を変更する前、および影響を受けるViewやView ControllerのtraitCollectionDidChange(_ :)メソッドを呼び出す前に、このメソッドを呼び出します。このメソッドの実装者は、newCollectionの値に基づいてインターフェイスを適応させるためにこのメソッドを使用できます。このメソッドの一般的な使用方法は、現在のサイズクラスが変更されたときに高レベルの表示スタイルを変更することです。
たとえば、複数の子View Controllerを管理するコンテナView Controllerは、サイズクラスが変更されたときに画面に表示される子View Controllerの数を変更することがあります。標準のView Controllerは、このメソッドを使用して、管理するビューに対する制約を変更します。行った変更をアニメートするには、提供されているコーディネータオブジェクトを使用します。
独自のオブジェクトでこのメソッドをオーバーライドする場合は、UIKitが特性の変更を関連するプレゼンテーションコントローラおよび任意の子View Controllerに転送できるように、実装のある時点で常にsuperを呼び出します。View Controllerは、特性変更メッセージを子View Controllerに転送します。プレゼンテーションコントローラは、特性の変更を表示されているビューコントローラに転送します。参考記事
・viewWillTransition(to:) - NSViewController | Apple Developer Documentation
・viewWillTransition(to:with:) - UIContentContainer | Apple Developer Documentation
・willTransition(to:with:) - UIContentContainer | Apple Developer Documentation
・iOSTraining/1-3_Supporting-Multiple-Interface-Orientations.md at master · mixi-inc/iOSTraining
- 投稿日:2019-07-04T10:54:19+09:00
【Swift】初めてのXcode
この記事では、Webページを表示するアプリを作ります。
プロジェクトを立ち上げる。
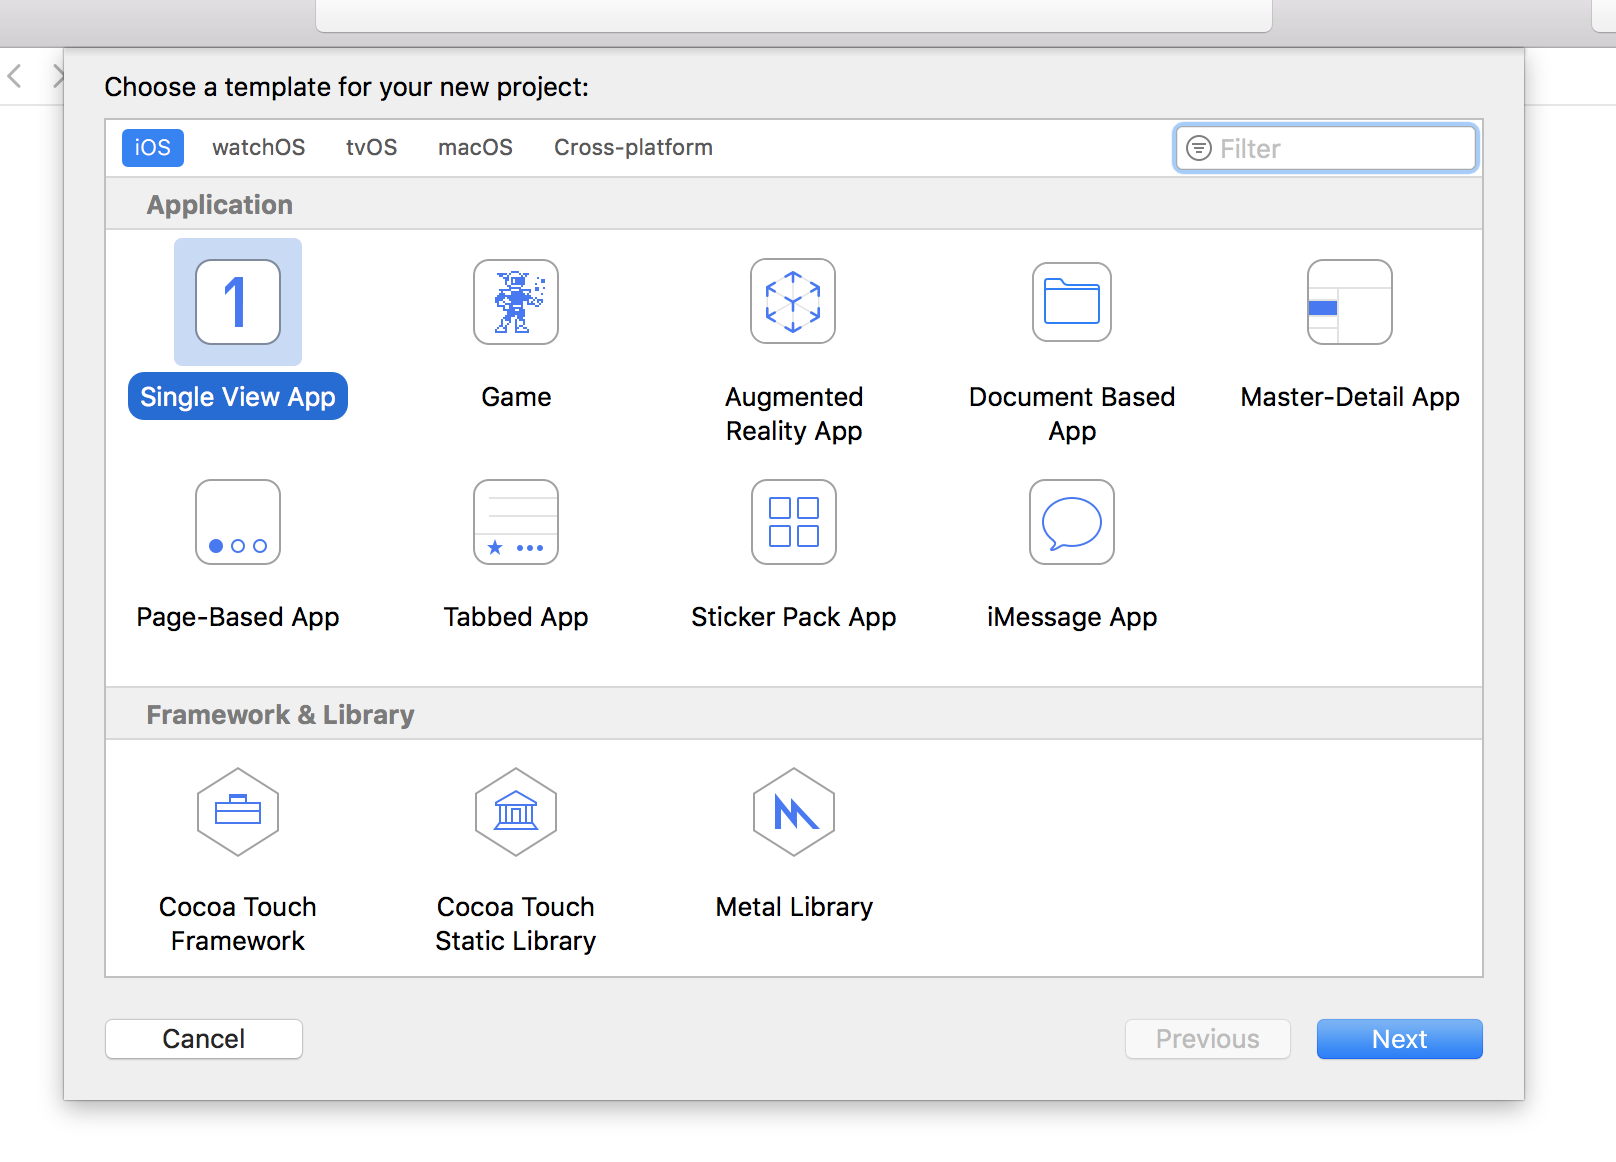
- Xcodeを起動し、起動画面から"Create a new Xcode project"を選択。
- 次に、"Single View Application"を選択。

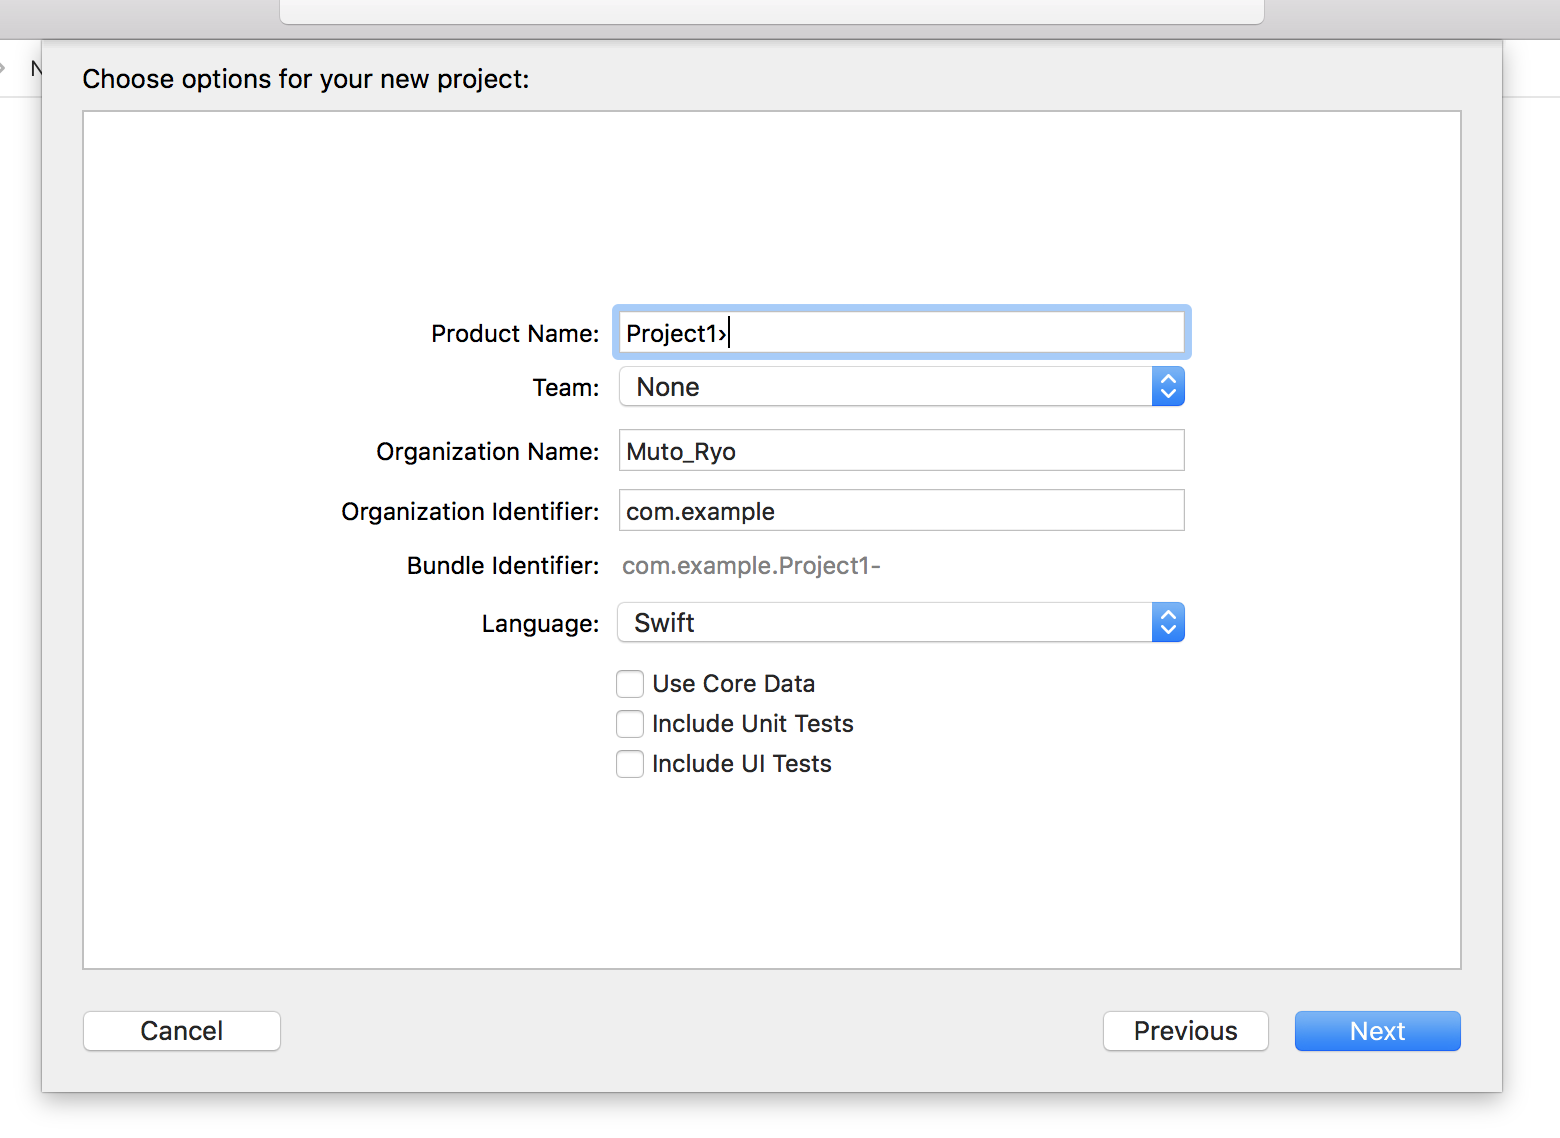
- 次の画面ではプロジェクト名を入力。"Organization Identifier"では、ドメイン名を逆に記入するが、練習なので、com.exampleとする。

- 保存する場所を選択する。
実行する
- プロジェクトが立ち当たったら、どの種類のデバイスでシュミレータを実行するかを選択します。デフォルトではiPhone XRになっているはず。IPad AirやiPhone 8などいろいろ選択することができます。
- 機種を選択したら、実行してみます。左上にある三角のボタン(▶︎)を押すことでコードを実行することができます。Cmd+Rでも同じようにできます。
- 白い画面が現れたら成功。

- Cmd+.で実行をストップできる。
Webサイトを表示してみる。
今回は、Webページを画面に表示させてみます。
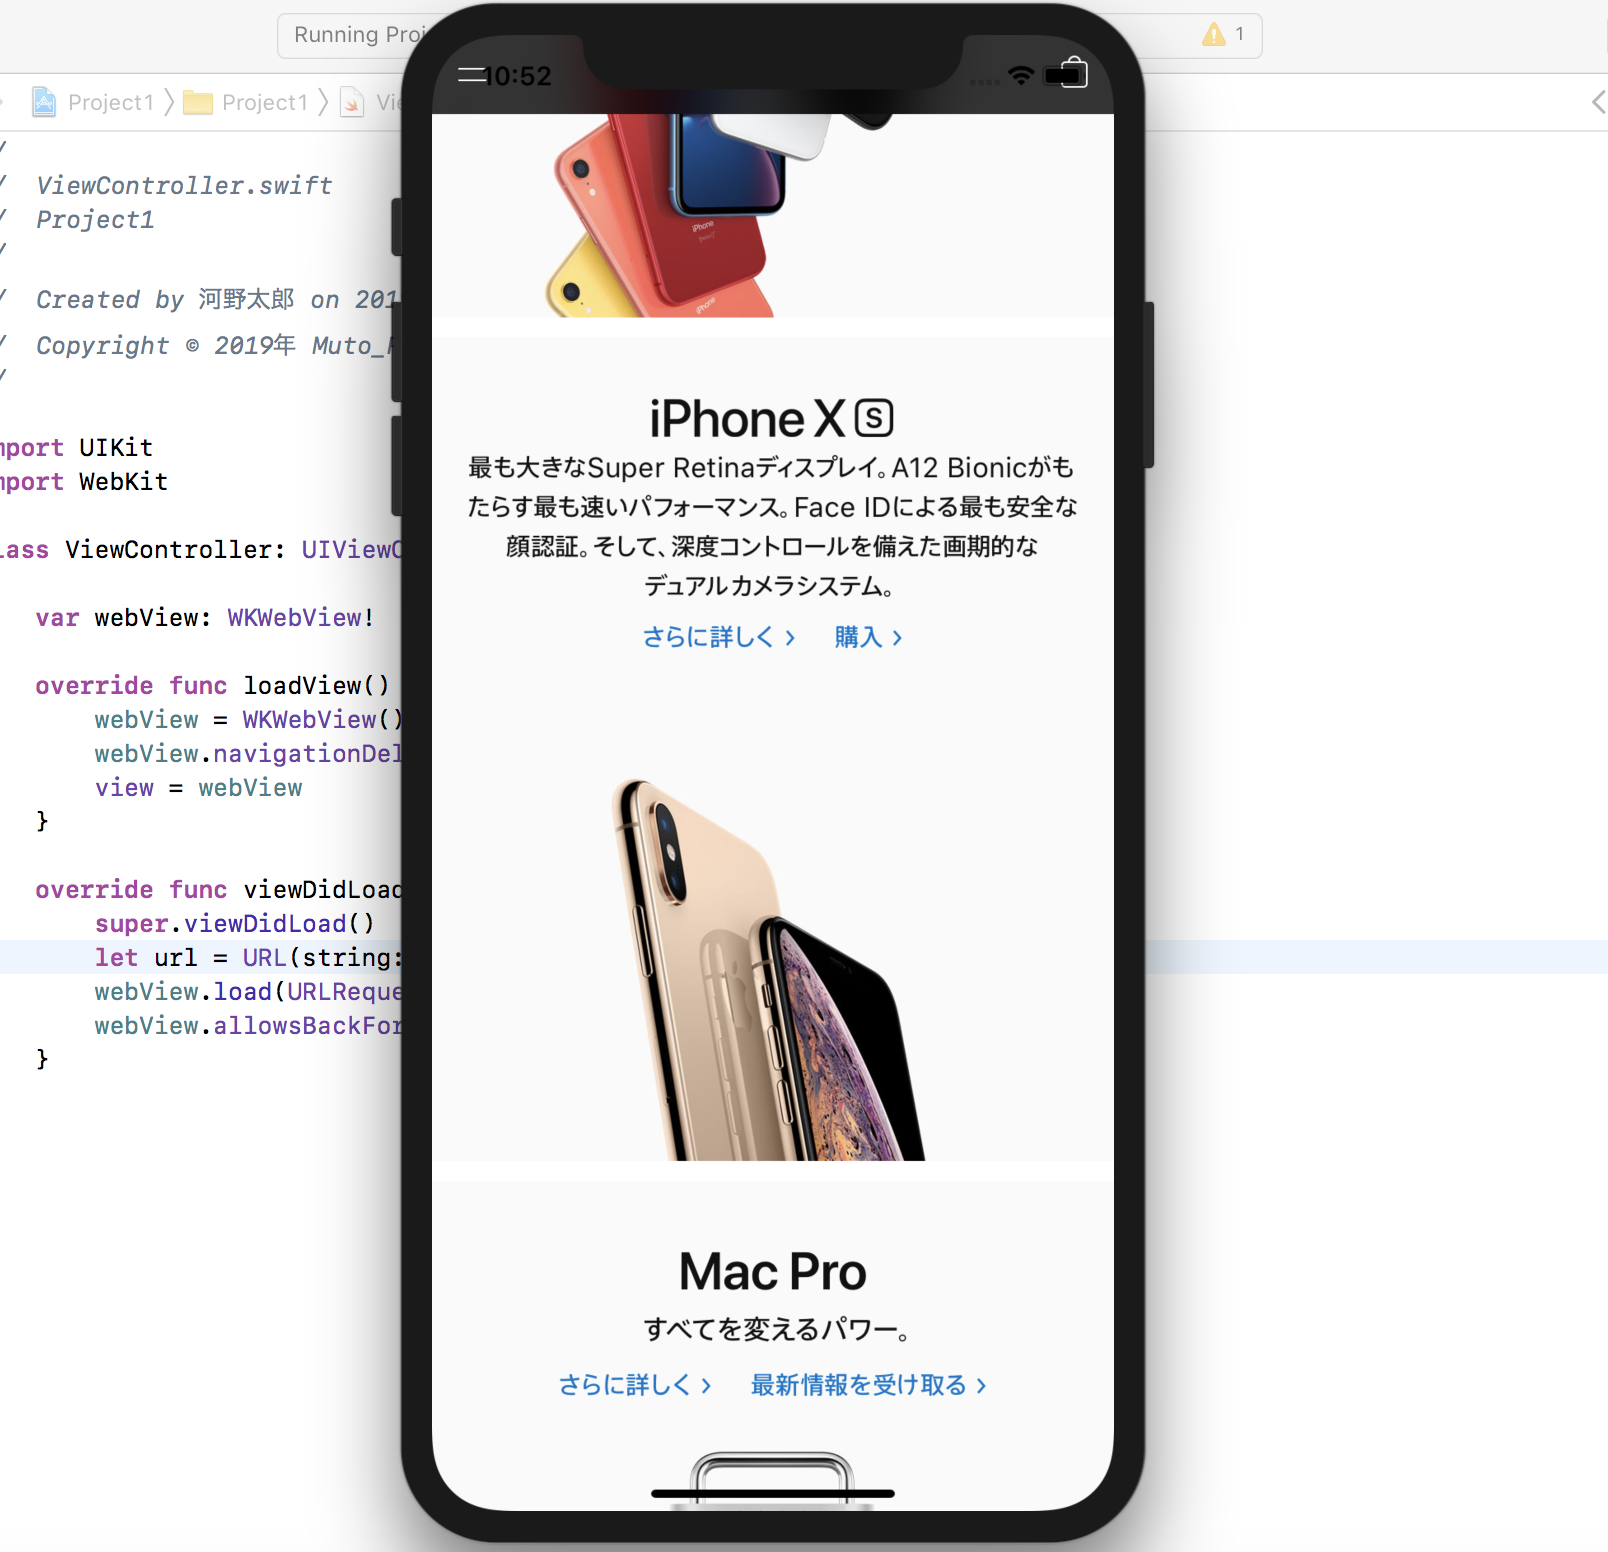
WebKitの導入
ViewController.swiftを開き、import UIKitの下にimport WebKitを追加する。ViewController.swiftimport WebKit画面を作る
WKWebViewを生成。
ViewController.swiftvar webView: WKWebView!
viewDidLoad()の前に以下のメソッドを追加注:この段階ではまだ動かない。
ViewController.swiftoverride func loadView() { webView = WKWebView() webView.navigationDelegate = self view = webView }
- 厳密には
loadView()をviewDidLoad()の前に置く必要はない。ViewControllerクラスのどこにloadView()を置いてもいいが、loadView()がviewDidLoad()の前に呼ばれるため、実行される順番がわかりやすいように上のような記述にしている。WKWebViewと呼ばれる部品のインスタントを作り、これをwebViewプロパティとひもづける。デリゲートを実装する。
上記のエラーを解消する。
以下のコードを
ViewController.swiftclass ViewController: UIViewController {以下のように変更する。
ViewController.swiftclass ViewController: UIViewController, WKNavigationDelegate {
class A: Bとすることで、AクラスはBの機能を実装できる。class A: B, Cとなっている場合、AはBを継承していることを示し、Cがデリゲートされていることになる。- 上記のコードでは、
ViewControllerがUIViewControllerの子クラスであり、WKNavigationDelegateをデリゲートすることになる。表示するURLの設定
viewDidLoad()のsuper.viewDidLoad()の後に以下のコードを書く。ViewController.swiftlet url = URL(string: "https://www.apple.com/")! //任意のURL webView.load(URLRequest(url: url)) webView.allowsBackForwardNavigationGestures = true
- string型の
URL型に保存。- URLから
URLRequestオブジェクトを生成する。- urlの冒頭は
https://とすること。実行
Cmd+Rで実行すると、シュミレータにWebページが表示される。
終わりに
まずはWebページを表示するシンプルなアプリを作ってみました。
これから色々なアプリを作って練習していこうと思います。