- 投稿日:2019-04-17T00:25:57+09:00
TensorFlow2.0でアニメキャラ識別
TensorFrowのチュートリアルを
パクって参考にしてアニメキャラ識別をしてみました。
解説はチュートリアルに書いてあるのでそちらを見てください。
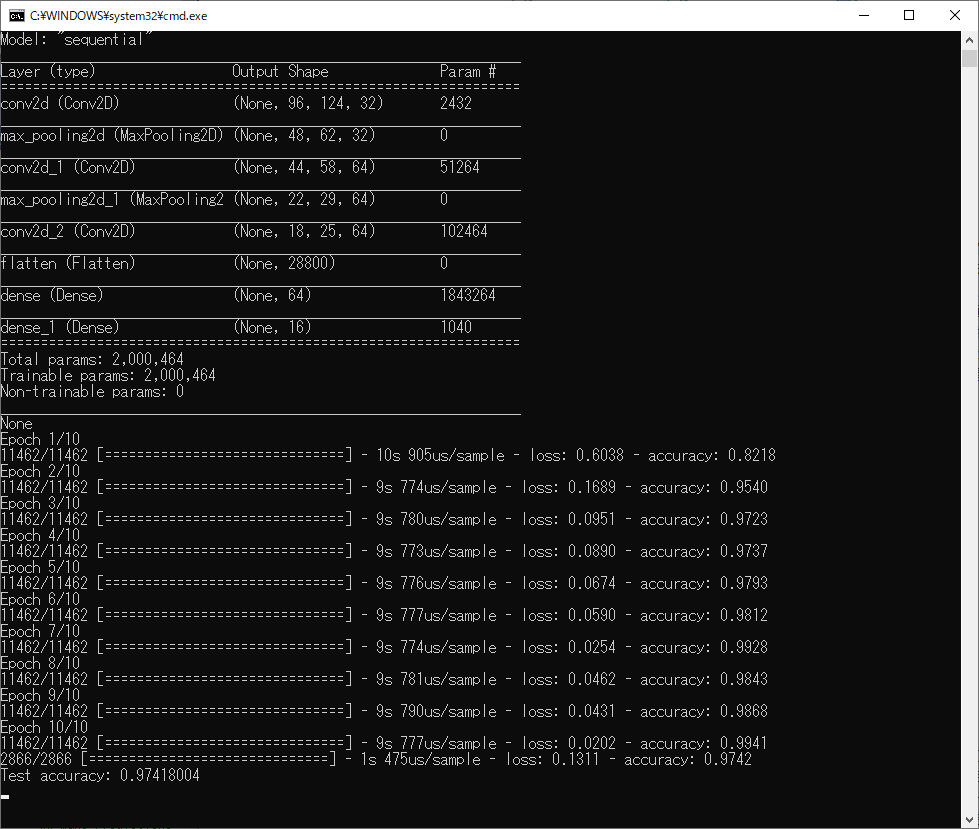
(4/21追記:畳み込みニューラルネットワーク(CNN)で精度97%になりました)環境
- Windows10 (64bit)
- Python 3.6.8
- TensorFrow 2.0.0-alpha0
以下のようなフォルダ階層となっている前提で話を進めます。
.
├─mk_DataSet.py
├─Training.py
├─Classifier.py
├─Labels.tsv
└─Anime_Title
   ├─Chara1
   │   └─大量の画像データ
   ├─Chara2
   │   └─大量の画像データ
   ├─Chara3
   │   └─大量の画像データ
学習データ集め
まずは学習用のデータを集めます。使うのはこれ↓だと思いますが、先人たちがいろいろ書いてくれてますので今回は割愛します。
OpenCVによるアニメ顔検出ならlbpcascade_animeface.xml集めたデータはキャラクターごとに分けてください。
それに合わせてLabels.tsvファイルを作成します。タブ区切りで「キャラ名(フォルダ名),イメージカラー」
Labels.tsvLala (255, 127, 255) Mirei (255, 99, 99) Sophy (255, 0, 255) Sion (0, 255, 0) Dorothy (255, 0, 0) Reona (0, 0, 255) Faruru (127, 255, 127) Aroma (255, 0, 255) Mikan (0, 0, 255) Garuru (127, 127, 127) Yui (0, 255, 255) Nino (127, 255, 127) Michiru (127, 127, 127) Shuka (127, 127, 127) Meganee (0, 0, 255) Meganii (0, 0, 255)データセット作成
学習用とテスト用データセットをつくる。
train.tsvとtest.tsvができます。mk_DataSet.pyimport os import glob import numpy as np imdir = 'PriPara' labels, col = np.loadtxt('Labels.tsv', delimiter='\t', dtype='S20,S20', unpack=True) data = [] for i,name in enumerate(labels): lst = glob.glob(os.path.join(imdir, name.decode(), '*.png')) print('%10s: %d'%(name.decode(), len(lst))) for fn in lst: data.append([i, fn]) np.random.shuffle(data) tt = int(len(data)*0.8) np.savetxt('train.tsv', data[:tt], fmt='%s', delimiter='\t') np.savetxt('test.tsv', data[tt:], fmt='%s', delimiter='\t')学習する
チュートリアルではグレースケール画像ですが,アニメキャラは髪の色で判別してる説があるのでカラー画像で学習します。
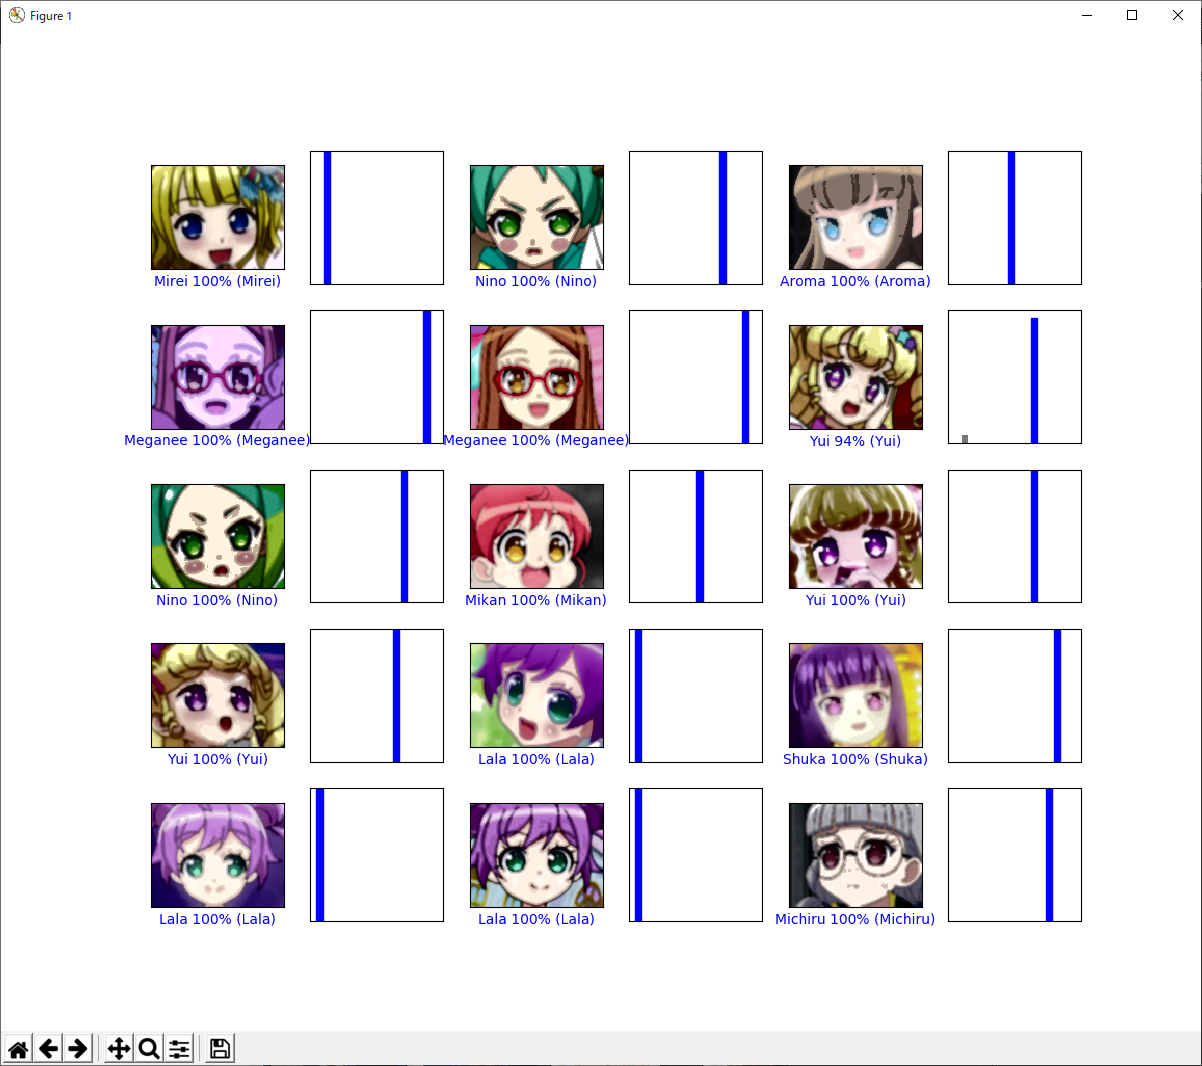
画像を読み込むときにいろいろ処理していますが,それっぽいことをしているだけで効果があるかは確認していません。Training_CNN.pyimport tensorflow as tf from tensorflow.keras import layers, models import numpy as np import cv2 import matplotlib.pyplot as plt labels, col = np.loadtxt('Labels.tsv', delimiter='\t', dtype='S20,S20', unpack=True) IMG_SHAPE = (100, 128, 3) def read_img(fn): img = cv2.imread(fn) # サイズ調整 img = cv2.resize(img, (np.max(IMG_SHAPE),np.max(IMG_SHAPE))) img = img[:IMG_SHAPE[0],:IMG_SHAPE[1],:] # ガウシアンフィルタで平滑化 img = cv2.GaussianBlur(img, (5,5), 1) # 輝度のみ平坦化 img = cv2.cvtColor(img, cv2.COLOR_BGR2YUV) img[:,:,0] = cv2.equalizeHist(img[:,:,0]) img = cv2.cvtColor(img, cv2.COLOR_YUV2BGR) return img def mk_data(fn): print('Loading...', fn) labels, lst = np.loadtxt(fn, delimiter='\t', dtype='i8,S50', unpack=True) images = np.stack([read_img(fn.decode()) for fn in lst]) images = images / 255.0 return labels, images try: data = np.load('train.npz') train_labels = data['lbl'] train_images = data['img'] data = np.load('test.npz') test_labels = data['lbl'] test_images = data['img'] ans = input('Use save data? [Y/n] ') if ans in ['N','n','No','no']: raise Exception except: train_labels, train_images = mk_data('train.tsv') np.savez('train.npz',lbl=train_labels,img=train_images) test_labels, test_images = mk_data('test.tsv') np.savez('test.npz', lbl=test_labels, img=test_images) # Create the convolutional base kernel_size = (5, 5) model = models.Sequential() model.add(layers.Conv2D(32, kernel_size, activation='relu', input_shape=IMG_SHAPE)) model.add(layers.MaxPooling2D((2, 2))) model.add(layers.Conv2D(64, kernel_size, activation='relu')) model.add(layers.MaxPooling2D((2, 2))) model.add(layers.Conv2D(64, kernel_size, activation='relu')) # Add Dense layers on top model.add(layers.Flatten()) model.add(layers.Dense(64, activation='relu')) model.add(layers.Dense(len(labels), activation='softmax')) # Compile and train the model model.compile(optimizer='adam', loss='sparse_categorical_crossentropy', metrics=['accuracy']) model.fit(train_images, train_labels, epochs=10) ## Evaluate accuracy test_loss, test_acc = model.evaluate(test_images, test_labels) print('Test accuracy:', test_acc) model.save('model.h5') ## Make predictions predictions = model.predict(test_images) def plot_image(i, predictions_array, true_label, img): predictions_array, true_label, img = predictions_array[i], true_label[i], img[i] plt.grid(False) plt.xticks([]) plt.yticks([]) img = np.array(img * 255, dtype=np.uint8) img = cv2.cvtColor(img, cv2.COLOR_BGR2RGB) plt.imshow(img) predicted_label = np.argmax(predictions_array) color = 'blue' if predicted_label == true_label else 'red' plt.xlabel("{} {:2.0f}% ({})".format(labels[predicted_label].decode(), 100*np.max(predictions_array), labels[true_label].decode()), color=color) def plot_value_array(i, predictions_array, true_label): predictions_array, true_label = predictions_array[i], true_label[i] plt.grid(False) plt.xticks([]) plt.yticks([]) thisplot = plt.bar(range(len(labels)), predictions_array, color="#777777") plt.ylim([0, 1]) predicted_label = np.argmax(predictions_array) thisplot[predicted_label].set_color('red') thisplot[true_label].set_color('blue') num_rows = 5 num_cols = 3 num_images = num_rows * num_cols plt.figure(figsize=(2*2*num_cols, 2*num_rows)) for i in range(num_images): plt.subplot(num_rows, 2*num_cols, 2*i+1) plot_image(i, predictions, test_labels, test_images) plt.subplot(num_rows, 2*num_cols, 2*i+2) plot_value_array(i, predictions, test_labels) plt.show()10000枚(左右反転させてるので実際は半分)くらい集めて実行すると精度97%超えました。
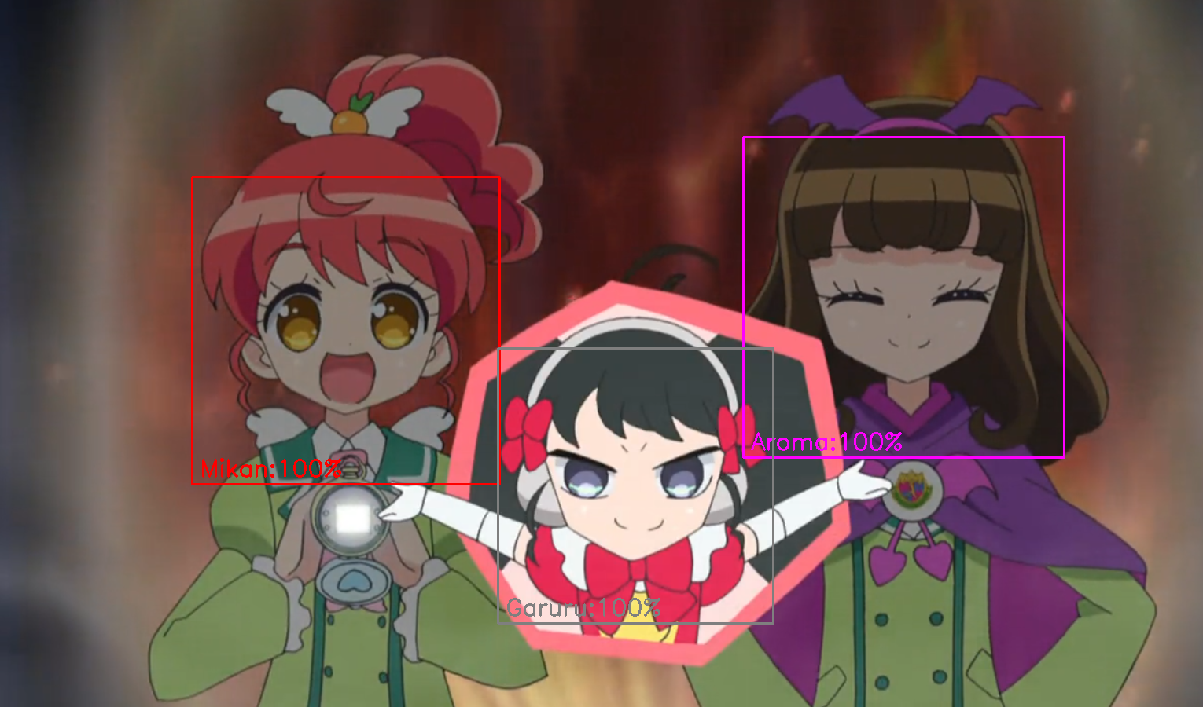
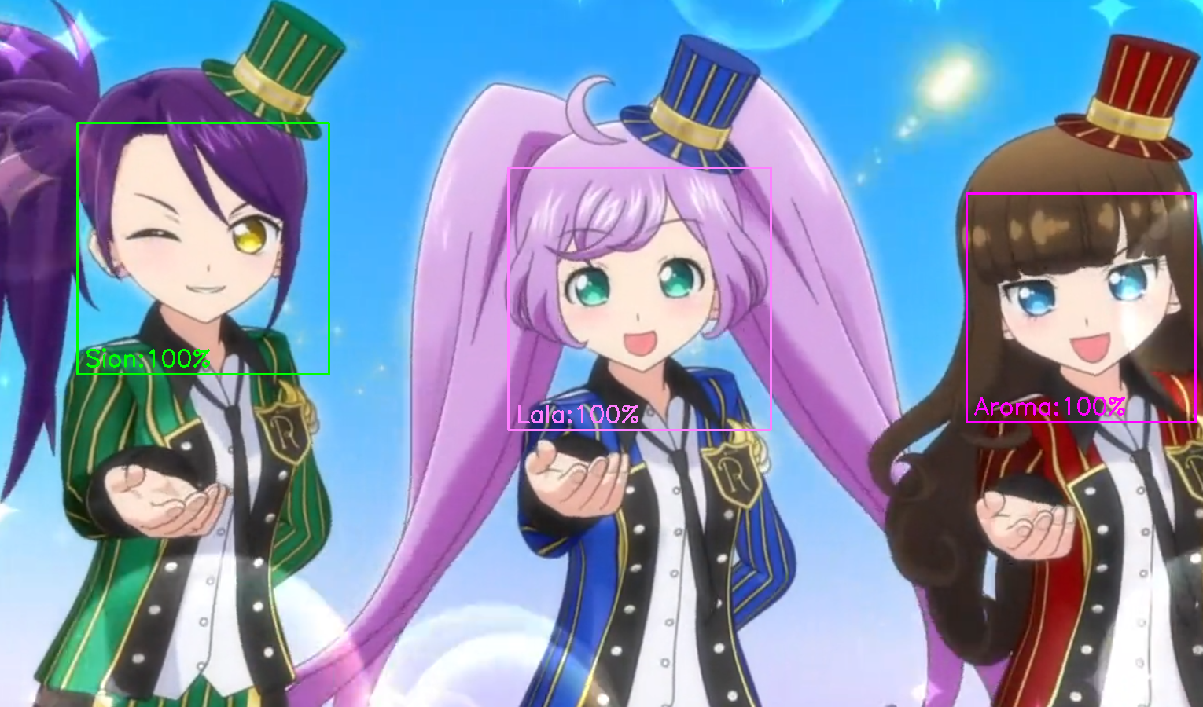
識別する
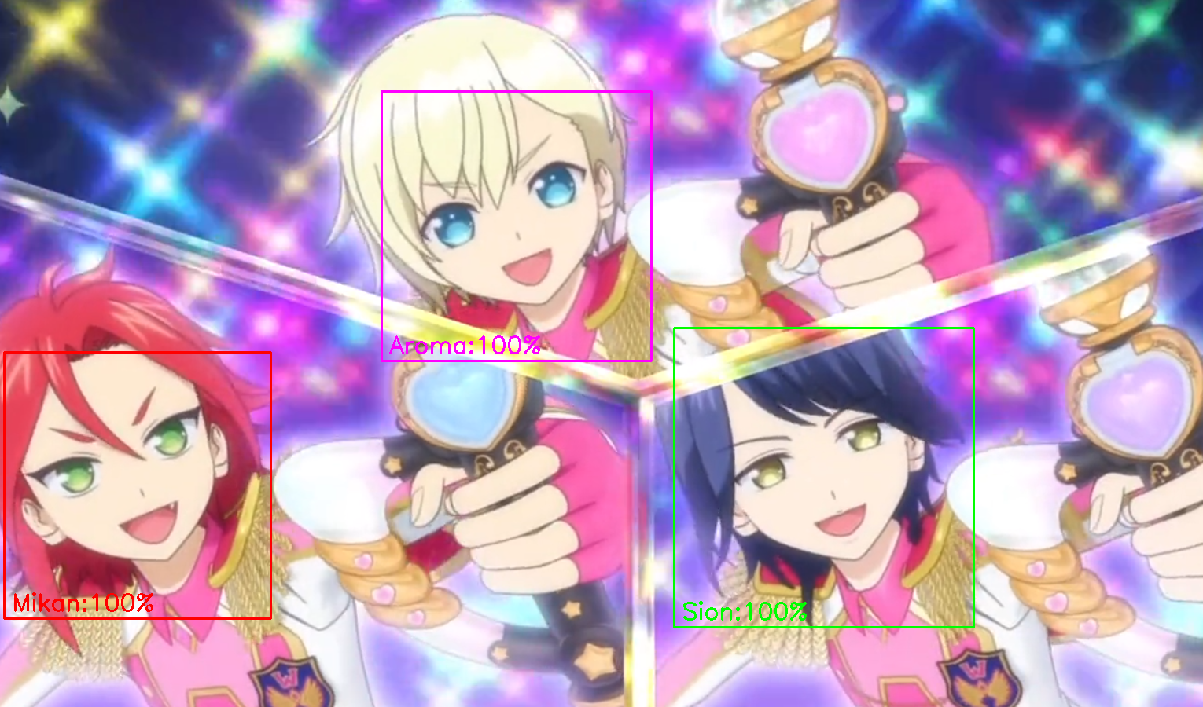
スクショをとって識別してみます。
model = keras.models.load_model('model.h5')で保存したモデルごと読み込むだけで使える。Classifier.pyimport tensorflow as tf from tensorflow import keras import numpy as np import cv2 from PIL import ImageGrab labels, cols = np.loadtxt('Labels.tsv', delimiter='\t', dtype='S20,S20', unpack=True) IMG_SHAPE = (100, 128, 3) model = keras.models.load_model('model.h5') print(model.summary()) path = 'PATH\\TO\\lbpcascade_animeface.xml' cascade = cv2.CascadeClassifier(path) def predict(img): img = cv2.resize(img, (np.max(IMG_SHAPE),np.max(IMG_SHAPE))) img = img[:IMG_SHAPE[0],:IMG_SHAPE[1],:] img = cv2.GaussianBlur(img, (3,3), 1) img = cv2.cvtColor(img, cv2.COLOR_BGR2YUV) img[:,:,0] = cv2.equalizeHist(img[:,:,0]) img = cv2.cvtColor(img, cv2.COLOR_YUV2BGR) predictions = model.predict(np.expand_dims(img,0)) return np.argmax(predictions[0]), np.max(predictions[0]) cv2.namedWindow('ret', cv2.WINDOW_NORMAL) while cv2.waitKey(1)!=27: img = ImageGrab.grab(bbox=(70, 300, 1600, 1200)) img = np.asarray(img) img = cv2.cvtColor(img, cv2.COLOR_RGB2BGR) gray = cv2.cvtColor(img, cv2.COLOR_BGR2GRAY) gray = cv2.equalizeHist(gray) faces = cascade.detectMultiScale(gray, minSize=(100,100), scaleFactor=1.05, minNeighbors=5) for (x,y,w,h) in faces: face = img[y:y+h, x:x+w] idx, val = predict(face) label = labels[idx].decode() col = tuple(map(int, cols[idx][1:-1].decode().split(','))) cv2.rectangle(img, (x,y), (x+w,y+h), col, 2) cv2.putText(img, '%s:%d%%'%(label,val*100), (x+10,y+h-10), cv2.FONT_HERSHEY_SIMPLEX, 1.0, col, 2) cv2.imshow('ret', img) cv2.destroyAllWindows()結果