- 投稿日:2019-04-13T23:58:47+09:00
ブロック引数付き proc をあるコンテキスト上で実行する
問題点
#instance_execや#module_exec等を使えば、あるコンテキスト上で、引数付きの proc オブジェクトを実行することができます。OK
object = Object.new
object.instance_variable_set(:@a, 1)

block = -> (b) { @a + b }
object.instance_exec(2, &block) # 3
しかし、これらのメソッドでは、ブロック引数付きの proc オブジェクトを実行できません。
Error
object = Object.new
object.instance_variable_set(:@a, 1)

block = -> (b, &c) { @a + b + c.call }
object.instance_exec(2, &block) #  undefined method `call' for nil:NilClass (NoMethodError)
object = Object.new object.instance_variable_set(:@a, 1) block = -> (b, &c) { @a + b + c.call } object.instance_exec(2, &block) { 3 } # both block arg and actual block given解決策
そこで、
#define_methodと#instance_methodを組み合わせて、proc オブジェクトを UnboundMethod オブジェクトに変換し、#bindメソッドで実行したいコンテキストと結びつけます。#callメソッドなら、実行時にブロックを渡せるので、ブロック引数付き proc オブジェクトも扱うことが可能です。block1 = -> (b, &c) { @a + b + c.call } block2 = Module.new.module_eval do define_method(:__unbound_method__, &block1) instance_method(:__unbound_method__) end object = Object.new object.instance_variable_set(:@a, 1) block2.bind(object).call(2) { 3 } # 6
- 投稿日:2019-04-13T21:44:28+09:00
プロを目指す人のためのRuby入門 2章
概要
個人的にアウトプットを残すため記事にしています。
そのため、全項目につて触れていません。Rubyの基礎を理解する
2.3 文字列
シングルクオート(')とダブルクオート(")の違い
(')は\nを改行にするのに対して(")ではそのまま文字列として扱われる2.5 真偽値と条件分岐
Rubyではif分の条件分岐は
・またはであれば偽
・それ以外はすべて真
返り値がHashやオブジェクトでもTrueとなる。2.6 メソッドの定義
Rubyは最後に評価された式がメソッドの戻り値になる。
returnはほとんど使われず、メソッドを途中で脱出する際に使われることが多い。metho.rbdef greeting(country) return 'countryを入力して下さい' if country.nil? if country == 'japan' 'こんにちは' else 'Hello' end end2.8 文字列についてもっと詳しく
ヒアドキュメントについて
長い文字列を作成する際はヒアドキュメントをつかうと見やすくなる
<<識別子
~~~~
~~~~
識別子識別子はシングルクォートで囲うと文字列になりそれ以外では式展開も可能である。
example.rba = <<TEXT あいうえお かきくけこ さしすせそ TEXT puts a #=>あいうえお # かきくけこ # さしすせそ2.10 真偽値と条件分岐についてもっと詳しく
Rubyでは式全体の真偽値を決定するために左辺から順に式を評価する。
真か偽かが確定するとその時点で評価を終了し最後に評価した式の値を返す。ex.rb#左辺から評価していき存在すれば真が確定し、そのuserを返す user = find_user('Alice') ||find_user('Bob') || find_user('Carol') #返ってきたuserに対してメールが送られる user.valid? && send_email(user) #上記の引数で()を省略できるがその場合&&の範囲がemailまでになってしまいエラーとなる #優先度の低いandに変えると正常に機能する三項演算子
シンプルなIf/else文であればスッキリと書ける
ex.rb#通常のif/else文 n = 11 if n > 10 'bigger than 10' else 'smaller' end #三項演算子 n > 10 ? 'bigger than 10' : 'smaller'2.12 その他の基礎知識
参照の概念理解する
Rubyの変数にはオブジェクトそのものではなく、オブジェクトへの参照が格納されている。これはつまりobject_idを引き渡しているということ。したがって同じ文字列でも違うものを指している可能性があり、思いがけないバグを踏むことがある。
requireとload
requireは一度目は読み込みTrueを返すが二度目はFalseを返す。よって、内容を変更し再度読み込みたいときはloadを使う必要がある。
puts,print,pメソッド
putsとprintはどちらもnilを返す。
pは引数のオブジェクトを返す。今回覚えたメソッド
method.rb# 引数に数値を入れるとX進数に変換できる。 10.to_s(16) #=> "a" #to_fは小数点表示に変えるもの 1.to_f #=>1.0
- 投稿日:2019-04-13T21:08:45+09:00
nokogiriのインストールに失敗する問題
nokogiriのインストールに失敗
railsでgemを追加してbundle installしたらnokogiriがインストールできないと下記のようなエラーが出ました。
--use-system-libraries
checking if the C compiler accepts  -I
/Library/Developer/CommandLineTools/SDKs/MacOSX.sdk/usr/include/libxml2... yes
checking if the C compiler accepts -Wno-error=unused-command-line-argument-hard-error-in-future... no
Building nokogiri using system libraries.
ERROR: cannot discover where libxml2 is located on your system. please make sure `pkg-config` is installed.
ネットの情報だと昔からあるエラーらしくgemにpkg-config追加すると直るなど情報がありますが自分はこれだとなおりませんでした。
たぶんmacのOSをアップデートしたりXcodeのバージョンを変更したりなどなどシステム内部の変更で何か問題が起きてしまうのが原因のように思われます。
ということで一応自分のmacのバージョンも下記に記します。mac os mojave macOS 10.14.3 (18D109)直し方
homebrewのリンクの問題なのかまず下記コマンドを入れます。
brew install --force libxml2
brew link libxml2
上記のlinkを入れた後に下記のwarningが出たので念の為pathを入れておく。
Warning: Refusing to link macOS-provided software: libxml2
If you need to have libxml2 first in your PATH run:
  echo 'export PATH="/usr/local/opt/libxml2/bin:$PATH"' >> ~/.zshrc

For compilers to find libxml2 you may need to set:
  export LDFLAGS="-L/usr/local/opt/libxml2/lib"
  export CPPFLAGS="-I/usr/local/opt/libxml2/include"

For pkg-config to find libxml2 you may need to set:
  export PKG_CONFIG_PATH="/usr/local/opt/libxml2/lib/pkgconfig"
上記のechoとexportしたのちにnokogiriを入れて見ました。
nokogiriのインストール
gem install nokogiri -- --use-system-libraries上記コマンドを入れたところ無事にインストールできました。
Building native extensions with: '--use-system-libraries'
This could take a while...
Successfully installed nokogiri-1.10.2
Parsing documentation for nokogiri-1.10.2
Installing ri documentation for nokogiri-1.10.2
Done installing documentation for nokogiri after 8 seconds
1 gem installed
- 投稿日:2019-04-13T20:17:35+09:00
Rails6 のちょい足しな新機能を試す(rails routes --expanded編)
はじめに
Rails 6 に追加されそうな新機能を試してみます。第1段は
rails routes --expandedです。
記載時点では、Rails は 6.0.0.beta3 です。gem install rails --prereleaseでインストールできます。$ rails --version Rails 6.0.0.beta3u``単純なCRUD機能をscaffold で作る
新機能を試すために、scaffold で単純なCRUD機能を作ってみます。
$ rails new sandbox_6_0_0b3
$ cd sandbox_6_0_0b3
$ rails g scaffold User name
従来の機能
まずはオプションなしで実行してみます。
$ rails routes
# rails routes
                               Prefix Verb   URI Pattern                                                                              Controller#Action
                                users GET    /users(.:format)                                                                         users#index
                                      POST   /users(.:format)                                                                         users#create
                             new_user GET    /users/new(.:format)                                                                     users#new
                            edit_user GET    /users/:id/edit(.:format)                                                                users#edit
                                 user GET    /users/:id(.:format)                                                                     users#show
                                      PATCH  /users/:id(.:format)                                                                     users#update
                                      PUT    /users/:id(.:format)                                                                     users#update
                                      DELETE /users/:id(.:format)                                                                     users#destroy
          rails_amazon_inbound_emails POST   /rails/action_mailbox/amazon/inbound_emails(.:format)                                    action_mailbox/ingresses/amazon/inbound_emails#create
        rails_mandrill_inbound_emails POST   /rails/action_mailbox/mandrill/inbound_emails(.:format)                                  action_mailbox/ingresses/mandrill/inbound_emails#create
        rails_postmark_inbound_emails POST   /rails/action_mailbox/postmark/inbound_emails(.:format)                                  action_mailbox/ingresses/postmark/inbound_emails#create
           rails_relay_inbound_emails POST   /rails/action_mailbox/relay/inbound_emails(.:format)                                     action_mailbox/ingresses/relay/inbound_emails#create
        rails_sendgrid_inbound_emails POST   /rails/action_mailbox/sendgrid/inbound_emails(.:format)                                  action_mailbox/ingresses/sendgrid/inbound_emails#create
         rails_mailgun_inbound_emails POST   /rails/action_mailbox/mailgun/inbound_emails/mime(.:format)                              action_mailbox/ingresses/mailgun/inbound_emails#create
       rails_conductor_inbound_emails GET    /rails/conductor/action_mailbox/inbound_emails(.:format)                                 rails/conductor/action_mailbox/inbound_emails#index
                                      POST   /rails/conductor/action_mailbox/inbound_emails(.:format)                                 rails/conductor/action_mailbox/inbound_emails#create
    new_rails_conductor_inbound_email GET    /rails/conductor/action_mailbox/inbound_emails/new(.:format)                             rails/conductor/action_mailbox/inbound_emails#new
   edit_rails_conductor_inbound_email GET    /rails/conductor/action_mailbox/inbound_emails/:id/edit(.:format)                        rails/conductor/action_mailbox/inbound_emails#edit
        rails_conductor_inbound_email GET    /rails/conductor/action_mailbox/inbound_emails/:id(.:format)                             rails/conductor/action_mailbox/inbound_emails#show
                                      PATCH  /rails/conductor/action_mailbox/inbound_emails/:id(.:format)                             rails/conductor/action_mailbox/inbound_emails#update
                                      PUT    /rails/conductor/action_mailbox/inbound_emails/:id(.:format)                             rails/conductor/action_mailbox/inbound_emails#update
                                      DELETE /rails/conductor/action_mailbox/inbound_emails/:id(.:format)                             rails/conductor/action_mailbox/inbound_emails#destroy
rails_conductor_inbound_email_reroute POST   /rails/conductor/action_mailbox/:inbound_email_id/reroute(.:format)                      rails/conductor/action_mailbox/reroutes#create
                   rails_service_blob GET    /rails/active_storage/blobs/:signed_id/*filename(.:format)                               active_storage/blobs#show
            rails_blob_representation GET    /rails/active_storage/representations/:signed_blob_id/:variation_key/*filename(.:format) active_storage/representations#show
                   rails_disk_service GET    /rails/active_storage/disk/:encoded_key/*filename(.:format)                              active_storage/disk#show
            update_rails_disk_service PUT    /rails/active_storage/disk/:encoded_token(.:format)                                      active_storage/disk#update
                 rails_direct_uploads POST   /rails/active_storage/direct_uploads(.:format)                                           active_storage/direct_uploads#create
ActionMailbox 関連のものとかも見えますね。
新機能
--expandedつきで実行してみます。$ rails routes --expanded --[ Route 1 ]------------------------------------------------------------------------------------------------------------------------------------------------------------------------------------------------------ Prefix | users Verb | GET URI | /users(.:format) Controller#Action | users#index --[ Route 2 ]------------------------------------------------------------------------------------------------------------------------------------------------------------------------------------------------------ Prefix | Verb | POST URI | /users(.:format) Controller#Action | users#create --[ Route 3 ]------------------------------------------------------------------------------------------------------------------------------------------------------------------------------------------------------ Prefix | new_user Verb | GET URI | /users/new(.:format) Controller#Action | users#new --[ Route 4 ]------------------------------------------------------------------------------------------------------------------------------------------------------------------------------------------------------ Prefix | edit_user Verb | GET URI | /users/:id/edit(.:format) Controller#Action | users#edit --[ Route 5 ]------------------------------------------------------------------------------------------------------------------------------------------------------------------------------------------------------ Prefix | user Verb | GET URI | /users/:id(.:format) Controller#Action | users#show --[ Route 6 ]------------------------------------------------------------------------------------------------------------------------------------------------------------------------------------------------------ Prefix | Verb | PATCH URI | /users/:id(.:format) Controller#Action | users#update --[ Route 7 ]------------------------------------------------------------------------------------------------------------------------------------------------------------------------------------------------------ Prefix | Verb | PUT URI | /users/:id(.:format) Controller#Action | users#update --[ Route 8 ]------------------------------------------------------------------------------------------------------------------------------------------------------------------------------------------------------ Prefix | Verb | DELETE URI | /users/:id(.:format) Controller#Action | users#destroy --[ Route 9 ]------------------------------------------------------------------------------------------------------------------------------------------------------------------------------------------------------ Prefix | rails_amazon_inbound_emails Verb | POST URI | /rails/action_mailbox/amazon/inbound_emails(.:format) Controller#Action | action_mailbox/ingresses/amazon/inbound_emails#create --[ Route 10 ]----------------------------------------------------------------------------------------------------------------------------------------------------------------------------------------------------- Prefix | rails_mandrill_inbound_emails Verb | POST URI | /rails/action_mailbox/mandrill/inbound_emails(.:format) Controller#Action | action_mailbox/ingresses/mandrill/inbound_emails#create --[ Route 11 ]----------------------------------------------------------------------------------------------------------------------------------------------------------------------------------------------------- Prefix | rails_postmark_inbound_emails Verb | POST URI | /rails/action_mailbox/postmark/inbound_emails(.:format) Controller#Action | action_mailbox/ingresses/postmark/inbound_emails#create --[ Route 12 ]----------------------------------------------------------------------------------------------------------------------------------------------------------------------------------------------------- Prefix | rails_relay_inbound_emails Verb | POST URI | /rails/action_mailbox/relay/inbound_emails(.:format) Controller#Action | action_mailbox/ingresses/relay/inbound_emails#create --[ Route 13 ]----------------------------------------------------------------------------------------------------------------------------------------------------------------------------------------------------- Prefix | rails_sendgrid_inbound_emails Verb | POST URI | /rails/action_mailbox/sendgrid/inbound_emails(.:format) Controller#Action | action_mailbox/ingresses/sendgrid/inbound_emails#create --[ Route 14 ]----------------------------------------------------------------------------------------------------------------------------------------------------------------------------------------------------- Prefix | rails_mailgun_inbound_emails Verb | POST URI | /rails/action_mailbox/mailgun/inbound_emails/mime(.:format) Controller#Action | action_mailbox/ingresses/mailgun/inbound_emails#create --[ Route 15 ]----------------------------------------------------------------------------------------------------------------------------------------------------------------------------------------------------- Prefix | rails_conductor_inbound_emails Verb | GET URI | /rails/conductor/action_mailbox/inbound_emails(.:format) Controller#Action | rails/conductor/action_mailbox/inbound_emails#index --[ Route 16 ]----------------------------------------------------------------------------------------------------------------------------------------------------------------------------------------------------- Prefix | Verb | POST URI | /rails/conductor/action_mailbox/inbound_emails(.:format) Controller#Action | rails/conductor/action_mailbox/inbound_emails#create --[ Route 17 ]----------------------------------------------------------------------------------------------------------------------------------------------------------------------------------------------------- Prefix | new_rails_conductor_inbound_email Verb | GET URI | /rails/conductor/action_mailbox/inbound_emails/new(.:format) Controller#Action | rails/conductor/action_mailbox/inbound_emails#new --[ Route 18 ]----------------------------------------------------------------------------------------------------------------------------------------------------------------------------------------------------- Prefix | edit_rails_conductor_inbound_email Verb | GET URI | /rails/conductor/action_mailbox/inbound_emails/:id/edit(.:format) Controller#Action | rails/conductor/action_mailbox/inbound_emails#edit --[ Route 19 ]----------------------------------------------------------------------------------------------------------------------------------------------------------------------------------------------------- Prefix | rails_conductor_inbound_email Verb | GET URI | /rails/conductor/action_mailbox/inbound_emails/:id(.:format) Controller#Action | rails/conductor/action_mailbox/inbound_emails#show --[ Route 20 ]----------------------------------------------------------------------------------------------------------------------------------------------------------------------------------------------------- Prefix | Verb | PATCH URI | /rails/conductor/action_mailbox/inbound_emails/:id(.:format) Controller#Action | rails/conductor/action_mailbox/inbound_emails#update --[ Route 21 ]----------------------------------------------------------------------------------------------------------------------------------------------------------------------------------------------------- Prefix | Verb | PUT URI | /rails/conductor/action_mailbox/inbound_emails/:id(.:format) Controller#Action | rails/conductor/action_mailbox/inbound_emails#update --[ Route 22 ]----------------------------------------------------------------------------------------------------------------------------------------------------------------------------------------------------- Prefix | Verb | DELETE URI | /rails/conductor/action_mailbox/inbound_emails/:id(.:format) Controller#Action | rails/conductor/action_mailbox/inbound_emails#destroy --[ Route 23 ]----------------------------------------------------------------------------------------------------------------------------------------------------------------------------------------------------- Prefix | rails_conductor_inbound_email_reroute Verb | POST URI | /rails/conductor/action_mailbox/:inbound_email_id/reroute(.:format) Controller#Action | rails/conductor/action_mailbox/reroutes#create --[ Route 24 ]----------------------------------------------------------------------------------------------------------------------------------------------------------------------------------------------------- Prefix | rails_service_blob Verb | GET URI | /rails/active_storage/blobs/:signed_id/*filename(.:format) Controller#Action | active_storage/blobs#show --[ Route 25 ]----------------------------------------------------------------------------------------------------------------------------------------------------------------------------------------------------- Prefix | rails_blob_representation Verb | GET URI | /rails/active_storage/representations/:signed_blob_id/:variation_key/*filename(.:format) Controller#Action | active_storage/representations#show --[ Route 26 ]----------------------------------------------------------------------------------------------------------------------------------------------------------------------------------------------------- Prefix | rails_disk_service Verb | GET URI | /rails/active_storage/disk/:encoded_key/*filename(.:format) Controller#Action | active_storage/disk#show --[ Route 27 ]----------------------------------------------------------------------------------------------------------------------------------------------------------------------------------------------------- Prefix | update_rails_disk_service Verb | PUT URI | /rails/active_storage/disk/:encoded_token(.:format) Controller#Action | active_storage/disk#update --[ Route 28 ]----------------------------------------------------------------------------------------------------------------------------------------------------------------------------------------------------- Prefix | rails_direct_uploads Verb | POST URI | /rails/active_storage/direct_uploads(.:format) Controller#Action | active_storage/direct_uploads#create
rails routes -Eでも同じ結果になります。
-cオプションや-gオプションとも一緒に使えます。$ rails routes -c UsersController --expanded --[ Route 1 ]------------------------------------------------------------------------------------------------- Prefix | users Verb | GET URI | /users(.:format) Controller#Action | users#index --[ Route 2 ]------------------------------------------------------------------------------------------------- Prefix | Verb | POST URI | /users(.:format) Controller#Action | users#create --[ Route 3 ]------------------------------------------------------------------------------------------------- Prefix | new_user Verb | GET URI | /users/new(.:format) Controller#Action | users#new --[ Route 4 ]------------------------------------------------------------------------------------------------- Prefix | edit_user Verb | GET URI | /users/:id/edit(.:format) Controller#Action | users#edit --[ Route 5 ]------------------------------------------------------------------------------------------------- Prefix | user Verb | GET URI | /users/:id(.:format) Controller#Action | users#show --[ Route 6 ]------------------------------------------------------------------------------------------------- Prefix | Verb | PATCH URI | /users/:id(.:format) Controller#Action | users#update --[ Route 7 ]------------------------------------------------------------------------------------------------- Prefix | Verb | PUT URI | /users/:id(.:format) Controller#Action | users#update --[ Route 8 ]------------------------------------------------------------------------------------------------- Prefix | Verb | DELETE URI | /users/:id(.:format) Controller#Action | users#destroy$ rails routes -g index --expanded --[ Route 1 ]------------------------------------------------------------------------------------------------- Prefix | users Verb | GET URI | /users(.:format) Controller#Action | users#index --[ Route 2 ]------------------------------------------------------------------------------------------------- Prefix | rails_conductor_inbound_emails Verb | GET URI | /rails/conductor/action_mailbox/inbound_emails(.:format) Controller#Action | rails/conductor/action_mailbox/inbound_emails#indexおまけ
rails routes --helpで--no-expandedってオプションが表示されたのですが、出力は、--expandedと変わらなかったです。これは、いつか修正されるかな。$ rails routes --help Usage: rails routes [options] Options: -c, [--controller=CONTROLLER] # Filter by a specific controller, e.g. PostsController or Admin::PostsController. -g, [--grep=GREP] # Grep routes by a specific pattern. -E, [--expanded], [--no-expanded] # Print routes expanded vertically with parts explained.参考情報
- 投稿日:2019-04-13T20:14:42+09:00
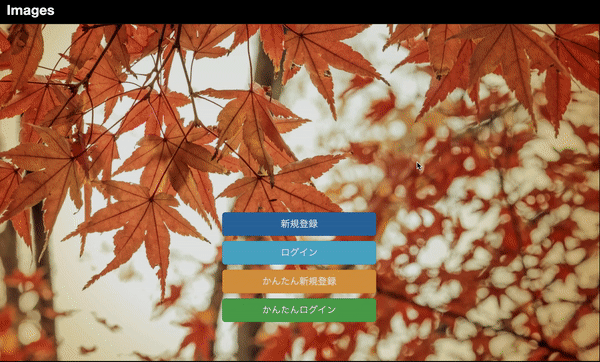
離脱率を下げる!かんたんログイン機能の実装【学習アウトプット2】
新規登録、ログインというのはめんどくさいものです。Facebookログインがあると何処となく安心するのも、偏にこの入力の手間が省けるからです。
我々初学者は良いWeb企業様に入るためにポートフォリオを作成します。しかし全力で作ったポートフォリオも、中身を見てもらえなければ悲しいですよね。
この記事では、これからRailsでポートフォリオを作成する人向けに、ボタン一押しでログインできる「かんたんログイン」機能の実装方法について述べます。
方法1 : htmlに隠しパラメータで忍ばせる
まずは結論から。ログインボタンを表示したい場所に以下のコードを記載すればOKです。
top.rb<%= form_for(User.new, url:login_path) do |f| %> <%= f.hidden_field :email, value: "xxx@example.com" %> <%= f.hidden_field :password, value: "password" %> <%= f.submit "かんたんログイン", class:"btn btn-lg center-block btn-success"%> <% end %>params[:user][:email]とparams[:user][:password]にテストユーザ用の情報をいれてusers#createに送ります。hidden_fieldの中身は表示されないので、見た目的にもスッキリします。(ソースには載っちゃいますが)
方法2 : サーバ側で処理する
まずtestsessionsコントローラーを作ります
$ rails g controller testsessionsルーティングを追加します。使うアクションはcreateだけです。
routes.rbresources :testsessions, only: :createcreateアクションを追加します。
testsessions_controller.rbclass TestsessionsController < ApplicationController def create user=User.find_by(email:"test@example.com") user&.authenticate("password") session[:user_id] = user.id flash[:success] = "テストユーザとしてログインしました。" redirect_to user end endコントローラーの中で情報をいれていく感じです。これでサーバ側はOKです。あとはログインボタンを表示したい場所に以下のコードを記載すればOKです。classはお好みで。
top.rb<%= link_to 'かんたんログイン', testsessions_path, method: :post, class:"btn btn-lg btn-success center-block" %>こちらのやり方ではテストユーザの情報がソースに載りません。テストユーザのときはflashを変えたい、というときにもこちらの方が良いかと思います。
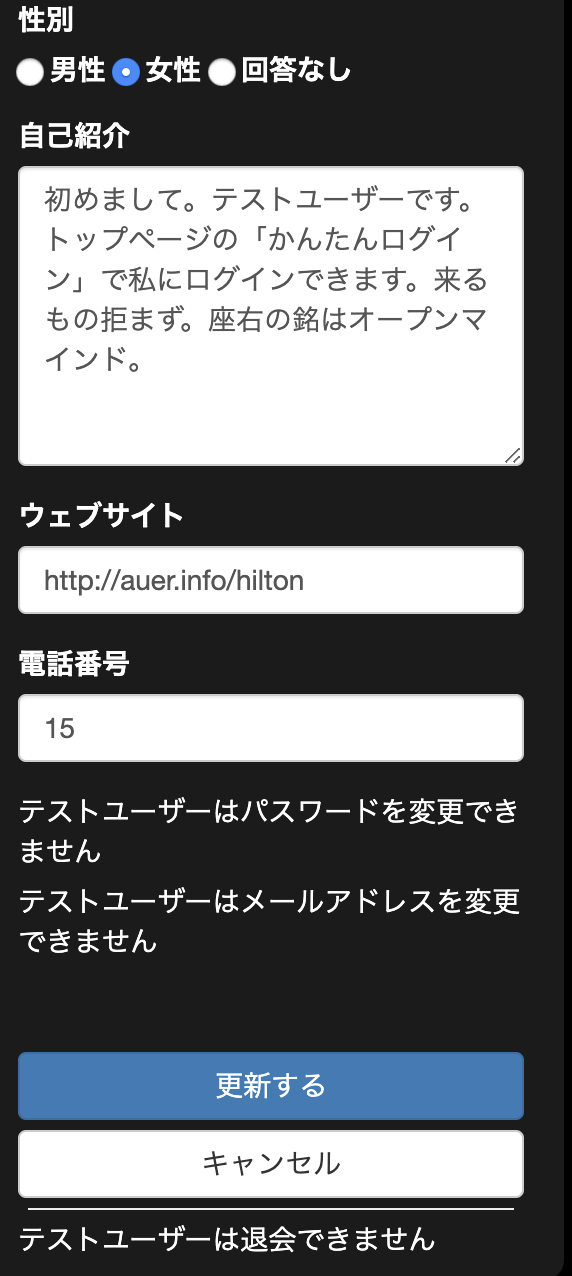
(普通に既存のsessions_controllerにif user.email=="xxx@example.com"...などして分岐させてもいいかもですが、ちょっとごちゃごちゃします。)実際の画面
注意
ログイン後にemailやpasswordを変えられたり退会されてしまうと機能しなくなります!これらを変更する機能はビューに表示させないようにして、かつ念の為テストユーザー専用のフィルターをつけておきましょう。
みなさんのポートフォリオがより多くの方に見てもらえますように!
- 投稿日:2019-04-13T20:07:03+09:00
#docker で #ruby に色々と gem を入れたイメージやコンテナを作成するごく簡単な Dockerfile の例
Dockerfile
FROM ruby

RUN gem install reverse_markdown redcarpet
exe
$ docker build . -t ruby-gems$ docker run -it ruby-gems /bin/bashroot@dd130726b871:/# echo "<h1>Hello</h1>" | reverse_markdown # Hello root@dd130726b871:/# echo "<h1>Hello</h1>" | reverse_markdown | redcarpet <h1>Hello</h1>Original by Github issue
- 投稿日:2019-04-13T19:07:44+09:00
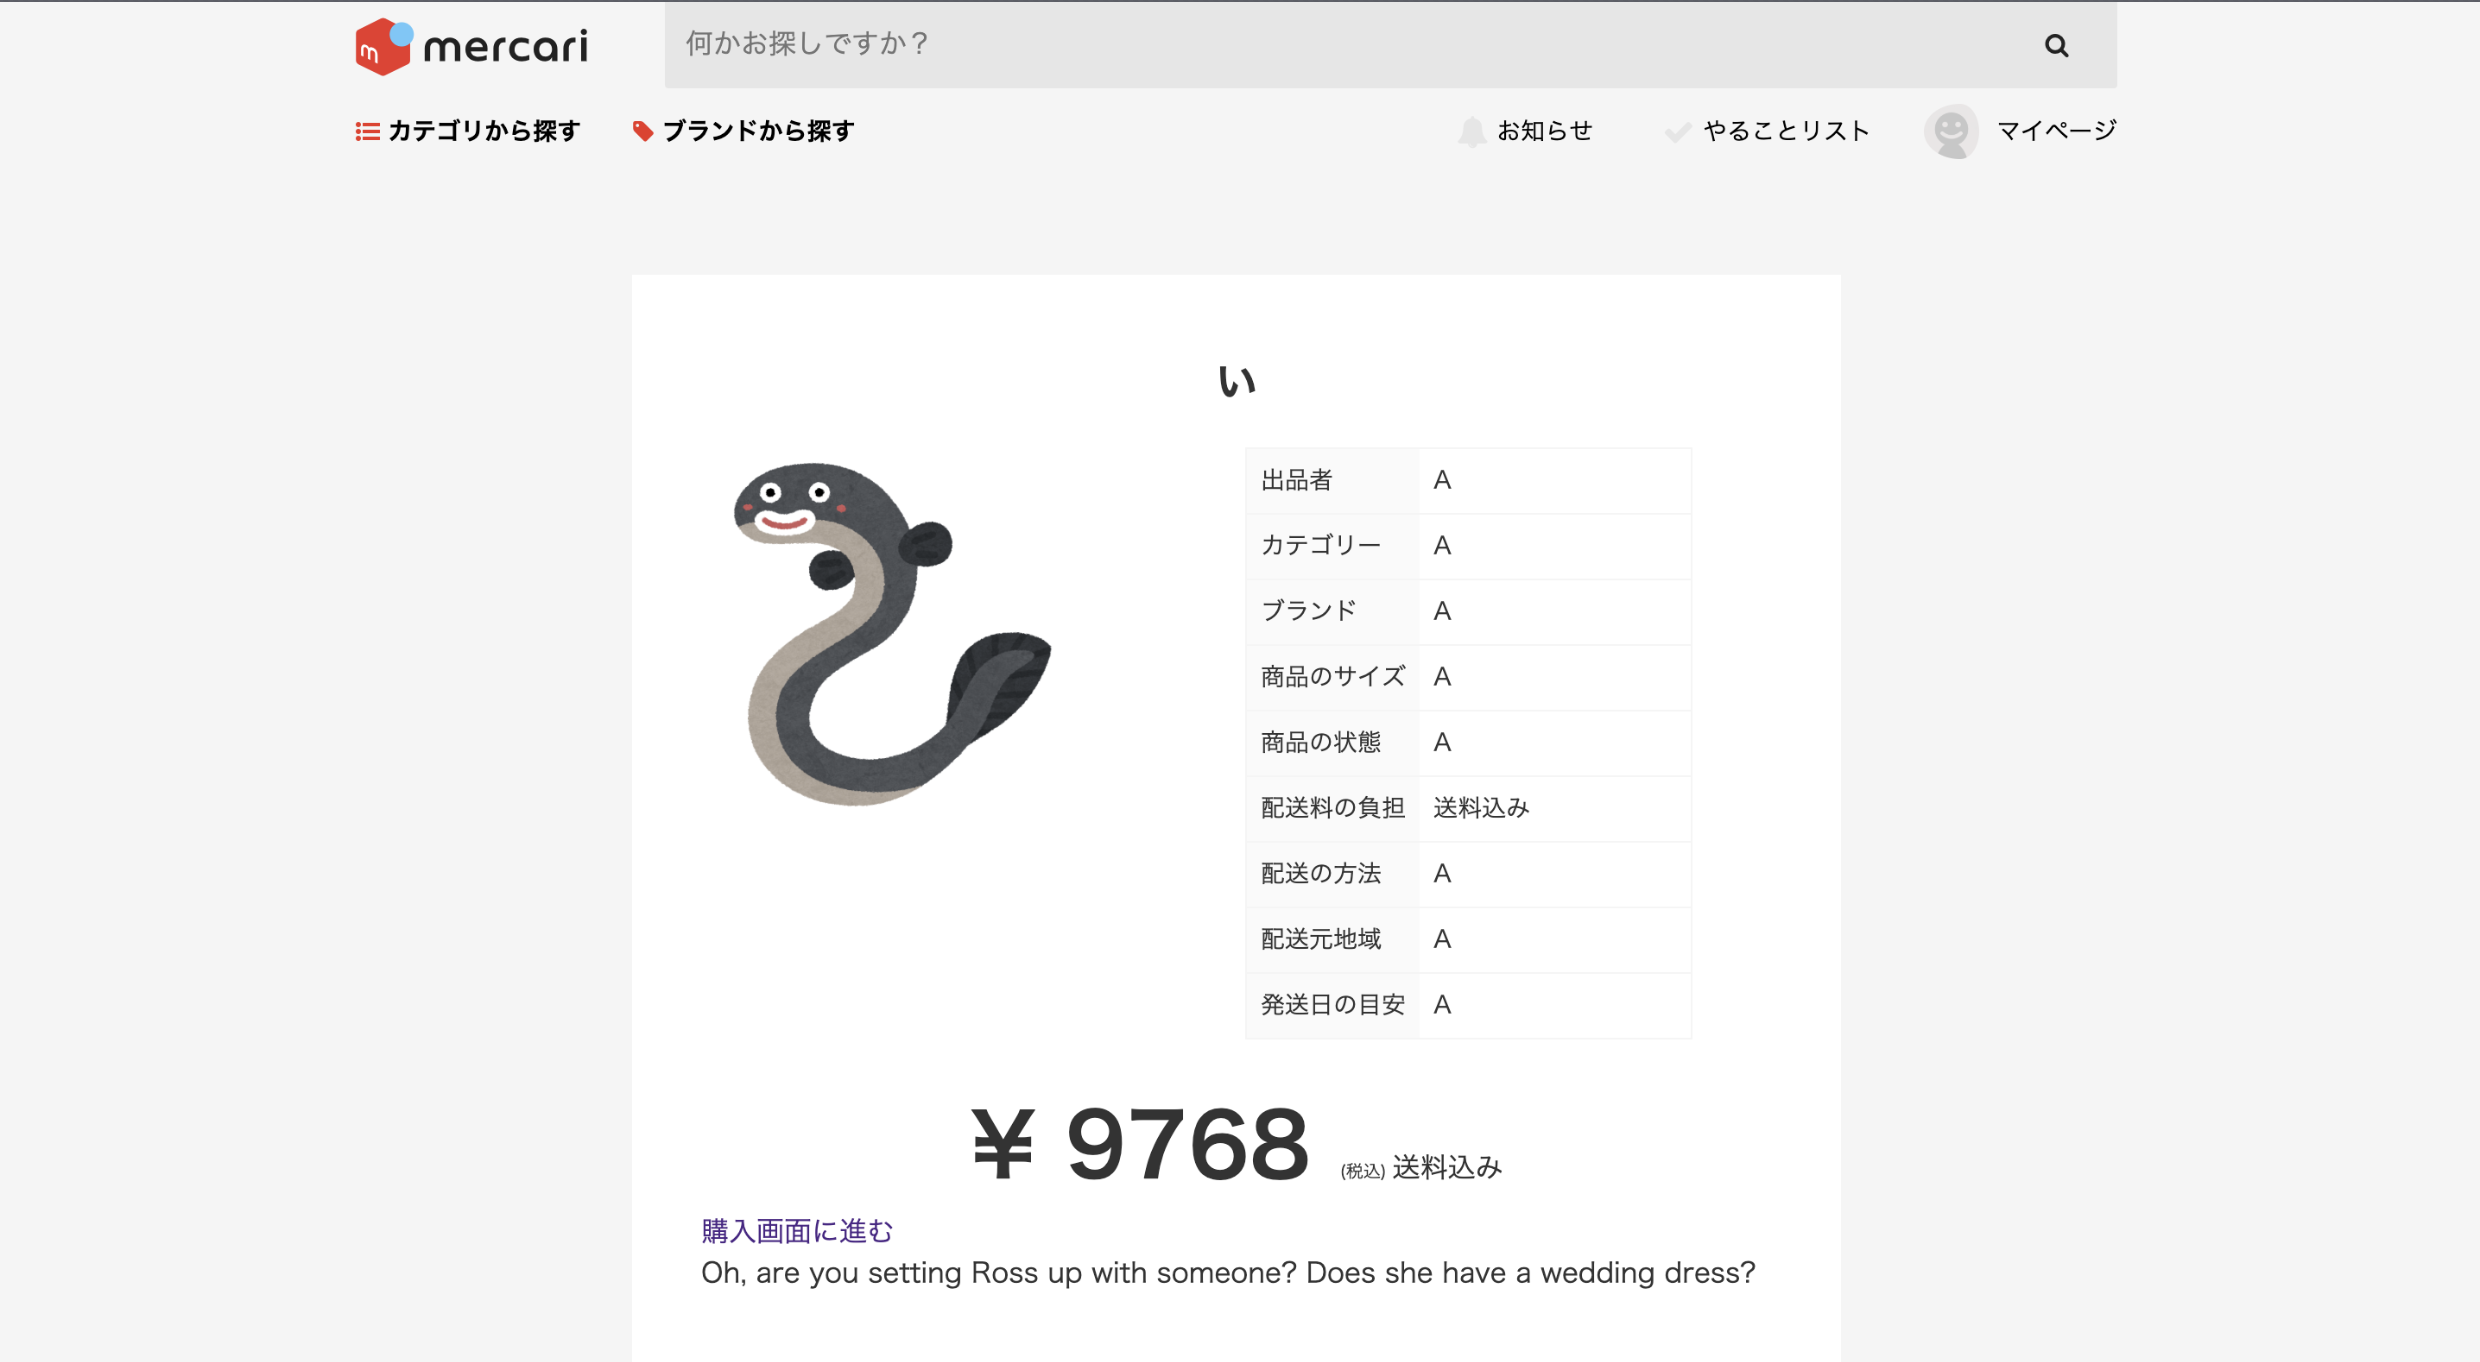
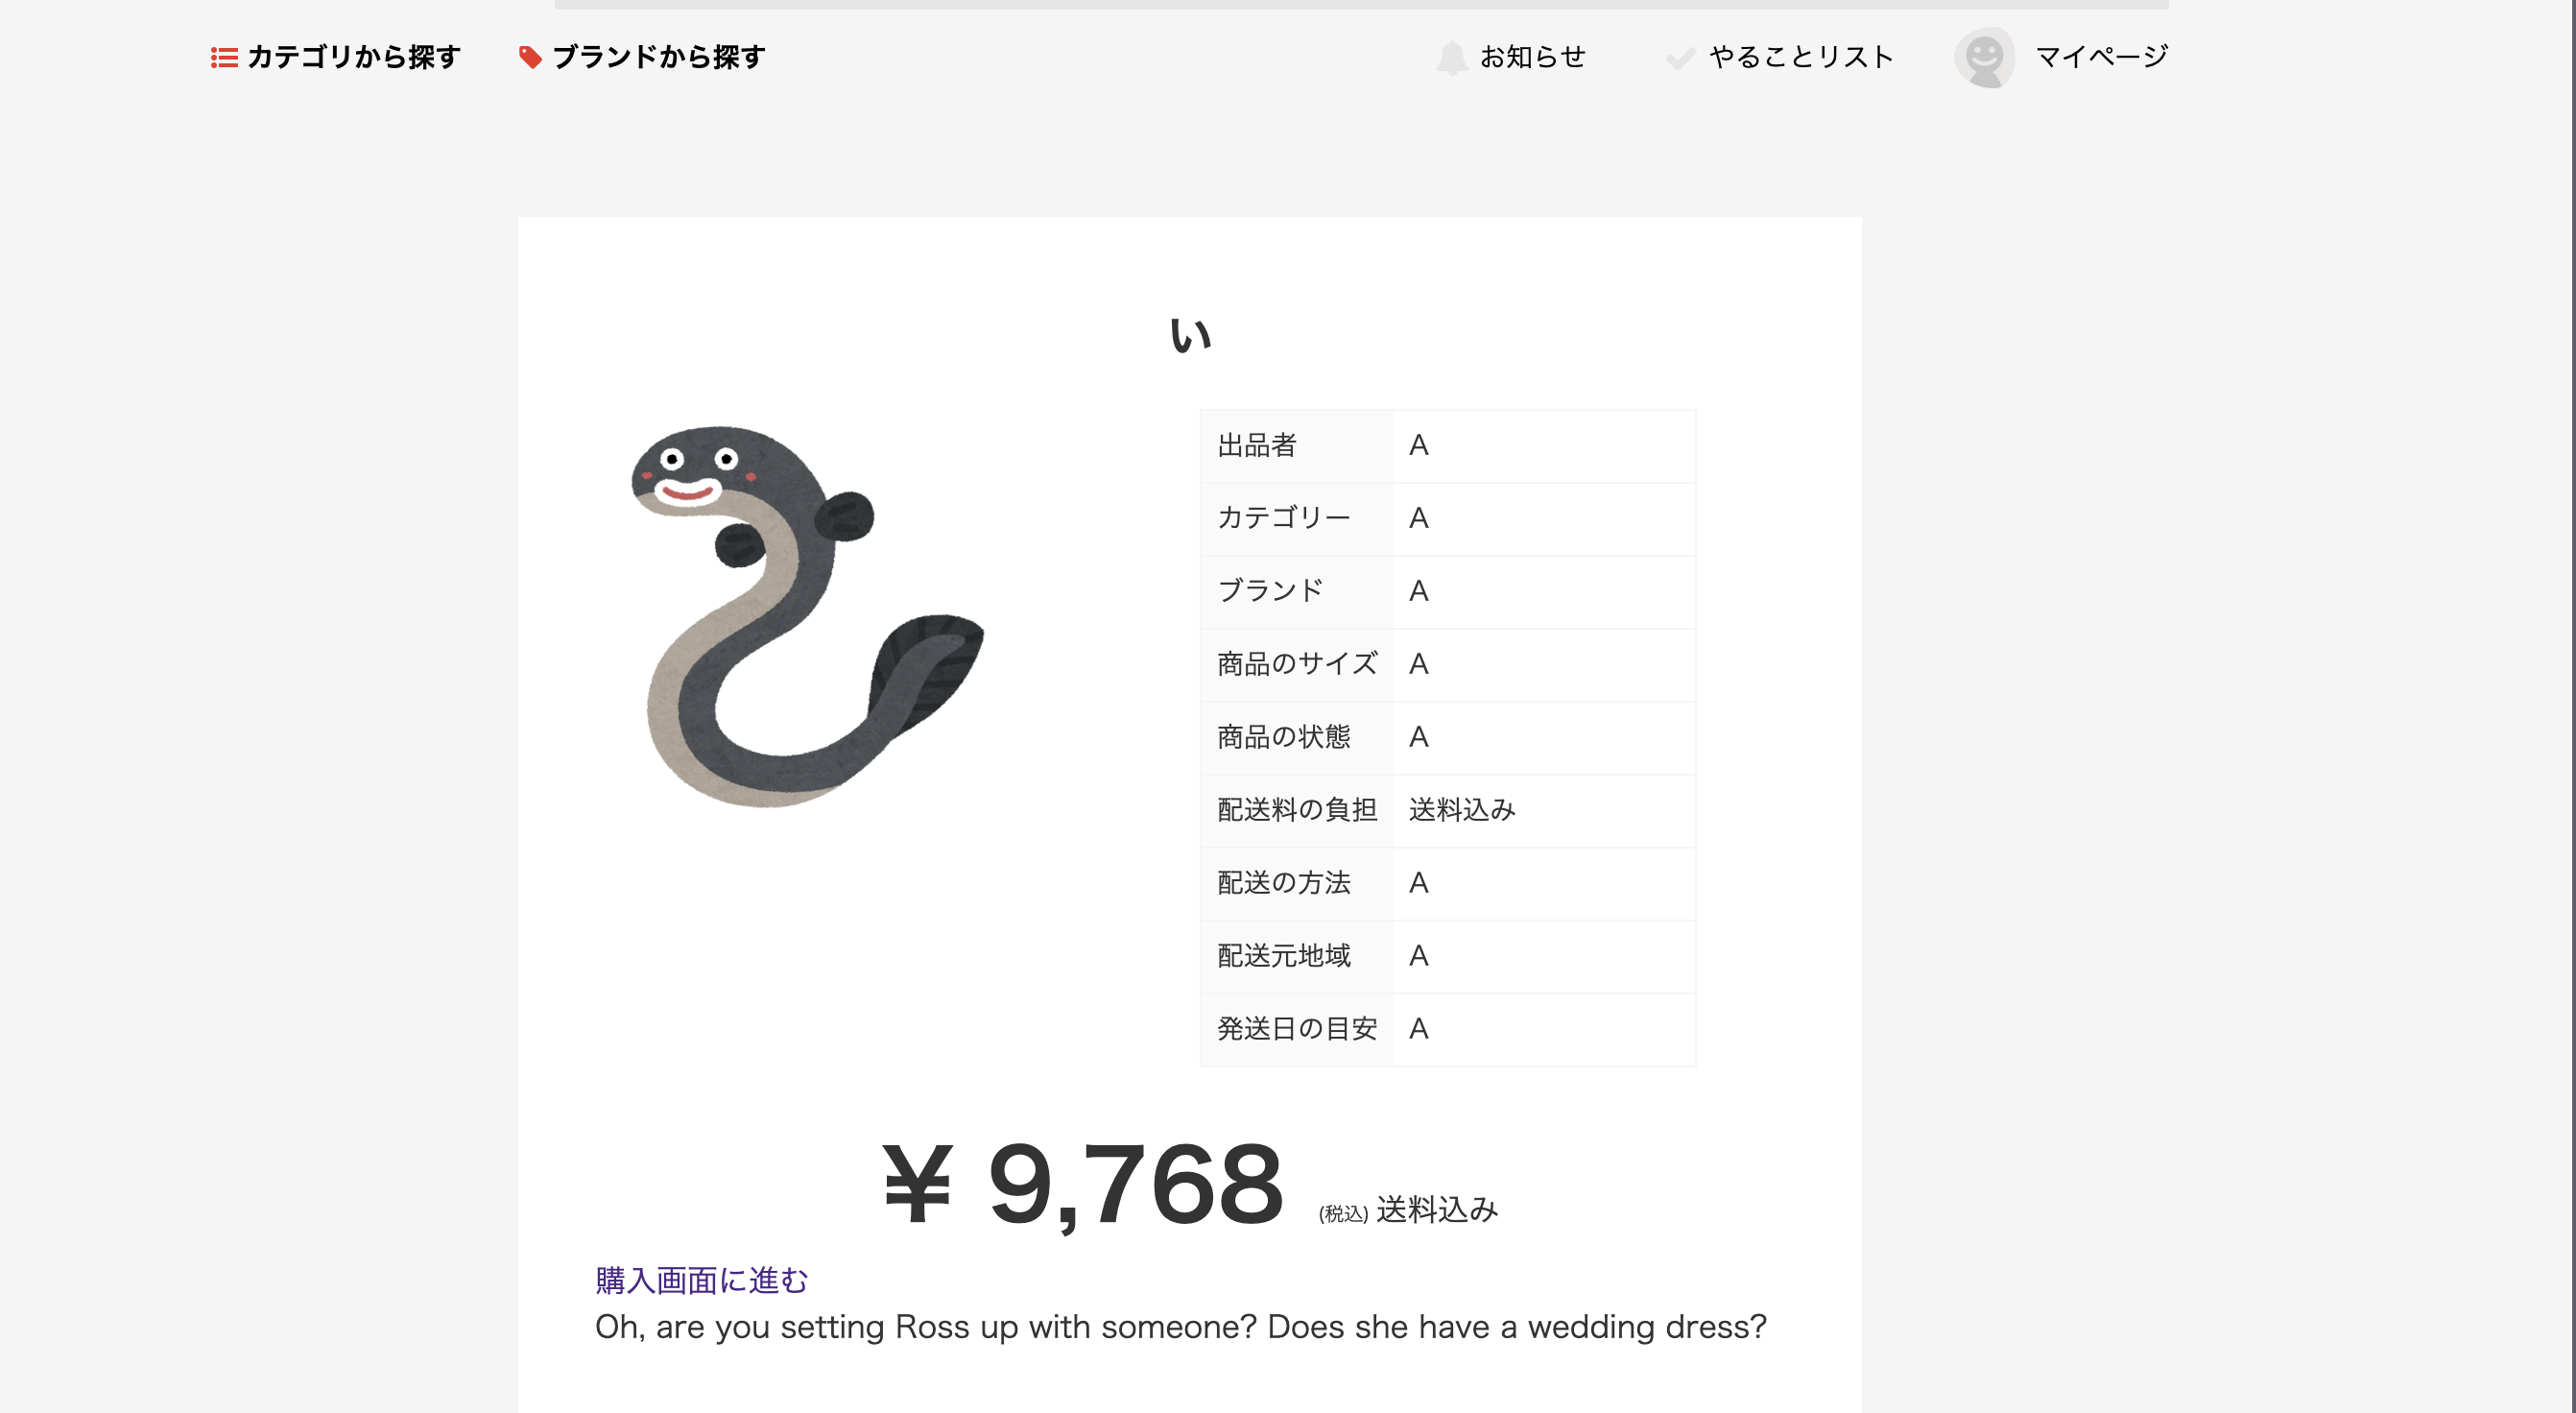
数字を通貨表示にする
数字を通貨表示(コンマをつける)とかってどうするんやろう?と思い
調べてみたら簡単だったので覚書です。課題

下記の記載だとコンマが入らず数字が大きくなった時に読みづらい
.individual__items__item__middle__price
  ¥
  =@item.price
%span.individual__items__item__middle__price__tax
 (税込)
%span.individual__items__item__middle__price__text
  =@item.fee_side
解決

rubyのヘルパーメソッド、number_to_currencyを使用して解決!
.individual__items__item__middle__price
  = number_to_currency(@item.price, unit: "¥", strip_insignificant_zeros: true)
%span.individual__items__item__middle__price__tax
  (税込)
%span.individual__items__item__middle__price__text
  =@item.fee_side
①ヘルパーメソッドの記述
=@item.price
↓
= number_to_currency(@item.price)
コンマがつくが、小数点まで表示される(9,768.00となる)②小数点以下を消す
= number_to_currency(@item.price, strip_insignificant_zeros: true)③通貨マークを表示させる
= number_to_currency(@item.price, unit: "¥", strip_insignificant_zeros: true)参考記事
http://railsdoc.com/references/number_to_currency
http://railsdoc.com/references/number_to_rounded
(公式)
https://qiita.com/noriaki/items/d6c0503e7d25c7329bf7
(他にもやり方色々あるようです!)
- 投稿日:2019-04-13T18:36:30+09:00
Rubyメソッド
- 投稿日:2019-04-13T18:28:01+09:00
Active Storageを使った画像アップロードでSQLite3::BusyException: database is locked:のエラー
こんにちは、けんぞうです。
RailsでActiveStorageを使った画像アップロードを実装している中で、以下のエラーが発生しました。SQLite3::BusyException: database is locked:SQLite3::BusyException: database is locked:のエラーの解決で紹介されている記事で今までは解決できていたのですが、今回はうまくいかず、対処しました。
原因:アップロード済の画像を削除していない
users_controller.rbdef update @user = User.find_by(id: params[:id]) @user.update(user_params) flash[:notice] = "ユーザー編集が完了しました!" redirect_to("/users/#{@user.id}") endユーザー画像のupdateアクションは上記のような記述をしていたのですが、これだとどうしてもSQLエラーが出てしまいます。
対処:attachされている画像を削除する
今回の場合は以下のように書き換えるとエラーが解消されました。
users_controller.rbdef update @user = User.find_by(id: params[:id]) @user.image.purge #アタッチされている画像を削除 @user.image.attach(params[:image]) #受け取った画像をアタッチ @user.update(user_params) flash[:notice] = "ユーザー編集が完了しました!" redirect_to("/users/#{@user.id}") end以上です!
- 投稿日:2019-04-13T18:11:11+09:00
「String does not have #dig method」AWS S3とのねちっこい戦い【初心者の場合】
こんにちは、けんぞうです。
Railsでアプリを作ってHerokuでデプロイすると「画像保存できねーじゃん!」というのは、皆が通る道ですよね。その「画像保存できない問題」については【Rails】AWS S3を使ってHerokuで画像を投稿できるようにする方法で解決できるんですが、これをやっている中で以下のエラーに出くわしました。
String does not have #dig methodこいつの解決策を書きます、初心者ならではのミスという感じです、、、苦笑
そもそも、#digてどこのことやねん
storage.ymlaccess_key_id: <%= Rails.application.credentials.dig(:aws, :access_key_id) %> secret_access_key: <%= Rails.application.credentials.dig(:aws, :secret_access_key) %>これに含まれるdigでエラーが出てしまってます。
原因①:
credentialsのコメントアウト外した?【Rails】AWS S3を使ってHerokuで画像を投稿できるようにする方法の流れの中で
$ EDITOR=vim rails credentials:editaws: access_key_id: #ここに自分のアクセスキーIDをコピペ secret_access_key: #ここに自分のシークレットアクセスキーをコピペこの手順を踏むのですが、
aws以下の3行はもともとコメントアウトされてるんですよね。これに気がつかず、2時間くらい消耗、、、#aws: # access_key_id: #ここに自分のアクセスキーIDをコピペ # secret_access_key: #ここに自分のシークレットアクセスキーをコピペ⬆︎コメントアウトを外そう
原因②:半角スペース開けた?
aws:
   access_key_id: #これを消してアクセスキーIDをペースト
   secret_access_key: #これを消してシークレットアクセスキーをコピペ
上記の
access_key_id:とsecret_access_key:の後ろには、それぞれ半角スペースが必要。
僕の場合はスペースが相手いなかったので、うまく読み取れず出力できなかった。上記の原因をつぶせば、問題なくdig君のエラーはいなくなりました。おしまい!
- 投稿日:2019-04-13T16:55:53+09:00
Vue.jsをRails環境下で動かすための環境構築手順
参考サイト
https://qiita.com/jnchito/items/30ab14ebf29b945559f6
https://qiita.com/cohki0305/items/582c0f5ed0750e60c951
説明が丁寧でわかりやすい。開発環境
ruby 2.6.2
Rails 5.2.3ゴール
ローカル環境下でRuby on RailsにVue.jsを動かす環境を構築する。
手順
通常のプロジェクトを作成
※DBMSにはpostgesqlを指定$ rails new vue_app -d postgresqlGemfilegem 'webpacker', github: 'rails/webpacker'gemを入れたら、必ずbundle install
webpackerに関する参考サイト
https://blog.tai2.net/webpacker3.html
https://qiita.com/chimame/items/8d3d6f4afea675cffa7d$ yarn -v上のコマンドでもしyarnのインストールをしていなかったら、インストールをする。
$ rails webpacker:installここでwebpackerをインストール
このコマンドだけで、Vue.jsをインストールできる!
$ rails webpacker:install:vue
hello_vue.jsを使い、Rails上で動作させるための準備
$ rails g controller homes index適当に、コントローラー・アクション・ビューをコマンドで生成
app/views/layouts/application.html.erb<%= yield %> <%= javascript_pack_tag 'hello_vue' %> </body>このタグを挿入する。
当たり前だが、CDNのインポートは必要ない↓このタグの挿入は必要ない!!!!!!!!!!! <script src="https://cdn.jsdelivr.net/npm/vue/dist/vue.js"></script>app/views/homes/index.html.erb<div id="app"> </div>app/javascript/packs/hello_vue.jsimport Vue from 'vue/dist/vue.esm' const vm = new Vue({ })※app/javascript/app_vueのコード、ファイルは削除しても構わない。
これで、Rails上でVue.jsを動かす準備は完了。
- 投稿日:2019-04-13T16:23:50+09:00
Railsで単発決済システム(Pay.jp)を実装
Pay.jpを使用した決済システムの実装方法です。
Goals
以下のようなアプリを作成します。
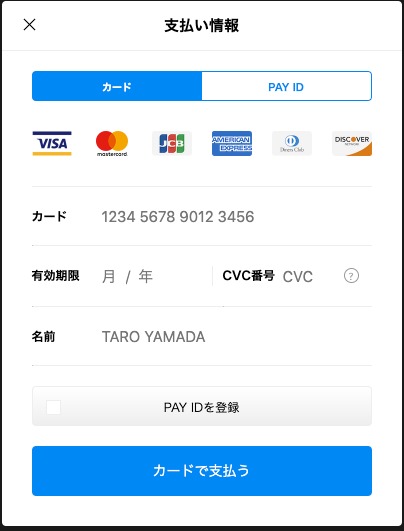
金額を入力して「カードを支払う」をクリックすると、支払いのウィンドウが表示されます。
クレジットカード情報を入力し「カードを支払う」をクリックすると支払いが完了します。
PAY.JPの会員登録
PAY.JP公式ページより会員登録をします。
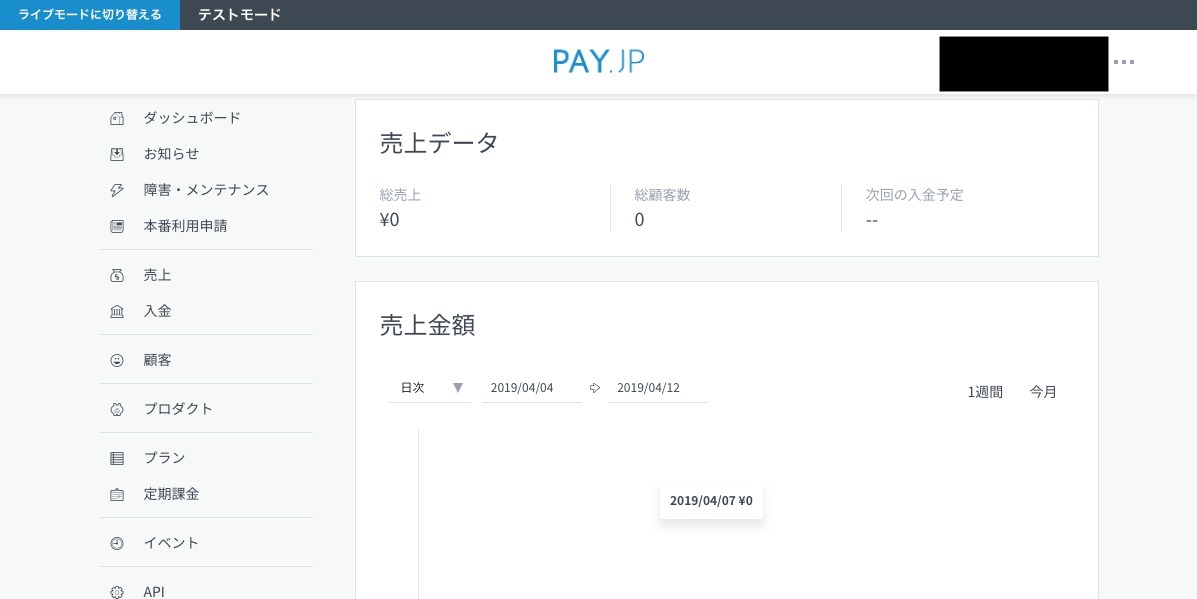
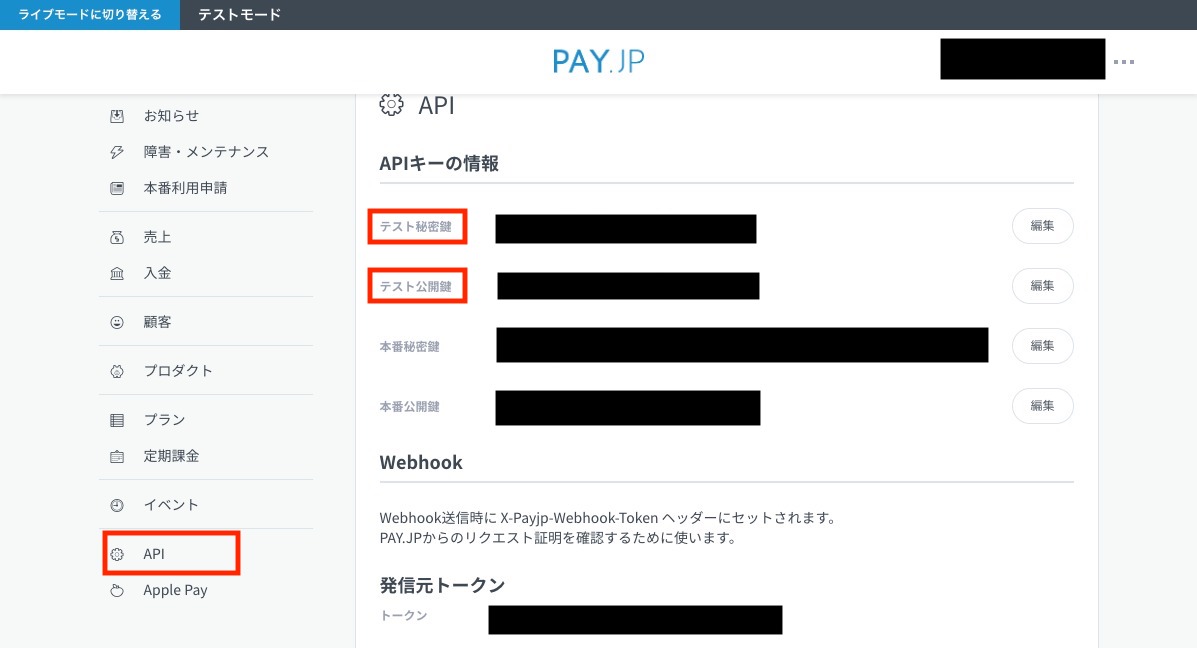
ログインすると以下の画面が表示されます。
左の「API」を選択するとAPIキーの情報が表示されます。
今回はテストアプリなのでテスト秘密鍵とテスト公開鍵を使用します。
サンプルアプリの作成
Railsのプロジェクトを作成したら、Gemfileを開き以下をグローバルに追記します。
gem 'payjp'インストールします。
bundle install環境変数の設定
ローカル環境
環境変数の設定には
dotenv-railsというを使用します。
dotenv-railsのインストールは、Gemfileのグローバルへgem 'dot-env'を記載してbundle installを実行してください。使用方法は、プロジェクト直下に.envファイルを作成し、以下のように編集しましょう。
注:.envがリモートリポジトリへアップされないようにgit.ignorへ追加しましょうPAYJP_PUBLIC_KEY='テスト公開鍵' PAYJP_SECRET_KEY='テスト秘密鍵'これでローカル環境での環境変数の設定は完了です。
ViewとControllerの作成
以下を実行してControllerとViewを作成します。
rails g controller products index payView
app/views/products/index.html.erb「カードで支払う」ボタンを設置します。
このボタンをクリックするだけで、支払い用のモーダルウィンドウが表示されます。<%= form_with local: true, url: products_pay_path do |form| %> 金額:<%= form.text_field :amount %> <script type="text/javascript" src="https://checkout.pay.jp" class="payjp-button" data-key="<%= ENV["PAYJP_PUBLIC_KEY"] %>"> </script> <% end %>

app/views/products/pay.html.erb支払い完了の旨を表示します。
支払いが完了しました

<br>
<%= link_to 'Topへ', root_path %>
Controller
payメソッドを編集します。
def pay
  Payjp.api_key = ENV["PAYJP_SECRET_KEY"]
  Payjp::Charge.create(
    :amount => params[:amount],
    :card => params['payjp-token'],
    :currency => 'jpy'
  )
end
動作確認
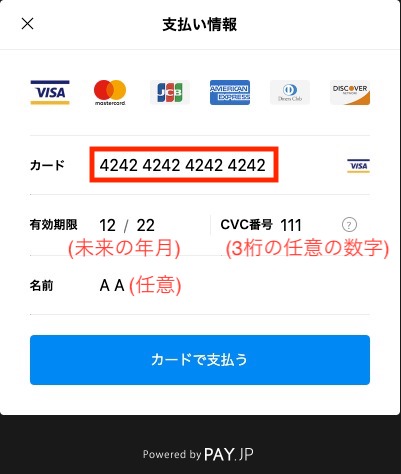
金額(50〜)を入力し、「カードで支払う」をクリックします。
支払い情報ウィンドウにクレジットカード情報を入力し「カードで支払う」をクリックします。
- カード:テストカードに記載の番号
- 有効期限:未来の年月
- CVC番号:3桁の適当な数字
- 名前:任意の名前
「支払いが完了しました」の画面が表示されれば成功です。
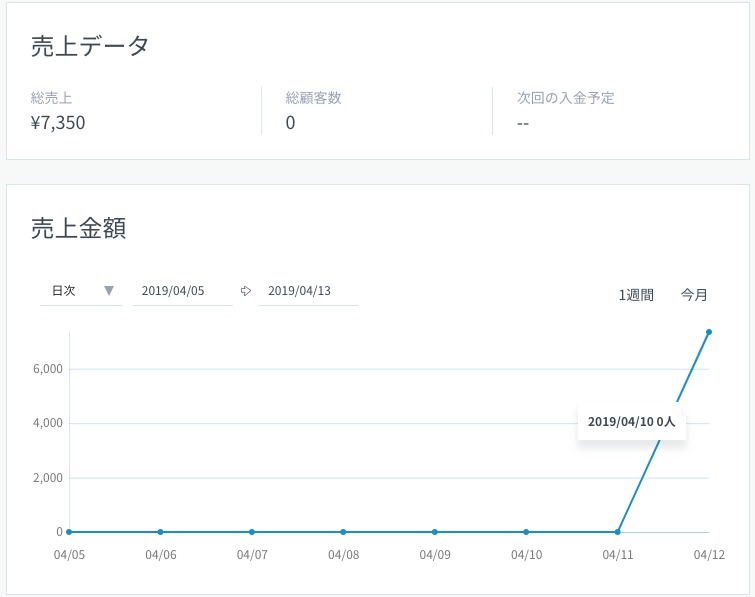
Webのダッシュボードで売り上げデータが更新されていることが確認できます。
最後に
返金は「売上一覧」->「課金ID」->「売上返金」から。
本番運用する際は、ほかにもいろいろ考慮する点がありますが、最低限の実装であれば、ものすごく簡単ですね。


- 投稿日:2019-04-13T16:03:16+09:00
RSpecのrequest specでパラメータが正しく認識されない問題の対処法
RSpec 3.8 のRequest Specを使っていると、時おりリクエストパラメータが正しくRailsに届いてくれない問題に遭遇することがあったので、対策を書き残しておきます。
環境
- Rails 5.2.2.1
- RSpec 3.8
- rspec-core 3.8.0
- rspec-expectations 3.8.2
- rspec-mocks 3.8.0
- rspec-rails 3.8.2
- rspec-support 3.8.0
問題
booleanや数値が文字列に変換されてしまう
# RSpec側
post xxxx_path, params: { foo: 1, bar: true }

# Rails側
# => <ActionController::Parameters {"foo"=>"1", "bar"=>"true", "controller"=>"xxx", "action"=>"xxx"} permitted: false>
空の配列になぜか空の文字列が含まれてしまう
# RSpec側
post xxxx_path, params: { foo: [] }

# Rails側
# => <ActionController::Parameters {"foo"=>[""], "controller"=>"xxx", "action"=>"xxx"} permitted: false>
対処法
- headers に
{ "Content-Type" => "application/json" }を追加した上で、パラメータのハッシュをto_jsonで文字列に変換してから送信する。# RSpec側 post xxxx_path, params: { foo: 1, bar: true, hoge: [] }.to_json, headers: { "Content-Type" => "application/json" } # Rails側 # => <ActionController::Parameters {"foo"=>1, "bar"=>true, "hoge"=>[], "controller"=>"xxx", "action"=>"xxx"} permitted: false>ちなみに
- 空の配列に空文字が含まれてしまう問題だけについて言えば、Gemfileで
rack-testのバージョンを< 0.7.0に指定すれば解消できる。- 参考: stackoverflow
- 投稿日:2019-04-13T15:50:57+09:00
Rspec を使ったrailsアプリケーションの自動テスト
Rspecのgemを使ったRailsの自動テストについて
積極的にアウトプット!
ということで今回はRspecのgemを使った自動テストについて学習をしましたので、
それについてのアウトプットをしていきます。はじめに
Rspecでは単体で動くプログラムが正常に動くのか、複数のプログラムが連動して正常に動くかということを自動でテストしてくれる機能になります。
Railsではgemを使って、実装し使っていくことになります。今回はRailsで rspec-rails というgemを使ってテストしていきます。
Setting
まずはgemのインストール、bundle installを済ませましょう。
gem 'rspec-rails'bundle install次にRspecに必要な設定ファイルを用意します。
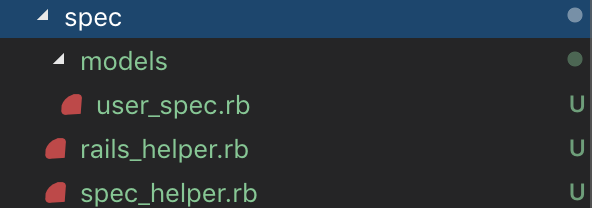
ターミナルで以下のコマンドを入力。bundle exec rails g rspec:installそうすると以下のようなフォルダ・ファイルが作成されます。
app/spec
app/spec/rails_helper.rb
app/spec/spec_helper.rb
.rspec今後はこのspecのディレクトリ内にテストコードやそれを入れておくフォルダを作成していきます。
各ファイルの役割
上記コマンドで生成されたファイルの役割です。
rails_helper.rb
テストコードを書いたファイルに対して共通して使いたい設定やメソッドをここに記入します。
呼び出すときは、各々のファイルで require 'rails_helper' のように記載する。spec_helper.rb
共通する設定やメソッドを書いておくというところは同じであるが、こちらはrailsを使用しないという違いがある。
railsの特殊な書き方はせず、Rspecの全体的な設定をかけるようです。テスト結果の形式設定
次に.rspecファイルにテスト結果で返ってくる答えがどういう形式で返ってくるかを設定します。
記入の仕方は
--format progressのように記載します。
この progress というところが指定する形式名になります。
種類として、
・ progress
・ documentation
・ html
・ json
があるようです。何も設定として記載しなかった場合は、progressがデフォルトとして設定されています。
それぞれどのように返ってくるかは、詳しくまとめられている方がいらっしゃったので、
参考としてリンク貼っておきます。
http://samurai.ataglance.jp/rspec_format/今回はdocumentationで指定していきます。
Test
では早速テストを行っていきます。
今回はモデルの一つのファイルに対して、単体テストを行いました。
テストを行う際はテストを行うそれぞれのフォルダを作成し、その中にテストコードを書くspecファイルを設置します。
コントローラーであれば、spec/controller
テストコードを書くspecファイルの命名には慣習があるようです。
対応するクラス名_spec.rb
今回はuserモデルのファイルでテストを起こっていくので画像のように作成しています。
spec/models/user_spec.rbrequire 'rails_helper' describe User do describe '#create' do it "is invalid without a nickname" do user = User.new(nickname: "", email: "", password: "00000000", password_confirmation: "00000000") user.valid? expect(user.errors[:nickname]).to include("can't be blank") end end end上記のように記載をしました。
これはニックネームカラムにデータが入っていなかったとき、ちゃんとエラーが出るかどうか
バリデーションが機能しているかどうかを確認するテストコードになっています。require 'rails_helper' rails_helperで設定した共通設定を呼び出します。
describe 詳細名 do
 ・・・
end
テストのまとまりをグループ化します。
基本的に・・・の部分に処理を書いていきます。上の例で行くと、userモデルの中のcreateというアクションに対するテストということになります。
it "testの説明" do
・・・
end
it doは一つのテストのかたまり(example)を表します。
一つのテストの処理をこの中に書いていきます。expect(X).to eq(Y)基本的なテストコードの書き方です。
エクスペクテーションという。
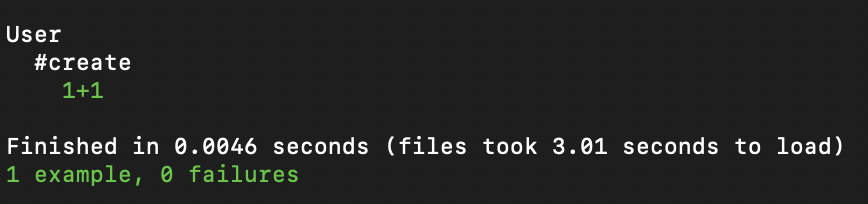
意味は、XとYが等しければテスト成功 という意味です。一度試しに X 1+1 Y 1+1 の値はお互いに等しいかということをテスト実行してみると
のように返ってくる。
これはexample が1つ 、失敗は0 という内容です。また、eqの部分はマッチャといい他にも種類がある。
include() ()内の値を含む場合、テスト成功。など□他使用メソッド
valid? バリデーションによりデータが保存できない状態かを確認する true false で返す
errors 上記のようなメソッドを利用したインスタンスに対して原因がわかるようにする。
最後に テストを実行するときは
ターミナルで bundle exec rspec
以上

- 投稿日:2019-04-13T15:48:01+09:00
【Rails】PWAのmanifestの内容を動的に取得する
はじめに
この記事では、以下のように初期ページのURLがユーザー毎に異なる場合に、「ホーム画面追加時」の設定を動的に取得するための方法を紹介します。
http://localhost:3000/projects/0afaf48836b7fe60今回のアプリのgif動画(「ホーム画面へ追加」)
manifest.jsonの概要PWAのWebアプリケーションでホーム画面に追加する際の設定をしたい場合、
manifest.jsonを使います。例えば、以下のような
manifest.jsonを作成し{ "short_name": "サンプルアプリ", "name": "サンプルアプリ", "icons": [ { "src": "launcher-icon-4x.png", "type": "image/png", "sizes": "192x192" } ], "start_url": "/index.html" }HTMLの
<head>に、manifest.jsonを読み込むタグを埋め込めば良いです。<link rel="manifest" href="/manifest.json">そうすることで、「ホーム画面に追加」時に、
manifest.jsonの内容に応じて起動時のURL等を設定してくれます。やりたいこと
通常の「ホーム画面に追加」時の設定については、上述の方法で事足りるかもしれません。ただ、今回やりたいことは、
start_urlが動的に変化するケース での使用です。例えば、以下のようなユーザー毎にユニークな識別子を与えている場合、ユーザー毎に異なるURLになってしまうため、静的な
manifest.jsonでは対応することができません。http://localhost:3000/projects/0afaf48836b7fe60今回の記事では、動的に
manifestの内容を取得する方法を紹介します。manifestの動的取得
概要
そもそもの話として、PWAにおける
<link>タグで読み込むmanifestの内容は、JSON形式のデータであれば、静的ファイル(manifest.json)ではなくてもよいです。<link rel="manifest" href="/manifest.json">そのため、指定のJSON形式の内容を返すAPIで対応することにしました。
リポジトリ
今回の記事は以下のリポジトリにコードがありますので、ご興味があればどうぞ。
https://github.com/Ushinji/pwa_sampleアプリケーションの環境
- ruby:2.6.2
- Rails:5.2.3
実装の紹介
今回のサンプルアプリケーションは、以下のURLがユーザー毎に
key_hashという識別子が与えられており、それに応じたProjectのURLが初期ページ(start_url)であるものとします。# ルートURL http://localhost:3000/projects/:key_hashなので、
key_hashに応じたmanifestの内容を返せばいいので、以下のようなAPIルーティングを作成しますRails.application.routes.draw do # manifestを返すAPI get "/manifest/:key_hash", to: "manifest#show", as: :manifest endこのルーティングに対応するアクションが以下の通りです。今回は
key_hashに対応するProjectを取得し、その内容に応じてstart_urlを返します。class ManifestController < ApplicationController def show project = Project.find_by(key_hash: params[:key_hash]) if project render json: { "name": "PWAサンプル", "short_name": "PWAサンプル", "start_url": project_url(project), "display": "standalone", "icons": [ { "src": "apple-touch-icon.png", "type": "image/png", "sizes": "192x192" } ], } else render json: {}, status: :not_found end end endHTMLの
<head>で以下のようにmanifestを読み込む際は、hrefにAPIのURLを指定すれば、APIにGETリクエストを行い、そのレスポンスをmanifestとして読み込んでくれます。<head> <!-- manifestの読み込み --> <link rel="manifest" href=<%= manifest_path %>> </head>終わりに
こんな感じでPWAにおける
manifestを動的に取得することができるようになりました。今後もPWAをうまく使って、ユーザーにとって使いやすいサービスを作っていきたいです。
参考文献
https://developers.google.com/web/fundamentals/web-app-manifest/?hl=ja
- 投稿日:2019-04-13T14:54:41+09:00
Cloud9 コマンドライン 一覧
- 投稿日:2019-04-13T13:10:17+09:00
Rails勉強ネタ HTMLのformは本当にGETとPOSTに制限されているのか
webを支える技術を読んでいたら、p98に以下の記述がありました。
しかし、現実に一番よく利用されているのはGETとPOSTの2つです。
これはHTMLのフォームで指定できるメソッドがGETとPOSTだけという制限に起因します。
これを読んで、「だとすると、updateアクションはどうやって実現されるのだろう??」
と思ったのですが、すぐ隣のページに書かれてました。
どうやらRailsは_methodパラメーターを使って実現させているみたいですね。実際に確認して見た
お知らせを投稿できるNoticeというModelがあるとします。
ルーティング
(当たり前ですが)updateアクションはPATCHメソッドかPUTメソッドで発動となっています。
$ rails routes|grep notice
     notices GET      /notices(.:format)                                                                  notices#index
             POST     /notices(.:format)                                                                  notices#create
  new_notice GET      /notices/new(.:format)                                                              notices#new
 edit_notice GET      /notices/:id/edit(.:format)                                                         notices#edit
      notice PATCH    /notices/:id(.:format)                                                              notices#update
             PUT      /notices/:id(.:format)                                                              notices#update
             DELETE   /notices/:id(.:format)                                                              notices#destroy
HTML
editページのformを
右クリック→ページのソースを表示で見てみます。<form class="edit_notice" id="edit_notice_18" action="/notices/18" accept-charset="UTF-8" method="post"><input name="utf8" type="hidden" value="✓" /> <input type="hidden" name="_method" value="patch" /><input type="hidden" name="authenticity_token" value="lGc0ypr/fV1WxhHZm6OS1ehZMpPj9IIgKF/8S5pm3FglyNHWxFgGLGt25AjoFb9BAINs4iRwg7VXn8eLjv9QGQ==" /> <label>お知らせ</label> <textarea name="notice[body]" id="notice_body">test</textarea> <input type="submit" name="commit" value="登録" data-disable-with="登録中…" /> </form>確かにformタグを見ると、 method="put" や method="patch"ではなく、
method="post"となっています。
そして、隠しパラメータ(hidden)に_methodパラメータを用意しているのが確認できます。↓
<input type="hidden" name="_method" value="patch" />Wiresharkでパケットキャプチャーして見た
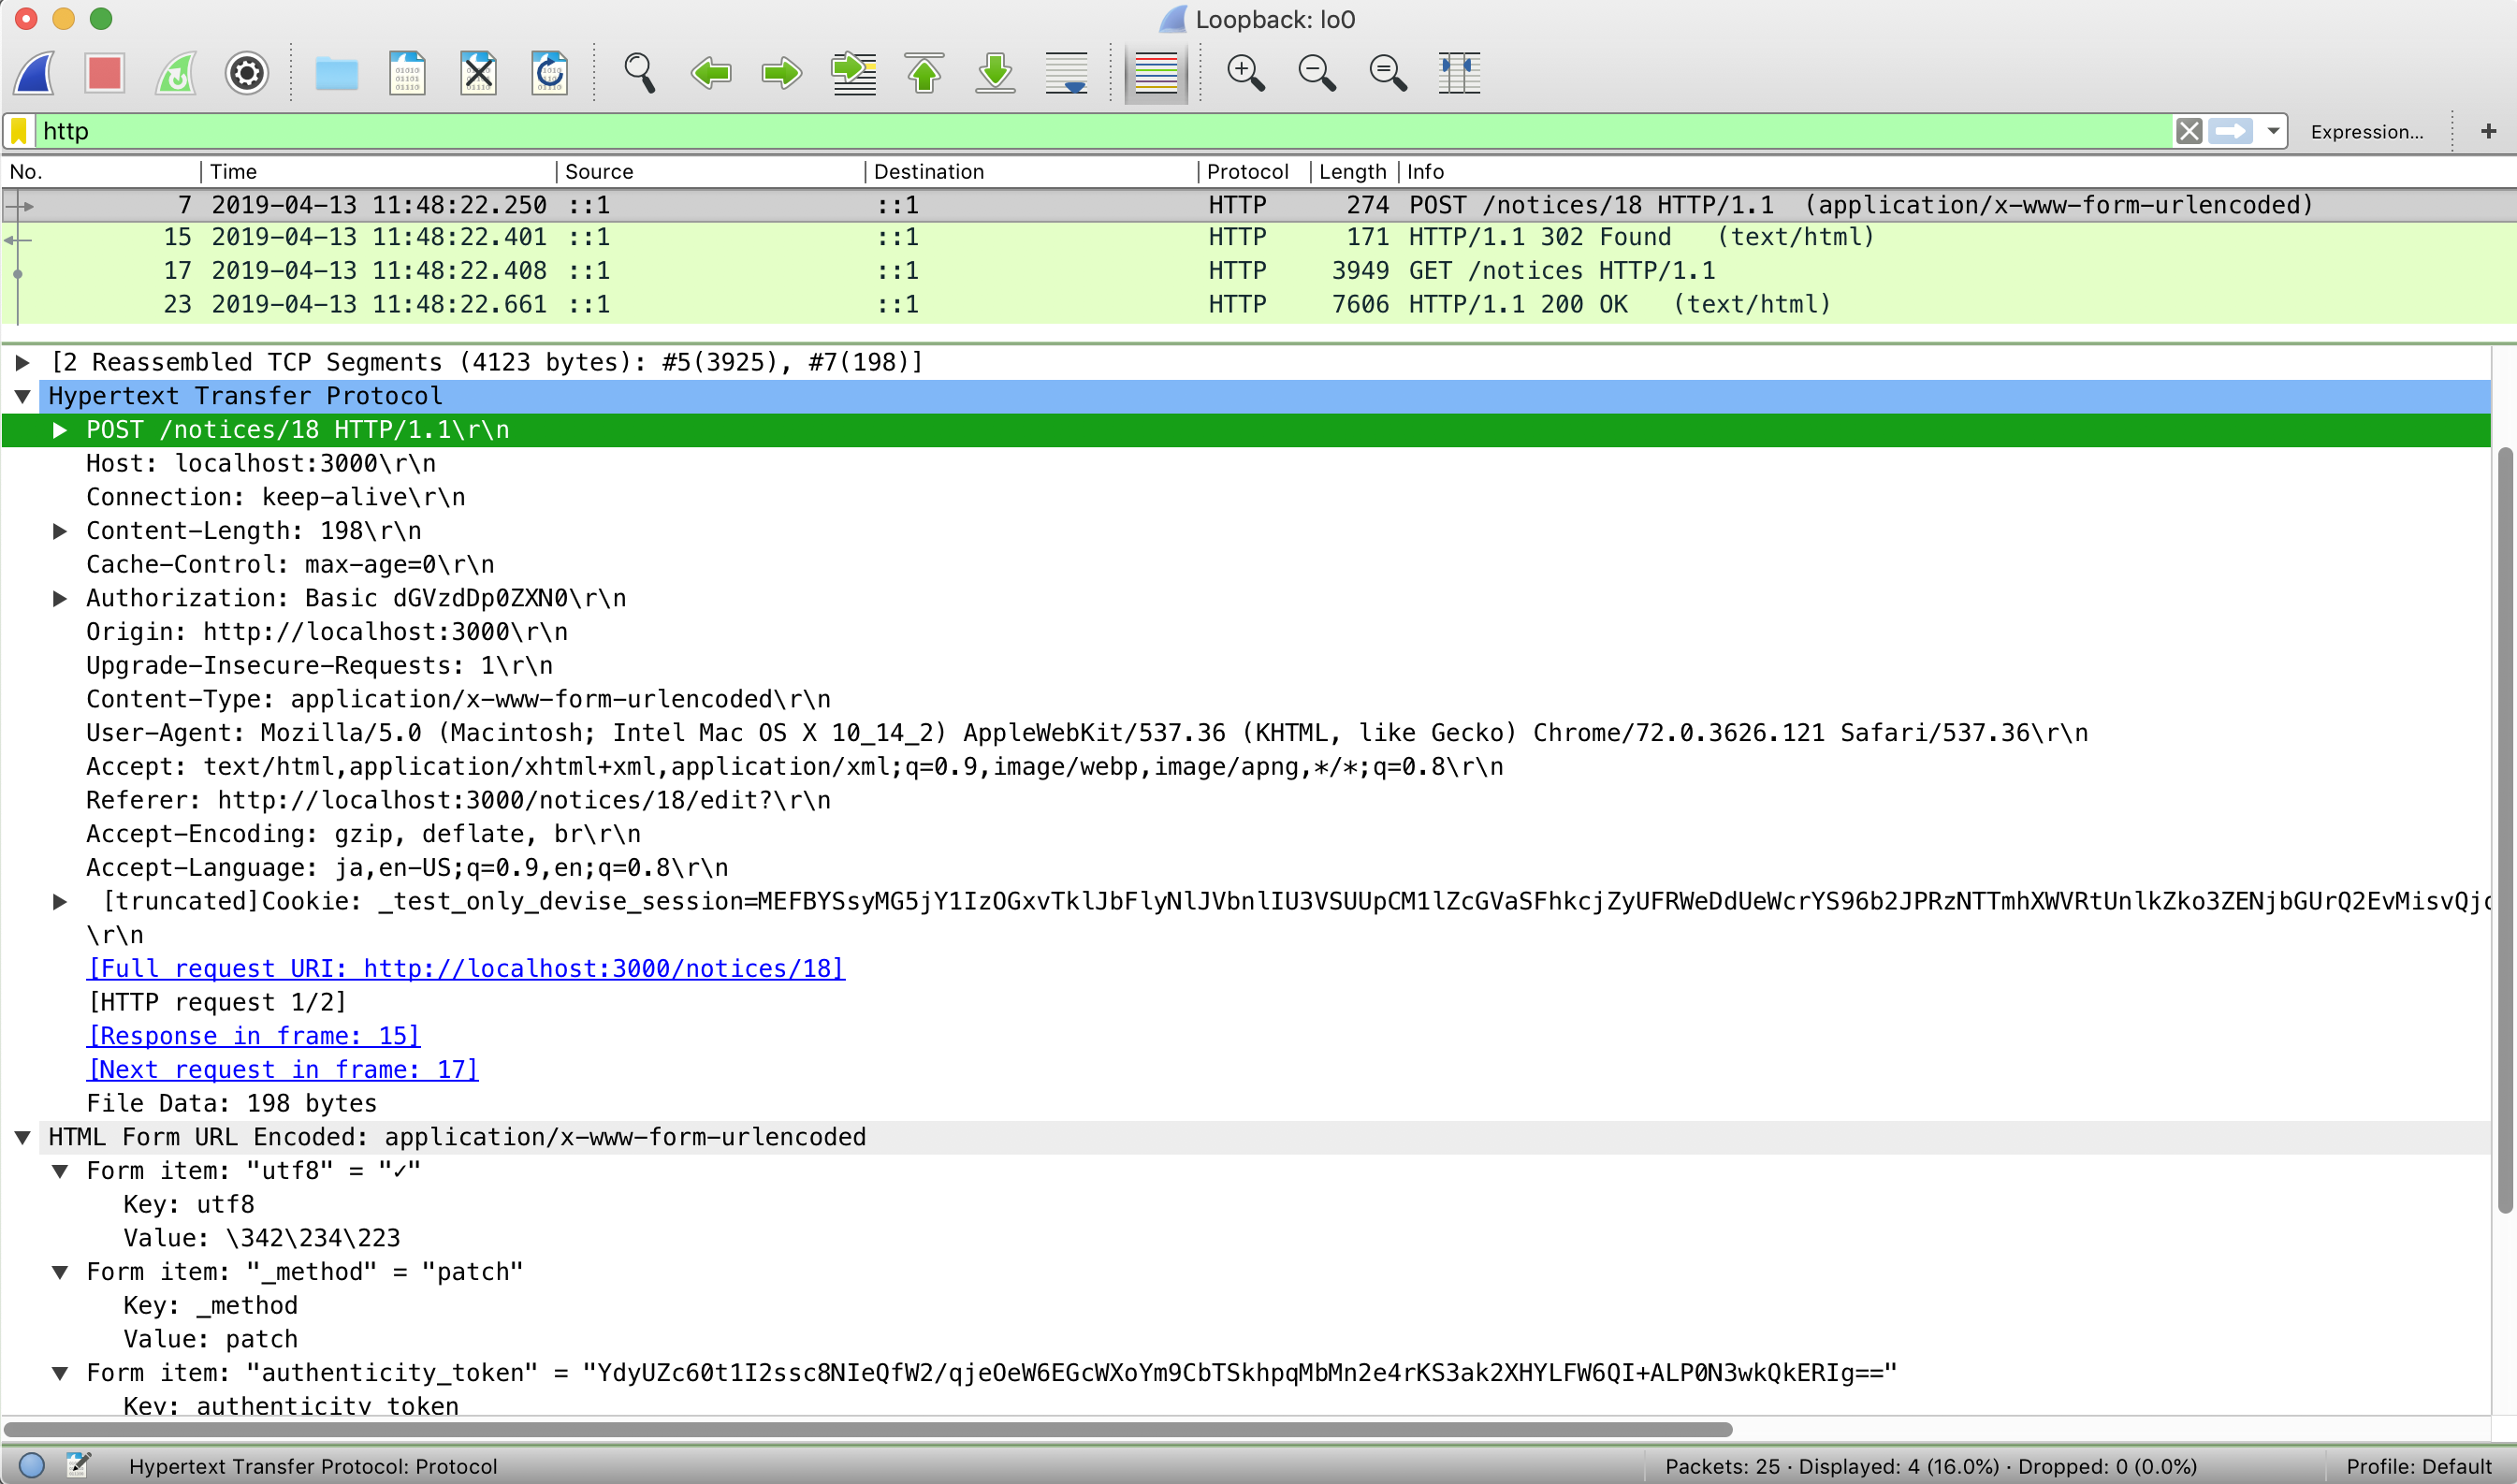
リアルなhttpパケットが見たいのでキャプってみました。
wiresharkでインターフェイスをlocalhostに指定してあげると、localhost:3000とのパケット通信をキャプチャーできます。画像はeditページでsubmitした時のhttpパケットです。
確かに
POSTメソッドのHTTPリクエストが送信されていることが確認できます。また、
HTML Form URL Encoded: application/x-www-form-urlencoded内で
Form item: "_method" = "patch"というパラメーターが確認できる。
おそらくこのパラメーターを見て"patch"メソッドが送られたこととして処理しているんだと思われる(本当はPOSTメソッドを受け取っているが)。binding.pry
updateアクション内にbinding.pryを仕込んでデバッグ。
[1] pry(#<NoticesController>)> request => #<ActionDispatch::Request:0x00007fd6cb6156d0 @env= {"CONTENT_LENGTH"=>"210", "CONTENT_TYPE"=>"application/x-www-form-urlencoded", "GATEWAY_INTERFACE"=>"CGI/1.1", "PATH_INFO"=>"/notices/15", "QUERY_STRING"=>"", "REMOTE_ADDR"=>"::1", "REMOTE_HOST"=>"::1", "REQUEST_METHOD"=>"PATCH", "REQUEST_URI"=>"http://localhost:3000/notices/15", "SCRIPT_NAME"=>"", "SERVER_NAME"=>"localhost", "SERVER_PORT"=>"3000",送信されるリアルなHTTPリクエストはPOSTメソッドですが、RailsはPATCHメソッドを受け取ったと認識しているようです。
("REQUEST_METHOD"=>"PATCH")疑問に思ったこと
今回の確認では_methodでpatchが当てがわれているが、putはどのような条件で出てくるのだろう??
(何かの条件でputのパターン、patchのパターンがあるのだろうか)
- 投稿日:2019-04-13T13:10:17+09:00
【Rails勉強ネタ】 HTMLのformは本当にGETとPOSTに制限されているのか
webを支える技術を読んでいたら、p98に以下の記述がありました。
しかし、現実に一番よく利用されているのはGETとPOSTの2つです。
これはHTMLのフォームで指定できるメソッドがGETとPOSTだけという制限に起因します。
これを読んで、「だとすると、updateアクションはどうやって実現されるのだろう??」
と思ったのですが、すぐ隣のページに書かれてました。
どうやらRailsは_methodパラメーターを使って実現させているみたいですね。実際に確認してみる
お知らせを投稿できるNoticeというModelがあるとします。
ルーティング
(当たり前ですが)updateアクションはPATCHメソッドかPUTメソッドで発動となっています。
$ rails routes|grep notice
     notices GET      /notices(.:format)                                                                  notices#index
             POST     /notices(.:format)                                                                  notices#create
  new_notice GET      /notices/new(.:format)                                                              notices#new
 edit_notice GET      /notices/:id/edit(.:format)                                                         notices#edit
      notice PATCH    /notices/:id(.:format)                                                              notices#update
             PUT      /notices/:id(.:format)                                                              notices#update
             DELETE   /notices/:id(.:format)                                                              notices#destroy
HTML
editページのformを
右クリック→ページのソースを表示で見てみます。<form class="edit_notice" id="edit_notice_18" action="/notices/18" accept-charset="UTF-8" method="post"><input name="utf8" type="hidden" value="✓" /> <input type="hidden" name="_method" value="patch" /><input type="hidden" name="authenticity_token" value="lGc0ypr/fV1WxhHZm6OS1ehZMpPj9IIgKF/8S5pm3FglyNHWxFgGLGt25AjoFb9BAINs4iRwg7VXn8eLjv9QGQ==" /> <label>お知らせ</label> <textarea name="notice[body]" id="notice_body">test</textarea> <input type="submit" name="commit" value="登録" data-disable-with="登録中…" /> </form>確かにformタグを見ると、 method="put" や method="patch"ではなく、
method="post"となっています。
そして、隠しパラメータ(hidden)に_methodパラメータを用意しているのが確認できます。↓
<input type="hidden" name="_method" value="patch" />Wiresharkでパケットキャプチャーして見た
リアルなhttpパケットが見たいのでキャプってみました。
wiresharkでインターフェイスをlocalhostに指定してあげると、localhost:3000とのパケット通信をキャプチャーできます。画像はeditページでsubmitした時のhttpパケットです。
確かに
POSTメソッドのHTTPリクエストが送信されていることが確認できます。また、
HTML Form URL Encoded: application/x-www-form-urlencoded内で
Form item: "_method" = "patch"というパラメーターが確認できる。
おそらくこのパラメーターを見て"patch"メソッドが送られたこととして処理しているんだと思われる(本当はPOSTメソッドを受け取っているが)。binding.pry
updateアクション内にbinding.pryを仕込んでデバッグ。
[1] pry(#<NoticesController>)> request => #<ActionDispatch::Request:0x00007fd6cb6156d0 @env= {"CONTENT_LENGTH"=>"210", "CONTENT_TYPE"=>"application/x-www-form-urlencoded", "GATEWAY_INTERFACE"=>"CGI/1.1", "PATH_INFO"=>"/notices/15", "QUERY_STRING"=>"", "REMOTE_ADDR"=>"::1", "REMOTE_HOST"=>"::1", "REQUEST_METHOD"=>"PATCH", "REQUEST_URI"=>"http://localhost:3000/notices/15", "SCRIPT_NAME"=>"", "SERVER_NAME"=>"localhost", "SERVER_PORT"=>"3000",送信されるリアルなHTTPリクエストはPOSTメソッドですが、RailsはPATCHメソッドを受け取ったと認識しているようです。
("REQUEST_METHOD"=>"PATCH")疑問に思ったこと
今回の確認では_methodでpatchが当てがわれているが、putはどのような条件で出てくるのだろう??
(何かの条件でputのパターン、patchのパターンがあるのだろうか)
- 投稿日:2019-04-13T13:01:45+09:00
オフラインリアルタイムどう書く E32 の実装例(ruby)
問題の名前 : きれいな四角
問題 : http://nabetani.sakura.ne.jp/hena/orde32rects/
実装リンク集 : https://qiita.com/Nabetani/items/bd16f3fa1d9e4d0d60aeで。
実装
まあ実装を。今回は珍しくコメントたくさん書いた。
ruby2.6# frozen_string_literal: true require "json" # 線分。水平線なら level が y 座標。lo と hi が左端と右端。垂直線なら x座標、上端、下端。 Seg = Struct.new( :level, :lo, :hi ) # 矩形 Rect = Struct.new( :x, :y, :right, :bottom ) do # 水平な線分の配列 def hsegs [Seg.new( y, x, right ), Seg.new( bottom, x, right ) ] end # 垂直な線分の配列 def vsegs [Seg.new( x, y, bottom), Seg.new( right, y, bottom ) ] end # 面積 def size (right-x)*(bottom-y) end # 引数がselfに完全に含まれている? def include?(c) x<=c.x && y<=c.y && c.right<=right && c.bottom<=bottom end # 引数がselfの外側にある? def no_connection?(c) c.right<=x || c.bottom<=y || right<=c.x || bottom<=c.y end # other のせいで self がきたない矩形になる? def partial_intersect?(other) ! no_connection?(other) && ! other.include?(self) end end # 解くためのクラス class Solver def initialize( rects ) @rects = rects @hsegs = rects.flat_map(&:hsegs).sort_by(&:values) @vsegs = rects.flat_map(&:vsegs).sort_by(&:values) @ys = @hsegs.map(&:level).uniq @xs = @vsegs.map(&:level).uniq end # 線分 s 上の点が全て segs のあつまりに含まれる? def seg_cover?(s, segs) non_covered = s.lo segs.select{ |e| e.level == s.level }.each do |e| non_covered = e.hi if e.lo<=non_covered && non_covered<e.hi end s.hi<=non_covered end # 引数はきれいな矩形? def clean?(c) return false if @rects.any?{ |rc| c.partial_intersect?(rc) } return false unless c.hsegs.all?{ |s| seg_cover?(s, @hsegs) } return false unless c.vsegs.all?{ |s| seg_cover?(s, @vsegs) } true end # きれいな矩形の配列を返す def cleans # 以下のループは計算量を減らせるが、サボっている @ys.combination(2).flat_map do |tb| t,b = tb.sort @xs.combination(2).flat_map do |lr| l,r = lr.sort c = Rect.new( l, t, r, b ) clean?(c) ? [c] : [] end end end end # 解く def solve( src ) rects = src.split("/").map{ |e| Rect.new(*e.chars.map{ |s| s.to_i(36) }) } Solver.new( rects ).cleans.map(&:size).sort.join(",") end if __FILE__==$PROGRAM_NAME if ARGV.size != 1 puts "usage: #{__FILE__} data.json" exit end data = JSON.parse( File.open( ARGV[0], &:read), symbolize_names:true ) data[:test_data].map{ |number:, src:, expected:| actual = solve( src ) (expected==actual).tap do |ok| p [ (ok ? "ok" : "**NG**"), number, src, expected, actual ] end }.tap{ |r| puts( r.all? ? "everything is okay" : "something wrong" ) } endGo による実装とは異なる戦略。
実装戦略
順に説明すると:
- 矩形から、垂直な線分と水平な線分を抽出する。
- 水平な線分の y座標から2個選ぶ。
- 垂直な線分の x座標から2個選ぶ。
- (2)と(3)で選んだ4座標で矩形を作る
- 作った矩形がきれいならリストに追加する
という感じ。(5) の「きれいなら」の部分が
Solver#clean?に書かれている。このメソッドの戦略は下記の通り:а. 他の矩形が邪魔をしない
б. 他の矩形によってちゃんと境界線が作られているの両方が真なら「きれい」である。
(а) は
Rect#partial_intersect?で書かれている。
(б) はSolver#seg_cover?で書かれている。(б) について説明すると。
上辺、下辺 について、以下のように「ちゃんと境界線が作られている」か否かを調べる
壱. 「まだカバーされていない場所の左端」として、上辺または下辺(以下、辺)の左端を憶えておく。
弐. 辺と同じy座標の水平線を集める(以下、線分列と呼ぶ)
参. 線分列内の線分を列挙し、線分が「まだカバーされていない場所の左端」を含んでいたら、「まだカバーされていない場所の左端」を線分の右端に変更する
肆. 「まだカバーされていない場所の左端」が辺の右端以上に右になったら「ちゃんと境界線が作られている」左辺、右辺 についても同様に調べる。
ここで重要なのは、
Solver#initializeで行われれているsort_by(&:values)。整列済みなので線分を順に調べるだけで「ちゃんと境界線が作られている」か否かがわかる。という具合。
というわけで
ソースコードコメントに書いたとおり、
Solver#cleans内の 二重combination(2).flat_mapが遅い。このループを回すだけで、矩形の数を R として、$O(R^4)$ である。工夫の余地があるが、問題のサイズが小さいことがわかっているので工夫していない。一方。地図を作っていないので、座標が百兆だったり浮動小数点数だったりしても問題ない。
トータルの計算量としては、矩形の数を R としたら $O(R^5)$ かな。
分量としては、コメントやら空行やらテストランナーを含んでぴったり百行。
地図を作る戦略よりも難しそうな印象で書き始めたけど、書いてみるとわりとシンプルになった。会場でお見せしたときには
combinationのブロック引数の順序に依存していたが、指摘を受けてちゃんとsortした。
- 投稿日:2019-04-13T12:18:37+09:00
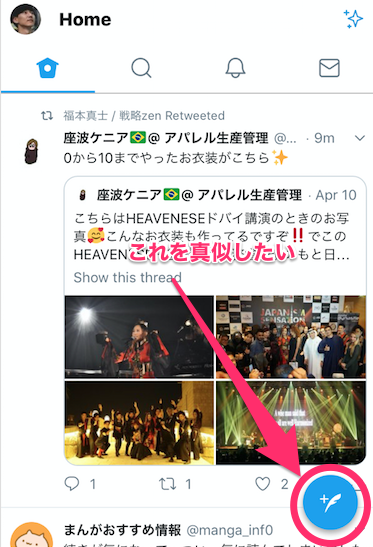
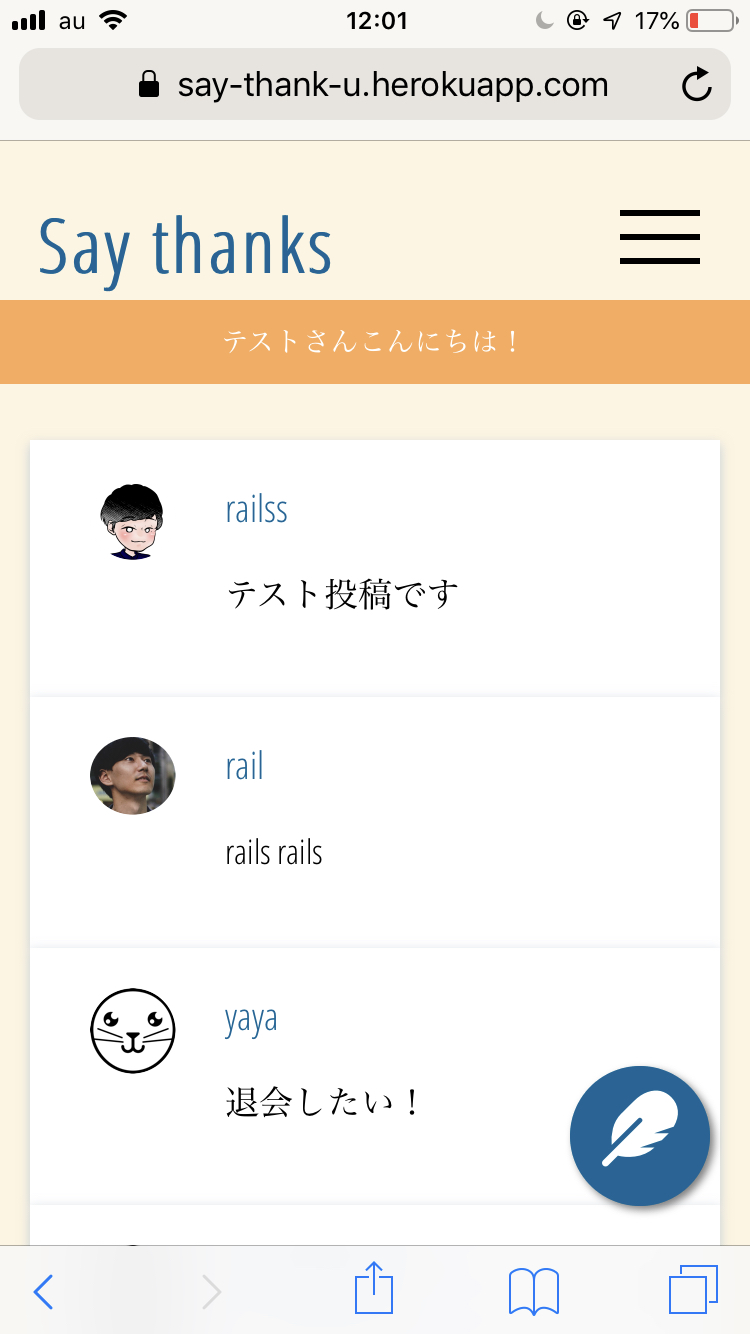
TwitterのUIを真似てモダールウィンドウで投稿できるようにしてみた
TwitterのUIで右下ある「あれ」を真似たいな、と思った訳です。
なのでやってみました↓
実装内容は以下の通りです
index.html.erbでモダールウィンドウを開くボタン用意- css記述
- javascript記述
index.html.erbでモダールウィンドウを開くボタン用意index.html.erb<!-- モダールボタン --> <div class="new-post-window"> <i class="fas fa-feather fa-2x" id='openModal'></i> </div> <!-- モダールエリア --> <section id="modalArea" class="modalArea"> <div id="modalBg" class="modalBg"></div> <div class="modalWrapper"> <div class="modalContents"> <%= form_tag("/posts/create") do %> <div class="form-wrp form-for-index"> <div class="form newpost"> <textarea name="content"></textarea> <input type="submit" value="投稿"> </div> </div> <% end %> </div> <div id="closeModal" class="closeModal"> × </div> </div> </section>今回は
form_tagの送信先を、posts/createに指定しているので、もちろんcreateメソッドをちゃんと準備しておく必要があります。あとは、モダールボタンのところでFontAwesomeを使用しているので、読み込みコードをheadタグ内に記述する必要もあります。
application.html.erb<head> <link rel="stylesheet" href="https://use.fontawesome.com/releases/v5.7.2/css/all.css" integrity="sha384-fnmOCqbTlWIlj8LyTjo7mOUStjsKC4pOpQbqyi7RrhN7udi9RwhKkMHpvLbHG9Sr" crossorigin="anonymous"> </head>css記述
home.scss.new-post-window{ border-radius: 50%; text-align: center; width: 70px; height: 70px; background: #006598; position: fixed; bottom: 20px; right: 20px; z-index: 40; box-shadow: 2px 2px 4px gray; } .fa-feather{ margin-top: 18%; width: 100%; height: 100px; color: white; } /*モダール*/ .modalArea { display: none; position: fixed; z-index: 10; /*サイトによってここの数値は調整 */ top: 0; left: 0; width: 100%; height: 100%; } .modalBg { width: 100%; height: 100%; background-color: rgba(30,30,30,0.9); } .modalWrapper { position: absolute; top: 50%; left: 50%; transform:translate(-50%,-50%); width: 70%; max-width: 500px; padding: 10px 30px; background-color: #fff; } .closeModal { position: absolute; top: 0.5rem; right: 1rem; cursor: pointer; }JacaScriptの記述・読み込み
app/assets/javascripts/nav.js$(function(){ // modal window $('#openModal').click(function(){ $('#modalArea').fadeIn(); }); $('#closeModal , #modalBg').click(function(){ $('#modalArea').fadeOut(); }); });最後にこいつを`application.html.erbで読んであげます。
application.html.erb<body> <%= javascript_include_tag "nav" %>参考
コピペで実装!モーダルウィンドウ[HTML / CSS / jQuery]
以上です!

- 投稿日:2019-04-13T10:02:29+09:00
RailsでBootstrapを使おうとしたらassets precompileで未定義エラー
はじめに
bootstrap-sassでエラーメモ
こちらの方とエラー内容、解決方法としては同じだが、以下のbootstrap-rubygemでも発生したので、書き留めておく。
bootstrap-rubygemエラー内容
先述のgemのREADME->Installation->a.Ruby on Railsに従って、bootstrapを使う設定を行い、アプリを起動したところ以下のエラーが発生した。
Undefined variable: "$alert-padding". while precompile assets解決方法
以下のようにワイルドカードでコンパイル後のcssを取り込もうとしていた。
assets.rbRails.application.config.assets.precompile += %w( *.js *.css)これがまずいらしく、以下のように取り込むcssを指定して設定する必要がある
assets.rbRails.application.config.assets.precompile += %w( *.js *application.css)
- 投稿日:2019-04-13T10:01:29+09:00
vim-rspec で Vim 上で RSpec を楽に実行する
はじめに
Vim で Rails でのアプリ開発をしているときに、RSpec でモデルのテストを回す、というようなケースがあると思います。
今までは tmux で別ペインにターミナルを立てて、該当の spec を直接コマンド実行していたのですが、なかなか面倒でした。
そんな中、vim-rspec という Vim プラグインが非常に便利だったので、紹介します。
vim-rspec とは
vim-rspec とは、Vim 上で動作する軽量の RSpec ランナーです。
よく使うキーマップを設定しておくことで、Vim 上で Rspec を実行することが出来ます。
使い方
インストール
まず、vim-rspec をインストールします。(以下は dein.vim でのインストール例です)
.vimrccall dein#add('thoughtbot/vim-rspec')キーマップ設定
次に、それぞれの関数を実行するキーマップを設定します。
.vimrc" RSpec.vim mappings map <Leader>t :call RunCurrentSpecFile()<CR> map <Leader>s :call RunNearestSpec()<CR> map <Leader>l :call RunLastSpec()<CR> map <Leader>a :call RunAllSpecs()<CR>それぞれの関数の概要は以下の通りです。
関数 概要 RunCurrentSpecFile() 現在開いている spec ファイル全体を実行 RunNearestSpec() 現在開いている spec ファイルのカーソルに一番近いブロックの spec を実行 RunLastSpec() 前回実行した spec を実行 RunAllSpecs() プロジェクトのすべての spec を実行 実行コマンド設定
次に、実際に実行するコマンドを設定します。
.vimrclet g:rspec_command = "!bin/rspec {spec}"
{spec}内に実際に実行する spec ファイル名が入ります。外部コマンドを実行するので、最初に!をつけます。僕の場合は、spring-commands-rspecを使っていたので、
bin/rspecとしています。実行
上記設定後、編集中の spec ファイル上で例えば
<Leader>t実行すると、その RSpec ファイルを実行し、Quickfix ウインドウ上で結果を表示してくれます。vim-dispatch で更に便利に
tmux などの仮想ターミナルを使っている方は、vim-dispatch と組み合わせると更に便利かもしれません。
vim-dispatch は tmux、screen、iTerm、Windows などの仮想ターミナル上で、非同期にテストやコンパイルを実行できるプラグインです。
利用イメージは作者の動画を見るのがわかりやすいです。
使い方としては、まずvim-dispatch をインストールし、
.vimrccall dein#add('tpope/vim-dispatch')rspec を以下のように修正するだけで OK です。
.vimrclet g:rspec_command = "Dispatch bin/rspec {spec}"この設定で RSpec を実行すると、tmux であれば別ペインを開き、非同期で spec を実行してくれます。実行中も Vim 上で操作ができるので便利です。
おわりに
こちらで 開発中何度も RSpec を実行するのが非常に楽になりました。よかったら試してみてください。
他の使い方は vim-rspec の READMEを読むと良いと思います。参考
- 投稿日:2019-04-13T02:43:42+09:00
WSL上にRuby on railsの環境を構築する
gitの導入
sudo apt-get install gitrbenvの導入
rbenv:Rubyのバージョンを管理するツール
git clone https://github.com/sstephenson/rbenv.git ~/.rbenv
git clone https://github.com/sstephenson/ruby-build.git ~/.rbenv/plugins/ruby-build
git clone https://github.com/rkh/rbenv-update.git ~/.rbenv/plugins/rbenv-update
パスを通す
echo 'export PATH="$HOME/.rbenv/bin:$PATH"' >> ~/.bash_profile
echo 'eval "$(rbenv init -)"' >> ~/.bash_profile
Rubyの導入
2019/04/13時点で安定版の2.6.2を導入
rbenv install 2.6.2うまくいかない
Inspect or clean up the working tree at /tmp/ruby-build.20190413020215.166
Results logged to /tmp/ruby-build.20190413020215.166.log

Last 10 log lines:
checking for ruby... false
checking build system type... x86_64-pc-linux-gnu
checking host system type... x86_64-pc-linux-gnu
checking target system type... x86_64-pc-linux-gnu
checking for gcc... no
checking for cc... no
checking for cl.exe... no
configure: error: in `/tmp/ruby-build.20190413020215.166/ruby-2.6.2':
configure: error: no acceptable C compiler found in $PATH
See `config.log' for more details
Cコンパイラが無いせいらしい
インストールsudo apt-get install gccまたエラー
Inspect or clean up the working tree at /tmp/ruby-build.20190413022147.4755
Results logged to /tmp/ruby-build.20190413022147.4755.log

Last 10 log lines:
checking for _setjmp as a macro or function... yes
checking for sigsetjmp as a macro or function... no
checking for setjmp type... __builtin_setjmp
checking for prefix of external symbols... NONE
checking pthread.h usability... yes
checking pthread.h presence... yes
checking for pthread.h... yes
checking if make is GNU make... ./configure: line 29155: make: command not found
no
checking for safe null command for make... configure: error: no candidate for safe null command
makeコマンドがないみたい
インストールsudo apt-get install makeまたエラー
Inspect or clean up the working tree at /tmp/ruby-build.20190413022903.11877
Results logged to /tmp/ruby-build.20190413022903.11877.log

Last 10 log lines:
The Ruby openssl extension was not compiled.
The Ruby readline extension was not compiled.
The Ruby zlib extension was not compiled.
ERROR: Ruby install aborted due to missing extensions
Try running `apt-get install -y libssl-dev libreadline-dev zlib1g-dev` to fetch missing dependencies.
エラー文を見て必要そうなパッケージをインストール
sudo apt-get install -y libssl-dev libreadline-dev zlib1g-devいけた
$ rbenv install 2.6.2
Downloading ruby-2.6.2.tar.bz2...
-> https://cache.ruby-lang.org/pub/ruby/2.6/ruby-2.6.2.tar.bz2
Installing ruby-2.6.2...
Installed ruby-2.6.2 to /home/yutauchino/.rbenv/versions/2.6.2
これだけだとrbenvディレクトリにのみRuby 2.6.2が適用されているので、環境全体に適用する
rbenv global 2.6.2
ruby -v
ruby 2.6.2p47 (2019-03-13 revision 67232) [x86_64-linux]
railsの導入
gemは導入済み
gem -v
3.0.3
インストール
gem install rails以上