- 投稿日:2019-04-03T23:37:55+09:00
[RUBY] %記法
%記法
「’ ‘」や「” “」に対するエスケープを省略するためのもの。
%w
文字列の配列の("")
などを省略することができる。例:
puts ["test1", "test2", "test3"]%wを使えばスッキリ書くことができる。
puts %w(test1 test2 test3)また、%Wと%wの違いは以下の通り。
%W→変数の式展開あり
%w→変数の式展開なし%と%Q
「” “」(ダブルクォーテーション)の代替をする。
例:
puts "\"テスト\" \"サンプル\""puts %("テスト","サンプル")さいごに
まぁ、%wがめちゃ便利だということがわかりました。
- 投稿日:2019-04-03T22:46:04+09:00
ルーティングを制するものはRailsを制す!
ルーティングを制するものはRailsを制す!
目次
・rootとなるURLを指定する
・パスごとに個々のルーティングを設定する
・resources
・id以外のパスを指定するparamオプション
・単数 resource
・resourcesのネスト
・アクションの絞り込み
・onlyオプション
・exceprオプション
・アクションの追加
・member
・collection
・ルーティングをまとめる
・namespace
・scope
・module
・おわりにrootとなるURLを指定する
routes.rbroot to: "toppages#index"生成されるパスPrefix Verb URI Pattern Controller#Action root GET / toppages#indexパスごとに個々のルーティングを設定する
routes.rbget 'users/:id', to: 'users#show', as: 'users'生成されるパスPrefix Verb URI Pattern Controller#Action users GET /users/:id(.:format) users#show
asオプションを使うことでルート名(Prefix)を指定することができます。resources
RESTfulなURLを生成できる
resourcesはルーティングの基本です。routes.rbresources :users生成されるパスPrefix Verb URI Pattern Controller#Action users GET /users(.:format) users#index POST /users(.:format) users#create new_user GET /users/new(.:format) users#new edit_user GET /users/:id/edit(.:format) users#edit user GET /users/:id(.:format) users#show PATCH /users/:id(.:format) users#update PUT /users/:id(.:format) users#update DELETE /users/:id(.:format) users#destroy複数のリソースを同時に定義することもできます。
resources :users, :tweets, :photosid以外のパスを指定するparamオプション
showやeditなどのidを指定するアクションでは
paramオプションを使ってid以外の値をパスに指定することもできます。
例えば、idの代わりにuser_nameを使う場合は以下のようになります。routes.rbresources :users, param: :user_name生成されるパスPrefix Verb URI Pattern Controller#Action users GET /users(.:format) users#index POST /users(.:format) users#create new_user GET /users/new(.:format) users#new edit_user GET /users/:user_name/edit(.:format) users#edit user GET /users/:user_name(.:format) users#show PATCH /users/:user_name(.:format) users#update PUT /users/:user_name(.:format) users#update DELETE /users/:user_name(.:format) users#destroy単数 resource
idの振り分けが不要なページでは単数形のresourceでRESTfulなURLを生成できます。
routes.rbresource :users生成されるパスPrefix Verb URI Pattern Controller#Action new_users GET /users/new(.:format) users#new edit_users GET /users/edit(.:format) users#edit users GET /users(.:format) users#show PATCH /users(.:format) users#update PUT /users(.:format) users#update DELETE /users(.:format) users#destroy POST /users(.:format) users#createresourcesのネスト
resourcesブロックの中に別のresourcesをネストさせた場合のルーティングは以下のようになります。usersのRESTfulなURLが生成される他にネストされたtweetsのRESTfulなURLも生成されます。ネストさせる場合も必要に応じて単数resourceを使いましょう。routes.rbresources :users do resources :tweets end生成されるパスPrefix Verb URI Pattern Controller#Action user_tweets GET /users/:user_id/tweets(.:format) tweets#index POST /users/:user_id/tweets(.:format) tweets#create new_user_tweet GET /users/:user_id/tweets/new(.:format) tweets#new edit_user_tweet GET /users/:user_id/tweets/:id/edit(.:format) tweets#edit user_tweet GET /users/:user_id/tweets/:id(.:format) tweets#show PATCH /users/:user_id/tweets/:id(.:format) tweets#update PUT /users/:user_id/tweets/:id(.:format) tweets#update DELETE /users/:user_id/tweets/:id(.:format) tweets#destroy users GET /users(.:format) users#index POST /users(.:format) users#create new_user GET /users/new(.:format) users#new edit_user GET /users/:id/edit(.:format) users#edit user GET /users/:id(.:format) users#show PATCH /users/:id(.:format) users#update PUT /users/:id(.:format) users#update DELETE /users/:id(.:format) users#destroyアクションの絞り込み
resourcesを使うとRESTfulなURLを簡単に生成できますが、必ずしも全てのアクションが必要とは限りません。不要なデフォルトアクションはオプションで絞り込みましょう。only オプション
使用するデフォルトアクションが少ない場合はonly オプションが便利です。
routes.rbresources :users, only: [:index, :show]生成されるパスPrefix Verb URI Pattern Controller#Action users GET /users(.:format) users#index user GET /users/:id(.:format) users#showexcept オプション
使用するデフォルトアクションが多い場合はexcept オプションが便利です。
routes.rbresources :users, except: [:show, :destroy]生成されるパスPrefix Verb URI Pattern Controller#Action users GET /users(.:format) users#index POST /users(.:format) users#create new_user GET /users/new(.:format) users#new edit_user GET /users/:id/edit(.:format) users#edit user PATCH /users/:id(.:format) users#update PUT /users/:id(.:format) users#updateアクションの追加
Rails標準のindex, show, new, edit, create, update, destroy 以外のアクションを追加する場合には
memberまたはcollectionを使います。
両者にはmemberではidを伴うパスが生成され、collectionではidのないパスが生成されるという違いがあります。member
memberはidを伴うパスの生成に使います。routes.rbresources :users do member do get :search end end追加で生成されるパスPrefix Verb URI Pattern Controller#Action search_user GET /users/:id/search(.:format) users#search ~省略~collection
idの指定をしないパスの生成には
collectionを使います。routes.rbresources :users do collection do get :search end end追加で生成されるパスPrefix Verb URI Pattern Controller#Action search_users GET /users/search(.:format) users#search ~省略~ルーティングをまとめる
続いてルーティングをまとめていきます。ルーティングをまとめることでアプリケーション全体の構成も整理されます。
namespace
ルーティングを名前空間
namespaceのブロックで囲むとパスとコントローラーを指定のディレクトリ配下におくことができます。routes.rbnamespace :admin do resources :users end生成されるパスPrefix Verb URI Pattern Controller#Action admin_users GET /admin/users(.:format) admin/users#index POST /admin/users(.:format) admin/users#create new_admin_user GET /admin/users/new(.:format) admin/users#new edit_admin_user GET /admin/users/:id/edit(.:format) admin/users#edit admin_user GET /admin/users/:id(.:format) admin/users#show PATCH /admin/users/:id(.:format) admin/users#update PUT /admin/users/:id(.:format) admin/users#update DELETE /admin/users/:id(.:format) admin/users#destroyscope
パスのみを指定のディレクトリ配下におく場合は
scopeを使います。routes.rbscope '/admin' do resources :users end生成されるパスPrefix Verb URI Pattern Controller#Action users GET /admin/users(.:format) users#index POST /admin/users(.:format) users#create new_user GET /admin/users/new(.:format) users#new edit_user GET /admin/users/:id/edit(.:format) users#edit user GET /admin/users/:id(.:format) users#show PATCH /admin/users/:id(.:format) users#update PUT /admin/users/:id(.:format) users#update DELETE /admin/users/:id(.:format) users#destroymodule
コントローラーのみを指定のディレクトリ配下におく場合は
moduleを使います。routes.rbscope module: :admin do resources :users end生成されるパスPrefix Verb URI Pattern Controller#Action users GET /users(.:format) admin/users#index POST /users(.:format) admin/users#create new_user GET /users/new(.:format) admin/users#new edit_user GET /users/:id/edit(.:format) admin/users#edit user GET /users/:id(.:format) admin/users#show PATCH /users/:id(.:format) admin/users#update PUT /users/:id(.:format) admin/users#update DELETE /users/:id(.:format) admin/users#destroyおわりに
細かいルーティングのオプションは他にもありますが、まずはここで紹介したものが組み合わせて使えると良いと思います。ありがとうございました。
- 投稿日:2019-04-03T22:46:04+09:00
Rails よく使うルーティングまとめ
ルーティングを制するものはRailsを制す!
目次
・rootとなるURLを指定する
・パスごとに個々のルーティングを設定する
・resources
・id以外のパスを指定するparamオプション
・単数 resource
・resourcesのネスト
・アクションの絞り込み
・onlyオプション
・exceprオプション
・アクションの追加
・member
・collection
・ルーティングをまとめる
・namespace
・scope
・module
・おわりにrootとなるURLを指定する
routes.rbroot to: "toppages#index"生成されるパスPrefix Verb URI Pattern Controller#Action root GET / toppages#indexパスごとに個々のルーティングを設定する
routes.rbget 'users/:id', to: 'users#show', as: 'users'生成されるパスPrefix Verb URI Pattern Controller#Action users GET /users/:id(.:format) users#show
asオプションを使うことでルート名(Prefix)を指定することができます。resources
RESTfulなURLを生成できる
resourcesはルーティングの基本です。routes.rbresources :users生成されるパスPrefix Verb URI Pattern Controller#Action users GET /users(.:format) users#index POST /users(.:format) users#create new_user GET /users/new(.:format) users#new edit_user GET /users/:id/edit(.:format) users#edit user GET /users/:id(.:format) users#show PATCH /users/:id(.:format) users#update PUT /users/:id(.:format) users#update DELETE /users/:id(.:format) users#destroy複数のリソースを同時に定義することもできます。
resources :users, :tweets, :photosid以外のパスを指定するparamオプション
showやeditなどのidを指定するアクションでは
paramオプションを使ってid以外の値をパスに指定することもできます。
例えば、idの代わりにuser_nameを使う場合は以下のようになります。routes.rbresources :users, param: :user_name生成されるパスPrefix Verb URI Pattern Controller#Action users GET /users(.:format) users#index POST /users(.:format) users#create new_user GET /users/new(.:format) users#new edit_user GET /users/:user_name/edit(.:format) users#edit user GET /users/:user_name(.:format) users#show PATCH /users/:user_name(.:format) users#update PUT /users/:user_name(.:format) users#update DELETE /users/:user_name(.:format) users#destroy単数 resource
idの振り分けが不要なページでは単数形のresourceでRESTfulなURLを生成できます。
routes.rbresource :users生成されるパスPrefix Verb URI Pattern Controller#Action new_users GET /users/new(.:format) users#new edit_users GET /users/edit(.:format) users#edit users GET /users(.:format) users#show PATCH /users(.:format) users#update PUT /users(.:format) users#update DELETE /users(.:format) users#destroy POST /users(.:format) users#createresourcesのネスト
resourcesブロックの中に別のresourcesをネストさせた場合のルーティングは以下のようになります。usersのRESTfulなURLが生成される他にネストされたtweetsのRESTfulなURLも生成されます。ネストさせる場合も必要に応じて単数resourceを使いましょう。routes.rbresources :users do resources :tweets end生成されるパスPrefix Verb URI Pattern Controller#Action user_tweets GET /users/:user_id/tweets(.:format) tweets#index POST /users/:user_id/tweets(.:format) tweets#create new_user_tweet GET /users/:user_id/tweets/new(.:format) tweets#new edit_user_tweet GET /users/:user_id/tweets/:id/edit(.:format) tweets#edit user_tweet GET /users/:user_id/tweets/:id(.:format) tweets#show PATCH /users/:user_id/tweets/:id(.:format) tweets#update PUT /users/:user_id/tweets/:id(.:format) tweets#update DELETE /users/:user_id/tweets/:id(.:format) tweets#destroy users GET /users(.:format) users#index POST /users(.:format) users#create new_user GET /users/new(.:format) users#new edit_user GET /users/:id/edit(.:format) users#edit user GET /users/:id(.:format) users#show PATCH /users/:id(.:format) users#update PUT /users/:id(.:format) users#update DELETE /users/:id(.:format) users#destroyアクションの絞り込み
resourcesを使うとRESTfulなURLを簡単に生成できますが、必ずしも全てのアクションが必要とは限りません。不要なデフォルトアクションはオプションで絞り込みましょう。only オプション
使用するデフォルトアクションが少ない場合はonly オプションが便利です。
routes.rbresources :users, only: [:index, :show]生成されるパスPrefix Verb URI Pattern Controller#Action users GET /users(.:format) users#index user GET /users/:id(.:format) users#showexcept オプション
使用するデフォルトアクションが多い場合はexcept オプションが便利です。
routes.rbresources :users, except: [:show, :destroy]生成されるパスPrefix Verb URI Pattern Controller#Action users GET /users(.:format) users#index POST /users(.:format) users#create new_user GET /users/new(.:format) users#new edit_user GET /users/:id/edit(.:format) users#edit user PATCH /users/:id(.:format) users#update PUT /users/:id(.:format) users#updateアクションの追加
Rails標準のindex, show, new, edit, create, update, destroy 以外のアクションを追加する場合には
memberまたはcollectionを使います。
両者にはmemberではidを伴うパスが生成され、collectionではidのないパスが生成されるという違いがあります。member
memberはidを伴うパスの生成に使います。routes.rbresources :users do member do get :search end end追加で生成されるパスPrefix Verb URI Pattern Controller#Action search_user GET /users/:id/search(.:format) users#search ~省略~collection
idの指定をしないパスの生成には
collectionを使います。routes.rbresources :users do collection do get :search end end追加で生成されるパスPrefix Verb URI Pattern Controller#Action search_users GET /users/search(.:format) users#search ~省略~ルーティングをまとめる
続いてルーティングをまとめていきます。ルーティングをまとめることでアプリケーション全体の構成も整理されます。
namespace
ルーティングを名前空間
namespaceのブロックで囲むとパスとコントローラーを指定のディレクトリ配下におくことができます。routes.rbnamespace :admin do resources :users end生成されるパスPrefix Verb URI Pattern Controller#Action admin_users GET /admin/users(.:format) admin/users#index POST /admin/users(.:format) admin/users#create new_admin_user GET /admin/users/new(.:format) admin/users#new edit_admin_user GET /admin/users/:id/edit(.:format) admin/users#edit admin_user GET /admin/users/:id(.:format) admin/users#show PATCH /admin/users/:id(.:format) admin/users#update PUT /admin/users/:id(.:format) admin/users#update DELETE /admin/users/:id(.:format) admin/users#destroyscope
パスのみを指定のディレクトリ配下におく場合は
scopeを使います。routes.rbscope '/admin' do resources :users end生成されるパスPrefix Verb URI Pattern Controller#Action users GET /admin/users(.:format) users#index POST /admin/users(.:format) users#create new_user GET /admin/users/new(.:format) users#new edit_user GET /admin/users/:id/edit(.:format) users#edit user GET /admin/users/:id(.:format) users#show PATCH /admin/users/:id(.:format) users#update PUT /admin/users/:id(.:format) users#update DELETE /admin/users/:id(.:format) users#destroymodule
コントローラーのみを指定のディレクトリ配下におく場合は
moduleを使います。routes.rbscope module: :admin do resources :users end生成されるパスPrefix Verb URI Pattern Controller#Action users GET /users(.:format) admin/users#index POST /users(.:format) admin/users#create new_user GET /users/new(.:format) admin/users#new edit_user GET /users/:id/edit(.:format) admin/users#edit user GET /users/:id(.:format) admin/users#show PATCH /users/:id(.:format) admin/users#update PUT /users/:id(.:format) admin/users#update DELETE /users/:id(.:format) admin/users#destroyおわりに
細かいルーティングのオプションは他にもありますが、まずはここで紹介したものが組み合わせて使えると良いと思います。ありがとうございました。
- 投稿日:2019-04-03T22:07:27+09:00
Railsで「投稿お気に入り追加機能」を実装する
プログラミングスクールの発展的な課題で、【Railsで「投稿お気に入り追加機能」」の実装】がありましたが、難易度が高く理解するのに数十時間を要しため、簡単に整理します。
なお、ユーザーUserモデルと投稿Micropostモデルの中間テーブルをFavoriteモデルとして定義し、進めていきます。
説明は、基本的に「投稿お気に入り追加機能」の実装に絞ります。
モデルを作成する
Userモデルの作成
Userモデルはログイン機能を実装することを前提にしています。
rails g model User name:string email:string password_digest:string下記のマイグレーションファイルが作成されます。
class CreateUsers < ActiveRecord::Migration[5.0]
  def change
    create_table :users do |t|
      t.string :name
      t.string :email
      t.string :password_digest

      t.timestamps
    end
  end
end
Micropostモデルの作成
MicropostモデルはUserモデルに関連づけることを前提にしています。
rails g model Micropost content:string user:references下記のマイグレーションファイルが作成されます。
class CreateMicroposts < ActiveRecord::Migration[5.0]
  def change
    create_table :microposts do |t|
      t.string :content
      t.references :user, foreign_key: true

      t.timestamps
    end
  end
end
Favoriteモデルの作成
rails g model Favorite user:references micropost:references下記のマイグレーションファイルさ作成されるので、
t.index [:user_id, :micropost_id], unique: trueを追加します。これは、
user_idとmicropost_idの組み合わせが重複して保存されないようにするためです。class CreateFavorites < ActiveRecord::Migration[5.0] def change create_table :favorites do |t| t.references :user, foreign_key: true t.references :micropost, foreign_key: true t.timestamps t.index [:user_id, :micropost_id], unique: true #ここを追記 end end end関連モデルを追記する
Favoriteモデルの確認
favorite.rbclass Favorite < ApplicationRecord belongs_to :user belongs_to :micropost endMicropostモデルの追記
has_many :favoritesでMicropostモデルは複数のFavoriteモデルに関連づけられることを定義します。
foreign_keyにはFavariteモデル作成時に追加したt.index [:user_id, :micropost_id], unique: trueにおけるmicropost_idを追加します。
has_many :users, through: :favoritesでは、MicropostモデルはFavoriteモデルを介して複数のUserモデルに関連づけられることを定義します。micropost.rbclass Micropost < ApplicationRecord belongs_to :user validates :content, presence: true, length: { maximum:255 } #お気に入り機能追加用中間テーブル追加 has_many :favorites, foreign_key: 'micropost_id', dependent: :destroy has_many :users, through: :favorites endUserモデルの追記
Userモデルの追記は複雑で、この投稿お気に入り追加機能の一番重要な部分です。
Userモデルは
has_many :microposts複数のMicropostモデルに紐づけられます。次に、Micropostモデル追記時と同様に、
has_many :favoritesでUserモデルは複数のFavoriteモデルに関連づけられることを定義します。ここがかなり重要で、
has_many :favposts, through: :favorites, source: :micropostは、UserモデルがFavoriteモデルを介して複数のMicropostモデルと関連づけます。しかし、すでにhas_many :micropostsが使用されているため、favpostsと定義し、source: :micropostによって情報元はmicropostだと補足することで中間モデルで定義されたbelongs_to :micropostと関連づけます。user.rbclass User < ApplicationRecord before_save { self.email.downcase! } validates :name, presence: true, length: { maximum: 50} validates :email, presence: true, length: { maximum: 50}, format: { with: /\A[\w+\-.]+@[a-z\d\-.]+\.[a-z]+\z/i }, uniqueness: { case_sensitive: false } has_secure_password #Userモデルは複数のMicropostモデルに関連づけられる has_many :microposts #お気に入り機能追加用 has_many :favorites has_many :favposts, through: :favorites, source: :micropost投稿お気に入り追加メソッドを追加
like(micropost)メソッドでは、favoritesテーブルに保存されているFavoriteモデル作成時に定義したmicropost_idを投稿一覧のインスタンスmicropostのidであるmicropost.idと照合(find)し、見つからなければ新規に作成(create)します。
unlike(micropost)メソッドでは、favoritesテーブルに保存されているFavoriteモデル作成時に定義したmicropost_idを投稿一覧のインスタンスmicropostのidであるmicropost.idと照合(find)し、削除します。likeメソッド違いcreateされない点がポイントです。
favpost?メソッドでは、お気に入り追加した投稿が、投稿一覧の投稿一覧のインスタンスmicropostを含むかどうかを判定しています。含んでいればtrue含んでいなければfalseを返すメソッドです。user.rbclass User < ApplicationRecord #お気に入り追加 def like(micropost) favorites.find_or_create_by(micropost_id: micropost.id) end #お気に入り削除 def unlike(micropost) favorite = favorites.find_by(micropost_id: micropost.id) favorite.destroy if favorite end #お気にり登録判定 def favpost?(micropost) self.favposts.include?(micropost) end endrails console で確認
user = User.find(1)
micropost = Micropost.find(1)

#favoritesテーブルに保存されるか確認
user.like(1)

#trueが返り値となるか確認
user.favpost?(micropost)

#favoritesテーブルから削除されるか確認
user.unlike(1)
お気に入り追加の確認
お気に入り登録判定の確認
user1.favpost?(micropost1)で=> trueが表示されたら成功です。user1.favpost?(micropost1)お気に入り削除の確認
Favorite.allでuser_idとmicropost_idの組み合わせが表示されなくなったら成功です。user1.unlike(micropost1) Favorite.allcontrollerの作成
favoritesコントローラー
このコントローラーは投稿一覧に「お気に入り登録」もしくは「お気に入り削除」機能を追加します。
そのため、元となる投稿一覧のインスタンスが
@micropost.each do |micropost|で取り出されたmicropostである点が超重要です。決して@が付く@micropostでは無いのです。
user.rbで定義したlikeメソッドを用いて、micropostをお気に入り登録します。favorites_controller.rbclass FavoritesController < ApplicationController def create #@micropostとはならないよ micropost = Micropost.find(params[:micropost_id]) current_user.like(micropost) flash[:success] = 'お気に入り登録をしました。' redirect_back(fallback_location: root_path) end def destroy micropost = Micropost.find(params[:micropost_id]) current_user.unlike(micropost) flash[:success] = 'お気に入り登録を解除しました。' redirect_back(fallback_location: root_path) end endusersコントローラー
likesメソッドでuserがお気に入り登録した投稿の一覧を取得します。user.rbで定義したお気に入り登録した投稿である
favpostsを用いて@favpostsを取得します。users_controller.rbclass UsersController < ApplicationController before_action :require_user_logged_in, only: [:index, :show, :followings, :followers, :likes] def index @users = User.all.page(params[:page]) end def show @user = User.find(params[:id]) @microposts = @user.microposts.order('created_at DESC').page(params[:page]) counts(@user) end def new @user = User.new end def edit end def create @user = User.new(user_params) if @user.save flash[:success] = 'ユーザ登録しました' redirect_to @user else flash[:danger] = 'ユーザの登録に失敗しました' render :new end end def followings @user = User.find(params[:id]) @followings = @user.followings.page(params[:page]) counts(@user) end def followers @user = User.find(params[:id]) @followers = @user.followers.page(params[:page]) counts(@user) end #お気に入り投稿一覧取得 def likes @user = User.find(params[:id]) @favposts = @user.favposts.page(params[:page]) counts(@user) end private def user_params params.require(:user).permit(:name, :email, :password, :password_confirmation) end endmicropostsコントローラー
お気に入り投稿機能と直接の関連性はないため説明は省略します。
microposts_controller.rbclass MicropostsController < ApplicationController before_action :require_user_logged_in before_action :correct_user, only: [:destroy] def create @micropost = current_user.microposts.build(micropost_params) if @micropost.save flash[:success] = 'メッセージの投稿に成功しました' redirect_to root_url else @microposts = current_user.feed_microposts.order('created_at DESC').page(params[:page]) flash.now[:danger] = 'メッセージの投稿に失敗しました' render 'toppages/index' end end def destroy @micropost.destroy flash[:success] = 'メッセージを削除しました。' redirect_back(fallback_location: root_path) end private def micropost_params params.require(:micropost).permit(:content) end def correct_user @micropost = current_user.microposts.find_by(id: params[:id]) unless @micropost redirect_to root_url end end endrouteの作成
下記のURLに対応するようにルートファイルを設定します。
/users/:id/likes お気に入り投稿一覧取得アクション
/favorites お気に入り登録アクション
/favorites/:id お気に入り登録削除アクション
お気に入り投稿一覧取得アクションは、
/users/:id/likesとするため、member doを用いてresources内に定義します。routes.rbRails.application.routes.draw do root to: 'toppages#index' get 'login', to: 'sessions#new' post 'login', to: 'sessions#create' delete 'logout', to: 'sessions#destroy' get 'signup', to: 'users#new' resources :users, only: [:index, :show, :new, :create] do member do get :followings get :followers get :likes end end resources :microposts, only: [:create, :destroy] resources :relationships, only: [:create, :destroy] resources :favorites, only: [:create, :destroy] endviewの作成
作成するアプリケーションによって、ビューファイルの作成はかなり変わると思いますので、あくまで一例ということで。
viewの作成では、renderを用いるなどする中で、ローカル変数やインスタンス変数に何が代入されているのかを注意することがポイントになります。
お気に入りボタンページ
user.rbで定義した
favpost?(micropost)メソットを用いてお気に入り登録の判定します。favorites/_like_button.html.erb<% if current_user.favpost?(micropost) %> <%= form_for(current_user.favorites.find_by(micropost_id: micropost.id), html: { method: :delete }) do |f| %> <%= hidden_field_tag :micropost_id, micropost.id %> <%= f.submit 'お気に入り登録解除', class: 'btn btn-danger' %> <% end %> <% else %> <%= form_for(current_user.favorites.build) do |f| %> <%= hidden_field_tag :micropost_id, micropost.id %> <%= f.submit 'お気に入り登録', class: 'btn btn-primary' %> <% end %> <% end %>お気に入り投稿一覧取得ページ
render 'microposts/microposts', microposts: @favpostsによってmicropostの一覧取得ページとの共通化を図っています。renderメソッドは<%= render 'パーシャルのパス', パーシャルで使う変数名: 変数に代入する値 %>なので、変数に代入する値にはusers_controller.rbで定義した@favpostを指定します。users/show.html.erb<div class="row"> <aside class="col-xs-4"> <div class="panel panel-default"> <div class="panel-heading"> <h3 class="panel-title"><%= @user.name %></h3> </div> <div class="panel-body"> <img class="media-object img-rounded img-responsive" src="<%= gravatar_url(@user, { size: 500 }) %>" alt=""> </div> </div> <%= render 'relationships/follow_button', user: @user %> </aside> <div class="col-xs-8"> <ul class="nav nav-tabs nav-justified"> <li class="<%= 'active' if current_page?(user_path(@user)) %>"><%= link_to user_path(@user) do %>Microposts <span class="badge"><%= @count_microposts %></span><% end %></li> <li class="<%= 'active' if current_page?(followings_user_path(@user)) %>"><%= link_to followings_user_path(@user) do %>Followings <span class="badge"><%= @count_followings %></span><% end %></li> <li class="<%= 'active' if current_page?(followers_user_path(@user)) %>"><%= link_to followers_user_path(@user) do %>Followers <span class="badge"><%= @count_followers %></span><% end %></li> <li class="<%= 'active' if current_page?(likes_user_path(@user)) %>"><%= link_to likes_user_path(@user) do %>Likes<span class="badge"><%= @count_favposts %></span><% end %></li> </ul> <%= render 'microposts/microposts', microposts: @favposts %> # </div> </div>投稿一覧ページ(お気に入りボタン設置)
お気に入りボタンを投稿一覧ページに設定するため、renderメソッドを用いて
<%= render 'favorites/like_button', micropost: micropost %>とします。
microposts.each do |micropost|として抽出されたmicropostに対してお気に入りボタンを1つずつ結びつけるので@不要でmicropost: micropostになります。microposts/_microposts.html.erb<ul class="media-list"> <% microposts.each do |micropost| %> <li class="media"> <div class="media-left"> <img class="media-object img-rounded" src="<%= gravatar_url(micropost.user, { size: 50 }) %>" alt=""> </div> <div class="media-body"> <div> <%= link_to micropost.user.name, user_path(micropost.user) %> <span class="text-muted">posted at <%= micropost.created_at %></span> </div> <div> <p><%= micropost.content %></p> </div> <div> <%= link_to "Delete", micropost, method: :delete, data: { confirm: "You sure?" }, class: 'btn btn-danger btn-xs' %> </div> <!--お気に入りボタン登録--> <div> <%= render 'favorites/like_button', micropost: micropost %> </div> </div> </li> <% end %> <%= paginate microposts %> </ul>Railsで「投稿お気に入り追加機能」を実装する方法まとめ
以上が、Railsで「投稿お気に入り追加機能」を実装する方法でした。
まとめることで、改めてわかりきっていないことを調べるきっかけになり良い経験となりました。
- 投稿日:2019-04-03T21:32:05+09:00
deviseの導入と実装
deviseの導入と実装
Gemfileにgemを追加
Gemfilegem 'devise'bundle installを実行し、サーバーを再起動
$ bundle install
$ rails s
deviseの設定ファイルを作成
$ rails g devise:installuserモデルを作成
$ rails g devise user
$ bundle exec rake db:migrate
 #マイグレーションファイルに必要なカラム(name等)を設定した後に実行
deviseのビューファイルを作成
$ rails g devise:viewsuserのサインアップ時に名前を登録できるようにする
deviseでは初期状態でサインアップ時にメールアドレスとパスワードのみを受け取るようにストロングパラメーターが設定してあるので、
追加のパラメーターを許可したい場合は、application_controllerでbefore_actionにconfigure_permitted_parametersメソッドを設定する。application_controller.rbbefore_action :configure_permitted_parameters, if: :devise_controller? protected def configure_permitted_parameters devise_parameter_sanitizer.permit(:sign_up, keys: [:name]) enduser編集機能を追加する
①ルーティング
routes.rbresources :users, only: [:edit, :update]②users_controller作成
$ rails g controller users③edit,updateの定義
users_controllerclass UsersController < ApplicationController def edit end def update if current_user.update(user_params) redirect_to root_path else render :edit #更新できない場合は編集画面に戻る end end private def user_params params.require(:user).permit(:name, :email) end end④ビューファイル作成
- 投稿日:2019-04-03T20:03:04+09:00
プログラミング学習記録46〜あと少し〜
今日やったこと
- ブログ執筆
- Railsで作っているWebアプリのいいね!欄の投稿をいいね!した順に表示されるように調整
インプット→アウトプットの流れを加速させるためにブログ書きました。
プログラミング学習記録をQiitaに45日連続で投稿してわかったこと
Qiitaにプログラミングの学習記録を投稿して気づいたこと、考えたことについてまとめています。
どんな形であれ、インプットした内容を自分の言葉でアウトプットするのは大事だなと改めて思いました。
1日1記事は難しくても、1日1000字ならなんとかいけそうなので、まずはそこから習慣化していこうと思います。
Qiitaで学習記録の投稿を続けてみた結果、「続けよう!」と思うよりも「途切れさせたくない!」という状態になった方が続けられることがわかりました。
なので、ブログ執筆もその状態にするために、その日書いたブログの記事数と文字数を記録していこうと思います。
とりあえずグーグルのスプレットシートで記録していきます。
Railsで作ってきたアプリもようやく形になりそうです。いいね!欄は投稿順にできたので、あとはユーザーページの投稿を作成順に並び替えて、投稿詳細画面に「投稿一覧」に戻るボタンをつけたら、一旦完成ということにしたいと思います。
ユーザーページの投稿はいいね!欄と若干構造が違うので同じようにはいかないですが、もう一度Progateのスライドを見て、並び替えれたらと思います。
ということで、明日からも引き続きプログラミング学習頑張ります。
おわり
- 投稿日:2019-04-03T19:17:39+09:00
Railsチュートリアル三章あたりから、テストの際にエラーが出る方々へ...
cloud9環境にてRailsチュートリアルを学習中、テスト自体は無事に検証できるものの、毎回下記のようなエラーが出て気になっていました。
今後も同じ経験をされる方がいらっしゃると思い、共有しようと思います!
まずは私自身のコンソールに生じていたエラーです。
ec2-user:~/environment/sample_app (master) $ rails t
Running via Spring preloader in process 19388
Run options: --seed 51796

# Running:

..................

Finished in 0.564856s, 31.8665 runs/s, 63.7331 assertions/s.

18 runs, 36 assertions, 0 failures, 0 errors, 0 skips
Traceback (most recent call last):
        33: from -e:1:in `<main>'
        32: from /home/ec2-user/.rvm/rubies/ruby-2.6.0/lib/ruby/2.6.0/rubygems/core_ext/kernel_require.rb:54:in `require'
        31: from /home/ec2-user/.rvm/rubies/ruby-2.6.0/lib/ruby/2.6.0/rubygems/core_ext/kernel_require.rb:54:in `require'
        30: from /home/ec2-user/.rvm/gems/ruby-2.6.0/gems/spring-2.0.2/lib/spring/application/boot.rb:19:in `<top (required)>'
        29: from /home/ec2-user/.rvm/gems/ruby-2.6.0/gems/spring-2.0.2/lib/spring/application.rb:135:in `run'
        28: from /home/ec2-user/.rvm/gems/ruby-2.6.0/gems/spring-2.0.2/lib/spring/application.rb:135:in `loop'
        27: from /home/ec2-user/.rvm/gems/ruby-2.6.0/gems/spring-2.0.2/lib/spring/application.rb:141:in `block in run'
        26: from /home/ec2-user/.rvm/gems/ruby-2.6.0/gems/spring-2.0.2/lib/spring/application.rb:171:in `serve'
        25: from /home/ec2-user/.rvm/gems/ruby-2.6.0/gems/spring-2.0.2/lib/spring/application.rb:171:in `fork'
        24: from /home/ec2-user/.rvm/gems/ruby-2.6.0/gems/minitest-5.10.3/lib/minitest.rb:63:in `block in autorun'
        23: from /home/ec2-user/.rvm/gems/ruby-2.6.0/gems/minitest-5.10.3/lib/minitest.rb:141:in `run'
        22: from /home/ec2-user/.rvm/gems/ruby-2.6.0/gems/minitest-5.10.3/lib/minitest.rb:687:in `report'
        21: from /home/ec2-user/.rvm/gems/ruby-2.6.0/gems/minitest-5.10.3/lib/minitest.rb:687:in `each'
        20: from /home/ec2-user/.rvm/gems/ruby-2.6.0/gems/guard-minitest-2.4.4/lib/guard/minitest/reporter.rb:10:in `report'
        19: from /home/ec2-user/.rvm/gems/ruby-2.6.0/gems/guard-minitest-2.4.4/lib/guard/minitest/notifier.rb:31:in `notify'
        18: from /home/ec2-user/.rvm/gems/ruby-2.6.0/gems/guard-compat-1.2.1/lib/guard/compat/plugin.rb:113:in `notify'
        17: from /home/ec2-user/.rvm/gems/ruby-2.6.0/gems/guard-2.13.0/lib/guard/notifier.rb:31:in `notify'
        16: from /home/ec2-user/.rvm/gems/ruby-2.6.0/gems/guard-2.13.0/lib/guard/notifier.rb:11:in `connect'
        15: from /home/ec2-user/.rvm/gems/ruby-2.6.0/gems/notiffany-0.1.1/lib/notiffany/notifier.rb:42:in `connect'
        14: from /home/ec2-user/.rvm/gems/ruby-2.6.0/gems/notiffany-0.1.1/lib/notiffany/notifier.rb:42:in `new'
        13: from /home/ec2-user/.rvm/gems/ruby-2.6.0/gems/notiffany-0.1.1/lib/notiffany/notifier.rb:87:in `initialize'
        12: from /home/ec2-user/.rvm/gems/ruby-2.6.0/gems/notiffany-0.1.1/lib/notiffany/notifier.rb:198:in `_activate'
        11: from /home/ec2-user/.rvm/gems/ruby-2.6.0/gems/notiffany-0.1.1/lib/notiffany/notifier.rb:180:in `_detect_or_add_notifiers'
        10: from /home/ec2-user/.rvm/gems/ruby-2.6.0/gems/notiffany-0.1.1/lib/notiffany/notifier/detected.rb:59:in `detect'
         9: from /home/ec2-user/.rvm/gems/ruby-2.6.0/gems/notiffany-0.1.1/lib/notiffany/notifier/detected.rb:59:in `each'
         8: from /home/ec2-user/.rvm/gems/ruby-2.6.0/gems/notiffany-0.1.1/lib/notiffany/notifier/detected.rb:60:in `block in detect'
         7: from /home/ec2-user/.rvm/gems/ruby-2.6.0/gems/notiffany-0.1.1/lib/notiffany/notifier/detected.rb:60:in `detect'
         6: from /home/ec2-user/.rvm/gems/ruby-2.6.0/gems/notiffany-0.1.1/lib/notiffany/notifier/detected.rb:60:in `each'
         5: from /home/ec2-user/.rvm/gems/ruby-2.6.0/gems/notiffany-0.1.1/lib/notiffany/notifier/detected.rb:62:in `block (2 levels) in detect'
         4: from /home/ec2-user/.rvm/gems/ruby-2.6.0/gems/notiffany-0.1.1/lib/notiffany/notifier/detected.rb:100:in `_add'
         3: from /home/ec2-user/.rvm/gems/ruby-2.6.0/gems/notiffany-0.1.1/lib/notiffany/notifier/detected.rb:100:in `new'
         2: from /home/ec2-user/.rvm/gems/ruby-2.6.0/gems/notiffany-0.1.1/lib/notiffany/notifier/base.rb:59:in `initialize'
         1: from /home/ec2-user/.rvm/gems/ruby-2.6.0/gems/notiffany-0.1.1/lib/notiffany/notifier/tmux.rb:69:in `_check_available'
/home/ec2-user/.rvm/gems/ruby-2.6.0/gems/notiffany-0.1.1/lib/notiffany/notifier/tmux/client.rb:12:in `version': undefined method `[]' for nil:NilClass (NoMethodError)
長くなってしまいましたが、、、
_check_available'
/home/ec2-user/.rvm/gems/ruby-2.6.0/gems/notiffany-0.1.1/lib/notiffany/notifier/tmux/client.rb:12:in `version': undefined method `[]' for nil:NilClass (NoMethodError)
一番下のこの辺り↑が怪しそう。。。
結論から述べると、「tmux」の部分が原因です。
まずtmux(てぃーまっくす)とは何者なのか・・・
Answer.
tmuxは端末多重化ソフトウェアつまり、1つのターミナルで複数の擬似ターミナルを起動することが可能になります。
複数のターミナルを立ち上げずとも、tmux上のターミナルを切り替えてオペレーションすることを可能とするソフトウェアです。cloud9は一つのターミナルで複数のターミナルに切り替えることが出来ますよね。。。
そこで、とりあえずtmuxをインストールすることに。。。
$ sudo yum install -y tmuxLoaded plugins: priorities, update-motd, upgrade-helper amzn-main | 2.1 kB 00:00:00 amzn-updates | 2.5 kB 00:00:00 epel/x86_64/metalink | 13 kB 00:00:00 epel | 4.7 kB 00:00:00 1060 packages excluded due to repository priority protections Resolving Dependencies --> Running transaction check ---> Package tmux.x86_64 0:1.8-4.12.amzn1 will be installed --> Finished Dependency Resolution Dependencies Resolved ============================================================================================================ Package Arch Version Repository Size ============================================================================================================ Installing: tmux x86_64 1.8-4.12.amzn1 amzn-main 254 k Transaction Summary ============================================================================================================ Install 1 Package Total download size: 254 k Installed size: 543 k Downloading packages: tmux-1.8-4.12.amzn1.x86_64.rpm | 254 kB 00:00:00 Running transaction check Running transaction test Transaction test succeeded Running transaction Installing : tmux-1.8-4.12.amzn1.x86_64 1/1 Verifying : tmux-1.8-4.12.amzn1.x86_64 1/1 Installed: tmux.x86_64 0:1.8-4.12.amzn1 Complete!どうやらインストール出来ました!
再度、テストを実行してみると。。。??
ec2-user:~/environment/sample_app (master) $ rails t
Running via Spring preloader in process 19512
Run options: --seed 63909

# Running:

..................

Finished in 0.582820s, 30.8843 runs/s, 61.7686 assertions/s.

18 runs, 36 assertions, 0 failures, 0 errors, 0 skips
エラー文が消え、スッキリとテストを実行できるようになりました!!
- 投稿日:2019-04-03T19:15:18+09:00
モックオブジェクトを作成する際のexpectとallowの違い
Rspecを書いている際にexpectとallowの違いにつまづいたので、まとめたいと思います。
allowの使い方
allow(Hoge::Grpc) .to receive(:call)RSpecでは
allow(モックオブジェクト).to receive(メソッド名)の形で、モックに呼び出し可能なメソッドを設定することができます。因みにこの場合だと、
Hoge::Grpcというモックオブジェクトを作って、callメソッドを設定しています。メソッド名はシンボルで記述することに注意してください。
expectの使い方
expect(Hoge::Grpc).to receive(:call)
expect(モックオブジェクト).to receive(メソッド名)で、そのメソッドが呼び出されたかを確認することができます。あれ?両者の違いは・・・??
では違いは??
結論から言うと・・・
・allowを使って呼び出し可能なメソッドをセットアップしたときは、メソッドが呼び出されなくてもテストが通る。

・expectを使うと、そのメソッドが呼び出されないとテスト失敗になる。
ということです。
つまり、モックを使うときは単に実装を置き換えたいだけなのか?
それともメソッドの呼び出しも検証したいのか?に応じて
allowとexpectを使い分ける必要があるということですね。
withで引数の確認をすることも可能
expect(Hoge::Grpc).to receive(:call).with('Alice')因みに、withをつけることで引数の中身の確認をすることが可能になります。
ここだと
Aliceですね。仮に引数に複数の値を渡したいときは、「,」で区切ってあげればOK
expect(Hoge::Grpc).to receive(:call).with('Alice', 'alice@example.com')こんな感じですね!
【参考記事】
https://qiita.com/jnchito/items/640f17e124ab263a54dd
https://qiita.com/sesame/items/8d4419da0afde3bb845f
- 投稿日:2019-04-03T19:15:18+09:00
モック使用時におけるexpectとallowの違い
Rspecでモックを作っている際に
expectとallowの違いにつまづいたので、まとめたいと思います。
モックの作成
mock_obj = double('mock name')doubleメソッドでモックを作成することができます。
引数で渡す文字列(この場合だと
mock name)は任意ですが、設定することでテスト失敗時にメッセージで表示されるので、名前を付けといた方がわかりやすいかもです。allowの使い方
allow(Hoge::Grpc) .to receive(:call)RSpecでは
allow(モックオブジェクト).to receive(メソッド名)の形で、モックに呼び出し可能なメソッドを設定することができます。因みにこの場合だと、
Hoge::Grpcというモックオブジェクトに、callメソッドを設定しています。メソッド名はシンボルで記述することに注意してください。
expectの使い方
expect(Hoge::Grpc).to receive(:call)
expect(モックオブジェクト).to receive(メソッド名)で、そのメソッドが呼び出されたかを確認することができます。あれ?両者の違いは・・・??
では違いは??
結論から言うと・・・
・allowを使って呼び出し可能なメソッドをセットアップしたときは、メソッドが呼び出されなくてもテストが通る。

・expectを使うと、そのメソッドが呼び出されないとテスト失敗になる。
ということです。
つまり、モックを使うときは単に実装を置き換えたいだけなのか?
それともメソッドの呼び出しも検証したいのか?に応じて
allowとexpectを使い分ける必要があるということですね。
withで引数の確認をすることも可能
expect(Hoge::Grpc).to receive(:call).with('Alice')因みに、withをつけることで引数の中身の確認をすることが可能になります。
ここだと
Aliceですね。仮に引数に複数の値を渡したいときは、「,」で区切ってあげればOK
expect(Hoge::Grpc).to receive(:call).with('Alice', 'alice@example.com')こんな感じですね!
【参考記事】
https://qiita.com/jnchito/items/640f17e124ab263a54dd
https://qiita.com/sesame/items/8d4419da0afde3bb845f
- 投稿日:2019-04-03T18:37:06+09:00
git add パス⇦を打つのがめんどくさい件

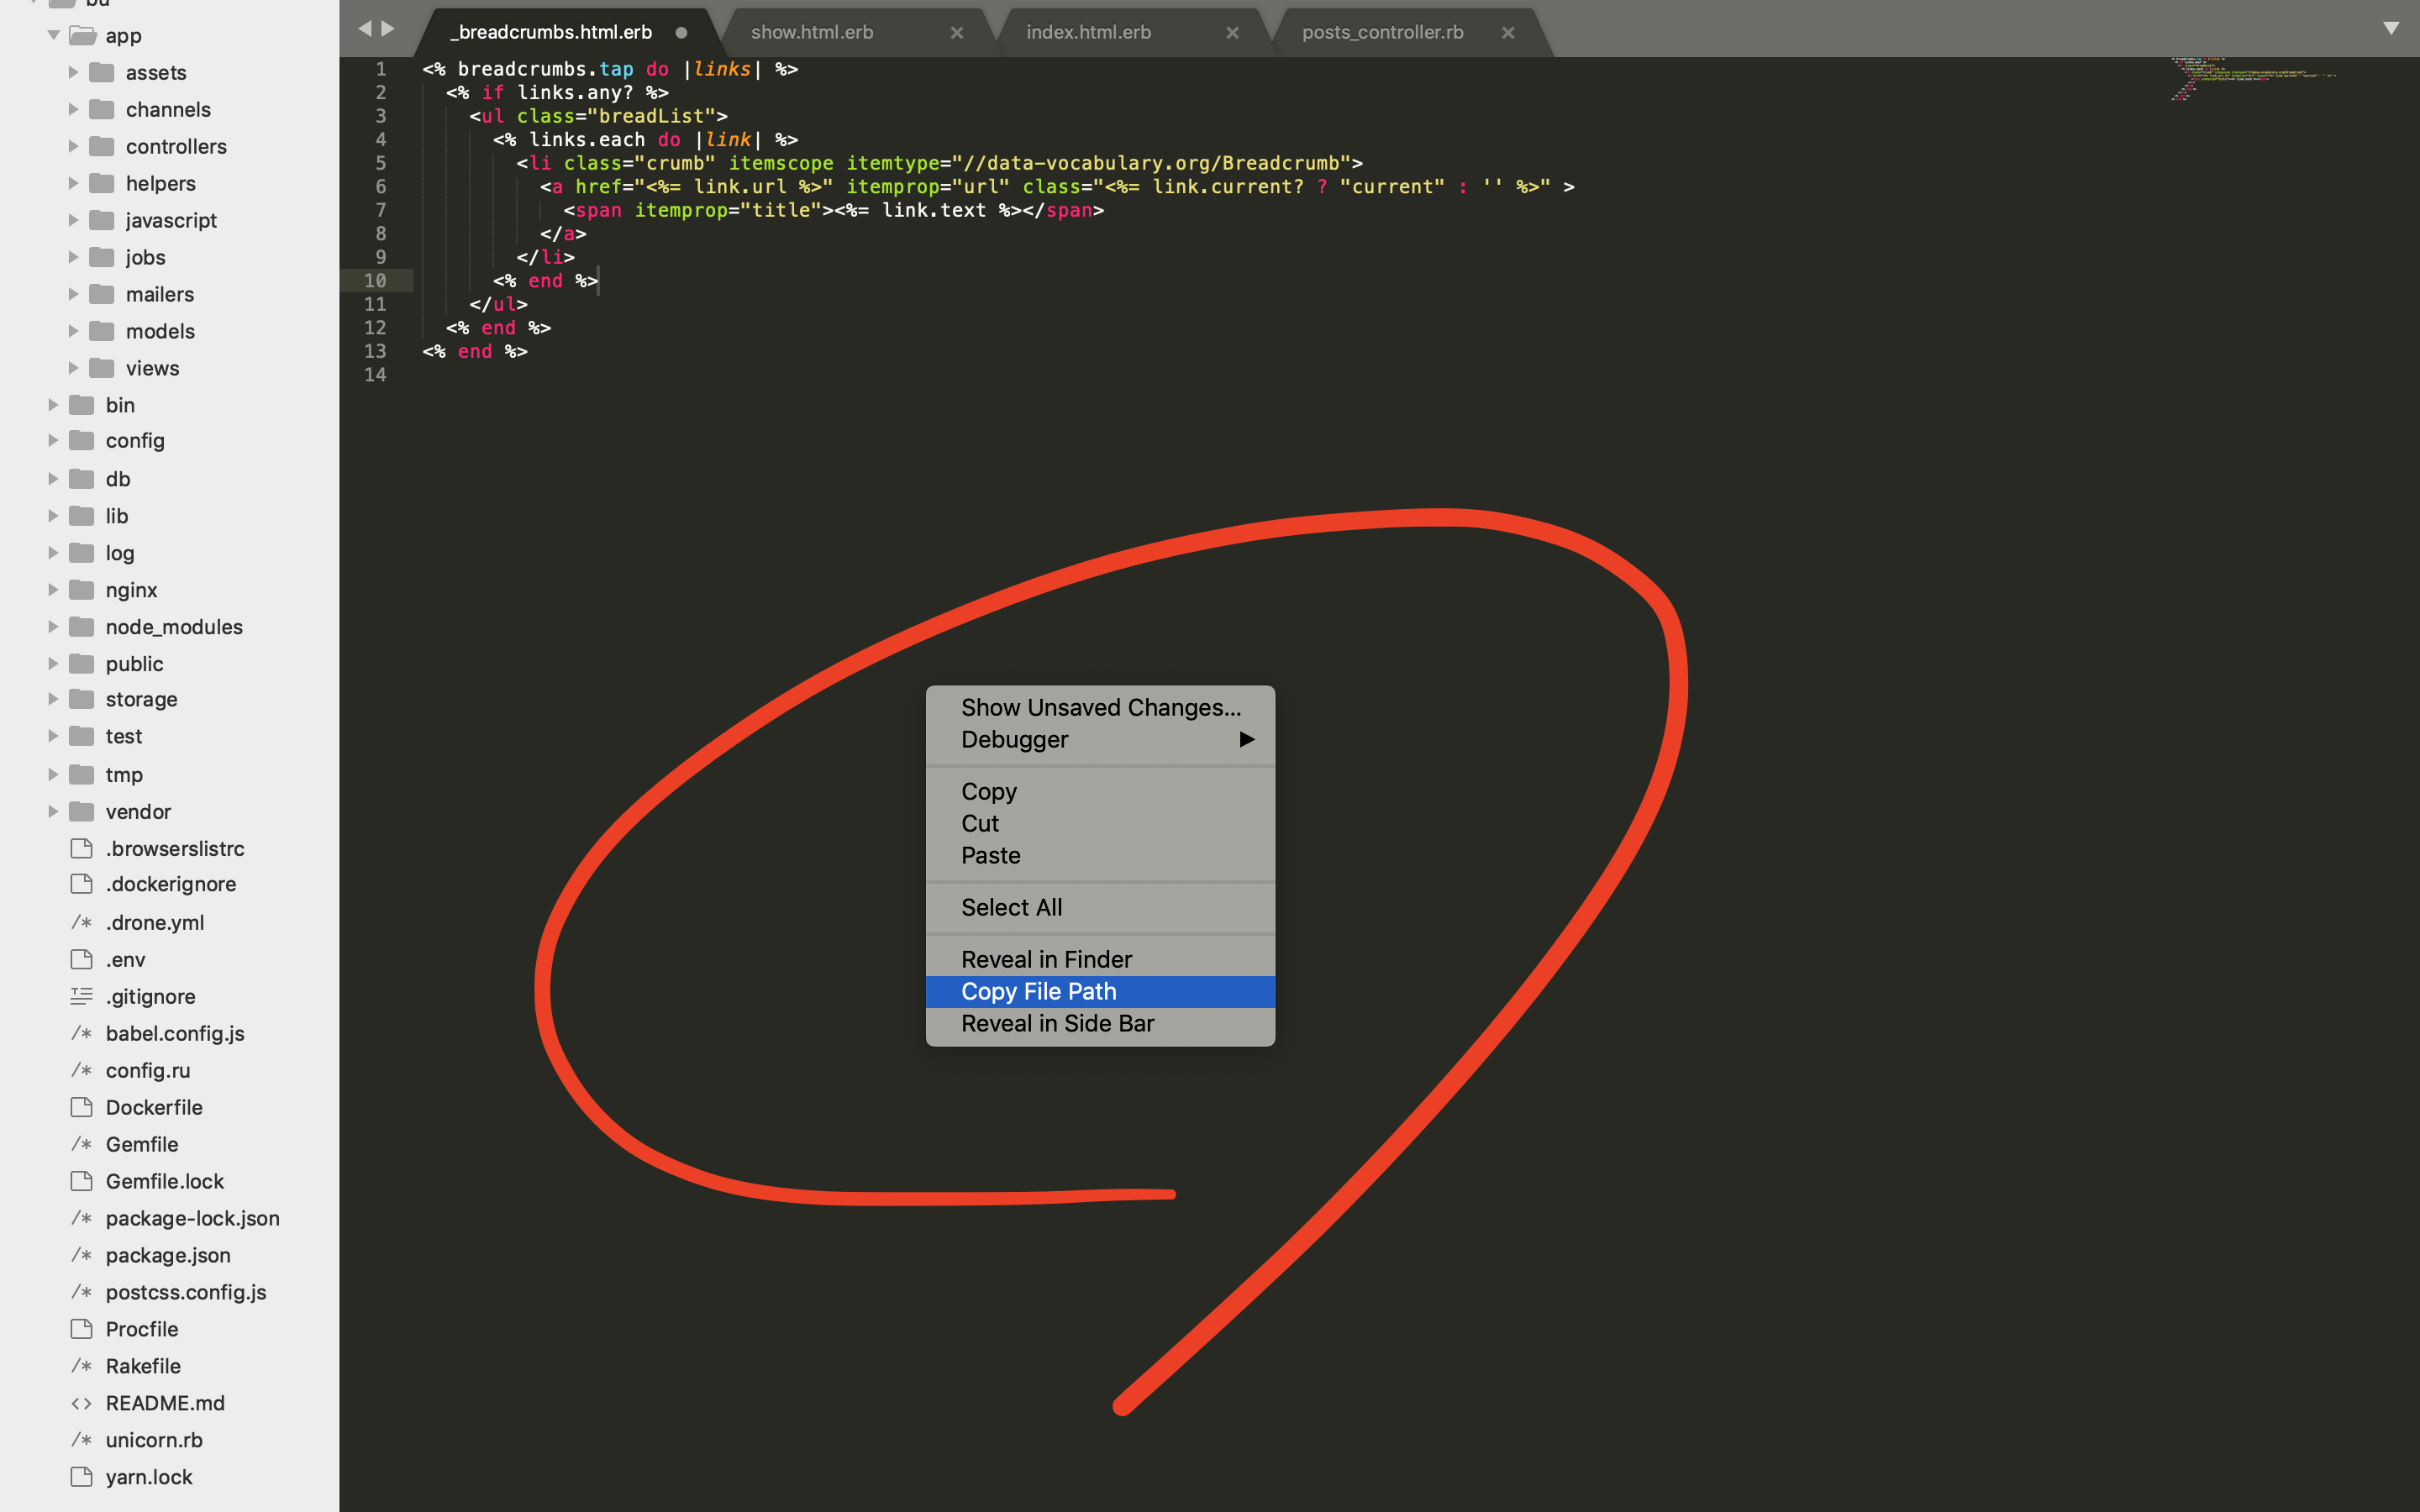
- 投稿日:2019-04-03T18:37:06+09:00
git add /pass ⇦ コピー
- 投稿日:2019-04-03T18:37:06+09:00
git add /pass ⇦ 自動コピー
- 投稿日:2019-04-03T17:46:28+09:00
railsチュートリアル1章 herokuへのデプロイに七転八倒。
railsチュートリアル1章後半のherokuへのデプロイにつまづきまくったので、2度とここでつまづかないようにまとめておきます。
railsチュートリアル1.5で
git push heroku masterを実行した後に生成されたアドレスをブラウザで開こうとしたら、
Application Errorの文字が、、、下に書いてある
heroku logs --tail
を実行しても、2019-04-02T08:45:11.178789+00:00 heroku[router]: at=error code=H10 desc="App crashed" method=GET path="/" host=cherry-pudding-18708.herokuapp.com request_id=418c602d-6211-4552-9488-abbfd39fae16 fwd="115.69.237.151" dyno= connect= service= status=503 bytes= protocol=https 2019-04-02T08:45:11.634170+00:00 heroku[router]: at=error code=H10 desc="App crashed" method=GET path="/favicon.ico" host=cherry-pudding-18708.herokuapp.com request_id=7d395db1-345a-40ad-833c-8e770f0b8b7b fwd="115.69.237.151" dyno= connect= service= status=503 bytes= protocol=https ^C何言ってるか分かりません。笑
ここで
heroku run rails console
を実行。`Add `gem 'sqlite3'`to your Gemfile (and ensure its version is at the minimum required by ActiveRecord). (Gem::LoadError)の文字が。
railsチュートリアルのいうことを正確に聞いてきた人には分かりますが、
sqlite3はGemfileで実行してますよ!?!?ここで、またググる。
すると、ここの記事に答えに繋がりそうなことが、、、!
Rails Tutorial原因
.bundle/config の中身が
BUNDLE_WITHOUT: "production"
になっていることが原因らしい。あと、
database.ymlも変更する必要があるっぽい。
対策
.bundle/configってどこにあるんだと思って探したけど、どこにも見つからなかったので、c9コマンドでそこまで移動。
BUNDLE_WITHOUT: "production"
を
#BUNDLE_WITHOUT: "production"
に変更。それでもうまくいかない。
そこで、datebase.ytmlproduction: <<: *default adapter: postgresql database: db/production.pgに変更。
それでもうまくいかない、、、。
一旦、もう一度
heroku run rails consoleをしてみると、Add `gem 'pg'` to your Gemfile (and ensure its version is at the minimum required by ActiveRecord). (Gem::LoadError)あれ?
Add gem 'pg'に変わってる!!
これを解決すれば、デプロイできるぞ、、、と思い、ググるが、答えが見つからない。
そこで、色々いじった後にgit push heroku masterを実行してないことに気づき、実行。これでデプロイが完了した。2日間格闘した甲斐があった。(おそらく、ここまで分からなかったら飛ばして次に行くほうが効率がいい)
まとめ
おそらく、
database.ymlの変更が解決法に繋がったと考える。
それと、heroku run rails consoleで確認をすると丁寧にどこが間違っていたのかを教えてくれるので、有効活用していきたい。
- 投稿日:2019-04-03T16:57:19+09:00
Railsで画像スライドのためのslickを使う。(hamlで記述)
Railsでslickを使う。
画像のスライドをしようと思った時に便利なslick。
それをRailsで使ったので備忘録。
まずslickを使うにはjqueryのgemをインストールする必要がある。
Gemfileにgem 'jquery-rails'と記述してbundle installすればOK。
そしてassets/javascripts/application.jsに//= require jquery //= require jquery_ujsと記述する。
turbolinksが入った状態だとうまく動作しない可能性があるので//= require turbolinksの記述は削除しておく。
そしてslickのサイトにアクセスしてget it now。
CDN用のCSSとJSをコピーする。
http://kenwheeler.github.io/slick/CSS
<link rel="stylesheet" type="text/css" href="//cdn.jsdelivr.net/npm/slick-carousel@1.8.1/slick/slick.css"/>JS
<script type="text/javascript" src="//cdn.jsdelivr.net/npm/slick-carousel@1.8.1/slick/slick.min.js"></script>それをapplication.html.hamlに記述する。記述する順番を間違えるとうまく動作しないことがある。
!!!
%html
  %head
    %title Something
    %meta{charset: "utf-8"}
    = csrf_meta_tags
    = stylesheet_link_tag    'application', media: 'all', data:{ turbolinks:{ track: true }}
    %link{ rel: "stylesheet", type: "text/css", href: "//cdn.jsdelivr.net/npm/slick-carousel@1.8.1/slick/slick.css"}
    = javascript_include_tag 'application', data: { turbolinks: { track: true }}
    %script{ type: "text/javascript", src: "//cdn.jsdelivr.net/npm/slick-carousel@1.8.1/slick/slick.min.js"}


  %body
    = yield
%linkや%scriptの{}の中身はハッシュロケット(=>)を使わずにシンボル(:)を使って記述した方がいいっぽい。
まあこのままでも一応使えるっぽいけど念の為にslickのサイトからファイルをダウンロードしておいたほうがいいかも。
(画像スライドの際のドットやアローなどのスタイルが記述されている)
get it nowのDownload Nowからダウンロード可能。
その中で必要そうなファイルだけをRailsの中に移した。
僕はslick-theme.cssだけstylesheetsの中に移行した。そしてビューファイルでslickを使う。
%ul.slider
  %li
     = image_tag
  %li
     = image_tag
  %li
     = image_tag
のように親要素にsliderというクラスをつける。
そしてJSファイルに$(function() { $('.slider').slick(); });と記述すればとりあえずslickが機能していると思う。
使用したオプション
・ドット
・アローをfontawesomeのものに変更
・自動スライド
・ドットをhoverするだけで画像スライド$(function() { $('.slider').slick({ prevArrow:'<i class="fa fa-angle-left arrow arrow-left"></i>', nextArrow:'<i class="fa fa-angle-right arrow arrow-right"></i>', dots: true, autoplay: true, autoplaySpeed: 4000, speed: 800 }); $('.slick-dots li').on('mouseover', function() { $('.slider').slick('goTo', $(this).index()); }); });.slick-dots { position: absolute !important; bottom: 20px !important; li { font-size: 20px !important; button:before { content: "●" !important; font-size: 14px !important; color: rgb(60, 60, 60) !important; } } }ドットを設定するとslick-dotsというクラスのついたulが生成され、その中のliの中のbuttonにドットが入っている。
slickの元から設定されているスタイルに対抗するために!importantを使っている。slickのオプションをもっと知りたければたくさん載っている記事があるのでそちらを参照ください。
(こちらの記事など)
https://qiita.com/katsunory/items/25b385aae0f07b41e611
https://qiita.com/ymeeto/items/7fc56eea4bd44487cdb7僕が使用したのはこのぐらい。
至らぬ点があればぜひコメントで教えてください。
- 投稿日:2019-04-03T16:03:06+09:00
Rails + Mongoid で MongoDBのバージョンを3.4→3.6に上げる時の注意点
公式の手順に沿って上げるだけと思いきや、意外とつまづいたのでここに記します。
マニアックな問題なので、該当する人は少ないかと思います。前提
Rails
Gemfilegem 'rails', '~> 5.2.1' gem "mongoid", "~> 7.0" gem 'mongo', '~> 2.8'mongoid.yml一部抜粋production: clients: default: database: production hosts: - [PrimaryのIP] - [SecondaryのIP] options: read: mode: :primaryMongodb
レプリカセット
Primary,Secondary,Arbiterの3台構成
OS: Ubuntu18
aptでインストールバージョン$ mongo --version MongoDB shell version v3.4.19バージョンアップ手順
MongoDBのバージョンアップ自体は簡単です。
こちらの手順に従って更新します。
https://docs.mongodb.com/manual/release-notes/3.6-upgrade-replica-set/aptでインストールしている場合、各サーバで行うことは、source.listを更新してapt upgradeするだけです。
$ sudo rm /etc/apt/sources.list.d/mongodb-org-3.4.list $ sudo apt-key adv --keyserver hkp://keyserver.ubuntu.com:80 --recv 2930ADAE8CAF5059EE73BB4B58712A2291FA4AD5 $ echo "deb [ arch=amd64,arm64 ] https://repo.mongodb.org/apt/ubuntu xenial/mongodb-org/3.6 multiverse" | sudo tee /etc/apt/sources.list.d/mongodb-org-3.6.list $ sudo systemctl stop mongod $ sudo apt update $ sudo apt upgrade $ sudo systemctl start mongodバージョン$ mongo --version MongoDB shell version v4.0.8バージョンアップできました。
Mongoidのエラー
Mongoid側は基本的には特に変更なく、普通に使えました。
しかし、このように個別のクエリーでSecondaryをreadするとUser.read(mode: :secondary_preferred).first下記のエラーが。
not master and slaveOk=false (13435)ログを見てみると、Secondaryに対して、何故かmode: primaryでクエリを投げています。
これではエラーになります。MONGODB | [SecondaryのIP]:27017 〜 $readPreference"=>{"mode"=>"primary"}どうやら、mongoのFeatureCompatibilityVersionが3.6の状態だと発生し、3.4だと発生しないようです。
FeatureCompatibilityVersionの変更方法はこちら。db.adminCommand( { setFeatureCompatibilityVersion: "3.4" } )解決策
mongoid.ymlを変更することで一応解決しました。
下記の部分を外します。
readのmodeはデフォルトがprimaryなので特に変わりはありません。options: read: mode: :primaryそうすると、FeatureCompatibilityVersionが3.6でも指定したmodeになり、エラーは発生しなくなりました。
MONGODB | [SecondaryのIP]:27017 〜 $readPreference"=>{"mode"=>"secondaryPreferred"}どうもmongoid.ymlの設定を優先してしまっているようです。
mongo-ruby-driverのバグ?仕様変更?
現状原因不明です。参考
https://docs.mongodb.com/manual/release-notes/3.6-upgrade-replica-set/
https://docs.mongodb.com/v3.6/tutorial/install-mongodb-on-ubuntu/
- 投稿日:2019-04-03T16:02:07+09:00
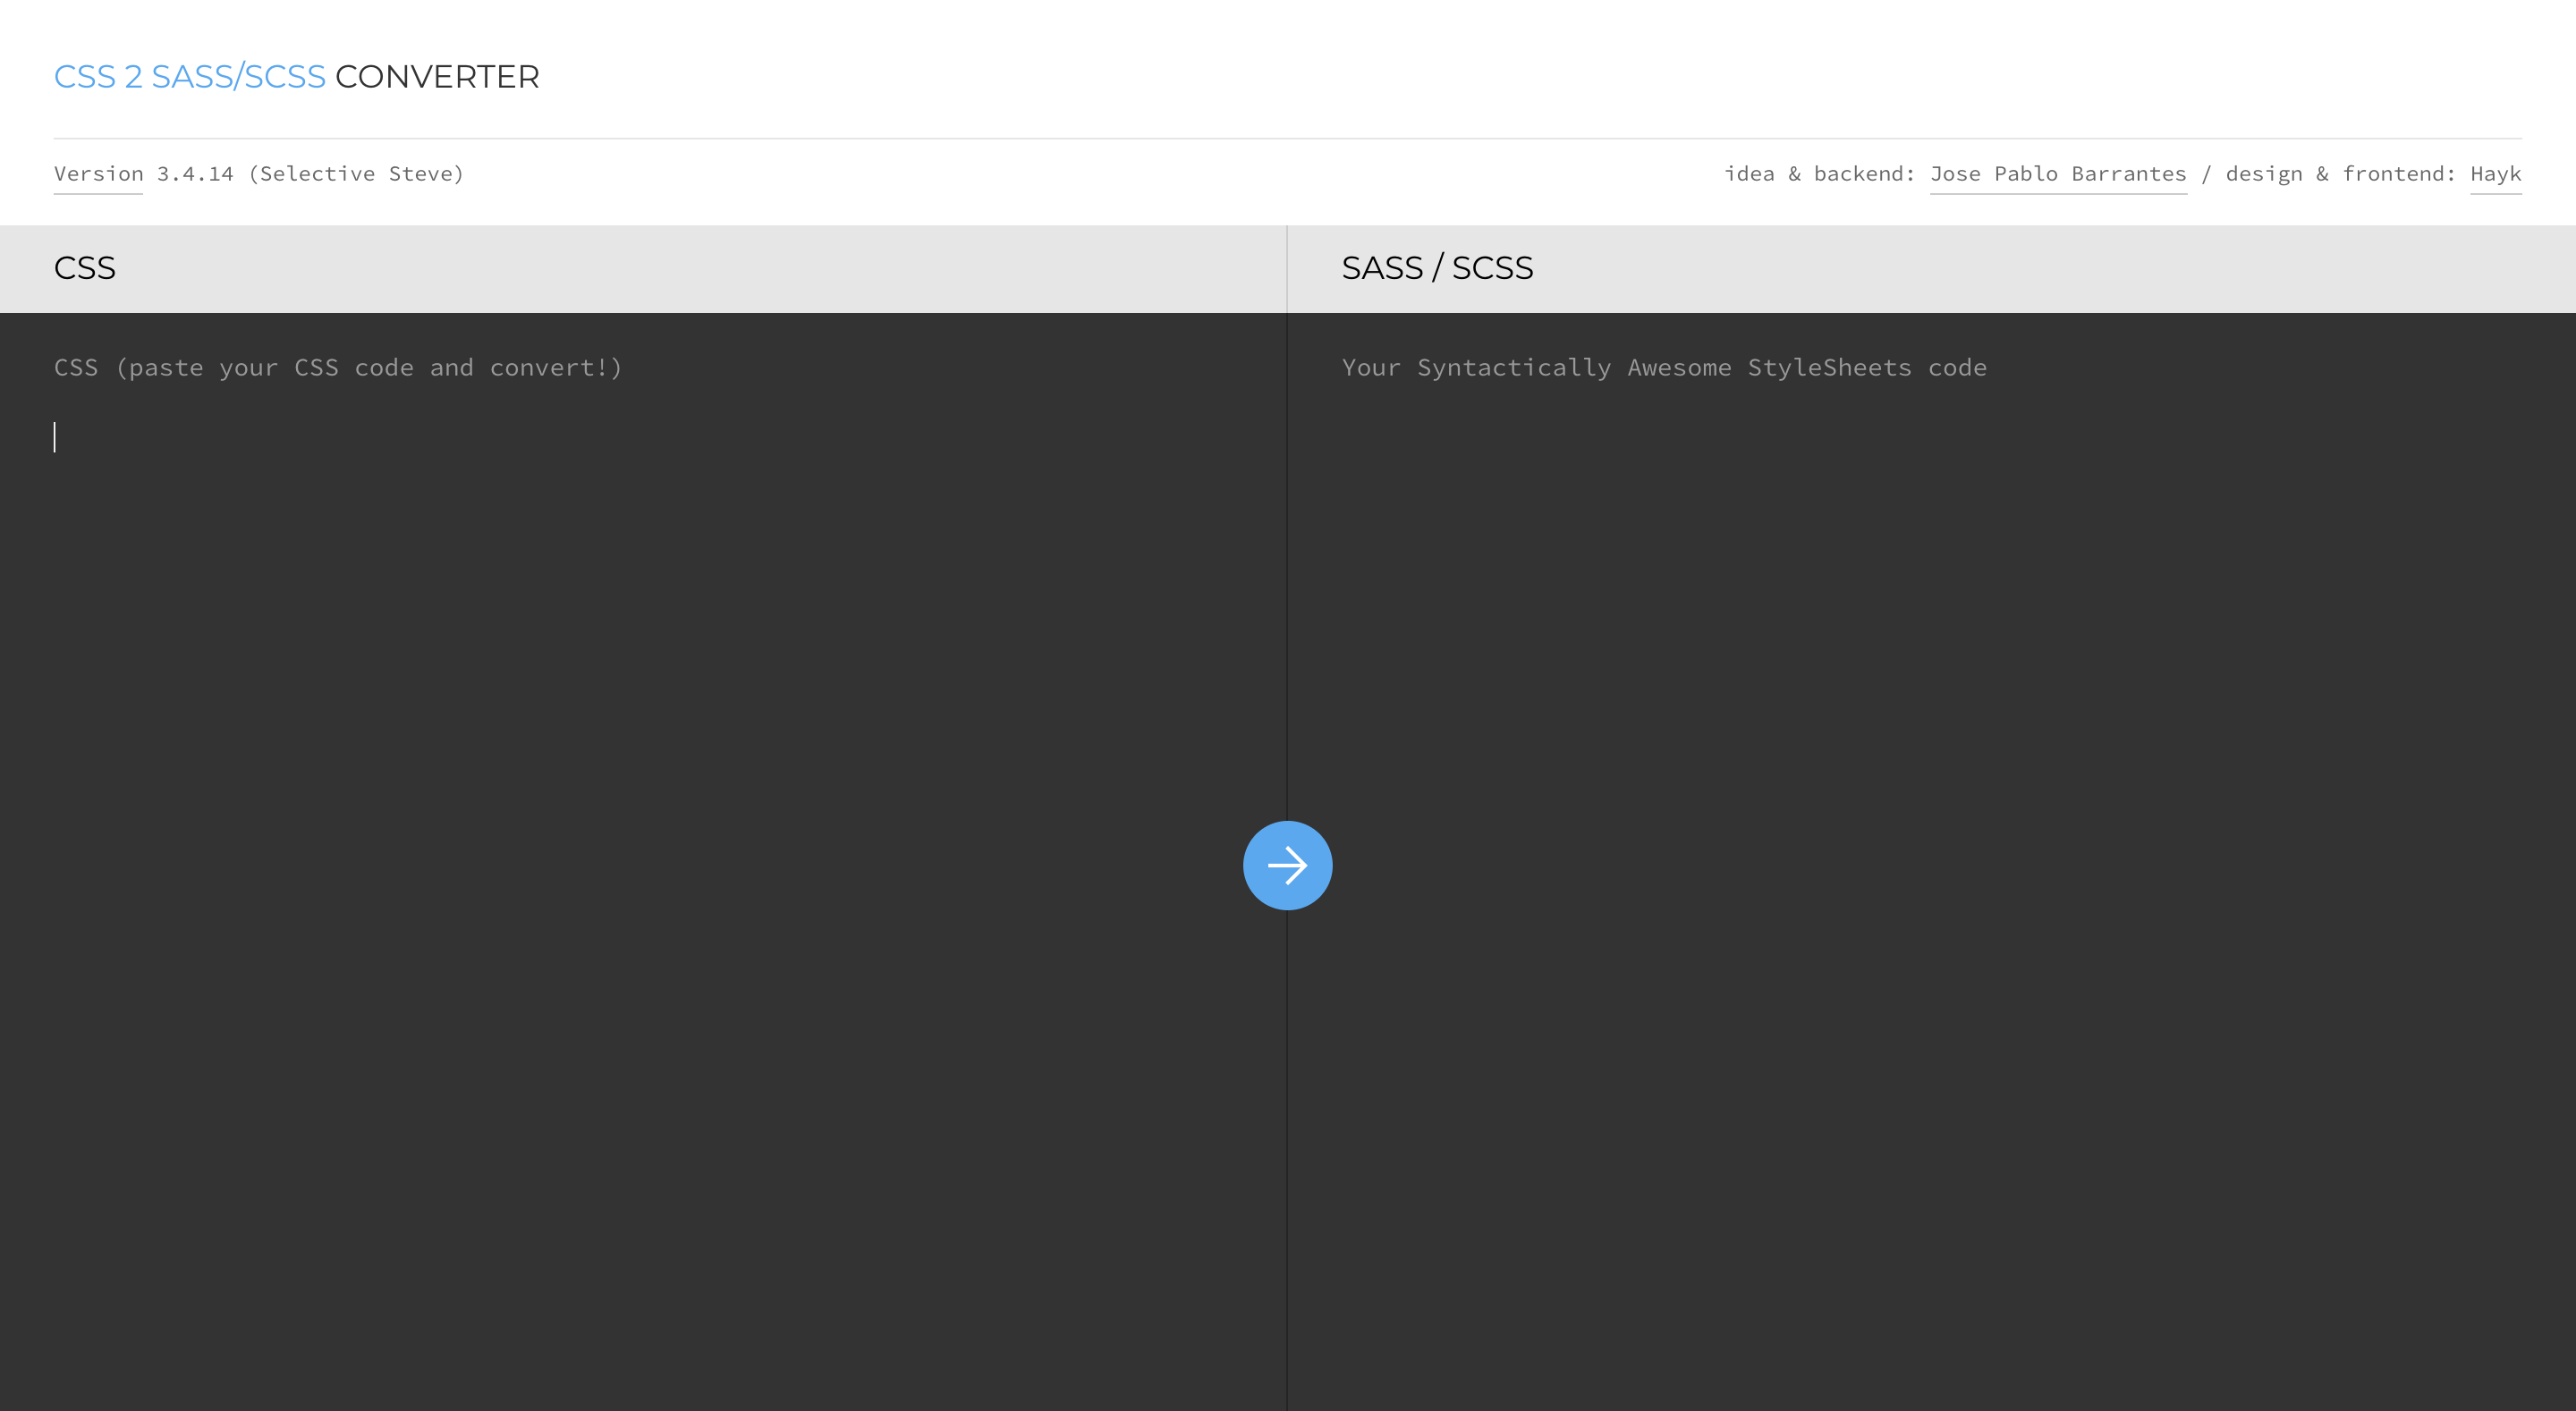
【sass変換サイト】cssからsassにコンパイルできるサイト
Vue+Webpack+Sass使った開発があるんだがsassが全然わからん(PG歴半年)
sassを使うメリット
・コードがシンプルらしい
・変数の使用が可能らしい
・コードを使い回しができるらしい
・if文・while文が使えるらしい
・四則演算ができるらしい参考にしたサイト
https://qiita.com/m0nch1/items/b01c966dd2273e3f6abe↓↓↓↓↓こんなん↓↓↓↓↓↓
※他にいいのあったら教えてください

- 投稿日:2019-04-03T15:13:09+09:00
RailsでHTMLCollection/NodeListを使うとき。(JavaScript)
RailsでHTMLCollection・NodeListを使う
今回、getElementByClassNameやquerySelectorAllで要素を取得してイベントを登録する際に引っかかったっ点を備忘録として記述しておく。
まず、要素を取得する時点からミスっていたのでその原因の究明から先に行った。
まず、Railsから要素が取得できていなかったので次のようなコードを書いた。
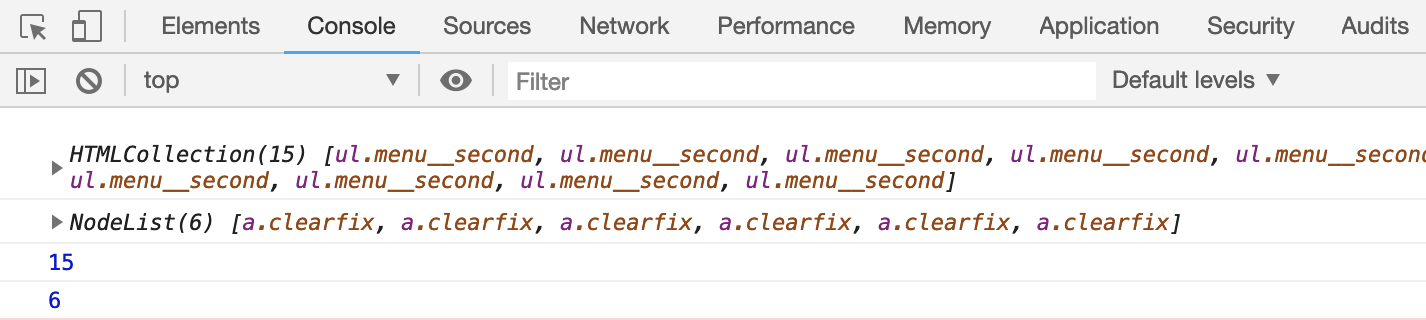
var menuSeconds = document.getElementsByClassName('menu__second');
var profiles    = document.querySelectorAll('.profile-lists li a');
console.log(menuSeconds);
console.log(profiles);
getElementsByClassNameでは戻り値がHTMLCollection、querySelectorAllでは戻り値はNodoListsとなる。
ちなみに矢印をクリックすると中の要素が表示されるがHTMLCollectionの中身は全て表示され、lengthも表示される。NodeListsは中身もなく、lengthも0と表示される。
しかし、HTMLCollectionで取得できた要素ですら、いざ使用しようと思うとなぜかできない。
念の為、console.logでそれぞれのlengthを出してみよう。console.log(menuSeconds.length); console.log(profiles.length);
するとどちらの要素もlengthが0で何も取得できていないことがわかる。
なぜか。簡潔に言うとこれはJavaSctiptがDOMがrenderされる前に走っているから。つまりHTMLのbodyが読み込まれる前にスクリプトが読み込まれているから。Rails上で先にjsファイルが読み込まれていた。
解決策は
1.HTMLのbodyの最後にscriptタグで囲んで書く。
2.下記のようにDOMが読み込まれるのを待つ記述をする。(function() { 'use strict'; document.addEventListener('DOMContentLoaded', function(e) { var menuSeconds = document.getElementsByClassName('menu__second'); var profiles = document.querySelectorAll('.profile-lists li a'); console.log(menuSeconds.length); console.log(profiles.length); }); })();のように書くと、
上のようにちゃんと取得される。
また、NodeListsから一つの要素を取り出す際は、profile[0]のように配列と同じでいいが、HTMLCollectionから取り出す際は、menuSeconds.item[0]と、itemをつける必要がある。
イベントリスナーを登録したい
取得した要素にイベントリスナーを登録したいときの処理も備忘録のため。
まず前提としてHTMLCollectiondにはforEachは使えない。よってfor文を使おう。
for (var i = 0; i < menuSeconds.length; i++) {
  menuSeconds.item[i].addEventListener('mouseover', function() {
のように書き始めていた。が、
これだとクロージャが生成されずカウンター変数が保持されないためどこから参照してもlengthの値しかカウントされないらしい。
よって中で即時関数を定義することで解決できる。
for (var i = 0; i < menuSeconds.length; i++) { function(n) {
  menuSeconds.item[n].addEventListener('mouseover', function() {
  .
  .
  .
  }, false);
 })(i);
これでちゃんとイベントが登録されているはず。
NodeListsはforEachが使えるので、
profiles.forEach( pf => {
  pf.addEventListener('mouseover', function() {
  .
  .
  .
などとかけば登録できる。
まだまだ未熟者なので至らない箇所があればぜひコメントください。


- 投稿日:2019-04-03T15:05:48+09:00
もそ、プログラミングを学ぶ【Ruby & Rails復習編】〜どんどんエラーを解いてみよう!〜
エラーを克服せよ
エラー解決の数をこなしていくうちに、プログラミングスキルが徐々に覚醒しつつある もそ。
前はあまりにエラーが解決できず奇声を発しそうになっていたのですが、だんだんと考え方のコツをつかんで落ち着きを取り戻した今、波紋の呼吸を修得しつつあります。
プログラミングだし、スタンド名はOKコンピューターとかがいいかな〜
...さっそく話がそれてしまいました。
今回も引き続き、エラーを解決していこうと思います。エラー発生!名探偵もそ、出動!
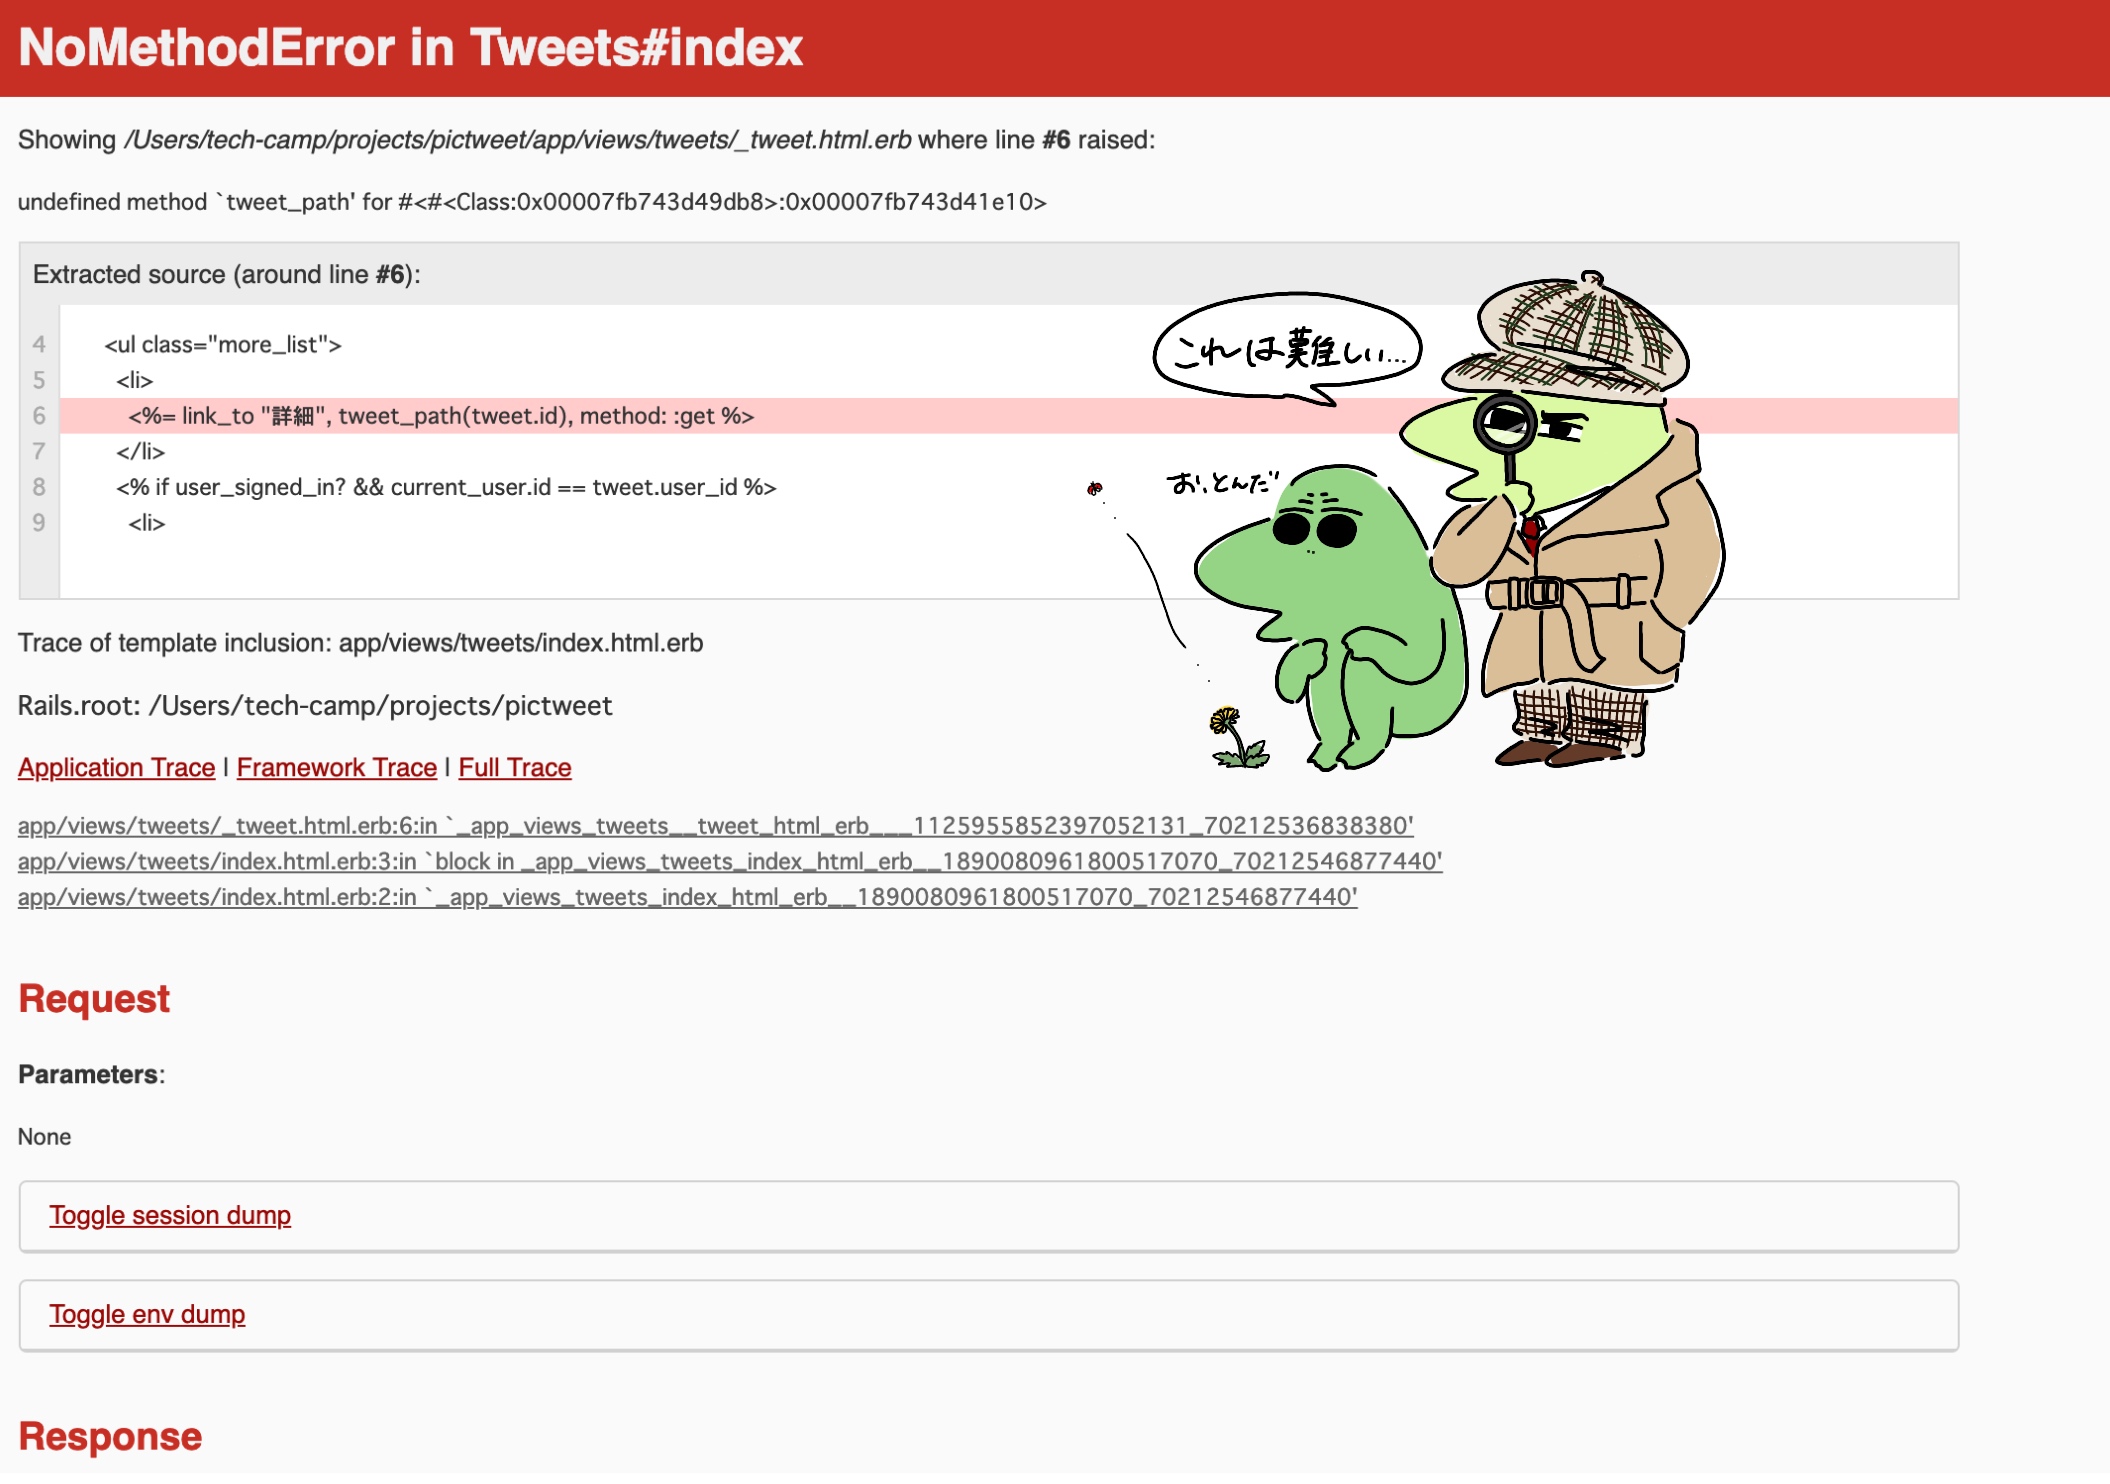
まずはエラー画面を見てみましょう。
精神を乱さず、まずは冷静に英文を読みます。
1行目を読んでみると「NoMethodError in Tweets#index」と表示されていますよね。
これは、「tweetsコントローラのindexアクションを読み込んだ時に、メソッドがなかったよ〜」
という内容です。
さらに2行目を見てみると、「部分テンプレートファイルの6行目に記述しているtweet__pathの部分でメソッドが定義されていない」と出ています。仮説を立ててみる
これまでの経験と勘から、”NoMethodError”と出ているのでメソッドの名前とコントローラのアクションが一致していないのでは?と考えました。
そこで改めて部分テンプレートファイルの記述を確認してみます。
でも、詳細ページを表示するためのHTTPメソッドはgetで合っているはず。う〜〜む、これは難題な予感です。
名探偵もそ、ターミナルを捜査(操作)
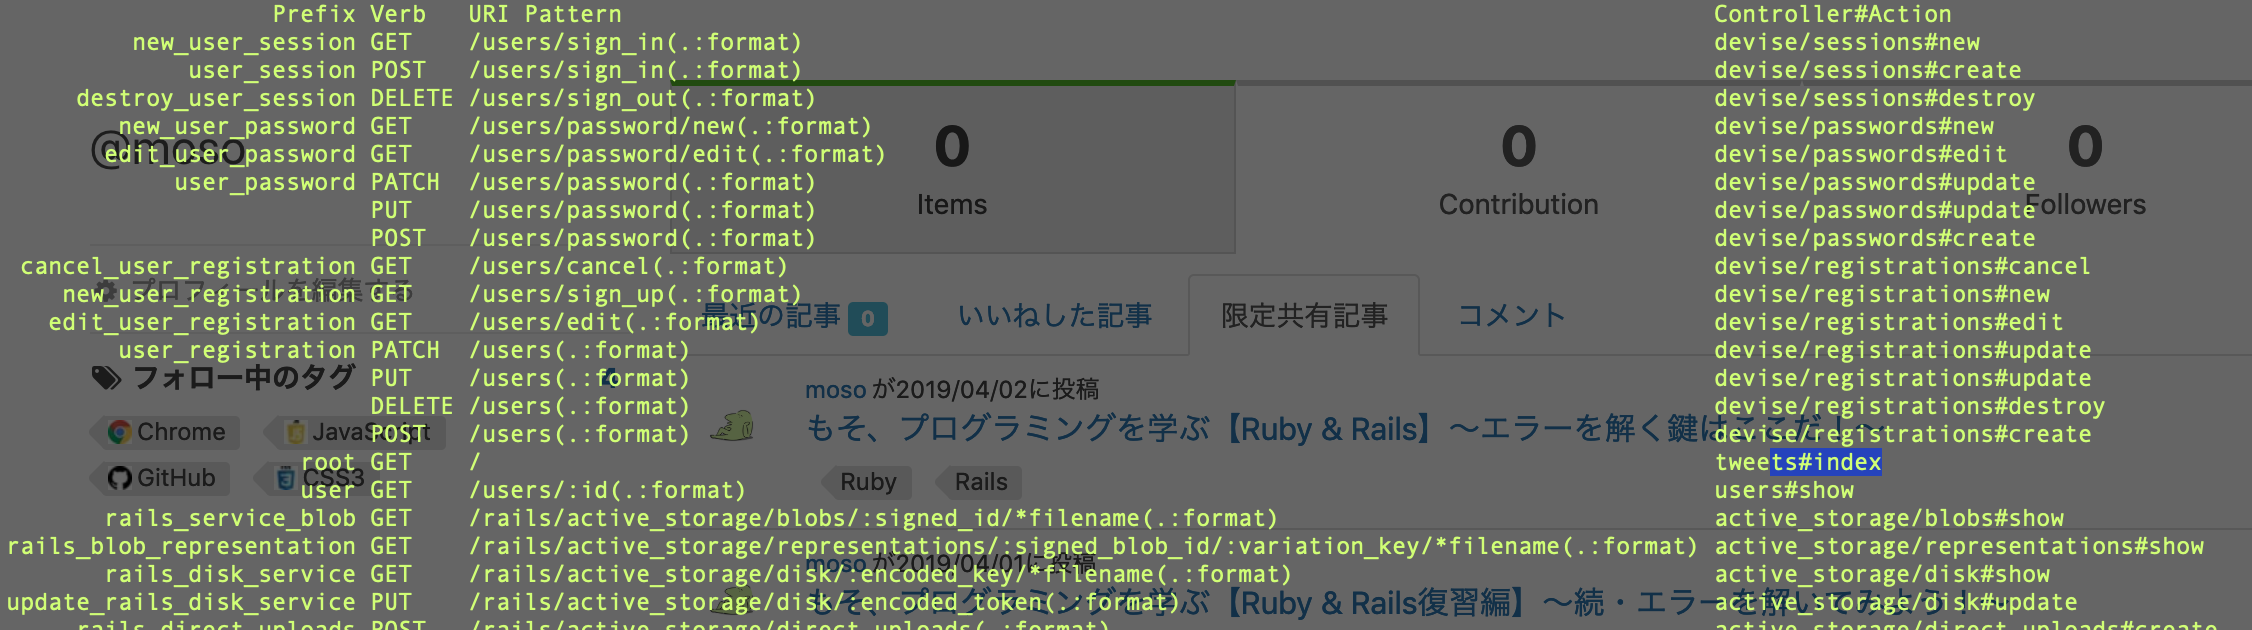
ここでエラーの原因箇所がビューファイルにない可能性も考え、ターミナルにrake routesコマンドを実行しました。
rake routesすることでルーティング名やルートパス、コントローラとアクションに対応するHTTPメソッドを確認することができます。ここで実際のrake routes結果を見てみましょう。
表示されている内容についてカンタンに説明します。
薄きみどり色(もそカラーをイメージして設定してみました)の1列目の表記ですが、・Prefix...ルーティング名
・Verb...HTTPメソッド
・URI Pattern...ルートパス名
・Controller#Action...コントローラ名#アクション名を表しています。
画像内の下の方、ブルーボックスで中途半端に選択してしまっている
tweets GET /tweets(.:format) tweets#indexこの部分が今回エラーを起こした処理になります。
思ったとおり、HTTPメソッドはやはり間違っていないようです。
原因はどこにあるのか...ターミナルの実行画面を見ていると、もそはハッと気がつきました。「あれ?ほかのtweetsコントローラ全然表示されてなくない??」
本来であれば、tweetsコントローラのファイルで定義した各アクションが並ぶはずです。
でも実行結果をよく見ると、tweetsコントローラのindexアクションしか表示されていません。エラー解決編
この結果を踏まえて、原因はルーティングにあると断定しました。
コントローラファイルの記述がごっそり抜けている可能性もなくはないのですが、この部分は30弱の記述があります。
この部分がまるっと無くなっていたらさすがに気がつくだろうと考え、今回は先にルーティングを検証することにしました。さっそくルーティングファイルを開き、記述を確認してみます。
error_routing.rbRails.application.routes.draw do devise_for :users root "tweets#index" do resources :tweets resources :comments, only: [:create] end resources :users, only: [:show] endよ〜〜く見てみましょう。
...
...!!!
3行目のdoの記述位置、間違ってるやん!!resourcesメソッドはコントローラとアクションの設定をかんたんに行ってくれる便利なメソッドで、基本となるコントローラの7つのアクション名に対して、ルーティングを自動で生成してくれます。
詳しくはこちらの記事へ。記述の仕方はこんな感じです。↓
resources :コントローラ名 doさらにここでは、resourcesメソッドをネストという入れ子構造にしています。
そんなわけで、正しい記述はこちら↓routing.rbRails.application.routes.draw do devise_for :users root "tweets#index" resources :tweets do resources :comments, only: [:create] end resources :users, only: [:show] endなかなかの難題でしたが、名探偵もそ、見事に解決しました!
--
エラー解決は難しいですが、解けるとなるほど面白い!もっと頑張ろう!と前向きな気持になれます。
次の目標も決まってきたので(※スタンド発動ではありません)、復習をしつつエラーに挑戦していこうと思います。
...続く。


- 投稿日:2019-04-03T14:48:57+09:00
Railsコマンド集!!
- 投稿日:2019-04-03T13:45:43+09:00
ユーザー登録<パスワードのハッシュ化>
gemfile.#コメントアウト外す gem 'bcrypt', '~> 3.1.7'bundle install※passwordカラムは作成しない rails g model User password_hash:string password_salt:stringファイル作成
models/concerns/user_authenticater.rbmodule UserAuthenticator extend ActiveSupport::Concern included do before_save :encrypt_password attr_accessor :password end module ClassMethods # 認証 def authenticate(email, password) user = self.approved.readonly(false).find_by_email(email) if user.present? && user.password_hash == BCrypt::Engine.hash_secret(password, user.password_salt) return user else return nil end end end private # パスワードソルトを生成、パスワードをハッシュ化し保存 def encrypt_password if password.present? self.password_salt = BCrypt::Engine.generate_salt self.password_hash = BCrypt::Engine.hash_secret(self.password, self.password_salt) end end end適用させたいモデルに追記
user.rbinclude UserAuthenticator attr_accessor :passwordストロングパラメータに :password 記載
でDBにはこんな感じで登録される

- 投稿日:2019-04-03T13:40:57+09:00
docker-composeで起動しているRubyアプリケーションをデバッグする方法
自分はRubyのデバッグにはpry-byebugを利用しています。
pry-byebugは、デバッグしたいポイントにbinding.pryを仕込むことでその時点でアプリが停止し、デバッグをすることができます。問題点
フォアグラウンドで
docker-compose upすると、binding.pryを仕込むことで以下のようなログが表示されます。
アプリの実行は中断されますが、あくまでログが表示されているだけなのでこのコンソール上でデバッグはできません。web_1 | 9: def index web_1 | 10: binding.pry web_1 | => 11: end web_1 |解決方法
docker attachでRubyアプリケーションのコンテナに入るとデバッグできます。
$ docker attach ${container_id}

### エンターキーを押すとデバッグができる
[1] pry(#<HomeController>)>
- 投稿日:2019-04-03T13:14:26+09:00
Railsの多段Association、多段Scope(joins)の実装例
はじめに
本記事はRails5.2にて作成されています、他のバージョンでの互換性を保証しません。
Table構成
Model構成
#### item.rb ####
class Item < ActiveRecord::Base
  belongs_to :order
end

#### order.rb ####
class Order < ActiveRecord::Base
  has_many :items
  has_many :reviews
end

#### review.rb ####
class Review < ActiveRecord::Base
  belongs_to :order
  has_many :themes
end

#### theme.rb ####
class Theme < ActiveRecord::Base
  belongs_to :review
end
各種実装
多段Association
orderからthemeを二段
has_manyしたい & themeからorderを二段belongs_toしたい#### order.rb #### class Order < ActiveRecord::Base # ... has_many :themes, through: :reviews end #### theme.rb #### class Theme < ActiveRecord::Base # ... delegate :order, to: :reviews end注意:
has_many, throughの逆はdelegate, toを使いますこんなSQLが発行されます:
pry(main)> Theme.last.order
  Theme Load (0.4ms)  SELECT  `reviews`.* FROM `reviews` ORDER BY `reviews`.`id` DESC LIMIT 1
  Review Load (0.3ms)  SELECT  `reviews`.* FROM `reviews` WHERE `reviews`.`id` = 1 LIMIT 1
  Order Load (0.5ms)  SELECT  `orders`.* FROM `orders` INNER JOIN `reviews` ON `reviews`.`id` = `orders`.`review_id` WHERE `orders`.`review_id` = 1 LIMIT 1
多段Scope(多段Joins)
itemをreview.textでsortしたい#### item.rb #### class Item < ActiveRecord::Base # ... scope :join_reviews, -> { joins(:order, order: :reviews) } endこんなSQLが発行されます:
pry(main)> Item.all.order("review.theme_id desc")
  Item Load (7.0ms)  SELECT  `items`.* FROM `items` INNER JOIN `orders` ON `orders`.`id` = `items`.`order_id` INNER JOIN `reviews` ON `reviews`.`order_id` = `orders`.`id` ORDER BY reviews.text DESC
参考
https://blog.toshimaru.net/belongs_to-through/
https://qiita.com/takashisite/items/9d1484b88708e2872134
https://qiita.com/ishidamakot/items/7dba557d764362a828ff

- 投稿日:2019-04-03T11:44:44+09:00
RailsでSQLite3を複数Thread/Processから同時WriteするときにBusyExceptionを回避
TL;DR
RailsのDBにSQLite3を使ってしまうと,Redis等々で同時WriteするとSQLite3::BusyExceptionが発生する.
database.ymlのtimeoutも効かぬらしい.
仕方がないので自分でプロセス横断の排他Lockを実装する.やったこと
ActiveRecord.save/.save!でfalseが返ったり例外発生したりするので,成功するまでRetryするとかしても良かったかもしれませんが,あまり格好良くないので,排他Lock制御します.
Rubyの排他Lockの実装自体はぐぐるといっぱい出てくるので,それらを参考に↓のようなblockを排他実行させるClassを用意しました.LockBlock.rbrequire 'tmpdir' class LockBlock class << self def locked(lock_file_name) File::open(File::join(Dir::tmpdir, lock_file_name), 'w') { |file| begin file.flock(File::LOCK_EX) yield ensure file.flock(File::LOCK_UN) end } end end endこの排他Lockで守った状態で
ActiveRecord.save/.save!するためのMethodをApplicationRecordに用意します.app/models/application_record.rbdef safe_save! LockBlock::locked(`db_lock`) { self.save! } endあとは各Modelの
.save/.save!やってるところをsafe_save!に置き換えれば完了.これでいいのか疑問
ひとまず ↑ の対応を入れて
Redis使って平行動作させて様子見してますが,FileのLock/Unlockのアトミック性とかよくわかっておらず,これで100%保証されてるのかどうかが不明...# そもそも`SQLite3やめいとかは言わないように...
# 最初はシンプル機能のお手軽Appになるはずやったんや...---///
- 投稿日:2019-04-03T10:04:08+09:00
「Long Life RailsApps」というテーマで登壇した話 (前編)
少し前ですが、Reproさんのイベントで登壇させていただきました。
その際に使用したスライドの共有と、深掘りをしたいと思います。スライド
まずは耳障りの良いKeepからいきます。
Keep
リリースしたり、効果が良かったりすると事業側のメンバーから感謝される
素晴らしく良い雰囲気で仕事できます。何気ない一言で救われる場面が多々あります。
(自分は特にちょろい気がする)Githubフローをちゃんと回せている
当然の話ではありますが、事実良い習慣なのでKeepしたいです。
開発環境をDockerで構築できるようにした
新しいメンバーが参画する時にめちゃくちゃ楽になりました。特定のバージョンのミドルウェアを使用していたりするとセットアップ手順のアップデートが大変なのですがコマンド数回でセットアップできるようになりました。
効率的にレビューをするために色々ルールを設けた
2名以上のレビュアーに見てもらうというローカルルールがあるのですが、一日10プルリクエストほどレビューしないといけないので気を抜くとすぐ溢れてしまいます。
レビューをする時間を決めたり、レビュアー毎に権限を設けこの人のレビューを貰わないとリリースできないというルールを設けました。
権限のあるレビュアーはしっかりと見ますし、通常のメンバーはレビューに対して重い責任を負わずに済みます。
良かったのはメンバーが軽い気持ちでレビューができ、レビュアーはメンバーのレビューを参考にできるという点です。Jenkinsを使ってデプロイやタスクの実行をできるようにした
DevOps的な。ここはSlackに移行するなどTryが挙げられそうなKeepです。
RspecとSeleniumが主要な機能をカバーした
テストのカバレッジが極端に低かったので、サービス(ビジネス)として障害になってはいけないところのテストを厚くしました。ユーザーの基本フローを網羅することで実装者、事業者が安心して過ごすことができるようになりました。
Reviewdogで自動的にコードの書き方を指摘されるのでロジックに対して議論することができる
導入はぐぐっていただけると助かります。
ドキュメント管理システムを導入して非エンジニアも巻き込んだ
色々なツールを試しましたが、カスタマイズが可能なオープンソースに落ち着きました。
API連携も見据えた動きができています。
ここからは直近のプロジェクトを振り返ってみた結果
プロジェクトのキックオフをすることでコアメンバーの意識を統一できた
なんだかんだキックオフは大事。ゆるゆると始まるプロジェクトはだいたい炎上する気がします。
プロジェクト進行においてシンプルなルールだけ決めて守るようにした
blameしない、前を向く、などプロジェクトマネジメントの基本を守りました。
当然ながら良い習慣だと思います。何のためのプロジェクトなのかを明確にした
めちゃくちゃKeepです。意思決定のスピードが格段に向上し、方向性が明確なので決定事項について背景を説明することができるので、
メンバーが納得感を持って業務に当たることができます。ガントチャートをすぐ更新できるように専用のツールを導入した
Backlogを普段使っているのですがガントチャートの更新が非常に多かったのでxPlanというツールを導入しました。
クリティカルパスの設定も簡単にできるのでおすすめです。(有料)Backlogは基本的にFIXした内容とスケジュールのみ記載するようにした
ガントチャートと分業したので相応の使い方にまとめました。
情報が散らばらないのは良いことです。Try
KeepからTryに挙げられるのは以下です。
- Jenkinsで運用しているものはSlackやクラウドサービスへ移行できそう
- Rspec, Seleniumのカバレッジを増やしたい
- とは言えテストリソースの上限はあるのでバランスを取るべき
- 開発用DockerImageを配布できるようにしたい
- Reviewdogはタイミングによって邪魔な場合があるので任意での実行も視野に入れる
- ドキュメント管理者が不在なので責任者を据えたい
- 進行管理の雑務に時間を割くことに対する心理的ハードルを下げたい
- ガントチャート、Github、Backlog、スプレッドシートを使って進行管理すると情報が分散して効率が下がるポイントがある
- プロジェクト管理及びドキュメント管理のベストプラクティスを探る
重い話になるProblemは後編で綴っていきたいと思います。
- 投稿日:2019-04-03T09:36:29+09:00
【TDD】Rspecを活用し、Rails APIの開発のテスト〜その1〜
はじめに
※私個人的なメモ用です。
「Ruby On Rails を活用した認証システムをRspecを使いテストしながら開発してみよう。」
と考え、作ってみました。Rspecは触ったものもなくどのように開発するか、調べながら手探りで開発をしたので、Rspecについての知見を記録として残す。
Rspec -GitHub- : https://github.com/rspec/rspec
Rspec documentation : http://rspec.info/documentation/APIアプリケーションの作成
$ rails new api --api
#APIモードでRailsアプリの作成
一般的な rails new に --api を加えることでAPIモードでアプリが作成できる。
念のためconfigを確認
config/application.rbconfig.api_only = true上記のような記述があればOK
rspecのインストール
gemfilegem 'rspec-rails' gem 'factory_bot_rails'$bundle install $rails g rspec:install create .rspec create spec create spec/spec_helper.rb create spec/rails_helper.rbrspecのインストールについての詳細は↓
https://github.com/rspec/rspec今回factory_bot_railsのインストールも行なっている。
factory_bot_railsとは、rspecの定義の構文やビルドなどのサポートを行ってくれる。こちらも詳細は以下である。
https://github.com/thoughtbot/factory_bot_railsrspecが正常に動くかを確認
$ rspec

No examples found.


Finished in 0.00063 seconds (files took 0.18726 seconds to load)
0 examples, 0 failures
動いた! ついでにアプリもlocalhostで動くかを確認
$rails s

=> Booting Puma
=> Rails 5.2.3 application starting in development
=> Run `rails server -h` for more startup options
Puma starting in single mode...
* Version 3.12.1 (ruby 2.5.3-p105), codename: Llamas in Pajamas
* Min threads: 5, max threads: 5
* Environment: development
* Listening on tcp://localhost:3000
Use Ctrl-C to stop
動いた!
これらをやると rails g hogehoge でモデルやコントローラーを作成しても、
$rails g model hogehoge


create spec/models/hogehoge_apec.rb
create spec/factories/hodegode.rb
上記のように自動でテストファイルが生成される。
Rspecのテストのやり方① 〜基本の構文〜
では、早速テストを書いてみます。
Rspecでテストを書く時に必要な構文を書いてみます。例えば、articleに、titleとcontentというカラムが存在しているとします。
article.rbに以下のようなバリデーションを記載しましょう。article.rbclass Article < ApplicationRecord validates :title, presence:true validates :content, presence:true endテストを書いてみます。modelのテストなので、spec/models/article_spec.rb というファイルを編集します。
spec/models/article_spec.rbrequire 'rails_helper' RSpec.describe Article, type: :model do describe '#validations' do example 'titleのバリデーションのテスト' do article = FactoryBot.build :article, title: ' ' expect(article).not_to be_valid expect(article.errors.messages[:title]).to include("can't be blank") end it 'contentのバリデーションのテスト' do article = FactoryBot.build :article, content: ' ' expect(article).not_to be_valid expect(article.errors.messages[:content]).to include("can't be blank") end end endこれを試しにテストを実行してみます。
$ rspec spec/models/article_spec.rb

..

Finished in 0.03105 seconds (files took 1.42 seconds to load)
2 examples, 0 failures
2つのexamplesを実行し、0個の失敗。つまり成功をしました。
では、spec/models/article_spec.rb のテストの内容を解説します。
Rsepecのテストには、
describe と it(example) と expectの3つの役割が代表的です。
これらを一つずつ説明するとdescribe : テストのグループ(この中にそれぞれのテストを書きます)
it(example) : テストを it(example)に書きます。
expect : テストの期待する結果を記載します。これらを今回のテストに解説を加えると
article.rbrequire 'rails_helper' RSpec.describe Article, type: :model do describe '#validations' do ## '#validations' というテストのグループを作る example 'titleのバリデーションのテスト' do ##ここでは、titleのバリデーションをテストするよ article = FactoryBot.build :article, title: ' ' expect(article).not_to be_valid ##articleの実行はされなかったことが、適切だよ ##(=titleの空欄は、モデルに保存されないことを期待しているよ) expect(article.errors.messages[:title]).to include("can't be blank") end it 'contentのバリデーションのテスト' do article = FactoryBot.build :article, content: ' ' expect(article).not_to be_valid ##articleの実行はされなかったことが、適切だよ ##(=contentの空欄は、モデルに保存されないことを期待しているよ) expect(article.errors.messages[:content]).to include("can't be blank") end end endつまり、バリデーションによってtitleとcontentが空欄で作成された場合は、falseを返すテストである。
expextの内容を詳細はこうだ。
spec/models/article_spec.rbarticle = FactoryBot.build :article, content: ' ' expect(article).not_to be_valid
expect(hodehoge).not_to be_validで、hogehogeが適切でないと期待するという意味である。
反対にexpect(hodehoge).to be_validでhogehogeは、適切であるという意味。
be_validは、マッチャと言われる期待している処理と、実際に行われた結果が、一致した(しない)を表現するオブジェクトである。
マッチャについては、こちらを参照。
https://relishapp.com/rspec/rspec-expectations/v/3-8/docs/built-in-matchers最後にrails c で実際にarticleを空欄で作成してみる。
$rails c

2.5.3 :002 > article = Article.create
   (0.1ms)  begin transaction
   (0.1ms)  rollback transaction
 => #<Article id: nil, title: nil, content: nil, slug: nil, created_at: nil, updated_at: nil>
2.5.3 :003 > article.save
   (0.1ms)  begin transaction
   (0.2ms)  rollback transaction
 => false

2.5.3 :006 > article = Article.new(title: "aaaaa", content: "aaaaa")
 => #<Article id: nil, title: "aaaaa", content: "aaaaa", slug: nil, created_at: nil, updated_at: nil>
2.5.3 :007 > article.save
   (0.2ms)  begin transaction
  Article Create (2.7ms)  INSERT INTO "articles" ("title", "content", "created_at", "updated_at") VALUES (?, ?, ?, ?)  [["title", "aaaaa"], ["content", "aaaaa"], ["created_at", "2019-03-31 08:09:26.168944"], ["updated_at", "2019-03-31 08:09:26.168944"]]
   (0.8ms)  commit transaction
 => true
空欄の時はfalse、titleとcontentに
aaaaが入っている時は、trueだ。Rspecのテストのやり方② ~routingのテスト編〜
routingのテストの場合も、先ほどのmodelのテストのやり方は変わらない。
例えば以下のようなテストを書いてみる
spec/routing/articles_spec.rbrequire 'rails_helper' describe 'articles route' do example 'indexのrouteをテスト' do expect(get '/articles').to route_to('articles#index') end example 'showアクションのrouteをテスト' do expect(get '/articles/1').to route_to('articles#show', id: '1') end endこれは、index,showアクションを呼び出した時のrouteがそれぞれ適切routeとなるかをテストしている。
では、テストを実行してみよう。$ rspec spec/routing/articles_spec.rb FF Failures: 1) articles route should route to articles index Failure/Error: expect(get '/articles').to route_to('articles#index') No route matches "/articles" # ./spec/routing/articles_spec.rb:5:in `block (2 levels) in <top (required)>' 2) articles route should route to articles index Failure/Error: expect(get '/articles/1').to route_to('articles#show', id: '1') No route matches "/articles/1" # ./spec/routing/articles_spec.rb:9:in `block (2 levels) in <top (required)>' Finished in 0.05378 seconds (files took 1.48 seconds to load) 2 examples, 2 failures Failed examples: rspec ./spec/routing/articles_spec.rb:4 # articles route should route to articles index rspec ./spec/routing/articles_spec.rb:8 # articles route should route to articles index当たり前だ。route.rb にarticlesのルートの定義をしていないのだから、テストをしてもエラーが返ってきてしまう。
config/route.rbRails.application.routes.draw do # For details on the DSL available within this file, see http://guides.rubyonrails.org/routing.html resources :articles end念のため記載をするが、上記の記載をしても、コントローラーにアクションを定義していないために、テストの実行はエラーが返ってくる。なので、コントローラーのアクションの定義も忘れずに。
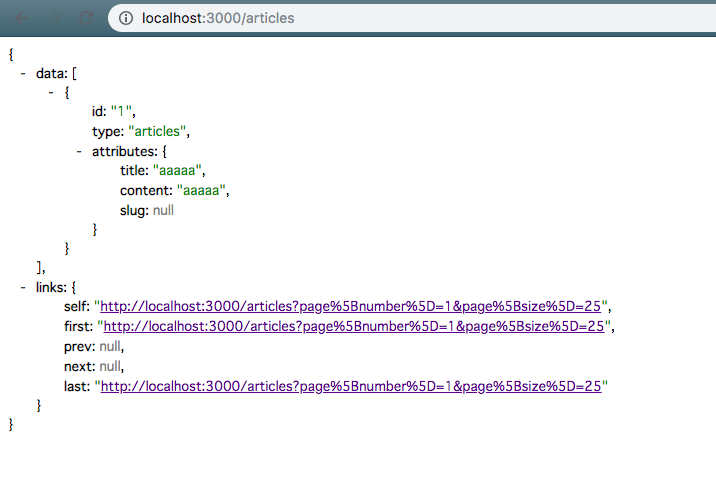
app/controllers/articles_controller.rbclass ArticlesController < ApplicationController def index end def show end end$ rspec spec/routing/articles_spec.rb .. Finished in 0.02241 seconds (files took 1.42 seconds to load) 2 examples, 0 failuresでは、実際にlocalhostで、/articlesを確認してみよう。
確認する前に、articles_conrollers.rbのindexアクションに、render jsonを加えておく。app/controllers/articles_controller.rbclass ArticlesController < ApplicationController def index render json: 'hello' end def show end end$rails shello
が表示されれば、OK。
active_model_serializersのインストール
active_model_serializers をインストールする。
RailsでWeb APIを作る時は、JSON形式でレスポンスを返すパターンが多い。
しかし、レスピンスにcreated_atやupdated_atを含むたくない場合がある。
このような制御を行う場合に便利なのが、active_model_serializersである。gemfilegem 'active_model_serializers'$bundle install$ rails g serializer article title content slug Running via Spring preloader in process 6180 create app/serializers/article_serializer.rb/config/initializers/active_model_serializers.rbActiveModelSerializers.config.adapter = :json_apiactive_model_serializers の準備が整いました。
では、コントローラーのテストを書いて見ます。spec/controllers/articles_controller_spec.rbrequire 'rails_helper' describe ArticlesController do describe '#index' do example '成功した場合のレスポンスのテスト' do get :index expect(response).to have_http_status(:ok) end example '適切なjsonを返すテスト' do create_list :article, 2 get :index json = JSON.parse(response.body) pp json end end end
example '適切なjsonを返すテスト' do
以下には、articleのインスタンスを2つ生成し、indexをgetし、json形式でapiを生成するということが書かれている。spec/factories/article.rbFactoryBot.define do factory :article do sequence(:title){ |n| "記事のタイトル #{n}" } sequence(:content){ |n| "記事のコンテンツ #{n}" } sequence(:slug){ |n| "記事の番号 #{n}" } end endこれでテストを実行してみる
$ rspec spec/controllers/articles_controller_spec.rb

.F

Failures:

  1) ArticlesController#index 適切なjsonを返すテスト
     Failure/Error: create_list :article, 2

     NoMethodError:
       undefined method `create_list' for #<RSpec::ExampleGroups::ArticlesController::Index:0x00007f87782ae7f0>
     # ./spec/controllers/articles_controller_spec.rb:12:in `block (3 levels) in <top (required)>
おや?create_listがNoMethodで返ってきている。
rails_helperに以下の記述を忘れていたspec/rails_helper.rbconfig.include FactoryBot::Syntax::Methodsこれでどうだ。
$ rspec spec/controllers/articles_controller_spec.rb

.{"data"=>
  [{"id"=>"1",
    "type"=>"articles",
    "attributes"=>
     {"title"=>"記事のタイトル 1", "content"=>"記事のコンテンツ 1", "slug"=>"記事の番号 1"}},
   {"id"=>"2",
    "type"=>"articles",
    "attributes"=>
     {"title"=>"記事のタイトル 2", "content"=>"記事のコンテンツ 2", "slug"=>"記事の番号 2"}}]}
.

Finished in 0.05575 seconds (files took 1.41 seconds to load)
2 examples, 0 failures
created_atやupdated_atがなくなった状態でjson形式のAPIが出力できた下記のようにテストを書いてみる
spec/controllers/articles_controller_spec.rbrequire 'rails_helper' describe ArticlesController do describe '#index' do example '成功した場合のレスポンスのテスト' do get :index expect(response).to have_http_status(:ok) end example '適切なjsonを返すテスト' do create_list :article, 2 get :index json = JSON.parse(response.body) pp json json_data = json['data'] expect(json_data.length).to eq(2) expect(json_data[0]['attributes']).to eq({ "title" => "記事のタイトル 1", "content" => "記事のコンテンツ 1", "slug" => "記事の番号 1" }) expect(json_data[1]['attributes']).to eq({ "title" => "記事のタイトル 2", "content" => "記事のコンテンツ 2", "slug" => "記事の番号 2" }) end end end$ rspec spec/controllers/articles_controller_spec.rb .{"data"=> [{"id"=>"1", "type"=>"articles", "attributes"=> {"title"=>"記事のタイトル 1", "content"=>"記事のコンテンツ 1", "slug"=>"記事の番号 1"}}, {"id"=>"2", "type"=>"articles", "attributes"=> {"title"=>"記事のタイトル 2", "content"=>"記事のコンテンツ 2", "slug"=>"記事の番号 2"}}]} . Finished in 0.05521 seconds (files took 1.42 seconds to load) 2 examples, 0 failuresテストが通った!
では、先ほどのコードを整えてみる
spec/controllers/articles_controller_spec.rbrequire 'rails_helper' describe ArticlesController do describe '#index' do example '成功した場合のレスポンスのテスト' do get :index expect(response).to have_http_status(:ok) end example '適切なjsonを返すテスト' do articles = create_list :article, 2 get :index json = JSON.parse(response.body) pp json json_data = json['data'] articles.each_with_index do |article, index| expect(json_data[index]['attributes']).to eq({ "title" => article.title, "content" => article.content, "slug" => article.slug }) end end end end上記のままだと、
get :indexが重複して活用されていたり、json["data"]やJSON.parse(response.body)などjsonに関わる記述は外に出して見やすくしたい。そこでspec/supportを活用する
その前に、rails_helper.rbでspec/supportディレクトリのファイルを読み込む設定をするspec/rails_helper.rbDir[Rails.root.join('spec', 'support', '**', '*.rb')].each { |f| require f }そしてsupportディレクトリを作成し、json_api_helpers.rbというファイルを作成する
spec/support/json_api_helpers.rbmodule JsonApiHelpers def json JSON.parse(response.body) end def json_data json["data"] end end
subjectを活用しget :indexの重複記述をなくす。spec/controllers/articles_controller_spec.rbrequire 'rails_helper' describe ArticlesController do describe '#index' do subject { get :index } example '成功した場合のレスポンスのテスト' do subject expect(response).to have_http_status(:ok) end example '適切なjsonを返すテスト' do articles = create_list :article, 2 subject articles.each_with_index do |article, index| expect(json_data[index]['attributes']).to eq({ "title" => article.title, "content" => article.content, "slug" => article.slug }) end end end endここまでできたら、一度テストをしてみる
$ rspec spec/controllers/articles_controller_spec.rb

..

Finished in 0.06546 seconds (files took 1.6 seconds to load)
2 examples, 0 failures
すううううぅう。
paginationをテストしてみる
まずは、kaminari をインストールする
gemfilegem 'kaminari'$bundle installページネーションのテストをするために、コントローラを以下のようにかく
app/controllers/articles_controller.rbarticles = Article.recent.page(params[:page]).per(params[:per_page])そしてテストコードをかく
spec/controllers/articles_controller_spec.rbexample 'ページネーションのテスト' do create_list :article, 3 get :index, params: { page: 2, per_page: 1 } expect(json_data.length).to eq 1 expected_article = Article.recent.second.id.to_s expect(json_data.first['id']).to eq(expected_article) end$ rspec spec/controllers/articles_controller_spec.rb . Finished in 0.04801 seconds (files took 1.57 seconds to load) 1 example, 0 failures
rails sで確認
self:last:の記載を確認
seed.rbでテストデータを作成して確認するdbArticle.create([ { title: '記事のタイトル 1', content: '記事の本文 1', slug: '記事番号 1'}, { title: '記事のタイトル 2', content: '記事の本文 2', slug: '記事番号 2'}, { title: '記事のタイトル 3', content: '記事の本文 3', slug: '記事番号 3'} ])$ rails db:seed$rails c 2.5.3 :001 > Article.count (0.6ms) SELECT COUNT(*) FROM "articles" => 4
- 投稿日:2019-04-03T01:04:07+09:00
Rails初学者が次に覚えるべきルーティング
ルーティングを制するものはRailsを制す!
目次
・rootとなるURLを指定する
・パスごとに個々のルーティングを設定する
・resources
・id以外のパスを指定するparamオプション
・単数 resource
・resourcesのネスト
・アクションの絞り込み
・onlyオプション
・exceprオプション
・アクションの追加
・member
・collection
・ルーティングをまとめる
・namespace
・scope
・module
・おわりにrootとなるURLを指定する
routes.rbroot to: "toppages#index"生成されるパスPrefix Verb URI Pattern Controller#Action root GET / toppages#indexパスごとに個々のルーティングを設定する
routes.rbget 'users/:id', to: 'users#show', as: 'users'生成されるパスPrefix Verb URI Pattern Controller#Action users GET /users/:id(.:format) users#show
asオプションを使うことでルート名(Prefix)を指定することができます。resources
RESTfulなURLを生成できる
resourcesはルーティングの基本です。routes.rbresources :users生成されるパスPrefix Verb URI Pattern Controller#Action users GET /users(.:format) users#index POST /users(.:format) users#create new_user GET /users/new(.:format) users#new edit_user GET /users/:id/edit(.:format) users#edit user GET /users/:id(.:format) users#show PATCH /users/:id(.:format) users#update PUT /users/:id(.:format) users#update DELETE /users/:id(.:format) users#destroy複数のリソースを同時に定義することもできます。
resources :users, :tweets, :photosid以外のパスを指定するparamオプション
showやeditなどのidを指定するアクションでは
paramオプションを使ってid以外の値をパスに指定することもできます。
例えば、idの代わりにuser_nameを使う場合は以下のようになります。routes.rbresources :users, param: :user_name生成されるパスPrefix Verb URI Pattern Controller#Action users GET /users(.:format) users#index POST /users(.:format) users#create new_user GET /users/new(.:format) users#new edit_user GET /users/:user_name/edit(.:format) users#edit user GET /users/:user_name(.:format) users#show PATCH /users/:user_name(.:format) users#update PUT /users/:user_name(.:format) users#update DELETE /users/:user_name(.:format) users#destroy単数 resource
idの振り分けが不要なページでは単数形のresourceでRESTfulなURLを生成できます。
routes.rbresource :users生成されるパスPrefix Verb URI Pattern Controller#Action new_users GET /users/new(.:format) users#new edit_users GET /users/edit(.:format) users#edit users GET /users(.:format) users#show PATCH /users(.:format) users#update PUT /users(.:format) users#update DELETE /users(.:format) users#destroy POST /users(.:format) users#createresourcesのネスト
resourcesブロックの中に別のresourcesをネストさせた場合のルーティングは以下のようになります。usersのRESTfulなURLが生成される他にネストされたtweetsのRESTfulなURLも生成されます。ネストさせる場合も必要に応じて単数resourceを使いましょう。routes.rbresources :users do resources :tweets end生成されるパスPrefix Verb URI Pattern Controller#Action user_tweets GET /users/:user_id/tweets(.:format) tweets#index POST /users/:user_id/tweets(.:format) tweets#create new_user_tweet GET /users/:user_id/tweets/new(.:format) tweets#new edit_user_tweet GET /users/:user_id/tweets/:id/edit(.:format) tweets#edit user_tweet GET /users/:user_id/tweets/:id(.:format) tweets#show PATCH /users/:user_id/tweets/:id(.:format) tweets#update PUT /users/:user_id/tweets/:id(.:format) tweets#update DELETE /users/:user_id/tweets/:id(.:format) tweets#destroy users GET /users(.:format) users#index POST /users(.:format) users#create new_user GET /users/new(.:format) users#new edit_user GET /users/:id/edit(.:format) users#edit user GET /users/:id(.:format) users#show PATCH /users/:id(.:format) users#update PUT /users/:id(.:format) users#update DELETE /users/:id(.:format) users#destroyアクションの絞り込み
resourcesを使うとRESTfulなURLを簡単に生成できますが、必ずしも全てのアクションが必要とは限りません。不要なデフォルトアクションはオプションで絞り込みましょう。only オプション
使用するデフォルトアクションが少ない場合はonly オプションが便利です。
routes.rbresources :users, only: [:index, :show]生成されるパスPrefix Verb URI Pattern Controller#Action users GET /users(.:format) users#index user GET /users/:id(.:format) users#showexcept オプション
使用するデフォルトアクションが多い場合はexcept オプションが便利です。
routes.rbresources :users, except: [:show, :destroy]生成されるパスPrefix Verb URI Pattern Controller#Action users GET /users(.:format) users#index POST /users(.:format) users#create new_user GET /users/new(.:format) users#new edit_user GET /users/:id/edit(.:format) users#edit user PATCH /users/:id(.:format) users#update PUT /users/:id(.:format) users#updateアクションの追加
Rails標準のindex, show, new, edit, create, update, destroy 以外のアクションを追加する場合には
memberまたはcollectionを使います。
両者にはmemberではidを伴うパスが生成され、collectionではidのないパスが生成されるという違いがあります。member
memberはidを伴うパスの生成に使います。routes.rbresources :users do member do get :search end end追加で生成されるパスPrefix Verb URI Pattern Controller#Action search_user GET /users/:id/search(.:format) users#search ~省略~collection
idの指定をしないパスの生成には
collectionを使います。routes.rbresources :users do collection do get :search end end追加で生成されるパスPrefix Verb URI Pattern Controller#Action search_users GET /users/search(.:format) users#search ~省略~ルーティングをまとめる
続いてルーティングをまとめていきます。ルーティングをまとめることでアプリケーション全体の構成も整理されます。
namespace
ルーティングを名前空間
namespaceのブロックで囲むとパスとコントローラーを指定のディレクトリ配下におくことができます。routes.rbnamespace :admin do resources :users end生成されるパスPrefix Verb URI Pattern Controller#Action admin_users GET /admin/users(.:format) admin/users#index POST /admin/users(.:format) admin/users#create new_admin_user GET /admin/users/new(.:format) admin/users#new edit_admin_user GET /admin/users/:id/edit(.:format) admin/users#edit admin_user GET /admin/users/:id(.:format) admin/users#show PATCH /admin/users/:id(.:format) admin/users#update PUT /admin/users/:id(.:format) admin/users#update DELETE /admin/users/:id(.:format) admin/users#destroyscope
パスのみを指定のディレクトリ配下におく場合は
scopeを使います。routes.rbscope '/admin' do resources :users end生成されるパスPrefix Verb URI Pattern Controller#Action users GET /admin/users(.:format) users#index POST /admin/users(.:format) users#create new_user GET /admin/users/new(.:format) users#new edit_user GET /admin/users/:id/edit(.:format) users#edit user GET /admin/users/:id(.:format) users#show PATCH /admin/users/:id(.:format) users#update PUT /admin/users/:id(.:format) users#update DELETE /admin/users/:id(.:format) users#destroymodule
コントローラーのみを指定のディレクトリ配下におく場合は
moduleを使います。routes.rbscope module: :admin do resources :users end生成されるパスPrefix Verb URI Pattern Controller#Action users GET /users(.:format) admin/users#index POST /users(.:format) admin/users#create new_user GET /users/new(.:format) admin/users#new edit_user GET /users/:id/edit(.:format) admin/users#edit user GET /users/:id(.:format) admin/users#show PATCH /users/:id(.:format) admin/users#update PUT /users/:id(.:format) admin/users#update DELETE /users/:id(.:format) admin/users#destroyおわりに
細かいルーティングのオプションは他にもありますが、まずはここで紹介したものが組み合わせて使えると良いと思います。ありがとうございました。
- 投稿日:2019-04-03T01:04:07+09:00
Rails ルーティングのまとめ
ルーティングを制するものはRailsを制す!
目次
・rootとなるURLを指定する
・パスごとに個々のルーティングを設定する
・resources
・id以外のパスを指定するparamオプション
・単数 resource
・resourcesのネスト
・アクションの絞り込み
・onlyオプション
・exceprオプション
・アクションの追加
・member
・collection
・ルーティングをまとめる
・namespace
・scope
・module
・おわりにrootとなるURLを指定する
routes.rbroot to: "toppages#index"生成されるパスPrefix Verb URI Pattern Controller#Action root GET / toppages#indexパスごとに個々のルーティングを設定する
routes.rbget 'users/:id', to: 'users#show', as: 'users'生成されるパスPrefix Verb URI Pattern Controller#Action users GET /users/:id(.:format) users#show
asオプションを使うことでルート名(Prefix)を指定することができます。resources
RESTfulなURLを生成できる
resourcesはルーティングの基本です。routes.rbresources :users生成されるパスPrefix Verb URI Pattern Controller#Action users GET /users(.:format) users#index POST /users(.:format) users#create new_user GET /users/new(.:format) users#new edit_user GET /users/:id/edit(.:format) users#edit user GET /users/:id(.:format) users#show PATCH /users/:id(.:format) users#update PUT /users/:id(.:format) users#update DELETE /users/:id(.:format) users#destroy複数のリソースを同時に定義することもできます。
resources :users, :tweets, :photosid以外のパスを指定するparamオプション
showやeditなどのidを指定するアクションでは
paramオプションを使ってid以外の値をパスに指定することもできます。
例えば、idの代わりにuser_nameを使う場合は以下のようになります。routes.rbresources :users, param: :user_name生成されるパスPrefix Verb URI Pattern Controller#Action users GET /users(.:format) users#index POST /users(.:format) users#create new_user GET /users/new(.:format) users#new edit_user GET /users/:user_name/edit(.:format) users#edit user GET /users/:user_name(.:format) users#show PATCH /users/:user_name(.:format) users#update PUT /users/:user_name(.:format) users#update DELETE /users/:user_name(.:format) users#destroy単数 resource
idの振り分けが不要なページでは単数形のresourceでRESTfulなURLを生成できます。
routes.rbresource :users生成されるパスPrefix Verb URI Pattern Controller#Action new_users GET /users/new(.:format) users#new edit_users GET /users/edit(.:format) users#edit users GET /users(.:format) users#show PATCH /users(.:format) users#update PUT /users(.:format) users#update DELETE /users(.:format) users#destroy POST /users(.:format) users#createresourcesのネスト
resourcesブロックの中に別のresourcesをネストさせた場合のルーティングは以下のようになります。usersのRESTfulなURLが生成される他にネストされたtweetsのRESTfulなURLも生成されます。ネストさせる場合も必要に応じて単数resourceを使いましょう。routes.rbresources :users do resources :tweets end生成されるパスPrefix Verb URI Pattern Controller#Action user_tweets GET /users/:user_id/tweets(.:format) tweets#index POST /users/:user_id/tweets(.:format) tweets#create new_user_tweet GET /users/:user_id/tweets/new(.:format) tweets#new edit_user_tweet GET /users/:user_id/tweets/:id/edit(.:format) tweets#edit user_tweet GET /users/:user_id/tweets/:id(.:format) tweets#show PATCH /users/:user_id/tweets/:id(.:format) tweets#update PUT /users/:user_id/tweets/:id(.:format) tweets#update DELETE /users/:user_id/tweets/:id(.:format) tweets#destroy users GET /users(.:format) users#index POST /users(.:format) users#create new_user GET /users/new(.:format) users#new edit_user GET /users/:id/edit(.:format) users#edit user GET /users/:id(.:format) users#show PATCH /users/:id(.:format) users#update PUT /users/:id(.:format) users#update DELETE /users/:id(.:format) users#destroyアクションの絞り込み
resourcesを使うとRESTfulなURLを簡単に生成できますが、必ずしも全てのアクションが必要とは限りません。不要なデフォルトアクションはオプションで絞り込みましょう。only オプション
使用するデフォルトアクションが少ない場合はonly オプションが便利です。
routes.rbresources :users, only: [:index, :show]生成されるパスPrefix Verb URI Pattern Controller#Action users GET /users(.:format) users#index user GET /users/:id(.:format) users#showexcept オプション
使用するデフォルトアクションが多い場合はexcept オプションが便利です。
routes.rbresources :users, except: [:show, :destroy]生成されるパスPrefix Verb URI Pattern Controller#Action users GET /users(.:format) users#index POST /users(.:format) users#create new_user GET /users/new(.:format) users#new edit_user GET /users/:id/edit(.:format) users#edit user PATCH /users/:id(.:format) users#update PUT /users/:id(.:format) users#updateアクションの追加
Rails標準のindex, show, new, edit, create, update, destroy 以外のアクションを追加する場合には
memberまたはcollectionを使います。
両者にはmemberではidを伴うパスが生成され、collectionではidのないパスが生成されるという違いがあります。member
memberはidを伴うパスの生成に使います。routes.rbresources :users do member do get :search end end追加で生成されるパスPrefix Verb URI Pattern Controller#Action search_user GET /users/:id/search(.:format) users#search ~省略~collection
idの指定をしないパスの生成には
collectionを使います。routes.rbresources :users do collection do get :search end end追加で生成されるパスPrefix Verb URI Pattern Controller#Action search_users GET /users/search(.:format) users#search ~省略~ルーティングをまとめる
続いてルーティングをまとめていきます。ルーティングをまとめることでアプリケーション全体の構成も整理されます。
namespace
ルーティングを名前空間
namespaceのブロックで囲むとパスとコントローラーを指定のディレクトリ配下におくことができます。routes.rbnamespace :admin do resources :users end生成されるパスPrefix Verb URI Pattern Controller#Action admin_users GET /admin/users(.:format) admin/users#index POST /admin/users(.:format) admin/users#create new_admin_user GET /admin/users/new(.:format) admin/users#new edit_admin_user GET /admin/users/:id/edit(.:format) admin/users#edit admin_user GET /admin/users/:id(.:format) admin/users#show PATCH /admin/users/:id(.:format) admin/users#update PUT /admin/users/:id(.:format) admin/users#update DELETE /admin/users/:id(.:format) admin/users#destroyscope
パスのみを指定のディレクトリ配下におく場合は
scopeを使います。routes.rbscope '/admin' do resources :users end生成されるパスPrefix Verb URI Pattern Controller#Action users GET /admin/users(.:format) users#index POST /admin/users(.:format) users#create new_user GET /admin/users/new(.:format) users#new edit_user GET /admin/users/:id/edit(.:format) users#edit user GET /admin/users/:id(.:format) users#show PATCH /admin/users/:id(.:format) users#update PUT /admin/users/:id(.:format) users#update DELETE /admin/users/:id(.:format) users#destroymodule
コントローラーのみを指定のディレクトリ配下におく場合は
moduleを使います。routes.rbscope module: :admin do resources :users end生成されるパスPrefix Verb URI Pattern Controller#Action users GET /users(.:format) admin/users#index POST /users(.:format) admin/users#create new_user GET /users/new(.:format) admin/users#new edit_user GET /users/:id/edit(.:format) admin/users#edit user GET /users/:id(.:format) admin/users#show PATCH /users/:id(.:format) admin/users#update PUT /users/:id(.:format) admin/users#update DELETE /users/:id(.:format) admin/users#destroyおわりに
細かいルーティングのオプションは他にもありますが、まずはここで紹介したものが組み合わせて使えると良いと思います。ありがとうございました。
- 投稿日:2019-04-03T01:04:07+09:00
綺麗なRailsルーティングを書こう
ルーティングを制するものはRailsを制す!
目次
・rootとなるURLを指定する
・パスごとに個々のルーティングを設定する
・resources
・id以外のパスを指定するparamオプション
・単数 resource
・resourcesのネスト
・アクションの絞り込み
・onlyオプション
・exceprオプション
・アクションの追加
・member
・collection
・ルーティングをまとめる
・namespace
・scope
・module
・おわりにrootとなるURLを指定する
routes.rbroot to: "toppages#index"生成されるパスPrefix Verb URI Pattern Controller#Action root GET / toppages#indexパスごとに個々のルーティングを設定する
routes.rbget 'users/:id', to: 'users#show', as: 'users'生成されるパスPrefix Verb URI Pattern Controller#Action users GET /users/:id(.:format) users#show
asオプションを使うことでルート名(Prefix)を指定することができます。resources
RESTfulなURLを生成できる
resourcesはルーティングの基本です。routes.rbresources :users生成されるパスPrefix Verb URI Pattern Controller#Action users GET /users(.:format) users#index POST /users(.:format) users#create new_user GET /users/new(.:format) users#new edit_user GET /users/:id/edit(.:format) users#edit user GET /users/:id(.:format) users#show PATCH /users/:id(.:format) users#update PUT /users/:id(.:format) users#update DELETE /users/:id(.:format) users#destroy複数のリソースを同時に定義することもできます。
resources :users, :tweets, :photosid以外のパスを指定するparamオプション
showやeditなどのidを指定するアクションでは
paramオプションを使ってid以外の値をパスに指定することもできます。
例えば、idの代わりにuser_nameを使う場合は以下のようになります。routes.rbresources :users, param: :user_name生成されるパスPrefix Verb URI Pattern Controller#Action users GET /users(.:format) users#index POST /users(.:format) users#create new_user GET /users/new(.:format) users#new edit_user GET /users/:user_name/edit(.:format) users#edit user GET /users/:user_name(.:format) users#show PATCH /users/:user_name(.:format) users#update PUT /users/:user_name(.:format) users#update DELETE /users/:user_name(.:format) users#destroy単数 resource
idの振り分けが不要なページでは単数形のresourceでRESTfulなURLを生成できます。
routes.rbresource :users生成されるパスPrefix Verb URI Pattern Controller#Action new_users GET /users/new(.:format) users#new edit_users GET /users/edit(.:format) users#edit users GET /users(.:format) users#show PATCH /users(.:format) users#update PUT /users(.:format) users#update DELETE /users(.:format) users#destroy POST /users(.:format) users#createresourcesのネスト
resourcesブロックの中に別のresourcesをネストさせた場合のルーティングは以下のようになります。usersのRESTfulなURLが生成される他にネストされたtweetsのRESTfulなURLも生成されます。ネストさせる場合も必要に応じて単数resourceを使いましょう。routes.rbresources :users do resources :tweets end生成されるパスPrefix Verb URI Pattern Controller#Action user_tweets GET /users/:user_id/tweets(.:format) tweets#index POST /users/:user_id/tweets(.:format) tweets#create new_user_tweet GET /users/:user_id/tweets/new(.:format) tweets#new edit_user_tweet GET /users/:user_id/tweets/:id/edit(.:format) tweets#edit user_tweet GET /users/:user_id/tweets/:id(.:format) tweets#show PATCH /users/:user_id/tweets/:id(.:format) tweets#update PUT /users/:user_id/tweets/:id(.:format) tweets#update DELETE /users/:user_id/tweets/:id(.:format) tweets#destroy users GET /users(.:format) users#index POST /users(.:format) users#create new_user GET /users/new(.:format) users#new edit_user GET /users/:id/edit(.:format) users#edit user GET /users/:id(.:format) users#show PATCH /users/:id(.:format) users#update PUT /users/:id(.:format) users#update DELETE /users/:id(.:format) users#destroyアクションの絞り込み
resourcesを使うとRESTfulなURLを簡単に生成できますが、必ずしも全てのアクションが必要とは限りません。不要なデフォルトアクションはオプションで絞り込みましょう。only オプション
使用するデフォルトアクションが少ない場合はonly オプションが便利です。
routes.rbresources :users, only: [:index, :show]生成されるパスPrefix Verb URI Pattern Controller#Action users GET /users(.:format) users#index user GET /users/:id(.:format) users#showexcept オプション
使用するデフォルトアクションが多い場合はexcept オプションが便利です。
routes.rbresources :users, except: [:show, :destroy]生成されるパスPrefix Verb URI Pattern Controller#Action users GET /users(.:format) users#index POST /users(.:format) users#create new_user GET /users/new(.:format) users#new edit_user GET /users/:id/edit(.:format) users#edit user PATCH /users/:id(.:format) users#update PUT /users/:id(.:format) users#updateアクションの追加
Rails標準のindex, show, new, edit, create, update, destroy 以外のアクションを追加する場合には
memberまたはcollectionを使います。
両者にはmemberではidを伴うパスが生成され、collectionではidのないパスが生成されるという違いがあります。member
memberはidを伴うパスの生成に使います。routes.rbresources :users do member do get :search end end追加で生成されるパスPrefix Verb URI Pattern Controller#Action search_user GET /users/:id/search(.:format) users#search ~省略~collection
idの指定をしないパスの生成には
collectionを使います。routes.rbresources :users do collection do get :search end end追加で生成されるパスPrefix Verb URI Pattern Controller#Action search_users GET /users/search(.:format) users#search ~省略~ルーティングをまとめる
続いてルーティングをまとめていきます。ルーティングをまとめることでアプリケーション全体の構成も整理されます。
namespace
ルーティングを名前空間
namespaceのブロックで囲むとパスとコントローラーを指定のディレクトリ配下におくことができます。routes.rbnamespace :admin do resources :users end生成されるパスPrefix Verb URI Pattern Controller#Action admin_users GET /admin/users(.:format) admin/users#index POST /admin/users(.:format) admin/users#create new_admin_user GET /admin/users/new(.:format) admin/users#new edit_admin_user GET /admin/users/:id/edit(.:format) admin/users#edit admin_user GET /admin/users/:id(.:format) admin/users#show PATCH /admin/users/:id(.:format) admin/users#update PUT /admin/users/:id(.:format) admin/users#update DELETE /admin/users/:id(.:format) admin/users#destroyscope
パスのみを指定のディレクトリ配下におく場合は
scopeを使います。routes.rbscope '/admin' do resources :users end生成されるパスPrefix Verb URI Pattern Controller#Action users GET /admin/users(.:format) users#index POST /admin/users(.:format) users#create new_user GET /admin/users/new(.:format) users#new edit_user GET /admin/users/:id/edit(.:format) users#edit user GET /admin/users/:id(.:format) users#show PATCH /admin/users/:id(.:format) users#update PUT /admin/users/:id(.:format) users#update DELETE /admin/users/:id(.:format) users#destroymodule
コントローラーのみを指定のディレクトリ配下におく場合は
moduleを使います。routes.rbscope module: :admin do resources :users end生成されるパスPrefix Verb URI Pattern Controller#Action users GET /users(.:format) admin/users#index POST /users(.:format) admin/users#create new_user GET /users/new(.:format) admin/users#new edit_user GET /users/:id/edit(.:format) admin/users#edit user GET /users/:id(.:format) admin/users#show PATCH /users/:id(.:format) admin/users#update PUT /users/:id(.:format) admin/users#update DELETE /users/:id(.:format) admin/users#destroyおわりに
細かいルーティングのオプションは他にもありますが、まずはここで紹介したものが組み合わせて使えると良いと思います。ありがとうございました。
- 投稿日:2019-04-03T01:04:07+09:00
Rails ルーティングのすべて
※ルーティングのすべてと言っておきながら「すべて」ではありません。ごめんなさい。
ルーティングを制するものはRailsを制す!
目次
・rootとなるURLを指定する
・パスごとに個々のルーティングを設定する
・resources
・id以外のパスを指定するparamオプション
・単数 resource
・resourcesのネスト
・アクションの絞り込み
・onlyオプション
・exceprオプション
・アクションの追加
・member
・collection
・ルーティングをまとめる
・namespace
・scope
・module
・おわりにrootとなるURLを指定する
routes.rbroot to: "toppages#index"生成されるパスPrefix Verb URI Pattern Controller#Action root GET / toppages#indexパスごとに個々のルーティングを設定する
routes.rbget 'users/:id', to: 'users#show', as: 'users'生成されるパスPrefix Verb URI Pattern Controller#Action users GET /users/:id(.:format) users#show
asオプションを使うことでルート名(Prefix)を指定することができます。resources
RESTfulなURLを生成できる
resourcesはルーティングの基本です。routes.rbresources :users生成されるパスPrefix Verb URI Pattern Controller#Action users GET /users(.:format) users#index POST /users(.:format) users#create new_user GET /users/new(.:format) users#new edit_user GET /users/:id/edit(.:format) users#edit user GET /users/:id(.:format) users#show PATCH /users/:id(.:format) users#update PUT /users/:id(.:format) users#update DELETE /users/:id(.:format) users#destroy複数のリソースを同時に定義することもできます。
resources :users, :tweets, :photosid以外のパスを指定するparamオプション
showやeditなどのidを指定するアクションでは
paramオプションを使ってid以外の値をパスに指定することもできます。
例えば、idの代わりにuser_nameを使う場合は以下のようになります。routes.rbresources :users, param: :user_name生成されるパスPrefix Verb URI Pattern Controller#Action users GET /users(.:format) users#index POST /users(.:format) users#create new_user GET /users/new(.:format) users#new edit_user GET /users/:user_name/edit(.:format) users#edit user GET /users/:user_name(.:format) users#show PATCH /users/:user_name(.:format) users#update PUT /users/:user_name(.:format) users#update DELETE /users/:user_name(.:format) users#destroy単数 resource
idの振り分けが不要なページでは単数形のresourceでRESTfulなURLを生成できます。
routes.rbresource :users生成されるパスPrefix Verb URI Pattern Controller#Action new_users GET /users/new(.:format) users#new edit_users GET /users/edit(.:format) users#edit users GET /users(.:format) users#show PATCH /users(.:format) users#update PUT /users(.:format) users#update DELETE /users(.:format) users#destroy POST /users(.:format) users#createresourcesのネスト
resourcesブロックの中に別のresourcesをネストさせた場合のルーティングは以下のようになります。usersのRESTfulなURLが生成される他にネストされたtweetsのRESTfulなURLも生成されます。ネストさせる場合も必要に応じて単数resourceを使いましょう。routes.rbresources :users do resources :tweets end生成されるパスPrefix Verb URI Pattern Controller#Action user_tweets GET /users/:user_id/tweets(.:format) tweets#index POST /users/:user_id/tweets(.:format) tweets#create new_user_tweet GET /users/:user_id/tweets/new(.:format) tweets#new edit_user_tweet GET /users/:user_id/tweets/:id/edit(.:format) tweets#edit user_tweet GET /users/:user_id/tweets/:id(.:format) tweets#show PATCH /users/:user_id/tweets/:id(.:format) tweets#update PUT /users/:user_id/tweets/:id(.:format) tweets#update DELETE /users/:user_id/tweets/:id(.:format) tweets#destroy users GET /users(.:format) users#index POST /users(.:format) users#create new_user GET /users/new(.:format) users#new edit_user GET /users/:id/edit(.:format) users#edit user GET /users/:id(.:format) users#show PATCH /users/:id(.:format) users#update PUT /users/:id(.:format) users#update DELETE /users/:id(.:format) users#destroyアクションの絞り込み
resourcesを使うとRESTfulなURLを簡単に生成できますが、必ずしも全てのアクションが必要とは限りません。不要なデフォルトアクションはオプションで絞り込みましょう。only オプション
使用するデフォルトアクションが少ない場合はonly オプションが便利です。
routes.rbresources :users, only: [:index, :show]生成されるパスPrefix Verb URI Pattern Controller#Action users GET /users(.:format) users#index user GET /users/:id(.:format) users#showexcept オプション
使用するデフォルトアクションが多い場合はexcept オプションが便利です。
routes.rbresources :users, except: [:show, :destroy]生成されるパスPrefix Verb URI Pattern Controller#Action users GET /users(.:format) users#index POST /users(.:format) users#create new_user GET /users/new(.:format) users#new edit_user GET /users/:id/edit(.:format) users#edit user PATCH /users/:id(.:format) users#update PUT /users/:id(.:format) users#updateアクションの追加
Rails標準のindex, show, new, edit, create, update, destroy 以外のアクションを追加する場合には
memberまたはcollectionを使います。
両者にはmemberではidを伴うパスが生成され、collectionではidのないパスが生成されるという違いがあります。member
memberはidを伴うパスの生成に使います。routes.rbresources :users do member do get :search end end追加で生成されるパスPrefix Verb URI Pattern Controller#Action search_user GET /users/:id/search(.:format) users#search ~省略~collection
idの指定をしないパスの生成には
collectionを使います。routes.rbresources :users do collection do get :search end end追加で生成されるパスPrefix Verb URI Pattern Controller#Action search_users GET /users/search(.:format) users#search ~省略~ルーティングをまとめる
続いてルーティングをまとめていきます。ルーティングをまとめることでアプリケーション全体の構成も整理されます。
namespace
ルーティングを名前空間
namespaceのブロックで囲むとパスとコントローラーを指定のディレクトリ配下におくことができます。routes.rbnamespace :admin do resources :users end生成されるパスPrefix Verb URI Pattern Controller#Action admin_users GET /admin/users(.:format) admin/users#index POST /admin/users(.:format) admin/users#create new_admin_user GET /admin/users/new(.:format) admin/users#new edit_admin_user GET /admin/users/:id/edit(.:format) admin/users#edit admin_user GET /admin/users/:id(.:format) admin/users#show PATCH /admin/users/:id(.:format) admin/users#update PUT /admin/users/:id(.:format) admin/users#update DELETE /admin/users/:id(.:format) admin/users#destroyscope
パスのみを指定のディレクトリ配下におく場合は
scopeを使います。routes.rbscope '/admin' do resources :users end生成されるパスPrefix Verb URI Pattern Controller#Action users GET /admin/users(.:format) users#index POST /admin/users(.:format) users#create new_user GET /admin/users/new(.:format) users#new edit_user GET /admin/users/:id/edit(.:format) users#edit user GET /admin/users/:id(.:format) users#show PATCH /admin/users/:id(.:format) users#update PUT /admin/users/:id(.:format) users#update DELETE /admin/users/:id(.:format) users#destroymodule
コントローラーのみを指定のディレクトリ配下におく場合は
moduleを使います。routes.rbscope module: :admin do resources :users end生成されるパスPrefix Verb URI Pattern Controller#Action users GET /users(.:format) admin/users#index POST /users(.:format) admin/users#create new_user GET /users/new(.:format) admin/users#new edit_user GET /users/:id/edit(.:format) admin/users#edit user GET /users/:id(.:format) admin/users#show PATCH /users/:id(.:format) admin/users#update PUT /users/:id(.:format) admin/users#update DELETE /users/:id(.:format) admin/users#destroyおわりに
細かいルーティングのオプションは他にもありますが、まずはここで紹介したものが組み合わせて使えると良いと思います。ありがとうございました。
- 投稿日:2019-04-03T00:29:16+09:00
[Ruby] 真偽値を返すメソッドの実装について
Ruby で true / false を返すメソッドの実装について、いくつか書き方があると思ったのでまとめてみた。
前提
こんな感じの仕様のメソッドを実装するときのことを考える
下記条件を全て満たす場合 "true" を返し、それ以外の場合は "false" を返す、ポイント付与可能かどうかを判定するメソッド - ログインユーザーであること - ユーザーのステータスコードが "1" であること<条件を整理する>
logged_in? user.status_code 結果 true 1 true true 0 false false 1 false false 0 false 1. 真面目実装
超真面目に実装するとこうなる。こんな書き方をしたのは久しぶりなので、なんだか気持ち悪い。こういう書き方は Ruby だとあまり見ないかも?
def pointable? if logged_in? if user.status_code == '1' true else false end else false end end2. 比較演算子
比較演算子を使って実装する。
def pointable? logged_in? && user.status_code == '1' end※ Ruby 触り始めは、こんな風に書いていたなー。
def pointable? (logged_in? && user.status_code == '1') ? true : false end3. ガード節
- 全て満たす場合に "true" なので、ひとつでも "false" になる条件があったらその時点で return する
- 結構よく見る
- ネストが浅くなるので読みやすい
- 正常系とエラー系の処理が別れていて読みやすい
- 最後の "true" を書き忘れることがあるが(実際この前書き忘れた)、テストをちゃんと書いていれば気付けるはず
def pointable? return false unless logged_in? return false if user.status_code != '1' true end※ if 使うか unless 使うかは好みの問題だと思うけど結構迷う。個人的には下記の2択だったら、前者の方が分かりやすくて好き。
# false を返す、もし user.status_code が '1' でないならば return false if user.status_code != '1' # false を返す、そうじゃないなら user.status_code が '1' である return false unless user.status_code == '1'4. all? メソッドを使う
こんなのも思いついたけど、どうなんでしょう。
def pointable? [logged_in?, user.status_code == '1'].all? endまとめ
同じ仕様のメソッドでも、実装の仕方がいくつもあるので考えてみると楽しいです。
個人的には、2. 比較演算子か3. ガード節の書き方をよく見るし読みやすくて好きなのですが、どうなんでしょう。