- 投稿日:2019-04-03T23:03:23+09:00
pythonでAtCoder -ABC006-
対象
- AtCoder初心者(緑よりもランクが下の人)
- pythonがそれなりにかける人
- 数学やプログラミングに対する深い理解を持っていない人
- Ex) DP, 深さ優先探索, メモ化再帰の実装ができない
動機
AtCoderは全ての問題に対して解説スライドが存在するが
解説をみて何となく理論を理解しても独力で実装ができない場合が多かった。他の提出を見ても親切に解説コメントがついている回答はあまり存在せず、理解を実装に落とすことに苦労したため、簡単にでも解説がある回答はないものかと思い立ったことが動機である。
同様の苦労をしている人のためにも、稚拙なコードではあるが何らかの参考になればと思い
私の回答とそれに対する簡単なコメントを付与したコードをアップロードする。実行環境
- python3
A
print('YES' if int(input()) % 3 == 0 else 'NO')pythonは単純な
if elseが1行で書けます。B
N = int(input())
S = [0, 0, 1]
if N <= len(S):
    print(S[N-1])
else:
    for i in range(len(S), N-1):
        S[i % 3] = sum(S) % 10007
    print(sum(S) % 10007)
トリボナッチ数列と呼ばれる数列を計算する問題。
注意点として
- 和を素直に持ち続けるとTLE(Time Limit Exceeded)になってしまう
ことが挙げられます。
この対策のために和に対して10007の余りをとりながら処理を実行しています。C
N, M = map(int, input().split(' '))

if M % 4 == 0:
    ans = (M//2-(M//2-N)*2, 0, M//2-N) if M//4 <= N <= M//2 else (-1, -1, -1)
elif M % 4 == 2:
    ans = (M//2-(M//2-N)*2, 0, M//2-N) if M//4+1 <= N <= M//2 else (-1, -1, -1)
else:
    ans = (M//2-(M//2-N)*2-1, 1, M//2-N) if M//4+1 <= N <= M//2 else (-1, -1, -1)
print(ans[0], ans[1], ans[2])
カオスな数式ですが、条件式から読み解くとわかりやすいかと思います。
可能な限り赤ちゃんで構成すると必要最小人数がわかり、可能な限り大人で構成すると必要最大人数が分かります。指定の人数がこの範囲に入っていない場合は構成ができません。
組み合わせの中身については、赤ちゃんを1人減らして大人を2人増やすと足の数を変えずに人間の数を変えることができるので、求まります。足が奇数の場合1人、偶数の場合は0人でOKです。
D
from bisect import bisect_left
N = int(input())
C = [int(input()) for _ in range(N)]
S = [0]
for c in C:
    i = bisect_left(S, c)
    if len(S) == i:
        S += [c]
    else:
        S[i] = c
print(N - len(S) + 1)
終わりに
B問題が普段より難しかったですね。
次回もよろしくお願いします。
- 投稿日:2019-04-03T22:51:19+09:00
prophet mac anaconda install
- 投稿日:2019-04-03T21:56:53+09:00
二次元イラストの特徴を検出する[illustration2vec]
1.illustration2vecとは?
illustration2vecは事前学習済みのニューラルネットワークで、
DanbooruとSafebooruから100万枚の画像を用いて学習したもの
タグを正解ラベルとしているので、簡単に二次元イラストの特徴を検出できるので便利
VGGを参考にしたモデルで学習してるらしい詳しくは論文を参照
Caffe版とChainer版があるが今回はChainerの方を使用する。2.実際に検出する
https://github.com/rezoo/illustration2vec からリポジトリを入手、i2vが本体
get_models.shにあるリンクから予めtag_list.json.gzとillust2vec_tag_ver200.caffemodelを入手
実行するコードと同じディレクトリに入れる。
(illust2vec_tag.prototxtとillust2vec_ver200.caffemodelはFeatureVectorを検出する用のものなので今回は使わない)illustration2vecにはimagesにミクさんの画像が入っているが今回は使わずにフリー素材のhttp://www.jewel-s.jp/download/
からf353.pngを使う。
実際に検出するmain.pyimport i2v from PIL import Image def estimate_one(img): illust2vec = i2v.make_i2v_with_chainer("illust2vec_tag_ver200.caffemodel", "tag_list.json") img = Image.open(img) tag = illust2vec.estimate_plausible_tags([img]) return tag[0] def main(): tag = estimate_one('images/f353.png') print(tag) if __name__ == "__main__": main()注意するのはestimate_plausible_tagsに渡す引数は画像のリストで、戻り値は辞書のリストということ
keyはcharacter(キャラ名)、copyright(著作)、general(特徴)、rating(18禁かどうか)結果
{'copyright': [], 'character': [], 'rating': [('safe', 0.9474104642868042), ('questionable', 0.04457685351371765), ('explicit', 0.00435987114906311)],
'general': [('1girl', 0.9905315041542053), ('blonde hair',0.9727756977081299), ('green eyes', 0.9559593796730042), ('solo', 0.8911849856376648),
('open mouth', 0.6233431696891785), ('animal ears', 0.5574820637702942), ('smile', 0.4673902988433838), ('long hair', 0.41225337982177734),
('fang', 0.3859747648239136), ('dress', 0.3833463191986084), ('frills', 0.3065197467803955), ('bow', 0.28883492946624756), ('ribbon', 0.2731117606163025),
('fangs', 0.2701604962348938)]}
大体あってる。
3.問題点
基本的なやり方は上記だけで大丈夫、ただ大量に画像を処理する場合この章を読んでもらいたい
実際に実行してみるとわかると思うが、案外計算に時間が掛かる
実はこれ計算に時間が掛かっているというよりCaffeFunctionという
CaffeのモデルをChainerのモデルにコンバート(変換)するのに掛かっている時間
これのなにが問題かというと大量に画像をタグ付けする場合、そのリストを渡すと
OutOfMemoryになる可能性があるので上記のestimate_one関数をループさせる方が安全なのだが
ループする都度コンバートしてしまう。ゆえに予めループさせる前にコンバートさせておく
と大幅に高速化する。
chainer_i2vにあるmake_i2v_with_chainerを少し改良する。chainer_i2v.pydef make_i2v_with_chainer(param_path, tag_path=None, threshold_path=None, p_net=None): if p_net is not None: net = p_net else: # ignore UserWarnings from chainer with warnings.catch_warnings(): warnings.simplefilter('ignore') net = CaffeFunction(param_path) kwargs = {} if tag_path is not None: tags = json.loads(open(tag_path, 'r').read()) assert(len(tags) == 1539) kwargs['tags'] = tags if threshold_path is not None: fscore_threshold = np.load(threshold_path)['threshold'] kwargs['threshold'] = fscore_threshold return ChainerI2V(net, **kwargs)main.pyimport i2v from PIL import Image from utility import utility import warnings from chainer.links.caffe import CaffeFunction def estimate_one(img, param_path, tag_path, p_net): illust2vec = i2v.make_i2v_with_chainer(param_path=param_path, tag_path=tag_path, p_net=p_net) img = Image.open(img) tag = illust2vec.estimate_plausible_tags([img]) return tag[0] def main(): tags = [] param_path = "illust2vec_tag_ver200.caffemodel" tag_path = "tag_list.json" with warnings.catch_warnings(): warnings.simplefilter('ignore') print("start converting...") p_net = CaffeFunction(param_path) print("end converting") for img in utility.find_all_files('images/'): tag = estimate_one(img, param_path, tag_path, p_net) tags.append(tag) print(tags) if __name__ == "__main__": main()find_all_filesはimagesにあるファイルをyieldですべて返す自作のジェネレーター
4.まとめ
正直illustration2vecだけで画像をフォルダ分けするアプリとかできそうなので非常に便利
ただillustration2vecは計算がCPUのみなので大量の画像分類には少々時間が掛かるため
GPU化できれば次の記事にしたい。著作権
Copyright (c) 2015 Masaki Saito and Yusuke Matsui.
under the MIT License

- 投稿日:2019-04-03T19:30:54+09:00
Node-RED+CloudFunctionsでPythonを動かす
CloudFunctionsとは?


- Cloud上に関数を置ける
- httpリクエストで実行できる
- Node.js、Pythonに対応している
つまり「Node-REDからhttpリクエストでCloudFunctionsにある関数を呼び出せばPythonが動くよ!」と言うことです。
詳しくはこちらを参照してください。具体的な手順
※Google Cloud Platformの環境が整っている前提で書いていきます。
CloudFunctionsに関数を追加する
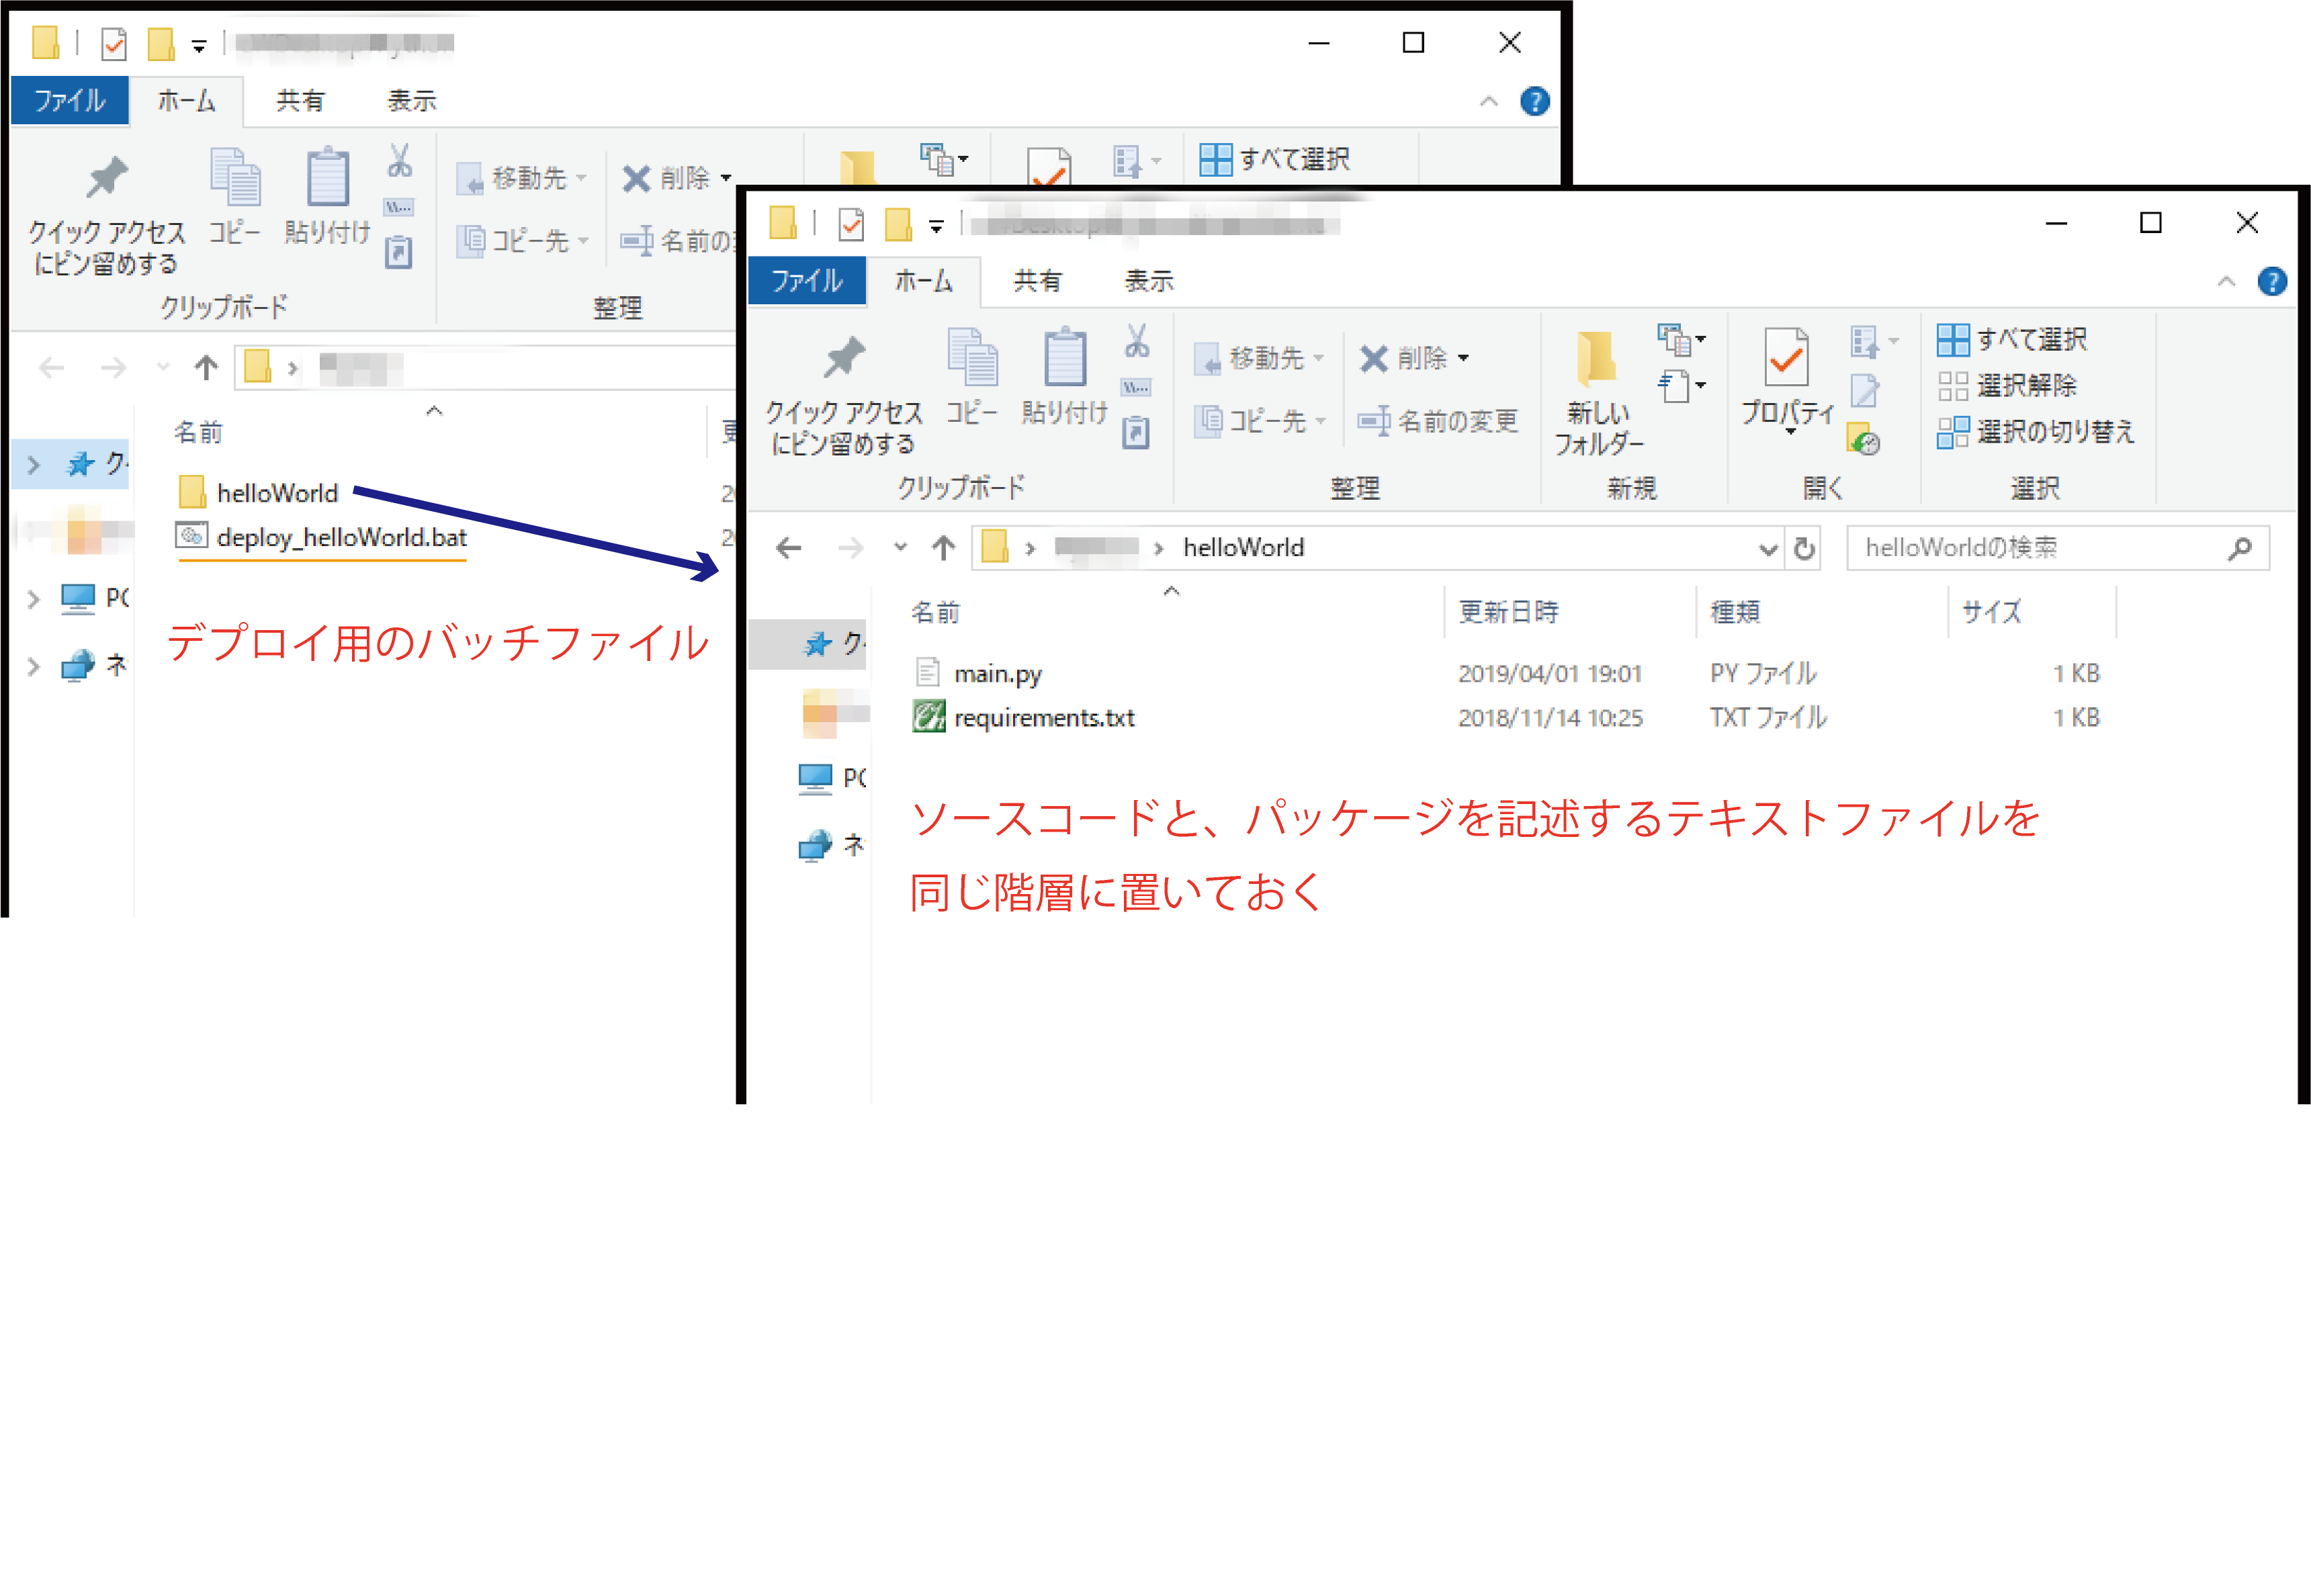
ローカル環境のフォルダ構成は以下の通りです。
詳しくはPython での依存関係の指定を参照してください。
ローカル環境で関数を作る
例としてリクエストで受け取った文字を2つ繋げて返すだけの関数を作りました。
ファイル名は必ずmain.pyです。CloudFunctionsに追加する関数名=メイン関数(今回はhelloWorld)になります。import sys def helloWorld(request): """リクエストを編集して返す """ import struct import json ret = '' #リクエストデータ(JSON)を変換 request_json = request.get_json() #print(request_json) if request_json and 'data' in request_json: ret = request_json['data'] ret += ret return retもし使いたいパッケージがあればrequirements.txtに記述します。
(例えばopencv-pythonやPillowなどなど)デプロイする
こんな感じでバッチファイルを作っておくと便利です。
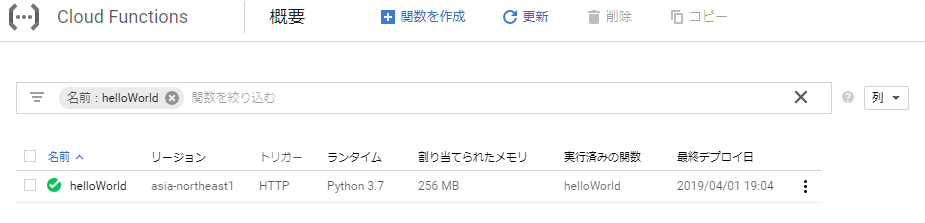
cd /d %~dp0\helloWorld
gcloud functions deploy helloWorld --runtime python37 --trigger-http --region asia-northeast1
これで無事追加されました。
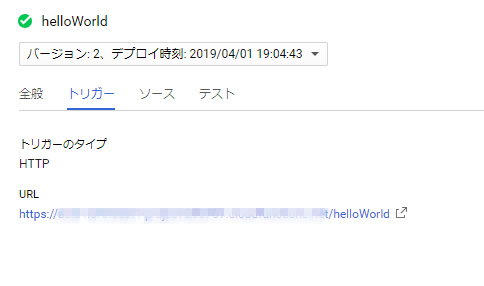
関数を選択すると、トリガーとなるURLを確認できます。
Node-REDの設定
httpリクエストを使います。
リクエストは以下のようにしています。
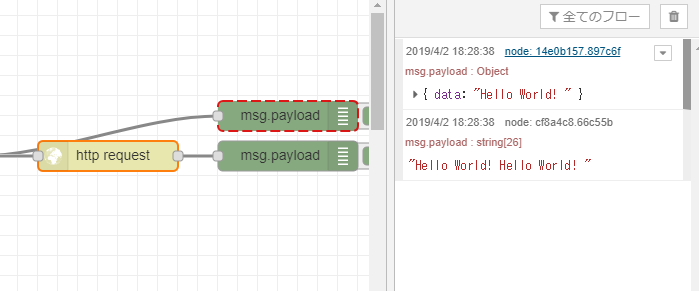
msg.headers = {'content-type':'application/json'};
msg.payload ={
    "data" : "Hello World! "
}

return msg;
無事動きました。
フローはこちらです。
[{"id":"14e0b157.897c6f","type":"debug","z":"b229a692.0aace8","name":"","active":true,"tosidebar":true,"console":false,"tostatus":false,"complete":"false","x":670,"y":120,"wires":[]},{"id":"d8857efc.bfef3","type":"function","z":"b229a692.0aace8","name":"リクエスト生成","func":"msg.headers = {'content-type':'application/json'};\nmsg.payload ={\n \"data\" : \"Hello World! \"\n}\n\nreturn msg;","outputs":1,"noerr":0,"x":280,"y":160,"wires":[["14e0b157.897c6f","4cb37902.60edd8"]]},{"id":"4cb37902.60edd8","type":"http request","z":"b229a692.0aace8","name":"","method":"POST","ret":"txt","url":"","tls":"","x":490,"y":160,"wires":[["cf8a4c8.66c55b"]]},{"id":"23f23570.64fefa","type":"inject","z":"b229a692.0aace8","name":"","topic":"","payload":"true","payloadType":"bool","repeat":"","crontab":"","once":false,"onceDelay":0.1,"x":110,"y":160,"wires":[["d8857efc.bfef3"]]},{"id":"cf8a4c8.66c55b","type":"debug","z":"b229a692.0aace8","name":"","active":true,"tosidebar":true,"console":false,"tostatus":false,"complete":"false","x":670,"y":160,"wires":[]},{"id":"b3015520.0971e8","type":"comment","z":"b229a692.0aace8","name":"Pythonを動かす","info":"","x":120,"y":100,"wires":[]}]まとめ
ネットワークに接続できる環境であれば、デプロイする装置(ラズパイなど)に依存しないメリットがあります。
何か参考になれば嬉しいです。ではでは。


- 投稿日:2019-04-03T19:23:55+09:00
QuantXでグラフを上手く活用する方法
自己紹介
株式会社Smart Tradeでインターンをしているkatakyoです。
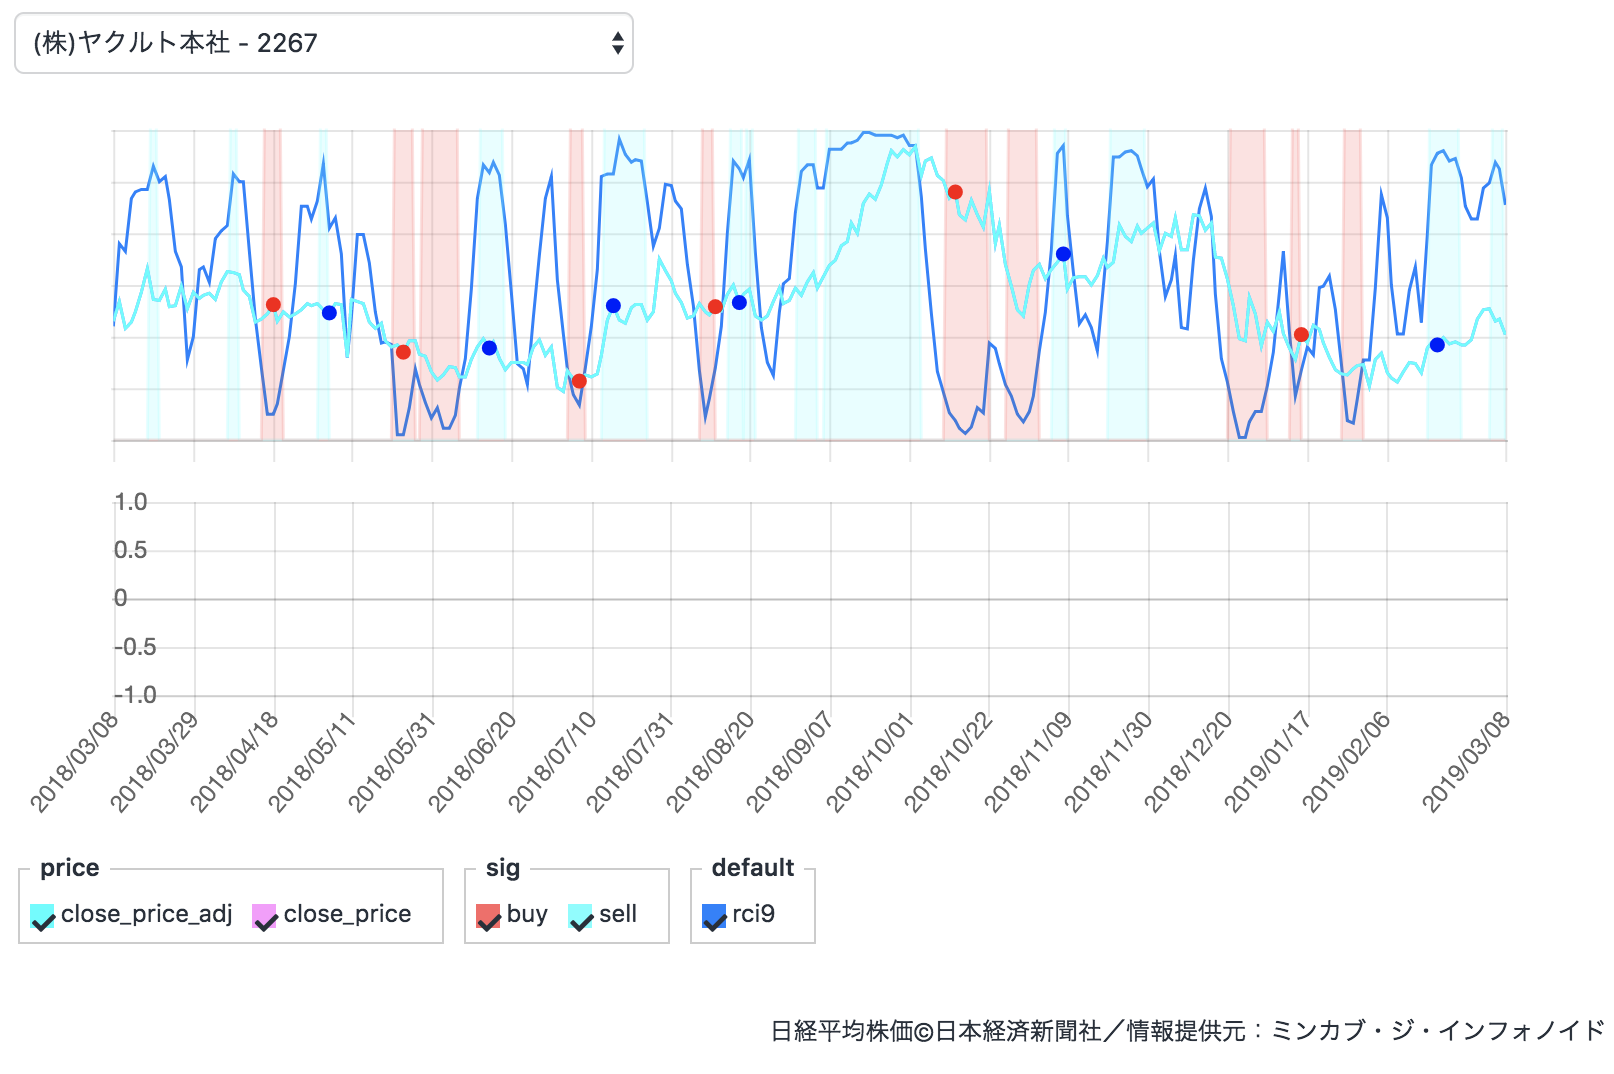
今回は豆知識を投稿QuantXのグラフ分けたい!
9日間のRCIをreturnで描画しました。
これが大量の折れ線グラフを描画するととても見にくいですよね。これが今のreturnの書き方です。
      return {
        "buy:sig":buy_sig,
        "sell:sig":sell_sig,
        "rci9":rci9
      }
他のQiitaの記事と特に変わりませんね。
グラフ2について
みなさん
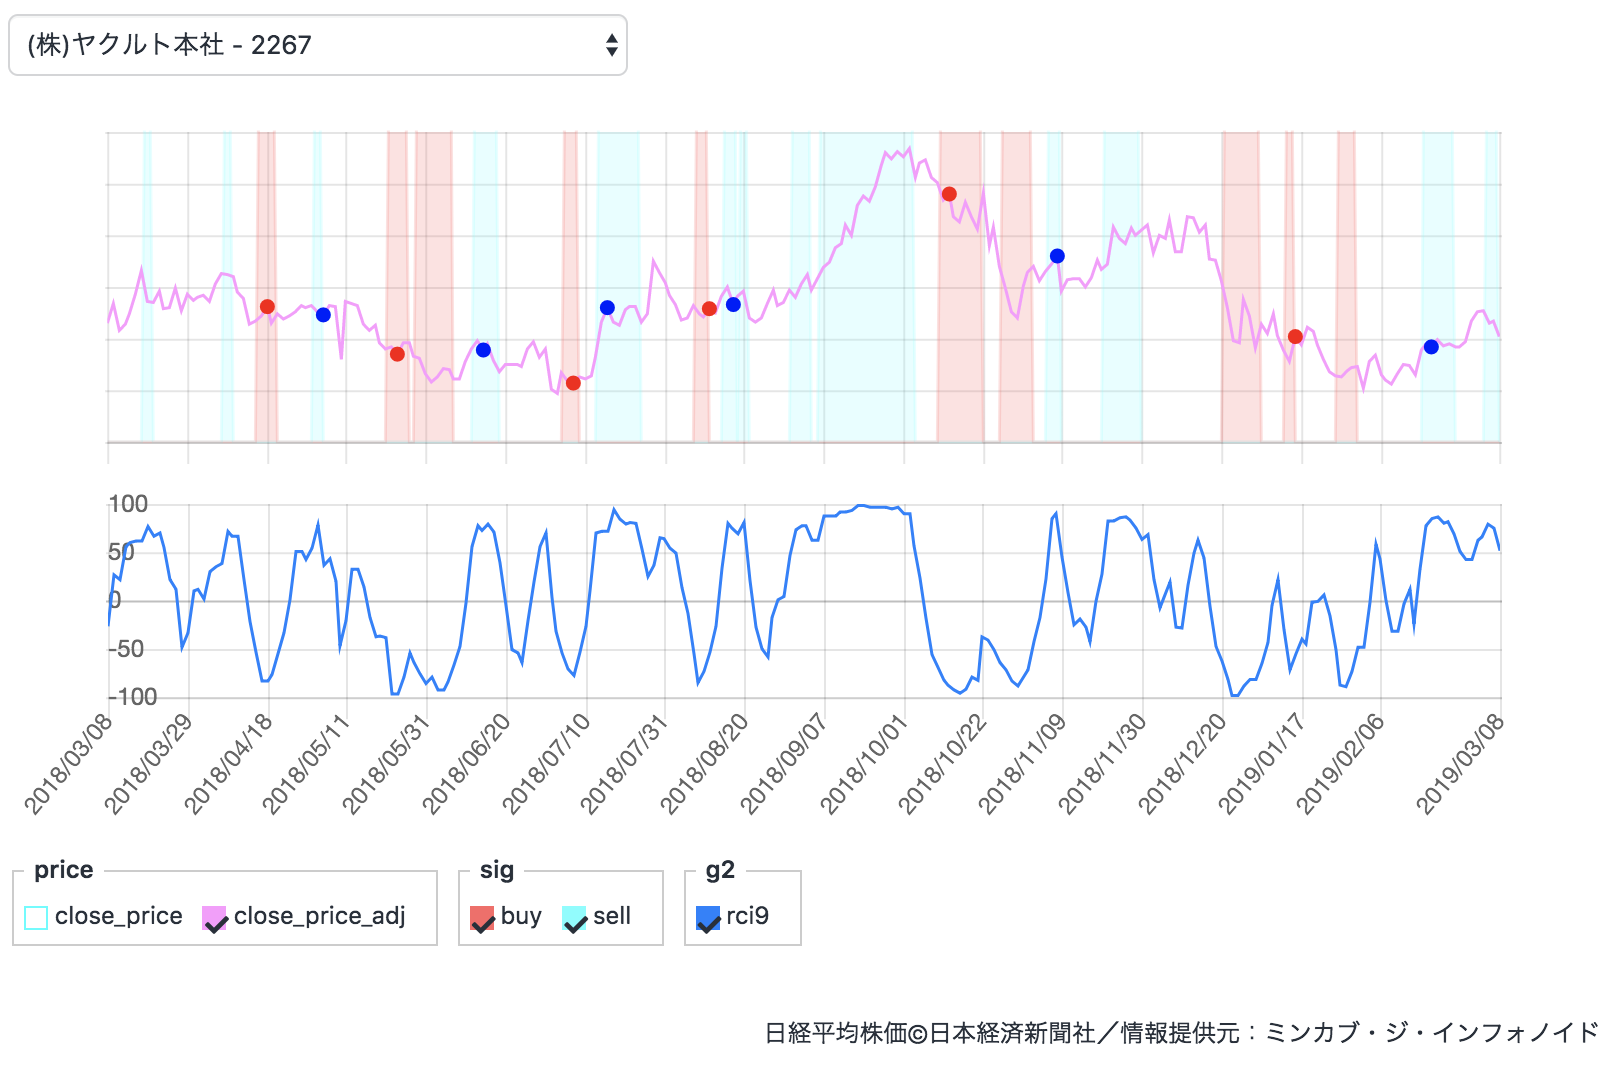
ここ気になりませんか?実はQuantXはデフォルトで2つのグラフが用意されているんですよね。
こっちの下に自在に描画できるようになりたい!実装は簡単!
      return {
        "描画したい名前:g2":参照データ名,
      }
先ほどのコードだと
      return {
        "buy:sig":buy_sig,
        "sell:sig":sell_sig,
        "rci9:g2":rci9
      }
という風に書きます。
バックテスト結果
ちゃんと描画されていますね!
終わりに
このグラフ機能は複雑なアルゴリズムを使うほど、データ整理に役に立つと思います。
興味がある方は是非使って見てください!!免責注意事項
このコードや知識を使った実際の取引で生じた損益に関しては一切の責任を負いかねません。

- 投稿日:2019-04-03T19:23:55+09:00
QuantXでグラフを2つ用意する方法
自己紹介
株式会社Smart Tradeでインターンをしているkatakyoです。
今回は豆知識を投稿QuantXのグラフ分けたい!
9日間のRCIをreturnで描画しました。
これが大量の折れ線グラフを描画するととても見にくいですよね。これが今のreturnの書き方です。
      return {
        "buy:sig":buy_sig,
        "sell:sig":sell_sig,
        "rci9":rci9
      }
他のQiitaの記事と特に変わりませんね。
グラフ2について
みなさん
ここ気になりませんか?実はQuantXはデフォルトで2つのグラフが用意されているんですよね。
こっちの下に自在に描画できるようになりたい!実装は簡単!
      return {
        "描画したい名前:g2":参照データ名,
      }
先ほどのコードだと
      return {
        "buy:sig":buy_sig,
        "sell:sig":sell_sig,
        "rci9:g2":rci9
      }
という風に書きます。
バックテスト結果
ちゃんと描画されていますね!
終わりに
このグラフ機能は複雑なアルゴリズムを使うほど、データ整理に役に立つと思います。
興味がある方は是非使って見てください!!免責注意事項
このコードや知識を使った実際の取引で生じた損益に関しては一切の責任を負いかねません。
- 投稿日:2019-04-03T17:56:52+09:00
Pythonで競技プログラミング -ライブラリ編-
okumuraです。前回の記事で異様にいいねがついて少々驚きました。その記事の最後に「余力があればよく使うライブラリー集とかも出すかもしれません」とかいってて何もしてなかったので、まとめました。
0. はじめに
この記事は半分自分用のために作りました。私自身あんまりライブラリを使わない方なので、結構抜けているかもしれません。「推しライブラリがないぞ!」などなどはコメントに記入していただけると幸いです。また説明が雑な箇所や個人的見解、ミスなど多々見られるかもしれません。これは私の理解力不足と経験不足などなどからくるものです、申し訳ございません。
一応各項目の後には私のAtCoder,Codeforcesでの使用例も載せておきました。問題のネタバレも含むので読むときには注意してください。参考になればいいと思います。
1. sys
sys.exit
プログラムを終了させます。私がsysモジュールでよく使うのはこれです。自明な条件分岐をすぐに終わらせれるから非常に楽です。例えば「N=1の時はYESでそのほかの時は・・・」というプログラム書きたい時はこんな使い方とかよくします。
import sys
N=int(input())
if N==1:
    print('YES')
    sys.exit()
結構簡単に条件分岐を減らせて、ネストが深くなるのを防げるので、かなり使っています。
AGC028-A Two Abbreviations 解答例sys.stdin
入力がめっちゃ早くなります。ただ私はあんまり使っていないです。今すぐできる簡単な使い方は整数値などの入力に対して
import sys input = sys.stdin.readlineとやってあとはいつも通り使うかんじです。ただし文字列を扱う時には注意すること。改行やらなんやらで事故ります。(事故った例を見たことあるので、文字列には使わない方が良い)。詳しくはPythonで競プロやるときによく書くコードをまとめてみたを参照してください。
CodeForces E. Polycarp's New Job 解答例sys.setrecursionlimit
Pythonでは、再帰呼び出しの上限がデフォルトで1000回らしくこの上限を上げます。「Pythonで再帰関数のプログラム書いて提出したのにREになったんだが・・・」って時の解決法です。再帰関数使う時にはこれをつけておくとよいです。
import sys
sys.setrecursionlimit(10**6)
ARC031-B 埋め立て 解答例
EDPC-P Independent Set 解答例2. collections
collections.deque
デックが使えるようになります。デックは前から後ろから出しても入れても計算量$O(1)$のデータ構造です。幅優先検索、深さ優先検索、トポロジカルソート、01BFSなどでよく使います。
l = [0,1,2,3] q = deque(l) q.append(4) # 後ろから4を挿入, l=deque([0,1,2,3,4]) q.appendleft(5)#前から5を挿入, l=deque([5,0,1,2,3,4]) x = q.pop() #後ろの要素を取り出す, x=4, l=deque([5,0,1,2,3]) y = q.popleft() # 前の要素を取り出す, y=5, l = deque([0,1,2,3])collections.defaultdict
なんか好きなのでよく使います。普通の辞書と違って存在しないキーに参照してもエラーになりません。詳しくはPythonでdictからデフォルト値指定をしつつ値を取得する参照にしてください。個数カウントする時に下のようによく使います。
from collections import defaultdict
A=[int(i) for i in input().split()]
dd=defaultdict(int)
for a in A:
    dd[a]+=1
AGC031-A Colorful Subsequence 解答例
あとは個人的に辞書で動的計画法する時のもよく使いますが、これは真似しなくても良いです。
ARC067-E Grouping 解答例collections.Counter
個数カウントするならこっちを使っている人の方が多いと思います。私はあんまり使ってないですが・・・。詳しくはPythonのCounterでリストの各要素の出現個数をカウント参照にしてください。辞書っぽい扱いができるのと「個数が多いものを2取る」といったことができるのが良い点だと思います。
from collections import Counter l=['a','b','b','c','b','a','c','c','b','c','b','a'] S=Counter(l)#カウンタークラスが作られる。S=Counter({'b': 5, 'c': 4, 'a': 3}) print(S.most_common(2)) #[('b', 5), ('c', 4)] print(S.keys()) #dict_keys(['a', 'b', 'c']) print(S.values()) #dict_values([3, 5, 4]) print(S.items()) #dict_items([('a', 3), ('b', 5), ('c', 4)])3. itertools
itertools.accumulate
累積和が一発でできます。ものすごく速いため便利です。ですが私はあんまり使ってないです(なんか初期値で混乱するのとtypeがわからなくなるため)。
from itertools import accumulate
A=[1,4,3,4,6,5]
print(list(accumulate(A))) #[1, 5, 8, 12, 18, 23]
先ほどのCounterとaccumulateを使うと1行解答ができます。
AGC023-A Zero-Sum Ranges 解答例itertools.permutations, itertools.combinations
私はほぼ使ったことないです(他にもproductというものがあるが、使ってすらいなかった)。しかもそこまで速くならないらしいです。Lをリスト(または文字列), rを自然数として
- permutations(L,r) Lのr個の順列を全て列挙
- combinations(L,r) Lのr個の組み合わせを全て列挙
をそれぞれ出します。公式ドキュメントを見たら具体例ものっててわかりやすいです。from itertools import product, permutations,combinations A=[1,2,3,4] for i in permutations(A,2): print(i,end=' ') #(1, 2) (1, 3) (1, 4) (2, 1) (2, 3) (2, 4) (3, 1) (3, 2) (3, 4) (4, 1) (4, 2) (4, 3) for i in combinations(A,2): print(i, end=' ') #(1, 2) (1, 3) (1, 4) (2, 3) (2, 4) (3, 4)
- permutation ABC054-C One-stroke path 解答例
- combinations Tenka1 Programmer Contest-D Crossing 解答例
4. operator
operator.itemgetter
座標などどのキーでソートするかを指定できる。例見た方が早い。
from operator import itemgetter
B =[(5,8), (6,10), (7,2),(4,1), (3,11),(9,0)]
print(sorted(B, key = itemgetter(0))) #第1変数で昇順ソートしてる
#[(3, 11), (4, 1), (5, 8), (6, 10), (7, 2), (9, 0)]
print(sorted(B, key = itemgetter(0),reverse=True)) #第1変数で降順ソートしてる
#[(9, 0), (7, 2), (6, 10), (5, 8), (4, 1), (3, 11)]
print(sorted(B, key = itemgetter(1))) #第2変数で昇順ソートしてる
#[(9, 0), (4, 1), (7, 2), (5, 8), (6, 10), (3, 11)]
print(sorted(B, key = itemgetter(1),reverse=True)) #第2変数で降順ソートしてる
#[(3, 11), (6, 10), (5, 8), (7, 2), (4, 1), (9, 0)]
ABC091-C 2D Plane 2N Points 解答例
5. bisect
bisect.bisect_left, bisect.bisect_right, bisect.bisect
二分探索(にぶたん)でよく使います。ソートされたリストLに対して用いいます。毎回どっちがどっちって悩むのですが、
- bisect_left(L,x) xをLに挿入できる点(の番号)を探し当てる、ただしLにxがある場合は一番左になるようにする。
- bisect_right(L,x), bisect(L,x) xをLに挿入できる点(の番号)を探し当てる、ただしLにxがある場合は一番右になるようにする。
という違いがあります。詳しくは公式ドキュメントも参照してください。自分でもぴったりくる説明がピンとないので毎回困ります。計算量は$O(\log N)$ (NはリストLの要素数)です。
from bisect import bisect_left,bisect L=[1,3,6,6,6,9,11] print(bisect_left(L,0)) #0 #0はLの先頭にくるので0番目に入ります、よって0が出力される。 print(bisect(L,0)) #0 上に同じ print(bisect_left(L,5)) #2 #5は3の次に入るので2番目に入ります。 print(bisect(L,5)) #2 上に同じ print(bisect_left(L,6)) #2 #同じものがある場合は一番左の番号を出力するので、3の次にこの6は入ります。よって2番目に6がはいる。 print(bisect(L,6)) #5 #同じものがある場合は一番左の番号を出力するので、6の次にこの6は入ります。よって5番目に6がはいる。 print(bisect_left(L,12)) #7 #12は一番後ろにくるので7番目に入ります。 print(bisect(L,12)) #7 上に同じ0は自然数なのででてくる数字も0-indexです(これがさらに混乱を生み出す)。
codeFlyer予選-C - 徒歩圏内 解答例
ARC084-C Snuke Festival 解答例6. heapq
heapq.heappop, heapq.heappush
プライオリティーキューのことです(Pythonだとヒープキューっていうらしい)。プライオリティーキューとは
- 計算量$O(\log N)$で要素を挿入
- 計算量$O(\log N)$で最小値を取り出す
ができるデータ構造です。最短経路を求めるダイクストラ法でお世話になります。from heapq import heappop,heappush L=[3,0,2,5,7,2] H=[] for l in L: #ここはH=heapq.heapify(L)でもいいです。 heappush(H,l) print(H) #[0, 3, 2, 5, 7, 2] print(heappop(H)) #0 print(heappop(H)) #2 print(heappop(H)) #2
- プライオリティーキューの使用例 ABC116-D Various Sushi 解答例
- ダイクストラ法 SoundHound Inc. Programming Contest 2018 予選-D Saving Snuuk 解答例
7. fractions
fractions.gcd
最大公約数を出してくれます。自分でユークリッドの互除法作らなくてもいいです。ただしAtCoderのPythonのバージョンは3.4.3です。よってgcdはfractionsモジュールの中にあります。誰しもが一回はハマるので注意しましょう(Python 3.5からmathモジュールに追加されました)。
from fractions import gcd
print(gcd(78627872,1798742872)) #8
ABC118-C Monsters Battle Royale 解答例
8. math
math.ceil, math.floor
- ceil 数字の切り上げ
- floor 数字の切り下げ
from math import ceil,floor
print(7/3) #2.3333333333333335 勝手にfloatにしてしまいます。
print(ceil(7/3)) #3
print(floor(7/3)) #2
print(7//3) #2 int型が出てきます
math.sqrt
正の平方根を出してくれます。自然数$A$の素因数分解を$O(\sqrt{A})$でやるときに使うことがあります。
CADDi 2018-C Product and GCD 解答例
math.cos, math.sin, math.pi
cos, sin, $\pi$が使えるようになります。一回CodeForcesでお世話になりました。
Codeforces-C NN and the Optical Illusion 解答例
9. copy
copy.deepcopy
A=[1,2,3]
B=A
B[1]=100
print(A) #[1, 100, 3]
皆さんもこのような経験があると思います(私はこれで3時間潰したことがあります)。これを防ぐのに使うのがcopy.deepcopyです。
from copy import deepcopy A=[1,2,3] B=deepcopy(A) B[1]=100 print(A)またcopy.copyというものもあります。copy.copyとcopy.deepcopyの違いに関してはPythonのcopyとdeepcopyについてを参照にしてください。2次元配列で違いが出てきますが、めんどくさいのでdeepcopy使えば良いと思います。
ARC083-D Restoring Road Network 解答例
10. numpy, scipy, scikits
AtCoderでは使えます、ちゃんとルールにも書いてます。でも競技プログラミングではあんまり使わないと思われます(機械学習とか深層学習では絶対使うんだけども)。いや無理すれば使えるのですが、別に使わなくてもなあ・・・って感じのが多いです。
一応何個かの応用例を書いておきます。
- numpy 行列演算ができる。ABC113-D Number of Amidakuji 解答例
- scipy.optimize.newton ニュートン法が使える。ABC026-D 高橋君ボール1号 解答例
他にもscipyでワーシャルフロイド法が使えるらしいです。おまけ. 自分で作らなくてもPythonに組み込まれているもの
ユークリッドの互除法を作らなくてもfractions.gcdで最大公約数を求められました。実は同じような奴がもう一個あります
繰り返し二乗法
「$n^m$ を$p$で割った余り」を$O(\log m)$で求めるアルゴリズム。pythonだと
pow(n,m,p)で求められます(自分で作らなくて良い!)。なので$p$が素数の時、$n$の$modulo$ $p$での逆元はフェルマーの小定理より
pow(n,p-2,p)で求められます。計算量は$O(\log p)$です。二項係数とかでよく使います。
エクサウィザーズ 2019-E Black or White 解答例
-1. さいごに
自分用のメモの整理のために作りました。案外自分のためになりました。特にitemgetterやCounterは毎回使い方を調べてたのでこれを機に覚えれたかもしれません。
- 投稿日:2019-04-03T17:43:33+09:00
脳死で覚えるPyTorch1.0入門
前書き
全てのプログラマーは写経から始まる。 by俺
この記事は機械学習入門用ではありません。
良質な写経元を提供するためにあります。
無駄のないコードと無駄のない説明を用意したつもりです。
PyTorchコーディングを忘れかけた時に立ち返られる原点となれば幸いです。
実行環境
- python (3.7.2)
- PyTorch (1.0.1)
コード全文
PyTorch等のインストールを済ませ、僕と同じバージョンならコピペすれば動くはずです。
一つ一つ解説していきます。
import torch
import torchvision
import torch.nn as nn
import torch.nn.functional as F
import torch.optim as optim


class MNISTConvNet(nn.Module):

    def __init__(self):
        super(MNISTConvNet, self).__init__()
        self.conv1 = nn.Conv2d(1, 20, 5, 1)
        self.conv2 = nn.Conv2d(20, 50, 5, 1)
        self.fc1 = nn.Linear(4*4*50, 500)
        self.fc2 = nn.Linear(500, 10)

    def forward(self, x):
        x = F.relu(self.conv1(x))
        x = F.max_pool2d(x, 2, 2)
        x = F.relu(self.conv2(x))
        x = F.max_pool2d(x, 2, 2)
        x = x.view(-1, 4*4*50)
        x = F.relu(self.fc1(x))
        x = self.fc2(x)
        return F.log_softmax(x, dim=1)

if __name__ == "__main__":

    # hyper param
    epochs = 20
    batch_size = 128

    # model
    model = MNISTConvNet()

    # data
    transform = torchvision.transforms.Compose(
        [torchvision.transforms.ToTensor(),
         torchvision.transforms.Normalize((0.5, ), (0.5, ))]
    )

    trainset = torchvision.datasets.MNIST(root='~/datasets', train=True, download=True, transform=transform)
    testset = torchvision.datasets.MNIST(root='~/datasets', train=False, download=True, transform=transform)

    trainloader = torch.utils.data.DataLoader(trainset, batch_size=128, shuffle=True, num_workers=2)
    testloader = torch.utils.data.DataLoader(testset, batch_size=128, shuffle=False, num_workers=2)

    # loss
    criterion = nn.CrossEntropyLoss()
    # optimizer
    optimizer = optim.SGD(model.parameters(), lr=0.001, momentum=0.9)

    # train
    for epoch in range(epochs):
        running_loss = 0.0

        for i, data in enumerate(trainloader):
            inputs, labels = data

            optimizer.zero_grad()

            outputs = model(inputs)

            loss = criterion(outputs, labels)
            loss.backward()
            optimizer.step()

            running_loss += loss.data
            if i % 100 == 99:
                print('Epoch:{}/{} loss: {:.3f}'.format(epoch + 1, epochs, running_loss / 100))
                running_loss = 0.0

    print('Finished Training')
解説
import
torchvisionってのは画像変換によく使われるパッケージ。
import torch
import torchvision
import torch.nn as nn
import torch.nn.functional as F
import torch.optim as optim
モデル定義
PyTorch公式のexampleを参考にしました。
class MNISTConvNet(nn.Module):

    def __init__(self):
        super(MNISTConvNet, self).__init__()
        self.conv1 = nn.Conv2d(1, 20, 5, 1)
        self.conv2 = nn.Conv2d(20, 50, 5, 1)
        self.fc1 = nn.Linear(4*4*50, 500)
        self.fc2 = nn.Linear(500, 10)

    def forward(self, x):
        x = F.relu(self.conv1(x))
        x = F.max_pool2d(x, 2, 2)
        x = F.relu(self.conv2(x))
        x = F.max_pool2d(x, 2, 2)
        x = x.view(-1, 4*4*50)
        x = F.relu(self.fc1(x))
        x = self.fc2(x)
        return F.log_softmax(x, dim=1)
__init__とforwardを実装すればOKです。当然他にも機能を追加していってもOKです。
__init__の中に使用する層を書きます。
forwardの中にモデルを設計します。よく見ると、
reluやmax_pool2dなどは__init__に書かれていないことがわかります。どうやら、層は__init__に書いて、関数は__init__に書かないというスタンスがあるみたいです。ハイパーパラメータ
ここから下は全てメインルーティングです。
# hyper param
epochs = 20
batch_size = 128
説明略
モデルインスタンスの作成
# model
model = MNISTConvNet()
説明略
(補足)
print(model)とすると、
MNISTConvNet(
  (conv1): Conv2d(1, 20, kernel_size=(5, 5), stride=(1, 1))
  (conv2): Conv2d(20, 50, kernel_size=(5, 5), stride=(1, 1))
  (fc1): Linear(in_features=800, out_features=500, bias=True)
  (fc2): Linear(in_features=500, out_features=10, bias=True)
)
という風にモデルのsummaryを出力してくれます。
データ
PyTorchがデフォルトで用意してくれているデータセットを使用します。
データセットをダウンロードするpathは
rootで指定できますので、お好みの場所に変更してください。# data transform = torchvision.transforms.Compose( [torchvision.transforms.ToTensor(), torchvision.transforms.Normalize((0.5, ), (0.5, ))] ) trainset = torchvision.datasets.MNIST(root='~/datasets', train=True, download=True, transform=transform) testset = torchvision.datasets.MNIST(root='~/datasets', train=False, download=True, transform=transform) trainloader = torch.utils.data.DataLoader(trainset, batch_size=128, shuffle=True, num_workers=2) testloader = torch.utils.data.DataLoader(testset, batch_size=128, shuffle=False, num_workers=2)1行目で
transformというオブジェクトを生成していると思います。Composeに正規化などを事前に指定しておきます。そして、2行目3行目の際にtransformオブジェクトを渡すことによって、正規化などが施されたデータをロードしてくれます。4行目5行目で
trainloaderとtestloaderというオブジェクトを生成していると思います。このtransloaderは、あとでfor文のイテレータとしてぶち込まれるもので、(inputs, labels)というタプルをイテレートしてくれます。loss関数と最適化アルゴリズムの設定
当然、自作関数を設定することもできます。
自作関数を設定したかったらググりましょう。(頑張れ)
# loss
criterion = nn.CrossEntropyLoss()
# optimizer
optimizer = optim.SGD(model.parameters(), lr=0.001, momentum=0.9)
学習
# train
for epoch in range(epochs):
    running_loss = 0.0

    for i, data in enumerate(trainloader):
        inputs, labels = data

        optimizer.zero_grad()

        outputs = model(inputs)

        loss = criterion(outputs, labels)
        loss.backward()
        optimizer.step()

        running_loss += loss.data
        if i % 100 == 99:
            print('Epoch:{}/{} loss: {:.3f}'.format(epoch + 1, epochs, running_loss / 100))
            running_loss = 0.0

print('Finished Training')
trainloaderからイテレートされたdataは(inputs, labels)というタプルですので、分解してあげます。
optimizer.zero_grad()でoptimizerを初期化しています。
outputs = model(inputs)で入力画像をモデルに入力し、出力値をoutputsに代入しています。
loss = criterion(outputs, labels)で損失値を計算しています。
loss.backward()で誤差逆伝播を行なっています。
optimizer.step()で最適化を行なっています。
running_loss += loss.dataから下は損失値の表示をしているだけです。参考
自己紹介
冒頭に書くと邪魔になるので最後にひっそりと自己紹介させてください。
名前 綿岡晃輝 職業 大学院生 (2019年4月から) 分野 機械学習, 深層学習, 音声処理 @Wataoka_Koki Twitterフォローしてね!

- 投稿日:2019-04-03T17:03:27+09:00
Scrapy(スパイダー)でのfor文で何をキーにループをすればいいのかがわからない。
質問(悩み):
独学で初めてPythonを勉強中です。
まずは、scrapyの勉強のため、以下のURLから
「タイトル」と「社名」と「勤務場所」(※画像参照)だけをクローリング(スクレイピング)しようと
ググりながらプログラミングしていますが、
記述方法がわからず、手が止まっている状況です(汗)以下に、途中までのソースを記述しました。
ソース:
pyjob/pyjob/items.pyimport scrapy class PyjobItem(scrapy.Item): title = scrapy.Field() # タイトル company = scrapy.Field() # 社名 location = scrapy.Field() # 勤務場所ソース:
pyjob/pyjob/spiders/pyjob_spider.pyimport scrapy from ..items import PyjobItem class PyjobSpider(scrapy.Spider): name = 'pyjob_spider' allowed_domains = ['python.org'] start_urls = ['https://www.python.org/jobs/'] def parse(self, response):↓↓ ここから先がどのように書いたら良いのかがわかりません。
↓↓ 手が止まっている状態です、ご教授下さい。for jobs in response.css(''): item = PyjobItem() item['title'] = jobs.css('').extract_first() item['company'] = jobs.css('').extract_first() item['location'] = jobs.css('').extract_first() yield item・for文のループ処理をどうやって書けばいいのかが苦戦中。
・要は、何をキーにループをすればいいのかがわからない。
・「NEXT」ページにもデータがあるので、それも最後まで取得したい。
・「社名」を抽出する際、以下のような\nや\tなどが入っていて、文字列だけを抽出する方法がわからない。
['\n                    ',
 '\n                    \n                    ',
 '\n\t\t    Stiftelsen Flowminder\n                ']
実現したいこと:
例えば、
pyjob_list.json
に以下のように吐き出したいです。[
{
"title": "Senior Python Developer",
"company": "Stiftelsen Flowminder",
"location": "Southampton, Hampshire, United Kingdom"
},
{
"title": "Senior Software Engineer (BACKEND)",
"company": "CB Insights",
"location": "New York, New York, USA"
},
・
・
・
最後のページまで
]以上、ご教授お願い致します。

- 投稿日:2019-04-03T17:00:05+09:00
Qiita初投稿。プログラミングに本腰を入れて1か月でわかってきたこと。
就活を終え、とあるweb系企業に就職することになりました。
webアプリを作ろうと1か月ほどの出来事を初心忘るべからず精神で書き留めることにしました。
この先のアウトプットの第一歩として。
来年の今頃にはしっかりとしたエンジニアの知識を持っていたいなぁ。就活を終えてまずやったこと
就職までに出来るだけ技術力を身に付けないといけないと思い、Udemyで適当なコースを何個か購入。
Udemy(https://www.udemy.com/)これできっと自分もかっこいいホームページとか、webアプリケーションとかバンバン作れるぞ!!!と思った
だけど・・・
webページを作る。と言っても色んな事を決めないといけない事に気が付く
- webページを作るにはそもそも何の言語で作るのかを決めないといけない。
- なんのwebページを作るかも決まってない
- なにをしたいかも決まってない
何していいのか、何がベストなのかぜんっぜんわからない!!!
わからない事がわからない問題
そもそもプログラミングと言っても、研究のデータ分析のためにpythonをいじくり回してた程度で、プログラミングが何のために存在しているかわかってない。
恐らく体系的に勉強することが第一歩なのだろうけど...
とりあえずudemyで購入したコースを1個やり遂げよう
出来ない事はとにかく一回やってみようの精神で、こちらのコースをやってみた。
よくわかるRuby on Rails入門-RubyとRailsを基礎から学びWebアプリケーションをネットに公開しよう(https://www.udemy.com/the-ultimate-ruby-on-rails-bootcamp/)
こちらのコースはAWSを使って、RubyとRuby on railsを使って簡単なQアンドAサイトをリリースしてみましょう。という内容。
このコースで学んだことを今度また記事にしてみよう。このコースを選んだのは、webアプリケーションと調べた時にRubyが便利だよ!みたいな記事を見たから。あとAWSが入社予定の会社で使われているから。今のうちから触ってたら後々重宝するかもしれないと思った。
結果どうなったか
自分で書いたコード(厳密にいえば写経だけど)が実際に動いて、ボタンだとか、質問機能だとかが実装されていくのはとても面白かった。
すげぇええええええ!!これ見たことあるうううううぅぅぅぅ!!ってなった最終的に実際に誰でもアクセスできるようにして、友達に書き込んでみてもらったりした。
自分以外の人が自分で作ったサイトを使ってくれるのってなんだか不思議な感覚だった。多分webエンジニアのやりがいってこういうところにあるのかなぁと思ったし、これで喜べるならエンジニアの素養あるんじゃ?ってなった。
今のところわかったこと
- 簡単なwebアプリケーションの制作
- webアプリのリリース、デプロイ?(本当はそう呼べないだろうけど、カッコつけのために)
- Rubyの記法とかもろもろ(まだ全然使いこなせてない)
- railsを使ってのwebアプリの作り方(MVCアーキテクチャがどう作用するのか)
- アプリ作りの楽しさ
- 自分で作ることの大変さ
まとめてみると大事なことを結構得られた気がする
一番わかったのはやることが決まってないとやる気が出ない事
今回はwebアプリを作ることが目的だったけど、何の目標もなしにただ言語だけ学習するのは本当に退屈だと思った。
まだわからないこと
- サーバー、データベース関連 → SQLとかその辺り。こいつらが何のためにあるのかわかってない
- AWSの機能について → 今回言われるがままに使ったけど、ローカル環境にわざわざlinux環境を作らなくていいって事くらいしかわかってない
- linux関連 → 操作方法全然わかんねぇ。そもそも何がわかってないのかがわかってない。優先度どれくらいなんだ
- railsについて → なんかgemを使うと機能が拡張できるってことは分かった。どんなものがあるかは自分で調べる事っぽい
- git・Githubについて → コードの編集履歴を残せるってことは知ってる。どう使うかは勉強しないと
最後に。これからやりたいこと
- 新しいwebアプリケーションの制作 → 就活のための補助アプリとかできないかな
- HTML5、CSSを使いこなして見栄えがいいものを作れるようになる → まだ色とかリンクとかもわからないから、ハンズオンで身に付けていきたい
- セキュリティについての勉強 → もしこの先アカウント情報とかを管理するようになった時のために。転ばぬ先の杖
- 自分のポートフォリオの制作 → ぶっちゃけこれが最優先事項なんじゃないだろうか。
Qiitaでやっていきたいこと
定期的な更新!!!!
せっかく初投稿したんだから定期的に投稿したいし、色んな人に読んでもらいたいし、コメント貰ったり、コメント送りたい
見やすいページとか、いろいろ研究していこうと思います。
- 投稿日:2019-04-03T16:54:57+09:00
ツイッターの機能を使えるLINEボットを作った話
https://github.com/takuuuu517/line_twitter_bot
主な昨日はラインボットを通じて、ツイートをしたり、最新のタイムラインのツイートをみたりなどなど。。。
現在も機能を追加しようとしてます。このプロジェクトの目的は
- pythonの勉強 (pythonに触れるのほぼ初めてです)
- 複数のAPIの活用
- あと単純にラインボット作ってみたかった
機能追加で考えてるのは
- タイムラインをストリーミングして、気に入ったユーザーがツイートしたら、ラインの通知を送ったり
- 自分宛のツイートに返信する
使用したツール、API
- 言語:Python3
- SDK/API:
- ngrok (これはローカルホストで動かしてるサーバーを簡易的にデプロイしてくる感じのサービス、非常に便利)
注意
今回の記事は割と細かく説明しています。ラインボットの基礎がわかってる方はある程度のステップをスキップしてくだい。
ステップ 1
- LINE Developperからline Message API のチャンネルの開設
- Twitter Developper から新しいappを作る
この二つがそもそもないとラインボットの作成もツイッターの操作もできない。
ステップ 2
まずは下準備です。
terminal.pip install line-bot-sdk pip install tweepyrequirement.txtline-bot-sdk flaskProcfile.web: python twitter_bot/bot.pyruntime.txtpython-3.7.2credential.py# line LINE_CHANNEL_SECRET = "your line secret" LINE_CHANNEL_ACCESS_TOKEN = "your line access token" # twitter TWITTER_ACCESS_TOKEN = "your twitter access token" TWITTER_ACCESS_TOKEN_SECRET = "your twitter access secret" TWITTER_CONSUMER_KEY = "consumer key" TWITTER_CONSUMER_SECRET = "consumer key"あとラインボットをファイルを作ります。
LINE SDK のサンプルをまずは使っていきます。linebot.py# -*- coding: utf-8 -*- # Licensed under the Apache License, Version 2.0 (the "License"); you may # not use this file except in compliance with the License. You may obtain # a copy of the License at # # https://www.apache.org/licenses/LICENSE-2.0 # # Unless required by applicable law or agreed to in writing, software # distributed under the License is distributed on an "AS IS" BASIS, WITHOUT # WARRANTIES OR CONDITIONS OF ANY KIND, either express or implied. See the # License for the specific language governing permissions and limitations # under the License. import os import sys from argparse import ArgumentParser from flask import Flask, request, abort from linebot import ( LineBotApi, WebhookHandler ) from linebot.exceptions import ( InvalidSignatureError ) from linebot.models import ( MessageEvent, TextMessage, TextSendMessage, ) app = Flask(__name__) # get channel_secret and channel_access_token from your environment variable channel_secret = credentials.LINE_CHANNEL_SECRET #ここも変えて channel_access_token = credentials.LINE_CHANNEL_SECRET #ここも変えて if channel_secret is None: print('Specify LINE_CHANNEL_SECRET as environment variable.') sys.exit(1) if channel_access_token is None: print('Specify LINE_CHANNEL_ACCESS_TOKEN as environment variable.') sys.exit(1) line_bot_api = LineBotApi(channel_access_token) handler = WebhookHandler(channel_secret) @app.route("/callback", methods=['POST']) def callback(): # get X-Line-Signature header value signature = request.headers['X-Line-Signature'] # get request body as text body = request.get_data(as_text=True) app.logger.info("Request body: " + body) # handle webhook body try: handler.handle(body, signature) except InvalidSignatureError: abort(400) return 'OK' @handler.add(MessageEvent, message=TextMessage) def message_text(event): line_bot_api.reply_message( event.reply_token, TextSendMessage(text=event.message.text) ) if __name__ == "__main__": #ここも変えて port = int(os.getenv("PORT", 8000)) app.run(host="0.0.0.0", port=port)一番下とaccesstokenのところだけ変えるのを忘れないようにしてください。
まずはこれで動作確認をしましょう。ngrokでローカルホストをhttpsのURLを作ってもらい
terminal.Forwarding https://ff6fec54.ngrok.io -> http://localhost:8000この [https://ff6fec54.ngrok.io]
をこのように入力し、更新。あとはサーバーを動かしてラインボットを友達追加してエコーボットが動いているか確認しましょう。
ステップ 3
ラインボットが動いていたら今度はツイッターのアカウントを認証してラインのアカウントとツイッターのアカウントを連携させていく作業です。
ツイッターのアカウントの認証はTweepy APIに事細かかく書かれています。twitter.pyconsumer_key = credentials.TWITTER_CONSUMER_KEY consumer_secret = credentials.TWITTER_CONSUMER_SECRET access_token = credentials.TWITTER_ACCESS_TOKEN access_token_secret = credentials.TWITTER_ACCESS_TOKEN_SECRET auth = tweepy.OAuthHandler(consumer_key, consumer_secret) api = tweepy.API(auth) def authentication(): try: redirect_url = auth.get_authorization_url() return redirect_url except tweepy.TweepError: print ('Error! Failed to get request token.') def authentication_final(user_verifier): global auth global api session = { "request_token": auth.request_token, } # verifier = user_verifier # Let's say this is a web app, so we need to re-build the auth handler # first... auth = tweepy.OAuthHandler(consumer_key, consumer_secret) token = session["request_token"] session.pop("request_token") auth.request_token = token try: ts = auth.get_access_token(user_verifier) token = ts[0] secret = ts[1] auth.set_access_token(token, secret) api = tweepy.API(auth) # api.update_status('test tweet!!') # 認証が成功した時にツイートで確認したい方は使ってください except tweepy.TweepError: print ('Error! Failed to get access token.')認証プロセスを二つに分けたの理由は後ほど記載します。
bot.pyhandler.add(MessageEvent, message=TextMessage) def message_text(event): message = event.message.text sending_message = determine_message_to_send(message) line_bot_api.reply_message( event.reply_token, sending_message ) authentication_in_process = False def determine_message_to_send(user_message): sending_message = [TextSendMessage(text="ツイートしたよ!")] global authentication_in_process if user_message == "認証": sending_message = [TextSendMessage(text="ここにアクセスして認証してください"), TextSendMessage(text=twitter.authentication()),TextSendMessage(text="承認番号を送ってください")] authentication_in_process = True; return sending_message elif authentication_in_process: # add regex to make sure the format matches authentication_in_process = False twitter.authentication_final(user_message) return TextSendMessage(text="認証されたよ!") else: twitter.tweet(user_message) return sending_messageラインボットを使ったtwitterの認証を簡単に説明すると、
1. ユーザーが"認証"とラインボット内で送信
2. bot.pyでtwitter.py のauthenticationメソッドが呼ばれ、ユーザーに認証するためのURLがメッセージとして送られる
3. ユーザーが認証URLにアクセスし、ゲットした認証番号をユーザーがボットに送信
4. bot.pyでauthentication_finalが呼ばれ認証が完了する。ステップ 4
ここまできたらもうほぼ終わりです!
あとはTweepyAPIを読むなり、LINEAPIを読むなり、自分の好きな機能を追加してみてください!ちなみに単純にツイートするにはtwitter.py で
twitter.pyapi.update_status('test tweet!!')で、できます。
最後に
筆者は現在、自分のラインのアカウント、ツイッターのアカウントしか使ってないのでこのように単純にすることができている(必要な情報はとりあえずcredential.pyにおいとけばいいから)が、ユーザーが増えるのであれば、ラインとツイッターのアカウントを紐ずけるデータベースが必要になるのかなと考えている。
間違ってたらコメントください。
また、説明足りてないよ、ステップ抜けてない?ってゆうコメントもどんどんください。

- 投稿日:2019-04-03T16:05:07+09:00
再帰法で引数が配列のときにも対応させる。
例:2乗を出力する関数
配列に対応していない版square_1.py# coding:utf-8 #関数本体 def square(x): #シンプルに2乗を計算する return x ** 2 #関数を呼び出す ans = square(2) print(ans)配列(リスト)に対応させた版
square_2.py# coding:utf-8 #関数本体 def square(x): if type(x) is list: #引数がリスト配列のとき lsRet = [] #返り値はリスト型配列 for cnt in range(len(x)): #配列の中身を再帰的に関数に渡して、返り値のリストに追加する lsRet.append(square(x[cnt])) return lsRet #引数がリスト配列ではないときはシンプルに計算 else: return x ** 2 #関数を呼び出す ans1 = square(2) #引数が数値のとき print(ans1) #返り値は数値 #>>4 ans2 = square([2,3,4]) #引数がリスト配列のとき(1次元) print(ans2) #返り値は配列となる #>>[4, 9, 16] ans3 = square([[[1,2,3],[2,3,4]],[[3,4,5],[4,5,6]]]) #引数が3次元のリスト配列でも対応 print(ans3) #>>[[[1, 4, 9], [4, 9, 16]], [[9, 16, 25], [16, 25, 36]]]リストとタプルに対応させた版
square_3.py# coding:utf-8 #関数本体 def square(x): if type(x) in [list,tuple]: #引数がリストかタプルのとき lsRet = [] #返り値はとりあえずリスト配列 for cnt in range(len(x)): lsRet.append(square(x[cnt])) return type(x)(lsRet) #配列の型を維持する else: return x ** 2 #関数を呼び出す ans1 = square((2,3,4)) #引数がタプル配列のとき(1次元) print(ans1) #返り値はタプルとなる #>>(4, 9, 16) ans2 = square([([1,2,3],[2,3,4]),([3,4,5],[4,5,6])]) #リストのタプルのリストの...とかでも対応 print(ans2) #>>[([1, 4, 9], [4, 9, 16]), ([9, 16, 25], [16, 25, 36])]御意見やアドバイスがあればコメントしてください!
- 投稿日:2019-04-03T16:05:07+09:00
関数を再帰法で引数が配列のときにも対応させる
例:2乗を出力する関数(square)
配列に対応していない版
square_1.py# coding:utf-8 #関数本体 def square(x): #シンプルに2乗を計算する return x ** 2 #関数を呼び出す ans = square(2) print(ans)配列(リスト)に対応させた版
square_2.py# coding:utf-8 #関数本体 def square(x): if type(x) is list: #引数がリスト配列のとき lsRet = [] #返り値はリスト型配列 for cnt in range(len(x)): #配列の中身を再帰的に関数に渡して、返り値のリストに追加する lsRet.append(square(x[cnt])) return lsRet #引数がリスト配列ではないときはシンプルに計算 else: return x ** 2 #関数を呼び出す ans1 = square(2) #引数が数値のとき print(ans1) #返り値は数値 #>>4 ans2 = square([2,3,4]) #引数がリスト配列のとき(1次元) print(ans2) #返り値は配列となる #>>[4, 9, 16] ans3 = square([[[1,2,3],[2,3,4]],[[3,4,5],[4,5,6]]]) #引数が3次元のリスト配列でも対応 print(ans3) #>>[[[1, 4, 9], [4, 9, 16]], [[9, 16, 25], [16, 25, 36]]]リストとタプルに対応させた版
square_3.py# coding:utf-8 #関数本体 def square(x): if type(x) in [list,tuple]: #引数がリストかタプルのとき lsRet = [] #返り値はとりあえずリスト配列 for cnt in range(len(x)): lsRet.append(square(x[cnt])) return type(x)(lsRet) #配列の型を維持する else: return x ** 2 #関数を呼び出す ans1 = square((2,3,4)) #引数がタプル配列のとき(1次元) print(ans1) #返り値はタプルとなる #>>(4, 9, 16) ans2 = square([([1,2,3],[2,3,4]),([3,4,5],[4,5,6])]) #リストのタプルのリストの...とかでも対応 print(ans2) #>>[([1, 4, 9], [4, 9, 16]), ([9, 16, 25], [16, 25, 36])]まとめ
Pythonらしく書くならイテレータを使った方がいいのかな?
こういう再帰関数の使い方ってありなのかな?
御意見やアドバイスがあればコメントしてください!
- 投稿日:2019-04-03T15:26:58+09:00
pythonのpickleはserializeのこと
Conflict resolution doesn't need to read new pickle data from the database #38
https://github.com/zodb/relstorage/issues/38Python: オブジェクトを漬物 (Pickle) にする
https://blog.amedama.jp/entry/2015/12/05/132520Python の標準ライブラリにある pickle モジュールは Python のオブジェクトを直列化・非直列化するための機能を提供している。
- 投稿日:2019-04-03T12:23:03+09:00
機械学習で使う関数まとめ1
torch.randn
torch.randn(*sizes, out=None, dtype=None, layout=torch.strided, device=None, requires_grad=False) → Tensor
Returns a tensor filled with random numbers from a normal distribution with mean 0 and variance 1 (also called the standard normal distribution).The shape of the tensor is defined by the variable argument sizes.
- Parameters:
- sizes (int...) – a sequence of integers defining the shape of the output tensor. Can be a variable number of arguments or a collection like a list or tuple.
- out (Tensor, optional) – the output tensor dtype (torch.dtype, optional) – the desired data type of returned tensor. Default: if None, uses a global default (see torch.set_default_tensor_type()).
- layout (torch.layout, optional) – the desired layout of returned Tensor. Default: torch.strided.
- device (torch.device, optional) – the desired device of returned tensor. Default: if None, uses the current device for the default tensor type (see torch.set_default_tensor_type()). device will be the CPU for CPU tensor types and the current CUDA device for CUDA tensor types.
- requires_grad (bool, optional) – If autograd should record operations on the returned tensor. Default: False.
>>>torch.randn(4)
>>>tensor([-2.1436,  0.9966,  2.3426, -0.6366])
>>>torch.randn(2, 3)
>>>tensor([[ 1.5954,  2.8929, -1.0923],
        [ 1.1719, -0.4709, -0.1996]])
torch.nn.Linear
torch.nn.Linear(in_features, out_features, bias=True)[SOURCE]
Applies a linear transformation to the incoming data: y = xA^T + b
- Parameters:
- in_features – size of each input sample out_features – size of each output sample
- bias – If set to False, the layer will not learn an additive bias. Default: True
- Shape:
- Input: (N, *, \text{in_features})(N,∗,in_features) where *∗ means any number of additional dimensions
- Output: (N, *, \text{out_features})(N,∗,out_features) where all but the last dimension are the same shape as the input.
- Variables:
- weight – the learnable weights of the module of shape (\text{out_features}, \text{in_features})(out_features,in_features).
- bias – the learnable bias of the module of shape (\text{out_features})(out_features).
>>> m = nn.Linear(20, 30)
>>> input = torch.randn(128, 20)
>>> output = m(input)
>>> print(output.size())
torch.Size([128, 30])
nn.MSELoss
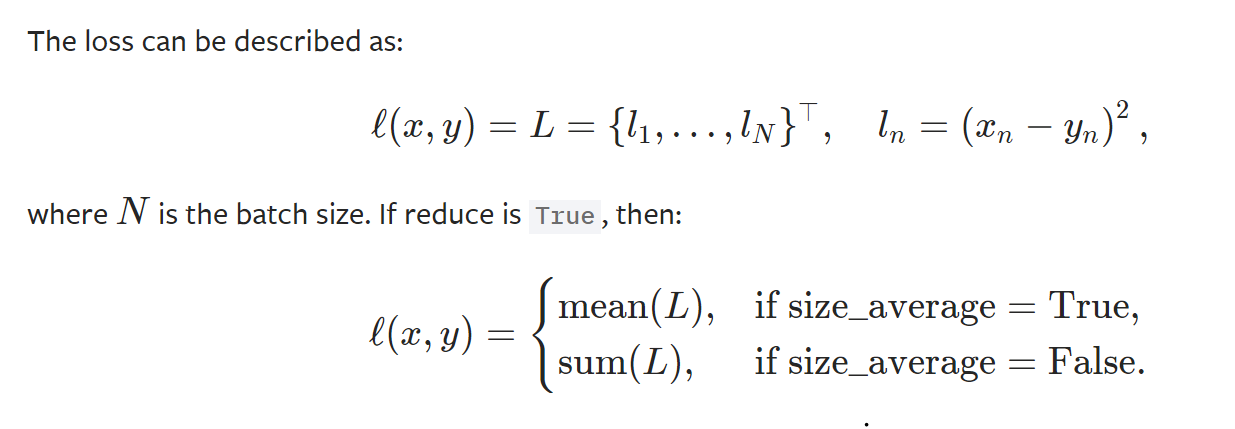
torch.nn.MSELoss(size_average=None, reduce=None, reduction='mean')[SOURCE]
Creates a criterion that measures the mean squared error (squared L2 norm) between each element in the input x and target y.
- parameters
- size_average(bool,optional)
- reduce(book.optional)
- reduction(string,optional)
- shape
- input:(N,*) where * means, any number of additional dimentions
- target:(N,*) same shape as the input
>>> loss = nn.MSELoss()
>>> input = torch.randn(3, 5, requires_grad=True)
>>> target = torch.randn(3, 5)
>>> output = loss(input, target)
>>> output.backward()
torch.optim.SGD
torch.optim.SGD(params, lr=, momentum=0, dampening=0, weight_decay=0, nesterov=False)[SOURCE]
Implements stochastic gradient descent (optionally with momentum).Nesterov momentum is based on the formula from On the importance of initialization and momentum in deep learning.
- Parameters:
- params (iterable) – iterable of parameters to optimize or dicts defining parameter groups lr (float) – learning rate
- momentum (float, optional) – momentum factor (default: 0)
- weight_decay (float, optional) – weight decay (L2 penalty) (default: 0)
- dampening (float, optional) – dampening for momentum (default: 0)
- nesterov (bool, optional) – enables Nesterov momentum (default: False)
>>> optimizer = torch.optim.SGD(model.parameters(), lr=0.1, momentum=0.9)
>>> optimizer.zero_grad()
>>> loss_fn(model(input), target).backward()
>>> optimizer.step()
- 投稿日:2019-04-03T11:22:50+09:00
Django簡単なアプリケションができるまで⑦
おさらい
前回まではpost内容をブラウザに表示させるところまでやりました。
Bootstrapを適用させ、ブラウザの画面サイズにページが付いてくる様にする
今のままだと画面サイズを変えた時に画像や本文が見えなくなってしまう可能性があります。
そこでBootstrapを適用したいと思います。リンクを踏んでいただくとDocumentationに飛ぶ様になっています。
ページ左端にメニューがあると思いますので、ここから随時必要なパーツがあるところにアクセスしていきます。
最初にBootstrapを適用させるコードを追加します。Getting startedからCSSの欄に書いてある以下のコードをindex.htmlに追加します。<link rel="stylesheet" href="https://stackpath.bootstrapcdn.com/bootstrap/4.3.1/css/bootstrap.min.css" integrity="sha384-ggOyR0iXCbMQv3Xipma34MD+dH/1fQ784/j6cY/iJTQUOhcWr7x9JvoRxT2MZw1T" crossorigin="anonymous">次にContents→imagesと飛び、Responsive imagesを見ます。
ここでは画面に合わせて画像を変えていくためにはimgタグの中にclass="img-fluid"を追加しろと書かれていますのでそうしましょう。<img src=.... class="img-fluid" />ここまでできたらブラウザを更新して、ブラウザの画面サイズを変えてみましょう。
うまく画像が付いてきているはずです。ここまでで簡単なアプリケーションができるまでを終わります。
- 投稿日:2019-04-03T09:49:15+09:00
Stanford NER Taggerを自分のデータで訓練
NERとは、Named Entity Recognitionの略で、固有表現認識という自然言語処理のタスクの一つです。Stanford NER Taggerは、このタスクを解くためのツールです。今回は、これを自分で訓練します。
事前準備
まず、訓練データの例をダウンロードします。
https://github.com/synalp/NER/blob/master/corpus/CoNLL-2003/eng.train次に、Stanford NER Taggerをダウンロードします。
https://nlp.stanford.edu/software/CRF-NER.shtml#Downloadそして、jdkをインストールします。
apt install default-jdk訓練データの準備
ダウンロードしたeng.trainを整形します。
out = []
with open("eng.train", "r") as f:
    for line in f:
        line = line.split()
        if len(line) > 2:
            out.append(str(line[0])+"\t"+str(line[-1]).replace("I-","").replace("B-","")+"\n")
        else:
            out.append("\n")

with open("train.tsv") as f:
    f.write(''.join(out))
訓練
訓練準備
- stanford ner taggerをunzipして、展開後のディレクトリに入ってください。
- そのディレクトリ内に、train.tsvを入れてください。
プロパティファイルの作成
train.proptrainFile = train.tsv serializeTo = ner-model.ser.gz map = word=0,answer=1 useClassFeature=true useWord=true useNGrams=true noMidNGrams=true maxNGramLeng=6 usePrev=true useNext=true useSequences=true usePrevSequences=true maxLeft=1 useTypeSeqs=true useTypeSeqs2=true useTypeySequences=true wordShape=chris2useLC useDisjunctive=trueこれを、train.propというファイル名で保存してください。
訓練の実行
java -cp stanford-ner.jar edu.stanford.nlp.ie.crf.CRFClassifier -prop train.propすると、ner-model.ser.gzという名のファイルとしてモデルが出来上がります。
モデルをpythonから使う
nltkのStanford NER Taggerのラッパーを使えば、モデルをpythonから使えます。
import nltk
from nltk.tag.stanford import StanfordNERTagger
sent = "Balack Obama kills people by AK47"
model = "./ner-model.ser.gz"
jar = "./stanford-ner.jar"
tagger = StanfordNERTagger(model, jar, encoding='utf-8')
print(tagger.tag(sent.split()))
[出力]
[('Balack', 'PER'),
 ('Obama', 'PER'),
 ('kills', 'O'),
 ('people', 'O'),
 ('by', 'O'),
 ('AK47', 'O')]
参考
[0] https://nlp.stanford.edu/software/crf-faq.html#a
[1] https://blog.sicara.com/train-ner-model-with-nltk-stanford-tagger-english-french-german-6d90573a9486
- 投稿日:2019-04-03T08:39:19+09:00
Jupyter Notebookで描画したチャート内の日本語が文字化けしてしまうときの対処方法
ipython_kernel_config.pyに以下の内容を追記する。
- ファイルが存在しない場合は新たに作成してしまって良い。
vi ~/.ipython/profile_default/ipython_kernel_config.pyipython_kernel_config.pyc.InlineBackend.rc = { 'font.size': 11, 'font.family': 'Osaka', 'figure.figsize': (6.0, 4.0), 'savefig.dpi': 80, 'axes.titlesize': 12 } c.InlineBackend.figure_formats = set(['png', 'retina'])
- 投稿日:2019-04-03T08:00:06+09:00
#python で日付を JST=日本時刻=現地時刻で与えると日の始まりの unixtimstamp を出力する例
- 強引に string の日付を split して replace に与えています
#!/usr/bin/env python3

from datetime import datetime
import pytz, time, os

tz = pytz.timezone('Asia/Tokyo')

date = os.environ.get('DATE')

year = int(date.split('-')[0])
month = int(date.split('-')[1])
day = int(date.split('-')[2])

local_datetime = datetime.now(tz=tz).replace(year=year, month=month, day=day, hour=0, minute=0, second=0, microsecond=0)

unixtimestamp = time.mktime(local_datetime.timetuple())

print(unixtimestamp)
$ DATE=2016-03-02 ./jst-unixtimestamp.py 1456844400.0$ DATE=2016-03-03 ./jst-unixtimestamp.py 1456930800.0shellと組み合わせて使ってみる例
$ DATE=$(date --date="1 days ago" +'%Y-%m-%d') ./jst-unixtimestamp.py
1554044400.0
$ DATE=$(date +'%Y-%m-%d') ./jst-unixtimestamp.py 1554130800.0Original by Github issue
- 投稿日:2019-04-03T07:47:23+09:00
#3 Google OR-Toolsを使って整数計画問題を解く(前半)
この記事を読むとできること
- Google OR-Toolsを使って整数計画問題が解けるようにする
を目指します。参考図書として以下を利用します。
「あたらしい数理最適化 python言語とGurobiで解く」イントロ
前回まで取り扱っていた問題は線形計画問題でした。今回は線形ではなく、整数計画問題について取り組みたいと思います。
整数計画問題とは
今まで取り扱っていた線形計画問題は、例えば、以下のような定式化がされていました。
\begin{align}
&\rm{maximize} & & y+z \\
&\rm{subject\ to} & & x+2y+z \leq 30\\
& & & x+4y+8z \leq 80\\
& & & x, y, z\geq0
\end{align}
この場合、3つの変数$x, y, z$は実数であればなんでもよかったのが、線形計画問題でした。ちょっと解いてみましょう。
線形計画問題を解くfrom __future__ import print_function from ortools.linear_solver import pywraplp def main(): solver = pywraplp.Solver( 'SolveSimpleSystem', pywraplp.Solver.GLOP_LINEAR_PROGRAMMING) # Create the variables x and y. x = solver.NumVar(0, solver.infinity(), 'x') y = solver.NumVar(0, solver.infinity(), 'y') z = solver.NumVar(0, solver.infinity(), 'z') # Constraint 1: x + 2y + z <= 30. constraint1 = solver.Constraint(0, 30) constraint1.SetCoefficient(x, 1) constraint1.SetCoefficient(y, 2) constraint1.SetCoefficient(z, 1) # Constraint 2: x + 4y +8z <= 80 constraint2 = solver.Constraint(0, 80) constraint2.SetCoefficient(x, 1) constraint2.SetCoefficient(y, 4) constraint2.SetCoefficient(z, 8) # objective: y+z objective = solver.Objective() objective.SetCoefficient(y, 1) objective.SetCoefficient(z, 1) objective.SetMaximization() # Call the solver and display the results. solver.Solve() print('Solution:') print('x = ', x.solution_value()) print('y = ', y.solution_value()) print('z = ', z.solution_value()) if __name__ == '__main__': main()実行結果はこちらです。
x =  0.0
y =  13.333333333333332
z =  3.333333333333335
どうやら$x=0, y=13\frac{1}{3},z=3\frac{1}{3}$が答えのようですね。今回取り扱う、整数計画問題は、以下のように、変数が整数でなければならないという制約があるものです。
\begin{align}
&\rm{maximize} & & y+z \\
&\rm{subject\ to} & & x+2y+z \leq 30\\
& & & x+4y+8z \leq 80\\
& & & x, y,z は非負の整数

\end{align}
目的関数がどうとか、制約条件に整数しか使ってはいけないとか言うわけではありません。あくまで変数が整数である、という制約を持つということです。線形計画問題としては、$y, z$はともに実数でしたから、整数ではありません。
ガイドに沿ってやってみる
さて、整数計画問題についてもガイドが書かれています。googleの中の人は優秀だぁ...。これを参考に、まずは使い方を学習していきたいと思います。
本当に実行可能解があるのか
さて、整数計画問題は、線形計画問題に対して、さらなる制約を加えたものだと述べました。制約が加わっているので、実際に制約を満たす変数の組み合わせ(=実行可能解)があるとは限りません。そこで、それを知るために、
Constraint programming (CP) solverが存在します。このページで詳細が書かれているので、やってみましょう。(以下、引用)from __future__ import print_function from ortools.sat.python import cp_model def main(): model = cp_model.CpModel() var_upper_bound = max(50, 45, 37) x = model.NewIntVar(0, var_upper_bound, 'x') y = model.NewIntVar(0, var_upper_bound, 'y') z = model.NewIntVar(0, var_upper_bound, 'z') model.Add(2*x + 7*y + 3*z <= 50) model.Add(3*x - 5*y + 7*z <= 45) model.Add(5*x + 2*y - 6*z <= 37) model.Maximize(2*x + 2*y + 3*z) solver = cp_model.CpSolver() status = solver.Solve(model) if status == cp_model.OPTIMAL: print('Maximum of objective function: %i' % solver.ObjectiveValue()) print() print('x value: ', solver.Value(x)) print('y value: ', solver.Value(y)) print('z value: ', solver.Value(z)) if __name__ == '__main__': main()前回と色々違いますが、
model.NewIntVarを指定することで整数計画問題を指定しているようですね。また、model.addで直接、制約条件を挿入できるようですね。全体の構造として、modelを作り、それをsolverに食わせることで、解いているようです。実際に実行してみましょう。Maximum of objective function: 35 x value: 7 y value: 3 z value: 5ちゃんと、整数計画問題が解けました!今回は実行可能解があるようです。
注意点
実行可能解の集合が凸型のもの(すべての制約条件を満たさなければならないタイプはこれに該当します。)に対して、MIPソルバ
(後半で説明します)のほうが高速です。ただし、実行可能解の集合が、凸型でない場合(例えば、3つある制約条件のうち、1つを満たせば良い、といったorで結ばれた制約条件を抱えている場合)は、CPソルバのほうが高速です。振り返り
今回は、整数計画問題を解くために、CPソルバを利用しました。整数計画問題と、線形計画問題の拡張として、混合整数計画問題が存在します。先程出てきたMIPソルバはそちらを解くためのソルバで、もちろん整数計画問題も解けます。MIPソルバは次回あたり、混合整数計画問題は次次回あたりに述べることとします。
終わりに
自分の記事のクオリティを高めたいので、質問でも、次の要望、ただの感想、何でもいいのでコメントを残して頂けると幸いです。ちゃんと答えますので、よしなしによろしくお願いいたします。
関連記事
- 投稿日:2019-04-03T06:42:42+09:00
xserverでpythonを実行させる方法
- 投稿日:2019-04-03T06:00:25+09:00
#Twitter #API で1個のツイートIDを指定すると、ツリーの最上段までたどって全ツイートを取得する #python スクリプトの例 ( + #jq )
- Twitterのツイート同士はツリー構造なので、ツイートがチェーンしている場合、下から上にむかって順々にたどることが出来る
- show status API ではツイートの full_text を得ることが出来ず、文章が省略されてしまっているものがある、timeline API を上手く使うなりする必要があるかもしれない
config.py
CONSUMER_KEY = ''
CONSUMER_SECRET = ''
ACCESS_TOKEN = ''
ACCESS_TOKEN_SECRET = ''
script
#!/usr/bin/env python3

# https://developer.twitter.com/en/docs/tweets/post-and-engage/api-reference/get-statuses-show-id
# https://twitter.com/YumaInaura/status/1112838809991798784

import json, config, os, re
from requests_oauthlib import OAuth1Session

if os.environ.get('TWITTER_CONSUMER_KEY'):
  CONSUMER_KEY = os.environ.get('TWITTER_CONSUMER_KEY')
  CONSUMER_SECRET = os.environ.get('TWITTER_CONSUMER_SECRET')
  ACCESS_TOKEN = os.environ.get('TWITTER_ACCESS_TOKEN')
  ACCESS_TOKEN_SECRET = os.environ.get('TWITTER_ACCESS_TOKEN_SECRET')
else:
  CONSUMER_KEY = config.CONSUMER_KEY
  CONSUMER_SECRET = config.CONSUMER_SECRET
  ACCESS_TOKEN = config.ACCESS_TOKEN
  ACCESS_TOKEN_SECRET = config.ACCESS_TOKEN_SECRET

twitter = OAuth1Session(CONSUMER_KEY, CONSUMER_SECRET, ACCESS_TOKEN, ACCESS_TOKEN_SECRET)

last_tweet = {}
tweets = []

MAX_ROUND = int(os.environ.get('ROUND')) if os.environ.get('ROUND') else 30

for i in range(1, MAX_ROUND+1):
  api_parameter = {
    "id": last_tweet['in_reply_to_status_id_str'] if last_tweet and last_tweet['in_reply_to_status_id_str'] else os.environ.get('ID'),
  }

  api_url = "https://api.twitter.com/1.1/statuses/show.json"

  response = twitter.get(api_url, params=api_parameter)
  tweet = last_tweet = response.json()

  if not tweet['in_reply_to_status_id_str']:
    break
  else:
    tweets.append(tweet)

print(json.dumps(tweets))
e.g
ID=1112838809991798784 ./show-chain.py | tee chain.log | jq [ { "created_at": "Mon Apr 01 22:07:02 +0000 2019", "id": 1112838809991798800, "id_str": "1112838809991798784", "text": "転職ドラフトの前回 第17回のユーザーランキングを見ると、年収提示ランキングの最高額が1100万円であり、累計平均が最高のユーザーは975万円のようだ。これだけ有名なサービスでの、有象無象のエンジニアのトップがこれであると考えると… https://t.co/veQb92SbHo", "truncated": true, "entities": { "hashtags": [], "symbols": [], "user_mentions": [], "urls": [ { "url": "https://t.co/veQb92SbHo", "expanded_url": "https://twitter.com/i/web/status/1112838809991798784", "display_url": "twitter.com/i/web/status/1…", "indices": [ 117, 140 ] } ] }, "source": "<a href=\"https://mobile.twitter.com\" rel=\"nofollow\">Twitter Web App</a>", "in_reply_to_status_id": 1112837955121438700, "in_reply_to_status_id_str": "1112837955121438720", "in_reply_to_user_id": 473780756, "in_reply_to_user_id_str": "473780756", "in_reply_to_screen_name": "YumaInaura", "user": { "id": 473780756, "id_str": "473780756", "name": "0", "screen_name": "YumaInaura", "location": "", "description": "", "url": "https://t.co/8PZWB3UTuq", "entities": { "url": { "urls": [ { "url": "https://t.co/8PZWB3UTuq", "expanded_url": "https://www.instagram.com/yumainaura/", "display_url": "instagram.com/yumainaura/", "indices": [ 0, 23 ] } ] }, "description": { "urls": [] } }, "protected": false, "followers_count": 539, "friends_count": 0, "listed_count": 28, "created_at": "Wed Jan 25 09:59:57 +0000 2012", "favourites_count": 25059, "utc_offset": null, "time_zone": null, "geo_enabled": true, "verified": false, "statuses_count": 37617, "lang": "en", "contributors_enabled": false, "is_translator": false, "is_translation_enabled": false, "profile_background_color": "000000", "profile_background_image_url": "http://abs.twimg.com/images/themes/theme1/bg.png", "profile_background_image_url_https": "https://abs.twimg.com/images/themes/theme1/bg.png", "profile_background_tile": false, "profile_image_url": "http://pbs.twimg.com/profile_images/1110446096596127744/wI7-uC6I_normal.jpg", "profile_image_url_https": "https://pbs.twimg.com/profile_images/1110446096596127744/wI7-uC6I_normal.jpg", "profile_banner_url": "https://pbs.twimg.com/profile_banners/473780756/1552991452", "profile_link_color": "1B95E0", "profile_sidebar_border_color": "000000", "profile_sidebar_fill_color": "000000", "profile_text_color": "000000", "profile_use_background_image": false, "has_extended_profile": false, "default_profile": false, "default_profile_image": false, "following": false, "follow_request_sent": false, "notifications": false, "translator_type": "none" }, "geo": null, "coordinates": null, "place": null, "contributors": null, "is_quote_status": false, "retweet_count": 0, "favorite_count": 0, "favorited": false, "retweeted": false, "possibly_sensitive": false, "possibly_sensitive_appealable": false, "lang": "ja" }, { "created_at": "Mon Apr 01 22:03:38 +0000 2019", "id": 1112837955121438700, "id_str": "1112837955121438720", "text": "転職ドラフトはエントリー期間対象外であった。こういう時に妙な罪悪感を持ち出して、もっと早く見ておけば良かったとか、動くのがおそすぎたのだと、自分を刃物で突き刺すのは愚策である。結果はあくまで結果論であり、過去の愛すべき自分だって、最善を尽くしたであろうから。#i", "truncated": false, "entities": { "hashtags": [ { "text": "i", "indices": [ 129, 131 ] } ], "symbols": [], "user_mentions": [], "urls": [] }, "source": "<a href=\"https://mobile.twitter.com\" rel=\"nofollow\">Twitter Web App</a>", "in_reply_to_status_id": 1112837456577978400, "in_reply_to_status_id_str": "1112837456577978369", "in_reply_to_user_id": 473780756, "in_reply_to_user_id_str": "473780756", "in_reply_to_screen_name": "YumaInaura", "user": { "id": 473780756, "id_str": "473780756", "name": "0", "screen_name": "YumaInaura", "location": "", "description": "", "url": "https://t.co/8PZWB3UTuq", "entities": { "url": { "urls": [ { "url": "https://t.co/8PZWB3UTuq", "expanded_url": "https://www.instagram.com/yumainaura/", "display_url": "instagram.com/yumainaura/", "indices": [ 0, 23 ] } ] }, "description": { "urls": [] } }, "protected": false, "followers_count": 539, "friends_count": 0, "listed_count": 28, "created_at": "Wed Jan 25 09:59:57 +0000 2012", "favourites_count": 25059, "utc_offset": null, "time_zone": null, "geo_enabled": true, "verified": false, "statuses_count": 37617, "lang": "en", "contributors_enabled": false, "is_translator": false, "is_translation_enabled": false, "profile_background_color": "000000", "profile_background_image_url": "http://abs.twimg.com/images/themes/theme1/bg.png", "profile_background_image_url_https": "https://abs.twimg.com/images/themes/theme1/bg.png", "profile_background_tile": false, "profile_image_url": "http://pbs.twimg.com/profile_images/1110446096596127744/wI7-uC6I_normal.jpg", "profile_image_url_https": "https://pbs.twimg.com/profile_images/1110446096596127744/wI7-uC6I_normal.jpg", "profile_banner_url": "https://pbs.twimg.com/profile_banners/473780756/1552991452", "profile_link_color": "1B95E0", "profile_sidebar_border_color": "000000", "profile_sidebar_fill_color": "000000", "profile_text_color": "000000", "profile_use_background_image": false, "has_extended_profile": false, "default_profile": false, "default_profile_image": false, "following": false, "follow_request_sent": false, "notifications": false, "translator_type": "none" }, "geo": null, "coordinates": null, "place": null, "contributors": null, "is_quote_status": false, "retweet_count": 0, "favorite_count": 0, "favorited": false, "retweeted": false, "lang": "ja" }, { "created_at": "Mon Apr 01 22:01:39 +0000 2019", "id": 1112837456577978400, "id_str": "1112837456577978369", "text": "転職ドラフトという名前だけあって、期間が区切られてエントリーを受け付ける形式のようだ。ところで開催月は奇数月らしく、早速も、既に4月2日の今はエントリーが出来ぬことに気づく。次回は5月の開催。結果発表はそれよりも遅くなると考えると… https://t.co/FUBLhWk2mh", "truncated": true, "entities": { "hashtags": [], "symbols": [], "user_mentions": [], "urls": [ { "url": "https://t.co/FUBLhWk2mh", "expanded_url": "https://twitter.com/i/web/status/1112837456577978369", "display_url": "twitter.com/i/web/status/1…", "indices": [ 117, 140 ] } ] }, "source": "<a href=\"https://mobile.twitter.com\" rel=\"nofollow\">Twitter Web App</a>", "in_reply_to_status_id": 1112835847680749600, "in_reply_to_status_id_str": "1112835847680749568", "in_reply_to_user_id": 473780756, "in_reply_to_user_id_str": "473780756", "in_reply_to_screen_name": "YumaInaura", "user": { "id": 473780756, "id_str": "473780756", "name": "0", "screen_name": "YumaInaura", "location": "", "description": "", "url": "https://t.co/8PZWB3UTuq", "entities": { "url": { "urls": [ { "url": "https://t.co/8PZWB3UTuq", "expanded_url": "https://www.instagram.com/yumainaura/", "display_url": "instagram.com/yumainaura/", "indices": [ 0, 23 ] } ] }, "description": { "urls": [] } }, "protected": false, "followers_count": 539, "friends_count": 0, "listed_count": 28, "created_at": "Wed Jan 25 09:59:57 +0000 2012", "favourites_count": 25059, "utc_offset": null, "time_zone": null, "geo_enabled": true, "verified": false, "statuses_count": 37617, "lang": "en", "contributors_enabled": false, "is_translator": false, "is_translation_enabled": false, "profile_background_color": "000000", "profile_background_image_url": "http://abs.twimg.com/images/themes/theme1/bg.png", "profile_background_image_url_https": "https://abs.twimg.com/images/themes/theme1/bg.png", "profile_background_tile": false, "profile_image_url": "http://pbs.twimg.com/profile_images/1110446096596127744/wI7-uC6I_normal.jpg", "profile_image_url_https": "https://pbs.twimg.com/profile_images/1110446096596127744/wI7-uC6I_normal.jpg", "profile_banner_url": "https://pbs.twimg.com/profile_banners/473780756/1552991452", "profile_link_color": "1B95E0", "profile_sidebar_border_color": "000000", "profile_sidebar_fill_color": "000000", "profile_text_color": "000000", "profile_use_background_image": false, "has_extended_profile": false, "default_profile": false, "default_profile_image": false, "following": false, "follow_request_sent": false, "notifications": false, "translator_type": "none" }, "geo": null, "coordinates": null, "place": null, "contributors": null, "is_quote_status": false, "retweet_count": 0, "favorite_count": 0, "favorited": false, "retweeted": false, "possibly_sensitive": false, "possibly_sensitive_appealable": false, "lang": "ja" }, { "created_at": "Mon Apr 01 21:55:16 +0000 2019", "id": 1112835847680749600, "id_str": "1112835847680749568", "text": "Qiitaなどの記事を一本書くことのコストというのは莫大である。なぜか。Twitterでないからだ。巨大なテキストの編集コストというものは、巨大に跳ね上がるように出来ている。しかしTwitterのように小さい粒のまとまりをスタック… https://t.co/M12LalFzrt", "truncated": true, "entities": { "hashtags": [], "symbols": [], "user_mentions": [], "urls": [ { "url": "https://t.co/M12LalFzrt", "expanded_url": "https://twitter.com/i/web/status/1112835847680749568", "display_url": "twitter.com/i/web/status/1…", "indices": [ 117, 140 ] } ] }, "source": "<a href=\"https://mobile.twitter.com\" rel=\"nofollow\">Twitter Web App</a>", "in_reply_to_status_id": 1112835400660222000, "in_reply_to_status_id_str": "1112835400660221952", "in_reply_to_user_id": 473780756, "in_reply_to_user_id_str": "473780756", "in_reply_to_screen_name": "YumaInaura", "user": { "id": 473780756, "id_str": "473780756", "name": "0", "screen_name": "YumaInaura", "location": "", "description": "", "url": "https://t.co/8PZWB3UTuq", "entities": { "url": { "urls": [ { "url": "https://t.co/8PZWB3UTuq", "expanded_url": "https://www.instagram.com/yumainaura/", "display_url": "instagram.com/yumainaura/", "indices": [ 0, 23 ] } ] }, "description": { "urls": [] } }, "protected": false, "followers_count": 539, "friends_count": 0, "listed_count": 28, "created_at": "Wed Jan 25 09:59:57 +0000 2012", "favourites_count": 25059, "utc_offset": null, "time_zone": null, "geo_enabled": true, "verified": false, "statuses_count": 37617, "lang": "en", "contributors_enabled": false, "is_translator": false, "is_translation_enabled": false, "profile_background_color": "000000", "profile_background_image_url": "http://abs.twimg.com/images/themes/theme1/bg.png", "profile_background_image_url_https": "https://abs.twimg.com/images/themes/theme1/bg.png", "profile_background_tile": false, "profile_image_url": "http://pbs.twimg.com/profile_images/1110446096596127744/wI7-uC6I_normal.jpg", "profile_image_url_https": "https://pbs.twimg.com/profile_images/1110446096596127744/wI7-uC6I_normal.jpg", "profile_banner_url": "https://pbs.twimg.com/profile_banners/473780756/1552991452", "profile_link_color": "1B95E0", "profile_sidebar_border_color": "000000", "profile_sidebar_fill_color": "000000", "profile_text_color": "000000", "profile_use_background_image": false, "has_extended_profile": false, "default_profile": false, "default_profile_image": false, "following": false, "follow_request_sent": false, "notifications": false, "translator_type": "none" }, "geo": null, "coordinates": null, "place": null, "contributors": null, "is_quote_status": false, "retweet_count": 0, "favorite_count": 0, "favorited": false, "retweeted": false, "lang": "ja" }, { "created_at": "Mon Apr 01 21:53:29 +0000 2019", "id": 1112835400660222000, "id_str": "1112835400660221952", "text": "このようにTwitterでセルフリプライのチェーンを繋げていき、それをあとで一本のブログに出来るようなのを用意すれば、自分の人生にどれだけ役立つかと思うのだ。ちょっとしたコストをかければすぐに出来るとは思う。ツリー構造を上へとたど… https://t.co/B20buqukMd", "truncated": true, "entities": { "hashtags": [], "symbols": [], "user_mentions": [], "urls": [ { "url": "https://t.co/B20buqukMd", "expanded_url": "https://twitter.com/i/web/status/1112835400660221952", "display_url": "twitter.com/i/web/status/1…", "indices": [ 117, 140 ] } ] }, "source": "<a href=\"https://mobile.twitter.com\" rel=\"nofollow\">Twitter Web App</a>", "in_reply_to_status_id": 1112834904448876500, "in_reply_to_status_id_str": "1112834904448876544", "in_reply_to_user_id": 473780756, "in_reply_to_user_id_str": "473780756", "in_reply_to_screen_name": "YumaInaura", "user": { "id": 473780756, "id_str": "473780756", "name": "0", "screen_name": "YumaInaura", "location": "", "description": "", "url": "https://t.co/8PZWB3UTuq", "entities": { "url": { "urls": [ { "url": "https://t.co/8PZWB3UTuq", "expanded_url": "https://www.instagram.com/yumainaura/", "display_url": "instagram.com/yumainaura/", "indices": [ 0, 23 ] } ] }, "description": { "urls": [] } }, "protected": false, "followers_count": 539, "friends_count": 0, "listed_count": 28, "created_at": "Wed Jan 25 09:59:57 +0000 2012", "favourites_count": 25059, "utc_offset": null, "time_zone": null, "geo_enabled": true, "verified": false, "statuses_count": 37617, "lang": "en", "contributors_enabled": false, "is_translator": false, "is_translation_enabled": false, "profile_background_color": "000000", "profile_background_image_url": "http://abs.twimg.com/images/themes/theme1/bg.png", "profile_background_image_url_https": "https://abs.twimg.com/images/themes/theme1/bg.png", "profile_background_tile": false, "profile_image_url": "http://pbs.twimg.com/profile_images/1110446096596127744/wI7-uC6I_normal.jpg", "profile_image_url_https": "https://pbs.twimg.com/profile_images/1110446096596127744/wI7-uC6I_normal.jpg", "profile_banner_url": "https://pbs.twimg.com/profile_banners/473780756/1552991452", "profile_link_color": "1B95E0", "profile_sidebar_border_color": "000000", "profile_sidebar_fill_color": "000000", "profile_text_color": "000000", "profile_use_background_image": false, "has_extended_profile": false, "default_profile": false, "default_profile_image": false, "following": false, "follow_request_sent": false, "notifications": false, "translator_type": "none" }, "geo": null, "coordinates": null, "place": null, "contributors": null, "is_quote_status": false, "retweet_count": 0, "favorite_count": 0, "favorited": false, "retweeted": false, "lang": "ja" }, { "created_at": "Mon Apr 01 21:51:31 +0000 2019", "id": 1112834904448876500, "id_str": "1112834904448876544", "text": "転職ドラフトは自分で入力をしないと、審査が開始されない仕様らしい。これが何もせずともGithub連携などして審査が開始されるような仕様であれば、エンジニアは大喜びであろう。利用言語は自動解析できるだろうし、ポートフォリオなども、全… https://t.co/BPjTOlM8NC", "truncated": true, "entities": { "hashtags": [], "symbols": [], "user_mentions": [], "urls": [ { "url": "https://t.co/BPjTOlM8NC", "expanded_url": "https://twitter.com/i/web/status/1112834904448876544", "display_url": "twitter.com/i/web/status/1…", "indices": [ 117, 140 ] } ] }, "source": "<a href=\"https://mobile.twitter.com\" rel=\"nofollow\">Twitter Web App</a>", "in_reply_to_status_id": 1112834329275560000, "in_reply_to_status_id_str": "1112834329275559936", "in_reply_to_user_id": 473780756, "in_reply_to_user_id_str": "473780756", "in_reply_to_screen_name": "YumaInaura", "user": { "id": 473780756, "id_str": "473780756", "name": "0", "screen_name": "YumaInaura", "location": "", "description": "", "url": "https://t.co/8PZWB3UTuq", "entities": { "url": { "urls": [ { "url": "https://t.co/8PZWB3UTuq", "expanded_url": "https://www.instagram.com/yumainaura/", "display_url": "instagram.com/yumainaura/", "indices": [ 0, 23 ] } ] }, "description": { "urls": [] } }, "protected": false, "followers_count": 539, "friends_count": 0, "listed_count": 28, "created_at": "Wed Jan 25 09:59:57 +0000 2012", "favourites_count": 25059, "utc_offset": null, "time_zone": null, "geo_enabled": true, "verified": false, "statuses_count": 37617, "lang": "en", "contributors_enabled": false, "is_translator": false, "is_translation_enabled": false, "profile_background_color": "000000", "profile_background_image_url": "http://abs.twimg.com/images/themes/theme1/bg.png", "profile_background_image_url_https": "https://abs.twimg.com/images/themes/theme1/bg.png", "profile_background_tile": false, "profile_image_url": "http://pbs.twimg.com/profile_images/1110446096596127744/wI7-uC6I_normal.jpg", "profile_image_url_https": "https://pbs.twimg.com/profile_images/1110446096596127744/wI7-uC6I_normal.jpg", "profile_banner_url": "https://pbs.twimg.com/profile_banners/473780756/1552991452", "profile_link_color": "1B95E0", "profile_sidebar_border_color": "000000", "profile_sidebar_fill_color": "000000", "profile_text_color": "000000", "profile_use_background_image": false, "has_extended_profile": false, "default_profile": false, "default_profile_image": false, "following": false, "follow_request_sent": false, "notifications": false, "translator_type": "none" }, "geo": null, "coordinates": null, "place": null, "contributors": null, "is_quote_status": false, "retweet_count": 0, "favorite_count": 0, "favorited": false, "retweeted": false, "possibly_sensitive": false, "possibly_sensitive_appealable": false, "lang": "ja" }, { "created_at": "Mon Apr 01 21:49:14 +0000 2019", "id": 1112834329275560000, "id_str": "1112834329275559936", "text": "世界を分報に変えよ。本当に苦手な事柄は、自分が好みとする事柄と、ミックスインすると良い。たとえば僕の場合、ただ単に転職ドラフトなどのサイトに慣れ親しむだけでも莫大なるコストを感じるが、こうやってTwitterなどで実況中継やアウトプットをすると、楽しみが増すように感じられる。#i", "truncated": false, "entities": { "hashtags": [ { "text": "i", "indices": [ 138, 140 ] } ], "symbols": [], "user_mentions": [], "urls": [] }, "source": "<a href=\"https://mobile.twitter.com\" rel=\"nofollow\">Twitter Web App</a>", "in_reply_to_status_id": 1112833866710974500, "in_reply_to_status_id_str": "1112833866710974464", "in_reply_to_user_id": 473780756, "in_reply_to_user_id_str": "473780756", "in_reply_to_screen_name": "YumaInaura", "user": { "id": 473780756, "id_str": "473780756", "name": "0", "screen_name": "YumaInaura", "location": "", "description": "", "url": "https://t.co/8PZWB3UTuq", "entities": { "url": { "urls": [ { "url": "https://t.co/8PZWB3UTuq", "expanded_url": "https://www.instagram.com/yumainaura/", "display_url": "instagram.com/yumainaura/", "indices": [ 0, 23 ] } ] }, "description": { "urls": [] } }, "protected": false, "followers_count": 539, "friends_count": 0, "listed_count": 28, "created_at": "Wed Jan 25 09:59:57 +0000 2012", "favourites_count": 25059, "utc_offset": null, "time_zone": null, "geo_enabled": true, "verified": false, "statuses_count": 37617, "lang": "en", "contributors_enabled": false, "is_translator": false, "is_translation_enabled": false, "profile_background_color": "000000", "profile_background_image_url": "http://abs.twimg.com/images/themes/theme1/bg.png", "profile_background_image_url_https": "https://abs.twimg.com/images/themes/theme1/bg.png", "profile_background_tile": false, "profile_image_url": "http://pbs.twimg.com/profile_images/1110446096596127744/wI7-uC6I_normal.jpg", "profile_image_url_https": "https://pbs.twimg.com/profile_images/1110446096596127744/wI7-uC6I_normal.jpg", "profile_banner_url": "https://pbs.twimg.com/profile_banners/473780756/1552991452", "profile_link_color": "1B95E0", "profile_sidebar_border_color": "000000", "profile_sidebar_fill_color": "000000", "profile_text_color": "000000", "profile_use_background_image": false, "has_extended_profile": false, "default_profile": false, "default_profile_image": false, "following": false, "follow_request_sent": false, "notifications": false, "translator_type": "none" }, "geo": null, "coordinates": null, "place": null, "contributors": null, "is_quote_status": false, "retweet_count": 0, "favorite_count": 1, "favorited": false, "retweeted": false, "lang": "ja" }, { "created_at": "Mon Apr 01 21:47:23 +0000 2019", "id": 1112833866710974500, "id_str": "1112833866710974464", "text": "転職ドラフトの正社員採用のプレゼントにうまい棒10万円分というものがあるが、ツッコミどころを満載に用意している感じがするよなあ。これを選ぶ人はきっと面白い社員、もしくはベタにお仕事ができます社員になることでしょう。うまい棒は安定感… https://t.co/uyav2ILByP", "truncated": true, "entities": { "hashtags": [], "symbols": [], "user_mentions": [], "urls": [ { "url": "https://t.co/uyav2ILByP", "expanded_url": "https://twitter.com/i/web/status/1112833866710974464", "display_url": "twitter.com/i/web/status/1…", "indices": [ 117, 140 ] } ] }, "source": "<a href=\"https://mobile.twitter.com\" rel=\"nofollow\">Twitter Web App</a>", "in_reply_to_status_id": 1112826051728564200, "in_reply_to_status_id_str": "1112826051728564224", "in_reply_to_user_id": 473780756, "in_reply_to_user_id_str": "473780756", "in_reply_to_screen_name": "YumaInaura", "user": { "id": 473780756, "id_str": "473780756", "name": "0", "screen_name": "YumaInaura", "location": "", "description": "", "url": "https://t.co/8PZWB3UTuq", "entities": { "url": { "urls": [ { "url": "https://t.co/8PZWB3UTuq", "expanded_url": "https://www.instagram.com/yumainaura/", "display_url": "instagram.com/yumainaura/", "indices": [ 0, 23 ] } ] }, "description": { "urls": [] } }, "protected": false, "followers_count": 539, "friends_count": 0, "listed_count": 28, "created_at": "Wed Jan 25 09:59:57 +0000 2012", "favourites_count": 25059, "utc_offset": null, "time_zone": null, "geo_enabled": true, "verified": false, "statuses_count": 37617, "lang": "en", "contributors_enabled": false, "is_translator": false, "is_translation_enabled": false, "profile_background_color": "000000", "profile_background_image_url": "http://abs.twimg.com/images/themes/theme1/bg.png", "profile_background_image_url_https": "https://abs.twimg.com/images/themes/theme1/bg.png", "profile_background_tile": false, "profile_image_url": "http://pbs.twimg.com/profile_images/1110446096596127744/wI7-uC6I_normal.jpg", "profile_image_url_https": "https://pbs.twimg.com/profile_images/1110446096596127744/wI7-uC6I_normal.jpg", "profile_banner_url": "https://pbs.twimg.com/profile_banners/473780756/1552991452", "profile_link_color": "1B95E0", "profile_sidebar_border_color": "000000", "profile_sidebar_fill_color": "000000", "profile_text_color": "000000", "profile_use_background_image": false, "has_extended_profile": false, "default_profile": false, "default_profile_image": false, "following": false, "follow_request_sent": false, "notifications": false, "translator_type": "none" }, "geo": null, "coordinates": null, "place": null, "contributors": null, "is_quote_status": false, "retweet_count": 0, "favorite_count": 1, "favorited": false, "retweeted": false, "possibly_sensitive": false, "possibly_sensitive_appealable": false, "lang": "ja" }, { "created_at": "Mon Apr 01 21:16:20 +0000 2019", "id": 1112826051728564200, "id_str": "1112826051728564224", "text": "最終出社から早くも1週間が経過した。1ヶ月など飛ぶようにすぎるだろうという予感は、おそらく忠実に叶おうとしている。今日こそは転職ドラフトに渾身のエントリーシートを記入し、髪を切り、久しぶりに東京から戻った知人とも会う。", "truncated": false, "entities": { "hashtags": [], "symbols": [], "user_mentions": [], "urls": [] }, "source": "<a href=\"http://twitter.com/download/iphone\" rel=\"nofollow\">Twitter for iPhone</a>", "in_reply_to_status_id": 1110489119011074000, "in_reply_to_status_id_str": "1110489119011074048", "in_reply_to_user_id": 473780756, "in_reply_to_user_id_str": "473780756", "in_reply_to_screen_name": "YumaInaura", "user": { "id": 473780756, "id_str": "473780756", "name": "0", "screen_name": "YumaInaura", "location": "", "description": "", "url": "https://t.co/8PZWB3UTuq", "entities": { "url": { "urls": [ { "url": "https://t.co/8PZWB3UTuq", "expanded_url": "https://www.instagram.com/yumainaura/", "display_url": "instagram.com/yumainaura/", "indices": [ 0, 23 ] } ] }, "description": { "urls": [] } }, "protected": false, "followers_count": 539, "friends_count": 0, "listed_count": 28, "created_at": "Wed Jan 25 09:59:57 +0000 2012", "favourites_count": 25059, "utc_offset": null, "time_zone": null, "geo_enabled": true, "verified": false, "statuses_count": 37617, "lang": "en", "contributors_enabled": false, "is_translator": false, "is_translation_enabled": false, "profile_background_color": "000000", "profile_background_image_url": "http://abs.twimg.com/images/themes/theme1/bg.png", "profile_background_image_url_https": "https://abs.twimg.com/images/themes/theme1/bg.png", "profile_background_tile": false, "profile_image_url": "http://pbs.twimg.com/profile_images/1110446096596127744/wI7-uC6I_normal.jpg", "profile_image_url_https": "https://pbs.twimg.com/profile_images/1110446096596127744/wI7-uC6I_normal.jpg", "profile_banner_url": "https://pbs.twimg.com/profile_banners/473780756/1552991452", "profile_link_color": "1B95E0", "profile_sidebar_border_color": "000000", "profile_sidebar_fill_color": "000000", "profile_text_color": "000000", "profile_use_background_image": false, "has_extended_profile": false, "default_profile": false, "default_profile_image": false, "following": false, "follow_request_sent": false, "notifications": false, "translator_type": "none" }, "geo": null, "coordinates": null, "place": null, "contributors": null, "is_quote_status": false, "retweet_count": 0, "favorite_count": 1, "favorited": false, "retweeted": false, "lang": "ja" } ]jq コマンドでテキストだけに絞り込む例
$ cat log/chain.log | jq --raw-output '.[].text'
転職ドラフトの前回 第17回のユーザーランキングを見ると、年収提示ランキングの最高額が1100万円であり、累計平均が最高のユーザーは975万円のようだ。これだけ有名なサービスでの、有象無象のエンジニアのトップがこれであると考えると… https://t.co/veQb92SbHo
転職ドラフトはエントリー期間対象外であった。こういう時に妙な罪悪感を持ち出して、もっと早く見ておけば良かったとか、動くのがおそすぎたのだと、自分を刃物で突き刺すのは愚策である。結果はあくまで結果論であり、過去の愛すべき自分だって、最善を尽くしたであろうから。#i
転職ドラフトという名前だけあって、期間が区切られてエントリーを受け付ける形式のようだ。ところで開催月は奇数月らしく、早速も、既に4月2日の今はエントリーが出来ぬことに気づく。次回は5月の開催。結果発表はそれよりも遅くなると考えると… https://t.co/FUBLhWk2mh
Qiitaなどの記事を一本書くことのコストというのは莫大である。なぜか。Twitterでないからだ。巨大なテキストの編集コストというものは、巨大に跳ね上がるように出来ている。しかしTwitterのように小さい粒のまとまりをスタック… https://t.co/M12LalFzrt
このようにTwitterでセルフリプライのチェーンを繋げていき、それをあとで一本のブログに出来るようなのを用意すれば、自分の人生にどれだけ役立つかと思うのだ。ちょっとしたコストをかければすぐに出来るとは思う。ツリー構造を上へとたど… https://t.co/B20buqukMd
転職ドラフトは自分で入力をしないと、審査が開始されない仕様らしい。これが何もせずともGithub連携などして審査が開始されるような仕様であれば、エンジニアは大喜びであろう。利用言語は自動解析できるだろうし、ポートフォリオなども、全… https://t.co/BPjTOlM8NC
世界を分報に変えよ。本当に苦手な事柄は、自分が好みとする事柄と、ミックスインすると良い。たとえば僕の場合、ただ単に転職ドラフトなどのサイトに慣れ親しむだけでも莫大なるコストを感じるが、こうやってTwitterなどで実況中継やアウトプットをすると、楽しみが増すように感じられる。#i
転職ドラフトの正社員採用のプレゼントにうまい棒10万円分というものがあるが、ツッコミどころを満載に用意している感じがするよなあ。これを選ぶ人はきっと面白い社員、もしくはベタにお仕事ができます社員になることでしょう。うまい棒は安定感… https://t.co/uyav2ILByP
最終出社から早くも1週間が経過した。1ヶ月など飛ぶようにすぎるだろうという予感は、おそらく忠実に叶おうとしている。今日こそは転職ドラフトに渾身のエントリーシートを記入し、髪を切り、久しぶりに東京から戻った知人とも会う。
Original by Github issue
- 投稿日:2019-04-03T05:00:16+09:00
(改善版) ( timeline API を利用) #Twitter #API で1個のツイートIDを指定すると、ツリーの最上段までたどって全ツイートを取得する #python スクリプトの例
note
こちらの改善
What
- Twitterのツイート同士はツリー構造なので、ツイートがチェーンしている場合、下から上にむかって順々にたどることが出来る
- status API ではツイートの full_text を得ることが出来なかったので timeline API を使う
- max_id を指定して得られた最初の1個のツイートだけを使う
script
#!/usr/bin/env python3

# https://developer.twitter.com/en/docs/tweets/timelines/api-reference/get-statuses-user_timeline.html

import json, config, os, re
from requests_oauthlib import OAuth1Session
import time
import datetime
from datetime import timedelta

if os.environ.get('TWITTER_CONSUMER_KEY'):
  CONSUMER_KEY = os.environ.get('TWITTER_CONSUMER_KEY')
  CONSUMER_SECRET = os.environ.get('TWITTER_CONSUMER_SECRET')
  ACCESS_TOKEN = os.environ.get('TWITTER_ACCESS_TOKEN')
  ACCESS_TOKEN_SECRET = os.environ.get('TWITTER_ACCESS_TOKEN_SECRET')
else:
  CONSUMER_KEY = config.CONSUMER_KEY
  CONSUMER_SECRET = config.CONSUMER_SECRET
  ACCESS_TOKEN = config.ACCESS_TOKEN
  ACCESS_TOKEN_SECRET = config.ACCESS_TOKEN_SECRET

twitter = OAuth1Session(CONSUMER_KEY, CONSUMER_SECRET, ACCESS_TOKEN, ACCESS_TOKEN_SECRET)

api_url = "https://api.twitter.com/1.1/statuses/user_timeline.json"
last_id = ''

last_tweet = {}
tweets = []

MAX_ROUND = int(os.environ.get('ROUND')) if os.environ.get('ROUND') else 30

for i in range(1, MAX_ROUND+1):
  status_id = last_tweet['in_reply_to_status_id_str'] if last_tweet and last_tweet['in_reply_to_status_id_str'] else os.environ.get('ID')

  api_params = {
    'trim_user' : True,
    'exclude_replies' : False,
    'tweet_mode' : 'extended',
    'count' : 1,
    'max_id' : status_id,
  }

  response = twitter.get(api_url, params=api_params)
  tweet = last_tweet = response.json()[0]

  if not tweet['in_reply_to_status_id_str']:
    break
  else:
    tweets.append(tweet)

print(json.dumps(tweets))
config.py
CONSUMER_KEY = ''
CONSUMER_SECRET = ''
ACCESS_TOKEN = ''
ACCESS_TOKEN_SECRET = ''
e.g
$ ID=1112838809991798784 ./timeline-chain.py | jq [ { "created_at": "Mon Apr 01 22:07:02 +0000 2019", "id": 1112838809991798800, "id_str": "1112838809991798784", "full_text": "転職ドラフトの前回 第17回のユーザーランキングを見ると、年収提示ランキングの最高額が1100万円であり、累計平均が最高のユーザーは975万円のようだ。これだけ有名なサービスでの、有象無象のエンジニアのトップがこれであると考えると、甘すぎる夢は見られぬ金額か。サービス特質かもしれぬが。#i https://t.co/iqx1URG4B4", "truncated": false, "display_text_range": [ 0, 145 ], "entities": { "hashtags": [ { "text": "i", "indices": [ 143, 145 ] } ], "symbols": [], "user_mentions": [], "urls": [], "media": [ { "id": 1112838802429505500, "id_str": "1112838802429505536", "indices": [ 146, 169 ], "media_url": "http://pbs.twimg.com/media/D3GY_qcU8AAg_LM.jpg", "media_url_https": "https://pbs.twimg.com/media/D3GY_qcU8AAg_LM.jpg", "url": "https://t.co/iqx1URG4B4", "display_url": "pic.twitter.com/iqx1URG4B4", "expanded_url": "https://twitter.com/YumaInaura/status/1112838809991798784/photo/1", "type": "photo", "sizes": { "small": { "w": 680, "h": 402, "resize": "fit" }, "thumb": { "w": 150, "h": 150, "resize": "crop" }, "medium": { "w": 1200, "h": 710, "resize": "fit" }, "large": { "w": 1690, "h": 1000, "resize": "fit" } } } ] }, "extended_entities": { "media": [ { "id": 1112838802429505500, "id_str": "1112838802429505536", "indices": [ 146, 169 ], "media_url": "http://pbs.twimg.com/media/D3GY_qcU8AAg_LM.jpg", "media_url_https": "https://pbs.twimg.com/media/D3GY_qcU8AAg_LM.jpg", "url": "https://t.co/iqx1URG4B4", "display_url": "pic.twitter.com/iqx1URG4B4", "expanded_url": "https://twitter.com/YumaInaura/status/1112838809991798784/photo/1", "type": "photo", "sizes": { "small": { "w": 680, "h": 402, "resize": "fit" }, "thumb": { "w": 150, "h": 150, "resize": "crop" }, "medium": { "w": 1200, "h": 710, "resize": "fit" }, "large": { "w": 1690, "h": 1000, "resize": "fit" } } } ] }, "source": "<a href=\"https://mobile.twitter.com\" rel=\"nofollow\">Twitter Web App</a>", "in_reply_to_status_id": 1112837955121438700, "in_reply_to_status_id_str": "1112837955121438720", "in_reply_to_user_id": 473780756, "in_reply_to_user_id_str": "473780756", "in_reply_to_screen_name": "YumaInaura", "user": { "id": 473780756, "id_str": "473780756" }, "geo": null, "coordinates": null, "place": null, "contributors": null, "is_quote_status": false, "retweet_count": 0, "favorite_count": 0, "favorited": false, "retweeted": false, "possibly_sensitive": false, "lang": "ja" }, { "created_at": "Mon Apr 01 22:03:38 +0000 2019", "id": 1112837955121438700, "id_str": "1112837955121438720", "full_text": "転職ドラフトはエントリー期間対象外であった。こういう時に妙な罪悪感を持ち出して、もっと早く見ておけば良かったとか、動くのがおそすぎたのだと、自分を刃物で突き刺すのは愚策である。結果はあくまで結果論であり、過去の愛すべき自分だって、最善を尽くしたであろうから。#i", "truncated": false, "display_text_range": [ 0, 131 ], "entities": { "hashtags": [ { "text": "i", "indices": [ 129, 131 ] } ], "symbols": [], "user_mentions": [], "urls": [] }, "source": "<a href=\"https://mobile.twitter.com\" rel=\"nofollow\">Twitter Web App</a>", "in_reply_to_status_id": 1112837456577978400, "in_reply_to_status_id_str": "1112837456577978369", "in_reply_to_user_id": 473780756, "in_reply_to_user_id_str": "473780756", "in_reply_to_screen_name": "YumaInaura", "user": { "id": 473780756, "id_str": "473780756" }, "geo": null, "coordinates": null, "place": null, "contributors": null, "is_quote_status": false, "retweet_count": 0, "favorite_count": 0, "favorited": false, "retweeted": false, "lang": "ja" }, { "created_at": "Mon Apr 01 22:01:39 +0000 2019", "id": 1112837456577978400, "id_str": "1112837456577978369", "full_text": "転職ドラフトという名前だけあって、期間が区切られてエントリーを受け付ける形式のようだ。ところで開催月は奇数月らしく、早速も、既に4月2日の今はエントリーが出来ぬことに気づく。次回は5月の開催。結果発表はそれよりも遅くなると考えると、これも仕事は熟考しなさいというお告げだろうか。#i https://t.co/B84fLXQnVF", "truncated": false, "display_text_range": [ 0, 141 ], "entities": { "hashtags": [ { "text": "i", "indices": [ 139, 141 ] } ], "symbols": [], "user_mentions": [], "urls": [], "media": [ { "id": 1112837445886722000, "id_str": "1112837445886722048", "indices": [ 142, 165 ], "media_url": "http://pbs.twimg.com/media/D3GXws7UwAA7QT_.jpg", "media_url_https": "https://pbs.twimg.com/media/D3GXws7UwAA7QT_.jpg", "url": "https://t.co/B84fLXQnVF", "display_url": "pic.twitter.com/B84fLXQnVF", "expanded_url": "https://twitter.com/YumaInaura/status/1112837456577978369/photo/1", "type": "photo", "sizes": { "medium": { "w": 1200, "h": 546, "resize": "fit" }, "thumb": { "w": 150, "h": 150, "resize": "crop" }, "small": { "w": 680, "h": 309, "resize": "fit" }, "large": { "w": 1960, "h": 892, "resize": "fit" } } } ] }, "extended_entities": { "media": [ { "id": 1112837445886722000, "id_str": "1112837445886722048", "indices": [ 142, 165 ], "media_url": "http://pbs.twimg.com/media/D3GXws7UwAA7QT_.jpg", "media_url_https": "https://pbs.twimg.com/media/D3GXws7UwAA7QT_.jpg", "url": "https://t.co/B84fLXQnVF", "display_url": "pic.twitter.com/B84fLXQnVF", "expanded_url": "https://twitter.com/YumaInaura/status/1112837456577978369/photo/1", "type": "photo", "sizes": { "medium": { "w": 1200, "h": 546, "resize": "fit" }, "thumb": { "w": 150, "h": 150, "resize": "crop" }, "small": { "w": 680, "h": 309, "resize": "fit" }, "large": { "w": 1960, "h": 892, "resize": "fit" } } } ] }, "source": "<a href=\"https://mobile.twitter.com\" rel=\"nofollow\">Twitter Web App</a>", "in_reply_to_status_id": 1112835847680749600, "in_reply_to_status_id_str": "1112835847680749568", "in_reply_to_user_id": 473780756, "in_reply_to_user_id_str": "473780756", "in_reply_to_screen_name": "YumaInaura", "user": { "id": 473780756, "id_str": "473780756" }, "geo": null, "coordinates": null, "place": null, "contributors": null, "is_quote_status": false, "retweet_count": 0, "favorite_count": 0, "favorited": false, "retweeted": false, "possibly_sensitive": false, "lang": "ja" }, { "created_at": "Mon Apr 01 21:55:16 +0000 2019", "id": 1112835847680749600, "id_str": "1112835847680749568", "full_text": "Qiitaなどの記事を一本書くことのコストというのは莫大である。なぜか。Twitterでないからだ。巨大なテキストの編集コストというものは、巨大に跳ね上がるように出来ている。しかしTwitterのように小さい粒のまとまりをスタックしていく方式であると、奇跡的に人間に優しいように思う。#i", "truncated": false, "display_text_range": [ 0, 144 ], "entities": { "hashtags": [ { "text": "i", "indices": [ 142, 144 ] } ], "symbols": [], "user_mentions": [], "urls": [] }, "source": "<a href=\"https://mobile.twitter.com\" rel=\"nofollow\">Twitter Web App</a>", "in_reply_to_status_id": 1112835400660222000, "in_reply_to_status_id_str": "1112835400660221952", "in_reply_to_user_id": 473780756, "in_reply_to_user_id_str": "473780756", "in_reply_to_screen_name": "YumaInaura", "user": { "id": 473780756, "id_str": "473780756" }, "geo": null, "coordinates": null, "place": null, "contributors": null, "is_quote_status": false, "retweet_count": 0, "favorite_count": 0, "favorited": false, "retweeted": false, "lang": "ja" }, { "created_at": "Mon Apr 01 21:53:29 +0000 2019", "id": 1112835400660222000, "id_str": "1112835400660221952", "full_text": "このようにTwitterでセルフリプライのチェーンを繋げていき、それをあとで一本のブログに出来るようなのを用意すれば、自分の人生にどれだけ役立つかと思うのだ。ちょっとしたコストをかければすぐに出来るとは思う。ツリー構造を上へとたどりテキスト整形。やはりAPIの扱いは覚えておくべきである。#i", "truncated": false, "display_text_range": [ 0, 146 ], "entities": { "hashtags": [ { "text": "i", "indices": [ 144, 146 ] } ], "symbols": [], "user_mentions": [], "urls": [] }, "source": "<a href=\"https://mobile.twitter.com\" rel=\"nofollow\">Twitter Web App</a>", "in_reply_to_status_id": 1112834904448876500, "in_reply_to_status_id_str": "1112834904448876544", "in_reply_to_user_id": 473780756, "in_reply_to_user_id_str": "473780756", "in_reply_to_screen_name": "YumaInaura", "user": { "id": 473780756, "id_str": "473780756" }, "geo": null, "coordinates": null, "place": null, "contributors": null, "is_quote_status": false, "retweet_count": 0, "favorite_count": 0, "favorited": false, "retweeted": false, "lang": "ja" }, { "created_at": "Mon Apr 01 21:51:31 +0000 2019", "id": 1112834904448876500, "id_str": "1112834904448876544", "full_text": "転職ドラフトは自分で入力をしないと、審査が開始されない仕様らしい。これが何もせずともGithub連携などして審査が開始されるような仕様であれば、エンジニアは大喜びであろう。利用言語は自動解析できるだろうし、ポートフォリオなども、全てGithubに置いておけば良い。そのような未来は来ぬか。#i https://t.co/01oW7ycd7p", "truncated": false, "display_text_range": [ 0, 146 ], "entities": { "hashtags": [ { "text": "i", "indices": [ 144, 146 ] } ], "symbols": [], "user_mentions": [], "urls": [], "media": [ { "id": 1112834895057838100, "id_str": "1112834895057838080", "indices": [ 147, 170 ], "media_url": "http://pbs.twimg.com/media/D3GVcOWU4AAv5vh.jpg", "media_url_https": "https://pbs.twimg.com/media/D3GVcOWU4AAv5vh.jpg", "url": "https://t.co/01oW7ycd7p", "display_url": "pic.twitter.com/01oW7ycd7p", "expanded_url": "https://twitter.com/YumaInaura/status/1112834904448876544/photo/1", "type": "photo", "sizes": { "thumb": { "w": 150, "h": 150, "resize": "crop" }, "small": { "w": 680, "h": 240, "resize": "fit" }, "medium": { "w": 1188, "h": 420, "resize": "fit" }, "large": { "w": 1188, "h": 420, "resize": "fit" } } } ] }, "extended_entities": { "media": [ { "id": 1112834895057838100, "id_str": "1112834895057838080", "indices": [ 147, 170 ], "media_url": "http://pbs.twimg.com/media/D3GVcOWU4AAv5vh.jpg", "media_url_https": "https://pbs.twimg.com/media/D3GVcOWU4AAv5vh.jpg", "url": "https://t.co/01oW7ycd7p", "display_url": "pic.twitter.com/01oW7ycd7p", "expanded_url": "https://twitter.com/YumaInaura/status/1112834904448876544/photo/1", "type": "photo", "sizes": { "thumb": { "w": 150, "h": 150, "resize": "crop" }, "small": { "w": 680, "h": 240, "resize": "fit" }, "medium": { "w": 1188, "h": 420, "resize": "fit" }, "large": { "w": 1188, "h": 420, "resize": "fit" } } } ] }, "source": "<a href=\"https://mobile.twitter.com\" rel=\"nofollow\">Twitter Web App</a>", "in_reply_to_status_id": 1112834329275560000, "in_reply_to_status_id_str": "1112834329275559936", "in_reply_to_user_id": 473780756, "in_reply_to_user_id_str": "473780756", "in_reply_to_screen_name": "YumaInaura", "user": { "id": 473780756, "id_str": "473780756" }, "geo": null, "coordinates": null, "place": null, "contributors": null, "is_quote_status": false, "retweet_count": 0, "favorite_count": 0, "favorited": false, "retweeted": false, "possibly_sensitive": false, "lang": "ja" }, { "created_at": "Mon Apr 01 21:49:14 +0000 2019", "id": 1112834329275560000, "id_str": "1112834329275559936", "full_text": "世界を分報に変えよ。本当に苦手な事柄は、自分が好みとする事柄と、ミックスインすると良い。たとえば僕の場合、ただ単に転職ドラフトなどのサイトに慣れ親しむだけでも莫大なるコストを感じるが、こうやってTwitterなどで実況中継やアウトプットをすると、楽しみが増すように感じられる。#i", "truncated": false, "display_text_range": [ 0, 140 ], "entities": { "hashtags": [ { "text": "i", "indices": [ 138, 140 ] } ], "symbols": [], "user_mentions": [], "urls": [] }, "source": "<a href=\"https://mobile.twitter.com\" rel=\"nofollow\">Twitter Web App</a>", "in_reply_to_status_id": 1112833866710974500, "in_reply_to_status_id_str": "1112833866710974464", "in_reply_to_user_id": 473780756, "in_reply_to_user_id_str": "473780756", "in_reply_to_screen_name": "YumaInaura", "user": { "id": 473780756, "id_str": "473780756" }, "geo": null, "coordinates": null, "place": null, "contributors": null, "is_quote_status": false, "retweet_count": 0, "favorite_count": 1, "favorited": false, "retweeted": false, "lang": "ja" }, { "created_at": "Mon Apr 01 21:47:23 +0000 2019", "id": 1112833866710974500, "id_str": "1112833866710974464", "full_text": "転職ドラフトの正社員採用のプレゼントにうまい棒10万円分というものがあるが、ツッコミどころを満載に用意している感じがするよなあ。これを選ぶ人はきっと面白い社員、もしくはベタにお仕事ができます社員になることでしょう。うまい棒は安定感のあるネタ作りには定番である。#i https://t.co/cqrJU2y58G", "truncated": false, "display_text_range": [ 0, 132 ], "entities": { "hashtags": [ { "text": "i", "indices": [ 130, 132 ] } ], "symbols": [], "user_mentions": [], "urls": [], "media": [ { "id": 1112833861635850200, "id_str": "1112833861635850240", "indices": [ 133, 156 ], "media_url": "http://pbs.twimg.com/media/D3GUgEjUwAArgSR.jpg", "media_url_https": "https://pbs.twimg.com/media/D3GUgEjUwAArgSR.jpg", "url": "https://t.co/cqrJU2y58G", "display_url": "pic.twitter.com/cqrJU2y58G", "expanded_url": "https://twitter.com/YumaInaura/status/1112833866710974464/photo/1", "type": "photo", "sizes": { "thumb": { "w": 150, "h": 150, "resize": "crop" }, "medium": { "w": 974, "h": 654, "resize": "fit" }, "large": { "w": 974, "h": 654, "resize": "fit" }, "small": { "w": 680, "h": 457, "resize": "fit" } } } ] }, "extended_entities": { "media": [ { "id": 1112833861635850200, "id_str": "1112833861635850240", "indices": [ 133, 156 ], "media_url": "http://pbs.twimg.com/media/D3GUgEjUwAArgSR.jpg", "media_url_https": "https://pbs.twimg.com/media/D3GUgEjUwAArgSR.jpg", "url": "https://t.co/cqrJU2y58G", "display_url": "pic.twitter.com/cqrJU2y58G", "expanded_url": "https://twitter.com/YumaInaura/status/1112833866710974464/photo/1", "type": "photo", "sizes": { "thumb": { "w": 150, "h": 150, "resize": "crop" }, "medium": { "w": 974, "h": 654, "resize": "fit" }, "large": { "w": 974, "h": 654, "resize": "fit" }, "small": { "w": 680, "h": 457, "resize": "fit" } } } ] }, "source": "<a href=\"https://mobile.twitter.com\" rel=\"nofollow\">Twitter Web App</a>", "in_reply_to_status_id": 1112826051728564200, "in_reply_to_status_id_str": "1112826051728564224", "in_reply_to_user_id": 473780756, "in_reply_to_user_id_str": "473780756", "in_reply_to_screen_name": "YumaInaura", "user": { "id": 473780756, "id_str": "473780756" }, "geo": null, "coordinates": null, "place": null, "contributors": null, "is_quote_status": false, "retweet_count": 0, "favorite_count": 1, "favorited": false, "retweeted": false, "possibly_sensitive": false, "lang": "ja" }, { "created_at": "Mon Apr 01 21:16:20 +0000 2019", "id": 1112826051728564200, "id_str": "1112826051728564224", "full_text": "最終出社から早くも1週間が経過した。1ヶ月など飛ぶようにすぎるだろうという予感は、おそらく忠実に叶おうとしている。今日こそは転職ドラフトに渾身のエントリーシートを記入し、髪を切り、久しぶりに東京から戻った知人とも会う。", "truncated": false, "display_text_range": [ 0, 109 ], "entities": { "hashtags": [], "symbols": [], "user_mentions": [], "urls": [] }, "source": "<a href=\"http://twitter.com/download/iphone\" rel=\"nofollow\">Twitter for iPhone</a>", "in_reply_to_status_id": 1110489119011074000, "in_reply_to_status_id_str": "1110489119011074048", "in_reply_to_user_id": 473780756, "in_reply_to_user_id_str": "473780756", "in_reply_to_screen_name": "YumaInaura", "user": { "id": 473780756, "id_str": "473780756" }, "geo": null, "coordinates": null, "place": null, "contributors": null, "is_quote_status": false, "retweet_count": 0, "favorite_count": 1, "favorited": false, "retweeted": false, "lang": "ja" } ]Original by Github issue
- 投稿日:2019-04-03T04:30:04+09:00
#python でJST=日本時間=現地時刻を現在時刻を文字列で得る例
- python3
- datetime オブジェクトを pytz で localize する
from pytz import timezone
from datetime import datetime

timezone('Asia/Tokyo').localize(datetime.now()).strftime('%Y-%m-%d %H:%M:%S %Z')

# '2019-04-02 19:50:55 JST'
Ref
Pythonの UTC ⇔ JST、文字列(UTC) ⇒ JST の変換とかのメモ - Qiita
Original by Github issue
- 投稿日:2019-04-03T04:00:33+09:00
#python で unixtimestamp を日付形式の文字列に変換する例
- 投稿日:2019-04-03T03:46:38+09:00
# エイプリルフールに発表される新元号が、偽物かどうかAIだけで判別する物語 【完】
はじめに
エイプリルフールに発表される新元号が、偽物かどうかAIだけで判別する物語の続き
以下ポエム新元号は令和

西暦2019年4月1日11時30分(ちょい過ぎ)から新元号の記者会見が始まった。
そして菅官房長官によって発表された新元号「令和」
典拠は日本最古の歌集「万葉集」の梅の花の歌より于時初春令月 氣淑風和 (時に、初春の令月にして、気淑く風和ぎ)初めて中国古典ではなく、日本古典から採用されたらしい。
予想ガチ勢がAIの学習用辞書データに四書五経とか使っていたら、外れている可能性が高そうである。Wikipediaを辞書データにしてよかった。(中国の詩文集「文選」に似たようなフレーズが存在し、著者はそれを参考にしたという説もあるらしい。つまり中国古典を辞書にしても当たっていた可能性もある。)
後、元号発表がお祭騒ぎだったからか、あまりデマ元号は流れているのを見なかった。元号判別機は「令和」を元号として判別したのか
グダグダと話したが、「令和」は元号として判定されました、めでたしめでたし。
-----令和-----
適切な語と語の距離感 0.06 <= x <= 0.54
語と語の距離感: 0.1180524155497551
適切な一語目 0.1 <= x <= 0.56, 適切な二語目 0.03 <= y <= 0.49
一語目 平均: 0.1357724815607071, 二語目 平均: 0.1358799934387207
元号かもしれないです!
(MTSHの確認は人がしてください)
せっかくなので精度を見てみる
これ前の記事でやらなきゃいけないこと、、、
令和を除く全ての元号を訓練データにしたので、正直なところテストデータがそれこそ新元号「令和」しかなかった。(勉強不足なので他に良い方法があるのかもしれない)
だからと言ってテストデータ1つに対して正解したので精度100%というのもありえない話なので、この際、判別機を少しいじってでも(前回でいうフィルター)過去の元号にも当てはめてエセ精度を見てみようの回。テストで使う元号の総数は243
# 過去の元号 +「令和」のリストをgengoとする
all_gengo_len = len(gengo)
# 243
過去元号フィルターを外す
過去の元号フィルターを外す。
ルール: これまでに元号として用いられたものでないこと
を適用しているが、過去の元号も元号っぽいか判別するので当然外す。
外す作業はjudge関数から適宜行なっている。では精度はどうだろう。
# judge関数はTrueかFalseを返す
unfil_kakogengo_len = len([gen for gen in gengo if judge(gen, model, mecab)])
# 70

# 精度
unfil_kakogengo_len/all_gengo_len*100
# 28.80658436213992
低い、ハサミギロチンの命中と同じレベル。この数字だけ見れば「令和」もヤマカンで当たったように見える。
しかし、1つ1つを見るとMeCabに品詞として発見されているものが多く見える。過去の元号は既存の単語なのだから引っ掛かって当然か。-----平成----- 既存の品詞のようです 元号ではなさそうです ・ ・ ・ -----大化----- 既存の品詞のようです 元号ではなさそうです既存品詞フィルターを外す
既存品詞フィルターを外す。
ルール: 俗用されているものでないこと
を適用していたもの。先ほどの例でも既存の品詞として多くの元号が引っ掛かっていたので、外す。# 同上 unfil_kakogengo_hinsi_len = len([gen for gen in gengo if judge(gen, model, mecab)]) # 140 # 精度 unfil_kakogengo_hinsi_len/all_gengo_len*100 # 57.61316872427984精度は倍ほど上がったがそれでもまだ57%、さいみんじゅつと同レベル。
内訳は以下の通り
- 元号の可能性がある (57.61316872427984%)
- 単語間の距離が適切でない (27.160493827160494%)
- 常用漢字ではない (12.345679012345679%)
- 単語の意味が元号向きではない (2.880658436213992%)
3番に関してはどうしようもない。過去の元号は読み書きのしやすさなど重視していなかったのだろうが、ここは外せない。
先ほどから精度を出すために一部のフィルターを外しているが、あくまで元号判別の機能を残すことは忘れてはいけない。(全て外せば100%なのは当たり前)
では2番と4番も外せないのだろうか。1つの仮説
前回の記事の中で、ルール: 国民の理想としてふさわしいようなよい意味を持つものであること
に関して、その漢字の出し方について考察し、そこで以下のような仮説を立てた。(参考: やっぱり最大の難関は「よい意味の判断」)
- 過去の元号もそれ以前の元号で使われたことのある漢字と関連性がある
- 元号の一語目は他の元号の一語目と関連性があり、二語目も同様である
重要なのは、この仮説では元号にふさわしい漢字を絞り込んだのではなく、元号の一語目・二語目それぞれにふさわしい漢字を絞り込んだという点である。
ここで1つの仮説が出てきた。
それは 過去の元号は、いい感じの距離感を持つ、いい意味の漢字2文字から成り立っていて、それを基に一語目・二語目それぞれにふさわしい漢字が決まるならば、同様にふさわしい距離感も保証されるというものだ。それはつまり、元記事の平成の次の元号を、AIだけで決めさせる物語で考察していた「元号として適切な組み合わせ・元号としての組み合わせのバランス」は元号の一語目・二語目それぞれにふさわしい漢字が決まったならば、既に求められているということだ。
はっきり言って、仮説の上に立つ仮説なので正しい保証はどこにもないが、なんだか正しそうな気がする。 (ヤケクソ)
二語の距離感フィルターを外す
上記の仮説に従えば、語の適正フィルターに通りさえすれば、二語の距離感フィルターを通さずとも元号として適切な距離感を持つので、信じて外す。
# 同上
unfil_kakogengo_hinsi_ad_len = len([gen for gen in gengo if judge(gen, model, mecab)])
# 198

# 精度
unfil_kakogengo_hinsi_ad_len/all_gengo_len*100
# 81.48148148148148
精度が80%を超えた。ようやくハイドロポンプのレベル。
もうこれ以上は外せるフィルターがないので、これで打ち止め。まとめ
「令和」が無事元号で良かった!
インスタを巧みに使う官庁も流石にエイプリルフールには乗らなかったようで。ついでにエセ精度も評価してみた。判別機として機能するギリギリのラインで過去の元号を判別すると8割以上の確率で正解を出すことが分かった。
これに関しては、同じデータを使っているので、精度も何もないのだがそこも含めてポエムなのでご愛嬌ということで。他のテストデータも試してみたいところではあるが、しばらくは「令和」が続くことを祈る。

- 投稿日:2019-04-03T03:46:38+09:00
エイプリルフールに発表される新元号が、偽物かどうかAIだけで判別する物語 【完】
はじめに
エイプリルフールに発表される新元号が、偽物かどうかAIだけで判別する物語の続き
以下ポエム新元号は令和
西暦2019年4月1日11時30分(ちょい過ぎ)から新元号の記者会見が始まった。
そして菅官房長官によって発表された新元号「令和」
典拠は日本最古の歌集「万葉集」の梅の花の歌より于時初春令月 氣淑風和 (時に、初春の令月にして、気淑く風和ぎ)初めて中国古典ではなく、日本古典から採用されたらしい。
予想ガチ勢がAIの学習用辞書データに四書五経とか使っていたら、外れている可能性が高そうである。Wikipediaを辞書データにしてよかった。(中国の詩文集「文選」に似たようなフレーズが存在し、著者はそれを参考にしたという説もあるらしい。つまり中国古典を辞書にしても当たっていた可能性もある。)
後、元号発表がお祭騒ぎだったからか、あまりデマ元号は流れているのを見なかった。元号判別機は「令和」を元号として判別したのか
グダグダと話したが、「令和」は元号として判定されました、めでたしめでたし。
-----令和-----
適切な語と語の距離感 0.06 <= x <= 0.54
語と語の距離感: 0.1180524155497551
適切な一語目 0.1 <= x <= 0.56, 適切な二語目 0.03 <= y <= 0.49
一語目 平均: 0.1357724815607071, 二語目 平均: 0.1358799934387207
元号かもしれないです!
(MTSHの確認は人がしてください)
せっかくなので精度を見てみる
これ前の記事でやらなきゃいけないこと、、、
令和を除く全ての元号を訓練データにしたので、正直なところテストデータがそれこそ新元号「令和」しかなかった。(勉強不足なので他に良い方法があるのかもしれない)
だからと言ってテストデータ1つに対して正解したので精度100%というのもありえない話なので、この際、判別機を少しいじってでも(前回でいうフィルター)過去の元号にも当てはめてエセ精度を見てみようの回。テストで使う元号の総数は243
# 過去の元号 +「令和」のリストをgengoとする
all_gengo_len = len(gengo)
# 243
過去元号フィルターを外す
過去の元号フィルターを外す。
ルール: これまでに元号として用いられたものでないこと
を適用しているが、過去の元号も元号っぽいか判別するので当然外す。
外す作業はjudge関数から適宜行なっている。では精度はどうだろう。
# judge関数はTrueかFalseを返す
unfil_kakogengo_len = len([gen for gen in gengo if judge(gen, model, mecab)])
# 70

# 精度
unfil_kakogengo_len/all_gengo_len*100
# 28.80658436213992
低い、ハサミギロチンの命中と同じレベル。この数字だけ見れば「令和」もヤマカンで当たったように見える。
しかし、1つ1つを見るとMeCabに品詞として発見されているものが多く見える。過去の元号は既存の単語なのだから引っ掛かって当然か。-----平成----- 既存の品詞のようです 元号ではなさそうです ・ ・ ・ -----大化----- 既存の品詞のようです 元号ではなさそうです既存品詞フィルターを外す
既存品詞フィルターを外す。
ルール: 俗用されているものでないこと
を適用していたもの。先ほどの例でも既存の品詞として多くの元号が引っ掛かっていたので、外す。# 同上 unfil_kakogengo_hinsi_len = len([gen for gen in gengo if judge(gen, model, mecab)]) # 140 # 精度 unfil_kakogengo_hinsi_len/all_gengo_len*100 # 57.61316872427984精度は倍ほど上がったがそれでもまだ57%、さいみんじゅつと同レベル。
内訳は以下の通り
- 元号の可能性がある (57.61316872427984%)
- 単語間の距離が適切でない (27.160493827160494%)
- 常用漢字ではない (12.345679012345679%)
- 単語の意味が元号向きではない (2.880658436213992%)
3番に関してはどうしようもない。過去の元号は読み書きのしやすさなど重視していなかったのだろうが、ここは外せない。
先ほどから精度を出すために一部のフィルターを外しているが、あくまで元号判別の機能を残すことは忘れてはいけない。(全て外せば100%なのは当たり前)
では2番と4番も外せないのだろうか。1つの仮説
前回の記事の中で、ルール: 国民の理想としてふさわしいようなよい意味を持つものであること
に関して、その漢字の出し方について考察し、そこで以下のような仮説を立てた。(参考: やっぱり最大の難関は「よい意味の判断」)
- 過去の元号もそれ以前の元号で使われたことのある漢字と関連性がある
- 元号の一語目は他の元号の一語目と関連性があり、二語目も同様である
重要なのは、この仮説では元号にふさわしい漢字を絞り込んだのではなく、元号の一語目・二語目それぞれにふさわしい漢字を絞り込んだという点である。
ここで1つの仮説が出てきた。
それは 過去の元号は、いい感じの距離感を持つ、いい意味の漢字2文字から成り立っていて、それを基に一語目・二語目それぞれにふさわしい漢字が決まるならば、同様にふさわしい距離感も保証されるというものだ。それはつまり、元記事の平成の次の元号を、AIだけで決めさせる物語で考察していた「元号として適切な組み合わせ・元号としての組み合わせのバランス」は元号の一語目・二語目それぞれにふさわしい漢字が決まったならば、既に求められているということだ。
はっきり言って、仮説の上に立つ仮説なので正しい保証はどこにもないが、なんだか正しそうな気がする。 (ヤケクソ)
二語の距離感フィルターを外す
上記の仮説に従えば、語の適正フィルターに通りさえすれば、二語の距離感フィルターを通さずとも元号として適切な距離感を持つので、信じて外す。
# 同上
unfil_kakogengo_hinsi_ad_len = len([gen for gen in gengo if judge(gen, model, mecab)])
# 198

# 精度
unfil_kakogengo_hinsi_ad_len/all_gengo_len*100
# 81.48148148148148
精度が80%を超えた。ようやくハイドロポンプの命中率にまで持ってくることができた。
もうこれ以上は外せるフィルターがないので、これで打ち止め。まとめ
「令和」が無事元号で良かった!
インスタを巧みに使う官庁も流石にエイプリルフールには乗らなかったようで。ついでにエセ精度も評価してみた。判別機として機能するギリギリのラインで過去の元号を判別すると8割以上の確率で正解を出すことが分かった。
これに関しては、同じデータを使っているので、精度も何もないのだがそこも含めてポエムなのでご愛嬌ということで。他のテストデータも試してみたいところではあるが、ホイホイ元号が変わるのも面倒なので、しばらくは「令和」が続くことを祈ることにする。
- 投稿日:2019-04-03T03:30:01+09:00
#python で JST(日本時間)などの現地時刻で今日の始まりの unixtimstamp を得る例
from datetime import datetime
import pytz, time

tz = pytz.timezone('Asia/Tokyo')

d = datetime.now(tz=tz).replace(hour=0, minute=0, second=0, microsecond=0)
print(d)

unixtimestamp = time.mktime(d.timetuple())

print(unixtimestamp)
e.g
$ python3 today.py
2019-04-02 00:00:00+09:00
1554130800.0
ツールで逆変換して正しいかどうか確認してみる
Unixtime相互変換ツール - konisimple tools
Original by Github issue

- 投稿日:2019-04-03T02:54:13+09:00
flaskで実装されたAPIにrequestsでPython objectを渡す方法
はじめに
ご了承
- この記事はわかりにくい(何をしたいか分からない,日本語がバグってる)かもしれません.
- この記事のプログラムは,僕が書いたスクリプトから一部抜き取ったものなので,動くかどうかはわかりません.
- Flaskを使った機械学習APIの記事 (たとえば これとか,これとか,これ) はAPIのFlaskでの実装を主としていますが,この記事はクライアント側もPython実装する場合を考えるため,Webサービスを作りたい方には参考にならないかもしれません.
シチュエーション
機械学習モデルにデータをたくさん予測させるようなシチュエーションを想定しています.この記事の内容はすべてCLIで実行することを前提として書いてあります.どちらかと言うと研究用.
APIも,client側のプログラムも自分で実装するものとします._________ ___________ | client | ---- x: object ---> | api server| | data:x | | y = f(x) | |_________| <--- y: object ---- |___________|メリット
たとえば,機械学習のモデルをサーバ側にAPI実装して,クライアントから,予測したいデータをPython Objectで投げて,それをそのままサーバ側で使えたらデータの形に依存しない通信が可能となる.データ通信の部分を考えずに,スクリプトを実装できるようになる.
Client側の実装
requestsライブラリを使います.
requests.post("URL")でURLにPOSTリクエストを送れます.
こんなクラスを実装します.Modelインスタンスを通して,APIにQueryを投げます.model.pyimport requests import pickle class Model(object): def __init__(self, base_url:str): """base_url is api url for example: base_url=http://abc.xyz/ following must be accessable: - http://abc.xyz/evaluate response must include 'evaluation' and 'class' fields. """ self.base_url = base_url def evaluate(self, x:object) -> dict: """ :X -> dict return the api result x must be able to convert to a pickle object """ # make payload payload = {"instance": x} resp = requests.post(self.base_url+"evaluate", data=pickle.dumps(payload), headers={"Content-Type": "application/octet-stream"}) resp.raise_for_status() # if status is 200, raise_for_status returns None return pickle.loads(resp.content)script.pyfrom model import Model if __name__ == "__main__": model = Model("your_api_url") # # Scratch here :) #ポイント
- Objectを
pickle.dumps(object)でPickle化 (わざわざファイルに保存する必要はない) して通信することで,引数xの型に依存しなくなる.これで,使うモデル,データが変わっても,このクラスを使えるようになる.クライアント側はscript.pyだけの変更で良い.- レスポンスもPickle化されているため,
pickle.loads(resp)でAPI出力を受け取る.Pickle化の恩恵で,APIの出力に依存しない.結果の解析はscript.pyでやればいい.headers={"Content-Type": "application/octet-stream"}が一番大事.これがないと,flaskで読み取れない.一般にdataがjsonの場合はapplication/jsonとか書くでしょ?知らんけど.raise_for_status()で例外処理.400,500系のエラーが発生したらプログラムを終了する.- モデルはサーバ側にあるためクライアント側では気にしなくていい.とりあえず,
model=Model("your_api_url")ってやっておいて,実験スクリプトをscript.pyに書けばいい.- データセットはクライアント側にあっても,なくてもよい.
- あるとき:
x = cv2.imread(img_path)とかで,データを読み込んで,model.evaluate(x)でおk.- ないとき:大規模なデータセットがサーバ上にあって,そのテストデータのいくつかを予測をしたい場合,
model.evaluate(x=("test", 5)とかにしておいて,API側で,データをロードすればいい.この場合,テストデータの5番目のデータがロードされるようにAPIを実装する.Server側の実装
サーバ側はFlaskをつかって実装します.Flaskを使ったAPI実装方法は上で示した記事などにも書いてあるため,詳細は割愛します.
以下の例では,学習済みのscikit-learnのmlpを使う例を示します.
このAPIの出力はxの予測されたクラスと,その確率の辞書,すなわち{"prob": prob, "class", cls}となります.api.pyimport pickle import flask app = flask.Flask(__name__) model = None class Model(object): def __init__(self): # load model with open("pre-trained-mlp.pkl", "rb") as f: self.model = pickle.load(f) def evaluate(self, x, cls): return self.model.predict_proba(x)[0][cls] def predict(self, x): return self.model.predict(x)[0] @app.route("/evaluate", methods=["POST"]) def evaluate(): if flask.request.method == "POST": data = pickle.loads(flask.request.data) x = data["instance"] cls = model.predict(x) prob = model.evaluate(x, cls) return pickle.dumps({ "prob": prob, "class" = cls }) if __name__ == "__main__": print(" * Starting server ...") print(" * initializing ...") model = Model() print(" * done") app.run()ポイント
- サーバ側にもモデルを制御するためのクラス (この場合は
Model) を作る.ここは要実装.わざわざクラスにしなくても,グローバル変数で十分な場合もあるかも. データの前処理が多い場合などはクラスにしたほうがいいかも.flask.request.method=="POST"でリクエストの種類の判定flask.request.dataにPickle化されたxの生データが入っている.requests.postでheaders={"Content-Type": "application/octet-stream"}を指定することで,これで受け取れる.pickle.loads(flask.request.data)でPython Objectに戻す.あとは,こいつをモデルに入力して結果を得る.- 結果はPickle化して
returnする.これで,どんな結果でも返信できる.おわりに
とりあえず,意図するものができました.分かっていれば多分簡単かもしれませんが,Flaskを触ったのが初めてだったので色々戸惑いました.
機械学習の実験のために書いたものですが,他のタスクにも応用できそうですね.
改善点や変なところがあったらコメントいただけると嬉しいです.
- 投稿日:2019-04-03T02:54:13+09:00
flaskで実装された機械学習APIにrequestsでPython objectを渡す方法
はじめに
ご了承
- この記事はわかりにくい(何をしたいか分からない,日本語がバグってる)かもしれません.
- この記事のプログラムは,僕が書いたスクリプトから一部抜き取ったものなので,動くかどうかはわかりません.
- Flaskを使った機械学習APIの記事 (たとえば これとか,これとか,これ) はAPIのFlaskでの実装を主としていますが,この記事はクライアント側もPython実装する場合を考えるため,Webサービスを作りたい方には参考にならないかもしれません.
シチュエーション
機械学習モデルにデータをたくさん予測させるようなシチュエーションを想定しています.この記事の内容はすべてCLIで実行することを前提として書いてあります.どちらかと言うと研究用.
APIも,client側のプログラムも自分で実装するものとします._________ ___________ | client | ---- x: object ---> | api server| | data:x | | y = f(x) | |_________| <--- y: object ---- |___________|メリット
たとえば,機械学習のモデルをサーバ側にAPI実装して,クライアントから,予測したいデータをPython Objectで投げて,それをそのままサーバ側で使えたらデータの形に依存しない通信が可能となる.データ通信の部分を考えずに,スクリプトを実装できるようになる.
Client側の実装
requestsライブラリを使います.
requests.post("URL")でURLにPOSTリクエストを送れます.
こんなクラスを実装します.Modelインスタンスを通して,APIにQueryを投げます.model.pyimport requests import pickle class Model(object): def __init__(self, base_url:str): """base_url is api url for example: base_url=http://abc.xyz/ following must be accessable: - http://abc.xyz/evaluate response must include 'evaluation' and 'class' fields. """ self.base_url = base_url def evaluate(self, x:object) -> dict: """ :X -> dict return the api result x must be able to convert to a pickle object """ # make payload payload = {"instance": x} resp = requests.post(self.base_url+"evaluate", data=pickle.dumps(payload), headers={"Content-Type": "application/octet-stream"}) resp.raise_for_status() # if status is 200, raise_for_status returns None return pickle.loads(resp.content)script.pyfrom model import Model if __name__ == "__main__": model = Model("your_api_url") # # Scratch here :) #ポイント
- Objectを
pickle.dumps(object)でPickle化 (わざわざファイルに保存する必要はない) して通信することで,引数xの型に依存しなくなる.これで,使うモデル,データが変わっても,このクラスを使えるようになる.クライアント側はscript.pyだけの変更で良い.- レスポンスもPickle化されているため,
pickle.loads(resp)でAPI出力を受け取る.Pickle化の恩恵で,APIの出力に依存しない.結果の解析はscript.pyでやればいい.headers={"Content-Type": "application/octet-stream"}が一番大事.これがないと,flaskで読み取れない.一般にdataがjsonの場合はapplication/jsonとか書くでしょ?知らんけど.raise_for_status()で例外処理.400,500系のエラーが発生したらプログラムを終了する.- モデルはサーバ側にあるためクライアント側では気にしなくていい.とりあえず,
model=Model("your_api_url")ってやっておいて,実験スクリプトをscript.pyに書けばいい.- データセットはクライアント側にあっても,なくてもよい.
- あるとき:
x = cv2.imread(img_path)とかで,データを読み込んで,model.evaluate(x)でおk.- ないとき:大規模なデータセットがサーバ上にあって,そのテストデータのいくつかを予測をしたい場合,
model.evaluate(x=("test", 5)とかにしておいて,API側で,データをロードすればいい.この場合,テストデータの5番目のデータがロードされるようにAPIを実装する.Server側の実装
サーバ側はFlaskをつかって実装します.Flaskを使ったAPI実装方法は上で示した記事などにも書いてあるため,詳細は割愛します.
以下の例では,学習済みのscikit-learnのmlpを使う例を示します.
このAPIの出力はxの予測されたクラスと,その確率の辞書,すなわち{"prob": prob, "class", cls}となります.api.pyimport pickle import flask app = flask.Flask(__name__) model = None class Model(object): def __init__(self): # load model with open("pre-trained-mlp.pkl", "rb") as f: self.model = pickle.load(f) def evaluate(self, x, cls): return self.model.predict_proba(x)[0][cls] def predict(self, x): return self.model.predict(x)[0] @app.route("/evaluate", methods=["POST"]) def evaluate(): if flask.request.method == "POST": data = pickle.loads(flask.request.data) x = data["instance"] cls = model.predict(x) prob = model.evaluate(x, cls) return pickle.dumps({ "prob": prob, "class" = cls }) if __name__ == "__main__": print(" * Starting server ...") print(" * initializing ...") model = Model() print(" * done") app.run()ポイント
- サーバ側にもモデルを制御するためのクラス (この場合は
Model) を作る.ここは要実装.わざわざクラスにしなくても,グローバル変数で十分な場合もあるかも. データの前処理が多い場合などはクラスにしたほうがいいかも.flask.request.method=="POST"でリクエストの種類の判定flask.request.dataにPickle化されたxの生データが入っている.requests.postでheaders={"Content-Type": "application/octet-stream"}を指定することで,これで受け取れる.pickle.loads(flask.request.data)でPython Objectに戻す.あとは,こいつをモデルに入力して結果を得る.- 結果はPickle化して
returnする.これで,どんな結果でも返信できる.おわりに
とりあえず,意図するものができました.分かっていれば多分簡単かもしれませんが,Flaskを触ったのが初めてだったので色々戸惑いました.
機械学習の実験のために書いたものですが,他のタスクにも応用できそうですね.
改善点や変なところがあったらコメントいただけると嬉しいです.